
310 - Bread maker Magic Chef - Free user manual and instructions
Find the device manual for free 310 Magic Chef in PDF.


| Product type | Bread machine |
| Brand | Magic Chef |
| Model | 310 |
| Dimensions (L x W x H) | 30 x 25 x 35 cm |
| Weight | 5.5 kg |
| Power supply | 220-240 V, 50/60 Hz |
| Power | 600 W |
| Maximum bread capacity | 1.5 kg |
| Number of programs | 12 |
| Main programs | White, whole wheat, gluten-free, sweet, rapid, pizza dough, jam, yogurt |
| Crust colors | Light, medium, dark |
| Delay timer | Up to 13 hours |
| Keep warm | Up to 1 hour |
| Baking pan material | Non-stick |
| Viewing window | Yes, with indicator light |
| Included accessories | Baking pan, kneading blade, hook, measuring cups, recipe booklet |
| Care and cleaning | Wash the baking pan and accessories in warm soapy water; do not immerse the main body |
| Safety | Automatic shut-off in case of overheating, locked lid |
| Spare parts and repairability | Baking pan and kneading blade available on request; repairability index estimated at 7/10 |
| General information | Household use; do not use outdoors |
Frequently Asked Questions - 310 Magic Chef
User questions about 310 Magic Chef
0 question about this device. Answer the ones you know or ask your own.
Ask a new question about this device
Download the instructions for your Bread maker in PDF format for free! Find your manual 310 - Magic Chef and take your electronic device back in hand. On this page are published all the documents necessary for the use of your device. 310 by Magic Chef.
USER MANUAL 310 Magic Chef
The following paragraph does not apply to any country where such provisions are inconsistent with local law: LEXMARK INTERNATIONAL, INC., PROVIDES THIS PUBLICATION "AS IS" WITHOUT WARRANTY OF ANY KIND, EITHER EXPRESS OR IMPLIED, INCLUDING, BUT NOT LIMITED TO, THE IMPLIED WARRANTIES OF MERCHANTABILITY OR FITNESS FOR A PARTICULAR PURPOSE. Some states do not allow disclaimer of express or implied warranties in certain transactions; therefore, this statement may not apply to you.
This publication could include technical inaccuracies or typographical errors. Changes are periodically made to the information herein; these changes will be incorporated in later editions. Improvements or changes in the products or the programs described may be made at any time.
Comments about this publication may be addressed to Lexmark International, Inc., Department F95/032-2, 740 West New Circle Road, Lexington, Kentucky 40550, U.S.A. In the United Kingdom and Eire, send to Lexmark International Ltd., Marketing and Services Department, Westhorpe House, Westhorpe, Marlow Bucks SL7 3RQ. Lexmark may use or distribute any of the information you supply in any way it believes appropriate without incurring any obligation to you. You can purchase additional copies of publications related to this product by calling 1-800-553-9727. In the United Kingdom and Eire, call +44 (0)8704 440 044. In other countries, contact your point of purchase.
References in this publication to products, programs, or services do not imply that the manufacturer intends to make these available in all countries in which it operates. Any reference to a product, program, or service is not intended to state or imply that only that product, program, or service may be used. Any functionally equivalent product, program, or service that does not infringe any existing intellectual property right may be used instead. Evaluation and verification of operation in conjunction with other products, programs, or services, except those expressly designated by the manufacturer, are the user's responsibility.
Lexmark and Lexmark with diamond design are trademarks of Lexmark International, Inc., registered in the United States and/or other countries. Photo Jetprinter is a trademark of Lexmark International, Inc.
Other trademarks are the property of their respective owners.
© 2004 Lexmark International, Inc.
All rights reserved.
UNITED STATES GOVERNMENT RIGHTS
This software and any accompanying documentation provided under this agreement are commercial computer software and documentation developed exclusively at private expense.
Safety information
- Use only the power supply provided with this product or the manufacturer's authorized replacement power supply.
- Connect the power supply cord to an electrical outlet that is near the product and easily accessible.
- Refer service or repairs, other than those described in the user documentation, to a professional service person.
CAUTION: Do not set up this product or make any electrical or cabling connections, such as the power supply cord or telephone, during a lightning storm.
Conventions
Note: A note identifies something that could help you.
CAUTION: A caution identifies something that could cause you harm.
Warning: A warning identifies something that could damage your product hardware or software.
Contents
Understanding your printer ....7
Printer parts 7
Control panel 8
Loading paper 10
Supported photo paper types 10
Loading the photo paper 10
Inserting memory cards ....11
Supported memory cards 11
Inserting memory cards 12
Printing from a memory card ....13
Step 1: Load photo paper 13
Step 2: Insert a memory card .... 13
Step 3: View your photos 13
Step 4: Select a photo to print .... 13
Step 5: Customize the photo .... 14
Step 6: To select another photo, repeat steps 4 and 5. ..... 14
Step 7: Print photo(s) 14
Step 8: Remove the memory card .... 14
Printing from a digital camera 15
Customizing your photo prints ....16
Printing an index page 16
Printing all photos 16
Printing a photo in black and white 17
Cropping a photo 18
Adjusting the brightness 19
Adjusting the number of prints 20
Viewing slide show 21
Printing DPOF selection 21
Customizing your printer settings 22
Changing the blank paper size 22
Changing the blank paper type 22
Changing the print quality 23
Adjusting preview before print 23
Changing the control panel display language 23
Changing the power save 24
Clearing photo settings 24
Restoring factory defaults 25
Traveling with your printer 26
Before you travel 26
Packing the printer 26
Unpacking the printer 28
Maintaining your print cartridge 30
Checking the ink level status 30
Refilling the print cartridge 30
Ordering supplies 30
Replacing the print cartridge 31
Aligning the print cartridge 34
Cleaning the print cartridge nozzles 34
Printing a test page 35
Troubleshooting ....36
Setup troubleshooting 37
Print troubleshooting 38
Improving print quality 40
Jams and misfeeds troubleshooting 43
Memory card and PictBridge troubleshooting 44
Error messages troubleshooting 45
Finding more information 47
Notices 48
Index 51
Understanding your printer
Printer parts
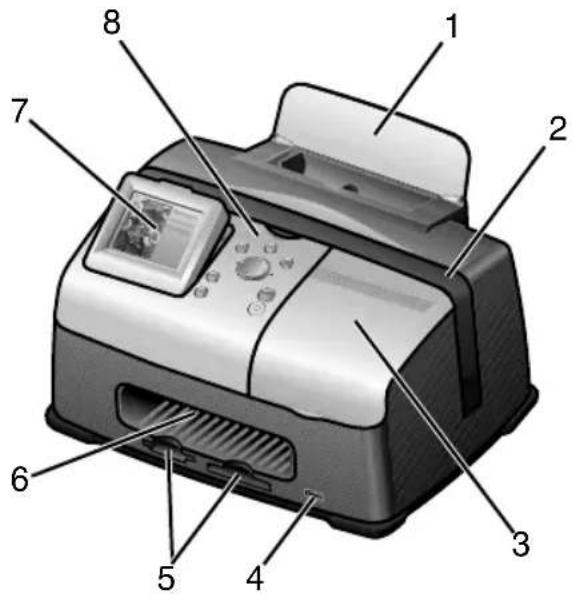
| # Part Purpose | ||
| 1 Paper support Load paper into the printer. | ||
| 2 Carry handle Transporting the printer. | ||
| 3 Access cover Install or replace print cartridge. | ||
| 4 PictBridge port Connect a PictBridge-enabled digital camera to the printer. Use the controls on the camera to select and print your photos. | ||
| 5 Memory card slots Insert memory cards. | ||
| 6 Paper exit Allows paper to exit after printing is complete. | ||
| 7 Control panel display | Preview photos on your memory card and check the status of the printer.The display has 4 positions: flat, 25°, 50°, and 90°. | |
| 8 | Control panel | Operate the printer. For more details, see “Control panel” on page 8 |

natural_image
Illustration of a microwave oven with a labeled component (1), showing internal structure and control panel (no text or symbols beyond label)# Part Purpose
1 Power supply cord port Install the provided power supply cord.
Control panel

| # Button Purpose | ||
| 1 | M e n u | • Display the Photo menu. |
| 2 Stop/Clear • Deselect the displayed photo for printing.• Stop the print job. | ||
| 3 Start Begin printing the selected photos. | ||
| 4 Power Turn the printer on and off. | ||
| 5 Up | arrow • Scroll through menu options. Change the selected area when cropping an image. Skip forward through the pictures on the memory card 10 at a time. | |
| Down arrow • Scroll through menu options. Change the selected area when cropping an image. Skip backward through the pictures on the memory card 10 at a time. | ||
| Right arrow (+) • Increase the number of prints. Change the selected area when cropping an image. Increase the value of a menu item. Display the next picture on a memory card. | ||
| Left arrow (-) • Decrease the number of prints. Change the selected area when cropping an image. Decrease the value of a menu item. Display the previous picture on a memory card. | ||
| 6 | Number of Prints | Change the number of photos you want to print. Change the size of the green crop box when cropping an image. |
| 7 Rotate Rotate the image on the control panel display90° counterclockwise for easier viewing. | ||
| 8 Select • Choose a menu option. | Choose a displayed photo for printing. | |
Supported photo paper types
| Type Size Usage | ||
| Photo/Glossy cards | Photo paper: 4 x 6 inches (102 x 152 mm) | Print photos |
| Hagaki card: 3.9 x 5.8 inches (100 x 148 mm) | Print photos | |
| A6 card: 4.1 x 5.8 inches (105 x 148 mm) | Print photos | |
| Card stock Index | card: 4 x 6 inches (102 x 152 mm) | Print test pages and cartridge maintenance pages |
| Note: Do not load more than 25 sheets into the paper support. | ||
Loading the photo paper
1 Lift the paper support.
2 Load the photo paper into the paper support with the print side facing you.
Note: Do not force the photo paper into the printer.

natural_image
Two grayscale images of a traditional flat-screen printer with a paper feed cover, shown from front and side views (no text or symbols visible)Inserting memory cards
Supported memory cards
Note: Your card manufacturer may differ from the ones pictured.

Microdrive

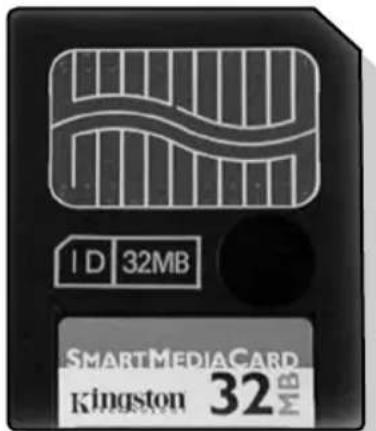
SmartMedia

CompactFlash Type I and Type II
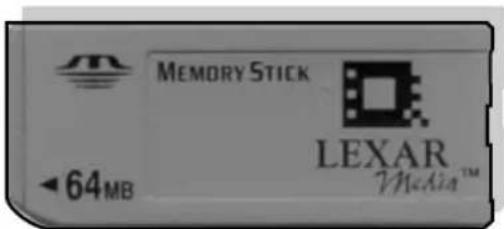
Memory Stick
Memory Stick PRO
Memory Stick Duo (with adapter)
Memory Stick PRO Duo (with adapter)

Secure Digital (SD)

MultiMedia Card

xD Picture Card (up to 512MB)
Inserting memory cards
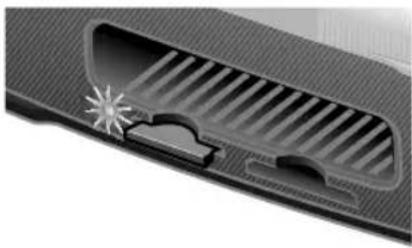
The memory card reader has two slots to accommodate different size memory cards. A small light turns on when a memory card is inserted. The light blinks to indicate the memory card is being read or is transmitting data.
natural_image
Close-up of a mechanical component with a starburst pattern and internal grooves (no text or symbols visible)Warning: Do not remove the memory card while the light is blinking.
| Slot Memory card Installation | ||
Left slot • Secure Digital | • SmartMedia• MultiMedia• Memory Stick• Memory Stick PRO• Memory Stick Duo (with adapter)• Memory Stick PRO Duo (with adapter)• xD Picture Card. | • Insert card with brand name label face up.Note: If you are using SmartMedia cards, make sure the gold contact area faces up.Note: If you are using a Memory Stick Duo or Memory Stick PRO Duo card, be sure to connect it to the adapter that came with the card before inserting it in the slot.• If you have an arrow on your card, make sure it points toward the printer. |
Right slot • Compact Flash Type I and Type II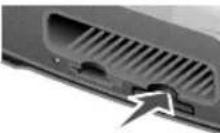 | • Microdrive | • The name label faces up.• If you have an arrow on your card, make sure it points toward the printer. |
Note: Your printer recognizes only one digital media source for photos at a time.
Step 1: Load photo paper
Note: For help loading photo paper and a list of supported paper types, see page 10.
Step 2: Insert a memory card
Note: If you are unsure of what type of memory card you have, see page 11.
The I Want To... menu appears.
Step 3: View your photos
1 Press the down arrow to highlight Slide Show.
2 Press Select.
Each photo will appear on the display for five seconds. To skip ahead, press the right arrow button. To go back, press the left arrow button.
3 Press Stop/Clear when you are ready to select the photos you want to print.
Step 4: Select a photo to print
1 Press the right or left arrow buttons to scroll to the photo you want to print.
Note: For easier viewing, press Rotate to rotate the image on the display 90° counterclockwise.
2 Press Select.
Step 5: Customize the photo
You can adjust the photo settings before you print. If you want to:
- Crop the photo, see page 18.
- Adjust the brightness, see page 19.
- Change the number of prints, press Number Of Prints.
- Change the print quality, see page 23.
- Change the blank paper size, see page 22.
Step 6: To select another photo, repeat steps 4 and 5.
When you are finished selecting your photo(s), continue with step 7.
Step 7: Print photo(s)
Press Start.
If Preview before Print is on, a preview of the print job is first displayed. Press Start again to print the photo.
If Preview before Print is off, the photo prints immediately.
Note: To adjust the Preview setting, see page 23.
Step 8: Remove the memory card
Warning: Do not remove the memory card while the light is blinking. The light blinks to indicate the memory card is being read or is transmitting data.

natural_image
Close-up of a mechanical component with a starburst pattern, showing internal structure and no visible text or symbols.Printing from a digital camera
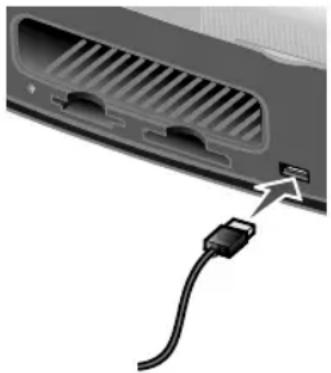
You can connect a PictBridge-enabled digital camera to your printer and use the buttons on the camera to select and print your photos:
1 Insert one end of the USB cable into the camera.
Note: Use only the USB cable that came with your camera.
2 Insert the other end of the cable into the PictBridge port on the front of the printer.
natural_image
Close-up of a computer ventilation grille and cable connector (no text or symbols visible)3 Refer to the instructions included with your camera for PictBridge connection and usage information.
Note: Make sure the PictBridge-enabled digital camera is set to the correct USB mode. Refer to the camera documentation for more information.
Customizing your photo prints
Printing an index page
1 Load photo paper.
2 Insert a memory card.
Note: If you are unsure of what type of memory card you have, see page 11.
The I Want To... menu appears.
3 Press Menu.
The Photo menu appears.
4 Press the down arrow button until you highlight Print Index Page.
5 Press Select.
If Preview before Print is on, a preview of the print job is first displayed. Press Start to print the index page.
If Preview before Print is off, the index page prints immediately.
Note: To adjust the Preview setting, see page 23.
Printing all photos
1 Load photo paper.
2 Insert a memory card.
Note: If you are unsure of what type of memory card you have, see page 11.
The I Want To... menu appears.
3 Press the down arrow button until you highlight Print All Photos.
4 Press Select.
If Preview before Print is on, a preview of the print job is first displayed. Press Start to print the photos.
If Preview before Print is off, the photos print immediately.
Note: To adjust the Preview setting, see page 23.
Printing a photo in black and white
1 Load photo paper.
2 Insert a memory card.
Note: If you are unsure of what type of memory card you have, see page 11.
The I Want To... menu appears with View Photos or Print highlighted.
3 Press Select.
4 Press the right or left arrow buttons to scroll to the photo you want to adjust.
5 Press Select.
6 Press Menu.
The Photo menu appears.
7 Press the down arrow button until you highlight Print Color.
8 Press the right arrow button until you highlight Black & White.
9 Press Select.
To adjust other photos, repeat steps 4–8.
10 Press Start to print the photo(s).
If Preview before Print is on, a preview of the print job is first displayed. Press Start again to print the photo.
If Preview before Print is off, the photo prints immediately.
Note: To adjust the Preview setting, see page 23.
Cropping a photo
1 Load photo paper.
2 Insert a memory card.
Note: If you are unsure of what type of memory card you have, see page 11.
The I Want To... menu appears with View Photos or Print highlighted.
3 Press Select.
4 Press the right or left arrow buttons to scroll to the photo you want to adjust.
5 Press Menu.
The Photo menu appears.
6 Press the down arrow button until you highlight Crop.
7 Press Select.
8 Adjust the green crop box over the photo.
Press the arrow buttons to move the crop box.
Press Number Of Prints to change the size of the crop box.
9 Press Select to accept your changes.
To adjust other photos, repeat steps 4–9.
10 Press Start to print the photo(s).
If Preview before Print is on, a preview of the print job is first displayed. Press Start again to print the photo.
If Preview before Print is off, the photo prints immediately.
Note: To adjust the Preview setting, see page 23.
Adjusting the brightness
1 Load photo paper.
2 Insert a memory card.
Note: If you are unsure of what type of memory card you have, see page 11.
The I Want To... menu appears with View Photos or Print highlighted.
3 Press Select.
4 Press the right or left arrow buttons to scroll to the photo you want to adjust.
5 Press Menu.
The Photo menu appears.
6 Press the down arrow button until you highlight Brightness.
7 Press Select.
8 Press the right or left arrow buttons to adjust the brightness of the photo.
9 Press Select to accept your changes.
To adjust other photos, repeat steps 4–9.
10 Press Start to print the photo(s).
If Preview before Print is on, a preview of the print job is first displayed. Press Start again to print the photo.
If Preview before Print is off, the photo prints immediately.
Note: To adjust the Preview setting, see page 23.
Adjusting the number of prints
1 Load photo paper.
2 Insert a memory card.
Note: If you are unsure of what type of memory card you have, see page 11.
The I Want To... menu appears with View Photos or Print highlighted.
3 Press Select.
4 Press the right or left arrow buttons to scroll to the photo you want to adjust.
5 Press Number Of Prints until you reach the desired quantity.
To adjust the number of prints of other photos, repeat steps 4 and 5.
6 Press Start to print the photo(s).
If Preview before Print is on, a preview of the print job is first displayed. Press Start again to print the photo.
If Preview before Print is off, the photo prints immediately.
Note: To adjust the Preview setting, see page 23.
Viewing slide show
1 Insert a memory card.
Note: If you are unsure of what type of memory card you have, see page 11.
The I Want To... menu appears.
2 Press the down arrow button until you highlight Slide Show.
3 Press Select.
4 Press Stop/Clear when you are ready to select the photos you want to print.
Printing DPOF selection
The Digital Print Order Format (DPOF) is an option available on some digital cameras. If you take pictures with a camera that supports DPOF, you can specify which photos to print and the number of copies of each photo while the memory card is still in the camera.
1 Load photo paper.
2 Insert a memory card.
Note: If you are unsure of what type of memory card you have, see page 11.
The I Want To... menu appears.
3 Use the down arrow button to highlight Print DPOF Selection.
4 Press Select.
If Preview before Print is on, a preview of the print job is first displayed. Press Start to print the DPOF selections.
If Preview before Print is off, the DPOF selections print immediately.
Note: To adjust the Preview setting, see page 23.
Customizing your printer settings
Adjustments made to the settings in this section will remain in effect until you adjust the settings again or until you reset the factory default settings.
Changing the blank paper size
The factory default setting is 4x6.
1 Press Menu.
The Photo menu appears.
2 Press the down arrow button until you highlight Blank Paper Size.
3 Press the right or left arrow buttons to scroll through the paper sizes.
Your choices are 4x6, A6, and Hagaki.
4 Press Select to save your choice.
Changing the blank paper type
The factory default setting is Glossy.
1 Press Menu.
The Photo menu appears.
2 Press the down arrow button until you highlight Paper Type.
3 Press the right or left arrow buttons to scroll through the paper types.
Your choices are Glossy, Plain, and Coated.
4 Press Select to save your choice.
Changing the print quality
The factory default setting is Automatic.
1 Press Menu.
The Photo menu appears.
2 Press the down arrow button until you highlight Print Quality.
3 Press the right or left arrow buttons to scroll through the print quality settings.
Your choices are Draft, Normal, and Photo.
4 Press Select to save your choice.
Adjusting preview before print
The factory default setting is On.
1 Press Menu.
The Photo menu appears.
2 Press the down arrow button until you highlight Preview before Print.
3 Press the right or left arrow buttons to scroll through the settings.
Your choices are On and Off.
4 Press Select to save your choice.
Changing the control panel display language
The factory default setting is English.
1 Press Menu.
The Photo menu appears.
2 Press the down arrow button until you have reached the last item.
3 Press the up arrow button twice.
4 Press the right or left arrow buttons to scroll through the languages.
5 Press Select to save your choice.
Changing the power save
The factory default setting is 20 Min.
1 Press Menu.
The Photo menu appears.
2 Press the down arrow button until you highlight Power Save.
3 Press the right or left arrow buttons to scroll through the settings.
Your choices are Immediately, 10 Min, 20 Min, and 30 Min.
4 Press Select to save your choice.
Clearing photo settings
This option lets you adjust when the current photo settings are cleared. The settings that are affected are Number of Copies and Brightness. The factory default setting is After 2 Minutes.
1 Press Menu.
The Photo menu appears.
2 Press the down arrow button until you highlight Clear Settings When.
3 Press the right or left arrow buttons to scroll through the settings.
Your choices are Never and After 2 Minutes.
4 Press Select to save your choice.
Restoring factory defaults
1 Press Menu.
The Photo menu appears.
2 Press the down arrow button until you highlight Restore Settings.
3 Press Select.
Traveling with your printer
Before you travel
When traveling with your printer, make sure you bring the following items:
- Photo paper.
- Extra print cartridge if you expect to do a lot of printing. For compatible print cartridges, see “Ordering supplies” on page 30.
- A memory card for photos or a PictBridge-enabled camera with a USB cable. For compatible memory cards, see “Supported memory cards” on page 11.
Packing the printer
1 Turn the printer off.
2 Remove all photo paper from the paper support.
3 Close the paper support.

natural_image
Illustration of a modern kitchen toaster with control panel and ventilation slots (no text or symbols)4 Remove any memory cards from the memory card slots.
5 Disconnect the power cord.

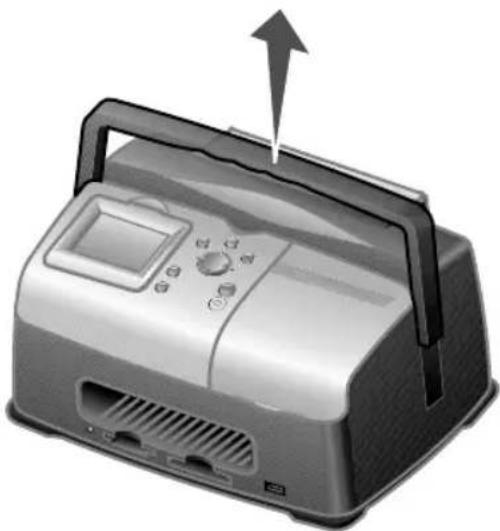
6 Raise the carry handle.
natural_image
Illustration of a portable kitchen appliance with a control panel and indicator lights (no text or symbols)Note: When traveling with your printer, it is not necessary to remove the print cartridge.
Warning: Always travel with the printer in the upright position.
Unpacking the printer
1 Place the printer on a flat, level surface.
2 Lower the carrying handle.

natural_image
Illustration of a microwave oven with a digital display and control panel (no text or symbols visible)3 Connect the power cord.

4 Press Power. Make sure the power light and display are on.
5 Lift the paper support.

natural_image
Exterior view of a modern printer with control panel and paper feed (no visible text or symbols)6 Load photo paper.
The printer is now ready to print your photos. Insert a memory card containing photos or connect your PictBridge-enabled camera to the printer.
Checking the ink level status
1 Press Menu.
The Photo menu appears.
2 Press the down arrow button until you highlight Ink Levels.
3 Press Select.
Note: Press Stop/Clear to return to the previous menu.
If you need to order a new print cartridge, see "Ordering supplies" on page 30.
Refilling the print cartridge
Lexmark's warranty does not cover the repair of failures or damage caused by a refilled cartridge. We do not recommend use of a refilled cartridge. Refilling a cartridge can affect print quality and cause damage to the printer. Use Lexmark supplies for the best results. See “Ordering supplies” on page 30.
Ordering supplies
To order printer supplies or to locate a dealer near you, contact the Lexmark Web site at www.lexmark.com.
| Color print cartridges | |
| • 33 • 35 | |
Replacing the print cartridge
Removing a used print cartridge
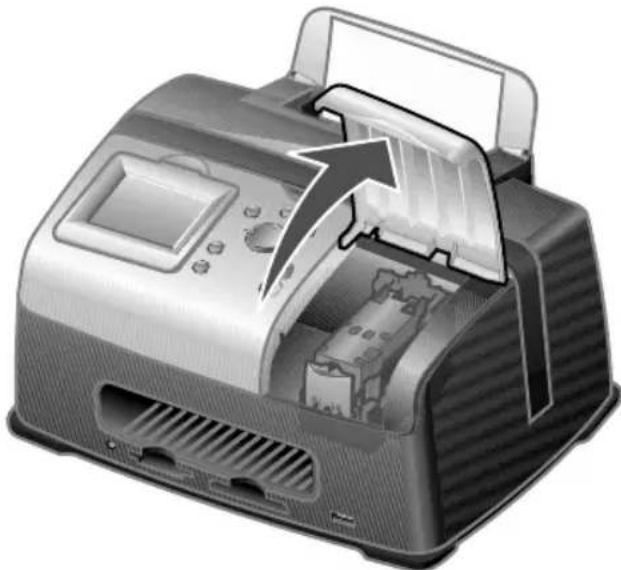
1 If the printer is off, press the Power button.
2 Open the access cover.
natural_image
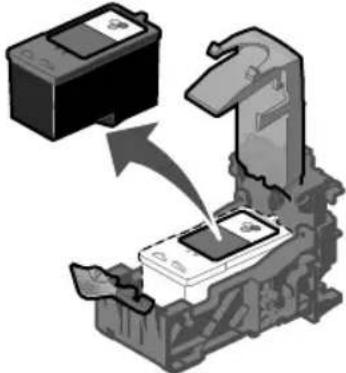
Illustration of a portable printer with internal components and a paper airplane, showing no text or symbols.3 Press down on the cartridge lever to open the cartridge lid.

natural_image
Illustration of a mechanical device with a dashed arc indicating motion or force (no text or symbols)4 Remove the old cartridge.
natural_image
Diagram showing a battery being inserted into a device, with no visible text or symbolsInstalling a print cartridge
1 If you are installing a new print cartridge, remove the sticker and transparent tape from the bottom of the print cartridge.
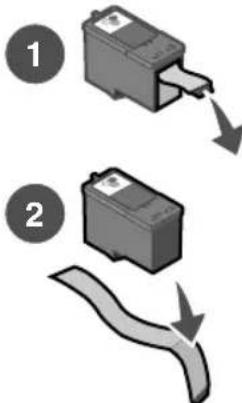
Warning: Do not touch the gold contact area on the back or the nozzles on the bottom of the cartridge.
2 Unless it is already open, press down on the cartridge lever to open the cartridge lid.
3 Insert the cartridge.

natural_image
Diagram showing a battery being inserted into a mechanical device (no text or symbols present)4 Snap the lid closed.
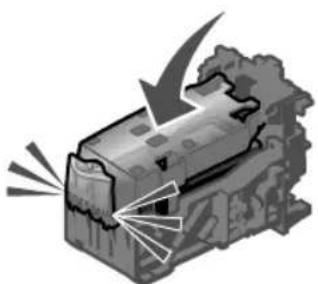
natural_image
Illustration of a mechanical component with arrows indicating motion or force, no text or symbols present5 Close the access cover.

natural_image
Illustration of a portable printer with internal components and a downward arrow indicating compression or disassembly (no text or symbols present)6 Load a blank 4x6 index card into the paper support.
7 When prompted on the display, press Select to print the cartridge alignment page.
Note: You may discard this page after it prints.
Aligning the print cartridge
1 Load a blank 4x6 index card.
2 Press Menu.
The Photo menu appears.
3 Press the down arrow button until you highlight Align Cartridge.
4 Press Select.
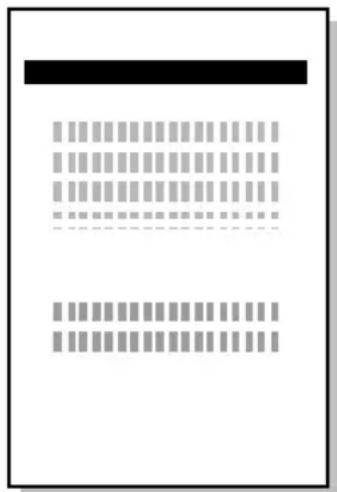
natural_image
Abstract geometric pattern with horizontal and vertical gray bars, no text or symbols presentNote: Discard the index card after it prints.
Cleaning the print cartridge nozzles
1 Load a blank 4x6 index card.
2 Press Menu.
The Photo menu appears.
3 Press the down arrow button until you highlight Clean Cartridge.
4 Press Select.
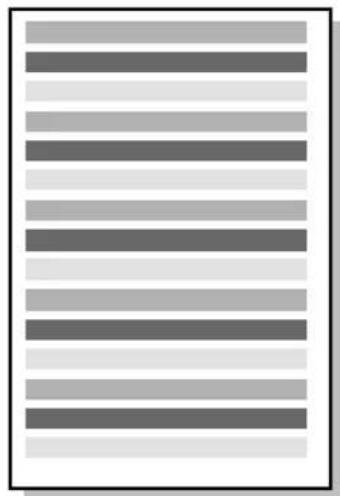
natural_image
Abstract pattern of horizontal gray and white stripes with no text or symbolsNote: Discard the index card after it prints.
Printing a test page
1 Load a blank 4x6 index card.
2 Press Menu.
The Photo menu appears.
3 Press the down arrow button until you highlight Print Test Page.
4 Press Select.

natural_image
Blank document page with placeholder text and a small diagram of a document (no readable text or symbols)Note: Discard the index card after it prints.
Troubleshooting
| Category Purpose | |
| “Setup troubleshooting” on page 37 | Resolves issues that occur during the initial printer setup. |
| “Print troubleshooting” on page 38 | Resolves issues that occur while printing. |
| “Improving print quality” on page 40 | Resolves issues with the print quality of your photos. |
| “Jams and misfeeds troubleshooting” on page 43 | Resolves issues with paper jams and misfeeds. |
| “Memory card and PictBridge troubleshooting” on page 44 | Resolves issues that occur while using memory cards and PictBridge-enabled cameras. |
| “Error messages troubleshooting” on page 45 | Resolves issues with error messages on the display. |
Setup troubleshooting
| Symptom Diagnosis Solution | ||
| Incorrect language appears on the display | Did you select the wrong language during the initial printer setup? | See “Changing the control panel display language” on page 23. |
| The Power light is not lit | Is the power supply pushed all the way into the printer? | 1 Disconnect the power supply cord from the wall outlet, and then from the printer.2 Reconnect the power supply cord by pushing it all the way into the wall outlet and the connector on the printer.3 Press thePowerbutton. |
| Is the printer connected to a working electrical outlet? | 1 Connect the printer to an electrical outlet that other electrical devices have been using.2 Press thePowerbutton. | |
| Alignment page or test page will not print | Is the printer on? Press thePowerbutton. If the Power light does not come on, see “The Power light is not lit” on page 37. | |
| Do you see an error message? | See “Error messages troubleshooting” on page 45. | |
| Did you remove the transparent tape from the bottom of the print cartridge?Is the print cartridge installed properly? | Remove the print cartridge, check for the transparent tape and then reinsert it. See “Replacing the print cartridge” on page 31. | |
| Is the photo paper loaded correctly? | See “Loading the photo paper” on page 10. | |
Print troubleshooting
| Symptom Diagnosis Solution | ||
| Poor photo qualityIncluding:Blank pageDark printFaded printIncorrect colorsLight and dark bands in printSkewed linesSmudgesStreaksWhite lines in print | Are you using the correct print quality setting? | Try using a different print quality setting. For help, see “Changing the print quality” on page 23. |
| Did the ink completely dry on the photo paper before you moved it? | Allow the ink some time to dry completely before handling the print. | |
| Is the photo paper wrinkled? | Use a new piece of photo paper that is straight and unwrinkled. | |
| Are the printer settings adjusted to the correct paper size? | Select the correct paper size. See “Changing the blank paper size” on page 22. | |
| Is the print cartridge aligned properly? | See “Aligning the print cartridge” on page 34. | |
| Has the print cartridge been properly maintained? | See “Improving print quality” on page 40. | |
| Is the cartridge out of ink? | 1 Check the status of the ink cartridge. See “Checking the ink level status” on page 30.2 If the ink level is low, replace the ink cartridge. See “Replacing the print cartridge” on page 31. | |
| Poor quality at the edges of the page | Are you using the correct paper size with the size you selected in the printer? | The printer supports three paper sizes: 4x6, A6, and Hagaki.1 Verify the paper size you are using.2 Verify the printer setting matches your paper size. See “Changing the blank paper size” on page 22. |
| Printer does not print or respond | Is the printer on? Press the | Power button.If the Power light does not come on, see “The Power light is not lit” on page 37. |
| Do you see an error message? | See “Error messages troubleshooting” on page 45. | |
| Is the print cartridge installed properly? | Remove the print cartridge, check for transparent tape and then reinsert. See “Replacing the print cartridge” on page 31. | |
| Slow print speed Are you using the highest print quality resolution? | Reduce the print quality resolution. See “Changing the print quality” on page 23.Note: Draft and Normal print more quickly than Best. | |
Improving print quality
Basic solutions
If you are not satisfied with the print quality of your document, make sure you:
- Use the appropriate paper size for your print. See “Changing the blank paper size” on page 22.
- Select a higher print quality. See “Changing the print quality” on page 23.
Advanced solutions
If your photo still does not have the print quality you want, follow these steps:
1 Align the print cartridge. See page 34.
If print quality has not improved, continue to step 2.
2 Clean the print nozzles. See page 34.
If print quality has not improved, repeat step 2 up to two more times before continuing to step 3.
3 Reinsert the print cartridge. See page 41.
If print quality has not improved, continue to step 4.
4 Wipe the print cartridge nozzles and contacts. See page 41.
If print quality has not improved, repeat step 4 up to two more times.
5 If print quality is still not satisfactory, replace the print cartridge. See page 30.
Reinserting the print cartridge
1 Remove the print cartridge. See page 31.
2 Insert the print cartridge. See page 32.
3 Print your photo again.
Wiping the print cartridge nozzles and contacts
1 Remove the print cartridge. See page 31.
2 Dampen a clean, lint-free cloth with water and place it on a level surface.
Note: Place two pieces of paper under the cloth to avoid getting ink on the work surface.
3 Gently hold the nozzles against the cloth for about three seconds, and then wipe in the direction shown.
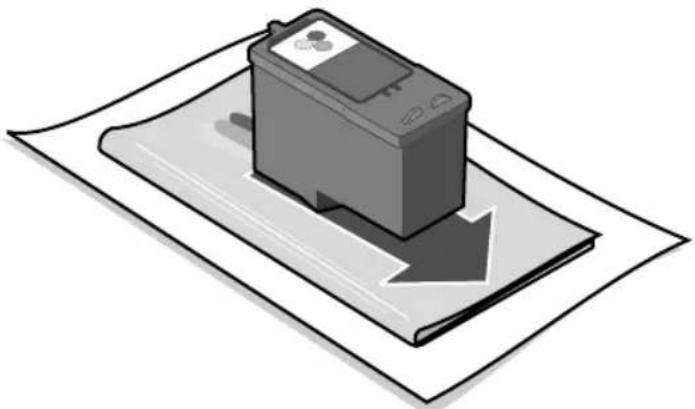
natural_image
Illustration of a battery on a surface with a downward arrow, no text or symbols present4 Gently hold the contacts against another clean section of cloth for about three seconds, and then wipe in the direction shown.
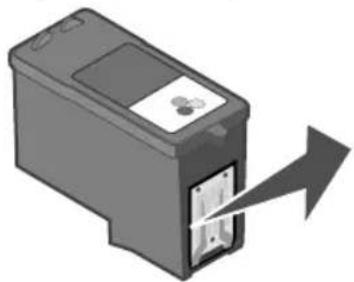
natural_image
Illustration of a device with a black box and arrow pointing to a connector (no text or symbols)5 With another clean section of the cloth, repeat steps 3 and 4.
6 Let the nozzles and contacts dry completely.
7 Reinsert the print cartridge. See "Installing a print cartridge" on page 32.
8 Run the clean cartridge utility. See "Cleaning the print cartridge nozzles" on page 34.
9 Print your photo again.
Jams and misfeeds troubleshooting
| Symptom Diagnosis Solution | ||
| Paper jams Did the jam occur at the paper support? | Turn the power off. Firmly grasp the photo paper and gently pull it from the printer. | |
| Paper misfeeds, skews, or multiple sheets feed | Is the photo paper loaded correctly? | See “Loading the photo paper” on page 10. |
| Are you using photo paper recommended for your printer? | The printer supports three photo paper sizes: 4x6, A6, and Hagaki. | |
| Are you loading more than one page at a time? | Try loading a smaller amount of photo paper into the printer. See page 10. | |
| Is the photo paper wrinkled or damaged? | Use a new piece of photo paper that is straight and unwrinkled. | |
Memory card and PictBridge troubleshooting
| Symptom Diagnosis Solution | ||
| Memory card is not recognized by the printer | Is the memory card damaged? | Verify that there is no damage to the memory card. |
| Is the memory card inserted correctly? | Insert the memory card correctly. See page 12. | |
| Is there more than one memory card inserted at the same time. | Only one memory card may be used at one time.Remove the second memory card. | |
| Are you using a supported memory card type? | For supported memory cards, see page 11. | |
| Do you have a PictBridge-enabled digital camera connected to the printer. | Disconnect the PictBridge-enabled digital camera from the printer. | |
| Cannot print from the digital camera | Is the digital camera PictBridge compatible? | Remove the device and use a PictBridge-enabled digital camera in the PictBridge port.Refer to your camera documentation to determine if it is PictBridge compatible. |
| Is the PictBridge-enabled digital camera set to the correct USB mode? | Refer to your camera documentation for help selecting the correct USB mode. | |
| Is there a memory card inserted in the printer? | Remove the memory card from the printer. | |
| Are you using the USB cable that came with your digital camera? | You must use the USB cable that came with your camera.Refer to your camera documentation to determine which type of USB cable it supports. | |
Error messages troubleshooting
| Error Message What it indicates Solution | ||
| Ink low The print | cartridge is running out of ink.The Ink Low warning occurs when your cartridge is about 25% full, 15% full, and 10% full. | Replace the cartridge. See page 31. |
| Paper jam | There is a paper jam. | 1 Clear the paper jam. See “Jams and misfeeds troubleshooting” on page 43.2 Press Select to reprint the last photo. |
| Carrier jam The | print cartridge carrier is stuck. | 1 Remove all the paper from the printer.2 Verify that the print cartridge is installed properly. See “Reinserting the print cartridge” on page 41.3 Press Select to reprint the last photo. |
| Paper out The | printer is out of photo paper. | Load more photo paper into the printer. See page 10. |
| Cover open The | access cover was open when you pressed Start. | Verify that the access cover is closed.Printing continues immediately. |
| Cartridge missing | The print cartridge is missing or not installed properly. | Verify that the cartridge is installed properly. See “Installing a print cartridge” on page 32. |
| Alignment error | The print cartridge is not installed properly or the transparent tape was not removed. | Verify that the cartridge is installed properly and the transparent tape is removed.See “Installing a print cartridge” on page 32. |
| Card problem The | memory card was inserted incorrectly or is damaged. | 1 Verify that there is no damage to the memory card.2 Insert the card correctly.See page 12. |
| A second memory card has been detected. | Only one memory card may be used at one time.Remove the second card. | |
| No images The m | memory card has no supported images. | Use a different memory card containing photos. |
| Card format The | memory card formatting is not supported. | Reformat the memory card in your digital camera.For help, see your digital camera documentation. |
| PictBridge port | The device attached to the PictBridge port is not supported. | 1 Remove the device.2 Use a PictBridge-enabled digital camera in the PictBridge port. |
| The PictBridge-enabled digital camera is not set to the correct USB mode. | Refer to your digital camera documentation for help selecting the correct USB mode. | |
| Size warning The p | paper size selected does not match the size of the photo paper in the paper support. | Verify the printer setting matches your blank paper size. See page 22.Note: An index page can only be printed on 4 x 6 photo paper. |
Finding more information
| Resource Description | |
| Setup sheet Instructions | on how to set up your printer. |
| User's Guide Information | on:Digital photo printingUsing the control panelMaintenanceTroubleshootingSafety |
| Lexmark Web site http://support.lexmark.com/The Web site has information on:Customer Care—Product registration, contact information, order status, warranty status, and repair information.Reference—Printer documentation and specificationsSolutions—Searchable KnowledgeBase and e-mail support | |
Electronic emission notices
Federal Communications Commission (FCC) compliance information statement
The Lexmark 310 Series Photo Jetprinter, Type Number 4300, has been tested and found to comply with the limits for a Class B digital device, pursuant to Part 15 of the FCC Rules. Operation is subject to the following two conditions: (1) this device may not cause harmful interference, and (2) this device must accept any interference received, including interference that may cause undesired operation.
The FCC Class B limits are designed to provide reasonable protection against harmful interference in a residential installation. This equipment generates, uses, and can radiate radio frequency energy and, if not installed and used in accordance with the instructions, may cause harmful interference to radio communications. However, there is no guarantee that interference will not occur in a particular installation. If this equipment does cause harmful interference to radio or television reception, which can be determined by turning the equipment off and on, the user is encouraged to try to correct the interference by one or more of the following measures:
- Reorient or relocate the receiving antenna.
- Increase the separation between the equipment and receiver.
- Connect the equipment into an outlet on a circuit different from that to which the receiver is connected.
- Consult your point of purchase or service representative for additional suggestions.
The manufacturer is not responsible for any radio or television interference caused by using other than recommended cables or by unauthorized changes or modifications to this equipment. Unauthorized changes or modifications could void the user's authority to operate this equipment.
Any questions regarding this compliance information statement should be directed to:
Director of Lexmark Technology & Services
Lexmark International, Inc.
740 West New Circle Road
Lexington, KY 40550
(859) 232-3000
Industry Canada compliance statement
This Class B digital apparatus meets all requirements of the Canadian Interference-Causing Equipment Regulations.
European Community (EC) directives conformity
This product is in conformity with the protection requirements of EC Council directives 89/336/EEC and 73/23/EEC on the approximation and harmonization of the laws of the Member States relating to electromagnetic compatibility and safety of electrical equipment designed for use within certain voltage limits.
A declaration of conformity with the requirements of the directives has been signed by the Director of Manufacturing and Technical Support, Lexmark International, S.A., Boigny, France.
This product satisfies the Class B limits of EN 55022 and safety requirements of EN 60950.
Japanese VCCI notice
If this symbol appears on your product, the accompanying statement is applicable.
Korean MIC statement
If this symbol appears on your product, the accompanying statement is applicable.

This equipment has undergone EMC registration as a household product. It can be used in any area, including a residential area.
The United Kingdom Telecommunications Act 1984
This apparatus is approved under the approval number NS/G/1234/J/100003 for the indirect connections to the public telecommunications systems in the United Kingdom.
Noise emission levels
The following measurements were made in accordance with ISO 7779 and reported in conformance with ISO 9296.
| 1-meter average sound pressure, dBA | |
| Printing | 44 dBA |
| Idling Silent | |
ENERGY STAR

The EPA ENERGY STAR Office Equipment program is a partnership effort with office equipment manufacturers to promote the introduction of energy-efficient products and to reduce air pollution caused by power generation.
Companies participating in this program introduce products that power down when they are not being used. This feature will cut the energy used by up to 50 percent. Lexmark is proud to be a participant in this program.
As an ENERGY STAR Partner, Lexmark International, Inc. has determined that this product meets the ENERGY STAR guidelines for energy efficiency.
Printer energy consumption
The following table documents the energy consumption characteristics of the printer.
| Mode Description | Power consumption | |
| Printing Printer is generating hard copy output 10 W | ||
| Power Saver Printer is in energy saving mode 7 W | ||
| Off | Printer is plugged into a wall outlet, but switch is turned off 5.5 W | |
The power consumption levels listed in the previous table represent time-averaged measurements. Instantaneous power draws may be substantially higher than the average.
Power Saver
As part of the ENERGY STAR program, this printer is designed with an energy-saving mode called Power Saver. The Power Saver Mode is equivalent to the EPA Sleep Mode. The Power Saver Mode saves energy by lowering power consumption during periods of inactivity. For this printer, the Power Saver Mode is entered immediately at the end of a print job. The Power Saver Mode does not affect the performance of this product and therefore cannot be modified by the user.
Off modes
This printer has an off mode which still consumes a small amount of power. To completely stop printer power consumption, disconnect the power supply from the wall outlet.
Total energy usage
It is sometimes helpful to calculate the total printer energy usage. Since power consumption claims are provided in power units of Watts, the power consumption should be multiplied by the time the printer spends in each mode in order to calculate energy usage. The total printer energy usage is the sum of each mode's energy usage.
Mercury statement
This product contains mercury in the lamp (<5mg Hg). Disposal of mercury may be regulated due to environmental considerations. For disposal or recycling information, contact your local authorities or the Electronic Industries Alliance: www.eiae.org.
Copyright advisory
It may be illegal to copy certain materials without permission or license, including documents, images, and currency. If you are not sure whether you have permission, seek legal advice.
Limited Warranty Information
Lexmark International, Inc. furnishes a limited warranty that this printer or All-In-One product will be free of defects in material and workmanship for a period of 12 months after the original date of purchase. To view the limitations and conditions of this limited warranty, please refer to the Statement of Limited Warranty included with this unit or set forth at http://warranty.lexmark.com.
A
access cover 7
adjust printer settings 22
aligning the print
cartridge 34
arrow button 9
B
black & white photos 17
blank paper
loading 10
selecting 22
selecting type 22
size 10
type 10
brightness, adjust 19
buttons, control panel
- (left arrow) 9
+ (right arrow) 9
down arrow 9
left arrow 9
Menu 8
Number of Prints 9
Power 9
right arrow 9
Rotate 9
Select 9
Start 9
Stop/Clear 8
up arrow 9
C
cable, USB 15
cards, memory 11
cartridge, print
aligning 34
clean contacts 41
clean nozzles
automatic 34
manual 41
ink level status 30
installing 32
ordering 30
part numbers 30
refilling 30
removing 31
replacing 31
changing
area to print 18
blank paper size 22
blank paper type 22
brightness 19
language 23
number of prints 20
power save 24
preview before
rint 23
print quality 23
cleaning print cartridge
nozzles
automatic 34
manual 41
clear photo settings 24
color print cartridge part
numbers 30
CompactFlash, memory
card 11
control panel 8
control panel display 7
copyright advisory 50
crop photos 16, 18
customize photos 16
customize printer
settings 22
D
darken photos 19
default settings 25
digital camera
port 7
printing from 15
USB cable 15
digital photos
from memory card 13
from
PictBridge-enabled
camera 15
display, control panel 7
down arrow button 9
DPOF 21
E
edit photos
black & white 17
brightness 19
crop 16, 18
number of prints 20
edition information 2
electronic emission
statement 48
emission statement 48
error message
Alignment error 45
Card format 46
Card problem 46
Carrier jam 45
Cartridge missing 45
Cover open 45
Ink low 45
No images 46
Paper jam 45
Paper out 45
PictBridge port 46
Size warning 46
F
FCC statement 48
finding more information 47
H
handle 7
|
I Want To... menu 16
improving print quality 40
index page, print 16
ink level status 30
inserting a memory card 12
installing the print cartridge 32
J
jam, paper 43
Jams and misfeeds troubleshooting 43
L
language, changing 23
left arrow button 9
Lexmark Web site 47
lighten photos 19
loading blank paper 10
M
maintaining the print cartridge 30
maintenance 30
memory card
inserting 12
printing from 13
removal 14
slots 7
supported types 11
troubleshooting 44
memory cards, supported
CompactFlash 11
Memory Stick 11
Memory Stick Duo 11
Memory Stick PRO 11
Memory Stick Duo, memory card 11
Memory Stick PRO Duo, memory card 11
Memory Stick PRO, memory card 11
Memory Stick, memory card 11
Menu button 8
Microdrive, memory card 11
Minus (-) button 9
mobility 26
MultiMedia memory card 11
N
nozzle, print cartridge cleaning
automatic 34
manual 41
Number of Prints button 9
number of prints, changing 20
0
ordering supplies 30
P
packing the printer, travel 26
paper exit 7
paper jam 43
paper misfeeds 43
paper size, blank selecting 22
supported 10
paper support 7
paper type, blank selecting 22
supported 10
paper, blank
loading 10
select size 22
select type 22
supported sizes 10
supported types 10
part numbers
color print cartridge 30
parts
access cover 7
control panel 8
control panel display 7
handle 7
memory card slots 7
paper exit 7
paper support 7
PictBridge port 7
power supply port 8
photo settings
black & white 17
brightness 19
clear 24
crop 18
default 25
DPOF selections 21
number of prints 20
photos
print all 16
print index page 16
select to print 13
slide show 21
PictBridge
port 7
printing 15
troubleshooting 44
USB cable 15
Plus (+) button 9
Power button 9
power save 24
power supply port 8
preview before print 23
alignment page 34
all photos 16
black & white
photo 17
index page 16
preview 23
selecting photo 13
test page 35
using DPOF
selections 21
using
PictBridge-enabled
digital camera 15
print cartridge
aligning 34
clean contacts 41
clean nozzles
automatic 34
manual 41
ink level status 30
installing 32
ordering 30
part numbers 30
refilling 30
removing 31
replacing 31
print from
memory card 13
PictBridge-enabled
digital camera 15
print quality
improving 40
select 23
Print troubleshooting 38
printer settings, adjust 22
Q
quality, improve print 40
R
refilling print cartridge 30
removing memory
cards 14
removing print
cartridge 31
replacing print
cartridge 31
restore default
settings 25
right arrow (+) button 9
Rotate button 9
S
safety information 2
Secure Digital, memory
card 11
Select button 9
selecting photo to
print 13
settings, photo
brightness 19
clear 24
default 25
DPOF selections 21
number of prints 20
settings, print
blank paper size 22
blank paper type 22
clear settings 24
default settings 25
language 23
power save 24
preview 23
print quality 23
Setup troubleshooting 37
slide show 21
slow print speed 39
SmartMedia, memory
card 11
Start button 9
Stop/Clear button 8
supplies, ordering 30
T
test page 35
traveling with your
printer 26
troubleshooting
alignment page will not
print 37
error message
Alignment error 45
Card format 46
Card problem 46
Carrier jam 45
Cartridge
missing 45
Cover open 45
Ink low 45
No images 46
Paper jam 45
Paper out 45
PictBridge port 46
Size warning 46
language,
incorrect 37
memory card 44
not printing 39
not responding 39
paper jam 43
paper misfeeds 43
paper sticks
together 43
photo edge quality 39 PictBridge 44 poor photo quality 38 power light not lit 37 print quality problems 38 print speed 39 slow printing 39 test page will not print 37
U
Understanding your printer 7 unpacking the printer, travel 28 up arrow button 9 USB cable 15 USB, PictBridge port 15
W
Web site, Lexmark 47 wiping print cartridge contacts 41 nozzles 41
X
xD Picture Card, memory card 11
LEXMARK™
310 Series
Benutzerhandbuch
Ausgabe: Juni 2004
© 2004 Lexmark International, Inc.
This software and any accompanying documentation provided under this agreement are commercial computer software and documentation developed exclusively at private expense.
natural_image
Illustration of a toaster with control panel and labeled component (no text or symbols beyond label)natural_image
Two grayscale images of a printer with a paper feed, showing front and side views (no text or symbols visible)Microdrive
SmartMedia

natural_image
Close-up of a mechanical component with a starburst pattern and internal structure (no text or symbols)natural_image
Close-up of a mechanical component with a starburst pattern, showing internal structure and no visible text or symbols.natural_image
Close-up of a computer ventilation grille and cable connector (no text or symbols visible)natural_image
Illustration of a modern kitchen toaster with control panel and ventilation slots (no text or symbols)natural_image
Illustration of a portable kitchen appliance with a digital display and control panel (no text or symbols visible)natural_image
Illustration of a portable kitchen appliance with a downward arrow indicating compression or cooling (no text or symbols present)natural_image
Illustration of a portable printer with a paper feed and control panel (no text or symbols visible)natural_image
Illustration of a portable electronic device with internal components and a paper airplane (no text or symbols visible)natural_image
Mechanical device with a dashed arc indicating motion or force (no text or symbols visible)natural_image
Illustration of a battery being inserted into a device (no text or symbols visible)natural_image
Diagram showing a battery being inserted into a mechanical device (no text or symbols present)natural_image
Illustration of a tree stump with arrows indicating fire damage (no text or symbols)natural_image
Illustration of a portable printer with internal components and a downward arrow indicating compression or disassembly (no text or symbols present)natural_image
Abstract geometric pattern with horizontal and vertical gray bars on white background (no text or symbols)natural_image
Abstract pattern of horizontal gray and white stripes with no text or symbolsnatural_image
Illustration of a battery on a surface with a downward arrow, no text or symbols presentnatural_image
Illustration of a device with a black box and arrow indicating direction (no text or symbols)Director of Lexmark Technology & Services
Lexmark International, Inc.
740 West New Circle Road
Lexington, KY 40550, USA
(859) 232-3000
Industry Canada compliance statement
This Class B digital apparatus meets all requirements of the Canadian Interference-Causing Equipment Regulations.
Japanese VCCI notice
If this symbol appears on your product, the accompanying statement is applicable.

United Kingdom Telecommunications Act 1984
This apparatus is approved under the approval number NS/G/1234/J/100003 for the indirect connections to the public telecommunications systems in the United Kingdom.
© 2004 Lexmark International, Inc.
This software and any accompanying documentation provided under this agreement are commercial computer software and documentation developed exclusively at private expense.
natural_image
Illustration of a toaster with a labeled component (1), showing front and side views without any text or symbols on the device itself.natural_image
Two grayscale images of a printer with a paper feed, showing front and side views (no text or symbols visible)Microdrive
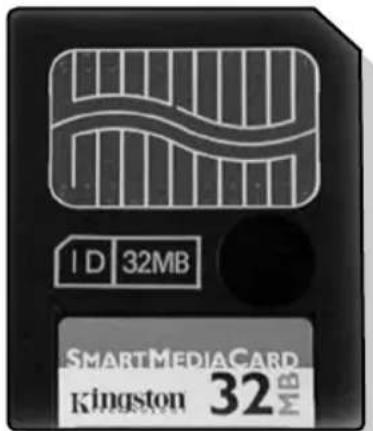
SmartMedia

natural_image
Close-up of a mechanical component with a starburst pattern and internal structure (no text or symbols visible)natural_image
Cross-sectional diagram of a mechanical component with internal structure and a starburst pattern (no text or symbols)natural_image
Close-up of a computer ventilation grille and cable connector (no text or symbols visible)natural_image
Illustration of a microwave oven with control panel and ventilation slots (no text or symbols)natural_image
Illustration of a portable kitchen appliance with a digital display and control panel (no text or symbols visible)natural_image
Illustration of a portable kitchen appliance with a downward arrow indicating compression or cooling (no text or symbols present)natural_image
Illustration of a portable printer with a paper feed and control panel (no text or symbols visible)natural_image
Illustration of a portable printer with internal components and a paper airplane, showing no text or symbols.natural_image
Diagram of a mechanical device with a dashed arc indicating motion or force, no visible text or symbolsnatural_image
Illustration of a battery being inserted into a device (no text or symbols visible)natural_image
Illustration of a mechanical device with a box and arrow indicating process (no text or symbols)natural_image
Illustration of a mechanical component with arrows indicating motion or force, no text or symbols presentnatural_image
Illustration of a portable printer with internal components and a downward arrow indicating compression or disassembly (no text or symbols present)natural_image
Abstract geometric pattern with horizontal and vertical gray bars on white background (no text or symbols)natural_image
Abstract pattern of horizontal gray and white stripes with no text or symbolsnatural_image
Illustration of a battery on a surface with a downward arrow, no text or symbols presentnatural_image
Illustration of a device with a label and arrow indicating direction (no text or symbols present)Director of Lexmark Technology & Services
Lexmark International, Inc.
740 West New Circle Road
Lexington, KY 40550
(859) 232-3000
Industry Canada compliance statement
This Class B digital apparatus meets all requirements of the Canadian Interference-Causing Equipment Regulations.
Japanese VCCI notice
If this symbol appears on your product, the accompanying statement is applicable.

Korean MIC statement
If this symbol appears on your product, the accompanying statement is applicable.

This equipment has undergone EMC registration as a household product. It can be used in any area, including a residential area.
The United Kingdom Telecommunications Act 1984
This apparatus is approved under the approval number NS/G/1234/J/100003 for the indirect connections to the public telecommunications systems in the United Kingdom.
site Web, Lexmark 47
Stop/Effacer, touche 8
support papier 7
© 2004 Lexmark International, Inc.
This software and any accompanying documentation provided under this agreement are commercial computer software and documentation developed exclusively at private expense.
natural_image
Illustration of a toaster with control panel and labeled component (no text or symbols beyond label)natural_image
Two grayscale images of a printer with a paper feed, showing front and side views (no text or symbols visible)Microdrive
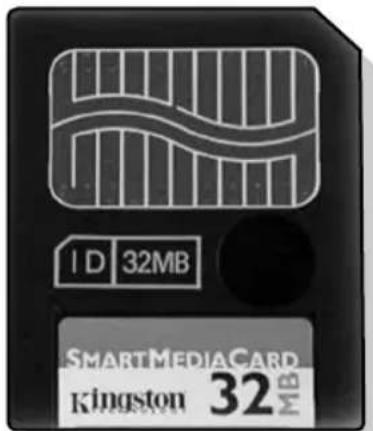
SmartMedia
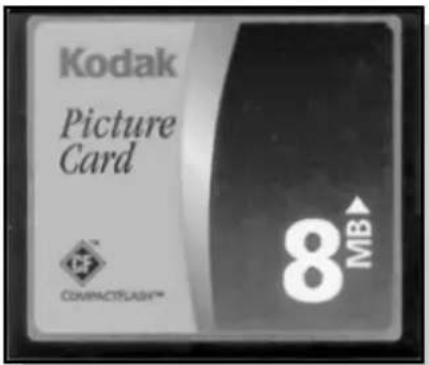
CompactFlash Type I e Type II

natural_image
Close-up of a mechanical component with a starburst pattern, showing internal structure and ridges (no text or symbols)natural_image
Close-up of a mechanical component with a starburst pattern, showing internal structure and no visible text or symbols.natural_image
Close-up of a computer ventilation grille and cable connector (no text or symbols visible)natural_image
Illustration of a modern toaster oven with control panel and ventilation slots (no text or symbols)natural_image
Illustration of a portable kitchen appliance with a digital display and control panel (no text or symbols visible)natural_image
Illustration of a portable kitchen appliance with a downward arrow indicating compression or cooling (no text or symbols)natural_image
Exterior view of a silver printer with control panel and paper feed (no visible text or symbols)natural_image
Illustration of a portable printer with internal components and a paper airplane, showing no text or symbols.natural_image
Illustration of a mechanical device with a dashed arc indicating motion or force (no text or symbols)natural_image
Diagram showing a battery being inserted into a device, with no visible text or symbols.natural_image
Illustration of a mechanical device with a box and arrow indicating process (no text or symbols)natural_image
Illustration of a firecracker with smoke and flame (no text or symbols)natural_image
Illustration of a portable printer with internal components and a downward arrow indicating compression or disassembly (no text or symbols present)natural_image
Abstract geometric pattern with horizontal and vertical gray bars on white background (no text or symbols)natural_image
Abstract pattern of horizontal gray and white stripes with no text or symbolsnatural_image
Illustration of a battery on a document with a downward arrow, no text or symbols presentnatural_image
Illustration of a device with a black box and arrow pointing to a port (no text or symbols)Director of Lexmark Technology & Services
Lexmark International, Inc.
740 West New Circle Road
Lexington, KY 40550
(859) 232-3000
Industry Canada Compliance Statement
This Class B digital apparatus meets all requirements of the Canadian Interference-Causing Equipment Regulations.
The United Kingdom Telecommunications Act 1984
This apparatus is approved under the approval number NS/G/1234/J/100003 for the indirect connections to the public telecommunications systems in the United Kingdom.
© 2004 Lexmark International, Inc.
This software and any accompanying documentation provided under this agreement are commercial computer software and documentation developed exclusively at private expense.
natural_image
Illustration of a toaster with control panel and labeled component (no text or symbols beyond label)natural_image
Two grayscale images of a printer with a paper feed, showing front and side views (no text or symbols visible)Microdrive
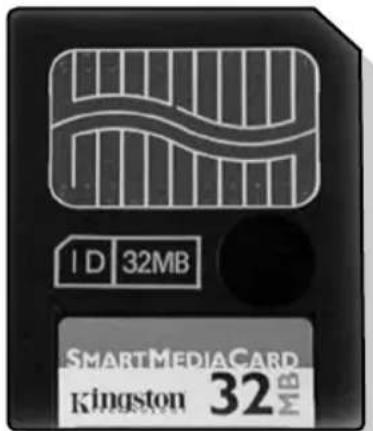
SmartMedia

CompactFlash I y II

Memory Stick
Memory Stick PRO
natural_image
Close-up of a mechanical component with a starburst pattern on the side (no text or symbols visible)natural_image
Close-up of a mechanical component with a starburst pattern, showing internal structure and no visible text or symbols.natural_image
Close-up of a computer ventilation grille and cable connector (no text or symbols visible)natural_image
Exterior view of a modern kitchen toaster with control panel and ventilation slots (no text or symbols visible)6 Levante el asa.

natural_image
Illustration of a portable kitchen appliance with a handle and control panel (no text or symbols visible)natural_image
Illustration of a microwave oven with a black arrow pointing to the top panel (no text or symbols visible)natural_image
Illustration of a portable printer with a paper feed and control panel (no text or symbols visible)natural_image
Illustration of a portable printer with internal components and a paper airplane, showing no text or symbols.natural_image
Diagram of a mechanical device with a dashed arc indicating motion or force, no visible text or symbolsnatural_image
Illustration of a battery being inserted into a device, showing internal components and an arrow indicating flow (no text or symbols present)natural_image
Illustration of a mechanical device with a box and arrow indicating process (no text or symbols)natural_image
Illustration of a firecracker with smoke and flame (no text or symbols)natural_image
Illustration of a portable printer with a paper airplane being inserted, showing internal components and airflow direction (no text or symbols)natural_image
Abstract geometric pattern with horizontal and vertical gray bars, no text or symbols presentnatural_image
Abstract pattern of horizontal gray and white stripes with no text or symbolsnatural_image
Illustration of a battery on a document with a downward arrow, no text or symbols presentnatural_image
Illustration of a device with a black arrow pointing to a component (no text or symbols visible)Director of Lexmark Technology & Services
Lexmark International, Inc.
740 West New Circle Road
Lexington, KY 40550
(859) 232 30 00
Industry Canada compliance statement
This Class B digital apparatus meets all requirements of the Canadian Interference-Causing Equipment Regulations.
The United Kingdom Telecommunications Act 1984
This apparatus is approved under the approval number NS/G/1234/J/100003 for the indirect connections to the public telecommunications systems in the United Kingdom.
© 2004 Lexmark International, Inc.
This software and any accompanying documentation provided under this agreement are commercial computer software and documentation developed exclusively at private expense.
Supplies bestellen ....30
Inktcartridge vervangen ....31
natural_image
Illustration of a toaster with a labeled component (1), showing front and side views without any text or symbols on the device itself.natural_image
Two identical grayscale images of a printer with a paper feed, showing front and side views (no text or symbols visible)Microdrive

SmartMedia

CompactFlash Type I en Type II

Memory Stick
Memory Stick PRO
Memory Stick Duo (met adapter)
Memory Stick PRO Duo (met adapter)

Secure Digital (SD)

MultiMedia-kaart

xD Picture Card (maximaal 512 MB)
natural_image
Close-up of a mechanical component with a starburst pattern, showing internal structure and ridges (no text or symbols)natural_image
Close-up of a mechanical component with a starburst pattern and internal structure (no text or symbols)natural_image
Close-up of a computer ventilation grille and cable connector (no text or symbols visible)De standaardfabrieksinstelling is Glossy.
De standaardfabrieksinstelling is Nederlands.
natural_image
Illustration of a portable kitchen appliance with control panel and ventilation slots (no text or symbols)natural_image
Illustration of a portable kitchen appliance with a digital display and control panel (no text or symbols visible)natural_image
Illustration of a microwave oven with a black arrow pointing to the top panel (no text or symbols visible)natural_image
Illustration of a portable printer with a paper feed and control panel (no text or symbols visible)natural_image
Illustration of a portable electronic device with internal components and a paper airplane (no text or symbols visible)natural_image
Mechanical device with a dashed arc indicating motion or force (no text or symbols visible)natural_image
Diagram showing a battery being inserted into a device, with an arrow indicating the process (no text or symbols present)Inktcartridge installeren
natural_image
Diagram of a battery being inserted into a device (no text or symbols visible)natural_image
Illustration of a mechanical component with arrows indicating motion or force, no text or symbols presentnatural_image
Illustration of a portable printer with internal components and a downward arrow indicating compression or disassembly (no text or symbols present)natural_image
Abstract geometric pattern with horizontal and vertical gray bars, no text or symbols presentnatural_image
Abstract pattern of horizontal gray and white stripes with no text or symbolsnatural_image
Illustration of a battery on a surface with a downward arrow, no text or symbols presentnatural_image
Illustration of a device with a black box and arrow indicating direction (no text or symbols)Director of Lexmark Technology & Services
Lexmark International, Inc.
740 West New Circle Road
Lexington, KY 40550
(859) 232-3000
Industry Canada compliance statement
This Class B digital apparatus meets all requirements of the Canadian Interference-Causing Equipment Regulations.
The United Kingdom Telecommunications Act 1984
This apparatus is approved under the approval number NS/G/1234/J/100003 for the indirect connections to the public telecommunications systems in the United Kingdom.
Geluidsemissie
PictBridge-camera's 15
display van het
bedieningspaneel 7
- © 2004 Lexmark International, Inc.
- All rights reserved.
- UNITED STATES GOVERNMENT RIGHTS
- Safety information
- Conventions
- Contents
- Understanding your printer ....7
- Loading paper 10
- Inserting memory cards ....11
- Printing from a memory card ....13
- Printing from a digital camera 15
- Customizing your photo prints ....16
- Customizing your printer settings 22
- Traveling with your printer 26
- Maintaining your print cartridge 30
- Troubleshooting ....36
- Finding more information 47
- Notices 48
- Index 51
- Understanding your printer
- # Part Purpose
- Control panel
- Supported photo paper types
- Loading the photo paper
- Inserting memory cards
- Supported memory cards
- Step 1: Load photo paper
- Step 2: Insert a memory card
- Step 3: View your photos
- Step 4: Select a photo to print
- Step 5: Customize the photo
- Step 6: To select another photo, repeat steps 4 and 5.
- Step 7: Print photo(s)
- Step 8: Remove the memory card
- Printing from a digital camera
- Customizing your photo prints
- Printing an index page
- Printing all photos
- Printing a photo in black and white
- Cropping a photo
- Adjusting the brightness
- Adjusting the number of prints
- Viewing slide show
- Printing DPOF selection
- Customizing your printer settings
- Changing the blank paper size
- Changing the blank paper type
- Changing the print quality
- Adjusting preview before print
- Changing the control panel display language
- Changing the power save
- Clearing photo settings
- Restoring factory defaults
- Traveling with your printer
- Before you travel
- Packing the printer
- Unpacking the printer
- Checking the ink level status
- Refilling the print cartridge
- Ordering supplies
- Replacing the print cartridge
- Removing a used print cartridge
- Installing a print cartridge
- Aligning the print cartridge
- Cleaning the print cartridge nozzles
- Printing a test page
- Troubleshooting
- Setup troubleshooting
- Print troubleshooting
- Improving print quality
- Basic solutions
- Advanced solutions
- Reinserting the print cartridge
- Wiping the print cartridge nozzles and contacts
- Jams and misfeeds troubleshooting
- Memory card and PictBridge troubleshooting
- Error messages troubleshooting
- Finding more information
- Electronic emission notices
- Federal Communications Commission (FCC) compliance information statement
- Industry Canada compliance statement
- European Community (EC) directives conformity
- Japanese VCCI notice
- Korean MIC statement
- The United Kingdom Telecommunications Act 1984
- Noise emission levels
- ENERGY STAR
- Printer energy consumption
- Power Saver
- Off modes
- Total energy usage
- Mercury statement
- Copyright advisory
- Limited Warranty Information
- A
- B
- C
- D
- E
- F
- H
- |
- J
- L
- M
- N
- 0
- P
- Q
- R
- S
- T
- U
- W
- X
- LEXMARK™
- Series
- Ausgabe: Juni 2004
- United Kingdom Telecommunications Act 1984
- Inktcartridge installeren
- Geluidsemissie
Brand : Magic Chef
Model : 310
Category : Bread maker