
10002978 - Telephone TRISTAR - Free user manual and instructions
Find the device manual for free 10002978 TRISTAR in PDF.


| Brand | TriStar |
| Model | 10002978 |
| Product type | Wired landline phone |
| Dimensions (L x W x H) | 200 x 150 x 80 mm |
| Weight | 500 g |
| Power supply | Mains, 230 V adapter |
| Color | Black |
| Display | Backlit LCD |
| Phonebook | Up to 50 contacts |
| Main functions | Call, dialing, speakerphone, hold, redial |
| Care and cleaning | Clean with a soft, dry cloth. Do not use abrasive products. |
| Safety | Do not expose to moisture. Unplug during storms. |
| Spare parts and repairability | Contact TriStar after-sales service. No spare parts available for self-service. |
| General information | Indoor use only. Conforms to CE standards. |
Frequently Asked Questions - 10002978 TRISTAR
User questions about 10002978 TRISTAR
0 question about this device. Answer the ones you know or ask your own.
Ask a new question about this device
Download the instructions for your Telephone in PDF format for free! Find your manual 10002978 - TRISTAR and take your electronic device back in hand. On this page are published all the documents necessary for the use of your device. 10002978 by TRISTAR.
USER MANUAL 10002978 TRISTAR
natural_image
Black and silver electronic device with a screen and keypad, resting on a black base (no visible text or symbols)USER GUIDE / HANDLEIDING / MANUEL D'UTILISATEUR BEDIENUNGSANLEITUNG / MANUAL DE USUARIO
v1.3 - 07/08
CE
Important
To use 'Caller ID' (display caller), this service has to be activated on your phone line. Normally you need a separate subscription from your telephone company to activate this function. If you don't have the Caller ID function on your phone line, the incoming telephone numbers will NOT be shown on the display of your telephone.
Belangrijk
This product is in compliance with the essential requirements and other relevant provisions of the R&TTE directive 1999/5/EC.
The Declaration of conformity can be found on
http://www.topcom.net/support/cedeclarations.php


natural_image
Cross-sectional diagram of a spherical device with internal components and a numbered label (12), no readable text or symbols present.UK The features described in this manual are published with reservation to modifications.
The CE symbol indicates that the unit complies with the essential requirements of the R&TTE directive
NL De in deze handleiding beschreven mogelijkheden worden gepubliceerd onder voorbehoud van wijzigingen.
Het toestel voldoet aan de basiseisen van de R&TTE-richtlijn. Dit wordt bevestigd door de CE-markering.
F Les possibilités décrites dans ce manuel sont publiées sous réserve de modifications.
La conformité de l'appareil avec les exigences fondamentales de la directive européenne R&TTE relative aux terminaux, est confirmée par le label CE.
D Die in dieser Bedienungsanleitung umschriebenen Möglichkeiten, werden vorbehaltlich Änderungen publiziert.
Die Übereinstimmung des Gerätes mit den grundlegenden Anforderungen der R&TTE-Directive ist durch das CE-Kennzeichen bestätigt.
ES Las características descritas en este manual pueden ser objeto de futuras modificaciones.
El sello CE corrobora la conformidad del equipo con los requerimientos básicos de la directiva R&TTE.
2 Getting started 14
2.1 How to use this user guide 14
2.2 Installing the base 14
2.3 Installing the handset 15
2.4 Wall mounting 16
2.5
2.6
2.7 Display keys 18
2.8 Navigating the menu 18
2.9 Menu overview 19
3 Using the telephone
3.1 Switching the handset ON/OFF 19
3.2 Changing the menu language 19
3.3 Setting the date and time 20
3.4 Setting the time format 20
3.5 Making a normal telephone call 20
3.6 Receiving a telephone call 21
3.7 Handsfree mode 21
3.8 Adjust earpiece/handsfree volume 21
3.9 Secrecy function (Mute function) 22
3.10 Locating a handset (Paging function) 22
3.11 Keypad Lock 22
3.12 Using the alphanumerical keypad 22
4 Phonebook
4.1 To access and search in the phonebook 22
4.2 To add an entry 23
4.3 To dial an entry 23
4.4 Show Details 23
4.5 Delete an entry 23
4.6 Delete all entries 23
4.7 Edit Entry 24
4.8 Copy a phonebook entry or all entries to another handset 24
4.9 Memory status 25
4.10 Change the ringtone 25
5 Caller Identification 25
5.1 Call Waiting 25
6 Calls List 26
6.1 New calls Alert 26
6.2 To view new missed calls 26
6.3 View and dial from the Calls list 26
6.4 Copy a Calls list number into the phonebook 26
6.5 Send a text message to a Calls list number 26
6.6 Delete an entry 27
6.7 Delete all entries 27
7 Personalise the handset 27
7.1 Ringtone and volume 27
7.2 Handset name 28
7.3 Keypad beeps 28
7.4
7.5 Menu color 29
7.6 Setting the contrast 29
7.7 Setting the light timeout 29
7.8 Setting the screensaver 29
7.9
7.10 PABX Access code 30
7.11 Receiving Volume 30
7.12 Using the alarm feature 30
8 Base settings 31
8.1
8.2 Ringer Volume 31
8.3 Dial Mode 31
8.4 Recall (Flash) 31
8.5 System PIN 32
8.6 Ring Priority 32
8.7 First ring On/Off 32
9 Factory Reset
10 Agenda 33
11 SMS 34
11.1 How to write an SMS 34
11.2 Sending an SMS 34
11.3 Read and view the list of received messages (Inbox) 35
11.4 Reading and sending the saved message (Draft folder) 36
11.5 Using the outbox 36
11.6 Template messages 37
11.7 Delete messages 37
11.8 SMS Settings 37
11.9 User Areas 38
12 Additional handsets and base stations 40
12.1 Adding a new handset 40
12.2 Removing a handset 40
12.3 Select a base 41
12.4 Using the intercom feature 41
13 Troubleshooting 42
14 Technical dataTechnical characteristics 43
15 Topcom Warranty 43
15.1 Warranty period 43
15.2 Warranty handling 44
15.3 Warranty exclusions 44
16 Disposal of the device (environment) 44
17 Cleaning 44
Nederlands
11.7 Supprimer SMS (Delete messages) 106
11.8 Réglages SMS 106
The following safety advice must always be followed before using electrical equipment. Please read carefully through the following information concerning safety and proper use. Make yourself familiar with all the functions of the equipment. Be careful to keep these advice notes and if necessary pass them on to a third party.
Electrical safety and protection:
- Do not operate the equipment if the mains plug, cable or the equipment itself is damaged.
- If the equipment is dropped, then it must be checked by an electrician before further use.
- Dangerous voltages are present inside the equipment. Never open the housing or insert objects through the ventilation holes.
- Do not allow liquids to get into the equipment. In case of emergency, pull out the plug from the socket.
- Similarly, if a fault develops during use or before you start to clean the equipment, pull the plug out if the socket.
- Do not touch the charger and plug contacts with sharp or metal objects.
- Do not carry out any modifications or repairs to the equipment yourself. Have repairs done to the equipment or the mains cable only by a specialist service centre. Unsatisfactory repairs can lead to considerable danger for the user.
- Children frequently underestimate the dangers associated with electrical equipment. Therefore you must never leave children unsupervised in the vicinity of electrical equipment.
- The equipment is not to be used in a damp room (e.g. bathrooms) or rooms where there is a lot of dust.
- Equipment connected to the mains during a thunderstorm can be damaged by lightning. Therefore you should pull the plug out of the mains socket during a storm.
- To completely disconnect the equipment from the electricity supply, the plug must be removed from the socket. When doing this always pull on the plug itself and never on the cable.
- Protect the mains cable from hot surfaces or other sources of damage and do not allow it to become constrained.
- Check the mains cable regularly for any damage.
- Unwind the mains cable completely before use.
- Make sure that the mains cable does not represent a trip hazard.
- The operation of some medical devices may be affected.
- The handset may cause an unpleasant buzzing sound in hearing aids.
Fire safety:
- The heat accumulated inside the equipment can lead to the defect and/or to the fire of the equipment. Do not expose this equipment therefore to extreme temperature like:
-
direct sun exposure and heater warmth
-
ventilation holes may not be covered
-
direct sun exposure and heater warmth
- ventilation holes may not be covered
Danger of explosion:
- Never throw batteries in fire.
Poisoning danger:
- Keep batteries away from small children.
Note:
- Only use the charger plug supplied. Do not use other chargers, as this may damage the batteries cells.
- The wall outlet for the power supply must be close and accessible.
- Only use rechargeable batteries of the same type. Place the batteries with correct polarity inside the battery compartment (polarity is marked inside the handset). Never use normal unrechargeable batteries!

As this telephone cannot be used in case of a power cut, you should use a mains-independent telephone for emergency calls, e.g. a mobile phone.
2 Getting started
2.1 How to use this user guide
In this user guide, following method is used to clarify the instructions:

Key to press. This key can be a soft key. When the soft key is a symbol, it is shown in the left column. When the soft key is text, the left or right soft key is shown in the left column and the text is shown in the right column between quotation marks.
2.2 Installing the base
For installation, do the following:
1 Plug one end of the adaptor into the outlet and the other end into the adaptor jack on the bottom of the base.
2Connect one end of the telephone cord with the wall phone jack and the other end to the bottom of the base.
3 Put the telephone- and AC power line cord in the base guides as shown on picture 2A.

- 2A Back view of base -
A. Telephone wall outlet
B. Power cable
C. Telephone cord
2.3 Installing the handset
1Open the battery compartment as shown on picture 2B.
2Insert the batteries respecting the polarity (+ and -).
3Close the battery compartment.
4 Leave the handset on the base unit for 20 hours.

- 2B Back view of handset -
A. Cover
B. Rechargeable batteries

Before you use the telephone for the first time, you must first make sure the battery is charged for 20 hours. If you do not do this, the telephone will not work optimally.
2.4 Wall mounting
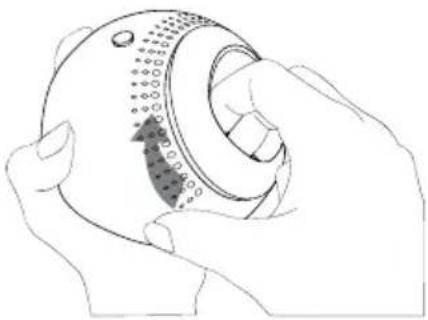
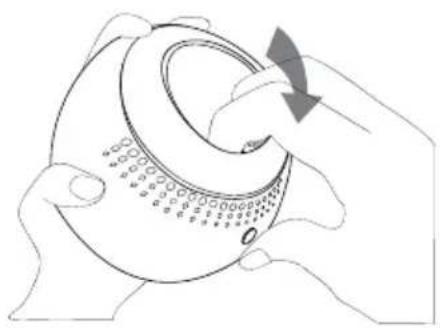
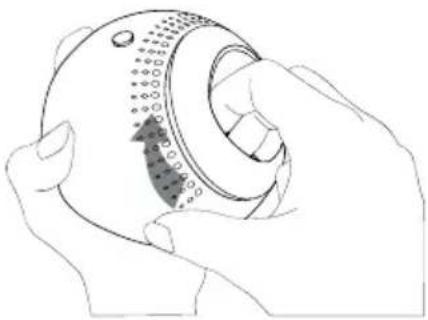
You can hang the base against the wall by turning the cradle inside the base as shown below:
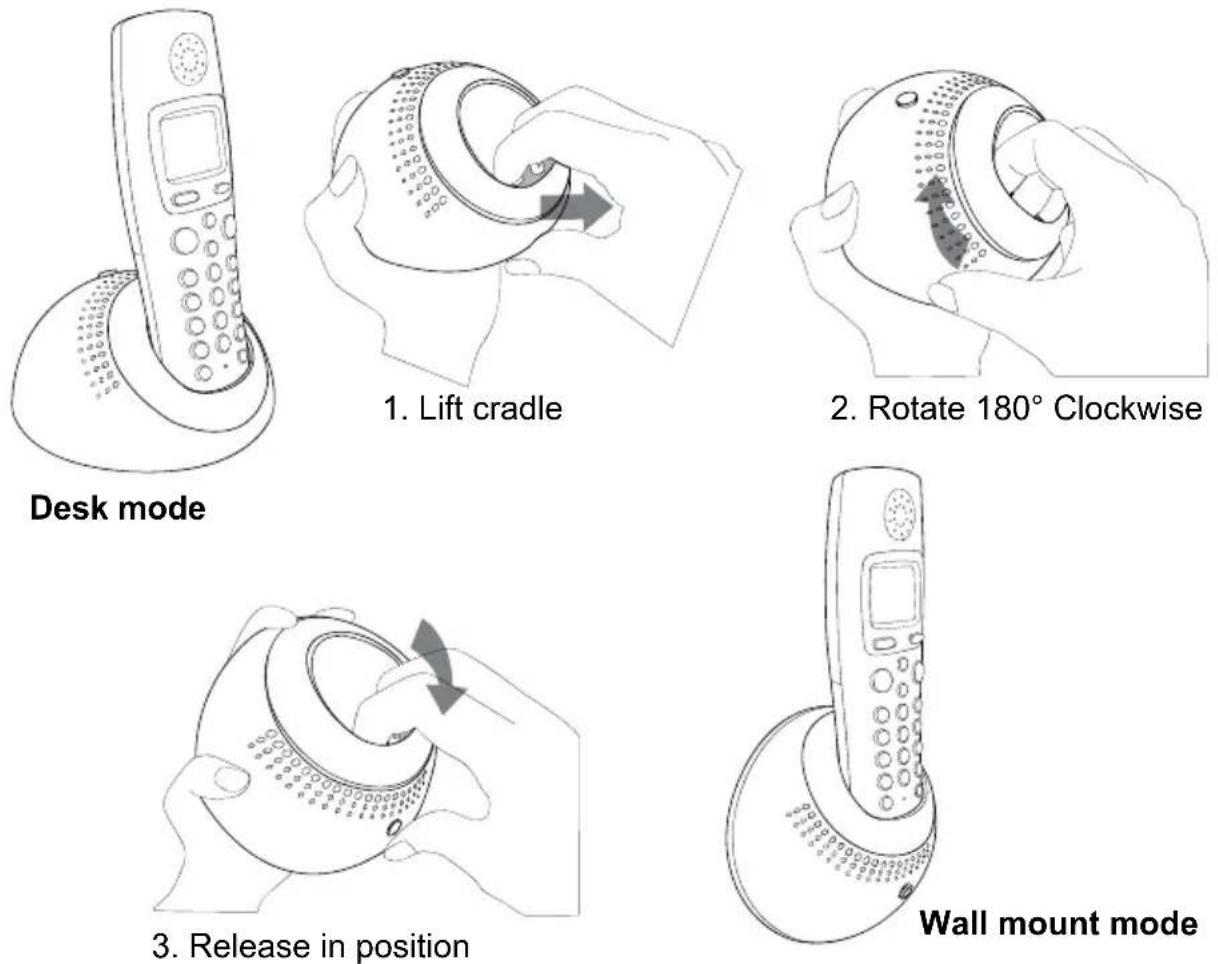
- 2C Wall mounting -
Use the template at the back side of the manual to drill the holes in the wall 5 cm apart horizontally.

- 2D Wall mounting -
2.5 Keys/Led
Handset
- Display
- Right soft menu key
- Up / Redial / Pause key
- On-hook / ON-OFF key
- Alphanumeric keys
- Keypad lock
- INT key
- Flash key
- Down / Phonebook key
- Off-hook / Handsfree key
- Left soft menu key

- 2E Handset -
Base
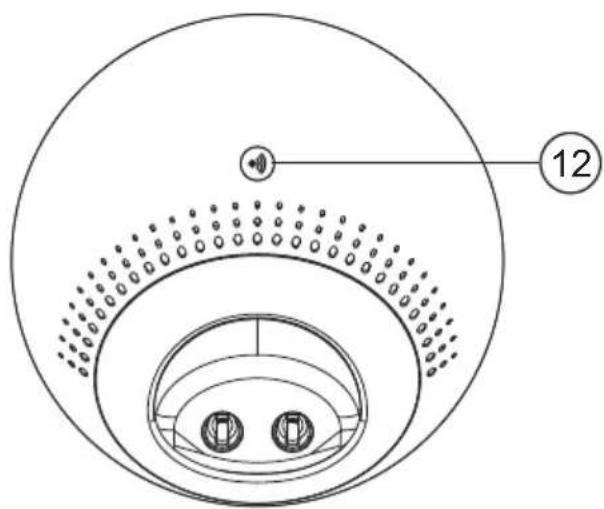
- Paging key

natural_image
Diagram of a circular mechanical or architectural component with concentric layers and two central circular features, labeled with number 12 (no text or symbols beyond label)- 2F Base -
2.6 Symbols

Keypad lock

Handset within base range (Flashes if you are out of range)

Alarm set Handsfree


Handset ringer volume is off Battery full


You have SMS messages Battery medium


You have missed calls Battery low


You have new voice mail Battery is almost discharged
2.7 Display keys
Display-keys (softkeys) are located directly under the display. The function of these 2 keys changes depending on the operation mode. The actual function is displayed as icon or text directly above the 2 display keys.
2.8 Navigating the menu
The Orbit has a menu system which is easy to use. Each menu leads to a list of options. The menu map is shown on the following paragraph.


1When the handset is switched on and in standby, press the left soft menu key (Key 11 - Picture 2E) "Menu" to open the main menu.
2Scroll to the desired menu option.
3 Press the soft menu key to view further options or to confirm the setting displayed.
To exit or to go back one level in the menu
Back

To go to the previous level in the menu, press the soft menu key "Back".
To cancel and return to standby at any time, press the on-hook key.
2.9 Menu overview
| Menu Submenu items | ||
 | Text Messaging | Write MessageInboxDraftsOutboxTemplatesDelete messagesText Settings |
 | Calls Lists | Missed CallsReceived CallsDialled CallsDelete Calls |
 | Agenda Add Event (when there are no Events) | |
 | Clock & Alarm | Date & TimeAlarmTime Format |
 | Settings | Set HandsetSet Base |
 | Registration | Register HandsetSelect BaseDe-register |
3 Using the telephone
3.1 Switching the handset ON/OFF


1 Press and hold the On-Off key to switch the handset off.
2 Press the On-Off key or place the handset in the base to switch the handset back on.
3.2 Changing the menu language


1Enter the menu.
2Select "Settings" and confirm.
3Select "Set Handset" and confirm.
4Select "Language" and confirm.
5Select a language and confirm.
The screen displays "Saved".
6Press the on-hook key to return to standby.
The or arrows indicate that further options are available in the menu.
3.3 Setting the date and time

- The date and time is kept inside the base and send to all handsets, so you only have to set the date/time ones when using more then one handset.
- The date/time can be set by the Caller ID (Clip) information, or manually as mentioned below.
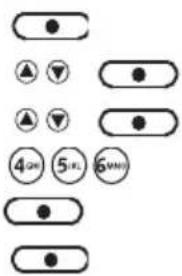
1Enter the menu.
2Select "Clock & Alarm" and confirm.
3Select "Date & Time" and confirm.
4Enter day, month, year, time and minutes and select "Save" to confirm.
5Press "Back" to go to the previous menu.
3.4 Setting the time format

The time format can be set differently for each handset.
flowchart
graph TD
    A["●"] --> B["△ ▼"]
    B --> C["▲ ▼"]
    C --> D["▲ ▼"]
    D --> E["●"]
    E --> F["●"]
    F --> G["●"]
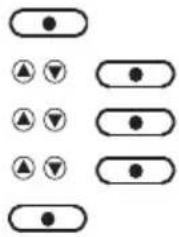
1Enter the menu.
2Select "Clock & Alarm" and confirm.
3Select "Time Format" and confirm.
4Select "12 Hour" or "24 Hour" and confirm.
5Press "Back" to go to the previous menu.
3.5 Making a normal telephone call
Direct dialling

1Press the off-hook key to start the call.
2Dial the telephone number.
3Press the on-hook key to hang up or put the handset back on the base.
Pre-dialling
With the pre-dialling feature, you can enter and modify a number before making the call.

1Dial a number of up to 32 digits.
Press and hold the Pause-key to insert a pause. The screen displays a "P".
2Press the soft menu key "Clear" to correct.
3Press the off-hook key to start the call or select "Options".
4If you selected "Options", scroll and select:
"Save": to store the number into the phonebook;
"Send Message": to send a message.
5Press the on-hook key to hang up or put the handset back on the base.
Redial a number from the dialled call list
You can redial up to 20 of the last numbers called. If you have stored a name in the phonebook to go with the number, the name will be displayed instead.


1Press the redial key.
2Select a number. If the number is in the phonebook, the name will be shown.
3Press the off-hook key to start the call or select "Options".
4If you selected "Options", scroll and select:
"Show Details": To show the details;
"Save Number": to store the number into the phonebook;
"Send Message": to send a message;
"Delete Call": to remove the number from the call list.
5Confirm selection.
6Press the on-hook key to return to standby.
3.6 Receiving a telephone call
When you receive an external call, the screen displays "External Call". To take the call:

1Press the off-hook key.
OR
Lift the handset off its base if you have activated "Auto Talk".
(See "7.9 Autotalk")
The call duration is displayed after 15 seconds.

2Press the on-hook key to hang up or put the handset back on the base.

You can turn the ring volume off during incoming call by selecting "Silence".
3.7 Handsfree mode
Handsfree lets you talk to your caller without holding the handset. It also enables other people in the room to listen to both sides of your conversation.

1 To switch any call to handsfree, press the handsfree key during the call.
3.8 Adjust earpiece/handsfree volume

1Press up or down to select volume 1-8 during a normal or handsfree call.

You cannot set the earpiece/handsfree volume independently.
3.9 Secrecy function (Mute function)
To turn off the microphone so the person on the other side of the line will not hear you.

1 During a conversation, press the soft menu key "Secrecy" to deactivate the microphone.
"Secrecy On" appears on the display.

2Select "Off" to activate the microphone again.
3.10 Locating a handset (Paging function)

1Press the paging key on the base.
All handsets registered with the base will ring for 30 seconds.

2Press "Stop" or any key on the handset to stop the paging.
3.11 Keypad Lock
To lock the keypad to prevent accidental dialling while carrying the handset around.

3Press and hold the keypad locked key (key 6 - Picture 2E) until "Keypad Locked" and the keypad locked icon appears on the display.

4To unlock, select "Unlock", followed by the keypad locked key #.
3.12 Using the alphanumerical keypad
With your telephone, you can also enter alphanumeric characters. This is useful for entering a name into the phonebook, giving a name to the handset, ...
To select a letter, press the corresponding key as many times as necessary.
For example, to select an 'A', press '2' once. To select a 'B', press '2' twice and so on. To select 'A' and then 'B' consecutively, press '2' once, wait until the cursor moves on to the next character, then press '2' twice.
When names are entered, the first character is upper case and then the case switches to lower. You can manually change the case as below mentioned.

Press '0' to select a space.

Press the #-key to switch between small letters, capitals or numeric input.

Press the soft menu key "Clear" to correct.
4 Phonebook
Each handset can store up to 250 names and numbers. Names can be up to 12 characters long and numbers up to 24 digits. You can also select different ring tones for each entry.
4.1 To access and search in the phonebook
There are two ways to access the name list of your phonebook:


1Press the right soft menu key "Names" and select "Search". OR


2Press the Down/Phonebook key.


3 Scroll to the name you want or enter the first characters of the name.

If the phonebook is empty "Phonebook Empty" will be shown shortly.
4.2 To add an entry

4.3 To dial an entry


1Press the Down/Phonebook key.
2Select the desired name or use the keypad to enter the first letter of the name.
3Press the off-hook key to start the call.
4Return to standby.
4.4 Show Details


1Press the Down/Phonebook key.
2Select the desired name or use the keypad to enter the first letter of the name.
3Select "Options".
4Select "Show Details".
The name, number and ring melody you have assigned to the entry appear on the display.
5Press "Dial" to dial out the number or "Back" to go back.
6Return to standby.

4.5 Delete an entry


1Press the Down/Phonebook key.
2Select the desired name or use the keypad to enter the first letter of the name.
3Select "Options".
4Select "Delete Entry" and confirm.
4.6 Delete all entries


1Press the right soft menu key "Names".
2Select "Delete Phonebook" and confirm.
4.7 Edit Entry
| 1Press the Down/Phonebook key. |
| 2Select the desired name or use the keypad to enter the first letter of the name. |
| 3Select "Options". |
| 4Select "Edit Entry" and confirm. |
| 5 Press the soft menu key "Clear" to delete and use the keypad to change the name. |
| 6Select "OK". |
| 7Edit the number and select "Save". |
| 8Select the desired ring melody and press "Select". |
| 9Return to standby. |
4.8 Copy a phonebook entry or all entries to another handset

- The copy process can be interrupted when there is an incoming call.
- When other handset is not available (out of range) or memory is full, the display will show "Copy unsuccessful".
- When only one handset is registered, "Not available" will be shown for 2 seconds.
Copy an entry to another handset
| 1Press the Down/Phonebook key. |
| 2Select the desired name or use the keypad to enter the first letter of the name. |
| 3Select "Options". |
| 4Select "Copy Entry". |
| 5Select "To Handset". |
| The available handsets (all the handsets that are registered on the base) are shown. |
| 6Select the desired handset and confirm. |
| "Please wait..." appears on the display. |
| "Copy phonebook?" appears on the display of the destination handset. |
| 7 On the destination handset, press the left menu key to confirm or the right menu key to cancel the transfer. |
| 8Return to standby. |
Copy all phonebook entries to another handset
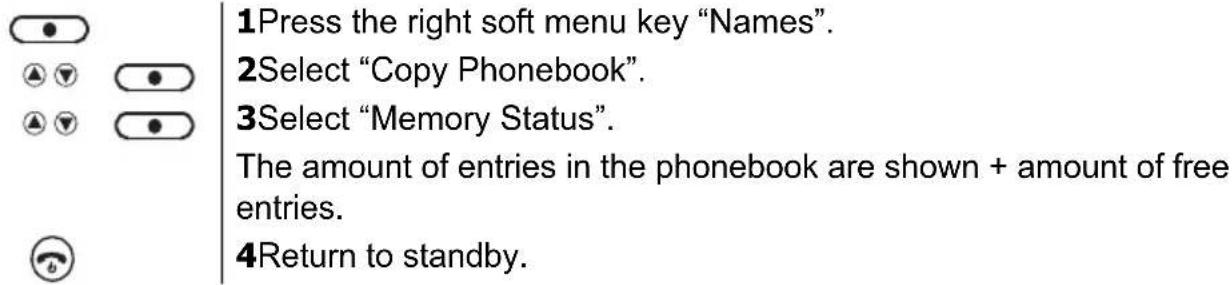
| 1Press the right soft menu key "Names". | |
| 2Select "Copy Phonebook". | |
| 3Select "To Handset". |

4.9 Memory status
4.10 Change the ringtone

5 Caller Identification

This service only works when you have a Caller ID/Clip subscription. Please contact your telephone company.
When you receive a call from your fixed telephone line, the telephone number of the caller appears on the handset display. You can also see his or her name if it is transmitted by the network. If the name is programmed in the phonebook, the name in the phonebook is displayed!
5.1 Call Waiting

This service only works when you have Caller ID / Call Waiting subscription.
During a call, you hear a beep (knocking tone) when a second call comes in (through the earpiece). The number (or name) will be shown on the display. If no number/name is available the phone will show "Call Waiting".
6 Calls List
Each handset can store 30 calls in the Call List (received and missed) that can be reviewed later.
Also the last 20 dialled calls are stored in the Call list. When the memory is full, the new calls automatically replace the oldest calls in the memory.
6.1 New calls Alert

0123456789
Missed calls are indicated by a text "You have xx new missed call(s)" or by an Icon on the idle screen.
New unanswered/Missed calls are shown in the list with a blue dot behind the telephone number or callers name.
6.2 To view new missed calls

1Press the left soft menu key "View". Only the Missed/unanswered calls are shown in the Missed calls list.
OR

2Press right soft menu key "Back" to view at a later stage.
6.3 View and dial from the Calls list

1Enter the menu.


2Select "Calls List".


3Select "Missed Calls, Received Calls or Dialled Calls".


4Scroll through the list and select "Options".


5Select "Show Details" to see the callers number, date and time.


6Select "Dial" to call the number.

7Select "Back" to return to previous menu.
6.4 Copy a Calls list number into the phonebook

1Enter the menu.

2Select "Calls List".

3Select "Missed Calls, Received Calls or Dialled Calls".

4Scroll through the list and select "Options".

5Select "Save Number".

6Enter the name and press "Save" to confirm.

7Select the ringtone and press "Select".

8Select "Back" to return to previous menu.
6.5 Send a text message to a Calls list number

1Enter the menu.

2Select "Calls List".

3Select "Missed Calls, Received Calls or Dialled Calls".
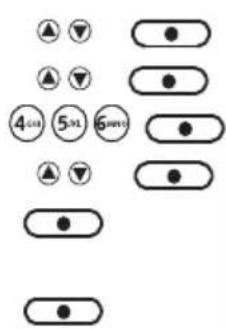
4Scroll through the list and select "Options".
5Select "Send Message".
6Enter the message and press "Options".
7 Select "Send" (you can save, insert a symbol, emoticon or template).
8The number is pre-entered on the screen, press "Send" to send the message.
9Select "Back" to return to previous menu.
6.6 Delete an entry

1Enter the menu.
2Select "Calls List".
3Select "Missed Calls, Received Calls or Dialled Calls".
4Scroll through the list and select "Options".
5Select "Delete Call".
6Select "Back" to return to previous menu.
6.7 Delete all entries

1Enter the menu.
2Select "Calls List".
3Select "Delete Calls".
4 Scroll through the list and select "Missed Calls", "Received Calls", "Dialled Calls" or "All Calls".
5Select "Yes" to confirm or "No" to cancel.
6Select "Back" to return to previous menu.
7 Personalise the handset
7.1 Ringtone and volume
Ringtone
You can choose from 10 different ringer melodies for internal and external calls.

1Enter the menu.
2Select "Settings".
3Select "Set Handset".
4Select "Ringtone".
5Select "External Call" for external calls or select "Internal Calls" for internal calls and confirm.
6Select the desired melody and confirm.
During scrolling the melody is played.
7 Return to standby.
Ringer volume
You can choose from 5 handset ringer volume levels and off.

flowchart
graph TD
    A["●"] --> B["▲"]
    A --> C["▼"]
    D["▲"] --> E["▲"]
    D --> F["▼"]
    G["▲"] --> H["▲"]
    G --> I["▼"]
    J["●"] --> K["●"]
    J --> L["●"]
    M["●"] --> N["●"]
    M --> O["●"]
    P["▲"] --> Q["▼"]
    R["●"] --> S["○"]
1Enter the menu.
2Select "Settings".
3Select "Set Handset".
4Select "Ringer volume".
The current setting is displayed.
5Press the up key to increase the volume.
6Press the down key to decrease the volume.
7Select "Save" to confirm.
8Return to standby.

When you change the ringing volume to "Off", the idle screen will show the ringer Off icon.
7.2 Handset name
You can change the name displayed on the handset during standby (max. 10 characters).
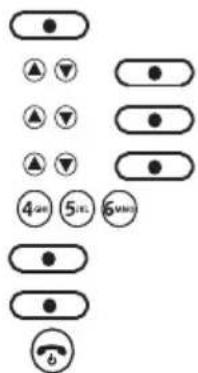
1Enter the menu.
2Select "Settings".
3Select "Set Handset".
4Select "Handset name".
5Enter the name you want.
6Press the soft menu key "Clear" to correct.
7Select "Save" to confirm.
8Return to standby.
7.3 Keypad beeps

1Enter the menu.
2Select "Settings".
3Select "Set Handset".
4Select "Key Beep".
5Select "On" or "Off".
6Return to standby.
7.4 Wallpaper
You can choose from 3 different wallpaper pictures which appear in the background during standby.

1Enter the menu.
2Select "Settings".
3Select "Set Handset".
4Select "Wallpaper".
5Select the picture you want and confirm.
During scrolling press "View" to show the picture.
6Return to standby.
7.5 Menu color
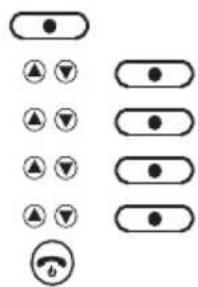
1Enter the menu.
2Select "Settings".
3Select "Set Handset".
4Select "Menu colour".
5Select "Blue", "Orange" or "Pink" and confirm.
6Return to standby.
7.6 Setting the contrast

1Enter the menu.
2Select "Settings".
3Select "Set Handset".
4Select "Display Contrast".
5Select the contrast you want (low, Mid or high).
6Return to standby.
7.7 Setting the light timeout

1Enter the menu.
2Select "Settings".
3Select "Set Handset".
4Select "Light Timeout".
5Select the timeout you want (15,30 or 45 seconds).
6Return to standby.
7.8 Setting the screensaver

1Enter the menu.
2Select "Settings".
3Select "Set Handset".
4Select "Screensaver".
5Select "Clock" or "No" screensaver and confirm.
6Return to standby.
7.9 Autotalk
When there is an incoming call and the handset is on the base, the phone automatically takes the line when lifted from the base. This function can be turned on or off.

1Enter the menu.
2Select "Settings".
3Select "Set Handset".
4Select "Autotalk".
5Select "On" or "Off".
6Return to standby.
7.10 PABX Access code
It is possible to use your telephone with a prefix number. When dialling from the call list or phonebook, this prefix will be dialled automatically before the number.
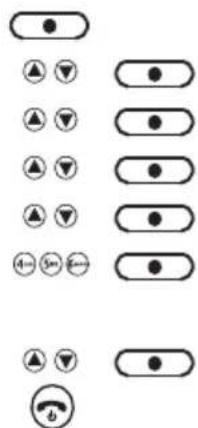
1Enter the menu.
2Select "Settings".
3Select "Set Handset".
4Select "PABX Access Code".
5Select "Set code".
6Enter the prefix code, e.g. '0' (1 digit only) and select "Save".
OR
7Select "On" or "Off".
8Return to standby.

When dialling manually a number, this prefix will not be dialled but has to be entered manually.
7.11 Receiving Volume
This sets the standard volume level for the handset earpiece.

1Enter the menu.
2Select "Settings".
3Select "Set Handset".
4Select "Receiving volume".
5Select the desired volume (1-8) and confirm.
6Return to standby.
7.12 Using the alarm feature
You can have different alarm setting for each handset registered to your base. The alarm rings only at the handset, not at the base or any other handset. When an alarm is set, the
icon will appear on the top of the display.
Set the alarm
1Enter the menu.
2Select "Clock & Alarm".
3Select "Alarm".
4Select "On".
5Select "Once", "On daily", or "Mon to Fri" and confirm.
If you have selected "Once", "On daily" or "Mon to Fri", the display will show:
Enter Time:
00:00

6To deactivate the alarm, select "Off" and confirm.
7Press "Back" to go to the previous menu.

If the alarm is set on daily or Mon-Fri the icon will remain on the screen.
8 Base settings
8.1 Ringtone
You can choose from 5 different ringer melodies.

8.2 Ringer Volume
You can choose from 5 handset ringer volume levels.

8.3 Dial Mode
There are 2 types of dialling mode:
• DTMF/Tone dialling (most common used)
- Pulse dialling (for older installations)
To change the dialling mode:

8.4 Recall (Flash)
Press the Flash key "R" (Key 8 - Picture 2E) to use certain services on your external line such as "call waiting" (if your phone company offers this feature); or to transfer calls if you use a telephone exchange (PABX). The Flash key "R" is a brief interruption of the line.
You can set the flash time to 100ms or 250ms.

3Select "Set Base".
4Select "Recall Mode".
5Select "Recall 1" for short flash time (100ms) or "Recall 2" for long flash time (250ms).
6Return to standby.
8.5 System PIN
The System PIN is used for registering and deregistering handsets and some other optional settings. The default System PIN is 0000.

1Enter the menu.
2Select "Settings".
3Select "Set Base".
4Select "System PIN".
5Enter the old PIN (0000 by default) and select "OK".
6Enter the new PIN, select "OK" and repeat this.
7Return to standby.
8.6 Ring Priority
If you have more then one handset registered, you can choose which handset should ring first before the others starts to ring. You can also set the amount of rings (2,4 or 6) after the others start to ring.

1Enter the menu.
2Select "Settings".
3Select "Set Base".
4Select "Ring Priority".
5Select "All Handset" or "Select Handset". If "Select Handset" is selected:
6Select the handset that should ring first.
7 Set the ring delay to 2, 4 or 6 rings and confirm.
8Return to standby.
8.7 First ring On/Off
If you have Caller ID service, your phone will not ring until the caller information has been received. You can make your handsets to ring without waiting for the caller information by turning the first ring On:

1Enter the menu.
2Select "Settings".
3Select "Set Base".
4Select "First Ring".
5Select "On" or "Off" and confirm.
6Return to standby.

When turning On the first ring you will hear the default ring tone first. This will change to the selected ring tone ones the caller information is displayed.
9 Factory Reset
You can restore your phone back to default (original) settings. This doesn't effect the phonebook, call list, user data or registrations of handsets.

1Enter the menu.
2Select "Settings".
3Select "Set Base".
4Select "Master Reset".
5Select "Yes" to confirm or "No" to cancel.
6Return to standby.
10 Agenda
You can set 5 event (appointments or reminders) which you can give a name and an alarm by date and time. The event can be shown as a text message with our without alarm. The events are stored inside the handset so each handset can have it's own events. When a reminder is On, the event name is show together with the alarm 🔔 icon for 1 minute.

1Enter the menu.
2Select "Agenda" and confirm.
3Select one of the 5 appointments and select "Option".
To add an appointment:
4Select "Add Entry".
5Enter a name for the event (max. 24 characters) and confirm.
6Enter the date and time and confirm.
7Select "Silent" if you only want a visual indication or "Alarm" if you want to have visual and audible warning.
8If you have set "Alarm" the phone will ask you to have it "Ones" or "Annually (for birthdays).
9 If you have set it "Ones" you can choose to have it "At event time" or "30 min before".
To edit the appointment:
10Select "Edit Event" and confirm.
11 Edit the name of the event and select "Save".
12 Enter the date and time of the event and select "Save".
13Select "Silent" or "Alarm" and confirm.
To delete the appointment:
14Select "Delete Event" and confirm.
15Press "Yes" to confirm or "No" to go back.
16Return to standby.
To delete all events:
17Select "Delete All Event" and confirm.


The caller's details are always stored (answered or not) in the Calls list. When the list is full and a new call is received, the oldest will be removed.
11 SMS

This service only works when you have Caller ID/SMS subscription!
You can send and receive SMS with your telephone. This section tells you how to use the SMS feature. The phone keeps the messages which are received in the Inbox. You can store a total of 50 SMS messages across all handsets Outboxes, Draft and inbox. Messages which are ready to be send out to the SMS-server are stored in the Outbox. Messages which are saved are stored in the Draft box.

Before sending and receiving SMS text messages you need to set the telephone number of your Network's SMS Centre for outgoing and incoming messages (see "SMS Service center numbers")
11.1 How to write an SMS
The method is the same as entering a name in the phonebook ("4 Phonebook"). To enter a space press '0' and to change from capital to small character or numeric input, press '#'. The remaining amount of characters per message is shown on the upper right corner of the screen.
11.2 Sending an SMS


To add an emoticon:
7Select "Insert Emoticon".
8 Choose one of the emoticons and select "Insert".
To add one of the template text:
9Select "Use Template".
10 Choose one of the template text and select "Insert".
To add a symbol:
11Select "Insert Symbol".
12 Choose one of the symbols and select "Insert".
To Send the message:
13Select "Send".
14Enter the telephone number and select "Send".

Instead of entering a number with the numerical keypad, you can select a number out of the phonebook by pressing the left soft key "Search".
11.3 Read and view the list of received messages (Inbox)
Your telephone display indicates if there are new messages received. The icon be shown along with "You have X new messages".

When there are new message:





1Press left soft key "Read".
The Inbox list appears on the display. This is a combination of new and read messages. Messages which are new are indicated with a blue dot 🔒 icon.
2 Scroll through the list and select "Read" to read the message.
3Select "Option".
To delete this message:
4Select "Delete" and confirm with "Yes". To cancel press "No".
To Reply this message:
5Select "Reply".
6 Write your message and select "Options". Same as writing a new message you have to possibility to send, Save and to use a template etc ...
7Select "Send".
To forward this message to another number:
8Select "Forward".
9 Edit the message if needed and select "Option". Same as writing a new message you have to possibility to send, Save and to use a template etc.
10Select "Send".
To dial this number:
11Select "Use Number" and confirm. The number will be dialled automatically.

Read the inbox by the menu:

1Enter the menu.
2Select "Text Messaging".
3Select "Inbox".
11.4 Reading and sending the saved message (Draft folder)
If you save a message to complete or send later it will be stored in the Draft box. You can write a message and send it later by saving it into the Draft box. Only one message can be stored in each user's draft box.
Edit or Send texts in the draft folder:

1Enter the menu.
2Select "Text Messaging".
3Select "Drafts".
4Select "Edit" to edit your message content.
5Select "Options".
You have now the same options as reading the inbox.
11.5 Using the outbox
The outbox contains all messages which are ready to send or failed to be send. The outbox can store up to 5 messages. In case more then 5 messages are send, the oldest message successfully send will be removed.
Read the Outbox:

1Enter the menu.
2Select "SMS Message".
3Select "Outbox".
4Select the message and select "Read".
5Select "Options".
To forward this message to another number:
6Select "Forward".
7 Edit the message if needed and select "Options". Same as writing a new message you have to possibility to Send, Save and to use a template etc.
8Select "Send".


To delete this message:
9Select "Delete" and confirm with "Yes". To cancel press "No".
11.6 Template messages
You can edit you own template messages to use when writing a message. The phone can store up to 3 templates of maximum 32 characters. Default the templates are empty: To Edit your own messages:

11.7 Delete messages

11.8 SMS Settings
SMS Service center numbers
To send and receive SMS text messages you need the telephone number of your Network's SMS Centre. These numbers have been pre-loaded into the phone. If you accidentally delete the SEND or RECEIVE SMS Service Centre numbers you will need to re-enter them in order for your SMS Service to work.
The Orbit can store 2 SMS Service center numbers, one incoming and one outgoing. This sending SMS service number will be dialed out by the phone whenever you send out a SMS.
To set the SMS Center numbers
If there is an incoming call with a number matching with one of these SMS center numbers, the phone knows it's a call from the SMS center and will take the line automatically to receive the messages.
Message alert tone
When you receive a text message, the message alert tone will sound. These beeps can be switched on or off:
1Enter the menu.
2Select "Text Messaging".
3Select "Text Settings".
4Select "Message Alert".
5Select "Yes" or "No".
Set Message size
A standard text message is 160 characters long. You can set a message to be up to 612 characters and the message will be sent as 4 messages of 160 characters long:

1Enter the menu.
2Select "Text Messaging".
3Select "Text Settings".
4Select "Message Size".
5Select "160 Characters" or "612 Characters".
11.9 User Areas
If you have more than one SMS terminal device on the same telephone line you must create different User Areas. Each user can have his own Inbox and outbox which are only accessible by a pin code. By giving each user different sub addresses, they can receive there own private messages.
In order to receive personal SMS messages, you must give your correspondents the sub address Number that they need to add to your standard telephone number (See below).
You correspondents will need to add your sub address to your telephone number when they want to send personal SMS.

E.g. If your personal sub address is "1" and your telephone number is 123456789, your correspondents should send their SMS messages to:1234567891! This is the number you need to remember and give to your correspondents.
If no sub address is add to you telephone number or '0', all devices will receive these messages.
You can change the sub address number to another one but only from 0-9:
Add a User mailbox

1Enter the menu.
2Select "Text Messaging".
3Select "Text Settings".
4Select "Users".
5Select one of the users and press "Options".
6Select "Edit".
7Enter the user name (max. 8 characters) and press "Save".


8 Use the sub address shown or enter you own sub address (0-9).
9Press "Save".
10Enter the 4-digit mailbox PIN and press "Save".
11Enter the PIN code again and press "Save".
Open and read your own mailbox content
Once a mailbox is set and you enter the "Text Messaging" menu, the mailboxes in use will be displayed. You can open the "General User" mailbox without PIN code, the others will be PIN protected.
When there are new message:


1Press left soft key "Read".
The mailboxes are displayed. Mailboxes with new messages are marked with blue dots 🔒
2Scroll through the list and select the mailbox you want.
3Enter the mailbox PIN code and press OK.
4Select the message you want and press "Read".
Edit a user mailbox
1Enter the menu.
2Select "Text Messaging".
3Scroll to the mailbox you want to edit and press "Select".
4Enter the 4 PIN password and press OK.
5Select "Text Settings".
6Select "Users".
7Scroll to the user mailbox you want to edit and press "Options".
8Select "Edit".
9Enter the 4 PIN password and press OK.
10Edit the name and press "Save".
11Enter the new sub-address and press "Save".
12Enter the new 4 PIN password and press "Save".
13Re-Enter the PIN password and press "Save".
Delete a user mailbox

1Enter the menu.
2Select "Text Messaging".
3Scroll to the mailbox you want to edit and press "Select".
4Enter the 4 PIN password and press OK.
5Select "Text Settings".
6Select "Users".
7Scroll to the user mailbox you want to edit and press "Options".
8Select "Delete".
9 Confirm with "Yes" or press "No" to cancel.
10Enter the 4 PIN password and press OK.
Set the Common mailbox sub address

1Enter the menu.
2Select "Text Messaging".
3Select "Text Settings".
4Select "Mailbox Number".
5Enter the new sub-address and press "Save".

If you enter a number already in use, you hear an error beep. Enter a different number to avoid this.
12 Additional handsets and base stations
You can subscribe up to 5 handsets on a base. Each handset can register up to 4 base stations and the user can select the base he wants to use.
12.1 Adding a new handset

Only needed when you have deregistered a handset or when you bought a new one.
To put the base into registration mode:

1Press and hold the paging key on the base for 3 seconds.
During 60 seconds the base is ready to register.
On the handset:

1If the handset is new "Please Register" is shown. Press "Menu" and select "Registration". OR


2Enter the menu.
3Select "Registration".
4Select "Register handset".
5 Select the number of the base to be associated with the handset (1-4) and confirm.
6Enter the system PIN (0000 by default) and confirm.
7Return to standby.
12.2 Removing a handset
This procedure needs to be carried out on a different handset then the one you want to remove.

1Enter the menu.
2Select "Registration".
3Select "De-Register".

4Enter the system PIN (0000 by default) and confirm.

5Scroll to the handset that needs to be removed and confirm.

6Press "Yes" to confirm or "No" to cancel.

7Return to standby.

12.3 Select a base
You can switch your handset between bases. The handset must first be registered with each base individually.
1Enter the menu.
2Select "Registration".
3Select "Select Base".
4 Scroll to the base you want to use and confirm. The base currently in-use is marked with "In-use".
12.4 Using the intercom feature
Calling an internal handset

1Press the INT-Key.
The screen displays "Internal Call".
2 Enter the internal number of the handset you want to call (1-5).
3Press "OK" to dial.
4Press the on-hook key to hang up or put the handset back on the base.
Transfer an external call to another handset
During an external call:

1Press the INT-Key.
Your external correspondent is placed on hold.
The screen displays "Internal Call".
2 Enter the internal number of the handset you want to call (1-5).
3Press "OK" to dial.
4 When the internal correspondent answers, press the on-hook key to transfer the call.
OR

3If the internal correspondent doesn't answer, press the INT key to retrieve the external correspondent or to go from one to the other.
4Press the on-hook key to hang up or put the handset back on the base.


Conference call
You can talk between 2 handsets and an external line at the same time.
During an external call:

1Press the INT-Key.
Your external correspondent is placed on hold.
The screen displays "Internal Call".
2 Enter the internal number of the handset you want to call (1-5).
3Press "OK" to dial.
4When the internal correspondent answers, select "Join".
"Conference Call" is shown on the display.

5Press the on-hook key to hang up or put the handset back on the base.
Taking an external call during an internal communication
When you are on intercom with another handset, you can still pick up outside calls.
To take an incoming call:

1 Press the on-hook key. The internal communication is now interrupted.

2Press the off-hook key. You are now in communication with the outside caller.
13 Troubleshooting
| Symptom Possible cause | Solution | |
| No display Batteries uncharged | Check the position of the batteries | |
| Recharge the batteries | ||
| Handset turned OFF Turn ON | the handset | |
| No tone Telephone cord badly connected | 连接 | Check the telephone cord connection |
| The line is occupied by another handset | Wait until the other handset hangs up | |
| The icon flashes Handset | out of range Bring the handset | closer to the base |
| The base has no power supply | Check the mains connection to the base | |
| The handset is not registered on the base | Register the handset on the base | |
| Base or handset do not ring | The ringing volume is off or low | Adjust the ringing volume |
| Not possible to transfer a call on PABX | The Flash Time is too short or too long | Change the Flash Time |
| Telephone does not react to pressing the keys | Manipulation error Remove the batteries and put them back in place | |
14 Technical dataTechnical characteristics
Standard
DECT(Digital Enhanced Cordless Telecommunications)
GAP (Generic Access Profile)
Frequency range 1880 MHz to 1900 MHz
Number of channels 120 duplex channels
Modulation GFSK
Speech coding 32 kbit/s
Emission power 10 mW (average power per channel)
Range 300m in open space /50m maximum in-house
Number of handsets Up to 5
Base power supply 230V / 50 Hz / 7,5V DC 300mA
Handset Batteries: 2 rechargeable batteries AAA, NiMh 1,2V, 750mA
Handset autonomy 110 hours in standby
Handset talk time
11 hours
Normal conditions of use
+5 °C to +45 °C
Dialling mode
Pulse / Tone
Flash time
100 or 250 ms
Measurements base
ca. 112mm x 112mm x 64mm (L x B x H)
Measurements handset
ca. 34mm x 52,5mm x 154mm (L x B x H)
Weight base with adaptor
ca. 319g
Weight base without adaptor
ca. 135g
Weight handset with batteries
ca. 124g
15 Topcom Warranty
15.1 Warranty period
The Topcom units have a 24-month warranty period. The warranty period starts on the day the new unit is purchased. There is no warranty on standard or rechargeable batteries (AA/AAA type).
Consumables or defects causing a negligible effect on operation or value of the equipment are not covered.
The warranty has to be proven by presentation of the original or copy of the purchase receipt, on which the date of purchase and the unit-model are indicated.
15.2 Warranty handling
A faulty unit needs to be returned to a Topcom service centre including a valid purchase note and a filled in service card.
If the unit develops a fault during the warranty period, Topcom or its officially appointed service center will repair any defects caused by material or manufacturing faults free of charge, by either repairing or exchanging the faulty units or parts of the faulty units. In case of replacement, colour and model can be different from the original purchased unit.
The initial purchase date shall determine the start of the warranty period. The warranty period is not extended if the unit is exchanged or repaired by Topcom or its appointed service centre.
15.3 Warranty exclusions
Damage or defects caused by incorrect treatment or operation and damage resulting from use of non-original parts or accessories are not covered by the warranty.
The warranty does not cover damage caused by outside factors, such as lightning, water and fire, nor any damage caused during transportation.
No warranty can be claimed if the serial number on the units has been changed, removed or rendered illegible. Any warranty claims will be invalid if the unit has been repaired, altered or modified by the buyer.
This appliance may only be used with rechargeable batteries. If you want to replace the originally included batteries, please check whether the batteries you use are suitable and rechargeable. Alkaline batteries may under NO circumstances be used in the handsets. If you use Alkaline batteries and place the handset on the basis, the batteries will heat up and may explode. Any damage which may be caused cannot be recovered from the manufacturer and the damage thus caused to the appliance is not covered by the warranty conditions. Any repairs will be charged to you.
16 Disposal of the device (environment)

At the end of the product lifecycle, you should not throw this product into the normal household garbage but bring the product to a collection point for the recycling of electrical and electronic equipments. The symbol on the product, user guide and/or box indicate this.
Some of the product materials can be re-used if you bring them to a recycling point. By re-using some parts or raw materials from used products you make an important contribution to the protection of the environment. Please contact your local authorities in case you need more information on the collection points in your area.
17 Cleaning
Clean the telephone with a slightly damp cloth or with an anti-static cloth. Never use cleaning agents or abrasive solvents.
Nederlands
1 Veiligheidsadvies
natural_image
Line drawing of a classic mobile phone with keypad and front panel (no text or symbols)Bureaumodus

natural_image
Illustration of hands holding a circular object with a curved handle, showing a motion arrow (no text or symbols)- Haak optillen
natural_image
Line drawing of a hand holding a circular device with a dial and arrow indicating rotation (no text or symbols)- 180° rechtsom draaien
natural_image
Illustration of hands holding a circular device with a knob, showing a curved arrow indicating rotation (no text or symbols present)natural_image
Line drawing of a classic mobile phone with keypad and front panel (no text or symbols)natural_image
Diagram of a circular mechanical or architectural component with concentric layers and two central circular features, labeled with number 12 (no text or symbols beyond label)- 2F Basisstation -
2.6 Symbolen

Toetsenbordvergrendeling

2Kies "Toevoegen" (Add Entry).
3Kies "Options" (Options).
4Kies "Details tonen" (Show Details).
3Kies "Options" (Options).
4Kies "Nr. wissen" (Delete entry) en bevestig.
4.6 Alle contacten wissen


3Kies "Options" (Options).
3Kies "Options" (Options).
5Kies "Naar handset" (To Handset).
3Kies "Naar handset" (To Handset).
3 Kies "Gemiste oproepen", "Ontvangen opr." of "Gebelde nummers" (Missed Calls, Received Calls of Dialled Calls).
3 Kies "Gemiste oproepen", "Ontvangen opr." of "Gebelde nummers" (Missed Calls, Received Calls of Dialled Calls).
natural_image
Pure electrical circuit symbols without any text or labels1Open het menu.
2Selecteer "Instellingen" (Settings).
3Kies "Handset instell." (Set Handset).
4Kies "Toetstoon" (Key Beep).
5Kies "Aan" (On) of "Uit" (Off).
6Keer terug naar standby.
7.4 Achtergrond
7.10 PABX-code
1Open het menu.
2Selecteer "Instellingen" (Settings).
3Kies "Basis instellen" (Set Base).
4Kies "Kiesmethode" (Dialling mode).
5Kies "Toon" (Tone) of "Puls" (Pulse).
6Keer terug naar standby.
8.4 Flash (Recall)
8.6 Voorrang belsign.
3Kies "Options" (Options).


Om dit bericht te wissen:
5Kies "Beantwoorden" (Reply).

7Kies "Zenden" (Send).


8Kies "Doorsturen" (Forward).
10Kies "Zenden" (Send).
Om dit nummer te bellen:

5Kies "Options" (Options).
5Kies "Options" (Options).
6Kies "Doorsturen" (Forward).
8Kies "Zenden" (Send).
Om dit bericht te wissen:
1Open het menu.
2Kies "SMS" (Text Messaging).
3Kies "Berichten wissen" (Delete Messages).
4 Kies "Inbox", "Klad", "Outbox" of "Alle berichten" (Inbox, Draft, Outbox of All Messages).
5 Bevestig met "Ja" (Yes) of druk op "Nee" (No) om te annuleren.
11.8 SMS-instellingen
Nummers SMS-berichtencentrales
1Open het menu.
2Kies "SMS" (Text Messaging).
3Selecteer "SMS-instellingen" (Text Settings).
4Kies "SMS-centrales" (Service Centres).
5Kies "Ontvangstnr." (Receiving Centres) of "Verzendnr." (Send Centres).
6Kies "Nr. 1" (Centre 1).
7Toets het nummer van de centrale in en druk op "Opslaan" (Save).
DECT(Digital Enhanced Cordless Telecommunications) GAP (Generic Access Profile)
Frequentiebereik 1880 MHz tot 1900 MHz
Aantal kanalen 120 duplex kanalen
Modulatie GFSK
Spraakcodering 32 kbit/s
ca. 112mm x 112mm x 64mm (L x B x H)
Afmetingen handset
ca. 34 mm x 52,5 mm x 154 mm (L x B x H)
b :B.Piles rechargeables

natural_image
Line drawing of a classic mobile phone with keypad and front panel (no text or symbols)
natural_image
Illustration of hands holding a circular object with a dotted pattern, no text or symbols present- Soulevez le support
natural_image
Line drawing of hands holding a circular device with a knob and dial (no text or symbols)natural_image
Illustration of hands holding a circular device with a knob, showing a rotating knob (no text or symbols)natural_image
Line drawing of a classic mobile phone with keypad and front panel (no text or symbols)- 2E Combiné -
Base
- Touche Recherche (Paging)

- 2F Base -
2.6 Symboles

1Accédez au menu.
11.7 Supprimer SMS (Delete messages)
natural_image
Diagram of a circular mechanical or architectural component with concentric layers and central features, no text or symbols present.- 2F Basisstation -
2.6 Symbole

Tastatursperre

natural_image
Pure electrical circuit lines without any symbolsnatural_image
Line drawing of a classic mobile phone with keypad and front panel (no text or symbols)
natural_image
Line drawing of hands holding a circular object with a dotted pattern, no text or symbols present- Levante el soporte.

natural_image
Line drawing of hands holding a circular device with a dotted pattern and arrow indicating rotation (no text or symbols)natural_image
Illustration of hands holding a circular device with a curved handle and arrow indicating rotation (no text or symbols)natural_image
Line drawing of a classic mobile phone with keypad and control panel (no text or symbols)natural_image
Pure electrical circuit lines without any symbols1Acceda al menú.
natural_image
Pure electrical circuit lines without any symbols1Acceda al menú.
1Acceda al menú.
2 Seleccione «Ajustes» ("Settings").
3Seleccione «Fijar terminal» ("Set Handset").
4 Seleccione «Timbre» ("Ringtone").
1Pulse la tecla INT.
1Pulse la tecla INT.
RETURN WITH YOUR DEFECT PRODUCT
natural_image
Two identical rectangular frames with evenly spaced vertical lines inside, no text or symbols present.Location/Ort./Lieu/Plaats: Post code/Postleitzahl/Code Postal/Postcode:

natural_image
Two identical rectangular frames with evenly spaced vertical lines inside, no text or symbols present.| Country/Land/Pays/Land: |


(Original Proof of Purchase has to be attached to this return card to be valid for warranty)
natural_image
Black and silver Lenovo 300 phone with a digital display on top, resting on a black base (no visible text or symbols)USER GUIDE / BRUKSANVISNING / BRUGERVEJLEDNING ANVÄNDARHANDBOK / KÄYTTÖOHJE
v1.3 - 07/08
CE
Important
To use 'Caller ID' (display caller), this service has to be activated on your phone line. Normally you need a separate subscription from your telephone company to activate this function. If you don't have the Caller ID function on your phone line, the incoming telephone numbers will NOT be shown on the display of your telephone.
Viktigt
This product is in compliance with the essential requirements and other relevant provisions of the R&TTE directive 1999/5/EC.
The Declaration of conformity can be found on:
http://www.topcom.net/support/cedeclarations.php


natural_image
Cross-sectional diagram of a spherical device with internal components and a numbered label (12), no readable text or symbols present.UK The features described in this manual are published with reservation to modifications. The CE symbol indicates that the unit complies with the essential requirements of the R&TTE directive.
UK This product works with rechargeable batteries only. If you put non-rechargeable batteries in the handset and place it on the base, the handset will be damaged and this in NOT covered under the warranty conditions.
2 Getting started 14
2.1 How to use this user guide 14
2.2 Installing the base 14
2.3 Installing the handset 15
2.4 Wall mounting 16
2.5
2.6
2.7 Display keys 18
2.8 Navigating the menu 18
2.9 Menu overview 19
3 Using the telephone 19
3.1 Switching the handset ON/OFF 19
3.2 Changing the menu language 19
3.3 Setting the date and time 20
3.4 Setting the time format 20
3.5 Making a normal telephone call 20
3.6 Receiving a telephone call 21
3.7 Handsfree mode 21
3.8 Adjust earpiece/handsfree volume 21
3.9 Secrecy function (Mute function) 22
3.10 Locating a handset (Paging function) 22
3.11 Keypad Lock 22
3.12 Using the alphanumerical keypad 22
4 Phonebook
4.1 To access and search in the phonebook 22
4.2 To add an entry 23
4.3 To dial an entry 23
4.4 Show Details 23
4.5 Delete an entry 23
4.6 Delete all entries 23
4.7 Edit Entry 24
4.8 Copy a phonebook entry or all entries to another handset 24
4.9 Memory status 25
4.10 Change the ringtone 25
5 Caller Identification 25
5.1 Call Waiting 25
6 Calls List 26
6.1 New calls Alert 26
6.2 To view new missed calls 26
6.3 View and dial from the Calls list 26
6.4 Copy a Calls list number into the phonebook 26
6.5 Send a text message to a Calls list number 26
6.6 Delete an entry 27
6.7 Delete all entries 27
7 Personalise the handset 27
7.1 Ringtone and volume 27
7.2 Handset name 28
7.3 Keypad beeps 28
7.4
7.5 Menu color 29
7.6 Setting the contrast 29
7.7 Setting the light timeout 29
7.8 Setting the screensaver 29
7.9
7.10 PABX Access code 30
7.11 Receiving Volume 30
7.12 Using the alarm feature 30
8 Base settings 31
8.1
8.2 Ringer Volume 31
8.3 Dial Mode 31
8.4 Recall (Flash) 31
8.5 System PIN 32
8.6 Ring Priority 32
8.7 First ring On/Off 32
9 Factory Reset
10 Agenda 33
11 SMS 34
11.1 How to write an SMS 34
11.2 Sending an SMS 34
11.3 Read and view the list of received messages (Inbox) 35
11.4 Reading and sending the saved message (Draft folder) 36
11.5 Using the outbox 36
11.6 Template messages 37
11.7 Delete messages 37
11.8 SMS Settings 37
11.9 User Areas 38
12 Additional handsets and base stations 40
12.1 Adding a new handset 40
12.2 Removing a handset 40
12.3 Select a base 41
12.4 Using the intercom feature 41
13 Troubleshooting 42
14 Technical dataTechnical characteristics 43
15 Topcom Warranty 43
15.1 Warranty period 43
15.2 Warranty handling 44
15.3 Warranty exclusions 44
16 Disposal of the device (environment) 44
17 Cleaning 44
Svenska
2.5 Taster/led-indikator
2.6 Symboler
2.7 Displaytaster
2.8 Navigere i menyen 115
2.9 Menyoversikt
3 Bruke telefonen 116
The following safety advice must always be followed before using electrical equipment. Please read carefully through the following information concerning safety and proper use. Make yourself familiar with all the functions of the equipment. Be careful to keep these advice notes and if necessary pass them on to a third party.
Electrical safety and protection:
- Do not operate the equipment if the mains plug, cable or the equipment itself is damaged.
- If the equipment is dropped, then it must be checked by an electrician before further use.
- Dangerous voltages are present inside the equipment. Never open the housing or insert objects through the ventilation holes.
- Do not allow liquids to get into the equipment. In case of emergency, pull out the plug from the socket.
- Similarly, if a fault develops during use or before you start to clean the equipment, pull the plug out if the socket.
- Do not touch the charger and plug contacts with sharp or metal objects.
- Do not carry out any modifications or repairs to the equipment yourself. Have repairs done to the equipment or the mains cable only by a specialist service centre. Unsatisfactory repairs can lead to considerable danger for the user.
- Children frequently underestimate the dangers associated with electrical equipment. Therefore you must never leave children unsupervised in the vicinity of electrical equipment.
- The equipment is not to be used in a damp room (e.g. bathrooms) or rooms where there is a lot of dust.
- Equipment connected to the mains during a thunderstorm can be damaged by lightning. Therefore you should pull the plug out of the mains socket during a storm.
- To completely disconnect the equipment from the electricity supply, the plug must be removed from the socket. When doing this always pull on the plug itself and never on the cable.
- Protect the mains cable from hot surfaces or other sources of damage and do not allow it to become constrained.
- Check the mains cable regularly for any damage.
- Unwind the mains cable completely before use.
- Make sure that the mains cable does not represent a trip hazard.
- The operation of some medical devices may be affected.
- The handset may cause an unpleasant buzzing sound in hearing aids.
Fire safety:
- The heat accumulated inside the equipment can lead to the defect and/or to the fire of the equipment. Do not expose this equipment therefore to extreme temperature like:
-
direct sun exposure and heater warmth
-
ventilation holes may not be covered
-
direct sun exposure and heater warmth
- ventilation holes may not be covered
Danger of explosion:
- Never throw batteries in fire.
Poisoning danger:
- Keep batteries away from small children.
Note:
- Only use the charger plug supplied. Do not use other chargers, as this may damage the batteries cells.
- The wall outlet for the power supply must be close and accessible.
- Only use rechargeable batteries of the same type. Place the batteries with correct polarity inside the battery compartment (polarity is marked inside the handset). Never use normal unrechargeable batteries!

As this telephone cannot be used in case of a power cut, you should use a mains-independent telephone for emergency calls, e.g. a mobile phone.
2 Getting started
2.1 How to use this user guide
In this user guide, following method is used to clarify the instructions:

Key to press. This key can be a soft key. When the soft key is a symbol, it is shown in the left column. When the soft key is text, the left or right soft key is shown in the left column and the text is shown in the right column between quotation marks.
2.2 Installing the base
For installation, do the following:
1 Plug one end of the adaptor into the outlet and the other end into the adaptor jack on the bottom of the base.
2Connect one end of the telephone cord with the wall phone jack and the other end to the bottom of the base.
3 Put the telephone- and AC power line cord in the base guides as shown on picture 2A.

- 2A Back view of base -
A. Telephone wall outlet
B. Power cable
C. Telephone cord
2.3 Installing the handset
1Open the battery compartment as shown on picture 2B.
2Insert the batteries respecting the polarity (+ and -).
3Close the battery compartment.
4Leave the handset on the base unit for 20 hours.

- 2B Back view of handset -
A. Cover
B. Rechargeable batteries

Before you use the telephone for the first time, you must first make sure the battery is charged for 20 hours. If you do not do this, the telephone will not work optimally.
2.4 Wall mounting
You can hang the base against the wall by turning the cradle inside the base as shown below:

- 2C Wall mounting -
Use the template at the back side of the manual to drill the holes in the wall 5 cm apart horizontally.

- 2D Wall mounting -
2.5 Keys/Led
Handset
- Display
- Right soft menu key
- Up / Redial / Pause key
- On-hook / ON-OFF key
- Alphanumeric keys
- Keypad lock
- INT key
- Flash key
- Down / Phonebook key
- Off-hook / Handsfree key
- Left soft menu key

- 2E Handset -
Base
- Paging key
natural_image
Diagram of a circular mechanical or architectural component with concentric layers and two central circular features, labeled with number 12 (no text or symbols beyond label)- 2F Base -
2.6 Symbols

Keypad lock

Handset within base range (Flashes if you are out of range)

Alarm set Handsfree


Handset ringer volume is off Battery full


You have SMS messages Battery medium


You have missed calls Battery low


You have new voice mail Battery is almost discharged
2.7 Display keys
Display-keys (softkeys) are located directly under the display. The function of these 2 keys changes depending on the operation mode. The actual function is displayed as icon or text directly above the 2 display keys.
2.8 Navigating the menu
The Orbit has a menu system which is easy to use. Each menu leads to a list of options. The menu map is shown on the following paragraph.


1 When the handset is switched on and in standby, press the left soft menu key (Key 11 - Picture 2E) "Menu" to open the main menu.
2Scroll to the desired menu option.
3 Press the soft menu key to view further options or to confirm the setting displayed.
To exit or to go back one level in the menu
Back

To go to the previous level in the menu, press the soft menu key "Back".
To cancel and return to standby at any time, press the on-hook key.
2.9 Menu overview
| Menu Submenu items | ||
 | Text Messaging | Write MessageInboxDraftsOutboxTemplatesDelete messagesText Settings |
 | Calls Lists | Missed CallsReceived CallsDialled CallsDelete Calls |
 | Agenda Add Event (when there are no Events) | |
 | Clock & Alarm | Date & TimeAlarmTime Format |
 | Settings | Set HandsetSet Base |
 | Registration | Register HandsetSelect BaseDe-register |
3 Using the telephone
3.1 Switching the handset ON/OFF


1 Press and hold the On-Off key to switch the handset off.
2 Press the On-Off key or place the handset in the base to switch the handset back on.
3.2 Changing the menu language


1Enter the menu.
2Select "Settings" and confirm.
3Select "Set Handset" and confirm.
4Select "Language" and confirm.
5Select a language and confirm.
The screen displays "Saved".
6Press the on-hook key to return to standby.
The or arrows indicate that further options are available in the menu.
3.3 Setting the date and time

- The date and time is kept inside the base and send to all handsets, so you only have to set the date/time ones when using more then one handset.
- The date/time can be set by the Caller ID (Clip) information, or manually as mentioned below.

1Enter the menu.
2Select "Clock & Alarm" and confirm.
3Select "Date & Time" and confirm.
4Enter day, month, year, time and minutes and select "Save" to confirm.
5Press "Back" to go to the previous menu.
3.4 Setting the time format

The time format can be set differently for each handset.

1Enter the menu.
2Select "Clock & Alarm" and confirm.
3Select "Time Format" and confirm.
4Select "12 Hour" or "24 Hour" and confirm.
5Press "Back" to go to the previous menu.
3.5 Making a normal telephone call
Direct dialling

1Press the off-hook key to start the call.
2Dial the telephone number.
3Press the on-hook key to hang up or put the handset back on the base.
Pre-dialling
With the pre-dialling feature, you can enter and modify a number before making the call.
1Dial a number of up to 32 digits.
Press and hold the Pause-key to insert a pause. The screen displays a "P".
2Press the soft menu key "Clear" to correct.
3Press the off-hook key to start the call or select "Options".
4If you selected "Options", scroll and select:
"Save": to store the number into the phonebook;
"Send Message": to send a message.
5Press the on-hook key to hang up or put the handset back on the base.
Redial a number from the dialled call list
You can redial up to 20 of the last numbers called. If you have stored a name in the phonebook to go with the number, the name will be displayed instead.


1Press the redial key.
2Select a number. If the number is in the phonebook, the name will be shown.
3Press the off-hook key to start the call or select "Options".
4If you selected "Options", scroll and select:
"Show Details": To show the details;
"Save Number": to store the number into the phonebook;
"Send Message": to send a message;
"Delete Call": to remove the number from the call list.
5Confirm selection.
6Press the on-hook key to return to standby.
3.6 Receiving a telephone call
When you receive an external call, the screen displays "External Call". To take the call:

1Press the off-hook key.
OR
Lift the handset off its base if you have activated "Auto Talk".
(See "7.9 Autotalk")
The call duration is displayed after 15 seconds.

2Press the on-hook key to hang up or put the handset back on the base.

You can turn the ring volume off during incoming call by selecting "Silence".
3.7 Handsfree mode
Handsfree lets you talk to your caller without holding the handset. It also enables other people in the room to listen to both sides of your conversation.

1 To switch any call to handsfree, press the handsfree key during the call.
3.8 Adjust earpiece/handsfree volume

1Press up or down to select volume 1-8 during a normal or handsfree call.

You cannot set the earpiece/handsfree volume independently.
3.9 Secrecy function (Mute function)
To turn off the microphone so the person on the other side of the line will not hear you.

1 During a conversation, press the soft menu key "Secrecy" to deactivate the microphone.
"Secrecy On" appears on the display.
2 Select "Off" to activate the microphone again.

3.10 Locating a handset (Paging function)

1 Press the paging key on the base.
All handsets registered with the base will ring for 30 seconds.

2 Press "Stop" or any key on the handset to stop the paging.
3.11 Keypad Lock
To lock the keypad to prevent accidental dialling while carrying the handset around.

3 Press and hold the keypad locked key (key 6 - Picture 2E) until "Keypad Locked" and the keypad locked icon appears on the display.

4 To unlock, select "Unlock", followed by the keypad locked key #.
3.12 Using the alphanumerical keypad
With your telephone, you can also enter alphanumeric characters. This is useful for entering a name into the phonebook, giving a name to the handset, ...
To select a letter, press the corresponding key as many times as necessary.
For example, to select an 'A', press '2' once. To select a 'B', press '2' twice and so on. To select 'A' and then 'B' consecutively, press '2' once, wait until the cursor moves on to the next character, then press '2' twice.
When names are entered, the first character is upper case and then the case switches to lower. You can manually change the case as below mentioned.

Press '0' to select a space.
Press the #-key to switch between small letters, capitals or numeric input.

Press the soft menu key "Clear" to correct.

4 Phonebook
Each handset can store up to 250 names and numbers. Names can be up to 12 characters long and numbers up to 24 digits. You can also select different ring tones for each entry.
4.1 To access and search in the phonebook
There are two ways to access the name list of your phonebook:


1 Press the right soft menu key "Names" and select "Search". OR

2 Press the Down/Phonebook key.


3 Scroll to the name you want or enter the first characters of the name.

If the phonebook is empty "Phonebook Empty" will be shown shortly.
4.2 To add an entry

4.3 To dial an entry


1Press the Down/Phonebook key.
2Select the desired name or use the keypad to enter the first letter of the name.
3Press the off-hook key to start the call.
4Return to standby.
4.4 Show Details


1Press the Down/Phonebook key.
2Select the desired name or use the keypad to enter the first letter of the name.
3Select "Options".
4Select "Show Details".
The name, number and ring melody you have assigned to the entry appear on the display.
5Press "Dial" to dial out the number or "Back" to go back.
6Return to standby.

4.5 Delete an entry


1Press the Down/Phonebook key.
2Select the desired name or use the keypad to enter the first letter of the name.
3Select "Options".
4Select "Delete Entry" and confirm.
4.6 Delete all entries


1Press the right soft menu key "Names".
2Select "Delete Phonebook" and confirm.
4.7 Edit Entry
| 1Press the Down/Phonebook key. |
| 2Select the desired name or use the keypad to enter the first letter of the name. |
| 3Select "Options". |
| 4Select "Edit Entry" and confirm. |
| 5 Press the soft menu key "Clear" to delete and use the keypad to change the name. |
| 6Select "OK". |
| 7Edit the number and select "Save". |
| 8Select the desired ring melody and press "Select". |
| 9Return to standby. |
4.8 Copy a phonebook entry or all entries to another handset

- The copy process can be interrupted when there is an incoming call.
- When other handset is not available (out of range) or memory is full, the display will show "Copy unsuccessful".
- When only one handset is registered, "Not available" will be shown for 2 seconds.
Copy an entry to another handset
| 1Press the Down/Phonebook key. |
| 2Select the desired name or use the keypad to enter the first letter of the name. |
| 3Select "Options". |
| 4Select "Copy Entry". |
| 5Select "To Handset". |
| The available handsets (all the handsets that are registered on the base) are shown. |
| 6Select the desired handset and confirm. |
| "Please wait..." appears on the display. |
| "Copy phonebook?" appears on the display of the destination handset. |
| 7 On the destination handset, press the left menu key to confirm or the right menu key to cancel the transfer. |
| 8Return to standby. |
Copy all phonebook entries to another handset
| 1Press the right soft menu key "Names". | |
| 2Select "Copy Phonebook". | |
| 3Select "To Handset". |

4.9 Memory status

4.10 Change the ringtone
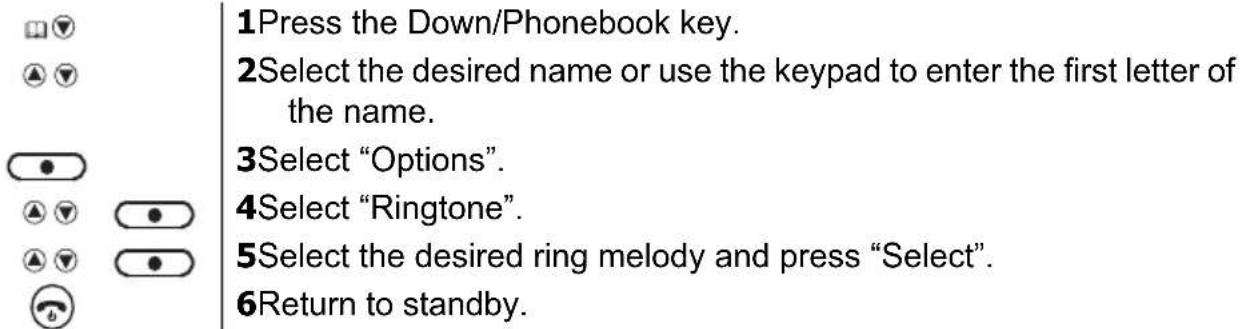
5 Caller Identification

This service only works when you have a Caller ID/Clip subscription. Please contact your telephone company.
When you receive a call from your fixed telephone line, the telephone number of the caller appears on the handset display. You can also see his or her name if it is transmitted by the network. If the name is programmed in the phonebook, the name in the phonebook is displayed!
5.1 Call Waiting

This service only works when you have Caller ID / Call Waiting subscription.
During a call, you hear a beep (knocking tone) when a second call comes in (through the earpiece). The number (or name) will be shown on the display. If no number/name is available the phone will show "Call Waiting".
6 Calls List
Each handset can store 30 calls in the Call List (received and missed) that can be reviewed later.
Also the last 20 dialled calls are stored in the Call list. When the memory is full, the new calls automatically replace the oldest calls in the memory.
6.1 New calls Alert

0123456789
Missed calls are indicated by a text "You have xx new missed call(s)" or by an Icon on the idle screen.
New unanswered/Missed calls are shown in the list with a blue dot behind the telephone number or callers name.
6.2 To view new missed calls

1Press the left soft menu key "View". Only the Missed/unanswered calls are shown in the Missed calls list.
OR

2Press right soft menu key "Back" to view at a later stage.
6.3 View and dial from the Calls list

1Enter the menu.


2Select "Calls List".


3Select "Missed Calls, Received Calls or Dialled Calls".


4Scroll through the list and select "Options".


5Select "Show Details" to see the callers number, date and time.


6Select "Dial" to call the number.

7Select "Back" to return to previous menu.
6.4 Copy a Calls list number into the phonebook

1Enter the menu.

2Select "Calls List".

3Select "Missed Calls, Received Calls or Dialled Calls".

4Scroll through the list and select "Options".

5Select "Save Number".

6Enter the name and press "Save" to confirm.

7Select the ringtone and press "Select".

8Select "Back" to return to previous menu.
6.5 Send a text message to a Calls list number

1Enter the menu.

2Select "Calls List".

3Select "Missed Calls, Received Calls or Dialled Calls".

4Scroll through the list and select "Options".
5Select "Send Message".
6Enter the message and press "Options".
7 Select "Send" (you can save, insert a symbol, emoticon or template).
8The number is pre-entered on the screen, press "Send" to send the message.
9Select "Back" to return to previous menu.
6.6 Delete an entry

1Enter the menu.
2Select "Calls List".
3Select "Missed Calls, Received Calls or Dialled Calls".
4Scroll through the list and select "Options".
5Select "Delete Call".
6Select "Back" to return to previous menu.
6.7 Delete all entries

1Enter the menu.
2Select "Calls List".
3Select "Delete Calls".
4 Scroll through the list and select "Missed Calls", "Received Calls", "Dialled Calls" or "All Calls".
5Select "Yes" to confirm or "No" to cancel.
6Select "Back" to return to previous menu.
7 Personalise the handset
7.1 Ringtone and volume
Ringtone
You can choose from 10 different ringer melodies for internal and external calls.

1Enter the menu.
2Select "Settings".
3Select "Set Handset".
4Select "Ringtone".
5Select "External Call" for external calls or select "Internal Calls" for internal calls and confirm.
6Select the desired melody and confirm.
During scrolling the melody is played.
7 Return to standby.
Ringer volume
You can choose from 5 handset ringer volume levels and off.

flowchart
graph TD
    A["●"] --> B["▲"]
    A --> C["▼"]
    D["▲"] --> E["▲"]
    D --> F["▼"]
    G["▲"] --> H["▲"]
    G --> I["▼"]
    J["●"] --> K["▲"]
    J --> L["▼"]
    M["●"] --> N["▲"]
    M --> O["▼"]
    P["●"] --> Q["▲"]
    P --> R["▼"]
1Enter the menu.
2Select "Settings".
3Select "Set Handset".
4Select "Ringer volume".
The current setting is displayed.
5Press the up key to increase the volume.
6Press the down key to decrease the volume.
7Select "Save" to confirm.
8Return to standby.

When you change the ringing volume to "Off", the idle screen will show the ringer Off icon.
7.2 Handset name
You can change the name displayed on the handset during standby (max. 10 characters).
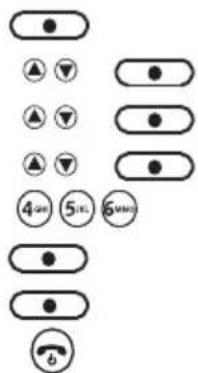
1Enter the menu.
2Select "Settings".
3Select "Set Handset".
4Select "Handset name".
5Enter the name you want.
6Press the soft menu key "Clear" to correct.
7Select "Save" to confirm.
8Return to standby.
7.3 Keypad beeps

1Enter the menu.
2Select "Settings".
3Select "Set Handset".
4Select "Key Beep".
5Select "On" or "Off".
6Return to standby.
7.4 Wallpaper
You can choose from 3 different wallpaper pictures which appear in the background during standby.

1Enter the menu.
2Select "Settings".
3Select "Set Handset".
4Select "Wallpaper".
5Select the picture you want and confirm.
During scrolling press "View" to show the picture.
6Return to standby.
7.5 Menu color

1Enter the menu.
2Select "Settings".
3Select "Set Handset".
4Select "Menu colour".
5Select "Blue", "Orange" or "Pink" and confirm.
6Return to standby.
7.6 Setting the contrast

1Enter the menu.
2Select "Settings".
3Select "Set Handset".
4Select "Display Contrast".
5Select the contrast you want (low, Mid or high).
6Return to standby.
7.7 Setting the light timeout

1Enter the menu.
2Select "Settings".
3Select "Set Handset".
4Select "Light Timeout".
5Select the timeout you want (15,30 or 45 seconds).
6Return to standby.
7.8 Setting the screensaver

1Enter the menu.
2Select "Settings".
3Select "Set Handset".
4Select "Screensaver".
5Select "Clock" or "No" screensaver and confirm.
6Return to standby.
7.9 Autotalk
When there is an incoming call and the handset is on the base, the phone automatically takes the line when lifted from the base. This function can be turned on or off.
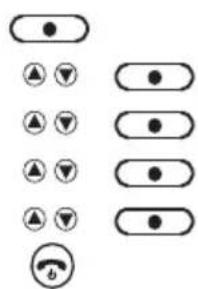
1Enter the menu.
2Select "Settings".
3Select "Set Handset".
4Select "Autotalk".
5Select "On" or "Off".
6Return to standby.
7.10 PABX Access code
It is possible to use your telephone with a prefix number. When dialling from the call list or phonebook, this prefix will be dialled automatically before the number.
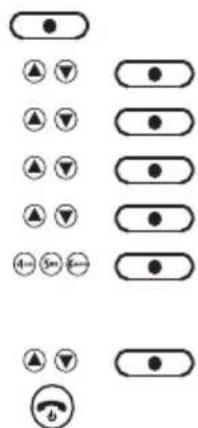
1Enter the menu.
2Select "Settings".
3Select "Set Handset".
4Select "PABX Access Code".
5Select "Set code".
6Enter the prefix code, e.g. '0' (1 digit only) and select "Save".
OR
7Select "On" or "Off".
8Return to standby.

When dialling manually a number, this prefix will not be dialled but has to be entered manually.
7.11 Receiving Volume
This sets the standard volume level for the handset earpiece.

1Enter the menu.
2Select "Settings".
3Select "Set Handset".
4Select "Receiving volume".
5Select the desired volume (1-8) and confirm.
6Return to standby.
7.12 Using the alarm feature
You can have different alarm setting for each handset registered to your base. The alarm rings only at the handset, not at the base or any other handset. When an alarm is set, the
icon will appear on the top of the display.
Set the alarm

1Enter the menu.
2Select "Clock & Alarm".
3Select "Alarm".
4Select "On".
5Select "Once", "On daily", or "Mon to Fri" and confirm.
If you have selected "Once", "On daily" or "Mon to Fri", the display will show:
Enter Time:
00:00

6To deactivate the alarm, select "Off" and confirm.
7Press "Back" to go to the previous menu.

If the alarm is set on daily or Mon-Fri the icon will remain on the screen.
8 Base settings
8.1 Ringtone
You can choose from 5 different ringer melodies.
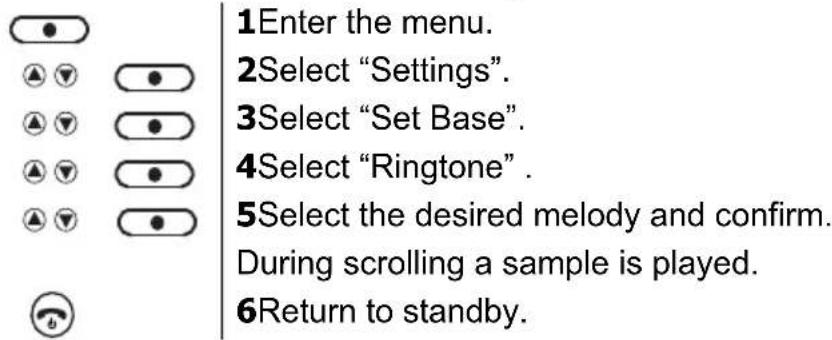
8.2 Ringer Volume
You can choose from 5 handset ringer volume levels.

8.3 Dial Mode
There are 2 types of dialling mode:
• DTMF/Tone dialling (most common used)
- Pulse dialling (for older installations)
To change the dialling mode:
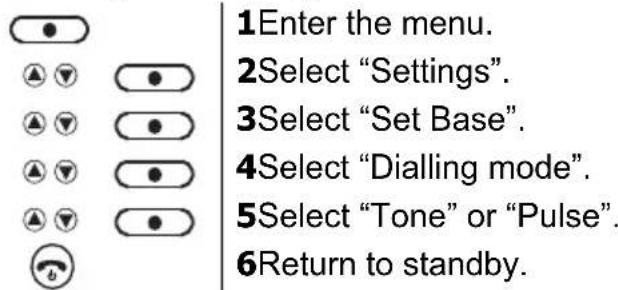
8.4 Recall (Flash)
Press the Flash key "R" (Key 8 - Picture 2E) to use certain services on your external line such as "call waiting" (if your phone company offers this feature); or to transfer calls if you use a telephone exchange (PABX). The Flash key "R" is a brief interruption of the line.
You can set the flash time to 100ms or 250ms.

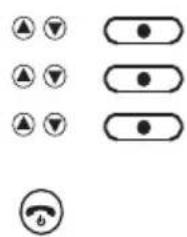
3Select "Set Base".
4Select "Recall Mode".
5Select "Recall 1" for short flash time (100ms) or "Recall 2" for long flash time (250ms).
6Return to standby.
8.5 System PIN
The System PIN is used for registering and deregistering handsets and some other optional settings. The default System PIN is 0000.
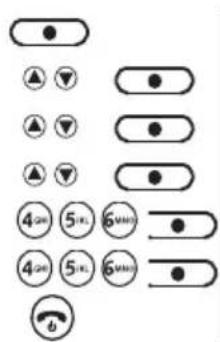
1Enter the menu.
2Select "Settings".
3Select "Set Base".
4Select "System PIN".
5Enter the old PIN (0000 by default) and select "OK".
6Enter the new PIN, select "OK" and repeat this.
7Return to standby.
8.6 Ring Priority
If you have more then one handset registered, you can choose which handset should ring first before the others starts to ring. You can also set the amount of rings (2,4 or 6) after the others start to ring.
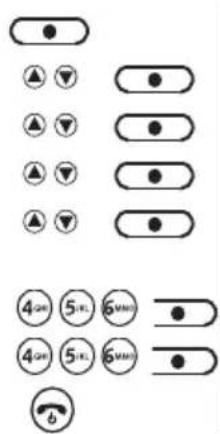
1Enter the menu.
2Select "Settings".
3Select "Set Base".
4Select "Ring Priority".
5Select "All Handset" or "Select Handset". If "Select Handset" is selected:
6Select the handset that should ring first.
7 Set the ring delay to 2, 4 or 6 rings and confirm.
8Return to standby.
8.7 First ring On/Off
If you have Caller ID service, your phone will not ring until the caller information has been received. You can make your handsets to ring without waiting for the caller information by turning the first ring On:
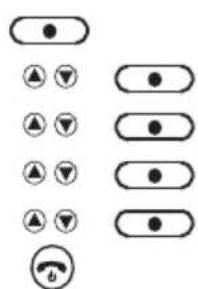
1Enter the menu.
2Select "Settings".
3Select "Set Base".
4Select "First Ring".
5Select "On" or "Off" and confirm.
6Return to standby.

When turning On the first ring you will hear the default ring tone first. This will change to the selected ring tone ones the caller information is displayed.
9 Factory Reset
You can restore your phone back to default (original) settings. This doesn't effect the phonebook, call list, user data or registrations of handsets.

1Enter the menu.
2Select "Settings".
3Select "Set Base".
4Select "Master Reset".
5Select "Yes" to confirm or "No" to cancel.
6Return to standby.
10 Agenda
You can set 5 event (appointments or reminders) which you can give a name and an alarm by date and time. The event can be shown as a text message with our without alarm. The events are stored inside the handset so each handset can have it's own events. When a reminder is On, the event name is show together with the alarm 🔔 icon for 1 minute.
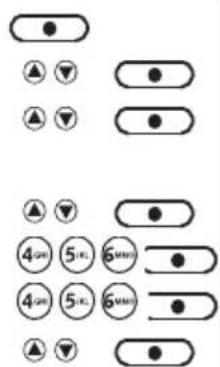
1Enter the menu.
2Select "Agenda" and confirm.
3Select one of the 5 appointments and select "Option".
To add an appointment:
4Select "Add Entry".
5Enter a name for the event (max. 24 characters) and confirm.
6Enter the date and time and confirm.
7Select "Silent" if you only want a visual indication or "Alarm" if you want to have visual and audible warning.
8If you have set "Alarm" the phone will ask you to have it "Ones" or "Annually (for birthdays).
9 If you have set it "Ones" you can choose to have it "At event time" or "30 min before".
To edit the appointment:
10Select "Edit Event" and confirm.
11 Edit the name of the event and select "Save".
12 Enter the date and time of the event and select "Save".
13Select "Silent" or "Alarm" and confirm.
To delete the appointment:
14Select "Delete Event" and confirm.
15Press "Yes" to confirm or "No" to go back.
16Return to standby.
To delete all events:
17Select "Delete All Event" and confirm.


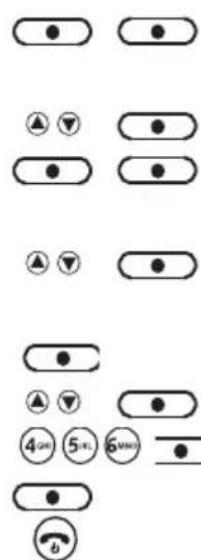
18Press "Yes" to confirm or "No" to go back. To show details:
19Select "Show Details" and confirm.
20Press "Yes" to confirm or "No" to go back. To send as text:
21Select "Send as Text" and confirm.
22The Event will be shown as a text message which you can edit.
23Select "Option"
24Select "Send"
25Enter the telephone number or select "Search".
26Select "Save" to send the event as an SMS.
27Return to standby.
The caller's details are always stored (answered or not) in the Calls list. When the list is full and a new call is received, the oldest will be removed.
11 SMS

This service only works when you have Caller ID/SMS subscription!
You can send and receive SMS with your telephone. This section tells you how to use the SMS feature. The phone keeps the messages which are received in the Inbox. You can store a total of 50 SMS messages across all handsets Outboxes, Draft and inbox. Messages which are ready to be send out to the SMS-server are stored in the Outbox. Messages which are saved are stored in the Draft box.

Before sending and receiving SMS text messages you need to set the telephone number of your Network's SMS Centre for outgoing and incoming messages (see "SMS Service center numbers")
11.1 How to write an SMS
The method is the same as entering a name in the phonebook ("4 Phonebook").
To enter a space press '0' and to change from capital to small character or numeric input, press '#'. The remaining amount of characters per message is shown on the upper right corner of the screen.
11.2 Sending an SMS
1Enter the menu.
2Select "Text Messaging".
3Select "Write Message".
4Start writing the message.
5Select "Options".
To save the message in the Draft folder so you can send it later:
6Select "Save message".


To add an emoticon:
7Select "Insert Emoticon".
8 Choose one of the emoticons and select "Insert".
To add one of the template text:
9Select "Use Template".
10 Choose one of the template text and select "Insert".
To add a symbol:
11Select "Insert Symbol".
12 Choose one of the symbols and select "Insert".
To Send the message:
13Select "Send".
14Enter the telephone number and select "Send".

Instead of entering a number with the numerical keypad, you can select a number out of the phonebook by pressing the left soft key "Search".
11.3 Read and view the list of received messages (Inbox)
Your telephone display indicates if there are new messages received. The icon be shown along with "You have X new messages".

When there are new message:





1Press left soft key "Read".
The Inbox list appears on the display. This is a combination of new and read messages. Messages which are new are indicated with a blue dot 🔒 icon.
2 Scroll through the list and select "Read" to read the message.
3Select "Option".
To delete this message:
4Select "Delete" and confirm with "Yes". To cancel press "No".
To Reply this message:
5Select "Reply".
6 Write your message and select "Options". Same as writing a new message you have to possibility to send, Save and to use a template etc ...
7Select "Send".
To forward this message to another number:
8Select "Forward".
9 Edit the message if needed and select "Option". Same as writing a new message you have to possibility to send, Save and to use a template etc.
10Select "Send".
To dial this number:
11Select "Use Number" and confirm. The number will be dialled automatically.

Read the inbox by the menu:

1Enter the menu.
2Select "Text Messaging".
3Select "Inbox".
11.4 Reading and sending the saved message (Draft folder)
If you save a message to complete or send later it will be stored in the Draft box. You can write a message and send it later by saving it into the Draft box. Only one message can be stored in each user's draft box.
Edit or Send texts in the draft folder:

1Enter the menu.
2Select "Text Messaging".
3Select "Drafts".
4Select "Edit" to edit your message content.
5Select "Options".
You have now the same options as reading the inbox.
11.5 Using the outbox
The outbox contains all messages which are ready to send or failed to be send. The outbox can store up to 5 messages. In case more then 5 messages are send, the oldest message successfully send will be removed.
Read the Outbox:

1Enter the menu.
2Select "SMS Message".
3Select "Outbox".
4Select the message and select "Read".
5Select "Options".
To forward this message to another number:
6Select "Forward".
7 Edit the message if needed and select "Options". Same as writing a new message you have to possibility to Send, Save and to use a template etc.
8Select "Send".

To delete this message:
9Select "Delete" and confirm with "Yes". To cancel press "No".
11.6 Template messages
You can edit you own template messages to use when writing a message. The phone can store up to 3 templates of maximum 32 characters. Default the templates are empty: To Edit your own messages:
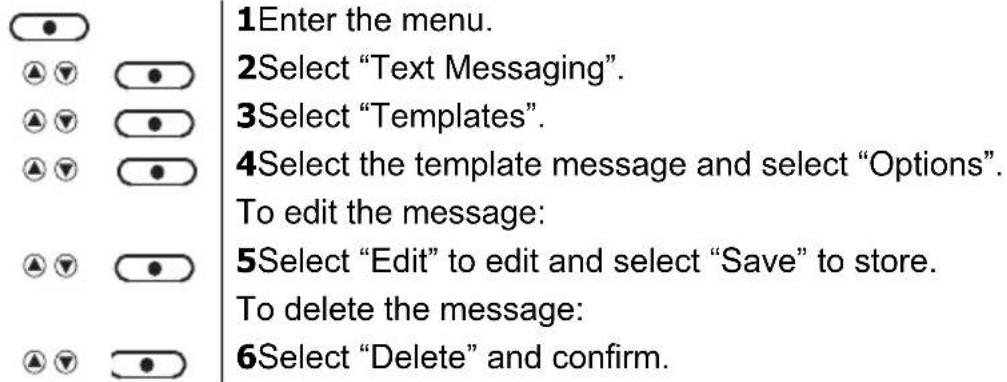
11.7 Delete messages
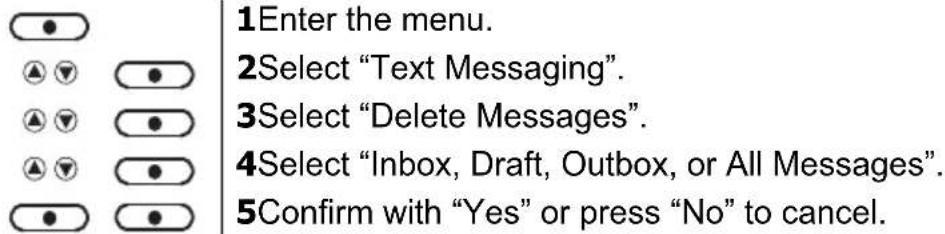
11.8 SMS Settings
SMS Service center numbers
To send and receive SMS text messages you need the telephone number of your Network's SMS Centre. These numbers have been pre-loaded into the phone. If you accidentally delete the SEND or RECEIVE SMS Service Centre numbers you will need to re-enter them in order for your SMS Service to work.
The Orbit can store 2 SMS Service center numbers, one incoming and one outgoing. This sending SMS service number will be dialed out by the phone whenever you send out a SMS.
To set the SMS Center numbers

If there is an incoming call with a number matching with one of these SMS center numbers, the phone knows it's a call from the SMS center and will take the line automatically to receive the messages.
Message alert tone
When you receive a text message, the message alert tone will sound. These beeps can be switched on or off:
1Enter the menu.
2Select "Text Messaging".
3Select "Text Settings".
4Select "Message Alert".
5Select "Yes" or "No".
Set Message size
A standard text message is 160 characters long. You can set a message to be up to 612 characters and the message will be sent as 4 messages of 160 characters long:

1Enter the menu.
2Select "Text Messaging".
3Select "Text Settings".
4Select "Message Size".
5Select "160 Characters" or "612 Characters".
11.9 User Areas
If you have more than one SMS terminal device on the same telephone line you must create different User Areas. Each user can have his own Inbox and outbox which are only accessible by a pin code. By giving each user different sub addresses, they can receive there own private messages.
In order to receive personal SMS messages, you must give your correspondents the sub address Number that they need to add to your standard telephone number (See below).
You correspondents will need to add your sub address to your telephone number when they want to send personal SMS.

E.g. If your personal sub address is "1" and your telephone number is 123456789, your correspondents should send their SMS messages to:1234567891! This is the number you need to remember and give to your correspondents.
If no sub address is add to you telephone number or '0', all devices will receive these messages.
You can change the sub address number to another one but only from 0-9:
Add a User mailbox

1Enter the menu.
2Select "Text Messaging".
3Select "Text Settings".
4Select "Users".
5Select one of the users and press "Options".
6Select "Edit".
7 Enter the user name (max. 8 characters) and press "Save".
8 Use the sub address shown or enter you own sub address (0-9).
9Press "Save".
10Enter the 4-digit mailbox PIN and press "Save".
11Enter the PIN code again and press "Save".
Open and read your own mailbox content
Once a mailbox is set and you enter the "Text Messaging" menu, the mailboxes in use will be displayed. You can open the "General User" mailbox without PIN code, the others will be PIN protected.
When there are new message:
1Press left soft key "Read".
The mailboxes are displayed. Mailboxes with new messages are marked with blue dots
2Scroll through the list and select the mailbox you want.
3Enter the mailbox PIN code and press OK.
4Select the message you want and press "Read".
Edit a user mailbox

1Enter the menu. 2Select "Text Messaging". 3Scroll to the mailbox you want to edit and press "Select". 4Enter the 4 PIN password and press OK. 5Select "Text Settings". 6Select "Users". 7Scroll to the user mailbox you want to edit and press "Options". 8Select "Edit". 9Enter the 4 PIN password and press OK. 10Edit the name and press "Save". 11Enter the new sub-address and press "Save". 12Enter the new 4 PIN password and press "Save". 13Re-Enter the PIN password and press "Save".
Delete a user mailbox
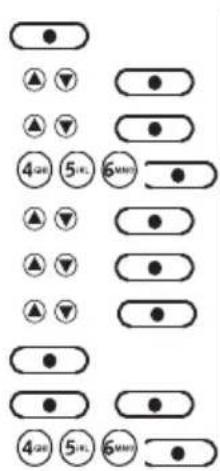
1Enter the menu.
2Select "Text Messaging".
3Scroll to the mailbox you want to edit and press "Select".
4Enter the 4 PIN password and press OK.
5Select "Text Settings".
6Select "Users".
7Scroll to the user mailbox you want to edit and press "Options".
8Select "Delete".
9Confirm with "Yes" or press "No" to cancel.
10Enter the 4 PIN password and press OK.
Set the Common mailbox sub address
1Enter the menu.
2Select "Text Messaging".
3Select "Text Settings".
4Select "Mailbox Number".
5Enter the new sub-address and press "Save".

If you enter a number already in use, you hear an error beep. Enter a different number to avoid this.
12 Additional handsets and base stations
You can subscribe up to 5 handsets on a base. Each handset can register up to 4 base stations and the user can select the base he wants to use.
12.1 Adding a new handset

Only needed when you have deregistered a handset or when you bought a new one.
To put the base into registration mode:

1Press and hold the paging key on the base for 3 seconds.
During 60 seconds the base is ready to register.
On the handset:

1If the handset is new "Please Register" is shown. Press "Menu" and select "Registration". OR

2Enter the menu.

3Select "Registration".

4Select "Register handset".

5 Select the number of the base to be associated with the handset (1-4) and confirm.
6Enter the system PIN (0000 by default) and confirm.

7Return to standby.
12.2 Removing a handset
This procedure needs to be carried out on a different handset then the one you want to remove.

1Enter the menu.
2Select "Registration".
3Select "De-Register".
4Enter the system PIN (0000 by default) and confirm.
5Scroll to the handset that needs to be removed and confirm.
6Press "Yes" to confirm or "No" to cancel.
7Return to standby.
12.3 Select a base
You can switch your handset between bases. The handset must first be registered with each base individually.

1Enter the menu.
2Select "Registration".
3Select "Select Base".
4 Scroll to the base you want to use and confirm. The base currently in-use is marked with "In-use".
12.4 Using the intercom feature
Calling an internal handset

1Press the INT-Key.
The screen displays "Internal Call".
2 Enter the internal number of the handset you want to call (1-5).
3Press "OK" to dial.
4Press the on-hook key to hang up or put the handset back on the base.
Transfer an external call to another handset
During an external call:

1Press the INT-Key.
Your external correspondent is placed on hold.
The screen displays "Internal Call".
2 Enter the internal number of the handset you want to call (1-5).
3Press "OK" to dial.
4 When the internal correspondent answers, press the on-hook key to transfer the call.
OR

3If the internal correspondent doesn't answer, press the INT key to retrieve the external correspondent or to go from one to the other.
4Press the on-hook key to hang up or put the handset back on the base.


Conference call
You can talk between 2 handsets and an external line at the same time.
During an external call:

1Press the INT-Key.
Your external correspondent is placed on hold.
The screen displays "Internal Call".
2 Enter the internal number of the handset you want to call (1-5).
3Press "OK" to dial.
4When the internal correspondent answers, select "Join".
"Conference Call" is shown on the display.

5Press the on-hook key to hang up or put the handset back on the base.
Taking an external call during an internal communication
When you are on intercom with another handset, you can still pick up outside calls.
To take an incoming call:

1 Press the on-hook key. The internal communication is now interrupted.

2Press the off-hook key. You are now in communication with the outside caller.
13 Troubleshooting
| Symptom Possible cause | Solution | |
| No display Batteries uncharged | Check the position of the batteries | |
| Recharge the batteries | ||
| Handset turned OFF Turn ON | the handset | |
| No tone Telephone cord badly connected | 连接 | Check the telephone cord connection |
| The line is occupied by another handset | Wait until the other handset hangs up | |
| The icon flashes Handset | out of range Bring the handset | closer to the base |
| The base has no power supply | Check the mains connection to the base | |
| The handset is not registered on the base | Register the handset on the base | |
| Base or handset do not ring | The ringing volume is off or low | Adjust the ringing volume |
| Not possible to transfer a call on PABX | The Flash Time is too short or too long | Change the Flash Time |
| Telephone does not react to pressing the keys | Manipulation error Remove the batteries and put them back in place | |
14 Technical dataTechnical characteristics
Standard
DECT(Digital Enhanced Cordless Telecommunications)
GAP (Generic Access Profile)
Frequency range 1880 MHz to 1900 MHz
Number of channels 120 duplex channels
Modulation GFSK
Speech coding 32 kbit/s
Emission power 10 mW (average power per channel)
Range 300m in open space /50m maximum in-house
Number of handsets Up to 5
Base power supply 230V / 50 Hz / 7,5V DC 300mA
Handset Batteries: 2 rechargeable batteries AAA, NiMh 1,2V, 750mA
Handset autonomy 110 hours in standby
Handset talk time
11 hours
Normal conditions of use
+5 °C to +45 °C
Dialling mode
Pulse / Tone
Flash time
100 or 250 ms
Measurements base
ca. 112mm x 112mm x 64mm (L x B x H)
Measurements handset
ca. 34mm x 52,5mm x 154mm (L x B x H)
Weight base with adaptor
ca. 319g
Weight base without adaptor
ca. 135g
Weight handset with batteries
ca. 124g
15 Topcom Warranty
15.1 Warranty period
The Topcom units have a 24-month warranty period. The warranty period starts on the day the new unit is purchased. There is no warranty on standard or rechargeable batteries (AA/AAA type).
Consumables or defects causing a negligible effect on operation or value of the equipment are not covered.
The warranty has to be proven by presentation of the original or copy of the purchase receipt, on which the date of purchase and the unit-model are indicated.
15.2 Warranty handling
A faulty unit needs to be returned to a Topcom service centre including a valid purchase note and a filled in service card.
If the unit develops a fault during the warranty period, Topcom or its officially appointed service center will repair any defects caused by material or manufacturing faults free of charge, by either repairing or exchanging the faulty units or parts of the faulty units. In case of replacement, colour and model can be different from the original purchased unit.
The initial purchase date shall determine the start of the warranty period. The warranty period is not extended if the unit is exchanged or repaired by Topcom or its appointed service centre.
15.3 Warranty exclusions
Damage or defects caused by incorrect treatment or operation and damage resulting from use of non-original parts or accessories are not covered by the warranty.
The warranty does not cover damage caused by outside factors, such as lightning, water and fire, nor any damage caused during transportation.
No warranty can be claimed if the serial number on the units has been changed, removed or rendered illegible. Any warranty claims will be invalid if the unit has been repaired, altered or modified by the buyer.
This appliance may only be used with rechargeable batteries. If you want to replace the originally included batteries, please check whether the batteries you use are suitable and rechargeable. Alkaline batteries may under NO circumstances be used in the handsets. If you use Alkaline batteries and place the handset on the basis, the batteries will heat up and may explode. Any damage which may be caused cannot be recovered from the manufacturer and the damage thus caused to the appliance is not covered by the warranty conditions. Any repairs will be charged to you.
16 Disposal of the device (environment)

At the end of the product lifecycle, you should not throw this product into the normal household garbage but bring the product to a collection point for the recycling of electrical and electronic equipments. The symbol on the product, user guide and/or box indicate this.
Some of the product materials can be re-used if you bring them to a recycling point. By re-using some parts or raw materials from used products you make an important contribution to the protection of the environment. Please contact your local authorities in case you need more information on the collection points in your area.
17 Cleaning
Clean the telephone with a slightly damp cloth or with an anti-static cloth. Never use cleaning agents or abrasive solvents.
Svenska
- 2A Basenhetens baksida -
A. Telefonjack
B. Nätsladd
C. Telefonsladd
2.3 Installera handenheten
natural_image
Diagram of a circular mechanical or architectural component with concentric layers and two central circular features, labeled with number 12 (no text or symbols beyond label)- 2F Bas -
2.6 Symboler

Knappsatslås

1Öppna menyn.
2Välj "Samtalslista".
3 Välj "Missade samtal, Mottagna samtal eller Uppringda samtal".
1Öppna menyn.
1Öppna menyn.
1Öppna menyn.
1Öppna menyn.
2Välj "SMS".
3Välj "Skrivs meddelande".
1Öppna menyn.
2Välj "SMS".
3Välj "SMS-inställn."
4Välj "Meddelandelarm".
5Välj "Ja" eller "Nej".
1Öppna menyn.
2Välj "SMS".
3Välj "SMS-inställn.".
4Välj "Medd.storlek".
5Välj "160 tecken" eller "612 tecken".
1Öppna menyn.
2Välj "SMS".
DECT(Digital Enhanced Cordless Telecommunications)
GAP (Generic Access Profile)
ca 34mm x 52,5mm x 154mm (L x B x H)
Basenhetens vikt (inklusive adapter)
ca 319g
Basenhetens vikt (exklusive adapter)
ca 135g
- 2A Basestationen set bagfra -
natural_image
Line drawing of a classic mobile phone with keypad and front panel (no text or symbols)Bordinstallation

natural_image
Line drawing of hands holding a circular object with a textured surface, no text or symbols present- Løft holder
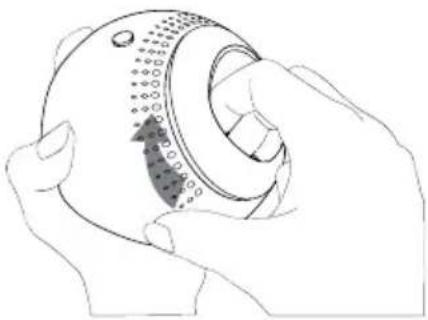
natural_image
Line drawing of hands holding a circular device with a dial and arrow indicating rotation (no text or symbols)- Drej 180° med uret

natural_image
Illustration of hands holding a circular device with a curved arrow indicating rotation (no text or symbols)- Slip når i position

natural_image
Line drawing of a Vægmontering mobile phone with keypad and screen (no text or symbols on device)- 2C Vægmontering -
1 Tryk på knappen Ned/Telefonbog.
1Åbn menuen.
2Vælg "Opkaldslistler".
1Åbn menuen.
2Vælg "Opkaldslistler".
1Åbn menuen.
2Vælg "Opkaldslistler".
Alarmtone for besked
DECT(Digital Enhanced Cordless Telecommunications) GAP (Generic Access Profile)
Frekvens 1880 – 1900 MHz
Antal kanaler 120 duplekskanaler
Modulation
GFSK
Talekodning
32 kbit/s
Emissionsstrøm
2.5 Taster/led-indikator
Håndsett

1Åpne menyen.
2Velg "Anropslister".
3 Velg "Ubesvarte anrop", "Innkomm. anrop" eller "Utgående anrop".
1Åpne menyen.
2Velg "Anropslister".
3Velg "Slett samtaler".
1Åpne menyen.
2Velg "Innstillinger".
3Velg "Still inn tlf.".
4Velg "Ringetone".
5 Velg "Eksternt anrop" for eksterne samtaler eller "Internt anrop" for interne samtaler, og bekreft.
1Åpne menyen.
2Velg "Innstillinger".
3Velg "Still inn tlf.".
4Velg "Tastelyd".
5Velg "På" eller "Av".
6Gå tilbake til beredskap.
7.4 Bakgrunn
Du kan velge mellom 3 ulike bakgrunnsbilder som vises i bakgrunnen när håndsettet står i beredskap.

1Åpne menyen.
2Velg "Innstillinger".
3Velg "Still inn tlf.".
4Velg "Bakgrunnsbilde".
5Velg ønsket bilde og bekreft.
Mens du blar kan du velge "Se" for å vise bildet.
6Gå tilbake til beredskap.
7.5 Menyfarge

1Åpne menyen.
2Velg "Innstillinger".
3Velg "Still inn tlf.".
4Velg "Menyfarge".


3Velg "Still inn tlf.".
4Velg "PABX-kode".
5Velg "Angi kode".
6 Tast inn prefiskoden, f.eks. "0" (kun 1 siffer), og velg "Lagre".
ELLER
7Velg "På" eller "Av".
1Åpne menyen.
2Velg "Innstillinger".
3Velg "Still inn tlf.".
4Velg "Høyttalervolum".
1Åpne menyen.
2Velg "Tidsinnstill.".
3Velg "Alarm".
4Velg "På".
1Åpne menyen.
2Velg "Innstillinger".
3Velg "Still inn base".
4Velg "Nullstill".
1Åpne menyen.
1Åpne menyen.
2Velg "SMS".
3Velg "Skriv melding".
4Skriv inn meldingen.
5Velg "Valg".
12Velg "Lagre nummer". 13Skriv inn navnet og velg "Lagre". 14Rediger telefonnummeret hvis du ønsker det, og velg "Lagre". Vise meldingsdetaljer: 15Velg "Meldingsinfo". 16Avsenderens nummer vises. Trykk "Ring" hvis du vil ringe opp nummeret.
Slik leser du innboksen via menyen:

1Åpne menyen. 2Velg "SMS". 3Velg "Innboks".
1Åpne menyen. 2Velg "SMS". 3Velg "Utkast". 4Velg "Rediger" hvis du vil redigere innholdet i meldingen. 5Velg "Valg".
1Åpne menyen. 2Velg "SMS". 3Velg "Utboks". 4Skriv inn meldingen og velg "Les". 5Velg "Valg". Slik videresender du meldingen til et annet nummer: 6Velg "Videresend". 7 Rediger meldingen hvis du ønsker det, og velg "Valg". På samme måte som når du skriver en ny melding har du muligheten til å sende, lagre og bruke en mal osv. 8Velg "Send". Slik sletter du meldingen: 9 Velg "Slett" og bekreft med "Ja". Velg "Nei" for å avbryte.
11.6 Meldingsmal
1Åpne menyen.
2Velg "SMS".
3Velg "SMS-innst.".
4Velg "Meldingsvarsel".
5Velg "Ja" eller "Nei".
Angi meldingsstørrelse
1Åpne menyen.
2Velg "SMS".
3Velg "SMS-innst.".
4Velg "Meldingsstørr.".
5Velg "160 tegn" eller "612 tegn".
11.9 Brukerområder
1Åpne menyen.
2Velg "SMS".
3Velg "SMS-innst.".
4Velg "Postboksnummer".
5Angi en ny underadresse og trykk "Lagre".

1Trykk på INT-tasten.
Den eksterne samtalepartneren settes på venting.
Displayet viser "Internt anrop".
DECT (Digital Enhanced Cordless Telecommunications) GAP (Generic Access Profile)
Frekvensområde 1880 MHz til 1900 MHz
Antall kanaler 120 duplekskanaler
Modulering GFSK
Talekoding 32 kbit/s
natural_image
Line drawing of a classic mobile phone with keypad and front panel (no text or symbols)Työpöytätila

natural_image
Line drawing of hands holding a circular object with a textured surface, no text or symbols present- Nosta kannatinta
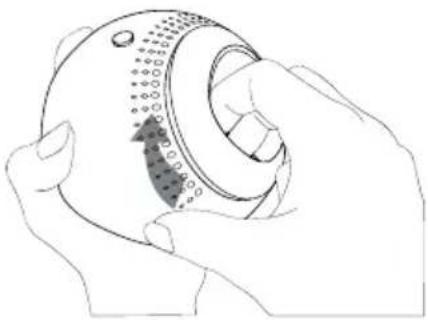
natural_image
Line drawing of a hand holding a circular device with a dial and arrow indicating rotation (no text or symbols)natural_image
Illustration of hands holding a circular device with a knob, showing a rotating knob (no text or symbols)- Vapauta asennossa

natural_image
Line drawing of a classic mobile phone with keypad and front panel (no text or symbols)natural_image
Diagram of a circular mechanical or architectural component with concentric layers and two central circular features, labeled with number 12 (no text or symbols beyond label)- 2F Tukiasema -
2.6 Symbolit

Näppäinlukko

1Siirry valikkoon.
1Siirry valikkoon.
1Siirry valikkoon.
1Siirry valikkoon.
1Siirry valikkoon.
24Valitse "Lähetä"
RETURN WITH YOUR DEFECT PRODUCT
natural_image
Two identical rectangular frames with evenly spaced vertical lines inside, no text or symbols present.Location/Ort./Lieu/Plaats: Post code/Postleitzahl/Code Postal/Postcode:

natural_image
Two identical rectangular frames with evenly spaced vertical lines inside, no text or symbols present.| Country/Land/Pays/Land: |


(Original Proof of Purchase has to be attached to this return card to be valid for warranty)
- Important
- Belangrijk
- Getting started 14
- Using the telephone
- Phonebook
- Caller Identification 25
- Calls List 26
- Personalise the handset 27
- Base settings 31
- Factory Reset
- Nederlands
- Electrical safety and protection:
- Fire safety:
- Danger of explosion:
- Poisoning danger:
- Note:
- Getting started
- How to use this user guide
- Installing the base
- Installing the handset
- Wall mounting
- Keys/Led
- Handset
- ON
- Base
- Symbols
- Display keys
- Navigating the menu
- To exit or to go back one level in the menu
- Menu overview
- Switching the handset ON/OFF
- Changing the menu language
- Setting the date and time
- Setting the time format
- Making a normal telephone call
- Direct dialling
- Pre-dialling
- Redial a number from the dialled call list
- Receiving a telephone call
- Handsfree mode
- Adjust earpiece/handsfree volume
- Secrecy function (Mute function)
- Locating a handset (Paging function)
- Keypad Lock
- Using the alphanumerical keypad
- To access and search in the phonebook
- To add an entry
- To dial an entry
- Show Details
- Delete an entry
- Delete all entries
- Edit Entry
- Copy a phonebook entry or all entries to another handset
- Copy an entry to another handset
- Copy all phonebook entries to another handset
- Memory status
- Change the ringtone
- Caller Identification
- Call Waiting
- Calls List
- New calls Alert
- To view new missed calls
- View and dial from the Calls list
- Copy a Calls list number into the phonebook
- Send a text message to a Calls list number
- Delete an entry
- Delete all entries
- Personalise the handset
- Ringtone and volume
- Ringtone
- Ringer volume
- Handset name
- Keypad beeps
- Wallpaper
- Menu color
- Setting the contrast
- Setting the light timeout
- Setting the screensaver
- Autotalk
- PABX Access code
- Receiving Volume
- Using the alarm feature
- Set the alarm
- Base settings
- Ringtone
- Ringer Volume
- Dial Mode
- Recall (Flash)
- System PIN
- Ring Priority
- First ring On/Off
- Agenda
- SMS
- How to write an SMS
- Sending an SMS
- Read and view the list of received messages (Inbox)
- Reading and sending the saved message (Draft folder)
- Using the outbox
- Template messages
- Delete messages
- SMS Settings
- SMS Service center numbers
- To set the SMS Center numbers
- Message alert tone
- Set Message size
- User Areas
- Add a User mailbox
- Open and read your own mailbox content
- Edit a user mailbox
- Delete a user mailbox
- Set the Common mailbox sub address
- Additional handsets and base stations
- Adding a new handset
- Removing a handset
- Select a base
- Using the intercom feature
- Calling an internal handset
- Transfer an external call to another handset
- Conference call
- Taking an external call during an internal communication
- Troubleshooting
- Technical dataTechnical characteristics
- Topcom Warranty
- Warranty period
- Warranty handling
- Warranty exclusions
- Disposal of the device (environment)
- Cleaning
- Veiligheidsadvies
- Symbolen
- Alle contacten wissen
- Achtergrond
- PABX-code
- Flash (Recall)
- Voorrang belsign.
- SMS-instellingen
- Nummers SMS-berichtencentrales
- Symboles
- Supprimer SMS (Delete messages)
- Symbole
- Viktigt
- Using the telephone 19
- Svenska
- Bruke telefonen 116
- Back
- Installera handenheten
- Symboler
- Alarmtone for besked
- Taster/led-indikator
- Håndsett
- Bakgrunn
- Menyfarge
- Meldingsmal
- Angi meldingsstørrelse
- Brukerområder
- Symbolit
Brand : TRISTAR
Model : 10002978
Category : Telephone