
TP9000 - Thermostat DANFOSS - Free user manual and instructions
Find the device manual for free TP9000 DANFOSS in PDF.


| Product Type | Programmable Thermostat |
| Brand | Danfoss |
| Model | TP9000 |
| Power Supply | 24 VAC or 2 x AA batteries |
| Display Type | LCD screen with backlight |
| Temperature Range | 5°C to 35°C (41°F to 95°F) |
| Accuracy | ±0.5°C at 20°C |
| Programming | 7-day, 4 time periods per day |
| Dimensions (W x H x D) | 120 x 80 x 25 mm |
| Weight | 200 g (including batteries) |
| Mounting | Wall mount (screws and wall plugs included) |
| Compatibility | Most heating systems (gas, oil, electric, heat pump) |
| Control Type | Proportional-integral (PI) or ON/OFF |
| Special Functions | Frost protection, holiday mode, key lock |
| Maintenance | Clean with a soft, dry cloth; do not use liquids |
| Safety | No user-serviceable parts; refer to qualified technician |
| Spare Parts | Batteries (AA) only; contact Danfoss for other parts |
| Certifications | CE, RoHS |
Frequently Asked Questions - TP9000 DANFOSS
User questions about TP9000 DANFOSS
0 question about this device. Answer the ones you know or ask your own.
Ask a new question about this device
Download the instructions for your Thermostat in PDF format for free! Find your manual TP9000 - DANFOSS and take your electronic device back in hand. On this page are published all the documents necessary for the use of your device. TP9000 by DANFOSS.
USER MANUAL TP9000 DANFOSS
natural_image
Black-and-white photo of a pregnant woman and a young girl preparing food in a kitchen, with no visible text or symbols.TP9000
Electronic Programmable Room Thermostat plus Domestic Hot Water Timer
TP9000
Electronic Programmable Room Thermostat plus Domestic Hot Water Timer

For a large print version of these instructions please call Marketing on 0845 121 7400.

Certification Mark
This product complies with the following EC Directives:
Electro-Magnetic Compatibility Directive.
(EMC) (2004/108/EC)
Low Voltage Directive.
(LVD) (2006/95/EC)
CE

natural_image
Simple line drawing of a trash bin with no text or symbolsDanfoss can accept no responsibility for possible errors in catalogues, brochures, and other printed material. All trademarks in this material are property of the respective companies. Danfoss and the Danfoss logotype are trademarks of Danfoss A/S. All rights reserved.
Thank you for Buying a Danfoss Product
1.1 An introduction to your programmable room thermostat....6
1.2 Preset Programmes (CH/HW) 7
1.3 Setting the correct date and time 8
1.4 Changing the preset programmes ....10
1.5 Copy functions explained ....13
1.6 Holiday Programme ....14
2.0 User Overrides
2.1 Temporarily alter current programmed temperature .....15
2.2 To change day of week legends from numbers to text ..15
2.3 To change time display between 12 and 24 hour clock .16
2.4 To change between °C and °F scaling .....16
2.5 Thermostat mode (Heating mode only) 16
2.6 Changing the clock forwards and backwards .....16
2.7 Remote override into and out of thermostat mode .....17
2.8 Delay start feature ....17
2.9 Optimum start control (OSC) 17
3.0 Temporary override buttons
3.0 Temporary override buttons ....18
4.0 User Advanced Programming Options
4.1 To access User Advanced Programming ....20
4.2 Overview of installer selectable features which may affect the operation of your thermostat ....23
4.3 Service Interval Timer 24
4.4 Resetting the unit 24
TACMA
THE ASSOCIATION OF CONTROLS MANUFACTURERS

What is a programmable room thermostat?
... an explanation for householders
A programmable room thermostat is both a programmer and a room thermostat. A programmer allows you to set 'On' and 'Off' time periods to suit your own lifestyle. A room thermostat works by sensing the air temperature, switching on the heating when the air temperature falls below the thermostat setting, and switching it off once this set temperature has been reached.
So, a programmable room thermostat lets you choose what times you want the heating to be on, and what temperature it should reach while it is on. It will allow you to select different temperatures in your home at different times of the day (and days of the week) to meet your particular needs.
Turning a programmable room thermostat to a higher setting will not make the room heat up any faster. How quickly the room heats up depends on the design of the heating system, for example, the size of boiler and radiators.
Neither does the setting affect how quickly the room cools down. Turning a programmable room thermostat to a lower setting will result in the room being controlled at a lower temperature, and saves energy.
The way to set and use your programmable room thermostat is to find the lowest temperature settings that you are comfortable with at the different times you have chosen, and then leave it alone to do its job. The best way to do this is to set low temperatures first, say 18^ , and then turn them up by one degree each day until you are comfortable with the temperatures. You won't have to adjust the thermostat further. Any adjustments above these settings will waste energy and cost you more money.
If your heating system is a boiler with radiators, there will usually be only one programmable room thermostat to control the whole house. But you can have different temperatures in individual rooms by installing thermostatic radiator valves (TRVs) on individual radiators. If you don't have TRVs, you should choose a temperature that is reasonable for the whole ho use. If you do have TRVs, you can choose a slightly higher setting to make sure that even the coldest room is comfortable, then prevent any overheating in other rooms by adjusting the TRVs.
The time on the programmer must be correct. Some types have to be adjusted in spring and autumn at the changes between Greenwich Mean Time and British Summer Time.
You may be able to temporarily adjust the heating programme, for example, 'Override', 'Advance' or 'Boost'. These are explained in the manufacturer's instructions.
Programmable room thermostats need a free flow of air to sense the temperature, so they must not be covered by curtains or blocked by furniture. Nearby electric fires, televisions, wall or table lamps may prevent the thermostat from working properly.
1.0 Basics
1.1 An introduction to your programmable room thermostat
The TP9000 is a programmable thermostat designed to control both your Hot Water and Heating.
Depending on the setting value in the Installer Advanced Programming (option 41) you can have 7-day, 5-2 day or 24 hour programming. A full explanation of these different methods is located on page 10-11.
The thermostat can also be set by you to provide two different programming blocks which can then be assigned to any day of the week, this is referred to as A/B programme operation.
The Heating side of the TP9000 can be set by your installer to provide up to 2, 4 or 6 time and temperature settings each day, whereas the Hot Water can be set to provide 1, 2 or 3 on/off periods each day.
The thermostat also features useful overrides, including a programmable frost setting.
The TP9000 has some advanced features which the installer will set-up if they are required. There are also a number of advanced features which can be set up by you. These advanced settings alter the way that your thermostat operates, some also affect the programming functions and the user overrides. Please read the User Advanced Programming instructions before programming the unit (see page 20).
General Operation
The TP9000 has two distinct display modes - one for Hot Water, one for Central Heating. The currently selected mode is indicated by a bar at the bottom of the LCD screen when in run mode. The right bar is for Heating, the left bar is for Hot Water.

When programming the TP9000 it is important to be aware of which mode is active before beginning programming. To toggle between modes, press the CH/HW button. The display will change and the indicator bar at the bottom will move to reflect which mode is selected. The flame 🔊) and tap (→ symbols are used in conjunction with the LED's to show the current output status (on/off ). The output status is always shown for both Heating and Hot Water regardless of the display mode.
1.2 Preset programmes
Your TP9000 comes ready programmed with a set of operating times and temperatures which suit most people. Please remember that some of the options available will depend on how the installer has set up the unit.
Central Heating
| Weekdays (Mon-Fri) Weekend (Sat-Sun) | |||||
| Event | Time Temp. | °C Event | Time Temp. | °C | |
| 1 | 06:30 | 20 | 1 | 07:30 | 20 |
| 2 | 08:30 | 15 | 2 | 09:30 | 20 |
| 3 | 11:30 | 20 | 3 | 11:30 | 20 |
| 4 | 13:30 | 15 | 4 | 13:30 | 20 |
| 5 | 16:30 | 21 | 5 | 16:30 | 21 |
| 6 | 22:30 | 15 | 6 | 22:30 | 15 |
| Note: these are also times for Block “A” programmes | Note: these are also times for Block “B” programmes | ||||
Hot Water
| Weekdays (Mon-Fri) Weekend (Sat-Sun) | |||||
| Event | Time | Temp. °C | Event | Time | Temp. °C |
| 1 | 06:30 | On | 1 | 07:30 | On |
| 2 | 08:30 | Off | 2 | 09:30 | Off |
| 3 | 11:30 | On | 3 | 11:30 | On |
| 4 | 13:30 | Off | 4 | 13:30 | Off |
| 5 | 16:30 | On | 5 | 16:30 | On |
| 6 | 22:30 | Off | 6 | 22:30 | Off |
| Note: these are also times for Block “A” programmes | Note: these are also times for Block “B” programmes | ||||
Note: If set up for two on/off events per day, events 3 and 4 are skipped. If set up for one on/off event per day, events 2, 3, 4 & 5 are skipped. In both cases the events are re-numbered.
Customising the display
For the sake of clarity, the instructions assume that the display setting uses a 24 hour clock, °C and that days of the week are shown as text. All of these settings can be personalised after the thermostat has been programmed, see page 16.
1.3 Setting the correct date and time
Your TP9000 incorporates a real time clock with calendar function that automatically changes time in both Spring and Autumn. The time and date is set in the factory for the UK time zone, and does not normally require adjustment. If you live in another time zone refer to “Time zone off set” (option 4) on page 21. However, should it be found necessary to adjust time or date for any other reason refer to the following instructions.
Setting the date
Press and hold and PROG for 3 seconds, to display date in dd/mm/yy format.

The YEAR number will flash, use or V to correct the year.
Use - or + to move to MONTH, then use or V to correct month.
Use - or + to move to DATE in month, then use or V to correct day in month.
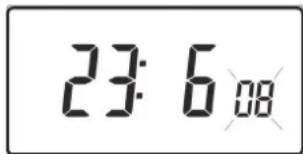
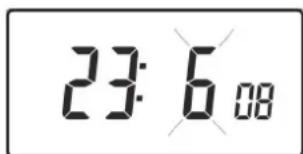

If you attempt to select an invalid date the unit software will reject it and apply the nearest valid date. It is recommended that date is set in the order, yy/mm/dd.
Setting the correct time
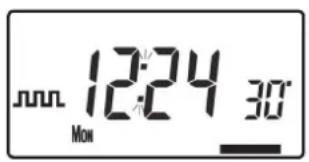
After setting the date press PROG to display the time. The time display will flash on and off.
Use the + and - buttons to set the correct time (press and hold to change in 10 min. increments).

Setting the correct day
The day of the week is set automatically. Press PROG to return to normal operation (RUN).
Accepting the preset programmes
If you are happy with the preset times shown in the table on page 7 you need take no further action.
1.4 Changing the preset programmes
Before you change the preset programmes
Your installer will have set the unit to operate in one of the following modes:
- 7 day - each day has independent times and temperatures offering full fl exibility of programming (page 10).
- 5/2 day - one set of programmes for weekdays and another for weekends (page 10).
- 24 hr - one set of programmes for the whole of the week (page 11).
Alternatively
- A/B - The unit can also be set by you to provide two programme blocks, either of which can be applied to different days of the week. If this is required refer to option 1 on page 20 for instructions on how to turn on this feature.
Please Note
The unit must be programmed in sequence, event times cannot be set out of sequence.
If you want to leave a preset time as it is, simply press NEXT to move to the next setting.
If you want to return the unit to RUN, press PROG and hold until the display returns to the previous RUN mode. Alternatively leave alone and the unit will automatically return to RUN after 2 minutes.
Your installer will have set your unit to programme 6, 4 or 2 events per day for Heating, or 1, 2 or 3 events per day for Hot Water. This will determine the number of events per day that you are able to programme.
Before beginning programming the unit remember to check that the correct function is selected i.e. Heating or Hot Water by using the CH/HW button.
Changing the preset programmes in 7 day mode
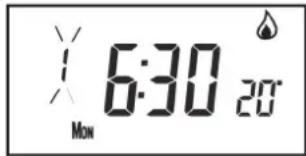
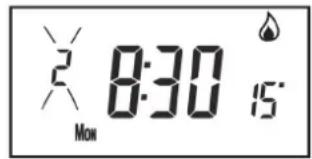
a) Press PROG once until the display shows the first preset time and temperature
b) Use the + and - buttons to adjust the time (press and hold to adjust in 10 minute increments)
c) Use the and V buttons to adjust the required temperature (CH only)
d) Press NEXT to move to the next preset time and/or temperature (Event 2)
e) Once all events for the day have been programmed, press DAY/HOL to move to the next day
f) Repeat steps b, c, d & e to programme the remaining weeks events.
g) Press and hold PROG to return to the main screen.
Changing the preset programmes in 5/2 day mode
For Weekdays
a) Press PROG until the first preset time and temperature
(Event 1 Days MON, TUE, WED, THU, FRI)
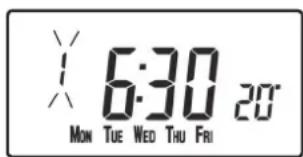
b) Use the + and - buttons to adjust the TIME (press and hold to change in 10 minute increments).

c) Use the and V buttons to adjust the required TEMPERATURE (CH only).
d) Press NEXT to move to the next preset time and/or temperature (Event 2).
e) Repeat steps b, c, & d to programme the remaining weekday events.
f) Press DAY/HOL to move on to weekend events.
For Weekends
Press PROG until the first preset time and temperature (Event 1 Days SAT, SUN) appears in display.

Repeat steps b, c, & d above to programme the remaining weekend events.
Press PROG to return to the main screen.
Changing the preset programmes in 24 hour mode


a) Press PROG until the first preset time and temperature (Event 1 for all days of the week) appears in display.
b) Use the + and - buttons to adjust the TIME (press and hold to change in 10 min increments).
c) Use the and V buttons to adjust the required TEMPERATURE (CH only).
d) Press NEXT to move to the next preset time and/or temperature (Event 2).
e) Repeat steps b, c, & d to programme the remaining events.
f) Press DAY/HOL to move on to weekend events.
Changing preset programmes for AB programming
(Installer option 41 must be set to 5-2 day mode)
Press and hold PROG and V for 3 seconds. The display will change to the figure opposite. This will take you into User Advanced Programming option 1.
Use and V keys to enable or disable the function (1=enabled, 0=disabled).
Press PROG for 5 seconds until the display returns to previous RUN mode.
Press PROG once, the display will change to show the default days assigned to programme "A" (days MON, TUE, WED, THU, FRI).
Use the + and - keys to scroll forwards or backwards through the days of the week.
To deselect a day press V, (for example TUE). To select a day press (for example SUN).
Any deselected days are automatically assigned to programme "B".


Programming "A" programme days and events
a) Press PROG until the first preset time and/or temperature (Event 1 for Programme A) appears in display.
b) Use the + and - buttons to adjust the TIME (press and hold to change in 10 minute increments).
c) Use the and V buttons to adjust the required TEMPERATURE.
d) Press NEXT to move to the next preset time and temperature (CH only) (Event 2).
e) Repeat steps b, c, & d to programme the remaining events.

Programming "B" programme days and events
a) Press DAY/HOL until the first preset time and temperature (Event 1 for Programme B) appears in the display.
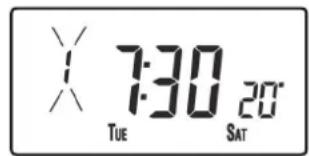
b) Use the + and - buttons to adjust the TIME (press and hold to change in 10 minute increments).
c) Use the and V buttons to adjust the required TEMPERATURE (CH only).
d) Press NEXT to move to the next preset time and/or temperature (Event 2).
e) Repeat steps b, c, & d to programme the remaining events.
Running the programme
Press PROG to return to previous RUN mode. The Heating will now follow the times and temperatures programmed.

1.5 Copy functions explained
There are 2 possible copy functions available. These are; Standard Copy and Enhanced Copy. Copy functions are enabled/disabled in the Advanced Programming Options (page 20)
Standard Copy: Pressing copy will copy the previous days events into the displayed day. The unit will then display the 1st event for the new day. This copy function is present only if the unit is set to run in 5+2 or 7 day mode.
Enhanced copy: The enhanced copy function is available in 7 day mode only. This allows any day to be copied to any other day, or days. To use the enhanced copy function, go into the event programming using the PROG button, then:
1) use the DAY button to find the day to be copied from
2) press the COPY button to select the day to be copied from. When selected, the day should begin to flash.
3) use the DAY button to find the day to be copied to
4) press COPY button to copy the selected day
5) repeat steps 3 and 4 to select and copy other days
6) to stop copying, use the DAY button to go back to the fl ashing day and press the COPY button. The previously fl ashing day will stop fl ashing to indicate it has been de-selected.
1.6 Holiday programme
The TP9000 is equipped with a holiday mode that enables it to automatically bring back on the Heating and Hot Water when returning from holiday. During the period when the unit is in holiday mode, the Hot Water is turned off, and the central Heating is placed in frost protection mode
To set up the holiday programme, please follow the below steps:
a) Press and hold DAY/HOL
b) Use the and V buttons to set the year
c) Use the + button to move to the month. Use the and V buttons to set the month
d) Use the + button to move to the day. Use the and V buttons to set the day
e) To exit and activate the holiday mode press DAY/HOL once. The display will change, Heating and Hot Water will be switched off. The unit will stay in this state until the programmed return date, at which point it will resume normal operation.
f) Once in holiday mode, the return modes for both the heating and hot water can be set. Use the CH/HW button to change between heating and hot water display mode.

g) The Heating set temperature for the duration of the holiday mode can be adjusted by selecting the Heating display mode with the CH/HW button and then adjusting the set temperature using the (image of Up button) and image of Down button) buttons.
h) Holiday mode can be manually ended at any time by pressing the DAY button
2.0 User Overrides
Altering the display to show time or temperature (Heating Mode)
Press + and - together to change between settings.


2.1 Temporarily alter current programmed temperature
Press or V until required temperature is displayed. Please note that your installer may have restricted both upper and lower temperature settings and the temperature override limits.
This override will automatically be cancelled at the beginning of the next programmed event. Please note that your installer may have restricted the duration of the override to something other than next event. In this case the override arrow will flash to indicate a timed override is active during the next event
2.2 To change day of week legends from numbers to text
Press and - together to toggle between day numbers and text.
2.3 To change time display between 12 hour and 24 hour clock
Press and + together to toggle between 12 and 24 hour clock.
2.4 To change between °C and °F scaling
Press V and - together to toggle between °C and °F temperature scaling.
2.5 Thermostat mode (Heating mode only)
a) A constant temperature of between 5-30°C can be selected if required. This can provide frost protection for periods away from home, it can also be used to provide untimed higher temperatures if, for example, a family member is sick.
b) Press and V together to enter thermostat mode. The default setting is 5°C, but this can be reprogrammed, see User Advanced Programming, option 10, (page 21).
c) A frost protection symbol (snowfl ake in shield) will appear in the display when the selected temperature is equal to or less than the programmed frost protection setting.
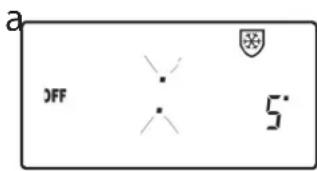
d) Use the or V buttons to change the temperature away from the programmed frost protection temperature to another value.
e) To return to automatic programming press both and together.
f) Alternately, Thermostat mode can be accessed via the MODE button (see page 18)
2.6 Changing the clock forwards and backwards
This is handled automatically, however, if the manual changeover has been selected (User Advanced Programming option 3 on page 21) follow the instructions below.
To change from Summer to Winter (clocks back)
With clock display showing, press and hold - button until time moves back.
To change from Winter to summer (clocks forward)
With clock display showing, press and hold + button until time moves forward.
2.7 Remote override into and out of thermostat mode
Selected models are available with a feature which allows a telephone activated switch or window contacts to step the unit into or out of thermostat mode.
The required temperature to be maintained when the building is unoccupied, or when windows are open, must first be set up in User Advanced Programming, option 10, (page 21).
To locally override this feature press either both and V together, or press the MODE button.
2.8 Delay start feature
Your thermostat includes an optional delay start feature to hold off the Heating for a time on mild days when the room temperature at the start of an event is close to the programmed value. If you have enabled this function it can be overridden by pressing either or V buttons. To enable this feature, please refer to User Advanced Programming, option 11, (page 22).
When this function is active, the set temperature will flash on the display and an hourglass symbol will be displayed.
2.9 Optimum start control (OSC)
Your thermostat includes an optional optimum start control. This feature allows you to set the time at which you require a room temperature by. The thermostat then calculates how soon before the event time the system must be turned up to ensure that the room is at the temperature by the required time. A full description of this and how to enable it and set it up is given in User Advanced Programming, options 12 & 13, (page 22-23). When this function is active, the set temperature will flash on the display
3.0 Temporary override buttons
Sometimes you may need to change the way you use your Heating temporarily, i.e. due to unusually cold weather. The TP9000 has two convenient overrides which can be selected without affecting the set programme.
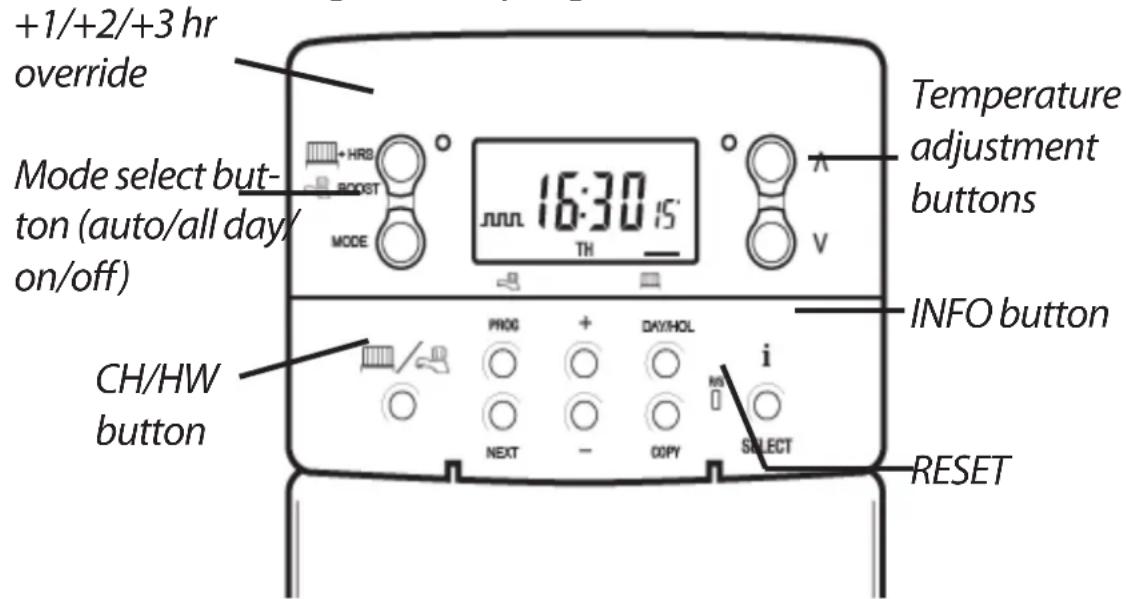
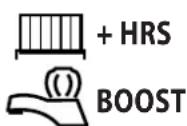
The grey buttons next to the radiator and tap symbol is the + HRS button for heating and the BOOST button for the Hot Water.
For Water display mode, pressing this button once, twice or three times when the system is in OFF, AUTO or ALLDAY mode will cause the Hot Waterto remain on for an extra 1, 2 or 3 hours if already on, or will switch the water on for 1, 2 or 3 hours if currently off. BOOST +1, +2 or +3 HRS will be shown in the display.
For Heating display mode, pressing the +HRS button once, twice or three times will extend the current time/temperature period for 1, 2 or 3 hours, but does not operate if the thermostat is in the OFF or FROST PROTECTION mode. +1, +2 or +3 HRS will be shown in the display. Pressing this button for a fourth time will cancel the +HRS BOOST function.
MODE Pressing this button will alternate between setting the unit in OFF (Thermostat), AUTO or ALLDAY modes for HEATING or ON, OFF, AUTO or ALLDAY modes for WATER. In AUTO mode, all programmed events will run,
whereas in ALLDAY mode, only the first and last events will run. If set for two events per day for Heating, or one ON/OFF event for Water then AUTO and ALLDAY modes are the same. The display will show how many events are to run:

Indicates that unit is in ALLDAY or AUTO mode with 2 events per day for 1 On/Off for Hot Water.

Indicates that the unit is in AUTO mode with 4 events per day for heat or 2 ON/OFF for Hot Water.

Indicates that the unit is in AUTO mode with 6 events per day for heat or 3 for Hot Water.
ON Indicates Hot Water is permanently on (Applies to Hot Water only)
OFF
Indicates permanently off for Hot Water or Thermostat mode (see 2.5 on page 16) for Heating

The INFO button is used to display information about either the next programmed event for the currently selected mode (central Heating or Hot Water) to display the outdoor temperature (if outdoor sensor is fitted) and to show the Service Due Date if set. Below is a more detailed explanation of operation:
If no outdoor sensor is fitted:
Pressing the INFO button will display the time of the next event according to the programmed times. The event time shown will include any +HRS or BOOST extensions. If the next event time is shown fl ashing, this represents an approximate time due to Optimum Start, Delayed Start or a timed override being active.
If an outdoor sensor is fitted:
Pressing the INFO button will display the current outdoor temperature, followed by the lowest and highest outdoor temperatures in the last 24 hours.
If Service Due date is set:
Pressing the INFO button will display the date the service is due.
If in holiday mode:
Pressing the INFO button will display the holiday end date.
4.0 User Advanced Programming Options
Important: The thermostat has been set in the factory to suit most situations, however, there are additional optional settings which can improve the comfort, convenience and energy effectiveness of your thermostat. These are set in the User Advanced Programming and Installer Advanced Programming modes.
4.1 To access User Advanced Programming
Press and hold V and PROG for 3 seconds. This will take you into User Advanced Programming. Use + and - keys to scroll backwards and forwards between options then and V keys to change option settings. The flashing digit on the right hand of the display indicates the number of the selected option.
| Option 1 - Enable or disable A/B programming (Option 41 and/or 61 set to 5+2) | ||
| This enables or disables the A/B programming option. Press + until Option 1 is displayed, use Λ and V to select required setting. |  | |
| Setting 0 | Disabled, unit operates as 5+2 | |
| Setting 1 | Enabled: activates A/B programming | |
Option 2 - Enable/Disable Advanced Programming (Option 41 and/or 61 set to 7 Day)
| This option enables or disables the Advanced Copy Functionality. Press + until option 2 is selected, use Λ or V to select required setting |  |
| Setting 0 Advanced Copy disabled (standard copy mode) | |
| Setting 1 Advanced Copy enabled | |
Option 3 - Calendar clock rules
This establishes the rules that the automatic calendar clock follows to calculate changes between summer and winter time. Press + until Option 3 is displayed, use and V to select required setting
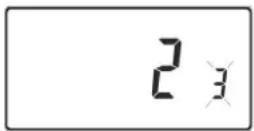
Setting 0 Disabled.
| Setting 1 | Manual: user must change using + to advance and - to retard displayed time. |
| Setting 2 | European rules. (Factory Setting) |
| Setting 3 | USA rules (2007 onwards) |
| Setting 4 | USA rules (pre-2007) |
Option 4 - Time zone off set
This feature allows the time zone to be established and corrects time display. Press + until Option 4 is displayed, use and V to select required setting

| Setting 0 | UK models: this feature should be left at the factory setting of 0. |
| Setting 1 | Central European time models: this feature should be left at the factory setting of +1:00. |
| -12 Hours +14 HoursRest of World: use and V keys to select offset from Universal time (GMT) for the location in which the thermostat is being installed. | |
Option 10 - Frost/ thermostat mode setting
This feature allows the default frost/thermostat mode temperature to be set. Press + until Option 10 is displayed, use and V to select required setting.
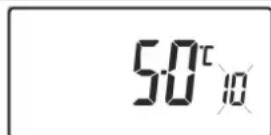
5-40°C - Factory setting is 5°C, but can be changed to any value between 5-40°C.
| Option 11 - Start-up method | |
| Your thermostat can start up the system in three different ways. Press + until Option 11 is displayed, use Λ and V to select required setting. | |
| Setting 0 | Normal: Heating is turned up or down at the programmed times. |
| Setting 1 | Optimum start control (OSC) (or Comfort Setting): This allows you to programme the time at which you would like to be up to the required temperature. The thermostat then calculates how soon before the required time the Heating is turned up. This will vary with weather conditions ranging from a maximum of 120 minutes to 0 minutes before the programmed event time. This setting must be used together with option 12 to match the optimiser setting to the building in which it is installed. |
| Setting 2 | Delay start (or Economy Setting): This is an alternative to OSC. Set the event times in the normal way taking into account the time that the building takes to heat on an average day. The thermostat monitors switch on time, actual temperature and wanted temperature and delays the start of the Heating if the actual temperature is close to the programmed temperature. |
| Option 12 - Optimum start control pre-heat setting (Option 11 set to 1) | |
| Press + until Option 12 is displayed, use and V to select required setting (only active if Option 11 is set to 1).The optimum start control must be adjusted to match the building energy characteristics. Use the and V keys to selected the required pre-heat period. The table below suggests typical settings.If the building fails to reach temperature on time, increase the setting by 15 minute steps each day until the correct setting is found.If the building reaches temperature ahead of time, decrease the setting by 15 minute steps each day until the correct setting is found. | |
| 0:15 | 15 mins, warm air systems, well insulated building. |
| 0:30 | 30 mins, warm air systems, well insulated building. |
| 0:45 | 45 mins, warm air system poorly insulated building. |
| 1:00 | 60 mins, radiator system, light weight well insulated building. (Factory setting) |
| 1:15 | 75 mins, radiator system, light weight medium insulation. |
| 1:30 | 90 mins, radiator system, medium weight poorly insulation. |
| 1:45 | 105 mins, radiator system, heavy weight building, well insulated. |
| 2:00 | 120 mins, radiator system, heavy weight building, poorly insulated. |
| Option 13 - Optimum start control/Delayed start event setting (Option 11 set to 1 or 2) | |
| The Optimum start or delayed start control can be applied to event 1 only or to each event of the day which requires a higher temperature than the previous event. Press + until Option 13 is displayed, use Λ and V to select required setting (only active if Option 11 is set to 1 or 2). | |
| Setting 0 A | pplies only to first event of day. (Factory setting) |
| Setting 1 A | pplies to each event of the day that requires a higher temperature compared to previous event. |
4.2 Overview of installer selectable features which may affect the operation of your thermostat
Temperature range limitation
This allows the installer to programme both upper and lower temperature limits. It may limit the upper and lower temperature that you are able to set on the thermostat.
Temperature override limitation
This allows the installer to limit the number of degrees that you can override the programmed temperature by, it also allows the installer to set rules regarding how long a temperature override will remain in place.
Keyboard lock
This allows the installer to limit or lock the keyboard to prevent unauthorised changes to programme values and limits overrides.
4.3 Service Interval Timer
- If the property is owned by a landlord he may, for gas safety reasons, have instructed the installer to set the service interval timer.
-
If set, 28 days prior to the service due date, a visual and audible warning will start each day at noon. The audible warning will last for 10 seconds and will be repeated every hour until a button is pressed to cancel it. If cancelled the alarm will recommence the following day at noon.
-
If the boiler is not serviced before the due date, a visual and audible warning will start each day at noon. The audible warning will last for 1 minute and will be repeated every hour until a button is pressed to cancel it. If cancelled the alarm will recommence the following day at noon.
- In addition, all overrides and programming buttons will be disabled and the Heating and Hot Water may operate for a limited amount of time each hour.
- The installer may cancel or reset the service interval timer as part of the boiler service.
- This is a gas safety feature that can only be accessed by an installer.
4.4 Resetting the unit
Partial reset: Press RESET (used to restart micro-computer) if display freezes for any reason. This does not reset any programme, clock or date. It is recommended that this is done at time of installation.
User full reset: Press RESET whilst holding down PROG button. This resets event times and any User Advanced Programme setting, but does not reset time or date.
Installer full reset: This is only available to the installer. In addition
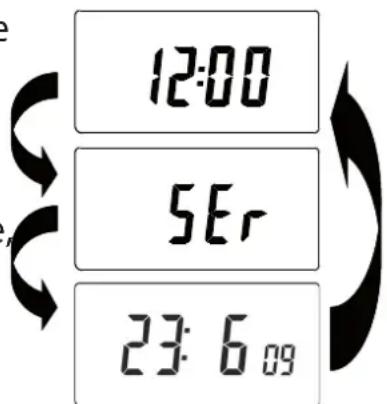
Service Interval Date
to the above all of the Installer Advanced Programming settings are returned to factory settings, however, time, date and service due date are not reset.
| Installer Settings | ||
| Option Description Installer Setting | ||
| Option 30 Set upper limit of temperature range | ||
| Option 31 Set lower limit of temperature range | ||
| Option 32 Enable Off at lower limit | ||
| Option 33 Enable On at upper limit | ||
| Option 34 Select On/Off or Chrono-proportional | ||
| Option 35 Set Integration Time | ||
| Option 36 Set temperature override rule | ||
| Option 37 Set time duration of override rule | ||
| Option 40 Number of events per day (Heating) | ||
| Option 41 Operating mode (Heating) | ||
| Option 60 Number of events per day (Hot Water) | ||
| Option 61 Operating Mode (Water) | ||
| Option 70 Keyboard disable rules | ||
| Option 71 Random start rules | ||
| Option 72 Owner site reference number | ||
| Option 73 Owner thermostat reference number | ||
| Option 74 Date format for calendar clock | ||
| Option 80 Enable/Disable + hrs boost | ||
| Option 81 Thermostat calibration bias | ||
| Option 90 Defi ne remote sensor type | ||
| Option 93 Set limit sensor set-point | ||
| Option 94 Confi gure digital input switch type | ||
| User Settings | ||
| Option Description User Settings | ||
| Option 1 Enable/disable A/B programming | ||
| Option 2 Enable/Disable advanced programming | ||
| Option 3 Calendar clock rules | ||
| Option 4 Time zone off set | ||
| Option 10 Frost/thermostat mode setting | ||
| Option 11 Start-up method | ||
| Option 12 Optimum start control pre-heat setting | ||
| Option 13 Optimum start control/delayed start event setting | ||
Danfoss Heating
Instrukcja obsługi
1.0 podstawowy

Press and - together to toggle between day numbers and text.
Service Interval Date
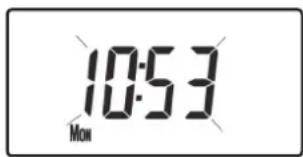
(Evento 1, Días MON, TUE, WED, THU, FRI) (Lun, Mar, Mie, Jue, Vie)

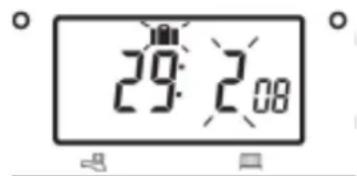


Service Interval Date
natural_image
Black-and-white interior photo of a modern kitchen with ovens, a blender, and a bowl of vegetables (no visible text or symbols)Danfoss Randall Ltd.
Ampthill Road
Bedford MK42 9ER
Tel: 0845 1217 400
Fax: 0845 1217 515
Email: danfossrandall@danfoss.com
Website: www.danfoss-randall.co.uk


- TP9000
- For a large print version of these instructions please call Marketing on 0845 121 7400.
- User Overrides
- Temporary override buttons
- User Advanced Programming Options
- TACMA
- What is a programmable room thermostat?
- Basics
- An introduction to your programmable room thermostat
- General Operation
- Preset programmes
- Customising the display
- Setting the correct date and time
- Setting the date
- Setting the correct time
- Setting the correct day
- Accepting the preset programmes
- Changing the preset programmes
- Before you change the preset programmes
- Alternatively
- Please Note
- Changing the preset programmes in 7 day mode
- Changing the preset programmes in 5/2 day mode
- For Weekdays
- For Weekends
- Changing the preset programmes in 24 hour mode
- Changing preset programmes for AB programming
- (Installer option 41 must be set to 5-2 day mode)
- Programming "A" programme days and events
- Programming "B" programme days and events
- Running the programme
- Copy functions explained
- Holiday programme
- Altering the display to show time or temperature (Heating Mode)
- Temporarily alter current programmed temperature
- To change day of week legends from numbers to text
- To change time display between 12 hour and 24 hour clock
- To change between °C and °F scaling
- Thermostat mode (Heating mode only)
- Changing the clock forwards and backwards
- To change from Summer to Winter (clocks back)
- To change from Winter to summer (clocks forward)
- Remote override into and out of thermostat mode
- Delay start feature
- Optimum start control (OSC)
- OFF
- If no outdoor sensor is fitted:
- If an outdoor sensor is fitted:
- If Service Due date is set:
- If in holiday mode:
- To access User Advanced Programming
- Option 3 - Calendar clock rules
- Option 4 - Time zone off set
- Option 10 - Frost/ thermostat mode setting
- Overview of installer selectable features which may affect the operation of your thermostat
- Temperature range limitation
- Temperature override limitation
- Keyboard lock
- Service Interval Timer
- Resetting the unit
- Instrukcja obsługi
- podstawowy
- Danfoss Randall Ltd.
Brand : DANFOSS
Model : TP9000
Category : Thermostat