
BM 20 - Sphygmomanometer BEURER - Free user manual and instructions
Find the device manual for free BM 20 BEURER in PDF.


| Product type | Electronic upper arm blood pressure monitor |
| Brand | Beurer |
| Model | BM 20 |
| Color | White |
| Power supply | 4 AAA batteries (1.5 V) |
| Display | Digital LCD screen |
| Measurement unit | mmHg |
| Pressure measurement range | Systolic: 60-260 mmHg, Diastolic: 40-200 mmHg |
| Pulse measurement range | 40-160 pulses/min |
| Pressure accuracy | ±3 mmHg |
| Pulse accuracy | ±5% |
| Memory | 2 x 30 readings (for 2 users) |
| Cuff | 22-32 cm, suitable for arm circumference |
| Dimensions | 140 x 100 x 60 mm |
| Weight | Approx. 250 g (without batteries) |
| Main functions | Arrhythmia detection, WHO risk indicator, average calculation, automatic shut-off |
| Care and cleaning | Clean with a soft, slightly damp cloth; do not immerse |
| Safety | CE certification, use recommended under medical supervision |
| Spare parts and repairability | Replacement cuff available; repair by Beurer customer service |
| Warranty | 3 years |
Frequently Asked Questions - BM 20 BEURER
User questions about BM 20 BEURER
0 question about this device. Answer the ones you know or ask your own.
Ask a new question about this device
Download the instructions for your Sphygmomanometer in PDF format for free! Find your manual BM 20 - BEURER and take your electronic device back in hand. On this page are published all the documents necessary for the use of your device. BM 20 by BEURER.
USER MANUAL BM 20 BEURER
beurer ____medical

BM 20
D Blutdruckmessgerät
Gebrauchsanweisung 2–10
GB Blood pressure monitor
Instruction for Use ....11–18
F Tensiomètre
Mode d'emploi....19–27
E Tensiómetro
Instrucciones para el uso .....28 – 36
Misuratore die pressione
Instruzioni per l'uso 37-45
TR Bilgisayarli tansiyon ölçer
Kullanma Talimatı 46–53
RUS Прибор для измерения артериального давления на предплечье
Инструкция по применению .....54 – 63
PL Pomiar ciśnienia krwi
Instrukcja obsługi....64–72
Beurer GmbH • Söfl inger Str. 218 • D-89077 Ulm (Germany) Tel.: +49 (0) 7 31 / 39 89-144 • Fax: +49 (0) 7 31 / 39 89-255 www.beurer.de • Mail: kd@beurer.de
CE 0483
DEUTSCH



Thank you for choosing one of our products. Our name stands for high-quality, thoroughly tested products for the applications in the areas of heat, weight, blood pressure, body temperature, pulse, gentle therapy, massage and air.
Please read these instructions for use carefully and keep them for later use, be sure to make them accessible to other users and observe the information they contain.
Best regards,
Your Beurer Team
1. Getting to know your instrument
The upper arm blood pressure monitor is used for non-invasive measurement and monitoring of adults' arterial blood pressure.
You can use it to measure your blood pressure quickly and easily, storing the results and displaying the progression of readings together with the average.
2. Important information

Advice on use
- Always measure your blood pressure at the same time of day, in order to ensure that values are comparable.
- Relax for approx. 5 minutes before each measurement.
-
You should wait five minutes before measuring a second time.
-
The readings that you take may only be used for information purposes – they are not a substitute for a medical examination! Discuss your results with the doctor. Never use them to make medical decisions independently (e.g. regarding medication and dosage thereof).
- There may be incorrect measurements where there is cardiocirculatory disease, as well as with very low blood pressure, circulatory disorders, dysrhythmia and other preexisting diseases.
- Only use the instrument on persons whose upper arm has the right circumference for the instrument.
- You can operate the blood pressure monitor with both batteries and mains part. Note that it is only possible to save data when your blood pressure monitor is receiving power. As soon as the batteries wear out or you disconnect the mains part from the mains, the blood-pressure instrument loses the date and time. Any measurement results that have been stored are however retained.
- The automatic switch-off function switches off the blood pressure monitor in order to preserve the batteries, if no button is pressed within one minute.

Storage and Care
- The blood pressure monitor is made up of precision electronic components. Accuracy of readings and the instrument's service life depend on careful handling.
- You should protect the device from impact, moisture, dirt, major temperature fluctuations and direct exposure to the sun's rays.
- Never drop the device.
- Do not use near strong electromagnetic fields, i.e. keep it away from any radio systems and mobile phones.
- Only ever use the cuffs provided with the monitor or original replacement cuffs. Otherwise erroneous results will be recorded.
- Do not press any buttons until the cuff is in position.
- If the instrument is not used for any length of time, we recommend removing the batteries.

Advice on batteries
- Batteries can be fatal if swallowed. You should therefore store the batteries and products where they are inaccessible to small children. If a battery has been swallowed, call a doctor immediately.
- Batteries should not be charged or reactivated with any other means, nor should they be taken apart, thrown in the fire or short-circuited.
- Remove the batteries from the instrument if they are worn out or if you are not going to use the instrument for any length of time. This prevents any damage as a result of leakage. Always replace all the batteries at the same time.
- Never use different types of battery, battery brands or batteries with different capacities. You should preferably use alkaline batteries.

Repair and disposal
- Batteries do not belong in domestic refuse. Used batteries should be disposed of at the collection points provided.
- Never open the instrument. If these instructions are not heeded, the warranty will be null and void.
- Never attempt to repair the instrument or adjust it yourself. We can no longer guarantee perfect functioning if you do.
- Repairs may only be performed by Beurer Customer Service or authorized dealers. However, always check the batteries and replace them if necessary prior to making any complaint.
- The appliance should be disposed of according to Regulation 2002/96/EC – WEEE (Waste Electrical and Electronic Equipment). In case of queries, please contact the municipal authorities responsible for waste disposal in your area.

- Device description

A Cuff F Display
B Cuff tube G Memory button M2
C Cuff connector H ON/OFF: On /off button
D Cuff connector port I Memory button M1
E Mains part connector (rear)
Icons in the display:
1 Memory space number
2 Time and date
3 Systolic pressure
4 Diastolic pressure
5 Pulse symbol ♥
6 Calculated pulse value
7 Battery replacement symbol
8 User memory M2
9 User memory M1
10 Inflate▲, release air

- Prepare measurement Inserting the batteries
- Remove the battery cover from the back of the monitor. Insert four AA 1.5V alkaline batteries, making absolutely sure that you insert them with the correct polarity
as marked. Never use rechargeable batteries.
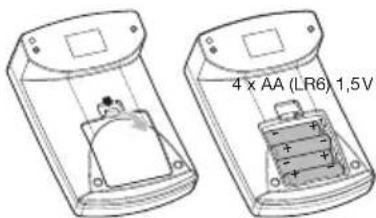
- Replace the battery cover carefully. Now you can set the date and time.
Changing batteries
If the battery change is blinking, the batteries are already too low. Even though measurement is still possible, the batteries should be replaced soon. If the battery change is continuously illuminated, measurement is no longer possible and you must replace all the batteries. Once batteries have been removed from the device, the time must be reset. Any measurement results that have been stored are however retained.
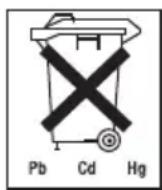
Used batteries do not belong in the household waste. You are legally obliged to dispose of the batteries. Dispose of them via
your specialist electrical supplier or local collecting point for recyclable waste.
Note: Batteries containing pollutant substances are marked as follows: Pb = Battery contains lead, Cd = Battery contains cadmium, Hg = Battery contains mercury.
Setting the date and time
The date/time setting is necessary, so that you can save your readings correctly with the date and time and call them up again later.
To set the date and time, proceed as follows:
- After inserting/replacing the batteries, press any button. The year will then flash.
-
Using the M1 button, you can increase the basic values to be set; using M2 you can decrease the values. Set the year and confirm the entry using the on/off button.
-
Now set the month using the M1 and M2 buttons. Confirm using the on/off button.
- Now set the day using the M1 and M2 buttons. Confirm using the on/off button.
- Now you can set the time, which is displayed in 24-hour mode: first the hours – confirm with on/off – and then the minutes. After confirmation with the on/off button, the device switches off automatically.
Mains operation
You can also operate this device with a mains part. When doing so, there must not be any batteries in the battery compartment. The mains part can be obtained from specialist retailers or from the service address using order number 071.51.
- To prevent possible damage to the device, the blood pressure monitor must only be used with the mains part described here.
- Insert the mains part into the connection provided for this purpose on the right-hand side of the blood pressure monitor. The mains part must only be connected to the mains voltage that is specified on the type plate.
- Then insert the mains plug of the mains part into the mains socket.
- After using the blood pressure monitor, unplug the mains part from the mains socket first and then disconnect it from the blood pressure monitor. As soon as you unplug the mains part, the blood pressure monitor loses the date and time setting but the saved measured values are retained.
5. Measuring blood pressure
Please ensure the device is at room temperature before measuring.
Fixing the cuff
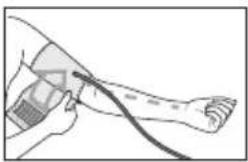
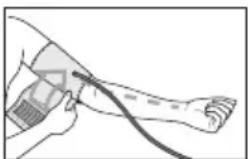
Fit the cuff round your bare left upper arm. Blood circulation in the arm should not be restricted by tight clothing or other objects.
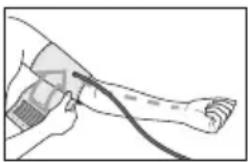
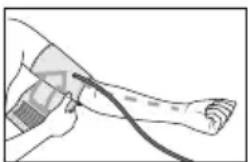
The cuff should be placed on the upper arm so that the lower edge is 2 to 3 cm above the bend of the elbow and above the artery. The tube should be in line with the centre of the palm.
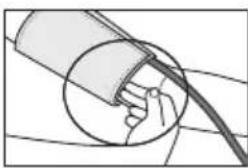
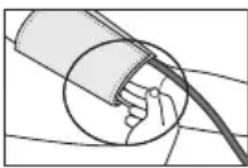
Now place the free end of the cuff snugly, but not too tightly, around the arm, and fix it with the Velcro fastener. The cuff should be fitted tight enough to allow just two fingers to fit beneath the cuff.
Insert the cuff tubing into the socket for the cuff attachment.

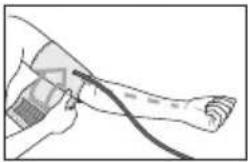


Important: The instrument should only be operated with the original cuff. The cuff is suitable for an arm circumference of 22 to 32 cm. A larger cuff for upper arm circumferences from 32 to 42 cm is available from retailers or the service address under order no. 162.093.
Correct measurement position

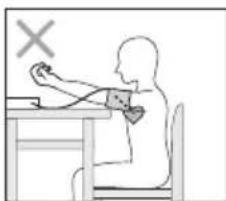

- Rest for approx. 5 minutes before each measurement. Otherwise there may be divergences.
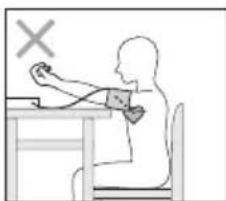
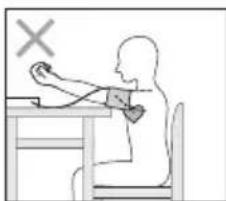
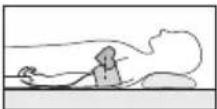
- You can perform the measurement either sitting or lying down. Always make sure that the cuff is on a level with your heart.
- In order not to distort the result, it is important to keep still during the measurement and not talk.
Measuring your blood pressure
- Put on the cuff as described above and take up the position in which you wish to perform the measurement.
- Switch on the device using the on/off button.
- A self-test runs, during which all display elements are illuminated briefly, and then measurement starts. While the cuff is being pumped up, the symbol is displayed. Pressure is increased to 180 mmHg. If a tendency towards high blood pressure is already detectable, the cuff is pumped up again and cuff pressure increased further.
-
As soon as a pulse is detected, the pulse symbol ✏ashes.
-
When the measurement has been taken, the pressure dissipates very quickly. The pulse, the systolic and diastolic blood pressure are displayed.
- Now press memory keys M1 or M2 to select the required user memory. If you do not select any user memory, the measurement result is assigned for storage in the user memory which was last used. The symbol M1 M2 appears accordingly in the display.
- Using the on/off button, switch off the blood pressure monitor. The measurement result is then saved to the selected user memory. If you forget to switch off the device, it switches off automatically after approx. 3 minutes. Even then, the result is still saved to the selected user memory.
Note: Measuring can be cancelled at any time by pressing the on/off button.
Wait at least 5 minutes before any new measurement!
- Table for classification of blood pressure values (unit of measurement mmHg) for adults:
| Range | Systolic | Diastolic | Action |
| Hypotonia (degraded blood pressure) lower than 105 lower than 60 Check with doctor | |||
| Normal range between 105 and 120 between 60 and 80 Self check | |||
| Pre-hypertensive blood pressure range* between 120 and 140 between 80 and 90 Check with doctor | |||
| High blood pressure – degree I between 140 and 160 between 90 and 100 Consult your doctor | |||
| High blood pressure – degree II higher than 160 higher than 100 Consult your doctor | |||
(*) Blood pressure range that might transfer to high blood pressure
Adapted from JNC 2003
7. Displaying and deleting measurements Memory recall
You can recall stored results from the two user memories and display averages.
- Press memory buttons M1 or M2. First the average is displayed of all the results held in this user memory. This is indicated by reading R.
- Continue pressing the memory button to recall other individual measurement results – the first result to appear is that of
the most recent value measured. These individual values are indicated by memory location numbers 1 to 30. After approx. 4 seconds, the date of the respective measurement result is displayed and then the time after a further 4 seconds.
- Once 30 individual values are in the memory, the oldest value is deleted in order to make room for the new measured value.
- Use the on/off button to turn off the device, or it will turn off automatically after approx. 30 seconds.
Note: You can also use the two user memories to save measurement results separately, e.g. in the morning and evening.
Deleting saved values
You can delete saved values individually or else you can delete all of them.
- To delete individual values, first select the stored value you wish to delete and keep memory button M1 or M2 depressed. The display starts blinking. Keep holding the button depressed until the display has completely cleared.
- To delete an entire user memory, you have to select the appropriate user memory. The average is displayed and indicated with R. Hold the memory button M1 or M2 depressed until the display starts blinking and keep the button depressed until the display completely clears.
8. Error recovery
Error messages may appear if
- you move or talk during measurement (E appears in the display),
- the cuff tube is not inserted properly (E appears in the display),
- when changing the batteries, the on/off button was pressed,
- the cuff is inflated for longer than 20 seconds (E appears in the display),
- blood pressure is unusually high or low (E appears in the display),
- inflation pressure is higher than 300 mmHg (E appears in the display).
In the above cases, you must repeat the measurement. Make sure that the cuff tube is properly inserted and that you do not move or talk. Put the batteries back in if necessary, or else replace them.
9. Cleaning
- Clean your blood pressure monitor carefully using a slightly damp cloth only.
- Do not use detergents or solvents.
- On no account must you immerse the computer in water, otherwise liquid can enter it and cause damage.
- When storing the device, make sure that no heavy objects are placed on top of it. Remove the batteries. The cuff tube should not have any sharp kinks.
10. Specifications
Model No. BM 20
| Method of Measurement | Oscillometric, non-invasive blood pressure measurement on the upper arm |
| Range of Meas-urement | Cuff pressure: 0 – 300 mmHg,systolic: 50–250 mmHg,diastolic: 40 –180 mmHg,pulse: 40 –160 beats/minute |
| Display accuracy | systolic: ±3 mmHg/diastolic: ±3 mmHg/pulse: ±5 % of the isplayed value |
| Measuring uncertainty | max. permissible standard deviation accord-ing to clinical testing in accordance with EN 1060-4: systolic: 8 mmHg / diastolic: 8 mmHg |
| Sets of Memory 2 x 30 memory places | |
| Unit Dimension L110 x W170 x H58 mm | |
| Unit Weight Approx. 265 g | |
| Cuff Size | Cuff for upper arm circumference of 22 – 32 cm |
| Operating Temperature | +10°C to +40°C, ≤85% RH |
| Storage-Temperature | -5°C to +50°C, ≤85% RH |
| Power Supply 4 x 1,5 V AA batteries (alkaline type LR6) | |
| Battery Life For approx. 300 measurements, depending on blood pressure level or inflation pressure | |
| Accessories With storage pouch, instruction for use, 4 pcs “AA” battery | |
| Protection class Internal power supply, IPX0, no AP or APG, continuous operation | |
| Classification Application part Type BFDevice with internal power supply, protection class II (in reference to the AC/DC mains part and the device as an overall system) | |
| Key to symbols Application part Type BF Important!Read the operating instruction | |
These specification are subject to change without notice for purpose of improvement.
11. Mains part
Model No. 8194047/02
Input 100 V - 240 V \~, 50/60 Hz
Output 6 V, 600 mA, only in connection with beurer blood pressure monitor
| Supplier Ansmann AG | |
| Protection This device is double isolated and protected against short circuit and overload by a primary thermal fuse.Make sure to take the batteries out of the compartment before using the mains part. | |
| Double isolated/ equipment class 2 | |
| Enclosures and Protective Covers | Equipment enclosed to protect against contact with live parts, and with parts which can become live (finger, pin, hook test).The operator shall not contact the patient and the output plug of AC mains part simultaneously. |
- This unit is in line with European Standard EN60601-1-2 and is subject to particular precautions with regard to electromagnetic compatibility (EMC). Please note that portable and mobile HF communication systems may interfere with this instrument. More details can be requested from the stated Customer Service address or found at the end of the instructions for use.
- The instrument is in line with the EU Medical Products Directive 93/42/EC, the German medical products act and European standards EN1060-1 (non-invasive blood pressure monitors, Part 1: General Requirements) and EN1060-3 (non-invasive blood pressure monitors, Part 3: Supplementary Requirements for Electromechanical Blood Pressure Measurement Systems).
FRANÇAIS
Chère cliente, cher client,










Guidance and manufacturer's declaration – electromagnetic emissions – for all EQUIPMENT and SYSTEMS
| Guidance and manufacturer's declaration – electromagnetic emission | ||
| The BM 20 is intended for use in the electromagnetic environment specified below. The customer of the user of the BM 20 should assure that it is used in such an environment. | ||
| Emissions test Compliance Electromagnetic environment – guidance | ||
| RF emissionsCISPR 11 | Group 1 The BM 20 uses RF energy only for its internal function. Therefore, its RF emissions are very low and are not likely to cause any interference in nearby electronic equipment. | |
| RF emissionCISPR 11 | Class B The BM 20 is suitable for use in all establishments other than domestic and those directly connected to a low voltage power supply network which supplies buildings used for domestic purposes. | |
| Harmonic emissionsIEC 61000-3-2 | Class A | |
| Voltage fluctuations/fl icker emissionsIEC 61000-3-3 | Complies | |
Guidance and manufacturer's declaration – electromagnetic immunity – for all EQUIPMENT and SYSTEMS
| Guidance and manufacturer's declaration – electromagnetic immunity | |||
| The BM 20 is intended for use in the electromagnetic environment specified below. The customer or the user of BM 20 should assure that it is used in such an environment. | |||
| Immunity test IEC 60601 test level | Compliance level Electromagnetic environment - guidance | ||
| Electrostatic discharge (ESD)IEC 61000-4-2 | ± 6 kV contact± 8 kV air | ± 6 kV contact± 8 kV air | Floors should be wood, concrete or ceramic tile.If fl oor are covered with synthetic material, the relative humidity should be at least 30 %. |
| Electrical fast transient/burstIEC 61000-4-4 | ± 2 kV for power supply lines | ± 2 kV for power supply lines | Mains power quality should be that of a typical commercial or hospital environment. |
| SurgeIEC 61000-4-5 | ± 1 kV differential mode± 2 kV common mode | ± 1 kV differential mode± 2 kV common mode | Mains power quality should be that of a typical commercial or hospital environment. |
| Voltage dips, short interruptions and voltage variations on power supply input linesIEC 61000-4-11 | <5% UT(>95% dip in UT)for 0.5 cycle40% UT(60 % dip in UT)for 5 cycles70% UT(30 % dip in UT)for 25 cycles<5% UT(>95 % dip in UT)for 5 sec | <5% UT(>95% dip in UT)for 0.5 cycle40% UT(60 % dip in UT)for 5 cycles70% UT(30 % dip in UT)for 25 cycles<5% UT(>95 % dip in UT)for 5 sec | Mains power quality should be that of a typical commercial or hospital environment. The BM 20 can continue the operation during power mains interruptions due to the usage of battery. |
| Power frequency (50/60 Hz)magnetic fi eldIEC 61000-4-8 | 3 A/m 3 A/m | Mains power quality should be that of a typical commercial or hospital environment. | |
| NOTE: UT is the a.c. mains voltage prior to application of the test level. | |||
Guidance and manufacture's declaration – electromagnetic immunity – for EQUIPMENT and SYSTEMS that are not LIFE-SUPPORTING
| The BM 20 is intended for use in the electromagnetic environment specified below. The customer or the user of BM 20 should assure that it is used in such an environment. | |||
| Immunity test IEC 60601 test level | Compliance level | Electromagnetic environment – guidance | |
| Conducted RFIEC 61000-4-6 | 3 Vrms150 kHz to 80 MHz outside ISM bands | 3 Vrms | Portable and mobile RF communications equipment should be used no closer to any part of the BM 20, including cables, than the recommended separation distance calculated from the equation applicable to the frequency of the transmitter.Recommended separation distanced= [ 3.5/V1 ] d = [ 3.5/E1 ] 80 to 800 MHz d = [ 7/E1 ] √800 MHz to 2.5 GHz |
| Radiated RFIEC 61000-4-3 | 3 V/m80 MHz to 2.5 GHz | 3 V/m | Where P is the maximum output power rating of the transmitter in watts (W) according to the transmitter manufacturer and d is the recommended separation distance in metres (m).Field strengths from fixed RF transmitters, as determined by an electromagnetic site survey, a should be less than the compliance level in each frequency range bInterference may occur in the vicinity of equipment marked with the following symbol: |
| NOTE 1 At 80 MHz and 800 MHz, the higher frequency range applies.NOTE 2 These guidelines may not apply in all situations. Electromagnetic propagation is affected by absorption and reflection from structures, objects and people. | |||
| a Field strengths from fixed transmitters, such as base stations for radio (cellular/cordless) telephones and land mobile radios, amateur radio, AM and FM radio broadcast and TV broadcast cannot be predicted theoretically with accuracy. To assess the electromagnetic environment due to fixed RF transmitters, an electromagnetic site survey should be considered. If the measured field strength in the location in which the BM 20 is used exceeds the applicable RF compliance level above, the BM 20 should be observed to verify normal operation. If abnormal performance is observed, additional measures may be necessary, such as reorienting or relocating the BM 20.b Over the frequency range 150 kHz to 80 MHz, field strengths should be less than 3 V/m. | |||
RF communications equipment and the EQUIPMENT or SYSTEM - for EQUIPMENT or SYSTEM that are not LIFE-SUPPORTING
| Recommended separation distances between portable and mobile RF communications equipment and the BM 20 | |||
| The BM 20 is intended for use in an electromagnetic environment in which radiated RF disturbances are controlled. The customer or the user of the BM 20 can help prevent electromagnetic interference by maintaining a minimum distance between portable and mobile RF communications equipment (transmitters) and the BM 20 as recommended below, according to the maximum output power of the communications equipment. | |||
| Rated maximum output power of transmitter (W) | Separation distance according to frequency of transmitter (m) | ||
| 150 kHz to 80 MHz d = [ 3.5/V1 ] | 80 MHz to 800 MHz d = [ 3.5/E1 ] | 800 MHz to 2.5 GHz d = [ 7/E1 ] | |
| 0.01 0.12 0.12 0.23 | |||
| 0.1 0.37 0.37 0.74 | |||
| 1 1.17 1.17 2.33 | |||
| 10 3.69 3.69 7.38 | |||
| 100 11.67 11.67 23.3 | |||
| For transmitters rated at a maximum output power not listed above, the recommended separation distancedin metres (m) can be estimated using the equation applicable to the frequency of the transmitter, whereP$ is the maximum output power rating of the transmitter in watts (W) according to the transmitter manufacturer.NOTE 1 At 80 MHz and 800 MHz, the separation distance for the higher frequency range applies.NOTE 2 These guidelines may not apply in all situations. Electromagnetic propagation is affected by absorption and reflection from structures, objects and people. | |||


- BEURER ____MEDICAL
- BM 20
- DEUTSCH
- GETTING TO KNOW YOUR INSTRUMENT
- IMPORTANT INFORMATION
- ADVICE ON USE
- STORAGE AND CARE
- ADVICE ON BATTERIES
- REPAIR AND DISPOSAL
- CHANGING BATTERIES
- SETTING THE DATE AND TIME
- MAINS OPERATION
- MEASURING BLOOD PRESSURE
- FIXING THE CUFF
- CORRECT MEASUREMENT POSITION
- MEASURING YOUR BLOOD PRESSURE
- DISPLAYING AND DELETING MEASUREMENTS MEMORY RECALL
- DELETING SAVED VALUES
- ERROR RECOVERY
- CLEANING
- SPECIFICATIONS
- MAINS PART
- FRANÇAIS
- CHÈRE CLIENTE, CHER CLIENT
Brand : BEURER
Model : BM 20
Category : Sphygmomanometer