
MPK25 - MIDI Keyboard AKAI - Free user manual and instructions
Find the device manual for free MPK25 AKAI in PDF.


| Product Type | MIDI Controller Keyboard |
| Brand | AKAI |
| Model | MPK25 |
| Number of Keys | 25 velocity-sensitive keys |
| Pads | 8 MPC pads, velocity- and pressure-sensitive |
| Controllers | 8 assignable knobs, 1 pitch bend wheel, 1 modulation wheel |
| Connectivity | USB Type B, 5-pin MIDI in, 5-pin MIDI out, sustain pedal input |
| Power Supply | Via USB (bus power) or 9V DC power adapter (not included) |
| Included Software | AKAI Pro VIP3, Ableton Live Lite, MPC Beats, SONiVOX Twist, Hybrid, etc. |
| Dimensions (W x D x H) | 47.6 x 24.1 x 7.6 cm |
| Weight | 2.0 kg |
| Arpeggiator | Built-in with control of resolution, mode and range |
| Sequencer | No built-in sequencer |
| Display | No (LED indicators) |
| Compatibility | Windows (XP/Vista/7/8/10/11), Mac OS X, iOS via CCK adapter |
| Editing Software | MPK Editor (free download) |
| Care and Cleaning | Clean with a soft, dry cloth. Do not use chemical products. |
| Safety | Use in a dry environment, away from dust and shocks. |
| Spare Parts and Repairability | Contact AKAI support for repairs. No consumer spare parts. |
| Warranty | 2 years (depending on country) |
Frequently Asked Questions - MPK25 AKAI
User questions about MPK25 AKAI
0 question about this device. Answer the ones you know or ask your own.
Ask a new question about this device
Download the instructions for your MIDI Keyboard in PDF format for free! Find your manual MPK25 - AKAI and take your electronic device back in hand. On this page are published all the documents necessary for the use of your device. MPK25 by AKAI.
USER MANUAL MPK25 AKAI
This Quickstart Manual is intended to give you a brief overview of the functionality and features of the MPK25. In this manual you will find instructions on how to connect the MPK25 and how to use its basic features. For detailed information, we recommend reading the Operator's Manual included on the software CD. Enjoy!
HOOKUP DIAGRAM
Please refer to the following scenario for connecting the MPK25.

flowchart
graph TD
    A["COMPUTER"] -->|USB| B["External Sound Module"]
    C["SUSTAIN PEDAL EXPRESSION"] -->|USB| B
    D["POWER ADAPTER MIDI DEVICE"] -->|USB| B
    E["ASAD"] --> F["External"]
    G["ASAD"] --> H["External"]
    I["ASAD"] --> J["External"]
    K["ASAD"] --> L["External"]
- Connect a USB cable from your computer to the MPK25. The unit will be powered through the USB connection. Alternatively, if you do not wish to use a computer in your setup or if you wish to power the MPK25 externally, please plug in a MP6-1 power adapter.
- If you would like to use an external sound module, connect a 5-pin MIDI cable from the MIDI OUT of the MPK25 to the MIDI IN of the external device.
- If you would like to use another MIDI controller in your setup, connect a 5-pin MIDI cable from the MIDI OUT of the controller to the MIDI IN of the MPK25.
REAR PANEL OVERVIEW
- DC POWER ADAPTER INPUT – Plug in a MP6-1 power adapter if you do not wish to power the MPK25 through the USB connection.
- POWER ADAPTER RESTRAINT – You can secure a power adapter cord to this restraint to prevent accidental unplugging.
- USB CONNECTION – Plug a standard USB cable into this outlet and into the USB port of your computer. The computer's USB port will provide power to the MPK25. This connection is used to send and receive MIDI data to and from your computer and may also be used to send MIDI data from your computer to a device attached to the MIDI OUT port of the MPK25.
- MIDI OUT - Use a five-pin MIDI cable to connect the MIDI OUT of the MPK25 to the MIDI IN of an external device.
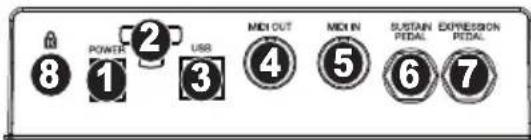
- MIDI IN - Use a five-pin MIDI cable to connect the MIDI OUT of an external MIDI device to the MIDI IN of the MPK25.
- SUSTAIN PEDAL – Connect a 14 " TS sustain pedal to this input.
- EXPRESSION PEDAL INPUT - Connect a ¼" TRS expression pedal to this input.
- KENSINGTON LOCK SLOT - You may use this Kensington lock slot to secure the MPK25 to a table or other surface.
FRONT PANEL OVERVIEW
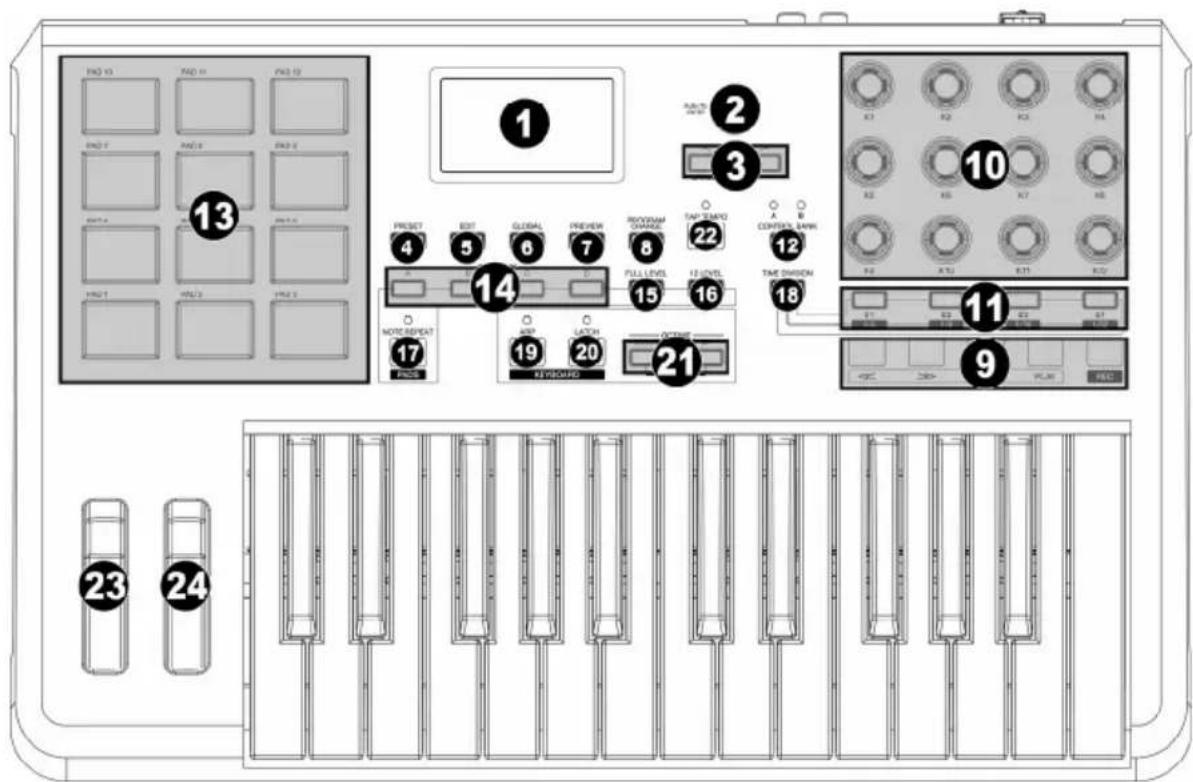
- LCD - The display is used for navigating menus, displaying data, and affecting change on MPK25's options and parameters.
- [VALUE] (Push to Enter) - This dial is used to increment and decrement Presets, parameter values and settings. This dial also functions as an [ENTER] button when it is pressed down.
-
[<] AND [>] BUTTONS – These buttons are used to navigate through the fields of menus and options. The [<] button also functions as a [CANCEL] button.
-
[PRESET] – This button calls up Preset Mode. You can select and recall different Preset programs in this mode.
- [EDIT] – This button calls up Edit Mode, which allows you to edit the behavior of the keyboard, pads, knobs, buttons, and default settings for each preset.
-
[GLOBAL] - This button calls up Global Mode, where MIDI reset commands and global system preferences are set.
-
[PREVIEW] – This button allows you to see the last value that was sent by a controller without actually sending a value. Hold down this button and adjust a controller to display the value in the LCD. Then, you can either change it to a new value or return it to last value that was sent.
- [PROGRAM CHANGE] – Pressing this button will enter Program Change mode. In this mode, you can send a Program Change or Program with Bank Change message to a hardware or software module.
- TRANSPORT CONTROL BUTTONS – These five buttons are dedicated buttons for sending transport control commands. The transport control buttons can be set to transmit either MMC (MIDI Machine Control), MMC/MIDI SysEx, MIDI START/STOP or pre-assigned MIDI CC values.
- 12 ASSIGNABLE KNOBS - Each 360-degree knob can be used to send continuous control data to a desktop audio workstation or external MIDI device.
- 4 ASSIGNABLE BUTTONS – These buttons can be used as MIDI CC switches or Program Change switches. They can function in Momentary or Toggle Modes. When [TIME DIVISION] has been activated, these 4 buttons are used to set the time division of the Arpeggiator and Note Repeat features.
- [CONTROL BANK] - The MPK25 features 2 independent banks of continuous controllers. Effectively, this allows you to control up to 32 independent parameters with the knobs and buttons on the MPK25. The [CONTROL BANK] button is used to switch among the 2 banks. The LEDs above the button will reflect the currently selected control bank.
- 12 MPC PRESSURE AND VELOCITY SENSITIVE PADS – The pads can be used to trigger drum hits or samples on your software or hardware module. The pads are pressure and velocity sensitive, which makes them very responsive and intuitive to play.
- PAD BANK BUTTONS – These 4 buttons switch among pad banks A, B, C, D. Each bank can address a unique set of 12 sounds, giving you access of up to 48 different sounds you can trigger with the pads. The currently selected pad bank will be indicated on the LCD display
- [FULL LEVEL] - When [FULL LEVEL] is activated, the pads always play back at a maximum velocity (127), no matter how hard or softly you hit them.
- [12 LEVEL] – When [12 LEVEL] is activated, you can use the 12 pads to change a selected sound's velocity in 12 steps. When you press the [12 LEVEL] button, the last pad that was hit gets mapped to all 12 pads. The pads will now output the same note number and pressure controller as the initial pad, but the velocity is fixed at the values shown in the diagram on the right, regardless of how hard you hit them. This allows you to have more control over the velocity of a sound.
-
[NOTE REPEAT] – Holding this button while striking a pad causes the pad to retrigger at a rate based on the current Tempo and Time Division settings. The Note Repeat feature can be synced to an internal or external MIDI Clock source. [NOTE REPEAT] can function as a latching or momentary button.
-
[TIME DIVISION] – This button is used to specify the rate of the Note Repeat and Arpeggiator features. When [TIME DIVISION] is activated, you can press one of the 4 switches to specify a time division. Each switch toggles between a “straight” and “triplet” feel for that time division. [TIME DIVISION] can function as a momentary or toggle button.
Please note that while [TIME DIVISION] is active, the 4 assignable buttons will not function as MIDI CC or Program Change switches until [TIME DIVISION] has been de-activated.
- [ARP ON/OFF] – This button enables and disables the internal Arpeggiator. The Arpeggiator will only function on notes being played on the keyboard. The Arpeggiator feature on the MPK25 works in conjunction with the Tempo and Time Division settings, which specify the rate of arpeggiation. Please note that the Arpeggiator can be synced either to an internal or external MIDI Clock source (such as a software DAW or a MIDI device).
- [LATCH] – This button works in conjunction with the Arpeggiator. When the Arpeggiator is turned on and [LATCH] has been enabled, you can hold down a combination of keys – the Arpeggiator will memorize and continue to arpeggiate these notes, even if you depress the keys. There are a couple of ways to use the [LATCH] function:
a. While holding down the keys, you can add more notes to the sequence by pressing down additional keys.
b. If you depress the keys, release them, and then press down a new combination of notes, the Arpeggiator will memorize and arpeggiate the new notes.
- [OCTAVE + / -] – These buttons can be used to shift the keyboard's range up and down. The display will indicate which octave you have shifted to. If both buttons are pressed at the same time, the octave shift will reset to 0.
- [TAP TEMPO] – This button allows you to tap in a new tempo. If the preset is reloaded, the tempo will revert to the saved tempo value. (Please note that a preset's default tempo can be set in Edit Mode). Tap Tempo does not work when the MPK25 is set to External sync.
- PITCH BEND WHEEL – Transmits MIDI Pitch Bend information on a selected MIDI channel and port.
- MODULATION WHEEL – This wheel can be used to transmit continuous controller data. By default, the modulation wheel will transmit MIDI CC #01.
ABOUT MODES
The MPK25 has four different modes of operation. Each mode can be accessed by pressing the corresponding button on the MPK25. Following is a short description of each mode:
Preset Mode
PRESET

This mode allows you to load, save and copy Presets. A Preset is a collection of information about how different knobs and pads will behave. Using Presets allows you to save different configurations so you can quickly load them when you need them, without having to reprogram the MPK25 every time.
Edit Mode
EDIT

This mode allows you to edit the configuration of the MPK25. Edit Mode is a powerful tool for customizing your set-up. In this mode, you can make changes to how the keyboard, pads, knobs and other features are behaving. For example, you may wish to have a knob transmit only a limited range of MIDI data, or you may wish to have a pad that transmits on a different MIDI Channel. You can change these and other various parameters in Edit Mode. See the PRESET parameter table for a full listing of parameters.
Global Mode
GLOBAL

This mode allows you to set global parameters and make general changes to how your MPK25 is functioning. For example, in Global Mode you can change how the pads respond to the touch, or change the brightness of the LCD screen. The parameters that you can modify in Global Mode also include controller resets, MIDI Common Channel, Pad Velocity Curve, Pad Threshold, Keyboard Transposition, and more. See Global Mode on Page 12 for a full list of the menus.
Program Change Mode
PROGRAM CHANGE

This mode allows you to transmit various Program Change messages. In this mode, you can tell your DAW or an external device to switch to a different program bank of sounds. This way, you can avoid having to manually switch between different programs on your DAW or external device.
PRESET MODE
A Preset is a collection of information about how the MPK25's keyboard, knobs, buttons and pads will behave. Using Presets allows you to save different configurations so you can quickly recall them at any time, without having to reprogram the MPK25 every time. You can press the [PRESET] button at any time to call up this mode. In Preset Mode you can load, save/copy and rename Presets – each of these functions can be accessed through the 3 different pages.
PAGE 1 - LOAD PRESET
- While you are in Preset Mode, you can change Presets with the [VALUE] dial below the screen. Turning the dial increments or decrements the current Preset number and displays the screen on the right:
When you do this, you will notice that 'PRESS ENTER' will begin to blink. - Pressing [ENTER] loads the selected Preset. Pressing [<] or the [PRESET] button cancels and returns you to the Preset that was last selected.

PAGE 2 - SAVE/COPY PRESET
In Preset Mode, you can also save and copy a Preset to a new location. This allows you to save any changes that you would have made to the Preset in Edit Mode.
Note that if you are saving the Preset to the same location (same preset number) the screen will say 'SAVE TO' and if you are saving to a different location (different Preset number), the screen will display 'COPY TO'.

DESTINATION
- While you are in Preset Mode, press [>] button until you see the 'SAVE TO' screen similar to the one shown above.
- You can select the location where you want to save the Preset by turning the [VALUE] knob.
When you do this, you will notice that 'PRESS ENTER' will begin to blink. - Press [ENTER] to save current Preset to the destination. Pressing the [<] button or [PRESET] button cancels the operation and returns you to the Preset play mode.
PAGE 3 – NAME PRESET
While you are in Preset Mode, you can also change the Preset name. This way you can assign specific names to different Presets so you can better keep track and quickly access different controller configurations.
- To name or rename the Preset, press the [>] button until you see 'Preset Name' displayed on the screen.
You will notice that the first letter of the name will begin blinking.
-
Turn the [VALUE] dial to change the blinking character.
-
To move between the characters, use [<] and [>] buttons.
-
When done, press [PRESET] again. The name will be saved.
-
Turn the [VALUE] dial to change the blinking character.
- To move between the characters, use [<] and [>] buttons.
- When done, press [PRESET] again. The name will be saved.

ENTER PRESET NAME IN THIS FIELD
EDIT MODE
Pressing the [EDIT] button calls up Edit Mode. In this mode, you can edit the settings of the currently selected Preset. The settings vary depending on the controller you are editing and are described on the following page.
Please note that the changes you make will only apply to the currently selected Preset.
NAVIGATING EDIT MODE
- Press the [EDIT] button.
- To select the controller you wish to edit, simply engage it – this will prompt the screen to display the properties of the particular controller (Page 1).
- If there are multiple menus for the selected controller, turn the [VALUE] dial to select the menu you wish to edit. Press [ENTER] to view the parameters of the selected property (Page 2).
- To move between the parameter fields on Page 2, use the [<] and [>] buttons. To change the values of the fields, turn the [VALUE] dial.
- When finished editing the controller, press [ENTER] to accept the change or press [<] to cancel.
You can use the example screenshot on the right to help you determine where the Page 2 parameters described on the following page will appear on the screen.
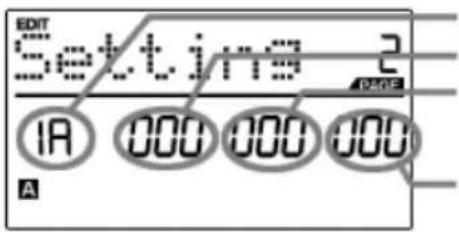
FIELD 1
FIELD 2
FIELD 3
FIELD 4
EDIT MODE PARAMETERS
| CONTROLLER SELECTED PAGE 1 PAGE 2 | ||
| KEYBOARD | OCTAVE | KEYBOARD MIDI CHANNEL (field 1)UP/DOWN (field 4) |
| AFTERTOUCH | KEYBOARD MIDI CHANNEL (field 1)ON/OFF BEHAVIOR (field 4) | |
| VELOCITY | KEYBOARD MIDI CHANNEL (field 1)ON/OFF BEHAVIOR (field 4) | |
| PADS | NOTE | MIDI CHANNEL (field 1)NOTE NUMBER (field 2)ON/OFF BEHAVIOR (field 3)PRESSURE BEHAVIOR (field 4) |
| PROGRAM CHANGE | MIDI CHANNEL (field 1)PROGRAM CHANGE NUMBER (field 2)BANK M (MSB) (field 3)BANK L (LSB) (field 4) | |
| KNOBS | CONTROL CHANGE | MIDI CHANNEL (field 1)CC NUMBER (field 2)RANGE - MINIMUM VALUE (field 3)RANGE - MAXIMUM VALUE (field 4) |
| AFTERTOUCH | MIDI CHANNEL (field 1)CC NUMBER (field 2)RANGE - MINIMUM VALUE (field 3)RANGE - MAXIMUM VALUE (field 4) | |
| BUTTONS | CONTROL CHANGE | MIDI CHANNEL (field 1)CC NUMBER (field 2)BUTTON MODE (field 4) |
| PROGRAM CHANGE | MIDI CHANNEL (field 1)PROGRAM CHANGE NUMBER (field 2)BANK M (MSB) (field 3)BANK L (LSB) (field 4) | |
| ARP ON/OFF | TYPE/RANGE/TOGGLE | ARPEGGIO TYPE (field 2)ARPEGGIO RANGE (field 3)ARPEGGIO TOGGLE BEHAVIOR (field 4) |
| GATE/SWING | ARPEGGIO GATE VALUE (field 2)ARPEGGIO SWING VALUE (field 4) | |
| NOTE REPEAT | TOGGLE/MOMENTARY | BUTTON MODE (field 2) |
| GATE/SWING | NOTE REPEAT GATE VALUE (field 2)NOTE REPEAT SWING VALUE (field 4) | |
| TIME DIVISION | DIVISION | DEFAULT TIME DIVISION (field 2)BUTTON MODE (field 4) |
| PITCH BEND WHEEL | PITCH BEND | MIDI CHANNEL (field 1) |
| MODULATION WHEEL | MODULATION WHEEL | MIDI CHANNEL (field 1)CC NUMBER (field 2)RANGE - MINIMUM VALUE (field 3)RANGE - MAXIMUM VALUE (field 4) |
| TRANSPORT | TRANSPORT FUNCTION | MMC, MIDI, MMC/MIDI, or CTRL (field 2) |
| TAP TEMPO | TEMPO | BPM (field 2) |
| EXPRESSION PEDAL | CNTL CHANGE | MIDI CHANNEL (field 1)CC NUMBER (field 2)RANGE - MINIMUM VALUE (field 3)RANGE - MAXIMUM VALUE (field 4) |
| AFTERTOUCH | MIDI CHANNEL (field 1)RANGE - MINIMUM VALUE (field 3)RANGE - MAXIMUM VALUE (field 4) | |
| SUSTAIN PEDAL | MIDI CC | MIDI CHANNEL (field 1)CC NUMBER (field 2)BUTTON MODE (field 4) |
| DRUM PAD | PAD NUMBER (field 4) | |
| NOTE REPEAT | ||
| TIME DIV | ||
| TAP TEMPO | ||
| BANK CHANGE | ||
| PLAY/STOP | ||
| PLAY/RECORD | ||
| ARP ON/OFF | ||
| ARP LATCH | ||
| SUSTAIN | ||
GLOBAL MODE
In Global Mode, you can send global messages and make general changes to the way that your MPK25 functions. Global Mode options are organized under different pages and include the list of options shown below.
NAVIGATING GLOBAL MODE
- Press the [GLOBAL] button.
- Use the [<] and [>] buttons to navigate through the available pages of options (shown below).
- Use the [VALUE] dial to change settings, values or select a message on the selected page.
- Press [ENTER] to accept the change or send a message or press [<] to cancel.
| KILL MIDI | Send an All Notes Off or Reset Controllers message | Page 1 |
| MIDI COMMON CHANNEL | Select which MIDI channel will be used as the Common Channel. | Page 2 |
| LCD CONTRAST | Adjust the contrast of the display. Page 3 | |
| PAD SENSITIVITY | Adjust how sensitive the pads are to the touch. Page 4 | |
| PAD VELOCITY CURVE | Adjust how the pads will output MIDI velocity, based on the force applied to them. | Page 5 |
| PAD THRESHOLD | Adjust the threshold of minimum force required to activate a pad. | Page 6 |
| KEYBOARD TRANSPOSITION | Transpose the keyboard up or down in semitones. Page 7 | |
| MIDI CLOCK | Select Internal or External MIDI Clock source. Page 8 | |
| TAP TEMPO AVERAGE | Select the number of taps to be averaged in determining tempo. | Page 9 |
| SAVE SETUP | Save the current global settings. Page 10 | |
| SYSEX TX | Transfer a Preset via SysEx. Page 11 | |
| VERSION | Check the current firmware version. Page 12 |
PROGRAM CHANGE MODE
A Program Change, often referred to as a Patch Change, is a MIDI message used for sending data to devices to cause them to change to a new program. This allows you to tell a hardware or software device which sound to play. For example, if your MPK25 is controlling a piano patch on your DAW or an external device, using a Program Change command allows you to easily switch to a synth patch.
NAVIGATING PROGRAM CHANGE MODE
- Press the [PROGRAM CHANGE] button.
- On Page 1, use the [VALUE] dial to select a Prog Change or Prog+Bank message on and press [ENTER].
- On Page 2, use the [<] and [>] buttons to move through the different options and use the {VALUE} dial to change them.
- Press [ENTER] to send the message.
There are two different types of Program Change messages on the MPK25:
PROG CHANGE – This event will transmit a regular Program Change message (0-127) to your DAW or an external device, allowing you to switch between 128 different program banks.
PROG+BANK – This event transmits a Program Change message (0-127), along with a Bank L (Least Significant Bit) Change message (0-127) and a Bank M (Most Significant Bit) Change message (0-126), which allows access of up to 16384 different program banks. You can use PROG+BANK if your DAW or external device supports LSB and MSB.
FREQUENTLY ASKED QUESTIONS
Question: Does the MPK25 have internal sounds?
Answer: No. The MPK25 is a MIDI-controller, which means that it does not contain any sounds inside but is instead used to control external sound devices, such as hardware and software synthesizers, sequencers and drum machines.
Question: Can the MPK25 be synced to external devices?
Answer: Yes, the MPK25 can receive MIDI Clock through both the USB and the MIDI IN connection. This means that you can synchronize tempo-based features, such as Note Repeat and the Arpeggiator, to an external source. To synchronize the MPK25 to an external MIDI Clock source, please enter Global Mode, scroll to MIDI Clock and select "External".
Question: Do I need to use a power adapter if I am using the MPK25 with a computer?
Answer: No. The MPK25 will draw power directly from the USB port. However, if your USB port does not supply enough power or if you are using a USB hub, it may be necessary to use an adapter.
Question: What software applications is the MPK25 compatible with?
Answer: The MPK25 is compatible with any software or hardware device which supports the MIDI protocol. Please consult your specific hardware or software device's documentation for instructions on enabling the MPK25 as a MIDI input device.
Question: Can I use the MPK25 as a MIDI interface for other MIDI devices?
Answer: Yes. The MPK25 functions as a MIDI interface and can be used to send or receive MIDI to and from other MIDI devices connected to it.
Question: Can I control multiple devices with the MPK25?
Answer: Yes. The MPK25 can transmit information on 16 MIDI channels on 2 ports for a total of 32 different MIDI Channels.
Question: How many different Presets can the MPK25 hold?
Answer: The MPK25 can hold 30 Preset settings, which allow you to store different configurations for use with various software and hardware modules. Presets can easily be copied, edited and stored for quick recall of desired configurations.
Question: Can I send Program Change messages to my software or hardware devices?
Answer: Yes. You can send Program Change messages in Program Change mode. In addition, pads and buttons may also be assigned to transmit program change messages.
Question: Are the pads on the MPK25 velocity and pressure sensitive?
Answer: Yes. The MPK25 sports MPC-style velocity and pressure sensitive pads. This allows you to be extremely expressive with your programming and performance.
Question: What is the octave range of the keyboard?
Answer: The MPK25 has a 2-octave physical range (25 keys). However, you can access 10 octaves simply by transposing the keyboard up or down with the [OCTAVE] buttons.
Question: What type of pads is used on the MPK25?
Answer: The MPK25 features the same exact pads which are used on the Akai MPC500.
Question: Are the knobs on the MPK25 endless?
Answer: The knobs on the MPK25 are endless pots. This allows you to limit the range of the knobs, as well as use them as increment/decrement controls. Please note that your software application must be able to receive and recognize NRPNs for Increment/decrement functions to work.
Question: I see 12 knobs, 4 buttons, and 12 pads. Is that all I get?
Answer: No. The MPK25 features multiple banks of controllers and pads, which can be accessed with the [PAD BANK] and [CONTROL BANK] buttons. This allows you to access significantly more parameters than the amount of physical controllers. There are 2 control banks, which effectively give you 32 (2x16) controllers. There are also 4 different pad banks which give you a total of 48 (4x12) pads.
Question: Are the Pitch Bend and Mod wheels freely assignable?
Answer: The Pitch Bend wheel transmits dedicated pitch bend information and cannot be freely assigned to another controller value. The Mod wheel, on the other hand, can be assigned to transmit CC information on any MIDI CC#.
Question: Does the Note Repeat feature on the MPK25 work similarly to Note Repeat on the Akai MPC series?
Answer: Yes, the MPK25 features the same Note Repeat algorithm as can be found on the legendary Akai MPC series. This feature allows you to perform and program rhythm patterns that would otherwise be nearly impossible to do by hand.
TROUBLESHOOTING
| PROBLEM CAUSE SOLUTION | ||
| The display does not light up. | No power. | Please make sure that the MPK25 is connected to your computer and that the computer is powered on. |
| If using a power adapter, please make sure that the adapter is plugged into a live power outlet. | ||
| No sound from target device. | MPK25 not properly connected. | Check your computer's USB connection to confirm that the MPK25 is recognized. If necessary, replug the connection and restart your computer. |
| If controlling an external hardware module, make sure that the MIDI cable is connected from the MPK25 to the device's MIDI IN port. | ||
| MPK25 connected after software application has started. | Restart the software application with the controller plugged in. | |
| Problem is caused by use of a USB hub. | Unplug the MPK25 from the USB hub and connect directly to the computer. | |
| Software application not set to receive MIDI data from the MPK25. | Ensure that the MPK25 or "USB" MIDI device is listed as an active MIDI source in your application. Usually, the MIDI settings can be accessed through the application's Preferences menu. | |
| MPK25's MIDI channel not the same as application's incoming MIDI chanel. | Make sure that the MPK25 is sending MIDI information on the channel that the target device expects. | |
| Notes sustain continuously. | Sustain pedal was plugged in after the MPK25 was powered on. | Turn the unit's power off, wait a moment and then turn it on again. |
| Stuck notes due to incomplete MIDI data. | Turn the unit's power off, wait a moment and then turn it on again. | |
| Sustain pedal works in reverse. | Sustain pedal was plugged in after power was turned on. | With the pedal plugged in, turn the unit's power off, wait a moment, and turn it on again. |
| Arpeggiator and Note Repeat features are not synchronized to my clock source. | Clock source on MPK25 set to "Internal". | In Global Mode, change the MIDI Clock setting to "External". Also, make sure that the software you are using is set to send MIDI Clock to the MPK25. |
| Arpeggiator and Note Repeat features are not working and my Seq/DAW is sending clock. | Software DAW is not in play mode. | If your software DAW is not playing, it will not be sending clock. |
| My knob or mod wheel works in reverse. | Controller minimum value is set higher than its maximum. | Edit the controller and set the minimum value to be lower than the maximum. |
| Transport control does not work. | Software does not support MMC messages, MIDI START/STOP or the MIDI CC mode. | Edit the transport control to send MIDI messages instead. Make sure that the Transport mode you are using on the MPK matches the receive modes of your software. |
| I am only hearing one sound when I hit different pads | 12 Level function is engaged. | When engaged, the 12 Level function will map the last hit pad to all 12 pads. Deactivate 12 Level to return to normal operation. |
| The pads always play at maximum velocity (127). | Full Level feature is engaged. | When engaged, the Full Level function will cause all the pads to output maximum velocity, no matter how hard they are hit. Turn off Full Level to return to normal operation. |
TECHNICAL SPECIFICATIONS
| GENERAL | |
| Display custom LCD w/ backlight | |
| Dimensions (WxDxH) 477 mm x 359 mm x 88 mm | |
| Weight | 3.4 |
| Power | ~100mA, 5V DC via USB ~1A, 6V DC via external adaptor |
| Number of Presets 30 | |
| MIDI output channels over USB 48 (16 channels x 3 ports) | |
| MIDI output channels from 5-pin MIDI 16 | |
| Keyboard | 25 Semi-Weighted keyboard (velocity and channel pressure sensitive) |
| Drum pads 12 (velocity and pressure sensitive) | |
| Drum pad banks 4 | |
| 360 degree knobs 12 | |
| Switches | 4 |
| Accessories | User's manualUSB cable (1m)CD-ROM disc |
| INPUTS/OUTPUTS | |
| MIDI inputs 5-pin DIN x 1 | |
| MIDI outputs 5-pin DIN x 1 | |
| USB Slave connector x 1 (MIDI over USB) | |
| DC IN 6V DC, 1A | |
CONTACT INFORMATION
Please visit the Akai Professional website (www.akaipro.com) regularly for additional information, news and firmware upgrades for the MPK25.
For additional technical support:
EMAIL: support@akaipro.com
TEL: 401.658.4032 (U.S)
ÍNDICE
INTRODUCCIÓN....19
EDIT MODE (MODE ÉDITION).... 38
GLOBAL MODE (GÉNÉRAL).... 40
PROGRAM CHANGE MODE (CHANGEMENT DE PROGRAMME)...... 40
FOIRE AUX QUESTIONS 41
DÉPANNAGE 42
SPÉCIFICATIONS TECHNIQUES 43
COORDONNÉES 43
INTRODUCTION
MODE EDIT (MODE ÉDITION)
NAVIGATION DU MODE EDIT
PARAMÈTRES DU MODE EDIT
| CLAVIER | OCTAVE | KEYBOARD MIDI CHANNEL (champ 1)UP/DOWN (champ 4) |
| AFTERTOUCH | KEYBOARD MIDI CHANNEL (champ 1)ON/OFF BEHAVIOR (champ 4) | |
| VELOCITY | KEYBOARD MIDI CHANNEL (champ 1)ON/OFF BEHAVIOR (champ 4) | |
| PADS | NOTE | MIDI CHANNEL (champ 1)NOTE NUMBER (champ 2)ON/OFF BEHAVIOR (champ 3)ON/OFF BEHAVIOR (champ 4) |
| PROGRAM CHANGE | MIDI CHANNEL (champ 1)PROGRAM CHANGE NUMBER (champ 2)BANK M (MSB) (champ 3)BANK L (LSB) (champ 4) | |
| BOUTONS | CONTROL CHANGE | MIDI CHANNEL (champ 1)CC NUMBER (champ 2)RANGE - MINIMUM VALUE (champ 3)RANGE - MAXIMUM VALUE (champ 4) |
| AFTERTOUCH | MIDI CHANNEL (champ 1)CC NUMBER (champ 2)RANGE - MINIMUM VALUE (champ 3)RANGE - MAXIMUM VALUE (champ 4) | |
| TOUCHES | CONTROL CHANGE | MIDI CHANNEL (champ 1)CC NUMBER (champ 2)BUTTON MODE (champ 4) |
| PROGRAM CHANGE | MIDI CHANNEL (champ 1)PROGRAM CHANGE NUMBER (champ 2)BANK M (MSB) (champ 3)BANK L (LSB) (champ 4) | |
| ARP ON/OFF | TYPE/RANGE/TOGGLE | ARPEGGIO TYPE (champ 2)ARPEGGIO RANGE (champ 3)ARPEGGIO TOGGLE BEHAVIOR (champ 4) |
| GATE/SWING | ARPEGGIO GATE VALUE (champ 2)ARPEGGIO SWING VALUE (champ 4) | |
| NOTE REPEAT | TOGGLE/MOMENTARY | BUTTON MODE (champ 2) |
| GATE/SWING | NOTE REPEAT GATE VALUE (champ 2)NOTE REPEAT SWING VALUE (champ 4) | |
| TIME DIVISION | DIVISION | DEFAULT TIME DIVISION (champ 2)BUTTON MODE (champ 4) |
| MOLETTE DE VITESSE DE LECTURE | PITCH BEND | MIDI CHANNEL (champ 1) |
| MOLETTE DE MODULATION | MODULATION WHEEL | MIDI CHANNEL (champ 1)CC NUMBER (champ 2)RANGE - MINIMUM VALUE (champ 3)RANGE - MAXIMUM VALUE (champ 4) |
| TOUCHES DE DÉFILEMENT | TRANSPORT FUNCTION | MMC, MIDI, MMC/MIDI, or CTRL (champ 2) |
| TAP TEMPO | TEMPO | BPM (champ 2) |
| PÉDALE D'EXPRESSION | CNTL CHANGE | MIDI CHANNEL (champ 1)CC NUMBER (champ 2)RANGE - MINIMUM VALUE (champ 3)RANGE - MAXIMUM VALUE (champ 4) |
| AFTERTOUCH | MIDI CHANNEL (champ 1)RANGE - MINIMUM VALUE (champ 3)RANGE - MAXIMUM VALUE (champ 4) | |
| PÉDALE DE SOUTIEN | MIDI CC | MIDI CHANNEL (champ 1)CC NUMBER (champ 2)BUTTON MODE (champ 4) |
| DRUM PAD | PAD NUMBER (champ 4) | |
| NOTE REPEAT | ||
| TIME DIV | ||
| TAP TEMPO | ||
| BANK CHANGE | ||
| PLAY/STOP | ||
| PLAY/RECORD | ||
| ARP ON/OFF | ||
| ARP LATCH | ||
| SUSTAIN |
GLOBAL MODE (GÉNÉRAL)
PARAMETER DES EDIT MODUS
| GEWAHLTER CONTROLLER SEITE 1 SEITE 2 | ||
| KEYBOARD | OCTAVE | KEYBOARD MIDI KANAL (Feld 1)AUF/AB (Feld 4) |
| AFTERTOUCH | KEYBOARD MIDI KANAL (Feld 1)AN/AUS VERHALTEN (Feld 4) | |
| VELOCITY | KEYBOARD MIDI KANAL (Feld 1)AN/AUS VERHALTEN (Feld 4) | |
| PADS | NOTE | MIDI KANAL (Feld 1)NOTE NUMMER(Feld 2)AN/AUS VERHALTEN (Feld 3)DRUCKVERHALTEN (Feld 4) |
| PROGRAM CHANGE | MIDI KANAL (Feld 1)PROGRAM CHANGE NUMMER(Feld 2)BANK M (MSB) (Feld 3)BANK L (LSB) (Feld 4) | |
| REGLER | CONTROL CHANGE | MIDI KANAL (Feld 1)CC NUMMER (Feld 2)BEREICH - MINIMALWERT (Feld 3)BEREICH - MAXIMALWERT (Feld 4) |
| AFTERTOUCH | MIDI KANAL (Feld 1)CC NUMMER (Feld 2)BEREICH - MINIMALWERT (Feld 3)BEREICH - MAXIMALWERT (Feld 4) | |
| TASTEN | CONTROL CHANGE | MIDI KANAL (Feld 1)CC NUMMER (Feld 2)TASTEN MODUS (Feld 4) |
| PROGRAM CHANGE | MIDI KANAL (Feld 1)PROGRAM CHANGE NUMMER (Feld 2)BANK M (MSB) (Feld 3)BANK L (LSB) (Feld 4) | |
| ARP ON/OFF | TYPE/BEREICH/TOGGLE | ARPEGGIO TYP (Feld 2)ARPEGGIO BEREICH (Feld 3)ARPEGGIO UMSCHALTVERHALTEN (Feld 4) |
| GATE/SWING | ARPEGGIO GATE WERT (Feld 2)ARPEGGIO SWING WERT (Feld 4) | |
| NOTE REPEAT | TOGGLE/MOMENTARY | TASTEN MODUS (Feld 2) |
| GATE/SWING | NOTE REPEAT GATE WERT (Feld 2)NOTE REPEAT SWING WERT (Feld 4) | |
| TIME DIVISION DIVISION | DEFAULT TIME DIVISION (Feld 2)TASTEN MODUS (Feld 4) | |
| PITCH BEND WHEEL | PITCH BEND | MIDI KANAL (Feld 1) |
| MODULATION WHEEL MODULATION WHEEL | MIDI KANAL (Feld 1)CC NUMMER (Feld 2)BEREICH - MINIMALWERT (Feld 3)BEREICH - MAXIMALWERT (Feld 4) | |
| TRANSPORT | TRANSPORT FUNCTION | MMC, MIDI, MMC/MIDI, oder CTRL (Feld 2) |
| TAP TEMPO | TEMPO | BPM (Feld 2) |
| EXPRESSION PEDAL | CNTL CHANGE | MIDI KANAL (Feld 1)CC NUMMER(Feld 2)BEREICH - MINIMALWERT (Feld 3)BEREICH - MAXIMALWERT (Feld 4) |
| AFTERTOUCH | MIDI KANAL (Feld 1)BEREICH - MINIMALWERT (Feld 3)BEREICH - MAXIMALWERT (Feld 4) | |
| SUSTAIN PEDAL | MIDI CC | MIDI KANAL (Feld 1)CC NUMMER(Feld 2)TASTEN MODUS (Feld 4) |
| DRUM PAD | PAD NUMMER(Feld 4) | |
| NOTE REPEAT | ||
| TIME DIV | ||
| TAP TEMPO | ||
| BANK CHANGE | ||
| PLAY/STOP | ||
| PLAY/RECORD | ||
| ARP ON/OFF | ||
| ARP LATCH | ||
| SUSTAIN | ||
GLOBAL MODUS
EMAIL: support@akaipro.de
INDICE
INTRODUZIONE......61
SCHEMA DEI COLLEGAMENTI....61
PANORAMICA PANNELLO POSTERIORE......62
PANORAMICA PANNELLO ANTERIORE ......62
MODALITÀ....64
MODALITÀ PRESET......65
MODALITÀ EDIT....66
MODALITÀ GLOBAL....68
MODALITÀ PROGRAM CHANGE ......68
DOMANDE FREQUENTI (FAQ)......69
NAVIGARE IN MODALITÀ EDIT
PARAMETRI MODALITÀ EDIT
| CONTROLLER SELEZIONATO | PAGINA 1 PAGINA 2 | |
| TASTIERA | OTTAVA | CANALE MIDI TASTIERA (campo 1)SU/GIU (campo 4) |
| AFTERTOUCH | CANALE MIDI TASTIERA (campo 1)COMPORTAMENTO ON/OFF (campo 4) | |
| VELOCITÀ | CANALE MIDI TASTIERA (campo 1)COMPORTAMENTO ON/OFF (campo 4) | |
| PAD | NOTA | CANALE MIDI (campo 1)NUMERO NOTA (campo 2)COMPORTAMENTO ON/OFF (campo 3)COMPORTAMENTO PRESSIONE (campo 4) |
| MODIFICA PROGRAMMA | CANALE MIDI (campo 1)NUMERO MODIFICA PROGRAMMA (campo 2)BANCO M (MSB) (campo 3)BANCO L (LSB) (campo 4) | |
| MANOPOLE | MODIFICA COMANDO | CANALE MIDI (campo 1)NUMERO CC (campo 2)GAMMA - VALORE MINIMO (campo 3)GAMMA - VALORE MASSIMO (campo 4) |
| AFTERTOUCH | CANALE MIDI (campo 1)NUMERO CC (campo 2)GAMMA - VALORE MINIMO (campo 3)GAMMA - VALORE MASSIMO (campo 4) | |
| TASTI | MODIFICA COMANDO | CANALE MIDI (campo 1)NUMERO CC (campo 2)MODALITÀ TASTO (campo 4) |
| MODIFICA PROGRAMMA | CANALE MIDI (campo 1)NUMERO MODIFICA PROGRAMMA (campo 2)BANCO M (MSB) (campo 3)BANCO L (LSB) (campo 4) | |
| ARP ON/OFF | TIPO/GAMMA/COMMUTAZIONE | TIPO ARPEGGIO (campo 2)GAMMA ARPEGGIO (campo 3)COMPORTAMENTO COMMUTAZIONE ARPEGGIO (campo 4) |
| GATE/SWING | VALORE ARPEGGIO GATE (campo 2)VALORE ARPEGGIO SWING (campo 4) | |
| NOTE REPEAT | COMMUTAZIONE/MOMENTANEO | MODALITÀ TASTO (campo 2) |
| GATE/SWING | VALORE GATE DI NOTE REPEAT (campo 2)VALORE SWING DI NOTE REPEAT (campo 4) | |
| DIVISIONE TEMPO | DIVISIONE | DIVISIONE TEMPO PREDEFINITA (campo 2)MODALITÀ TASTO (campo 4) |
| ROTELLA PITCH BEND | BEND DEL PITCH | CANALE MIDI (campo 1) |
| ROTELLA DIMODULAZIONE | ROTELLA DIMODULAZIONE | CANALE MIDI (campo 1)NUMERO CC (campo 2)GAMMA - VALORE MINIMO (campo 3)GAMMA - VALORE MASSIMO (campo 4) |
| TRASPORTO | FUNZIONE TRASPORTO | MMC, MIDI, MMC/MIDI, o CTRL (campo 2) |
| TAP TEMPO | TEMPO | BPM (battiti al minuto) (campo 2) |
| PEDALE DI ESPRESSIONE | MODIFICA CNTL | CANALE MIDI (campo 1)NUMERO CC (campo 2)GAMMA - VALORE MINIMO (campo 3)GAMMA - VALORE MASSIMO (campo 4) |
| AFTERTOUCH | CANALE MIDI (campo 1)GAMMA - VALORE MINIMO (campo 3)GAMMA - VALORE MASSIMO (campo 4) | |
| PEDALE SUSTAIN | MIDI CC | CANALE MIDI (campo 1)NUMERO CC (campo 2)MODALITÀ TASTO (campo 4) |
| PAD PERCUSSIONI | NUMERO PAD (campo 4) | |
| NOTE REPEAT | ||
| DIVISIONE TEMPO | ||
| TAP TEMPO | ||
| MODIFICA BANCO | ||
| PLAY/STOP | ||
| PLAY/RECORD (RIPRODUCI/REGISTRA) | ||
| ARP ON/OFF | ||
| BLOCCO ARP | ||
| SUSTAIN | ||
MODALITÀ GLOBAL
E-MAIL: support@akaipro.com
TEL: 401.658.4032 (U.S)
7-51-0276-A
AKAI
professional


- HOOKUP DIAGRAM
- REAR PANEL OVERVIEW
- FRONT PANEL OVERVIEW
- ABOUT MODES
- Preset Mode
- Edit Mode
- Global Mode
- Program Change Mode
- PAGE 1 - LOAD PRESET
- PAGE 2 - SAVE/COPY PRESET
- PAGE 3 – NAME PRESET
- NAVIGATING EDIT MODE
- EDIT MODE PARAMETERS
- NAVIGATING GLOBAL MODE
- NAVIGATING PROGRAM CHANGE MODE
- FREQUENTLY ASKED QUESTIONS
- TROUBLESHOOTING
- TECHNICAL SPECIFICATIONS
- CONTACT INFORMATION
- ÍNDICE
- INTRODUCTION
- MODE EDIT (MODE ÉDITION)
- NAVIGATION DU MODE EDIT
- PARAMÈTRES DU MODE EDIT
- GLOBAL MODE (GÉNÉRAL)
- PARAMETER DES EDIT MODUS
- GLOBAL MODUS
- INDICE
- NAVIGARE IN MODALITÀ EDIT
- MODALITÀ GLOBAL
Brand : AKAI
Model : MPK25
Category : MIDI Keyboard