
Timbre Wolf - MIDI Keyboard AKAI - Free user manual and instructions
Find the device manual for free Timbre Wolf AKAI in PDF.


| Product Type | 4-voice polyphonic analog synthesizer |
| Brand | AKAI |
| Model | Timbre Wolf |
| Category | MIDI Keyboard |
| Keyboard | 37 velocity-sensitive keys |
| Synthesis | Analog, 4 voices, 2 oscillators per voice |
| Polyphony | 4 voices |
| Filter | Resonant low-pass filter |
| Envelope Generator | Dedicated ADSR for filter and amplifier |
| Sequencer | Step sequencer, 64 steps, 4 patterns |
| Connectivity | MIDI In/Out, USB, headphone output, 6.35 mm audio output |
| Power Supply | 9V DC power adapter (included) |
| Dimensions (W x D x H) | 710 x 270 x 85 mm |
| Weight | 5 kg |
| Care and Cleaning | Clean with a dry, soft cloth. Avoid solvents. |
| Safety | Do not expose to moisture, shocks, or extreme temperatures. |
| Spare Parts and Repairability | Contact AKAI after-sales service for spare parts. |
| General Information | Analog synthesizer designed for musicians and producers. |
Frequently Asked Questions - Timbre Wolf AKAI
User questions about Timbre Wolf AKAI
0 question about this device. Answer the ones you know or ask your own.
Ask a new question about this device
Download the instructions for your MIDI Keyboard in PDF format for free! Find your manual Timbre Wolf - AKAI and take your electronic device back in hand. On this page are published all the documents necessary for the use of your device. Timbre Wolf by AKAI.
USER MANUAL Timbre Wolf AKAI
User Guide (English)
Introduction
Box Contents
Timbre Wolf User Guide
Power Adapter Safety & Warranty Manual
Support
For the latest information about this product (system requirements, compatibility information, etc.) and product registration, visit akaipro.com.
For additional product support, visit akaipro.com/support.
Quick Start / Connection Diagram
Important: After powering Timbre Wolf on, let it warm up before using it. Its tuning can be affected by the temperature. After it warms up for the first time, we recommend calibrating it (see Calibration to learn how to do this).
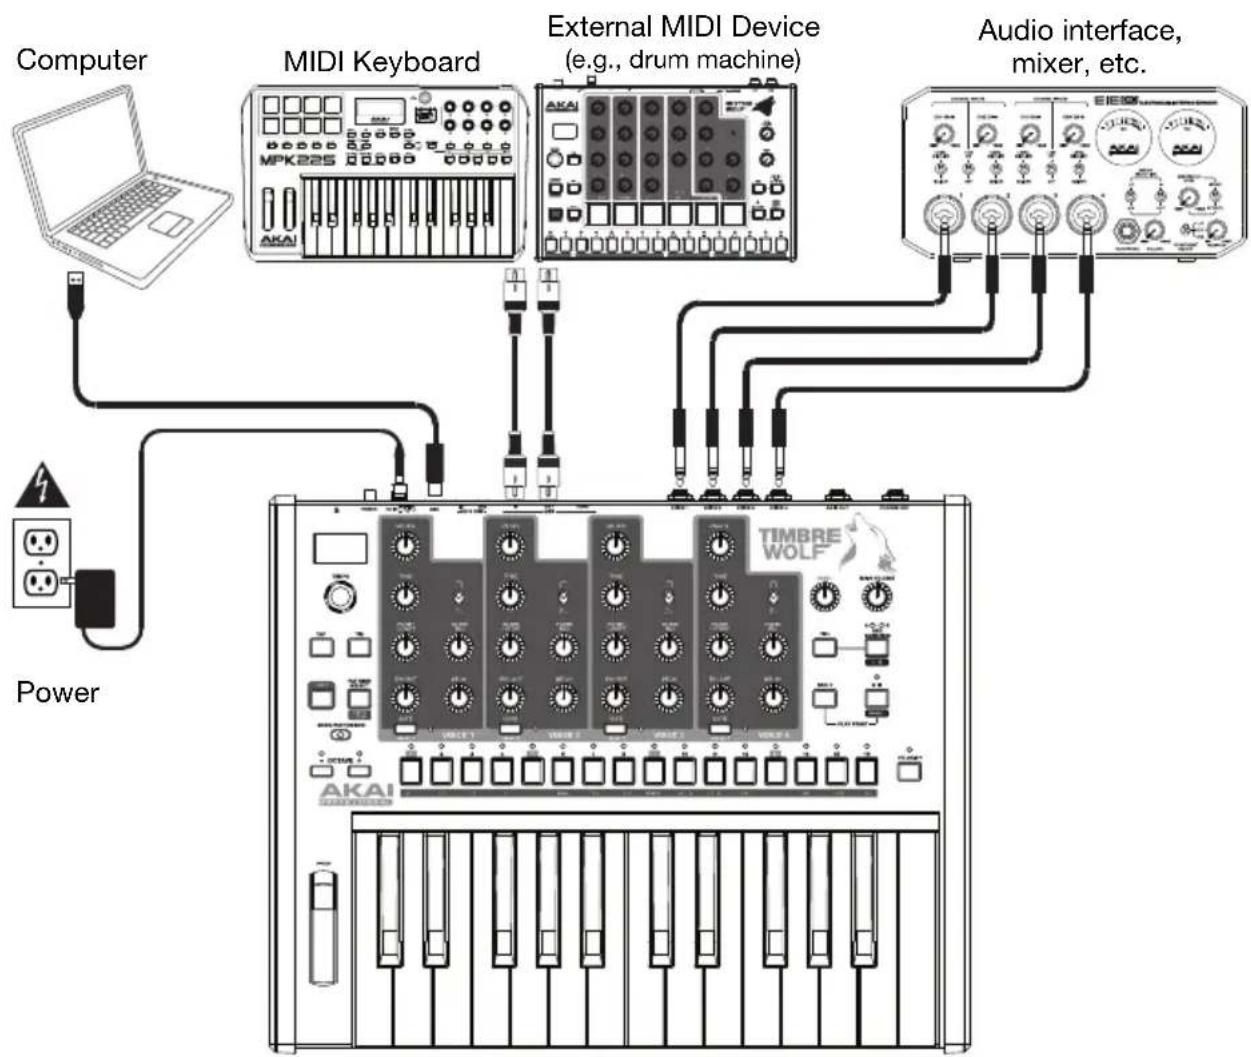
flowchart
graph TD
    A["Computer"] --> B["MIDI Keyboard"]
    B --> C["External MIDI Device (e.g., drum machine)"]
    C --> D["Audio interface, mixer, etc."]
    D --> E["Power"]
    E --> F["ACAI"]
    F --> G[" Timbre WOLF "]
    G --> H["100 MHz"]
    G --> I["2 MHz"]
    G --> J["3 MHz"]
    G --> K["4 MHz"]
    G --> L["5 MHz"]
    G --> M["6 MHz"]
    G --> N["7 MHz"]
    G --> O["8 MHz"]
    G --> P["9 MHz"]
    G --> Q["10 MHz"]
    G --> R["11 MHz"]
    G --> S["12 MHz"]
    G --> T["13 MHz"]
    G --> U["14 MHz"]
    G --> V["15 MHz"]
    G --> W["16 MHz"]
    G --> X["17 MHz"]
    G --> Y["18 MHz"]
    G --> Z["19 MHz"]
    G --> AA["20 MHz"]
Items not listed in Box Contents are sold separately.
Features
Top Panel

-
Display: This display shows Timbre Wolf's tempo or other relevant values described in this guide.
-
Tempo: Turn this knob to adjust Timbre Wolf's global tempo (20–300 BPM or beats per minute). The number will be shown in the display. You also use this knob to perform other operations such as selecting note values, swing amount, patterns, or the pattern length.
-
Tap: Press this button at the desired rate to enter a new tempo. Timbre Wolf will detect the new tempo after three taps.
-
Shift: Press and hold this button to access the secondary functions of certain buttons.
-
Step Switches: Press these buttons to enter or erase a step/note from the pattern.
Press and hold Shift to access their secondary functions:
- Tune: Use this button to calibrate the tuning of Timbre Wolf's voices. See Calibration to learn how to do this.
- 1/4, 1/8, 1/16, 1/32: Use these buttons to select the pattern's time division (i.e., the note value of each Step Switch). When holding Shift, the Step Indicator above the current time division will be lit.
- Triplet: Press this button activate or deactivate Triplet, which turns the time division into triplet-based one (except for 1/32). When holding Shift, the Step Indicator above this button is lit when activated.
- Swing: Press this button and then turn the Tempo knob to adjust how much swing is applied to the pattern. At 50, no swing is applied. At 75, the pattern is entirely swung. (This is identical to Akai Professional MPCs.)
- Legato: Press this button to configure the legato settings for each voice. When legato is on, playing a note while another note is being held will not retrigger the envelope for the new note, resulting in a smooth glide from the original note to the new note. When legato is off, playing a note will always trigger the envelope, giving each note more definition. See Voice Settings > Legato to learn more.
- Priority: Press this button to set which note will be replaced when the number of simultaneously played notes exceeds the voice limit (1 while the Voice Mode Selector is set to Mono or Unison or 5 while the Voice Mode Selector is set to Poly). See Voice Settings > Priority to learn more.
- MIDI Ch: Press this button to set the MIDI channels to which the voices respond (from Timbre Wolf's keyboard or from an external MIDI device). This setting determines the channel for Voice 1 only. Voices 2–4 will use the three next-highest MIDI channels in sequential order. See Voice Settings > MIDI Channel to learn more.
- Local: Press this button to turn the Local setting on or off. When on, its Step Indicator will be lit and Timbre Wolf's keyboard will send its MIDI messages to the four internal voices. When off, its Step Indicator will be off and Timbre Wolf's keyboard will send its MIDI messages to the MIDI Out.
Note: You can still record and edit patterns when Local is off.
- Sync: Press this button to select Timbre Wolf's MIDI clock source: Internal, External, USB, or Gate. See the Transport Control section to learn more.
-
Copy, Clear, Save: Use these buttons to copy, clear, or save the current pattern. See the Saving, Copying, and Clearing section to learn more.
-
Step Indicators: These LEDs will light up to indicate various states:
-
While playing a pattern, they show the current position in the Sequence.
- When viewing a pattern, they show which steps contain a note (i.e., which Step Switches are active). See Sequencer > Step Switches to learn more.
- While holding down the Velocity button in Record Mode, their colors show the velocity of each step. See Sequencer > Step Switches to learn more.
-
While selecting a pattern, the red Step Indicator shows which pattern is currently selected. See About Patterns to learn more.
-
Tie: Press and hold this button, and then press a Step Switch to "tie" its note to the previous step or to return it to its previous ("un-tied") state. A tied note is "held over" from the previous note, meaning that its envelope is not retriggered. When you press and hold this button, the Step Indicators of tied steps will be lit amber, those with "un-tied" notes will be lit red, and those with no notes will be unlit.
You can do this to multiple Step Switches at once, and you can tie several consecutive notes together. Tied notes can also “wrap around” from the end to the beginning of a sequence.
- Keyboard: This 25-note keyboard is velocity-sensitive and, in conjunction with the Octave Up/Down buttons, can control a 4-octave range.
- Octave Down/Up: Use these buttons to shift the keyboard's range up or down.
-
Pitch-Bend Wheel: Move this wheel to bend the pitch of the notes you are playing on the keyboard.
-
Voice Mode Selector: Use this switch to set Timbre Wolf's voice mode (Mono, Poly, or Unison), which determines which voice/voices you will hear. See Voice Settings > Mono, Poly, or Unison to learn more.
- Voice Controls: Use these controls to adjust the sounds of their respective voices.
• Volume: Turn this to set the voice's volume.
- Tune: Turn this to tune the pitch of the voice.
- Filter Cutoff: Turn this to set the cutoff frequency of the voice's low-pass filter.
- Filter Res: Turn this to set the resonance of the voice's low-pass filter. This determines the slope of filter at the cutoff frequency.
- Env Amt: Turn this to set how much the voice is affected by the filter envelope. (The envelope's effect will still be heard even at the minimum setting.)
- Decay: Turn this to set how long it takes for the voice's amplitude envelope to continue after the note stops playing.
- Mute/Select: Press and hold Shift and then press this button to mute or unmute the corresponding voice. The light next to the button is lit if the voice is unmuted, unlit if the voice is muted. This affects sequencer playback only; you can still use play the voice using the keyboard or an external MIDI device.
- Play/Stop: Press this button to start or stop playback. During playback, press and hold Rec and then press this button to restart playback from the very beginning of the pattern.
Press and hold Shift and then press this button to send a MIDI Panic (All Notes Off) message.
When Sync is set to Gate, press this button to return to Step 1. See Transport Controls to learn more.
- Rec: Press this button to record-arm the sequencer. See the Sequencer section of this guide to learn more. During playback, press and hold this button and then press Play/Stop to restart playback from the very beginning of the pattern.
- Velocity: Press this button to edit the velocity of a step. See the Sequencer section of this guide to learn more.
- Seq Variation: Press this button to select whether you are playing/editing Sequence A, Sequence B, or Sequence A and B. See the About Patterns section to learn more.
- Fill: Press this button to play the fill for the current sequence (A, B, or A and B). See the About Patterns section to learn more.
- Pattern Select: Press this button and then select a pattern by (A) pressing one of the 16 Step Switches to select the pattern of the same number or (B) turning the Tempo knob (when selecting a pattern, the Tempo knob will not adjust the tempo). Press Pattern Select again to return to normal operation. If you do this during playback, the current pattern will finish before moving to the next one.
Press and hold Shift and then press this button to set the pattern's length. The pattern's length (in steps) will appear in the display, and the same number Step Indicators will light up amber. Press one of the 16 Step Switches or turn the Tempo knob to set the pattern's length (in steps). If the Seq Variation button has either A or B lit, the maximum pattern length is 16 steps. If both A and B are lit, the maximum pattern length is 32 steps, and the minimum pattern length is 17 steps. Press Pattern Select (without holding Shift) to return to normal operation.
- Main Volume: Turn this knob to set the output volume of Timbre Wolf's Main Out and Phones Out.
- Howl: Turn this knob to set the amount of overdrive (distortion) applied to Timbre Wolf's Main Out and Phones Out. This does not affect the sound of Voice Outs 1–4.
Rear Panel

- DC In: Use the included power adapter (12V, 2A, center-positive) to connect this jack to a power outlet.
- Power Button: Press this button to power Timbre Wolf on or off.
Important: After powering Timbre Wolf on, let it warm up before using it. Its tuning can be affected by the temperature.
- Cable Restraint: You can secure a cable to this restraint to prevent it from accidentally unplugging.
- Kensington ^® Lock Slot: You may use this Kensington lock slot to secure the Timbre Wolf to a table or other surface.
- USB Port: Use a standard USB cable to connect this port to an available USB port on your computer. This connection lets Timbre Wolf send and receive MIDI over USB to and from your computer.
- Main Out: Use a standard 1/4" (6.35 mm) TRS or TS cable to connect this output to the input of an audio interface, mixer, amplifier system, etc.
- Voice Outs 1-4: Use standard 1/4'' (6.35 mm) TRS or TS cables to connect these outputs to the inputs of an audio interface, mixer, amplifier system, etc. Each Timbre Wolf voice is sent separately to each of these outputs, so you can record or mix them independently of each other. When a cable is connected to one of these outputs, that voice will be removed from the Main Out and Phones Out. The Howl knob does not affect these outputs.
- Phones Out: Connect your standard 1/4" (6.35 mm) stereo headphones to this output.
- MIDI In: Use a standard five-pin MIDI cable to connect this MIDI In to the MIDI Out of an external MIDI device (e.g., another MIDI controller).
- MIDI Out: Use a standard five-pin MIDI cable to connect this MIDI Out to the MIDI In of an external MIDI device (e.g., a synthesizer, sequencer, drum machine, etc.).
- MIDI Thru: Use a standard five-pin MIDI cable to connect this MIDI Thru to the MIDI In of an external MIDI device (e.g., a synthesizer, sequencer, drum machine, etc.). All messages sent from this MIDI Thru are identical to the messages received by Timbre Wolf's MIDI In.
- Gate Trig Out: Use a standard 1/8" (3.5 mm) TS cable to connect this output to the input of an optional external device that can receive Timbre Wolf's Gate (trigger) messages.
- Gate Trig In: Use a standard 1/8" (3.5 mm) TS cable to connect this input to the output of an optional external device to send Gate (trigger) messages to Timbre Wolf.
Calibration
Before using Timbre Wolf for the first time (after letting it warm up), we recommend calibrating its voices. You can also do this in the future as needed, though you shouldn't have to do it often.
Important: During calibration, Timbre Wolf's keyboard and sequencer will be disabled, and no audio signal or messages will be sent out of the Gate Out, MIDI Out, Voice Outputs, Main Out, or Phones Out. Also, the calibration process ignores the positions of each voice's Tune knob, so all voices will calibrate properly regardless of their control settings.
To calibrate the tuning of Timbre Wolf's voices:
- Press and hold Shift and then press Step Switch 1 (Tune). CAL will appear in the display.
-
While still holding Shift, do one of the following:
-
Press Step Switch 1 (Tune) again to confirm that you want to calibrate.
-
Release Shift to cancel the operation.
-
After pressing Step Switch 1 (Tune), the display will show various note values as the voices calibrate, and the Step Indicators will light in various patterns.
-
When the calibration is done, Step Indicator 1 will flash. To return to normal operation, press Step Switch 1 (Tune).
Voice Settings
In addition to the seven Voice Controls for each of the four voices, there are a few other settings that affect how Timbre Wolf uses its voices.
Mono, Poly, or Unison
Use the Voice Mode Selector to set Timbre Wolf's voice mode (Mono, Poly, or Unison). This setting determines how its voices are played as well as other features (Priority, Legato, and MIDI Channel).
Mono
Each voice is played monophonically and independently.
The keyboard will play the currently selected voice. To select a voice, press its Mute/Select button.
The sequencer will play all four voices independently and simultaneously as each voice has its own track in a sequence. The Step Indicators will show the steps for the currently selected track (one of four) in the current sequence. To select a track, press its Mute/Select button. The sequences of all four tracks will also be sent out as MIDI note messages, which can be used to sequence external devices (drum machines, other synths, etc.) along with Timbre Wolf.
When Timbre Wolf receives MIDI note messages (through its MIDI In) on the MIDI channel for each voice, all four voices can play independently simultaneously.
Poly
As a series of notes plays, each note will be played by a separate voice in sequential order (Voice 1 will play the first note, Voice 2 will play the second note, etc. and eventually cycle back to Voice 1).
Notes played by the keyboard will be played by each voice in a rotation, as described above.
The sequencer will play the steps for the first track (of four) only, but the notes will be played by each voice in a rotation, as described above. The sequences of all four tracks will also be sent out as MIDI note messages, which can be used to sequence external devices (drum machines, other synths, etc.) along with Timbre Wolf.
When Timbre Wolf receives MIDI note messages (through its MIDI In) on the MIDI channel for the first voice only, that voice will play. MIDI note messages sent to the other voices will be ignored.
Unison
All voices are played simultaneously. The Priority setting will determine how the voices are silenced when more than one note is played at the same time.
The keyboard will play all voices simultaneously.
The sequencer will play the steps for the first track (of four) only, but the notes will be played by all four voices simultaneously. The sequences of all four tracks will also be sent out as MIDI note messages, which can be used to sequence external devices (drum machines, other synths, etc.) along with Timbre Wolf.
When Timbre Wolf receives MIDI note messages (through its MIDI In) on the MIDI channel for the first voice only, all four voices will play simultaneously. MIDI note messages sent to the other voices will be ignored.
Priority
The priority setting determines how which note will be replaced when the number of simultaneously played notes exceeds the voice limit (1 while the Voice Mode Selector is set to Mono or Unison or 5 while the Voice Mode Selector is set to Poly).
To set the priority of each voice:
-
Press and hold Shift and then press Step Switch 9 (Priority). Keep holding Shift.
-
The display will show the number of current voice (1-4) and a two-letter indicator of the priority:
To select a voice, press Step Switch 8 (Legato) to move to the next voice (1–4).
To change the priority, turn the Tempo knob to select low (LO), high (HI), or last (LS). The effects of this setting depend on the voice mode.
- When the Voice Mode Selector is set to Mono:
o Low (LO): The voice will play the lowest note of the notes sent to that voice.
○ High (HI): The voice will play the highest note of the notes sent to that voice.
- Last (LS): The voice will play the newest note of the notes sent to that voice.
- When the Voice Mode Selector is set to Poly:
o Low (LO): The voice playing the lowest note will play the new note, silencing the note that is currently playing.
○ High (HI): The voice playing the highest note will play the new note, silencing the note that is currently playing.
- Last (LS): The voice playing the oldest note will play the new note, silencing the note that is currently playing.
- When the Voice Mode Selector is set to Unison:
o Low (LO): The voices will play the new note if it is lower than the notes that are currently playing.
○ High (HI): The voices will play the new note if it is higher than the notes that are currently playing.
- Last (LS): The voices will always play the new note, silencing any notes that are currently playing.
To return to normal operation, release Shift.
Legato
When the legato feature is on, playing a note while another note is being held will not retrigger the envelope for the new note, resulting in a smooth glide from the original note to the new note.
When the legato feature is off, playing a note will always trigger the envelope, giving each note more definition.
To turn the legato feature on or off for each voice:
- Press and hold Shift and then press Step Switch 8 (Legato). Keep holding Shift.
- The display will show the number of current voice (1-4) and a two-letter indicator that legato is off (Of) or on (On).
To select a voice, press Step Switch 8 (Legato) to move to the next voice (1–4).
To activate/deactivate the legato feature, turn the Tempo knob to turn the setting off (Of) or on (On).
To return to normal operation, release Shift.
MIDI Channel
Each of the four voices responds to messages on a MIDI channel from Timbre Wolf's keyboard or from an external MIDI device. The MIDI Channel setting determines the channel for Voice 1. Voices 2–4 use the three next-highest MIDI channels in sequential order.
Example: If the MIDI Channel is set to 3, Voice 1 will respond to messages on Channel 3. Voices 2, 3, and 4 will respond to messages on Channels 4, 5, and 6 (respectively).
When the Voice Mode Selector is set to Mono, each voice will respond independently to MIDI messages on their respective MIDI channel. The keyboard will always send its messages on the channel of the currently selected voice.
When the Voice Mode Selector is set to Poly or Unison, all four voices will respond to incoming MIDI messages on Voice 1's MIDI channel only (playing polyphonically or in unison, respectively). The keyboard will always send its messages on Voice 1's channel.
Important: Because all four voices use adjacent MIDI channels, as described above, the ranges of available channels are different for each voice:
| Voice 1 can use Channels 1–13 |
| Voice 2 can use Channels 2–14 |
| Voice 3 can use Channels 3–15 |
| Voice 4 can use Channels 4–16 |
Note: While Timbre Wolf's sequencer plays, it will send out its MIDI note messages for all four tracks (each on its corresponding channel) through its USB port and MIDI Out, regardless of the voice mode or any performance on Timbre Wolf's keyboard. You can use this feature to sequence external devices (drum machines, other synths, etc.) along with Timbre Wolf.
To set the MIDI channel:
- Press and hold Shift and then press Step Switch 10 (MIDI Ch). Keep holding Shift.
- Do either of the following to set the channel:
Press Step Switch 10 (MIDI Ch) to move to the next channel, which is shown in the display.
Turn the Tempo knob to select the channel, which is shown in the display.
Transport Controls
Timbre Wolf's Play/Stop button operates differently depending on its Sync setting (Step Switch 13).
When set to Internal:
- Press the Play/Stop button to start or stop playback.
- During playback, press and hold Rec and then press Play/Stop to restart playback from the very beginning of the pattern.
- Timbre Wolf will send MIDI Start, Stop, Continue, Clock, and SongPosPtr=0 depending on its transport state.
- Timbre Wolf's Gate Trig Out will pulse each time it advances one step.
When set to External or USB:
- Timbre Wolf's playback will respond to incoming MIDI Start, Stop, Continue, Clock, and SongPosPtr=0 messages.
- Timbre Wolf's transport controls will not function.
When set to Gate:
- Timbre Wolf will not receive any sequence position information, but you can return it immediately to Step 1 by doing either of the following:
○ While stopped, press Play/Stop.
During playback, press and hold Rec and then press Play/Stop at the same time.
- Timbre Wolf can receive Gate messages with time divisions of 1/8 or 1/16 only:
- 1/8: Two pulses will advance playback by one step.
- 1/16: One pulse will advance playback by one step.
Note: Unlike normal MIDI messages, Gate messages contain Note On messages only (no CC messages, Note Off messages, etc.). Because of this, the Gate messages Timbre Wolf receives are simplified.
- Timbre Wolf's Gate Trig Out will mimic its Gate Trig In.
About Patterns
Timbre Wolf can store up to 16 patterns. Each pattern consists of four sequences: Sequence A, Sequence B, Fill A, and Fill B.
To simply play your patterns, press the Play/Stop button. To edit a Sequence or Fill, see the end of this chapter and the Sequencer chapter.
To select a pattern, press Pattern Select and then (A) press one of the 16 Step Switches to select the pattern of the same number or (B) turn the Tempo knob (when selecting a pattern, the Tempo knob will not adjust the tempo). The current pattern's Step Indicator will be lit red. The Step Indicator of the pattern that will play next will flash. Press Pattern Select again to return to normal operation.
To set the pattern length, press Last Step. The pattern's length (in steps) will appear in the display, and the same number Step Indicators will light up amber. Press one of the 16 Step Switches or turn the Tempo knob to set the pattern's length (in steps). If the Seq Variation button has either A or B lit, the maximum pattern length is 16 steps. If both A and B are lit, the maximum pattern length is 32 steps, and the minimum pattern length is 17 steps. Press Pattern Select (without holding Shift) to return to normal operation.
To select which sequence you are playing/editing during playback, press Seq Variation to switch between Sequence A or Sequence B. The LED for the currently playing sequence will be lit solid. If the other sequence will play next, its LED will flash.
To automatically switch to playing Sequence A and then Sequence B (or vice versa), press and hold Shift and then press Seq Variation. A-b will appear in the display.
To return to playing only Sequence A or Sequence B, either press Seq Variation while the desired sequence is playing, or press and hold Shift and then press Seq Variation. A or b will appear in the display.
To select which sequence(s) you are playing/editing while stopped, press Seq Variation to switch between: Sequence A only (A will be lit) and Sequence B only (B will be lit).
To switch to playing Sequence A and then Sequence B (or vice versa), press and hold Shift and then press Seq Variation. The current mode (A, b, or A-b) will appear in the display. Keep holding Shift and press Seq Variation to switch between A and A-b or between b and A-b.
Note: To select a fill to loop and/or edit, see below.
To play a fill followed by a sequence, press the Fill button during playback. The fill that plays will be determined by (1) the state of the Seq Variation button and (2) which sequence is currently playing.
Important: When a fill plays, playback will switch from the current sequence to the fill without automatically resetting to Step 1. For example, if you press Fill while the sequence is currently on Step 5, the fill will start from its own Step 6 and play through Step 16.
When Seq Variation is set to Sequence A only or Sequence B only:
- Press Fill to play the corresponding fill. When the fill is finished, the other sequence will start playing.
- Press and hold Fill to play the corresponding fill. When the fill is finished, the original sequence will continue playing.
When Seq Variation is set to both Sequences A and B:
- Press Fill during Sequence A to play Fill A and then Fill B. When Fill B is finished, Sequence A will start playing again.
- Press Fill during Sequence B to play Fill B. When Fill B is finished, Sequence A will start playing again.
To select a fill to loop and/or edit during playback, press and hold the Fill button, press the Seq Variation button, and then release both buttons. Fil will appear in the display. The fill you selected will now loop. This also lets you edit the fill (as you would edit Sequence A or Sequence B). If playback was alternating between Sequence A and Sequence B, Fill A and Fill B will alternate. To return to normal operation, press the Seq Variation button.
To select a fill to edit while stopped, press the Fill button, and then press the Seq Variation button to select either A or B buttons. Fil will appear in the display. This lets you edit the fill (as you would edit Sequence A or Sequence B). To return to normal operation, press the Fill button.
Sequencer
You can edit the sequences (and fills) of each pattern using Timbre Wolf's Step Switches and/or keyboard.
Note: While Timbre Wolf's sequencer plays, it will send out its MIDI note messages for all four tracks (each on its corresponding channel) through its USB port and MIDI Out, regardless of the voice mode or any performance on Timbre Wolf's keyboard. You can use this feature to sequence external devices (drum machines, other synths, etc.) along with Timbre Wolf.
Step Switches
You can use the 16 Step Switches to enter or remove notes from the sequence simply by pressing the corresponding Step Switches.
To enter or remove steps, press the Mute/Select button for the voice whose steps you want to enter or remove, and then press one or more Step Switches to enter or remove notes at those positions. The notes are entered with the default Step Switch velocity (described below).
For each voice, each step has a note value, which you can set in two different ways:
- To set the note value of one or more specific steps, press and hold the desired Step Switches and turn the Tempo knob. If you are adjusting only one note, the note value will be shown in the display. If you are adjusting multiple notes, the display will show how many semitones up or down you are shifting them. Each voice has a three-octave range.
- To set the default note value, press a key on Timbre Wolf's keyboard. This will be the note value that is recorded when you select a step. This is useful for setting the note value before entering your steps.
For each voice, each step has a velocity, which determines how loud the note is played. You can set this in two different ways:
- To edit a single step's velocity, press and hold the Velocity button and then press the desired Step Switch to cycle between the available velocities: low (green), medium (amber), high (red), and off (unlit).
- To select the default Step Switch velocity, press the Velocity button to cycle through the available default velocities: low (green), medium (amber), and high (red). This will be the velocity that is recorded when you select a step or press the pad. This is useful for setting the velocity before entering your steps.
Keyboard
You can use Timbre Wolf's keyboard to record a sequence in real time. The notes you play will be quantized (aligned) automatically with the steps. Your recording will be “overdubbed” onto the sequence(s), but recording a note over an already existing note will replace it.
To record while stopped, press Rec to record-arm the sequencer, and then press Play/Stop to start recording, or press Rec to cancel recording.
To record during playback, press Rec. Recording will begin immediately. Press Rec again to stop recording while playback continues, or press Play/Stop to stop both recording and playback.
Before or while you are recording, press the Mute/Select button for the voice you want to use to record.
Saving, Copying, and Clearing
Saving
To save patterns, sequences/fills, or global settings:
- Press and hold Shift, and then press Step Switch 16 (Save). (To cancel and exit the process at any time, release Shift.)
- While still holding Shift, turn the Tempo knob to select what you want to save: all patterns and global settings (All), the current pattern only (One), or the global settings only (Glo).
Important: Global settings include the tempo and Sync settings.
- Press Step Switch 16 (Save), and then release Shift.
Copying
Important: Copying does not save a pattern, sequence, or fill. You must save it, as well.
To copy the current pattern:
- Press and hold Shift, and then press Step Switch 14 (Copy). Keep holding Shift. The Step Indicators for non-empty patterns will flash amber. The Step Indicators for empty patterns will be unlit. (To cancel and exit the process at any time, release Shift.)
- Turn the Tempo knob to select Pat in the display.
- Press the Step Switch with the same number as your desired "destination" pattern (the pattern you want to copy to). The pattern will copy and load the destination pattern. After that, release Shift.
To copy the current sequence or fill:
Important: You can copy a sequence or fill only to another sequence or fill in the same pattern.
-
Press and hold Shift, and then press Step Switch 14 (Copy). Keep holding Shift. The Step Indicators for non-empty patterns will flash amber. The Step Indicators for empty patterns will be unlit. (To cancel and exit the process at any time, release Shift.)
-
Turn the Tempo knob to select where you want to copy the sequence or fill (within the same pattern):
• S-A: The sequence or fill will be copied over Sequence A.
• S-b: The sequence or fill will be copied over Sequence B.
• F-A: The sequence or fill will be copied over Fill A.
• F-b: The sequence or fill will be copied over Fill B.
- Press Step Switch 14 (Copy), and then release Shift.
Clearing
Important: Clearing does not save the empty pattern, sequence, or fill. You must save it, as well.
To clear the current pattern, sequence, or fill:
-
Press and hold Shift, and then press Step Switch 15 (Clear). Keep holding Shift. (To cancel and exit the process at any time, release Shift.)
-
Turn the Tempo knob to select which part of the current pattern you want to clear.
• Pat: Both sequences and fills will be cleared.
• S-A: Only Sequence A will be cleared.
• S-b: Only Sequence B will be cleared.
• F-A: Only Fill A will be cleared.
• F-b: Only Fill B will be cleared.
- Press Step Switch 15 (Clear) again, and then release both buttons.
Assistance technique
Technical Specifications
Specifications are subject to change without notice.
| Voice | 4 independent voices, playable by built-in keyboard and/or incoming MIDI messagesIndependent Controls: volume, tuning, waveform selection (square, sawtooth), filter cutoff, filter resonance, envelope amount, envelope decay, mute/selectSelectable Voice Modes: Mono, Poly, Unison |
| Time Divisions | 1/4; 1/4 triplet-based; 1/8; 1/8 triplet-based; 1/16; 1/16 triplet-based; 1/32 |
| Patterns / Sequences | 16 patterns, each with 2 sequences + 2 fills/sequences |
| Display | 3-digit, 7-segment LED |
| Keyboard | 25 velocity-sensitive keys (3-octave range withOctave-/+buttons)1 pitch bend wheel |
| Step Switches | 16 on-off buttons with 3-color step indicator LEDs |
| Knobs | 1 360° encoder26 270° knobs |
| Inputs / Outputs | 1 1/4” (6.35 mm) TRS main output (TS-compatible)1 1/4” (6.35 mm) TRS headphones output4 1/4” (6.35 mm) TRS voice outputs (1 for each voice)1 1/8” (3.5 mm) TS gate trigger input (0–12 V max, 5 V recommended)1 1/8” (3.5 mm) TS gate trigger output (5 V pulse)1 5-pin MIDI input1 5-pin MIDI output1 5-pin MIDI through1 USB port |
| Power | 12 V, 2 A, center-positive power adapter (included) |
| Dimensions(width x depth x height) | 16.8” x 13.7” x 3.1”427 mm x 348 mm x 79 mm |
| Weight | 8.6 lbs.3.9 kg |
Trademarks and Licenses
Akai Professional and MPC are trademarks of inMusic Brands, Inc., registered in the U.S. and other countries. Kensington and the K & Lock logo are registered trademarks of ACCO Brands. All other product or company names are trademarks or registered trademarks of their respective owners.
AKAI®
PROFESSIONAL


- User Guide (English)
- Introduction
- Box Contents
- Support
- Quick Start / Connection Diagram
- Features
- Top Panel
- Rear Panel
- Calibration
- To calibrate the tuning of Timbre Wolf's voices:
- Voice Settings
- Mono, Poly, or Unison
- Mono
- Poly
- Unison
- Priority
- To set the priority of each voice:
- Legato
- To turn the legato feature on or off for each voice:
- MIDI Channel
- To set the MIDI channel:
- Transport Controls
- When set to Internal:
- When set to External or USB:
- When set to Gate:
- About Patterns
- When Seq Variation is set to Sequence A only or Sequence B only:
- When Seq Variation is set to both Sequences A and B:
- Sequencer
- Step Switches
- Keyboard
- Saving, Copying, and Clearing
- Saving
- To save patterns, sequences/fills, or global settings:
- Copying
- To copy the current pattern:
- To copy the current sequence or fill:
- Clearing
- To clear the current pattern, sequence, or fill:
- Assistance technique
- Technical Specifications
- Trademarks and Licenses
Brand : AKAI
Model : Timbre Wolf
Category : MIDI Keyboard