
91-3037P - Installation Kit Metra - Free user manual and instructions
Find the device manual for free 91-3037P Metra in PDF.


| Product Type | Installation Kit |
| Brand | Metra |
| Model | 91-3037P |
| Compatibility | Compatible with select vehicle models (check fit guide) |
| Material | High-grade ABS plastic and steel brackets |
| Color | Matte black |
| Dimensions (L x W x H) | 8 x 6 x 2 inches (20.3 x 15.2 x 5.1 cm) |
| Net Weight | 0.5 lbs (0.23 kg) |
| Included Components | Mounting brackets, dash trim, wiring harness, screws, and instruction manual |
| Installation Difficulty | Easy – no special skills required |
| Tools Required | Basic hand tools (screwdriver, panel pry tool) |
| Warranty | 1-year limited warranty against defects |
| Maintenance | Wipe clean with dry cloth; avoid harsh chemicals |
| Safety | Complies with automotive safety standards |
| Repairability | Replacement parts available through Metra distributors |
| Country of Origin | China |
Frequently Asked Questions - 91-3037P Metra
User questions about 91-3037P Metra
0 question about this device. Answer the ones you know or ask your own.
Ask a new question about this device
Download the instructions for your Installation Kit in PDF format for free! Find your manual 91-3037P - Metra and take your electronic device back in hand. On this page are published all the documents necessary for the use of your device. 91-3037P by Metra.
USER MANUAL 91-3037P Metra
Before starting, compare items on your invoice with items received. Carefully check through packaging material.
If an item is missing, please call:
Crutchfield at 1-888-955-6000
Chevrolet/GMC
Revision 12/10/03
Parts Supplied:

natural_image
Isometric line drawing of a rectangular enclosure with mounting holes and labeled 'Kit Frame' (no other text or symbols)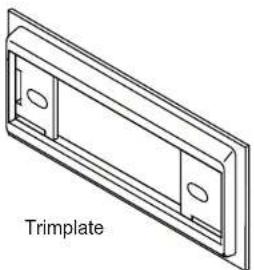
natural_image
Technical line drawing of a trim plate component (no text or symbols)
natural_image
Isometric line drawing of a support tray component (no text or symbols)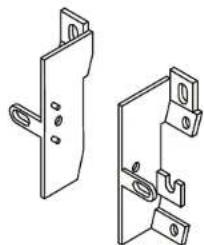
natural_image
Technical line drawing of two mechanical bracket components (no text or symbols)Mounting Brackets

(4) 1/4" Hex Screws

(2) Studs

(2) 3/8" Nuts
Kit assembly instructions are on the following pages.

CRUTCHFIELD®
Copyright 2003 Crutchfield Corporation
Installation Kit
120 91-3037P
Chevrolet/GMC
DIN Receiver Assembly
- Press posts on trimplate into holes on kit frame to snap parts together and secure with hex screws (Figure 1).
- Use a utility knife to cut out shaft supports in trimplate to create a DIN opening (Figure 2).
- Push clips on support tray into slots on rear of kit frame to secure (Figure 1).
- Cut off tabs on both mounting brackets labeled "B" and "C" that are shown as shaded (Figure 3). The "A" tabs must remain.
- Secure mounting brackets to sides of kit frame with studs and nuts supplied (Figure 1).
- Remove DIN sleeve from receiver and slide into opening in trimplate. Secure sleeve to trimplate by bending the securing tabs (Figure 4).
- Slide receiver into sleeve/kit assembly.
FIGURE 2

FIGURE 1
Left Mounting Bracket

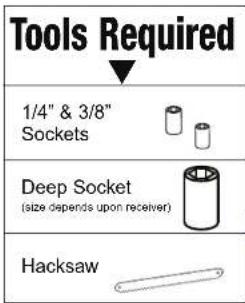
Tools Required
1/4" & 3/8"
Sockets


Utility
Knife

Small Flat Blade
Screwdriver

Hacksaw

FIGURE 3
Cut off
"B" & "C" tabs
(shaded)
"A" tabs remain

FIGURE 4
Securing Tabs
Bend tabs after sleeve is inside assembly.

natural_image
Hand holding a small mechanical component with wires, no visible text or symbolsCRUTCHFIELD®
Copyright 2003 Crutchfield Corporation
Installation Kit
120 91-3037P
Chevrolet/GMC
Shaft Receiver Assembly
- Press posts on trimplate into holes on kit frame to snap parts together and secure with hex screws (Figure 1).
- Push clips on support tray into slots on rear of kit frame to secure (Figure 1).
- Cut off tabs on both mounting brackets labeled "B" and "C" shown as shaded (Figure 2). The "A" tabs must remain.
- Secure mounting brackets to sides of kit assembly with studs and nuts supplied (Figure 1).
- Choose the proper spacers (supplied with your order) to allow receiver nosepiece to extend 1/8" to 1/4" beyond face of trimplate (Figure 3).
- Insert receiver shafts (with spacers in place) through openings in trimplate. Secure receiver and faceplate with shaftnuts supplied with receiver.
- Attach control knobs.
FIGURE 1



CRUTCHFIELD®
Copyright 2003 Crutchfield Corporation


Brand : Metra
Model : 91-3037P
Category : Installation Kit