
Manua 4 - Barbecue BARBECOOK - Free user manual and instructions
Find the device manual for free Manua 4 BARBECOOK in PDF.


| Brand | Barbecook |
| Model | Manua 4 |
| Product type | Gas BBQ with side burner |
| Dimensions (approx.) | 120 x 50 x 100 cm |
| Weight (approx.) | 30 kg |
| Power source | Butane or propane gas (cylinder not supplied) |
| Power | Main burners + side burner |
| Ignition | Electronic (AA battery) and backup match |
| Heating system | Turbo Heating System (gas savings up to 20%) |
| Cooking surface | Enameled steel grills |
| Number of burners | 4 main + 1 side |
| Max load side burner | 9 kg |
| Max pot diameter (side) | 220 mm |
| Routine maintenance | Clean grills with non-abrasive brush, clean burners and venturi twice a year |
| Safety | Leak test mandatory before each use, strict gas instructions |
| Spare parts | Burners, grills, igniter, hose, regulator (not supplied) |
| Warranty | 2 years against manufacturing defects |
| Usage | Domestic only, not professional |
| Recommended accessories | Barbecook® protective cover |
Frequently Asked Questions - Manua 4 BARBECOOK
User questions about Manua 4 BARBECOOK
0 question about this device. Answer the ones you know or ask your own.
Ask a new question about this device
Download the instructions for your Barbecue in PDF format for free! Find your manual Manua 4 - BARBECOOK and take your electronic device back in hand. On this page are published all the documents necessary for the use of your device. Manua 4 by BARBECOOK.
USER MANUAL Manua 4 BARBECOOK
Carefully read the instructions before installing the barbecue. Install the barbecue on a flat and clean base.
Note: Be careful when installing the barbecue. Tools may damage the enamelled surface. Some screws may be left over after installation.
SK POKYNY PRE MONTÁŽ
MANUA 4
223.9983.000 / # 223.9983.200
| 1 G-456 | -0100-9000 27 G456-0015-9031 | |||
| 2 G456 | -0002-9000 28 G456-0011-9031 | |||
| 3 G456 | -0003-9000 29 F404-0010-9000 | |||
| 4 G303 | -0038-9000 30 G350-0017-9000 | |||
| 5 G508 | -0063-9000 31 G456-0010-9031 | |||
| 6 G456 | -0200-9001 32 G456-0018-9000 | |||
| 7 G431 | -0300-9200 33 G433-0028-9081 | |||
| 8 G439 | -0039-9000 34 G456-0400-9031 | |||
| 9 G413 | -0004-9000 35 G456-0014-9031 | |||
| 10a G432 | -4700-9001 36 G456-0013-9031 | |||
| 11 G432 | -4600-9001 37 G452-0010-9081 | |||
| 12 G308 | -1000-9001 38 G432-0034-9031 | |||
| 13 G432 | -0002-9001 39 G456-0016-9083 | |||
| 14 G432 | -0001-9081 40 G401-0061-9000 | |||
| 15 G456 | -0300-9000 41 G606-0027-9000 | |||
| 16 G456 | -2300-9000 42 G401-0079-9100 | |||
| 17 G452 | -0008-9081- 43 G452-1200-9031 | |||
| 18 G452 | -0003-9084 44 G601-0090-9000 | |||
| 19 G456 | -0009-9000 45 G456-0017-9000 | |||
| 20 G430 | -00049-9083 46 G452-0400-9031 | |||
| 21 G518 | -0026-9100 47 G452-0006-9001 | |||
| 22 G430 | -0027-9081 48 G452-0500-9100 | |||
| 23 G305 | -0043-9082 49 G452-0007-9000 | |||
| 24 G430 | -0033-9000 50 G452-0014-9001 | |||
| 25 G456 | -0500-9031 51 G456-B001-01 | |||
| 26 G213 | -0022-9000 52 G456-M001-01 |


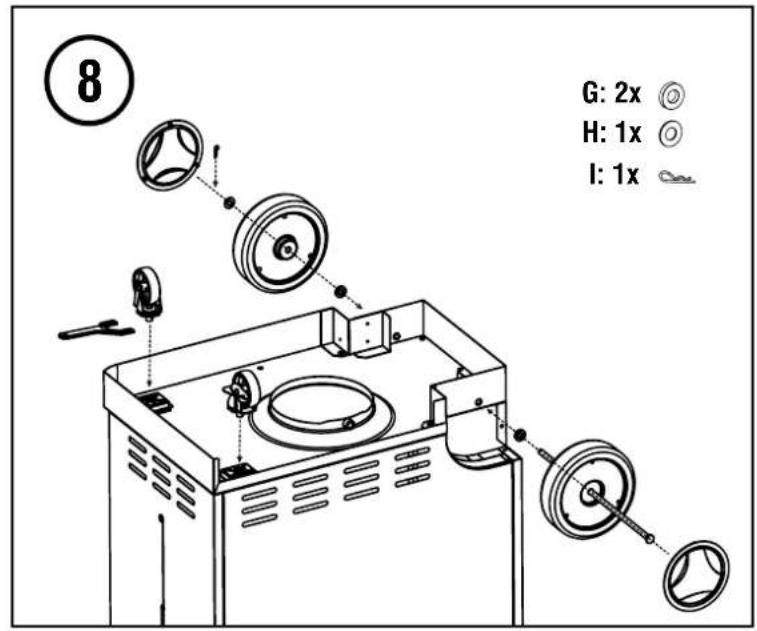


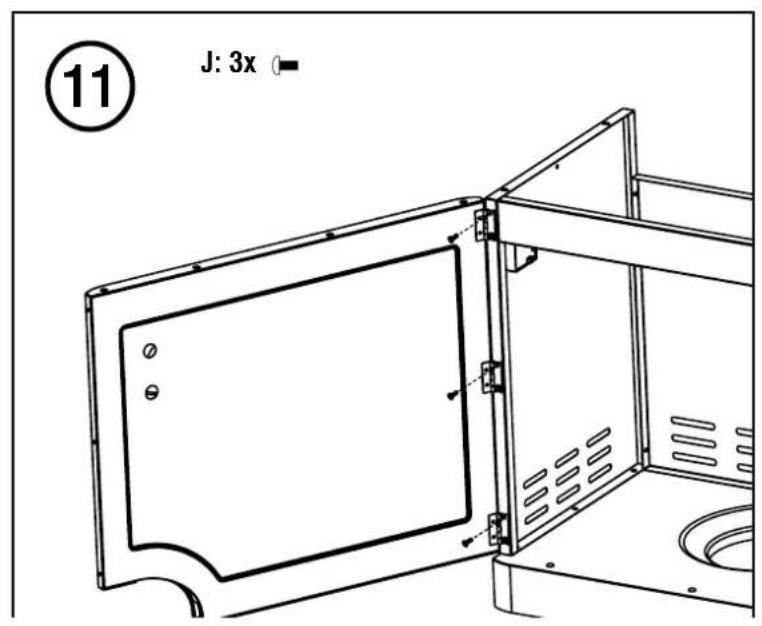


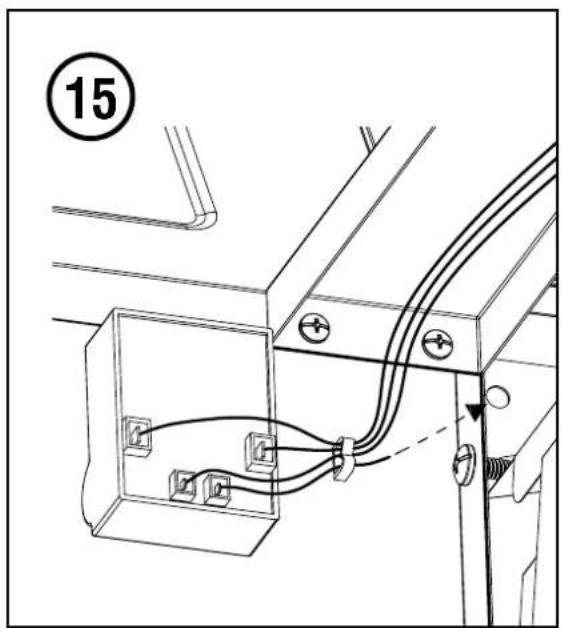
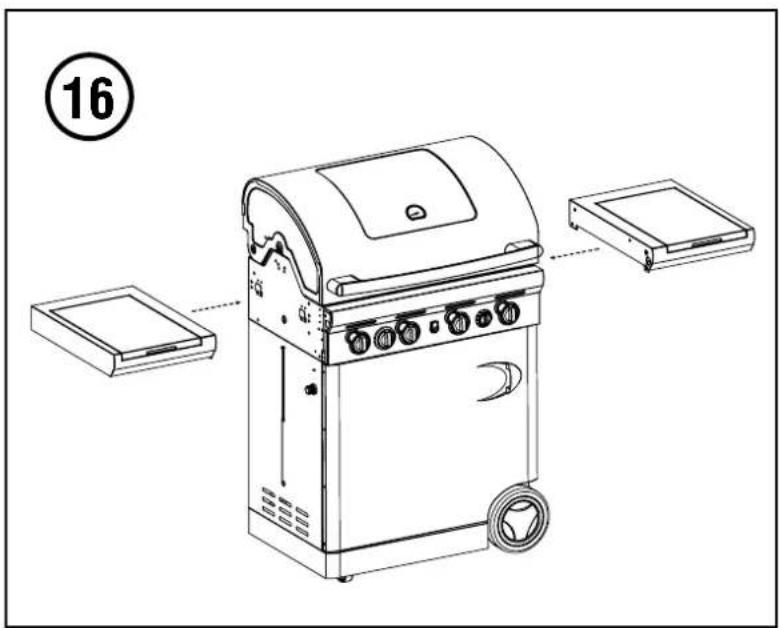


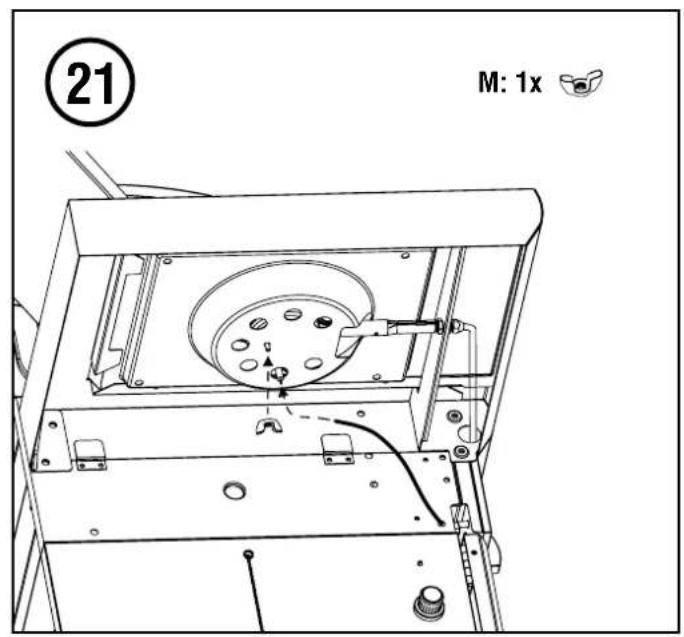


25

26


NL BELANGRIJK!
VOOR LANDEN MET 50 MBAR MET SLANG EN SCHROEFSYSTEEM
FOR COUNTRIES WITH 50 MBAR WITH HOSE AND SCREW SYSTEM
- Remove the hose coupling
- Connect the threaded nut provided to the appliance
- Screw the hose adjusting nut onto the transition
DE WICHTIG!
FÜR LÄNDER MIT 50 MBAR MIT SCHLAUCH UND SCHRAUBSYSTEM
WINNERS
PRODUCT ENGINEERING LTD
25/F Top Glory Tower, 262,
Gloucester Road, Causeway Bay,
HONG KONG
Type - Typ - Tipo - Tyyppi A1

C: Land van bestemming - Pays de destination - Landesbezeichnung - Country indentification - Идентификация на страната - Identifikace zemé - Identifikationsland - Xápa touromolýnyč - Identificador de país - Riigitáhs - Maan tunnistus - država za identifikaciju - Szármaszási ország - Paese - Identifikuojama šalis - Identifikácijas valsts - Opprinnelseland - Identyfikacja kraju - Identificação do país - Tara de identificare - Identifikácia krajiny - Identifikacijska država - Landsidentifikation
barbecook®
HANDLEIDING VOOR MONTAGE, GEBRUIK EN ONDERHOUD 15
NOTICE DE MONTAGE, D'UTILISATION ET D'ENTRETIEN 19
INSTALLATION, USE AND MAINTENANCE INSTRUCTIONS 24
VEILIGHEIDSINFORMATIE
ONTSTEKING VAN DE BRANDERS
ONTSTEKING VAN DE BRANDERS MET DE ONTSTEKER
ONTSTEKING VAN BRANDERS MET EEN LUCIFER
ONTSTEKING VAN DE ZIJBRANDER MET LUCIFER
INFORMATIONS RELATIVES A LA SECURITE
ALLUMAGE DES BRULEURS
ALLUMAGE DES BRULEURS AVEC L'ALLUMEUR
ALLUMAGE DES BRULEURS AVEC UNE ALLUMETTE
ALLUMAGE DU BRULEUR LATERAL AVEC UNE ALLUMETTE
INSTALLATION, USE AND MAINTENANCE INSTRUCTIONS
SAFETY INFORMATION
THIS APPLIANCE IS DESIGNED FOR OUTDOOR USE ONLY IF YOU SMELL GAS:
- TURN OFF THE GAS SUPPLY
- EXTINGUISH ANY OPEN FLAME
- OPEN THE LID
-
IF ODOUR CONTINUES, IMMEDIATELY CALL YOUR GAS SUPPLIER OR THE FIRE DEPARTMENT
-
THE USER IS RESPONSIBLE FOR PROPER INSTALLATION AND APPROPRIATE USE OF THE BARBECUE.
- FAILURE TO COMPLY WITH THE INSTRUCTIONS IN THIS MANUAL MAY RESULT IN A DANGEROUS FIRE OR EXPLOSION.
- FAILURE TO FOLLOW THE INSTRUCTIONS IN THIS MANUAL MAY RESULT IN SERIOUS INJURIES AND MATERIAL DAMAGE.
- USE PROTECTIVE GLOVES WHEN HANDLING PARTICULARLY HOT PARTS
• MODIFICATIONS TO THE BARBECUE ARE DANGEROUS AND NOT PERMITTED. THIS APPLIANCE MUST BE
INSTALLED IN ACCORDANCE WITH THE APPLICABLE PROVISIONS.
- STORE THE CYLINDER OUTDOORS IN A WELL-VENTILATED AREA
- NEVER PLACE THE SPARE CYLINDER (FULL OR EMPTY) UNDER OR NEXT TO A BARBECUE IN USE.
- NEVER STORE OR USE GASOLINE OR OTHER FLAMMABLE VAPOURS AND LIQUIDS IN THE VICINITY OF THIS OR ANY OTHER BARBECUE.
- KEEP COMBUSTIBLE MATERIAL AT LEAST 76 CM AWAY FROM THE BAR-BECUE
- KEEP THE AREA AROUND YOUR BARBECUE AT ALL TIMES FREE FROM ANY COMBUSTIBLE MATERIALS, GASOLINE OR OTHER FLAMMABLE LIQUIDS
- USE THE BARBECUE ONLY OUTDOORS IN A WELL-VENTILATED AREA AND AT LEAST 3 M FROM ANY DWELLING OR BUILDING.
• DO NOT USE THIS APPLIANCE UN-DER AN OVERHANGING STRUCTURE OR FOLIAGE - DO NOT USE THE BARBECUE ON A BOAT OR OTHER RECREATIONAL VEHICLE
- DO NOT USE THE BARBECUE IN A GARAGE, SHED, CORRIDORS OR OTHER ENCLOSED AREAS
- NEVER LEAVE THE BARBECUE UNATTENDED WHEN IN USE
• DO NOT OBSTRUCT THE FLOW OF COMBUSTION AND VENTILATION AIR TO THE BARBECUE
• DO NOT USE THE BARBECUE WHEN YOU HAVE CONSUMED ALCOHOL OR TAKEN DRUGS
- ACCESSIBLE PARTS MAY BECOME VERY HOT. KEEP (YOUNG) CHILDREN AND ANIMALS AWAY FROM THE BARBECUE.
• DO NOT MOVE THE BARBECUE WHEN IN USE
• NEVER USE CHARCOAL, WOOD OR BRIQUETTES
• NEVER USE LAVA ROCKS OR CERA-
MIC BRIQUETTES
- KEEP THE VENT HOLES IN THE TROLLEY CLEAR AT ALL TIMES.
- PARTS SEALED BY THE MANUFACTURER OR HIS REPRESENTATIVE MAY NOT BE ALTERED BY THE USER.
- NEVER LIGHT THE SIDE BURNER WITHOUT OPENING THE LID.
GAS CONNECTION
GAS CYLINDER
Always use an approved cylinder that complies with all national provisions and standards. Check whether the cylinder can vaporize sufficient gas as specified for your barbecue model.
• Always keep the cylinder in a stable and upright position.
- Be careful when handling the cylinder valves
- Never connect a cylinder without regulator to the barbecue.
- Never connect a non-regulated cylinder to the barbecue.
• Always close the cylinder valves when the barbecue is not in use - If the barbecue is not equipped with a cylinder holder, place the cylinder on the ground, next to the barbecue
- Never place the spare cylinder under or next to a barbecue in use
- Never expose the cylinder to excessive heat or direct sunlight
- Change the flexible tube if required by national regulations
REPLACING THE CYLINDER
When replacing the cylinder, ensure that the control knob on the barbecue is in the OFF position and the cylinder is closed. Never replace a cylinder in the vicinity of potential ignition sources.
TRANSPORT AND STORAGE OF THE GAS CYLINDER
Although perfectly safe when handled correctly, lack of caution may result in fire and/or explosion.
To minimise the risks:
- Never store the cylinder in a building, garage or other enclosed area, but always in a well-ventilated area
- Never store the cylinder in the vicinity of another gas operated appliance, or in a very warm area, such as a car or boat
• Always keep the cylinder out of reach for children
• Always transport and store the cylinder in an upright position - Do not smoke in the vicinity of the cylinder, especially during transport with a vehicle
HOSE AND REGULATOR
The hose and regulator are not supplied by the manufacturer. Only use a hose / regulator combination that complies with all local and national provisions and standards, and that is compatible with the couplings of the gas cylinder used and the gas type/nominal pressure stated on the barbecue. Keep the hose as short as possible.
- Never connect the barbecue to a non-regulated gas supply. Never try to alter the hose or regulator in any way whatsoever.
- Prior to each use of the barbecue, check the hose over its full length for any damage (cracks, tears, burnt sections) or excessive wear. When you notice any damage or wear, replace the hose before using the barbecue, in accordance with the national standards
- Fat (or any other hot substance) must never fall onto the hose, and
the hose must never come into contact with any hot points on the barbecue
- The connector of the regulator must be protected when it is not connected to the cylinder
- Make sure it is not dragged along the ground as this could compromise the tightness of the connector
- Do not distort the hose when connecting or disconnecting the cylinder
- The maximum permissible length of the hose is 1.5m
LEAKAGE TEST


A leakage test must be performed:
- Before the barbecue is lighted for the first time
• Each time the cylinder is replaced or a gas part is changed - At least once a year, preferably at the start of the season
The leakage test must be performed outdoors, in a well-ventilated area and not in the vicinity of an open flame, heat or ignition sources. No smoking! Use only a 50/50 mixture of liquid soap and water for the leakage test. Do not use a match or an open flame.
- Once you have connected the cylinder to the barbecue and all control knobs are 'OFF', slowly open the cylinder 1 turn.
- Rub the soap solution over all connections and components listed below.
Check the following areas for leaks:
• The welded joints of the cylinder (Fig. A)
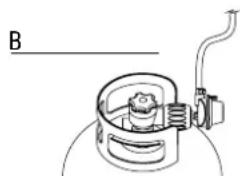
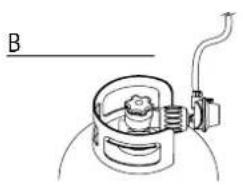
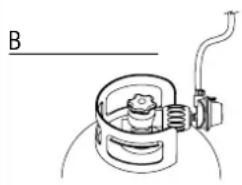
• All valve connections (Fig. B)
- Regulator coupling and connection of the cylinder (Fig. B)
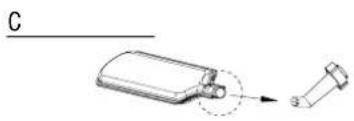
• All hose connections (Fig. C)
-
Soap bubbles indicate a leak.
-
Firmly tighten any leaky connection and repeat the test as long as a leak is indicated (close the cylinder valve when you are checking the leak).
- Disconnect the cylinder/control valve and check that all control knobs are OFF.
- Do not use the barbecue if you cannot repair the leak. Close the cylinder valve, remove the cylinder and contact a qualified maintenance person for gas appliances or the gas supplier to carry out the appropriate repairs.
Note: the regulator may differ from the version shown here.
PRIOR TO FIRST USE / AFTER PROLONGED PERIOD OF NON-USE
Do not use the barbecue before you have read, understood and checked all information in this manual.
Ensure that:
• The barbecue is correctly installed
- There is no leak in the gas supply (see 'Leakage test')
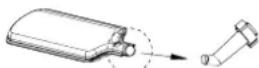
- The burners are correctly installed, the venturi tubes are properly placed over the openings of the gas valves (Fig. D), and there are no obstructions (see safety information and cleaning of the burners)
• None of the gas supply hoses can come into contact with a hot surface
- Your barbecue is installed in a safe place

SAFETY INFORMATION
Natural hazards - spiders and insects: very tiny insects may crawl into the venturi tubes of the gas burners and build a web or nest (Fig. E)

that could block gas flow in whole or in part. Such a situation is indicated by a smoky, yellow flame and/or burner that can only be lighted with difficulty or not at all. The gas may eventually burn outside the venturi tube and thus cause serious damage to your barbecue.
Should this happen, immediately close the cylinder. Clean the burners as soon as the barbecue has cooled down.
Remove the burner(s) as shown in Fig. F. Clean with a pipe cleaner or brush both venturi tubes. Put the burner back into place in accordance with the instructions. (Fig. F) After cleaning, the venturi tubes must be correctly placed back over the openings of the gas valves.
Note: damage arising from a fully or partly blocked venturi tube in a burner is not covered by the guarantee and is considered lack of proper maintenance

Prior to lighting the burners, all checks and procedures detailed in the chapter 'Before the first use' must have been carried out.
- The lid of the barbecue must always be open when you light the burner(s)
- Do not bend directly over the barbecue when lighting the burner(s)
- The control knobs of the barbecue must be 'OFF'. Slowly open the gas cylinder valve. Before opening the control knob of one burner, wait approx. 10 seconds to allow to gas to stabilize
- Important: first light the middle burner
- As soon as one burner has been lighted, you only need to put the control knob of the other burner(s) in the position 'HIGH' to light them.
- Never try to light all burners at once

LIGHTING THE BURNERS WITH THE IGNITER
- Open the lid of the barbecue
- Open the gas cylinder valve.
-
Press the igniter until you hear sparks
-
Holding down the igniter, press the control knob of the middle burner and turn to 'HIGH'
- If the burner does not light after 3 attempts, disconnect the gas and wait 5 minutes before trying again. This will allow the accumulated gas to escape. Try again, repeating the above steps.
- If the burner still does not light, read the chapter 'Troubleshooting Guide' to determine the cause and the remedy, or use a match as described below.
G

LIGHTING THE BURNERS WITH A MATCH
Left and right at the bottom of the burner box is a small opening that can be used to light the burners with a match, if the electronic igniter does not work. (Fig. G)
- Open the lid of the barbecue
- Place a match in the match holder provided (Fig. G)
- Hold a burning match through the hole, approx. 13 mm from the burner
- Open the gas cylinder valve.
- Push the required control knob and turn to 'HIGH'. The burner should light within 5 seconds. If not, turn the control knob off and wait 5 minutes to allow the gas to escape.
- Repeat steps 1 through 5. If the burner still does not light after 3 attempts, read the chapter 'Troubleshooting Guide'
- As soon as the middle burner has been lighted, you only need to put the control knob of the other burner(s) in the position 'HIGH' to light them.
First open the lid of the side burner. To light the side burner, use the igniter on the control panel and the control knob on the side table.
- Press the igniter until you hear sparks.
- Holding down the igniter, press the control knob of the side burner and turn to 'HIGH'
- Repeat a number of times if the burner does not light immediately.
- If the burner does not light after 5 seconds, turn the control knob to 'OFF' and wait 5 minutes to allow the gas to escape.
- Repeat steps 1 through 3. If the burner still does not light, read the chapter 'Troubleshooting Guide' or use a match as described below.
Note:
- the maximum load of the side burner is 9 kg!
- the maximum diameter of the cooking vessel is 220 mm
H

LIGHTING THE SIDE BURNER WITH A MATCH
- Place a match in the match holder provided
- Hold a burning match approx. 13 mm from the burner (Fig. H)
- Push the control knob of the side burner and turn to 'HIGH'. The burner should light within 5 seconds. If not, turn the control knob 'OFF' and wait 5 minutes to allow the gas to escape.
- Repeat steps 1 through 3. If the burner still does not light, read the chapter 'Troubleshooting Guide' to determine the cause and the remedy.
VISUAL CHECK OF THE FLAMES
|
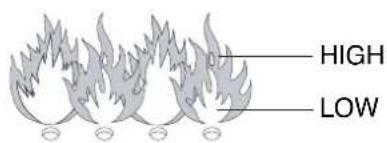
If the flames of the burners jump out of the burner box when the barbecue is in use, immediately turn off the control knobs. Wait 5 minutes to allow the gas to escape before relighting the barbecue. Read the chapter 'Troubleshooting Guide' if the problem persists.
Each time you light the barbecue you should check the flames. (Fig. 1) A proper flame is almost completely blue, with some yellow at the top. If the flame is abnormally small and for the most part yellow, switch off the barbecue and check the venturi tubes for obstructions, or read the chapter 'Troubleshooting Guide'.
SWITCHING OFF THE BARBECUE
- Close the gas cylinder valve
- Turn all control knobs of the burners to 'OFF'.
If you follow the above order, there will be no more pressurized gas in the system.
USEFUL TIPS FOR USE OF THE BARBECUE
USING YOUR BARBECOOK FOR THE FIRST TIME
When using your gas barbecue for the first time, you must first allow the unit to run in by operating it for a short period of time without any food. To run in the barbecue, light the barbecue. Close the lid and maintain the temperature at 'HIGH' for 15 minutes. Do not open the lid during this procedure. You then open the lid and allow the barbecue to operate for another 5 minutes at 'HIGH'. The barbecue is now ready for use.
WARMING UP THE BARBECUE
Allow the barbecue to warm up before placing any food on it. Close the lid and heat the cooking surface for at least 10 minutes in the setting 'HIGH'. To bake at a lower temperature than the setting 'HIGH', turn the control knobs to the required position before placing any food on the barbecue.
COOKING TIME
The actual cooking time depends on various factors such as taste, outside temperature and wind. Experience will teach you how to estimate this time.
KEEPING FLARE-UPS UNDER CONTROL
During barbecuing, some flare-ups are natural. Too many flare-ups, however, will increase the temperature in the barbecue, thereby causing accumulated fat to ignite and cause fire.
To reduce flare-ups:
- Remove excess fat from the meat before baking
- Bake fat meat (chicken and pork) at a low setting
- Check that the hole in front of the fat drain is not blocked and the fat drip cup is not full
- Bake with closed lid to cut off the air supply and lower the heat settings
NOTE: If the lid is closed, your barbecue will retain a more constant temperature
and food can be baked faster and with less energy.
Should the burner(s) go out during baking, open the lid, turn off the burner(s) and wait 5 minutes to allow the gas to escape before relighting the burner.
HOW TO PREVENT FOOD FROM STIC-KING TO THE GRID
- Rub food lightly with oil before you place it on the grid
- Or brush the grid with some cooking oil to prevent food from sticking
- Do not turn food too quickly after placing it on the grid
CLEANING AND MAINTENANCE
To prolong the lifetime of your barbecue, you should at least annually perform all of the following operations, preferably at the start of the barbecue season. Buy a barbecook ® cover to protect your barbecue.
COOKING GRIDS AND GRIDDLES
After each use, allow the barbecue to cool down and clean the grids using a non-abrasive brush.
You can also wash grids using the special barbecook ® enamel cleaner, a soft detergent or sodium bicarbonate. Never use oven cleaners.
BURNERS AND VENTURI TUBES
Burners and venturi tubes should be removed and cleaned at least twice a year. Thoroughly clean the venturi tubes. Open any blocked holes using a thin wire (e.g. opened paper clip). Check that the bottom of the burner box is clean and no hole is blocked. Place the burner back in accordance with the instructions and check that the venturi tubes are positioned over the exhaust valves. If the burner exhibits cracks, unusual holes or other damage, it should be replaced.
BURNING OFF
After use, you can continue to burn the appliance for 10 or so minutes without food and with the lid closed, with all burners in the position 'HIGH'. In this way, most of the dirt will be burned off, which facilitates subsequent cleaning. Allow the appliance to cool down. You can then wipe off the burnt dust with a non-abrasive brush and clean the barbecue with soapy water.
STORAGE
Disconnect the gas from the cylinder when not in use. Store the barbecue and the gas cylinder outdoors in a well-ventilated area. Never store them in a garage, a shed or any other enclosed area, or in the vicinity of an open flame or heat source.
You can store the barbecue indoors, provided the gas cylinder is disconnected from the appliance and stored outdoors in a well-ventilated area.
The barbecue must be stored indoors during the winter season. Some tips:
- Clean the burners and rub them in with cooking oil. Wrap them in paper.
- Clean the cooking grids and rub them in with cooking oil. Wrap them in paper and store them indoors.
- Protect the barbecue with a barbecook® cover if it is stored outdoors.
- Do not store gas cylinders indoors
GUARANTEE
Your barbecook® appliance comes with a two year guarantee against all manufacturing defects. This guarantee applies from the date of purchase, provided it is used in accordance with these instructions. Your till receipt specifying the date of purchase is your certificate of guarantee.
This barbecook ® is not suitable for commercial use.
This guarantee is limited to the repair or replacement of parts which prove defective under normal use and service.
This guarantee shall not apply to defects due to improper installation, incorrect use, alterations to the appliance, disassembly of the appliance, wear and tear, or lack of maintenance.
| SOLVING PROBLEMS | ||
| Problem Probable cause Solution | ||
| Impossible to light burner (with igniter or match) | • Blocked venturi tubes • Clean venturi tubes | |
| Not enough heat • Gas cylinder valve is not open• Venturi tubes not positioned over exhaust valves• Blocked burner openings• Cylinder is empty or almost empty• Regulator not fitted correctly on cylinder | • Open gas cylinder valve• Reinstall venturi tubes• Clean openings or fit new burner• New cylinder• Tighten up connector of regulator• Disconnect hose | |
| Yellow flames • Venturi tubes are partly blocked• Salt on burner | • Clean venturi tubes• Clean burner | |
| Impossible to light burner with igniter • Ignition wire not fitted properly• Defective ignition electrode• Faulty ground• Defective igniter | • Check all connections• Check installation of electrodes, burner and igniter• Replace igniter | |
| Flames jumping out of the burner box • Windy weather• Cylinder almost empty | • Move barbecue with rear side pointing towards the wind• New cylinder or fill up | |
| Excessive heat and flare-ups • Too fatty food• Blocked fat drain hole• Cooking system not positioned correctly | • Trim excess fat or reduce heat• Clean bottom of burner box and burner• Position cooking system correctly | |
| Flames behind control panel • Blocked venturi tubes • Shut off gas immediately, allow barbecue to cool down and clean venturi tubes | ||
| Regulator humming • Temporary situation caused by high outside temperature or full cylinder | • This is not a defect or a hazard | |
| Incomplete flame | • Plugged, leaky or rusted burner | • Clean / replace burner |
| Warming rack does not fit | • Legs are angled too narrowly, or too widely | • The warming rack feet are adjustable. Bend them to fit into the warming rack holes. |
| TROUBLESHOOTING GUIDE FOR ELECTRIC IGNITION | ||
| Problem Probable cause Solution | ||
| No sparks when pressing the ignition; no sound | Battery not installed correctlyEmpty batteryIgnition button not installed correctlyDefective spark generator | Install battery (ensure that Ô + Ô and Ô-Ô are oriented correctly, with Ô + Ô at the top and Ô-Ô at the bottom)Replace with new AA batteryScrew off button and reinstallReplace spark generator |
| No sparks when pressing the ignition; sound is present | Faulty ground | Remove and reconnect all connections with spark generator and electrodes |
| Sparks are present but not with all electrodes and/or not powerful enough | Faulty groundSpark flashover away from burner(s)Low batteryElectrodes are wetElectrodes cracked or brokenn “sparks are present” | Remove and reconnect all connections to the spark generator and the electrodesIf sparks are present that do not originate from the burner(s), the wiring may be damaged. Replace the wiring.Replace with new AA batteryUse paper tissues to remove the dirtReplace cracked or defective electrodes |
TURBO HEATING SYSTEM
An additional feature is the new Turbo Heating System: your barbecook is immediately ready to grill and the heat is distributed optimally.
Advantage: barbecook uses 20% less gas than any other gas barbecue.
DE


ANAMMA TΩN KAYΣTHPΩN
ANAMMA KAYΣTHPΩN ME TON ΣΠΙΝΘΗΡΙΣΤΗ
ANAMMA KAYΣTHPΩN ME ΣΠΙΡΤΑ
ENCENDIDO DEL QUEMADOR LATERAL CON UNA CERILLA

GAASIBALLOONI TRANSPORT JA HOIUSTAMINE
VOOLIK JA REGULAATOR
PÖLETITE SÜÜTAMINE
PÖLETITE SÜÜTAMINE SÜÜTURIGA
PÖLETITE SÜÜTAMINE TIKKUDEGA
KÜLGPÖLETI SÜÜTAMINE TIKKUDEGA
C
TURVAOHJEET
POLTINTEN SYTYTTÄMINEN
POLTINTEN SYTYTYS SYTYTTIMEN AVULLA
POLTINTEN SYTYTTÄMINEN TULITIKUILLA
SIVUPOLTTIMEN SYTYTTÄMINEN TULITIKUILLA
SKIFTE AV GASSBEHOLDER

SIKKERHETSINFORMASJON
TENNE BRENNERNE
TENNE BRENNERNE MED TENNEREN
TENNE BRENNERNE MED EN FYRSTIKK
TENNE SIDEBRENNEREN MED EN FYRSTIKK
HOLDE OPPFLAMMING UNDER KONTROLL

SÄKERHETSINFORMATION
TÄNDA BRÄNNARNA
TÄNDA BRÄNNARNA MED TÄNDSATSEN
TÄNDA BRÄNNARNA MED TÄNDSTICKA
TÄNDA SIDOBRÄNNAREN MED TÄNDSTICKA

INFORMAZIONI PER LA SICUREZZA
ACCENSIONE DEI BRUCIATORI
ACCENDERE I BRUCIATORI CON L'ACCENDITORE
ACCENDERE I BRUCIATORI CON UN FIAMMIFERO
ACCENDERE IL BRUCIATORE LATERALE CON UN FIAMMIFERO
INFORMAÇÕES DE SEGURANÇA
ACENDER OS BICOS DE GÁS COM O DISPOSITIVO DE IGNICÃO
ACENDER OS BICOS DE GÁS COM UM FÓSFORO
ACENDER O BICO DE GÁS LATERAL COM UM FÓSFORO


SIKKERHEDSINFORMATION
TÆNDING AF BRÆNDERE MED TÆNDER
TÆNDING AF BRÆNDER MED TÆNDSTIK
TÆNDING AF BRÆNDER MED TÆNDSTIK
For at reducere stikflammer:

BIZTONSÁGI INFORMÁCIÓK
AZ ÉGŐFEJEK BEGYÚJTÁSA A BEGYÚJTÓVAL
AZ OLDALSÓ ÉGŐFEJ BEGYÚJTÁSA GYUFÁVAL
C
INFORMATII PRIVIND SIGURANTA
APRINDEREA ARZĂTOARELOR
APRINDEREA ARZĂTOARELOR CU APRINZĂTORUL
APRINDEREA ARZĂTOARELOR CU UN CHIBRIT


BEZPEČNOSTNÍ INFORMACE
ZAPALOVÁNÍ HOŘÁKŮ
ZAPÁLENÍ HOŘÁKŮ POMOCÍ ZAPALOVAČE
ZAPALOVÁNÍ HOŘÁKŮ POMOCÍ SIREK
ZAPALOVÁNÍ BOČNÍHO HOŘÁKU POMOCÍ SIREK


Provjera propuštanja mora se provesti:
- prije prvog paljenja roštilja
- pri svakoj izmjeni boce s plinom ili plinskog dijela
- najmanje jedanput godišnje, po mogućnosti na početku sezone.
NAPUCI ZA SIGURNOST
PALJENJE PLAMENIKA
PALJENJE PLAMENIKA UPALJAČEM
PALJENJE PLAMENIKA ŠIBICOM
PALJENJE BOČNOG PLAMENIKA ŠIBICOM
• Stavite šibicu u držač šibice.
- Držite šibicu na udaljenosti od oko 13 mm od plamenika (sl. H).
- Pritisnite regulacijski prekidač bočnog plamenika i okrenite ga u položaj "HIGH". Plamenik bi se trebao upaliti unutar 5 sekundi. Ako se ne upali, isključite regulacijski prekidač i pričekajte 5 minuta kako bi plin izašao.
- Ponovite postupak od koraka 1 do 3. Ako se plamenik svejedno ne upali, pročitajte poglavlje "Problemi u radu" i pokušajte ustanoviti uzrok i rješenje.
VIZUALNA PROVJERA PLAMENA


INFOMACIJA DÉL SAUGUMO
DEGIKLIŲ UŽDEGIMAS
DEGIKLIŲ UŽDEGIMAS NAUDOJANT VIDINĖ UŽDEGIMO SISTEMA
DEGIKLIŲ UŽDEGIMAS NAUDOJANT DEGTUKUS
ŠONINIŲ DEGIKLIŲ UŽDEGIMAS NAUDOJANT DEGTUKUS
DROŠĪBAS INFORMĀCIJA
DEGLU IEDEGŠANA
DEGLU IEDEGŠANA AR AIZDĖDZINĀTĀJU
DEGLU IEDEGŠANA AR SĚRKOCIŇU
SĀNU DEGLA IEDEGŠANA AR SĒRKOCIŅU


WSKAZÓWKI DOTYCZĄCE BEZPIECZEŃSTWA
ROZPALANIE PALNIKÓW
ROZPALANIE PALNIKÓW ZA POMOCĄ ZAPŁONNIKA
ROZPALANIE PALNIKÓW ZA POMOCĄ ZAPAŁEK
ROZPALANIE PALNIKA BOCZNEGO ZA POMOCA ZAPAŁEK
C
BEZPEČNOSTNÉ INFORMÁCIE
ZAPAL'OVANIE HORÁKOV
ZAPAL'OVANIE HORÁKOV POMOCOU ZÁPALIEK
ZAPALOVANIE BOČNÉHO HORÁKU POMOCOU ZÁPALIEK

INFORMACIJE O VARNOSTI
VŽIG GORILNIKOV
PRIŽIGANJE GORILNIKOV Z VŽIGALNIKOM
PRIŽIGANJE GORILNIKOV Z VŽIGALICO
PRIŽIGANJE STRANSKEGA GORILNIKA Z VŽIGALICO
barbecook® and Aromaz® are registered trade marks of
SAEY Home & Garden N.V. Industrielaan 4 / B-8501 Heule (Kortrijk) Belgium
www.barbecook.com


- SK POKYNY PRE MONTÁŽ
- 223.9983.000 / # 223.9983.200
- NL BELANGRIJK
- DE WICHTIG
- BARBECOOK®
- VEILIGHEIDSINFORMATIE
- ONTSTEKING VAN DE BRANDERS
- ONTSTEKING VAN DE BRANDERS MET DE ONTSTEKER
- ONTSTEKING VAN BRANDERS MET EEN LUCIFER
- ONTSTEKING VAN DE ZIJBRANDER MET LUCIFER
- INFORMATIONS RELATIVES A LA SECURITE
- ALLUMAGE DES BRULEURS
- ALLUMAGE DES BRULEURS AVEC L'ALLUMEUR
- ALLUMAGE DES BRULEURS AVEC UNE ALLUMETTE
- ALLUMAGE DU BRULEUR LATERAL AVEC UNE ALLUMETTE
- INSTALLATION, USE AND MAINTENANCE INSTRUCTIONS
- THIS APPLIANCE IS DESIGNED FOR OUTDOOR USE ONLY IF YOU SMELL GAS
- GAS CONNECTION
- GAS CYLINDER
- REPLACING THE CYLINDER
- TRANSPORT AND STORAGE OF THE GAS CYLINDER
- HOSE AND REGULATOR
- LEAKAGE TEST
- PRIOR TO FIRST USE / AFTER PROLONGED PERIOD OF NON-USE
- SAFETY INFORMATION
- NOTE
- LIGHTING THE SIDE BURNER WITH A MATCH
- VISUAL CHECK OF THE FLAMES
- SWITCHING OFF THE BARBECUE
- USEFUL TIPS FOR USE OF THE BARBECUE
- USING YOUR BARBECOOK FOR THE FIRST TIME
- WARMING UP THE BARBECUE
- COOKING TIME
- KEEPING FLARE-UPS UNDER CONTROL
- HOW TO PREVENT FOOD FROM STIC-KING TO THE GRID
- CLEANING AND MAINTENANCE
- COOKING GRIDS AND GRIDDLES
- BURNERS AND VENTURI TUBES
- BURNING OFF
- STORAGE
- GUARANTEE
- TURBO HEATING SYSTEM
- DE
- ANAMMA TΩN KAYΣTHPΩN
- ANAMMA KAYΣTHPΩN ME TON ΣΠΙΝΘΗΡΙΣΤΗ
- ANAMMA KAYΣTHPΩN ME ΣΠΙΡΤΑ
- ENCENDIDO DEL QUEMADOR LATERAL CON UNA CERILLA
- GAASIBALLOONI TRANSPORT JA HOIUSTAMINE
- VOOLIK JA REGULAATOR
- PÖLETITE SÜÜTAMINE
- PÖLETITE SÜÜTAMINE SÜÜTURIGA
- PÖLETITE SÜÜTAMINE TIKKUDEGA
- KÜLGPÖLETI SÜÜTAMINE TIKKUDEGA
- TURVAOHJEET
- SKIFTE AV GASSBEHOLDER
- SIKKERHETSINFORMASJON
- TENNE BRENNERNE
- TENNE BRENNERNE MED TENNEREN
- TENNE BRENNERNE MED EN FYRSTIKK
- TENNE SIDEBRENNEREN MED EN FYRSTIKK
- HOLDE OPPFLAMMING UNDER KONTROLL
- SÄKERHETSINFORMATION
- TÄNDA BRÄNNARNA
- TÄNDA BRÄNNARNA MED TÄNDSATSEN
- TÄNDA BRÄNNARNA MED TÄNDSTICKA
- TÄNDA SIDOBRÄNNAREN MED TÄNDSTICKA
- INFORMAZIONI PER LA SICUREZZA
- ACCENSIONE DEI BRUCIATORI
- ACCENDERE I BRUCIATORI CON L'ACCENDITORE
- ACCENDERE I BRUCIATORI CON UN FIAMMIFERO
- INFORMAÇÕES DE SEGURANÇA
- ACENDER OS BICOS DE GÁS COM O DISPOSITIVO DE IGNICÃO
- ACENDER OS BICOS DE GÁS COM UM FÓSFORO
- ACENDER O BICO DE GÁS LATERAL COM UM FÓSFORO
- SIKKERHEDSINFORMATION
- TÆNDING AF BRÆNDERE MED TÆNDER
- TÆNDING AF BRÆNDER MED TÆNDSTIK
- BIZTONSÁGI INFORMÁCIÓK
- AZ ÉGŐFEJEK BEGYÚJTÁSA A BEGYÚJTÓVAL
- AZ OLDALSÓ ÉGŐFEJ BEGYÚJTÁSA GYUFÁVAL
- INFORMATII PRIVIND SIGURANTA
- APRINDEREA ARZĂTOARELOR
- APRINDEREA ARZĂTOARELOR CU APRINZĂTORUL
- APRINDEREA ARZĂTOARELOR CU UN CHIBRIT
- BEZPEČNOSTNÍ INFORMACE
- ZAPALOVÁNÍ HOŘÁKŮ
- ZAPÁLENÍ HOŘÁKŮ POMOCÍ ZAPALOVAČE
- ZAPALOVÁNÍ HOŘÁKŮ POMOCÍ SIREK
- ZAPALOVÁNÍ BOČNÍHO HOŘÁKU POMOCÍ SIREK
- NAPUCI ZA SIGURNOST
- INFOMACIJA DÉL SAUGUMO
- DEGIKLIŲ UŽDEGIMAS
- DEGIKLIŲ UŽDEGIMAS NAUDOJANT VIDINĖ UŽDEGIMO SISTEMA
- DEGIKLIŲ UŽDEGIMAS NAUDOJANT DEGTUKUS
- ŠONINIŲ DEGIKLIŲ UŽDEGIMAS NAUDOJANT DEGTUKUS
- DROŠĪBAS INFORMĀCIJA
- DEGLU IEDEGŠANA
- DEGLU IEDEGŠANA AR AIZDĖDZINĀTĀJU
- DEGLU IEDEGŠANA AR SĚRKOCIŇU
- SĀNU DEGLA IEDEGŠANA AR SĒRKOCIŅU
- WSKAZÓWKI DOTYCZĄCE BEZPIECZEŃSTWA
- ROZPALANIE PALNIKÓW
- ROZPALANIE PALNIKÓW ZA POMOCĄ ZAPŁONNIKA
- ROZPALANIE PALNIKÓW ZA POMOCĄ ZAPAŁEK
- BEZPEČNOSTNÉ INFORMÁCIE
- ZAPAL'OVANIE HORÁKOV
- ZAPAL'OVANIE HORÁKOV POMOCOU ZÁPALIEK
- ZAPALOVANIE BOČNÉHO HORÁKU POMOCOU ZÁPALIEK
- INFORMACIJE O VARNOSTI
- VŽIG GORILNIKOV
- PRIŽIGANJE GORILNIKOV Z VŽIGALNIKOM
- PRIŽIGANJE GORILNIKOV Z VŽIGALICO
- PRIŽIGANJE STRANSKEGA GORILNIKA Z VŽIGALICO
Brand : BARBECOOK
Model : Manua 4
Category : Barbecue