
AR 4025 BT - Car radio AEG - Free user manual and instructions
Find the device manual for free AR 4025 BT AEG in PDF.


| Product Type | Car Stereo with Bluetooth, CD/MP3/WMA playback, FM/MW tuner, USB/SD/MMC input |
| Brand | AEG |
| Model | AR 4025 BT |
| Dimensions (L x W x H) | 178 x 175 x 50 mm (standard ISO slot) |
| Weight | 1.5 kg |
| Power Supply | 12 V DC (negative ground), max 10 A |
| Maximum Power Output | 4 x 40 W (at 14.4 V) |
| Speaker Impedance | Minimum 4 ohms |
| Radio Frequency Bands | FM (87.5-108 MHz) and MW (522-1620 kHz) |
| Radio Sensitivity (FM) | 9 μV (usable) |
| CD Player | Audio CD, MP3/WMA CD playback with anti-shock (ESP) |
| Signal-to-Noise Ratio (CD) | 65 dB |
| Frequency Response (CD) | 20 Hz - 20 kHz |
| USB Port | Front USB for MP3/WMA playback, compatible with iPod/iPhone |
| Card Reader | SD/MMC slot (front, behind detachable panel) |
| Bluetooth | Hands-free calling and A2DP music streaming |
| AUX Input | 3.5 mm stereo jack on front |
| Detachable Control Panel | Yes, with storage case included |
| Remote Control | Infrared remote control included (CR2025 battery) |
| ISO Connector | Standard ISO A (power) and ISO B (speakers) |
| Operating Temperature | +5 to +40 °C |
| Cleaning | Wipe housing with slightly damp cloth; avoid moisture ingress |
| Safety Features | Class 1 laser, automatic reconnection for Bluetooth, RESET button, TA/TP functions |
| Spare Parts / Repairability | Use only original spare parts; repairs by authorized specialists only |
| General Information | Instructions manual in multiple languages; complies with Automotive EMC Directive 2004/104/EC |
Frequently Asked Questions - AR 4025 BT AEG
User questions about AR 4025 BT AEG
0 question about this device. Answer the ones you know or ask your own.
Ask a new question about this device
Download the instructions for your Car radio in PDF format for free! Find your manual AR 4025 BT - AEG and take your electronic device back in hand. On this page are published all the documents necessary for the use of your device. AR 4025 BT by AEG.
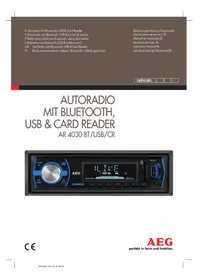
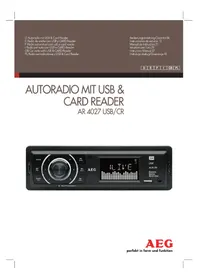
USER MANUAL AR 4025 BT AEG
Overview of the Components....Page 3
Instruction Manual Page 69
Technical Data......Page 82
Polish
Table of Contents
Card reader (SD/MMC)....15
Phone calls via Bluetooth 16
Pairing devices......16
Disconnecting devices 16
(Advanced Audio Distribution Profile)....17
Cleaning....17
Card reader (SD/MMC)
i NOTE:
D-47906 Kempen/Germany
PORTUGUESE
(TA - "Traffic Announcement")......46
(Advanced Audio Distribution Profile)....65
Cleaning....66
Information about this Instruction Manual....69
Copyright 69
Liability....69
Warning symbols....69
Intended use....70
Safety 70
General Safety Instructions....70
Danger caused by laser beams....70
Safety when driving....70
Controls (see foldout page)....70
Car radio....70
Remote control....71
Installation and connection....71
Safety Instructions....71
Supplied parts and transport inspection....71
Disposal of packaging....71
Connection....72
Installation and disassembly....73
Setting up....75
Attach control panel....75
Detach the control panel 75
Operation and use....75
Switch on/switch off....75
Settings....76
Radio functions....77
General CD functions....78
Additional functions for MP3/WMA-CDs....79
USB port....79
Card reader (SD/MMC)....79
Phoning via Bluetooth 80
Pairing devices (PAIRING) 80
Disconnecting the devices 80
Reconnecting the devices 80
End call....80
Incoming call....80
Music playback via A2DP
(Advanced Audio Distribution Profile) 81
Cleaning....81
Safety advice....81
Cleaning....81
Troubleshooting 81
Safety advice....81
Fault causes and troubleshooting....81
Technical Data 82
Declaration of Conformity....82
Index 83
Introduction
Foreword
Dear Customer,
Thank you for choosing our product.
Read the information below to familiarize yourself with your unit and to make full use of its range of functions.
We hope you enjoy using the unit.
Information about this Instruction Manual
This instruction manual forms part of the Stereo Car Radio AR 4025 BT (hereinafter known as the unit) and contains important information on intended use, safety, installation as well as the operation of the unit.
The instruction manual must be kept close to the unit. It must be read and the information applied by anyone who intends to operate and maintain the unit.
Keep this instruction manual safe and pass it on to any subsequent owners.
Copyright
This documentation is protected by copyright.
Any reproduction or reprinting, including extracts thereof, as well as the distribution of images, even if altered, is only permitted with the written consent of the manufacturer.
Liability
All technical information, data and instructions contained in this instruction manual for the connection, installation and the operation of the unit corresponds to the best of our knowledge to the information current at the time of print.
We assume no liability arising from the information, figures and descriptions in this manual.
The manufacturer assumes no liability for damage attributable to non-compliance with this manual, to any use other than that for which the unit is intended, faulty repairs, unauthorized modifications or the use of non-approved replacement parts.
Warning symbols
WARNING:
A warning symbol of this level of hazard indicates a potentially hazardous situation.
If the hazardous situation is not prevented, this could lead to injury.
▶ Follow the instructions in this warning symbol to prevent personal injury.

CAUTION:
A warning symbol of this level of hazard indicates potential damage to property.
If the situation is not prevented, this may lead to damage to property.
▶ Follow the instructions in this warning symbol to prevent damage to property.

NOTE:
A note highlights additional information which may facilitate handling and operation of the unit.
Intended use
This unit is intended for
■ Reception of UKW and MW radio stations ■ Playback of audio CDs ■ Playback of MP3 and WMA files from CD, USB storage devices or SD/MMC memory cards ■ Playback of audio signals from external audio devices ■ Playback of music via Bluetooth profile A2DP ■ Making phone calls via Bluetooth
A different use or one which is over and above the purposes listed here is deemed contrary to the intended purpose.

WARNING:
Danger arising from use other than that which is intended!
The unit may cause a hazard if used not as intended and/or for a different purpose.
▶ Only use the unit as intended. ▶ Follow the procedures described in this instruction manual.
Any liability arising from use for a purpose other than that which is intended is excluded.
Use of the unit is at the sole risk of the User.
Safety
In this chapter you will find important safety instructions for handling and operating the unit.
This unit complies with safety standards. Incorrect use may lead to personal injury and damage to property.
General Safety Instructions
For safe handling of the unit, follow the safety advice below:
■ Before use, check the unit for any obvious visible damage. Do not use a damaged or dropped unit. ■ If the cable or connectors are damaged, have them replaced by an authorized specialist or our customer service. ■ Persons with reduced physical, mental or motor capabilities who are unable to use the unit in a safe manner may only operate the unit under the supervision or instruction of a responsible person.
■ Children may only operate the unit under supervision. ■ Repairs to the unit may only be carried out by authorized specialists or our customer service. A significant risk for the user may arise from faulty repairs. Furthermore, the warranty shall be deemed null and void. ■ Repairs to the unit during the warranty period may only be carried out by a customer service center authorized by the manufacturer, otherwise any subsequent damage arising thereafter shall invalidate the warranty. ■ Defective parts may only be replaced by original spare parts. The safety requirements can only be met through use of original spare parts. ■ Protect the unit against moisture and contact with liquids.
Danger caused by laser beams

WARNING:

The unit is fitted with a class 1 laser. Laser beams may damage your eyesight!
Follow the safety advice below in order not to expose yourself or others to laser beams:
▶ Never open the unit. ▶ Have the unit repaired by a specialist. ▶ Do not carry out modifications to the unit.
Safety when driving

WARNING:
Safety when driving is paramount!
Follow the safety advice below in order not to endanger yourself or others:
Before beginning your journey, familiarize yourself with the operation of the unit. ▶ Only operate the unit if the traffic situation allows! Stop in a suitable place to make any complex adjustments. ▶ Only remove or attach the control panel if the vehicle is standing. ▶ Adjust the volume to a reasonable level so that you can hear police, fire service and other emergency service sirens in good time.
Controls (see foldout page)
Car radio
1 MODE button: Set operating mode. 2 PWR/MUTE button: Switch unit off/switch to mute. 3 Multicontrol: turn to adjust the volume, press to access other setting options. 4 DIS button: Show additional information on the display.
5 PTY Button:
Program type
6 Display
7 OPEN Button:
Release button for control panel
8 Button:
Accept/reject call, or dial the selected number, End call
9 Button TA:
Switch on/switch off traffic announcements
10 Button AF:
Switch on/switch off alternative frequencies
11 Button 1/PAUSE:
Access preset radio stations/pause playback/terminate Bluetooth connection
12 Button2/RPT:
Access preset radio stations /Switch on/switch off repeat function
13 Button 3/INT:
Access preset radio stations /activate SCAN function
14 Button 4/RDM:
Access preset radio stations / Switch on/switch off random playback
15 Button 5/-10:
Access preset radio stations /Rewind 10 titles
16 Button 6/+10:
Access preset radio stations /Skip 10 titles
17 Button AS/PS:
Automatic Preset/Start search function
18 Button BAND:
Select frequency range/Confirm search settings/Switch on/switch off subwoofer
19 Button
Reduce frequency/Search/Playback previous title
20 Button
Increase frequency/Search/Playback next title
21 AUX-IN:
3.5 mm stereo input jack
22 USB port
23 SD/MMC card slot
24 Button ▲ Eject CD
25 CD slot
26 Button RESET: Reset unit
27 MIC (Microphone)
28 IR Receiver for remote control signals
Remote control
29 Button MUTE: Switch unit to mute
30 Button MODE: Set operating mode
31 Button DIS:
Show additional information on the display
32 Button PWR:
Switch off the unit
33 Button TA/TP:
Switch on/switch off traffic announcements
34 Button PTY:
Programme type
35 Button AF/REG:
Switch on/switch off alternative frequencies
36 Button AS/PS
Auto Preset/Start search function
37 Button
Increase frequency/Search/Playback next title
38 Button V+:
Increase volume
39 Button SEL:
Access other settings options
40 Button V-:
Reduce volume
41 Button
Reduce frequency/Search/Playback previous title:
42 Button BAND:
Select frequency range/Confirm search settings
43 Button 1 - 6:
Tune into preset radio stations
Installation and connection
Safety Instructions

WARNING:
Installing the unit may lead to personal injury and damage to property!
Follow the safety instructions below to prevent risk:
▶ Packaging material must not be used as a toy. ▶ Follow the instructions for electrical connection of the unit to prevent personal injury and damage to property.
Supplied parts and transport inspection
The unit is supplied as standard with the following components:
■ Car radio (including control panel) ■ Mounting sleeve (attached) ■ Frame (attached) ■ Mounting strip (incl. fasteners) ■ Assembly key for mounting sleeve (2x) ■ Case for control panel ■ ISO connector ■ Remote control ■ Instruction manual
i NOTE:
▶ Check that all parts are in the box and that there is no visible damage. ▶ If you notice any transport damage, inform your dealership without delay.
Disposal of packaging
The packaging protects the unit against transport damage. The packaging materials are selected according to environmental and disposal criteria and can therefore be recycled.

Recycling the packaging conserves raw materials and reduces waste. Dispose of any unwanted packaging materials in accordance with local regulations.
i NOTE:
If possible keep the original packaging for the duration of the warranty period of the unit, in order that you can repack the unit properly in the event of a warranty claim.
Connection

WARNING:
Damage to property may occur when installing the unit!
▶ If possible, have the unit installed by a qualified specialist. If you want to install the unit yourself, follow the instructions on connection and installation for safe and correct operation of the unit.

CAUTION:
Using the wrong connections may damage the unit.
When installing, use the ISO connections on the unit. The vehicle-specific ISO adapter which may be needed can be obtained from repair shops, specialist retailers or in the relevant departments of department stores.
Connections on the back of the unit

A ISO connection A (power supply) B ISO connection B (speaker) C Car fuse (5 A) D Antenna connection E Subwoofer connector cable F Amplifier connector cable (front speaker) F Amplifier connector cable (rear speaker)
Pinout of ISO connections
ISO connection A 1 not in use

2 Steering wheel control 3 not in use 4 Permanent positive (memory) 5 Control voltage for electronic/motor antenna or amp 6 not in use 7 12 V (Positive under key) 8 Minus (Ground -)
ISO connection B

1 Speaker rear right + 2 Speaker rear right - 3 Speaker front right + 4 Speaker front right - 5 Speaker front left + 6 Speaker front left - 7 Speaker rear left + 8 Speaker rear left -

CAUTION:
▶ Use speakers with an impedance of at least 4 Ohm. ▶ The speaker wires must be floating.

NOTE:
▶ Always use the cable for the front speakers to connect the unit to two speakers. ▶ Note that connection 4 must be connected to permanent positive for auto preset. In some car models the default pinout of connections [4] and [7] (ISO A) is swapped in the assembly plant. If this is the case, auto preset may not function. To rectify the problem, connections 7 (positive under key) and 4 (permanent positive) must be swapped.
Antenna power connection A5 (ISO A)

CAUTION:
Potential damage to unit!
▶ Never connect the antenna power connection to the motor power cable for the antenna. ▶ Max. allowed current: 100 mA.
The antenna power connection is available for a relay-controlled antenna. The relay automatically extends the antenna when the unit is switched on. The antenna retracts again when the unit is switched off. This connection can also be used to control an external amplifier. To connect this properly please refer to the amplifier operating manual.
Connecting an external amplifier
To connect an external amplifier, use the LINE OUT connector cable. To do so, refer to the amplifier operating manual.
Installation and disassembly
The unit can be fitted into any standard ISO dashboard slot. If your car does not have an ISO dashboard slot, ask your repair shop, specialist retailer or relevant department in your nearest department store.
i NOTE:
▶ Before installation, you must remove the two transport protection screws on the upper housing. ▶ Connect the cables before you permanently install the unit. Ensure that they are properly connected and that the system functions correctly.
Important additional information for installing your car radio!
- The device is designed for the minus pole of the battery, which must be connected to the body of the vehicle. Please check this before installation.
- When installing/connecting your device, please note that not every vehicle is equipped with an "ISO connection". In this case, we recommend the use of an ISO adapter specifically designed for your vehicle.
Adapters are available from car accessory shops and/or from your vehicle workshop.
- Depending on the specific car type, different wiring connections of the "Duration +" wire (constant current connection) are available. (However, this is necessary for storing the radio stations.)
In order to guarantee all functions, installation in line with these instructions is essential. In cases of doubt, please contact an authorized car workshop.
Due to the various types of motor vehicles and motor manufacturers, it is not possible to guarantee that the pin assignment of the ISO plug is correct, even if the ISO plug connections fit together mechanically.
It may therefore be necessary to modify the electrical connection or use vehicle-specific adapters.
i NOTE:
If the device is correctly connected, the radio can be switched on and off via the ignition. If the stored stations are lost, this indicates that the radio is not receiving any "Duration +" current, which is required for storing the stations.
CAUTION:
▶ Where there is a connection to "Duration +" without the ignition being switched on, the car battery might be drained of power even if the radio is switched off. This may even result in the battery becoming completely flat.
- Depending on the specific car type, interferences can possibly arise during radio operation. These interferences can be avoided easily with an additional interference filter. Your car radio is originally prepared with an interference filter already.
In these cases, please contact your authorized car dealer.
- When installing your radio, please ensure that there is enough space at the rear of the radio to ensure sufficient cooling.
- For the antenna connection, there are two different norms. The first of these is the old (50 ohm) version with a long protruding round contact on the vehicle and a round socket on the radio end. The second is the ISO-standardised antenna plug (150 ohm).
Adapters for both formats are available from accessory manufacturers and/or your car workshop.
i NOTE:
▶ Important information for VW/Audi vehicles: The antenna in your vehicle may be an active antenna. This requires a power supply which is only provided by the original car radio. If this is the case, use an antenna adapter for phantom power supply.
Antenna adapters can be found in car accessory outlets and/or at your car repair shop.
Installation instructions
■ Only use tools suitable for car HiFi installation. ■ Insert the unit into the slot provided or select an installation slot where all buttons can be reached comfortably and which does not hinder the driver. ■ Always connect the unit to a properly installed 12 V car battery. ■ Always connect the unit via an ISO connector in the car. ■ Install the unit in such a way that no build-up of heat can occur and where the unit is well-ventilated. ■ To prevent malfunction, the installation angle should be less than 30°. - Do not install the unit into a slot where it is exposed to high temperatures (e.g. direct sunlight or hot air from the heater), heavy soiling and powerful vibrations. ■ If modifications to the vehicle need to be carried out, ask your car dealer/repair shop.
Installing the unit into the ISO dashboard slot
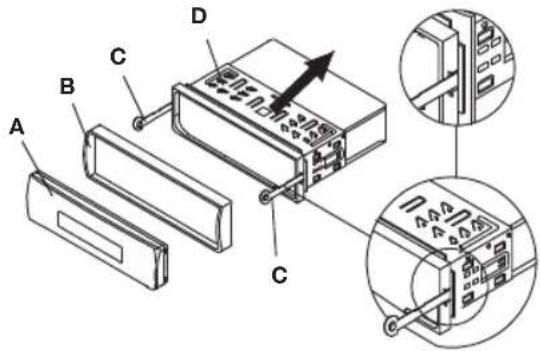
◆ Detach the mounting sleeve (D) and frame (B) from the unit housing. Use the assembly keys (C) to do so. ◆ Fit the mounting sleeve into the ISO dashboard slot. ◆ Bend the mounting sleeve tabs round with a screw-driver so that the frame is mounted securely in the dashboard slot.

◆ Check that the frame is secure. ◆ Connect the ISO connection of the unit to the two ISO connectors of your vehicle. ◆ Connect the antenna cable of the vehicle antenna to the antenna adapter of the unit. If necessary, also secure your unit against theft. Fasten the screws to the mounting bracket and to the mounting material on the engine firewall of the car.
◆ Slide the unit carefully into the mounting sleeve, until it clicks into place. ◆ After all connections have been made, press the RESET button (26) using a ballpoint pen or other pointed object.
◆ Attach the control panel (A), as described under "Attach control panel".

CAUTION:
Possible damage to the cables!
When inserting the unit, pay attention to the cable routing to prevent damage. ◆ Then mount the frame.
Disassemble the unit
To disassemble the unit, proceed as follows:
◆ Remove the frame. ◆ Insert the right and left hand assembly key into the respective slots on the sides of the unit. (The tabs are now bent back.) ◆ Pull out the unit.

NOTE:
If the housing is uneven, the tabs on the mounting sleeve may become jammed. Use the assembly keys to release the tabs.
Installation for Toyota or Nissan

NOTE:
Mounting sleeve, frame and mounting strip are not required.
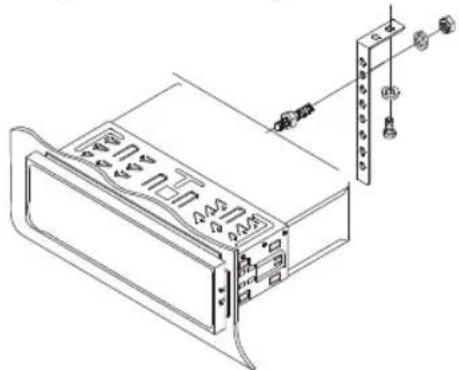
Use the threaded mounting holes on the sides of the unit (A), to fasten the unit to the mounting brackets (supplied with your vehicle). The holes are labeled T (for Toyota) or N (for Nissan).

◆ Loosen the mounting screws for the left and right hand catches on the front of the unit and remove the catches.
◆ Use the screws (B) to fasten the unit to the mounting brackets (D).
Connect an external audio device to the unit
◆ Connect the audio output of an external audio device to the AUX IN jack (21) on the front of the unit.
◆ Select playback of the audio input by pressing the MODE button (1) several times until the display shows AUX.
Insert batteries into the remote control
NOTE:
Before initial use of the remote control, you must insert the supplied batteries to prepare the remote control for use. The life of the supplied batteries may be reduced depending on storage conditions. ◆ Pull the battery compartment out of the remote control by pressing the side catch and at the same time pulling out the compartment. ◆ Insert the batteries into the battery compartment. Make sure that the batteries are inserted correctly according to their polarity. ◆ Slide the battery compartment back into the remote control.
Setting up
You can remove the control panel from your unit to protect against theft. Do not keep the detached panel in your car.
NOTE:
▶ To protect your control panel always keep it in the case. ▶ Do not touch the terminals on the unit or the control panel.
Attach control panel
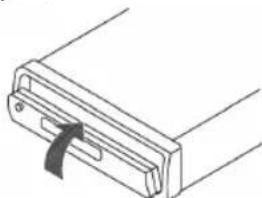
- Firstly insert the right hand side of the control panel into the frame.
- Then press in the left hand side until it clicks into place. ◆ Flip up the control panel until it clicks into place. ◆ Check whether the control panel is inserted correctly and securely into the frame. If the control panel is not properly fitted, the unit may not operate correctly.
Detach the control panel
◆ Press the OPEN button (7) and flip the control panel down.
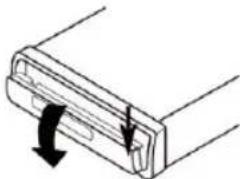
- Then carefully pull the left hand side of the control panel to detach it.
Replace
The battery of the remote control is a long-life lithium cell. If the range of the remote control is reduced during use, please proceed as follows:
◆ Pull the battery compartment out of the remote control, by pressing in the side catch and pulling out the battery compartment at the same time. ◆ Replace the cell by a battery of the same type (CR 2025). Ensure correct polarity. ◆ Slide the battery compartment back into the remote control.
If the remote control is not used for a prolonged period, remove the batteries to prevent battery acid leaking.

WARNING:
▶ Do not expose the batteries to high temperatures or direct sunlight. Never throw batteries into the fire. There is a danger of explosion!

CAUTION:
▶ Do not dispose of batteries with household waste. Take spent batteries to a designated collection point or to a dealer.
Operation and use
This chapter provides you with important instructions on the operation and use of the unit.

NOTE:
Some keys are to be found both on the device itself and on the remote control. Keys with the same designation have the same function. The following pages detail the operation of the unit. The remote control signals are transmitted to the unit via infrared light. The transmission of the signals from the remote control to the unit may be impaired by direct sunlight on the IR Sensor (28) of the unit.
Switch on/switch off
◆ To switch on the unit, press any button (except the OPEN button (7)). This activates the display. ◆ To switch off the unit, keep the PWR/MUTE button (2) pressed.
Settings
Adjust the volume

WARNING:
Setting the volume too high may damage your hearing!
If the volume is set too high, your hearing may be permanently damaged.
▶ Set the volume to a reasonable level.
◆ Turn the multijog (3) to set the volume.
Switch unit to mute
◆ Press the PWR/MUTE button (2) to switch the unit to mute. ◆ Press the PWR/MUTE button (2) again to deactivate the function.
Sound settings
◆ Press the multijog (3). The current volume is displayed. Press the multijog each time to select the next option.
The following settings are available:
VOL - Volume (from 0 to 100),
BAS - Bass (from -10 to +10)
TRB - Treble (from -10 to +10)
BAL - Balance (Sound balance between the right and left speaker) (from 10L to 10R)
FAD - Fader (Sound balance between the rear and front speaker) (from 10F to 10R)
DSP - Equalizer (Digital Sound Processing) (FLAT, CLASSICS, POP M, ROCK M, DSP OFF)
◆ Turn the multijog to adjust the displayed setting.
More settings via the multijog
◆ Keep the multijog (3) pressed for a few seconds to access more settings options. Press the multijog each time to select the next option.
◆ Turn the multijog to adjust the displayed setting.
The following settings are available:
TA
Traffic announcement settings
■ TA SEEK: If the TA function is activated, the unit will try to select a station which is broadcasting traffic information. ■ TA ALARM: The station is not automatically preset. If no traffic information is received a buzzer sounds and NO TP/TA is shown on the display. If the selected station is not transmitting a RDS-Signal, SEEK PI is shown in the display.
PI
If you are driving through an area in which two stations with the same AF- but different PI-Code (PI = Programme information) – can be received, the reception will then become instable. In this situation you have a choice between:
■ PI SOUND: If the unit switches over in any case to the other station, the sound from the other station will only be heard for less than one second. ■ PI MUTE: The sound of the other station is suppressed.
RETUNE Time frame for automatic tuning into traffic information or program information:
■ S (Short) after around. 30 seconds ■ L (Long) after around 90 seconds
MASK This option decides which stations should be excluded from the station scan:
■ DPI: Alternative frequencies with different PI-Code are excluded from the scan. ■ ALL: Alternative frequencies with different PI-Code and without RDS-Information with high signal levels are excluded.
TA VOL Traffic information volume
EON TA The unit can receive RDS EON data. EON means the transmission of additional station information within a station group. In the event of a traffic announcement (TA) it will switch within a station group from a non-traffic broadcast to the corresponding traffic radio station of the station group.
■ DX: the unit attempts to receive the EON TA information from a station within range and thus to improve the reception quality. ■ LO: Prevents switching over to a station with too weak a signal level.
BEEP Sound heard when a button is pressed:
■ BEEP 2ND: Unit beeps when a button with multiple functions is kept pressed. ■ BEEP ALL: A beep sounds whenever a button is pressed ■ BEEP OFF: no beep
Stereo/ Switch between Stereo and Mono Mono
Loudness The bass is amplified when the Loudness function is activated.
■ LOUD ON: Loudness function is activated. ■ LOUD OFF: Loudness function is deactivated.
DX/LOCAL Switches between local and more distant stations.
■ DX: Receive other more distant stations. ■ LOCAL: Receive local stations.
Show Display information
◆ Press the DIS (40) button several times to display the following information on the display in sequence:
Time (is automatically set during RDS reception), radio station, programme type, frequency of the currently selected radio station, current DSP setting, information on file names (only for playback MP3 or WMA file).
NOTE:
▶ If no corresponding information is available, PTY NONE is shown on the display. ▶ If the information on the display is too long it is shown as scrolling text.
Reset radio (RESET)
To restore the factory settings, press the RESET button (26) with a pointed object, e.g., a ballpoint pen.
Reset the unit:
■ when using for the first time after connecting the cable, ■ if not all function buttons work, ■ if an error message is shown on the display.
Radio functions
Select the RADIO operating mode
◆ Press the MODE button repeatedly (1) until the radio frequency and the frequency band or radio station is shown on the display.
Select frequency range
◆ Press the BAND button (18) to toggle between UKW (FM1, FM2, FM3) and medium wave (MW1, MW2). The selected frequency range is displayed.
Automatic station search
◆ Press the ▶ (20) or ◀ (19) buttons to start the station search. SEARCH is shown on the display. The search is halted when a station is found.
Set station manually
- Keep the ▶ (20) or ◀ (19) buttons pressed until MANUAL is shown on the display. ■ Press the (26) or (27) button to change the frequency in steps of 0.05 MHz (UKW) or 9 kHz (MW) until the desired frequency is set.
If no button is pressed for two seconds, automatic station search is automatically selected. AUTO is shown on the display.
Preset stations
6 stations can be preset for each frequency range.
Keep the required numeric button (11 to 16) pressed for about 2 seconds to preset the currently set station. After presetting, 1 beep is sounded (unless BEEP OFF has been selected).
Tune into preset stations
Use the BAND button (18) to select the desired frequency range. Press one of the numeric buttons (11 to 16) to tune into the preset station.
Automatic Preset
Use the BAND button (18) to select the desired frequency range. Keep the AS/PS button (17) pressed. SEARCH appears on the display. A search begins automatically. After searching, the six strongest stations are preset and the unit tunes into the preset stations in sequence for about 5 seconds. In doing so, the preset location flashes on the display. Press one of the numeric buttons (11 to 16) to select the required station.
Scan the preset stations
Press the AS/PS button (17). The unit tunes into all stations briefly. If you hear the station you would like to listen to, press the AS/PS button (17). The selected station remains selected.
Alternative Frequencies (AF)
AF is a function which works with the help of the RDS (Radio Data System) and can only be used for UKW stations. The unit searches in the background for the frequency giving the clearest reception for the preset station.
Press the AF button (10) to switch on/off this function.
AF is displayed: Function is activated and RDS-Information is received.
AF flashes: No RDS information is received.
AF is not displayed: Function is deactivated.
Regional programmes
At certain times, some stations split their schedules into regional programmes with differing content.
◆ To play only the regional programmes of the station, keep the AF button (10) pressed until REG ON appears on the display. ◆ To play the networked programmes again, keep the AF button (10) pressed until REG OFF appears on the display.
Programme type (PTY)
Alongside the station name, some UKW stations also give information on the programme type of their programme. You can search for stations of a specific type.
◆ Press the PTY button (5). ◆ Select the required PTY identifier by turning the multi-jog (3). The PTY identifier is shown on the display.
These programme types may be e.g.:
SPORT NEWS POP M CLASSICS
After selecting a PTY identifier, press the button (26). PTY SEEK is shown on the display. The unit searches for stations which correspond to the selected PTY identifier and stops when a matching station has been found. If no station with the selected PTY identifier is found, PTY NONE appears on the display.
The PTY function ends when the selected PTY identifier can no longer be received. Alternatively, press the PTY button (5) to close the function before this.
Radio traffic service (TA - "Traffic Announcement")
◆ Keep the TA button (9) pressed to switch on/switch off this mode. TA is displayed if this function is activated. In TA mode, you can immediately cut into radio stations which are broadcasting traffic announcements from other stations or operating modes. The volume level is adjusted to the figure set in the menu for transmitting traffic information.
- When playing the radio traffic service, press the TA button (9) to exit the TA function, without switching it off.
General CD functions
Anti-Shock Function (ESP - "Electric Shock Protection")
The unit is equipped with an Anti-Shock function. This function eliminates the effects of vibrations e.g. on uneven roads and guarantees uninterrupted playback even if the unit moves.
Insert and remove a CD
◆ Press the OPEN button (7) to flip down the control panel. ◆ Insert the CD into the CD slot with the printed side facing up. Flip the control panel up again. CDP PLAY is shown on the display. The CD starts to play. ◆ To remove the CD, press the ▲ button (24) when the control panel is flipped down. The CD is ejected. The unit switches to radio mode. ◆ Remove the CD immediately from the CD slot. If an ejected CD is not removed after around 15 seconds, the unit pulls the CD back in but does not start to play it.
i NOTE:
▶ Please note:
There are a number of different recording and compression methods, as well as quality differences between CDs and self-recorded CDs.
The music industry does not adhere to any defined standards (copyright protection).
For these reasons it is possible that in rare cases there are problems with the playback of CDs and MP3/WMA-CDs. This is not a malfunction of the device.
Select CD type
◆ Press the MODE button (1), until CDP PLAY is shown on the display.
Skip titles
◆ Press the ▶l button (20) or ◀(19) to select the next or previous title. The title number and the elapsed playing time are shown on the display. ◆ Press the 5/-10 button (15) or 6/+10 (16) to rewind or skip 10 titles. The title number and the elapsed playing time are shown on the display.
Fast forward/rewind
◆ Keep the ▶ button (20) or ◀(19) pressed to start fast forward or rewind.
Pause play
◆ Press the 1/PAUSE button (11) to pause play. ◆ To continue play, press the 1/PAUSE button (11) again.
Repeat function
◆ Press the 2/RPT button (12) to repeat the current title. RPT is shown on the display. Pressing the button again resumes normal playback. For MP3 files and CDs in MP3 format only: Keep the 2/RPT button (12) pressed for a short time to repeat the current folder. D-RPT and the current title are shown on the display. Press the button to restore normal playback.
Sample titles
◆ Press the 3/INT button (13). S INT is shown on the display. All titles are played in sequence for around 10 seconds. Press the button again to resume normal playback. For MP3 files and CDs in MP3 format only: Keep the 3/INT button (13) pressed for a short time. All titles of the current folder are played in sequence for around 10 seconds. D-INT and the current title are shown on the display. Press the button again to restore normal playback.
Random playback of all titles
◆ Press the 4/RDM button (14). S RDM is shown on the display. Random playback of all titles begins. Press the button again to resume normal playback. For MP3 files and CDs in MP3 format only: Keep the 4/RDM button (14) pressed for a short time. Random playback of all titles of the current folder begins. D RDM is shown on the display. Press the button again to resume normal playback.
Additional functions for MP3/WMA-CDs
Search functions
Search for title number
◆ Press the AS/PS button (17). ◆ Turn the multijog (3) until the required title number is shown on the display. ◆ Press the BAND button (18) to confirm the selection. The unit searches for the selected title number and plays it.
Search for title or directory name
Press the AS/PS button twice (17).
◆ Turn the multijog (3) until the required character is shown on the display and confirm the setting by pressing the multijog (3). ◆ Repeat this step until you have entered the required sequence of characters. ◆ Press the BAND button (18) to confirm the selection. The titles which begin with the entered sequence of characters are displayed. ◆ Turn the multijog (3) to select the required title or required directory from the search results and press the multijog (3) to confirm the selection and start playback.
Search from the main directory
◆ Press the AS/PS button three times (17). ◆ Turn the multijog (3) to select the required directory (ROOT = main directory). ◆ Confirm your selection by pressing the multijog (3). ◆ Turn the multijog (3) to select the required title. ◆ Confirm your selection by pressing the multijog (3). Playback begins.
USB port
You can connect USB storage devices as well as an iPod/iPhone.
Note:
The wide range of USB storage devices of all types on the market today unfortunately does not allow us to guarantee full compatibility with all USB storage devices. For this reason, in rare instances there may be problems when playing back files from some USB storage devices. This is not a malfunction of the unit.
Connecting data storage media
Open the protective cap from the USB port. Connect your USB device to the port. The device searches for MP3 or WMA files on the data storage device and the message USB/iPod appears on the display. Playback starts automatically. Keep the protective cap on the USB port when no USB device is connected to prevent dirt and contamination.
Playback and search functions
The procedure for playing files from an external storage device as well as the search function works exactly as for MP3-CDs. If a different operating mode has been selected, you can use the MODE button (1) to select the USB storage device.
iPod functions
After connecting an iPod or iPhone, IPODPLAY is shown on the display.
Note:
The buttons on the iPod are deactivated while the iPod is connected. Switch on the iPod and start the Music App.
The procedure for playing files from an iPod or iPhone works exactly as for MP3-CDs.
iPod menu
The unit can use the search function to search for songs from the iPod menu.
Press the AS/PS button (17) to activate the search function. Turn the multijog (3) anti-clockwise to open a submenu: Play list -> Interpret -> Album -> Song -> Genre -> Composer -> Podcast. Press the multijog (3) to confirm the selection. Turn the multijog (3) anti-clockwise to select the required title.
Card reader (SD/MMC)
i NOTE:
The wide range of memory cards of all types on the market today unfortunately does not allow us to guarantee full compatibility with all memory cards. For this reason, in rare instances there may be problems when playing back files from some memory cards. This is not a malfunction of the unit.
Connect data storage devices
◆ Press the OPEN button (7) to flip down the control panel. ◆ Insert the memory card into the card slot with the printed side facing right. ◆ Flip the control panel back up. The message SD PLAY appears on the display. Playback of the MP3- or WMA title on the memory card begins automatically.
Playback and search functions
■ The procedure for playing files from an external storage device as well as the search function works exactly as for MP3-CDs.
■ If a different operating mode has been selected, you can select the card reader with the MODE button (1).
Phoning via Bluetooth
Bluetooth is a technology for wireless radio connection of devices over short distances. Bluetooth technology enables hands-free use of mobile phones. The driver can hold a conversation via his mobile phone without having to hold it to his ear.
This unit offers you the option of using a Bluetooth-enabled mobile phone. The function radius is limited to around 3 metres depending on the device.
For optimum sound quality during a telephone call Do not set the volume too high. Doing so may lead to feedback (whistling) from the speakers.
i NOTE:
The speaker setting depends on the installation positions of the speaker to the microphone and therefore cannot be specified.
Pairing devices (PAIRING)
Before you can use the car radio to make phone calls, you must pair the units.
◆ Select the Bluetooth menu in your mobile phone and register the car radio in your mobile phone. To do so, refer to the user manual of your mobile phone. The device "CAR RADIO" is selected on your mobile phone. ◆ Depending on the device manufacturer, model and software versions, now enter the password "0000" in your mobile phone. When pairing has been completed successfully, CONN OK and then PAIR OK appears on the car radio display. The symbol "?" is shown on the display (6).
NOTE:
▶ If pairing was not successful, the symbol "®" flashes. ▶ Depending on the mobile phone manufacturer, you must execute the (PAIRING) message again to pair your mobile telephone to the car radio. Bluetooth compatibility cannot be guaranteed for mobile phones which may be available on the market in future. ▶ To guarantee an optimum connection, make sure that the battery of your mobile phone is fully charged. Some makes of mobile phone have a power saving mode. Please deactivate power saving mode since otherwise problems may arise when phoning via Bluetooth. To conduct an incoming or outgoing conversation, you must keep Bluetooth activated on your mobile phone. Please refer to the user manual of your mobile phone.
i NOTE:
▶ Please make sure that you speak towards the integrated microphone (27). An external microphone cannot be connected.
Disconnecting the devices
The devices are disconnected when you switch off the car radio via the ignition or on the unit.
Reconnecting the devices
This unit supports automatic reconnection.
Requirements are:
■ the devices have already been paired ■ Bluetooth is activated in your mobile telephone ■ your mobile telephone supports this function.
After the car radio has been switched off and switched on again via the ignition or on the unit, automatic reconnection is activated. This may take a few seconds. CONN TRY is shown on the display (6).
When the connection has been restored, CONN OK appears on the display.
Redial
The unit stores the last dialed number. To access this, proceed as follows:
◆ Press the ↻ button (8). L-DIAL is shown on the display. ◆ Press the ↗ button again (8) to call the number.
Call log
The unit stores the numbers of the incoming calls. To access one of these numbers, proceed as follows:
◆ Press the ↻ button (8). L-DIAL is shown on the display. ◆ Turn the multijog (3) to select the menu item CALL LIST and press the multijog (3) to confirm the selection. ◆ Turn the multijog (3) to select the required phone number. ◆ Press the ↻ button (8) to call the phone number.
End call
◆ Keep the ↗ button (8) pressed to end outgoing or incoming calls. CALL END is shown on the display.
i NOTE:
To reject an incoming call, keep the button (8) pressed.
Incoming call
If you receive an incoming call, the ring tone sounds from the speakers and if the caller has a CLIP "Calling Line Identification Presentation (Caller ID)" capable phone, the caller number appears on the car radio display. Otherwise, "RINGING" appears on the display.
To answer an incoming call, press the button (8). You can hear the caller via the loudspeaker in your car.
Music playback via A2DP (Advanced Audio Distribution Profile)
This involves a cross-manufacturer Bluetooth profile.
Stereo-audio signals are transmitted wireless via streaming between the playback unit (source) and receiver unit.
To control the source remotely, the playback unit must support the AVRCP profile (Audio Video Remote Control Profile).
Full functionality cannot be guaranteed due to the different unit manufacturers, models and software versions.
◆ After you have connected the units to each other, start playing the music in your mobile phone. ◆ Use the ▶(20) button (20) or ◀(19) to select the next or previous music title.
Cleaning
Safety advice

CAUTION:
Possible damage to the unit
▶ Ensure that no moisture gets into the unit during cleaning to prevent irreparable damage to the unit.
Cleaning
◆ Always clean the housing with a slightly damp cloth.
Troubleshooting
This chapter contains important advice on identifying faults and troubleshooting. Follow the instructions to prevent hazards and damage.
Safety advice

WARNING:
Follow the safety instructions below to prevent hazards and damage to property:
Repairs to electrical devices may only be carried out by qualified persons who have been trained by the manufacturer. Significant risks for the user and damage to the unit may arise from faulty repairs.
Fault causes and troubleshooting
Before sending the unit to our customer services, use the following table to check whether you can repair the fault yourself.
| Fault Potential | cause Solution | |
| Cannot switch on the unit. | The ignition is not turned on. | Turn the key to start the ignition. |
| No sound | The volume is set at the minimum level. | Increase the volume. |
| The cable is not connected properly. | Check the cable connections. | |
| The CD jumps. | The installation angle exceeds 30°. | Correct the installation angle. |
| The CD is very dirty or faulty. | Clean the CD or insert a different CD. | |
| The CD does not load or eject. | There is already a CD in the unit. | Remove the CD. |
| The CD has been inserted upside down. | Insert the CD with the label facing upwards. | |
| The CD is dirty or faulty. | Clean the CD or insert a different CD. | |
| The CD format is not supported by the unit. | Insert a different CD. | |
| Fault on a CD which you have burned yourself. | Check the self-burned CD in a different playback unit. | |
| The temperature in the vehicle is too high. | Air condition the vehicle until the temperature returns to the operating temperature. | |
| Condensation on the laser lens | Switch off the unit for a few hours and then try again. | |
| Transport screws have not been removed. | Disassemble the car radio, remove the transport screws and re-install the car radio. | |
| Function button does not work. | There is a fault on the unit. | Press the RESET button (4). |
| The control panel is not attached properly. | Check that the control panel is attached securely. | |
| Radio and/or the automatic station preset does not work | The antenna cable is not connected properly | Check that the antenna is connected securely. |
| The transmitter signals are too weak | Manually tune the stations. | |
| Station preset does not work. | Connection 4 in the ISO connection A (permanent positive) is not properly connected. | Check the cable connections. To do so, refer to the “Connection” chapter |
| Unit does not work on the USB port. | The USB port is designed for devices which work according to the USB standard. Not all devices on the market conform to this standard. A device which does not function according to the USB standard may have been connected. | Connect a device which works according to the USB standard. Ensure that the data storage device is formatted with the FAT32 file system. |
| SD/MMC memory card does not work. | The device is not reading the card. | Check the card. Insert it with the printed side facing right. Ensure that the data storage device is formatted with the FAT32 file system. |
| A connection cannot be established via Bluetooth. | Bluetooth is turned off on your mobile phone. | Activate Bluetooth in your mobile phone. |
Technical Data
General
Input voltage 12 V =
Power consumption < 10 A
Operating temperature +5 ... +40 °C
Humidity (no condensation) 5 - 90 %
Dimensions (L x W x H) 178 x 175 x 50 mm
Weight 1.5 kg
Maximum power output 4 x 40 W (at 14.4 V =)
Radio
Frequency range FM (UKW) 87.5 - 108 MHz
Usable reception (UKW) 9 μV
Channel separation >25 dB
Frequency range (MW) 522 - 1620 kHz
Usable reception (MW) 28 dBu
CD-Player
Signal to noise ratio 65 dB
Frequency response 20 Hz - 20 kHz
MP3/WMA format requirements
Compression rate 16 - 320 kBit/s
Sampling rate 44.1 kHz
Declaration of Conformity
ETV - Elektro-Technische Vertriebsgesellschaft mbH hereby declares that the unit AR 4025 BT complies with the basic requirements of Automotive EMC Directive 2004/104/EC. A copy of the Declaration of Conformity can be requested from the address given.
Index
A
Alternative Frequencies (AF)....77
Antenna power connection A5 (ISO A)....72
Anti-Shock Function....78
Attach control panel....75
Automatic Preset....77
Automatic station search....77
C
Connecting an external amplifier....73
Connections on the back of the unit....72
D
Detach the control panel 75
Disassembly....73
DSP button....76
F
Fast forward/rewind....78
|
Insert a CD....78
Installation in the ISO dashboard slot....74
Installation (Toyota or Nissan)"....74
P
Pause play....78
Pinout of ISO connections....72
Preset stations....77
Programme type (PTY)....77
R
Radio traffic service (TA - "Traffic Announcement") .....78
Random playback of all titles....78
Regional programmes....77
Remove a CD....78
Repeat function....78
RESET button....77
S
Sample titles....78
Scan the preset stations....77
Search functions....79
Select CD type....78
Select frequency range....77
Select RADIO mode....77
Settings
Balance....76
Bass....76
BEEP....76
DSP....76
EON TA....76
Fader....76
Loudness....76
MASK....76
PI....76
RETUNE....76
TA....76
TA VOL....76
Treble....76
Volume 76
Set station manually....77
Skip titles....78
Supplied parts....71
Switch off....75
Switch on....75
T
Tune into preset stations 77
Table of contents
Introduction....84
Foreword....84
(Advanced Audio Distribution Profile)....96
Cleaning....96


- POLISH
- TABLE OF CONTENTS
- CARD READER (SD/MMC)
- I NOTE
- PORTUGUESE
- INTRODUCTION
- FOREWORD
- INFORMATION ABOUT THIS INSTRUCTION MANUAL
- COPYRIGHT
- LIABILITY
- WARNING SYMBOLS
- WARNING
- CAUTION
- NOTE
- INTENDED USE
- SAFETY
- GENERAL SAFETY INSTRUCTIONS
- DANGER CAUSED BY LASER BEAMS
- SAFETY WHEN DRIVING
- CONTROLS (SEE FOLDOUT PAGE)
- CAR RADIO
- REMOTE CONTROL
- INSTALLATION AND CONNECTION
- SAFETY INSTRUCTIONS
- SUPPLIED PARTS AND TRANSPORT INSPECTION
- DISPOSAL OF PACKAGING
- CONNECTION
- CONNECTIONS ON THE BACK OF THE UNIT
- PINOUT OF ISO CONNECTIONS
- ISO CONNECTION B
- ANTENNA POWER CONNECTION A5 (ISO A)
- CONNECTING AN EXTERNAL AMPLIFIER
- INSTALLATION AND DISASSEMBLY
- IMPORTANT ADDITIONAL INFORMATION FOR INSTALLING YOUR CAR RADIO
- INSTALLATION INSTRUCTIONS
- INSTALLATION FOR TOYOTA OR NISSAN
- CONNECT AN EXTERNAL AUDIO DEVICE TO THE UNIT
- INSERT BATTERIES INTO THE REMOTE CONTROL
- SETTING UP
- ATTACH CONTROL PANEL
- DETACH THE CONTROL PANEL
- REPLACE
- OPERATION AND USE
- SWITCH ON/SWITCH OFF
- SWITCH UNIT TO MUTE
- SOUND SETTINGS
- MORE SETTINGS VIA THE MULTIJOG
- SHOW DISPLAY INFORMATION
- RESET RADIO (RESET)
- RADIO FUNCTIONS
- SELECT THE RADIO OPERATING MODE
- SELECT FREQUENCY RANGE
- AUTOMATIC STATION SEARCH
- SET STATION MANUALLY
- PRESET STATIONS
- TUNE INTO PRESET STATIONS
- AUTOMATIC PRESET
- SCAN THE PRESET STATIONS
- ALTERNATIVE FREQUENCIES (AF)
- REGIONAL PROGRAMMES
- PROGRAMME TYPE (PTY)
- RADIO TRAFFIC SERVICE (TA - "TRAFFIC ANNOUNCEMENT")
- GENERAL CD FUNCTIONS
- INSERT AND REMOVE A CD
- SELECT CD TYPE
- SKIP TITLES
- FAST FORWARD/REWIND
- PAUSE PLAY
- REPEAT FUNCTION
- SAMPLE TITLES
- RANDOM PLAYBACK OF ALL TITLES
- ADDITIONAL FUNCTIONS FOR MP3/WMA-CDS
- SEARCH FUNCTIONS
- SEARCH FOR TITLE NUMBER
- SEARCH FOR TITLE OR DIRECTORY NAME
- PRESS THE AS/PS BUTTON TWICE (17)
- SEARCH FROM THE MAIN DIRECTORY
- USB PORT
- CONNECTING DATA STORAGE MEDIA
- PLAYBACK AND SEARCH FUNCTIONS
- IPOD FUNCTIONS
- IPOD MENU
- CONNECT DATA STORAGE DEVICES
- PHONING VIA BLUETOOTH
- PAIRING DEVICES (PAIRING)
- DISCONNECTING THE DEVICES
- RECONNECTING THE DEVICES
- REDIAL
- CALL LOG
- END CALL
- INCOMING CALL
- MUSIC PLAYBACK VIA A2DP (ADVANCED AUDIO DISTRIBUTION PROFILE)
- CLEANING
- TROUBLESHOOTING
- FAULT CAUSES AND TROUBLESHOOTING
- TECHNICAL DATA
- GENERAL
- RADIO
- CD-PLAYER
- MP3/WMA FORMAT REQUIREMENTS
- DECLARATION OF CONFORMITY
- INDEX
- A
- C
- D
- F
- P
- R
- S
- SETTINGS
- T
Brand : AEG
Model : AR 4025 BT
Category : Car radio