Intelligent Quartz Altimeter T2N729 - Watch TIMEX - Free user manual and instructions
Find the device manual for free Intelligent Quartz Altimeter T2N729 TIMEX in PDF.

User questions about Intelligent Quartz Altimeter T2N729 TIMEX
0 question about this device. Answer the ones you know or ask your own.
Ask a new question about this device
Download the instructions for your Watch in PDF format for free! Find your manual Intelligent Quartz Altimeter T2N729 - TIMEX and take your electronic device back in hand. On this page are published all the documents necessary for the use of your device. Intelligent Quartz Altimeter T2N729 by TIMEX.
USER MANUAL Intelligent Quartz Altimeter T2N729 TIMEX
Perpetual Calendar • Fly-back Chronograph
- Fly-back Chrono Compass • Linear Chronograph • World Time
- Compass • Tide Temp and Compass Altimeter • Depth
• Yacht Racer with Perfect Date • 3GMT
Congratulations on purchasing your TIMEX® INTELLIGENT QUARTZ™ watch. Please read these instructions carefully to understand how to operate your Timex watch.
Your watch may not have all of the features described in this booklet.
For more information, and to register your
product please visit:
www.timex.com
TABLE OF CONTENTS
How to Start Your Watch....5
Water and Shock Resistance 6
Indiglo® Night-Light 8
Date and Time Setting....9
Perpetual Calendar 11
Fly-Back Chronograph....14
Fly-back Chronograph Compass....20
Linear Chronograph 32
World time ....38
Compass.... 45
Tide Temp and Compass....52
Altimeter 61
Depth....69
Yacht Racer 74
3GMT 83
Tachymeter Function 89
Slide-Rule Bezel Function 90
How to Adjust Bracelet....95
Bracelet Link Removal....97
Battery....98
Warranty....99
Welcome to the world of Timex® watches with Intelligent Quartz™ technology, the future of quartz analogue technology. Intelligent Quartz technology brings the power of a micro-processor to the reliability and accuracy of quartz analogue timekeeping. With Timex Intelligent Quartz watches, the technology is written into the design, delivering a new level of dial complication. Uses up to three additional independent hands to display an array of information, normally only available in digital watches, in a traditional analogue format.
HOW TO START YOUR WATCH
(Does not apply to Perpetual Calendar models.) To start your watch remove the plastic guard from under the crown, then press the crown in against the case.
Some watches require the setting crown to be screwed in. If your watch case has a protrusion with screw threads, the crown must be screwed in after setting the watch.
To screw in, push the crown firmly against the threaded protrusion and hold in while turning the crown clockwise. Continue to screw in the crown until it is tight. You will need to unscrew the crown (counter-clockwise) before pulling it out the next time you want to set your watch.
WATER AND SHOCK RESISTANCE
If your watch is water-resistant, meter marking (WR_M) is indicated.
| Water-Resistance Depth p | s.i.a.* Water Pressure Below Surface |
| 30m/98ft 60 | |
| 50m/164ft 86 | |
| 100m/328ft 160 | |
| 200m/656ft 284 |
WARNING: TO MAINTAIN WATER-RESISTANCE, DO NOT PRESS ANY BUTTONS UNDER WATER UNLESS YOUR WATCH IS INDICATED AS 200 METER WATER-RESISTANT. NEVER PULL OUT THE CROWN WHILE UNDER WATER.
- Watch is water-resistant only as long as crystal, crown and case remain intact.
- Watch is not a certified Diver's watch.
- Rinse watch with fresh water after exposure to salt water.
- Shock-resistance will be indicated on the watch face or caseback. Watches are designed to pass ISO test for shock-resistance. However, care should be taken to avoid damaging the crystal.
Press button or crown to activate light. Electroluminescent technology used in the INDIGLO® night-light illuminates the watch face at night and in low light conditions.
text_image
ORDATE AND TIME SETTING
NOTE: The watch crown has three positions: closed, middle and outer. To familiarize yourself with the difference between the various positions extend the crown to its outer position and then push the crown very lightly until you feel it click into the middle position.
To set the date and time:
Time
Pull the crown to its outer position and turn it until the correct time is shown. Ensure AM/PM setting is correct by verifying that the date changes at midnight, not noon.
Date (Does not apply to Perpetual Calendar)
Pull the crown to its middle position and turn it until the correct date appears in the date window. Note: The date changes between 10 pm and 2 am. Do not change the
date during this timeframe. Doing so could damage the watch movement.
Push crown to closed position after setting date/time. The second hand will begin moving.
NOTE: For months with fewer than 31 days, the date will need to be adjusted.
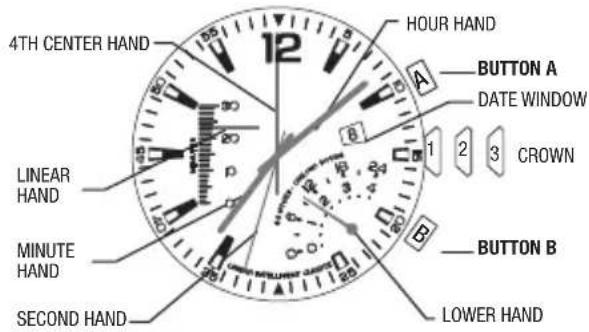
PERPETUAL CALENDAR
OVERVIEW

text_image
DAY HAND MINUTE HAND SECOND HAND DATE HAND BUTTON A (RECESSED) HOUR HAND CROWN MONTH HAND BUTTON B (RECESSED) CLOSED POSITION MIDDLE POSITION OUTER POSITIONINTRODUCTION
With your watch's perpetual calendar feature, the date does not need adjustment until 2100. The watch automatically accounts for short months and leap years, always showing the correct day and date. The day and date were preset at the Timex factory. You only need to adjust the time. The watch has two recessed push buttons for use by Timex Service Center to set the day and date after battery replacement. They have no use otherwise.
LEAP YEAR OFFSET
To maintain the correct date, the watch includes a setting for the current leap year offset. This setting is made at the Timex factory or after battery replacement and cannot be changed, only viewed.
To view the offset, pull the crown to its middle position. The date hand shows the offset: 1 = 1 year after leap year; 2 = 2 years after leap year; 3 = 3 years after leap year; 4 = leap year. Push the crown in when done and the hands resume their normal display of day, month, and date.
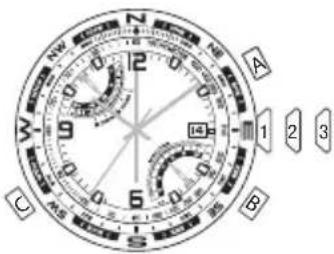
FLY-BACK CHRONOGRAPH
OVERVIEW
text_image
4TH CENTER HAND UPPER HAND CHRONO HOURS 2ND TIME ZONE MINUTE HAND SECOND HAND 1 CLOSED POSITION 2 MIDDLE POSITION 3 OUTER POSITION HOUR HAND BUTTON A DATE WINDOW CROWN 1 2 3 23 6 5 B CHRONO MINUTES SCALE BUTTON B LOWER HAND4TH CENTER HAND ADJUSTMENT
To readjust a misaligned 4th center hand:
- Pull the crown to its outer position. The upper and lower hands reset to the ends of their sweeps automatically.
- 4th center hand should point to 12 o'clock. If within 5 seconds of pulling the crown to its outer position the 4th center hand does not point to 12 o'clock, press Button A or B to move the hand counterclockwise or clockwise until it points to 12 o'clock.
- Push crown to closed position when finished.
SECOND TIME ZONE
The upper hand shows the time for the second time zone.
Note that the scale is 24-hours, with midnight at either end and noon in the middle. Most often, time zones differ in hour increments. In such cases, the minute value of the second time zone will be the same as that displayed by the watch's minute hand.
text_image
A 1 2 3 23 5 6 7 8 9 10 11 12 BTO SET THE SECOND TIME ZONE:
- Pull crown to its middle position. The upper hand
shows the second time zone time and the 4th center hand shows the minutes.
-
Assuming that the second time zone time has the same minutes value as the first time zone, the 4th center hand should be aligned with the minute hand. If the hands are not aligned, or if your second time zone is a different minute within the hour, press Button B to move the 4th center hand forward until it is in the desired position.
-
Press Button A to move the upper hand forward in one-hour increments until it reaches desired second time zone hour. To move the hand quickly, press and hold Button A.
-
Push the crown in when finished.
FLY-BACK CHRONOGRAPH
The watch provides a 4-hour fly-back chronograph.
- To start, press Button A (START/STOP).
The 4th center hand shows the seconds with 1/5 second resolution. The lower hand shows the last digit of the minutes, counting up to ten and repeating. The upper hand shows the total time, including hours and minutes, with divisions every ten minutes. The chronograph counts up to four hours before stopping automatically.
- To stop, press Button A (START/STOP) again. All hands stop moving.
-
To resume, press Button A (START/STOP) again.
-
To reset the fly-back chronograph to zero position, press Button B (FLY-BACK/RESET).
When the chronograph is reset, all hands move to zero position. After another eight seconds, the watch resumes normal display of the second time zone.
- To reset and/or restart the fly-back chronograph while it is running, press and hold Button B (FLY-BACK/RESET). Release it when you wish to restart.
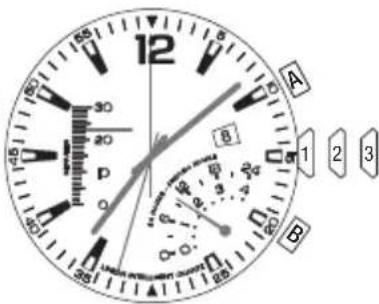
FLY-BACK CHRONOGRAPH COMPASS
OVERVIEW

text_image
4TH CENTER HAND UPPER HAND CHRONO HOURS 2ND TIME ZONE HOUR HAND BUTTON C SECOND HAND MINUTE HAND BUTTON A DATE WINDOW CROWN CHRONO MINUTES SCALE BUTTON B LOWER HAND CLOSED POSITION MIDDLE POSITION OUTER POSITIONINDICATOR HAND (4TH CENTER HAND) ADJUSTMENT
To readjust a misaligned indicator hand:
- Pull the crown to its outer position. The upper and lower hands reset to the ends of their sweeps automatically.
- The 4th center hand should point to 12 o'clock. If it does not within 5 seconds of pulling the crown to its outer position, press A or B to move the hand counterclockwise or clockwise, respectively, until it points to 12 o'clock.
- Push the crown in when done.
SECOND TIME ZONE
The upper hand normally shows the time for the second time zone. Note that the scale is 24 hours, with midnight at either end and noon in the middle.
To set the second time zone time:
- Pull the crown to its middle position. The upper hand shows the second time zone time in military hours and the 4th center hand shows the minutes.
text_image
A B C 1 2 3-
Press B to move the 4th center hand forward. Hold the button to move the hand quickly. The upper and 4th center hands move together; as the 4th center hand makes one revolution, the upper hand moves one hour. Assuming that the second time zone time has the same minutes value as your first time zone, the 4th center and minute hands should be aligned.
-
Press A to move the upper hand forward in one-hour increments. Hold the button to move the hand quickly.
-
Push the crown in when fi nished.
The second time zone time can alternatively be used to display your home time on a 24-hour format, if you prefer. When setting the second time in this manner, ensure that the hour/minute display corresponds to the 24-hour display by verifying that the date changes at midnight, not noon.
FLY-BACK CHRONOGRAPH
The watch provides a 4-hour fl y-back chronograph.
- To start, press A (START/STOP). The 4th center hand shows the seconds with 1/5-second resolution and
the lower hand shows the last digit of the minutes, counting up to ten and repeating. The upper hand shows the total time, including hours and minutes, with divisions every ten minutes. The chronograph counts up to four hours before stopping automatically.

text_image
A 1 2 3 B C- To stop, press A again (START/STOP). All hands freeze.
- To resume, press A (START/STOP) again, or to reset the chronograph to zero, press B (FLY-BACK/RESET).
When the chronograph is reset, all hands move to zero. After eight seconds, the watch resumes the normal display of the second time zone time.
- You may also reset and/or restart the chronograph while it is running. To do so, press and hold B (FLY-BACK/RESET) to zero the chronograph and release it when you wish to restart. You do not have to wait for all hands to reach zero before releasing the button; the timing will start internally from the button release. This "fl y-back" feature allows you to measure lap time.
The compass may be used while the chronograph is running without interfering with its operation. See COMPASS OPERATION.
COMPASS CALIBRATION
Before use, the compass must be calibrated.
Since a compass uses the earth's magnetic field, you must be aware of large metallic objects, such as vehicles or bridges, or objects that give off electromagnetic radiation, such as televisions or computers, which could affect the magnetic field around the watch. If the compass is calibrated near such objects, it will only work properly in that same location. If the compass is calibrated away from such objects, it will not work properly near them. For best results, calibrate in the area of intended use.
In calibrating and taking headings, it is important, as with all compasses, to keep the compass level. Calibrating or taking a heading when the watch is not level can result in large errors. Also avoid areas that may exhibit higher than normal concentrations of hard and soft iron, as they may cause inaccurate headings. Whenever a heading is suspect, recalibrate.
Do not store the watch near any source of magnetism, such as a computer, appliance, or television, as the watch can take on a magnetic charge, yielding inaccurate headings. Typical accuracy of wrist-worn instruments is within +/- 10 degrees.
To calibrate the compass:
-
Pull the crown to its middle position and wait for the indicator hands to stop moving.
-
Keep the watch level or place it on a level surface (if the band interferes, place the watch on an inverted cup). The watch may be face down, but take care to protect the watch face.
-
Press C (COMPASS) to begin. The 4th center hand rotates two revolutions to remind you to rotate the watch. While level, SLOWLY rotate the watch two revolutions, taking at least 15 seconds per revolution.
-
When done, press C (COMPASS), keeping the watch level. The 4th center hand moves back and forth to acknowledge the end of calibration and then moves to the current magnetic declination setting.
-
If you do not wish to set the magnetic declination, push the crown in. Otherwise, to have watch automatically compensate for the declination angle, turn the compass ring until north is at 12 o'clock.
-
Press A or B to move the 4th center hand west (-) or east (+), respectively, to point to your location's declination angle using the declination scale. Hold a button to move the hand quickly. See the figure below for an example.
-
Push the crown in when done.

text_image
NW 12° NE AMagnetic declination set to -14° (14°W)
COMPASS OPERATION
Normally, the compass is inactive, with the 4th center hand pointing to 12 o'clock or showing the chronograph seconds.
While holding the watch level, press C (COMPASS) to activate the compass. The compass hand moves to point north. If the watch is turned, the 4th center hand will continue to move, always pointing north. After 20 seconds, the compass will automatically turn off and the 4th center hand will return to its normal operation. This conserves battery life. Press C (COMPASS) at any time to keep the compass on for another 20 seconds.
The compass may be activated while the chronograph is in use. The 4th center hand merely switches operation temporarily. The upper and lower hands continue to show the chronograph time and all chronograph functions are
available through buttons A (START/STOP) and B (FLY-BACK/RESET).
NOTE: During compass operation, the second hand moves in two-second increments. Also, when the compass is activated, the upper and lower hands may shift position slightly, returning to their proper positions when the compass is deactivated. This operation is normal and yields the most accurate compass reading.
LINEAR CHRONOGRAPH
OVERVIEW
text_image
4TH CENTER HAND LINEAR HAND MINUTE HAND SECOND HAND 12 HOUR HAND A BUTTON A DATE WINDOW 1 2 3 CROWN B BUTTON B LOWER HANDLINEAR AND 4TH CENTER HAND ADJUSTMENT
To readjust a misaligned 4th center hand:
- Pull the crown to its outer position. The lower hand resets to the end of its sweep automatically.
- 4th center hand should point to 12 o'clock. If within 5 seconds of pulling the crown to its outer position the 4th center hand does not point to 12 o'clock, press Button A to move the hand clockwise until it points to 12 o'clock.
- If the chronograph has been reset and the linear hand is not pointing to zero, press and hold Button B for 5 seconds to engage a full calibration of the linear indicator, which will take up to 32 seconds to perform.
- Push crown to closed position when finished.
SECOND TIME ZONE
The lower hand shows the time for the second time zone. Note that the scale is 24-hours, with midnight at either end and noon in the middle. Most often, time zones differ in hour increments. In such cases, the minute value of the second time zone will be the same as that displayed by the watch's minute hand.
text_image
12 A B 1 2 3 P 0 80 85 80 85 80 85 80 85 80 85 80 85 80 85 80 85 80 85 80 85 80 85 80 85 80 85 80 85 80 85 80 85 80 85 80TO SET THE SECOND TIME ZONE:
- Pull crown to its middle position. The lower hand shows the second time zone time and the 4th center hand shows the minutes.
- Assuming that the second time zone time has the same minutes value as the first time zone, the 4th center hand should be aligned with the minute hand. If the hands are not aligned, or if your second time zone is a different minute within the hour, press Button B to move the 4th center hand forward until it is in the desired position.
- Press Button A to move the lower hand forward in one-hour increments until it reaches desired second time zone hour. To move the hand quickly, press and hold Button A.
- Push the crown in when finished.
LINEAR CHRONOGRAPH
The watch provides a 4-hour split chronograph.
- To start, press Button A (START/STOP). The 4th center hand shows the seconds with 1/5 second resolution. The linear hand shows the minutes, counting up to thirty and repeating. The lower hand shows the total time, including hours and minutes, with divisions every ten minutes. The chronograph counts up to four hours before stopping automatically.
- To stop, press Button A (START/STOP) again. All hands stop moving.
- To reset the chronograph to zero position, press Button B (SPLIT/RESET).
When the chronograph is reset, all hands move to zero position. After another eight seconds, the watch resumes normal display of the second time zone. While the chronograph is running, you may take a split time. Press Button B (SPLIT/RESET) and all hands will stop while the chronograph continues to run. Press Button B (SPLIT/RESET) again to resume the display of the running chronograph elapsed time.
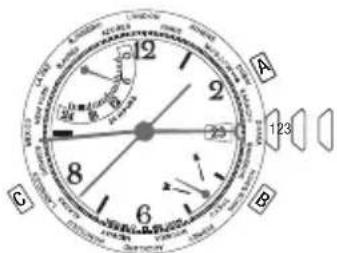
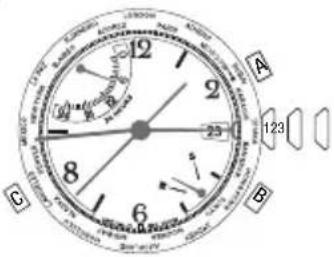
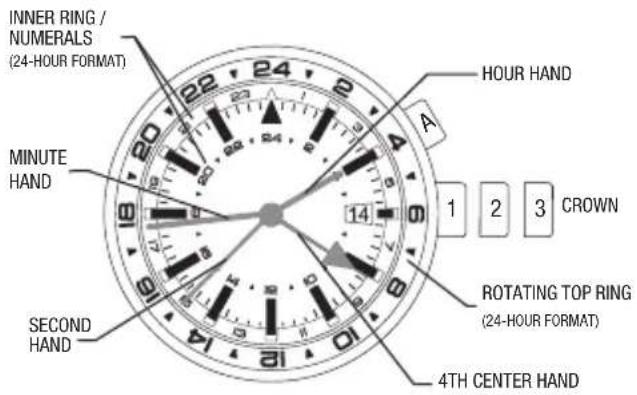
WORLD TIME
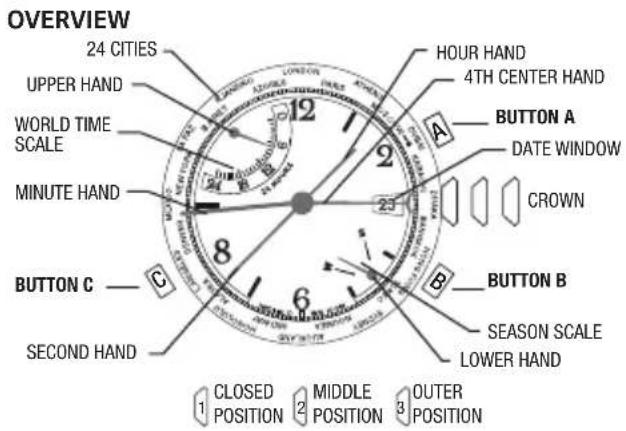
text_image
OVERVIEW 24 CITIES UPPER HAND WORLD TIME SCALE MINUTE HAND BUTTON C —— SECOND HAND 12 23 8 6 A HOUR HAND 4TH CENTER HAND BUTTON A DATE WINDOW CROWN B BUTTON B SEASON SCALE LOWER HAND 1 CLOSED 2 MIDDLE 3 OUTER POSITION POSITION POSITIONTO SET THE WORLD TIME:
- Pull the crown to its middle position. The center hand shows the world time zone city and the upper hand shows the time in that city.
text_image
A B C 123 23- Press A or B to move the center hand to the city that represents your home time zone. Hold a button to move the hand quickly. Any city may be used.
-
Pull the crown to its outer position. The city selector hand will revert back to the 12:00 position as indicated in INDICATOR HAND ADJUSTMENT. After a five second pause, the upper hand will show the world time (the time in the city selected in previous step), the center hand shows the minutes of the world time, and the lower hand shows the season (see SEASON SETTING). IMPORTANT: Do not manipulate any of the pushers or the crown until the center hand has completed its adjustment. (Approximately 10 seconds after crown is pulled to its outer position).
-
If the displayed season is not correct for the home time zone, press C to change it. If the home time zone observes daylight savings time, the upper hand will move by one hour.
- Press A or B to move the time backward or forward, respectively, to set the world time zone to be the same as the home time zone. Hold a button to change the time quickly. The hands move together; as the center hand makes one revolution, the upper hand moves one hour. After setting, the center and minute hands should be aligned.
- Push the crown in when finished.
INDICATOR HAND (4TH CENTER HAND) ADJUSTMENT
To readjust a misaligned indicator hand:
- Pull the crown to its outer position. The upper and lower hands reset to the ends of their sweeps, automatically.
- The 4th center hand should point to 12 o'clock. If it does not within 5 seconds of pulling the crown to its outer position, press A or B to move the hand counterclockwise or clockwise, respectively, until it points to 12 o'clock.
- Push the crown in when finished.
NOTE: If no button is pressed for five seconds after the hands stop, the watch proceeds to the world time setting operation (see WORLD TIME SETTING).
CITY TIME DISPLAY
Press A or B to move the center hand backward or forward, respectively, and select a city. The upper hand moves to show the time in the selected city. Note that the
text_image
A 123 B Cscale is 24 hours, with midnight at either end and noon in the middle.
SEASON SETTING
The season setting allows the watch to compensate for daylight savings time (also called "summer time").
The watch provides one setting to represent the two periods all cities that observe daylight savings time have. For the watch, the period of daylight savings time is SUMMER and the period of standard time is WINTER.
When the season in one city is set to SUMMER, all cities in the same hemisphere are automatically set to SUMMER, while all cities in the other hemisphere are automatically set to WINTER. The watch knows which cities are in each hemisphere.
Press C to change the season in the selected city.
COMPASS
OVERVIEW

text_image
DECLINATION SCALE COMPASS HAND (NORTH END IS RED POINTED/LONGER) A (COMPASS) CROWN B 12 9 3 6 5 MIDDLE 14 CENTER CROWN SET DATE OUT 14 SET TIMECOMPASS HAND ADJUSTMENT
Pull CROWN all the way out. Compass hand should point to 12 o'clock. If it does not, press either A or B to move compass hand until it points to 12 o'clock. Hold button to move hand fast. Push CENTER CROWN in when done and recalibrate compass.
COMPASS CALIBRATION
Before use, the compass must be calibrated.
Since a compass uses the earth's magnetic field, you must be aware of large metallic objects, such as vehicles or bridges, or objects that give off electromagnetic radiation, such as televisions or computers, which could affect the magnetic field around the watch. If the compass is calibrated near such objects, it will only work properly in that same location. If the compass is calibrated away from such objects, it will not work
properly near them. For best results, calibrate in the area of intended use.
In calibrating and taking headings, it is important, as with all compasses, to keep the compass level. Calibrating or taking a heading when the watch is not level can result in large errors. Also avoid areas that may exhibit higher than normal concentrations of hard and soft iron, as they may cause inaccurate headings. Whenever a heading is suspect, recalibrate.
Do not store the watch near any source of magnetism, such as a computer, appliance, or television, as the watch can take on a magnetic charge, yielding inaccurate headings. Typical accuracy of wrist-worn instruments is within +/- 10 degrees.
To calibrate the compass:
- Pull the crown to its middle position and wait for the indicator hands to stop moving.
- Keep the watch level or place it on a level surface (if the band interferes, place the watch on an inverted cup). The watch may be face down, but take care to protect the watch face.
- Press A or B to begin. The 4th center hand rotates two revolutions to remind you to rotate the watch. While level, SLOWLY rotate the watch two revolutions, taking at least 15 seconds per revolution.

natural_image
Abstract circular diagram with three curved arrows forming a cycle, no text or symbols present.- When done, press A or B, keeping the watch level. The 4th center hand moves back and forth to acknowledge the end of calibration and then moves to the current magnetic declination setting.
- If you do not wish to set the magnetic declination, push the crown in. Otherwise, to have watch automatically compensate for the declination angle, turn the compass ring until north is at 12 o'clock.
- Press A or B to move the 4th center hand west (-) or east (+), respectively, to point to your location's declination angle using the declination scale. Hold a button to move the hand quickly. See the figure on next page for an example.
- Push the crown in when done.
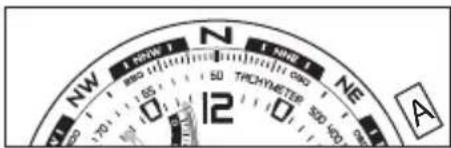
text_image
NW 1° NONE N 1° NONE NE 500 600 50 50 TICHYMETER 12 AMagnetic declination set to -14° (14°W)
COMPASSOPERATION
Normally, the compass is inactive, with the 4th center hand pointing to 12 o'clock or showing the chronograph seconds.
While holding the watch level, press A or B to activate the compass. The compass hand moves to point north. If the watch is turned, the 4th center hand will continue to move, always pointing north. After 20 seconds, the
compass will automatically turn off and the 4th center hand will return to its normal operation. This conserves battery life. Press A or B at any time to keep the compass on for another 20 seconds.
NOTE: During compass operation, the second hand moves in two-second increments.
TIDE TEMP AND COMPASS
OVERVIEW
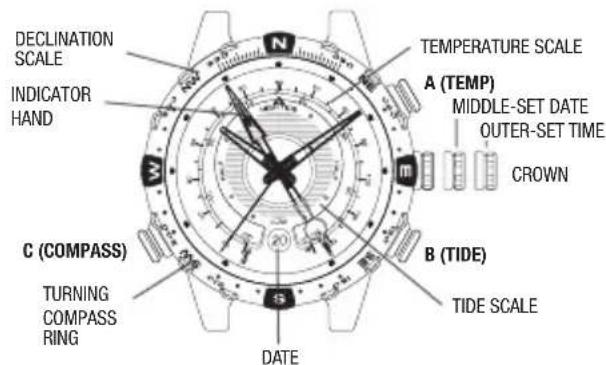
text_image
DECLINATION SCALE INDICATOR HAND N TEMPERATURE SCALE A (TEMP) MIDDLE-SET DATE OUTER-SET TIME CROWN B (TIDE) TIDE SCALE C (COMPASS) TURNING COMPASS RING DATEINDICATOR HAND ADJUSTMENT
Pull crown all the way out. Indicator hand should point to 12 o'clock. If it does not, press either TIDE or TEMP push button to move hand until it points to 12 o'clock. TIDE and TEMP push buttons move hand clockwise and counterclockwise, respectively. Hold push button to move hand fast. Push crown in when done.
TIDE/TEMPERATURE SELECTION
Indicator hand shows either tide or temperature constantly. When temperature is shown, press TIDE push button to select tide clock. Hand moves to low tide and then to current tide. When tide is shown, press TEMP push button to select thermometer. Hand moves to beginning of thermometer scale and then to current temperature.
THERMOMETER
When worn on wrist, thermometer reading is affected by body heat. For more accurate readings, remove watch and put in shade for at least several minutes.
Watch can measure water temperature also, if submerged. Be sure to select temperature display before placing watch in water, as buttons should not be pressed when watch is underwater.
Thermometer readings are taken every minute, more frequently, if temperature is changing.
TIDE CLOCK
For tide clock, indicator hand always rotates clockwise, so tide is rising when hand is pointing left and falling when pointing right. Number of hours to next high/low tide is shown on tide scale.
Tides are influenced by sun position and shape of shoreline, so tide clock cannot precisely give times of high and low tides. Periodic adjustment may be necessary.
To set tide clock, pull crown to MIDDLE position. Press either TIDE or TEMP push button to move hand to current tide. TIDE and TEMP push buttons move hand clockwise and counterclockwise, respectively. Push crown in when done.
COMPASS CALIBRATION
Before use, the compass must be calibrated.
Since a compass uses the earth's magnetic field, you must be aware of large metallic objects, such as vehicles or bridges, or objects that give off electromagnetic radiation, such as televisions or computers, which could affect the magnetic field around the watch. If the compass is calibrated near such objects, it will only
work properly in that same location. If the compass is calibrated away from such objects, it will not work properly near them. For best results, calibrate in the area of intended use.
In calibrating and taking headings, it is important, as with all compasses, to keep the compass level. Calibrating or taking a heading when the watch is not level can result in large errors. Also avoid areas that may exhibit higher than normal concentrations of hard and soft iron, as they may cause inaccurate headings. Whenever a heading is suspect, recalibrate.
Do not store the watch near any source of magnetism, such as a computer, appliance, or television, as the watch can take on a magnetic charge, yielding inaccurate headings. Typical accuracy of wrist-worn instruments is within +/- 10 degrees.
To calibrate the compass:
- Pull the crown to its middle position and wait for the indicator hands to stop moving.
- Keep the watch level or place it on a level surface (if the band interferes, place the watch on an inverted cup). The watch may be face down, but take care to protect the watch face.
- Press C (COMPASS) to begin. The 4th center hand rotates two revolutions to remind you to rotate the watch. While level, SLOWLY rotate the watch two revolutions, taking at least 15 seconds per revolution.

natural_image
Abstract circular diagram with three curved arrows forming a loop around a central icon (no text or symbols)- When done, press C (COMPASS), keeping the watch level. The 4th center hand moves back and forth to acknowledge the end of calibration and then moves to the current magnetic declination setting.
- If you do not wish to set the magnetic declination, push the crown in. Otherwise, to have watch automatically compensate for the declination angle, turn the compass ring until north is at 12 o'clock.
- Press A or B to move the 4th center hand west (-) or east (+), respectively, to point to your location's declination angle using the declination scale. Hold a button to move the hand quickly. See the figure on next page for an example.
- Push the crown in when done.

text_image
NW 1 NWF 1 N 1 NWF 1 NE 12 TRICHYMETER AMagnetic declination set to -14° (14°W)
COMPASSOPERATION
Normally, the compass is inactive, with the 4th center hand pointing to 12 o'clock or showing the chronograph seconds.
While holding the watch level, press C (COMPASS) to activate the compass. The compass hand moves to point north. If the watch is turned, the 4th center hand will continue to move, always pointing north. After 20
seconds, the compass will automatically turn off and the 4th center hand will return to its normal operation. This conserves battery life. Press C (COMPASS) at any time to keep the compass on for another 20 seconds.
NOTE: During compass operation, the second hand moves in two-second increments.
ALTIMETER
OVERVIEW

text_image
ALIMETER SCALE (HUNDREDS) UPPER RETROGRADE (THOUSANDS) BUTTON C (UNITS) SOD BUTTON A (MAXIMUM ALTITUDE) CROWN LOWER RETROGRADE (UNITS) BUTTON B (MINIMUM ALTITUDE)INDICATOR HAND (4TH CENTER HAND) ADJUSTMENT
Pull crown all the way out. The upper and lower retro-grade hands reset to the start of their scales automatically. Indicator hand (4th center hand) should point to 12 o'clock. If it does not, press either A and/or B button to move hand until it points to 12 o'clock. A and B buttons move hand clockwise and counterclockwise, respectively. Hold button to move hand fast. Push crown in when done.
ALTIMETER CALIBRATION
Before use, the altimeter must be calibrated.
Since an altimeter uses pressure to determine the altitude and pressure varies from place to place, it is important to set the altimeter to a known reference altitude value, or to a standard reference altitude of a given place. Sudden changes in pressure due to changes in weather can cause your altimeter reading to be off by +-100m (328 ft), even
if your location has not changed. Recalibrate to a known altitude when drastic pressure changes occur.
To calibrate the altimeter:
- Pull the crown to its middle position and wait for the indicator hands to stop moving.
- If the altimeter was OFF at the moment of crown pulling, the lower retrograde hand will point to the unit selected the last time the altimeter was used, otherwise the lower retrograde hand points to the current selected unit in altitude display. The 4th center hand and upper retrograde hand should point to the current altitude.
- Press A or B to move the 4th center hand counterclockwise or clockwise, respectively, until it points to the desired calibration altitude. Holding A or B
will move the center hand more rapidly. The upper retrograde hand moves relative to the altitude value displayed by the 4th center hand.
4. Push crown in when done.
ALTIMETER ON/OFF
To turn the altimeter on, press C. The lower retrograde hand points to METERS. Using the markings on the top ring, the 4th center hand shows the current altitude's hundreds and tens value with divisions every ten METERS/FEET. The upper retrograde hand shows the current altitude's thousands value with divisions every one thousand METERS/FEET.
To change the unit from METERS to FEET, press C a second time. To change the unit from FEET to METERS, press C twice (altimeter is turned off first then turned back on with the unit in METERS).

natural_image
Two identical circular analog clocks with hand gestures and scale markings (no text or symbols)Example : Altitude=2310 m Example : Altitude=7580 ft
To turn the altimeter off with the current unit set to FEET, press C. To turn the altimeter off with the unit set to METERS, press C twice (lower hand goes to FEET first before going to the OFF position).
The watch will automatically turn the altimeter off 60 minutes after activation.
ALTIMETER MIN/MAX ALTITUDE RECALL
To view the maximum recorded altitude, press A. The lower retrograde hand shows the unit of measure that the maximum altitude was recorded in if the altimeter was OFF at the moment of button press, otherwise it will show the maximum altitude using the current selected unit. The 4th center hand shows the maximum altitude's hundreds and tens value with divisions every ten METERS/FEET. The upper retrograde hand shows the maximum altitude's thousands value with divisions every one thousand METERS/FEET.
The maximum recorded altitude is displayed for ten seconds. To extend the display duration for another ten seconds, press A before the previous ten second duration expires.
To change the unit from METERS to FEET or FEET to METERS, press C.
To view the minimum recorded altitude, press B. The lower retrograde hand shows the unit of measure that the minimum altitude was recorded in if the altimeter was OFF at the moment of button press, otherwise it will show the minimum altitude using the current selected unit. The 4th center hand shows the minimum altitude's hundreds and tens value with divisions every
ten METERS/FEET. The upper retrograde hand shows the minimum altitude's thousands value with divisions every one thousand METERS/FEET.
The minimum recorded altitude is displayed for ten seconds. To extend the display duration for another ten seconds, press B before the previous ten second duration expires To change the unit from METERS to FEET or FEET to METERS, press C.
DEPTH

text_image
OVERVIEW CENTER HAND A BUTTON A 1 2 3 CROWN 3 B BUTTON B LOWER HAND OFF INDICATORNote: The center and lower hands will automatically calibrate when you move the crown to position 3 to set the time.
TEMPERATURE
The temperature sensor is always on and will take a reading at least once every 60 seconds. The temperature is indicated by the lower hand and accompanying scale.
When worn on wrist, temperature reading is affected by body heat. For more accurate readings, remove watch from wrist.
DEPTH SENSOR ON/OFF
The sensor is normally off, and must be turned on manually prior to submersion. Push and release button B to turn the sensor on. The 4th center hand will move from the OFF (6 o'clock) position to the 12 o'clock position and begin to take readings at least once every 5 seconds. As the depth increases, the 4th center hand will point to the actual depth as indicated on the depth scale. If the readings remain in the range of 0 to 2 meters (0-6 feet)
for 5 minutes, the sensor will automatically turn off. To turn the sensor off manually, press and hold button B for 2 seconds. The 4th center hand will move to the OFF (6 o'clock) position.
RECALL MAXIMUM DEPTH/MINIMUM TEMPERATURE
After coming to the surface, unscrew the crown and pull to the middle position. The center and lower hands will move to display the maximum depth value and the minimum temperature value, respectively, recorded during the most recent descent. When the depth sensor is activated again, the memory will be cleared.
If the watch has not yet been used, then the center and lower hands shall move to display 0 meters/feet and 0°C/32°F, respectively. The crown must be screwed back in prior to use/submersion.
BATTERY LEVEL DETECTION
The watch determines the battery level status and provides the user with a visual indication corresponding to the current battery level. The battery level status is classified as Normal Level, Battery Low Level, and Replace Battery Level, with each level indicated by the movement of the second hand.
For the Normal Level status, the second hand shall move one hand position every one second, which is its normal operation.
When the watch is in Battery Low Level status, the second hand shall only move at 2-second intervals and shall move by two hand positions. It is recommended that the user replace the battery when the watch is at Battery Low Level status.
When the watch is in Replace Battery Level status, the second hand shall only move at 5-second intervals and shall move by five hand positions. At this point, depth sensor can not be activated, and the user must replace the battery immediately.
YACHT RACER

text_image
PERFECT DATE SCALE UPPER HAND 4TH CENTER HAND MINUTE HAND SECOND HAND A HOUR HAND 1 2 3 CROWN B LOWER HANDPERFECT DATE
With your watch's Perfect Date feature, the date does not need adjustment until 2060. The watch automatically accounts for short months and leap years, and will always display the correct date upon demand. The date was pre-set at the Timex factory. You only need to adjust the time. The 4th center hand will display the date when the crown is pushed. The hand will travel to the position of the current date as shown on the top ring of the case. The hand will pause for you to be able to read the date and then return back to the 12 o'clock resting position. Please note that the Perfect Date function will only operate in the Time mode. When the battery is depleted and is replaced, the Perfect Date function must be recalibrated. When the battery requires replacement, it is highly recommended the watch be sent to a Timex service center, where the
battery will be replaced and the Perfect Date function will be recalibrated to the current date for the location where the watch is to be returned.
4TH CENTER HAND ADJUSTMENT
To readjust a misaligned 4th center hand:
- Pull the crown out to position 3. The upper and lower hands reset to the ends of their sweeps automatically.
-
Within 10 seconds of pulling the crown to position 3, the 4th center hand should point to 12 o'clock, if it does not point to 12 o'clock, press button A or B to move the hand counterclockwise or clockwise until it points to 12 o'clock. Pressing and holding button A or B will make the hand move at a fast rate. Please note: after 5 seconds without action with the crown in position 3, the 4th center hand will move to display the current date.
-
Push crown in to position 1 when finished.
MODE SELECTION
Press button C to advance the upper hand to the desired function.
TIME:
Displays the current time only (Perfect Date function will operate only in the Time mode).
YACHT RACE TIMER 5:
The countdown timer will start at 5 minutes and begin the chronograph once it reaches zero.
YACHT RACE TIMER 3:
The countdown timer will start at 3 minutes and begin the chronograph once it reaches zero.
YACHT RACE TIMER 1:
The countdown timer will start at 1 minute and begin the chronograph once it reaches zero.
CHRONO:
The chronograph will operate without the countdown timer.
YACHT RACE TIMER OPERATION
The watch provides a 5, 3 or 1 minute countdown timer. Once the countdown timer reaches zero a one hour chronograph will automatically start.
- Press button C until the upper hand displays the desired 5, 3, or 1 minute Yacht Race Timer mode.
- To start, press button A (START/STOP). The 4th center hand displays the seconds counting down and the lower hand shows the minutes, counting down.
(Please note: buttons B and C are disabled while the countdown timer is in operation).
- To stop, press button A (START/STOP) which will stop the countdown process. (Please note: button C is disabled until the countdown timer is reset).
- To reset, press and hold button B (SPLIT/RESET) for 2 seconds, which will reset the countdown timer back to the originally selected 5, 3 or 1 minute duration.
In the normal operation of the Yacht Race Timer, once the countdown timer has reached zero, the chronograph will automatically start. There is also an audible alert as the countdown timer reaches each minute mark as well as when the final minute reaches the last 5 seconds and begins the chronograph function. The chronograph will cycle through the 30-minute sequence twice, for a total maximum time of one hour.
CHRONOGRAPH OPERATION
The watch provides a one hour chronograph which may be operated independently from the Yacht Race Timer.
- Press button C until the upper hand is at the beginning of the 30-minute chronograph scale.
-
To start, press button A (START/STOP). The 4th center hand displays the seconds counting up; the lower hand shows the minutes, counting up in a 5-minute scale and the upper hand shows the half hour counting up in a 30-minute scale. Each time the lower hand reaches the five minute mark, it will return to the zero position while the upper hand will continue to advance through the 30 minute scale. (Please note: button C is disabled while the chronograph is in operation).
-
To take a split time, press button B (SPLIT/RESET). The upper, lower, and 4th center hands will hold their positions for you to note the split (lap) time. The chronograph is still maintaining the timing sequence while the hands are stopped. To release the hands, press button B (SPLIT/RESET) and the hands will quickly catch up to display the total elapsed time.
- To stop, press button A (START/STOP) which will stop the chronograph. (Please note: button C is disabled while the chronograph is stopped until the chronograph is reset).
- To reset, press and hold button B (SPLIT/RESET) for 3 seconds, which will reset the chronograph back to the beginning of the 30-minute scale.
In normal operation the Chronograph will cycle through the 30-minute sequence twice for a total maximum of one hour. Once this hour has elapsed, the upper hand will remain on the 30 minute marker and the lower hand will return to zero. The chronograph function will need to be reset prior to using the chronograph function again or before changing to a different mode. (Please note: button A is disabled when the maximum one hour time has elapsed and will not function until the chronograph has been reset by pressing and holding button B for 3 seconds).
3GMT
text_image
INNER RING / NUMERALS (24-HOUR FORMAT) MINUTE HAND SECOND HAND A HOUR HAND 1 2 3 CROWN ROTATING TOP RING (24-HOUR FORMAT) 4TH CENTER HAND3 TIME ZONE FUNCTION
Your watch has the ability to display three time zones:
- Hour and Minute hands: Displays the time in a standard 12 hour format. Please note: The date displayed in the date window is linked to the time displayed by these two hands.
- 4th center hand and inner ring: Displays the time in a 24-hour format.
- 4th center hand and case rotating top ring: Displays the time in a 24-hour format.
4TH CENTER HAND ADJUSTMENT
To readjust a misaligned 4th center hand:
- Pull the crown out to position 3.
- 4th center hand should point to 12 o'clock. If within 5 seconds of pulling the crown to position 3 the 4th
center hand does not point to 12 o'clock, press button A to move the hand clockwise until it points to 12 o'clock. Pressing and holding button A will make the hand move at a fast rate.
- Push crown in to position 1 when finished.
4TH CENTER HAND CALIBRATION
The 4th center hand is calibrated at the Timex factory to reflect the standard minutes within the hour as defined by Universal Time Coordinated. Globally a majority of locations use the standard minutes. If the location you are using for the 2nd and 3rd time zone uses the standard minutes, the 4th center hand does not require recalibration. Only if you wish to have the second and third time zones to reflect locations that do not follow the standard minute, the instructions to recalibrate the 4th center hand are as follows:
- Pull the crown out to position 3. The 4th center hand will point to 12 o'clock.
- Rotate the crown to position the minute hand in the correct position within the hour required for the location you are wishing to use for the 2nd and 3rd time zones.
- Push the crown in to position 2. The 4th center hand will point to its currently calibrated position of the minutes within the hour.
- Push button A to move the 4th center hand clockwise until it aligns with the minute hand. Pressing and holding button A will make the hand move at a fast rate.
- Pull the crown out to position 3. The 4th center hand will point to 12 o'clock.
-
Rotate the crown to position hour and minute hands to the correct time.
-
Push crown in to position 1 when finished.
Please note: The 4th center hand will track the time using the current calibration of the minutes within the hour. Time zones 2 and 3 both utilize the 4th center hand and therefore the locations being tracked in time zones 2 and 3 must both utilize the same minutes within the hour for these time zones to be displayed properly.
SETTING THE 4TH CENTER HAND (TIME ZONE II)
Note the current time in the location you wish to track as the 2nd time zone. Press button A until the 4th center hand is pointing to that time on the inner ring. (Please note: this scale is a 24-hour format). The 4th center hand will advance 30 minutes each time button A is pressed. Pressing and holding button A will make the hand move at a fast rate. This will set the 2nd time zone on the watch.
SETTING THE CASE ROTATING TOP RING (TIME ZONE III)
The 3rd time zone is set by using the existing setting of the 4th center hand and adjusting the case rotating top ring to the desired time of the 3rd time zone. (Please note: this scale is a 24-hour format). The top ring has 72 positions. To advance the top ring one hour you will advance it three positions (3 "clicks"). Note the current time in the location you wish to track as the 3rd time zone. Rotate the case top ring counter clockwise to position the correct hour marker for that time with the 4th center hand.
TACHYMETER FUNCTION
(not all models)
The tachymeter will only determine speeds greater than 60 units per hour using this method; slower speeds can be measured by decreasing the unit of measurement. The function performed by a tachymeter is independent of the unit of distance (e.g. statute miles, nautical miles, kilometers, meters etc.) as long as the same unit of length is used for all calculations.
- Determine the start and finish markers for your pre-determined distance.
- Start the chronograph once the target for speed measurement passes the start marker.
-
Stop the chronograph once the target for speed measurement passes the finish marker.
-
The chronograph second hand is compared to the tachymeter markings to determine the target's speed.
SLIDE-RULE BEZEL FUNCTION
The slide rule function of the top ring operates by rotating the outer ring. The inner ring does not move. The outer ring is always related to "distance" or "speed", or any data that varies with time. The inner ring only notes units of time.
Outer Ring
On the outer ring, the figure "10" represents factors or multiples of 10, such as 0.1, 1.0, 10, or 100.
Inner Ring
On the inner ring, "MPH" (mile per hour) refers to "speed index". This index is used to calculate the speed involving any data per hour. On the inner ring, "STAT" (statute miles) and "NAUT" (nautical miles) are for conversion of distance units.

text_image
OUTER RING INNER RINGThe following examples serve as a guide of how to use the slide rule.
SPEED CALCULATION:
What speed is required to go 10 nautical miles in 15 minutes?
Known Factors: Distance: 10 nautical miles Time: 15 minutes
- Align "10" arrow on the outer ring with "15" on the inner ring.
- The speed required can be found directly above the "MPH" marking on the inner ring.
The answer: 40 nautical miles per hour
Time Calculation: How long will it take to go 10 nautical miles at a speed of 40 miles per hour?
Known Factors: Speed: 40 miles per hour Distance: 10 nautical miles
- Align "40" on the outer ring with the mark "MPH" marking on the inner ring.
- The time required can be found directly below the "10" arrow on the outer ring, which is "15" on the inner ring.
The answer: 15 minutes
DISTANCE CALCULATION:
How far can you travel at 40 miles per hour for 15 minutes?
Known Factors: Speed: 40 nautical miles per hour Time: 15 minutes
- Align "40" on the outer ring directly above the mark "MPH" on the inner ring.
- The distance travelled can be obtained above the "15" marker on the inner ring. The number indicated on the outer ring is "10".
The answer: The distance travelled is 10 nautical miles.
UNIT CONVERSION:
To convert distance from nautical miles to statute miles and kilometers.
Known Factor: Distance to convert is 10 nautical miles
- Align the "10" arrow on the outer ring above the "NAUT" on the inner ring. The conversion in statute miles (11.5) is found above the inner ring "STAT" marking, and the conversion to kilometers (18.5) is found above the inner ring "MPH" marking.
HOW TO ADJUST BRACELET
(Variations of the following bracelet sections apply to all watch models).
SLIDING CLASP BRACELET
-
Open locking plate.
-
Move clasp to desired bracelet length.
-
Exert pressure while holding locking plate and slide clasp back and forth until it engages in grooves on underside of bracelet.
-
Press locking plate down until it snaps closed. Clasp can be damaged if excessive force is used.
natural_image
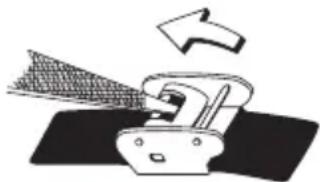
Diagram of a printer emitting powder into a tray, with an arrow indicating the process (no text or symbols present)FOLDOVER CLASP BRACELET
- Find spring bar that connects bracelet to clasp.
- Using a pointed tool, push in spring bar and gently twist bracelet to disengage.
- Determine wrist size, then insert spring bar in correct bottom hole.
- Push down on spring bar, align with top hole and release to lock in place.
natural_image
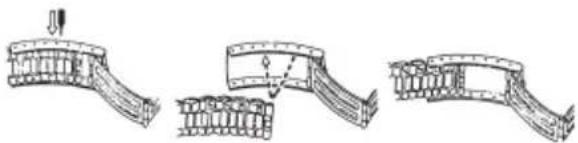
Three sequential line drawings of a curved structural component, showing progressive assembly and disassembly (no text or symbols)BRACELET LINK REMOVAL
REMOVING LINKS:
- Place bracelet upright and insert pointed tool in opening of link.
- Push pin forcefully in direction of arrow until link is detached (pins are designed to be difficult to remove).
- Repeat until desired number of links are removed.
RE-ASSEMBLY:
- Rejoin bracelet parts.
- Push pin back into link in opposite direction of arrow.
- Press pin down securely into bracelet until it is flush.
BATTERY
The battery should provide 4-6 years of normal watch use. The actual battery life may vary depending on actual use. When the battery needs to be changed, we recommend that only TIMEX replace it. Your watch will need to be recalibrated to correct time and date after changing the battery. To return your watch to Timex use a pre-paid shipper. To obtain a pre-paid shipper please call 1-800-448-4639 or visit the retailer where you purchased your watch or go to www.Timex.com. Please include the following with your watch to cover postage and handling (this is not a repair charge); a U.S.\8.00 check or money order in the U.S.; a CAN\7.00 cheque or money order in Canada; In other countries Timex will charge you for postage and handling.
NEVER INCLUDE A SPECIAL WATCHBAND OR ANY OTHER ARTICLE OF PERSONAL VALUE IN YOUR SHIPMENT.
DO NOT DISPOSE OF BATTERY IN FIRE. DO NOT RECHARGE. KEEP LOOSE BATTERIES AWAY FROM CHILDREN.
TIMEX INTERNATIONAL WARRANTY
Your TIMEX® watch is warranted against manufacturing defects by Timex Group USA, Inc. for a period of ONE YEAR from the original purchase date. Timex and its worldwide affiliates will honor this International Warranty.
Please note that Timex may, at its option, repair your watch by installing new or thoroughly reconditioned and inspected components or replace it with an identical or similar model. IMPORTANT — PLEASE NOTE THAT THIS
WARRANTY DOES NOT COVER DEFECTS OR DAMAGES TO YOUR WATCH:
- after the warranty period expires;
- if the watch was not originally purchased from an authorized Timex retailer;
- from repair services not performed by Timex;
- from accidents, tampering or abuse; and
- lens or crystal, strap or band, watch case, attachments or battery. Timex may charge you for replacing any of these parts.
THIS WARRANTY AND THE REMEDIES CONTAINED HEREIN ARE EXCLUSIVE AND IN LIEU OF ALL OTHER WARRANTIES, EXPRESS OR IMPLIED, INCLUDING ANY IMPLIED WARRANTY OF MERCHANTABILITY OR FITNESS FOR PARTICULAR PURPOSE. TIMEX IS NOT LIABLE FOR ANY
SPECIAL, INCIDENTAL OR CONSEQUENTIAL DAMAGES. Some countries and states do not allow limitations on implied warranties and do not allow exclusions or limitations on damages, so these limitations may not apply to you. This warranty gives you specific legal rights and you may also have other rights, which vary from country to country and state to state.
To obtain warranty service, please return your watch to Timex, one of its affiliates or the Timex retailer where the watch was purchased, together with a completed original Watch Repair Coupon or, in the U.S. and Canada only, the completed original Watch Repair Coupon or a written statement identifying your name, address, telephone number and date and place of purchase. Please include the following with your watch to cover postage and handling (this is not a repair charge): a US\$ 8.00
check or money order in the U.S.; a CAN\$7.00 cheque or money order in Canada; and a UK£3.50 cheque or money order in the U.K. In other countries, Timex will charge you for postage and handling. NEVER INCLUDE A SPECIAL WATCHBAND OR ANY OTHER ARTICLE OF PERSONAL VALUE IN YOUR SHIPMENT.
For the U.S., please call 1-800-448-4639 for additional warranty information. For Canada, call 1-800-263-0981. For Brazil, call +55 11 5572 9733. For Mexico, call 01-800-01-060-00. For Central America, the Caribbean, Bermuda and the Bahamas, call (501) 370-5775 (U.S.). For Asia, call 852-2815-0091. For the U.K., call 44 020 8687 9620. For France, call 03 81 63 42 51 (10 a.m. - 12 Noon). For Germany/Austria, call 43 662 88921 30. For the Middle East and Africa, call 971-4-310850.
EXTENDED WARRANTY
Available in U.S. only. Extend your warranty for an additional 4 years from date of purchase for \5. You can pay with AMEX, Discover, Visa or MasterCard by calling 1 800-448-4639 during normal business hours. Payment must be made within 30 days of purchase. Name, address, telephone number, purchase date, and 5-digit model number required. You can also mail a check for \5 to: Timex Extended Warranty, P.O. Box 1676, Dept. EF, Little Rock, AR 72203.
©2014 Timex Group USA, Inc. TIMEX, INDIGLO and INTELLIGENT QUARTZ are trademarks of Timex Group B.V. and its subsidiaries.
MONTRES TIMEX®
CHRONOGRAPHE AVEC FLY-BACK
VUE D'ENSEMBLE
text_image
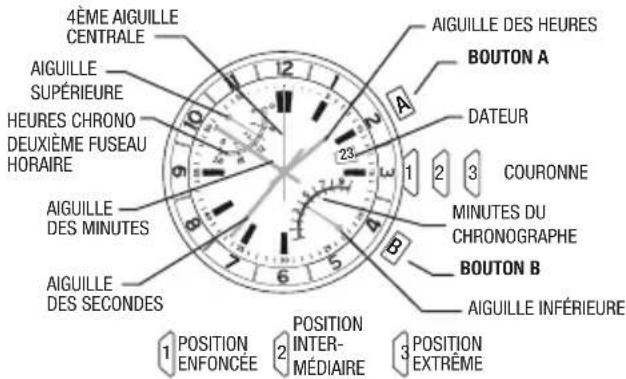
4ÈME AIGUILLE CENTRALE AIGUILLE SUPérieure HEURES CHRONO DEUXIÈME FUSEAU HORAIRE AIGUILLE DES MINUTES AIGUILLE DES SECONDS AIGUILLE DES HEURES BOUTON A DATEUR 1 2 3 COURONNE MINUTES DU CHRONOGRAPHE BOUTON B AIGUILLE INFÉRIEURE 1 POSITION ENFONCÉE 2 POSITION INTER-MÉDIAIRE 3 POSITION EXTREMERÉGLAGE DE LA 4ÈME AIGUILLE CENTRALE
text_image
A 1 2 3 C B N S 9 0 0 0 0 0 0 0 0 0 0 0 0 0 0 0 0 0 0 0 0 0 0 0 0 0 0 0 0 0 0 0 0 0 0 0 0 0 0 0 0 0 0 0 0 0 0 0 0 0 0 12natural_image
Abstract circular diagram with three curved arrows forming a loop around a central figure (no text or symbols)text_image
NW 12 NE Anatural_image
Abstract circular diagram with three curved arrows forming a loop around a central figure (no text or symbols)text_image
NW N NE 12 Anatural_image
Abstract circular diagram with three curved arrows forming a loop around a central figure (no text or symbols)text_image
NW N NE 12 Anatural_image
Two identical circular analog clocks with hand gauges and dials, no visible text or symbolsExemple : Altitude = 2310 m Exemple : Altitude = 7580 pieds
natural_image
Illustration of a robotic arm with a net and directional arrow (no text or symbols)BRACELET À FERMOIR DÉPLIANT
natural_image
Three sequential line drawings of a mechanical or structural component, showing progressive assembly and alignment (no text or symbols)DÉMONTAGE DE MAILLONS DU BRACELET
DÉMONTAGE DE MAILLONS :
LUZ NOCTURNA INDIGLO®
natural_image
Line drawing of a wristwatch with hour and minute hands (no text or symbols)BRÚJULA Y CRONÓGRAFO FLY-BACK
DESCRIPCIÓN GENERAL

natural_image
Abstract circular diagram with three curved arrows forming a loop around a central figure (no text or symbols)text_image
NW 12 NE Anatural_image
Abstract circular diagram with curved arrows and a central watch icon (no text or symbols)MAREA TEMPERATURA Y BRÚJULA
DESCRIPCIÓN GENERAL
text_image
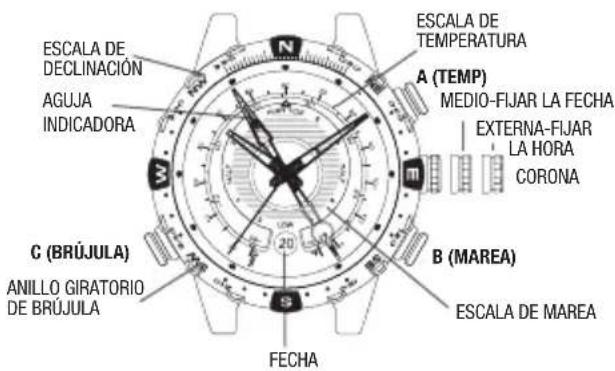
ESCALA DE DECLINACIÓN AGUJA INDICADORA C (BRÚJULA) ANILLO GIRATORIO DE BRÚJULA ESCALA DE TEMPERATURA A (TEMP) MEDIO-FIJAR LA FECHA EXTERNA-FIJAR LA HORA CORONA B (MAREA) ESCALA DE MAREA FECHAAJUSTANDO LA AGUJA INDICADORA
natural_image
Abstract circular diagram with three curved arrows forming a loop around a central figure (no text or symbols)natural_image
Close-up of a circular mechanical dial with measurement scales and pointer (no text or symbols visible)