DEH-2150UB - Receiver PIONEER - Free user manual and instructions
Find the device manual for free DEH-2150UB PIONEER in PDF.

User questions about DEH-2150UB PIONEER
0 question about this device. Answer the ones you know or ask your own.
Ask a new question about this device
Download the instructions for your Receiver in PDF format for free! Find your manual DEH-2150UB - PIONEER and take your electronic device back in hand. On this page are published all the documents necessary for the use of your device. DEH-2150UB by PIONEER.
USER MANUAL DEH-2150UB PIONEER
ThankyouforpurchasingthisPIONEERproduct.
Pleasereadthroughthismanualbeforeusingtheproductforthefirsttime,toensureproperuse.Afterreading,pleasekeepthemanualinasafeandaccessibleplace forfuturereference.
01 BeforeYouStart
Aboutthisunit4
Portableaudioplayercompatibility4
Visitourwebsite4
Protectingyourunitfromtheft4
-Removingthefrontpanel4
-Attachingthefrontpanel4
Useandcareoftheremotecontrol5
-Installingthebattery5
-Usingtheremotecontrol5
02 Operatingthisunit
What'swhat6
-Headunit6
-Remotecontrol7
-Displayindication7
BasicOperations8
-PowerON/OFF8
-Selectingasource8
-Adjustingthevolume8
Tuner8
-BasicOperations8
-Storingandrecallingbroadcast frequencies9
-Introductiontoadvanced operations9
-Storingthestrongestbroadcast frequencies9
-Tuninginstrongsignals9
Built-inCDPlayer10
-BasicOperations10
-Displayingtextinformationondisc10
-Selectingtracksfromthetracktitle list11
-Selectingfilesfromthefilename list11
-Introductiontoadvanced operations11
-Selectingarepeatplayrange12
-Playingtracksinrandomorder12
-Scanningfoldersandtracks12
-Pausing playback12
-UsingSoundRetriever12
PlayingsongsonUSBportableaudioplayer/
USBmemory12
-BasicOperations12
-Displayingtextinformationofanaudio file13
-Selectingfilesfromthefilename list13
-Introductiontoadvanced operations13
AudioAdjustments14
-Introductionofaudioadjustments14
-Usingbalanceadjustment14
-Usingtheequalizer14
-Adjustingequalizercurves14
-Adjustingloudness15
-Adjustingsourcelevels15
InitialSettings15
-Adjustinginitialsettings15
-Settingtheclock15
-SettingtheFMtuningstep16
-SettingtheAMtuningstep16
-Switchingtheauxiliarysetting16
OtherFunctions16
-UsingtheAUXsource16
-Turningtheclockdisplayonoroff17
03 Connections
Connectiondiagram19
04 Installation
DINfront/rearmount20
-DINFront-mount20
-DINRear-mount21
AdditionalInformation
Errormessages22
Handlingguidelineofdiscsandplayer23
DualDiscs23
Compressedaudiocompatibility24
Handlingguidelineandsupplemental information24
-Compressedaudiofilesonthe disc24
-USBaudioplayer/USBmemory24
Exampleofahierarchy25
-Thesequenceofaudiofilesonthe disc25
-ThesequenceofaudiofilesonUSB memory25
Copyrightandtrademarknotice26
Specifications27
Aboutthisunit

CAUTION
- Donotallowthisunittocomeintocontact withliquids. Electricalshockcouldresult. Also, damagetothisunit, smoke, andoverheatingcouldresultfromcontactwithliquids.
- "CLASS1LASERPRODUCT" Thisproductcontainsalaserdiodeofhigher classthan1.Toensurecontinuedsafety,do notremoveanycoversorattemptogainaccesstotheinsideoftheproduct.Referallservicingtoqualifiedpersonnel.
- Keep this manual handy as a reference for operating procedures and precautions.
• Always keep the volumelowenough so that you can hear sounds from outsidethe vehicle. - Protectthisunitfrommoisture.
- If the battery is disconnected, discharged, the preset memory will be erased and must be reprogrammed.
- Should this unit fail to operate properly, please contact your dealer or nearest authorized PIONEER Service Station.
Portableaudioplayer compatibility
InquireatthemanufactureraboutyourUSB portableaudioplayer/USBmemory.
Thisunitcorrespondstothefollowing.
—USBMSC(MassStorageClass) compliant portableaudioplayerandmemory
—WMA,MP3andWAVfileplayback

CAUTION
Pioneeracceptsnoresponsibilityfordataloston theUSBportableaudioplayer/USBmemoryeven ifthatdataislostwhileusingthisunit.
Visitourwebsite
Visitusatthefollowingsite:
http://pioneer.jp/group/index-e.html
- Weofferthelatestinformationabout PioneerCorporationonourwebsite.

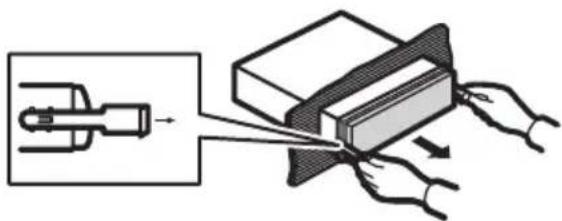
Protectingyourunitfrom theft
Thefrontpanelcanbedetachedtodetertheft.

Important
- Handlegentlywhenremovingorattaching thefrontpanel.
- Avoid subjecting the front panel to excessive shock.
- Keep the front panel out of direct sunlight and hight temperatures.
- Before detaching, besuretoremovetheAUX/USBcable and USB device from the front panel. Otherwise, this unit, connected device or vehicle interior may be damaged.
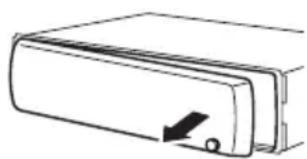
Removingthefrontpanel
1Press(detach)toreleasethefront panel.
2Grabthefrontpanelandremove.
natural_image
Simple line drawing of a rectangular device with a knob and arrow, no text or symbols present3Putthefrontpanelintotheprovided protectivecaseforsafekeeping.
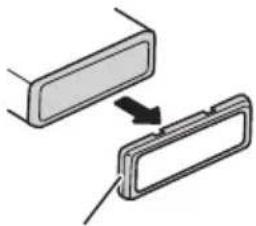
Attachingthefrontpanel
1Slidethefrontpaneltotheleftuntil clicks.
Frontpanelandtheheadunitarejointedon theleftside.Makesurethatthefrontpanel hasbeenjointedtotheheadunit.

natural_image
Diagram of a device's internal structure showing a connector inserted into a folder (no text or symbols present)2Presstherightsideofthefrontpanel untilitisfirmlyseated.
■ If you can't attach the front panel to the head units successfully, try again. Front panel maybe damaged if you attach the front panel forcedly.

natural_image
Simple line drawing of a door handle with an arrow indicating direction (no text or symbols)Useandcareoftheremote control
Installingthebattery
Slidethetrayonthebackoftheremotecontroloutandinsertthebatterywiththeplus(+) andminus(-)polesalignedproperly.

natural_image
Diagram of a laboratory procedure showing a pipette and test tube on a test tube (no text or labels)
WARNING
Keepthebatteryoutofthereachofchildren.
Should the battery beswallowed, consult doctor immediately.

CAUTION
• UseoneCR2025(3V) lithium battery.
- Removethebatteryiftheremotecontrolisnot usedforamonthorlonger.
- Thereisadangerofexplosionifthebatteryis incorrectlyreplaced.Replaceonlywiththe sameorequivalenttype.
- Donothandlethebatterywithmetallictools.
- Donotstorethebatterywithmetallicobjects.
- If the battery leaks, wipetheremote control completely clean and install anew battery.
- Whendisposingofusedbatteries,comply withgovernmentalregulationsorenvironmentalpublicinstitutions’rulesthatapplyinyour country/area.
Usingtheremotecontrol
Pointtheremotecontrolinthedirectionofthe frontpaneltooperate.
- Theremotecontrolmaynotfunctionproperlyindirectsunlight.

Important
- Donotstoretheremotecontrolinhighttemperaturesordirectsunlight.
- Donotlettheremotecontrolfallontothe floor,whereitmaybecomejammedunderthe brakeoracceleratorpedal.
What'swhat Headunit

text_image
① ② ③ ⑤ ⑥ ⑦ ④ ⑬ ⑭ ⑮ ⑯ ⑰ ⑱ ⑲ ⑳①SRC/OFFbutton
Thisunitisturnedonbyselectingasource. Presstocyclethroughalltheavailable sources.
② Ⓞ/LISTbutton
Presstodisplaythedisctitlelist,tracktitle list,folderlistorfilelist.
③ MULTI-CONTROL
Turntoincreaseordecreasethevolume. Alsousedforcontrollingfunctions.
④CLOCKbutton
Presstochangetotheclockdisplay.
⑤Discloadingslot
Insertadisctoplay.
⑥▲(eject)button
Presstoejectadisc.
⑦USBport
UsetoconnectaUSBaudioplayer/USB memory.
- Whenconnecting, openuptheUSBconnectorlid.
- UseaUSBcabletoconnecttheUSB audioplayer/USBmemorytotheUSB port.SincetheUSBaudioplayer/USB memoryisprojectedforwardfromthe unit,itisdangeroustoconnectdirectly. PioneerCD-U50EUSBcableisalsoavailable.Fordetails,consultyourdealer.
⑧ (detach)button
Presstoremovethefrontpanelfromthe headunit.
⑨AUXinputjack(3.5mmstereojack)
Usetoconnectanauxiliarydevice.
⑩1to6buttons
Pressforpreset tuning. Also used for controlling functions.
• 1/S.RtrvcanbeusedtocontrolS.RTRV (soundretriever).
• 2/PAUSE can be used to control PAUSE (pause).
- 5/ × canbeusedtocontrolRANDOM (random).
- 6/ ⇌ canbeusedtocontrolREPEAT(repeat).
⑪ ▲/▼/◄/► buttons
Presstoperformmanualseektuning, fast forward, reverse and track search controls. Alsoused for controlling functions.
- Whenoperatingmenus
—Pressing▲isthesamefunctionas turningMULTI-CONTROLright.
—Pressing▼isthesamefunctionas turningMULTI-CONTROLleft.
—Pressing ◀isthesamefunctionas pressingDISP/BACK/SCRL.
—Pressingandholding ◀isthesame functionaspressingandholding DISP/BACK/SCRL.
—Pressing▶isthesamefunctionas pressingMULTI-CONTROL.
—Pressingandholding▶isthesame functionaspressingandholding MULTI-CONTROL.
- Whenoperatinglists
—Pressing▲isthesamefunctionas turningMULTI-CONTROLleft.
—Pressing▼isthesamefunctionas turningMULTI-CONTROLright.
—Pressing ◀isthesamefunctionas pressingDISP/BACK/SCRL.
Operatingthisunit
—Pressingandholding ◀isthesame functionaspressingandholding DISP/BACK/SCRL.
—Pressing▶isthesamefunctionas pressingMULTI-CONTROL.
—Pressingandholding▶isthesame functionaspressingandholding MULTI-CONTROL.
⑫DISP/BACK/SCRLbutton
Presstoselectdifferentdisplays.
Pressandholdtoscrollthroughthetextinformation.
Presstoreturntothepreviousdisplaywhen operatingthemenu.
Pressandholdtoreturntothemainmenu whenoperatingthemenu.
⑬BAND/ESCbutton
PresstoselectamongthreeFMbandsand oneAMband.
Presstoreturntotheordinarydisplaywhen operatingthemenu.
Remotecontrol
Operationisthesameaswhenusingthebuttonsontheheadunit.

text_image
VOLUME 14 13 19 BAND EXAM MUTI 15 11 18 F FUNCTION A AUX 16 1 17 SRC DISP → ETRN → ETRN⑭VOLUMEbuttons
Presstoincreaseordecreasethevolume.
⑮MUTEbutton
Presstoturnoffthesound.Toturnonthe sound,pressagain.
⑯AUDIObutton
Presstoselectanaudiofunction.
⑰ I button
Presstoturnpauseonoroff.
⑱FUNCTIONbutton
Presstoselectfunctions. Pressandholdtorecalltheinitialsetting menuwhenthesourcesareoff.
⑲LIST/ENTERbutton
Presstodisplaythedisctitlelist,tracktitle list,folderlistorfilelistdependingonthe source. Whileintheoperatingmenu,presstocontrolfunctions.
Displayindication
text_image
1 2 3 4 5 6 7 8 9 10 11 12 13 LOC QUD Q T XX SHTV①(disc)indicator
Appearswhenthedisc(album:nameisdisplayonthemaindisplaysection.
② (artist)indicator
Appearswhenthedisc(track)artistnameis displayedonthemaindisplaysection.
③ Maindisplaysection
Displaysband,frequency,elapsed playback timeandothersettings.
- Tuner
Bandandfrequencyaredisplayed.
• Built-inCDplayerandUSB Elapsed playbacktime and literal information are displayed.
4 (song)indicator
Appearswhenthetrack(song)nameisdisplayonthemaindisplaysection.
Also, appears when a playable audio file is selected while operating the list.
⑤ ◀indicator
Appearswhenanuppertieroffolderor menuexists.
6 (folder)indicator
Appearswhenoperatinglistfunction.
⑦▶indicator
Appearswhenalowertieroffolderormenu exists.
⑧LOCindicator
Appearswhenlocalseektuningison.
9 LOUD(loudness)indicator
Appearswhenloudnessison.
10○(stereo)indicator
Appearswhentheselectedfrequencyis beingbroadcastinstereo.
⑪ ⇌ (repeat)indicator
Showswhentrackrepeatisturnedon. Also, showswhenfolderrepeatison.
⑫ (random)indicator
Showswhenrandomplayison.
13 S.Rtrv (SoundRetriever)indicator
AppearswhenSoundRetrieverfunctionis on.
BasicOperations
PowerON/OFF
Turningtheuniton
●PressSRC/OFFtoturntheuniton.
Turningtheunitoff
- PressSRC/OFFandholduntiltheunit turnsoff.
Selectingasource
Youcanselectasourceyouwanttolistento.
- PressSRC/OFFrepeatedlytoswitchbetweenthefollowingsources.
TUNER (tuner)—CD (built-in CD player)—USB (USB)—AUX(AUX)
Notes
- Inthefollowingcases,thesoundsourcewill notchange. —Whenthereisnodiscintheunit. —WhenAUX(auxiliaryinput)issettooff (refertopage16).
- WhentheUSBportableaudioplayer/USB memoryisnotconnectedtotheUSBportof thisunit, NODEVICE is displayed.
- AUXissettoonbydefault.TurnofftheAUX whennotinuse(refertoSwitchingtheauxiliarysettingonpage16).
- Chargingtheportableaudioplayerusing car'sDCpowersourcewhileconnectingitto AUXinputmaygeneratenoise.Inthiscase, stopcharging.
- Whenthisunit'sblue/whiteleadisconnected tothevehicle'sauto-antennarelaycontrol terminal,thevehicle'santennaextendshwhen thisunit'ssourceisturnedon.Toretractthe antenna,turnthesourceoff.
Adjustingthevolume
●TurnMULTI-CONTROLtoadjustthe soundlevel.
Tuner
BasicOperations
- Selectaband
PressBAND/ESC.
■PressBAND/ESCuntilthedesiredband(F1, F2, F3forFMorAM)isdisplayed.
● Manualtuning(stepbystep)
Press◄or►.
Operatingthisunit
- Seektuning
Pressandhold◀or▶, and then release.
■Youcancancelseektuningbybrieflypressing
◄Or►.
■Whilepressingandholding◄or►,youcan skipstations.Seektuningstartsassoonasyou release◄or►.
Storingandrecallingbroadcast frequencies
Youcaneasilystoreuptosixbroadcastfrequenciesforlaterrecall.
- Sixstationsforeachbandcanbestoredin memory.
- Whenyoufindafrequencythatyou wanttostoreinmemory, pressoneofpresettuningbuttons1to6andholduntilthe presetnumberstopsflashing.
Memorizedradiostationfrequencycanbere-calledbypressingthepresettuningbutton.
■Youcanalsorecallradiostationfrequencies assignedtopresettuningnumbersbypressing▲or▼duringthefrequencydisplay.
Introductiontoadvanced operations
1PressMULTI-CONTROLtodisplaythe mainmenu.
2UseMULTI-CONTROLtoselect FUNCTION.
Turntochangethemenuoption.Presstose-lect.
3TurnMULTI-CONTROLtoselectthe function.
BSM(beststationsmemory)—LOCAL(local seektuning)

Notes
- Toreturntothepreviousdisplay, press DISP/BACK/SCRL.
- Toreturntothemainmenu, pressandhold DISP/BACK/SCRL.
• Toreturntotheordinarydisplay, press BAND/ESC.
- If you donot operate functions within about 30 seconds, the display automatically returns to the ordinary display.
Storingthestrongestbroadcast frequencies
BSM(beststationsmemory)automatically storesthesixstrongestbroadcastfrequencies intheorderoftheirsignalstrength.
1UseMULTI-CONTROLtoselectBSMin thefunctionmenu.
2PressMULTI-CONTROLtoturnBSMon.
■Tocancel, press MULTI-CONTROLagain.
Tuninginstrongsignals
Localseektuningletsyoutuneinonlythose radiostationswithsufficientlystrongsignals forgoodreception.
1UseMULTI-CONTROLtoselectLOCALin thefunctionmenu.
2PressMULTI-CONTROLtodisplaythe settingmode.
3TurnMULTI-CONTROLtoselectthedesiredsetting.
FM: OFF—LEVEL 1—LEVEL 2—LEVEL 3—LEVEL4
AM:OFF—LEVEL1—LEVEL2
The LEVEL4 setting allows reception of only the strongest stations, while lower settings let you receive progressively weaker stations.
4PressMULTI-CONTROLtodetermine theselection.
■Evenifthemenuhasbeencancelledbefore determination,operationissettled.
Built-inCDPlayer
BasicOperations
- InsertaCD(CD-ROM)intothedisloadingslot.
Playbackwillautomaticallystart.
■Whenloadingadisc,facethelabelsideof adiscup.
●EjectaCD(CD-ROM)
Press▲(eject).
- Selectafolder
Press▲or▼.
- Selectatrack
Press◄or►.
●Fastforwardorreverse
Pressandhold◀or▶.
■Whenplayingcompressedaudio,thereisno soundonfastforwardorreverse.
●Returntorootfolder
PressandholdBAND/ESC.
●Switchbetweencompressedaudioand CD-DA
PressBAND/ESC.
■Thisoperationisavailableonlywhenplaying CD-EXTRAorMIXED-MODECDs.
■If you have switched between uncompressed audio and CD-DA, playback starts at the first track on the disc.

Notes
- Thebuilt-inCDplayercanplaybackaudioCD andcompressedaudiorecordedonaCD-ROM.(Pleaseseethefollowingsectionfor filesthatcanbeplayedback.Refertopage 24)
- Readtheprecautionsfordiscsandplayeron page23.
- Adischasalreadybeeninserted, press SRC/OFFtoselectthebuilt-inCDplayer.
- Thereissometimesadelaybetweenstarting updisc playback and the sound being issued. When being read, FRMTREAD is displayed.
- Ifanerrormessageisdisplayed, refertoError messagesonpage22.
- Playbackiscarriedoutinorderoffilenumber. Foldersareskippediftheycontainnofiles.(If folder01(ROOT)containsnofiles, playback commenceswithfolder02.)
Displayingtextinformationon disc
- PressDISP/BACK/SCRLtoselectthedesiredtextinformation.
ForCDTEXTdiscs
Playtime—DISCTITLE(discitle)—
ARTISTNAME(discartistname)—
TRACKTITLE(tracktitle)—ARTISTNAME
(trackartistname)
ForWMA/MP3
Playtime—FLDNAME(foldername)—
FILENAME(filename)—TRACKTITLE(track title)—ARTISTNAME(artistname)—
ALBUMTITLE(albumtitle)—COMMENT
(comment)—bitrate—folderandtracknumbers
ForWAV
Playtime—FLDNAME(foldername)—
FILENAME(filename)—samplingfrequency—folderandtracknumbers

Notes
- Youcanscrolltotheleftofthetitlebypassing andholdingDISP/BACK/SCRL.
• AudioCDthatcontainscertaininformation suchastextand/ornumberisCDTEXT. - If the characters recorded on the audio file are not compatible with this unit, those characters will not be displayed.
- If specific information is not recorded on a disc, NOXXXX will be displayed (e.g., NOTITLE).
- Thetextinformationofsomeaudiofilesmay notbecorrectlydisplayed.
Operatingthisunit
- DependingontheversionofiTunesusedto writeMP3filesontoadisc,commentinformationmaynotbecorrectlydisplayed.
- DependingontheversionofWindows Media™PlayerusedtoencodeWMAfiles, albumnamesandothertextinformationmay notbecorrectlydisplayed.
- WhenplayingbackVBR(variablebitrate)-recordedWMAfiles,theaveragebitratevalueis displayed.
- WhenplayingbackVBR(variablebitrate)-recordedMP3files, VBR is displayed instead of bitrate value.
- Thesamplingfrequencyshowninthedisplay maybeabbreviated.
Selectingtracksfromthetrack titlelist
Tracktitlelistletsyouseethelistoftracktitles onaCDTEXTdiscandselectoneofthemto playback.
1Press ☐/LISTtoswitchtothetracktitle listmode.
2UseMULTI-CONTROLtoselectthedesiredtracktitle.
Turntochangethetracktitle.Presstoplay.
■Toreturntotheordinarydisplay,press
BAND/ESCor 📋/LIST.
■ If you donotoperatethelist within about 30 seconds, the display automatically return to the ordinary display.
Selectingfilesfromthefile namelist
Filenamelistletsyouseethelistoffilenames (orfoldernames)andselectoneofthemto playback.
1Press ☐/LISTtoswitchtothefilename listmode.
Namesoffilesandfoldersappearinthedisplay.
2UseMULTI-CONTROLtoselectthedesiredfilename(orfoldername).
Turntochangethenameoffileorfolder.
—whenafileisselected.presstoplay.
—whenafolderisselected, presstoseealist offiles (orfolders) in theseleted folder.
—whenafolderisselected,pressandholdto playasongintheselectedfolder.
■Toreturntothepreviouslist(thefolderone levelhigher),pressDISP/BACK/SCRL.
■Toreturntothetoptieroflist,pressandhold DISP/BACK/SCRL.
■Toreturntotheordinarydisplay,press
BAND/ESCor 📋/LIST.
■ If you donotoperatethelist within about 30 seconds, the display automatically return to the ordinary display.
Introductiontoadvanced operations
1PressMULTI-CONTROLtodisplaythe mainmenu.
2UseMULTI-CONTROLtoselect FUNCTION.
Turntochangethemenuoption.Presstose-lect.
3TurnMULTI-CONTROLtoselectthe function.
REPEAT(repeatplay)—RANDOM(random play)—SCAN (scan play)—PAUSE (pause)—S.RTRV(soundretriever)

Notes
• Toreturntothepreviousdisplay, press DISP/BACK/SCRL.
• Toreturntothemainmenu, pressandhold DISP/BACK/SCRL.
• Toreturntotheordinarydisplay, press BAND/ESC.
- If you donot operate functions within about 30 seconds, the display automatically returns to the ordinary display.
Selectingarepeatplayrange
- Press6/repeatedlytoselectthedesiredsetting.
•DISC—Repeatalltracks
- TRACK-Repeatthecurrenttrack
• FOLDER—Repeat the current folder
■ If you select another folder during repeat play, therepeat play range changestodiscrepeat.
■Performingtracksearchorfastforward/reverseduringTRACK(trackrepeat)changesthe repeatplayrangetodisc/folder.
■WhenFOLDER(folderrepeat)isselected,itis notpossibletoplaybackasubfolderofthat folder.
■Youcanalsoperformthisoperationinthe menuthatappearsbyusingMULTI-CONTROL.
Playingtracksinrandomorder
Tracksinaselectedrepeatrangeareplayed in randomorder.
●Press5/ ×× toturnrandomplayon.
Tracksplayinarandomorder.
■Toturnrandomplayoff,press5/again
■Youcanalsoperformthisoperationinthe menuthatappearsbyusingMULTI-CONTROL.
Scanningfoldersandtracks
Scanplaysearchesthesongwithinthese- lectedrepeatrange.
1UseMULTI-CONTROLtoselectSCANin thefunctionmenu.
2PressMULTI-CONTROLtoturnscanplay on.
The first 10 second so feach track is played.
3Whenyoufindthedesiredtrackpress MULTI-CONTROLtoturnscanplayoff.
■ Ifthedisplayhasautomaticallyreturned to the playbackdisplay, select SCAN again by using MULTI-CONTROL.
■Afterscanningofadisc(folder)isfinished, normal playbackofthetracksbegins.
Pausing playback
●Press2/PAUSEtoturnpauseon.
Playbackofthecurrenttrackpauses.
■ To turn pause off, press 2/PAUSE again.
■Youcanalsoperformthisoperationinthe menuthatappearsbyusingMULTI-CONTROL.
UsingSoundRetriever
SoundRetrieverfunctionautomaticallyenhancescompressedaudioandrestoresrich sound.
- Press1/S.Rtrvrepeatedlytoselectthe desiredsetting.
OFF(off)—1—2
■2ismoreeffectivethan1.
■Youcanalsoperformthisoperationinthe menuthatappearsbyusing
MULTI-CONTROL.
PlayingsongsonUSBportable audioplayer/USBmemory
Fordetailsaboutthesupporteddevice,referto Portableaudioplayercompatibilityonpage4.
BasicOperations
- Selectafolder
Press▲or▼.
- Selectatrack
Press◄or►.
●Fastforwardorreverse
Pressandhold◀or▶.
●Returntorootfolder
PressandholdBAND/ESC.

Notes
- Optimumperformanceofthisunitmaynotbe obtaineddependingontheconnectedUSB portableaudioplayer/USBmemory.
Operatingthisunit
- Iffolder01(ROOT)containsnofiles, playback commenceswithfolder02.
- When the USB portable audioplayer having battery charging function is connected to this unit and the ignition switch is set to ACC or ON, the battery is charged.
- YoucandisconnecttheUSBportableaudio player/USBmemoryanytimeyouwanttofinishlisteningtoit.
- If you donot use an USB device, disconnect from this unit.
- When the USB portable audioplayer/USB memory is disconnected from this unit during playback, NODEVICE is displayed.
Displayingtextinformationof anaudiofile
Theoperationisthesameasthatofthecompressedaudioonthebuilt-inCDplayer.(Refer toDisplayingtextinformationondisconpage 10.)
Selectingfilesfromthefile namelist
Theoperationisthesameasthatofthebuilt-inCDplayer.(RefertoSelectingfilesfromthefilenamelistonpage11.)
Introductiontoadvanced operations
1PressMULTI-CONTROLtodisplaythe mainmenu.
2UseMULTI-CONTROLtoselect FUNCTION.
Turntochangethemenuoption.Presstose-lect.
3TurnMULTI-CONTROLtoselectthe function.
REPEAT(repeatplay)—RANDOM(random play)—SCAN (scan play)—PAUSE (pause)—
S.RTRV(soundretriever)
Functionandoperation
REPEAT, RANDOM, SCAN, PAUSE and S.RTRV operations are basically the same as that of the built-in CD player.
FunctionnameOperation
| REPEAT | RefertoSelectingarepeatplay rangeonthepreviouspage. However,therepeatplayranges youcanselectaredifferentfrom thatofthebuilt-inCDplayer.The repeatplayrangesoftheUSBportableaudioplayer/USBmemory are:•TRACK-Repeatjustthecurrentfile•FOLDER-Repeatthecurrent folder•ALL-Repeatallfiles |
| RANDOM | RefertoPlayingtracksinrandom orderonthepreviouspage. |
| SCAN | RefertoScanningfoldersand tracksonthepreviouspage. |
| PAUSE | RefertoPausingplaybackonthe previouspage. |
| S.RTRV | RefertoUsingSoundRetrieveron thepreviouspage. |

Notes
- Toreturntothepreviousdisplay, press DISP/BACK/SCRL.
- Toreturntothemainmenu, pressandhold DISP/BACK/SCRL.
- Toreturntotheordinarydisplay, press BAND/ESC.
- If you donot operate functions within about 30 seconds, the display automatically returns to the ordinary display.
- If you select another folder during repeat play, therepeat play range changesto ALL.
- If you perform track search forward/ reversed during TRACK, therepeat play range changesto FOLDER.
- Afterfileorfolderscanningisfinished,normalplaybackofthefilesbeginsagain.
AudioAdjustments Introductionofaudioadjustments
1PressMULTI-CONTROLtodisplaythe mainmenu.
2UseMULTI-CONTROLtoselectAUDIO.
Turntochangethemenuoption.Presstose-lect.
3TurnMULTI-CONTROLtoselectthe audiofunction.
FAD/BAL(balanceadjustment)—EQUALIZER (equalizerrecall)—TONECTRL(equalizeradjustment)—LOUDNESS (loudness)—SLA (sourceleveladjustment)

Notes
• Toreturntothepreviousdisplay, press DISP/BACK/SCRL.
• Toreturntothemainmenu, pressandhold DISP/BACK/SCRL.
• Toreturntotheordinarydisplay, press BAND/ESC.
- WhenselectingFMasthesource,youcannot switchtoSLA.
- If you donot operate functions within about 30 seconds, the display automatically returns to the ordinary display.
Usingbalanceadjustment
Youcanchangethefader/balancesettingso thatitcanprovidetheideallisteningenvironmentallooccupiedseats.
1UseMULTI-CONTROLtoselectFAD/BAL intheaudiofunctionmenu.
2PressMULTI-CONTROLtodisplaythe settingmode.
3PressMULTI-CONTROLtoselectthesesegmentyouwishtoset.
PressMULTI-CONTROLrepeatedlytoswitch betweenfaderandbalance.
4TurnMULTI-CONTROLtoadjustspeaker balance.
Front/rearspeakerbalancecanbeadjusted betweenF15andR15. Left/rightspeakerbalancecanbeadjusted betweenL15andR15.
■FROisthepropersettingwhenonlytwo speakersareused.
Usingtheequalizer
Therearesixstoreequalizersettingssuchas DYNAMIC, VOCAL, NATURAL, CUSTOM, FLATandPOWERFULthatcaneasilybere-calledatanytime.
- CUSTOMisanadjustedequalizercurve thatyoucreate.
- WhenFLATisselectednosupplementor correctionismadetothesound.
Recallingequalizercurves
1UseMULTI-CONTROLtoselect EQUALIZERintheaudiofunctionmenu.
2PressMULTI-CONTROLtodisplaythe settingmode.
3TurnMULTI-CONTROLtoselectthe equalizer.
DYNAMIC—VOCAL—NATURAL—CUSTOM —FLAT—POWERFUL
4PressMULTI-CONTROLtodetermine theselection.
■Evenifthemenuhasbeencancelledbefore determination,operationissettled.
Adjustingequalizercurves
You can adjust the currently selected equalizer curvesetting as desired. Adjusted equalizer curvesettings are memorized in CUSTOM.
Adjustingbass/mid/treble
Youcanadjustthebass/mid/treblelevel.
Operatingthisunit
1UseMULTI-CONTROLtoselect TONECTRLintheaudiofunctionmenu.
2PressMULTI-CONTROLtodisplaythe settingmode.
3PressMULTI-CONTROLtoselectBASS/MID/TREBLE.
4TurnMULTI-CONTROLtoadjustthe level.
+6 to -6 is displayed as the level is increased or decreased.
5PressMULTI-CONTROLtodetermine theselection.
■Evenifthemenuhasbeencancelledbefore determination,operationissettled.
Adjustingloudness
Loudnesscompensatesfordeficienciesinthe low-andhigh-soundrangesatlowvolume.
1UseMULTI-CONTROLtoselect LOUDNESSintheaudiofunctionmenu.
2PressMULTI-CONTROLtodisplaythe settingmode.
3TurnMULTI-CONTROLtoselectthedesiredsetting.
LOW (low)—HIGH (high)—OFF (off)
4PressMULTI-CONTROLtodetermine theselection.
■Evenifthemenuhasbeencancelledbefore determination,operationissettled.
Adjustingsourcelevels
Sourceleveladjustment(SLA)letsyouadjust thevolumelevelofeachsourcetopreventradicalchangesinvolumewhenswitchingbetweensources.
- SettingsarebasedontheFMvolumelevel, whichremainsunchanged.
- TheAMvolumelevelcanalsobeadjusted withsourceleveladjustments.
1 Compare the FM volume level with the level of the source you wish to adjust.
2UseMULTI-CONTROLtoselectSLAin theaudiofunctionmenu.
3PressMULTI-CONTROLtodisplaythe settingmode.
4TurnMULTI-CONTROLtoadjustthe sourcevolume.
+4to-4isdisplayedasthesourcevolumeis increasedordecreased.
5PressMULTI-CONTROLtodetermine theselection.
■Evenifthemenuhasbeencancelledbefore determination,operationissettled.
InitialSettings
Adjustinginitialsettings
1PressSRC/OFFandholduntiltheunit turnsoff.
2PressMULTI-CONTROLandholduntil CLOCKSETappearsinthedisplay.
3TurnMULTI-CONTROLtoselectoneof theinitialsettings.
CLOCK SET (clock)—FM STEP (FM tuning step)—AM STEP (AM tuning step)—AUX (auxiliaryinput)
■Toreturntothepreviousdisplay,press DISP/BACK/SCRL.
■Toreturntothemainmenu,pressandhold DISP/BACK/SCRL.
■Tocancelinitialsettings,pressBAND/ESC.
Settingtheclock
Usetheseinstructionstosettheclock.
1UseMULTI-CONTROLtoselect CLOCKSETintheinitialsettingmenu.
RefertoAdjustinginitialsettingsonthispage.
2PressMULTI-CONTROLtodisplaythe settingmode.
■Toreturntothepreviousdisplay,press DISP/BACK/SCRL.
3PressMULTI-CONTROLtoselectthesegmentoftheclockdisplayyouwishtoset.
EachtimeyoupressMULTI-CONTROL, one segmentoftheclockdisplayisselected.
Hour—Minute
Asyouselectsegmentsoftheclockdisplay, theselectedsegmentblinks.
4TurnMULTI-CONTROLtoputaclock right.
SettingtheFMtuningstep
TheFMtuningstepemployedbyseektuning canbeswitchedbetween100kHz,thepreset step,and50kHz.
- Ifseektuningisperformedin50kHzsteps, stationsmaybetunedinimprecisely.Tune inthestationswithmanualtuningoruse seektuningagain.
- Thetuningstepremainsat50kHz during manualtuning.
1UseMULTI-CONTROLtoselectFMSTEP intheinitialsettingmenu.
RefertoAdjustinginitialsettingsonthepreviouspage.
2PressMULTI-CONTROLtodisplaythe settingmode.
3TurnMULTI-CONTROLtoselecttheFM tuningstep.
50KHZ(50kHz)—100KHZ(100kHz)
4PressMULTI-CONTROLtodetermine theselection.
■Evenifthemenuhasbeencancelledbefore determination,operationissettled.
SettingtheAMtuningstep
TheAMtuningstepcanbeswitchedbetween 9kHz, thepresetstep, and 10kHz. When using thetunerinNorth, CentralorSouth America, reset the tuning step from 9kHz (531 kHz to 1602kHz allowable) to 10kHz (530kHz to 1640kHz allowable).
1UseMULTI-CONTROLtoselectAMSTEP intheinitialsettingmenu.
RefertoAdjustinginitialsettingsonthepreviouspage.
2PressMULTI-CONTROLtodisplaythe settingmode.
3TurnMULTI-CONTROLtoselecttheAM tuningstep.
4PressMULTI-CONTROLtodetermine theselection.
■Evenifthemenuhasbeencancelledbefore determination,operationissettled.
Switchingtheauxiliarysetting
Itispossibletouseauxiliarydevicewiththis unit.Activatetheauxiliarysettingwhenusing auxiliarydeviceconnectedtothisunit.
1UseMULTI-CONTROLtoselectAUXin theinitialsettingmenu.
RefertoAdjustinginitialsettingsonthepreviouspage.
2PressMULTI-CONTROLtoturnAUXon.
■ToturnAUXoff,pressMULTI-CONTROL again.
OtherFunctions
UsingtheAUXsource
Youcanconnectanauxiliarydevicetothis unitusingastereominiplugcable.
Operatingthisunit
- Insertthestereominiplugintothe inputjackonthisunit.
SelectingAUXasthesource
- PressSRC/OFFtoselectAUXasthe source.
■Iftheauxiliarysettingisnotturnedon,AUX cannotbeselected.Formoredetails,seeSwitchingtheauxiliarysettingonthepreviouspage.
Turningtheclockdisplayonoroff
Youcanturntheclockdisplayonoroff.
- Evenwhenthesourcesareoff, theclock displayappearsonthedisplay.
- PressCLOCKtoturntheclockdisplay onoroff.
EachpressofCLOCKturnstheclockdisplay onoroff.
■Theclockdisplaydisappearstemporarily whenyouperformotheroperations,buttheclock displayappearsagainafter25seconds.

Important
- Whenthisunitisinstalledinavehiclewithout ACC(accessory)positionontheignition switch,redcablemustbewiredtotheterminalthatcandetecttheoperationoftheignitionkey.Otherwise,batterydrainmayresult.

ACC position

No ACC position
- Useofthisunitinconditionsotherthanthe followingcouldresultinfireormalfunction.
—Vehicleswitha12-voltbatteryandnegative grounding.
—Speakerswith50W(outputvalue)and4ohmto8ohm(impedancevalue).
- Topreventashort-circuit,overheatingormal-function,besuretofollowthedirections below.
—Disconnectthenegativeterminalofthe batterybeforeinstallation.
—Securethewiringwithcableclampsoradhesivetape.Toprotectthewiring,wrapadhesivetapearoundthemwheretheylie againstmetalparts.
—Placeallcablesawayfrommovingparts, suchasgearshiftandseatrails.
—Placeallcablesawayfromhotplaces, suchasneartheheateroutlet.
—Donotpasstheyellowcablethrougha holeintotheenginecompartmenttoconnecttoabattery.
—Coveranydisconnectedcableconnectors withinsulatingtape.
—Useafuseoftheratingprescribed.
—Neverwirethespeakernegativecabledirectlytoground.
—Neverbandtogethermultiplespeaker'snegativecables.
- Controlsignalisoutputthroughblue/white cablewhenthisunitispoweredon.Connectit toanexternalpoweramp'ssystemremote controlorthevehicle'sauto-antennarelay controlterminal(max.300mA12VDC).Ifthe vehicleisequippedwithaglassantenna,connectittotheantennaboosterpowersupply terminal.
- Neverconnectblue/whitecabletoexternal poweramp'spowerterminal,Also,neverconnectittothepowerterminaloftheautoantenna. Otherwise,batterydrainormalfunction mayresult.
- Blackcableisground. This cable and other product's ground cable (especially, high-current product such as power amp) must be wired separately. Otherwise, fireormal function may result if they are accidentally detached.
Connectiondiagram

flowchart
graph TD
    A["This product"] --> B["Rear output"]
    B --> C["Antenna jack"]
    C --> D["Fuse (10 A)"]
    D --> E["Wired remote input\nHard-wired remote control adaptor can be connected (sold separately)."]
    E --> F["Yellow\nConnect to the constant 12 V supply terminal."]
    E --> G["Red\nConnect to terminal controlled by ignition switch (12 V DC)."]
    G --> H["Black (chassis ground)\nConnect to a clean, paint-free metal location."]
    H --> I["Front speaker Front speaker"]
    I --> J["White/white/black"]
    J --> K["Gray/gray/black"]
    K --> L["Violet"]
    L --> M["Violet/black"]
    M --> N["Rear speaker Rear speaker"]
    N --> O["Rear speaker Rear spakter"]
    P["Power amp (sold separately)"] --> Q["Connect with RCA cables (sold separately)"]
    Q --> R["System remote control"]
    R --> S["Blue/white\nConnect to system control terminal of the power amp or auto-antenna relay control terminal (max. 300 mA 12 V DC)."]
    S --> T["With a 2 speaker system, do not connect anything to the speaker leads that are not connected to speakers."]
Perform these connections when using the optional amplifier.


Important
- Checkall connections and systems before final installation.
- Donotuseunauthorizedparts.Useofun- authorizedpartsmaycausemalfunctions.
- Consultyourdealerifinstallationrequiresdrillingofholesorothermodificationstothevehicle.
- Donotinstallthisunitwhere: —itmayinterferewithoperationofthevehicle. —itmaycauseinjurytoapassengerasaresultofasuddenstop.
- These semiconductor laser will be damaged if it overheats. Install this unit away from hot places such as near the heater outlet.
- Optimum performance is obtained when the unitis installed at an angle of less than 60^ .
- Wheninstalling,toensureproperheatdispersalwhenusingthisunit,makesureyouleave amplespacebehindtherearpanelandwrap anyloosecablessotheyarenotblockingthe vents.
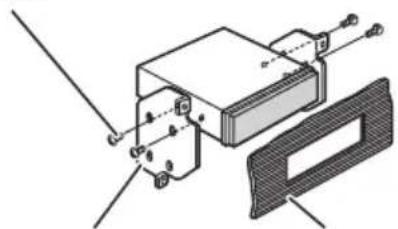
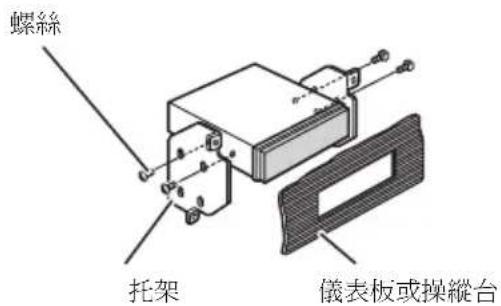
DINfront/rearmount
Thisunitcanbeproperlyinstalledeitherfrom "Front"(conventionalDINfront-mount)or "Rear"(DINrear-mountinstallation, utilizing threadedscrewholesatthesidesofunitchassis). Fordetails, refertothefollowinginstallationmethods.
DINFront-mount
Installationwiththerubberbush
1Insertthemountingsleeveintothe dashboard.
Wheninstallinginashallowspace,useasuppliedmountingsleeve.Ifthereisenough
spacebehindtheunit,usefactorysupplied mountingsleeve.
2Securethemountingsleevebyusinga screwdrivertobendthemetaltabs(90°) intoplace.
3Installtheunit.
DashboardRubberbush

text_image
Technical diagram showing a mechanical assembly with labeled parts and a close-up of a component detailMountingsleeveScrew
Removingtheunit
1 Extendtopandbottomofthetrimring outwardstoremovethetrimring. (When reattachingthetrimring, pointtheside withagroovedownwardsandattachit.)
natural_image
Diagram showing two rectangular components with an arrow indicating transformation or alignment (no text or symbols)Trimring
- Itbecomeseasytoremovethetrimringif thefrontpanelisreleased.
2Insertthesuppliedextractionkeysinto bothsidesoftheunituntiltheyclickinto place.
3Pulltheunitoutofthedashboard.
natural_image
Diagram showing a mechanical device interacting with a block, with hands holding the components (no text or symbols present)DINRear-mount
1 Extendtopandbottomofthetrimring outwardstoremovethetrimring. (When reattachingthetrimring, pointtheside withagroovedownwardsandattachit.)

natural_image
Diagram showing two rectangular components with an arrow indicating transformation or alignment (no text or symbols)Trimring
- Itbecomeseasytoremovethetrimringif thefrontpanelisreleased.
2Determinetheappropriateposition wheretheholesonthebracketandthe sideoftheunitmatch.

natural_image
Diagram showing circular patterns with downward arrows inside a rectangular container (no text or symbols)3Tightentwoscrewsoneachside.
Screw
natural_image
Technical diagram of a mechanical assembly with labeled components (no readable text or symbols)MountingbracketDashboardorconsole
- Use either truss screws (5mm × 8mm) or flush surfaces screws (5mm × 9mm), depending on the shape of screw holes in the bracket.
AdditionalInformation
Errormessages
Whenyoucontactyourdealeroryournearest PioneerServiceCenter,besuretohavethe errormessagerecorded.
Built-inCDPlayer
| MessageCauseAction | ||
| ERROR-11,12, 17,30 | DirtydiscCleandisc. | |
| ScratcheddiscReplacedisc. | ||
| ERROR-10,11, 12,15,17,30, A0 | Electricalorme-chanical | Turntheignition switchOFFand backON,orswitch toadifferent source,thenback totheCDplayer. |
| ERROR-15Theinserteddisc doesnotcontain anydata | Replacedisc. | |
| ERROR-22,23TheCDformat cannotbeplayed back | Replacedisc. | |
| NOAUDIOTheinserteddisc doesnotcontain anyfilesthatcan beplayedback | Replacedisc. | |
| SKIPPEDTheinserteddisc containsWMA filesthatareprotectedbyDRM | Replacedisc. | |
| PROTECTAllthefileson theinserteddisc aresecuredby DRM | Replacedisc. | |
USBaudioplayer/USBmemory
| MessageCauseAction | |
| NOAUDIOnosongsTransfertheaudio | |
| filestotheUSB portableaudio player/USBmemoryandconnect. | |
| USBmemory withsecurityenabledisconnected | FollowtheUSB memoryinstructionstodisablethe security. |
| SKIPPED | Theconnected USBportable audioplayer/USBmemory containsWMA filesthatareprotectedby Windows MediaTMDRM9/10 | Playanaudiofile notprotectedby WindowsMedia DRM9/10. |
| PROTECTAllthefileson theconnected USBportable audioplayer/USBmemoryare protectedby WindowsMedia DRM9/10 | Transferaudiofiles notprotectedby WindowsMedia DRM9/10tothe USBportable audioplayer/USB memoryandconnect. | |
| N/AUSB | TheUSBdevice connectedtois notsupportedby thisunit. | ConnectaUSB portableaudio playerorUSB memorythatis USBMassStorage Classcompliant. |
| CHECKUSB | TheUSBconnectororUSBcable isshort-circuited. | Confirmthatthe USBconnectoror USBcableisnot caughtinsome-thingordamaged. |
| Theconnected USBportable audioplayer/USBmemory consumesmore than500mA (maximumallow-ablecurrent). | Disconnectthe USBportable audioplayer/USB memoryanddo notuseit.Turnthe ignitionswitchto OFF;thentoACC orONandthen connectthecom-pliantUSBportableaudioplayer/USBmemory. | |
AdditionalInformation
| ERROR-19 | Communication failure | Performoneofthe followingoperations.-Turntheignition switchOFFand backON.-Disconnectthe USBportable audioplayer/USB memory.-Changetoadifferentsource. Then,returntothe USBportable audioplayer/USB memory. |
| ERROR-23 | USBdeviceis notformatted withFAT16or FAT32 | USBdeviceshould beformattedwith FAT16orFAT32. |

Handlingguidelineofdiscs andplayer
- Useonlydiscsfeaturingeitheroffollowing twologos.


- Useonlyconventional,fullycirculardiscs. Donotuseshapeddiscs.


- Use12-cmor8-cmCD.Donotusean adapterwhenplaying8-cmCDs.
- DonotinsertanythingotherthanaCDinto theCDloadingslot.
-
Donotusecracked, chipped, warped, or otherwisedamageddiscsastheymaydamagetheplayer.
-
UnfinalizedCD-R/CD-RWdiscplaybackis notpossible.
- Donottouchtherecordedsurfaceofthe discs.
- Storediscsintheircaseswhennotinuse.
- Avoidleavingdiscsinexcessivelyhotenvir- onmentsincludingunderdirectsunlight.
- Donotattachlabels, writeonorapplychemicalstothesurfaceofthediscs.
- TocleanaCD, wipethediscwithasoft clothoutwardfromthecenter.
- Condensationmaytemporarilyimpairthe player'sperformance.Leaveittoadjustto thewarmertemperatureforaboutone hour.Also,wipeanydumpdiscswithasoft cloth.
- Playbackofdiscsmaynotbepossiblebe- causeofdisc characteristics, disc format, recorded application, playbackenvironment, storage conditions, and soon.
- Textinformationmaynotbecorrectlydis-playeddependingontherecordedenvironment.
• Roadshocksmayinterruptdiscplayback. - Read the precautions for discs before using them.
DualDiscs
- DualDiscsaretwo-sideddiscsthathavea recordableCDforaudioononesideanda recordableDVDforvideoontheother.
- SincetheCDsideofDualDiscsisnotphysicallycompatiblewiththegeneralCD standard, itmaynotbepossibletoplaythe CDsidewiththisunit.
- FrequentloadingandejectingofaDual Discmayresultinscratchesonthedisc. Serioussscratchescanleadtoplaybackproblemsonthisunit.Insomecases,aDual Discmaybecomestuckinthediscloading slotandwillnoteject.Topreventthis,we recommendyourefrainfromusingDual Discwiththisunit.
AdditionalInformation
- Pleaserefertotheinformationfromthe discmanufacturerformoredetailedinformationaboutDualDiscs.
Compressedaudio compatibility
WMA
- Compatible format: WMAencoded by WindowsMediaPlayer
- Fileextension:.wma
- Bitrate:48kbpsto320kbps(CBR),48kbps to384kbps(VBR)
- Samplingfrequency:32kHz,44.1kHz,48 kHz
- WindowsMediaAudio9Professional, Lossless, Voice: No
MP3
- Fileextension:.mp3
- Bitrate:8kbpsto320kbps(CBR),VBR
- Samplingfrequency:16kHzto48kHz(32, 44.1,48kHzforeemphasis)
- CompatibleID3tagversion:1.0,1.1,2.2, 2.3,2.4(ID3tagVersion2.xisgivenpriority thanVersion1.x.)
• M3uplaylist: No - MP3i(MP3interactive),mp3PRO:No
WAV
- Compatible format: Linear PCM(LPCM), MSADPCM
- Fileextension:.wav
- Quantizationbits:8and16(LPCM),4(MS ADPCM)
- Samplingfrequency:16kHzto48kHz (LPCM),22.05kHzto44.1kHz(MSAD-PCM)
Handlingguidelineand supplementalinformation
- Theremaybeaslightdelaywhenstarting playbackofaudiofilesencodedwithimage data.
- Only32charactersfrombeginningcanbe displayedasafilename(includingthefile extension)orafoldername.
- Thetextinformationofsomeaudiofiles maynotbecorrectlydisplayed.
- Thisunitmaynotoperatecorrectlydependingontheapplicationusedtoencode WMAfiles.
Compressedaudiofilesonthedisc
- ISO9660Level1and2compliant.Romeo andJolietfilesystemsarebothcompatible withthisplayer.
- Multi-session playback is possible.
- Compressedaudiofilesarenotcompatible withpacketwritedatatransfer.
- Regardlessofthelengthofblanksection betweenthesongsoforiginalrecording, compressedaudiodiscsplaywithashort pausebetweenensongs.
USBaudioplayer/USBmemory
- ThisunitcanplaybackfilesintheUSBportableaudioplayer/USBmemorythatis USBMassStorageClass.However,copyrightprotectedfilesthatarestoredin above-mentionedUSBdevicescannotbe playedback.
- You cannot connect a USB portable audio player/USB memory to this unit via a USB hub.
- PartitionedUSBmemoryisnotcompatible withthisunit.
- DependingonthekindofUSBportable audioplayer/USBmemoryyouuse,this unitmaynotrecognizetheUSBaudio player/USBmemoryoraudiofilesmaynot beplayedbackproperly.
- DonotleavetheUSBportableaudio player/USBmemoryindirectsunlightfor extendedamountsoftime.ExtendedexposuretodirectsunlightcanresultinUSB portableaudioplayer/USBmemorymal-functionduetotheresultinghighttemperature.
AdditionalInformation
- DonotleavetheUSBportableaudio player/USBmemoryinhightemperature.
- FirmlysecuretheUSBportableaudio player/USBmemorywhendriving.Donot lettheUSBportableaudioplayer/USB memoryfallontothefloor,whereitmaybe-comejammedunderthebrakeoracceleratorpedal.
- Depending on the USB devices connected to this unit, it may generate noise in the radio.
- Theremaybeaslightdelaywhenstarting playbackofaudiofilesonaUSBportable audioplayer/USBmemorywithnumerous folderhierarchies.
- Donotconnectanythingotherthanthe USBportableaudioplayer/USBmemory.
- Operationsmayvarydependingonthe kindofUSBaudioplayerandaUSBmemory.
Exampleofahierarchy
:Folder
Compressedaudiofile

flowchart
graph TD
    01 --> 02
    02 --> 1
    02 --> 2
    02 --> 3
    03 --> 4
    04 --> 5
    04 --> 6
    05 --> 6
Level 1 L evel 2 L evel 3 L evel 4
Thesequenceofaudiofileson thedisc
- Thisunitassignsfoldernumbers.Theuser cannotassignfoldernumbers.
- Folderselectionsequenceorotheroperationmaybealtereddependingontheencodingorwritingsoftware.
- Folderhierarchyisalloweduptoeighttiers. However, apracticalhierarchyoffolderis lessthantwotiers.
- Upto99foldersonadisccanbeplayed back.
Thesequenceofaudiofileson USBmemory
ForUSBportableaudioplayers,thesequenceis differentfromthatofUSBmemoryanddependsontheplayer.
- 01to05representassignedfoldernumbers.①to⑥representthe playbacksequence.Theusercannotassignfolder numbersandspecifythe playbacksequencewiththisunit.
- Playbacksequenceoftheaudiofileisthe sameasrecordedsequenceintheUSBdevice.
- Tospecifythe playbacksequence, the following method is recommended.
1Createthefilenameincludingnumbers thatspecifythe playbacksequence(e.g., 001xxx.mp3and099yyy.mp3).
2Putthosefilesintoafolder.
3Recordthefoldercontainingfilesintothe USBdevice.
However, depending on the system environment, you cannot specify the file playback sequence.
• Upto15000filesonaUSBportableaudio player/USBmemorycanbeplayedback. - Upto500foldersonaUSBportableaudio player/USBmemorycanbeplayedback.
- UptoeighttiersdirectoryonaUSBportableaudioplayer/USBmemorycanbe playedback.
AdditionalInformation
Copyrightandtrademark notice
WMA

text_image
Plays Medium Medium™WindowsMediaandtheWindowslogoaretrademarksorregisteredtrademarksofMicrosoft CorporationintheUnitedStatesand/orother countries.
MP3
Supplyofthisproductonlyconveysalicense forprivate,non-commercialuseanddoesnot conveyalicensenorimplyanyrighttouse thisproductinanycommercial(i.e.revenue-generating)realtimebroadcasting(terrestrial, satellite,cableand/oranyothermedia),broadcasting/streamingviinternet,intranetsand/orothernetworksorinotherelectroniccontentdistributionsystems,suchaspay-audioor audio-on-demandapplications.Anindependentlicenseforsuchuseisrequired.Fordetails,pleasevisit http://www.mp3licensing.com.
iTunes
iTunesisattrademarkofAppleInc., registered intheU.S.andothercountries.
AdditionalInformation
Specifications
General
Ratedpowersource.....14.4VDC
Groundingsystem......Negativetype
Max.currentconsumption
10.0A
Dimensions(W×H×D):
DIN
Continuouspoweroutput...22W×4(50Hzto15000
Hz,5%THD,4Ωload,both
channelsdriven)
Load impedance .... 4 Ω (4 Ω to 8 Ω allowable)
Preoutmaxoutputlevel.....2.0V
Tonecontrols:
Bass
Frequency.....100Hz
Gain....±13dB
Mid
Frequency.....1kHz
Gain....±12dB
Treble
Frequency.....10kHz
Gain....±12dB
CDplayer
System....Compactdiscaudiosystem
Usablediscs....Compactdisc
Signal-to-noiseratio....94dB(1kHz)(IEC-Anet-
work)
Numberofchannels......2(stereo)
MP3decodingformat......MPEG-1&2AudioLayer3
WMAdecodingformat......Ver.7,7.1,8,9,10,11(2ch
audio)
(WindowsMediaPlayer)
WAVsignalformat....LinearPCM&MSADPCM
(Non-compressed)
USB
Specification.....USB2.0fullspeed
Supplycurrent.....500mA
Maximumamountofmemory
250GB
Minimumamountofmemory
256MB
USBClass....MSC(MassStorageClass)
Filesystem.....FAT16,FAT32
MP3decodingformat......MPEG-1&2AudioLayer3
WMAdecodingformat......Ver.7,7.1,8,9,10,11(2ch
audio)
(WindowsMediaPlayer)
WAVsignalformat....LinearPCM&MSADPCM
(Non-compressed)
FMtuner
Frequencyrange.....87.5MHzto108.0MHz
Usable sensitivity .... 11 dBf (0.7 μV/75 Ω, mono,
S/N:30dB)
Signal-to-noiseratio......72dB(IEC-Anetwork)
AMtuner
Frequencyrange.....531kHzto1602kHz(9kHz)
530kHzto1640kHz(10
kHz)
Usablesensitivity.....25μV(S/N:20dB)
Signal-to-noiseratio......62dB(IEC-Anetwork)
Infraredremotecontrol
Wavelength....940nm±50nm
Output.....typ;12mw/srperInfrared
LED

Note
Specificationsandthedesignaresubjecttomod-
ificationswithoutnoticeduetoimprovements.

GraciasporhabercompradoesteproductoPIONEER.
natural_image
Simple line drawing of a rectangular object with a curved edge and a small circular mark, no text or symbols present.3Coloquelacarátulaenlafundaprotectoraprovistaparaguardarlademanerasegura.
natural_image
Diagram of a device's internal structure showing a connector inserted into a folder (no text or symbols present)natural_image
Simple line drawing of a rectangular object with an arrow pointing to its side (no text or symbols)natural_image
Diagram of a mechanical or laboratory procedure showing a tool interacting with a component (no text or symbols visible)ADVERTENCIA
text_image
① ② ③ ⑤ ⑥ ⑦ ④ ⑬ ⑭ ⑮ ⑯ ⑰ ⑱ ⑲ ⑳①BotónSRC/OFF
FM: OFF—LEVEL 1—LEVEL 2—LEVEL 3—LEVEL4
AM: OFF—LEVEL 1—LEVEL 2
text_image
Technical diagram showing assembly of a device with labeled parts and connection to a box, including a magnified inset detail.ManguitodemontajeTornillo
Retiradadelaunidad
natural_image
Diagram showing two rectangular components with an arrow indicating transformation or alignment (no text or symbols)Anillodeguarnición
natural_image
Diagram showing a mechanical device being processed into a rectangular block, with hands pulling the components (no text or symbols present)MontajetraseroDIN
natural_image
Diagram showing two rectangular components with an arrow indicating transformation or alignment (no text or symbols)Anillodeguarnición
natural_image
Diagram showing circular objects with downward arrows entering a container (no text or symbols)3Aprietelosdostornillosencadalado.
Tornillo

natural_image
Technical diagram of a mechanical assembly with labeled components (no text or symbols present)CarcasaSalpicaderooconsola
• Utilicetornillosdecabezaredonda(5mm ×8mm)otornillosdecabezaembutida(5
natural_image
Simple line drawing of a rectangular device with a circular arrow pointing to its side (no text or symbols)natural_image
Diagram of a device's internal structure showing a connector inserted into a housing (no text or symbols present)2Pressioneoladodireitodopainelfrontalatéoseutotalencaixe.
natural_image
Simple line drawing of a rectangular object with an arrow pointing to its side (no text or symbols)natural_image
Diagram of a mechanical or electrical component with a tool and circular element, no visible text or symbolsADVERTÊNCIA
Mantenhaabateriaforadoalcancedecrianças. Casoelasejaingerida, consulteummédicoimediatamente.
CUIDADO
text_image
① ② ③ ⑤ ⑥ ⑦ ④ ⑬ ⑭ ⑮ ⑯ ⑰ ⑱ ⑲ ⑳①BotãoSRC/OFF
text_image
Diagram of an Ethernet cable connector with numbered pins pointing to the internal structure.①Indicador(Di9co)
FM: OFF—LEVEL 1—LEVEL 2—LEVEL 3—LEVEL4
AM: OFF—LEVEL 1—LEVEL 2
DYNAMIC—VOCAL—NATURAL—CUSTOM —FLAT—POWERFUL
natural_image
Diagram showing two rectangular components with an arrow indicating transformation or alignment (no text or symbols)Moldura
- Éfácil removeromolduraseopainelfrontalestásolto.
natural_image
Diagram showing a mechanical device interacting with a block, with hands pulling the components (no text or symbols present)MontagemtraseiraDIN
natural_image
Diagram showing two rectangular components with an arrow indicating transformation or alignment (no text or symbols)Moldura
- Éfácilremoveromolduraseopainelfrontalestásolto.
natural_image
Diagram showing particle motion with arrows indicating direction (no text or symbols)3Apertedoisparafusosemcadalado.
Parafuso

natural_image
Technical diagram of a mechanical assembly with no visible text or symbolsnatural_image
Simple line drawing of a rectangular device with a curved top and a circular button, no text or symbols present.natural_image
Diagram of a device showing a connector inserted into a folder (no text or symbols present)2 按下前面板右侧,直至其固定。
natural_image
Simple line drawing of a rectangular object with an arrow pointing to its side (no text or symbols)
遙控器的使用與保養
安裝電池
natural_image
Diagram of a laboratory procedure showing a pipette inserted into a test tube with a magnified view (no text or labels)
警告
text_image
① ② ③ ⑤ ⑥ ⑦ ④ ⑬ ⑭ ⑮ ⑯ ⑰ ⑱ ⑲ ⑳①SRC/OFF按鈕
text_image
Diagram of an electronic device rear panel with numbered pins pointing to ports and connectors① (碟片) 指示器
在主顯示幕顯示碟片(專輯)名稱時出現。
② (作者)指示器
natural_image
Diagram showing two rectangular components with an arrow indicating transformation or alignment (no text or symbols)飾環
natural_image
Diagram showing a mechanical device being processed into a block, with hands operating the process (no text or symbols present)DIN後座
natural_image
Diagram showing two rectangular components with an arrow indicating transformation or alignment (no text or symbols)飾環
natural_image
Diagram showing particle motion with arrows indicating direction (no text or symbols)3 鎖緊各邊的兩顆螺絲。
text_image
Plays Medium Medium™機身....178mmx50mmx165mm
機身....178mmx50mmx165mm
(Windows Media Player)
(Windows Media Player)
natural_image
Diagram showing a mechanical device interacting with a rectangular block, with hands holding it (no text or symbols present)natural_image
Diagram showing two rectangular objects with a directional arrow between them, no text or symbols presentحلقة التسicyق
natural_image
Diagram showing circular patterns with downward arrows inside a container (no text or symbols)—LEVEL 3—LEVEL 2—LEVEL 1—OFF :FM
LEVEL 4
LEVEL 2—LEVEL 1—OFF :AM
text_image
Diagram of an Ethernet cable connector with numbered pins pointing to ports and connectorstext_image
Diagram of a CD-ROM front panel with numbered labels pointing to key components such as dials, buttons, and display.SRC/OFF ①
natural_image
Simple line drawing of a rectangular object with an arrow pointing to its side, no text or symbols present.
امعتسا هليانيعوا
تركيب الطارية
natural_image
Illustration of a pipette and probe interacting with a sample holder (no text or symbols)
natural_image
Simple line drawing of a rectangular device with a circular button and arrow, no text or symbols present.natural_image
Diagram of a device's internal structure showing a connector inserted into a folder (no text or symbols present)Visit us on the World Wide Web at
http://pioneer.jp/group/index-e.html
Pioneer Gulf.FZE
http://www.pioneer-uae.com
Pioneer Electronics Australia. Pty.Ltd
http://www.pioneeraus.com.au
Pioneer Electronics Asiacentre.Pte
http://www.pioneer.com.sg
Pioneer (HK) Ltd.
http://www.pioneerhongkong.com.hk
Pioneer High Fidelity Taiwan Co., Ltd.
http://www.pioneer-twn.com.tw
Pioneer International Latin America S.A.
http://www.pioneer-latin.com
PIONEERCORPORATION
4-1,MEGURO1-CHOME,MEGURO-KU
PIONEERELECTRONICSAUSTRALIAPTY.LTD.
178-184BoundaryRoad, Braeside, Victoria3195, Australia
TEL:(03)9586-6300
PIONEERELECTRONICSOFCANADA, INC.
300AllstateParkway, Markham, OntarioL3R0P2, Canada
TEL:1-877-283-5901
TEL:905-479-4411
PIONEERELECTRONICSDEMEXICO,S.A.deC.V.
Blvd.ManuelAvilaCamacho13810piso
Col.LomasdeChapultepec,Mexico,D.F.11000
TEL:55-9178-4270
先鋒股份有限公司
總公司:台北市中山北路二段44號13樓
電話:(02)2521-3588
先鋒電子(香港)有限公司
香港九龍尖沙咀海港城世界商業中心
9樓901-6室
電話:(0852)2848-6488
PublishedbyPioneerCorporation.
Copyright©2008byPioneerCorporation.
Allrightsreserved.