DEH-1550UB - Receiver PIONEER - Free user manual and instructions
Find the device manual for free DEH-1550UB PIONEER in PDF.

User questions about DEH-1550UB PIONEER
0 question about this device. Answer the ones you know or ask your own.
Ask a new question about this device
Download the instructions for your Receiver in PDF format for free! Find your manual DEH-1550UB - PIONEER and take your electronic device back in hand. On this page are published all the documents necessary for the use of your device. DEH-1550UB by PIONEER.
USER MANUAL DEH-1550UB PIONEER
REPRODUCTOR DE CD CON RECEPTOR RDS
CD PLAYER COM RDS
CD RDS 接收機
ThankyouforpurchasingthisPIONEER product
Toensureproperuse, pleasereachthroughthis manual before using thisproduct. It is especially important that you read and observeWARN-
INGsandCAUTIONsinthismanual. Please keepthemanualinasafeandaccessibleplacefor futurereference.
Aboutthisunit
CAUTION:
USEOFCONTROLORADJUSTMENTOR PERFORMANCE OF PROCEDURES OTHER THAN THOSE SPECIFIED HEREIN MAY RESULTIN HAZARDOUSRADIATIO EXPOSURE.
CAUTION:
THEUSEOFOPTICALINSTRUMENTS WITHTHISPRODUCTWILLINCREASE EYEHAZARD.

CAUTION
- Donotallowthisunittocome ntoccontact withlicuids.Electricalshockcoulresult. Also,darnagetothisunit,smoke,anoverheatingccoulresultfromcontactwith liquids.
• Always keep the volume low enough to hear outsidesounds.
• Avo d'exposureto moisture. - If the battery is connected to discharged, any preset memory will be erased.
CAUTION
This product is a class1 aserproductclassified under the Safetyoflaserproducts, IEC 60825-1:2007.
CLASS 1 LASER PRODUCT
Note
Functionsettingoperat onsarecompletedeven ifthemenuiscanceledbeforetheoperations areconfirmed.
Aboutthismanual
In the following instructions, USB memories and USB audiop ayers are collectively referred to as "USB storage device".
Incaseoftrouble
Shouloth sunitfailtooperateproperly, please contactyourdeale ornearestauthorized PIONEERServiceStation.
Operatingthisunit
Headunit

text_image
Labeled diagram of a device rear panel with numbered components for identificationPartPart
①▲(eject)⑧ EQA(equalizer)
② SRC/OFF BAND
| 3 | MULTI-CONTROL(M.C.) | 10 | D (back)/DIMMER(dimmer) |
| 4 | Q(list) | 11 | ▶ |
| 5 | DISP/DISP OFF | 12 | 1/^ to 6/ ⇌ |
| 6 | Discloadings off3 | AUX input jack(3.5 mm stereo jack) | |
| 7 | USBport | 8 | Detachoutton |

CAUTION
• Use an optional Pioneer USB cable (CD- U50C) to connect the USB storage device as any device connected directly to the unit will protrude out from the unit which could be dangerous.
• Donotuseunauthorizedproducts.
Remotecontrol

text_image
15 ⑪ ⑨ 22 21 ② 20 16 17 18 19| Part | Operation |
| #VOLUME | Pressorncroascordocrasc volume. |
| #MUTE | Pressormute Pressagelinto unmute. |
| #▲/▼ | Pressorecallpreselsations, Prostosolecctthanoxt/pro-viousifolder. |
| #AUDIO | Pressoselectananidiofunc-tion. |
| #DISP/SCRL | Pressoselectdifferentdis-plays. Pressancholdoturndmmer onoroff. |
| #II | Prostospauscorrosumoplay-back. |
| # FUNC-TION | Prostosolecctfunctions. |
| # LIST/ENTER | Pressodisplaythedscltle, tracklittle,to door,ortilolistde pondingonthsource. Pressodisplaytheistde-pendingonthresource. Whileinthecopartingment, presslocontrofunctions. |
Operatingthisunit
Displayindication
| 10 | |
| 9 | |
| 8 | |
| 6 | |
| 4 | |
| 3 | |
| 2 |
IndicatorState
| 1 | p (list) | Thelisfunctionisbeingoperated. |
| 2 | Subinformationsection | Subinformationisdisplayed. |
| 3 | TA(traffic announcements) | TAlfunctionson. |
| 4 | TP(traffic program identification) | AIPstationistunodin. |
| 5 | S.Atrv(sound/rever) | Thesoundretrieverfunctionison. |
| 6 | LOCLocalseoetuningison. | |
| 7 | (repeat)TrackfordeRepeatson. | |
| 8 | XX(trancom) | Randomplayison. |
IndicatorState
| 5 | Maininformationsection | •Tunertandfrequency•RDS programservicename,FTInformationandotheritorinformation•CPlayerandLSboragodovcoolapsodplaybacktimcancitexinformation |
| 10 | > | Appeerswhena overtierofolderormenuexists. |
Setupmenu
When youtum the gn tionsw tchtoON afterin-stallation, setupmen appears on the display. You can setup themenuoctions below.
1 After installation of this unit, turn the ignitions switch to ON.
SETUPappears.
2TurnM.C.toswitchtoYES.
■If you do not operate for 30 seconds, the setup menu will not be displayed.
■ If you prefer not to set up a path time, turn M.C. to switch to NO. Press to select.
If you select NO, you cannot setup in the setup menu.
3PressM.C.toselect.
4Performthefollowingprocedurestoset themenu.
Toprecedtothenextmanoption,youneedto confirmyourselection.
Operatingthisunit
CLOCKSET(settingtheclock)
1) Turn M.C. to adjust hour.
2 PressM.C.tose ectminute.
3. Turn M.C. to adjust minute.
4) PressM.C.loconfirmtheselection
FMSTEP(FMtuningstep)
Normally, the FM tuning sleep employed by seek tuning is 50kHz When AF for IA son, that turing step automatically changesto 100kHz It may be preferable to set the tuning sleep lob 0kHz when AF is on.
- The tuningstopremainsat50k-hzduringman ualturing.
T) Turn M.C. to select the FM tuning step. 50(50kHz)—100(100kHz)
2) PressM.C.toconfirmtheselection
MWSTEP(MWtuningstep)
The MWtunngslepcanbeswitchedbetween 9kHz and 10kHz, When using the tuner in North, Central or South America, rosetthotuningstop from 9kHz (531k Hz to 1602 kHz allowable) to
10 kHz (530 kHz to 1840 kHz allowable)
T) Turn M.C. to select the MW tuning step 9(9kHz)—10(10kHz)
2) PressM.C.toconfirmtheselection QUITappears
5Tofinishyoursettings,turnM.C.toselect
YES.
■If you prefer to change your setting again. turn M.C. loswitchloNO. Pressloselect.
6PressM.C.toselect.
Notes
- You can setup the menu option from the systemmenu. For details about the sellings, refer to Systemmenuonpage?
- Youcancancelsetupmenubypressing
SRC/OFF
Basicoperations
Important
- Handlegently when removing or attaching the front panel.
- Avoid subjecting the front panel to excessive shock.
- Keep the front panel autoclvert direct sunlight and light temperatures.
- To avoid damaging the device or vehicle interior, remove any cables and devices attached to the front panel before detaching it.
Section
Operatingthisunit
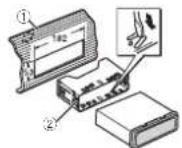
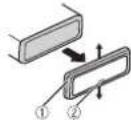
Removing the front panel to protect your run from theft
1 Press the each button to release the front panel.
2Push the front panel upward(Ⅰ) and then put il loward(Ⅱ) you.
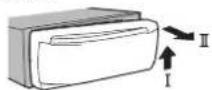
3) Always keep the detached front panel in a protection or devices such as protection case.
Re-attaching(befrontpanel
TSlidth of frontpanel to the left. Makes sure to insert the absolute the left side of the head unit into the slot on the front panel.

2) Presstnorightsideofthofrontpaneluntilitis firmlysealed.
If you cannot lack the front panel to the head units successfully, makes sure that you are placing the front panel to the head unit correctly. Forcing the front plane into placernay resu tindamagctoth front panel or head unit.
Tum ngtheuniton
TPressSRC/OFFtcturntheunion
Turningheuniloff
PressancholdSRC/OFF untilthoun turns off.
Selectingasource
1 PressSRC/OFFlocys between TUNER (luner)—CD (CD player)—USB (USB) —AUX(AUX)
Adjustingthevolume
1 Turn M.C.toadjustthevolume.
CAUTION
Forsafetyreasons, park your vehicle when removing the front panel.
Note
Whenthisunit'sblue/whiteleacisconnectedto thevehicle'sauto-antennarelaycontrolterminal,thevehicle'santennaextendswenthis unit'ssourceistumedon.Toretractneantenna,turnthesourceoff.
Useandcareoftheremote control
Using heremotecrol
T Pointtharomote control intnedirect on offthe frontpanc to operate. When using for the first time pull out the film protruding from not ray.
Replacing the battery
1 Sidelhelrayoulonthebackoftheremote control.
^2 In set the batte ywith the plus(+) and minus (-) polesal gned properly.

Operatingthisunit
WARNING
- Keep the battery out of thereach of children. Should the battery poswallowed consult a doctor immediately.
- Balleries(batterypackorbatteriesinstalled) must not box exposed to excess vehicle such as sunshine, fire or the like.
CAUTION
• UsoneCR2025(3V) lithium battery
- Removelhebattery iftheremolecontrolis notusedforamonthorlonger.
• There is a dangerous explosion if the battery is incorrectly replaced. Replace only with the same equivalent type. - Denothandlethebatterywithmetallictools.
- Donotslorethebatterywithmetallic objects.
- If the battery leaks, wip ether control completely clean and install anewbatter
- When disposing of used batteries, comply with governmental regulations on environmental public institutions' rules that apply in your country/area.
Important
- Donotstoretheremotecontrolinhighttemperaturesordirectsunlight.
• Theremotecontrol may not function properly indirect sunlight. - Donctlettheremotecontrollfallontothe floor,where tmaybecomejammeounder thebrakeoracceleratorpedal.
Frequentlyusedmenu operations
Returningtothepreviousdisplay Returningtotheprevious ist(thefolderonelevel
higher
TPress
DIMMER
Returning the ordinary display
Cancelingthemainmenu
TPressBAND.
Returning to the ordinary display from the list
TPressBAND.
Tuner
Basicoperations
Selectingabano
1PressBANDuntilthedesiredband|FM1,
FM2. FM3 for FM, MW or SW1, SW2 for short-wave is displayed.
Switchingpresetstations
1Press◄or►
- SelectPCH: presetchannel under SEEK to usethisfunction. Fordetails about these settings, refarto SEEK(left/right key setting) on page6.
Operatingthisunit
Manualtuning(stepbystep)
1 Press◄or►
- Select MAN(manualtuning)underSEEKto usothisfunction.For details about theseotings.refertoSEEK(left/right leysetting)on thenext.page.
Seeking
①Pressandhold◀or▶, and then release. Youcancancelseaktuningbybrieflypressing◀or▶.
Wh lepressingandholding◄or►, you can skipstations.Seaktuningstartsassoonas yourelease◄or►.
Note
This unit's AF(alternative frequenciessearch) function can be turned on and off. AF should be offnormaltuning operation (refer to AF(alternative frequenciessearch) on this page).
Storingandrecallingstations foreachband
Usingpreset tuning buttons
1 When you find a station that you want to store in memory, press one of the preset tuning buttons (1/ ^ to 6/) and hold until the preset number stops flashing.
2Pressoneofthepresettuningbuttons (1/^ to6/)toselectthedesiredstation.
Switchingthedisplay
Selectingthedesiredtextinformation
Press DISP/DISP OFF to cycle between the following:
• FREQUENCY(programservicenameor frequency)
• BRDCSTINFO(programservicename/PTY information)
•CLOCK(sourcenameandclock)
Notes
- If the program servicename cannot be acquired in FREQUENCY, the broadcast frequency is displayed instead. If the program servicename is detected, the program servicename will be displayed.
- BRDCSTINFOtextinformationwillchange automatically.
- Depending on the band, text information can be changed.
- Textinformationitemsthatcanbechanged dependonthearea.
UsingPTYfunctions
YoucanluneinfoastationusingPTY(program type)information.
SearchingforanRDSstationbyPTYinformation Youcansearchforgeneraltypesofbroadcasting programs,suchasthoselisted inthefollowing section.Refer tothispage.
1Press (list).
2 TurnM.C. to select a program type. NEWS/INFO—POPULAR—CLASSICS—OTHERS
3 PressM.C. to begin the search. The unit searches for a stationary broadcasting that type of program. When a station is found, its programs servicenames displayed.
• Tocancelthesearch, press M.C. again.
• The program of some stations may differ from that indicated by the transmitted PTY.
• Ifnostationisbroadcastingthetypef programyousearchedfor,NOTFOUNDis displayedforabouttwosecondsandthen theunerreturnstothetoriginalstation.
Operatingthisunit
PTYlist
NEWS/INFO(newsandinformation)
NEWS(News), AFFAIRS(Currentaffairs).INFO (Information), SPORT(Sports), WEATHER(Weather), FINANCE(Finance)
POPULAR(popular)
POPMUS(Popularmusic).ROCKMUS(Rock music),EASYMUS(Easyl stening),OTHMUS (Othermusic) JAZZ(Jazz),COUNTRY(Country music),NATMUS(Nationalmusic),OLDIES (Oldiesmusic),FOLKMUS(Folkmusic)
CLASSICS(classics)
L.CLASS(Lightclassical),CLASSIC(Classical)
OTHERS(others)
EDUCATE(Education), DRAMA(Drama), CULTURE (Culture), SCIENCE (Science), VARIED (Varied) CHILDREN(Chirren's), SOCIAL(Social affairs), RELIGION(Religion), PHONEIN(Phone In), TOURING (Travel), LEISURE (Leisure), DOCUMENT(Documentaries)
Functionsettings
1PressM.C.todisplaythemainmenu.
2TurnM.C.tochangethemenuoption andpresstoselectFUNCTION.
3TurnM.C.toselectthefunction.
Once selected, the following functions can be adjusted.
- If MW, SW1 or SW2 is selected, only BSM, LOCALandSEEKareavailable.
BSM(beststationsmemory)
BSM(beststationsmemory)automaticallystores thes xstrongeststations intheorderoftheirsig- nalstrength.
1 PressM.C.toturnBSMon.
Tocancel, pressM.C.again.
REGION(regional)
When AF is used, the regional function limits the selection of station to those broadcasting regional programs.
1 Press M.C. to turn theregional function or off.
Localseektuningletsyoutuneintocnlythose raciostationswithsufficientlystrongsignalsfor goodreception.
1 Press M.C. to select the desired setting.
FM: OFF - LV1 - LV2 - LV3 - LV4
MW/shortwave: OFF - LV1 - LV2
The highest level setting allows reception of only the longest stations, while lower levels allow thereception of weaker stations.
TA(trafficannouncementstandby)
1 PressM.C. column traffic announcement standby on or off.
AF(alternative frequency research)
1 PressM.C.toturnAFonoroff.
NEWS(newsprogram/interruption)
^1 PressM.C.teturntheNEWSfunctiononor off.
Section
Operatingthisunit
SEEK(left/rightkeysetting)
Youcanassignafunctiontotheleftancrightkeys oftheunit.
SelectMAN(manua tuning)totureupordown manuallyorselectPCH(presetchannel)oswitch betweenpresetchannels.
1 Press M.C. to select MAN or PCH
CD/CD-R/CD-RWandUSB storagedevices
Basicoperations
| PlayingaCD/CD-R/CD-RWTInsortthodiscintothodiscloacingslowwith thelabel-sideup. |
| EjectingaCD/CD-R/CD-RWTPress▲. |
| PlayingsongsoneUSBstoragedeviceTOponthoUSBsortcover.TPlugintheUSBstoragedevicousingaUSB cable.Playbackisperformedautomatically. |
| StoppingplaybackofffilesonaUSBstoragece-viceTYoumaydisconnecttheUSBstoragedeviceat anytime.Theurritstopsplayback. |
| Selectingafolder1Press1/ ▲or2/.√ |
| SelectingarackTIPress←on▶. |
| FastforwardingorreversingTIPressanchold←on▶Whenplayingcompressedaudio.thoroisno soundduringfastforwardreverse. |
| ReturninggtrooctolderTIPressancholdBAND. |
SwitchingbetweencompressedaudioandCD-DA 1 PressBAND
Switchingbetweenplaybackmemorydevices Youcanswitchbetweenplaybackmemorydevices onUSBstoragedevceswithmorethanoneMass StorageDevice-compatiblememorydevice.
1PressBAND
- Youcanswitchbetweenupto32different memorydevices.
Note
Disconnect USB storage devices from the unit when not in use.
Switchingthedisplay
Selectingthedesiredtext nformation
1 Press DISP/DISP OFF to cycle between the following:
CD-DA
• ELAPSEDTIME(tracknumberandplay-backtime)
•CLOCK(sourcenameandclock)
• SPEANA(spectrum analyzer)
CD-TEXT
- TRACKINFO(tracktitle/trackartist/disc
title)
• ELAPSEDTIME(tracknumberandplay-backtime)
•CLOCK(sourcenameandclock)
• SPEANA(spectrum analyzer)
MP3/WMA/WAV
• TRACKINFO(tracktitle/artistname/album tit e)
- FILEINFO(filename/foldername)
• ELAPSEDTIME(tracknumberandplaybacktime)
•CLOCK(sourcenarneandclock)
• SPEANA(spectrumanalyzer)
Notes
- TRACKINFOandFILEINFOtext information willchangeautomatically.
Operatingthisunit
- Depending on the version of iTunes used to write MP3 file to adiscomedia file types, incompatible text stored within an audio file may be displayed incorrectly.
- Textinformationitemsthatcanbechanged dependonthemedia.
Selectingandplayingfiles/ tracksfromthenamelist
1Presstoswitchtothefile/trackname listmode.
2UseM.C.toselectthedesiredfilename (orfoldername).
| Selectingefilecofolder☐TurnM.C. |
| Playing☐Whenaf leortrackisselected,pressM.C. |
| Viewingalistofthef les(orfolders) nthese-lectacofolder☐Whenafolderisselected,pressM.C. |
| Playingasongintheselectedfolder☐Whenafolderisselected,pressanchoklM.C. |
Operationsusingspecialbuttons
Selectingarepeatplayrange
Press6/ tocyclebetweenthefollowing
CD/CD-R/CD-RW
- ALL-Repeatalltracks
-ONE-Repeatthecurrenttrack
•FLD Repeat the current folder
USBstoragedevice
- ALL-Repeatalfiles
•ONE—Repeatthecurrentfile
•FLD-Repeatthecurrentfolder
Playingtracksinrandomorder
1Press5/XX toturnrandomplayoncroff. Tracksinaselectedrepeatrangeareplayed in randomorder.
• To changesongs during random play press to switch to then next track. Pressing restarts playback of the current track from the beginning got the song.
Pausing playback
1 Press 4/PAUSE to pause or resume.
Enhancing compressed audio and restoring rich sound (sound retriever)
1) Press3/S.Rtrvtocyclebetween:
1—2—OFF(off)
1iseffectiveforlowcompressionrates, and 2iseffectiveforhighcompressionrates.
Functionsettings
1PressM.C.todisplaythemainmenu.
2TurnM.C.tochangethemenuoption
andpresstoselectFUNCTION.
Once selected, the function below can be adjusted.
Operatingthisunit
S.RTRV(soundretriever)
Automatically enhances compressed audio and restorosrchsound. 1 Press M.C. lose the desired setting. For details, refer to Enhancing compressed audio and restorosrchsound(sound retriever on the previous page.
Audioadjustments
1PressM.C.todisplaythemainmenu.
2TurnM.C.tochangethemenuoption andpresstoselectAUDIO.
3TurnM.C.toselecttheaudiofunction. Once selected, the following audiofunctions can be adjusted.
- FADERisnotava lab owhenSUB.W/SUB.W isselected in SP-P/OMODE. For details, refer to SP-P/OMODE (reoutput and preout setting) on the next page.
- SUB.W, SUB.W CTRL and HPF SETTING are not available when REAR/REAR selected in SP-P/OMODE. For details, referto SP-P/OMODE (rear output and preout setting) or then next page.
- SUB.WCTRLandHPFSETTINGarenolavailablewhorSUB.WisselectocinOFFForce tails.referioSUB.W(subwooferon/off setting)onthispage.
FADER(faderadjustment)
1 PressM.C. to display the setting mode. 2 turn M.C. to adjust the front/rear speaker balance.
BALANCE(balancead uistment)
1 Press M.C. to display the setting mode. 2 Turn M.C. to address the left/right speaker balance.
EQSETTING(equalizer-recall)
1PressM.C.od.splaytheseltngmode.
[2]IumM.C. to select the equalizer POWERFUL NATURAL VOCAL CUSTOM1-CUSTOM2-FLAT-SUPERBASS The equalizer bandandequaizer evalcan be customized when CUSTOM1 or CUSTOM2 is selected.
IfselectingCUSTOM1orCUSTOM2,complete the procedures outlined below. Ifselecting other options,pressM.C. to return the previous display.
- CUSTOM1 can besetseparatelyforeach source.
- CUSTOM2: sasharedsetting used in commonforal sources.
3 PressM.C:od splaythesettingmode.
4 PressM.C. cycle between the following: Equalizer and Equalizer level
5 lurnM.C.toselectthedesiredsetting. Equalizer band: 80HZ—250HZ—800HZ—2.5KHZ—8KHZ Equalizer level: +6to-6
- Youcanalsoswitchtheequalzercypressing EQal repeatedly.
LOUDNESS(loudness)
Ioudnesscompensatesfordeficiencies in below-frequency and high-frequency ranges at low volume.
1 PressM.C. oselect the desired setting. OFF ( ^2 )—LOW (low)—MID (mid)—HI (high)
SUB.W(subwooferon/offsetting)
This unit is equipped with as upper output which can be turned on or off.
1PressM.C. oselect the desired selling. NOR (normal phase)—REV (reverse phase)— OFF(subwooferoff)
SUB.WCTRL(subwooferadjustment)
Operatingthisunit
Only frequencies lower than those in these selected range are out pulled from the subwoofer. 1 Press M.C. lod splaytheselling mode.
2) PressM.C.tocyclebetweenthefollowing: Cut-offfrequency—Outputlevel—Slopelevel Rulesthalcanbeadjustedwillflash.
3lumM.C.toselecthodesiredsetting. Cut-off frequency: 50HZ—63HZ—80HZ—100HZ—125HZ—160HZ—200HZ Outputlevel:-24Ic+6 Slopelevel:-6—12
BASSBOOST(bassboost)
1 PressM.C. to display the setting mode.
2. TumM.C. to select adesired level.
0to+6 is displayed at the level is increased or decreased.
HPFSETTING(ighpassfilteradjustment)
When you don't want owsounds from the sub-woo'er out of frequency target to play from the frontor ears speakers, turn the IPT (high pass filter). Only frequencleshighm nanthoseinth a selected range output from the frontor rear speakers.
1 PressM.C. to display the setting mode. 2 PressM.C. to cycle between the following: Cut-off frequency—Slope level. 3 TumM.C. to select the desired setting.
Cut-off frequency: OFF 50HZ 63HZ 80HZ —100HZ—125HZ—160HZ—200HZ Slopelevel: -6—12
SLA(source evel adjustment)
SLA(Source level adjustment) lets you adjust the volume level of each source to prevent radical changes in volumewers switching between sources.
- Settings are based on the volume level, which remains unchanged.
• The MW volume level can also be adjusted with function.
- Whenselecting Masth esource, you cannot switch to SLA.
1 PressM.C. to disa aythesetting mode.
2 TurnM.C. to adjust the source volume. Adjustment range: +4 to -4
Systemmenu
1PressM.C.todisplaythemainmenu.
2TurnM.C.tochangethemenuoption andpresstoselectSYSTEM.
3TurnM.C.toselectthesystemmenu function.
Once selected, the following system menu functions can be adjusted.
CLOCKSET setting the clock
- Press M.C. to dislay resetting mode.
2 Press M.C. to select these segments of the clock display you want to set. Hour—Minute
3TurnM.C. to adjust the clock.
12H/24H(timenotation)
1 Press M.C. to select the desired setting 12H(12-hourclock)—24H(24-hourclock)
AUTOPI(autoPlyseek)
Section
Section
02
Operatingthisunit
Theun tcanautomaticallysearchforacdifferent stationwiththesameprogramming evenduring preselrecall. T|PressM.C.tctumAutoFisookonoroff.
AUX(auxiliary input)
Activate this setting when using an auxiliary device connected to this unit. 1 Press M.C. column AUX on or off.
Switchingthedimmersetting
You can adjust the brightness of illumination.
1PressM.C.todisplaythemainmenu.
2TurnM.C.todisplay|LLUMlandpressto select.
3PressM.C.toselectthedesiredsetting. OFF(off)—ON(on)
- You can also changethedimmer setting by pressing and holding DIMMER.
Initialmenu
1PressandholdSRC/OFFuntiltheunit turnsoff.
2PressandholdM.C. until themainmenu appearsinthedisplay.
3TurnM.C.tochangethemenuoption andpresstoselectINITIAL.
4TurnM.C.toselecttheinitialmenufunction.
Once selected, the following initial menu functions can be adjusted.
FMSTEP(-M tuningstep)
Normally, the FMtuning stepemployed by seek tuning is 50 kHz. When AF or TAison, then tuning stepautomatically changest to 100 kHz, it maybe preferable to set the tuning step to 50 kHz when AF is on.
• Thetuningsteoremansat50kHz during man-ja tuning.
[1] Press M.C. to select the Mtuning step, 50(50kHz) — 100(100kHz)
MWSTEP(MWtuning step)
The MWtuning step can be switched between 9kHz and 10kHz. When using the tuner in North, Centralor South America, reset the tuning step from 9kHz (531kHz to 1602kHz allowable) to 10kHz (530kHz to 1640kHz allowable).
1 PressM.C.loselect the MW tuning step. 9(9kl·z)—10(10kl·z)
Operatingthisunit
SP-P/OMODE(rear output and preout setting)
TherearspeakerleadsoutputandtheRCAoutput, ofthisUnitcanbeusectoconnectaful-range speakers subwoofer.Selectasuitableoptionfor your connection.
1 PressM.C.todisplaythesettingmode.
2 Turn M.C. to select the desired red setting. You can select anyone of the options in the following list:
- REAR/SUB.W—Selectwhantharalsafull-rangespeakerconnectedtotherearspeakereasoutputandtherealsubwooferconnectedtotheRCAutput.
•SUB.W/SUB.W—Selectwhenthereisa subwooferconnecteddirectlytotherear speakerleadoutputwithcutanyauxiliary ampandthereisaubwooferconnected totheRCAoutput.
- REAR/REAR—Selectwhenthereisafull-rangespaekarconnectcdotherearspaekareadscoutputantheRCAoutput,ifthereisafull-rangespaekerconnectdotherearspaekareadscoutputantheRCA-outputisnotused,youmayselecteither REAR/SUB.Wo REAR/REAR
Systemmenu
1PressandholdSRC/OFFuntiltheunit turnsoff.
2PressandholdM.C. until themainmenu appearsinthedisplay.
3TurnM.C.tochangethemenuoption andpresstoselectSYSTEM.
4TurnM.C.toselectthesystemmenu function.
Once selected, the following system menu functions can be adjusted.
Fordetails, refertoSystemmenuonthepreviouspage.
UsinganAUXsource
1InsertthestereominiplugintotheAUX inputjack.
2PressSRC/OFFtoselectAUXasthe source.
Note
AUX cannot be selected unless the auxiliary setting is turned. Formed details, refer to AUX (auxiliary input) on this page.
Switchingthedisplay
Selecting the desired text information T) Press DISP/DISP OFF to cycle between the following: - Source name - Source name and clock
Turningthedisplayofforon
- PressandholdDISP/DISPOFFuntilthe displayturnsonoroff.
Ifanunwanteddisplayappears
Turnoff the unwanted display using the procedures listed below.
1PressM.C.todisplaythemainmenu.
2TurnM.C.tochangethemenuoption andpresstoselectSYSTEM.
3TurnM.C.todisplayDEMOOFFandpress toselect.
4TurnM.C.toswitchtoYES.
5PressM.C.toselect.
Installation
Connections

WARNING
- Usespeakersover50W(outputvalue)and between 4Ωlo8Ω(impedancevalue).Do nouse1Ωlo3Ωspeakersforthisunil.
• The black cab is ground. When installing this unit power (sold separately), ensure connected foreground wire first. Ensure that ground wire is properly connected to a parson the car body. The ground wire is the power and the one of the unit aryohord devicomustic connected to the course, with different screws. If these were for the round new reoosortia sout, it could result in fire generation of smox or malfunction.

Other devices Metal parts of car's body (Another electronic device in the car).
*1 Non supplied for this unit

Important
- When installing this un-lin vehicle without an ACC (accessory) position on the ignition switch, failure to connect thered cable to the terminal thal detect operation of the ignition key may result in battery drain.

ACC position

No ACC position
• Use this unit with a 12-volt battery and negative grounding only. Failure to dosomay result in a firearm function.
- Topreventashort-circuit overeatingormal-function, besuretofollowthedirections below.
— Disconnect the negative terminal of the battery before installation.
— Secure the wiring with cable clamps or adhesive tape. Wrap adhesive tape around wiring that comes into contact with metal parts to protect the wiring.
— Place all cables away from moving parts, such as the shift lever and seat rails.
— Place all cables away from hot places, such as near the heater outlet.
— Do not connect the yellow cable to the battery by passing it through the hole to the engine compartment.
— Cover any disconnected cable connectors with insulating tape.
— Do not shorten any cables.
— Never cut the insulation of the power cable of this unit in order to share the power with other devices. The current capacity of the cable is limited.
— Use a fuse of the rating prescribed.
— Never wire the negative speaker cable directly to ground.
— Never band together negative cables of multiple speakers.
- When this unit is on control signals a present through the play/whitcable. Connect is cable to the system are mole control of an external power and port vehicle e's auto-antenna clay control terminal (max 300mA 12VDC). If vehicle scouipped with glass antenna, connect to the antenna boost power supply terminal.
- Neverconnecttheblue/whitecabletothe powerterminalofanexternalpoweramp. Also,neverconnectittotnopowerterminal ofthautoantenna.Doingsomayresultin batterydrainoramalfunction.
Installation
This unit

①Powercordinout
②Rearoutputsubwooferoutput
③Antennainout
④Fuse(10A)
⑤Wiredremoteinput
Hard-wiredremotecontroladapter can be connected(soldseparately).
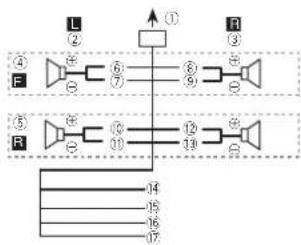
Power cord
Perform these connections when not connecting arcarspeaker load to asubwoofer.
flowchart
graph TD
    subgraph Left_Circuit
        L["①"] --> A["②"]
        A --> B["③"]
        B --> C["④"]
        C --> D["⑤"]
        D --> E["⑥"]
        E --> F["⑦"]
        F --> G["⑧"]
        G --> H["⑨"]
        H --> I["⑩"]
        I --> J["⑪"]
        J --> K["⑫"]
        K --> L["⑬"]
        L --> M["⑭"]
        M --> N["⑮"]
        N --> O["⑯"]
        O --> P["⑰"]
        P --> Q["⑱"]
        Q --> R["⑲"]
        R --> S["⑳"]
        S --> T["㉑"]
        T --> U["㉒"]
        U --> V["㉓"]
        V --> W["㉔"]
    end
    subgraph Right_Circuit
        R["㉕"] --> S
        S --> Y["14"]
        Y --> Z["15"]
        Y --> AA["16"]
        Y --> AB["17"]
    end
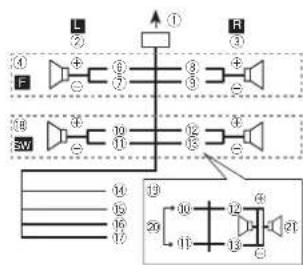
Perform these connections when using asub-woofer without the optional amplifier.
text_image
L ① F ② ③ ④ ⑤ ⑥ ⑦ ⑧ ⑨ ⑩ ⑪ ⑫ ⑬ ⑭ ⑮ ⑯ ⑰ ⑱ ⑲ ⑳ ㉑ ㉒ ㉓ ㉔ ㉕ ㉖ ㉗ ㉘ ㉙①Topowercorcinput
②Left
③Right
④ Frontspeaker
⑤Rearspeaker
⑥White
(7)White/black
⑧Grav
⑨Grav/black
d@Green
(1)Green/black
⑫Violet
⑬Violet/black
⑭Black(chassisground)
Connectloaclean, paint-freemel allocation.
15Ye ow
Connecttotheconstant12Vsupplytermi-
na
16Red
Connect to terminal controlled by ignition
switch(12VDC).
⑰Blue/white
Connectosystemcontrolterminalofthe
poweramporauto-antennare aycontroller-mina (max.300mA 12VDC).
⑱Subwoofer(4Ω)
Section
Installation
When using asubwooferof70W(2Ω), be suretoconnectthesubwooferlotheviolet and violet/blackleadsofthisunit.Donot connectanythingtothegreenandgreen/blackleads.
②Notused
②Subwoofer(402) × 2
Notes
- Witha2speakersystem, donctconnectanythingtothespeakerleadsthatarenotconnectedlospeakers.
- Changetneinitialmenuofthisunit.Refero SP-P/OMODE(rearoutputandpreoulselting)onpage8.
Thesubwooferoutoutofthisunitismonau- ral.
Poweramp(soldseparately)
Performtheseconnectionswhenusingtheo- tionalamplifier.
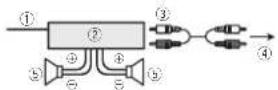
①Systemremolecontrol
Connect to Blue/whitecable.
②Poweramp(so/dseparately)
③ConnectwithRCAcables(soldseparately)
④ToRearouloulsubwooferouloul
⑤Rearspeakcrorsubwoofer
Installation
Important
- Checkall connections and systems before final installation.
- Donotuse:unauthorizedpartsasthismay cause malfunctions.
- Checkall connections and systems before final installation.
-
Donotuse:unauthorizedpartsasthismay cause malfunctions.
-
Consultyourdea enfinstalationrequires drillingofholesorothermodificationslothe vehicle.
- Donotinstallthisunitwhere: — tmayinterferewithoperationofthevehicle. — tmaycause injury;opassengerasaresult ofasucidenstop.
- These semiconductor laser will be damaged if it overheats. Install this unit away from not places such as near the heater outlet.
- Opt mumperformanceisootainedwhenthe unitisinstalledatanangleoflessthan80°.

- Wheninstalling,loensureproperhealdispersalwhenusingthisunit,makesureyouleavocamplospacebehindthercarpanolandwrapanyloosecablessotheyarenolblockingtrentvents.

DINfront/rearmount
Th sunitcanbeproperlyinstalled using either front-mountorrear-mountinstallation. Usecommerciallyavailablepartswheninstalling.
Installation
DIN Front-mount
1Insertthemountingsleeveintothedashboard.
Fornstellation nshallowspaces, usethesup- pliedmounlingsleeve. If thereisencoughspace, usethemountingsleevethatcamewiththev- hicle.
2Securethemountingsleevebyusinga screwdrivertobendthemetaltabs(90°)into place.
①Dashboard
②Mount ringsleeve
3Installtheunitasillustrated.
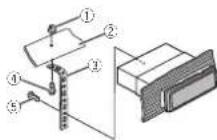
①Nut
②Firewallormetalsupport
③Metal strap
④Screw
⑤Screw(M4×9)
■ Makes sure that the unit is installed securely in place. An unstable installation may cause skipping other malfunctions.
DIN Rear-mount
1 Determinetheappropriateposition wheretheholesonthebracketandtheside oftheunitmatch.
2Tightentwoscrewsoneachside.

①Trusscrew(5mm×8mm)
②Mountingbracket
③Dashboardorconsole
Removing the unit
1Removethetrimring.

①Tirring
②Notchedtab
- Releasing the front panel allows easier access to the trim ring.
- When reattaching the trimming point the side with then notch adtabrown.
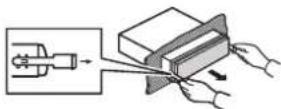
2Insertthesuppliedextractionkeysinto bothsidesoftheunituntiltheyclickinto place.
Installation
3Pulltheunitoutofthedashboard.
Removingandre-attachingthe frontpanel
You can remove the front panel to protect your unfromtheft. Pressthedetachbuttonandpushthefront panelupwardandpulltowardyou. Fordetails refer to removing the front panel to protect your unfromtheftandire-attaching the frontpanelpage4.
Additionalinformation
Troubleshooting
| SymptomCauseAction | ||
| Tredisplay automatically returnstoth ordinarydis play. | Youdidnot performancyopera tionwithin about30seconds. | Performoperation again. |
| Theropeat playrange changesun- expectedly. | Dependingon therepeatplay range,these- lecrearange maychange when another folderortrackis beingselected orduringfast forwarding/re- versing. | Selecttherepeat playrangeagain. |
| Asubfolders notplayed back. | Subfolderscan- notbplayed whenFLD(fold- errepeat)isse- lecero. | Selectanotherre- peatplayrange. |
| NOXXXXap- pearswnena, displays playls changoo!NO TITLE forex- ample) | There snowem- bededexin- formation. | Switchthedisplay orslayanother track?ila. |
| Theunitis malfunction- ng. Thereisinter- ference. | Youareusinga device,suchas acellular phone,that transmisselect- fricovasnear theunit. | Moveelectrical devices that may because'nlein- terorerceaway fromtheunit. |
Errormessages
When you contact your dealer or your mearest PionsorServiceCenter, besuretonotetheerror message.
Common
MessageCauseAction
| AMPERRORUnifalIslooperatorspeaker connections incorrectly correct to protectivacircuitis activated. | Check the speaker-connection if themessagefalls loud soapereven afterthoenginels switchedoff/on, contactyourdeal-oranaunor-zed Pioneer ServiceStation forassistance. |
CDplayer
MessageCauseAction
| ERROR-07,11,12,17,30 | Thediscisdirty.Clanthedisc. | |
| Thediscis scratched. | Replacethedisc. | |
| ERROR-07,10,11,12,15,17,30,A0 | thereisanelectricalormechanicalerror. | TumtheignitionswitchO-HandbackON,orswitchteacliffertensource,thenbacklitheCD player. |
| ERROR-15Theinserteddisc sblank. | Replacethedisc. | |
| ERROR-23UnsupportedCDformat. | Replacethedisc. | |
Appendix
Additionalinformation
MessageCauseAction
| FORMAT | Sometimes | Wait until the |
| READ | thereisade ay betweenthe startofplayback andwhenyou starttchearany sourd. | messagedisappearsandyou hearsound. |
| NOAUDIOThe inserted | Replaced disc. |
| discdoesnot | |
| containany | |
| playable of los. |
| SKIPPEDTheinserted disconcains DRMprotected files. | Replacethedisc. |
| PROTECTA(Thefleson theinserted discarc embeddedwith DRM. | Replacelted sc. |
USBstoragedevice
MessageCauseAction
| FORMATREAD | Sometimes therecisade ay between the startofplayback andwhenyou starttoharany sound. | Wait until the messagedisappearsandyou hearsound. |
| NOAUDIOThereareno songs. | Transfartheaudio filestotheUSB storagedevice andconnect. | |
| Theconnected USBsoragedevicehassecur ityenacled. | FollowtheUSB storagedevicin-structionstd s-ablethesecunty. | |
MessageCauseAction
| SKIPPEDTheconnected USB3storagedevicecontains filesembedded withWindows Media®DRM9/10. | Playanaudiofile notembedded withWindows MediaDRM9/10. |
| PROTECTAllthoflocisin | Transferacuio |
| theUSBstorage devicesreem-bdddodwith WindowsMedia | filesnotom-beededwithWindowsMedia |
| DRM9/10tothe | |
| DRM9/10. | USBstoragede-viceandconnect. |
| N/AUSBTheUSBdeviceconnecteddoisnotsupportedbyth sun t. | ConnectaUSBMassStorageClesscompliant device.Disconnect yourdevicancoreplacewithacompaticUSBstoragedevice. |
| CHECKUSBTheUSBconnectororUSBcap enasshort circuited. | CheckthattheUSBconnectororUSBcableisnotcaughtinsomethingordam- aged. |
| TheconnectedUSBstoragede-viceconsumesmonethanmaxi-mumal owablecurrent. | D sconnecttheUSBstoragede-viceandidonotusat.Turethegitor switchtoQTT,thentoACC-orONandthenconnectonlycompliant USBstoragedevices. |
Additionalinformation
MessageCauseAction
| ERROR-19:Commun cather failed. | Performance of the following operations.-Turn the ignition switch OFFand back ON.-Disconnect the USB storage device,-Changeload difference source.I then return to the USB Source. |
| ERROR-23USBstoragedo | USBstoragedo |
| vicewasnotfor | viceshouldacto |
| maltedwith | maltedwith |
| FAT12,FAT16or | FAT12,FAT16or |
| FAT32. | FAT32. |
| STOPThereareno songs in the current list. | Selectalistthat contains songs |
Handlingguidelines
Discsandplayer
Useonlycisostnatfeatureeitheroftnefollowing twologos.


Use12-cmdiscs.Donotuse8-cmdiscsoran adapterfor8-cmdiscs.
Useonlyconventional,fullycircu ardiscs. Donot useshapeccips.

DorctinsertanythingotherthanaCDintotho CDloadingslot.
Dorctusacracked,chipped,warped,orother- wisedamageddiscsastheymaydamagetheplay- er.
Unf nalizedCD-R/RWdiscscannotbeplayed back.
Doratouca thereacordedsurfaceofthediscs
Stored discsinthe reaseswhen notinuse.
Donatadlachlabels, writeonorapplychemicals tothesurfacecothediscs.
TocleanaCD, wiethed scwithasoftc othoutward from the center.
Condensat or may temporarily impair the player's performance. Let rest for about one hour load just to warmer temperature. Also, we peany dampelosoft with asortcloth.
Playbackofdiscsmaynotobepossiblebecauseof dsccharacteristics,dscformat,recordedapplication,playbackenvironment,storageconditions,andsoon,
Roadshocksmayinterruptdisplayback.
Read the precautions for disc before using them.

En
Additionalinformation
When using discstatcan beprinted on label surfaces, check the instructions and the warnings of the discs. Depending on the discs, inserting and ejecting may not be possible. Using such discs may result in an agetothisequipment.
Donotattachcommerciallyavailable labelsor othormaterialstothediscs.
- Thed scsraywarpmakingthediscunplayable.
• The labels may come off during playback and prevent ejection of the discs, which may result in damage to the equipment.
USBstoragedevice
Address any questions you have about your USB storage device to the manufacturer of the device.
ConnectionsviaUSBhucarenotsupported.
Donotconnectanythingothert nanalUSBstor- agedevice.
HirmlysecuretheUSBstoragedevicownendriving. Don't telltheUSBstoragedevicefalonla the floor, where tmaybecomejammacunderthe brakooracceleratorportal.
Depending on that USB storage device, the following problem smayoccur.
•Operat or smayvany.
- The storageevicemaynolberecogned,
- Filesmaynotbeplayerbackproperty.
• The device may generate noise in the radio.
DualDiscs
DualDiscsaretwo-sideddiscstathavearecordableCDforeudioononescaandarecordableDVDforvidecontrheother.
Since the CDside of Dual D scsis not physically compatible with the general CD standard, it may not be possible to play the CDs with the sumit.
Frequent loading and ejecting of a Dual Disc may result in scratches on the disc. Serious scratches can be at playback problems on sun't in some cases, a Dual Disc may become stuck in the disc loading slot and will not reject. To prevent this, were recommend you refrain from using Dual Disc with this unit.
Pleaserefer totheinformationfromthediscoman-
facturerformoredetailedinformationabout
Dual Discs.
Compressedaudio compatibility(disc,USB)
WMA
Fileextension.wma
B trate/48kbpsto320kbps(CBR), 48kbpsto 384kops(VBR)
Sampling frequency: 32kHz, 44.1kHz, 48kHz
WindowsMediaAudio Professional, Lossless. Voice/DRMStream/Streamwithvideo:Notcompatible
MP3
Fileextension:mp3
Btrata:8kbpsto320kops(CBR),VBR
Sampling frequency: 8kHz to 48kHz (32kHz, 44.1kHz, 48kHz foreemphasis);
Compatio cID3tagversion:1.0.1.1.2.2.3.2.4 (ID3tagVersion2,xisgivenpri onlyoverVersion 1.x.)
MSU playl st Notcompatiole
MP3i(MP3interactive),mp3PRO:Notcompatible
Additionalinformation
WAV
The extension: way
Quantization points:Band16(LPCM).4(MS ADPCM)
Sampling frequency: 16kl zto48kl Hz (LPCM), 22.05 kHz and 44.1 kHz (MSADPCM)
Supplementalinformation
Only the first 32 characters can be displayed as a filename (including that extension) or folder name.
This sun tmayrctoperatecorrectlydepending on the application used to encode WMAfiles.
Theremaybeaslightdelayatthestartofplayback ofaudiofilesembededwithmagedates:audio filesstoredon a USB storagedeviceth athas numerouslopierhierarchies.
Disc
Playableolderhierarchy:uptoeightiers(Apracticalhierarchyislessthantwotiers.)
Plavable folders:uptc99
Playable files: upto399
FI esystem:ISO9660Leveland7.Romeo.Joller
Multi-session playback: Compatible
PacketwritedalatransferNotcompatible
Regardless of the length of plank sections between the songs from the original recording, compressed audited scs play with short pause between songs.
USBstoragedevice
Playablefolder:h erarchyuptoeghliers(Apracticalh erarchylslessthantwothers.)
Playablefolders:upto500
Playablefiles:upto15000
Playbackofcopyright-protectedfiles:Notcompatible
Partitioned USB storage device: Only the first partition can be played.
Thoramayboasl ghtdelaywhenstart ngplay backofaud of i esonaUSBstoragedevicewith numerousfolderhierarch es.

CAUTION
• Pioneer cannot guarantee compatibility with all USB mass storage devices and assumes no responsibility for any loss of dacon mediaplayers, smartphones or other devices while using this product.
- DonolleavediscorsaUSBstoragedevice inanyp acethatissubjecttohightempratures.
Sequenceofaudiofiles
Treusercannolassignfoldernumbersand specify playbacksequenceswiththisunit.
Appendix
Additionalinformation
Exampleofahierarchy

Folder
Compressed audiofile
0 to 5:Folder number
①to⑥:Playback sequence
Disc
Folperse selectionsequenceorotheroperation may differ depending on the encoding or writing software.
USBstoragedevice
PlaybacksequenceisthesameasrecordedsequenceintneUSBstoragedevice.
Tospecifythe playbacksequence, the following methodisrecommended.
[1]Createafilenamethat includesnumbers thatspecify:theplaybacksequence(e.g., 001xxx.mp3and099yyy.mp3).
2 Putthosefilesintoafolder. 3 SavethefoldercontainingfilesontheUSB storagedevice.
I however, depending on the system environment, you may notice a be able to specify the playback sequence.
For USB portable audio players, these sequences different and depend on the player.
Copyrightandtrademark
iTunes
Aopieand TunesaretrademarksofAppleInc., registered in the U.S. and other countries.
MP3
Supply of this product only conveys a license for private, non-commercial use and does not convey a license or imply any right to set his product in any commercial (i.e. revenue generating) real-time broadcasting (terrestrial, satellite, cable and/or other media), broadcasting/streaming via internet, intranets and/or other networks or other electronic content distributions systems, such as pay-audic audio-on-demand applications. An independent licensor for such uses is required. For details, please visit http://www.mplicensing.com.
WMA
WindowsMediaiseltheraregistered,trademark,ortrademarkotMicrosoftCorporationintheUnitedStalesand/ortherccourries. ThisproductincludestechnologyownedbyMicrosoftCorporationanocannotocusdordistributedwithoutalicensefromMicrosoft.Licensing,Inc.
Additionalinformation
Specifications
General
| Ratio powersou...14.4VDC | |
| allowalvalo/lagrange: 12.0/0to14.4VDC) | |
| Groundingsystem | Negativetype |
| Maxim urr curren consumption | 10.6A |
| Dimensions(W×H×D): | |
| D/N | |
| Chassis....178mm×50mm×16brm | |
| Nose....188mm×58mm×16mm | |
| D | Chassis....178mm×50mm×16brm |
| Nose....1,0mm×46mm×16mm | |
| Weight | kg |
Audio
| Maximum poweroutput, 50W×4 | |
| 70W×1/20("subwoofer") | |
| Continuouspoweroutput | 22W×4/30Hz to 1500Hz, 687Hz, q00ac, bothchanc, nbd (low) |
| Load impedance | 4.0 (4.0 to 8.0 allowable) |
| Precurmaximumourpurlows | 2.0V |
| Loudnessoscircuit | 10d3(100Hz) - 5.5dB (10d 2Vc volume - 30dB) |
| Equalizer(5-Basic Graphic Equalize): | |
| Frequency | 80Hz/250Hz/200Hz/2.5Hz/8kHz |
| Equal zationrange | +12dB(2dBstop) |
| Susteofer(mono) | |
| Frequency | 50Hz/63Hz/200Hz/100Hz/12bHz/160Hz/200Hz |
| Slope | -8 dBx/ct, -12 dBx/ct |
| Gain | -6dBto-24dB |
| Phase | Norme/Reverse |
CDplayer
| System......Compactdiscaudosystem |
| Usablediscs......Compactdisc |
| Signal to nonscale.....94dB(1kHz)(LC Anclwork) |
| Number of channels.....2(stereo) |
| M73ecoding format.....VPEG-1&2AudioLayer3 |
| WMAdecoding format.....Ver.7,7,1,8,9,10,11,12(2ch audio) |
| (Wndows/VodiaPlayer) |
| WAVsigna format.... Linear PCM&MSADPCM (Non-compressed) |
USB
JSLs standardspecification
USR2 full speed
Maximl mclnrentsupply
JSBClass....MSC(MassStorageClass) Flesystem....FAT12,FAT16,FAT32
VP3decodingformat.....MPFG-42Audio layer? WVAdecodingformat.....Ver.7.7.1.3.9.10,11.12;2ph
(Windows\mediaPlayer)
WAVsigna format.... linear PCM&MSADPCM (Non compressed)
FMtuner
| Frequency range......87.5MHz to 108.0MHz |
| Usable sensitivity......9 dB (0.8μV/75Ω monc, 5/N:30dB) |
| Signal-to-noise ratio......72 dB (IFC-Anetwork |
MWtuner
Frequency range....531 kHz to 1602 kHz (9 kHz)
530kHz to 1640kHz (10kHz)
Jsab esensitivity.....26μV(S/N:20d 3)
Signal to noise ratio.....62dB(IEC Anetwork;
SWtuner
| Frequency range......2300Hz lto7735kHz(2500d lto2496kHz,2940d lto215kHz,4540d lto5175kHz,5820d lto645kHz,7100d lto7785kHz,9500d lto21975k Hz(9500d hto10135kHz,11500d hto19213k Hz,13570d lto13870k Hz,15100d lto15735k Hz,17500d lto17985k Hz,19010k lto18130k Hz,21340k lto21975k Hz |
Jssab esensitivity.....28μV(S/N:20d5)
Signal-to-noiseratio.....62dB(IEC-A network)
Note
Specificationsandthedesignaresubjectto modificat orswithoutnotice.

natural_image
Two horizontal rounded rectangular shapes with rounded ends, no text or symbols present.
English
15En
Antesdecomenzar
text_image
Labeled diagram of a device rear panel with numbered components for identificationParteParte
NEWS/INFO—POPULAR—CLASSICS—OTHERS
ListaPTY
NEWS/INFO(notic)aseinformación
MWondacorta OFF—LV1—LV2
(10.4H), 90, 117 men = 30.6H
Ease......Normal/Inverse
94J5(1kHz)(renIFC-X)
Numerodecanales.....2(estereo)
(Windows/MediaPlayer)
FormatodesenaWAV....PCMlineal&MSADPCM
(Nocurriprimico)
USB
Ver. 7, 1, 3, 9, 10, 11, 12
(audio2canales)
(Windows Mud iAPlay)
Formatodesena|WAV....PCM|lineal&MSADPCM
(locomprimico)
SintonizadordeFM
11530kHza12215kHz,de
13570kHza13870kHz.de
1b100kHza1b736kHz.de
1/500kHz a 17985kHz,de
18015kHz 18135kHz de
21340kHz@21975kHz
Sens Bilidadulizable....280V(sofial/ruide 20dB)
text_image
Labeled diagram of a device rear panel with numbered components for identification| ParteParte | ||
| 1▲(Ejotar) | 8 | EoLM (localizador) |
| 2 SRC/OFF | 9 BAND | |
| 3 MULTI-CONTROL(M.C.) | 10 | →(Vo tar)/DIM-MER(Redutorde luz) |
| 4 Q (Lista) | 11 ◀▶ | |
| 5 DISP/DISP OFF | 12 | 1/∧ e6/ ≈ |
| 6 Slotdocarrega menodedisco | 13 | Conectordocon tradaAUX(co rectoresténeo 3,5 mm) |
| 7 PortaUSB | 14 | BotãoDesencal-xar |

CUIDADO
text_image
Diagram of a 20-pin electronic component with numbered pins and internal connectionsFMSTEP(PassodesintoniaFM)
Normalmente, opassodesintoniaFMempregaco pelasintoniaporbuscaéde50kHz. QuandoAF
NEWS/INFO—POPULAR—CLASSICS—OTHERS
ListadePTY
MW/shortwave:OFF—LV1—LV2
•FLD—Repoteapastaatual
SUB.W/SUB.Wforselectionadoem
SP-P/OMODE. Paraobterdeta hes, consulte
FMSTEP(PassodesintoniaFM)
Normalmente, opassodesintoniaFMemopregado pelasintonarporbuscaéde50kHz. Quando AF ou IAestivorativo, opassodesinton amudaráulomaticamentepara100kHz Podeserpreferível ajustaropassodesintoniaab50kHz cuando AFestivorativo.
• Opassodesinton aperraneceab/0kl-hzuranleasintonianmanual.
T Pressione M. C. parasolacionaropassodesintonia FM.
50(50kHz)—100(100kHz)
MWSTEP(Passodesintoria(MW))
OpassodesintoniaMWpodesera ternadoentre 9kHz e 10kHz, Aquilizarosintonizadora Américado Norte, Central odo Sul, reajusleopasso desintoniado 9kHz (531kHz a 1602kHz permissive) para 10kHz (530kHz a 1640kHz permissive).
1) Pressione M.C. paraselecionar passodesintonia MW.
9(9kHz)—10(10kHz)
SP-P/OMODE(A) ustedasaldatraselreapré-saída)
Windows/ed aAudioProfessional, Sempercas, Voz/DRMStream/Streamcomvideo:Nãocompativel
MP3
Extensádearqu vo.mp3
Taxadebits:8kbpsa320kbps(CBR).VBR
Frequenc adeamostragam 8kHz/48kHz (32kHz/44,1kHz/48kHz paraéntase)
MP3i(MP3intorat vo),mpSPRO:Náocomestivel
WAV
(Windows/Media Player)
Formatodes nalWAV.....PCMlinear&MSA7PCM
(Náccompactado)
USB
natural_image
Two horizontal oval shapes with rounded ends, one black and one white, separated by a vertical line (no text or symbols)Português(B)
45Ptbr
開始使用前
感謝您購買本先鋒產品
text_image
Labeled diagram of a device rear panel with numbered components for identification部位部位
| 1▲(出)8 | EQM(等化器) | ||
| 2SRC/OFF9BAND | |||
| 3 | MULTI-CONTROL(M.C.) | 10 | (返回)/DIMMER(顯示帶亮度調整) |
| 4 | 9(清單) | 11 | </► |
| 5 | DISP/DISP OFF | 12 | 1/∧至6/↔ |
| 6 | 弹片槽 | 13 | 40×输入插孔(3.6mm立牌聲插孔) |
| 7 | DSS焊 | 14 | 拆卸按钮 |

注意
text_image
Diagram of a 20-pin electronic component with numbered pins and internal connections部位操作功能
TM: OFF-LV1-LV2-LV3-LV4
KW/短波:OFF LV1 LV2
natural_image
Two horizontal oval shapes with rounded ends, one black and one white, separated by a vertical line (no text or symbols)甲文
572htw


8Zhtw

natural_image
Two horizontal oval shapes with rounded ends, one black and one white, separated by a vertical line (no text or symbols)甲文
592htw


natural_image
Two horizontal rounded rectangles side by side, no text or symbols present
معلومات إضافية
معلومات إضافية
تَحُط

USB
| USB 2.0 | العربية USB م客户端 المفابية |
| (العربية) | |
| MSC | USBة |
| FAT12, FAT16, FAT32 | (العربية) |
| MPEG-1 & 2 Audio Layer 3 | MP3 |
| (العربية) | WMA |
| (Windows Media Player) | |
| Linear PCM & MS ADPCM | (WAV |
FM
(ض tight正面) CLOCK SET
HPF SETTING, SUB.W CTRL, SUB.W
HPF SETTING, SUB.W CTRL
The image is too blurry to recognize any text content.
(手指 Assistance) CLOCK SET
ل诱يط自家ة M.C. أفر
ال Editible M.C. إ功效 على 2
الحصيل المُم.
text_image
Labeled diagram of a device interior with numbered components for identification(Windows Media Player)
(Windows Media Player)
Windows Media Audio Professional -Lossless Voice/DRM Stream/Stream
m = 311
m = 311
catalus
عَقْبَ، تغیر کد
。
The Ground Truth image displays a single, solid horizontal line. According to Rule 2 (UNDERSCORE & LINE RULES), if the GT contains lines used for stylistic emphasis or as background elements (like ruled paper), the OCR result must ignore them. The provided OCR content is "____", which consists of four underscores. This is incorrect because underscores are not equivalent to a solid line and are not permitted under the “Stylistic/Background Lines (Ignore)” rule. The OCR has hallucinated underscores where none should exist in the GT, violating the “Stylistic/Background Lines (Ignore)” rule. Therefore, the OCR result is inconsistent with the Ground Truth.
زاحفالاحردنش
العربية
A
..
^1 ^2
[Unreadable]
[Unreadable]
پیام های خطا
Pioneer
يُيم خطارا بِه نَيَا لِنَّلَاع دَهِيد.
حدا کردن دستگاه
1 جاکردن حلفه نظيم.
###
(2) ٢ ٤ ١
The image is too blurry to recognize any text content.
•
2.1.1.
a_1 =
این دستگاه

① ورودی سیم برق
| SUB.W. HPF SETTING & SUB.W CTRL | |
| IFP, W: HPF SETTING & SUB.W CTRL | |
| IFP, W: HPF SETTING & SUB.W CTRL | |
| IFP, W: HPF SETTING & SUB.W CTRL |
text_image
Labeled diagram of a device interior with numbered components for identification| ### | ### | 1 | |
| (equalizer) E### | 3 | (###) ▲ | 2 |
| BAND | 9 | OFF/SRC | 3 |
| (###) DIMMER### | 10 | MULTI-CONTROL(M.C.) | 4 |
| ### | 11 | (###) ▲ | 5 |
| ### | 12 | DISP OFF/DISP | 6 |
| A### | 13 | ### | 7 |
| (###) ### | 14 | USB ### | 8 |

Visit us on the World Wide Web at
http://pioneer.jp/group/index-e.html
Pioneer Gulf.FZE
http://www.pioneer-uae.com
Pioneer Electronics Australia. Pty.Ltd
http://www.pioneer.com.au/
Pioneer Electronics Asiacentre.Pte
Pioneer (HK) Ltd.
Pioneer High Fidelity Taiwan Co., Ltd.
http://www.pioneer.com.sg
http://www.pioneerhongkong.com.hk
http://www.pioneer-twn.com.tw
Pioneer International Latin America S.A.
http://www.pioneer-latin.com
PIONEERCORPORATION
1-1, Shin-ogura, Saiwai-ku, Kawasaki-shi,
Kanagawa212-0031,JAPAN
PIONEERELECTRONICS(USA)INC.
P.O.Box1540,LongBeach,California90801-1540,U.S.A.
TEL:(800)421-1404
PIONEERELECTRONICSOFCANADA, INC.
340FerrierStreet,Unit2,Markham,OntarioL3R2Z5,Canada
TEL:1-877-283-5901
TEL:905-479-4411
PIONEEREUROPENV
Haven1087, Keetberglaan1, B-9120Melsele, Belgium/Belgique
TEL:(0)3/570.05.11
PIONEERELECTRONICSASIACENTREPTE.LTD.
253AlexandraRoad,#04-01,Singapore159936
TEL:65-6472-7555
PIONEERELECTRONICSAUSTRALIAPTY.LTD.
5ArcoLane,Heatherton,Victoria,3202Australia
TEL:(03)9586-6300
PIONEERELECTRONICSDEMEXICO,S.A.deC.V.
Blvd.ManuelAvilaCamacho13810piso
Col.LomasdeChapultepec,Mexico,D.F.11000
TEL:55-9178-4270
先锋股份有限公司
台北市內湖區瑞光路407號8樓
電話:886-(0)2-2657-3588
先锋电子(香港)有限公司
先锋电子(香港)有限公司
©2012PIONEERCORPORATION.
Allrightsreserved.
PrintedinThailand