AlarmDock Halo 2 - Speaker GEAR4 - Free user manual and instructions
Find the device manual for free AlarmDock Halo 2 GEAR4 in PDF.

User questions about AlarmDock Halo 2 GEAR4
0 question about this device. Answer the ones you know or ask your own.
Ask a new question about this device
Download the instructions for your Speaker in PDF format for free! Find your manual AlarmDock Halo 2 - GEAR4 and take your electronic device back in hand. On this page are published all the documents necessary for the use of your device. AlarmDock Halo 2 by GEAR4.
USER MANUAL AlarmDock Halo 2 GEAR4
The quick brown fox jumps over the lazy dog.
1981.124mm
BACK COVER COVER INNER FLAP OUTER
中
gear4
text_image
9:42" GraooAlarmDock™ Halo 2
User Manual
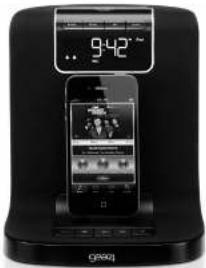
Thank you for buying the AlarmDock Halo 2, app-enhanced alarm clock for iPod and iPhone. Please read over this manual before use and retain it for future reference.
PRODUCT NO: PGS4SPG50
POWER ADAPTER: SEE"002011E3
INPUT: 100-24Hz/50GHz/0.64
OUTPUT:SV·2A ⊖—⊕—⊕
SideOneDummy 2009
The Copyright Actorem & SciTech Sell 2008
For more information visit www.gesightan.com
GEAR FG540 MANUAL COVER VI.1incd 1050623K COVER COVER INNER FLAP OUTER
[NO TEXT]


1

6

12

18

24

30

52

42 4736


AlarmDock Halo 2 Please read before use.
Features:
■ FM radio with 9 programmable preset stations
■ Charges iPod / iPhone
■ 12 / 24 hour clock with alarm - wake up to radio, your iPod / iPhone or buzzer
Dimmable LCD display
■ 2 programmable alarms
■ Snooze control
■ Sleep countdown timer
■ Line-in port for use with other music players
APP-ENHANCED:
Smarter than your average speaker, free app available from the App Store;
■ Use your iPhone or iPod touch to control the speaker wirelessly. To use this feature, dock a 2nd iPhone or iPod touch, ensure both devices are connected to Wi-Fi and select the control speaker feature in the SmartLink app.*
■ Auto-tune and save your favourite stations. The app screen displays what you're listening to.**
■ Auto-Sync time and alarms between your iPhone and the speaker. Dim both screens
using swipe gestures on the clock display.
■ Access your music library through the app and display your favourite album art.
N.B. App-enhanced features require GEAR4 SmartLink app for iPhone 4, iPhone 3GS, iPhone 3G or iPod touch (2nd, 3rd and 4th generation only) with iOS 3.1.3, iOS 4.0 or higher. App screens correct at time of print. Wireless remote control feature requires a 2nd docked iOS device, using SmartLink and Wi-Fi.
*Please ensure that you 'allow remote' in the SmartLink settings menu from the 2nd docked iOS device.
**Where RDS broadcast is available.
Getting started:
■ Install the CR2025 coin-cell battery in the battery compartment on the bottom of the unit. This battery keeps clock settings form being lost in the event of a loss of power.
- Plug the power cable into the back of the unit and then into the mains supply.
■ To activate the speaker, press the POWER button.
■ To select the mode, press the MODE button to scroll between the options (iPod / FM / AUX).


■ When in Standby, Press the SNOOZE button to adjust the LCD screen brightness. There are 5 brightness levels.
■ The LCD can also be changed using the ⚙ button on the remote control.
For use with iPod / iPhone:
■ Carefully insert your iPod / iPhone into the dock.
N.B. When connecting your iPhone or iPod touch to AlarmDock Halo 2 for the first time, your device will display a notification that the accessory requires an application that is not installed. Tap OK to go to the SmartLink App download page. Tap the Install button to begin your download. The GEAR4 SmartLink application is free of charge.
■ Press the MODE button to select iPod mode.
■ Press play on your iPod / iPhone and control the music using your device or use the remote control to navigate the iPod / iPhone menus.
For use with FM radio:
■ Press the MODE button to select FM mode.
■ Pressor ▶ to scan to the frequency desired.
■ Press and holdor ▶ to scan automatically to the next clear frequency.
■ To select a preset radio station, press and scroll between presets.
TO SAVE A PRESET FREQUENCY:
■ You can save up to 9 FM presets.
■ Adjust the radio to your desired frequency then press and hold the ▶ button until the display flashes. Input the desired memory position by pressing the ◀ / ▶ buttons. Press the ▶ button again to save.
To set the clock:
■ Turn off any active alarms (so no alarm icons are displayed).
■ Press the SET button.
■ '12h' will begin flashing. Press/▶buttons to select either 24 hour or 12 hour. Press the SET button to save.
■ The hour display will start flashing. Press ◀/▶adjust the hour. Press the SET button to save.
■ The minute display will start flashing. Press ◀◀ /▶to adjust the minutes. Press the SET button to save.
■ One of the days of the week will start flashing. Press ◀◀/▶to select the day of the week. Press the SET button to save.
To set the alarm:
■ Press the ALARM button until the alarm you want to set is illuminated.
■ Press the SET button.
■ The hour display will start flashing. Press ◀◀ / ▶to adjust the hour. Press the SET button to save.
■ The minute display will start flashing. Press ◀◀ / ▶to adjust the minutes. Press the SET button to save.
The days that the alarm is set to will start flashing. Press ◀◀/▶to choose between weekends, weekdays or all week. Press the SET button to save.
- Press the/▶button to scan through alarm modes – iPod, FM or buzzer. Press the SET button to save.
■ Press the ▶ button to set the volume (between 0 and 32). Press the SET button to save.
Sleep / snooze functions:
■ Snooze: When the alarm sounds, press the SNOOZE button once to delay the alarm by 10 minutes.
■ Press any other button to stop the alarm for that day.
■ The alarm will ring for 1 hour if no buttons are pressed.
■ Sleep: The sleep timer switches the unit off automatically after a set interval.
■ To activate the sleep timer, press the SLEEP button repeatedly to select the desired time (OFF, 10min, 20min, 30min, etc).
Leave the desired number on the screen to set. After a few seconds it will disappear and has now been saved. SLEEP will be displayed on the screen.
■ To turn off the sleep timer, press the SLEEP button repeatedly until OFF is displayed.
Register your AlarmDock Halo 2 to activate your warranty and receive product updates at www.gear4.com/register
Please ensure that your iPod / iPhone is using the latest software version. To update the software, connect your iPod / iPhone to iTunes. If there is a newer software version available you will be prompted to upgrade.
Copyright © 2011 Disruptive Limited. All rights reserved. Reproduction in part or in whole is prohibited. GEAR4, SmartLink and AlarmDock are trade marks of Disruptive Limited. iPhone, iPod, iPod nano, iPod classic and iPod touch are trade marks of Apple Inc., registered in the U.S. and other countries.
"Made for iPod" and "Made for iPhone" mean that an electronic accessory has been designed to connect specifically to iPod or iPhone respectively and has been certified by the developer to meet Apple performance standards.
Apple is not responsible for the operation of this device or its compliance with safety and regulatory standards.
WArnInG
To reduce the risk of fire or electric shock, do not expose this unit to rain or moisture.
cAuTlon
Use of controls or adjustments of performance or procedures other than those specified may result in hazardous radiation exposure.
Danger of explosion if battery is incorrectly replaced. Replace only with the same or equivalent type.
Batteries (battery pack or batteries installed) shall not be exposed to excessive heat such as sunshine, fire or the like.
unpAcKInG AnD InstTALLATION
Unpack your unit carefully. We recommend that you save the packaging in case you ever need to store your unit. To avoid damage, never place the unit or its batteries near radiators, in front of
heating vents, under direct sunlight or near water.
For your sAFeTy
- When disconnecting the power supply, pull the plug first. Do not pull the cord by itself.
- Never handle the power plug with wet hands, as this could cause fire or electric shock.
– Refer servicing to qualified personnel only. - Do not open the housing.
- Do not twist or pinch the power supply cord. If the plug or power supply cord needs to be replaced, ensure that it complies with the manufacturer's recommendation.
– Unplug the unit during lightning storms and when unused for extended periods of time. - Where the MAINS plug or an appliance coupler is used as the disconnect device, the disconnect device shall remain readily operable.
DisposAL
According to the European Directive 2002/96/EC all electrical and electronic products must be collected separately by a local collection system. Please act according to your local rules and do not dispose of your old products with your normal household waste.

The lightning flash with arrowhead symbol, within an equilateral triangle, is intended to alert user to the presence of uninsulated ‘Dangerous Voltage’ within the product’s enclosure that may be of sufficient magnitude to constitute risk of electric shock to person.

The exclamation point within an equilateral triangle is intended to alert user to the presence of important operating and maintenance (servicing) instruction in the literature accompanying the appliance.


CAUTION: TO REDUCE THE RISK OF ELECTRIC SHOCK DO NOT REMOVE COVER (OR BACK). NO USER-SERVICABLE PARTS INSIDE REFER SERVICING TO QUALIFIED SERVICE PERSONNEL
Fcc ruLes
You are cautioned that changes or modifications not expressly approved by the part responsible for compliance could void the user's authority to operate the equipment. This equipment has been tested and found to comply with the limits for a Class B digital device, pursuant to part 15 of the FCC rules.
These limits are designed to provide reasonable protection against harmful interference in
a residential installation. This equipment generates, uses and can radiate radio frequency energy and, if not installed and used in accordance with the instructions, may cause harmful interference to radio communications.
However, there is no guarantee that interference will not occur in a particular installation. If this equipment does cause harmful interference to radio or television reception, which can be determined by turning the equipment off and on, the user is encouraged to try to correct the interference by one or more of the following measures:
– Reorient or relocate the receiving antenna.
– Increase the separation between the equipment and receiver.
- Connect the equipment into an outlet on a circuit different from that to which the receiver is connected.
- Consult the dealer or an experienced radio / TV technician for help.
Operation is subject to the following two conditions:
1) This device may not cause interference and
2) This device must accept any interference, including interference that may cause undesired operation of the device.

Commandes de AlarmDock Halo 2
① MARCHE / ARRÊT
② MODE
③ ARRÊT MOMENTANÉ / SOMMEIL (SOMBRE EN VEILLE)
④ RÉGLAGE
⑤ ALARME
⑥ VOLUME -
⑦ VOLUME +
⑧ RETOUR RAPIDE
⑨ AVANCE RAPIDE
⑩ LECTURE / PAUSE
PRISE D'ENTRÉE POUR AUTRES LECTEURS
⑫ ENTRÉE CC
⑬ ANTENNE FM
14 COMPARTIMENT DES PILES
RISQUE D'ÉLECTROCUTION - NE PAS OUVRIR

ATTENTION : POUR RÉDUIRE LE RISQUE D'ÉLECTROCUTION, NE PAS RETIRER LE COUVERCLE NI LE FOND. CET APPAREIL NE CONTIENT AUCUNE PIÈCE RÉPARABLE PAR L'UTILISATEUR. CONSULTER LE PERSONNEL QUALIFIÉ POUR TOUTE RÉPARATION.
rèGLes De LA Fcc
Copyright © 2011 Disruptive Limited.
SOVELLUSYHTEENSOPIVA:
③ SLUMRE / SLEEP (NEDBLÆND I STANDBY)
① POWER
② MODE
④ SET
⑤ ALARM
⑥ VOLUMEN -
⑦ VOLUMEN +
SPRING TILBAGE
⑨ SPRING FREM
⑩ AFSPIL / PAUSE
11 AUX IN
12 DC-INDGANG
13 FM-ANTENNE
14 BATTERIRUM
Egenskaber:
www.gear4.com/register
Sørg for, at din iPod / iPhone anvender den seneste softwareversion. Opdatér softwaren ved at forbinde din iPod / iPhone til iTunes. Hvis der findes en nyere softwareversion, vil du blive bedt o2.8m at opgradere.
AF HENSYN TIL DIN SIKKERHED
GEAR4 One-Year Warranty
Disruptive Limited, who owns the GEAR4 brand, warrants this product to be free from defects in workmanship and materials at the point of sale and that when this product is used in accordance with the instructions for its use it shall continue to be free from defects, for a period of one (1) year from the date of original purchase.
Any damage or defects caused by a failure to follow the instructions which relate to this product or as the result of an accident, abuse, misuse, misapplication, product modification, faulty ancillary equipment, improper voltage or current, lightning or other acts of God, commercial non-home use, normal wear and tear, shipping damage or loss, damage to digital media players or damage caused by service performed by anyone other than Disruptive Limited are expressly excluded from the warranty stated above.
Disruptive Limited will, at its sole election, repair or replace any product that proves to be defective in either or both of workmanship or materials and which is covered by this warranty. If the product is no longer current or is out of stock, at its sole election, Disruptive Limited may replace your product with a similar product. Disruptive Limited's liability is limited to the repair or replacement, of any defective product under warranty and any incidental or consequential damages are expressly excluded to the fullest extent permitted by law. This warranty is not transferable and does not extend to users other than the person who originally purchased the product.
This warranty gives you specific legal rights in addition to the ones afforded you by the laws of your country and nor is this warranty intended nor does it operate to limit such legal rights.
GEAR4 | One-Year Warranty
Return Policy / Warranty Service
Warranty claims will only be valid when accompanied with proof of purchase to evidence that the product was purchased from an authorised dealer and that the claim is within allowed period. To make a warranty claim you must first contact Disruptive Limited by email to support@gear4.com stating your name, full postal address, telephone number, date and place of purchase and a detailed description of the problem you are experiencing and don't forget to include the name of the product and its serial number.
If the defect is covered by this warranty then you will be provided with a Return to Manufacturer Authorisation number and instructions for return shipment. Sending the product back to us under this warranty shall be at your expense, and the return MUST be accompanied by the original proof of purchase whilst we highly recommend that you retain a copy of this. Disruptive Limited shall not be responsible for lost or damaged products during shipment. Any product returned without the original proof of purchase will be returned without being examined or tested and such return shall be at the customer's expense.
To avoid any additional charges, all returns and exchanges must include the original packing materials, product box, all included accessories which may include, but not necessarily be limited to, power adapters or power cords, connecting cables, remote controls, adapters, insert cards and instruction manuals. The absence of any of the aforementioned items may mean that you incur a charge for their replacement. Disruptive Limited shall not be liable for any inconvenience, loss of time, or loss of use of the product.
Return Policy / Warranty Service | GEAR4
INNER FLAP INNER
INNER COVER
INNER BACK COVER
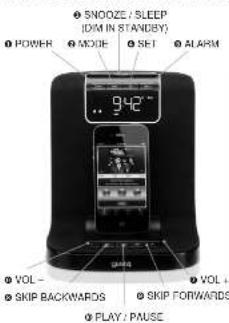
AlarmDock Halo 2 controls:
text_image
● SNOOZE / SLEEP (DIM IN STANDBY) ● POWER ● MODE ● SET ● ALARM 942° ● VOL - ● VOL + ● SKIP BACKWARDS ● SKIP FORWARDS ● PLAY / PAUSE
text_image
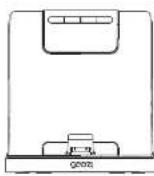
• AUX IN • DC INPUT • FM ANTENNA • BATTERY COMPARTMENTBox contents:
Contenu du coffret | Packungsinhalt
AlarmDock Halo 2

User manual Notice d'utilisation Derulzenhandbuch
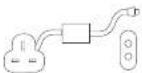
Power supply (UK & EU) Alimentation (GB & EU) Nental (SB & EU)

Back-up battery Battery de rechargo Reserve/batteria
Ramona control Telecommando Ferricbedierung
Declaration of Conformity
Product Name: GEAR4 AlarmDock Halo 2
Model: PG548/PG549
Address: Windsor House, Turnpike Road, High Wycombe, Bucks, HP12 3NR United Kingdom.
Declare that the product described below is in conformity with the relevant provisions
of the following directives and National Laws and Regulations adopting these directives
The Low Voltage Directive 2008:95/EC
The EMC Directive 2004/108/EEC
The product has been tested and assessed by application of the appropriate standards or specifications. Together with all relevant National Technical Standards and Specifications as applicable.
Standard Year Description
EN60365: 2002-A2:2010 Audio video and similar safety requirements
EN 55013: 2001TA22006 Sound and television broadcast receivers and
associated equipment. EN 55020: 2007. Flex
EN 61000-3-2: 2006-42:2009. Limits for harmonic current emissions
EN 61000-3-3: 2009 Limitation of voltage change
issued in:
High Wycombe, Bucks, United Kingdom
Date: 05/08/2011
Authorised Representative: Thomas Sore - Signature: Position: Products Director
Thomo Sun
CE FC Made in China
Made for iPod iPhone
Made for iPod touch (2nd, 3rd and 4th generation), iPod classic (80Gb, 160Gb), iPod with video. iPod nano (1st, 2nd, 3rd, 4th, 5th and 6th generation). Made for iPhone 4, iPhone 3GS and iPhone 3C.
GEARM PG540 MANUAL COVER VI.1 Indel INNER FLAP INNER
INNER COVER
INNER BACK COVER
CGC02011 1323