Marcato E-go - Bike Batavus - Free user manual and instructions
Find the device manual for free Marcato E-go Batavus in PDF.

User questions about Marcato E-go Batavus
0 question about this device. Answer the ones you know or ask your own.
Ask a new question about this device
Download the instructions for your Bike in PDF format for free! Find your manual Marcato E-go - Batavus and take your electronic device back in hand. On this page are published all the documents necessary for the use of your device. Marcato E-go by Batavus.
USER MANUAL Marcato E-go Batavus
text_image
Diagram of a mechanical device with labeled components A through F, showing wiring and connection points.natural_image
Technical line drawing of a bicycle frame with a yellow safety clip and rope (no text or symbols)natural_image
Mechanical diagram showing a bicycle frame with a yellow belt and rotating wheel (no text or symbols)natural_image
Technical line drawing of a mechanical component with a yellow arrow indicating direction (no text or symbols)natural_image
Technical diagram showing a mechanical assembly with highlighted components and directional arrows (no text or labels)natural_image
Mechanical diagram showing a yellow component mounted on a bicycle frame with rotating wheel (no text or symbols)natural_image
Diagram of a medical or laboratory device with tubing and a blue component, no visible text or symbols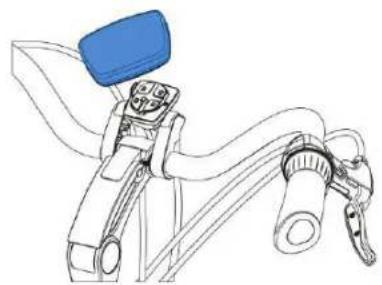
natural_image
Line drawing of a robotic arm with blue head and articulated joints (no text or symbols)3.1.3 Afstellen
natural_image
Technical diagram of a mechanical assembly with blue component and labeled 'S' (no text or symbols beyond label)3.2 Stuurbedieningsunit
natural_image
Line drawing of a mechanical device with a green arrow indicating rotation or movement (no text or symbols)
natural_image
Technical line drawing of a mechanical tool with two views (top and side), no text or symbols present4 Actieradius
4.1 Actieradius
text_image
Is cicket1.2 Safety warnings before use 24
1.3 Parts....24
1.3.1 Battery pack and recharger.... 24
1.3.2 Handlebar control.... 24
2 Battery pack and recharger.... 25
2.1 Battery pack 25
2.1.1 Removing the battery pack 25
2.1.2 Inserting the battery pack 26
2.2 Recharging the battery pack 27
2.2.1 Warnings before use 27
2.2.2 Recharging.... 28
2.2.3 Recharger and battery protection 29
2.2.4 Instructions for storage after use 29
3 Handlebar control.... 30
3.1 Display 30
3.1.1 Information....30
3.1.2 Disconnecting and securing.... 30
3.1.3 Adjusting position.... 30
3.2 Handlebar control unit 31
3.2.1 Control buttons.... 31
3.2.2 Turning the system on 31
3.2.3 Setting the assistance.... 31
3.2.4 Speed readout 31
3.2.5 The charge level 32
3.2.6 Light 32
3.2.7 Distance readout.... 32
3.2.8 Time readout.... 32
3.2.9 Temperature readout.... 32
3.2.10 Error messages 32
3.2.11 Adjusting the display's lighting level 32
3.3 Throttle 33
3.4 Handbrakes.... 33
4 Range 34
4.1 Range 34
4.2 Important factors 34
5 Transport and maintenance 35
5.1 Transport....35
5.2 Maintenance 35
6 Technical details....36
6.1 Battery details 36
6.2 Battery cell temperature ranges....36
7 Guarantee conditions and legal requirements 37
1 Descriptions
1.1 The system
The unique E-go ^® RemovE system is characterised by its removable battery which is so cleverly included in the chain guard that your bicycle cannot be identified as an E-bike. The low position of the high-power 36V Li-ion battery ensures very stable riding characteristics.
The system is equipped with two different cycling programmes. The Eco programme allows energy-efficient cycling of up to a speed of 25 km/h. The level of assistance can be set at three different levels.
The Speed programme allows the setting of six different speed levels'; at the highest of these, the system is supplying the highest level of assistance. This allows you to cycle safely at a constant speed.
1.2 Safety warnings before use
- Read the instruction manual carefully and make sure you understand it properly.
- Check your bicycle before using it for loose and/or damaged parts. Loose or damaged parts must be secured properly and/or replaced.
- Child seats may not be attached to aluminium carriers. In case of doubt, ask your dealer.
- Scratches, cracks or discolorations may occur in parts that experience serious stress. This means that the end of their economic lifespan has been reached and that they must be replaced.
- The Batavus E-go® RemovE models are exclusively intended for:
- cycling on asphalted/paved roads and paths;
- recreation and personal transport.
- The constructions of the Batavus E-go® RemovE models may never be changed.
- The E-go ^ RemovE models are not intended to be used by persons (including children) with reduced physical, sensory or mental capabilities or with a lack of experience or knowledge unless someone who is responsible for their safety keeps an eye on them or has explained how this equipment should be used.
- Keep an eye on young children to prevent them from playing with the E-go® RemovE or its individual electrical parts.
• Safety warnings for recharging the battery are given in paragraph 2.2.1.
1.3 Parts
1.3.1 Battery pack and recharger
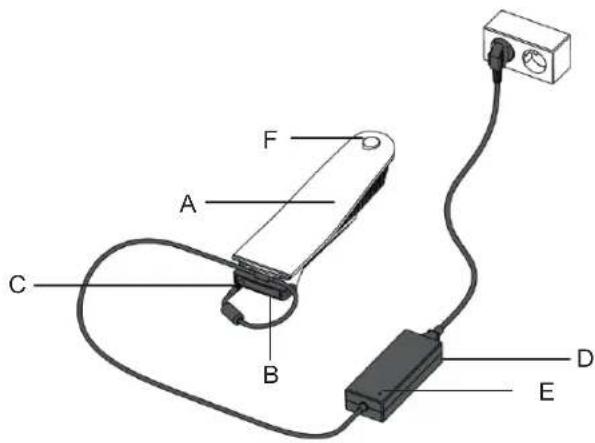
text_image
Diagram of a mechanical or electrical device with labeled components A through F, showing connections to a power outlet.A Battery pack
B Charging station
C Charging plug
D Recharger
E Indicator lamp
F Battery lock with lock cover
1.3.2 Handlebar control
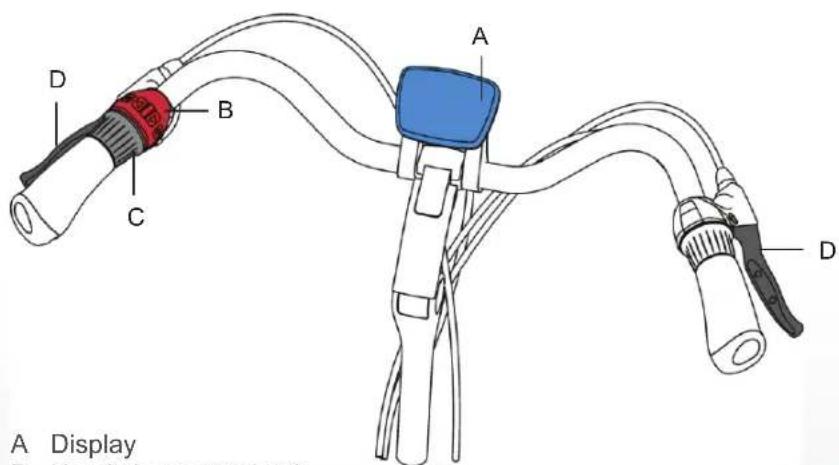
text_image
A Display D B C A DA Display
B Handlebar control unit
C Throttle
D Handbrakes
2 Battery pack and recharger
2.1 Battery pack
The battery of your Batavus E-go ^® RemovE model can be recharged both on and off the bike. There follows a description of how to remove and insert the battery.
2.1.1 Removing the battery pack
- Remove the lock cover.
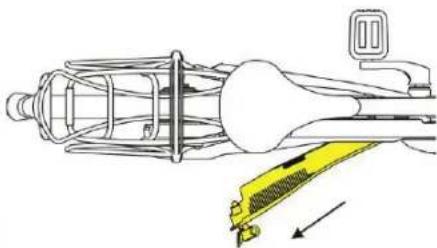
- Insert the key provided in the lock of the battery pack and turn ± 90^ clockwise.
natural_image
Technical line drawing of a bicycle frame with a yellow safety bracket (no text or symbols)- Now gently pull the key whilst supporting the battery pack from underneath.

natural_image
Mechanical diagram showing a yellow belt mechanism interacting with a blue bicycle frame (no text or symbols)- Rotate the battery outward (away from the bicycle frame) until it reaches the angle indicated here, and then hold the battery firmly in place.
- Now pull the battery out of the chain guard in the direction indicated by the arrow.
natural_image
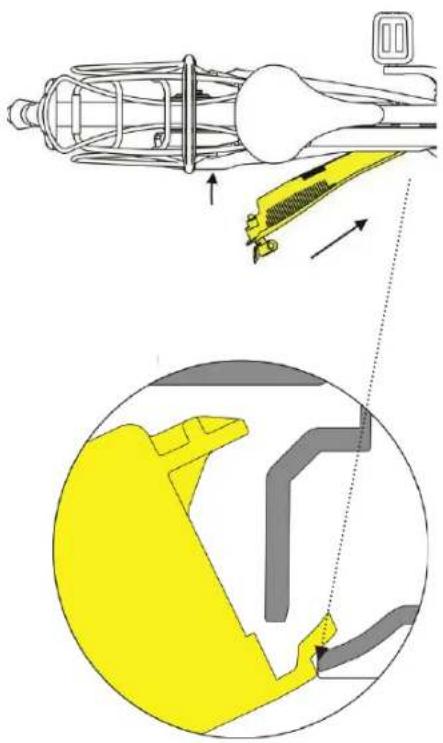
Technical line drawing of a mechanical assembly with a yellow component and directional arrow (no text or symbols)2.1.2 Inserting the battery pack
- Carefully insert the battery into the chain guard at the angle indicated here in the direction indicated by the arrow.
natural_image
Technical diagram showing a mechanical assembly with highlighted components and directional arrows (no text or labels)
Be sure to insert the battery into the chain guard rotating the battery inward towards the bicycle frame.
- Rotate and press the battery into the chain guard.
- Lock the battery with the key and remove the key.
- Press the rubber lock cover onto the lock.

natural_image
Mechanical linkage diagram showing a yellow component with rotational motion indicator (no text or symbols)2.2 Recharging the battery pack
2.2.1 Warnings before use

Read the warnings below carefully. Batavus is not liable for accidents and/or faults caused by improper use of (parts of) the E-go® RemovE models.
Recharger
- Only use the recharger that is supplied with your E-go ^ RemovE models. Using other battery rechargers causes the guarantee to lapse and may seriously damage the battery and electrical system.
- Do not take the recharger apart.
- Do not use the recharger for other purposes.
- Insert the charging plug firmly into the charging station or into the display connector.
- Make sure to avoid a short circuit from occurring when connecting the battery pack.
• Always place the charging station on a dry surface. - Use the recharger and its accessories only in a dry room.
- Make sure that your hands are dry before connecting the recharger.
- Do not touch the recharger during a thunderstorm.
- Do not put any liquids or metal into the recharger.
- Keep an eye on young children to prevent them from playing with the recharger.
Battery
- Do not take the battery apart.
- Do not expose the battery pack to fire or heat. Never place the battery pack in a fire.
- Do not immerse the battery pack in water or other liquid.
- Keep an eye on young children to prevent them from playing with the battery.
- Do not drop the battery pack, and avoid damage. No reimbursement will be made for the damage this causes. In this case the guarantee will lapse.
Motor
• Never open or damage the motor.
Recharging
- The recharger will become warm during recharging. This is normal and does not indicate a malfunction.
- Ensure proper ventilation during recharging.
- Do not recharge the battery in full sun.
- Stop recharging immediately if the battery has not recharged within the normal length of time (approx. 5 hours) or if you notice unusual noises or leakage. Pull the plug out of the mains socket.
- Do not connect the recharger to mains voltage when not using the recharger.
2.2.2 Recharging
- Check whether the recharger is suitable for the local voltage that your power company supplies.
- Connect the recharger to the mains socket.
- Now make the other connections:
| When you ...... | then...... |
| have removed the battery from the chain guard | place the battery onto the adaptor, |
insert the charging plug into the adaptor; | |
| want to recharge the battery without removing it from the chain guard | remove the lock cover and insert the charging plug into the display connector.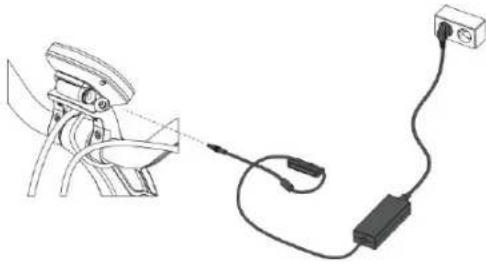 |
- The indicator light on the recharger will now light up. It will take approximately five hours to completely recharge the battery pack. Once the battery pack is fully recharged, recharging will stop automatically and the indicator light will turn green.
- Disconnect the battery pack within 24 hours after it has recharged.
- Remove the recharger cable and remove the plug from the mains socket.
2.2.3 Recharger and battery protection
- Recharge the battery pack once fully until the indicator light turns green before using the bicycle for the first time.
- Do not allow a fully recharged battery pack to stay in the recharger for more than 24 hours.
- Ensure that the recharging of the battery pack occurs within the temperature limits of 0 °C and 45 °C. This extends the life and increases the performance of the battery pack.
- Recharge the battery pack after using the bicycle. The battery pack does not have to be entirely empty before recharging it. The battery pack remains in good condition when you recharge it after each use, regardless of the distance.
- Always remove the display after using the bicycle. The display consumes energy even during sleep mode. For more information, see paragraph 2.2.4.
- A battery pack that is empty and not recharged can become defective.

Every battery runs down over time. This process is called 'self-discharge'. So-called deep discharge occurs when the battery discharges too much. Deep discharge can permanently damage the battery pack. The guarantee lapses if it is determined that deep discharge has occurred.
2.2.4 Instructions for storage after use
To prevent damage to your battery, it is important to store your bicycle properly. This table shows how to do this for two situations.
Situation 1: Storing the disconnected battery;
Situation 2: Storing the battery inside the chain guard.
| Disconnected battery | Battery inside the chain guard | ||
| Instructions for storage after use | |||
| 1 | Recharge completely at a temperature of 0 to 45 °C | x | x |
| 2 | Disconnect recharger within 24 hours | x | x |
| 3 | Remove display!(It consumes energy even during sleep mode!) | - | x |
| 4 | Store in a cool, dry, ventilated room, avoid exposure to sunlight | x | x |
| 5 | Recharge battery | At least once every two months | At least once every two months |
3 Handlebar control
3.1 Display
3.1.1 Information
Paragraph 3.2 describes which pieces of information can be read on the display and how they can be requested.
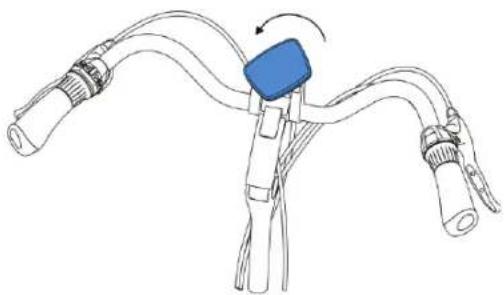
3.1.2 Disconnecting and securing
You can remove the display by rotating it to the left and then pulling it towards you.

Even during 'sleep mode', your E-go® RemovE consumes energy.
To prevent damage to the battery, the display should be removed whenever the bicycle is not in use. Paragraphs 2.2.3 and 2.2.4 provide detailed instructions for protecting and storing the battery.
natural_image
Diagram of a medical or laboratory device with tubing and a blue component, no visible text or symbols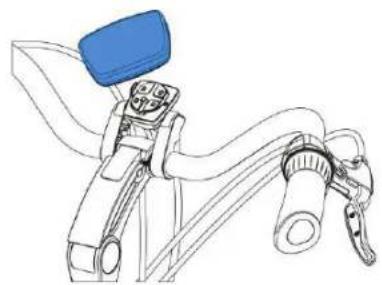
natural_image
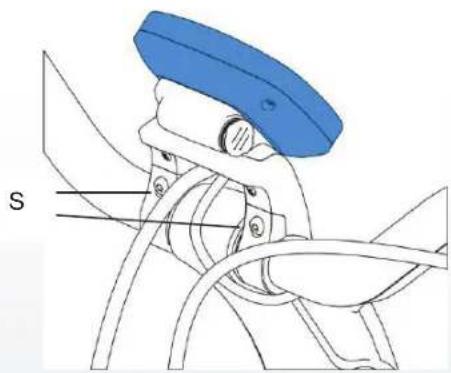
Line drawing of a robotic arm with blue head and articulated joints (no text or symbols)3.1.3 Adjusting position
The position of the display can be adjusted by using the screws that hold it in place (S).
natural_image
Technical diagram of a mechanical assembly with blue cap and labeled component 'S' (no text or symbols beyond label)3.2 Handlebar control unit
3.2.1 Control buttons
A System on/off
B Assistance level adjustment
C Assistance level adjustment
D Light on/off
E Mode selector
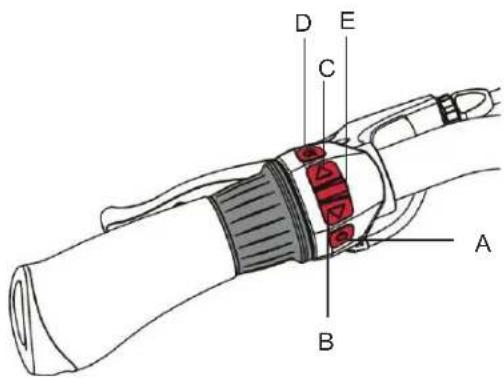
text_image
A B C D E3.2.2 Turning the system on
You can turn the assistance on and off by keeping button 'A' depressed. You can do this at any time, also while cycling.
The system switches off automatically if it is not used for more than 10 minutes.
3.2.3 Setting the assistance
| Programmes | Select programme | Assistance level | Select assistance level |
| Eco→ Low-level assistance | Keep button ‘B’ or ‘C’ depressed | Three power levels.Assistance provided up to a maximum of 25 km/h | Button ‘C’ = moreButton ‘B’ = less |
| Speed→ High-level assistance | Keep button ‘B’ or ‘C’ depressed | Six limited speedsS1 = max. 14 km/hS2 = max. 16 km/hS3 = max. 18 km/hS4 = max. 20 km/hS5 = max. 23 km/hS6 = max. 25 km/h | Button ‘C’ = moreButton ‘B’ = less |
Both the cycling programme and the assistance level can be readjusted at any time, even while cycling. Both are shown on the right side of the display.
3.2.4 Speed readout
The cycling speed is shown in the middle of the display.

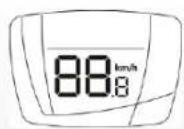
3.2.5 The charge level
The charge level of the battery is shown by the black blocks on the left side of the display. The clearest indication of the charge level is displayed if the throttle is not in use and the assistance level is set to the lowest Eco level.

3.2.6 Light
You can use the 'D' button to turn the light on and off. When the light is turned on, this is indicated by a symbol at the bottom of the display.
If the battery runs out of power during a trip, the light can still remain on for at least another two hours.
3.2.7 Distance readout
Repeatedly pressing the 'E' button will make the 'Trip distance' appear at the top of the display. The distance can be reset by keeping the 'E' button depressed for three seconds.
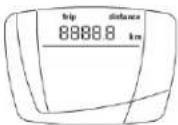
Pressing the 'E' button once again will make the 'Total distance' appear. This value cannot be reset.

3.2.8 Time readout
Repeatedly pressing the 'E' button will make a clock appear at the top of the display. You can now read the time. The time can be reset by keeping the 'E' button depressed until the numerals begin to flash. Then use the 'B' and 'C' buttons to reset the hour. Now press 'E' again and adjust the minutes with the 'B' and 'C' buttons. Finish by keeping the 'E' button depressed.
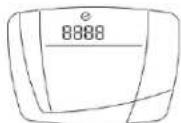
By pressing on 'E' again, the 'Trip time' is indicated. You can reset this by keeping the 'E' button depressed.
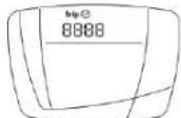
3.2.9 Temperature readout
The temperature can be read by pressing repeatedly on the 'E' button until 'temp' appears at the upper left of the display.

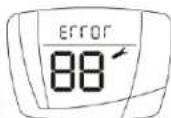
3.2.10 Error messages
If a malfunction occurs while using your E-go® RemovE system, this will be indicated by the appearance of the word 'error' at the top of the display. Your dealer can correct the malfunction.
3.2.11 Adjusting the display's lighting level
The display's lighting level can be adjusted by keeping the 'D' button depressed. Release pressure on the button when the desired lighting level is reached.
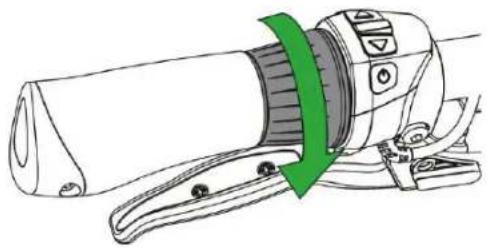
3.3 Throttle
The throttle is to the left of the handlebar control unit. The throttle can be used after the peddling assistance has been turned on.
natural_image
Line drawing of a mechanical device with a green arrow indicating rotation or movement (no text or symbols)
You can accelerate by rotating the throttle in the direction shown by the green arrow.

Turn the throttle slowly when first using it to get used to the power that the throttle provides.
The throttle offers extra assistance and can be used in the following ways:
- Extra assistance when you're walking alongside the bicycle When walking up a hill with the bicycle the throttle can provide you with extra assistance. This means that you do not have to bear the full weight of the bicycle on the hill yourself. An icon indicating that the throttle is active appears at the upper left of the display.

• Extra assistance when pulling away
You can use the throttle when pulling away. Without pedalling, the throttle can assist up to a speed of 4 km/hour. To get assistance above this you must peddle yourself.
• Extra assistance during cycling
The throttle can give peddling assistance an extra impulse during cycling. This may be useful when overtaking or riding up a hill. The impulse is most discernible when the cycling programme is set at the Eco level.
3.4 Handbrakes
The handbrakes 'D' are provided with a safety function. When you operate the handbrakes, the drive automatically disengages.

natural_image
Technical line drawing of a mechanical tool with two views (top and side), no text or symbols present4 Range
4.1 Range
The number of kilometres you can cycle under ideal conditions and with a fully charged battery pack lies within a range of about 95 kilometres. The action radius depends largely on the cycling programme and the assistance level. As the battery ages, the action radius decreases appreciably.
Other factors that adversely affect the action radius are listed in paragraph 4.2.
4.2 Important factors
The indicated range is adversely affected by the following factors:
| Factor | Negative factor situation |
| Ambient temperature | Low temperature (lower than 10 °C) |
| Wind | Headwind |
| Height differences | Hilly terrain |
| State of the road | Soft surface |
| Tyre pressure | Low tyre pressure |
| Bicycle maintenance | No or poor maintenance |
| Accelerating in the wrong gear | Low gear |
| Throttle | Use of the throttle |
| Weight | A lot of weight (rider + load) |
| Driving behaviour | Fluctuating speeds |
5 Transport and maintenance
5.1 Transport
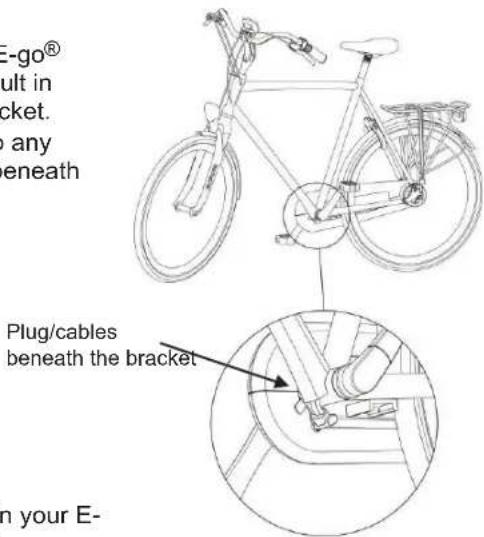
You can transport your E-go ^® RemovE by means of a bicycle carrier mounted at the back of your car.
Not every bicycle carrier is suitable for transporting your E-go ^® RemovE. The use of an unsuitable bicycle carrier can result in damage to the electrical plug and cables beneath the bracket.

Only use bicycle carriers that do not come into any contact whatsoever with the plug and cables beneath the bracket. If in doubt, consult your dealer.
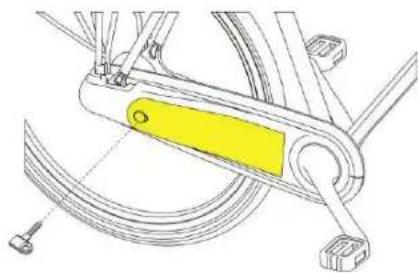
text_image
E-go® cult in ccket. any beneath Plug/cables beneath the bracket n your E-Batavus is not responsible for damage to and/or defects in your E-go® RemovE caused by using an unsuitable bicycle carrier.

Remove the battery from the chain guard before placing the bicycle onto the carrier. This reduces the weight of the bicycle. You can replace the battery when you arrive at your destination.
5.2 Maintenance
Periodic maintenance

Your electric bicycle requires periodic maintenance servicing. Your dealer can give you professional advice and inform you about making the best possible use of your bicycle.

During the winter, clean the battery and the inner surface of the chain guard frequently with a damp cloth and remove the accumulation of dirt. This keeps the system in good condition.

Never spray-clean the bicycle with a powerful jet of water. An overly strong jet of water can damage the electronics. When this happens, the guarantee will lapse!
6 Technical details
6.1 Battery details
| Detail | Specification |
| Battery pack | 8,7 Ah Li-ion, 36 V |
| Recharging time | ± 5 hours |
| Maximum power | 250 W |
| Weight | 1.8 kg |
| Maximum speed with pedal assistance | 25 km/hour |
6.2 Battery cell temperature ranges
| Status | Minimum [°C] | Maximum [°C] |
| Storage (minimum 60-80%) | -10 °C | 35 °C |
| Pedal assistance use | -5 °C 45 °C | |
| While recharging 0 °C 45 °C |

The E-go ^® RemovE models comply with the applicable European directive EN15194 for electrical bicycles.

7 Guarantee conditions and legal requirements
Guarantee conditions
The following guarantee conditions supplement your applicable legal rights. For the most recent guarantee provisions and the legal provisions that apply in your country, we refer you to www.batavus.com.
Article 1 Guarantee
1.1 Batavus BV guarantees that Batavus bicycles are free of construction and/or material defects and/or rust, one thing and another insofar that this flows from these guarantee provisions.
1.2 The guarantee can only be invoked by the first owner of the Batavus bicycle concerned.
1.3 The guarantee lapses by virtue of the provisions of articles 3.1 and 5.1.
1.4 The guarantee is non-transferable.
1.5 The guarantee provided by Batavus on the basis of these conditions does not prejudice the option of the seller to invoke the ordinary, legal provisions of the Civil Code.
Article 2 Guarantee period
2.1 Batavus frames and front forks without suspension are guaranteed against construction and/or material defects for a period of 10 years.
2.2 The same guarantee applies for suspension front forks, dampers and all other parts, with the exception of the parts referred to in paragraph 2.4 of this article, for a period of 2 years.
2.3 A guarantee against rust formation from the inside applies to paintwork on the frame and fork for a period of 2 years.
2.4 Parts that are subject to wear and tear, such as tyres, the chain, cog rings, freewheel, cog wheels, cables and brake blocks are not guaranteed, unless there are construction and/or material defects.
2.5 A guarantee against rust formation applies to other painted and chromed parts, if maintained, for a period of 2 years.
Article 3 Guarantee exclusions
3.1 The guarantee lapses in the following cases:
a. Incorrect and/or careless use of the bicycle and use that is contrary to the intended use;
b. Damage to or defects in batteries caused by a fall;
c. The bicycle has not been maintained in accordance with the service book;
d. Technical repairs are performed unprofessionally;
e. Parts mounted later do not satisfy the technical specifications of the bicycle concerned or are mounted incorrectly;
f. If proof of ownership, which shows that the bicycle was assembled and checked professionally before it was delivered to the customer, is not present or has not been signed by the seller.
3.2 Moreover, Batavus BV is explicitly not liable for damage caused to (parts of) the bicycle as a result of:
a. Incorrect adjustment/tensioning of the handlebars, handlebar spindle, saddle, saddle spindle, derailleur set, brakes and snap fasteners of the wheels and saddles;
b. Too late replacement of parts, such as brakes/derailleur cables, brake blocks, tyres, chain and cog wheels;
c. Climatic influences such as normal weathering of the paint or chrome rust;
d. Damage to electric cables located beneath the bracket as a result of contact with an unsuitable bicycle carrier.
Article 4 Guarantee on parts
4.1 During the guarantee period, all parts, for which Batavus BV determines that there is a material and/or construction defect, will, at the option of Batavus BV, be repaired or reimbursed. Any costs of (dis)assembly are for the account of the owner.
4.2 Contrary to that determined in the previous paragraph, the cost of labour for material and/or construction defects in frames and front forks are also for the account of the manufacturer during three years after the purchase date.
4.3 Costs of transport of the bicycle and/or parts from and to Batavus BV are for the account of the owner, unless the part concerned is covered by the guarantee.
4.4 If a certain part is covered by the guarantee and the original is no longer stocked, then Batavus BV will provide at least an equivalent alternative.
Article 5 Submitting a claim
5.1 Claims under this guarantee must be submitted subject to presenting the bicycle or the part concerned for inspection at the Batavus dealer from whom the bicycle was purchased. At the same time, a receipt of purchase as well as the proof of ownership provided with the bicycle must be handed over to the dealer.
5.2 If the owner has moved or the dealer is no longer available, Batavus BV will if required report this to the closest Batavus dealer.
Article 6 Liability
6.1 A guarantee claim accepted by Batavus BV does not automatically mean that Batavus BV also accepts liability for any damage suffered. The liability of Batavus BV never extends any further than described in these guarantee conditions. Any liability of Batavus BV for consequential damage is explicitly excluded. That stipulated in this provision does not apply if and insofar this flows from a mandatory provision. Het gestelde in deze bepaling geldt niet indien en voor zover zulks voortvloeit uit een dwingend rechtelijke rechtsbepaling.
Legal requirements
According to European legislation, the vehicle described is a bicycle because it satisfies the following rules:
• The assistance is only active if the cyclist pedals himself/herself.
• The assistance is active until a speed of maximum 25km/hour is reached.
• The power provided is maximum 250 Watt.
CE
The electric bicycle is an EPAC (Electrically Power Assisted Cycle) in accordance with EN15194.
Compliance
The manufacturer hereby declares that your electric bicycle complies with all requirements and other relevant provisions of the directives 2004/108/EC and 2002/24/EC.
The declaration of compliance can be requested from the manufacturer.
The environment

We recommend that you return a faulty bicycle battery pack to your dealer in accordance with the environmental regulations for collecting and processing batteries drawn up by the Ministry of Housing, Spatial Planning and the Environment. The dealer is required to accept the battery and must ensure that it is processed further by the manufacturer.
We wish you every pleasure with the purchase of your Batavus E-go ^® RemovE.
Batavus E-go® RemovE Guide d'utilisation
Batavus B.V., april 2012
625.13.276
Batavus E-go® RemovE
Table des matières
1 Descriptions 43
text_image
Diagram of a mechanical or electrical device with labeled components A through F, showing connections to a power outlet.natural_image
Mechanical diagram showing a yellow belt mechanism attached to a bicycle frame with rope and pulley (no text or symbols)natural_image
Mechanical diagram showing a yellow component attached to a chain with a rotating arrow indicating motion (no text or symbols)natural_image
Technical line drawing of a mechanical assembly with a yellow component and directional arrow (no text or symbols)natural_image
Technical diagram of a mechanical assembly with highlighted components and directional arrows (no text or labels)
natural_image
Technical line drawing of a bicycle frame with a yellow component and rotating wheel (no text or symbols)natural_image
Diagram of a medical or laboratory device with tubing and a blue component, no text or symbols present
natural_image
Line drawing of a robotic arm with blue head and attached sensors (no text or symbols)3.1.3 Réglage
natural_image
Technical line drawing of a mechanical component with blue cap and curved pipe (no text or symbols)3.2.3 Réglage assistance
natural_image
Line drawing of a handheld device with a green arrow indicating motion or adjustment (no text or symbols)
natural_image
Technical line drawing of two mechanical tools with a tool labeled D, showing different grip configurations (no text or symbols present)4 Rayon d'action
4.1 Rayon d'action
text_image
Diagram of a mechanical or electrical device with labeled components A through F, connected to a power outlet.natural_image
Technical line drawing of a mechanical linkage assembly with no visible text or symbolsnatural_image
Mechanical linkage diagram showing a yellow component with rotational arrow, no text or symbols presentnatural_image
Technical line drawing of a mechanical assembly with a yellow tool inserted, showing no text or symbols.natural_image
Technical diagram showing a mechanical assembly with highlighted components and directional arrows (no text or labels)
natural_image
Technical line drawing of a bicycle suspension system with a yellow bar and rotating wheel (no text or symbols)natural_image
Diagram of a medical or laboratory device with tubing and a blue component, no visible text or symbols
natural_image
Line drawing of a bicycle steering wheel with blue headrest and attached lever (no text or symbols)3.1.3 Einstellung
natural_image
Technical line drawing of a mechanical component with blue cap and labeled 'S' (no text or symbols beyond label)3.2.8 Zeiten ablesen
3.2.9 Temperatur ablesen
natural_image
Diagram of a mechanical device with a green arrow indicating rotation or movement (no text or symbols present)
natural_image
Technical line drawing of a mechanical tool with two views (top and side), no text or symbols present4 Aktionsradius
4.1 Aktionsradius
text_image
set consoletext_image
Diagram of a device with labeled components A through F, showing wiring and connection to a power outlet.natural_image
Technical line drawing of a bicycle frame with a yellow safety belt and suspension components (no text or symbols)natural_image
Mechanical linkage diagram showing a yellow component with a curved arrow indicating motion (no text or symbols)natural_image
Technical line drawing of a mechanical assembly with no visible text or symbolsnatural_image
Technical diagram showing a mechanical assembly with highlighted components and directional arrows (no text or labels)natural_image
Mechanical linkage diagram showing a yellow component with rotational arrow, no text or symbols presentnatural_image
Diagram of a medical or laboratory device with tubing and a blue component, no visible text or symbols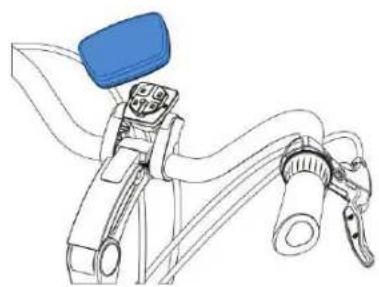
natural_image
Line drawing of a bicycle steering wheel with blue headrest and handle (no text or symbols)3.1.3 Justering
natural_image
Technical line drawing of a mechanical assembly with blue component and labeled 'S' (no text or symbols beyond label)3.2 Styrkontrollenhet
3.2.1 Kontrollknappar
natural_image
Technical line drawing of a mechanical device with a green arrow indicating rotation or adjustment (no text or symbols)