
MX-C300P - Printer SHARP - Free user manual and instructions
Find the device manual for free MX-C300P SHARP in PDF.

| Brand | Sharp |
| Model | MX-C300P |
| Product type | Desktop color laser printer |
| Print resolution | 600 x 600 dpi |
| Print speed | 30 pages/min (color and B&W) |
| First print time | 9.2 s (color), 5.5 s (B&W) |
| Paper sizes | A4 to A5, envelopes |
| Standard paper capacity | 300 sheets (250 + 50 bypass tray) |
| Maximum paper capacity | 750 sheets (with optional tray MX-CS11) |
| Memory | 512 MB |
| Interfaces | Ethernet 10/100, USB 2.0, Wi-Fi (optional) |
| Operating systems | Windows (XP to 8.1, Server 2003 to 2012), Mac OS X (10.4 to 10.8) |
| Print languages | PCL6, PostScript 3 |
| Power consumption | Max 1150 W (220-240 V) |
| Power supply | Local voltage ±10% (see rating plate) |
| Dimensions (W x D x H) | 429 x 509 x 337 mm |
| Weight | Approx. 25 kg |
| Ambient conditions | 10–35 °C, 20–85 % RH |
| Warm-up time | 29 seconds |
| Noise level (operating) | 53 dB |
| Maintenance | Use original Sharp supplies, store cartridges horizontally |
| Safety | Class 1 laser, electrical precautions, do not block ventilation openings |
| Spare parts | Available 7 years after end of production |
| Warranty | Limited warranty, contact Sharp after-sales service |
Frequently Asked Questions - MX-C300P SHARP
User questions about MX-C300P SHARP
0 question about this device. Answer the ones you know or ask your own.
Ask a new question about this device
Download the instructions for your Printer in PDF format for free! Find your manual MX-C300P - SHARP and take your electronic device back in hand. On this page are published all the documents necessary for the use of your device. MX-C300P by SHARP.
USER MANUAL MX-C300P SHARP
DIGITAL FULL COLOUR PRINTER
START GUIDE
| START GUIDE | English ...... 3 | |
| This guide explains important point to note for installation and usage. The Operation Guide for the machine is on the accompanying CD-ROM. View the Operation Guide when you use the machine after the initial setup is completed.Keep this manual close at hand for reference whenever needed. | ||
| GUIDE DE DEMARRAGE | Français ...... 7 | |
| Ce guide fournit des instructions importantes concernant l'installation et l'utilisation de cet appareil. Le Mode d'emploi de la machine se trouve sur le CD-ROM. Consultez le Mode d'emploi lorsque vous utilisez la machine après la configuration initiale.Conservez ce guide à portée de main afin de vous y reporter ultérieurement en cas de besoin. | ||
| GUÍA DE INICIO | Español ...... 11 | |
| Esta guía presenta observaciones importantes de instalación y uso. El Manual de instrucciones de la máquina está incluido en el CD-ROM suministrado. Consulte el Manual de instrucciones para utilizar la máquina una vez finalizada la configuración inicial.Mantenga este manual a mano para consultarlo cuando lo necesite. | ||
| ERSTE SCHRITTE | Deutsch .... 15 | |
| Diese Anleitung erläutert wichtige Hinweise zur Installation und Verwendung. Das Bedienungshandbuch für das Gerät ist auf der CD-ROM im Lieferumfang enthalten. Rufen Sie das Bedienungshandbuch auf, wenn Sie das Gerät verwenden, nachdem die erste Konfiguration abgeschlossen ist.Bewahren Sie diese Anleitung in greifbarer Nähe auf, um bei Bedarf darin nachschlagen zu können. | ||
| GUIDA RAPIDA | Italiano ...... 19 | |
| La presente guida fornisce istruzioni importanti per l'installazione e l'utilizzo. Il Manuale di istruzioni della macchina si trova sul CD-ROM allegato. Visualizzare il Manuale di istruzioni quando si utilizza la macchina al termine della configurazione iniziale.Tenere il presente manuale a disposizione per la consultazione in caso di necessità. | ||
| INSTALLATIEHANDLEIDING | Nederlands .. 23 | |
| Deze handleiding bevat belangrijke informatie voor de installatie en het gebruik. De bedieningshandleiding van het apparaat staat op de meegeleverde cd-rom. Raadpleeg de bedieningshandleiding wanneer u het apparaat gebruikt verder na de installatie.Houd deze handleiding binnen handbereik zodat u deze indien nodig kunt raadplegen. | ||
| STARTHANDBOK | Svenska .... 27 | |
| Den här handboken beskriver viktiga punkter som bör observeras vid installation och användning. Maskinens bruksanvisning finns på den medföljande cd-skivan. Läs bruksanvisningen när du använder maskinen efter det att den inledande inställningen är klar.Förvara den här handboken på ett lättillgängligt ställe så att du kan använda den vid behov. | ||
| HURTIGVEILEDNING | Norsk ...... 31 | |
| Denne hurtigveiledningen inneholder viktig informasjon om installasjon og bruk av maskinen. Du finner brukerveiledningen for maskinen på den medfølgende CD-ROM-en. Slå opp i brukerveiledningen när du bruker maskinen etter at den innledende konfigurasjonen er ferdig.Oppbevar denne veiledningen på et tilgjengelig sted, slik at du kan slå opp i den ved behov. | ||
| ALOITUSOPAS | Suomi ...... 35 | |
| Tämå opas sisältää tärkeitä asennusta ja käyttöä koskevia huomautuksia. Laitteen käyttöohje löytyy mukana toimitetulta CD-ROM-levyltä. Katso ohjeita käyttöohjeesta, kun käytät laitetta alkuasennuksen jälkeen.Säilytä tämä käyttöopas tarpeen mukaan saatavilla. | ||
| STARTVEJLEDNING | Dansk ...... 39 | |
| Denne vejledning forklarer vigtige punkter angående installation og anvendelse. Driftsguiden til maskinen findes på den medfølgende cd. Se i Driftsguiden, när du bruger maskinen, efter at den første installation er udført.Opbevar vejledningen i nærheden som reference, när det er nødvendigt. | ||
| GUIA INICIAL | Português ... 43 | |
| Este guia aborda pontos importantes a ter em consideração durante a instalação e utilização. O Manual do Utilizador da máquina encontra-se no CD-ROM fornecido. Visualize o Manual do Utilizador quando utiliza a máquina depois de concluída a configuração inicial.Mantenha este manual fechado e acessível para utilizar como referência sempre que necessitar. |
Symbols in this manual
To ensure safe use of the machine, this manual uses various safety symbols. The safety symbols are classified as explained below. Be sure you understand the meaning of the symbols when reading the manual.
Meaning of the symbols

CAUTION! HOT

PINCH POINT KEEP CLEAR
Power notes

WARNING

Be sure to connect the power cord only to a power outlet that meets the specified voltage and current requirements. Also make certain the outlet is properly grounded. Do not use an extension cord or adapter to connect other devices to the power outlet used by the machine. Using an improper power supply may cause fire or electrical shock. * For the power supply requirements, see the name plate on the left side of the machine.

Do not damage or modify the power cord. Placing heavy objects on the power cord, pulling it, or forcibly bending it will damage the cord, resulting in fire or electrical shock.

Do not insert or remove the power plug with wet hands. This may cause electrical shock.

CAUTION

When removing the power plug from the outlet, do not pull on the cord. Pulling on the cord may cause damage such as wire exposure and breakage, and may result in fire or electrical shock.

If you will not use the machine for a long time, be sure to remove the power plug from the outlet for safety.

When moving the machine, switch off the main power and remove the power plug from the outlet before moving. The cord may be damaged, creating a risk of fire or electrical shock.
Installation notes

CAUTION

Do not install the machine on an unstable or slanted surface. Install the machine on a surface that can withstand the weight of the machine. Risk of injury due to the machine falling or toppling. If peripheral devices are to be installed, do not install on an uneven floor, slanted surface, or otherwise unstable surface. Danger of slippage, falling, and toppling. Install the product on a flat, stable surface that can withstand the weight of the product.

Do not install in a location with moisture or dust. Risk of fire and electrical shock. If dust enters the machine, dirty output and machine failure may result.

Locations that are excessively hot, cold, humid, or dry (near heaters, humidifiers, air conditioners, etc.) The paper will become damp and condensation may form inside the machine, causing misfeeds and dirty output. If the location has an ultrasonic humidifier, use pure water for humidifiers in the humidifier. If tap water is used, minerals and other impurities will be emitted, causing impurities to collect on the inside of the machine and create dirty output.

Locations exposed to direct sunlight Plastic parts may become deformed and dirty output may result.

Locations with ammonia gas Installing the machine next to a diazo copy machine may cause dirty output.

Do not install the machine in a location with poor air circulation. A small amount of ozone is created inside the machine during printing. The amount of ozone created is not sufficient to be harmful; however, an unpleasant odor may be noticed during large print runs, and thus the machine should be installed in a room with a ventilation fan or windows that provide sufficient air circulation. (The odor may occasionally cause headaches.) * Install the machine so that people are not directly exposed to exhaust from the machine. If installed near a window, ensure that the machine is not exposed to direct sunlight.

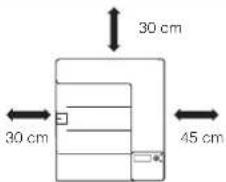
Near a wall Be sure to allow the required space around the machine for servicing and proper ventilation. (The machine should be no closer than the distances indicated below from walls.)

Locations subject to vibration. Vibration may cause failure.

WARNING

CAUTION
Indicates a risk of death or serious injury. Indicates a risk of human injury or property damage.

PROHIBITED ACTIONS

DO NOT DISASSEMBLE

MANDATORY ACTIONS

CAUTION
- The machine should be installed near an accessible power outlet for easy connection.
- Connect the machine to a power outlet which is not used for other electric appliances. If a lighting fixture is connected to the same outlet, the light may flicker.
About consumables

CAUTION

Do not throw a toner cartridge into a fire. Toner may fly and cause burns.

Store a toner cartridge out of the reach of children.
Handling precautions

WARNING

Do not place a container of water or other liquid, or a metal object that might fall inside, on the machine. If the liquid spills or the object falls into the machine, fire or electrical shock may result

Do not remove the machine casing. High-voltage parts inside the machine may cause electrical shock.

Do not make any modifications to this machine. Doing so may result in personal injury or damage to the machine.

Do not use a flammable spray to clean the machine. If gas from the spray comes in contact with hot electrical components or the fusing unit inside the machine, fire or electrical shock may result.

If you notice smoke, a strange odor, or other abnormality, do not use the machine.
If used in this condition, fire or electrical shock may result. Immediately switch off the main power and remove the power plug from the power outlet. Contact your dealer or nearest authorised service representative.

If a thunder storm begins, switch off the main power and remove the power plug from the outlet to prevent electrical shock and fire due to lightning.

If a piece of metal or water enters the machine, switch off the main power and remove the power plug from the power outlet. Contact your dealer or nearest authorised service representative. Using the machine in this condition may result in electrical shock or fire.

CAUTION

Do not block the ventilation ports on the machine. Do not install the machine in a location that will block the ventilation ports. Blocking the ventilation ports will cause heat to build up in the machine, creating a risk of fire.

The fusing unit and paper exit area are hot. When removing a misfeed, do not touch the fusing unit and paper exit area. Take care not to burn yourself.

When loading paper, removing a misfeed, performing maintenance, closing the front and side covers, and inserting and removing trays, take care that your fingers are not pinched.
Laser information
Wave length 790 nm ± 10 nm
Pulse times (9.97 μs ± 0.034 μs) / 7 mm
Output power Max 0.6 mW (LD1 + LD2)
Caution
Use of controls or adjustments or performance of procedures other than those specified herein may result in hazardous radiation exposure.
This Digital Equipment is CLASS 1 LASER PRODUCT (IEC 60825-1 Edition 2-2007)
Caution!
For complete electrical disconnection, pull out the main plug. The socket-outlet shall be installed near the equipment and shall be easily accessible.
Shielded interface cables must be used with this equipment to maintain compliance with EMC regulations.
The equipment should be installed near an accessible socket outlet for easy disconnection.
Each instruction also covers the optional units used with these products.
Software licence
The SOFTWARE LICENCE will appear when you install the software from the CD-ROM. By using all or any portion of the software on the CD-ROM or in the machine, you are agreeing to be bound by the terms of the SOFTWARE LICENCE.
- The explanations in this manual assume that you have a working knowledge of your Windows or Macintosh computer.
- For information on your operating system, please refer to your operating system manual or the online Help function.
- The explanations of screens and procedures in this manual are primarily for Windows 7 in Windows\$ environments. The screens may vary depending on the version of the operating system.
- Considerable care has been taken in preparing this manual. If you have any comments or concerns about the manual, please contact your dealer or nearest authorised service representative.
- This product has undergone strict quality control and inspection procedures. In the unlikely event that a defect or other problem is discovered, please contact your dealer or nearest authorised service representative.
- Aside from instances provided for by law, SHARP is not responsible for failures occurring during the use of the product or its options, or failures due to incorrect operation of the product and its options, or other failures, or for any damage that occurs due to use of the product.

Products that have earned the ENERGY STAR ^® are designed to protect the environment through superior energy efficiency.
The products that meet the ENERGY STARguidelines carry the ENERGY STARlogo. The products without the logo may not meet the ENERGY STARguidelines.
This product is designed for commercial application only and as such it falls outside the scope of Regulation (EC) 1275/2008 implementing EU Directive 2005/32/EC on eco-design requirements for standby and off mode electric power consumption. Sharp does not recommend the product for domestic application and will not accept any liability for such use.
Warranty
While every effort has been made to make this document as accurate and helpful as possible, SHARP Corporation makes no warranty of any kind with regard to its content. All information included herein is subject to change without notice. SHARP is not responsible for any loss or damages, direct or indirect, arising from or related to the use of this operation manual. © Copyright SHARP Corporation 2014. All rights reserved. Reproduction, adaptation or translation without prior written permission is prohibited, except as allowed under copyright laws.
Safety data sheet
The SDS (Safety Data Sheet) can be viewed at the following URL address: http://www.sharp-world.com/corporate/eco/env-info/sds/index.html
Wireless LAN (for MX-C300P/C300PE)
The communication range of wireless LAN may shorten or communication may not be possible in some usage environments, due to shielding materials, the installation location, the effects of ambient radio noise, data transmission speed, and other factors.
Noise emission
Noise emission values
The following shows noise emission values as measured according to ISO7779.
Sound power level L_WAd
| Operating (continuous printing) 6.9 B | |
| Standby mode (Low power level mode) | - |
Sound pressure level LpAm
| Operating (continuous printing) | Bystander positions 53 | dB |
| Standby mode Bystander positions 33 dB | ||
- Operating: with option MX-CS11.
- Standby: "-"=less than background noise.
Notice for users in Europe

Hereby, SHARP ELECTRONICS declares that this Digital Full Colour Printer MX-C300P/MX-C300PE is in compliance with the essential requirements and other relevant provisions of Directive 1999/5/EC.
The declaration of conformity may be consulted at:
"http://www.sharp.de/doc/MX-C300P_MX-C300PE.pdf"
Notice for users in the UK
MAINS PLUG WIRING INSTRUCTIONS
The mains lead of this equipment is already fitted with a mains plug which is either a non-rewireable (moulded) or a rewireable type. Should the fuse need to be replaced, a BSI or ASTA approved fuse
to BS1362 marked

and of the same rating as the one
removed from the plug must be used.
Always refit the fuse cover after replacing the fuse on the moulded plug. Never use the plug without the fuse cover fitted. In the unlikely event of the socket outlet in your home not being compatible with the plug supplied either cut-off the moulded plug (if this type is fitted) or remove by undoing the screws if a rewireable plug is fitted and fit an appropriate type observing the wiring code below.
DANGER: The fuse should be removed from the cut-off plug and the plug destroyed immediately and disposed of in a safe manner. Under no circumstances should the cut-off plug be inserted elsewhere into a 13A socket outlet as a serious electric shock may occur. To fit an appropriate plug to the mains lead, follow the instructions below:
IMPORTANT: The wires in this mains lead are coloured in accordance with the following code:
GREEN-AND-YELLOW: Earth
BLUE: Neutral
BROWN: Live
As the colours of the wires in this mains lead may not correspond with coloured markings identifying the terminals in your plug, proceed as follows: The wire which is coloured GREEN-AND-YELLOW must be connected to the terminal in the plug which is marked with the letter E, or by the safety earth symbol or coloured green or greenand-yellow.
The wire which is coloured BLUE must be connected to the terminal which is marked with the letter N or coloured black.
The wire which is coloured BROWN must be connected to the terminal which is marked with the letter L or coloured red.
If you have any doubt, consult a qualified electrician. WARNING: THIS APPARATUS MUST BE EARTHED.
Supplies
Standard supplies for this product that can replaced by the user include paper and toner cartridges.
Be sure to use only SHARP-specified products for the toner cartridges and transparency film.

GENUINE SUPPLIES
For best printing results, be sure to use only Sharp Genuine Supplies which are designed, engineered, and tested to maximize the life and performance of Sharp products. Look for the Genuine Supplies label on the toner package.
Storage of supplies Proper storage
-
Store the supplies in a location that is:
-
clean and dry,
• at a stable temperature,
• not exposed to direct sunlight. -
Store paper in the wrapper and lying flat.
-
Paper stored in packages standing up or out of the wrapper may curl or become damp, resulting in paper misfeeds.
Storing toner cartridges
Store a new toner cartridge box horizontally with the top side up. Do not store a toner cartridge standing on end. If stored standing on end, the toner may not distribute well even after shaking the cartridge vigorously, and will remain inside the cartridge without flowing out.
Supply of spare parts and consumables
The supply of spare parts for repair of the machine is guaranteed for at least 7 years following the termination of production. Spare parts are those parts of the machine which may break down within the scope of the ordinary use of the product, whereas those parts which normally exceed the life of the product are not to be considered as spare parts. Consumables too, are available for 7 years following the termination of production.
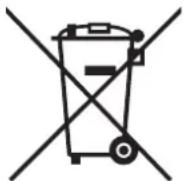
Information on Disposal for Users (private households)
Attention: Your product is marked with this symbol. It means that used electrical and electronic products should not be mixed with general household waste. There is a separate collection system for these products.
In the European Union
Attention: If you want to dispose of this equipment, please do not use the ordinary dust bin! Used electrical and electronic equipment must be treated separately and in accordance with legislation that requires proper treatment, recovery and recycling of used electrical and electronic equipment. Following the implementation by member states, private households within the EU states may return their used electrical and electronic equipment to designated collection facilities free of charge*. In some countries* your local retailer may also take back your old product free of charge if you purchase a similar new one.

* Please contact your local authority for further details. If your used electrical or electronic equipment has batteries or accumulators, please dispose of these separately beforehand according to local requirements. By disposing of this product correctly you will help ensure that the waste undergoes the necessary treatment, recovery and recycling and thus prevent potential negative effects on the environment and human health which could otherwise arise due to inappropriate waste handling.
In other Countries outside the EU
If you wish to discard this product, please contact your local authorities and ask for the correct method of disposal. For Switzerland: Used electrical or electronic equipment can be returned free of charge to the dealer, even if you don't purchase a new product. Further collection facilities are listed on the homepage of www.swico.ch or www.sens.ch.
Information on Disposal for Business Users
In the European Union
If the product is used for business purposes and you want to discard it: Please contact your SHARP dealer who will inform you about the take-back of the product. You might be charged for the costs arising from take-back and recycling. Small products (and small amounts) might be taken back by your local collection facilities. For Spain: Please contact the established collection system or your local authority for take-back of your used products.
In other Countries outside the EU
If you wish to discard of this product, please contact your local authorities and ask for the correct method of disposal.
Environmental information
Please read this part carefully. It will help you to reduce your impact on the environment and help you to reduce your costs at the same time.
Saving paper
-
The automated duplex printing function is for printing both sides of paper automatically without turning over the paper manually. If the machine is equipped with the automated duplex printing function, set up your print settings on your computer to automatically print double-sided. Please use the automatic duplex printing function of this machine wherever possible.
-
By printing on recycled paper and thin 64g/m ^2 paper that meet the standard EN12281:2002 and similar quality standards, you can reduce the impact on the environment.
Saving energy
-
This machine has an energy save mode for reducing power consumption largely. When the machine is not used for a certain period of time, the machine switches to this less power-consuming mode. In this mode, the power supplies of the operation panel and fusing unit are shut off. Thus the power consumption can be reduced. The recovery time from this mode requires more time than from the "ready mode". You can adjust the times the machine switches to the energy save mode. For models with a power-save button: If your next print would be later than the set time for the energy save mode, we recommend to press the power-save button to activate the power saving at once. For models with automated power management function that adjusts itself to the usage pattern of the device, or also for models with eco scan mode, we recommend the use of it in order to reduce the energy consumption and save additional costs. These energy-saving functions are described in detail in the operation manual.
-
This machine complies with the latest version of the International Energy Star criteria. The "International Energy Star Programme" is a voluntary registration scheme for energy-saving office devices.
Cartridge disposal and treatment
Regarding your used Sharp toner cartridges and other consumables from Sharp copiers/multifunctional machines, please observe that these waste products shall be treated properly according to the legal requirements in your area. We recommend to contact competent service providers (e.g. waste recycling companies) for this, and to ask local authorities for support, when necessary. For information on existing Sharp collection and recycling programs, which exist in some countries, please see our website www.sharp.eu.
Turning the power on and off
Turning on the power
Switch the main power switch to the “†” position.
Turning off the power Switch the main power switch to the “○” position.

Before switching off the main power switch, make sure that the data indicator is off on the operation panel.

Operation manuals
The instructions for this manual are separated in the following three sections.
Start Guide: this manual
This section explains precautions to ensure safe usage, part names and how to switch on/off the power. This section also includes important information for persons that are responsible for the maintenance of this machine.
Read this section before using the machine for the first time.
Software Setup Guide (PDF)
This section explains how to install the various drivers needed when using this machine as a printer.
Read this section when using this machine from a computer.
Operation Guide (PDF)
This section explains how to use the machine.
How to read the Operation Guide
The Operation Guide on the accessory CD-ROM provides detailed instructions for operating the machine. The Operation Guide is provided in PDF format. Insert the supplied CD-ROM into your CD-ROM drive. CD-ROM will run automatically.
If it does not start automatically, double-click the CD-ROM icon or display the contents of the CD-ROM and double-click "index.html".
To view the manual in PDF format, Acrobat Reader or Adobe Reader of Adobe Systems Incorporated is required. If neither program is installed on your computer, the programs can be downloaded from the following URL: http://www.adobe.com/
System settings password
A password is necessary to change the machine's system settings using administrator authority. System settings can be changed from either the operation panel or using a computer web browser. After setting up the machine, refer to [SYSTEM SETTINGS] in the Operation Guide to set a new password.
Password for logging in from this machine
The factory default password for the machine is "00000".
Password for logging in from a computer
There are two accounts that can log in from a web browser: "Administrator" and "User". The factory default passwords for each account are shown on the right side. Signing in as an "Administrator" will allow you to manage all the settings available via web browser.
| Account Password | ||
| User users users | ||
| Administrator admin | admin | |

Please take care not to forget newly set administrator passwords.
Basic Specifications
| Model | MX-C300P/MX-C300PE/MX-C300PL | |
| Type | Desktop | |
| Colour Full colour | ||
| Printing method Electrophotographic system (laser) | ||
| Resolution | Data processing: 600 x 600 dpiPrint: 600 x 600 dpi | |
| Page description language | Standard: PCL6 emulation, PS3 emulation | |
| Compatible protocols | TCP/IP (IPv4/IPv6) | |
| Compatible OS | Windows XP, Windows Server 2003, Windows Vista, Windows Server 2008, Windows 7, Windows 8, Windows 8.1, Windows Server 2012Macintosh (Mac OS X 10.4, 10.5, 10.6, 10.7, 10.8) | |
| Internal fonts (options) | 80 fonts for PCL, 136 fonts for PS3 emulation | |
| Interface | 10BASE-T/100BASE-TX, USB 2.0 (high speed mode) | |
| Gradation | Equivalent to 256 levels | |
| Print sizes | A4 to A5 (8-1/2'×14' to 5-1/2' × 8-1/2'), Envelopes Tray 1-2: A4, B5, A5, 8-1/2' × 11', 7-1/4 × 10-1/2', 5-1/2" × 8 Multi-bypass tray: 216 mm × 356 mm (8-1/2' × 14") to A6, Envelopes, Custom | |
| Lost margin (leading edge): 5 mm (13/64") or lessLost margin (trailing edge): 5 mm (13/64") or lessNear edge / far edge: total 8 mm (21/64") or less | ||
| Paper type | Tray 1-2: Plain paperMulti-bypass tray: Plain paper, Heavy paper, Thin paper, Special paper (Envelopes, Label, Glossy paper, Transparency film) | |
| Warm-up time | 29 seconds● This may vary depending on the ambient conditions. | |
| First-print time | Colour: 9.2 seconds B/W: 5.5 seconds● This may vary depending on the state of the machine.● Portrait feeding of A4 (8-1/2' × 11") sheets. | |
| Continuous print speed | 30 pages/min.* Continuous speed for same original source. Output may be temporarily interrupted to stabilize image quality. | |
| Paper feed / capacity | 250 sheets in one tray plus 50-sheet multi-bypass tray● Using 80 g/m ^2 (21 lbs.) weight paper | |
| Max. paper feed / max. capacity | 750 sheets in 2 trays plus 50-sheet multi-bypass tray● Using 80 g/m ^2 (21 lbs.) weight paper | |
| Continuous print | Max. 999 prints | |
| Memory | 512 MB | |
| Ambient environment | Operating environment | 10 °C (54 °F) to 35 °C (91 °F) (20 % to 85 % RH)590 - 1,013 hpa |
| Standard environment | 20 °C (68 °F) to 25 °CF (77 °F) (65 ± 5 % RH) | |
| Required power supply | Local voltage ± 10 % (For the power supply requirement see the name plate on the left side of the machine.)Power consumption Max. 1150 W (220-240 V)(including options such as the desk) | |
| Dimensions | 429 mm (W) × 509 mm (D) × 337 mm (H)(16-57/64" (W) × 20-3/64" (D) × 13-9/32" (H)) | |
| Weight | Approx. 25 kg (55.1 lbs.) | |
| Overall dimensions | 640 mm (W) × 509 mm (D)(25-13/64" (W) × 20-3/64" (D))(With multi-bypass tray extended) | |
Drawer (Optional)
| Model | 500-sheet paper feed unit (MX-CS11) |
| Paper sizes | A4, B5, A5, 8-1/2" × 11", 7-1/4" × 10-1/2", 5-1/2" × 8-1/2" |
| Useable paper | 60 g/m ^2 (16 lbs. bond) to 105 g/m ^2 (28 lbs. bond) |
| Paper capacity | 500 sheets● Using 21 lbs. (80 g/m ^2 ) weight paper |
| Dimensions | 427 mm (W) × 505 mm (D) × 151 mm (H)(16-13/16" (W) × 19-57/64" (D) × 5-61/64" (H)) |
| Weight Approx. 5 kg (11.1 lbs.) | |
Wireless LAN Specifications
| Model | MX-C300P/C300PE |
| Type | Built-in type |
| Compliance standards | IEEE802.11n/g/b |
| Transmission method | OFDM (IEEE 802.11n/g), DS-SS (IEEE 802.11b) |
| Frequency band / channels | IEEE802.11n/g/b: 2.4 GHz (1 - 13 ch) |
| Transmission speed (value of standard) * | IEEE802.11n max. 150 MbpsIEEE802.11g max. 54 MbpsIEEE802.11b max. 11 Mbps |
| Security | WEP, WPA Personal, WPA2 Personal |
* The indicated values are maximum theoretical values for the Wireless LAN Standard. The values do not indicate actual data transmission speeds.
MISE SOUS TENSION ET HORS TENSION
AFKNELPUNT VRIJ HOUDEN
Information on Disposal for Business Users
Inom EU
Veiledninger
Passord for systeminnstillinger
Sørg for ikke at glemme de nye administrator passwords.
- DIGITAL FULL COLOUR PRINTER
- START GUIDE
- Symbols in this manual
- Power notes
- WARNING
- CAUTION
- Installation notes
- About consumables
- Handling precautions
- Laser information
- Caution!
- Software licence
- Warranty
- Safety data sheet
- Wireless LAN (for MX-C300P/C300PE)
- Noise emission
- Noise emission values
- Notice for users in Europe
- Notice for users in the UK
- MAINS PLUG WIRING INSTRUCTIONS
- GREEN-AND-YELLOW: Earth
- BLUE: Neutral
- BROWN: Live
- Supplies
- Storage of supplies Proper storage
- Storing toner cartridges
- Supply of spare parts and consumables
- Information on Disposal for Users (private households)
- In the European Union
- In other Countries outside the EU
- Information on Disposal for Business Users
- Environmental information
- Please read this part carefully. It will help you to reduce your impact on the environment and help you to reduce your costs at the same time.
- Saving paper
- Saving energy
- Cartridge disposal and treatment
- Turning the power on and off
- Turning on the power
- Turning off the power Switch the main power switch to the “○” position.
- Operation manuals
- Start Guide: this manual
- Software Setup Guide (PDF)
- Operation Guide (PDF)
- How to read the Operation Guide
- System settings password
- Password for logging in from this machine
- Password for logging in from a computer
- MISE SOUS TENSION ET HORS TENSION
- Inom EU
- Veiledninger
- Passord for systeminnstillinger
Brand : SHARP
Model : MX-C300P
Category : Printer