DMC-2000 - DJ Equipment SynQ - Free user manual and instructions
Find the device manual for free DMC-2000 SynQ in PDF.

User questions about DMC-2000 SynQ
0 question about this device. Answer the ones you know or ask your own.
Ask a new question about this device
Download the instructions for your DJ Equipment in PDF format for free! Find your manual DMC-2000 - SynQ and take your electronic device back in hand. On this page are published all the documents necessary for the use of your device. DMC-2000 by SynQ.
USER MANUAL DMC-2000 SynQ
Copyright © 2011 by BEGLEC NV
t Hofveld 2C \~ B1702 Groot-Bigaarden \~ Belgium
Reproduction or publication of the content in any manner, without express permission of the publisher, is prohibited.
AM.2000
Multifunctional Modellon controller
natural_image
Black industrial CD/DVD computer with two dials and control knobs (no visible text or labels)Operation Manual EN
Mode d'emploi FR
Dispose of the unit and used batteries in an environment friendly manner according to your country regulations.
FR - DÉCLASSER L'APPAREIL
Congratulations and thank you for buying this SYNQ ^® product. Please read these operating instructions carefully so you will know how to operate this product properly. After you have finished reading the instructions, put them in a safe place for future reference.
DON'T FORGET TO REGISTER YOUR NEW SYNQ® PRODUCT. YOU WILL AUTOMATICALLY RECEIVE A REMINDER WHEN NEW SOFTWARE UPDATES ARE AVAILABLE! → SURF TO: WWW.SYNQ-AUDIO.COM/REGISTER/ ←
FEATURES
This unit is radio-interference suppressed. This appliance meets the requirements of the current European and national guidelines. Conformity has been established and the relevant statements and documents have been deposited by the manufacturer.
This professional digital media controller offers an extremely compact all-in-one solution that will even satisfy the most demanding DJs! All you need is a pair of powered speakers to get the party rolling! The unit is packed with tons of features like:
• Music from different sources can be played and mixed seamlessly:
- Two internal USB-players share the same USB-hard disk/USB-stick to play any WAV or MP3 file
• Different analog inputs like turntables, extra CD-players, etc.
- Controls all popular MIDI DJ-software you can imagine, free Deckadance-LE software included!
- Two microphones with talkover can be used simultaneously.
- Q-DBase system: smart, fully featured database lookup system to find your tracks very easily, even on big hard disks, up to 500GB!
• Free Windows Q-DBase-builder software included.
- The digital effects (echo, flange, filter, brake) can be used manually or fully beat synchronized with presets.
- Seamless loops with real-time loop edit function
- PCMS (Permanent Cue Memory System): for each track up to 4 cue points and seamless loops can be stored/recalled at any moment
• High precision scratch function and pitch bend, thanks to the touch sensitive jog wheels
• Several jog wheel modes: vinyl, CDJ and A.CUE scratch!
- DJ-software can use coded vinyl disks to control playback and scratch your MP3/WAV files.
• 2x 10character alphanumeric VFD-displays show all information, including ID3-tags.
• SMART RANDOM: random play can be limited to 1 genre or artist (ex. play only slows!)
- Original, upgradeable, Synq firmware: guarantees user-friendly, sophisticated functionality not found elsewhere.
• Fully customizable setup menu for MIDI and other functions.
• Pitch control (+/-6%, 10%, 16%, +16%/-100%)
• Pitch lock (Master Tempo)
• Full featured 2channel digital mixer with customizable crossfader, balanced output and booth master.
• PFL headphone monitor with CH1/CH2 mixing and adjustable volume.
- Many more ..
BEFORE USE
- Before you start using this unit, please check if there's no transportation damage. Should there be any, do not use the device and consult your dealer first.
- Important: This device left our factory in perfect condition and well packaged. It is absolutely necessary for the user to strictly follow the safety instructions and warnings in this user manual. Any damage caused by mishandling is not subject to warranty. The dealer will not accept responsibility for any resulting defects or problems caused by disregarding this user manual.
- To protect the environment, please try to recycle the packing material as much as possible.
SYNQ®
1/124 DMC2000
ENGLISH OPERATION MANUAL
- Keep this booklet in a safe place for future consultation. If you sell the unit, be sure to add this user manual.
Check that the carton contains the following items: - DMC2000 unit
- Operating instructions
• 1 USB cable - 1 AC power cord
Check the contents:
SAFETY INSTRUCTIONS:

CAUTION RISK OF ELECTRIC SHOCK DO NOT OPEN

CAUTION: To reduce the risk of electric shock, do not remove the top cover. No user-serviceable parts inside. Refer servicing to qualified service personnel only.

The lightning flash with arrowhead symbol within the equilateral triangle is intended to alert the use or the presence of un-insulated "dangerous voltage" within the product's enclosure that may be of sufficient magnitude to constitute a risk of electric shock.

The exclamation point within the equilateral triangle is intended to alert the user to the presence of important operation and maintenance (servicing) instructions in the literature accompanying this appliance.

This symbol means: indoor use only
This symbol means: Read instructions
This symbol means: Safety Class II appliance
• To prevent fire or shock hazard, do not expose this appliance to rain or moisture.
- To avoid condensation to be formed inside, allow the unit to adapt to the surrounding temperatures when bringing it into a warm room after transport. Condense sometimes prevents the unit from working at full performance or may even cause damages.
- This unit is for indoor use only.
- Don't place metal objects or spill liquid inside the unit. No objects filled with liquids, such as vases, shall be placed on this appliance. Electric shock or malfunction may result. If a foreign object enters the unit, immediately disconnect the mains power.
- No naked flame sources, such as lighted candles, should be placed on the appliance.
- Don't cover any ventilation openings as this may result in overheating.
- Prevent use in dusty environments and clean the unit regularly
- Keep the unit away from children.
• Inexperienced persons should not operate this device.
- Maximum save ambient temperature is 40°C. Don't use this unit at higher ambient temperatures.
- Minimum distances around the apparatus for sufficient ventilation is 5cm.
• Always unplug the unit when it is not used for a longer time or before you start servicing.
- The electrical installation should be carried out by qualified personal only, according to the regulations for electrical and mechanical safety in your country.
- Check that the available voltage is not higher than the one stated on the rear panel of the unit.
- The socket inlet shall remain operable for disconnection from the mains.
- The power cord should always be in perfect condition. Switch the unit immediately off when the power cord is squashed or damaged. It must be replaced by the manufacturer, its service agent or similarly qualified persons in order to avoid a hazard.
- Never let the power-cord come into contact with other cables!
- When the power switch is in OFF position, this unit is not completely disconnected from the mains!
- In order to prevent electric shock, do not open the cover. Apart from the mains fuse there are no user serviceable parts inside.
- Never repair a fuse or bypass the fuse holder. Always replace a damaged fuse with a fuse of the same type and electrical specifications!
- In the event of serious operating problems, stop using the appliance and contact your dealer immediately.
- Please use the original packing when the device is to be transported.
- Due to safety reasons it is prohibited to make unauthorized modifications to the unit.
SYNQ ^®
2/124 DMC2000
ENGLISH OPERATION MANUAL
INSTALLATION GUIDELINES:
- Placing and using the unit for long periods near heat-generating sources such as amplifiers, spotlights, etc. will affect its performance and may even damage the unit.
• Take care to minimize shocks and vibrations during transport. - When installed in a booth or flight case, please make sure to have good ventilation to improve heat evacuation of the unit.
- To avoid condensation to be formed inside, allow the unit to adapt to the surrounding temperatures when bringing it into a warm room after transport. Condense sometimes prevents the unit from working at full performance.
- Choose the place where you put your installation very carefully. Avoid presence of heat sources. Avoid places with vibrations or places that are dusty and humid.
• To prevent fire or shock hazard, do not expose this appliance to rain or moisture. - In order to prevent electric shock, do not open the top cover. If a problem occurs, contact your dealer.
- Do not place metal objects or spill liquid inside the player. Electric shock or malfunction may result.
- The player should not be adjusted or repaired by anyone except properly qualified service personnel.
- This unit may cause interference to radio and television reception.
CLEANING THE PLAYER:
Clean by wiping with a polished cloth slightly dipped with water. Avoid getting water inside the unit. Do not use volatile liquids such as benzene or thinner which will damage the unit.
CONTROLS AND FUNCTIONS
text_image
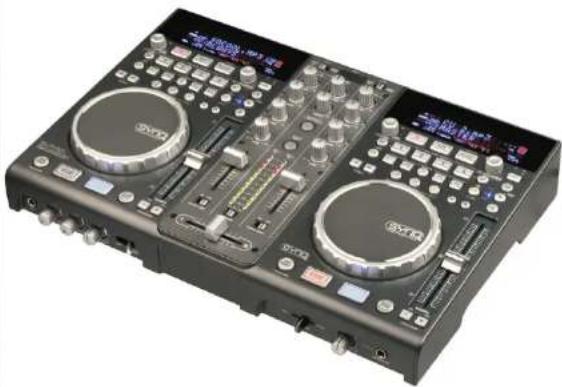
SYNQ DMC.2000 1 2 3 4 5 6 7 8 9 10 11 12- MAINS input: connect the unit to the 100-240V AC mains, using the supplied power-cord.
- POWER ON/OFF switch: switches the unit on and off.
- USB2 connection: this is the second (type-A) USB-connection, used to connect any USB mass storage device that was formatted in FAT or FAT32. By default this input is used to connect a hard disk. (see chapter "connections")
- MIDI / LINK USB connection: this (type-B) USB-connection is used to connect the player to a computer with MIDI DJ-software. Please check the chapter "connections" for more information.
- MASTER BALANCED OUTPUT: The XLR-connectors can be used to connect this mixer to any balanced amplifier input or powered speakers, using special balanced signal cables.
- MASTER UNBALANCED OUTPUT: The "master" output has the same output signal as the balanced master output(5) but unbalanced.
- BOOTH MASTER OUTPUT: The "booth master" output carries the same signal as the master but can be controlled independently by the booth master (49). Use the outputs to connect unbalanced amplifiers or connect a sound recorder.
- PH/LINE SWITCH: This switch makes it possible to switch between the Phono and the Line input level for this channel.
- ANALOG INPUT: to both mixer channels you can connect turntables or extra CD-players that can be mixed simultaneously with tracks from the DMC2000 players and DJ-software from your PC/MAC.
- GROUND (GND) CONNECTION: Many Turntables have a GND-connection. It is preferable to connect this signal ground to the GND-connector. If your turntable does not have a ground wire, you don't have to use this connector.
- DJ MIC INPUT JACK: Combo jack. Accepts either a balanced microphone with an XLR connector or an unbalanced microphone with 1/4" mono jack. This input is mainly used as DJ-microphone. The talkover does not affect the signal level of this input.
ENGLISH OPERATION MANUAL
- KENSINGTON SECURITY SLOT: can be used to protect the DMC2000 from opportunist theft. Keep in mind that this is absolutely not a 100% anti-theft protection! You can buy a compatible "Kensington" security cable from almost every computer store.

text_image
Labeled diagram of an electronic multimeter or oscilloscope with numbered components and function buttons- USB1 connection: this is the first (type-A) USB-connection, used to connect any USB mass storage device that was formatted in FAT or FAT32. By default this input is used to connect an occasional USB-drive like USB-sticks etc.
- SOURCE SELECT switch: use this button to select the desired audio source: USB1 or USB2.
-
DATABASE / NEXT TRACK button: a very important button if you want to find your next track easily and fast, even while the previous track is still playing! This button works in two different ways:
-
NEXT TRACK function: will be used while searching on mass storage devices that don't have the "Q-DBase system" files installed. You can only search on track and folder numbers.
-
DATABASE function: will be used while searching mass storage devices that have the "Q-DBase system" files installed. You can alphabetically search on artist, track title, genre or album. Very fast and no need for you to know where your files are located!
Once you have found the desired song, just press the LOAD TRACK-button (19) to load the track. For both functions, please refer to chapter "HOW TO USE" for more information. -
FOLDER knob: this knob has different functions:
-
No Q-Dbase: turn this knob to browse the folders of USB-drive while you don't use the Q-Dbase system.
- During Q-Dbase search: press while you turn the knob to select the first character of the search key you're looking for. Turn the knob to go to the next search key that starts with the same character. Press the knob to show the search key on the 2^nd text line of the display.
- Setup menu: turn the knob to browse the different menu options.
Please refer to chapters "HOW TO USE" & "SETUP MENU" for more information.
-
TRACK knob: this knob has different functions:
-
No Q-Dbase: turn this knob to browse the tracks inside a folder of a storage device while you don't use the Q-Dbase system.
• Q-Dbase search: two options:
ENGLISH OPERATION MANUAL
- Turn the knob to browse all files with the same first character that was first selected with the FOLDER button.
- Press the knob while you turn it to change the search key in the database, you can search the keys:
- Art: search for "artist names" in alphabetical order (default search key)
- Alb: search for "album names" in alphabetical order
- Gen: search for "Genres" in alphabetical order
- Std: don't use the Q-Dbase system, just folders and tracks manually.
- During playback: press the knob to see the different ID3-tags on the display;
- Press 1x: Album name of the current track is shown
- Press 2x: Genre of the current track is shown
- Press 3x: Bitrate information of the current track is shown
- Setup menu: turn the button to change the settings of the selected menu option.
Please refer to chapter "HOW TO USE" for more information.
-
SEARCH buttons: used to search quickly inside a track.
-
LOAD TRACK button: this button has different functions:
- Load a track: that was found using the database/next track function.
- Open setup menu: press the LOAD TRACK button for about 3seconds.
- Close setup menu: press the LOAD TRACK button shortly to leave setup.
"Please refer to chapters "HOW TO USE" & "SETUP MENU" for more information.
-
PLAY/PAUSE button: every time you press the PLAY/PAUSE button the player changes from play to pause or from pause to play. The button blinks as long as the player is set to pause.
-
CUE button: Pressing the CUE button during playback provides an immediate return to the position at which play was started. Playback starts immediately from the programmed cue point for as long as the CUE button is pressed. The player jumps back to the cue point as soon as the CUE button is released. Also with the unit in pause mode (Play/Pause button blinks) the jog wheel is used to set a different start point. By pressing "PLAY/PAUSE" or "LOOP IN" button followed by "CUE", you can confirm this new cue point.
-
TACTILE JOG-WHEEL: The jog-wheel on this player has 2 parts:
- Tactile center part: to match the vinyl feel as close as possible and largely improve scratch performance, the central part of the jog-wheel uses a patented touch-sensitive technology. With the WHEEL MODE buttons (23) you can change the behavior of this central part. Check the description of the WHEEL MODE buttons (23) for more information.
- Outer ring: silver colored part of the jog wheel which is not touch sensitive. Regardless of the selected wheel mode the outer ring can be always be used for pitch bending, except while using one of the digital effects.
- WHEEL MODE button: toggles between 3 different modes for the tactile jog-wheel. The tactile center part and outer ring behave differently:
- VINYL-mode: used for extremely realistic scratching of any MP3 file played on the internal players or DJ-software from your computer.
- Tactile center part: During playback, the music stops immediately when you touch the jog-wheel: playback speed and direction are now fully controlled by the movements of your hand. In pause mode you can easily set a new cue point.
- Outer ring: During playback you can use the outer ring for pitch bending to synchronize the beats of 2 tracks. In pause mode you will hear the typical very small loops that give you the possibility to set a cue point with 1frame (1/75seconds) accuracy.
- CDJ-mode: this is the standard mode, used by most DJ players. Both the tactile center part and the outer ring behave identically. While the track is playing, the jog wheel temporarily bends the pitch of the music up to +1 - 100% by rotating the wheel clockwise to speed it up or counterclockwise to slow it down. The amount of pitch change is determined by the speed of rotation. In pause mode you will hear the typical very small loops that give you the possibility to set a cue point with 1frame (1/75seconds) accuracy.
- A.CUE SCRATCH-mode: very similar to VINYL mode but scratching always starts from the actual cue point, the behavior of the outer ring is identical to that of vinyl mode:
- Tactile center part: During playback, the music stops immediately and returns to the actual cue point each time you touch the jog-wheel: playback speed and direction are now fully controlled by the movements of your hand. In pause mode you can easily set a new cue point but the player first returns to the actual cue point.
ENGLISH OPERATION MANUAL
- Outer ring: During playback you can use the outer ring for pitch bending to synchronize the beats of 2 tracks. In pause mode you will hear the typical very small loops that give you the possibility to set a cue point with 1frame (1/75seconds) accuracy.
-
HOT CUE buttons: 4 programmable buttons where you can store ordinary cue points and/or loops. When a normal cue point is stored, the corresponding button is green, when a loop is stored the corresponding button turns red. All stored cue points and loops can be backed up to permanent memory for future use. This feature is called "PCMS Permanent Cue Memory System". Check the chapter "HOW TO USE" for more information on how to program cue points etc.
-
RECORD CUE button: press this button prior to one of the 4 HOT CUE buttons (24) to save a new cue point or loop. See the chapter "HOW TO USE" to learn how you save cue points and loops.
- Saving cues to permanent memory: the hot cue system uses 2 kinds of memory: temporary "track memory" and "permanent" memory. New hot cues are only saved to the temporary "track memory". If you want to keep the hot cues for future use you must save the information to permanent memory. To save the cues to permanent memory, just press the RECORD CUE-button until the display shows "Saving".
- Saving personal settings: Press the RECORD CUE-button and X/SYNC-button (39) together to save different personal parameters that are currently in use (pitch range, single/cont, standard time display, jog wheel setting, auto cue, auto BPM-mode, pitch on/off, database search key and starttime/brake time)
- DELETE CUE: this button has several functions:
- DELETE 1 HOT CUE: press the DELETE CUE button, followed by the HOT CUE button that you want to delete from track memory. The deleted button will turn black.
- DELETE 4 HOT CUES: press the DELETE CUE button for about 2 seconds to erase all 4 hot cues from track memory.
- DELETE TRACK: press the DELETE CUE button and Y/RATIO-button (40) together to delete the hot cues for the entire track from permanent memory. Because there will be no way back, the display first asks you if you're sure: using the PITCH BEND buttons (29) you can choose YES or NO. please refer to the chapter "HOW TO USE" for more information.
-
TEMPO RANGE button: press this button to select the different available speed ranges: +/-6%, +/-10%, +/-16%, +18/-100%. The lower ranges make the SPEED-fader (28) more precise, the higher ranges are suitable for special effects. To turn the speed function off simply press the button for 1second, until the speed indicators turn off. Press the button again to re-activate speed control.
-
SPEED-fader: used to adjust the playback speed of the playing track. You can turn the speed function on/off or change the range with the TEMPO RANGE-button (27)
-
PITCH BEND buttons: The speed rises while the "+ button" is pressed and returns to the original pitch when the button is released. The speed drops when the "- button" is pressed and returns to the original pitch when the button is released. These buttons can be used to synchronize the beats of 2 tracks. They are also used to confirm (or not) the questions that are sometimes shown on the display.
-
KEY LOCK Button: (Master tempo) activates the Pitch Lock function. This function allows you to make adjustments to a tracks speed using the SPEED-fader without altering the tonal pitch.
-
LOOP IN button: Allows you to set a new cue point without stopping playback (CUE ON THE FLY). This button also sets the beginning of a seamless loop: marks the beginning of the loop, you have to press the LOOP OUT button to mark the end of the loop and start playback in loop mode. Please refer to the chapter "HOW TO USE" for more information.
-
OUT/EXIT button: Used to set the endpoint when looping music. The player starts seamless loop playback until you press this button again to exit. When a loop is programmed but not active you can also restart the loop. The point where you press the button will be memorized as the new end point of the loop. In loop edit mode pressing the OUT/EXIT button stops the loop editing and saves the new loop endpoint.
-
RELOOP/STUTTER button: This button has 3 functions:
- RELOOP: When a loop was programmed and you have hit the OUT/EXIT button, press the reloop button to enter the loop again. To exit the loop press the OUT/EXIT button. (intro and end points of the loop are unchanged)
- STUTTER: When a loop is playing you can press this button to restart the loop at once. You can also press this button when a track is not playing in loop. Every time the RELOOP/STUTTER button is pressed, it will restart the music from the actual cue point. The stutter effect adds extra creativity to your performance.
- ENTER EDIT LOOP MODE: When a loop is programmed (LOOP IN and OUT/EXIT buttons are on) you can enter loop edit mode by pressing the RELOOP/STUTTER button until the display shows "OUT EDIT". While in loop edit mode you toggle between "OUT EDIT" and "IN EDIT".
ENGLISH OPERATION MANUAL
- ECHO EFFECT button: press this button to activate the echo effect. Depending on the sync-mode (manual or beat synchronized), different settings are possible:
- Manual mode: the FX-SYNC button (38) is dark. You can set all parameters manually, use the following controls:
- Jog-wheel (22): used to set the echo time from 1ms to 2000ms.
- Y/RATIO button (40): as long as the Y/RATIO-button is blinking you can use the jog-wheel (22) to change the impact (dry/wet) of the effect.
- Beat synchronized mode: the FX-SYNC button (38) is lit. You can use the following controls:
- EFFECT SYNC-buttons (39+40): choose one of the beat synchronized echo presets.
- Y/RATIO button (40): as long as the Y/RATIO-button is blinking you can use the jog-wheel (22) to change the impact (dry/wet) of the effect.
- FLANGER EFFECT button: press this button to activate the flanger effect. Depending on the sync-mode (manual or beat synchronized), different settings are possible:
- Manual mode: the FX-SYNC button (38) is dark. You can set all parameters manually, use the following controls:
- Jog-wheel (22): used to manually change the effect.
- Y/RATIO button (40): as long as the Y/RATIO-button is blinking you can use the jog-wheel
(22) to change the impact (dry/wet) of the effect.
- Beat synchronized mode: the FX-SYNC button (38) is lit. You can use the following controls:
- EFFECT SYNC-buttons (39+40): choose one of the beat synchronized sweep presets.
- Y/RATIO button (40): as long as the Y/RATIO-button is blinking you can use the ino-wheel
(22) to change the impact (dry/wet) of the effect.
- FILTER EFFECT button: press this button to activate the filter effect. Depending on the sync-mode (manual or beat synchronized), different settings are possible;
- Manual mode: the FX-SYNC button (38) is dark. You can set all parameters manually, use the following controls:
- Jog-wheel (22): used to manually change the cutoff frequency of the filter.
- Y/RATIO button (40): as long as the Y/RATIO-button is lit you can use the jog-wheel (22) to change the impact (Q-factor) of the filter.
- Beat synchronized mode: the FX-SYNC button (38) is lit. You can use the following controls:
- EFFECT SYNC-buttons (39+40): choose one of the beat synchronized sweep presets.
- Y/RATIO button (40): as long as the Y/RATIO-button is lit you can use the jog-wheel (22) to change the impact (Q-factor) of the filter.
-
BRAKE button: press this button to activate the brake effect. Now you can determine the acceleration/deceleration speed of the music while using the PLAY/PAUSE button (20). You can set the parameters with buttons (39+40), see below.
-
FX SYNC button: press this button to toggle between manual and beat synchronized effect mode! Please refer to points (34+35+36) for more information.
-
EFFECT SYNC/START-button: this button has several functions, depending on the effect mode
- BPM-Synced effects: when an effect is used in beat synchronized mode, this button is lit. You can now choose how you want the effect to be synchronized to the beat. Use this button to cut the
ent BPM-parameter in half.
- BRAKE effect: press this button to change the acceleration time (time from zero to full speed). While the button is lit, you can use the jog-wheel (22) to change the time from 0.0s (instant start) to almost 10s. (very slow start)
- EFFECT SYNC/STOP/Y/RATIO-button: this button has several functions, depending on the effect mode;
- BPM-Synced effects: when an effect is used in beat synchronized mode, this button is lit. You can now choose how you want the effect to be synchronized to the beat. Use this button to double the current BPM-parameter.
- BRAKE effect: press this button to change the deceleration time (time from full speed to zero). While the button is lit, you can use the jog-wheel (22) to change the time from 0.0s (instant stop) to almost 10s. (very slow stop)
- IMPACT parameter: while one of the 3 DSP-effects is activated, press the button until it starts blinking. Now you can adapt the impact of the selected effect, also see EFFECT buttons (34+35+36).
- TIME Button: The TIME button switches between elapsed playing time, remaining time of the selected track.
ENGLISH OPERATION MANUAL
- SGL/CTN: You can choose between "single track mode" and "continuous play".
- Continuous play: all tracks will be played without interruption. (mostly used in pubs)
- Single track: player stops at the end of each track and waits at the beginning of the next track (mostly used by deejays)
Push the SGL/CNT button for more than 1second to switch between normal and 'auto cue' mode. In "auto cue" mode the player waits at the first music note of each track. This means that badly indexed tracks will not interfere with the instant start capabilities of the player. This is a very useful feature for depeaves!
- TAP/SHIFT button: this button has two functions:
- TAP-function: This player has a full automatic BPM-counter. In some rare cases the automatic beat counter doesn't count as it should do (beats are out of the normal range or there's simply no beat to detect). In these cases you can help the beat counter by manually tapping this button to the rhythm of the beat. You can switch back to the automatic beat counter by pressing the TAP button until the "AUTOBPM" in the right upper corner of the display turns on.
- SHIFT-function: only used while the player is used as a MIDI controller. The shift function doubles the functions of each control: press the shift button while using another control to obtain an extra, secondary, function. See the chapter *MIDI MAP* for more information.
-
VFD DISPLAY: Shows all important information needed during playback.
-
RANDOM button: you can select 2 different random play functions.
- TOTAL random: press the RANDOM button shortly until the LED is lit. Player 1 now plays tracks, randomly selected from the complete USB-mass storage. While player 1 is playing in random mode, player 2 can still be used to play any track you like.
- SMART random: you can choose to play only tracks from a certain directory, only tracks from a certain genre, or even only tracks from a certain album or artist:
- Play tracks only from 1 directory: first choose "search-key = Std" (folders/tracks). Now you have to select a directory, then press the RANDOM button for +/-2 seconds until the LED starts blinking. Player 1 now plays only tracks from the selected directory.
- Play tracks only from a certain genre/artist/album: choose the right search-key and select a track that corresponds to the desired genre, artist or album. After pressing the RANDOM button for +/-2seconds, the player will only play tracks with the same genre, artist or album as the track you're currently playing. (Avoids mix-up of 2 completely different music styles: perfect for bars, clubs, restaurants.) See chapter "HOW TO USE" for examples.
-
INPUT SOURCE SELECTOR: Used to select the correct input on both channels: internal player, MIDI-control for DJ-software on computer or external analog phono/line inputs (there are also additional input selectors (8) on the back).
-
GAIN LEVEL: Adjusts the input level on both channels. Use this control to adjust the level on the VU-meter at about 0dB.
-
3-BAND TONE CONTROLS: The frequency of each channel can be controlled separately over a range from -35dB to +10dB. You can kill (completely remove) the high, mid and/or low frequencies by pressing the corresponding knob(s). In the center position the tone control is flat. (switched off)
-
BOOTH MASTER LEVEL: Used to adjust the level of the unbalanced booth master output.
-
MASTER LEVEL: Used to adjust the level of the balanced Master output.
-
VU METER: Each channel has its own LED VU-meter so you can adjust the gain level (47) very quickly. Make sure the levels do not exceed 0dB (or 100%). The audio risks to be distorted when the signal level comes in the red zone of the VU-meter. While the MASTER METER-button (52) is lit the VU-meters indicate the output level on the master.
-
MASTER METER button: when this button is dark, the VU-meters indicate the levels of individual channels. Press the button to light it up: the VU-meters now indicate the output level of the master.
-
CHANNEL FADER: Used to set the level of each channel separately.
-
FADER START switch: when switched to ON the internal players can be started/stopped by moving the crossfader.
-
CROSS FADER CURVE: Adjusts the curve of the cross fader from sharp (left position) to smooth (right position).
-
CROSSFADER: With this fader you can mix over between both channels. The crossfader only works when you move the selected channel faders (53) to the desired level!
ENGLISH OPERATION MANUAL

text_image
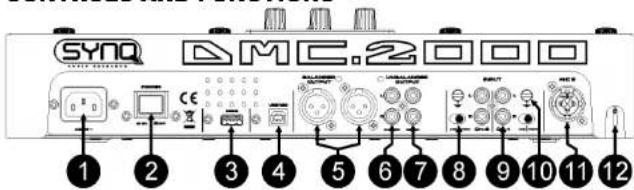
57 58 59 60 61 62 63 64- DJ MIC INPUT JACK: Accepts either an unbalanced microphone with 1/4* mono jack. This input is mainly used as DJ-microphone. The talkover does not affect the signal level of this input.
- MIC1 VOL: Used to adjust the input level of micro 1
- MIC2 VOL: Used to adjust the input level of micro 2.
- MIC TONE: used to adapt the sound of both microphone inputs.
- MIC ON/OFF/TALK OVER SWITCH: Used to switch the microphones:
• OFF: Both mic1 & mic2 are switched off.
• ON: Both mic1 & mic2 are switched on - TALK OVER: mid 8, 2 are switched on the sound level of all the other channels will decrease to
- TALK OVER: mict & 2 are switched on, the sound level of all the other channels will decrease to ground -30dB
- CUE MIX: With this knob you can mix the the input channels through the headphone output (64):
- Put the knob in the extreme left position to hear channel1.
- Put the knob in the extreme right position to hear channel2.
- Put the knob in any other position to hear a mix of the two signals.
This option makes it possible to check your mix before you put it on the master output.
This option makes it possible to check your mix before you put it on the line. 63. HEADPHONE VOLUME: controls the sound level of the headphone output. - HEADPHONE output: if you like you can connect your headphone here.
VFD DISPLAY

text_image
A B C D E F G H CUE FOLDER 888 AUTO BPM I RED CAPS 888 AUTO BPM J ALL TRACK TOTAL 888:88s 88° TEMPO:0 K L M N O P Q R SA. PLAY: appears while the unit is playing a track.
B. PAUSE: appears while the player is in pause or cue mode.
C. CUE: appears when the player is waiting at the CUE-poin
D. TOUCH INDICATOR: appears when the touch sensitive part of the iog wheel is active.
E. ALPHANUMERIC DISPLAY: Shows all kinds of important information like effect parameters, loop information, ID3-tags, ...
F. BPM DISPLAY: the automatic beat counter shows the number of Beats Per Minute on the display. In manual mode the display shows "BPM". In automatic mode the display shows "AUTOBPM". (press the TAP button for 2 seconds to switch to automatic mode)
G. MEMORY BUCKET: shows the status of the buffer memory needed for anti-shock and some special functions. Each bar of the bucket represents 2 seconds buffer memory.
ENGLISH OPERATION MANUAL
H. AUTO CUE: appears when the *auto cue* function is active. See SGL/CTN button (42).
I. RELOOP: shows when a loop is programmed. (repeating a particular area)
- RELOOP Flashing: Loop is programmed and currently playing.
• RELOOP on: Loop is programmed but not playing
J. SINGLE: appears when the unit is set to play just one track at a time. When it is not shown, all tracks are played without interruption. The function is controlled by the SGL/CTN button (42).
K. MP3 indicator: appears when an MP3-file is playing.
L. TRACK indicator: shows the number of tracks available in your current selection.
- Standard lookup: (no Q-Dbase) the track numbers in the current folder (M) are shown.
• Q-Dbase lookup: the track numbers that correspond to your Q-Dbase pre-selection.
M. FOLDER/SEARCH KEY indicator: the information depends on the lookup mode you selected.
- Standard lookup: (no Q-Dbase) the current folder number is shown.
• O-Dbase lookup: the current search key (Art, Alb or Gen) is shown
N. ELAPSED, TOTAL REMAIN: indicates that the time shown on the display is the track elapsed, remaining or total remaining time.
O. MINUTE: Shows "minutes" time information of current track.
P. SECOND: Shows "seconds" time information of current track.
Q. FRAME: Shows "frame" time information of current track. (1 frame = 1/75th sec.)
R. TIME BAR: has 2 functions:
• During normal playback: shows either time remaining or elapsed depending on the setting of the
- During normal playback shows other time remaining of elapsed depending on TIME button. Starts flashing at the end of each track to alert the user to take action.
• During loop playback: shows the time remaining until the end of the loop. This visual aid helps you
During loop, playbox shows the time remaining small to see where and when the seamless loop starts again.
S. PITCH DISPLAY: Shows the actual percentage of speed change, selected with the SPEED slider (28). The small red colored padlock is shown when the pitch lock function (Master Tempo) is active.
CONNECTIONS
Some important notes for the USB-storage devices that you will connect:
Note 1: the hard disk must be formatted in FAT32! A hard disk formatted in NTFS (mostly drives with big capacity) will NOT be recognized: such hard disk should be re-formatted in FAT32! (this can be done under Windows, support can be found on the DMC2000 product page)
Note 2: the USB-slots on this player can each deliver 1A power to the connected hard disk. However we suggest using a hard disk with separate power supply for better reliability.
Note 3: only WAV and MP3 files are recognized and can be played.
Note 4: for your convenience we strongly advice using the Q-DBASE indexer software, it simply mazkes life a lot easier!
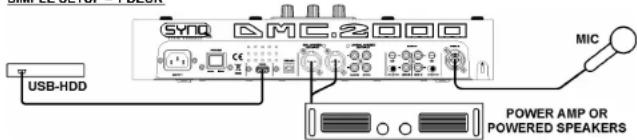
SIMPLE SETUP - 1 DECK
text_image
USB-HDD GND MC.2000 MIC POWER AMP OR POWERED SPEAKERS- Connect the balanced(5) or unbalanced(6) master to a power amplifier or powered speaker cabinets.
- Connect a USB-stick to USB1-input (13) or USB-harddisk to the USB2-input (3).
- If needed, connect a microphone to the mic1 (57) or mic2 (11) input.
- Connect the supplied power cord between the mains input (1) on the player and the mains socket.
→ You are ready to play and mix the MP3/WAV files on your USB-storage. Have fun!
[Non-Text]
ENGLISH OPERATION MANUAL
SETUP - WITH DMC1000 for harddisk share

text_image
USB-HDD PLAYER 1 SYNC MC.2000- Connect a USB hard disk to the USB2-connection of the DMC1000.
• Make sure that the USB-link on the DMC1000 is set to "LINK"
- Use the USB-cable, supplied with DMC1000, to connect the USB-link connection of the player to the USB2-connection (3) of the DMC2000.
- Use the SOURCE SELECT button (14) to select USB2 on the DMC2000: both the DMC1000 and DMC2000 players will connect to hard disk.
→ You can now play MP3 and WAV files from the connected hard disk.
IMPORTANT: for good, stable performance only use a good quality USB-cable with a maximum length of 1meter!
SETUP - COMPLETE SETUP, INCLUDING MIDI CONTROLLER

text_image
USB-HDD MIC DJ SOFTWARE MIC1 POWER AMP OR POWERED SPEAKERS PC / MAC EXTRA CD EXTRA TURNTABLEThe drawing shows a complete setup, including the MIDI-controller function.
You can connect up to 2 external audio sources (lumtable or line) to turn your DMC2000 into a multifunctional DJ-unit. All you have to do is switch the inputs on top of the 2 mixer channels!
- If you only want to use the MIDI controller function, you just have to connect the computer with DJ-software via the supplied USB-cable to the USB-MIDI output (4) on the DMC2000: the controller will be recognized and the drivers will be automatically installed.
- Put both mixer channel inputs (46) in MIDI-mode: most controls on the DMC2000 will send out MIDI.
- For specific MIDI-settings please refer to the chapter "SETUP MENU".
- Depending on the DJ-software you're using, you will have to load the desired MIDI-mappings. On some DJ-software the DMC2000 mapping will be loaded automatically, on other DJ-software you will have to download the MIDI mapping from our site or from the download section of the DJ-software. If the DMC2000 is not supported by the DJ-software you can make your own MIDI-mapping but this entirely depends on the software you're using. Please note that the installation and the use of different DJ-software is very specific and therefore not supported by Synq!
- The DMC2000 as internal sound cards: the music of your mix will come through the master outputs (5+6).
- MIDI function mixer: The setup of the DMC2000 is such that you can easily mix music from all inputs with each other. You can even mix music from the DJ-software with music coming from the internal players or a connected turntable. To be able to do this you must switch the MIDI-function of the internal mixer off. (see setup menu)
- VINYL scratching option on DJ-software: with the DMC2000 you can even use the very powerful 'vinyl scratch function' available on some highend DJ-software. This means that you can scratch and manipulate
ENGLISH OPERATION MANUAL
the audio tracks played on your DJ-software by using a special coded vinyl disc! Just connect a turntable to one of the audio inputs: the signals from the special coded vinyl disc will be sent to the DJ-software.
Note1: first check if your DJ-software can use this feature. If yes, follow the instructions of the software to setup this function.
Note2: a special vinyl scratch disc is optionally available from Synq, it uses a "time dephased 1kHz stereo signal" which can be used on different DJ-software.
Installing DECKADANCE-LE software
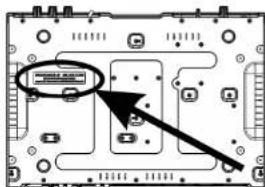
- The DMC2000 comes with a free license for Deckadance-LE, the unlock code also called serial) for this free license is fixed to the back of the DMC2000 (see drawing).
- To assure that you always have the latest version, the program is only available through download. Please follow the actions below to register and download your Deckadance-LE copy:
- Download the demo version of the software: - WINDOWS: http://windemo.deckadance.com - MAC OS: http://macdemo.deckadance.com
- Install the demo version
- To unlock the LE-version, go to: http://www.deckadance.com/synq → you will see the SYNQ-page on your computer.
- Press the 'Register' button
- Enter your email address and indicate that at you're a new customer. Now click the "Next" button.
• Follow all steps to register your player.
- Now you are able to login on your personal account: click on the Deckadance LE license (see screen)
- Click on the dark blue area "click here to unlock this product" → download the the Reg-file and double-click it to change the demo into a full functional LE-version of the software.
Difficulties? Check these links:
http://support.image-line.com/knowledgebase/base.php?id=45&ans=106 http://support.image-line.com/knowledgebase/base.php?id=&ans=119
- After this procedure you can use the free Deckadance LE software and upgrade to newer versions when they come available!
- To become more familiar with Deckadance, we suggest also visiting the following links:
• A complete overview on how to install and use Deckadance: http://deckadance.image-line.com/help
• All kinds of video tutorials:
Go to: http://www.youtube.com/user/imageline and search for "Deckadance".
text_image
Diagram of an electronic circuit board with labeled components and a highlighted connection point
text_image
Screenshot of a web interface showing a dropdown menu with options like 'Open', 'Close', and 'Close to the Web' highlighted by a red arrow.
text_image
Checkadurance LE Edition • If you haven't done so already, please download the unlockable demo installer help. • PC USERS If Deckadurance still show up to a demo, just unlock it by requesting a new update. Click here to unlock this product. ... and follow all instructions on this page. • MAC USERS For detailed information, please check the Knocked Save article. Deckadurance v1.0 and above If Deckadurance still show up as a demo, just unlock it by requesting a new update! Click here to unlock this product. ... and follow all instructions on this page. Previous versions of Deckadurance Click here for your serial number. Do to the Deckadurance setup panel, click registration and copy and paste the serial number. In case of problems, please check our Knocked Save.IMPORTANT: we strongly advise you to register your software on the Deckadance website;
You will gain access to the user forum, receive a newsletter and get full support from their support team. You will also receive 30% discount while upgrading to the HOUSE and CLUB edition of Deckadance. On the Deckadance site you can find a feature list with differences between the 3 versions. Please note that support for the Deckadance DJ-software goes exclusively through the Deckadance website (www.deckadance.com). They have a very well-developed support section with a user forum, video tutorials....
ENGLISH OPERATION MANUAL
Configuring DECKADANCE-LE software for DMC2000
Before you can use the DMC2000 with Deckadance, you have to configure both. We will configure the DMC2000 to use it its most flexible way. You will be able to mix tracks from Deckadance with tracks from the internal MP3 players and/or external sources (CD-player, turntable, ...) very easily.
- Put both channel input selectors (46) NOT in MIDI mode otherwise you cannot enter the setup menu.
- Press the LOAD TRACK button (19) for about 3secs to open the setup menu. (also see next chapter for help!)
- Go to menu option 1. MIDI CH and check if it is set to 01-02-03
- Go to menu option 2. MIDI Setup and check if it is set to TAP = HOLD
- Go to menu option 3.MIXER-mode and check if it is set to NO MIDI
- When these 3 options are correct: press the RECORD CUE-button (25) to close the setup menu and save your settings.
- Connect the DMC2000 to your PC, using the supplied USB-cable and wait until the drivers are automatically installed (NO external driver are needed!)
- Put both channel input selectors (46) in MIDI mode.
- Start Deckadance and press the SETUP-button on the screen: the setup window opens (see picture)
- Go to the option 'Remote controller' and press the button on top to scan for the connected controllers: you will be prompted that the DMC2000 is found and if you want to use it: confirm!
• Make sure that both MIDI input and output are switched ON (green color) - Close the Setup window
- Now press the AUDIO button on the upper part of the Deckadance screen, the window below opens:

flowchart
graph TD
    A["INPUTS"] --> B["Input 1"]
    A --> C["Input 2"]
    D["OUTPUTS"] --> E["<< none >>"]
    D --> F["0/2/4 >"]
    D --> G["<< none >>"]
    H["External Mixer"] --> I["HEADPHONES"]
    I --> J["PLAYER & / B"]
    J --> K["0/2/4 >"]
    J --> L["0/2/4 >"]
    J --> M["<< none >>"]
    N["SAMPLE"] --> O["<< none >>"]
    N --> P["<< none >>"]
Make sure that your setup window is identical to the window shown above.
Remark: no headphones are configured, this is normal since Deckadence is configured to be used with an external mixer (the mixer of your DMC2000)
- You are now ready to use the DMC2000 with Deckadance.
SETUP MENU
For maximum flexibility this unit is highly customizable. Therefore a lot of parameters can be set via the setup menu. To be able to enter the setup menu, the player should NOT be in MIDI mode.
• To enter the SETUP menu, press the LOAD TRACK button (19) for about 3 seconds.
- Use the FOLDER knob (16) to browse the different menu options.
- Use the TRACK knob (17) to browse the sub menus (if any)
- Use the JOG WHEEL (22) to change the settings (parameters) of the selected menu option.
ENGLISH OPERATION MANUAL
To save your settings: choose menu option E (EXIT & SAVE) and press the TRACK knob (17) or press the RECORD CUE button (25).
-
MIDI CHANNEL: used to set the MIDI-channels of the 3 different parts of the DMC2000. The display shows 3 groups of 2 digits: 01-02-03:
-
First 2 digits: MIDI-channel for the controls of player1 + channel1 of the mixer.
- Second 2 digits: MIDI-channel for the controls of the mixer, except the controls of the 2 input channels (gain+high/mid/low+fader)
- Third 2 digits: MIDI-channel for the controls of player2 + channel2 of the mixer.
→ Tum the TRACK knob (17) to browse the three 2digit groups
→ Tum the JOG WHEEL (22) to change the MIDI-channel
Note: the 3 parts should have different MIDI-channels.
2. MIDI SETUP:
There are 2 submenus: turn the TRACK knob (17) to select a submenu.
Submenu 1 - SHIFT button (43) functionality: you can choose how the SHIFT-button works in MIDI-mode.
⇒ Turn the JOG WHEEL (22) to select the desired setting:
- TAP = HOLD: similar to the SHIFT-key on your PC-keyboard → the MIDI-code of a button/knob changes only when you use it while the SHIFT-button (43) is pressed.
- TAP = TOGGLE : similar to the CAPS LOCK-key on your PC-keyboard → press the SHIFT-button (43) to turn the shift-function on: as long as the display shows "SHIFT" the MIDI-code of most buttons/knobs changes so they get a second (double) function.
- Submenu 2 – MIDI message display: you can select if the MIDI I/O messages should appear on the display or not. This can be helpful while making MIDI configuration files.
- Turn the 30G WHEEL (22) to select the desired setting.
• I/O = Hide : don't show MIDI messages that are sent / received
- I/O = DIS. : show MIDI messages that are sent / received
- MIXER-mode: used to switch the mixer between MIDI and non-MIDI mode.
⇒ Turn the JOG WHEEL (22) to select the desired setting:
- MIDI: use this setting when the DMC2000 is exclusively used to control DJ software. The mixer of the DJ software will be controlled.
-
NO MIDI : use this setting if you want to mix different audio sources (DJ software, external inputs, internal players) with each other, the levels of all audio sources can be easily matched using the gain knobs (47). Note: with this setting the mixer is not sending any MIDI, instead it works as a normal audio mixer.
-
LOAD HOTCUES: you can choose if the saved hot cues of a track should be recalled automatically.
Turn the JOG WHEEL (22) to select one of the 2 possibilities:
First Ask: when a track contains hot cues, the display asks if you want to load the hot cues or not. You can reply with the YES/NO buttons (29).
Autoload: when a track contains hot cues, they will be loaded automatically.
- CROSS FADER: switches the cross fader of the audio mixer on/off, this has no effect on the MIDI function of the crossfader.
→ Tum the JOG WHEEL (22) to select one of the 2 possibilities:
On: crossfader (56) is activated, ready to be used
Off: if you don't like using the crossfader, use this option.
- REVERSE CROSS FADER: switches the cross fader of the audio mixer in reverse mode, this has no effect on the MIDI function of the crossfader.
⇒ Turn the JOG WHEEL (22) to select one of the 2 possibilities:
On: crossfader (56) is working in reverse mode, channel1 is audible while the crossfader is in the right position.
Off: crossfader (56) is working in normal mode, channel2 is audible while the crossfader is in the right position.
- DISPLAY TIME: you can select how long a message is shown before the display returns to normal operation.
⇒ Turn the JOG WHEEL (22) to select the desired value: 0.5sec → 12.0sec.
ENGLISH OPERATION MANUAL
- SCROLL SPEED: you can select how fast the text scroll on the display.
Turn the JOG WHEEL (22) to select the desired value: 50 → 2000ms (50ms=fast/2000ms=slow).
- Sensitivity: you can change the sensitivity of the tactile jog wheel to optimize the jog wheel performance. ⇒ Turn the JOG WHEEL (22) to select one of the 41 possibilities:
ADJ. = 0: neutral setting (default setting, OK in most cases)
ADJ. = -20: lowest sensitivity
- ADL = +20; highest sensitivity
A. INTENSITY: used to adapt the brightness of the VFD-display.
⇒ Turn the JOG WHEEL (22) to select one of the 4 possibilities.
ADJ. = 1 → 4: 1 = low brightness, 4 = high brightness (default)
B. A.CUE Level: the auto cue function detects where the music really starts, this avoids blanks when a track is not well indexed. You can select one of eight detection level presets:
⇒ Turn the JOG WHEEL (22) to select one of the 8 possibilities
ADJ = -78dB → -36dB: the default setting = -48dB
C. Firmware version / upgrading: use this option to check and/or upgrade the firmware versions.
⇒ Turn the TRACK knob (17) to select the 4 firmware parts:
CON: xx: shows the version of the control firmware
- DSP: xx: shows the version of the DSP firmware
- Upgrade: blinks when the unit is ready to check if there are new firmware versions
upgrade: Intrinsic when the unit is ready to check if there are now available. See "FIRMWARE UPGRADING" for more information
D. Load defaults: as you already noted this unit is highly configurable but that means also that you can mess up a lot of settings as well. If you really messed up things, you can still reload the default setting!
While "Enter Load" is blinking in the display: press the TRACK knob (17) to load the defaults
E. Exit & Save: if you want your changes to the setup menu to be permanently saved (also after switching the unit off) you MUST use this option!
→ Press the TRACK knob (17): the display shows "Saving" and exits the setup menu.
Note: alternatively you can also press the RECORD CUE-button (25) to save settings permanently.
FIRMWARE UPGRADING
We strongly suggest to register your player on our website (www.synq-audio.com/register/) so we can inform you if new firmware updates are available. Upgrading firmware should always be done very carefully!
- Download the file containing the upgrade file(s)
- Read the instructions and follow them strictly, otherwise you could damage your equipment...
- Put the files on an EMPTY (important!) USB-stick.
- Press the LOAD TRACK button (19) for about 3 seconds to enter the setup menu.
- Use the FOLDER knob (16) to browse to menu option "C. Version"
• Turn the TRACK knob (17) until the display shows "Upgrade"
- Use the SOURCE SELECT button (14) to select USB1 input (13).
- Insert the USB-stick with firmware files in USB1-input (13)
→ Upgrading will start automatically: WAIT (I) until the upgrading process is finished. NEVER tum the player off while upgrading the software!!!
- If the display asks you to turn off the unit: turn the unit off, wait 3 seconds and turn it back on.
- Check if the software version corresponds to the version marked in the readme file that came with the update.
MIDI MAP (default settings)
| FUNCTION | Type | FUNCTION CODE (DECK A) | NOTE | SHIFT (Hold TAP) | FUNCTION CODE (DECK B) | NOTE | SHIFT (Hold TAP) | FUNCTION CODE (CENTER DECK) | NOTE | SHIFT (Hold TAP) | ACTION |
| POLDER | SWIENC | 0517 | 6456 | 6527 | 6498 | 7FH : ONDOH : OFF | |||||
| TRACK | SWIENC | 0118 | 4055 | 6128 | 6085 | 7FH : ONDOH : OFF | |||||
| IN | SWILED | 0202 | D-1 | 41 | 0202 | D-1 | 41 | 7FH : ONDOH : OFF | |||
| OUT | SWILED | 0303 | DN-1 | 42 | 0303 | DN-1 | 42 | 7FH : ONDOH : OFF |
ENGLISH OPERATION MANUAL
| SWILED | 0004 | E-1 | 43 | 04/04 | E-1 | 43 | 7TH ON COH : OFF | ||||
| SOURCE SELECT | SW | 06 | 45 | 06 | 45 | 7TH ON COH : OFF | |||||
| RECORD CUE | SWILED | 07/07 | G-1 | 48 | 07/07 | G-1 | 48 | 7TH ON COH : OFF | |||
| 1 | SWILED (RED) | 08/08 | GA-1 47 | 08/08 | GA-1 47 | 7TH ON COH : OFF | |||||
| 1 | SWILED (GREEN) | 08/05 | F-1 | 47 | 09/06 | F-1 | 47 | 7TH ON COH : OFF | |||
| 2 | SWILED (RED) | 09/09 | A-1 | 48 | 09/09 | A-1 | 48 | 7TH ON COH : OFF | |||
| 2 | SWILED (GREEN) | 09/06 | F4-1 | 48 | 09/06 | F3-1 | 48 | 7TH ON COH : OFF | |||
| 3 | SWILED (RED) | 0A/0A | A4-1 49 | 0A/0A | A4-1 49 | 7TH ON COH : OFF | |||||
| 3 | SWILED (GREEN) | 0A/15 | A0 | 49 | 0A/15 | A0 | 49 | 7TH ON COH : OFF | |||
| 4 | SWILED (RED) | 0B/CB | D-1 | 4A | 0B/CB | D-1 | 4A | 7TH ON COH : OFF | |||
| 4 | SWILED (GREEN) | 0B/16 | A#0 | 4A | 0B/16 | A#0 | 4A | 7TH ON COH : OFF | |||
| DELETE CUE | SWILED | 0C/CC | C0 | 4B | 0C/CC | C0 | 4B | 7TH ON COH : OFF | |||
| LOAD TRACK | SWILED | 0D/XD | C#0 | 4C | 0D/CD | C#0 | 4C | 7TH ON COH : OFF | |||
| TIME X | SWILED | 0E/0E | D0 | 4D | 0E/0E | D0 | 4D | 7TH ON COH : OFF | |||
| ECHO | SWILED | 0F/XF | D#0 | 4E | 0F/XF | D#0 | 4E | 7TH ON COH : OFF | |||
| FLANGER | SWILED | 10/10 | E0 | 4F | 10/10 | E0 | 4F | 7TH ON COH : OFF | |||
| HOLD | SWILED | 11/11 | F0 | 50 | 11/11 | F0 | 50 | 7TH ON COH : OFF | |||
| FILTER | SWILED | 12/12 | F#0 | 51 | 12/12 | F#0 | 51 | 7TH ON COH : OFF | |||
| BRAKE | SWILED | 13/13 | G0 | 52 | 13/13 | G0 | 52 | 7TH ON COH : OFF | |||
| RATIO Y | SWILED | 14/14 | G#0 | 53 | 14/14 | G#0 | 53 | 7TH ON COH : OFF | |||
| % | SW | 15 | 54 | 15 | 54 | 7TH ON COH : OFF | |||||
| SW | 16 | 55 | 16 | 55 | 7TH ON COH : OFF | ||||||
| SW | 17 | 56 | 17 | 56 | 7TH ON COH : OFF | ||||||
| A.Cue scratch | SWILED | 18/18 | C1 | 57 | 18/18 | C1 | 57 | 7TH ON COH : OFF | |||
| VINYL | SWILED | 19/19 | C#1 | 58 | 19/19 | C#1 | 58 | 7TH ON COH : OFF | |||
| CDJ | SWILED | 1A*1A | D1 | 59 | 1A*1A | D1 | 59 | 7TH ON COH : OFF | |||
| Time | SW | 18 | 5A | 18 | 5A | 7TH ON COH : OFF | |||||
| SGL/CTN | SW | 1C | 5B | 1C | 5B | 7TH ON COH : OFF | |||||
| SWILED | 1D*1D | F1 | 5C | 1D*1D | F1 | 5C | 7TH ON COH : OFF | ||||
| JOG | SWE*VC | 2X*1S | 6E*7 | 2X*2S | 6E*7 | 7TH ON COH : OFF | |||||
| TAPISHIFT | SW | 1E | 6D | 1E | 6D | 7TH ON COH : OFF | |||||
| CUE | SWILED | 1F*1F | G1 | 5E | 1F*1F | G1 | 5E | 7TH ON COH : OFF |
ENGLISH OPERATION MANUAL
| ▶ II | SWLED 20:20 | SY1 SF | 20:20 G11 SF | 75H : ON 00H : OFF | ||||||||
| DATABASE SWLED 21/21 A1-60 21/21 A1 80 | 75H : ON 00H : OFF | |||||||||||
| - | SW 22 61 22 B1 | 75H : ON 00H : OFF | ||||||||||
| + | SW 23 62 23 B2 | 75H : ON 00H : OFF | ||||||||||
| Pitch Slicer VSCENTER | PITCH BENDO28 | 67 | PITCH BENDO28 | 67 | 75H : ON 00H : OFF | |||||||
| GAIN | VR | 11 | 50 | 21 | 60 | VR300-2F | ||||||
| HIGH | VRS/W/CENTERLED | 120A29A24 | C2 | 510A08B | 2024/25/24 | C2 | 610A38B | VR500-7F | ||||
| MID | VRS/W/CENTERLED | 130A07A25 | C42 | 520A40B | 2025/0A26 | C42 | 620A43B | VR100-7F | ||||
| LOW | VR/SW/CENTERLED | 140B2B25 | D2 | 530SVA | 240B2B26 | D2 | 630SVA | VR100-7F | ||||
| Channel Fader | VR | 10 | 4F | 20 | 5F | VR300-7F | ||||||
| U1 | LED | 17 | B0 | 17 | B0 | 75H : ON 00H : OFF | ||||||
| U2 | LED | 18 | D11 | 18 | D11 | 75H : ON 00H : OFF | ||||||
| 16 | LED | 10 | E1 | 10 | E1 | 75H : ON 00H : OFF | ||||||
| 18 | LED | 1E | FA1 | 1E | FA1 | 75H : ON 00H : OFF | ||||||
| 6 | LED | 22 | A41 | 22 | A41 | 75H : ON 00H : OFF | ||||||
| LEVEL METER LED | LEVEL LED | 1 | 1 | 00H-7TH* | ||||||||
| RANDOM | SAILED | 200C | GA2 | 88 | 75H : ON 00H : OFF | |||||||
| MASTER METER | SAILED | 200D A2 IC | 75H : ON 00H : OFF | |||||||||
| MASTER | VR | 31 | 70 | VR300-7F | ||||||||
| BOOTH | VR | 32 | 71 | VR200-7F | ||||||||
| Cross Fader | VR/SW SW/CENTER | 300W 00VA | 6FN700W9 | VR300-7F | ||||||||
| MIC1 LEVEL | VR | 36 | 74 | VR300-7F | ||||||||
| MIC2 LEVEL | VR | 36 | 75 | VR300-7F | ||||||||
| CUE PAN SLIDER | VR | 36 | 73 | VR300-7F | ||||||||
| CUE PAN LEVEL | VR | 33 | 72 | VR300-7F | ||||||||
| Fader Start ON(L) | SW | 1 | 40 | 75H : ON 00H : OFF | ||||||||
| Fader Start OFF(L) | SW | 2 | 41 | 75H : ON 00H : OFF | ||||||||
| Fader Start ON(R) | SW | 3 | 42 | 75H : ON 00H : OFF | ||||||||
| Fader Start OFF(R) | SW | 4 | 43 | 75H : ON 00H : OFF | ||||||||
| C.F CURVE (L) | SW | 7 | 46 | 75H : ON 00H : OFF | ||||||||
| C.F CURVE (CENTER) | SW | 5 | 45 | 75H : ON 00H : OFF | ||||||||
| C.F CURVE (R) | SW | 5 | 44 | 75H : ON 00H : OFF | ||||||||
CC-ABSOLUTE (VR, LEVEL METER LED) TYPE
Control Change messages are sent with status 0xBn, where n is the channel, for the specified CC controller. Thus the controller MIDI ID is indicated with the channel along with the CC number. The value from 0x00 to 0x7F, directly related to the location of the controller.
ENGLISH OPERATION MANUAL
\* LEVEL METER LEDS
00-0B => ALL LEDS OFF
0C-17→LED(30)ON
18-22=LED(30, 20) ON
10-25-LED(30, 20) ON
24\~2F=>LED(-30,-20,-10)ON
30\~3B=>LED(-30,-20,-10,-7)ON
3C\~47=>LED(-30,-20,-10,-7,-4)ON
48-53=>LED(-30,-20,-10,-7,-4,-2)ON
54\~5E=>LED:30,20,10,7,4,2,0)ON
60-6P=>LED(-30, 20, 10, 7, 4, 2, 0,+2)ON
60-77→LED(30, 20, 19, 7, 4, 2, 0, +2) ON
6C-7T→LED(-30,-20,-10,-7,-4,-2,0,+2,+4)ON 78-75→ALL LEDS ON (30, 20, 40, 7, 4, 2, 0,+2,+4,+7)
78\~7F->ALL LEDS ON (-30, -20, -10, -7, -4, -2, 0, +2, +4, +7)
CC-RELATIVE (ENC) TYPE
Control Change messages are status 0xBn, where n is the channel, for the specified CC controller. Thus the controller MIDI ID is indicated with the channel along with the CC number. The value 0x40 is the reference value of the controller. This is an offset to 0x40 'one's complement' notation.
A message with data 0x43 indicates a positive change of 3.
A messages with data 0x31 indicates a negative change of 15.
SWITCH ON/OFF (SW,CENTER)
These messages are used for switches.
Control Change messages are sent with status 0x9n, SWITCH On and Off value are 0x7F and 0x00, where n is the channel.
LED ON/OFF (LED)
These messages are used for LED.
Control Change messages are sent with status 0x9n, LED On and Off value are 0x7F and 0x00, where n is the channel.
INSTALLING THE Q-DBASE SOFTWARE
The DMC2000 works perfectly without the Q-DBASE database files but if you want to search your tracks easily and lightning fast than you should install the Q-DBASE software on your computer! Please note that the program currently only works under Windows (XP, Vista, Win7). To be sure that you always have the latest version, you can download the software from our website (check the download section on the DMC2000 product page). Installing the program is very easy: just double-click the file and follow the instructions on your screen.
USING THE Q-DBASE SOFTWARE
Each time you add or remove tracks from your USB hard disk.
you must run the Q-DBASE software again to update the database files!
After the installation you will see a new program directory called "SYNQ". In this directory you will find 2 files:
- Uninstall (to uninstall the software)
- Q-DBASE (to start the software)
- Connect your USB-hard drive to your PC and check which drive letter was assigned to it.
- Click on the Q-DBASE icon to start the software: the main screen is shown.
- In the upper left corner choose your USB-drive.
- Press the BUILD-button on the right
→ The software starts scanning the USB-drive for compatible
audio files and extracts the ID3-tags to build the Q-DBASE files, needed to speed up the search function on player. Once the progression bar on the bottom is full, the database building process is finished and a short summary is shown.

ENGLISH OPERATION MANUAL
- The program wrote the Q-DBASE files (file extensions: .DBH + .dat + .DBX) to the USB-drive so now you can remove it from your PC and connect it to the DMC2000.
To achieve the best results, please always use the latest version of the database software. You can find the software version at the bottom left of the "About" screen.
! IMPORTANT MESSAGE FOR VISTA USERS!
Many Vista users will not be able to run the Q-DBASE software. This problem is caused by the UAC (User Account Control) limitation, a security option limiting the user privileges in Vista. To overcome this problem, right-click the Q-DBASE program icon and choose "Run as administrator" in the popup menu. Windows will respond with the window shown on the right: just click "Allow".

text_image
C:\Program Files\Outlook\Editor\ability WWW.SYNO.AUDIO.COM SYNO Version 16.03.200417 To Our Control Panel An under-Print program works easier to your computer. Do not use the program on your computer, you have done it from your computer or further. Auto-log Distributed Function Cancel To Start these programs, where you are not what it is safe. Allow To start this program, where you are not what it is safe and better. Options How Document Control helps you understand how to change your computer.HOW TO USE ...
Most of the common functions are explained in the previous chapter 'controls and functions' In this chapter we talk about the functions that need a little more explanation.
SOME GENERAL FUNCTIONS:
• SEARCH A TRACK WITH THE Q-DBASE SYSTEM:
Important: before you can use the Q-DBASE system, you should scan your USB-drive so it contains the necessary files.
You can choose the search key at any moment by pressing the TRACK-knob (17) while you turn it. You can search for Art(artist). Alb(album) or Gen(genre).
- Press the DATABASE-button (15) to start the lookup function the first character of the list you want to search is blinking in the display.
• Turn the FOLDER knob (16) to change the first character. - Turn the JOG WHEEL (22) to browse the list that corresponds to your demand at high speed. If you want to search more precisely track by track, you can also turn the TRACK knob (17).
- Once you have found the right track: press the LOAD TRACK-button (19).
• SEARCH A TRACK WITHOUT THE Q-DBASE SYSTEM:
Press and turn the TRACK-knob (17) to select Std(standard lookup system). If the USB-drive has no Q-DBASE files, the player automatically selects the standard lookup system. You have Two options: Option 1:
Simply use the FOLDER and TRACK knobs to browse the different directories.
Option 2:
- Press the DATABASE-button (15) to start the lookup function → both the FOLDER and TRACK displays start blinking.
- Turn the FOLDER knob (16) to browse the folders.
- Turn the JOG WHEEL (22) to browse the selected folder at high speed. If you want to search more precisely track by track, you can also turn the TRACK knob (17).
- Once you have found the right track: press the LOAD TRACK-button (19).
• TOTAL RANDOM ON A USB-drive:
This is the simple random function where any track on your USB-drive can be played randomly on player1: • Open the fader (53) for player1 on the audio mixer
- Press the SOURCE SELECT-button (14) of player1 to choose one of the USB-drives.
- Press the RANDOM-button (45) shortly until it is lit.
- Press the PLAY-button (20) of player1 to start random playback.
ENGLISH OPERATION MANUAL
• "SMART" RANDOM ON A USB-drive:
This is the "smart" random function where you have full control over which folder, genre, album or artist you want to play in your random selection, perfect for background music in restaurants, shops, clubs & bars without a dj. This is how it works:
- Open the fader (53) for player1 on the audio mixer.
- Press the SOURCE SELECT-button (14) of player1 to choose one of the USB-drives.
PLAY ONLY TRACKS FROM 1 FOLDER
- Press & turn the TRACK-knob (17) to select the "Std" search-key
- Press the FOLDER knob (16), the display will show the currently selected directory name.
- Turn the FOLDER knob (16) to select the directory you want to play files from.
- Press the RANDOM-button (45) for about 2 seconds until the LED starts blinking.
- Press the PLAY-button (20) to start random playback only from the selected folder.
PLAY ONLY TRACKS FROM 1 GENRE
- Press & turn the TRACK-knob (17) to select the "Genre" search-key.
- Press the FOLDER knob (16), the display will show the currently selected genre.
- Press and turn the FOLDER knob (16) to select the first letter of the genre you want to choose.
- If needed, turn the JOG WHEEL (22) while you keep the FOLDER knob (16) pressed to browse the different genres starting with the same letter.
- Press the RANDOM-button (45) for about 2 seconds until the LED starts blinking.
- Press the PLAY-button (20) to start random playback only from the tracks of the selected genre.
Remark1: to play only tracks from a certain artist or album, just repeat the actions but select the artist or album search-key.
Remark2: please note that the "SMART" random function will only work properly on condition that you ID3-tags are well maintained. A perfect "freeware" ID3-tag editor for this task is called "MP3TAG" and can be downloaded from www.mp3tag.de!
ABOUT LOOPS:
- CREATE A LOOP:
While a track is playing, press LOOP IN button (31) to program the starting point of the loop. Now press the OUT button (32) to program the endpoint of the loop. The seamless loop starts playing at once. (With some practice you will be able to create perfect loops!) While the loop is playing, you can press the OUT button (32) again to exit the loop and continue the rest of the track. It is possible to program a new loop, even when the current loop is still playing. While the loop is playing, simply press the LOOP IN button (31) to set the starting point of the new loop. Now enter the endpoint by pressing the OUT button (32). Your new loop is programmed and playing.
- RESTART A LOOP:
This can be done in 3 ways:
- When a loop is programmed and you left it by pressing the OUT button (32), just press RELOOP (33) to restart the loop.
- When a loop is programmed and you left it by pressing the OUT button (32), just press OUT again to restart the loop. The point where you pressed OUT is now programmed as the new endpoint of the loop.
- When the loop is still playing, press the RELOOP button (33) to restart the loop immediately. You can repeat this several times to create a "Stutter" effect.
• EDIT A LOOP
When a loop is programmed, press the RELOOP button (33) for about 2 seconds to enter 'loop edit' mode. While the loop is seamlessly playing, the alphanumeric display shows the time information of the loop endpoint. Use the jog wheel to set the new loop endpoint. To make things very easy you can hear your modifications to the loop endpoint continuously. If you also want to edit the loop intro point, press the RELOOP-button (33) to toggle between the loop start and endpoint. When the loop is perfect, press the LOOP OUT button (32) to save the new loop endpoint.
ENGLISH OPERATION MANUAL
ABOUT EFFECTS:
In the description of the effects you can already find a lot of information, don't forget to also check that part! • USE THE EFFECTS IN BEAT SYNCHRONIZED MODE:
Press the FX-SYNC button (38) so it's lit.
While music is playing you can press any of the 3 effects: the effect works in beat synchronized mode. Use the EFFECT SYNC X/Y buttons (39+40) to choose different beat presets. Press the RATIO-button (40) until it starts blinking to adapt the impact of the effect.
• USE THE EFFECTS IN MANUAL MODE:
Press the FX-SYNC button (38) so it's dark
While music is playing you can press any of the 3 effects: use the JOG WHEEL (22) to change the effect in real-time. Press the RATIO-button (40) until it starts blinking to adapt the impact of the effect.
ABOUT MEMORY:
• DIFFERENT MEMORIES
Before we talk about using the memory, we have to know the difference between "track memory" and "permanent memory":
- Track Memory: This is the memory where the DMC2000 stores a set of up to four cue points and/or loops for one track. You can set up a "track memory" for every single track on a USB-drive. Example: your USB-drive contains 5000 tracks for every track you can store up to 4 cue points and/or loops. This makes a total of 5000 × 4 = 20000 cue points and/or loops on one USB-drive!
- Permanent Memory: This is the large memory where all the cue points and loops are permanently stored. In fact it's an indexed collection of "track memories". When you recall previously stored cue points of a certain track, you make a transfer from "permanent memory" to "track memory". Note: All cue points are stored in database files on your USB-drive. If you connect the drive to another DMC2000 or DMC1000, all cue points can also be used immediately on this player.
USING THE "TRACK MEMORY"
• STORING A MASTER CUE POINT
There are 2 ways to set a master cue point:
- Press the LOOP IN (31) button during normal playback to set the new cue point ("CUE on the fly").
- Put the player in pause and use the jog/shuttle wheel to search for the exact location for the cue point. Once this location is found, press LOOP IN button (31) to set the new cue point. (or press PLAY/PAUSE button)
Once the cue point is programmed, just press the CUE button (21) to recall it.
• STORING A SIMPLE CUE POINT TO THE "HOT CUE" BUTTONS:
First press the RECORD CUE button (25) to make the unit enter hot cue memory mode (RECORD CUE button is on):
- Press one of the four HOT CUE buttons (24) at the right moment during normal playback: the HOT CUE button you just pressed changes to green color to indicate that the desired cue point is stored. ("Cue on the fly").
- Put the player in pause and use the jog/shuttle wheel to search for the exact location for the cue point. Once this location is found, press one of the four HOT CUE buttons to set the new cue point: the HOT CUE button you just pressed changes to green color to indicate that the desired cue point is stored. Once the cue point is programmed, just press the HOT CUE button to start playback from the stored cue point.
• STORING A LOOP TO THE "HOT CUE" BUTTONS:
This is very similar to storing a simple cue point. The only difference is that you have to put the DMC2000 in loop mode first. When the loop is playing, you press the RECORD CUE button (25) to make the player enter hot cue memory mode (RECORD CUE button is on). After this press one of the four HOT CUE buttons (24): the HOT CUE button you just pressed changes to red color to indicate that the loop, playing at that moment, is stored. You can store up to 4 loops per track!
- DELETE THE "HOT CUE" BUTTONS:
You can easily delete the contents of a HOT CUE button by pressing the DELETE CUE button (26). followed by the HOT CUE button you want to delete. Or simply store a new cue point or loop to this HOT CUE button. You can also erase all four HOT CUE buttons together by pushing the DELETE CUE button (26) for more than 2 seconds. You will notice that all 4 HOT CUE buttons turn dark to indicate that the HOT CUE buttons are empty.
ENGLISH OPERATION MANUAL
USING THE "PERMANENT MEMORY":
For security reasons the cue points and loops stored in the HOT CUE buttons are not automatically stored to the permanent memory. This means that if you recall a set of cue points and loops from permanent memory to the HOT CUE buttons (which is track memory), you can change, edit and delete them as much as you want. The permanent memory will not be affected until you make a backup of the HOT CUE buttons to permanent memory.
• STORING TO "PERMANENT MEMORY":
Press the RECORD CUE button (25) until the display shows "Now saving" to indicate that the cue points and loops in the HOT CUE buttons for that track are stored to permanent memory.
- DELETE A TRACK IN "PERMANENT MEMORY"
Select the track that you want to delete. Press the "DELETE CUE" (26) and "SYNC/Y" (40) buttons together. The display asks "DEL TRACK?" if you press the YES button (PITCH BEND+ button), the track information will be deleted in the permanent memory.
- RECALLING "HOT CUE POINTS/LOOPS" FROM PERMANENT MEMORY:
Because it takes some seconds to load the permanent cue points, they are not automatically restored. Sometimes you simply don't need them so why would you wait for them? Below we explain how everything works:
- No cue points stored: When you select a track that has no cue points or loops stored in permanent memory, nothing happens: you can start playback right away.
- Cue points stored: When you select a track where cue points or loops are stored in permanent memory, the DMC2000 shows "Load Cues?" and wants to know if you want to load the cue points. This is what you can do:
- You press the YES button: Press yes (pitch bend + button) to load the pre-stored cue points and loops. The display shows RECALL while the Hot cue buttons are filled up.
- You press the NO button: the cue points are not loaded and the display becomes normal. You can start playback right away.
- You do nothing: after some seconds the display becomes automatically normal and of course the cue points are not loaded.
Note: in the setup menu (point4) you can choose to load the cue points automatically (autoload). In that case the player asks nothing but simply loads the cue points.
ENGLISH OPERATION MANUAL
SPECIFICATIONS
Power Supply:
AC 100 - 240V, 50/60Hz
Power Consumption: 21W
Reference input level / Impedance:
Line: 47kΩ /-14dBV (200mV) +/-0.1dB
Phono: 47kΩ /-51dBV (2.8mV) +/-0.1dB
Mic: 10kΩ/-56dBV (1.5mV) +/-0.1dB
Maxi input: (1kHz, THD=1%, EQ flat, max. gain, load=100kΩ)
Line: > +0dBV
Phono: > -3BdBV
Mic: > -42dBV
Talkover: -20dB +/-2dB
Frequency response: (EQ flat, max. gain, load = 100kΩ)
Line: 20Hz - 20kHz +/-2dB
Phono: 20Hz - 20kHz +2/-3dB (RIAA)
Mic: 20Hz - 20kHz +2/-3dB
THD+N: (EQ flat, max. gain, w/20kHz LPF, A-weighted, load = 100kΩ)
Line: < 0.06% @ 1 KHz
Phono: < 0.08% @ 1 KHz
Mic: < 0.15% @ 1 KHz
Output level / impedance:
Master unbalanced: 1kΩ /3.8dBV (1.55V) +/-2dB
Master balanced (load=600Ω): 600Ω/+6dBm (1.55V)+/-3dB
Booth master: 1kΩ /3.8dBV (1.55V) +/-2dB
Headphones (load=32Ω): 33Ω /0dBV (1V) +/-2dB
Max. output: (1kHz, THD=1%, EQ flat, max. gain, load = 100kΩ)
Master
Headphones:
USB FORMAT:
File System: FAT12/16/32
Max. Hard disk capacity: 500GB
Max. Folders: 999
Max. Tracks / Folder: 999
Max. O-DBASE track capacity
WAV FORMAT:
MP3 FORMATS
MPEG1 Layer3 (ISO/IEC11172-3):
Bitrates:
Bitrate modes:
MPEG2 Layer3 (ISO/IEC13618-3):
Bitrates:
Bitrate modes:
MPEG2.5 Layer3:
Bitrates:
Bitrate modes:
Q-DBASE Software
File extensions
System requirements :
•
600Ω/+6dBm(1.55V)+/-3dB
1kΩ /3.8dBV (1.55V) +/-2dB
33Ω /0dBV (1V) +/-2dB
gain. load = 100kΩ)
+18dBV (8V) load=100kΩ
+4dBV/(1.6V) load=320
FAT12/16/32
500GB
999
999
9999
PCM 1411kbps
mono / stereo sampled at: 32 - 44.1 - 48kHz
32 - 320 Kbps
CBR (Constant Bitrate) or VBR (Variable Bitrate)
mono / stereo sampled at: 16 - 22.05 - 24kHz
32 - 160 Kbps
CBP (Constant Bitrate) or VBR (Variable Bitrate)
mono / stones sampled at 9 - 44.025 - 42kHz
monos / stereo sampled at: 0 = 11,020 - 12kHz 30 - 100 kHz
32 = 100 Kbps
CBR (Constant Bitrate) or VBR (Variable Bitrate)
DBH + dat + DBX
RAM 512MB
100MB free disk space
Microsoft® Win YD SP3 \~ Win Vista SP2 \~ Win 7
209(D) × 4200(N) × 80(H) mm
200(B) 4.42kg
Every information is subject to change without prior notice
You can download the latest version of this user manual on our website: www.beglec.com
FRANCAIS
MODE D'EMPLOI
MODE D'EMPLOI
text_image
Labeled diagram of a vintage analog oscilloscope with numbered components and instrument portstext_image
A B C D E F G H CUE FOLDER A OUT RLOOD CINGLE J ALL TRACK TOTAL REMAIN 598.88% 98° CAPSSED 1000 AUTO BPM K L M N O P Q R S TEMPOR.6.text_image
Diagram of an electronic circuit board with labeled components and a highlighted connection point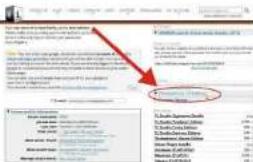
text_image
Properties 1. General 2. General 3. General 4. General 5. General 6. General 7. General 8. General 9. General 10. General 11. General 12. General 13. General 14. General 15. General 16. General 17. General 18. General 19. General 20. General 21. General 22. General 23. General 24. General 25. General 26. General 27. General 28. General 29. General 30. General 31. General 32. General 33. General 34. General 35. General 36. General 37. General 38. General 39. General 40. General 41. General 42. General 43. General 44. General 45. General 46. General 47. General 48. General 49. General 50. General 51. General 52. General 53. General 54. General 55. General 56. General 57. General 58. General 59. General 60. General 61. General 62. General 63. General 64. General 65. General 66. General 67. General 68. General 69. General 70. General 71. General 72. General 73. General 74. General 75. General 76. General 77. General 78. General 79. General 80. General 81. General 82. General 83. General 84. General 85. General 86. General 87. General 88. General 89. General 90. General 91. General 92. General 93. General 94. General 95. General 96. General 97. General 98. General 99. GeneralFRANCAIS MODE D'EMPLOI
text_image
Checkadence v.1.6 and above If Deckadence still show up as a demo, just unlock it by requesting a new update! Click here to unlock my product. ... and follow all instructions on the page! MAC USGS For detailed information, please check the Kowndalee Base check Deckadence v.1.6 and above Click here to unlock my product. ... and follow all instructions on the page! Previous versions of Deckadence Click here for your serial number, Go to the Deckadence setup panel, click 'Registration' and copy and paste the serial number. In case of problems, please check our Kowndalee Base.18-23 => LED (-30, -20) ON
24\~2E => LED (-30, -20, -10) ON
30\~3B => LED (-30, -20, -10, -7) ON
3C\~47 => LED (-30, -20, -10, -7, -4) ON
48-53 => LED (-30, -20, -10, -7, -4, -2) ON
54\~5F => LED (-30, -20, -10, -7, -4, -2, 0) ON
60-6B => LED (-30, -20, -10, -7, -4, -2, 0, +2) ON
6C-77 => LED (-30, -20, -10, -7, -4, -2, 0, +2, +4) ON
• DIFFERENTES MEMOIRES:
Casque (charge = 32 Ω)
33Ω /0dBV (1V) +/-2dB
Sortie max.: (à 1 kHz, THD = 1%, EQ neutre, gain max., charge = 100 kΩ)
Master :
+18dBV (8V) load=100kΩ
Casque
+4dBV (1,6V) load=32Ω
FORMATS USB :
Microsoft® Win XP SP3 - Win Vista SP2 - Win 7
Microsoft® Win XP SP3 - Win Vista SP2 - Win 7
Dimensions :
299 (P) x 420 (L) x 89 (H) mm
Poids
4,42 kg
text_image
Labeled diagram of a SYDQ computer interface with numbered components and instrument panelstext_image
A B C D E F G H CUE FOLDER 8.88 AUTO BPM I REDLOCK 8.88 J S R GPS ALL TRACK TOTAL TEMPO δ K L M N O P Q R S 8.88: 8.88 10.88text_image
Diagram of an electronic circuit board with labeled components and a highlighted component area
text_image
Add to Settings Add to Settings Add to Settings Add to Settings Add to Settings Add to Settings Add to Settings Add to Settings Add to Settings Add to Settings Add to Settings Add to Settings Add to Settings Add to Settings Add to Settings Add to Settings Add to Settings Add to Settings Add to Settings Add to Settings Add to Settings Add to Settings Add to Settings Add to Settings Add to Settings Add to Settings
text_image
Deckadance LE Edition • If you haven't done so already, please download the uncheckable demo modifier. Lao • PC USERS If Deckadance still shows up as a demo, just unlock it by requesting a new version. Click here to unlock this version. ... and follow all instructions on this page. • MAC USERS For detailed information, please check the Kindsidae New Service Deckadance v1.0 and above If Deckadance still shows up as a demo, just unlock it by requesting a new version. Click here to unlock this version. ... and follow all instructions on this page. Previous versions of Deckadance Click here for your serial number. Go to the Deckadance setup panel, click 'Registration' and copy and paste the serial number. In case of problems, please check our Kindsidae New.Turn the JOG WHEEL (22) to select the desired setting:
CC-ABSOLUTE (VR. LEVEL METER LED)
18\~23=>LED(-30,-20)AAN
24\~2F=>LED(-30,-20,-10) AAN
30\~3B=>LED(-30,-20,-10,-7)AAN
3C\~47=>LED(-30,-20,-10,-7,-4)AAN
48\~53=>LED(-30,-20,-10,-7,-4,-2)AAN
6C\~77=>LED(-30,-20,-10,-7,-4,-2,0,+2,+4)AAN
78\~7F=> ALLE LED'S AAN (-30, -20, -10, -7, -4, -2, 0, +2, +4, +7)
CC-RELATIVE (ENC)
• TOTAL RANDOM OPEEN USB-drive:
• "SMART" RANDOM OP EEN USB-drive:
Talkover: -20dB +/-2dB
Frequentierespons: (EQ neutraal, max. gain, belasting = 100kΩ)
Line: 20Hz - 20kHz +/-2dB
Phono: 20Hz - 20kHz +2/-3dB (RIAA)
Mic: 20Hz - 20kHz +2/-3dB
THD+N: (EQ neutraal, max. gain, w/20kHz LPF, A-weighted, belasting = 100kΩ)
Line: < 0.06% @ 1 KHz
Phono: < 0.08% @ 1 KHz
Mic: < 0.15% @ 1 KHz
Max. output: (1kHz, THD=1%, EQ neutraal, max. gain, belasting = 100kΩ)
Master: > +18dBV (8V) load=100kΩ
Koptelefoon: > +4dBV (1,6V) load=32Ω
USB FORMAT:
File Systeem: FAT12/16/32
Microsoft® Win XP SP3 \~ Win Vista SP2 \~ Win 7
etingen: 299(D) x 420(B) x 89(H) mm
Gewicht: 4.42kg
text_image
Labeled diagram of a CD-ROM drive with numbered components and analog buttons54-55 => LED (30, 20, 10, 7, 4, 2, 0) AN
60-68 => LED (30, 20, 10, 7, 4, 3, 0, +2)
6C 77→LED(30,20,10,7,4,2,8,+2)AN
0C 71 => EED (-56, -23, -10, -7, -4, -2, 0, -12, -14) AN
CC-RELATIVE (ENC)
text_image
Labeled diagram of an electronic multimeter with numbered components and analog waveforms54-5F->LED(-30,-20,-10,-7,-4,-2,0) ENCENDIDO 60-6P->LED(30,20,10,7,4,2,0,+2) ENCEND
60-6B->LED(-30, -20, -10, -7, -4, -2, 0, +2) ENCENDIDO
6C\~77->LED(-30, -20, -10, -7, -4, -2, 0, +2, +4) ENCENDIDO
76\~7F=> TODOS LOS LED ENCENDIDOS (-30, -20, -10, -7, -4, -2, 0, +2, +4, +7)