RTT95 - Turntable Ricatech - Free user manual and instructions
Find the device manual for free RTT95 Ricatech in PDF.

User questions about RTT95 Ricatech
0 question about this device. Answer the ones you know or ask your own.
Ask a new question about this device
Download the instructions for your Turntable in PDF format for free! Find your manual RTT95 - Ricatech and take your electronic device back in hand. On this page are published all the documents necessary for the use of your device. RTT95 by Ricatech.
USER MANUAL RTT95 Ricatech
natural_image
Line drawing of a Ricatech radio with open lid and base (no text or symbols on device)GB USER MANUAL
NL GEBRUIKERSHANDLEIDING
FR MODE D'EMPLOI
IMPORTANT SAFEGUARDS FOR AUDIO PRODUCTS
PLEASE READ CAREFULLY THE FOLLOWING IMPORTANT SAFEGUARDS THAT ARE APPLICABLE TO YOUR EQUIPMENT.
-
Read Instructions - All the safety and operating instructions should be read before the appliance is operated.
-
Retain Instructions - The safety and operating instructions should be retained for future reference.
-
Heed Warnings - All warnings on the appliance and in the operating instructions should be adhered to.
-
Follow Instructions - All operating and use instructions should be followed.
-
Water and Moisture - The appliance should not be used near water-for example, near a bathtub, washbowl, kitchen sink, laundry tub, in a wet basement, or near a swimming pool and the like.
-
Carts and Stands - The appliance should be used only with a cart or stan that is recommended by the manufacturer.
6A. An appliance and cart combination should be moved with care. Quick stops, excessive force, and uneven surfaces may cause the appliance and cart combination to overturn.
-
Wall or Ceiling Mounting - The appliance should be mounted to a wall or ceiling only as recommended by the manufacturer.
-
Ventilation - The appliance should be situated so that its location or position does not interfere with-its proper ventilation. For example, the appliance should not be situated on a bed, sofa, rug, or similar surface that may block the ventilation penings;
or, placed in a built-in installation, such as a bookcase or cabinet that may impede the flow of air through the ventilation openings.
-
Heat - The appliance should be situated away from heat sources such as radiators, heat registers, stoves, or other appliances (including amplifiers) that produce heat.
-
Power Sources - The appliance should be connected to a power supply only of the type described in the operating instructions or as marked on the appliance.
-
Grounding or Polarization - Precautions should be taken so that the grounding or polarization means of an appliance is not impeded.
-
Power - Cord Protection - Power-supply cords should be routed so that they are not likely to be walked on or pinched by items placed upon or against them, paying particular attention to cords at plugs, and the point where they exit from the appliance.
13.Cleaning - The appliance should be cleaned only as recommended by the manufacturer.
- This product is designed for use with the antenna attached and should not be connected to any other external antennas.
15.Non-use Periods - The power cord of the appliance should be unplugged from the outlet when left unused for a long period of time.
16.Object and Liquid Entry - Care should be taken so objects do not fall and liquids are not spilled into the enclosure through openings
- Damage Requiring Service - The appliance should be serviced by qualified service personnel when:
A. The power-supply cord of the plug has been damaged;or
B. Objects have fallen, or liquid has been spilled into the appliance;or C. The appliance has been exposed to rain;or
D. The appliance does not appear to operate normally or exhibits a marked change in performance; or
E. The appliance has been dropped, or the enclosure damaged.
- Servicing - The user should not attempt to service the appliance beyond that described in the operating instructions. All other servicing should be referred to qualified service personnel.

WARNING:
TO PREVENT FIRE OR SHOCK HAZARD, DO NOT EXPOSE THIS APPLIANCE TO RAIN OR MOISTURE. DO NOT REMOVE COVER. PILOT LAMPS SOLDERED IN PLACE. NO USER SERVICEABLE PARTS INSIDE. REFER SERVICING TO QUALIFIED SERVICE PERSONNEL.
CAUTION
The lighting flash with arrowhead symbol.
within an equilateral triangle, is intended
to alert user to the presence of
uninsulated "dangerous voltage" within
the product's enclosure that may be of
sufficient magnitude to constitute risk of
electric shock to persons.
CAUTION: TO REDUCE THE RISK OF
ELECTRIC SHOCK, DO NOT REMOVE
COVER (OR BACK). NO USER -
SERVICEABLE PARTS INSIDE. REFER
SERVICING TO QUALIFIED SERVICE
PERSONNEL.
The exclamation point within an
equilateral triangle is intended to alert
user to the presence of important
operating and maintenance (servicing)
instruction in the literature accompanying
the appliance.
SPECIFICATION
Power Supply : AC adapter -(DC 12V 0.5A)(Included)
Power Consumption : 12W
Speed : 33 1/3 / 45 /78 RPM
Speaker : 3 x 5° Dynamic Type x 2
For Windows:
Windows version Recommended RAM/processor speed Minimum
RAM/processor speed
Windows 2000, XP 512 MB/1 GHz 128 MB/300 MHz
Windows Vista Home Basic 2 GB / 1 GHz 512 MB / 1 GHz
Windows Vista Home 4 GB / 2 GHz 1 GB / 1 GHz
Premium/Business/Ultimate
For Mac:
Audacity 1.2 requires MAC OS X 10.1 or later
Audacity runs best with at least 64 MB RAM and a 300 MHz processor.
* DESIGN AND SPECIFICATION SUBJECT TO CHANGE WITHOUT NOTICE.
CONTROL LOCATORS
Unpacking
1 Remove packing materials from unit.
Note: Save all packing materials.
2 Remove plastic bag covering radio.
3 Remove AC ADAPTER from packing.
4 Remove tie from A/C ADAPTER.
5 Open lid and remove styrofoam shipping material from turntable.
6 Remove black tie-wrap from under the tone arm.
7 Remove white protective needle cover by gently
pulling towards the front of the unit.
8 Tum the TURNTABLE SUSPENSION SCREW clockwise until it is all the way down. Do not force or over tighten it. This allows the turntable to float on its shock absorbers.
9 Release tone arm hold down clip by gently pushing to the right. This will unlock tone arm from its arm rest. Re-lock the hold down clip when moving the unit to another location.
Power Source
1 Untie the tie-wrap on the AC ADAPTER
2 Plug the AC ADAPTER into appropriate wall outlet.
3 Plug the small end of the adapter into the DC JACK on the back of the unit.
Radio Operation
1 Set the FUNCTION SWITCH to RADIO mode.
2 Set the AM / FM SWITCH to the desired Band.
3 Select the desired radio station by rotating TUNING KNOB
4 Adjust the VOLUME ON/OFF KNOB to the desired sound level.
Headphone Jack Operation
1 Connect the headphone to the HEADPHONE JACK.
2 Adjust volume to the desired listening level.
NOTE: * When using headphones, the sound to the unit speakers will be cut off.
* Headphones not included with unit.
Accessory: ADAPTER FOR 45 RPM
This adaptor allows you to play 45 RPM records.
1 Place the 45 RPM adaptor over the spindle.
2 Gently place your 45 RPM record onto the turntable.
3 Follow the steps under turntable operation to play your record.
LINE Outputs
1 You can connect your turntable to external stereo systems using the RCA style LINE OUT jack.
2 To use this feature, connect RCA stereo cable (not supplied) to the LINE OUT jack on the back of the turntable, connect the other end of the cable to the input of your external stereo system. For specific information on how to hook into your external stereo system, please see the instruction manual for that particular device.
Troubleshooting
The unit does not operate.
1 Make sure the AC POWER CORD is connected to an AC outlet and the back of the unit.
2 The unit is not turned on : turn the VOLUME
knob from the OFF position.
No sound comes from unit
1 The white protective needle cover was not removed.
2 The volume is too low.
Tone arm does not move
1 Black tie-wrap was not removed from tone arm.
2 Tone arm hold down clip was not released.
Turntable Operation
- Tum the ON/OFF VOLUME KNOB clockwise to turn the unit on.
2 Set the SPEED CONTROL SWITCH to the correct speed (33 1/3,45 or 78 rpm).
3 Place the record on the turntable.
4 Use the CUE LEVER to raise the tone arm off its rest. Move the tone arm over the record and use the cue lever to lower it onto the record. The record will begin to turn automatically.
5 At the end of the record, the tone arm will return to its rest.
Software Notes
The USB Turntable will work with any software that supports a USB Audio Device. If you prefer to use software other than the included Audacity software; there are a variety of software packages available.
Audacity is free software, distributed under the General Public License (GPL). More information, as well as open source code, can be found on the web at http://audacity.sourceforge.net.


text_image
Audacity 2.0 Audacity for Windows® (Windows 98/ME/2000/XP/Vista/7) Audacity for Mac® (Universal Binary for Mac OS X 10.4 or later) Audacity for GNU/Linux® (source code)Audacity works on both Windows as well as Mac OS. See below for system requirements.
For Windows:
Windows version
Windows 2000, XP
Windows Vista Home Basic
Windows Vista Home
Premium/Business/Ultimate
Recommended RAM/processor speed Minimum RAM/processor speed
512 MB/1 GHz
2 GB / 1 GHz
4 GB / 2 GHz
512 MB / 1 GHz
1 GB / 1 GHz
For Mac:
Audacity 1.2 requires MAC OS X 10.1 or later
Audacity runs best with at least 64 MB RAM and a 300 MHz processor.
For more information, visit http://audacity.sourceforge.net
For help and tutorials, visit http://audacity.sourceforge.net/help/tutorials
Customer support
You can contact the Ricatech customer service when you have a question or a problem with your Ricatech product. You can contact us by telephone and email.
For customer support by email, please sent a email to
support@ricatech.com Please make sure that you mention the model number and serial number of the product, mention your name & address and describe your question or problem clearly.
Telephone
For customer support by telephone, please dial +31(0)10-4626733. One of our service staff will be ready to serve you. For full procedure please visit the website of Ricatech at: www.ricatech.com
Ricatech B.V.
Cornusbaan 1
2908 KB Capelle a/d IJssel
The Netherlands
Premium/Business/Oltimate
Minimum
512 MB/1 GHz
128 MB/300 MHz
2 GB/1 GHz
512 MB/1 GHz
4 GB/2 GHz
1 GB/1 GHz
Voor Mac:
Audacity 1.2 vereist MAC OS X 10.1 of hoger
VOORAFGAANDE KENNISGEVING.
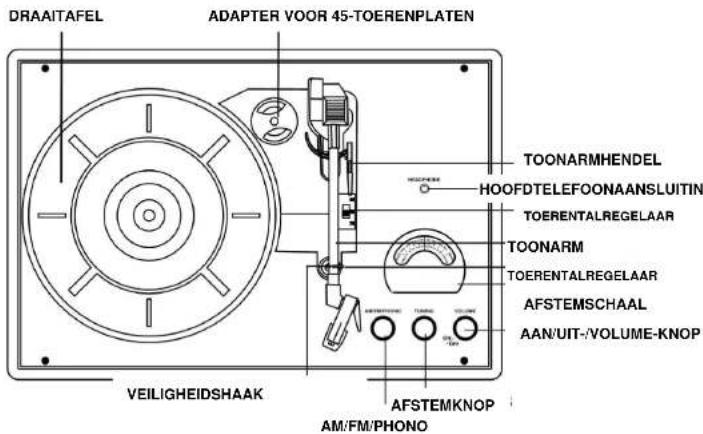
PLAATS VAN ONDERDELEN
text_image
DRAAITAFEL ADAPTER VOOR 45-TOERENPLATEN TOONARMHENDEL HOOFDTELEFOONAANSLUITIN TOERENTALREGELAAR TOONARM TOERENTALREGELAAR AFSTEMSCHAAL AAN/UIT-/VOLUME-KNOP VEILIGHEIDSHAAK AFSTEMKNOP AM/FM/PHONO
text_image
LUIDSPREKER USB-aansluiting LIJNINGANG LUIDSPREKER ADAPTERAANSLUITING LIJNINGANG/PHONOWISSELSTROOMADAPTER
Uitpakken
Audacity for Windows®
(Windows 98/ME/2000/XP/Vista/7)

Audacity for Mac®
(Universal Binary for Mac OS X 10.4 or later)

Audacity for GNU/Linux®
(source code)
Premium/Business/Ultimate
Voor Mac:
Audacity 1.2 vereist MAC OS X 10.1 of hoger
D'ÉLECTROCUTION, NE PAS RETIRER LE
COUVERCLE (OU LE DOS). NE CONTIENT
AUCUNE PIÈCE RÉPARABLE PAR
L'UTILISATEUR.
CONFIEZ
LA
MAINTENANCE À UN PERSONNEL
QUALIFIÉ.
text_image
Audacity 2.0 Audacity for Windows® (Windows 98/ME/2000/XP/Vista/7) Audacity for Mac® (Universal Binary for Mac OS X 10.4 or later) Audacity for GNU/Linux® (source code)Premium/Business/Ultimate
Für Mac:
text_image
Audacity 2.0 Audacity for Windows® (Windows 98/ME/2000/XP/Vista/7) Audacity for Mac® (Universal Binary for Mac OS X 10.4 or later) Audacity for GNU/Linux® (source code)Premium/Business/Ultimate
Para Mac:
Audacity 1.2 requiere MAC OS X 10.1 o posterior
text_image
Audacity 2.0 Audacity for Windows® (Windows 98/ME/2000/XP/Vista/7) Audacity for Mac® (Universal Binary for Mac OS X 10.4 or later) Audacity for GNU/Linux® (source code)Premium/Business/Ultimate
Para Mac:
Audacity 1.2 requiere MAC OS X 10.1 o posterior