SPF4328 - Digital photo frame PHILIPS - Free user manual and instructions
Find the device manual for free SPF4328 PHILIPS in PDF.

User questions about SPF4328 PHILIPS
0 question about this device. Answer the ones you know or ask your own.
Ask a new question about this device
Download the instructions for your Digital photo frame in PDF format for free! Find your manual SPF4328 - PHILIPS and take your electronic device back in hand. On this page are published all the documents necessary for the use of your device. SPF4328 by PHILIPS.
USER MANUAL SPF4328 PHILIPS
Register your product and get support at
www.philips.com/welcome
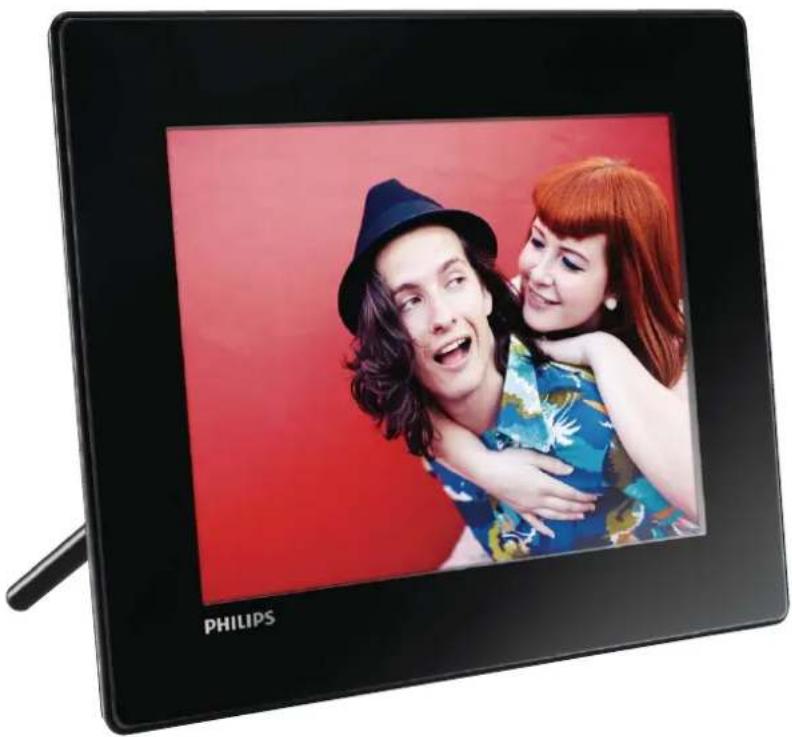
PhotoFrame
SPF4308
SPF4328
natural_image
Digital camera display showing two people embracing against a red background (no text or symbols on the image itself)EN User manual
Contents
1 Important 2
Safety 2
Notice 2
Banned Substance Declaration 3
Class II statement 4
2 Your PhotoFrame 5
Introduction 5
What's in the box 5
Overview of your PhotoFrame 6
3 Get started 7
Install the stand 7
Connect power 7
Turn on the PhotoFrame 8
Transfer media 9
Know these keypad icons 10
4 Display photos 11
Manage slideshow and photos 11
Zoom and crop a photo 12
5 Browse 13
Browse and manage albums and media 13
6 Clock 15
Display the clock 15
Clock menu 15
7 Message 16
Create a message 16
Edit a message 17
View a message 19
8 Settings 20
Select an on-screen language 20
Adjust brightness 20
Set time/date 20
Set SmartPower timer 21
Hibernate the PhotoFrame 22
Set auto orientation 23
Turn button sound on/off 23
Slideshow setting 24
View information of the PhotoFrame 26
Reset all settings to factory default 26
9 Upgrade the PhotoFrame
10 Product information
11 Frequently asked questions 31
12 Glossary 32
Need help?
Please visit www.philips.com/welcome where you can access a full set of supporting materials such as user manual, the latest software updates and answers to frequently asked questions.
1 Important
Safety
Safety precautions and maintenance
Never touch, push, rub or strike the • screen with hard objects as this may damage the screen permanently.
When the product is not used for long periods, unplug it.
Before you clean the screen, turn off and • unplug the power cord. Only clean the screen with a soft, water-damp cloth.
Never use substances such as alcohol, chemicals or household cleaners to clean the product.
Never place the product near naked • flames or other heat sources, including direct sunlight.
Never expose the product to rain or • water. Never place liquid containers, such as vases, near the product.
Never drop the product. When you drop • the product, it will be damaged.
Ensure that you install and use services or • software only from trustworthy sources free of virus or harmful software.
• This product is designed for indoor use only.
Only use the supplied power adaptor for • the product.
- The socket-outlet shall be installed near the equipment and shall be easily accessible.
Notice
Warranty
No components are user serviceable. Do not open or remove covers to the inside of the product. Repairs may only be done by Philips Service Centres and official repair shops. Failure to do so shall void any warranty, stated or implied.
Any operation expressly prohibited in this manual, any adjustments, or assembly procedures not recommended or authorised in this manual shall void the warranty.
CE
This product is in compliance with the essential requirements and other relevant provisions of Directives 2006/95/EC (Low Voltage), 2004/108/EC (EMC).
Respect copyrights

Be responsible Respect copyrights
The making of unauthorized copies of copy-protected material, including computer programs, files, broadcasts and sound recordings, may be an infringement of copyrights and constitute a criminal offence. This equipment should not be used for such purposes.
End of life disposal
Your new product contains materials that can be recycled and reused. Specialized companies can recycle your product to increase the amount of reusable materials and to minimize the amount to be disposed of.
Please find out about the local regulations • on how to dispose your old monitor from your local Philips dealer.
(For customers in Canada and U.S.A.) • Dispose the old product in accordance to local-state and federal regulations.
For additional information on recycling contact www.eia.org (Consumer Education Initiative).
Recycling Information for Customers
Philips establishes technically and economically viable objectives to optimize the environmental performance of the organization's product, service and activities.
From the planning, design and production stages, Philips emphasizes the importance of making products that can easily be recycled. At Philips, end-of-life management primarily entails participation in national take-back initiatives and recycling programs whenever possible, preferably in cooperation with competitors.
There is currently a system of recycling up and running in the European countries, such as The Netherlands, Belgium, Norway, Sweden and Denmark.
In U.S.A., Philips Consumer Lifestyle North America has contributed funds for the Electronic Industries Alliance (EIA) Electronics Recycling Project and state recycling initiatives for end-of-life electronics products from household sources. In addition, the Northeast Recycling Council (NERC) - a multi-state non-profit organization focused on promoting recycling market development - plans to implement a recycling program.
In Asia Pacific, Taiwan, the products can be taken back by Environment Protection Administration (EPA) to follow the IT product recycling management process, detail can be found in web site www.epa.gov.tw.
Environmental information

Your product is designed and manufactured with high quality materials and components, which can be recycled and reused.
When you see the crossed-out wheel bin symbol attached to a product, it means the product is covered by the European Directive 2002/96/EC:

Never dispose of your product with other household waste. Please inform yourself about the local rules on the separate collection of electrical and electronic products. The correct disposal of your old product helps prevent potentially negative consequences on the environment and human health.
North Europe Information (Nordic Countries)
WARNING:
FÖRSÄKRA DIG OM ATT HUVUDBRYTARE OCH UTTAG ÄR LÄTÄTKOMLIGA, NÄR DU STÄLLER DIN UTRUSTNING PÅPLATS.
Placering/Ventilation
ADVARSEL:
S∅RG VED PLACERINGEN FOR, AT NETLEDNINGENS STIK OG STIKKONTAKT ER NEMT TILGÆNGELIGE.
Paikka/llmankierto
VAROITUS:
SIJOITA LAITE SITEN, ETTÄ VERKKOJOHTO VOIDAAN TARVITTAESSA HELPOSTI IRROTTAA PISTORASIASTA.
Banned Substance Declaration
This product complies with RoHs and Philips BSD (AR17-G04-5010-010) requirements.
Class II statement
Class II equipment symbol:

This symbol indicates that this product has a double insulation system.
2 Your PhotoFrame
Congratulations on your purchase, and welcome to Philips! To fully benefit from the support that Philips offers, register your product at www.philips.com/welcome.
Introduction
With this Philips Digital PhotoFrame, you can use the PhotoFrame to:
Display JPEG photos•
Create gift messages•
What's in the box

natural_image
Blank rectangular frame with a thin inner rectangle and 'PHILIPS' label at the bottom (no other text or symbols)Philips Digital PhotoFrame•

Stand•

natural_image
Line drawing of a mechanical device with a coiled cable and terminal connectors (no text or symbols)AC-DC power adaptor•

text_image
PHILIPS PhotoAlbum 2.0 Digital User ManualCD-ROM with User manual

text_image
highcore your 100% user who has a www.philips.com/welcome PhotoFrame Quick Start Guide PHILIPSQuick start guide•
Overview of your PhotoFrame

text_image
PHILIPS 10 2 3 4 BACK HOME OK MODE POWER MENU 9 DC SD/MMC/MS/MS Pro 8 5 6 7①
Press to turn on the PhotoFrame•
Press and hold to turn off the • PhotoFrame
Press to switch modes: slideshow/• clock/calendar
②
Press to return to the previous step•
Press and hold to go to the home • screen
③ OK (Joystick)
Press to confirm a selection•
Press to pause or resume play•
- Move up/down/left/right to select the upper/lower/right/left option
④ MENU
Press to enter/exit the menu•
⑤ DC
Socket for the AC-DC power • adaptor
⑥ ▲ SD/MMC/MS/MS Pro
Slot for an SD/MMC/MS/MS Pro • card
⑦
Slot for a USB cable to PC•
⑧ Kensington lock
⑨ Stand hole
⑩ Wall mounting hole
3 Get started

Caution
Use the controls only as stated in this user • manual.
Always follow the instructions in this chapter in sequence.
If you contact Philips, you will be asked for the model and serial number of this apparatus. The model number and serial number are on the back of the apparatus. Write the numbers here:
Model No. ____
Serial No.
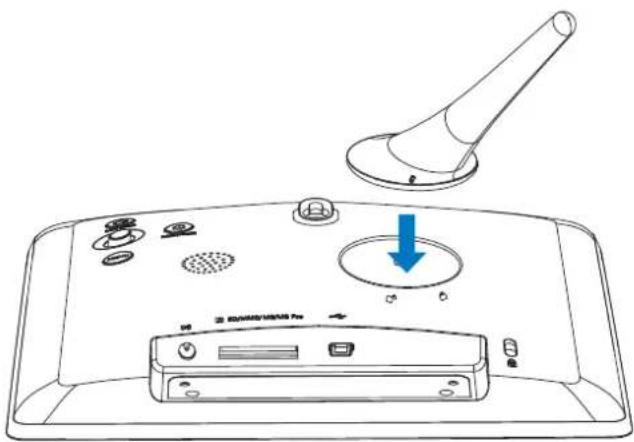
Install the stand
To place the PhotoFrame on a flat surface, attach the supplied stand to the back of the PhotoFrame.
1 Insert the stand into the PhotoFrame and position the indication on the stand to the □ position.
text_image
Diagram of a device rear panel with labeled ports and a downward arrow indicating a drop or change in the interior.2 Turn the stand anti-clockwise 45 degrees to the 🔒 position and lock it to the PhotoFrame firmly.

natural_image
Line drawing of a device panel with buttons and a lever, no text or symbols presentEnglish
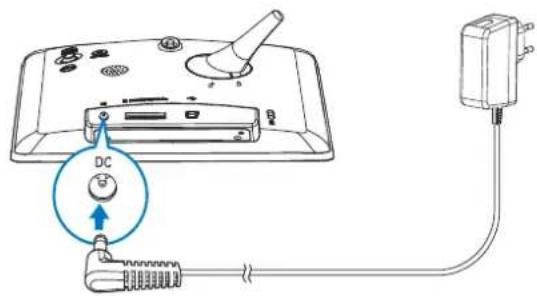
Connect power

Note
When you position the PhotoFrame, ensure that the power plug and outlet are easily accessible.
1 Connect the power cord to the DC socket of the PhotoFrame.
text_image
Diagram showing a device with a DC control knob connected to a cable, indicating connection to an electrical outlet.2 Connect the power cord to a power supply socket.

natural_image
Diagram showing a device connected to an electrical outlet with a blue arrow indicating direction (no text or symbols present)A few seconds later, the PhotoFrame → turns on automatically.
Turn on the PhotoFrame

Note
When you connect the PhotoFrame to a power supply, the PhotoFrame turns on automatically.
1 When the PhotoFrame is turned off and connected to the power supply, hold ⏻ to turn on the PhotoFrame.
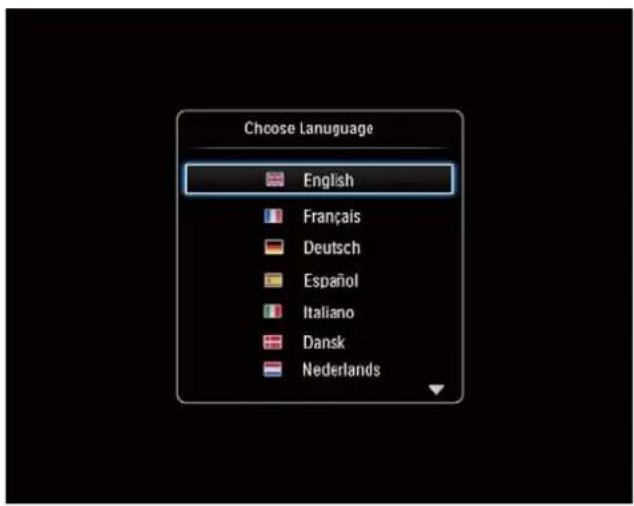
For the first time you turn on the PhotoFrame:
The screen prompts you to select a • language.
text_image
Choose Language English Français Deutsch Español Italiano Dansk NederlandsSelect a language, and then press • OK.

text_image
Choose Language English Français Deutsch Español Italiano Dansk NederlandsThe screen prompts you to set time • and date.

text_image
Time and Date Set Time 08 : 00 AM Set DateMove the joystick to set time and • date, and then press OK.
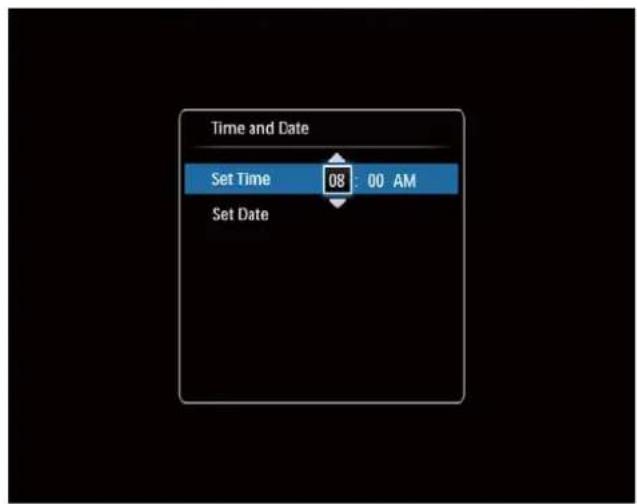
text_image
Time and Date Set Time 08:00 AM Set Date
Tip
If the PhotoFrame is disconnected from the power supply for a long time, you need set time and date again after you turn on the PhotoFrame.
Turn off the PhotoFrame

Note
You can only turn off the PhotoFrame after all • copy and save actions are complete.
To turn off the PhotoFrame, press and hold ⏻ for about 2 seconds.
Transfer media
Transfer photos with a storage device

Caution
Do not disconnect the storage device from the PhotoFrame during media transfer.
The PhotoFrame supports most types of the following storage device:
- Secure Digital (SD)
• Secure Digital High Capacity (SDHC)
• Multimedia Card (MMC)
• Memory Stick (MS)
• Memory Stick Pro (MS Pro) (with adaptor)
1 Insert a storage device into the PhotoFrame.
An option menu is displayed.

text_image
Choose Play Photos Browse Copy to PhotoFrame Settings[Play Photos]: Select it to play media on the storage device
[Browse]: Select it to browse media on the storage device
[Copy to PhotoFrame]: Select it to start transfer operation
2 Select [Copy to PhotoFrame], and then press OK.
▶ confirmation message is displayed.
To copy photos to the PhotoFrame:
1 Select [Yes], and then press OK.
• To remove a storage device, pull it out of the PhotoFrame.
Transfer photos with a computer

Caution
Do not disconnect the PhotoFrame from the computer during media transfer.
1 Connect a USB cable to the PhotoFrame and to the computer.

text_image
Diagram showing connections between computer, laptop, and device via USB port, with icons indicating data transfer or connection.You can drag and drop the media from the computer to an album on the PhotoFrame.
2 When the transfer is complete, disconnect the USB cable from the computer and the PhotoFrame.

Tip
You can transfer media from the PhotoFrame to a computer.
- The transfer speed depends the operating system and the software configuration of the computer.
Know these keypad icons
| Input in English | |
| Input in supported European languages | |
| Русский | Input in Russian |
| $#* / ABC Switch to select symbols, punctuations, alphabet or numbers | |
| aA Switch between upper and lower case | |
| Enter a blank space | |
| Enter a line break | |
4 Display photos

Note
You can display JPEG photos in slideshow • mode on the PhotoFrame.
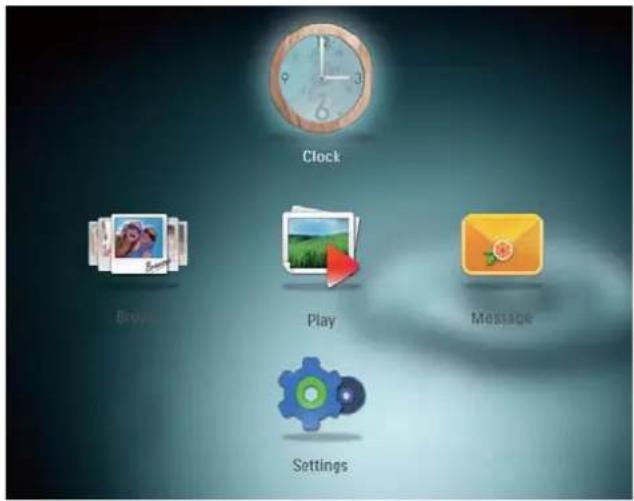
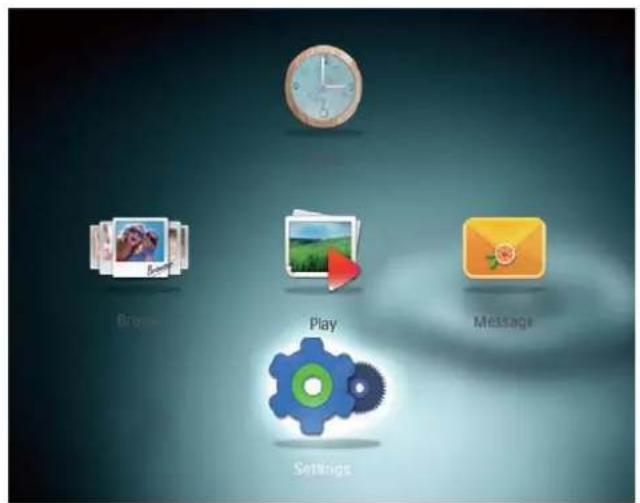
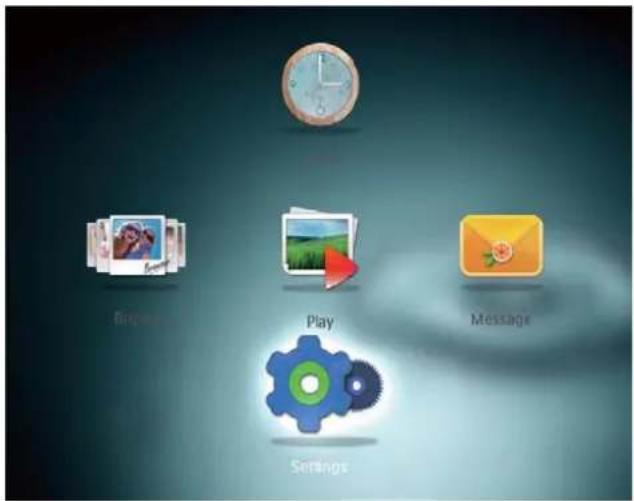
1 In the home screen, select [Play], and then press OK.
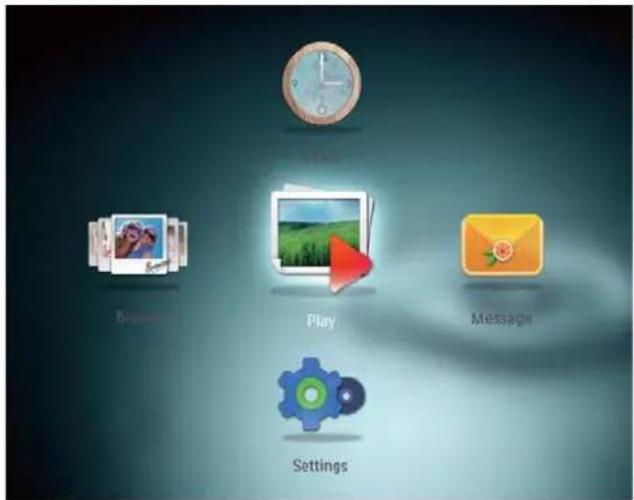
text_image
Time Play Message Settings4 Photos are displayed in slideshow mode.
In slideshow mode:
• To pause the slideshow, press OK.
• To resume the slideshow, press OK again.
• To select the previous/next photo, move the joystick to the left/right.

Tip
- During collage slideshow, photos are displayed randomly.
Manage slideshow and photos
You can take the following steps to manage the photo in slideshow mode or the slideshow settings:
1 Press MENU.
An option menu is displayed.
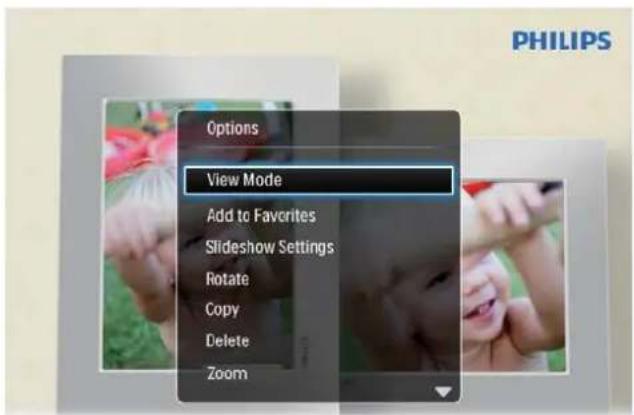
text_image
PHILIPS Options View Mode Add to Favorites Slideshow Settings Rotate Copy Delete Zoom2 Select an option, and then press OK.
• [View Mode]: Select the view mode
- [Add to Favorites]: Add the photo to the [Favorites] album on the PhotoFrame
- [Slideshow Settings]
• [Interval]: Set the interval in slideshow
• [Shuffle]: Play media randomly or not
• [Color Tone]: Select the color for the photo
• [Transition Effect]: Select the transition effect
• [Background Color]: Select the background color
• [Rotate]: Select an orientation to rotate the photo
• [Copy]: Copy the photo to another album
• [Delete]: Delete the photo
• [Zoom]: Zoom and crop a photo
• [Brightness]: Move the joystick up/down to adjust the brightness of display
Zoom and crop a photo
With the PhotoFrame, you can zoom in a photo, crop it, and save it as a new photo.
1 In slideshow mode, press MENU. An option menu is displayed.
2 Select [Zoom].

text_image
Options Add to Favorites Slideshow Settings Rotate Copy Delete Zoom Brightness3 Press OK repeatedly to zoom in the photo (or exit the zoom mode).
4 Move the joystick to pan the photo.
5 Press MENU.
6 Select [Crop and Save], and then press OK.
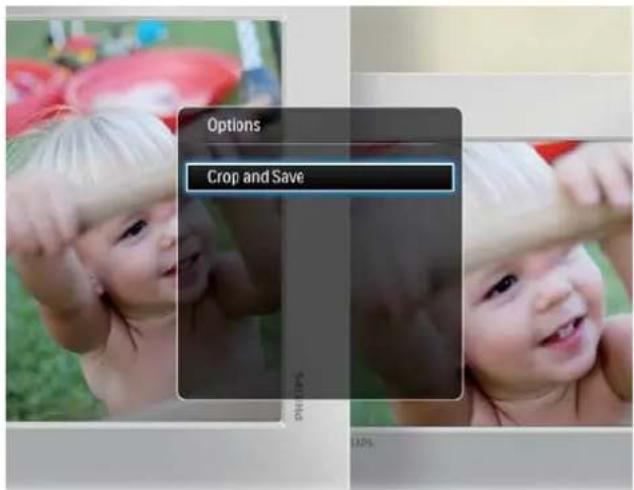
text_image
Options Crop and SaveA confirmation message is displayed.
7 Select [Yes], and then press OK.
• To cancel the operation, select [No] and then press OK.
8 Select a location to save the new photo, and then press OK.
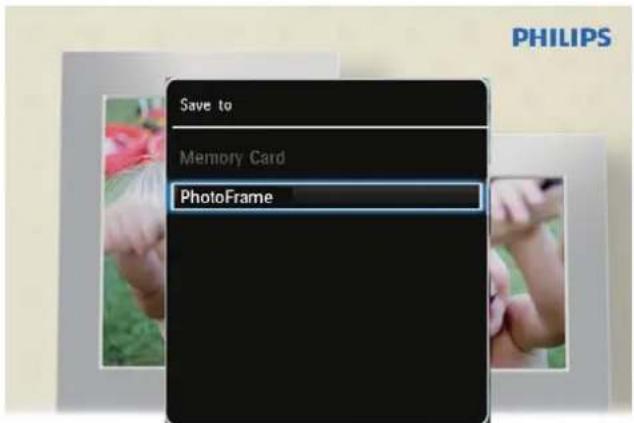
text_image
PHILIPS Save to Memory Card PhotoFrameAfter the photo is saved, the ↩ PhotoFrame goes back to the slideshow mode.
5 Browse
Browse and manage albums and media
You can browse and manage albums and media in wave mode or album mode.
- Wave mode:
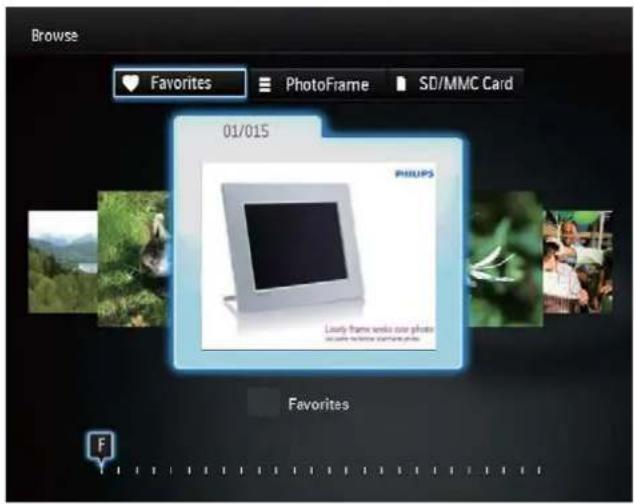
text_image
Browse Favorites PhotoFrame SD/MMC Card 01/015 PHIOPS Lastly frame works our photo as we're looking something photo. Favorites- Album mode:
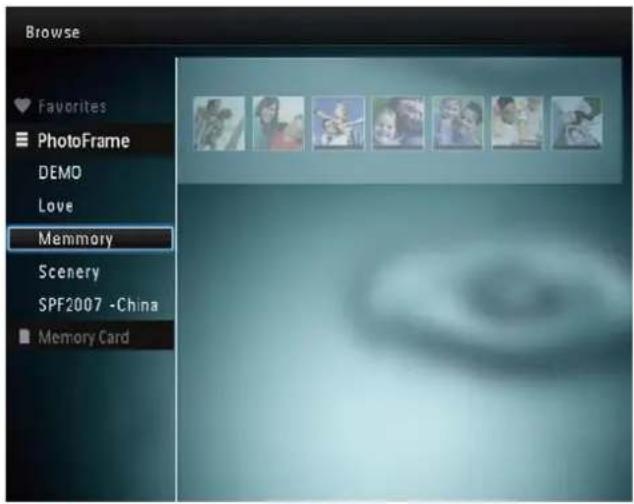
text_image
Browse Favorites PhotoFrame DEMO Love Memory Scenery SPF2007 -China Memory CardBrowse albums:
1 In the home screen, select [Browse] and then press OK.

text_image
Browse Play Message SettingsAlbums are displayed in wave mode.
• To access album mode, press ⏻.
- To return to wave mode, press Ⓗ. In wave/album mode, •
- Press OK once: A photo is displayed in pause mode.
- Press OK twice: Slideshow is started.
Manage albums and media:
1 Select an album/device, press MENU. An option menu is displayed.
2 Select an option, and then press OK to continue.
Album menu:
• [Add to Favorites]: Add media in the album to the [Favorites] album
• [Create New Album]: Create an album
• [Copy]: Copy media in the album to another album
• [Move]: Move media in the album to another album
• [Delete]: Delete media in the album
Thumbnail photo menu:
- [Add to Favorites]: Add media in the album to the [Favorites] album
• [Copy]: Copy media in the album to another album
• [Move]: Move media in the album to another album - [Delete]: Delete media in the album
• [Rotate]: Rotate the photo in the album
• [Color Tone]: Select a color for the photo
When you select the [Favorites] album, a different menu is displayed.
- [Remove from Favorites]: Remove media from the [Favorites] album
• [Copy]: Copy media in the album to another album - [Delete]: Delete media in the album
Add media to the favorite album
To add media in the album to the [Favorites] album:
1 Select [Add to Favorites], and then press OK.
Create an album
1 Select [Create New Album], and then press OK.
2 To enter the name (about 24 characters), select an alphabet/number and then press OK.
To switch between uppercase and • lowercase, select aA on the displayed keypad and then press OK.
3 When the name is complete, select and then press OK.
4 Press OK to start the saving process.
Copy media
1 Select [Copy], and then press OK.
2 Select a destination album, and then press OK to start copy.
Move media
1 Select [Move], and then press OK.
2 Select a destination album, and then press OK to start move.
Delete media
1 Select [Delete], and then press OK.
A confirmation message is displayed.
2 Select [Yes], and then press OK to start deletion.
To cancel the operation, hold ⚙.
Rotate photos
1 Select [Rotate], and then press OK.
2 Select an angle to rotate, and then press OK.
6 Clock
Display the clock
1 In the home screen, select [Clock] and then press OK.
text_image
Clock Video Play Message SettingsA clock/calendar is displayed.
Clock menu
1 When a clock/calendar is displayed, press MENU to enter the clock menu.

text_image
Clock Options Select Clock Time and Date- [Select Clock]: Move the joystick left/right to select another clock or calendar to be displayed.
- [Time and Date]: Move the joystick up/down/left/right to set time/date or to select a time/date format. For details, see Section "Settings - Set time and date".
Select a clock/calendar style
1 In the clock menu, select [Select Clock] and then press OK.
2 Move the joystick left/right to select a clock or calendar template, and then press OK.
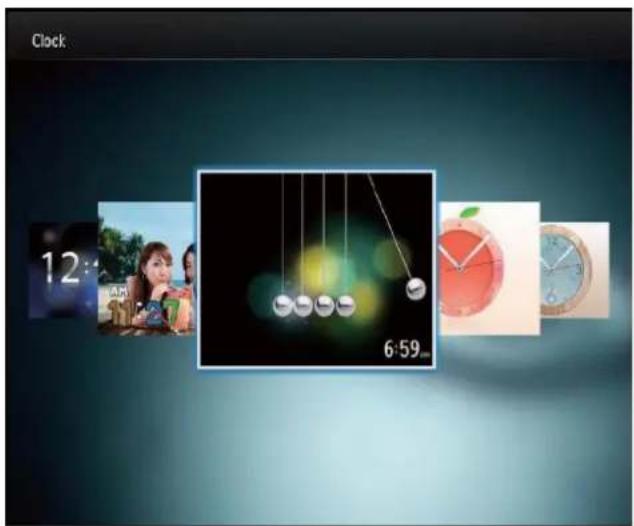
text_image
Clock 12:45 6:59To go back to the home screen, hold •
7 Message
Create a message
1 In the home screen, select [Message] and then press OK.

text_image
Media Browse Play Message Settings2 Select [Add a message to your photo], and then press OK.
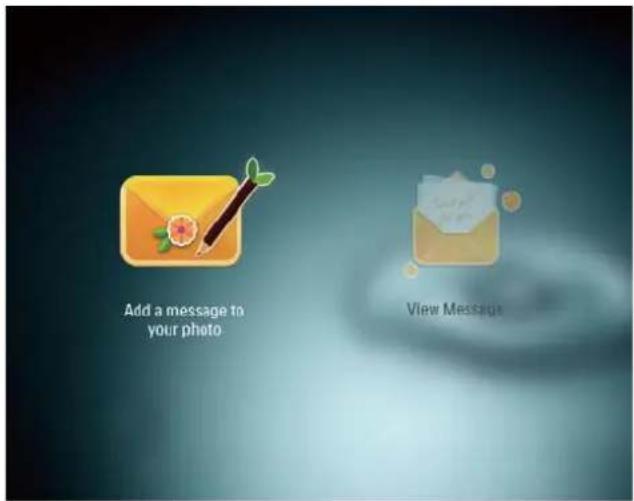
text_image
Add a message to your photo View Message3 Move the joystick right or left to select a message template, and then press OK.

text_image
Add a message to your photo It's a boy.Edit the text of the message or change image of the message.

text_image
Create Event Reminder It's a Boy My baby, you ago so lovely Change Image Edit Text DoneSet the real time and date if applicable.
4 Select [Done]. The screen prompts you to schedule the message.
5 Schedule the message.
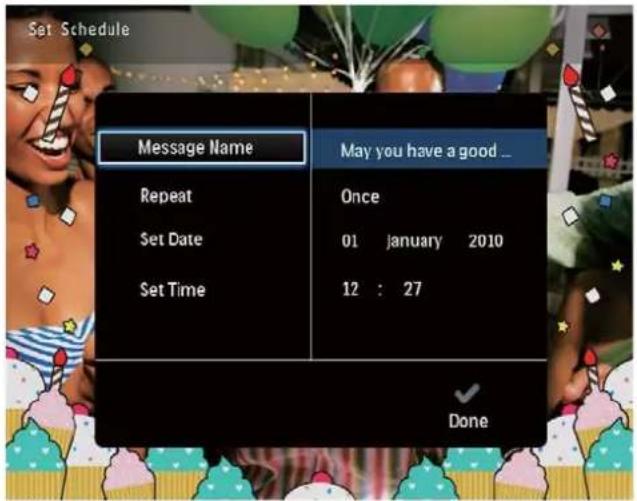
text_image
Set Schedule Message Name May you have a good _ Repeat Once Set Date 01 january 2010 Set Time 12 : 27 Done- [Message Name]: Enter the name. For details, see "Enter the name of a message".
• [Repeat]: Select a repeat frequency
• [Set Date]: Set the date or day - [Set Time]: Set the time
6 After you complete the message, select [Done] and press OK.
text_image
Set Schedule Message Name May you have a good ... Repeat Once Set Date 01 January 2010 Set Time 12 : 27 Done- To view the available messages, select [View Message].

text_image
Add message to the photo View Message• To go back to the home screen, hold.
Enter the name of a message
1 Select [Message Name], and then press OK.
2 Move the joystick downward twice to enter the keypad.
3 To enter the name (about 24 characters), select an alphabet/number and then press OK.
To switch between uppercase and • lowercase, select aA on the displayed keypad and then press OK.
4 When the name is complete, select and then press OK.
Edit a message
1 In the home screen, select [Message] and then press OK.
text_image
Browse Play Message Settings2 Select [Add a message to your photo], and then press OK.

text_image
Add a message to your photo View Message3 Move the joystick right or left to select a message template, and then press OK.

text_image
Add a message to your photo It's a boy.4 Move the joystick to select one of the following options to edit a message.
• [Change Image]: Change the photo of the message
• [Edit Text]: Edit the message text
To change the photo of a message:
1 Select [Change Image], and then press OK.

text_image
Create Event Reminder It's a Boy My baby, you ago so lovely Change Image Edit Text Done2 Select a photo available on the PhotoFrame, and then press OK.
To edit the text of a message:
1 Select [Edit Text], and then press OK.

text_image
Create Event Reminder It's a Boy My baby, you age so lovely Change Image Edit Text Done2 Select a preset template, and then press OK.
The keypad is displayed.

text_image
Add a message to your photo May you have a good day! ! Q W E R T Y U I O P 1 2 3 @ A S D F G H J K L ← 4 5 6 ? - Z X C V B N M , . 7 8 9$## aA ↙ ← * 0 ✓
3 Move the joystick downwards twice to enter the keypad.
4 To enter the text, select an alphabet/number and then press OK.
Select an input method, see "Know these keypad icons".
To switch between uppercase and • lowercase, select aA on the displayed keypad and then press OK.
5 After you enter the text, select and then press OK.
6 Move the joystick up/down/right/left to position the text, and then press OK.
7 Move the joystick up/down/right/left to select the color or font of the text, and then press OK.

text_image
Enjoy your birthday today!8 Move to √, and then press OK.
9 Select [Done], and then press OK.
View a message
1 In the home screen, select [Message] and then press OK.
2 Select [View Message], and then press OK.

text_image
Add a message to the photo View Message3 Select a message template, and then press OK.
A message template is displayed.
4 Press MENU, and then select an option to continue.

text_image
View Message I'm you have a good view. Re-schedule Delete Done5 Follow the on screen instruction to reschedule the message or delete the message.
To go back to the message browser • screen, select [Done] and then press OK.
8 Settings
Select an on-screen language
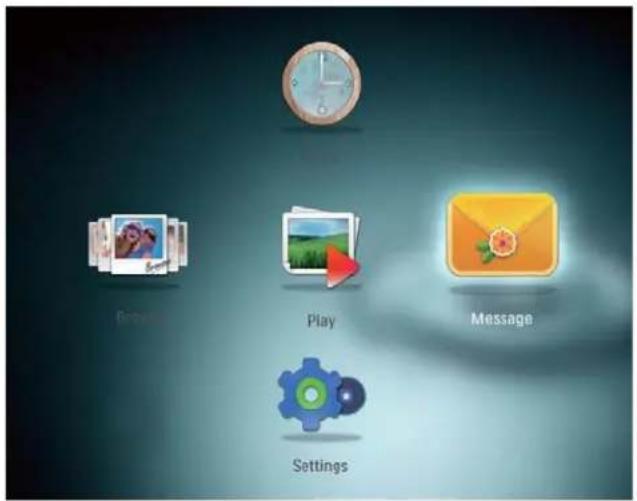
1 In the home screen, select [Settings] and then press OK.

text_image
Watch Breakdown Play Message Settings2 Select [Language], and then press OK.
3 Select a language, and then press OK.

text_image
Settings Language English Brightness Français Time and Date Deutsch SmartPower Espanol Hibernate Italiano Auto-orientate Dansk Set Beep Nederlands Slideshow Português Info PycckniïAdjust brightness
You can adjust the brightness of the PhotoFrame to achieve the best view.
1 In the home screen, select [Settings] and then press OK.

text_image
Settings Play Message2 Select [Brightness], and then press OK.

text_image
Settings Language Brightness Time and Date SmartPower Hibernate Auto-orientate Set Beep Slideshow Info3 Move the joystick up/down to adjust brightness, and then press OK.
Set time/date
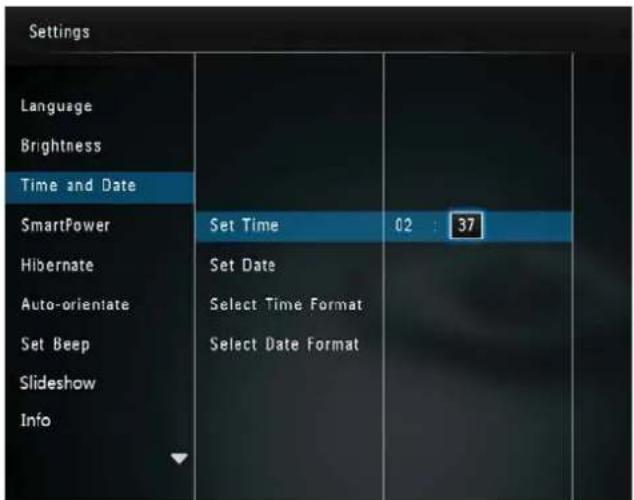
1 In the home screen, select [Settings] and then press OK.

text_image
Options Play Message Settings2 Select [Time and Date], and then press OK.

text_image
Settings Language Brightness Time and Date SmartPower Hibernate Auto-orientate Set Beep Slideshow Info Set Time Set Date Select Time Format Select Date Format 02 : 283 Select [Set Time] / [Set Date], and then press OK.
4 Move the joystick up/down/right/left to adjust minute/hour/day/month/year, and then press OK.
text_image
Settings Language Brightness Time and Date SmartPower Hibernate Auto-orientate Set Beep Slideshow Info Set Time 02 : 37Set time/date format
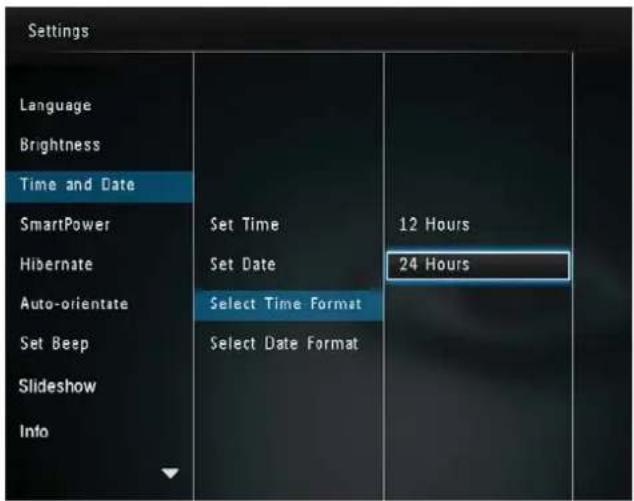
1 In the home screen, select [Settings] and then press OK.

text_image
Beginner Play Message Settings2 Select [Time and Date], and then press OK.
3 Select[Select Time Format] / [Select Date Format], and then press OK.
4 Select a format, and then press OK.
text_image
Settings Language Brightness Time and Date SmartPower Hibernate Auto-orientate Set Beep Slideshow Info Set Time Set Date Select Time Format Select Date Format 12 Hours 24 HoursSet SmartPower timer
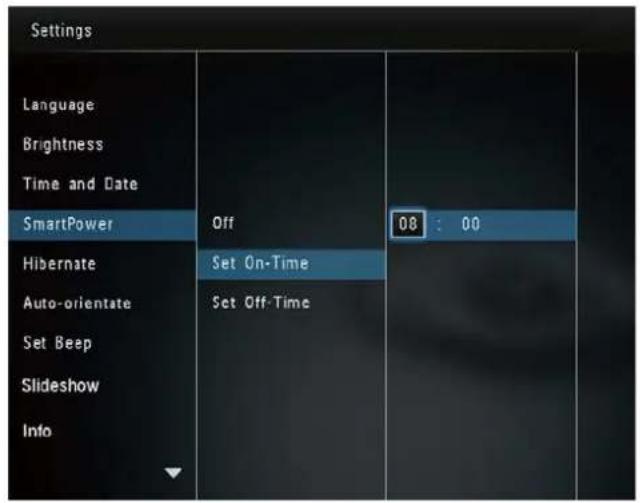
With the SmartPower timer, you can configure the time for the display of the PhotoFrame to turn on or turn off automatically. When the display automatically turns off, the PhotoFrame goes to standby (sleep) mode.

Note
Ensure that the current time of the • PhotoFrame is set correctly.
1 In the home screen, select [Settings] and then press OK.
text_image
Browse Play Message Settings2 Select [SmartPower], and then press OK.
3 Select [Set On-Time] / [Set Off-Time], and then press OK.
To switch off the SmartPower • function, select [Off] and then press OK.

text_image
Settings Language Brightness Time and Date SmartPower Off Hibernate Set On-Time Auto-orientate Set Off-Time Set Beep Slideshow Info4 Move the joystick up/down/right/left to set time, and then press OK.
text_image
Settings Language Brightness Time and Date SmartPower Off Set On-Time Set Off-Time Hibernate Auto-orientate Set Beep Slideshow Info 08 : 00
Tip
When the PhotoFrame is in standby (sleep) mode, you can press do wake up the PhotoFrame.
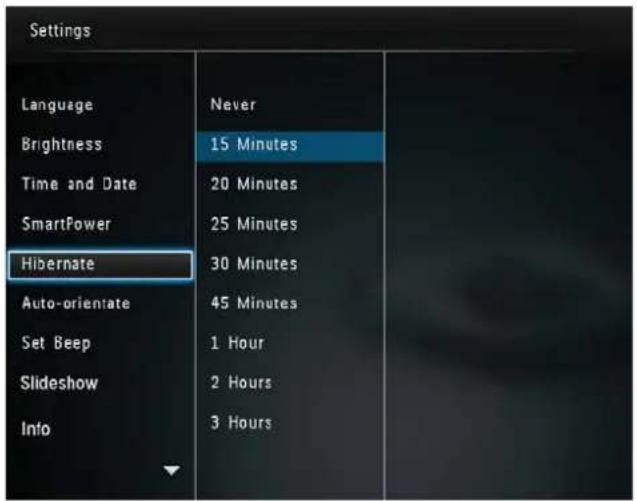
Hibernate the PhotoFrame
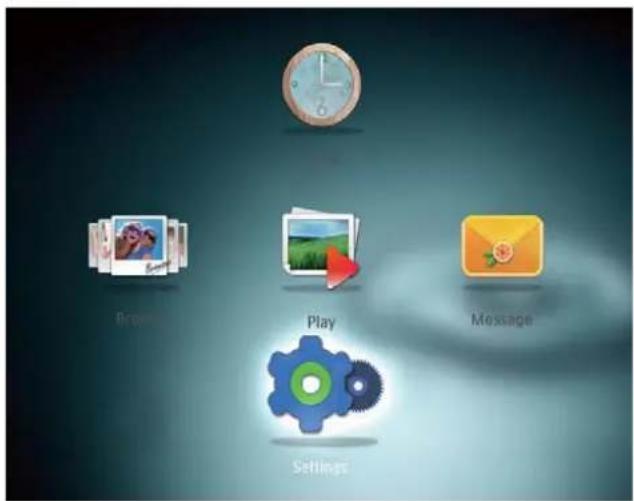
1 In the home screen, select [Settings] and then press OK.
text_image
Brack Play Message Settings2 Select [Hibernate], and then press OK.
3 Select an option, and then press OK.
text_image
Settings Language Brightness Time and Date SmartPower Hibernate Auto-orientate Set Beep Slideshow Info Never 15 Minutes 20 Minutes 25 Minutes 30 Minutes 45 Minutes 1 Hour 2 Hours 3 HoursAfter the selected period, the → PhotoFrame hibemates.
To disable the hibernation function, • select [Never] and then press OK.

text_image
Settings Language Brightness Time and Date SmartPower Hibernate Auto-orientate Set Beep Slideshow Info Never 15 Minutes 20 Minutes 25 Minutes 30 Minutes 45 Minutes 1 Hour 2 Hours 3 HoursTo get the PhotoFrame out of • hibernation, press ⏻.
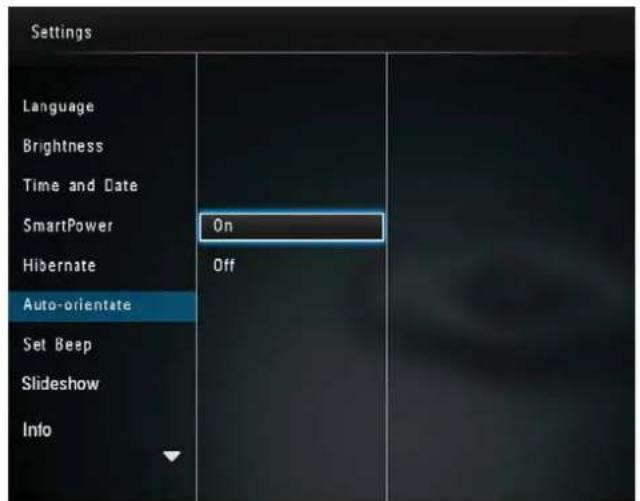
Set auto orientation
With the auto orientation function, you can play photos in the correct orientation depending on the horizontal/vertical orientation of the PhotoFrame.
1 In the home screen, select [Settings] and then press OK.

text_image
Media Play Message Settings2 Select [Auto-orientate], and then press OK.
3 Select [On], and then press OK.
text_image
Settings Language Brightness Time and Date SmartPower On Hibernate Off Auto-orientate Set Beep Slideshow InfoTo disable the auto orientation • function, select [Off] and then press OK.
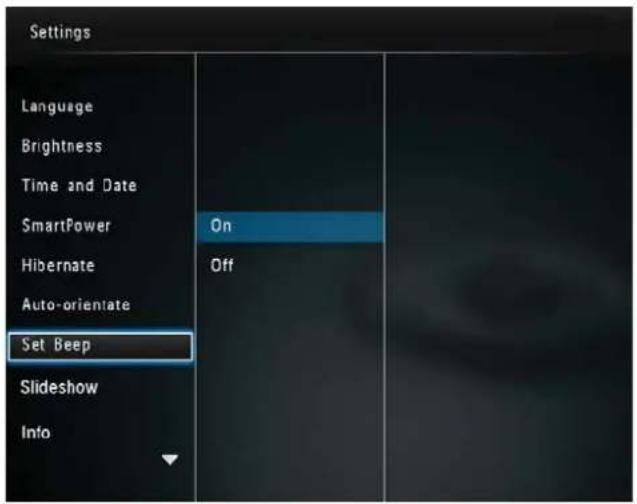
Turn button sound on/off
1 In the home screen, select [Settings] and then press OK.
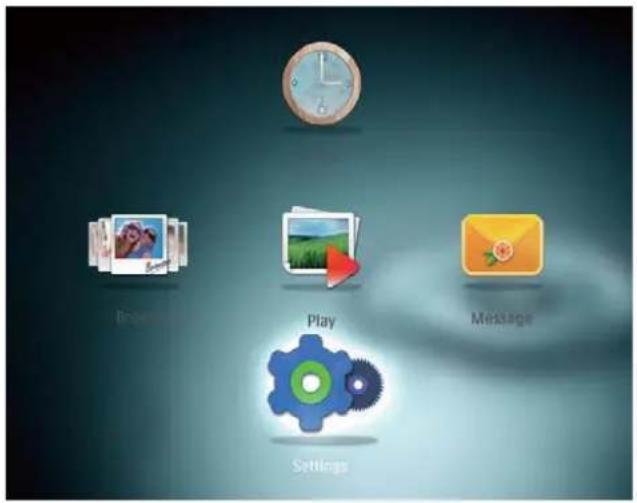
text_image
Options Play Message Settings2 Select [Set Beep], and then press OK.
3 To turn on the button sound, select [On] and then press OK.
text_image
Settings Language Brightness Time and Date SmartPower Hibernate Auto-orientate Set Beep Slideshow Info On OffTo turn off the button sound, select • [Off] and then press OK.
Slideshow setting
Select slideshow interval
1 In the home screen, select [Settings] and then press OK.

text_image
Bed Play Messages Settings2 Select [Slideshow], and then press OK.
3 Select [Interval], and then press OK.

text_image
Settings Brightness Time and Date SmartPower Hibernate Auto-orientate Set Beep Slideshow Info Default setting Interval Shuffle Transition Effect Background Color 5 Seconds 10 Seconds 30 Seconds 1 Minute 5 Minutes 30 Minutes 1 Hour 4 Hours 12 Hours4 Select a slideshow interval, and then press OK.
Select slideshow sequence
1 In the home screen, select [Settings] and then press OK.

text_image
Browse Play Message Settings2 Select [Slideshow], and then press OK.
3 Select [Shuffle], and then press OK.
4 To display slideshow randomly, select [On] and then press OK.
To display slideshow in sequence, • select [Off] and then press OK.
Select transition effect
1 In the home screen, select [Settings] and then press OK.

text_image
Begin Play Message Settings2 Select [Slideshow], and then press OK.
3 Select [Transition Effect], and then press OK.
4 Select a transition effect, and then press OK.
Select background color
You can select a background border color for photos that are smaller than the PhotoFrame display.
1 In the home screen, select [Settings] and then press OK.
text_image
Email Print Play Message Settings2 Select [Slideshow], and then press OK.
3 Select [Background Color], and then press OK.
4 Select [RadiantColor] / a background color/ [Auto-fit], and then press OK.
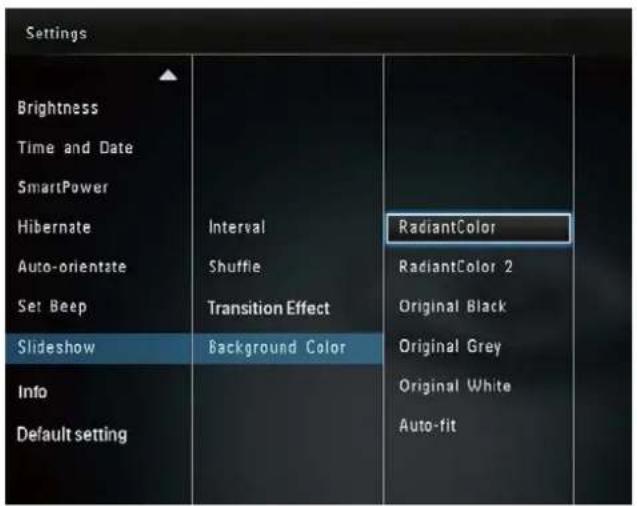
text_image
Settings Brightness Time and Date SmartPower Hibernate Auto-orientate Set Beep Slideshow Info Default setting Interval Shuffle Transition Effect Background Color RadiantColor RadiantColor 2 Original Black Original Grey Original White Auto-fitIf you select →[RadiantColor], the PhotoFrame extends the color on the edges of a photo that is smaller than the full screen to fill the screen without black bars or aspect ratio distortion.

natural_image
Exterior view of a two-story residential house with a red-tiled roof and white walls, surrounded by greenery and flowers under a clear blue sky (no signage or text visible)If you select a background color, the ↩ PhotoFrame displays a photo with a background color.

natural_image
Exterior view of a two-story residential house with red-tiled roof and white walls, surrounded by greenery and flowers under a clear blue sky (no signage or text visible)If you select [Auto-fit], the PhotoFrame extends a photo to fill the screen with picture distortion.

natural_image
Exterior view of a modern house with orange-tiled roof and white walls, surrounded by garden and lawn (no signage or text visible)View information of the PhotoFrame
You can find the model name, the firmware version of the PhotoFrame, and the memory status of the PhotoFrame and other storage device available on the PhotoFrame.
1 In the home screen, select [Settings] and then press OK.
text_image
Settings Play Message2 Select [Info].
The information of the PhotoFrame is ↩ displayed on the screen.
Reset all settings to factory default
1 In the home screen, select [Settings] and then press OK.

text_image
Settings Play Message2 Select [Default Settings], and then press OK.
A confirmation message is displayed.
3 Select [Yes], and then press OK.
All settings on the PhotoFrame are set → to factory default.
• To cancel the operation, select [No] in the prompt message and then press OK.
9 Upgrade the PhotoFrame

Caution
Do not power off the PhotoFrame during • software upgrade.
If there is a software update, you can download the latest software from www.philips.com/support to upgrade your PhotoFrame. The earlier software is unavailable on line.
1 Visit www.philips.com/support.
2 Search for your PhotoFrame and go to the software section.
3 Download the latest software onto the root directory of an SD card.
4 Insert the SD card into the PhotoFrame.
5 Turn on the PhotoFrame
A confirmation message is displayed.
6 Select [Yes], and then press OK to confirm.
When the upgrade is complete, the ↩
PhotoFrame reboots.
10 Product information

Note
- Product information is subject to change without prior notice.
Picture/Display
• Viewing angle: @ C/R > 10, 130° (H)/110° (V)
• Lifetime, to 50% brightness: 20000 hr
- Aspect ratio: 4:3
• Panel resolution: 800 × 600
• Brightness (typical): 180 cd/m²
• Contrast ratio (typical): 300:1
• Photo format support: JPEG photo (maximum: 8000 × 6000 pixel resolution)
Storage media
• Internal memory capacity: 2 GB
• Memory Card Types:
- Secure Digital (SD)
• Secure Digital High Capacity (SDHC)
• Multimedia Card (MMC)
• Memory Stick (MS)
• Memory Stick Pro (MS Pro)
Connectivity
• USB: USB 2.0 Slave
Dimensions & Weight
- Set dimensions without stand (W × H × D): 225 × 184.5 × 33.5 mm
- Set dimensions with stand (W × H × D): 225 × 184.5 × 113.5 mm
• Weight (with stand): 0.536 kg
Temperature range
Operation: 0 °C - 40 °C/32 °F - 104 °F
Storage: -10 °C - 60 °C/14 °F - 140 °F•
Power
Power mode supported: AC powered
Efficiency level: V•
Average consumption (system on): 4 W•
Power adaptor: •
Manufacturer: Philips Consumer • Lifestyle International B.V.
Model number: ASUC12x-050100 • (x=E, B, C, I)
Input: AC 100-240V \~ 50-60Hz • 0.3A
Output: DC 5V =1000mA
| Adaptor | Region |
| ASUC12E-050100 | Europe, Russia, and Singapore |
| ASUC12B-050100 | U.K. and Hong Kong |
| ASUC12C-050100 | Australia and New Zealand |
| ASUC12I-050100 | China |
Accessories
- AC-DC adaptor
• CD-ROM with digital user manual - Quick start guide
Convenience
• Card Reader: Built-in
• Photo format supported:
JPEG photo (maximum: 8000 × 8000 • pixel resolution)
• Progressive JPEG photo (Up to 1024 × 768 pixels)
- Placement supported: Photo auto orientation
Buttons and controls: Joystick, home/• back button, menu button, power/mode button
Playback mode: Slideshow, thumbnail • view, wave view, album view
Album management: Create, copy, move, • delete, add to the favorites album
Photo management: Copy, move, delete, rotate, add to the favorites album, color tone
Clock: Clock, calendar, set time and date•
Message: Create message, view message•
Slideshow setting: Transition effect, • background color, view mode, interval, shuffle, color tone
Color tone: Black and white, Sepia, other • colors
Screen background: Black, white, gray, • auto fit, RadiantColor
Settings: Language, brightness, time • and date, SmartPower, hibernate, auto orientation, beep (button sound), slideshow settings, information of the PhotoFrame, reset the PhotoFrame to the factory default
System status: Friendly name, software • version, memory size
• Plug & Play Compatibility: Windows Vista/XP/7, Mac OS X 10.4/10.5/10.6
• Regulatory Approvals: BSMI, C-Tick, CCC, CE, GOST, PSB
• Other convenience: Kensington lock compatible
- On-Screen Display languages: English, French, German, Spanish, Italian, Danish, Dutch, Portuguese, Russian, Simplified Chinese, Traditional Chinese
11 Frequently asked questions
Is the LCD screen touch-enabled?
The LCD screen is not touch-enabled. Use the buttons on the back to control the PhotoFrame.
Can I use the PhotoFrame to delete photos on a memory card?
Yes, it supports operations to delete photos on an external device, such as a memory card. Ensure that you enable the deletion function on a memory card available on the PhotoFrame.
Why does my PhotoFrame not show some of my photos?
The PhotoFrame plays only JPEG photos • (maximum: 8000 × 8000 pixel resolution) and Progressive JPEG photo (Up to 1024 × 768 pixels).
Ensure that these photos are not • damaged.
Why does the PhotoFrame not go into auto-off status after I set it?
Ensure that you set the real time, auto-off time, and auto-on time correctly. The PhotoFrame automatically turns off its display exactly at the auto-off time. If the time has already passed for the day, it starts to go into auto-off status at the specified time from the next day.
Can I increase the memory size to store more pictures on the PhotoFrame?
No. The internal memory of the PhotoFrame is fixed and cannot be expanded. However, you could switch between different photos by using different storage devices on the PhotoFrame.
12 Glossary
A
Aspect ratio
Aspect ratio refers to the length to height ratio of TV screens. The ratio of a standard TV is 4:3, while the ratio of a high-definition or wide TV is 16:9. The letter box allows you to enjoy a picture with a wider perspective on a standard 4:3 screen.
J
JPEG
A very common digital still picture format. A still-picture data compression system proposed by the Joint Photographic Expert Group, which features small decrease in image quality in spite of its high compression ratio. Files are recognized by their file extension '.jpg' or '.jpeg.'
K
Kbps
Kilobits per second. A digital-data-rate measurement system which is often used with highly compressed formats such as AAC, DAB, MP3 etc. The higher the amount, the better the quality generally is.
Kensington lock
A Kensington Security Slot (also called a K-Slot or Kensington lock). Part of an anti-theft system. It is a small, metal-reinforced hole found on almost all small or portable computer and electronics equipment, particularly on expensive and/or relatively light ones, such as laptops, computer monitors, desktop computers, gaming consoles, and video projectors. It is used for attaching a lock-and-cable apparatus, in particular those from Kensington.
M
Memory Stick
Memory Stick. A flash memory card for digital storage on cameras, camcorders and other handheld devices.
MMC Card
MultiMedia Card. A flash memory card that provides storage for cellphones, PDAs and other handheld devices. The card uses flash memory for read/write applications or ROM chips (ROM-MMC) for static information, the latter widely used for adding applications to a Palm PDA.
S
SD Card
Secure Digital Memory Card. A flash memory card that provides storage for digital cameras, cellphones and PDAs. SD Cards use the same 32 × 24mm form factor as the MultiMediaCard (MMC), but are slightly thicker (2.1mm vs. 1.4mm), and SD Card readers accept both formats. Cards up to 4GB are available.
T
Thumbnail
A thumbnail is reduced-size versions of a picture that is used to make it easier to recognize an them. Thumbnails serve the same role for images as a normal text index does for words.
