Macis - Scooter BENELLI - Free user manual and instructions
Find the device manual for free Macis BENELLI in PDF.

User questions about Macis BENELLI
0 question about this device. Answer the ones you know or ask your own.
Ask a new question about this device
Download the instructions for your Scooter in PDF format for free! Find your manual Macis - BENELLI and take your electronic device back in hand. On this page are published all the documents necessary for the use of your device. Macis by BENELLI.
USER MANUAL Macis BENELLI
This manual is to be regarded as an integral part of the vehicle, and is to remain with the vehicle in case of sale. The essential features described herein remaining unaltered, Benelli Q.J. reserves the right to make any changes whenever deemed necessary to improve the quality and technical characteristics of its models.
Benelli Q.J. shall not beheld responsible for any errors contained in its technical or information manuals, The right to reproduce this manual, in whole or in part and by any means whatsoever, is reserved worldwide.
The mention or representation of third parties' products is for information only and constitutes no engagement on the part of Benelli Q.J., which assumes no responsibility as to the use of such products.
First edition: 2010
BENELLI QJ
This instruction manual has been drawn up with a view to providing a clear and simple guide to operation. Also covered are simple maintenance operations as well as the periodic checks to be performed by a Benelli Dealer or Authorized Workshop.
The booklet also contains indications on how to perform simple repairs. Operations other than those described in this manual require special equipment and/or specific technical skills. We recommend having these operations performed by a Benelli Dealer or Authorized Workshop. The text highlighted in grey contains important information on vehicle operation and riding safety.
LE MANUEL
The symbols shown on the following page are very important. They are used to highlight parts of the manual to which the reader should pay special attention. As you may see, the different symbols make it easy for the reader to identify to which area the matter being dealt with is to be related.
LES SIGNAUX
POUR UNE CONDUITE CORRECTE
Failure to fully comply with these prescriptions may seriously jeopardize people's safety.
SÉCURITÉ DES PERSONNES
ATTENTION
Provides indications on how to behave in order that using the vehicle should not harm the environment.
SAUVEGARDE DE L'ENVIRONNEMENT
WHOLENESS OF THE VEHICLE
WARNING
Failure to fully comply with these prescriptions may result in serious damage to the vehicle and, in some cases, void the warranty.
INTÉGRITÉ DU VÉHICULE
ATTENTION
19 Main component location right side
21 Main component location left side
22 Controls on the left side of the handlebar
24 Instrument panel
26 Controls on the right side of the handlebar
26 Clock
28 Steering lock switch
28 Steering lock
30 Electronic fuel injection check warning light
32 Fuel
34 Fuel: Lever gauge
36 Turn indicators switch
36 Muffler
38 Tyres
40 Helmet compartment
42 Table of lubricants
44 Radiator
46 Cecking and topping up
48 Coolant topping up
54
OPERATION
54 Running-in
56 Preliminary checks
58 Troubleshooting
60 Electrik start
62 Stopping
62 Parking
64 Cleaning the vehicle
66 Prolonged inactivity
66 Restoring the vehicle to normal operation after prolonged inactivity
68 Transporting the scooter
12 INFORMATIONS UTILES
18 CONNAÎTRE LE SCOOTER
78 Tables scheduled maintenance
110 Maintaining the vehicle
112 Throttle
114 Rear shock absorbers
114 Oleopneumatic shock absorbers
116 Battery
118 Removing the battery
120 Recharging the battery
122 Spark plug
124 Dashboard
126 Bodywork
128 Headlight
130 Headlight-replacing the light bulbs
134 Rearlight - replacing the light bulbs
136 Numberplate light
138 Cleaning the air filter
140 Checking and adjusting the fork
142 Disc brakes
150 Checking and replacing the fuses
152 Front turn indicators
154 Rear turn indicators
156 Engine oil - Checking the level and
topping up
158 Renewing the engine oil
160 Transmission oil
162 Wheels
166 Reassembling the front wheel
168 Removing the rear wheel
170
SPECIFICATIONS
172 Tightening torques table
178 Injector wiring diagram
188 Carburator wiring diagram
86 ENTRETIEN
natural_image
Close-up of a mechanical assembly with a highlighted component and pipe connection (no visible text or symbols)The ROAD TRAFFIC ACT must be respected at all times.
All TAMPERINGS aimed at increasing piston displacement, power, speed and the general performance of the motorcycle are punishable by the law, with heavy fines including the sequestration of the motor-cycle. the new homologations and/or new registration.
Tampering of any kind releases the manufacturer of any liability, and all rights of guarantee are forfeited.
MODIFICATION or alteration of the position of the plate, the optical units (lights), warning horns and rearview mirror is punishable by law and will result in forfeiture of the guarantee and the insurance cover.
The IDENTIFICATION DATA of the vehicle is as follows:
- chassis number (fig. 1)
- engine number (fig .2)
- starting key code
Alteration of the chassis number will result in penal and/or administrative sanction for the offender.
Intake of alcohol, drugs or any type of medicine may cause sleepiness, drowsiness and/or poor concentration.
If you do not feel fit.....do not drive!!!
You need MAXIMUM CONCENTRATION in all conditions. Therefore, do not smoke, rink, eat, read and/or phone during driving.
For SAFER DRIVING for yourself and others we recommend:
• Always evaluate the road surface conditions.
- Be careful on the traffic signs painted on the road surface, which are often the cause of losing grip.
- Adapt driving according to the weather conditions, visibility and traffic intensity.
e. Always keep the lamps and direction indicators clean.
• Regularly check the condition and inflation of the tyres.
Always drive properly and in particular:
• with both hands on the handlebars
• with feet resting on the footrest
- seated on the saddle
- do not start with the scooter on the stand
• do not rear up on the back wheel

Do not TOW or have yourself towed by other vehicles. As a precaution against THEFT we recommend:
- Never leave the key in the steering lock.
- Park in a safe place.
- Secure the scooter to something fixed .fastening a chain and padlock to the anti-theft hook.
- Copy the identification data of the vehicle and keep it in a safe place.
Always use the FUELS AND LUBRICANTS recommended by Benelli and indicated in the table of lubricants. Using products other than those recommended may cause the scooter malfunctioning and limit or compromise its performances.
Use only ORIGINAL ACCESSORIES as recommended by the manufacturer. Benelli offers a range of accessories which ensures maintaining the technical, functional and esthetic characteristics of the scooter, also in compliance with the regulations of the road traffic code. Non-original accessories may compromise driveability of the scooter with obvious risks to the driver.
It is important to always wear proper clothing during driving. Wearing bright colours makes you more visible, also at night. Do not wear fluttering garments such as belts, ties, scarves or anything else which could get caught up in the moving parts or interfere with driving.
macis
- Steering lock switch/Saddle lock
- Battery compartment
- Central prop stand
- Exhaust
- Plate holder
- Petrol tank
- Helmet compartment (under saddle)
- Chassis registration number
- Passenger footrest
EMPLACEMENT DES ELEMENTS PRINCIPAUX CÔTÉ DROIT
- Air filter
- Side prop stand
- Side rearview mirrors
- Rear handhold
- Windscreen
- Front lights assembly
- Rear lights assembly
- Front turn indicators
- Rear turn indicators
- Numberplate light
EMPLACEMENT DES ELEMENTS PRINCIPAUX CÔTÉ GAUCHE
1 Rear brake lever
2 Warning horn push button
3 Turn indicator switch
4 Flashlights and upper/lower beam switch (downwards)
CONNAÎTRE LE SCOOTER
DEN MOTORROLLER KENNENLERNER
CONOCER EL SCOOTER

COMMANDES DU CÔTÉ GAUCHE DU GUIDON
1 Turn indicator warning light
2 Front driving beam warning light
3 Odometer
4 Speedometer
5 Reserve fuel warning light
6 Fuel level gauge
7 Clock functions push button
8 Clock adjustment push button
9 Clock
CONNAÎTRE LE SCOOTER
DEN MOTORROLLER KENNENLERNER
CONOCER EL SCOOTER

TABLEAU DE BORD
1 Lights OFF, parking lights and lower beam switch
2 Throttle control
3 Front brake lever
4 Starting button
CLOCK
Macis is equipped with a digital clock with three functions:
Clock: HOURS AND MINUTES
Calendar: MONTH AND DAY (press button 1 once-fig.2)
Chronometer: STOPWATCH (press button 1 twice-fig.2)
To adjust the clock and the date, press button 2 (fig. 2) until you obtain the desired time and date.
CONNAÎTRE LE SCOOTER
DEN MOTORROLLER KENNENLERNER
CONOCER EL SCOOTER

COMMANDES DU CÔTÉ DROIT DU GUIDON
| 1 | STEERING: locked remove the keyIGNITION: disabledLIGHTS: cannot be switched ON | It is possible to |
| 2 | STEERING: unlocked | It is possible remove the key |
| IGNITION: disabled | ||
LIGHTS: cannot be switched ON
| 3 | Ω | IGNITION: enabled | It is not possible to remove the key |
| LIGHTS: can be switched ON |
STEERING LOCK
To lock the steering:
- Turn the handlebar completely leftwards.
- Press and turn the key to position 🔒.
- Release the key.
To unlock the steering:
- Insert the key.
- Turn the key to position ✗.
COMMUTATEUR VERROU DE DIRECTION
| POS | REP | FONCTION | CLÉ | POS | SYM | FUNKTION | SCHLÜSSL | REF | FUNCIÓN | LLAVE | |||
| 1 | DIRECTION: bloquée l'extraireALLUMAGE: coupéFEUX: ne fonctionnent pas | On peut | 1 | LENKER: blockiert abziehbarZÜNDUNG: ausgeschaltetLICHT: ausgeschaltet | Schlüssel | 1 | DIRECCIÓN: bloqueada extraerENCENDIDO: desconectado LUCES: no funcionan | Se puede | |||||
| 2 | DIRECTION: débloquée l'extraireALLUMAGE: coupéFEUX: ne fonctionnent pas | On peut | 2 | LENKER: freigegeben abziehbarZÜNDUNG: ausgeschaltetLICHT: ausgeschaltet | Schlüssel | 2 | DIRECCIÓN: desbloqueadaENCENDIDO: desconectado LUCES: no funcionan | Se puede extrae | |||||
| 3 | ALLUMAGE: en service pas l'extraireFEUX: en service | On nespeut | ZÜNDUNG: eingeschaltet nichtLICHT: eingeschattet | Schlüssel | 3 | ENCENDIDO: conectado extraerabziehbarLUCES: funcionan | No se puede | ||||||
VERROU DE DIRECTION
Turns on for about three seconds every time the ignition switch is set to "ON" and the engine does not start; this tests the injection sy stem operation. The warning light should turn off as soon as the engine is started.
If the warning light turns on while the

engine is working properly, this means that there is a failure in the electronic fuel
injection system.
If this occurs, stop the engine at once and contact an official Benelli Dealer.
* Only for country where foressen
CONNAÎTRE LE SCOOTER
DEN MOTORROLLER KENNENLERNER
CONOCER EL SCOOTER

VOYANT DE CONTRÔLE DE L'INJECTION ÉLECTRONIQUE D'ESSENCE\*
Fuel is highly inflammable. Always fill up in an open environment with the engine off and far away from any possible source of fire
(cigarettes, sparks, open flames).
During refuelling avoid the fuel coming into contact with the red-hot surfaces of the engine as it could ignite.
In case of spillage during refuelling, thoroughly dry and clean the filler housing before starting.
Tightly close the filler cap at the end of refuelling.
Never fill the tank to the brim as the petrol volume increase due to solar heat.
Avoid the fuel coming into contact with the skin or eyes. In case of contact, thoroughly wash with abundant water.
Avoid inhaling petrol fumes. Avoid swallowing the fuel. ALWAYS KEEP OUT OF REACH OF CHILDREN!
The petrol tank has a capacity of about 11 litres.
Unleaded petrol can be used as long as the octane level is not lower than 95 RON /85 MON.
To access the tank for refuelling proceed as follows:
1) Insert the key in lock
2) Turn the key anticlockwise and lift seat (fig. 1)
3) Unscrew cap 1 (fig.2) by turning it anticlockwise
4) Refuel
(5) Relit the fillercap making sure it is well tightened.
6) Lower the seat.
CARBURANT

The gauge located on the right side of the dashboard 1 (fig. 1) indicates the quantity of fuel in the tank.
The reserve light 2 (fig.1) comes on when 50 km (30 miles) of autonomy remain. When the light comes on, you are recommended to stop at the nearest station for refuelling.
CONNAÎTRE LE SCOOTER
DEN MOTORROLLER KENNENLERNER
CONOCER EL SCOOTER

Operate the switch 1 (fig.1) to signal that you intend to change direction:
• TURNING TO THE RIGHT: turn switch to the right
- TURNING TO THE LEFT: turn switch to the left
The indicators are disconnected by pressing on the switch.
MUFFLER
The function of the muffler is to extract the exhaust gases from the cylinder, cool them down and emit them outside.
The silencer 1 (fig.2) situated at the end of the exhaust system helps in keeping the sound pollution (noise) within the limits stated by the highway code.
The Macis muffler is provided with an external shield 2 (fig.2) for protection against heat and collisions.
CONNAÎTRE LE SCOOTER
DEN MOTORROLLER KENNENLERNER
CONOCER EL SCOOTER

INTERRUPTEUR DES INDICATEURS DE DIRECTION
natural_image
Technical line drawing of a mechanical component with concentric rings and central hub (no text or symbols)PNEUMATICI
Benelli Macis is fitted with different-sizedtyres on the front and rear:
• FRONTWHEEL 100/80 - 16"
- REARWHEEL 120/80 - 16"
Always and only mount tyres of the dimensions prescribed by the manufacturer.
NON-OBSERVANCEOFTHISPRESCRIPTION WILL RESULTINSERIOUSPENALTIESUPTO SEIZUREOFTHE SCOOTER.
Recommended pressure (measured cold) is:
• FRONTWHEEL 2,1 Bar
- REARWHEEL 2,4 Bar
IMPORTANT:
- Regularly check the tyre pressure, the state: of the tread and that wear is even.
- Replace the tyres when the tread thickness is less than 2 mm.
- Carefully check for cuts or cracks, and if found, immediately replace the tyre.
CONNAÎTRE LE SCOOTER
DEN MOTORROLLER KENNENLERNER
CONOCER EL SCOOTER

PNEUS
natural_image
Interior view of a car showing the dashboard and side panel (no visible text or symbols)La trousse attrezzi contiene:
Your Benelli Macis is provided with an glove compartment.
The compartment is found under the saddle.
The glove compartment of your Benelli Macis contains the tool kit that allows to carry out the general maintenance operations on your scooter.
The tool kit contains:
- Dismountable screwdriver
- Plug socket wrench
To access the glove compartment and to open the saddle, insert the key in the steering lock and turn it anticlockwise.
CONNAÎTRE LE SCOOTER
DEN MOTORROLLER KENNENLERNER
CONOCER EL SCOOTER

BÔITE À GANTS
For the availability of the products recommended, Benelli Q.J. suggests to apply directly to its dealers or authorized Workshops.
Cautions: Benelli Q.J. guarantees optimum engine performance with the use of original products, if non original products are used, lubricants are accepted with minimum SAE 5W-40 - API SL - ACEA A3. The use of products with characteristics below the above-mentioned international specifications could cause damage to the engine without warranty coverage.
natural_image
Mechanical component diagram showing a heat exchanger mounted on a branch with a labeled part (no text or symbols present)
text_image
Fig. 2 1 C HRADIATORE
This part allows to cool the engine coolant.
We suggest to visually inspect the radiant surface 1 (fig.1) of the radiator at regular intervals and to remove any leaves, insects, mud and other foreign matters using a bolt of water at low pressure.
Coolant temperature indicator
The temperature indicator is found on the left side of the dashboard 1 (fig. 2).
If the indicator pointer is on the red area of the dial, stop the engine and have it checked by BenelliDealer or Authorized Workshop.
CONNAÎTRE LE SCOOTER
DEN MOTORROLLER KENNENLERNER
CONOCER EL SCOOTER

RADIATEUR
natural_image
Close-up of mechanical components with labeled parts (1), no readable text or symbols beyond label
text_image
Fig. 2 ② MAX MIN ③CONTROLLO E RABBOCCO
CHECKING AND TOPPING UP
- Remove the 6 screw from left cover.
- Remove the left cover 1 (fig.1).
- Unscrew the plug of tank 2 (fig.2).
- Check that the coolant level is between the "MIN" and "MAX" marks of sight glass 3 (fig.2).
- If the level is below the "MIN" mark, top up with liquid having the same characteristics as indicated in the fuel and lubricants table. Never exceed the "MAX" level mark.
CONNAÎTRE LE SCOOTER
DEN MOTORROLLER KENNENLERNER
CONOCER EL SCOOTER

CONTRÔLE ET REMPLISSAGE
natural_image
Two-panel image showing a motorcycle's side view and internal components, labeled Fig. 1 and Fig. 2 (no text or symbols on the main objects)RABBOCCO LIQUIDO DI RAFFREDDAMENTO
- Remove the six cap screws left.
- Check the coolant level in expansion tank. If the level is below "MIN", fill up with fluid. It 'better to make the liquid next to the "MAX".
- After topping up the coolant, we must replenish water to the radiator by the following method:
3.1 Turn the ignition key to "OPEN", opening the seat and remove the cover on the saddle.
CONNAÎTRE LE SCOOTER
DEN MOTORROLLER KENNENLERNER
CONOCER EL SCOOTER

REMLISSAGE LIQUIDE DE REFRODISSEMENT
natural_image
Two-panel black-and-white photo showing mechanical components: top panel labeled Fig. 1, bottom panel labeled Fig. 2; no visible text or symbols on the main objects.RABBOCCO LIQUIDO DI RAFFREDDAMENTO
3.2 Remove the bleed screw.
3.3 Remove the 6 screws from the right cover and then remove the right cover.
CONNAÎTRE LE SCOOTER
DEN MOTORROLLER KENNENLERNER
CONOCER EL SCOOTER

REMLISSAGE LIQUIDE DE REFRODISSEMENT
natural_image
Close-up of a mechanical component with a metallic fitting and a small square component, labeled 'Fig. 1' in the corner (no other text or symbols visible)
natural_image
Close-up of a hand holding a metallic tool inside a vehicle or mechanical component (no visible text or symbols)RABBOCCO LIQUIDO DI RAFFREDDAMENTO
3.4 Remove the screw filling water tank.
3.5 Lift the tank a bit, girareil cap coolant slowly. When is a leak of coolant from the bleeder screw means you have finished filling in the coolant tank. (If the flow of coolant in the reservoir is very slow or has a difficult inflow, we should turn the scooter to help get the liquid in the tank.)
3.6 Replace all components in the opposite order.
NOTE: The volume of the radiator is 820 ± 20 ml. The volume of MAX in the expansion tank is 400 ± 20 ml.
Caution: When refilling with coolant, be sure to raise the fill.
CONNAÎTRE LE SCOOTER
DEN MOTORROLLER KENNENLERNER
CONOCER EL SCOOTER

REMLISSAGE LIQUIDE DE REFRODISSEMENT
The running-in of the engine is primary to ensure the correct functioning of the mobile parts of the scooter.
For the first 1000 Km, keep to the following indications:
0-200 Km
Do not keep the throttle grip open in one half for long stretches.
200-1000 Km Do not keep the throttle grip open more than three-fourths for long stretches.
UTILISATION DU SCOOTER
DEN MOTORROLLER EAHREN
USO DEL SCOOTER

RODAGE
The time "wasted" on checkings is gained to a great degree in terms of your own safety and that of other people. Do not run
the scooter if you are not sure it is functioning properly.
Accelerator: Check that it functions smoothly and regularly with the steering in any position. Lubricate and adjust the control if necessary.
Battery: Check charging condition.
Fuel and lubricants: Check the level of the fuel, transmission oil, brake fluid. Top up if necessary. Check out for leakages from under the scooter. If leakages are noticed, have the scooter checked by a Benelli Dealer or Authorized Workshop.
Centre + side stand: Check that the spring keeps the stand in home position with the scooter in horizontal position.
Brakes: Check the frictional parts wear and the levers functioning. Adjust in case of anomalous plays.
Lights: Change the burnt out bulbs. Check the correct operation and good order of the front and rear lights and of the turn indicators.
Wheels and tyres: Check the tyres inflation pressure and the tread wear.
Steering: Check that it turns smoothly to both sides.
Fixing screws: Check the tightening of the main components, in particular the wheel and suspension nuts.
UTILISATION DU SCOOTER
DEN MOTORROLLER EAHREN
USO DEL SCOOTER


The engine does not start.
- Have you inserted and turned the key?
• Is the side stand down? - Have you actuated one of the brake levers?
- Is it powered? If the battery is down, carry out a quick recharging at a service center.
• Is there any fuel in the tank? - Check the spark plug: clean it and check the electrodes.
- Check the air filter: change it.
The engine misfires.
- Check the spark plug: clean it and check the electrodes.
- Check the fuel flow. This operation must only be carried out at a Benelli Dealer and Authorized Workshop.
- Have the ignition and phase checked. This operation must only be carried out at a Benelli Dealer and Authorized Workshop.
The engine loses power and pings.
- Check the fuel flow.
- Check the muffler final part: it may be clogged. Change it if necessary.
- Have the ignition and phase checked. This operation must only be carried out at a Benelli Dealer and Authorized Workshop.
The engine smokes.
- Check the air filter: change it.
The braking is insufficient.
- Is there any fluid in the brake fluid tanks? Top up if necessary.
- Check the brake pads wear.
UTILISATION DU SCOOTER
DEN MOTORROLLER EAHREN
USO DEL SCOOTER

natural_image
Technical line drawing of a mechanical component with labeled parts (no readable text or symbols)- Place the vehicle on the central stand.
- Turn the ignition key to 1 (fig.1).
• Pull either of the brake levers (tront or rear). - Press the start button 2 (fig.2) without opening the throttle and then release it as soon as the engine starts.
- Allow the engine to warm up tor at least one minute before starting off.

On no account must the engine be started in a closed and poorly ventilated place.
The exhaust gases contain carbon
monoxide, an extremely dangerous gas that may cause fainting or even death.
UTILISATION DU SCOOTER
DEN MOTORROLLER EAHREN
USO DEL SCOOTER

DÉMARRAGE ÉLECTRIQUE
STOPPING AND PARKING THE VEHICLE
ARRÊT ET STATIONNEMENT
ANHALTEN UNO PARKEN
- Release the throttle grip.
- Put on the brakes to stop the scooter.
- Turn the ignition key to 1 (fig. 1).
PARKING
- Your Macis is equipped with a side and central stand. Park the scooter on its central stand. Lift the scooter by grabbing the left side twistgrip with your left hand and lowering the stand with your right foot, as shown in the figure. If necessary, lift the scooter by also grabbing the handle with your right hand.
An electronic device 2 (fig.2) disables the engine starting when the side stand is lowered.
• After positioning the scooter on the stand, check its stability to prevent it from falling down and/or damages.
- Fully turn the handlebar to the left and turn the ignition key to 🔒 to lock the steering.
- Extract the key.
UTILISATION DU SCOOTER
DEN MOTORROLLER EAHREN
USO DEL SCOOTER

ARRÊT
CLEANING THE VEHICLE
NETTOYAGE ET LAVAGE
FAHRZEUGPFLEGE
LIMPIEZA Y LAVADO
PULIZIA E LAVAGGIO
CLEANING THE VEHICLE
- Clean the vehicle with a soft sponge and 3-4 percent bodywork shampoo in water.
- Never use solvents.
- Never use high-pressure water jets on: steering lock
carburettor
instrument panel
handlebar switches
brake levers
wheel hubs
silencer exhaust
under the saddle
• After washing the vehicle, rinse it with clean water to remove any shampoo residues.
• Dry with chamois leather. - Start the engine and run it a few minutes before starting of f.

I carry out a few braking tests in an area closed to traffic as the water on the linings temporarily reduces the braking
action.
UTILISATION DU SCOOTER
DEN MOTORROLLER EAHREN
USO DEL SCOOTER

NETTOYAGE ET LAVAGE
Before leaving the vehicle inactive for a long period, it is advisable to carry out the following operations:
- Carefully wash the scooter.
• Empty the fuel tank. - Lubricate the cylinder-piston assembly by removing the spark plug; pour about 20~cm^3 of oil allowing the piston to perform a few strokes. Refit the spark plug after completing this operation.
- Remove the battery and store it in a dry place.
- Protect the scooter with a dust cover.
RESTORING THE VEHICLE TO NORMAL OPERATION AFTER PROLONGED INACTIVITY
- Check for the presence of spots denoting leakage under the vehicle. If necessary, have the vehicle checked by a Benelli Dealer or Authorized Workshop.
- Wash the vehicle.
- Reinstall the battery after checking its charge.
- Refuel.
UTILISATION DU SCOOTER
DEN MOTORROLLER EAHREN
USO DEL SCOOTER

REMISAGE DE LONGUE DURÉE
Before transporting the scooter in another vehicle, remove all the fuel from the tank and the carburettor. During transport, the vehicle must remain in an upright position to prevent leakage of oil and battery electrolyte.
Emptying the fuel tank
- Stop the vehicle, switch off the engine and wait for the engine to cool down completely.
- Remove the fuel from the tank by means of a manual pump.
UTILISATION DU SCOOTER
DEN MOTORROLLER EAHREN
USO DEL SCOOTER

TRANSPORT DU SCOOTER
Impropriety or lack of recommended maintenance operations can lead to an increase of the risk of accidents and damage to the scooter. Always use gen
Benelli QJ. spare parts. Using non-genuine spare parts can accelerate the wear of your motorcycle and shorten its life. Failure to perform the recommended operations, as well as using non-genuine spare parts, can cause the unoperativeness of the legal guaranty. To replace or top up the lubricants and fluids of your scooter, use only the suitable products.
PROTECT THE ENVIRONMENT

Benelli Q.J., in order to protect the interests of the community, awakens Customers and the Technical Assistance operators to use the vehicle and dispose of its replaced parts
respecting the laws in force concerning environmental pollution and waste disposal and recycling.
The main periodic checks and maintenance operations are shown in the following tables. These operations are necessary to keep the scooter safe and in perfect running order. The intervals indicated in the periodic maintenance and lubrication tables must be intended as a general guide under normal riding conditions. It could be necessary to reduce these intervals according to the climate, the ground conditions, the geographic position and the conditions of use.
Some of the operations can be carried out by the user, providing he or she possesses the requisite skills and, however, only when explicitly scheduled in this Owner's Manual. In any other case have the operations performed by a Benelli Authorized Workshop, whose list is available on the web site www.benelli.com or calling the Benelli Coupomer Service dialling +39 0721.418740.

As a rule maintenance operations must be performed while the scooter is on the rear stand after switching off the engine and setting the start switch to OFF. On the
contrary, while checking the fluid levels it is advisable to keep the motorcycle in an upright position without using the rear stand.
TABLES OF SCHEDULED MAINTENANCE
NOTE :
- The annual checks must be performed every year, except if a kilometer-based maintenance is performed instead.
- From 14.000 Km, repeat the maintenance intervals starting from 10.500 Km.
- Items marked with an ☑ should be performed by a Benelli dealer as they require special tools, data and technical skills.
Code:
I = inspection and adjustment, cleaning, oiling, or change according to need.
R = change
T = tighten
= dealer
| Maintenance Frequency | ||||||||||
| NR. | Component | Check or maintenance job | 0 Km(0 mi)Before delivery | 1000 Km(621 mi)1st Service | 6000 Km(3728 mi)2nd Service | 12000 Km(7456 mi)3rd Service | 18000 Km(11184 mi)4th Service | 24000 Km(14912 mi)5th Service | Annual Check | |
| 1 | Transmission oil | Check/Change | I | R | I | R | I | R | I | |
| Replace every 12.000 km (7456 mi) or every 2 years. | ||||||||||
| 2 | Engine oil | Check/Change | I | R | R | R | R | R | I | |
| Check every 3.000 Km (1864 mi). | ||||||||||
| 3 | Oil filter | Check/Change | I | I | I | I | I | I | I | |
| 4 | Fuel filter | Check/Change | I | I | R | R | R | R | I | |
| Clean every change fuel filter. | ||||||||||
| 5 | Air filter | Check/Change | I | I | R | R | R | R | I | |
| 6 | Drive belt | Check/Change | I | I | R | I | ||||
| 7 | Sparkling-plugs | Check/Change | R | I | R | I | R | |||
| Check condition. Clean and regap. | ||||||||||
Benelli
MAINTENANCE
| Maintenance Frequency | ||||||||||
| NR. | Component | Check or maintenance job | 0 Km(0 mi)Before delivery | 1000 Km(621 mi)1st Service | 6000 Km(3728 mi)2nd Service | 12000 Km(7456 mi)3rd Service | 18000 Km(11184 mi)4th Service | 24000 Km(14912 mi)5th Service | Annual Check | |
| 8 | Oil circulating tubes | Check defects and losses | I I I R I | I | ||||||
| Replace every 12.000 Km (7456 mi) every 3 years in any case | ||||||||||
| 9 | Brake liquid | Check/Change | I I I R I | I | ||||||
| Replace every 12.000 Km (7456 mi) every 2 years in any case | ||||||||||
| 10 | Front brake/Rear brake | Check operation, fluid level and vehicle for fluid leakage | I I I I I I | I | ||||||
| 11 | Brake pads | Check/Change | I I I I I I | I | ||||||
| Replace whenever worn to the limit | ||||||||||
| 12 | Accelerator command | Check operation and free play.Adjust the throttle cable free play if necessary.Lubricate the throttle grip housing and cable. | I I I I I I | I | ||||||
| 13 | Steering crown saddle post | Check/Adjust | T | T | T T T T | T | ||||
| Before every use of the vehicle | ||||||||||
| 14 | Steering saddle post ball-bearings | Check/Adjust | I | I I I I I | ||||||
| Every 12.000 Km (7456 mi) lubricate with lithium-soap-based grease | ||||||||||
| 15 | Rear/ front wheel ball-bearing | Check/Change | I I I R I | I | ||||||
| Replace every 18.000 Km (11184 mi) | ||||||||||
| 16 | Fork | Check operation and for oil leakage | I I I I I I | I | ||||||
| 17 | Rear damper | Check operation and for oil leakage | I I I I I I | I | ||||||
| 18 | Wheels | Check ronout and for damage | I I I I I I | I | ||||||
| 19 | Tires | Check tread depth and for damageReplace if necessary.Check air pressure.Correct if necessary. | I I I I I I | I | ||||||
| Replace whenever worn to the limit. | ||||||||||
| 20 | Central stand | Check/Functioning | I | I | I I I I | I | ||||
| 21 | Side stand | Check/Functioning | I | I | I I I I I | |||||
Benelli
MAINTENANCE
| Maintenance Frequency | ||||||||||
| NR. | Component | Check or maintenance job | 0 Km(0 mi)Before delivery | 1000 Km(621 mi)1st Service | 6000 Km(3728 mi)2nd Service | 12000 Km(7456 mi)3rd Service | 18000 Km(11184 mi)4th Service | 24000 Km(14912 mi)5th Service | Annual Check | |
| 22 | Switch side stend worning | Check/Functioning | ||||||||
| 23 | Vision lights/Signals | Check/Functioning | ||||||||
| 24 | Horn | Check/Functioning | ||||||||
| 25 | Front headlight | Check/Functioning | ||||||||
| Adjust | At every variation in the state of the vehicle | |||||||||
| 26 | Instrument | Check/Functioning | ||||||||
| 27 | Battery connection | Check/Functioning | I | |||||||
| 28 | Battery | Check/Change | ||||||||
| 29 | Electrical plant | Check/Functioning | ||||||||
| 30 | Initiion switch | Check/Functioning | ||||||||
| 31 | Chassis fasteners | Check/Functioning | TTT | TTTT | ||||||
| Make sure that all nuts, bolts and screws are properly tightened | ||||||||||
| 32 | Carburator-higher speed | Check/Functioning | ||||||||
| Verify proper sliding cables, replace if damaged | ||||||||||
| 33 | Brake hoses | Check/Change | ||||||||
| Every 4 years/ before every use of the vehicle | ||||||||||
| 34 | Moving parts and cables | Check/Functioning | ||||||||
| Every 4 years/ before every use of the vehicle | ||||||||||
| 35 | Valves | Check/Functioning | I | I | ||||||
Benelli
MAINTENANCE
| Maintenance Frequency | ||||||||||
| NR. | Component | Check or maintenance job | 0 Km(0 mi)Before delivery | 1000 Km(621 mi)1st Service | 6000 Km(3728 mi)2nd Service | 12000 Km(7456 mi)3rd Service | 18000 Km(11184 mi)4th Service | 24000 Km(14912 mi)5th Service | Annual Check | |
| 36 | Chain sliding shoe | Check/Adjust | R | |||||||
| Every change chain distribution | ||||||||||
| 37 | Chain distribution | Check/Adjust | R | |||||||
MAINTENANCE
macis
ENTRETIEN
TABLEAU D'ENTRETIEN ET CONTRÔLE

Unless otherwise specified, all checks and maintenance operations must be carried out when the engine is off, and the engine and the exhaust system are cold.
To avoid serious burns, be sure to previously verify the temperature of the parts to be checked.
Unless otherwise specified, always reassemble or refit the parts by following the reverse procedure to the disassembly or the removal.
Normally you can carry out the maintenance operations personally using the wrenches supplied.
For any assistance requirements, and where expressly indicated, apply to a Benelli Dealer or Authorized Workshop.
ENTRETIEN
WARTUNG
MANUTENCION

ENTRETIEN DU SCOOTER

Adjusting the throttle control
The throttle twist grip travel should never exceed 3 mm. If necessary, adjust the throttle play by following these steps:
- Adjust the throttle control play by means of adjuster 1 (fig.2 carburetor) (fig.3 injection).
Tuning up
This operation must be performed with the vehicle on the stand. The engine must be running at the normal working temperature.
- Remove the inspection cover.
- Register the minimum 2 (fig.2 carburetor) (fig.3 injection) on the reference screw.
- Accelerate and decelerate a few times to check that the engine number of revolutions is not too high at idle speed.
ENTRETIEN
WARTUNG
MANUTENCION

ACCÉLÉRATEUR
natural_image
Close-up mechanical assembly showing springs, gears, and housing components (no visible text or symbols)
natural_image
Close-up of a mechanical suspension component with labeled part (1), no visible text or symbols beyond label and number markerAMMORTIZZATORI POSTERIORI

The rear shock absorbers play a key role in ensuring the safety and road holding of your vehicle. Under normal conditions the
shock absorbers require no maintenance. If the shock absorbers sometimes reach their travel end or if any oil leakage is found and the problem persists, immediately contact a Benelli Dealer or Authorized Workshop.
OLEOPNEUMATIC SHOCK ABSORBER
Preloading adjustment
Benelli shock absorbers allow the spring-load adjustment. The scooter is delivered with a setting intended for a driver weighing about 65-70 kg and for driving in normal conditions.
To adjust, turn ring nut (1) found in the lower part of the shock absorber. By turning it clockwise, the spring is hardened.
If the vehicle is used by 2 persons, turn the ring nut by 1 step.
ENTRETIEN
WARTUNG
MANUTENCION

AMORTISSEURS ARRIÈRES

natural_image
Line drawing of a rectangular appliance with lid and base, labeled Fig. 1 (no text or symbols on the device itself)BATTERIA

The battery is of the sealed type and is maintenance free. However, keep it away from sources of heat. The battery is found under the central shield.
KEEP OUT OF REACH OF CHILDREN.
Never invert the battery cable connections.
Turn the ignition key to the OFF position before
connecting or disconnecting the cables.
First connect the positive cable and then the negative cable.
Follow the reverse order when disconnecting the cables.
- Disconnect the negative cable and then the positive cable.
- Pull out the battery.
- Recharge the battery.
ENTRETIEN
WARTUNG
MANUTENCION

BATTERIE

- Remove the battery cover by means of the two upper fixing screws 1 (fig. 1).
- Disconnect the negative cable and then the positive cable.
• Pull out the battery 2 (fig. 2).
ENTRETIEN
WARTUNG
MANUTENCION

DÉPOSE DE LA BATTERIE
Before recharging, check the battery condition.
- Connect the battery to a battery charger. For best charging results, use an amperage equivalent to 1/10 of the battery capacity.
When the vehicle is to remain inactive for a long period, remove the battery and place it in a cool and dry place. Check the charge at least once a month to prevent the battery from deteriorating.
Never dis connect the battery cables with the engine on.
ENTRETIEN
WARTUNG
MANUTENCION

CHARGE DE LA BATTERIE
natural_image
Technical line drawing of a spark plug component (no text or symbols)SPARK PLUG - Checking and cleaning
To ensure proper engine operation, the spark plug must be cleaned every 1000 km and changed every 10000 km.
• Detach the spark plug cap.
- Unscrew the spark plug using the multifunction tool supplied.
- A light-brown colour of the insulator around the electrode denotes proper engine operation. Otherwise contact a Benelli Dealer or Authorized Workshop.
- Clean the spark plug with a wire brush.
- Adjust the electrodes gap at 0.6 - 0.7 mm using a thickness gauge.
Always replace the spark plug with another of the type prescribed in the specifications.
ENTRETIEN
WARTUNG
MANUTENCION

Operation to be performed at a Dealer authorized Benelli.
ENTRETIEN
WARTUNG
MANUTENCION

TABLEAU DE BORD
natural_image
Side view of a black electric scooter with visible seat and side-mounted sensor (no text or symbols)CARROZZERIA
The bodywork of the Benelli Macis is made of thermoplastic materials characterized by the highest resistance to shock and weathering. The same applies to the paintwork, which is made of ecologic materials.
The removal/refitting of the plastics must be carried out by a Benelli Dealer or Authorized Workshop. Failure to properly restore the high-precision fit of the plastics would result in bodywork gaps and/or vibration.
ENTRETIEN
WARTUNG
MANUTENCION

CARROSSERIE
natural_image
Front view of a motorcycle's head and windshield (no visible text or symbols)
text_image
Fig. 2 10 mFARO ANTERIORE
Adjusting the headlight beam
To adjust the headlight beam, position the vehicle on perfectly level ground, about 10 meters from a vertical wall.
Switch on the headlight, sit on the vehicle in riding position and check that the upper edge of the light beam projected onto the vertical wall is approximately 1/10 lower than the headlight horizontal axis.
If the headlight beam does not comply with the above indications, adjust it by means of the screw fixed to the headlight body.
ENTRETIEN
WARTUNG
MANUTENCION

PHARE AVANT
HEADLIGHT - REPLACING THE LIGHT BULBS

Perform this operation when the vehicle is stationary and the ignition key is in the OFF position. Do not force the wires. After
completing the operation, ensure that the wires are properly connected.
To do the replacement beam and low beam lights, proceed as follows:
- Loosen the screws 1, 2, 3, 4, 5 (Fig. 1) and remove the hull side. Do the same on the other side of the scooter.
- Loosen the screws 6, 7, 8, 9 (Fig. 1) to remove the plexiglass.
- Loosen the screws 1 and 2 (Fig. 2) and then the screws 3 and 4 (Fig. 2). Do the same on the other side of the scooter.
ENTRETIEN
WARTUNG
MANUTENCION

PHARE AVANT - REMPLACEMENT DES AMPOULES DU FEU

PHARE AVANT-REPLACEMENT DES AMPOULES
SCHEINWERFER-AUSTAUSCH DER LICHTLAMPE FAROL DELANTERO-SUSTITUCIOH BOMBELLAS
natural_image
Mechanical assembly diagram showing a motor component and a close-up of a gear mechanism (no text or symbols visible)
text_image
Fig. 2 1 2FARO ANTERIORE - SOSTITUZIONE LAMPADE
HEADLIGHT - REPLACING THE LIGHT BULBS
• After unscrewing all the screws to remove the front fairing 1 (Fig. 1).
- Remove the rubber bulb 2 (Fig. 1).
- Replace the defective bulb 1 (Fig. 2) with a new one.
- At this point if necessary also to change the light position.
To remove the bulb not pull electric cables.
NOTE: To facilitate these operations it is advisable to rotate the handle on the side of the bulb defective.
ENTRETIEN
WARTUNG
MANUTENCION

PHARE AVANT - REMPLACEMENT DES AMPOULES DU FEU
REAR LIGHT - BULBS REPLACEMENT
FEU ARRIÈRE-REEMPLACEMENT DES AMPOULES
REAR LIGHT - BULBS REPLACEMENT
- Remove the rubber cap, turn the bulb socket anticlockwise and pull out the bulb to be changed.
- Replace the bulb with another of the same type pull out the defective bulb by pressing on it and, at the same time, turning it by 30^ clockwise.
ENTRETIEN
WARTUNG
MANUTENCION

FEU ARRIÈRE-REMPLACEMENT DES AMPOULES
natural_image
Close-up of a black motorcycle's front bumper with a glossy cap and two circular buttons (no text or symbols visible)ILLUMINAZIONE TARGA
- Remove the rubber bulb socket.
- Change the bulb with another of the same type.
Do not pull the electrical cables when removing the bulb socket.
ENTRETIEN
WARTUNG
MANUTENCION

ÉCLAIRAGE DE LA PLAQUE
natural_image
Close-up of a motorcycle's internal gear and wheel assembly (no text or symbols visible)CLEANING THE AIR FILTER

To avoid the risk of fire or explosion, never use petrol or flammable solvents to clean the cartridge contained in the filter box.
Check and clean, if necessary, the air filter (see maintenance table). If you often drive on dusty or wet roads, clean it more frequently. To clean the sponge filter follow the steps below:
- Unloose screws 1 (fig.1)
- Remove the filtering element, wash it in the specific solvents that can be found at Benelli Dealers or points of sale of spare parts, and let it dry. Then apply a specific oil or a thick oil to the whole filter surface. Before refitting the filter in the box, remove any oil in excess by squeezing the filter, that must be well impregnated but should never drip.
- Refit in the right position.
Have this operation carried out by Benelli Dealers or Authorized Workshops.
ENTRETIEN
WARTUNG
MANUTENCION

FILTRE A AIR - NETTOYAGE

CHECKING AND ADJUSTING THE FORK
FOURCHE - CONTROLES ET RÉGLAGES
natural_image
Close-up of a white electric scooter's wheel and side panel, showing steering wheel and brake mechanism (no text or symbols)CHECKING AND ADJUSTING THE FORK
Under normal conditions, the fork of your Macis requires no maintenance.
However, it is advisable to periodically perform the following simple checks:
- If, during normal use, the fork sometimes reaches its travel end, have the oil level in the fork rods checked.
- Place the vehicle on the stand and repeatedly shake the fork backwards and forwards. If the play is excessive, have the steering play adjusted.
In either case contact a Benelli Dealer or Authorized Workshop.
ENTRETIEN
WARTUNG
MANUTENCION

FOURCHE - CONTRÔLES ET RÉGLAGES
The brakes play a key role in ensuring the vehicle's safety. For this reason, they must be kept in perfect working order at all
times. Have the brake fluid renewed by a Benelli Dealer or Authorized Workshop every 2 years. If any brake malfunction is noted, contact a Benelli Dealer or Authorized Workshop without delay.

The brake fluid is extremely corrosive and can cause irritation through contact with the eyes or the skin. In case of contact with
the eyes, contact an ophthalmologist.

When topping up, take care not to spill the brake fluid on the plastic parts as they would be irreparably damaged owing to
the high corrosive power of the fluid. Do not dispose of the fluid in the environment.

KEEP OUT OF REACH OF CHILDREN.
ENTRETIEN
WARTUNG
MANUTENCION

FREINS A DISQUE

natural_image
Close-up of a motorcycle wheel and brake assembly (no text or symbols visible)
natural_image
Close-up of a mechanical component with bolts and nuts, labeled Fig. 2 (no readable text or symbols beyond label)The front and rear brakes are of the disc type on both vehicle versions.
The braking action is obtained through the pressure applied to the disc by two opposing pads actuated by a hydraulic circuit.
The brake fluid tanks are located on the right side of the handlebar for the front brake, and on the left side for the rear brake, in a visible position that facilitates the access and the inspection.
Checking the fluid level
- Locate brake fluid circular inspection sight on the side of the brake fluid reservoir (see figure 2).
- Turn the handlebars until the fluid level is parallel with the minimum level notch on the inspection sight.
- If the fluid level is lower than prescribed, top up as described below.
ENTRETIEN
WARTUNG
MANUTENCION

Restoring the brake fluid level
- Remove brake fluid reservoir cover screws 1 (fig. 1) using the multifunction tool.
- Remove cover 2 (fig. 1) and gasket 3 (fig. 1).

To avoid spilling the brake fluid, do not actuate the brake lever after loosening the screws or removing the cover.
- Pour in having the characteristics shown in the Table of Fuels and Lubricants, until the inspection sight is completely covered.
- Replace the gasket and the cover in their respective seats and carefully tighten the fixing screws.
- Before riding again, check the braking action in an area closed to traffic.
Bleeding

The braking system must be bled on the first serving, and subsequently at the periodic service intervals. For safety reason,
the operation must be performed by a Benelli Dealer or Authorized Workshop.
ENTRETIEN
WARTUNG
MANUTENCION

Appoint de liquide
natural_image
Close-up of a bicycle wheel assembly with labeled components (no readable text or symbols)Checking and replacing the brake pads
Check the wear of the front and rear brake pads on the first servicing, and then every 6.000 km. If the vehicle is mostly used on dirty and/or wet roads, the brake pads wear more rapidly and must be checked at shorter intervals.
- Place the vehicle on the stand.
- FRONT BRAKE Lever off caliper cover 1 (fig. 1) with a screwdriver.
- REAR BRAKE Check the brake visually.

Do not operate the brake lever after the wheel has been removed as this will cause the pistons to come out of their seat and fluid leakage. When removing the caliper
from the brake disc, be careful not to damage the pipes containing the brake fluid.
- Check the thickness of the linings. If they are 1 mm thick or less, immediately contact a Benelli Dealer or Authorized Workshop to have the brake pads replaced.

On refitting the caliper of the disc brake, make sure to tighten the screws with the prescribed torque of 20-23 Nm. Failure to respect the torque values may compromise
the vehicle's safety.
ENTRETIEN
WARTUNG
MANUTENCION

CHECKING AND REPLACING THE FUSES
FUSIBLES -CONTRÔLE ETREPLACEMENT
natural_image
Isometric line drawing of a 75V/812C connector (no text or symbols on the component itself)FUSIBILI - CONTROLLO E SOSTITUZIONE
CHECKING AND REPLACING THE FUSES
The electrical equipment of your Benelli Macis is protected by two fuses located next to the battery and two spare fuses having the same amperage. To gain access, remove the front shield.
The function of these fuses is to prevent any voltage overloads or short circuits from damaging the electrical equipment.
If the electrical equipment of your scooter gives no signs of life when the ignition key is turned, check the fuse condition by inspecting the reed located on top of the fuse (see figure 2).
If the fuse has blown, immediately contact a Benelli Dealer or Authorized Workshop to have the electrical equipment checked.

Never use fuses having different characteristics from those fitted on the vehicle. The use of unsuitable fuses may
damage the electrical equipment and even cause a short circuit and a fire. Do not attempt to repair damaged fuses.
ENTRETIEN
WARTUNG
MANUTENCION

FUSIBLES - CONTRÔLE ET REMPLACEMENT
- Remove the fixing screw 1 (fig.1); extract the glass 2 (fig.1) and rotate it inwards.
- To extract the bulb from the holder cup, press the bulb gently 3 (fig.2) and rotate it anticlockwise.
- Replace the bulb with another of the same type.
- Refit the glass 2 (fig.1) of the turn indicator by screwing the fixing screw 1 (fig.1).
ENTRETIEN
WARTUNG
MANUTENCION

FEUX CLIGNOTANTS AVANTS
Perform this operation when the vehicle is stationary and the ignition key is in the OFF position. Do not force the wires. After completing the operation, ensure that the wires are properly connected.
- Remove the fixing screw 1 (fig.1); extract the glass 2 (fig.1) and rotate it inwards.
• To extract the bulb 3 (fig.2) from the holder cup, press the bulb gently and rotate it anticlockwise. - Replace the bulb with another of the same type.
- Refit the glass 2 (fig.1) of the turn indicator by screwing the fixing screw 1 (fig.1).
ENTRETIEN
WARTUNG
MANUTENCION

FEUX CLIGNOTANTS ARRIÈRES
ENGINE OIL - Checking the level and topping up
- Put the vehicle on its central stand on a flat surface.
- Start the engine and let it run for a few minutes.
- Switch off the engine.
- Pull out the dipstick 1 (fig.1) and check that the oil level is between the "MAX" and "MIN" marks (fig.1). If the level is below the "MIN" mark, top up with the oil indicated in the lubricants table up to the "MAX" level mark (fig.1).
• Refit the dipstick 1 (fig.1).

Never use oil having different characteristics from those recommended or with additives. Make sure that foreign
matters do not enter the engine crankcase while topping up with oil.
- Start the engine and let it run for a few minutes.
- Switch off the engine.
WAIT FOR A MINUTES BEFORE YOU CHECK THE OIL LEVEL AGAIN.
ENTRETIEN
WARTUNG
MANUTENCION

- Put the vehicle on its central stand on a flat surface.
- Start the engine and let it run for a few minutes.
- Switch off the engine.
• Pull out the oil dipstick 1 (fig.1). - Remove the oil drain plug 2 (Jig.2) and the relevant compression spring 3 (fig.2).
- Remove the oil filter 4 (fig.2).
- Wait until the engine oil has completely drained.

Check the 0 ring 5 condition (fig.2) on the engine oil drain plug 2 (fig.2). Replace it with a new one it it is damaged.
- Refit the engine oil drain plug 2 (fig.2) following the above operations in the reverse order. Tighten with torque of 32Nm (3,2kg - m)
- Pour in the engine oil through the hole 6 (fig.1) without exceeding the engine oil "MAX" level mark (fig.1).
ENTRETIEN
WARTUNG
MANUTENCION

The transmission oil is used to lubricate the transmission members.
The oil is found in the transmission crankcase having a capacity of 130 cm^3 .
Top up with oil of the same type as indicated in the fuel and lubricants table.
Renew the oil after the first servicing at the end of the running in period.
Afterwards, have the oil checked by a Benelli Dealer or Authorized Workshop when servicing the vehicle according the maintenance schedule, and renew it after 12000 km or 24 months.
ENTRETIEN
WARTUNG
MANUTENCION

HUILE DE TRANSMISSION
Contrôle et vidange
natural_image
Side view of a black electric scooter with visible battery pack and side-mounted roof (no text or symbols)RUOTE

The wheels play a key role in ensuring the vehicle's safety and road holding. The maintenance of the wheels and of the
related parts requires special equipment which is generally available only at repair shops. It is there fore advisable to have all the maintenance operations which involve the removal and refitting of the wheels performed by a Benelli Dealer or Authorized Workshop.
REMOVING THE FRONT WHEEL
Perform this operation when the vehicle is stationary and the ignition key is in the OFF position. Be careful not to damage the pipes, the disc and the brake pads.

Before performing the disassembly operations, carefully check the position of the spacer and of the kilometer
transmission in order to refit them in their original position.
- Put the scooter on the stand.
- Position a support under the sprag to ensure the scooter's stability, with the front wheel slightly lifted from the ground, taking care not to damage the sprag painted part (fig. 1).
ENTRETIEN
WARTUNG
MANUTENCION

ROUES

natural_image
Mechanical assembly diagram showing a wheel with brake and suspension components (no text or symbols)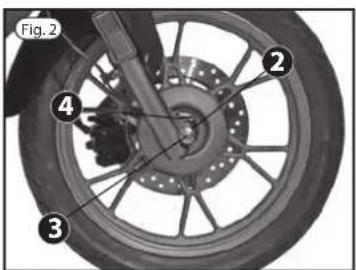
text_image
Fig. 2 ② ③ ④- Remove the brake caliper by unscrewing the 2 screws 1 (fig.1) fixing it to the fork. Extract the caliper from the disc.

Do not operate the front brake lever after the wheel has been removed as this will cause the pistons to come out of
their seat and fluid leakage.
- Unloose the pin fixing screw 2 (fig.2) situated on the fork sleeve (opposite to the disc).
- Unscrew the wheel pin 3 (fig.2) on the right side of the vehicle. Gently withdraw it from its seat while holding the wheel with one hand. Keep the spacer situated on the left side of the wheel. Remove the wheel and then detach the odometer transmission 4 (fig.2).
ENTRETIEN
WARTUNG
MANUTENCION

natural_image
Mechanical assembly diagram showing a wheel with brake and suspension components (no text or symbols)RUOTA ANTERIORE - RIMONTAGGIO
- Put the odometer transmission (4) on the right side of the wheel by inserting the transmission tang in the seat on the hub wheel (see figure 1).
- Fit the wheel between the 2 fork sleeves.
- Insert the wheel pin from the right side.
- Insert the spacer between the left sleeve and the wheel.
- Tighten the wheel pin 3 (fig.1) with the prescribed torque (70 Nm).
- Refit the brake caliper taking care not to damage the pads and brake pipes. Tighten the two fixing screws 1 (fig.2) on the left sleeve with the prescribed torque (23 Nm).
- Remove the support from under the sprag.
- Operate the front brake lever and repeatedly push down the handlebar to allow the fork to sink and the wheel bedding.
- Tighten the pin fixing screw 2 (fig.1) situated on the right sleeve with a torque not greater than 13Nm .
After every reassembly, have the wheel centering and the tightening torques checked by a Benelli Dealer or Authorized Workshop. Check the braking system efficiency by repeatedly operating the brake lever and testing the braking far from busy streets.
ENTRETIEN
WARTUNG
MANUTENCION

ROUE AVANT - REMONTAGE
REMOVING THE REAR WHEEL
Before removing the rear wheel, allow the engine and the exhaust system to reach the ambient temperature in order to avoid
burns.
- Place the scooter on the center stand.
- Disassemble the exhaust in succession by removing the 4 screws of covers, the 3 screws that secure the pot to support the engine, and the 2 screws that secure the muffler to the cylinder.
- Remove the screws Fixing brake caliper 3 (Fig. 1), the screw Fixing shock 4 (Fig. 1), the 2 screws mounting plate to the motor 5 (Fig. 1) and screw fastening wheel 6 (Fig. 1).
To reassemble to reverse than disassembly, taking care to reposition the internal spacers properly.
ENTRETIEN
WARTUNG
MANUTENCION

ROUE ARRIERE - DEMONTAGE

| Faro anteriore | 2 x 55 watt |
| Faro posteriore/stop | 5/21 watt |
SPECIFICATIONS
Weights and dimensions
| Length (mm) | 2095 | |
| Width without mirrors (mm) | 800 | |
| Height (mm) | 1290/1115 | |
| Saddle height (mm) | 800 | |
| Wheelbase (mm) | 1380 | |
| Dry weight (kg) | 137 |
Capacities
| Petrol (l) | 7 | |
| Transmission oil (l) | 0.21 | |
| Engine oil (l) | 1.2 |
Engine and transmission
| Displacement (cc / bore x stroke) | 124.6 / 52.4x57.8 mm |
| Compression ratio | 11:1 |
| Carburettor (mm) | 26 |
| Injection (mm) | 28 |
| Cooling liquid | |
| Primary | automatic |
Rolling chassis
| Tork | hydraulic |
| Rear shock absorbers | oleopneumatic |
| Front wheel / tyre | 16xMT2.5 |
| 100/80-16 M/C 50S (cheng shin) | |
| 100/80-16 M/C 50P (yuan xing) | |
| Rear wheel/tyre | 16xMT2.75 |
| 110/80-16 M/C 55S (cheng shin) | |
| 120/80-16 M/C 60S (cheng shin) | |
| Front brake (mm) | disc ∅ 240 |
| Rear brake (mm) | disc ∅ 240 |
Electrical equipment
| Headlight | 2 x 55 watt |
| Rear/stop light | 5/21 watt |
CARACTÉRISTIQUES TECHNIQUES
TECHNISCHE ANGABEN
CARACTERISTICAS TECNICAS

| Farol delantero | 2 x 55 watt |
| Farol trasero/stop | 5/21 watt |
Benelli
CARATTERISTICHE TECNICHE
SPECIFICATION
CARACTÉRISTIQUES TECHNIQUES
TECHNISCHE ANGABEN
CARACTERISTICAS TÉCNICAS
TABELLA COPPIE DI SERRAGGIO - TIGHTENING TORQUES TABLE - TABLEAU DES COUPLES DE SERRAGE - TABELLE DREHMOMENT-RICHTWERTE • TABLA PARES DE APRIETE
| DescrizioneDescriptionDescriptionBezeichnungDescripción | FilettaturaThreadFiletageGewindeRoscado | Coppia di serraggioTightening torqueCouple de serrageDrehmomentPar de apriete |
| Vite superiore bloccaggio forcellaFork upper locking screwVis supérieure de blocage de la fourcheObère Gabel-BefestigungsschraubeTornillo superior bloqueo horquilla | M10M10M10M10M10 | 30Nm30Nm30Nm30Nm30Nm |
| Perno ruota anterioreFront wheel pivotAxe de la roue avantVorderradachsePerno rueda delantera | M14M14M14M14M14 | 70Nm70Nm70Nm70Nm70Nm |
| Vite bloccaggio perno ruotaWheel pivot locking screwVis de blocage de l'axe de la roueBefestigungsschraube VorderradachseTomillo bloqueo perno rueda | M6M6M6M6M6 | 13Nm13Nm13Nm13Nm13Nm |
| Vite fissaggio pinza anteriore e posterioreFront and rear caliper fixing screwVis de fixation de retrier avant et arrièreBefestigungsschrauben vorderer und hinterer BremssattelTornillo fijación pinza delantera y trasera | M8M8M8M8M8 | 23Nm23Nm23Nm23Nm23Nm |
CARATTERISTICHE TECNICHE
SPECIFICATION
CARACTERISTIQUES TECHNIQUES
TECHNISCHE ANGABEN
CARACTERISTICAS TÉCNICAS

| Vite fissaggio avv. AcusticoWarning hooter fixing screwVis de fixation avertiss. sonoreBeistigungsschraube HupeTornillo fijaciòn claxon | M6M6M6M6M6 | 10Nm10Nm10Nm10Nm10Nm |
| Ghiera di sterzoSteering ringBague du guidon de directionGewindering LenkerrohrVirola de dirección | M30x1M30x1M30x1M30x1M30x1 | --------- |
| Controdado serie sterzoSteering séries check nutContre-écrou de série du guidon de directionKontermutter LenkerrohrbauteileContratuerca série dirección | M30x1M30x1M30x1M30x1M30x1 | --------- |
| Vite fissaggio manubrioHandlebar fixing screwVis de fixation du guidonBefestigungsschraube LenkerTornillo fijaciòn manillar | M10M10M10M10M10 | 30Nm30Nm30Nm30Nm30Nm |
| Vite fissaggio supporto motore (perno)Engine mount fixing screw (pin)Vis de fixation du support du moteur (axe)Befestigungsschraube Motorhalterung (Bolzen)Tornillo fijaciòn soporte motor (perno) | M10M10M10M10M10 | 40Nm40Nm40Nm40Nm40Nm |
Benelli
CARATTERISTICHE TECNICHE
SPECIFICATION
61100 -Pesaro- Italy
tel +39 0721 41871
fax +39 0721 418722
support@benelli.com
Benelli SSMT
Ver. 01.02 - Set. 10
Benelli consiglia :