
DPP-SV88 - Printer SONY - Free user manual and instructions
Find the device manual for free DPP-SV88 SONY in PDF.


| Product Type | Thermal sublimation digital photo printer |
| Brand | Sony |
| Model | DPP-SV88 |
| Dimensions (W × H × D) | Approx. 280 × 84 × 267 mm (excluding protrusions) |
| Weight | Approx. 3.0 kg (without paper tray) |
| Power Supply | 120 V AC, 60 Hz (120 V model) or 220–240 V AC, 50/60 Hz |
| Print Resolution | 403 × 403 dpi |
| Number of Colors | Approx. 16.77 million (256 levels per color) |
| Print Formats | Postcard (152.4 × 101.6 mm) borderless or with border, Small format (3.5 × 4 inches) |
| Print Time | Approx. 90 s for a postcard, approx. 60 s for a small format |
| Image Sources | Memory Stick, PC Card (PCMCIA Type II), CD-R/RW, composite/S-Video video input |
| Connectivity | USB (for PC connection), video output (for TV display) |
| Main Functions | Super Coat 2 (protection), Auto Fine Print 2 (image enhancement), Creative Print (calendar, card, sticker), image effects (sepia, monochrome, watercolor), DPOF printing, borderless printing |
| Maintenance and Cleaning | Casing: dry or slightly damp soft cloth; avoid solvents. Clean discs with a soft cloth from center to edge |
| Safety | Class 1 laser product; do not expose to rain or moisture; unplug before cleaning; use appropriate power cord |
| Replacement Parts and Repairability | Specific print kit (cartridge + paper): SVM-25LS (25 glossy postcards), SVM-25LW (25 sticker postcards), SVM-30SS (30 glossy small format), SVM-30SW (30 sticker small format), SVM-30SW09 (30 small format 9 portions) |
| Standby Power Consumption | Approx. 1 W |
Frequently Asked Questions - DPP-SV88 SONY
User questions about DPP-SV88 SONY
0 question about this device. Answer the ones you know or ask your own.
Ask a new question about this device
Download the instructions for your Printer in PDF format for free! Find your manual DPP-SV88 - SONY and take your electronic device back in hand. On this page are published all the documents necessary for the use of your device. DPP-SV88 by SONY.
USER MANUAL DPP-SV88 SONY
Digital Photo Printer
Operating Instructions
G
Before operating this printer, please read this manual thoroughly and retain it for future reference.
Mode d'emploi
FF
natural_image
Exterior view of a silver computer with an open drive (no visible text or symbols)
MEMORY STICK
SUPER COAT 2
digital photo printer
DPP-SV88
2001 Sony Corporation
WARNING
To prevent fire or shock hazard, do not expose the unit to rain or moisture.
To avoid electrical shock, do not open the cabinet. Refer servicing to qualified personnel only.
CAUTION
Pictures and/or Sound distortion may occur if this product is positioned in close proximity to equipment emitting electromagnetic radiation.
CAUTION
Sony shall assume no responsibility for any accidental or consequential damages or loss of the recording contents which may be caused by use or malfunction of the printer, "Memory Stick" or PC card.
For the customers in Europe
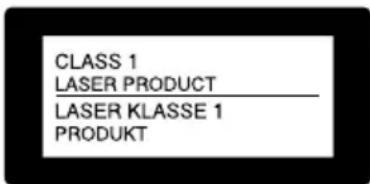
This Digital Photo Printer is classified as a CLASS 1 LASER PRODUCT.
This equipment has been tested and found to comply with the limits set out in the EMC Directive using a connection cable shorter than 3 meters.
For the customers in the U.S.A.
CAUTION
The nameplate is located on the bottom enclosure.
Owner's Record
The model and serial numbers are located on the bottom. Record the serial number in the space provided below. Refer to this number whenever you call upon your Sony dealer regarding this product.
Model No. DPP-SV88 Serial No.
WARNING
This equipment has been tested and found to comply with the limits for a Class B digital device, pursuant to Part 15 of the FCC Rules. These limits are designed to provide reasonable protection against harmful interference in a residential installation. This equipment generates, uses, and can radiate radio frequency energy and, if not installed and used in accordance with the instructions, may cause harmful interference to radio communications. However, there is no guarantee that interference will not occur in a particular installation. If this equipment does cause harmful interference to radio or television reception, which can be determined by turning the equipment off and on, the user is encouraged to try to correct the interference by one or more of the following measures:
– Reorient or relocate the receiving antenna.
– Increase the separation between the equipment and receiver.
- Connect the equipment into an outlet on a circuit different from that to which the receiver is connected.
- Consult the dealer or an experienced radio/TV technician for help.
You are cautioned that any changes or modifications not expressly approved in this manual could void your authority to operate this equipment.
The shielded interface cable recommended in this manual must be used with this equipment in order to comply with the limits for a digital device pursuant to Subpart B of Part 15 of Fcc Rules.
If you have any questions about this product, you may call:
Sony's Business Information Center (BIC) at 1-800-686-SONY (7669)
or Write to: Sony Customer Information Services Center
6900-29 Daniels Parkway, PMB 330
Fort Myerts, Florida 33912
FCC Statements for the Remote Commander RM-SV1
This device complies with Part 15 of the FCC Rules. Operation is subject to the following two conditions: (1) this device may not cause harmful interference, and (2) this device must accept any interference received, including interference that may cause undesired operation.
Declaration of Conformity
Trade Name: SONY
Model No.: DPP-SV88
Responsible Party:
Sony Electronics Inc.
Address: 680 Kinderkamarck Road,
Oradell NJ 07649 U.S.A.
Telephone No.: 201-930-6972
This device complies with part 15 of the FCC Rules. Operation is subject to the following two conditions:
(1) this device may not cause harmful interference, and (2) this device must accept any interference received, including interference that may cause undesired operation.
- Microsoft, MS, MS-DOS and Windows® are registered trademarks of Microsoft Corporation in the United States and other countries.
- IBM and PC/AT are registered trademarks of International Business Machines Corporation.
- MMX and Pentium are registered trademarks of Intel Corporation.
- Apple, Macintosh, Power Macintosh, and Mac OS are registered trademarks of Apple Computer, Inc.
- "Memory Stick," "MagicGate Memory Stick" and their logo marks are the trademarks of Sony Corporation.
- This printer uses JBlend™ of Aplx Corporation. JBlend and Aplx are registered trade marks of Aplx Corporation in Japan and other countries.
- All other companies and product names mentioned herein may be the trademarks or registered trademarks of their respective companies. Furthermore, "TM" and "®" are not mentioned in each case in this manual.
Duplication, edition, or printing of a CD, TV programs, copyrighted materials such as pictures or publications, or any other materials except for your own recording or creation is limited to private or domestic use only. Unless you hold copyright or have permission of copyright holders for the materials to be duplicated, use of those materials beyond this limit may infringe the provisions of the copyright law and be subject to the copyright holder's claim for damages.
When using photo images with this printer, pay special attention not to infringe the provisions of the copyright law. Any unauthorized use or modification of others' portrait may also infringe their rights.
For some demonstrations, performances, or exhibits, photography may be forbidden.
Notice for users
Program © 2001 Sony Corporation Documentation ©2001 Sony Corporation
All rights reserved. This manual or the software described herein, in whole or in part, may not be reproduced, translated or reduced to any machine readable form without prior written approval from Sony Corporation.
IN NO EVENT SHALL SONY CORPORATION BE LIABLE FOR ANY INCIDENTAL, CONSEQUENTIAL OR SPECIAL DAMAGES, WHETHER BASED ON TORT, CONTACT, OR OTHERWISE, ARISING OUT OF OR IN CONNECTION WITH THIS MANUAL, THE SOFTWARE OR OTHER INFORMATION CONTAINED HEREIN OR THE USE THEREOF.
By breaking the seal of the envelope of the CD-ROM package, you accept all the terms and conditions of this agreement. If you do not accept these terms and conditions, please return this disk envelope unopened, along with the rest of the package, immediately to the dealer where you obtained it.
Sony Corporation reserves the right to make any modification to this manual or the information contained herein at any time without notice.
The software described herein may also be governed by the terms of a separate user license agreement.
User Registration
To receive customer services, complete and return the registration card included in your package.
Any design data such as sample pictures provided in this software cannot be modified or duplicated except for the purpose of personal use. Any unauthorized duplication of this software is prohibited under copyright law.
Please note that unauthorized duplication or modification of others' portraits or copyrighted work could infringe the rights reserved by right holders.
Table of contents
Getting started
What you can do with the printer ..... 6
Unpacking the printer.... 8
Identifying the parts 9
Setting up
1 Connecting the printer.... 13
Connecting to a television 13
Connecting to video equipment 14
Connecting the AC power cord 15
Inserting a "Memory Stick" or PC card .... 15
Inserting a CD-R/RW disc 17
Connecting to a computer (optional) ..... 20
2 Preparing the remote commander .. 21
3 Preparing the printing pack ...... 22
4 Loading the print cartridge ...... 23
5 Inserting the print paper...... 25
Basic printing operations
Printing selected card or disc images ... 27
Printing all the images or DPOF preset images at one time 32
Printing an image from video equipment 35
Saving images
Saving "Memory Stick" or PC card images onto a CD-R/RW disc 37
Saving all the "Memory Stick" or PC card images at one time 37
Saving the selected "Memory Stick" or PC card images onto a CD-R/RW disc ...... 38
Saving CD-R/RW disc images onto the "Memory Stick" or PC card .... 42
Saving all the images in a CD-R/RW folder at one time 42
Saving the selected CD-R/RW disc images onto the "Memory Stick" or PC card..... 43
Saving the video memory image onto a "Memory Stick," PC card or CD-R/RW disc 45
Using a CD-R/RW disc
On CD-R/RW discs 47
Types of CD-R/RW discs you can use...... 47
On handling discs.... 48
Notes on cleaning CD-R/RW discs...... 48
Operations flow on using a CD-R/RW disc.... 49
Preparing a CD-R/RW disc for saving images (Initialization) 51
Arranging the folders in a CD-R/RW disc.... 52
Creating a new folder.... 52
Renaming a folder 53
Deleting a folder 55
Viewing images of a CD-R/RW disc on your computer 56
System requirements of the computer ..... 56
Preparing a CD-R/RW disc for viewing images on the computer (Finalization) ..... 56
Canceling the finalization (Unfinalization)... 58
Formatting a CD-RW disc 59
Setting the access speed to a CD-R/RW disc 60
Advanced printing operations
Adding effects to an image 61
What you can do with the EFFECT menu.. 61
Changing an image size and position ..... 63
Changing an image position 64
Adjusting the pictures 65
Adding a special filter to an image ...... 66
Making various prints (Creative Print) .. 67
What you can do with the Creative Print menu 67
Making a calendar 69
Making a card 72
Making a sticker.... 75
Making split images 77
Setting the printer (MENU) 78
What you can do with the MENU 78
Changing the printer preferences (SET) ..... 79
Deleting images.... 82
Deleting selected image(s) 82
Formatting a "Memory Stick" 83
Viewing the slideshow.... 84
Making an index print 86
Printing from your computer
Using your printer with Windows computers.... 88
System requirements 88
Installing the software 89
Using the reader software 98
Printing from a software application ..... 99
Using your printer with Macintosh computers.... 102
System requirements 102
Installing the printer driver 102
Printing from a software application ..... 104
Additional information
Precautions 106
About the "Memory Stick" and PC card media 108
On "Memory Stick" 108
To protect "Memory Stick" images ...... 108
Notes on use.... 109
Troubleshooting 110
If paper jams 112
Specifications 113
Index 114
What you can do with the printer
With the Digital Photo Printer DPP-SV88, you can print images of a "Memory Stick," PC card, CD-R/RW disc, a video recorder, or a computer. You can also save images on a "Memory Stick," or PC card or in albums in a CD-R/RW disc.
Photo-realistic printing
With its sublimation dye transfer printing system, the printer can make photo-realistic prints meeting a number of different requirements.
Super Coat 2 feature
The Super Coat 2 enables high durability and moisture or fingerprint resistance, keeping your prints in good picture quality for an extended period of time.
Auto Fine Print 2 function
The Auto Fine Print 2 analyses the picture information of an image and corrects it as vivid, clear, and natural picture.
Selection of print sizes and border/borderless print formats
You can select from a large, dynamic Post Card size print or an economical Small size print. For the Post Card size print, you can also select a borderless or border print format.
Saving images by folders (albums) in a CD-R/RW disc
You can save digital still camera images of “Memory Stick” or PC card or video images by folders (albums) in a CD-R/RW disc. You can save all the “Memory Stick” or PC card images at one time or only selected images. The images saved in a CD-R/RW disc can also be saved in the “Memory Stick” or PC card.
Notes
- We recommend you use CD-R/RW discs manufactured by Sony.
- Please use a commercially available unformatted CD-R/RW disc.
Direct printing of "Memory Stick," PC card, CD-R/RW disc, or video equipment images
You can print digital still camera images stored on a "Memory Stick" or PC card, or the PC images stored in a CD-R/RW disc. You can also capture and print images from a video recorder connected to the printer's video input connector. All the contained images or all the DPOF (Digital Print Order Format) preset images can be printed at one time.
Selection of print finish
You can select the print finish from either glossy or texture.
Printing 25/30 sheets at one time
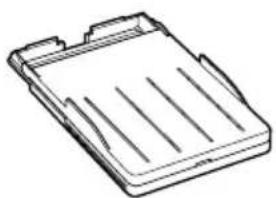
With the supplied paper tray, you can print up to 25 sheets for Post Card size and 30 sheets for Small size print paper at one time.
A wide variety of image processing available with your printer
You can make various types prints such as a standard print, a date print, or an index print of the images stored in a "Memory Stick," PC card or CD-R/RW disk. A variety of image processing functions allow you to magnify/ reduce, rotate, flip, or move the image. You can also add a special effect to the picture to produce sepia, monochrome, or paint pictures.
An even wider variety of prints using the Creative Print menu
The Creative Print menu allows you to make even more types of prints such as a calendar, a card, split images, a sticker with framed images.
Making a convenient USB connection with your computer
By installing the supplied DPP-SV88 printer driver software on your computer, you can print images from your computer. With the supplied "Memory Stick/PC card Reader Software," you can view and handle the images in a "Memory Stick" or PC card inserted in the printer from your computer.
Note
You cannot use the supplied "Memory Stick/PC card Reader Software" to transfer the images in a CD-R/RW disc to your computer.
Unpacking the printer
Make sure that the following accessories are supplied with your printer.
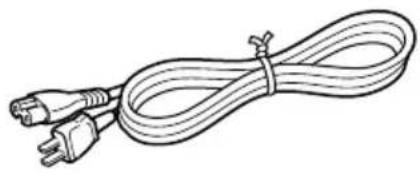
- AC power cord (1)*
natural_image
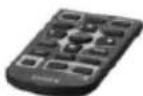
Line drawing of a coiled cable with two connectors (no text or symbols)- Remote commander (1)

natural_image
Line drawing of a remote control device with keypad and scroll (no text or symbols)• Video connection cable (1)
- CD-ROM (1)

natural_image
Illustration of a coiled cable with two connectors (no text or symbols)
- Paper tray (1)
natural_image
Simple line drawing of a clipboard with horizontal lines and a top clip (no text or symbols)- Sony DPP-SV88 Printer Driver Software for Windows® 98/Me/2000 Professional/XP Home Edition/XP Professional Version 1.0 for MAC OS 8.5.1./8.6/9.0/9.1/9.2 Version 1.0 -Memory Stick/PC card Reader Software for Windows® 98/Me/2000 Professional/XP Home Edition/XP Professional Version 1.0
- Operating Instructions (1)
- Warranty (1)
• Sample Printing Pack (1) - Owner registration card (1)
- Sony End User Software License Agreement (1)
\*Note
The AC power cord illustrated is for 120V only. The plug shape and specifications change depending on the region you use the printer.
Identifying the parts

For details, see the pages indicated in the parentheses.
Printer front panel
1 POWER button (pages 17, 27)
Lights in orange in the standby mode and lights in green in the power-on mode.
2 Operation panel (next page)
Pull down to open the operation panel.
3 CD-R/RW disc tray open/close button (page 17)
Press this button to open and close the CD-R/RW disc tray.
4 Ventilation holes
5 S VIDEO IN connector (page 14)
6VIDEO IN connector (page 14)
7 Paper tray compartment lid (page 25)
Insert the supplied paper tray here.
8 Remote sensor (page 21)
Point the supplied remote commander to this sensor to operate the printer.
9 Cartridge compartment lid (page 23)
10 Print cartridge eject lever (page 23)
Push up to eject the print cartridge.
11 Print cartridge (pages 22, 23)
(Not supplied)
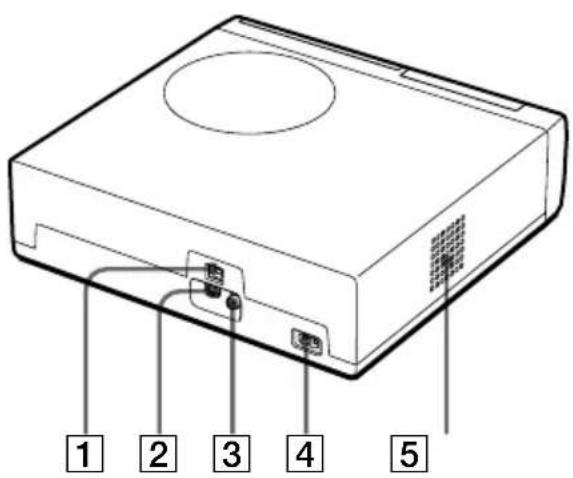
Printer rear panel
1 USB connector (page 20)
Connects to the USB connector of your computer.
2 S VIDEO OUT connector (page 13)
3VIDEO OUT connector (page 13)
4 AC IN connector (page 15)
5 Ventilation holes
Continued
Identifying the parts
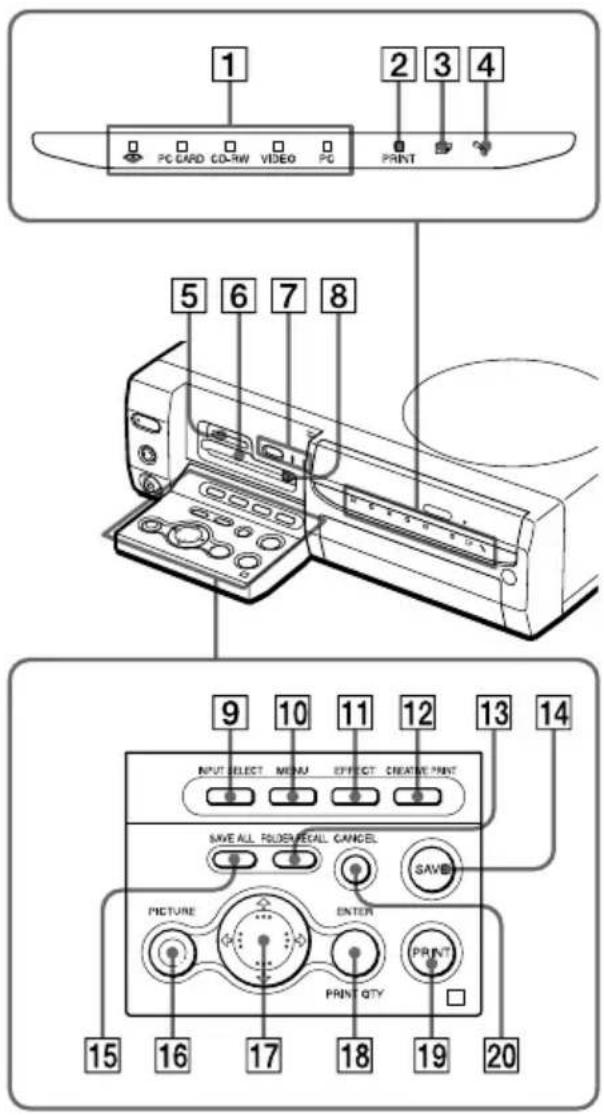
Printer indicators and operation panel
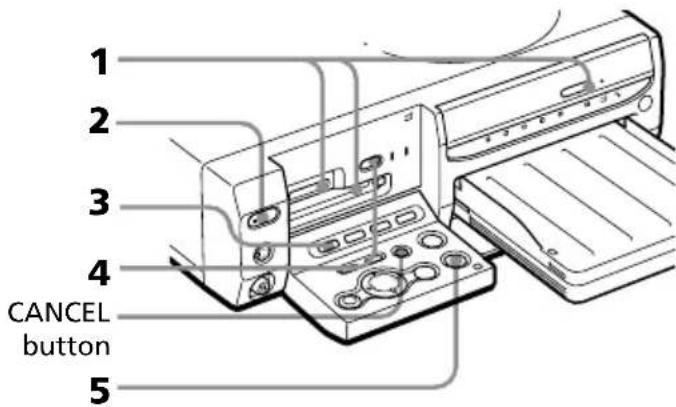
1 Input indicators (pages 20, 27, 35) The indicator for the current input signal lights ("MEMORY STICK"/PC CARD/CD-RW/VIDEO/PC).
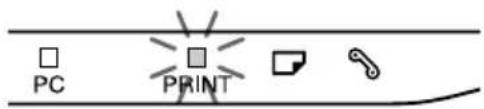
2 PRINT indicator (pages 30, 34)
3 Paper error indicator (pages 26, 112)
4 Cartridge error indicator (page 23)
5 "MEMORY STICK" insertion slot (page 15)
6 PC CARD insertion slot (page 16)
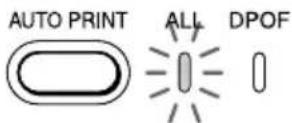
7 AUTO PRINT button (page 33)
Each time you press the button, ALL and DPOF printing modes switches. The relevant indicator lights.
8PC card eject button (page 16)
9 INPUT SELECT button (pages 20, 27, 35)
Switches the input. (The selected input indicator 1 lights, except for "PC.")
10 MENU button (pages 78)
11 EFFECT button (page 61)
12 CREATIVE PRINT button (page 67)
13 FOLDER RECALL button (page 29)
14 SAVE button (pages 39, 44)
15 SAVE ALL button (pages 37, 42)
16 PICTURE button (page 29)
Switches the thumbnail list and preview image.
17 Arrow (←/→/↑/↓) buttons
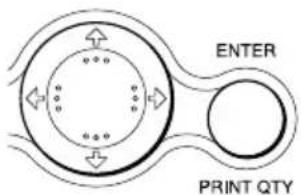
18 ENTER/PRINT QTY button
19 PRINT button (pages 30, 34, 36)
20 CANCEL button


Remote commander
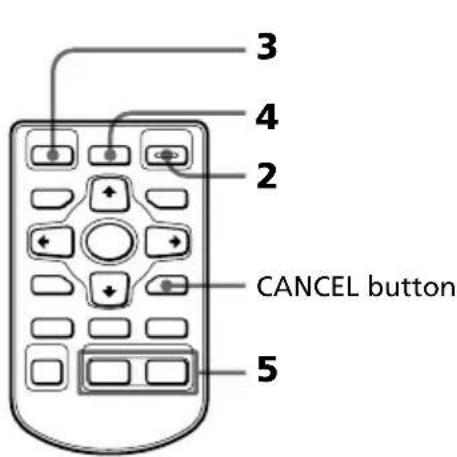
1 AUTO PRINT button (page 33) Each time you press the button, ALL and DPOF printing modes switches. The relevant indicator on the printer lights.
② INPUT SEL (SELECT) button (page 20, 27, 35)
Switches the input. (The selected input indicator on the printer lights, except for "PC.")
3 SAVE ALL button (pages 37, 42)
4 Arrow (◄/►/↑/↓) buttons
5PICTURE button (page 29) Switches the thumbnail list and preview image.
6 MENU button (pages 78)
7 SAVE button (pages 39, 44)
8 EFFECT button (page 61)
9 POWER button (pages 17, 27)
10 FOLDER RECALL button (page 29)
11 ENTER button
12 CANCEL button
13 CREATIVE PRINT button (page 67)
14 PRINT button (pages 30, 34, 36)
Paper tray
1 lid (page 25)
2 Partition (page 25)
Identifying the parts
Thumbnail list
![1 2 3 4 5 6 7 8 9 Memory Stick United Image 10 11 12 Set the quantity with [ENTER/SANCEL] into the image with [FEBY] or save it with [SAVE]](/content/2026/06/1239215/images/f6f9cee6fe8e0ed953e7c0d4325c06b801925c0ca9568576d1e609ce02f4e742.jpg)
Preview image
![2 1 30 7 8 9 Memory Stick Selected images 11 Set the O for with [ENTER]/[CANOEL] Print the image with [OENT] or save it with [SAVE] 12 4](/content/2026/06/1239215/images/d7c488b313bc1ee27a6154fb0da4a52f1d6b3e512bd578f3a134c34a2e8b0691.jpg)
Screen
1 Print preset (DPOF) indication
Indicates the image is DPOF preset for printing from a digital still camera.
② Image number
③ "Memory Stick"/PC Card/CD-R/RW indication
Indicates that the type of media currently being used.
4 Protect indication
Indicates the image is protected by a digital still camera.
5 Cursor (yellow frame)
Indicates that the image with the cursor.
6 Selection (orange)
Indicates that the image has been selected.
7 The quantity of selected images/the total image quantity
8 Remaining memory indication
Indicates the remaining memory in the "Memory Stick," PC card or CD-R/RW disc being loaded in the printer. For a "Memory Stick," icon changes from left to right as the memory reduces. (The empty icon is displayed for a protected media or finalized CD-R/RW disc.)

9 Print cartridge indication
Indicates the type of print cartridge currently loaded.
10 Print quantity indication
Indicates the print quantity.
11 Scroll bar
Indicates the position of the image currently displayed or selected from among the total number of images.
12 Guidance message
Displays simplified instructions for the next step.
1 Connecting the printer
Connecting to a television
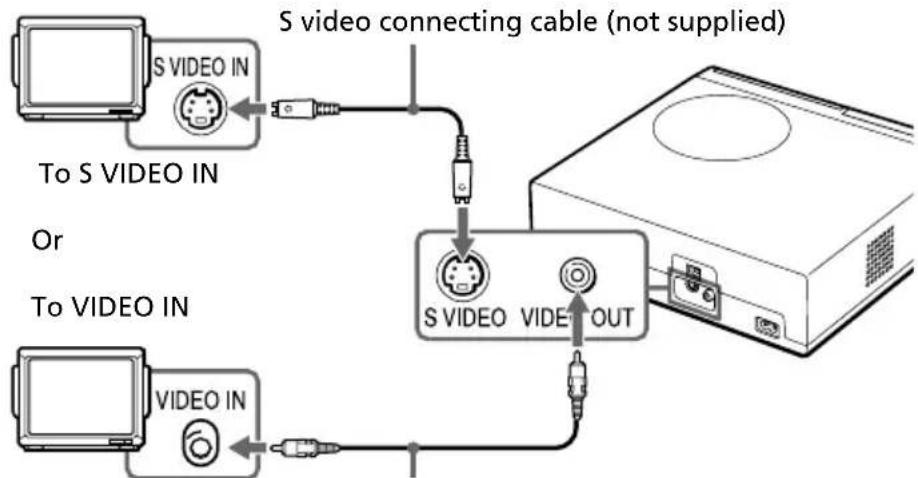
Connect the VIDEO OUT (output) connector of the printer to the video input of the television to display the images to be printed.
Television
Set the VIDEO/TV
input selector to
VIDEO.
flowchart
graph TD
    A["S VIDEO IN"] --> B["To S VIDEO IN"]
    B --> C["Switch"]
    C --> D["S VIDEO connecting cable (not supplied)"]
    D --> E["Switch"]
    E --> F["S VIDEO VIDE OUT"]
    G["To VIDEO IN"] --> H["Switch"]
    H --> I["Switch"]
    I --> J["Switch"]
Video connecting cable (supplied)
When your television has an S-video input connector
Connect the S-video input connector of your television to the S VIDEO OUT (output) connector of the printer using an S-video connection cable (not supplied). You can get better picture quality. In this case, you do not need to connect the video connector.
To view the video images on the television while the printer is turned off
- To view the video equipment connected to the printer's VIDEO IN connector, connect your television to the printer's VIDEO OUT connector.
- To view the video equipment connected to the printer's S VIDEO IN connector, connect your television to the printer's S VIDEO OUT connector.
Notes
- Before making connections or plugging in a cable, turn off the power of the printer and the television.
- When you do not use the video connecting cable supplied, use a commercially available video cable or S video connecting cable 3 ~m or shorter in length.
- When you connect your printer to a personal computer, you do not need to connect your printer to a television.
- Avoid connecting the video output connectors of the printer to a device other than a television. The units may not operate properly.
1 Connecting the printer
Connecting to video equipment
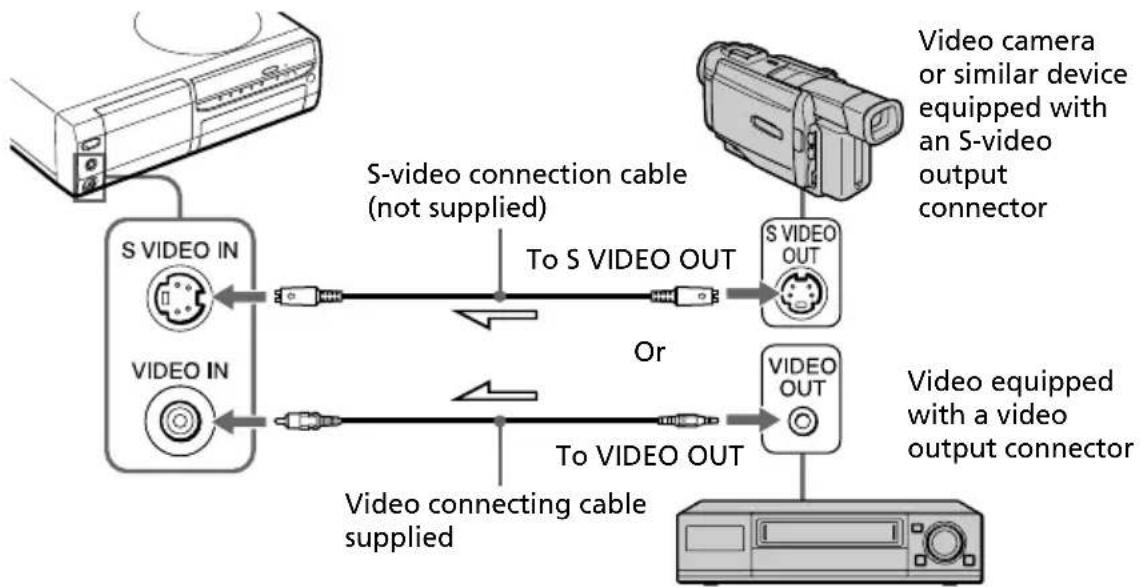
When printing images from video equipment such as a video camera or video recorder, use the supplied video connection cable to connect the video equipment and the printer. For details on how to print from your vide device, see “Printing an image from video equipment” (pages 35–36).
flowchart
graph LR
    A["Image Panel"] --> B["S VIDEO IN"]
    B --> C["To S VIDEO OUT"]
    C --> D["S VIDEO OUT"]
    D --> E["Video camera or similar device equipped with an S-video output connector"]
    E --> F["Video equipped with a video output connector"]
    F --> G["Video OUT"]
    G --> H["Video connecting cable supplied"]
    H --> I["Video IN"]
    I --> J["To S VIDEO OUT"]
    J --> K["Video camera or similar device equipped with an S-video output connector"]
:Signal flow
If the video equipment has an S-video output connector
Connect the S-video output connector of the video equipment to the S VIDEO IN (input) connector of the printer using an S-video connection cable (not supplied) so that you can get better picture quality. In this case, you do not need to connect the video connector.
To view the video images on the television while the printer is turned off
- To view the video equipment connected to the printer's VIDEO IN connector, connect your television to the printer's VIDEO OUT connector.
- To view the video equipment connected to the printer's S VIDEO IN connector, connect your television to the printer's S VIDEO OUT connector.
Notes
- Before making connections, turn off the power of the printer, the video equipment and television.
- When you do not use the video connecting cable supplied, use a commercially available video cable or S video connecting cable 3m or shorter in length.
- Also refer to the instruction manual of the video equipment.
Connecting the AC power cord
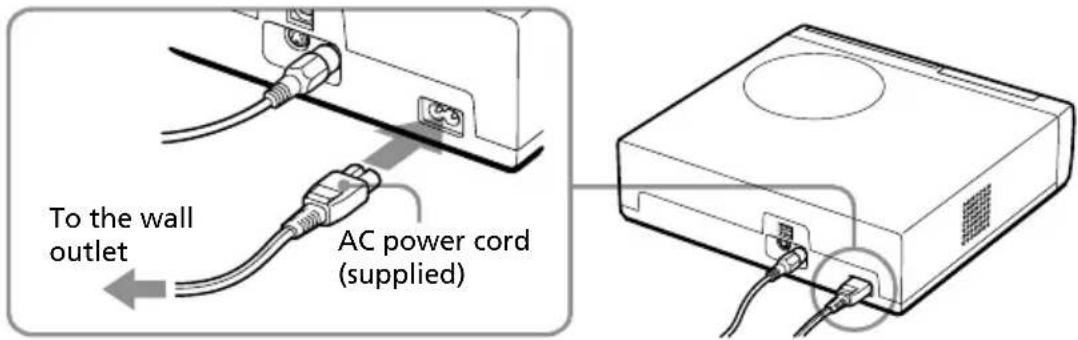
After you make the connections, connect the supplied AC power cord to the AC IN connector of the printer and then to an AC outlet.
The POWER indicator lights in red.
Inserting a "Memory Stick" or PC card
Notes
- Do not attempt to force a "Memory Stick" or a PC card into or out of the slot. If you do, the "Memory Stick" or the PC card or the printer may be damaged.
- When the printer is accessing the "Memory Stick" or PC card and the relevant indicator flashes, do not remove the "Memory Stick" or PC card from the printer. If you do, the "Memory Stick" or the PC card or the printer may be damaged.
Printing an image from a "Memory Stick"
Open the operation panel cover and insert the "Memory Stick" into the "MEMORY STICK" insertion slot until it clicks into place.

To eject the "Memory Stick"
Push the "Memory Stick" further into the insertion slot and then remove it slowly.
Continued
1 Connecting the printer
Note
Insert the "Memory Stick" only. Do not insert any other objects.
Printing an image from a PC card
Open the operation panel cover and insert the PC card into the PC CARD insertion slot until it clicks into place.

To eject the PC card
Press the PC CARD eject button. After the button pops out, press the button again further until it clicks into place. When the PC card is ejected, remove it slowly.
Notes
- Insert the PC card only. Do not insert any other objects.
- When you close the operation panel cover, make sure that the PC CARD eject button is firmly pressed.
Inserting a CD-R/RW disc
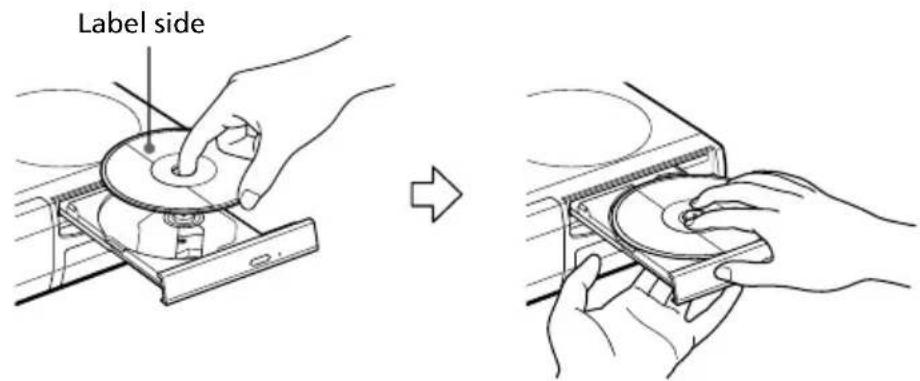
To read images or save images in folders, insert a CD-R/RW disk into the CD-R/RW disc tray of the printer. For the types of discs you can use with the printer and precautions on use of a disc, see "On CD-R/RW discs" on page 47.
1 Press the POWER button to turn on the printer.
The POWER indicator light changes orange to green.

2 Press the CD-R/RW disc tray open/close button.
The CD-R/RW disc tray slides out.

natural_image
Line drawing of a hand inserting a component into a device (no text or symbols)3 Place a CD-R/RW disc on the tray with the label side facing up and put it into the center hub until it clicks into place.
1 Connecting the printer
Notes
- When opening the disc tray, suspend it with your hand.
- When closing the CD-R/RW tray, make sure to seat the disc firmly over the CD-R/RW tray hub. If not, you could damage your CD-R/RW drive and you may not be able to open the tray.
4 Close the disc tray firmly until it clicks into place.
To take out the disc
1 Press the CD-R/RW disc tray open/close button.
The CD-R/RW disc tray comes out.
Note
While the CD-RW indicator lights or blinks, the CD-R/RW is being accessed. You cannot eject the CD-R/RW disc. Wait until the indicator turns off and then press the CD-R/RW disc tray open/close button.
2 Remove the CD-R/RW disc from the tray.
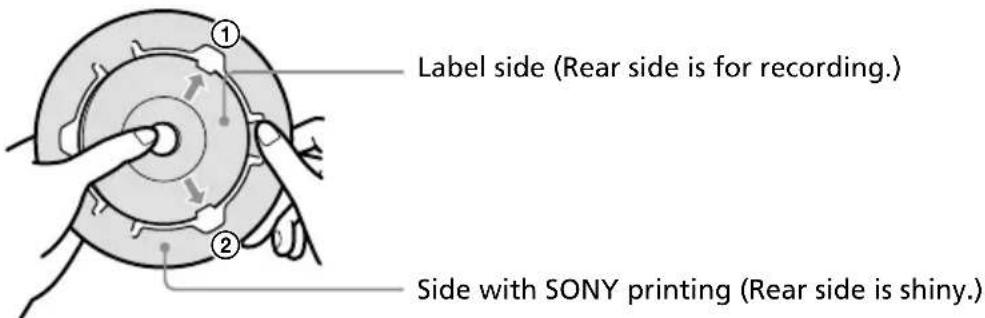
To use an 8cm CD-R/RW disc of your CD Mavica digital camera
When you use an 8cm CD-R/RW disc of your CD Mavica digital camera with this printer, we recommend you use the 8cm CD adaptor supplied with your CD Mavica.
1 Insert an 8cm CD-R/RW disc into the two tabs of the adaptor in the order of ① and ②.
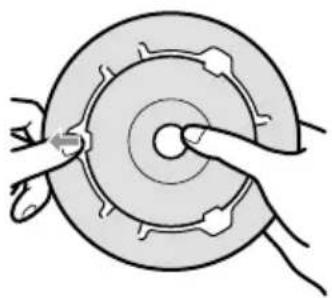
2 Pull the third tabs outside and then click the disc into place.
natural_image
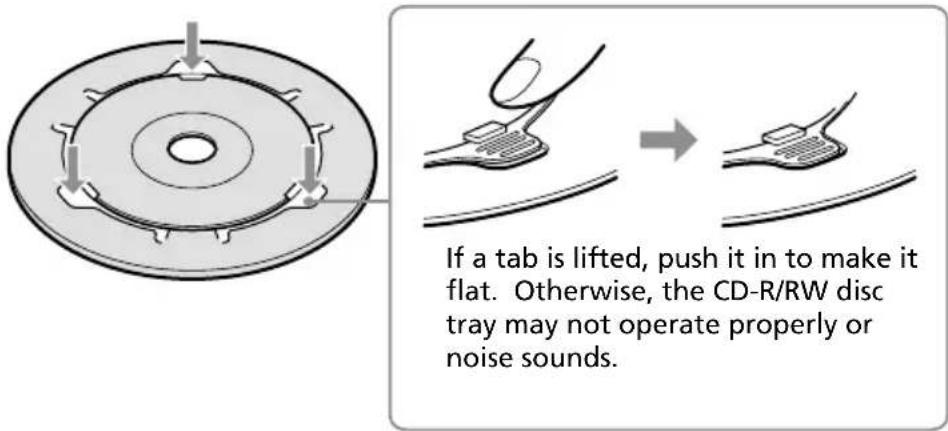
Diagram of hands operating a mechanical component with no visible text or symbols3 Make sure that the disc is properly fitted into the slits of the three tabs, that the tabs are flat, and that the disc is not bent or ejected from the adaptor.
Note
The CD adaptor supplied with your CD Mavica digital camera is for an 8cm CD-R/RW disc for the CD Mavica only. Do not use the adaptor with other types of 8cm CD-R/RW disc.
1 Connecting the printer
Connecting to a computer (optional)
Connect the USB connectors of the printer and your computer (Windows PC or Macintosh) with a commercially available USB cable. By installing the supplied driver software on your computer, you can print an image from your computer's hard disk. With the "Memory Stick/PC Card Reader Software," you can also transfer images from a "Memory Stick" or PC card to your computer's hard disk.
For details on how to install and operate the software, see "Printing from your computer" (pages 88–105).
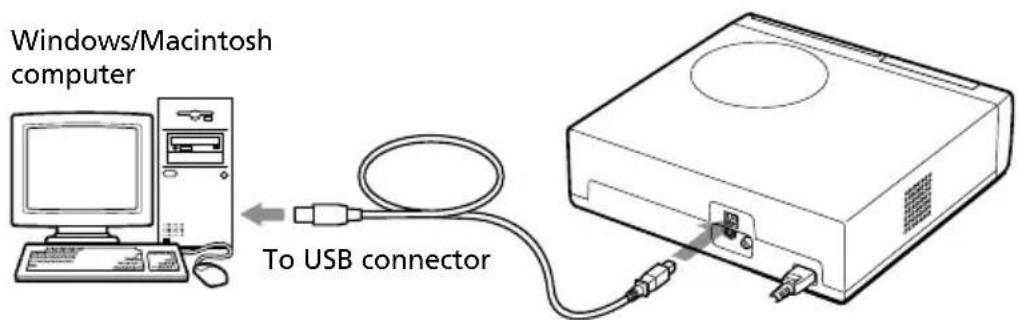
To USB connector
When you connect a computer that is already powered on to the USB connector of the printer
The PC input indicator lights and the printer enters the PC mode.

Notes
• The Reader software supports Windows only.
- Use a USB cable 3 ~m or shorter in length.
- Without connecting a computer that is already powered on to the USB connector, you cannot switch to the PC mode manually by pressing the INPUT SELECT button.
- When you connect your printer to a television, no pictures are displayed on the television in the PC mode. This is not due to trouble with the printer.
- Refer to the instruction manual of your computer for further information.
- You cannot use the printer and the printer driver on a network or with a commercially available printer buffer.
- You cannot use the supplied "Memory Stick/PC card Reader Software" to transfer the images in a CD-R/RW disc to your computer.
2 Preparing the remote commander
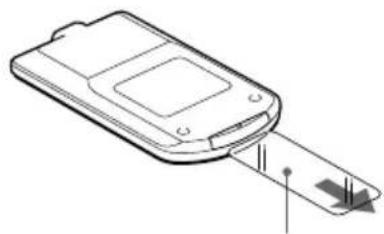
1 Remove the friction seal from the remote commander.
With the friction seal removed from the lithium battery, the remote commander is ready for use.
natural_image
Line drawing of a mobile phone with a cable inserted into the port (no text or symbols)Friction sea
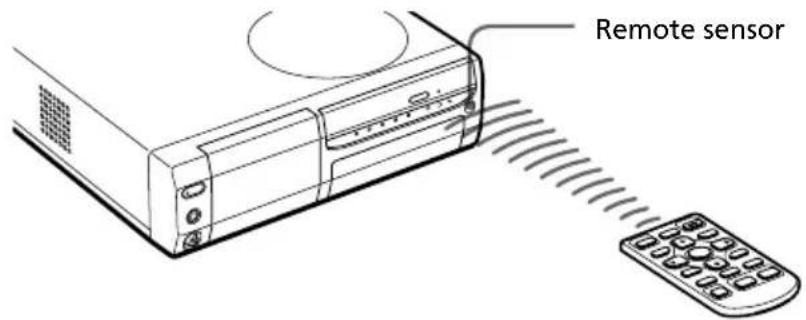
2 Point the remote commander to the remote sensor on the printer and then press a button to operate the printer.
You can use the buttons on the remote commander in the same way as those identical buttons on the printer.
Replacing batteries
When the printer does not respond to the remote commander, the battery may run out. Use a fine pin or other thin shaped device to pick and slide out the battery compartment lid. Remove the used battery and then insert a new lithium battery (CR2025) into the compartment with the + and – properly aligned.
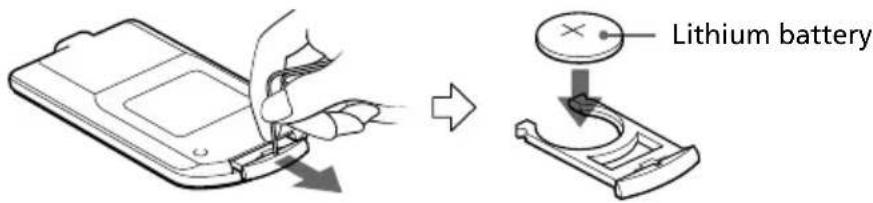
CAUTION:
Replace the battery with Sony CR2025 lithium battery. Use of another battery may preset a risk of fire or explosion.
Danger of explosion if battery is incorrectly replaced. Replace only with the same or equivalent type recommended by the manufacturer. Dispose of used batteries according to the manufacturer's instructions.
3 Preparing the printing pack
You need an optional printing pack designed for the printer. The pack contains a set of print paper and a print cartridge for either Post Card size (4x6 inch) or Small size (3.5x4 inch) prints.
Select the printing pack according to the type of printing you intend to do:
| Printing pack Contents |
| SVM-25LS 25 sheets of Post Card size photo paper/Print cartridge for 25 prints |
| SVM-25LW 25 sheets of Post Card size sticker/Print cartridge for 25 prints |
| SVM-30SS 30 sheets of Small size photo paper/Print cartridge for 30 prints |
| SVM-30SW 30 sheets of Small size stickers/Print cartridge for 30 prints |
| SVM-30SW09 30 sheets of Small size 9-split stickers/Print cartridge for 30 prints |
Notes
- Use the printing pack for this printer only.
- Always use the print cartridge designed for the size of the print paper you use. If you mix cartridges and paper of different types or size, printing may not be possible, or a paper jam or other trouble may occur.
- Do not rewind the ink ribbon and use the rewound print cartridge for printing. Otherwise, proper printing result will not be obtained, or even a breakdown may occur.
- Do not print on the used print paper. Printing an image twice on the same paper will not make the printed image thicker. This may even cause a malfunction or breakdown.
- Do not touch the ink ribbon of the print cartridge or the printing surface of the print paper. If there are fingerprints or dust on the printing surface or the ink ribbon, the printing quality may deteriorate.
- For high quality prints, avoid placing the printing pack in locations that are subject to high temperature, high humidity, excessive dust, or direct sunlight.
- When storing a partially-used pack of the print cartridge and print paper, store it in its original bag or in a similar container.
4 Loading the print cartridge
1 Press the POWER button to turn on the printer.
The POWER indicator lights in green.
2 Pull and open the cartridge compartment lid.
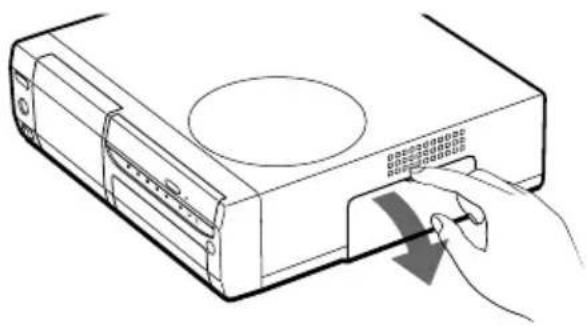
natural_image
Line drawing of a CD-ROM device with a hand inserting a cable to its side panel (no text or symbols)3 Insert the print cartridge into the printer firmly until it clicks into place and close the cartridge compartment lid.
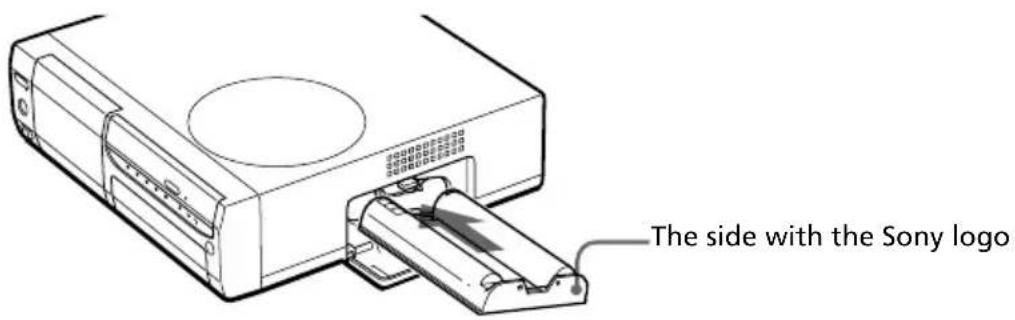
To replace the print cartridge
When the print cartridge runs out, the cartridge error indicator lights and an error message appears on the screen.
Open the cartridge compartment lid, push up the eject lever, remove the used print cartridge, and then insert a new cartridge.

Continued
4 Loading the print cartridge
Notes
- Never put your hand into the cartridge compartment. The thermal head reaches high temperatures, especially after repeated printing.
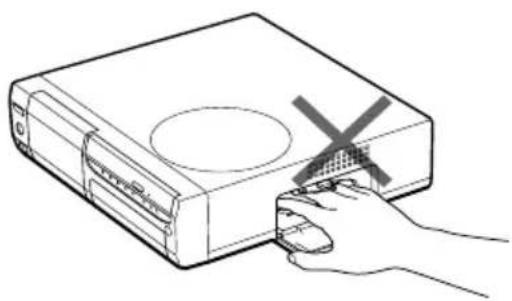
natural_image
Line drawing of a hand pressing a button on a device (no text or symbols present)- Do not rewind the ink ribbon and use the rewound print cartridge for printing. Otherwise, proper printing result will not be obtained, or even a breakdown may occur.
- If the print cartridge does not click into place, remove it and then re-insert it. If the ink ribbon is too slack to be loaded, wind the ink ribbon in the direction of the arrow to remove the slack.
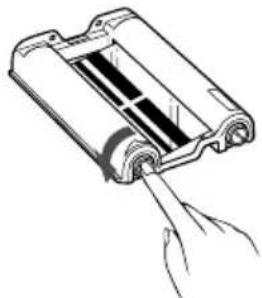
natural_image
Diagram of a battery pack with a hand inserting a slot into it (no text or symbols)- If the print cartridge is not loaded when you turn on the printer, the cartridge error indicator lights up.
- When placing the print cartridge on a desk or other surface, stand it vertically so that dust will not get on the ink ribbon.
- Do not touch the ink ribbon or place the print cartridge in a dusty location. Fingerprints or dust on the ink ribbon may result in imperfect printing.
- Do not change the print cartridge while operating the printer.
Notes on storing the print cartridge
- Avoid placing the print cartridge in a location subject to high temperatures, high humidity, excessive dust or direct sunlight
- When you are going to store a partially-used cartridge, store it in its original bag
5 Inserting the print paper
1 Open the paper tray lid and set the partition according to the print paper size you want to use.
To use Post Card size paper, lay the partition down .
To use Small size paper, stand the partition upright.
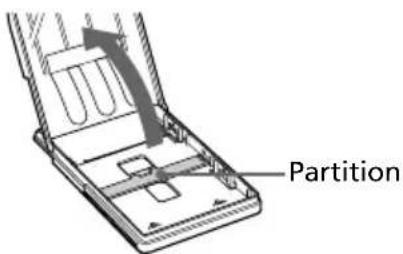
2 Set the print paper into the tray.
Riffle the print paper. Then insert the print paper with its printing surface (the side with no imprint) facing up and the arrow pointing in the same direction as the arrow in the tray.
When inserting paper, insert the protective sheet together with paper into the tray. After you have placed the paper into the tray, remove the protective sheet.
You can set up to 25 sheets for Post Card size and 30 sheets for Small size print paper. When inserting Small size print paper, set it behind the partition.

Note
Do not touch the printing surface. Fingerprints on the printing surface may result in imperfect printing.
Continued
5 Inserting the print paper
3 Close the paper tray lid. Then push and open the printer's paper tray compartment lid and insert the paper tray into the printer.
Insert it firmly until it clicks into place.

natural_image
Line drawing of a computer monitor with an open drive and a circular vent (no text or symbols)Notes
- If print paper does not feed automatically, the paper error indicator lights. Pull out the paper tray and check for a paper jam.
- When adding print paper to a partially full tray, make sure that the total number of sheets does not exceed 25 for the Post Card size or 30 for the Small size print paper. Do not place different types or sizes of paper in the tray. Otherwise, a paper jam or malfunction may occur.
- If the print paper runs out when you press PRINT, a warning sound beeps and the □ paper error indicator lights.
- Do not write or type on the printing surface of the paper before printing. If you want to write greetings or draw on the printed surface after printing, use an oil ink pen.
- Do not attach stickers or anything else on the printing surface before printing.
- Do not remove the backing from sticker print paper before printing is completed. Otherwise, jams or printer damage may occur.
- Do not print on the used print paper. Printing an image twice on the same paper will not make the printed image thicker. This may even cause a malfunction or breakdown.
- Before printing, do not fold or bend the print paper.
Notes on storing the print paper
- Avoid placing the print paper in a location subject to high temperatures, high humidity, excessive dust or direct sunlight.
- Avoid storing the paper with the printed faces touching each other or in contact with rubber or plastic products including vinyl chloride or plasticizer for an extended period of time; color changes or deterioration of the printed image may occur.
- When you are going to store partially-used print paper, store it in its original bag.
Printing selected card or disc images
You can select an image recorded in the "Memory Stick," PC card or CD-R/RW disc and print it at full-size (standard print).
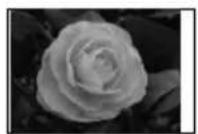
Borderless standard print

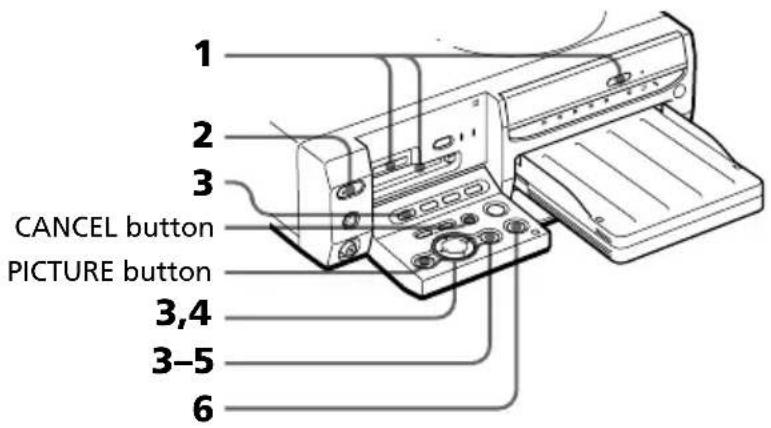
1 Insert a "Memory Stick," PC card or CD-R/RW disc with recorded images into the "Memory Stick" or PC card insertion slot (pages 15-16) or into the CD-R/RW disc tray (page 17).
2 Turn on the printer and television and set the input selector of your television to "VIDEO."
The POWER indicator of the printer lights in green.
3 Press INPUT SELECT to light "MEMORY STICK," PC CARD or CD-RW indicator.
When you select "MEMORY STICK" or PC CARD, the thumbnails of the stored images are displayed on the screen.
![INPUT SELECT PC CARD CD-RW VIDEO PC When you select "MEMORY STICK." Yellow frame (cursor) Memory Stick All Image 333 201 202 203 204 Gm 0 Gm 0 Gm 0 205 206 207 208 Gm 0 Gm 0 Gm 0 208 210 211 212 Gm 0 Gm 0 Select image with [— X— I | X | ] and [ENTER]](/content/2026/06/1239215/images/08252d387eed27ff1a5550aaf1dfd4dd12c4ad10def691b428326b7689380962.jpg)
Continued
Printing selected card or disc images
On INPUT SELECT
You can switch the input by pressing INPUT SELECT before the screen changes. After a while, the screen of the selected scree is displayed.
When you select CD-RW disc
The covers of the folders contained in the CD-R/RW disc are displayed. The front cover stands for the first image contained in each folder. Press the arrow (◄/►/↑/↓) button to move the yellow frame (cursor) to the desired folder, then press ENTER/PRINT QTY.
The images in the folder are displayed as thumbnails.
![CD-R/RW Album album album album ALBUM006 park Pari Album album album album Holiday School ALBUM019 Select folder with [←] [→] [↑] [↓] and [ENTER].](/content/2026/06/1239215/images/e53aa64139ade2f7ecc6144c4bbb2550b4ff5430edd885c4770c4bcb3fedf668.jpg)
Notes
- While the printer is accessing the CD-R/RW disc, do not submit the printer to shock or vibration. Otherwise, the printer may not operate properly or may not save an image. Even the images already stored in the disc may be damaged or the disc itself may crash.
- When you insert an 8cm CD-R/RW disc of your CD Mavica no folders are displayed.
![CD-R/RW 47 images 333 281 202 293 764 285 206 291 206 298 210 211 212 Select image with (← X→ X↑ X↓ ) and [ENTER]](/content/2026/06/1239215/images/f1a015837bb5a26635a5529f4b1aaec313a576d24c2a19242169e808237a22a5.jpg)
4 Press the arrow (◄/►/↑/▼) button to move the yellow frame (cursor) to the image you want to print, then press ENTER/PRINT QTY.
The image is selected and the print quantity indication becomes "1." The area beneath the image turns orange.
flowchart
graph TD
    A["ENTER"] --> B["PRINT QTY"]
    B --> C["Arrow Up"]
    B --> D["Arrow Down"]
    B --> E["Arrow Left"]
    B --> F["Arrow Right"]
![Memory Stick Selected Images 1 201 202 203 204 205 206 207 208 209 210 211 212 Set the quantity with [ENTER]/[CANCEL]Print the image with [PRINT] or save it with [SAVE] Selected image (orange)](/content/2026/06/1239215/images/383b9f20095aee00da11a7545fcb29d6ab1a72794f5580a8709e36f2a35c5755.jpg)
To display another page
When multiple pages exist, you can switch pages. To display the next page, move the yellow frame to the bottom line of the image list and press ↓. To display to the previous page, move the yellow frame to the top line and press ↑.
To cancel the selection
Move the yellow frame to the image you want to cancel and press CANCEL. The orange area turns gray and the print indication becomes "0." The selection is canceled.
To display the images of another folder (CD-R/RW only)
Press FOLDER RECALL. The folder thumbnails are displayed. You can select the desired folder.
Note
When you select a different folder, the selection of image(s) up to that moment is canceled.
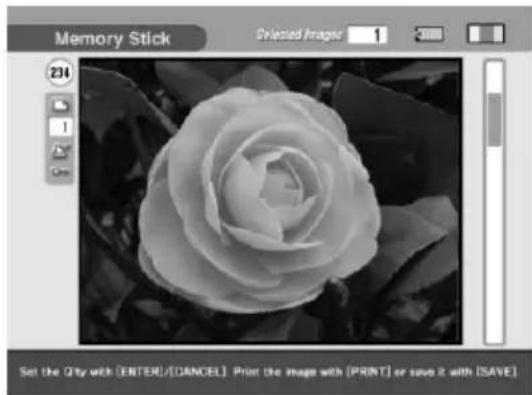
To display a preview image
Move the yellow frame to the desired image, then press PICTURE. The preview of the selected image is displayed.
To display the preview of the next image, press ➤. To display the preview of the previous image, press
To display the image list again, press PICTURE.
natural_image
Black and white photo of a rose with visible petals, set within a software interface (no text or symbols on the flower itself)Note
While the screen display is switching or the printer is accessing the "MEMORY STICK," PC card, or CD-R/RW disc, do not eject or insert them; they may crash.
Continued
Printing selected card or disc images
5 Press ENTER/PRINT QTY to set the print quantity.
Each time you press ENTER/PRINT QTY, the print quantity increases. To reset the print quantity to zero, press CANCEL.
To print multiple images at a time
Repeat steps 4 and 5 to select other images and set print quantity for each of them.
![Memory Stick Selected Images 1 301 202 203 204 305 206 207 208 209 210 211 212 Get the quantity with [ENTER]/CANCEL[Print, the image with [PRINT] or save it with [SAVE]](/content/2026/06/1239215/images/45798b7331bb4244d1f1c803b549c95b20f397efe5e9886e8023eaed47fb5f60.jpg)
The print quantity changes.
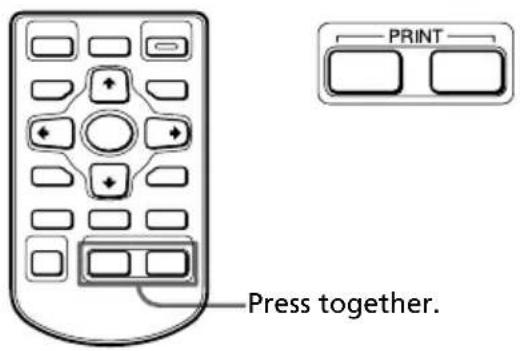
6 Press PRINT.
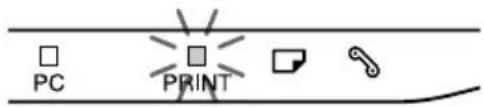
With the remote commander, press both the PRINT buttons together. Printing starts. During printing, the PRINT indicator lights. The printing process bar and the approximate printing time are displayed on the screen.
Printer

When you start printing while the preview image is displayed
An dialog box appears to ask whether you want to print the image being displayed or all the selected images. Select either of the two options to start printing.
To stop printing
Press CANCEL. Printing from the next print will be canceled.
7 When printing ends and the print paper automatically emerges from the paper outlet, remove the printed paper from the printer.
Notes
- When the “MEMORY STICK” or PC CARD indicator blinks or the data access message appears, do not eject the “Memory Stick” or PC card. Otherwise, they may crash.
- While the CD-RW indicator is blinking or the saving message is displayed, never move the printer. The data inside the CD-R/RW disc may be damaged.
- This printer cannot display or print the images of a CD-R/RW disc saved using other devices than this printer.
- While printing, never move or turn off the printer; the print cartridge or paper may become stuck. If this happens, turn the printer off and on, and resume printing from the beginning.
- While printing, the print paper is partially ejected from the paper outlet in stages. Never pull out the paper forcibly until the PRINT indicator turns off and the print paper emerges automatically.
- When using Small Size stickers, do not leave more than 10 sheets of the ejected printed paper on the paper tray.
- Depending on the file type and size of an image, it may take from 5 to 60 seconds to display a preview image on the screen.
- Depending on the type of digital still camera, it may take some time for the thumbnail list to be displayed.
- When the width or height of an image is smaller than 480 dots, the image is displayed in a small size. You can print the image but the printing quality is rough due to its small image size.
On icons of the Cybershot or CD Mavica images in the image list
In the image list, each image is displayed as thumbnail. For an image recorded with your Cybershot or CD Mavica, one of the following icons will be displayed in the upper right corner of the thumbnail or instead of the thumbnail. Icons differs depending on the image's recording mode or file formats as follows:
- Icons displayed in the upper right corner of the thumbnail
TIFF (TIFF file) (e-mail mode file)
voice message file)
- Icons displayed instead of the thumbnail
(motion file*) (image file without thumbnail)
(text file*) (clip motion file*)
*You can copy those files but cannot display nor print them on the printer.
Printing all the images or DPOF preset images at one time
You can print all the images stored in a "Memory Stick," PC card, or CD-R/RW disc at one time. You can also print multiple images preset by your digital still camera (DPOF) at one time.
What is "DPOF"?
The “DPOF” (Digital Print Order Format) is a format used to record the information necessary for automatically printing images shot with a digital still camera at a printing shop or with a home-use printer. The printer can automatically print the preset number of copies of the images preset with DPOF. For details, see the operating instructions of the digital still camera you are using.
Note
Some types of digital still camera does not support the DPOF function or the printer does not support part of the functions of the digital still camera.
1 Insert a "Memory Stick," PC card or CD-R/RW disc with recorded images into the "Memory Stick" or PC card insertion slot (pages 15-16) or into the CD-R/RW disc tray (page 17).
2 Press POWER to turn on the printer.
The POWER indicator lights in green.
To display the images on the screen
You can display and check the images to be printed on the screen. Connect the printer and the television and turn on the television. Then set the input selector of the television to "VIDEO."
3 Press INPUT SELECT to light "MEMORY STICK," PC CARD or CD-RW indicator.
When you connect your printer to the television, the thumbnails of the "Memory Stick" or PC card images are displayed on the screen.
When you select CD-RW disc
The folders contained in the CD-R/RW disc are displayed. Select the desired folder to display the thumbnails of the contained images. Or select the desired image from the image list to display its preview on the screen.
On INPUT SELECT
You can switch the input by pressing INPUT SELECT before the screen changes. After a while, the screen of the selected scree is displayed.
4 Do either of the following:
• To print all the images, press AUTO PRINT until ALL indicator lights.
- To print all the preset images for printing, press AUTO PRINT until DPOF indicator lights.
To cancel operation
Press CANCEL.
When you connect your printer to the television
When you select All, all the images in the thumbnail list are displayed with the orange area beneath the image. When you select DPOF, the preset images are displayed with the orange area beneath the image.
![Memory Stick 201 202 205 206 PRINT [PRINT]CANCEL ART [CANCEL]](/content/2026/06/1239215/images/4673243fe4512551abcf12c66beadef48c4ad2c1c4ebaef8dc929ce12407084c.jpg)
Continued
Printing all the images or DPOF preset images at one time
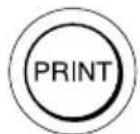
5 Press PRINT.
With the remote commander, press both the PRINT buttons together. Printing starts. When you select All, all the images in the "Memory Stick," PC card, or CD-R/RW disc are printed one by one in the order of their image numbers. When you select DPOF, the preset images are printed with the preset number of copies in the order they were preset.

Printer
To stop printing
Press CANCEL. Printing from the next print will be canceled.
6 When printing ends and the print paper automatically emerges from the paper outlet, remove the printed paper from the printer.
For notes giving further information during or after printing, see page 31.
To return to the usual printing mode
Press CANCEL to turn off the ALL and DPOF indicators.
Printing an image from video equipment
You can capture the input image from the video equipment connected to the VIDEO IN connector of the printer and print it in full-size (standard print).

Borderless standard print
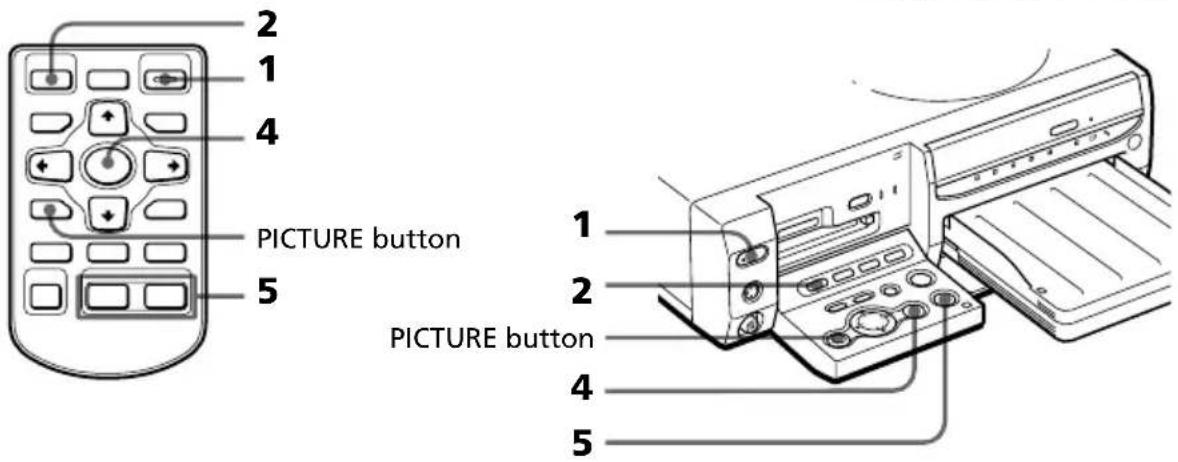
1 Turn on the printer and television and set the input selector of your television to "VIDEO."
The POWER indicator of the printer lights in green.
2 Press INPUT SELECT to light VIDEO indicator.
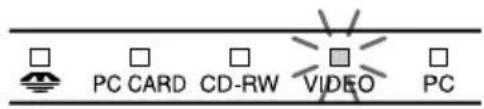
On INPUT SELECT
You can switch the input by pressing INPUT SELECT before the screen changes. After a while, the screen of the selected scree is displayed.
3 Start playback on the video equipment.
The playback pictures appear on the screen (input image). For details on playing back on your video equipment, refer to the instruction manual of your video equipment.
Note
It is not recommended that you select an image while pausing the video equipment because the picture quality will deteriorate. Capture an image while playing them back.
Continued
Printing an image from video equipment
4 Press ENTER/PRINT QTY when the picture you want to print appears on the screen.
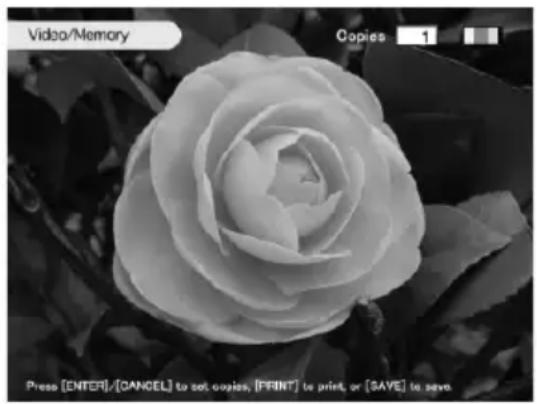
The selected image is captured in the printer's memory and the preview of the selected image (memory image) appears in the center of the screen.
To capture another image
Press PICTURE to display the playback pictures on the screen. Repeat steps 3 and 4 to select another image. The memory image is saved in the printer's memory until you select another image.
natural_image
Black and white close-up of a rose flower with visible petals and leaves, no text or symbols present.5 Press PRINT while the memory image is displayed.
With the remote commander, press both the PRINT buttons together. Printing starts. During printing, the PRINT indicator lights. The printing process bar and the approximate printing time are displayed on the screen.
To stop printing
Press CANCEL. Printing from the next print will be canceled.
6 When printing ends and the print paper automatically emerges from the paper outlet, remove the printed paper from the printer.
The memory image is being displayed on the screen. To display the playback pictures, press PICTURE.
Notes
- Before adjusting the pictures or adding another effect to the image, save the image in a card or disc.
- When you set "Video input" of the MENU screen to Motion, the image undergoes blur compensation for few seconds after it is captured.
Saving "Memory Stick" or PC card images onto a CD-R/RW disc
Saving all the "Memory Stick" or PC card images at one time
You can save all the images in a "Memory Stick" or PC card at one time into a new folder in a CD-R/RW disc.
1 Insert an unformatted CD-R/RW disc into the DC-R/RW disc tray.
2 Insert a "Memory Stick" or PC card storing the image(s) that you want to save on a CD-R/RW disc into the printer.
3 Press INPUT SELECT to turn on the "MEMORY STICK" or PC CARD indicator.
The thumbnails of the images saved on the "Memory Stick" or PC card are displayed.
4 Press SAVE ALL.
The confirmation dialog box for saving images is displayed.
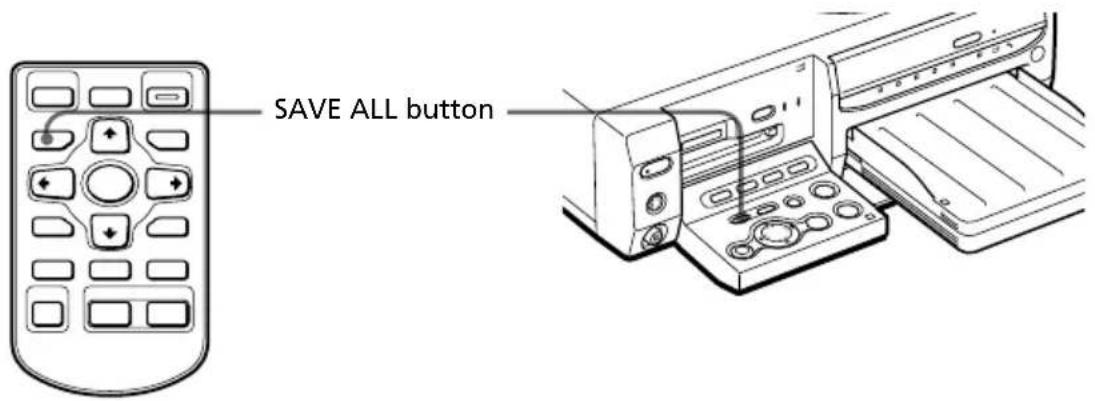
5 Press the arrow (◄/►) button to select "Yes" and then press ENTER/PRINT QTY.
The confirmation dialog box for initializing the disc is displayed.
Continued
Saving "Memory Stick" or PC card images onto a CD-R/RW disc
6 Press the arrow (◄/►) button to select "Yes" and then press ENTER/PRINT QTY.
The CD-R/RW disc is initialized and then all the images in the "Memory Stick" or PC card are saved onto the CD-R/RW disc.
7 When the message notifying saving is complete appears, press ENTER/PRINT QTY.
Tip
You can view the images saved on the CD-R/RW disc on your computer (page 56).
Saving the selected "Memory Stick" or PC card images onto a CD-R/RW disc
You can save the selected "Memory Stick" or PC card images on the desired folder of a CD-R/RW disc. To use a CD-R/RW disc on your printer, you need to initialize the disc. For details, refer to "Preparing a CD-R/RW disc for saving images (initializing)" on page 51.
1 Insert a CD-R/RW disc for saving data onto the CD-R/RW disc tray of the printer.
2 Insert a "Memory Stick" or PC card storing the image(s) that you want to save on a CD-R/RW disc into the printer.
3 Press INPUT SELECT to turn on the "MEMORY STICK" or PC CARD indicator.
The thumbnails of the images saved on the "Memory Stick" or PC card are displayed. You can select an image and press PICTURE to display its preview on the screen.
![Memory Stick All Images 333 261 202 293 264 265 296 297 268 209 210 211 212 Select images with [←→]→[↑]→[↓] and [ENTER]](/content/2026/06/1239215/images/c5ce6c8c412261a20023781f833638da08793ad170f3d5912972976d9b863ed5.jpg)
4 Select an image that you want to save.
■ When thumbnails are displayed
Press the arrow (◄/►/↑/↓) button to select the image you want to save and then press ENTER/PRINT QTY. You can select multiple images.
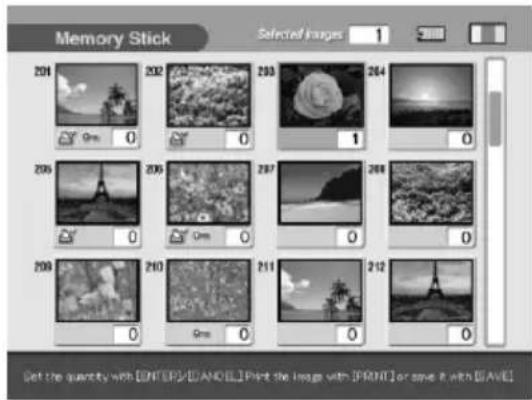
■ When a preview image is displayed
Press the arrow (◄/►/♠/▼) button to display the preview image you want to save and then press ENTER/PRINT QTY.
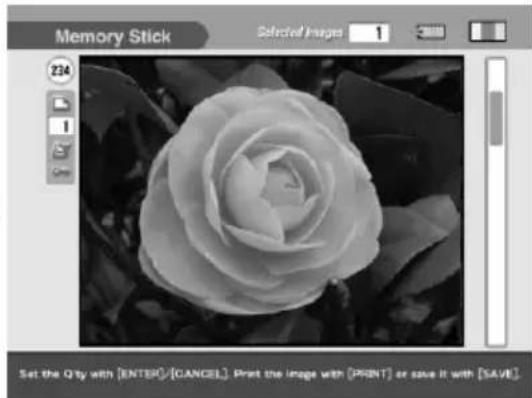
natural_image
Black and white photo of a rose with visible petals, set within a software interface (no text or symbols on the flower itself)Tips
- You can press PICTURE to switch thumbnails and preview image.
- Even if the print quantity of the selected image is more than one copy, only one image is to be saved.
- You can press PRINT to print an image.
5 Press SAVE.
The dialog box used for selecting the destination is displayed.
6 Press the arrow (◄/►) button to select "CD-R/RW" as the destination and then press ENTER/PRINT QTY.
The dialog box used for creating a new folder in the CD-R/RW disc is displayed. You can also select a folder from the existing folders.
![Memory Stick Selected images 1 201 202 203 204 Select the destination to save the image Memory Stick PC Card CD-R/RW Select item with [-->]C--> then press [ENTER]](/content/2026/06/1239215/images/b346e92b8472465c33c47492972b0ca0e3e8d3eb93a40ddd09e98ef79836262d.jpg)
Continued
Saving "Memory Stick" or PC card images onto a CD-R/RW disc
Tip
If you select "Memory Stick" or PC card as the destination, you can copy the images from a card to another card. You cannot select the identical card type (from "Memory Stick" to "Memory Stick", or from PC card to PC card).
Notes
- If there is no folder in the CD-R/RW disc, the dialog box for creating a new folder does not appear. A new folder is automatically created.
- If no CD-R/RW disc is loaded, an error message is displayed. Insert a CD-RW disc for saving images.
7 Press the arrow (◄/►) button to select "Yes" to create a new folder or "No" to save an image in an existing folder.
- When you select "Yes," a new folder is created to the end of the existing folders. The selected image is saved into the new folder.
- When you select "No," the existing folders are listed on the screen. Press the arrow (◄/►) button to select the destination folder and press ENTER/PRINT QTY. The image is saved on the selected folder.
Note
If there is not enough free space in the CD-R/RW disc for saving the image, an message asking you to replace discs will appear. Press the arrow (◄/►) button to select "Yes" to replace discs or "No" to cancel saving. When you select "Yes," insert a CD-R/RW disc with sufficient free space and select "Yes" when the confirmation message is displayed.
8 When the message notifying saving is complete appears, press ENTER/PRINT QTY.
Tip
You can view the images saved on the CD-R/RW disc on your computer (page 56).
On folders and file names in saving images on a CD-R/RW disc On folders (albums)
Folders are named and saved on a CD-R/RW disc as "ALBUM001,"
"ALBUM002," "ALBUM003" and so on in the order they are created. Even if you rename folders with your printer, the folders are written in a CD-R/RW disc with their original folder names. The folder name data you change with the printer is saved in the file called "dirname.txt" in each "ALBUM###" (######: numbers) folder.
On file names
- When you press SAVE ALL, a new folder is created in a CD-R/RW disc and all the images in the “Memory Stick” or PC card are saved as their original folder structures in the new folder.
- When you select images and press SAVE, saving format differs depending on the file format of the selected images:
- DCF files*: Saved to the "ALBUM###\DCIM\100MSDCF" folder. Each file is numbered in serial starting at next number to the last file number of the existing files in the CD-R/RW disc. If 999 or more files already exist in the folder, a new "ALBUM###\DCIM\101MSDCF" folder is created and the files are saved in the folder.
- Other format file than DCF: Only files are saved to the "ALBUM##\DPPSV" folder. If there is a file with the identical file name, the file is added with suffix numbers (serial number (1), (2) and so on) and saved in the folder.
* The files compatible with the DCF (Design rule for Camera File) format, which are saved in the "DCIM\100#########0001.jpg" (#: random alphanumeric letters) folder structure in the "Memory Stick" or PC card.
When you save images in the "Memory Stick" or PC card, no "ALBUM###" folder is created. The same saving rules except for the "ALBUM" folder apply.
Saving CD-R/RW disc images onto the "Memory Stick" or PC card
Saving all the images in a CD-R/RW folder at one time
You can save all the images contained in a folder of a CD-R/RW disc onto the "Memory Stick" or PC card at one time.
1 Insert a "Memory Stick" or PC card for saving CD-R/RW disc data into the printer.
2 Insert a CD-R/RW disc storing the image(s) that you want to save onto a card into the printer.
3 Press INPUT SELECT to turn on the CD-RW indicator.
The folder covers saved on the CD-R/RW disc are displayed.
![CD-R/RW Album album album album album album album album album album album album album album album album album album album album album album album album album album album album album album album album album album album album album album album album album album album album album album album album album album album bum008 park Pari Holiday School ALBUM019 Select folder with [←]→[↑]↓] and [ENTER]](/content/2026/06/1239215/images/d92a2c1a58597650662da8135de24186406dedff17dda9522258cc7c5e0dcd4d.jpg)
4 Press the arrow (◄/►/↑/↓) button to select the folder that you want to save and then press ENTER/PRINT QTY.
The images in the selected folder are displayed as thumbnails.
![CD-R/RW All images: 333 201 202 203 204 205 206 207 208 209 210 211 212 Select image with (← X → K ↑ K ↓ ) and [ENTER]](/content/2026/06/1239215/images/cf6decd1c292f5be5f817dec5642e25a150f465f0aca5454ed3c50fa9d33f8fb.jpg)
5 Press SAVE ALL.
The dialog box used for selecting the destination is displayed.
6 Press the arrow (◄/►) button to select "Memory Stick" or "PC Card" as the destination and then press ENTER/PRINT QTY.
All the images in the selected CD-R/RW disc folder are saved and added to the image list of the "Memory Stick" or PC card.
7 When the message notifying saving is complete appears, press ENTER/PRINT QTY.
Notes
- While saving the image, do not turn off the power of the printer or remove the "Memory Stick," PC card or CD-R/RW disc from the printer. The "Memory Stick," PC card or CD-R/RW disc may be damaged.
- If the "Memory Stick" or PC card is in write protect status, you cannot save an image in the "Memory Stick" or PC card.
- All the files in the folder including image files and other files are saved.
Saving the selected CD-R/RW disc images onto the "Memory Stick" or PC card
You can save the selected images in a CD-R/RW disc onto the “Memory Stick” or PC card.
1 Insert a "Memory Stick" or PC card for saving CD-R/RW disc data into the printer.
2 Insert a CD-R/RW disc storing the image(s) that you want to save onto a card into the printer.
3 Press INPUT SELECT to turn on the CD-RW indicator.
The folder covers saved on the CD-R/RW disc are displayed.
4 Press the arrow (◄/►/↑/↓) button to select the folder that you want to save and then press ENTER/PRINT QTY.
The images in the selected folder are displayed as thumbnails. You can select an image and press PICTURE to display its preview on the screen.
Continued
Saving CD-R/RW disc images onto the "Memory Stick" or PC card
5 Select an image that you want to save.
■ When thumbnails are displayed
Press the arrow (◄/►/↑/↓) button to select the image you want to save and then press ENTER/PRINT QTY. You can select multiple images.
■ When a preview image is displayed
Press the arrow (◄/►/↑/↓) button to display the preview image you want to save and then press ENTER/PRINT QTY.
Tips
- You can press PICTURE to switch thumbnails and preview image.
- Even if the print quantity of the selected image is more than one copy, only one image is to be saved.
- You can press PRINT to print an image.

natural_image
Black and white photo of a rose flower with visible petals, displayed within an image editing software interface (no text or symbols on the flower itself)6 Press SAVE.
The dialog box used for selecting the destination is displayed.
7 Press the arrow (◄/►) button to select "Memory Stick" or "PC Card" as the destination and then press ENTER/PRINT QTY.
The selected images are saved and added to the image list of the "Memory Stick" or PC card.
8 When the message notifying saving is complete appears, press ENTER/PRINT QTY.
Notes
- While saving the image, do not turn off the power of the printer or remove the "Memory Stick," PC card or CD-R/RW disc from the printer. The "Memory Stick," PC card or CD-R/RW disc may be damaged.
- If the "Memory Stick" or PC card is in write protect status, you cannot save an image in the "Memory Stick" or PC card.
- If a file name is changed with your computer or contains the characters or numbers that the printer does not support, you may not be able to display or save the file.
Saving the video memory image onto a "Memory Stick," PC card or CD-R/RW disc
The captured and printed image from the video equipment is stored in the printer's memory. If you capture another image, the previous image is overwritten and erased. You can save the memory image onto a "Memory Stick," PC card or CD-R/RW disc.
1 Insert a "Memory Stick," PC card or CD-R/RW disc for saving the video memory image into the printer.
2 Press INPUT SELECT to light VIDEO indicator.
3 Start playback on the video equipment and press ENTER/PRINT QTY when the picture you want to print appears on the screen.
The selected image is captured in the printer's memory and the preview of the selected image (memory image) appears in the center of the screen.
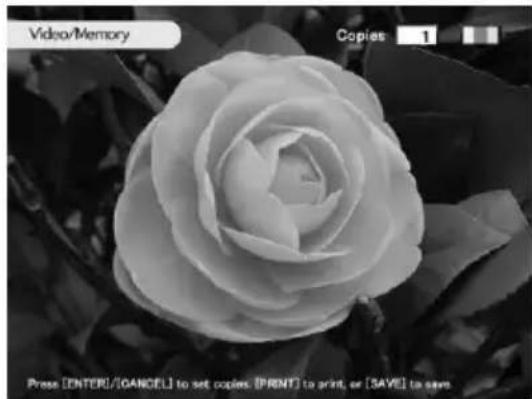
natural_image
Black and white close-up of a rose flower with visible petals and leaves, no text or symbols present.4 Press SAVE.
The dialog box used for selecting the destination is displayed.
![Video/Memory Copies 1 Select destination. Memory Stick PC Card CO-R/RW Select Item with [→][→] and [ENTER]](/content/2026/06/1239215/images/7f7d49e10aec69b68715ab18cb30ef2696bb2a020c503b9118bac19838ed4d08.jpg)
Continued
Saving the video memory image onto a "Memory Stick," PC card or CD-R/RW disc
5 Press the arrow (◄/►) button to select the destination ("Memory Stick," "PC Card" or "CD-R/RW") and then press ENTER/PRINT QTY.
- When you select "Memory Stick" or PC card, the memory image is saved and added to the image list of the card. The playback pictures are displayed again.
- When you select CD-R/RW disc, the dialog box used for selecting the destination folder is displayed. Press the arrow (◄/►) button to select the destination folder and then press ENTER/PRINT QTY. The images are saved onto the selected folder.
Notes
- While saving the image, do not turn off the power of the printer or remove the "Memory Stick," PC card or CD-R/RW disc from the printer. The "Memory Stick," PC card or CD-R/RW disc may be damaged.
- If the "Memory Stick" or PC card is in write protect status, you cannot save an image in the "Memory Stick" or PC card.
- If the video source is copy protected, the error message appears and you cannot save the image. Even when no message is displayed, some CD, TV programs, images or publications may be copyrighted. Please note that unauthorized duplication or modification of others' portraits or copyrighted work could infringe the rights reserved by right holders (page 3).
On CD-R/RW discs
Types of CD-R/RW discs you can use
With the printer, you can use the following discs:
- The CD-RW discs with the following logos:

CD-RW (CD-Rewritable) disc, resembling to a CD-ROM disc, is a storage media that allows you to write or delete data including image files repeatedly.
• The CD-R discs with the following logo:

CD-R (CD-Recordable) disc is also a storage media that allows you to write or delete data. Even if you delete files, however, the disc capacity does not increase.
Using a CD Mavica disc on the printer
You can display and print the images of an 8cm CD-R/RW disc recorded using your CD Mavica digital camera. You can also copy those images onto "Memory Stick," PC card or CD-R/RW disc.
Notes
- You cannot display or print files on a CD Mavica 8cm CD-R/RW disc except for image files. For details, see “On icons of the Cybershot or CD Mavica images in the image list” on page 31.
- We recommend you use CD-R/RW discs manufactured by Sony.
- Please use a commercially available unformatted CD-R/RW disc.
- You cannot use a CD-R/RW disc with "High Speed" description.
- You cannot use any disc that contains no data, has failed in data write, or is not ready for data read.
- Only round shaped disc can be used. Using discs other than round shaped (star shaped, heart shaped, and so on) will damage the printer.
- For a CD Mavica 8cm CD-R/RW disc, you cannot write or delete files, create or rename folders, or initialize the disc.
- You cannot use Double Density CD-R/RW disc.
On CD-R/RW discs
On handling discs
To prevent losing data, note the following.
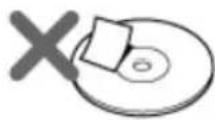
- Do not stick on paper or labels, or scratch the surface of the disc.
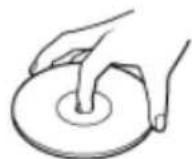
- Do not touch the recording surface of the disc (the surface on which nothing is printed).
- Do not place a disc in a location subject to excessive dust, direct sunlight, heat sources or high humidity.
- Keep a disc from any liquid falling on it.
- When it is not in use, store it in a case.
Notes on cleaning CD-R/RW discs
- Fingerprints and dust on the surface of a disc may cause read errors.
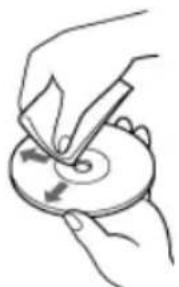
- For normal cleaning, hold the disc by its edge and use a soft cloth to wipe the surface from the center out.
natural_image
Illustration of hands using a tool to cut or mark a circular object with arrows (no text or symbols)- If the disc is badly soiled, moisten a soft cloth with water, wring it out well, and use it to wipe the surface of the disc from the center out. Wipe off any remaining moisture with a dry soft cloth.
- Do not use solvents such as benzine, thinner, commercially available cleaners or anti-static spray, because they may cause damage to the disc.
Operations flow on using a CD-R/RW disc
To use a CD-R/RW disc on the printer, you need the following operations:

flowchart
graph TD
    A["Start"] --> B["New disc"]
    B --> C["Initialization"]
    C --> D["You can save images."]
    D --> E["Saving all/selected images"]
    E --> F["Creating a new folder"]
    F --> G["Images are stored."]
    G --> H["Viewable by the printer"]
    H --> I["Finalization"]
    I --> J["You can view a disc with a CD-ROM drive."]
    J --> K["Unfinalization"]
    K --> L["Recover the space consumed by finalization except for 300 KB."]
    L --> M["Formatting"]
    M --> N["Recover all the space."]
    N --> O["[approx. 21 min."]]
    O --> P["[approx. 3 min."]]
    P --> Q["[approx. 7 min."]]
    Q --> R["Viewable by the computer"]
    R --> S["CD-R"]
    R --> T["CD-RW"]
    style A fill:#f9f,stroke:#333
    style H fill:#ccf,stroke:#333
    style I fill:#cfc,stroke:#333
    style J fill:#fcc,stroke:#333
Initialization
Initialization allows you to store images on a CD-R/RW disc with the printer (page 51).
Finalization
Finalization allows you to view and read the images of a CD-R/RW disc recorded by the printer with the CD-ROM drive of your computer (page 56)
Continued
Operations flow on using a CD-R/RW disc
Unfinalization
You can cancel finalization you have done for a CD-RW disc. When you perform unfinalization, the disc space consumed by finalization will be recovered (page 58).
Formatting
You can format a disc to erase all the images inside or to use a CD-RW disc formatted by other device on the printer. Formatting will erase all the data inside the disc. When you format a disc, the disc is automatically initialized (page 59).
On writing/reading a disc with the printer
- You can write data only on a CD-R/RW disc that is initialized with the printer.
- You can read a CD-R/RW disc storing the data written using the printer, CD Mavica, or a ISO9660 Level 2* basis. (*The printer does not support multi-session capability. Depending on the file name or directory structures on a disc, the printer will not be able to read the disc.)
Notes
- When the CD-R/RW disc is written using the Windows XP standard CD-R/RW writing software, only the data written first (the data written in the first session) will be viewed on the printer.
- The printer uses UDF1.5 format to write data on a CD-R/RW disc. When you use your computer or other device to write data on a CD-R/RW disc on the UDF1.5 format, however, we cannot guarantee the printer to read its data.
If you use other device to edit the printer data on a CD-R/RW disc, we cannot guarantee the printer to write or read data on the disc.
Preparing a CD-R/RW disc for saving images (Initialization)
To use a CD-R/RW disc on the printer, you need to initialize the disc.
1 Insert an unformatted CD-R/RW disc into the DC-R/RW disc tray.
2 Press INPUT SELECT to turn on the CD-RW indicator.
The confirmation dialog box for initializing the disc is displayed.
3 Press the arrow (◄/►) button to select "Yes" to initialize the disc or "No" to cancel initialization and then press ENTER/PRINT QTY.
When you select "Yes," the CD-R/RW disc is initialized.
You can also initialize a CD-R/RW disc with the following methods:
- While the image thumbnails of a CD-R/RW disc is displayed, press MENU. Select "DELETE/FORMAT" and then "Initializing CD-R/RW."
![MENU SET DELETE/FORMAT SLIDESHOW INDEX PRINT EXIT 201 Delete Image Memory Stick Format Initializing CD-R/RW Finalizing CD-R/RW Unfinalizing CD-RW Formatting CD-RW 206 0 One 0 0 0 209 210 One 0 211 212 Select item with [T] [I] and [ENTER]](/content/2026/06/1239215/images/611dfd3b161a8aa9cc7d84bb4411f1472ca07f79a6a062b85fc4ea97e0d69577.jpg)
- While the folder covers in a CD-R/RW disc are displayed, press MENU to display the folder menu. Select "FORMAT" and then "Initializing CD-R/RW."
![MENU NEW RENAME DELETE FORMAT SET EXIT Initialing CD-R/RW Finaling CD-R/RW Limiting CD-RR Formatting CD-RR ALBUM008 park Pari Album Album Album Album Holiday School ALBUM019 Select item with [ 1 ] [ ] and [ENTER]](/content/2026/06/1239215/images/65f63f0c852df44a5220573b6b615a829cad2e549d6ec418a7c44e33afd88797.jpg)
Notes
- It takes approximately 20 seconds to initialize a CD-RW disc and 15 seconds to initialize a CD-R disc. During initialization, do not give vibration or shock to the printer.
- You can perform initialization only for a CD-R/RW disc with no data written.
- You cannot initialize a disc that has been formatted using your computer or other devices. For a CD-RW disc, you can format it again and use it on the printer.
Arranging the folders in a CD-R/RW disc
You can add, delete, or rename a folder in a CD-R/RW disc.
Note
If the disc space is limited, you cannot add, delete, or rename a folder.
Creating a new folder
1 Insert a CD-R/RW disc in which you want to create a new folder into CD-R/RW disc tray of the printer.
2 Press INPUT SELECT to turn on the CD-RW indicator.
The folder covers on the CD-R/RW disc are displayed.
Note
While the printer is accessing a CD-R/RW disc, do not give vibration or shock to the printer. The printer may not operate correctly or save images. Furthermore, the disc itself or the images already saved on the disc may be damaged.
3 Press MENU.
The Folder menu is displayed.
![CD-R/RW Album album album album album album album album album album album album album album album album album album album album album album album album album album album album album album album album album album album album album album album album album album album album album album album album album album album bum008 park Pari Holiday School ALBUM019 Select folder with [←][→][↑][↓] and [ENTER]](/content/2026/06/1239215/images/f256e65db3df26c23cc2899ccca22cb11b4563e64a284902da357607a3838ec7.jpg)
![Folder menu MENU NEW RENAME DELETE FORMAT SET EXIT Album album album album album album album album album album album album album album album album album album album album album album album album album album album album album album album album album album album album album album album album album album album album album album album album album album album bum008 park Pari Holiday School ALBUM019 Select item with [→ I→] the press [ENTER]](/content/2026/06/1239215/images/4434a001af0786d2a49b6a0aedcdf446cb4c397b95f3a6f37eb07ace3ad9ad97.jpg)
4 Press the arrow (◄/►) button to select "NEW" and press ENTER/PRINT QTY.
A confirmation message for creating a new folder is displayed.
Note
The maximum folder number in a disc is 99. You cannot create more than 99 folders.
5 Press the arrow (◄/►) button to select "Yes" and then press ENTER/PRINT QTY.
A new folder is created and added to the end of the existing folders.
Renaming a folder
Each folder in a CD-R/RW disc is by default named "ALBUM###" (######: numbers). You can rename a folder up to 16 alphanumeric characters.
1 Insert a CD-R/RW disc containing a folder that you want to rename into CD-R/RW disc tray of the printer.
2 Press INPUT SELECT to turn on the CD-RW indicator.
The folder covers on the CD-R/RW disc are displayed.
3 Press MENU.
The Folder menu is displayed.
4 Press the arrow (◄/►) button to select "RENAME" and press ENTER/PRINT QTY.
5 Press the arrow (◄/►/♠/▼) button to select the folder that you want to rename and press ENTER/PRINT QTY.
The folder rename screen is displayed.
6 Press the arrow (←/→/↑/↓) button to select a character and then press ENTER/PRINT QTY.
The selected characters are input in the input box.
Continued
Arranging the folders in a CD-R/RW disc
To input in a capital letter
Select "CAPS" and press ENTER/PRINT QTY to display the capital letters table. Then select the desired character and press ENTER/PRINT QTY. To enter a small letter, select "CAPS" again.
To correct an input character
Select “◀” or “→” on the screen and press ENTER/PRINT QTY to move the cursor in the input box after the character you want to delete. Then select “BS” and press ENTER/PRINT QTY. The character before the cursor is deleted.
![Character input box Character table Input folder name ! @ # $ % ^ & * ( ) _ + Q W E R T Y U I O P { } A S D F G H J K L : " Z X C V B N M < > ? - SPACE ! BS CAPS ENTER [← ||→ ||↑ ||↓ ] and [ENTER] to select an item/input a character.](/content/2026/06/1239215/images/5a80a605110d794bbc6d6d40f0bbc9a48c866c75dfe2dacec2da09eb635eda07.jpg)
7 When you finish inputting a folder name, press the arrow (◄/►/↑/↓) button to select "ENTER" and then press ENTER/PRINT QTY.
The folder name screen is closed. The folder covers are displayed. The changed folder name is displayed under the folder icon.
8 When you exit the folder name inputting mode, press CANCEL.
Note
When you insert the CD-R/RW disc into your computer's CD-ROM drive, the folder name is displayed as "ALBUM###" (######: numbers). The folder name data you change with this printer is saved in the file called "dirname.txt" in each "ALBUM###" (######: numbers) folder.
Deleting a folder
1 Insert a CD-R/RW disc containing a folder that you want to delete into CD-R/RW disc tray of the printer.
2 Press INPUT SELECT to turn on the CD-RW indicator. The folder covers on the CD-R/RW disc are displayed.
3 Press MENU. The Folder menu is displayed.
4 Press the arrow (◄/►) button to select "DELETE" and press ENTER/PRINT QTY.
The folder selection screen is displayed.
![MENU NEW RENAME DELETE FORMAT SET EXIT Album album album album album album album album album album album album album album album album album album album album album album album album album album album album album album album album album album album album album album album album album album album album album album album album album album album Album008 park Pari Holiday School ALBUM019 Select item with [←]←→ the press [ENTER].](/content/2026/06/1239215/images/1f1a0b0b675d1ef2b705f66c6d38caaf6a784b5613eb4ffab3503407f7769687.jpg)
![MENU NEW RENAME DELETE FORMAT SET EXIT Album Album Album Album album008 park Pari Album Album Album Holiday School ALBUM019 Press [←→] → [↑↓] | 2/(ENTER) to select the folder.](/content/2026/06/1239215/images/7d6ecad15d9a95b33f067f1af6844a23abd593cbf140ff7b059288cb7f3126ae.jpg)
5 Press the arrow (◄/►/♠/↓) button to select the folder that you want to delete and press ENTER/PRINT QTY.
The confirmation message is displayed.
6 Press the arrow (◄/►) button to select "Yes" to delete the folder or "No" to cancel deletion.
When you select "Yes," the selected folder is deleted from the CD-R/RW disc.
7 When you exit the folder deleting mode, press CANCEL.
Viewing images of a CD-R/RW disc on your computer
System requirements of the computer
You can use the CD-ROM drive of your computer to view images that you save in a CD-R/RW disc on the printer. To view the images, your computer must meet the following system requirements:
Recommended Windows system:
OS: Microsoft Windows 98/Windows Me/ Windows 2000 Professional/Windows XP Home Edition/Windows XP Professional should be pre-installed.
CD-ROM Drive: MultiRead compatible
Recommended Macintosh system:
OS: Mac OS 8.5.1/8.6/9.0/9.1/9.2 should be pre-installed.
CD-ROM Drive: MultiRead compatible
Preparing a CD-R/RW disc for viewing images on the computer (Finalization)
To view a CD-R/RW disc storing the printer images on the CD-ROM drive of your computer, you need to finalize the disc on the printer. A CD-R/RW disc that are not finalized cannot be recognized with your computer's CD-ROM drive.
1 Insert a CD-R/RW disc that you want to finalize into CD-R/RW disc tray of the printer.
2 Press INPUT SELECT to turn on the CD-RW indicator.
The folder covers on the CD-R/RW disc are displayed.
3 Press MENU.
The Folder menu is displayed.
![MENU NEW RENAME DELETE FORMAT SET EXIT Album album album album album album album album album album album album album album album album album album album album album album album album album album album album album album album album album album album album album album album album album album album album album album album album album album album Album008 park Pari Holidays School ALBUM019 Select item with [←][→] the press [ENTER]](/content/2026/06/1239215/images/00d0e583389781781374a447da996922a1039e5a66a9cd0ec848715951467088.jpg)
4 Press the arrow (◄/►) button to select "FORMAT" and press ENTER/PRINT QTY.
The FORMAT sub menu is displayed.
![MENU NEW RENAME DELETE FORMAT SET EXIT Initiating CD-R/RW Finishing CD-R/RW Unfitizing CD-RW Formatting CD-RW ALBUM008 park Pari Album Album Album Album Holiday School ALBUM019 Select Item with [T][E][ ] and [ENTER]](/content/2026/06/1239215/images/2fc66d0a737b988fa1ee00882826e507eb38ee7c04e89590716263909f897668.jpg)
5 Press the arrow ( / ) button to select "Finalizing CD-R/RW" and then press ENTER/PRINT QTY.
The confirmation message is displayed.
6 Press the arrow (◄/►) button to select "Yes" to finalize the disc or "No" to cancel finalization.
When you select "Yes," the CD-R/RW disc is finalized.
You can also initialize a CD-R/RW disc with the following method:
While the image thumbnails of a CD-R/RW disc is displayed, press MENU. Select "DELETE/FORMAT" and then "Finalizing CD-R/RW."
Notes
- It takes approximately 7 minutes to finalize a CD-R/RW disc. (The time required depends on the number of files written on a disc.) During finalization, do not give vibration or shock to the printer.
- You can remove a CD-R/RW disc without finalization. You can perform finalization later.
• After you finalize a CD-R/RW disc, you cannot add recording to a disc, delete a folder or rename a folder.
Tip
For a CD-RW disc, the finalized disc can be unfinalized so that you can add recording, delete folders, or rename folders.
Viewing images of a CD-R/RW disc on your computer
Canceling the finalization (Unfinalization)
When using a CD-RW disc, you can cancel finalization you have done. When you perform unfinalization, the disc space consumed by finalization will be recovered.
1 Insert a finalized CD-RW disc that you want to unfinalize into CD-R/RW disc tray of the printer.
2 Press INPUT SELECT to turn on the CD-RW indicator.
The folder covers on the CD-RW disc are displayed.
3 Press MENU.
The Folder menu is displayed.
4 Press the arrow (◄/►) button to select "FORMAT" and press ENTER/PRINT QTY.
The FORMAT sub menu is displayed.
5 Press the arrow ( / ) button to select "Unfinalizing CD-RW" and then press ENTER/PRINT QTY.
The confirmation message is displayed.
6 Press the arrow (◄/►) button to select "Yes" to unfinalize the disc or "No" to cancel unfinalization.
When you select "Yes," the CD-RW disc is unfinalized.
You can also unfinalize a CD-RW disc with the following method:
While the image thumbnails of a CD-RW disc is displayed, press MENU. Select "DELETE/FORMAT" and then "Unfinalizing CD-RW."
Notes
- It takes approximately 3 minutes to unfinalize a CD-RW disc. During unfinalization, do not give vibration or shock to the printer.
- A CD-RW disc, after finalization, can be unfinalized so that you can add recording, delete folders, or rename folders. To view the disc on your computer's CD-ROM drive, you need to finalize it again.
- You cannot unfinalize a CD-R disc.
Formatting a CD-RW disc
To erase all the saved images or to use a CD-RW disc formatted by other device on the printer, you can format a disc. When you format a disc, the disc is automatically initialized.
Note
Formatting will erase all the data including image and non-image files inside the disc. Before performing formatting, make sure to check the disc contents.
1 Insert a CD-RW disc that you want to format into CD-R/RW disc tray of the printer.
2 Press INPUT SELECT to turn on the CD-RW indicator.
3 Press MENU. The Folder menu is displayed.
4 Press the arrow (◄/►) button to select "FORMAT" and press ENTER/PRINT QTY.
The FORMAT sub menu is displayed.
![MENU NEW RENAME DELETE FORMAT SET EXIT Initiating CD-R/WR Finating CD-R/PW Unfinating CD-RW Formatting CD-RW ALBUM008 park Pari Album Album Album Holiday School ALBUM019 Select item with [T][I] and [ENTER]](/content/2026/06/1239215/images/4312098d1ccc1fc3eb1c20cb7f8d86b92cf1e3f1099c2757a301d251ca623009.jpg)
5 Press the arrow ( / ) button to select "Formatting CD-RW" and then press ENTER/PRINT QTY.
The confirmation message is displayed.
6 Press the arrow (◄/►) button to select "Yes" to format the disc or "No" to cancel formatting.
When you select "Yes," the CD-RW disc is formatted and then initialized.
You can also format a CD-RW disc with the following method:
While the image thumbnails of a CD-RW disc is displayed, press MENU. Select "DELETE/FORMAT" and then "Formatting CD-RW."
Notes
- It takes approximately 21 minutes to format a CD-RW disc. During formatting, do not give vibration or shock to the printer.
- You cannot format a CD-R disc.
- You cannot use a CD-RW disc formatted by other devices. To use it on the printer, format the disc on the printer.
- You can format a CD-RW the maximum of 300 times.
Setting the access speed to a CD-R/RW disc
You can set the write and read speed of the CD-R/RW disc drive.
Usually use the initial speed settings listed below. Only when the operations are unstable, reduce the speed to the value in the parenthesis:
• CD-R write speed: X8 (X4)
• CD-RW write speed: X4 (X2)
- Read speed: X24 (X8)
1 Insert a CD-R/RW disc into CD-R/RW disc tray of the printer.
2 Press INPUT SELECT to turn on the CD-RW indicator.
3 Press MENU.
The Folder menu is displayed.
4 Press the arrow (◄/►) button to select "SET" and press ENTER/PRINT QTY.
The SET sub menu is displayed.
![MENU NEW RENAME DELETE FORMAT SET EXIT CD-R write speed CD-RW write speed. Read speed ALBUM008 park Pari Album Album Album Holiday School ALBUM019 Select item with [ 1 ] [ 2 ] and [ENTER].](/content/2026/06/1239215/images/b78b1667e85ed35f107d99982d049b1caaa4ac861cd1f5b3ba775ad1330e0787.jpg)
5 Press the arrow (♠/♦) button to select the item you want to change, press the arrow (♦/♦) button to set the access speed, and then press ENTER/PRINT QTY.
The message notifying you that the setting becomes effective after you turn on the power next time is displayed.
6 Press ENTER/PRINT QTY.
7 Turn off the printer and then turn it on.
The access speed setting you have changed becomes effective.
Adding effects to an image
What you can do with the EFFECT menu
The EFFECT menu allows you to edit, adjust or add special filters to an image in the "Memory Stick," PC card or CD-R/RW disc.
To display the EFFECT menu
1 Select the image to be edited in the thumbnail list or press PICTURE to display the preview of the image to be edited.
2 Press EFFECT.
The EFFECT menu bar is displayed.
Note
You cannot enter into the EFFECT menu while the video images are input with VIDEO input indicator on or the CD-R/RW folders are displayed.
![EFFECT button Cursor EFFECT menu bar Select item with [---][(→) and ENTER] EFFECT EXIT ADJUST FILTER RESET EXIT 234 0 1 2 3 4 5 6 7 8 9 10 11 12 13 14 15 16 17 18 19 20 21 22 23 24 25 26 27 28 29 30 31 32 33 34 35 36 37 38 39 40 41 42 43 44 45 46 47 48 49 50 51 52 53 54 55 56 57 58 59 60 61 62 63 64 65 66 67 68 69 70 71 72 73 74 75 76 77 78 79 80 81 82 83 84 85 86 87 88 89 90 91 92 93 94 95 96 97 98 99 100](/content/2026/06/1239215/images/b54754276ca4360e89cd12cfa2a0c31bbb4d787213c83962da5c270fd8ae3447.jpg)
Adding effects to an image
3 Press the arrow (◄/►) button to move the cursor to the desired menu item on the menu bar and then press ENTER/PRINT QTY to display its sub menu.
Sub menu Functions
+/- Enlarges or reduces an image. (Page 63)
EDIT Moves, rotates or flips an image. (Page 64)
ADJUST Adjusts the brightness, tint, color depth, and sharpness of the image. (Page 65)
FILTER Adds a special filter to an image to print monochrome, sepia, or painted pictures. (Page 66)
RESET Removes any edition, adjustment, or filter and reset the image to its default status.
Notes
- It may take longer to process an edited image after you press the PRINT button.
- Do not remove the “Memory Stick,” PC card or CD-R/RW disc while in the EFFECT mode. If you do, the EFFECT mode ends forcibly and any editing you have done is canceled.
To cancel operation
Press CANCEL to return to the screen of the preceding procedure.
To display another sub menu
Press until the current sub menu disappears.
To print the image
Press PRINT. The image being displayed will be printed.
To exit the EFFECT menu
Select "EXIT" in the main EFFECT menu or press EFFECT either in the EFFECT main or sub menus. When a dialog box for saving is displayed, select "Yes" to save the edited image or "No" to cancel it.
To save the image with the selected effects
For detailed saving procedures, see pages 37 to 46.
1 Press SAVE.
A dialog box to select the destination is displayed. You can select the destination from either "Memory Stick," PC card or CD-R/RW disc. (The same dialog box appears when you terminate the operations midway.)
2 Press the arrow (◄/►) button to select the destination and then press ENTER/PRINT QTY.
- When you select the "Memory Stick" or PC card as the destination, the image is added to the thumbnails.
- When you select the CD-R/RW disc as the destination, the dialog box to select the destination folder is displayed. Select the folder and save the image.
Notes
- If the "Memory Stick" or PC card is in write protect status, you cannot save an image in the "Memory Stick" or PC card.
- While saving the image, do not turn off the power or remove the "Memory Stick," PC card or CD-R/RW disc from the printer. The "Memory Stick," PC card or CD-R/RW disc may be damaged.
Changing an image size and position
In the EFFECT menu (page 61), press the arrow (◄/►) button to select "+" to enlarge an image or "-" to reduce an image and then press ENTER/PRINT QTY.
Each time you press ENTER/PRINT QTY, the image is enlarged or reduced:
-: up to 60%
•+: up to 200%
Note
The picture quality of an enlarged image may be deteriorated depending on its size.
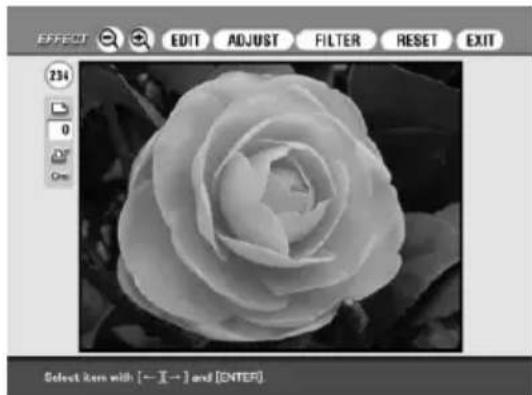
natural_image
Black and white close-up of a rose flower, no text or symbols visible in the main image area.Adding effects to an image
Changing an image position
The EDIT sub menu allows you to move, rotate, or flip an image.
1 In the EFFECT menu (page 61), press the arrow (←/→) button to select "EDIT."
The EDIT sub menu is displayed.
2 Press the arrow (♠/♦) button to move the cursor to the desired item on the EDIT sub menu and press ENTER/PRINT QTY.
![MOVE Rotate 90° Clockwise Rotate 90° Counterclockwise Merrer Select rows with [↑]↓] and [ENTER].](/content/2026/06/1239215/images/466e21545b2e15f7c5afa9e07c2e6cad43f3fd0ed8db8ecb3349e307b2da3c84.jpg)

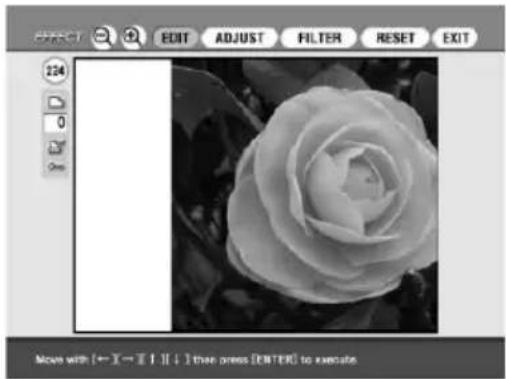
natural_image
Black and white photo of a rose with visible petals, set within an image editing interface (no text or symbols on the flower itself)Item Procedures
| Move Move the picture with the arrow (◄/►/↓/↑)button, then press ENTER/PRINT QTY. The image is moved to the selected direction. | |
| Rotate 90° Clockwise Each time you press ENTER/PRINT QTY,the image rotates 90° clockwise. | |
| Rotate 90° Counterclockwise | Each time you press ENTER/PRINT QTY,the image rotates 90° counterclockwise. |
| Mirror Each time you press ENTER/PRINT QTY,the image flips horizontally. | |
Adjusting the pictures
The ADJUST sub menu allows you to adjust brightness, color deepness, tint, or sharpness levels of the image pictures.
1 In the EFFECT menu (page 61), press the arrow (◄/►) button to select "ADJUST" on the menu bar and press ENTER/PRINT QTY.
The ADJUST sub menu is displayed.
2 Press the arrow (♠/♦) button to move the cursor to the desired adjustment item and press ENTER/PRINT QTY.
The adjustment slider appears.
![OR E O E I A B E O I A 224 0 9% Brightness Color deepness Tint Sharpness Select item info. [1][2][3] and (ENTER).](/content/2026/06/1239215/images/167d81afb3ad5309e140a29b5e18840151bb2e936d9a335667cc264f03ded17f.jpg)
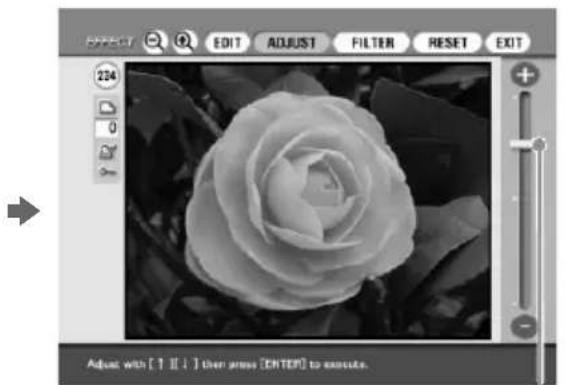
natural_image
Black and white photo of a rose with visible petals and leaves, displayed within an image editing interface (no text or symbols on the flower itself)Adjustment slider
3 Adjust the level as follows:
| Item | Adjustments |
| Brightness | Press ↑ to brighten the picture or ↓ to darken it. |
| Color deepness | Press ↑ to deepen the colors or ↓ to lighten the colors. |
| Tint | Press ↑ to make the picture bluish or ↓ to make it reddish. |
| Sharpness | Press ↑ to sharpen the outlines or ↓ to reset them. |
4 Press ENTER/PRINT QTY.
The adjustment takes effect.
Note
The picture quality of the image being displayed on the screen may differ from that of the printed image.
Adding effects to an image
Adding a special filter to an image
The FILTER sub menu allows you to add a special effect to an image to print in monochrome, paint, or sepia tone.
1 In the EFFECT menu (page 61), press the arrow (←/→) button to select "FILTER."
The FILTER sub menu is displayed.
![EFFECT EDIT ADJUST FILTER RESET EXIT 254 0 One Sepia Monochrome Point Select items with { 1 } [ 2 ] and [ENTER].](/content/2026/06/1239215/images/8f4a0239f86086f7b7fc0f7b350ade5c10ba3797863ca379f1a385a8ad1604d5.jpg)
2 Press the arrow ( / ) button to move the cursor to the desired filter you want to add to the image.
Item Filter
Sepia Makes the image like an old photograph with faded colors.
Monochrome Makes the image into a monochrome picture.
Paint Makes the image like a painted picture.
3 Press ENTER/PRINT QTY.
The filter takes effect.
Note
The picture of the image being displayed on the screen may differ from that of the printed image.
Making various prints (Creative Print)
What you can do with the Creative Print menu
The Creative Print menu allows you to make a variety of prints using an image of the "Memory Stick," PC card, or CD-R/RW disc.
To display the Creative Print menu, press CREATIVE PRINT.
Note
You cannot enter into the Creative Print menu while the video images are input with VIDEO input indicator on.
![CREATIVE PRINT button Creative Print Calendar Sticker Card Split Images Exit Select item with [←][→][T][↓] and [ENTER].](/content/2026/06/1239215/images/0cf8a8ea2a2fb8a5dab0fbe3670853912a2daa18386ffd11fb84091c447a1288.jpg)
Press the arrow (◄/►/↓/↑) button to select the desired sub menu.
Sub menu Functions
Calendar Add a calendar of selected month(s) to an image or images to make an original calendar. (Page 69)
Card Adds a selected greeting and your input message to an image make an original card. (Page 72)
Sticker Makes 9-split image sticker. (Page 75)
Split Images Makes 4-split or 9-split images prints. (Page 77)
Making various prints (Creative Print)
To cancel and restart operations midway
Press CANCEL. The screen returns to the preceding procedure; do the procedure again.
If it is difficult to return to the preceding procedure, the dialog box to return to the Creative Print top menu is displayed. If this occurs, start from the beginning.
To change the printer settings midway
You can press MENU and change the printer settings for "Finish," "Beep," "Video input" and "Clock setting." You cannot change the other items during the Creative Print menu mode and the settings before the mode are effective.
To exit the Creative Print menu
Select Exit in the Creative Print top menu or press CREATIVE PRINT both in the Creative Print top and sub menus. When the dialog box used for saving images is displayed, follow the saving procedures below.
To save the image with the selected effects
For detailed saving procedures, see pages 37 to 46.
1 Press SAVE in the Creative Print preview screen.
A dialog box to select the destination is displayed. You can select the destination from either "Memory Stick," PC card or CD-R/RW disc. (The same dialog box appears when you terminate the operations midway.)
2 Press the arrow (◄/►) button to select the destination and then press ENTER/PRINT QTY.
- When you select the "Memory Stick" or PC card as the destination, the image is added to the thumbnails.
- When you select the CD-R/RW disc as the destination, the dialog box to select the destination folder is displayed. Select the folder and save the image.
Notes
- If the "Memory Stick" or PC card is in write protect status, you cannot save an image in the "Memory Stick" or PC card.
- While saving the image, do not turn off the power or remove the “Memory Stick,” PC card or CD-R/RW disc from the printer. The “Memory Stick,” PC card or CD-R/RW disc may be damaged.
Making a calendar
You can add a selected calendar to an image or images to make an original calendar.
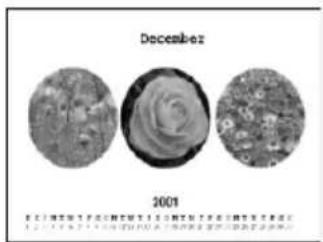
1 Press the arrow (◄/►/↓/↑) button to move the cursor to "Calendar", then press ENTER/PRINT QTY.
The calendar templates are displayed.
![Select Calendar Template 1 2 3 4 5 6 7 8 9 10 Select a Card template with [—] [→] [↑] [↓] and [ENTER].](/content/2026/06/1239215/images/53309d9372d1292c4affabcdd508542c643af380928fabf382f4f0c18ca586b8.jpg)
2 Press the arrow (←/→/↓/↑) button to move the cursor to the desired template, then press ENTER/PRINT QTY.
The preview of the selected template is displayed.
![Preview Cytes: 1 Cambridge December A B C 2001 NEXT [ENTER] for next step/[CANOEL] for previous setp.](/content/2026/06/1239215/images/26e1118774df2e53cdf3ab31a2536f905ff3a26ea664d924e0eba417e3737878.jpg)
3 Press ENTER/PRINT QTY.
The window for setting the calendar is displayed.
![Preview Copies 1 Cambridge Start month 01.2002 Start date: Sunday Monday Color of Day: Sunday in red Sunday in red/Saturday in blue Next: [←][→] to select Year or Month/[↑][↓] to set/[ENTER] to execute](/content/2026/06/1239215/images/aff875ca09d9c225718dbdf17014e4b9af730c7eb02d0737daf9b3efe7974cd6.jpg)
Continued
Making various prints (Creative Print)
4 Set the calendar:
①Set the first month and the year starting the calendar:
Press the arrow (↓/↑) button to select "Start month" and press the arrow (←/→) to move the cursor to the year. To set the number, press the arrow (↓/↑) button. In the same way, set the month. Then press ENTER/PRINT QTY.
②Set the day starting the week (placed furthest left in the calendar).
Press the arrow (↓/↑) button to select "Start date" and press the arrow (←/→) button to move the cursor to "Sunday" or "Monday."
Then press ENTER/PRINT QTY.
Some templates do not have the "Start date" setting.
③Set the color of days.
Press the arrow (↓/↑) button to select "Color of Day" and press the arrow (↔/→) button to move the cursor to "Sunday in red" or "Sunday in red/Saturdays in blue." Then press ENTER/PRINT QTY.
5 Insert the "Memory Stick," PC card, or CD-R/RW disc into the printer and press ENTER/PRINT QTY.
The thumbnail list for selecting an image is displayed.
![Select Image Select A image 201 202 203 204 205 206 207 208 209 210 211 212 [← II→][↑][↓] to select an image/[ENTER] for the next window.](/content/2026/06/1239215/images/401706c0bf35c67bc1c459e3463f3845174ba79a757b95900c55e0fbb7db03d4.jpg)
6 Press the arrow (←/→/↓/↑) button to move the cursor to the desired image, then press ENTER/PRINT QTY.
The window to adjust the image position is displayed.
![Adjust the image Cycles 1 EditHelp Adjust A image A Happy New Year B C MOVE NEXT Select item with [I] [J] and [ENTER].](/content/2026/06/1239215/images/257a7cc47a649c7630966415ee58726cdc2bd320d26ea250c4ac016034e07e4b.jpg)
7 Press the arrow (↓/↑) button to move the cursor to the desired adjustment item, then press ENTER/PRINT QTY.
To make multiple adjustments, repeat this step.
+ Each time you press ENTER/PRINT QTY, the image is enlarged.
– Each time you press ENTER/PRINT QTY, the image is reduced.
Move Move the picture with the arrow (◄/►/♠/↓) button, then press ENTER/PRINT QTY.

Each time you press ENTER/PRINT QTY, the image rotates 90^ clockwise.

Each time you press ENTER/PRINT QTY, the image rotates 90^ counterclockwise.
8 Press the arrow (↓/↑) button to move the cursor to "NEXT," then press ENTER/PRINT QTY.
When you select a template with multiple images, repeat steps 6 through 8 until you select and adjust the remaining images. When you finish, the preview of the created print is displayed.
![Preview Copies 1 Satridge December 2001 [PRINT] to print/[SAVE] to save the image.](/content/2026/06/1239215/images/d6572673aea91cebb8258608fcf53d6c0362a881edafb2a8d94ff29e2e4ed132.jpg)
By selecting the following button in the window, you can do:
COPIES Press ENTER/PRINT QTY to set the printing quantity. Each time you press ENTER/PRINT QTY, the copies increase one by one.
TOP MENU Returns to the Creative Print top menu.
EXIT Exits the Creative Print menu.
Continued
Making various prints (Creative Print)
9 To print the Creative Print image, press PRINT.
Printing starts.
To stop printing
Press CANCEL. When multiple copies are being printed, the printing from the next print will be canceled.
10 Press the arrow (B/b/V/v) button to move the cursor to "Exit" and then press ENTER/PRINT QTY.
The Creative Print menu exits.
Making a card
You can add a greeting and your own message to images and make an original card like the one shown on the right.
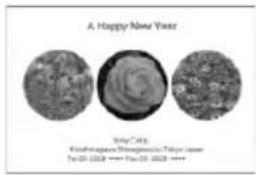
1 Press the arrow (B/b/v/V) button to move the cursor to "Card", then press ENTER/PRINT QTY.
The card templates are displayed.
![Select Card Template 1 2 3 4 5 6 7 Select a Card template with [—] [→] [↑] [↓] and [ENTER].](/content/2026/06/1239215/images/f8e35db501b7ac53687cc27e8bc44455a79cb3c3311b0601939445a0b4f5b35a.jpg)
2 Press the arrow (B/b/v/V) button to move the cursor to the desired template, then press ENTER/PRINT QTY.
The preview of the selected template is displayed.
![Preview Copies 1 Satelage A B C NEXT [ENTER] for next step/[CANCEL] for previous step.](/content/2026/06/1239215/images/e131dee4bd4219a79e9dda45bc79a2f95ea5d38d664ac14ecf343bff7ff9bb6f.jpg)
3 Press ENTER/PRINT QTY.
The window for selecting a greeting is displayed.
![Select Message 1 A Happy New Year 2 A Happy New Year 3 Congratulations! 4 Congratulations! 5 Happy Birthday 6 Happy Anniversary 7 Thank You 8 Thank You 9 Just Married 10 For You [←] [→] [1] [1] to select a message/[ENTER] for the next window.](/content/2026/06/1239215/images/645793a36093fe4e3f816d624744d261d39dde2cb5b0862d883979d36f1fd3e6.jpg)
4 Press the arrow (◄/►/◄/◄) button to move the cursor to the desired greeting, then press ENTER/PRINT QTY.
The color selection window for the greeting is displayed.
5 Press the arrow (◄/►/↓/▲) button to move the cursor to the desired color, then press ENTER/PRINT QTY.
The preview reflecting your selections up to the preceding step is displayed.
The greeting is displayed in the selected color.
6 Insert the "Memory Stick," PC card, or CD-R/RW disc into the printer and press ENTER/PRINT QTY.
The thumbnail list for selecting an image is displayed.
7 Press the arrow (◄/►/◄/▲) button to move the cursor to the desired image, then press ENTER/PRINT QTY.
The window to adjust the image position is displayed.
8 Adjust the image.
For adjustment, see step 7 on page 71.
9 Press the arrow (↓/↑) button to move the cursor to "NEXT," then press ENTER/PRINT QTY.
Repeat steps 7 through 9 until you select and adjust the remaining images and then character input window is displayed.
Making various prints (Creative Print)
10 Press the arrow (◄/►/♠/▼) button to move the cursor to the desired character, then press ENTER/PRINT QTY to input a character for the first line.
The selected characters are input in the input box. If you do not want to input characters, skip this step.
To input in a capital letter
Select "CAPS" and press ENTER/PRINT QTY to display the capital letters table. Then select the desired character and press ENTER/PRINT QTY. To enter a small letter, select "CAPS" again.
To select the font color
The characters are input in the color displayed next to "COLOR". To select a different color, select "COLOR" and press ENTER/PRINT QTY so that the color selection screen is displayed. Select the desired color and press ENTER/PRINT QTY to return to the character input screen.
![Character input box Character table Input Character Input 1 line ! @ # $ % ^ & * ( ) _ + Q W E R T Y U | O P ( } A S D F G H J K L : " Z X C V B N M < > ? - SPACE I FONT Gothic 1 COLOR NEXT [← I→ ][T][J] and [EN]ER] to select an item/input a caheter.](/content/2026/06/1239215/images/2433fb99a7d3eb0ca5c9b2cb8e0013dccbc1cb633babd2a9991d30ea3a083b0a.jpg)
Select color and font for the characters.
To correct an input character
Select “◀” or “▶” on the screen and press ENTER/PRINT QTY to move the cursor in the input box after the character you want to delete. Then select “BS” and press ENTER/PRINT QTY. The character before the cursor is deleted.
Note
You cannot apply different colors or fonts to a single line.
11 Press the arrow (◄/►/▲/▼) button to move the cursor to "NEXT," then press ENTER/PRINT QTY.
Repeat steps 10 and 11 to input the remaining lines. When you finish, the preview of the created print is displayed. You can set the printing quantity or other operations in this window (page 71).
![Preview A Happy New Year Sony Corp. Kashinagawa Shinagawa-ku Tokyu Japan Tel:03-5535- **** Fax:03-5535- **** [PRINT] to print/[SAVE] to save the image.](/content/2026/06/1239215/images/59436df317cbec6e0982803f37ef656e43f77342aa7119f0bd2d8c6cfa02ce61.jpg)
12 Perform steps 9 and 10 on page 72 of "Making a calendar."
Making a sticker
You can add a frame to each 9-split image to make a 9-split images sticker.
Notes
- To make a sticker, you can use the Small Size print paper only. Before making a sticker, make sure to feed the Small Size paper into the printer.
- If you want to make a sticker without frames, choose "Split Images."
1 Press the arrow (◄/►/↓/▲) button to move the cursor to "Sticker", then press ENTER/PRINT QTY.
The sticker templates are displayed.
![Select Sticker Template 1 A B C D E F G H I 2 A A A A A A A A A 3 A B C A B C A B C Select a Sticker template with [←] [→] and [ENTER].](/content/2026/06/1239215/images/56fba647e24fd86cd6b0e4e999b187446a346c04f42c03d2c9afb6efa570a520.jpg)
2 Press the arrow (◄/►/↓/↑) button to move the cursor to the desired template, then press ENTER/PRINT QTY.
The preview of the selected template is displayed.
Continued
Making various prints (Creative Print)
3 Press ENTER/PRINT QTY.
The screen for selecting a frame is displayed.
![Select Sticker Frame Select a frame for A image 1 2 3 4 5 6 Select a frame with [← I→ II↑ ↓] and [ENTER].](/content/2026/06/1239215/images/61b4ccd9872a5a220446985823b11027a2e5434e15c44b5718f58e00b282f2b5.jpg)
4 Press the arrow (←/→/↑/↓) button to move the cursor to the desired frame.
5 Insert the "Memory Stick," PC card, or CD-R/RW disc into the printer and press ENTER/PRINT QTY.
The thumbnail list for selecting an image is displayed.
6 Press the arrow (◄/►/↓/↑) button to move the cursor to the desired image, then press ENTER/PRINT QTY.
The window to adjust the image position is displayed.
7 Adjust the image.
For image adjustment, see page 71. When you selected a template of multiple images, follow steps 4, through 7 to select and adjust the remaining images.
8 Perform steps 8 through 10 of "Making a calendar."
Making split images
You can make a print with 4-split, 9-split, 13-split, or 16-split images.
1 Press the arrow (◄/►/↓/↑) button to move the cursor to "Split Images", then press ENTER/PRINT QTY.
The split image templates are displayed.
![Select Split Template 1 A B C D 2 A A A A 3 A B C D E F G H I 4 A A A A A A A A A 5 A B C D E F G H I J K L M N O P 6 A A A A A A A A A A A A A A A A 7 A B C D E M F G H I J K L 8 A A A A A A A A A A 9 A B C D C D 10 A A A A 11 A B C D F F G H I 12 A A A A A A A A A Select a split pattern with [---][---][↑][↓] and [ENTER].](/content/2026/06/1239215/images/f11d76937d78c2c0d5351eedeb9fcedd792a6dee0753ed4a245bf47d797c83d9.jpg)
2 Press the arrow (◄/►/↓/▲) button to move the cursor to the desired template, then press ENTER/PRINT QTY.
The preview of the selected template is displayed.
3 Insert the "Memory Stick," PC card, or CD-R/RW disc into the printer and press ENTER/PRINT QTY.
The thumbnail list for selecting an image is displayed.
4 Press the arrow (◄/►/◄/▲) button to move the cursor to the desired image, then press ENTER/PRINT QTY.
The window to adjust the image position is displayed.
5 Adjust the image.
For image adjustment, see page 71. Follow steps 2, 4, and 5 to select and adjust the remaining images.
6 Perform steps 8 through 10 of "Making a calendar."
Setting the printer (MENU)
What you can do with the MENU
The MENU allows you to change the printer settings, delete images, perform slideshow, or make an index print.
To display the MENU screen, press MENU:
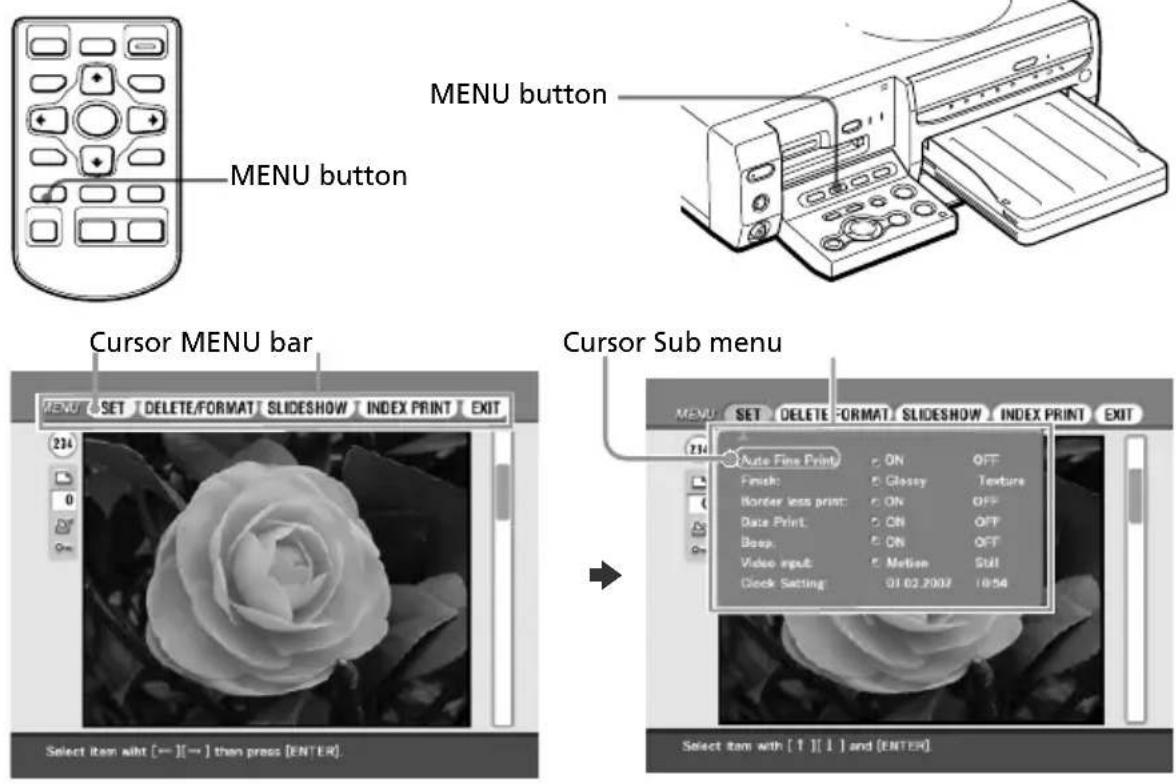
Press the arrow (◄/►) button to move the cursor to the desired sub menu and then press ENTER/PRINT QTY.
Sub menu Functions
| SET Changes the printing preferences including AutoFine Print 2, finish, and clock setting. (Page 79) | |
| DELETE/FORMAT Deletes the selected images in the “Memory Stick,”PC card or CD-R/RW. Also formats the “MemoryStick” and CD-RW disc. (Page 82) | |
| SLIDESHOW Performs a slideshow of the images in the “MemoryStick,” PC card or CD-R/RW disc. (Page 84) | |
| INDEX PRINT | Makes an index print of all the images stored in the“Memory Stick,” PC card or CD-R/RW disc. (Page 86) |
To display another sub menu
Press until the current sub menu disappears.
To exit the MENU
Press the arrow ( /// ) button to select "EXIT" in the MENU screen or press MENU. The screen displayed before you entered the MENU screen returns.
Changing the printer preferences (SET)
The SET sub menu allows you to change the printing preferences including Auto Fine Print 2, date print, finish, or borderless print settings. You can also set clock and beep.
1 In the MENU screen (page 78), press the arrow (◄/►) button to select "SET" and press ENTER/PRINT QTY.
The cursor moves to the SET sub MENU.
![MENU SET DELETE/FORMAT SLIDESHOW INDEX PRINT EXIT 234 Auto Fine Print ON OFF Finish: Glossy Texture Border less print: ON OFF Data Print: ON OFF Sheep: ON OFF Video Input: Motion Still Clock Setting 01.02.2002 10:54 Select item with [↑][↓] and [ENTER]](/content/2026/06/1239215/images/cfcd8708ce80748e1ff9bb1d31f35252f0f522a785f293fef50a188fdc985762.jpg)
Note
Items which cannot be changed are displayed in gray and cannot be selected.
To cancel operation midway in the MENU sub screen
Press CANCEL while the sub menu is displayed. The settings reset to the previous status and the MENU screen is displayed again.
2 Press the arrow ( / ) button to select the desired setting item and press the arrow ( / ) button to change the setting.
The items are factory-set to the item with *.
Continued
Setting the printer (MENU)
| Items Settings Contents | ||
| Auto Fine Print 2 | ON* Corrects an image automatically for printing in better picture quality, especially effective for a dark or low-contrast image. | |
| NoteThe image on the screen is not corrected.When printing from a computer, the Auto Fine Print 2 function does not work. | ||
| OFF Prints an image without any corrections. | ||
| Finish Glossy* Prints an image vividly with glossy finish. | ||
| Texture Prints an image softly with a uniform and uneven finish. | ||
| Border less print | ON* Prints an image without blank space around the image. | |
| NotesYou cannot make borderless prints with Small size print paper.When printing a 4:3 picture, the top and bottom edges of the image are cut and it is printed as a 3:2 picture. | ||
| OFFPrints an image with borders around the image. (4:3 and 3:2 pictures will not be cut off at the top and bottom.) | ||
| Date Print ON Prints an image with the date recorded together with the image shot with your digital still camera. | ||
| NotesYou can print the date only when the image's date data is recorded in the DCF (Design rule for Camera File system) format.When you add effect to an image, the edited date is printed. | ||
| OFF* Prints an image without the date print data. | ||
| Beep ON* The warning and operation sound beeps. | ||
| OFF No warning or operation sound beeps. | ||
| Video input | Motion* Select this option when capturing an image from the playback pictures of a video camera. If there is blur in the memory image, the printer automatically corrects it, which will take few seconds after the image is captured. | |
| Still Select this option when capturing a still image of a video camera to print it in better picture quality. | ||
| Clock Setting You can set the internal clock to record the date you saved the image in the “Memory Stick,” PC card, or CD-R/RW disc.1 Press the arrow (♠/♦) button to select “Clock Setting” and press ENTER/PRINT QTY.The printer enters clock setting mode. The cursor appears on the month (for NTSC) or the day (for PAL).2 Press the arrow (♠/♦) button to set the month or day.Press ♦ to increase the number.Press ↓ to decrease the number.3 Press ➔ or ENTER/PRINT QTY.The cursor moves to the day (for NTSC) or the month (for PAL).4 Repeat steps 2 and 3 to set all of the items: month or day, year, hour and minute.If you want to set the previous item, press ◀. The hour is displayed in 24-hour system.5 To release the clock setting mode, press ENTER/PRINT QTY or press ♦ to move the cursor to the menu bar.When you press ENTER/PRINT QTY in the step 3 below, the clock starts working. | ||
3 Press the arrow ( /// ) button to select "EXIT" and press ENTER/PRINT QTY.
The settings take effect until you change them even after you turn off the power. The previous screen is displayed.
Deleting images
You can delete images in the "Memory Stick," PC card, or CD-R/RW disc. You can also format the "Memory Stick" and CD-RW disc (page 59).
Notes
- During deleting or formatting, do not turn off the power or remove the “Memory Stick,” PC card or CD-R/RW disc from the insertion slot. The “Memory Stick,” PC card or CD-R/RW disc may be damaged.
- If the “Memory Stick” or PC card is in write protect status, you cannot delete images or format the “Memory Stick.”
- When you select "DELETE/FORMAT", you cannot delete an image protected or preset by DPOF.
- An image, once deleted, will be lost forever. Before deleting an image, double-check that it is the right one.
- When formatting a "Memory Stick" or CD-RW disc, all the files including the image files will be deleted.
- You cannot delete an image in the Creative Print or EFFECT mode.
- You cannot format a PC card and CD-R disc.
- You cannot delete an image file in a finalized CD-R/RW disc. For a CD-RW disc, you can delete an image file after you unfinalize the disc.
- When free disc space is limited, you may not be able to delete an image. Even if you fail in deletion, you can finalize a CD-R/RW disc and format a CD-RW disc.
- Even after you delete images in a CD-R/RW disc, the storage capacity in the disc will not increase.
Deleting selected image(s)
You can select and delete images on a "Memory Stick," PC card, or CD-R/RW disc.
1 Insert a "Memory Stick," PC card or CD-R/RW disc into the printer.
2 Press INPUT SELECT to light on "MEMORY STICK," PC CARD or CD-RW indicator.
When you select CD-RW
The covers of the folders contained in the CD-R/RW disc are displayed. Press the arrow (◄/►/↑/▼) button to select the desired folder, then press ENTER/PRINT QTY. The images in the folder are displayed as thumbnails.
3 In the MENU screen (page 78), press the arrow (◄/►) button to select "DELETE/FORMAT" and press ENTER/PRINT QTY.
The DELETE/FORMAT sub menu is displayed.
![MENU SET DELETE/FORMAT SLIDESHOW INDEX PRINT EXIT 201 Delete Image Memory Stick Format Initiating CD-R/RW Finishing CD-R/RW Unfinalizing CD-RW Formatting CD-RW 205 0 0 0 0 209 210 211 212 Select item with [T] [I] and [ENTER]](/content/2026/06/1239215/images/abe3b63359af5a31b334cbe5d822ee7e9f0eaaac359cc80ff55a169a1355757b.jpg)
4 Press the arrow (↑/↓) button to move the cursor to "Deleting Image" and press ENTER/PRINT QTY.
The thumbnail list is displayed. When you displayed a preview image in step 1, the trash icon is attached to that image.
![Memory Stick 333 Select image with [→] (→) [↑] [↓] and [ENTER]](/content/2026/06/1239215/images/4e2facb6a567d72b1165f9f11bdf8f860e66fd2c053fdf7ee9e8cb26437d2d93.jpg)
5 Press the arrow (◄/►/▲/▼) button to move the trash icon to the image you want to delete, then press ENTER/PRINT QTY.
6 Press ENTER/PRINT QTY.
A confirmation dialog box is displayed.
7 Press the arrow (◄/►) button to select "Yes" and press ENTER/PRINT QTY.
The selected image is deleted. To delete other images, repeat steps 4 through 6.
Formatting a "Memory Stick"
You can format a "Memory Stick." In step 4, select "Formatting Memory Stick" and press ENTER/PRINT QTY. When the confirmation dialog box is displayed, press the arrow (◄/►) button to select "Yes" and press ENTER/PRINT QTY. The "Memory Stick" is formatted and all the image files and other files are deleted at one time.
Viewing the slideshow
You can perform a slideshow of the images saved in a "Memory Stick," PC card or CD-R/RW disc.
1 Insert a "Memory Stick," PC card or CD-R/RW disc into the printer.
2 Press INPUT SELECT to light on "MEMORY STICK," PC CARD or CD-RW indicator.
When you select CD-RW
The covers of the folders contained in the CD-R/RW disc are displayed. Press the arrow (◄/►/↑/▼) button to select the desired folder, then press ENTER/PRINT QTY. The images in the folder are displayed as thumbnails.
3 In the MENU screen (page 78), press the arrow (◄/►) button to select "SLIDESHOW" and press ENTER/PRINT QTY.
The SLIDESHOW sub menu is displayed.
![MENU SET DELETE/FORMAT SLIDESHOW INDEX PRINT EXIT 254 Switch Time Quick Slow Executs Select item with [ ] [ ] and [ENTER]](/content/2026/06/1239215/images/d33f4938eaff1b12af2041223a611594bbbb2c5863f6f85f8e4aacf6fa242650.jpg)
4 In the Switch Time line, press the arrow (◄/►) button to select "Quick" to switch images quickly or "Slow" to switch them slowly.
5 Press the arrow (◄/►/▲/▼) button to move the cursor to "Execute," then press ENTER/PRINT QTY.
The images in the "Memory Stick," PC card or a folder of the CD-R/RW disc are displayed one after another with random patterns in the selected switch time like a slideshow.
To stop slideshow
Press CANCEL.
Notes
- Depending on the image, it may take time to be displayed.
- You cannot view the slideshow during the Creative Print or EFFECT mode.
- You cannot start sideshow from the CD-R/RW folders screen. Select the folder and display the image list. Or select an image to display its preview.
- You cannot display those images in a slideshow:
– Images that are not displayed as thumbnails because they are damaged or some other reason.
- (motion file)
- (text file)
- (clip motion file)
Making an index print
You can print a list of the images stored in a "Memory Stick," PC card or a folder in a CD-R/RW disc (Index print).
1 Insert a "Memory Stick," PC card or CD-R/RW disc into the printer.
2 Press INPUT SELECT to light on "MEMORY STICK," PC CARD or CD-RW indicator.
When you select CD-RW
The covers of the folders contained in the CD-R/RW disc are displayed. Press the arrow (◄/►/↑/▼) button to select the desired folder, then press ENTER/PRINT QTY. The images in the folder are displayed as thumbnails.
3 In the MENU screen (page 78), press the arrow (◄/►) button to select "INDEX PRINT" and press ENTER/PRINT QTY.
The INDEX PRINT sub menu is displayed.
![MENU SET DELETE/FORMAT SLIDESHOW INDEX PRINT EXIT 214 Pattern 8×8 10×8 Execute Select item with [ ] [ ] and [ENTER]](/content/2026/06/1239215/images/d684a48c439d61fb8a1dab5cc4c9137b0ba18513c93ab1ba7d15730629c05310.jpg)
4 Press the arrow (◄/►) button to select the desired split pattern either from "8 x 6" or "10 x 8" and then press ENTER/PRINT QTY.
- When you select "8 x 6," 8 images are printed horizontally and 6 images are printed vertically in a sheet of print paper.
- When you select "10 x 8," 10 images horizontally and 6 images vertically are printed.
When the small size print paper is loaded, you can select the pattern either from "4 x 4" or "6 x 5."
5 Press the arrow (◄/►/▲/▼) button to move the cursor to "Execute," then press ENTER/PRINT QTY.
The index of the images in a “Memory Stick,” PC card or a CD-R/RW disc are printed in the selected pattern. Each image is printed with corresponding image number. When the “Date Print” is set to “ON,” the recorded date (year, month and day) is also printed.
Notes
- You cannot make an index print during the Creative Print or EFFECT mode.
- You cannot make a index print from the CD-R/RW folders screen. Select the folder and display the image list. Or select an image to display its preview.
- You cannot print those images in an index print:
– Images that are not displayed as thumbnails because they are damaged or some other reason.
- (motion file)
- (text file)
- (clip motion file)
Using your printer with Windows computers
The supplied software enables you to print an image stored on your computer's hard disk with the Digital Photo Printer DPP-SV88. You can also view, copy, or transfer images stored in a "Memory Stick" or PC card inserted in the printer from your computer's monitor. To print an image from the computer, you need commercially available printing application software.
System requirements
To use the supplied software, you need a computer that meets the following system requirements:
OS: Microsoft Windows 98/Windows 98SE/Windows Me/
Windows 2000 Professional/Windows XP Home Edition/Windows XP Professional should be pre-installed.
Note
We cannot guarantee any operations with a computer where Windows 3.1 or Windows 95 has been upgraded to Windows 98 or Windows 98 has been upgraded to Windows Me.
CPU: MMX Pentium 200 MHz or above is recommended.
RAM: 32 MB or more (64 MB or more is recommended.)
Hard disk space: 50 MB or more (Depending on the number of copies to be printed.)
Port: A USB port should be installed as standard.
Drive: CD-ROM drive (for software installation)
Notes
- We cannot guarantee printer operations when a hub is used or when two or more USB devices are connected to your computer.
- If you connect more than one DPP-SV88/SV77/SV55 printer at the same time, you cannot operate the printer.
- You cannot operate the printer from another USB device being used simultaneously.
Installing the software
Install the printer driver and Memory Stick/PC card reader software contained on the supplied CD-ROM to your computer's hard disk.
When using Windows 98/98SE/Me
Installing the USB driver
1 Turn on your computer and the printer.
2 Start Windows and then connect your computer and the printer.
When the computer detects the printer, the "Add New Hardware Wizard" dialog box is displayed.
For the proper connections, refer to "Connecting to a computer (optional)" on page 20.
Note
Close all programs before running the installer.
3 Click "Next."
The dialog box to used select searching method appears.

4 Check "Search for the best driver for your device (Recommended)." and click "Next."
The dialog box to used specify the driver location is displayed.
Using your printer with Windows computers
5 Insert the supplied CD-ROM into your CD-ROM drive and check "CD-ROM drive." Then click "Next."
Installation starts. When installation ends, the "Finish Setup" dialog box appears.
Note
During installation, you may be asked to insert the Windows OS CD-ROM.
6 Click "Finish."
The Sony DPP-SV88 USB driver is installed.
Note
After you click "Finish," you may be prompted to restart the computer.
To check the installation
1 Click "Start," point to "Settings" and then click "Control Panel."
The "Control Panel" window is displayed.
2 Double-click "System."
The "System Properties" window is displayed.
3 Click a "Device Manager" tab.
When “Sony DPP-SV88 USB Digital Photo Printer” is listed under “Universal serial bus controller,” installation is completed successfully.

Installing the printer driver and reader software
1 Insert the supplied CD-ROM into your CD-ROM drive and click "Start," and then click "Run."
The "Run" dialog box is displayed.
2 Input "D:\Setup.exe" (When your CD-ROM drive is the D: drive) then click "OK."
If your CD-ROM drive is not the D: drive, input the appropriate drive name. You can also input the location of the installer by clicking the "Browse" button. The installer automatically starts, and the language selection dialog box appears.
3 Select the language for the application, then click "OK."
The "Welcome" dialog box appears.
4 Click "Next."
The “Choose Destination Location” dialog box is displayed. The files are factory-set to install the “C:\Program Files\Sony\DPPSV88” folder. If you want to install them to another folder, input the destination folder or specify the destination folder by clicking the “Browse” button.
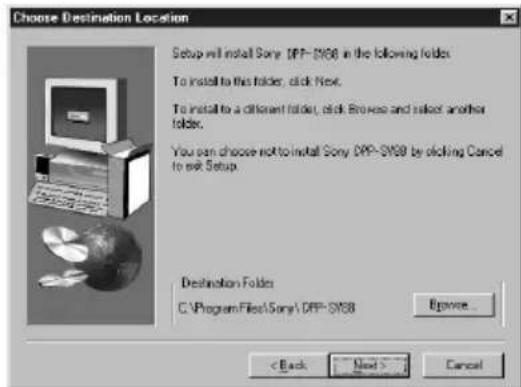
5 Click "Next."
"Add Printer Wizard" starts up.
6 Click "Next."
The dialog box used to select the printer connection is displayed.
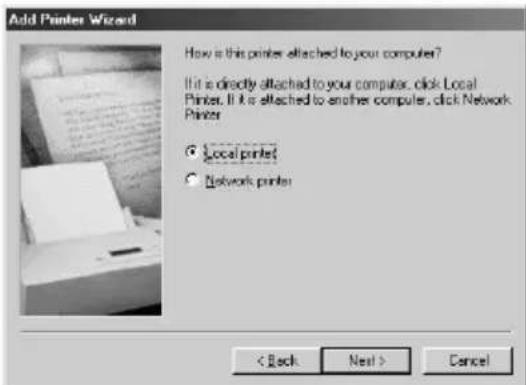
Continued
Using your printer with Windows computers
7 Check "Local printer" and click "Next."
The dialog box used to select the manufacturer and model of the printer is displayed.
8 Click "Have Disk."
The "Install From Disk" dialog box is displayed.
9 Click "Browse."
The following dialog box is displayed.
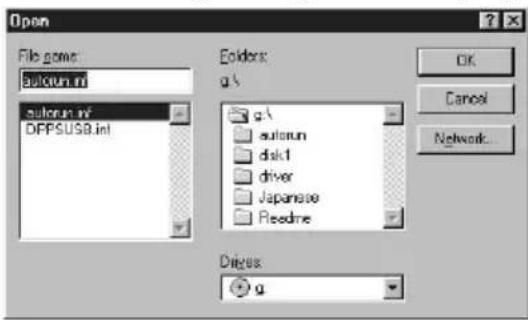
10 In the Drives box, select the CD-ROM drive.
The following dialog box is displayed.
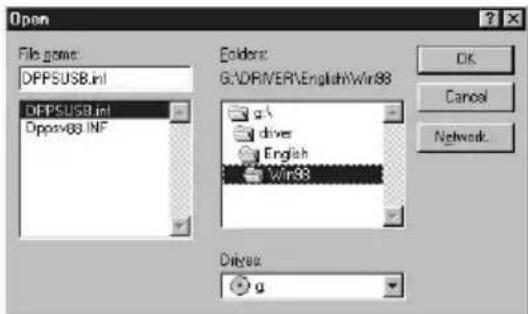
11 In the Folders box, select your language folder and then "WIN98" folder.
12 Make sure that "DPPSUSB.inf" is selected in the File name box and then click "OK."
The dialog box to select the model name is displayed.
13 Select "Sony DPP-SV88" and click "Next."
Copying of files starts. The dialog box used to select the port is displayed.
Note
During installation, you may be asked to insert the Windows OS CD-ROM.
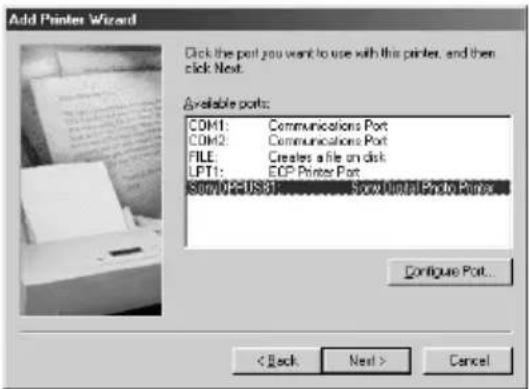
14 Select "Sony DPPUSB1: Sony Digital Photo Printer" in the list and click "Next."
The dialog box used to select the printer name is displayed. It is factory-set to "Sony DPP-SV88." If you want to use another name, input the name in the text box.
15 Click "Finish."
The "Setup Complete" dialog box is displayed.
16 Click "Finish."
The printer driver and reader software are installed. The readme file is displayed.
"Sony DPP-SV88" is added to the "Printers" window.
Notes
- After installation, the "Sony DPP-SV88" is not set as the default printer. Set the printer you use for each application.
- After you click "Finish," you may be prompted to restart the computer.
When using Windows 2000 Professional/Windows XP Home Edition/Windows XP Professional
To use your DPP-SV88 with a computer which has Windows 2000 Professional/Windows XP Home Edition/Windows XP Professional installed, you need to follow the procedures below to install the USB driver and the printer driver onto your computer.
1 Start Windows, and log on your computer as the user name having the administrator user account (such as "Administrator," "Computer administrator," or "Power User").
Continued
Using your printer with Windows computers
2 Turn on the printer and then connect the printer and the computer via their USB ports.
Note
Make sure to turn on your printer before connection.
3 Wait for the USB driver to be installed automatically and for the following dialog box to disappear.

Note
If the “Add New Hardware Wizard” dialog box is displayed instead of the above window, follow the instructions on the screen to install the “USB Printing Support.” When the dialog box asking where to search for the driver files appears, uncheck all the options and click “Next.”
4 Insert the supplied CD-ROM into the CD-ROM drive of your computer.
5 Double-click "Setup.exe" on the supplied CD-ROM.
The window used to select the driver language is displayed.
6 Select the language and click "OK."
The "Welcome" dialog box appears.
7 Click "Next."
The dialog box used to choose the destination folder is displayed. The files are factory-set to install to "C:\Program Files\Sony\DPPSV88" folder. If you want to install them to another folder, specify the destination folder by clicking the "Browse" button.
8 Click "Next."
The "Setup Complete" dialog box is displayed.
Note
When installing the software into Windows XP Home Edition/Profession, an error message stating the software has not passed the Windows Logo testing may appear. Click “Continue Anyway” to proceed with the next step.
9 Click "Finish."
The Readme file is displayed. "Sony DPP-SV88" is added to the "Printers" window.
Notes
- If you cannot install the printer driver with the supplied setup program, see “About the Printer Driver for Windows 2000 Professional” in the Readme file contained on the supplied CD-ROM (“Readme\English\readme.txt”).
- When you connect your printer to another USB port that is different from the port used at the time of installation, an error message prompting you to input the directory for the DPPSUSB.sys file may be displayed. If this occurs, type the directory of the folder where the Reader Software is installed (usually "C:\Program File\Sony\DPPSV88\Program") and follow the instructions on the screen to re-install the files.
- After you click "Finish," you may be prompted to restart the computer.
Uninstalling the software
When the software becomes unnecessary, you should remove the software from your computer's hard disk. Uninstall the software using the following procedures:
Uninstalling the "Sony DPP-SV88"
1 Disconnect the USB cable from the printer and the computer.
2 Click "Start," point to "Settings" and then click "Control Panel."
3 Double-click "Add/Remove Programs" in the "Control Panel" window.
4 On the "Install/Uninstall" tab of the "Add/Remove Programs Properties" window, select "Sony DPP-SV88" and click "Add/Remove." The confirmation dialog box is displayed.
5 Click "Yes."
The relevant files are removed from your computer's hard disk.
Uninstalling the printer driver
1 Disconnect the USB cable from the printer and the computer.
2 Click "Start," point to "Settings" and then click "Printers."
3 Right-click on "Sony DPP-SV88" in the "Printers" window and select "Delete" from the short-cut menu.
The confirmation dialog box is displayed.
4 Click "Yes."
The relevant files are removed from your computer's hard disk.
Using your printer with Windows computers
Note on DPP-SV88 software installation for the customers using Sony DPP-SV55/SV77 digital photo printer
When you have already installed the Sony DPP-SV55/SV77 printer driver or reader software onto your computer with Windows 98/98SE/Me operating system, your computer cannot detect the DPP-SV88 connected via USB port as new hardware. Follow the procedures below to change the DPP-SV55/SV77 USB driver into the DPP-SV88 USB driver. Then run “Setup.exe” contained in the CD-ROM supplied with the DPP-SV88 to install the software.
Once you have changed the USB driver, you can connect and use the DPP-SV55/SV77 as well as DPP-SV88. The DPP-SV55/SV77 is displayed as DPP-SV88 on your computer, which is no problem.
1 Start Windows, turn on the printer and connect the printer with the computer via USB port.
2 Click "Start" from the Windows taskbar, point to "Settings" and then click "Control Panel."
3 Double-click "System" to open the "System Properties" window.
4 Open the "Device Manager" tab, select "Sony DPP-SV55 USB Digital Photo Printer" or "Sony DPP-SV77 USB Digital Photo Printer" under the "Universal serial bus controller" and then click "Properties."
5 Open the "Driver" tab and click "Update driver."
6 Click "Next."
7 Click "Display a list of all the drivers in a specific location, so you can select the driver you want" and then click "Next."

8 Click "Have Disk."
9 Insert "Sony DPP-SV88" CD-ROM into your CD-ROM drive.
10 Click "Browse," select the CD-ROM drive where you inserted "Sony DPP-SV88" CD-ROM and then click "OK."
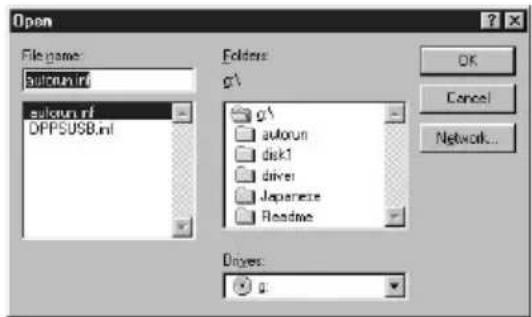
11 Click "OK."
12 Click "Next" until "Finish" is displayed.
13 Click "Finish."
- When the dialog box asking you to restart your computer is displayed, restart your computer and then execute the "Setup.exe" in the CD-ROM.
- When the dialog box for restart is not displayed, follow the procedures below.
①Click "Close."
②Check that the description is changed to "Sony DPP-SV88 USB Digital Photo Printer" and click "OK."
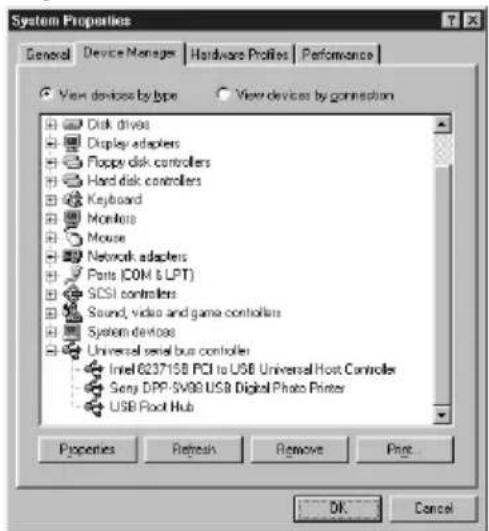
③Execute the "Setup.exe" in the CD-ROM.
Using your printer with Windows computers
Using the reader software
You can view the "Memory Stick" or PC card inserted in the printer as a drive on your computer's monitor.
1 In the "My Computer" or "Windows Explorer" window, double-click "Sony DPP-SV88."
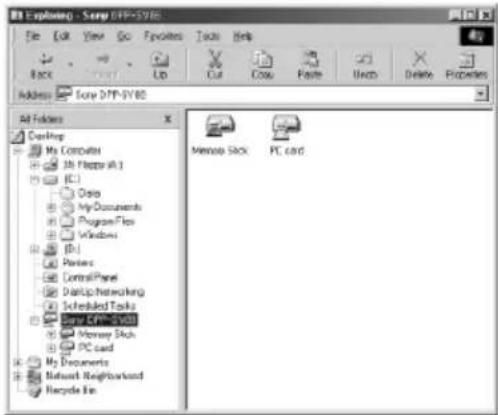
2 Click "Memory Stick" or the PC card icon.
The images stored in the “Memory Stick” or PC card inserted in the printer are displayed. You can copy, transfer or save the “Memory Stick” or PC card images just as you would any other Windows files.
Note
The reader software does not operate the DPP-SV88 as a completely removable medium. When using the software, note the following restrictions:
- Before editing an image from the "Memory Stick" or PC card inserted in the printer, store it on the computer's hard disk. If you double-click and open the file in the printer with its associated application and edit it with the application, you cannot save the edition on the "Memory Stick" or PC card with the application's saving command.
- You cannot view or open the file in the printer using the "Open" command of an application other than the reader software.
- You cannot run an execution file contained in the "Memory Stick" or PC card.
- You cannot use the supplied "Memory Stick/PC card Reader Software" to transfer the images in a CD-R/RW disc to your computer.
Printing from a software application
You can use the "Print" command of a software application to print an image from your computer's hard disk with the DPP-SV88 Digital Photo Printer.
Notes
- This sections explains the settings and operations with a typical application as an example. Depending on the application, print settings and operations may differ. For the details, refer to the manual of your application.
- To get the print you expect, we suggest you use application software that allows you to check the print preview. Otherwise, make the image size 1664 (dots) x 2466 (dots) and the resolution 403 dpi.
1 Start the application software that you use to print with, and select the image to be printed.
2 Click "Print Setup" from the "File" menu of the application. The "Print Setup" dialog box appears.
3 Set the printer.
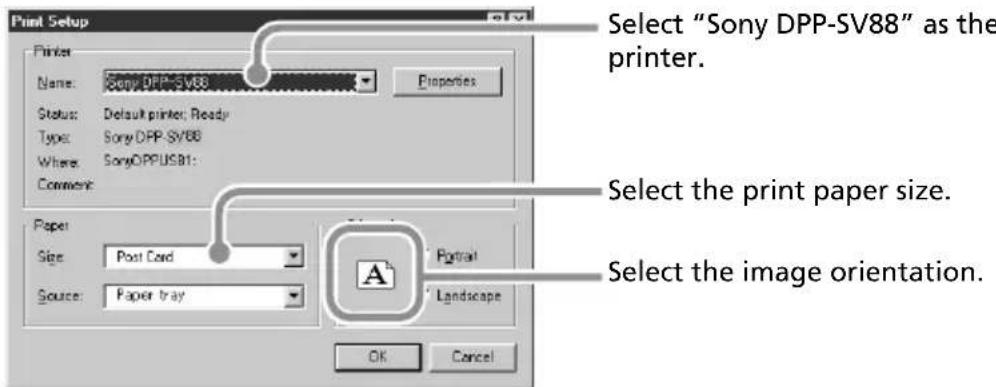
The dialog box differs depending on the application.
①Set "Printer" to "Sony DPP-SV88."
②Set "Paper Size."
Choose When you make
| Post Card (no margin) Post Card size borderless prints |
| Post Card Post Card size border prints |
| Small | Small size prints |
Using your printer with Windows computers
③Set "Orientation."
To print in portrait (tall) format, select "Portrait." To print in landscape (wide) format, select "Landscape."
To set properties of the printer
Click "Properties" to display the "Properties" dialog box.
□ Graphics tab
You can set the used resolution when printing an image. You cannot specify dithering, intension or color.
□ Device Options tab
You can select finish from either "Glossy" or "Texture."
4 Click "OK" to close the "Print Setup" dialog box.
5 Click "Print" from the "File" menu of the application.
The "Print" dialog box appears.

Print range Specify the pages to start and end printing. To print all the pages, select "All."
Copies Enter the number of copies to be printed.
6 Set the print range and copies and click "Print." The printer starts printing. To stop printing, click "Cancel."
Stopping printing midway when printing from your computer
When a "printing" dialog box is on the screen
Click the "Stop" button or the "Cancel" button.
The printing job is canceled and the dialog box is closed.
When the data is in the printer queue
1 Click "Start" in the Windows taskbar, point to "Settings," and click "Printers."
The "Printers" window is displayed.
2 Double-click the "Sony DPP-SV88" icon.
The "Sony DPP-SV88" window is displayed. In the window, the documents in the queue for printing are listed.
3 Click the document you want to stop printing.
4 Click "Stop" or "Cancel" from the "Document" menu.
The document is removed from the list and the printing job is canceled. For the details, refer to the Windows documentation.
Note
If the printing has already started with the print paper loaded, do not cancel the printing job. Doing so may cause paper jam. Wait until the printing is completed.
Using your printer with Macintosh computers
The supplied software enables you to print an image from your Macintosh with the Digital Photo Printer DPP-SV88. To print an image from the computer, you need a commercially available printing software application.
System requirements
To use the supplied software, you need a Macintosh computer that must meet the following system requirements.
OS: Mac OS 8.5.1/8.6/9.0/9.1/9.2 should be pre-installed.
Port: A USB port should be installed as standard.
RAM: 32 MB or more (64 MB or more is recommended.)
Hard disk space: 50 MB or more (depending on the number of copies to be printed.)
Drive: CD-ROM drive (for software installation)
Notes
- We cannot guarantee the printer operations when a hub is used or when two or more USB devices are connected to your computer.
- If you connect more than one DPP-SV88/SV77/SV55 printer at the same time, you cannot operate the printer.
- You cannot operate the printer from another USB device being used simultaneously.
Installing the printer driver
Install the Sony DPP-SV88 Printer Driver Software for Mac OS 8.5.1/8.6/9.0/9.1/9.2 Version 1.0 ("printer driver" in this manual) into your Macintosh.
1 Connect your Macintosh and the printer.
For the connections, refer to “Connecting to a computer (optional)” on page 20.
2 Turn on the printer and start your Macintosh.
Note
Close all programs before running the installer.
3 Insert the supplied CD-ROM into your CD-ROM drive.
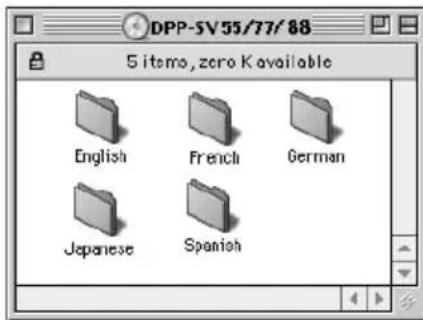
4 Select the software language by double-clicking the corresponding folder on the CD-ROM.
The selected language folder opens.
5 Double-click "Setup Program."
6 Click "Install."
Installation starts. Follow the instructions on the screen to complete installation.
Uninstalling the printer driver
When the software becomes unnecessary, remove the software as follows: In step 6, click "Uninstall."
Using your printer with Macintosh computers
Printing from a software application
You can use a software application to print images stored in your computer's hard disk using the DPP-SV88 Digital Photo Printer.
Notes
- This sections explains the settings and operations using a typical application as an example. Depending on the application, print settings and operations may differ. For the details, refer to the manual of your application.
- To get the print you expect, we suggest you use software application that allows you to check a print preview. Otherwise, set the image size to 1664 (dots) x 2466 (dots) and the resolution to 403 dpi.
1 Start the application software that you use to print with, and select the image to be printed.
2 Select "Chooser" from the Apple menu, click "Sony DPP-SV88" in the "Chooser," and then close the "Chooser."
3 Click "Print Setup" from the "File" menu of the application. The "Print Setup" dialog box appears.
4 Choose the printer settings.
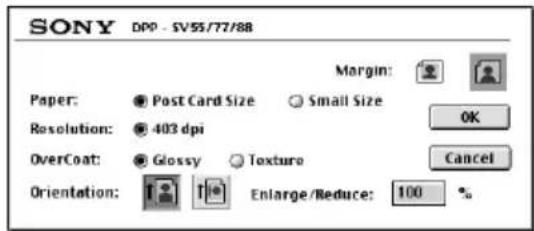
Paper/Margin To make Post Card Size borderless prints, click "Post Card Size" and the no margin icon 📁. To make border Post Card Size print, click "Post Card Size" and the margin icon 📁. To make Small Size prints, click "Small Size."
Orientation To print a wide image, click the landscape icon. To print a tall image, click the portrait icon.
Overcoat Select the overcoat type ("Glossy" / "Texture").
Enlarge/Reduce Select the size to be print: enlarged or reduced.
5 Click "OK" to close the dialog box and select "Print" from the "File" menu.
The "Print" dialog box appears.
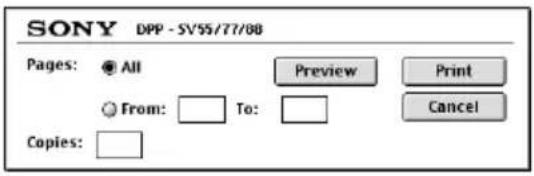
Print range Specify the pages to start and end printing. To print all the pages, select "All."
Copies Enter the number of copies to be printed.
Preview Displays a print preview.
6 Set the print range and copies and click "Print."
The printer starts printing. To stop printing, click "Cancel."
Precautions
On safety
- Operate the printer on 120 V AC, 60 Hz (for the 120V area) or 220 to 240 V AC, 50/60 Hz (for the models for other areas) only.
- Be careful not to set or drop any heavy objects on the power cord, or to damage the power cord in any way. Never operate this printer with a damaged power cord.
- Should any solid object or liquid fall into the cabinet, unplug the printer and have it checked by qualified personnel before operating it any further.
- Never disassemble the printer.
- To disconnect the power cord, pull it out by the plug. Never pull the power cord itself.
- When the printer is not going to be used for an extended period of time, disconnect the power cord from the wall outlet.
- Do not handle the printer roughly.
- To reduce the risk of electrical shock, always unplug the printer from the electrical outlet before cleaning and servicing the printer.
On installation
- Avoid placing the printer in a location subject to:
- vibration
– high humidity - excessive dust
– direct sunlight -
extremely high or low temperatures
-
Do not use electrical equipment near the printer. The printer will not work properly in electromagnetic fields.
- The printer is designed to operate horizontally. Never attempt to operate the printer in a tilted position.
- Do not place heavy objects on the printer.
- Leave enough room around the printer so that the ventilation holes are not blocked. Blocking these holes may cause internal heat build-up.
On moisture condensation
If the printer is brought directly from a cold location to a warm location or placed in an extremely warm or humid room, moisture may condense inside the unit. In such cases the printer will probably not work properly and may even develop a fault if you persist in using it. If moisture condensation occurs, turn off the power and do not use the printer for at least one hour.
On transport
When you transport the printer, remove the print cartridge, paper tray, the "Memory Stick" or PC card from the printer and put the printer and its peripherals in the original box with the protective packaging.
If you no longer have the original box and packing parts, use similar packing material so that the printer will not be damaged while being transported.
On cleaning
Clean the cabinet, panel and controls with a soft dry cloth, or a soft cloth lightly moistened with a mild detergent solution. Do not use any type of solvent, such as alcohol or benzine, which may damage the finish.
On restrictions on duplication
If duplicating documents with the printer, pay special attention to the following:
- Duplication of banknotes, coins, or securities is against the law.
- Duplication of blank certificates, licenses, passports, private securities, or unused postal stamps is also against the law.
- TV program, films, video tapes, others' portraits or other materials may be copyrighted. Unauthorized video printing of such materials may infringe the provisions of the copyright law.
About the “Memory Stick” and PC card media
The printer can read and write "Memory Stick" and PC card (PCMCIA ATA compatible type II flash memory cards with a power specification of 5V or 3.3/5V). By using a commercially available PC card adaptor, you can also use Smart Media and other types of compact flash memory cards.
On "Memory Stick"
"Memory Stick" is a removable storage media used with a digital still camera, video camera, or PC. You can easily display, save or delete images using this medium.
There are two types of “Memory Stick”: an ordinary “Memory Stick” and “MagicGate Memory Stick.” The “MagicGate Memory Stick” is equipped with the MagicGate copyright protection technology that uses encryption technology. You can use both types of “Memory Stick” with your printer.
However, because the printer does not support the MagicGate standards, data recorded with the printer is not subject to MagicGate copyright protection.
To protect "Memory Stick" images
To prevent accidental erasure of important image data, use the write protect switch on the "Memory Stick." Slide the switch to the write protect or write enable position:
■Write enable position
Slide the switch left to the write enable position. You can read, write and delete data on the “Memory Stick.” Formatting the “Memory Stick” is also enabled. When storing images on the “Memory Stick,” set the switch to the write enable position.
■Write protect position
Slide the switch right to the write protect position. It is now impossible to write or delete the data on the "Memory Stick." We suggest you set the switch to the write protect position while just viewing "Memory Stick" images.
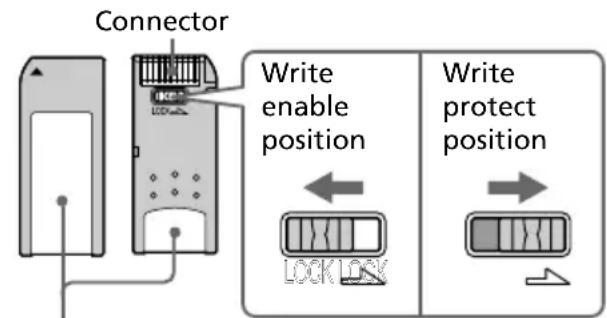
Place the label here
Notes on use
- You cannot use PC cards with a power specification of 3V only.
- Do not insert other types of PC card into the printer's insertion slot. The printer may be damaged.
- Do not drop, bend, or submit the "Memory Stick" or PC card to external shock.
- Do not disassemble or modify the "Memory Stick" or PC card.
- Avoid getting liquids on the "Memory Stick" or PC card or using them in areas subject to high humidity. Otherwise, data may be rendered unreadable.
- Avoid using or storing the “Memory Stick” or PC card in a location subject to:
- extremely high temperature such as the hot inside of a car or the outdoors exposed to a direct sunlight, or a place near a heater.
- direct sunlight
– high humidity - corrosive substances
- excessive dust
– electrostatic or electronic noises - magnetic fields
- Avoid touching the connector of the "Memory Stick" or contacting it with a metal object.
- When attaching a label to the "Memory Stick" as specified in the illustration, use the label supplied for the "Memory Stick" only. Do not use any other labels.
- When storing and carrying the "Memory Stick" or PC card, keep it in its original case to ensure protection of important data.
- Avoid removing the "Memory Stick" or PC card from the insertion slot or turning off the power of the printer while the printer is accessing the "Memory Stick" or PC card. Otherwise, data may be rendered unreadable.
- When using a compact flash card or Smart Media, use a commercially available PC card adaptor that is compatible with the card. Insert the card into the adaptor and then insert it into the printer. For how to install the card and adaptor, refer to the operating instructions of the PC card adaptor.
- Avoid inserting or removing the compact flash card or Smart Media into or out of the PC card adaptor while the PC card adaptor is inserted in the printer. The data may be rendered unreadable or erased.
Troubleshooting
If you run into any problems using the printer, use the following guidelines to solve the problem. If the problem persists, consult your Sony dealer. When you are printing from your computer, also refer to the computer manual.
Cannot operate the printer after the power switch is turned on.
→Connect the AC power cord to an AC outlet securely.
The television displays no images.
→Set the input selector of the television to "VIDEO."
→Press INPUT SELECT to turn on the appropriate input indicator.
→When printing from the “Memory Stick,” PC card, or CD-R/RW disc, insert it securely into the printer. Check that images recorded by a digital still camera or other device are recorded.
→When recording from your video recorder, connect the printer and the video device securely. Then turn on the printer and connected devices, including the television and the video device. Start playback on the video equipment.
The memory image is blurred.
→In the "Video input" in MENU, "Still" is selected. Select "Motion" to print motion pictures.
When playing back video device pictures, the pictures are noisy or the background becomes blue.
→When you input noisy video signals, the pictures are automatically displayed with the blue background, which is not a printer's trouble. Input video signals with less noise.
Cannot print.
→Insert the correct set of print cartridge and print paper.
→Check that the paper tray has paper.
→The thermal head may be overheated. Leave the printer until the head cools down and the printer resumes printing.
→Remove the jammed paper, if any.
An image in thumbnail list is not properly displayed or printed.
→If the image is displayed but can not be printed, the file used for printing is damaged.
→If the mark shown on the right is displayed in the thumbnail list, the image is a JPEG file created with your computer, or the thumbnail data of the image is damaged.
Select the mark and press PICTURE. If a preview image is displayed, you can print the image. If the same mark is displayed again as a preview, the image is stored in an incompatible file format that the

DPP-SV88 does not support or the image itself is damaged.
→An image which is damaged or has some kind of problem will not appear in the image list. A file error message appears. If there are no images stored in the “Memory Stick” or PC card, the no file message appears.
→If an image is not compatible with DCF (Design rule for Camera File system), it may not be printed using the printer even if it is displayed on the PC monitor.
→The printer can handle and display up to 999 image files. If there are more than 999 images stored in a "Memory Stick," PC card, or a folder of a CD-R/RW disc, use the computer to display and handle the remaining images.
→Depending on the type of digital still camera used, the aspect ratio of the recorded image differs, so the image may not be printed covering the entire printable area.
→Depending on the type of digital still camera used, preview images may be displayed along with the primary images in the thumbnail list. The printed quality of the preview images will not be as good as the primary images. Note that if you delete the preview images, the data for the primary images may be damaged.
→Depending on the type of digital still camera used, the image may be stretched vertically if it has been
rotated or processed using your digital still camera. This is not because of trouble with the printer, but because the image was rewritten using your digital still camera.
→Some types of PC card adaptor that are not compatible with PCMCIA ATA cannot be used with this printer.
The beeps sound.
→Check that you are following the correct procedures.
Cannot remove the CD-R/RW disc.
→Turn the printer off. Then insert a thin, pointed object (with diameter of approximately 1.2mm) into the CD-R/RW disc tray manual eject hole on the printer.
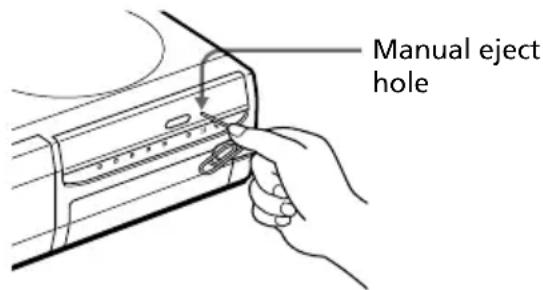
Cannot remove the print cartridge.
→Turn the printer off then on. After the motor sound stops, try to remove the cartridge.
The or indicator is lit or an error message is displayed.
→Follow the instructions on the screen.
Troubleshooting
If paper jams
If the print paper jams, the paper error indicator lights and an error message is displayed. Printing stops. Turn the printer off and remove the jammed paper from the paper outlet or take out the paper tray to remove the jammed paper.
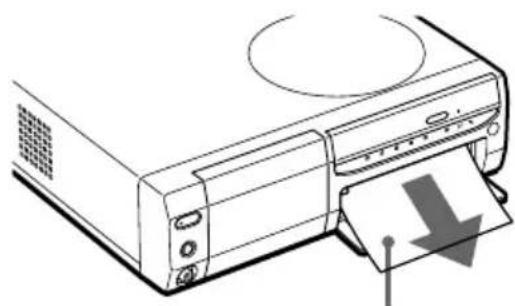
natural_image
Line drawing of a printer with a paper feed and arrow indicating compression (no text or symbols)Pull out the jammed paper slowly.
Take out the paper tray to remove the jammed paper.

natural_image
Simple line drawing of a folded paper or sheet with a vertical line and arrow indicating direction (no text or symbols)Note
If you cannot remove the jammed paper, contact your Sony dealer.
Specifications
Printing system
Sublimation dye transfer printing (Yellow/Magenta/Cyan 3 pass)
Resolution
403 (H) x 403 (V) dpi
Image processing
256 levels (8 bits for each Yellow/Magenta/Cyan), approx. 16,770,000 colors
Printing size
152.4 (H) x 101.6 (V) mm (maximum, Post Card Size, borderless) (6 x 4 inches)
Printing time
Approx. 90 seconds per sheet (Post Card Size Paper)/Approx. 60 seconds per sheet (Small Size Paper) (excluding the time for data processing and data transferring from the personal computer or "Memory Stick" or PC card)
Input/Output connectors
USB connector (1) VIDEO OUT (output) connector (phono jack x 1)/VIDEO IN (input) connector (phono jack x 1) 1 Vp-p, 75 ohms (unbalanced), sync negative S VIDEO OUT (output) connector (4-pin mini-DIN x 1)/S VIDEO IN (input) connector (4-pin mini-DIN x 1) 1 Vp-p, 75 ohms (unbalanced), sync negative C: 0.286 Vp-p (color burst), 75 ohms (unbalanced)
Slot
"Memory Stick" insertion slot (1) PC card insertion slot (PCMCIA II) (1) CD-R/RW disc drive (1)
Laser Diode Properties
Material: GaAIAs Wave Length: 780 - 787 nm Emission duration: 86 nsec Laser output power: 80mW
Compatible image file formats
JPEG: 4:4:4, 4:2:2, 4:2:0 (baseline JPEG) BMP: 24 bits full color, Windows format (Note that some versions of the file formats may not be compatible.)
Maximum number of files to be handled
999 files for a "Memory Stick" / PC card/ one folder in a CD-R/RW disc
Print cartridge/Print Paper
See "Preparing the printing pack" on page 22.
Power requirements
120 V AC, 60 Hz, 1.16 A (for 120 V users) 220 - 240 V AC, 50/60 Hz, 0.62A (for 220 to 240 V users)
Power consumption (standby mode)
Approximately 1 W
Operating temperature
5^ C to 35^ C ( 41^ F to 95^ F)
Dimensions
Approx. 280 x 84 x 267 mm (w/h/d, excluding protruding parts) (11 ^1 / 8 x 3 ^3 / 8 x 10 ^5 / 8 inches) (363 mm (14 ^3 / 8 inches) of depth when the paper tray is installed.)
Mass
Approx. 3.0 kg (7 lb) (excluding the 0.1 kg (4 oz) paper tray)
Supplied accessories
See “Unpacking the printer” on page 8. Design and specifications are subject to change without notice.
Index
Symbols
8cm CD-R/RW disc 18
A
AC power cord 15
Access speed 60
Adjusting an image 65
Album 28
ALL 33
Auto Fine Print 2 80
AUTO PRINT 33
B
Beep 80
Borderless print 80
C
Calendar 69
Card 72
Cartridge compartment lid 23
Cartridge error indicator 23
CD adaptor 18
CD Mavica 18, 31, 47
CD-R disc 47
CD-R/RW disc
Access speed setting 60
Cleaning 48
Creating a folder 52
Folder/file names 41
Formatting 59
Icons 31
Inserting/removing a disc 17
Notes on handling 48
Operation flow 49
Printing 27
Saving card images 37
Saving images in a card 42
Type of discs 47
Writing/reading a disc 50
CD-RW disc 47
Changing
Image position 64
Printer preferences 79
Cleaning 107
Clock setting 81
Connections
AC power cord 15
Computer 20
Television 13
Video equipment 14
Creating a new folder 52
Creative Print menu 67
D
Date print 80
Deleting
Folders 55
Images 82
DPOF 32, 33
E
EFFECT menu 61
Eject lever 23
F
Filter 66
Finalization 49, 56
Finish 80
Folder 28
Folder menu 52
Folder/file names 41
Formatting
CD-R/RW disc 59
Memory Stick 83
Frame 76
Front panel 9
|
Icons 31
Index print 86
Initialization 49, 51
Input image 35
INPUT SELECT
20, 27, 35
Inserting
CD-R/RW disc 17
Memory Stick 15
Paper tray 26
PC Card 16
Print cartridge 23
Print paper 25
Installing the software
Macintosh 102
Windows 89
M
Memory image (video) 36
Memory Stick
Inserting/removing 15
Note on use 109
Protecting the data 108
Saving CD-R/RW disc images 42
Saving images on a
CD-R/RW disc 37
Types 108
MENU 78
Mirror 64
0
Operation panel 10
Overview 6
P
Paper error indicator 26, 112
Paper jams 112
Paper tray 11, 25
PC card
Inserting/removing 16
Note on use 109
Saving CD-R/RW disc
images 42
Saving images on a
CD-R/RW disc 37
PC mode 20
PICTURE 29
Preview image 12, 29
Print cartridge 23
Print paper 25
Printing
All or DPOF images 32
From a Macintosh computer 104
From a Windows comptuer 99
Selected card or disc images 27
Video images 35
Printing pack 22
Printing surface 25
R
Reader software 98
Rear panel 9
Remote commander 11, 21
Renaming a folder 53
Replacing batteries 21
Restrictions on
duplication 107
Rotating an image 64
S
S VIDEO IN connector 14
S VIDEO OUT connector 13
SAVE 39, 44, 45
SAVE ALL 37,42
Saving
Card images 37
CD-R/RW disc images 42
Video images 45
Screen 12
Slideshow 84
Specifications 113
Split images 77
Standard print 27
Sticker 75
Supplied accessories 8
System requirements
Macintosh 102
Windows 88
T
Thumbnail list 12, 31
Transport 107
Troubleshooting 110
U
Unfinalization 58
Uninstalling the software 95, 103
USB connector 20
V
VIDEO 35,45
VIDEO IN connector 14
Video input setting 81
VIDEO OUT connector 13
W
Writing/reading 50, 60
Z
Zooming an image 63
AVERTISSEMENT
Programme © 2001 Sony Corporation Documentation ©2001 Sony Corporation
natural_image
Line drawing of a coiled cable with two connectors (no text or symbols)- Télécommande (1)

natural_image
Line drawing of a remote control with keypad and scroll (no text or symbols)natural_image
Line drawing of a coiled cable with two connectors (no text or symbols)- CD-ROM (1)
natural_image
Simple line drawing of a plastic tray with vertical slots (no text or symbols)-Logiciel "Sony DPP-SV88 Printer Driver Software"
Professional/XP Home Edition/ XP Professional Version 1.0
Professional/XP Home Edition/
XP Professional Version 1.0
Télécommande
Ecran
natural_image
Line drawing of a hand inserting a component into a device (no text or symbols)natural_image
Diagram of hands operating a mechanical component with no visible text or symbolsnatural_image
Line drawing of a computer monitor with a cable inserted, showing the handle and control panel (no text or symbols)natural_image
Line drawing of a computer case with a hand holding a mouse, no text or symbols presentnatural_image
Diagram of a hand inserting a component into a battery pack (no text or symbols)natural_image
Line drawing of a computer with an open drive and a circular top (no text or symbols)Remarques
Remarques
natural_image
Black and white photo of a rose with visible petals, set within a software interface (no text or symbols on the flower itself)Remarque
Suite
natural_image
Black and white close-up of a rose flower with visible petals and leaves, no text or symbols present.natural_image
Black and white photo of a rose with visible petals, set within a software interface (no text or symbols on the flower itself)Conseils
Suite
natural_image
Black and white photo of a rose with visible petals and leaves, displayed within an image editing interface (no text or symbols on the flower itself)Conseils
natural_image
Black and white close-up photo of a rose flower with visible petals and leaves (no text or symbols)4 Appuyez sur SAVE.
natural_image
Illustration of a hand using a tool to cut or mark a circular object with arrows indicating direction (no text or symbols)Remarques
![Menu du dossier MENU NEW RENAME DELETE FORMAT SET EXIT Album album album album album album album album album album album album album album album album album album album album album album album album album album album album album album album album album album album album album album album album album album album album album album album album album album album bum008 park Pari Holiday School ALBUM019 Select item with [→][→] the press [ENTER]](/content/2026/06/1239215/images/97e128f5c7c152d95d2ed5148c44e5311fbe2ac50282d859e457ecdb740ce5d0.jpg)
![MENU NEW RENAME DELETE FORMAT SET EXIT Album album album album album album album album album album album album album album album album album album album album album album album album album album album album album album album album album album album album album album album album album album album album album album album album album album album Album008 park Pari album Holiday School ALBUM019 Press [←]→ [↑]↓ /ENTER to select the folder.](/content/2026/06/1239215/images/a8bce76e40da6c59f847e705b9ec8d3819bffa3b5a8cbe16b1537fe0a5569df5.jpg)
Suite
natural_image
Black and white close-up of a blooming rose flower (no text or symbols visible)
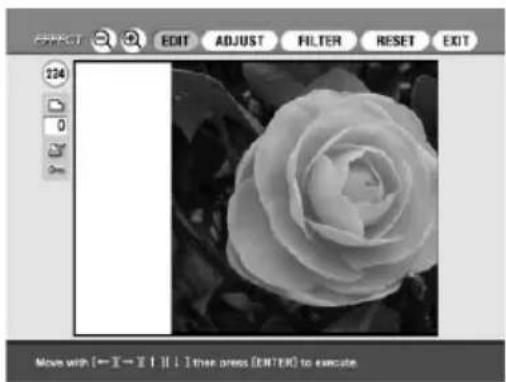
natural_image
Black and white photo of a rose with visible petals, set against a leafy background (no text or symbols)
natural_image
Black and white photo of a rose with visible petals and leaves, displayed within an image editing software interface (no text or symbols on the flower itself)Curseur de réglage
Suite
Remarque
Impression impossible.
natural_image
Line drawing of a printer with a paper being inserted, showing no text or symbolsnatural_image
Diagram of a mechanical component with arrows indicating direction (no text or symbols)CD Mavica 18, 31, 47
INPUT SELECT 20, 27, 35
Insertion
marge (Impression sans) 80
"Memory Stick"
natural_image
Line drawing of a coiled cable with two plug connectors (no text or symbols)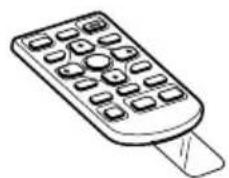
natural_image
Line drawing of a remote control with keypad and scroll (no text or symbols)natural_image
Line drawing of a coiled cable with two connectors (no text or symbols)
- Bandeja de papel (1)
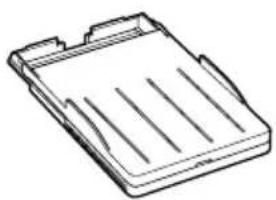
natural_image
Line drawing of a plastic tray with vertical slots (no text or symbols)- Sony DPP-SV88 Printer Driver Software for Windows® 98/ Me/2000 Professional/XP Home Edition/XP Professionall Version 1.0 for MAC OS 8.5.1./8.6/9.0/9.1/ 9.2 Version 1.0
-Memory Stick/PC card Reader Software for Windows® 98/ Me/2000 Professional/XP Home Edition/XP Professional Version 1.0
Mando a distancia
Pantalla
natural_image
Line drawing of a hand inserting a component into a device (no text or symbols)natural_image
Diagram of hands operating a mechanical component with no visible text or symbolsnatural_image
Line drawing of a computer monitor with a hand inserting a cable to the right side (no text or symbols)natural_image
Line drawing of a hand holding a device with a cross mark on the cover (no text or symbols)natural_image
Illustration of a hand inserting a component into a battery pack (no text or symbols)natural_image
Line drawing of a vintage desktop computer with an open drive and paper feed (no text or symbols)Notas
Notas
natural_image
Black and white photo of a rose with visible petals, set within a software interface (no text or symbols on the flower itself)Nota
Continúa
natural_image
Black and white photo of a rose with visible petals and leaves, displayed within an image editing interface (no text or symbols on the flower itself)natural_image
Black and white photo of a rose with visible petals, set within a software interface (no text or symbols on the flower or background)Sugerencias
natural_image
Black and white close-up photo of a rose with visible petals, surrounded by leaves (no text or symbols)6 Pulse SAVE.
natural_image
Black and white close-up of a rose flower with visible petals and leaves, no text or symbols present.4 Pulse SAVE.
Continúa
natural_image
Illustration of hands using a tool to cut or mark a circular object with arrows (no text or symbols)Notas
![Menü Folder MENU NEW RENAME DELETE FORMAT SET EXIT Album album album album album album album album album album album album album album album album album album album album album album album album album album album album album album album album album album album album album album album album album album album album album album album album album album album bum008 park Pari Heliay School ALBUM019 Select item with [→ I→] the press [ENTER]](/content/2026/06/1239215/images/f146b91fb50e6cf6871e8d6a159f7d6642418ff4767910e404996f8812c5e480.jpg)
natural_image
Black and white close-up of a blooming rose, no text or symbols visible in the main image area.
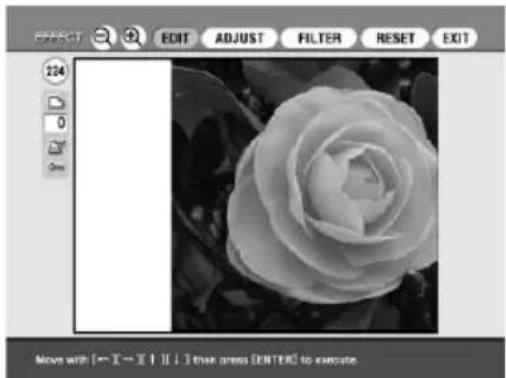
natural_image
Black and white photo of a rose with visible petals, set against a dark background (no text or symbols)
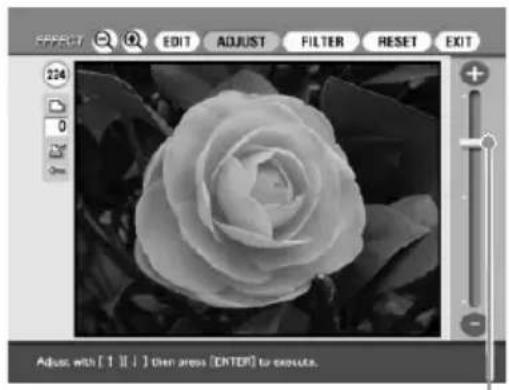
natural_image
Black and white photo of a rose with visible petals and leaves, displayed within an image editing interface (no text or symbols on the flower itself)natural_image
Three circular grayscale images showing a rose, with no visible text or symbols.3 Pulse ENTER/PRINT QTY.
Continúa
3 Pulse ENTER/PRINT QTY.
Nota


- Digital Photo Printer
- Operating Instructions
- Mode d'emploi
- WARNING
- CAUTION
- For the customers in Europe
- For the customers in the U.S.A.
- Owner's Record
- FCC Statements for the Remote Commander RM-SV1
- Declaration of Conformity
- Notice for users
- User Registration
- Table of contents
- Getting started
- Setting up
- Basic printing operations
- Saving images
- Using a CD-R/RW disc
- Advanced printing operations
- Printing from your computer
- Additional information
- What you can do with the printer
- Photo-realistic printing
- Super Coat 2 feature
- Auto Fine Print 2 function
- Selection of print sizes and border/borderless print formats
- Saving images by folders (albums) in a CD-R/RW disc
- Notes
- Direct printing of "Memory Stick," PC card, CD-R/RW disc, or video equipment images
- Selection of print finish
- Printing 25/30 sheets at one time
- A wide variety of image processing available with your printer
- An even wider variety of prints using the Creative Print menu
- Making a convenient USB connection with your computer
- Note
- Unpacking the printer
- \*Note
- Identifying the parts
- Printer front panel
- Printer rear panel
- Printer indicators and operation panel
- Remote commander
- Paper tray
- Screen
- Connecting the printer
- Connecting to a television
- When your television has an S-video input connector
- To view the video images on the television while the printer is turned off
- Connecting to video equipment
- If the video equipment has an S-video output connector
- Connecting the AC power cord
- Inserting a "Memory Stick" or PC card
- Printing an image from a "Memory Stick"
- To eject the "Memory Stick"
- Printing an image from a PC card
- To eject the PC card
- Inserting a CD-R/RW disc
- Close the disc tray firmly until it clicks into place.
- To take out the disc
- Press the CD-R/RW disc tray open/close button.
- Remove the CD-R/RW disc from the tray.
- To use an 8cm CD-R/RW disc of your CD Mavica digital camera
- Insert an 8cm CD-R/RW disc into the two tabs of the adaptor in the order of ① and ②.
- Connecting to a computer (optional)
- When you connect a computer that is already powered on to the USB connector of the printer
- Preparing the remote commander
- Remove the friction seal from the remote commander.
- Point the remote commander to the remote sensor on the printer and then press a button to operate the printer.
- Replacing batteries
- CAUTION:
- Preparing the printing pack
- Loading the print cartridge
- To replace the print cartridge
- Notes on storing the print cartridge
- Inserting the print paper
- Notes on storing the print paper
- Printing selected card or disc images
- On INPUT SELECT
- When you select CD-RW disc
- Press the arrow (◄/►/↑/▼) button to move the yellow frame (cursor) to the image you want to print, then press ENTER/PRINT QTY.
- To display another page
- To cancel the selection
- To display the images of another folder (CD-R/RW only)
- To display a preview image
- Press ENTER/PRINT QTY to set the print quantity.
- To print multiple images at a time
- Press PRINT.
- When you start printing while the preview image is displayed
- To stop printing
- When printing ends and the print paper automatically emerges from the paper outlet, remove the printed paper from the printer.
- On icons of the Cybershot or CD Mavica images in the image list
- Printing all the images or DPOF preset images at one time
- What is "DPOF"?
- To display the images on the screen
- Press INPUT SELECT to light "MEMORY STICK," PC CARD or CD-RW indicator.
- Do either of the following:
- To cancel operation
- When you connect your printer to the television
- Press PRINT.
- When printing ends and the print paper automatically emerges from the paper outlet, remove the printed paper from the printer.
- To return to the usual printing mode
- Printing an image from video equipment
- Press ENTER/PRINT QTY when the picture you want to print appears on the screen.
- To capture another image
- Press PRINT while the memory image is displayed.
- Saving "Memory Stick" or PC card images onto a CD-R/RW disc
- Saving all the "Memory Stick" or PC card images at one time
- Tip
- Saving the selected "Memory Stick" or PC card images onto a CD-R/RW disc
- ■ When thumbnails are displayed
- ■ When a preview image is displayed
- Tips
- Press SAVE.
- Press the arrow (◄/►) button to select "CD-R/RW" as the destination and then press ENTER/PRINT QTY.
- Press the arrow (◄/►) button to select "Yes" to create a new folder or "No" to save an image in an existing folder.
- When the message notifying saving is complete appears, press ENTER/PRINT QTY.
- On folders and file names in saving images on a CD-R/RW disc On folders (albums)
- On file names
- Saving CD-R/RW disc images onto the "Memory Stick" or PC card
- Saving all the images in a CD-R/RW folder at one time
- When the message notifying saving is complete appears, press ENTER/PRINT QTY.
- Saving the selected CD-R/RW disc images onto the "Memory Stick" or PC card
- Select an image that you want to save.
- Press SAVE.
- Press the arrow (◄/►) button to select "Memory Stick" or "PC Card" as the destination and then press ENTER/PRINT QTY.
- Saving the video memory image onto a "Memory Stick," PC card or CD-R/RW disc
- Press SAVE.
- Press the arrow (◄/►) button to select the destination ("Memory Stick," "PC Card" or "CD-R/RW") and then press ENTER/PRINT QTY.
- On CD-R/RW discs
- Types of CD-R/RW discs you can use
- Using a CD Mavica disc on the printer
- On handling discs
- Notes on cleaning CD-R/RW discs
- Operations flow on using a CD-R/RW disc
- Initialization
- Finalization
- Unfinalization
- Formatting
- On writing/reading a disc with the printer
- Preparing a CD-R/RW disc for saving images (Initialization)
- You can also initialize a CD-R/RW disc with the following methods:
- Arranging the folders in a CD-R/RW disc
- Creating a new folder
- Renaming a folder
- To input in a capital letter
- To correct an input character
- Deleting a folder
- Viewing images of a CD-R/RW disc on your computer
- System requirements of the computer
- Recommended Windows system:
- Recommended Macintosh system:
- Preparing a CD-R/RW disc for viewing images on the computer (Finalization)
- You can also initialize a CD-R/RW disc with the following method:
- Canceling the finalization (Unfinalization)
- You can also unfinalize a CD-RW disc with the following method:
- Formatting a CD-RW disc
- You can also format a CD-RW disc with the following method:
- Setting the access speed to a CD-R/RW disc
- Adding effects to an image
- What you can do with the EFFECT menu
- To display the EFFECT menu
- Sub menu Functions
- To display another sub menu
- To print the image
- To exit the EFFECT menu
- To save the image with the selected effects
- Press SAVE.
- Press the arrow (◄/►) button to select the destination and then press ENTER/PRINT QTY.
- Changing an image size and position
- Changing an image position
- Adjusting the pictures
- Adding a special filter to an image
- Item Filter
- Making various prints (Creative Print)
- What you can do with the Creative Print menu
- To cancel and restart operations midway
- To change the printer settings midway
- To exit the Creative Print menu
- Making a calendar
- Set the calendar:
- Press the arrow (↓/↑) button to move the cursor to the desired adjustment item, then press ENTER/PRINT QTY.
- Press the arrow (↓/↑) button to move the cursor to "NEXT," then press ENTER/PRINT QTY.
- Making a card
- Press ENTER/PRINT QTY.
- To select the font color
- Making a sticker
- Making split images
- Setting the printer (MENU)
- What you can do with the MENU
- To exit the MENU
- Changing the printer preferences (SET)
- In the MENU screen (page 78), press the arrow (◄/►) button to select "SET" and press ENTER/PRINT QTY.
- To cancel operation midway in the MENU sub screen
- Press the arrow ( / ) button to select the desired setting item and press the arrow ( ←/→ ) button to change the setting.
- Press the arrow ( //←/→ ) button to select "EXIT" and press ENTER/PRINT QTY.
- Deleting images
- Deleting selected image(s)
- When you select CD-RW
- Formatting a "Memory Stick"
- Viewing the slideshow
- To stop slideshow
- Making an index print
- Press the arrow (◄/►/▲/▼) button to move the cursor to "Execute," then press ENTER/PRINT QTY.
- Using your printer with Windows computers
- System requirements
- Installing the software
- When using Windows 98/98SE/Me
- Installing the USB driver
- To check the installation
- Installing the printer driver and reader software
- When using Windows 2000 Professional/Windows XP Home Edition/Windows XP Professional
- Click "Finish."
- Uninstalling the software
- Uninstalling the "Sony DPP-SV88"
- Uninstalling the printer driver
- Note on DPP-SV88 software installation for the customers using Sony DPP-SV55/SV77 digital photo printer
- Using the reader software
- Printing from a software application
- To set properties of the printer
- □ Graphics tab
- □ Device Options tab
- Stopping printing midway when printing from your computer
- When a "printing" dialog box is on the screen
- When the data is in the printer queue
- Using your printer with Macintosh computers
- Installing the printer driver
- Precautions
- On safety
- On installation
- On moisture condensation
- On transport
- On cleaning
- On restrictions on duplication
- About the “Memory Stick” and PC card media
- On "Memory Stick"
- To protect "Memory Stick" images
- ■Write enable position
- ■Write protect position
- Notes on use
- Troubleshooting
- Cannot operate the printer after the power switch is turned on.
- The television displays no images.
- The memory image is blurred.
- When playing back video device pictures, the pictures are noisy or the background becomes blue.
- Cannot print.
- An image in thumbnail list is not properly displayed or printed.
- The beeps sound.
- Cannot remove the CD-R/RW disc.
- Cannot remove the print cartridge.
- The or indicator is lit or an error message is displayed.
- If paper jams
- Specifications
- Printing system
- Resolution
- Image processing
- Printing size
- Printing time
- Input/Output connectors
- Slot
- Laser Diode Properties
- Compatible image file formats
- Maximum number of files to be handled
- Print cartridge/Print Paper
- Power requirements
- Power consumption (standby mode)
- Operating temperature
- Dimensions
- Mass
- Supplied accessories
- Index
- Symbols
- A
- B
- C
- D
- E
- F
- |
- M
- 0
- P
- R
- S
- T
- U
- V
- W
- Z
- AVERTISSEMENT
- Télécommande
- Ecran
- Remarques
- Remarque
- Conseils
- Appuyez sur SAVE.
- Impression impossible.
- Mando a distancia
- Pantalla
- Notas
- Nota
- Sugerencias
- Pulse SAVE.
- Pulse SAVE.
- Pulse ENTER/PRINT QTY.
Brand : SONY
Model : DPP-SV88
Category : Printer