
DPP-MP1 - Printer SONY - Free user manual and instructions
Find the device manual for free DPP-MP1 SONY in PDF.


| Product Type | Digital Photo Printer |
| Brand | Sony |
| Model | DPP-MP1 |
| Dimensions (W x H x D) | Approx. 66 x 39 x 111 mm (without paper cassette) |
| Weight | Approx. 260 g (without paper cassette) |
| Power Supply | AC adapter: input 100-240 V AC, 50/60 Hz; output 12 V DC, 3 A. Consumption: 12 V DC, 2.1 A (25 W during printing) |
| Printing Method | Thermal sublimation (YMC + overcoating layer) |
| Print Resolution | 307 x 307 dpi |
| Gradation | Approx. 16.77 million colors (8 bits/256 gradations per color) |
| Print Format | 81.6 (H) x 50 (V) mm |
| Print Time | Approx. 90 seconds per print (excluding transfer and processing) |
| Storage Media | Memory Stick (up to 128 MB) |
| Compatible File Formats | JPEG, TIFF (uncompressed), DPOF |
| Connectivity | USB (Mini-B) for PC connection |
| Main Functions | Direct printing from Memory Stick, DPOF printing, image selection, sharpness and brightness settings, date, format, multi-copies (2/4/8 per sheet) |
| Supplied Accessories | AC adapter, power cord, paper cassette, printing pack (SVM-24CS), quick-attach filter, USB cable, CD-ROM, installation guide, carrying case |
| Options | Battery kit MPA-BT1A (available separately) |
| Maintenance and Cleaning | Clean the housing with a soft, dry cloth; avoid solvents; do not open the housing; unplug before cleaning |
| Safety | Use only the supplied adapter; avoid humidity and dust; do not block ventilation openings; automatic shutdown after 3 minutes of inactivity |
| Spare Parts and Repairability | Main parts available for at least 8 years after production discontinuation; repair by qualified personnel; 1 year warranty |
Frequently Asked Questions - DPP-MP1 SONY
User questions about DPP-MP1 SONY
0 question about this device. Answer the ones you know or ask your own.
Ask a new question about this device
Download the instructions for your Printer in PDF format for free! Find your manual DPP-MP1 - SONY and take your electronic device back in hand. On this page are published all the documents necessary for the use of your device. DPP-MP1 by SONY.
USER MANUAL DPP-MP1 SONY
Digital Photo Printer
Operating Instructions GB
Mode d'emploi FR
natural_image
Exterior view of a silver digital printer with control panel and paper feed (no visible text or symbols)MEMORY STICK TM
digital photo printer
DPP-MP1
2001 Sony Corporation
WARNING
To prevent fire or shock hazard, do not expose the unit to rain or moisture.
To avoid electrical shock, do not open the cabinet. Refer servicing to qualified personnel only.
For the Customers in the U.S.A.
If you have any questions about this product, you may call:
Sony's Business Information Center (BIC) at 1-800-686-SONY (7669) or
Write to: Sony Customer Information Services Center
6900-29 Daniels Parkway, PMB 330
Fort Myers, Florida 33912
Declaration of Conformity
Trade Name: SONY
Model No.: DPP-MP1
Responsible Party: Sony Electronics Inc.
Address: 680 Kinderkamack
Road, Oradell, NJ
07649 USA
Telephone No.: 201-930-6972
This device complies with Part 15 of the FCC Rules. Operation is subject to the following two conditions: (1) This device may not cause harmful interference, and (2) this device must accept any interference received, including interference that may cause undesired operation.
CAUTION (U.S.A. only)
You are cautioned that any changes or modifications not expressly approved in this manual could void your authority to operate this equipment.
This equipment has been tested and found to comply with the limits for a Class B digital device, pursuant to Part 15 of the FCC Rules. These limits are designed to provide reasonable protection against harmful interference in a residential installation. This equipment generates, uses, and can radiate radio frequency energy and, if not installed and used in accordance with the instructions, may cause harmful interference to radio communications. However, there is no guarantee that interference will not occur in a particular installation. If this equipment does cause harmful interference to radio or television reception, which can be determined by turning the equipment off and on, the user is encouraged to try to correct the interference by one or more of the following measures:
– Reorient or relocate the receiving antenna.
– Increase the separation between the equipment and receiver.
- Connect the equipment into an outlet on a circuit different from that to which the receiver is connected.
- Consult the dealer or an experienced radio/TV technician for help.
The supplied interface cable must be used with the equipment in order to comply with the limits for a digital device pursuant to Subpart B of Part 15 of FCC Rules.
For the Customers in Canada
This Class B digital apparatus complies with Canadian ICES-003.
Table of Contents
Features 4
Before Use 5
Supplied Accessories 5
About the Printing Pack 6
Names of Parts....7
Preparations 9
1 Power Connection 9
2 Loading the Print Cartridge ..... 10
3 Loading the Print Paper ...... 11
4 Inserting the “Memory Stick” .... 13
Printing...... 14
Operation During Printing 14
Printing Images With Print Mark
(DPOF Print) 15
Assigning a Print Mark.... 15
Bulk printing of images with Print Mark 15
Changing the number of duplicates .... 17
Direct-Select Printing 18
Selecting an image.... 18
Printing 19
Print settings 21
PC Interface Kit ...... 23
Preparation.... 23
Printing 24
Others...... 25
Precautions 25
Print Cartridge Storage Precautions . 26
Print Paper Storage Precautions ..... 26
"Memory Stick" 27
Image Files and File Names ...... 28
Troubleshooting.... 29
Warranty and Service 33
Specifications 33
Features
The Digital Photo Printer DPP-MP1 makes it easy to produce attractive prints from digital images stored on a “Memory Stick”, for example with a Sony CyberShot camera or Handycam camcorder.
Simple printing of images with Print Mark
Images that were assigned a Print Mark on a Sony CyberShot digital camera or Handycam camcorder can be automatically printed (DPOF ^1) printing). For information on compatible file formats, see page 34.
1) DPOF = Digital Print Order Format
Direct-selection printing
Still images taken with a Sony CyberShot digital camera or Handycam camcorder and stored on a “Memory Stick” can be printed directly on the DPP-MP1.
Compact and lightweight
The DPP-MP1 is a compact and lightweight printer measuring approximately 66 · 39 · 111 mm and weighing approximately 260 grams. It can easily be carried and used anywhere.
Photo quality printing
The dye sublimation thermal method produces high-quality prints that rival actual photos.
Versatile print functions
The DPP-MP1 lets you adjust image properties (sharpness/brightness), control date printout, select multi-print (2/4/8 copies of the same image on one sheet), and perform various other functions.
USB connection allows printing of images stored on a PC
The supplied PC interface kit lets you print digital images stored on a computer.
Battery powered operation (option)
The separately available Battery Kit makes it possible to produce prints even when far from an AC power source.
Supplied Accessories
After unpacking the unit, make sure that the accessories shown below are complete.
- AC adapter

natural_image
Line drawing of a rectangular electronic device with a coiled cable and connector (no text or symbols)- Power cord
– U.S.A. and Canada

natural_image
Line drawing of a straight cord with two terminal plugs, no text or symbols present- Europe

natural_image
Line drawing of a cable with a plug and connector (no text or symbols)- Paper tray
natural_image
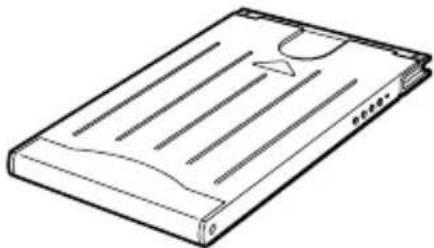
Line drawing of a flat electronic device with ventilation slots and connectors (no text or symbols)- Card size color printing pack (SVM-24CS)
natural_image
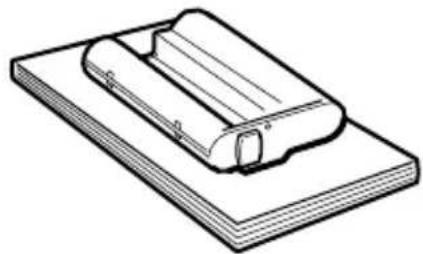
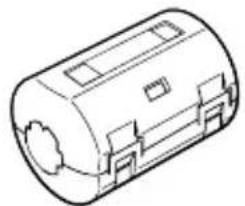
Isometric line drawing of a rolled-up document or scroll resting on a flat base (no text or symbols)- Clamp filter (3)

natural_image
Isometric line drawing of a cylindrical mechanical component with mounting holes (no text or symbols)- PC interface kit - USB cable
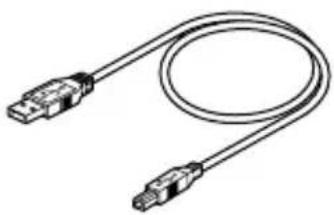
natural_image
Line drawing of a USB cable with two connectors (no text or symbols)- CD-ROM
- Carrying pouch (1)
- Operating Instructions (1)
- Owner registration card (1)
- Warranty (1)
- Sony End User Software License Agreement (1)
About the Printing Pack
To print with this unit, the dedicated printing pack is required.
Printing pack Application
SVM-24CS Photo paper 12-pack · 2 / print cartridge for 24 prints
Note
- Be sure to use only the dedicated printing packs for this unit.
- Do not try to reinsert used print paper or print cartridges. Otherwise paper jam or malfunction can occur.
Names of Parts
For detailed information, refer to the pages shown in brackets.

1 Power switch (pages 15, 19)
② Paper tray
③ Paper tray insertion door (page 12)
④ Ventilation openings
5 Display (page 8)
6 SELECT (-/+) buttons
7 ENTER/OPTION button
8DPOF button (page 16)
9 PRINT/STOP button (pages 16, 20)
10 Memory Stick slot (page 13)
11 Print cartridge door (page 10)
12 Print cartridge door latch (page 10)
13USB port

14 Paper exit slot
15 DC 12V connector (page 9)
16 Battery terminal cover
Display

1 Battery capacity indicator
2 Print setting display (page 22)
3 USB cable connection indicator
4DPOF indicator (page 16)
5 ERROR indicator (page 30)
6MS ACCESS indicator (page 13)
7 Folder number display (pages 16, 19)
8 File number display (pages 16, 19)
9 TIFF image indicator (page 20)
10 Print count display (pages 16, 19)
1 Power Connection
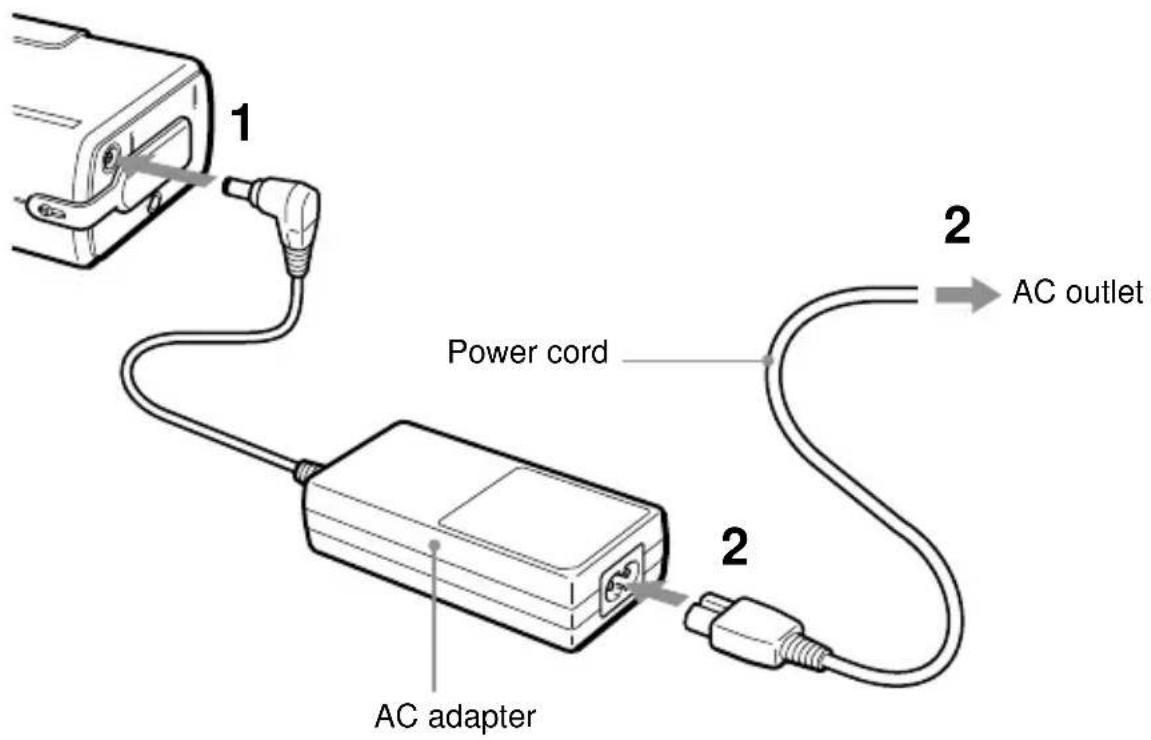
1 Connect the AC adapter to the DC 12V connector on the DPP-MP1.
2 Connect the power cord to the AC adapter and to an AC outlet.
Auto power-off function
The unit will automatically turn itself off if it is not being used for about 3 minutes (auto power-off function). While the unit is connected to a PC with an USB cable, the auto power-off function is disabled.
Battery Kit (option)
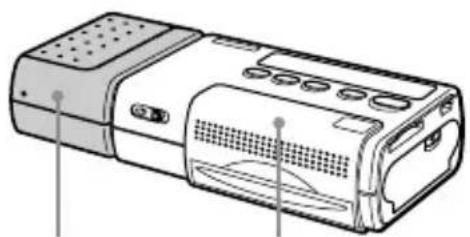
The separately available Battery Kit MPA-BT1A can be used to power the unit.
natural_image
Line drawing of a portable electronic device with ventilation slots and ports (no text or symbols)MPA-BT1A DPP-MP1
For information on how to mount the Battery Kit in the unit, refer to the documentation of the Battery Kit.
2 Loading the Print Cartridge
The print cartridge is supplied as part of the printing pack (page 6). Mount it in the unit as shown below.
1 Slide the latch of the door down ① to open the print cartridge door ②.

natural_image
Line drawing of a computer monitor with ports and a button, labeled with number 1 (no text or symbols on the device itself)
natural_image
Line drawing of a printer with ports and a paperclip, labeled with number ② (no text or symbols on the diagram itself)2 Remove the ribbon reel stopper from the print cartridge.

natural_image
Technical line drawing of a mechanical component with directional arrows indicating movement (no text or symbols)Reel stopper
3 Push the print cartridge into the unit until it audibly snaps into place. Then close the print cartridge door.
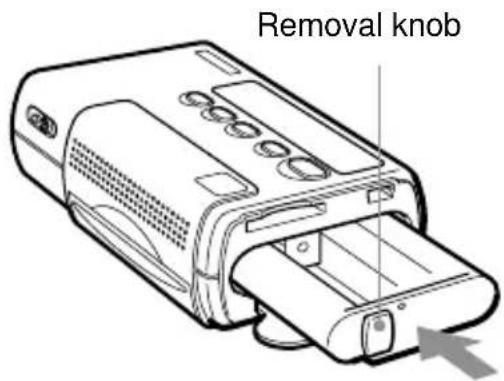
Replacing the print cartridge
When the print cartridge is used up, the indication "RIBON" flashes on the display.
1 Open the print cartridge door as described in step 1 above.
2 Grasp the removal knob on the cartridge and pull the old cartridge out. Then insert the new cartridge.
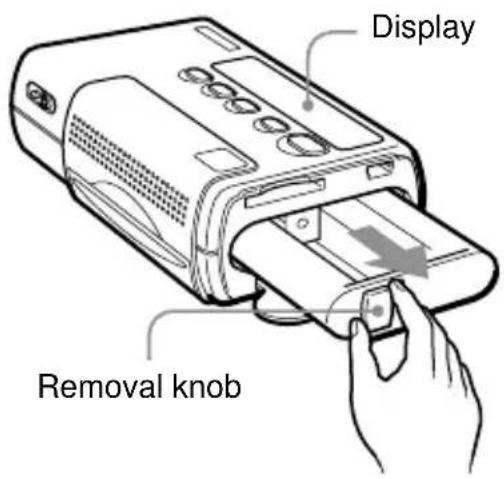
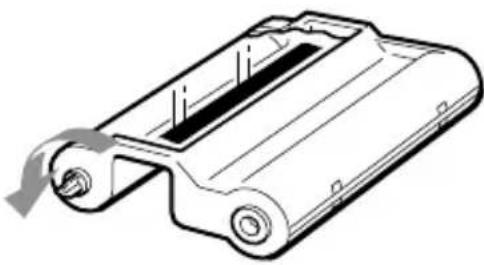
If print cartridge does not go in smoothly
Remove it fully from the unit and then reinsert it. If the cartridge does not go in smoothly because the ribbon is slack, rotate the spool of the cartridge in the direction shown by the arrow to take up the slack.
natural_image
Technical line drawing of a battery pack assembly (no text or symbols)Caution
The interior of the unit can become hot. Do not put your fingers or other objects into the print cartridge slot.
3 Loading the Print Paper
The print paper is supplied as part of the printing pack (page 6).
Mount it in the unit as shown below.
1 Open the cover of the paper tray.

2 Place the print paper on the tray.
Align the paper and place it on the tray with the protective sheet in place and facing up.

You can insert up to 12 print papers (1 pack) at a time.
Note
Do not separate along the perforated lines before printing.
3 Close the paper tray cover.
Note
If the print paper is not loaded properly, the paper tray cover cannot be closed. Make sure that the paper tray cover is completely closed.
4 Pull out the protective sheet.
5 Pull the paper tray door open, and insert the paper tray into the unit.

natural_image
Diagram showing a printer being inserted into a plastic sheet (no text or symbols present)Push the paper tray all the way in, until it audibly snaps into place.
When printing is completed
Remove the paper tray from the unit and close the paper tray door.
Notes
- The printing pack contains a print cartridge for 24 prints and 2 · 12-pack print paper. Only load half of the print paper at one time.
- When adding print paper to the paper tray, take care not to exceed the maximum of 12 sheets. Do not mix different types of print papers. Otherwise a paper jam can occur.
-
Do not write or print anything on the print paper before inserting it into this unit. After printing, if you wish to write onto the image side of the paper, use an oil-based marker. You cannot further print on the image side of the paper.
-
Do not attach any labels, stamps, stickers or similar to the print paper before printing.
- When handling the print paper before printing, do not touch the image side (the side where nothing is printed). If there are fingerprints or dust on the print paper or the ribbon, print quality may be degraded.
- Be sure to use only the dedicated print paper for this unit. Otherwise malfunction can occur.
- Do not fold or crease the print paper. Otherwise malfunction can occur.
4 Inserting the "Memory Stick"
Insert a “Memory Stick” into the unit as shown below.
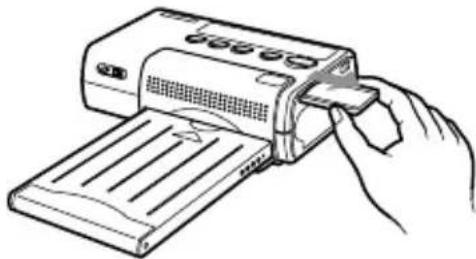
Be sure to push the “Memory Stick” all the way in, until it audibly snaps into place.
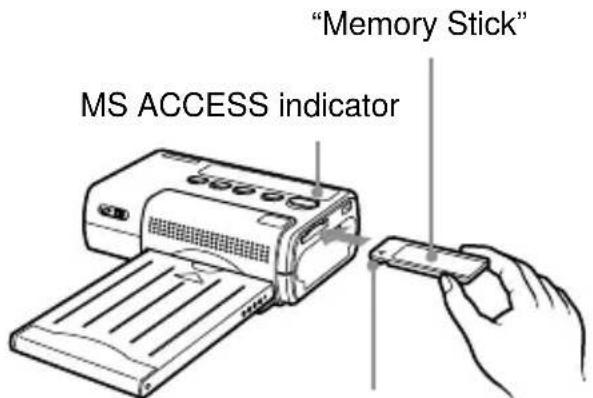
Insert with cutoff section facing left and arrow at top left.
To remove the "Memory Stick"
1 Verify that the MS ACCESS indicator is out. Then push the "Memory Stick" fully into the unit.
When you let go, the "Memory Stick" will pop out slightly.

2 Pull out the "Memory Stick".

natural_image
Line drawing of a hand inserting a card into a printer (no text or symbols)Notes
- While the “Memory Stick” is being accessed, the MS ACCESS indicator lights up. Do not remove the “Memory Stick” from the unit during this interval. Otherwise the unit and/or the “Memory Stick” may be damaged.
- Do not forcibly push or remove the "Memory Stick" into or from the unit. Otherwise the unit and/or the "Memory Stick" may be damaged.
- While printing is in progress, do not remove the “Memory Stick” from the unit. Otherwise the unit and/or the “Memory Stick” may be damaged.
- The maximum Memory Stick capacity with which this unit is compatible is 128 MB.
- For information and precautions regarding the handling of the “Memory Stick”, see the section “Memory Stick” on page 27.
Printing
Operation During Printing
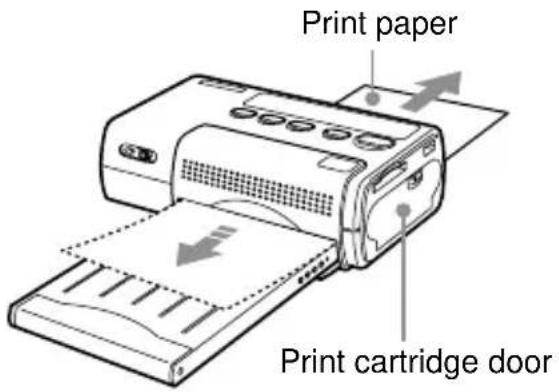
Print paper moves back and forth
During printing, the print paper passes four times back and forth between the paper exit slot and the top of the paper tray. When printing is completed, the paper is ejected from the paper exit slot.
Notes
- Place the unit on a flat, level surface for printing. If there is for example a raised section or a wall behind the unit, paper jams can occur.
- Before starting to print, make sure that there are no obstructions behind the unit which could block the smooth exit of the paper. There should be a clearance of at least 12 cm.
- Do not place any objects on top of the paper tray.
- Do not touch the paper during printing, and do not try to pull the paper out.
-
Do not pull the paper tray out of the unit during printing.
-
Do not open the print cartridge door or remove the print cartridge from the unit during printing.
- Never move the unit during printing, and do not turn off the power. Otherwise a paper jam may occur or the unit may be damaged. If the power was interrupted during operation, turn the power on again and repeat the procedure.
Printing Images With Print Mark (DPOF Print)
This unit supports DPOF (Digital Print Order Format) which enables bulk printing of images on a “Memory Stick” to which a Print Mark has been assigned, for example with a Sony CyberShot digital camera or Handycam camcorder.
Assigning a Print Mark
1 Insert the "Memory Stick" into the Sony CyberShot digital camera or Handycam camcorder.
2 Select the image you want to print.
3 Assign a Print Mark as described in the documentation of the camera or camcorder. This information should be found in a section entitled "Selecting Images for Print" or "Assigning Print Marks" or similar.
4 Verify that a Print Mark ( ) is shown with the image on the LCD of the Sony CyberShot digital camera or Handycam camcorder.
Bulk printing of images with Print Mark
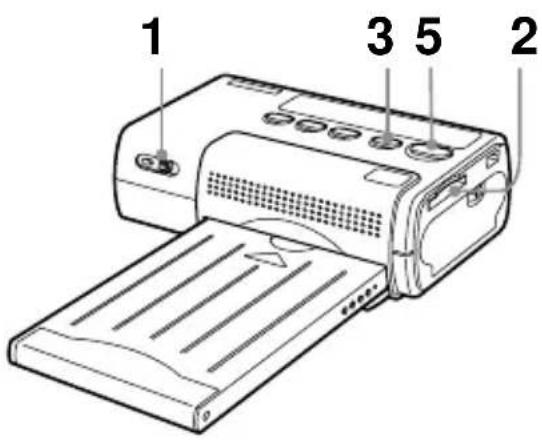
1 Push down the power switch and slide it to the right, to turn the unit on.

The indication “SETUP” flashes on the display, and then changes to “READY”.
Note
Do not remove or insert the print cartridge while the "SETUP" indication is flashing on the display.
2 Insert the "Memory Stick" into the unit.
The highest file number for an image with Print Mark is shown.
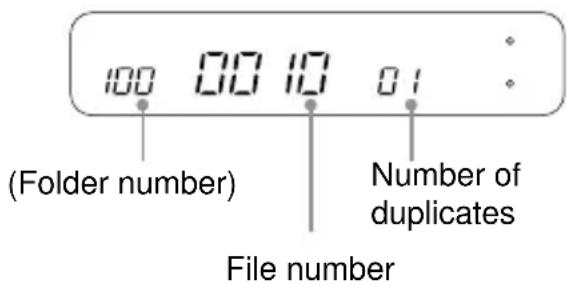
If a “Memory Stick” that has only one folder is inserted, the folder number is not shown.
3 Press the DPOF button.
The unit enters the DPOF mode, and the indication “DPOF” appears on the display. The total number of specified prints is shown on the display for about 1 second.
The folder number, file number, and number of duplicates for the first image with a Print Mark appear on the display.
If only one folder is available, no folder number is shown.
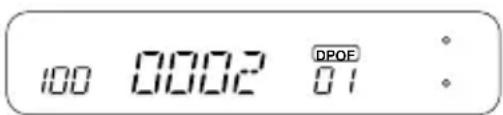
In this condition, you can use the SELECT (−/+) buttons to check the folder numbers, file numbers, and number of duplicates for the images with Print Mark.
4 Make the print settings as required.
You can make settings for image quality, print format, etc. For details, see “Print Settings” on page 21.
5 Press the PRINT/STOP button to start printing. During printing, the indication "PRINT" is shown on the display.
6 Remove the printed paper. If you have specified several prints, remove the prints one by one after they are finished.
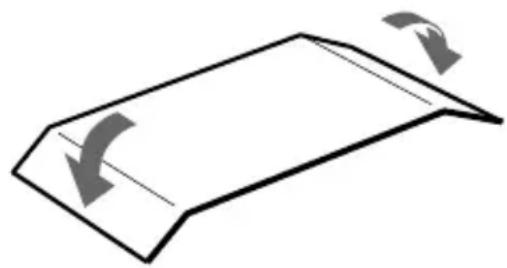
7 Fold the edges of the paper and remove them along the perforated lines.
natural_image
Simple 3D diagram of a folded or bent sheet with curved arrows indicating direction (no text or symbols)Turning the power off
- Push down the power switch and slide it to the left until the indication on the display disappears.
- Even if you do not use the power switch, the unit will automatically turn itself off after about 3 minutes (auto power-off function).
To cancel the operation while printing is in progress
If you have specified several prints but want to cancel the operation before it is completed, press the PRINT/STOP button. The indication “WAIT” appears on the display, and printing stops after the current print is finished.
If unit runs out of paper or print cartridge ribbon while printing
If the unit runs out of paper while printing, the indication “PAPER” flashes on the display. If the print cartridge ribbon runs out, the indication “RIBON” flashes on the display.
To continue the current operation, load print paper or replace the print cartridge without turning the unit off. Press the PRINT/STOP button to resume printing.
To turn off DPOF mode
To turn off the DPOF mode after printing, press the DPOF button once more. The indication “DPOF” disappears from the display and the normal indication is shown again.
Changing the number of duplicates
The number of duplicates for a Print Mark image that has been set with the digital camera can be changed on the DPP-MP1. To do this, perform the operation described below after step 3 in the section “Bulk printing of images with Print Mark” (page 15). The unit must be in DPOF mode (“DPOF” indication shown on display).
1 Select the Print Mark image for which you want to make the change.
Use the SELECT (−/+) buttons to call up the file number of the desired image. Then press the ENTER button. The indication for the number of duplicates flashes and can now be changed.
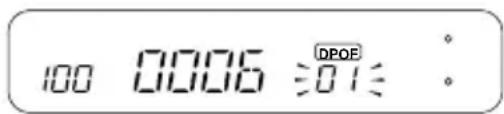
2 Change the number of duplicates.
Use the SELECT (−/+) buttons to set the number.
3 Press the ENTER button.
The new number of duplicates is now active.
4 Repeat steps 1 - 3 as necessary.
Perform steps 1 -3 for all other images for which you want to change the number of duplicates.
Note
This change will not be recorded on the "Memory Stick".
Direct-Select Printing
Images stored on a “Memory Stick” can be selected at the DPP-MP1 for printing.
Selecting an image
1 Insert the "Memory Stick" in the Sony CyberShot digital camera or Handycam camcorder.
2 Verify the folder number and file number of the image that you want to print on the LCD of the Sony CyberShot digital camera or Handycam camcorder.
Example from CyberShot

Example from Handycam
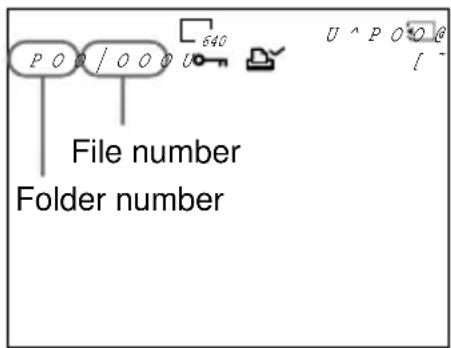
For information on folder numbers and file numbers, see page 30.
Printing

1 Push down the power switch and slide it to the right, to turn the unit on.

The indication “SETUP” flashes on the display, and then changes to “READY”.
Note
Do not remove or insert the print cartridge while the "SETUP" indication is flashing on the display.
2 Insert the "Memory Stick" into the DPP-MP1.
The file with the highest number is indicated.

If a “Memory Stick” that has only one folder is inserted, the folder number is not shown.
3 Use the SELECT (- / + ) buttons.
- If a folder number is not shown, the file number flashes.
- If a folder number is shown, the folder number flashes.
Repeatedly press the SELECT (- / + ) buttons to select the folder number, and press the ENTER button. The file number flashes.
4 Repeatedly press the SELECT (- / + ) buttons to select the image file number, and press the ENTER button. The number of duplicates flashes.
5 Repeatedly press the SELECT (- / + ) buttons to select the number of duplicates, and press the ENTER button.
• The flashing stops and the display stays lit.
• To reselect images for printing, start over with the folder number selection.
Continued
6 Make the print settings as required.
You can make settings for image quality, print format, etc. For details, see “Print settings” on page 21.
7 Press the PRINT/STOP
button to start printing.
During printing, the indication “PRINT” is shown on the display.
8 Remove the printed paper.
If you have specified several prints, remove the prints one by one after they are finished.
9 Fold the edges of the paper and remove them along the perforated lines.

natural_image
Simple line drawing of a folded paper or sheet with two curved arrows indicating rotation (no text or symbols)Turning the power off
- Push down the power switch and slide it to the left until the indication on the display disappears.
- Even if you do not use the power switch, the unit will automatically turn itself off after about 3 minutes (auto power-off function).
To cancel the operation while printing is in progress
If you have specified several prints but want to cancel the operation before it is completed, press the PRINT/STOP button. The indication “WAIT” appears on the display, and printing stops after the current print is finished.
Printing images in TIFF (non-compressed) format
If the image specified in step 5 above is a TIFF image, the indication “TIFF” appears on the display.
If unit runs out of paper or print cartridge ribbon while printing
If the unit runs out of paper while printing, the indication “PAPER” flashes on the display. If the print cartridge ribbon runs out, the indication “RIBON” flashes on the display.
To continue the current operation, load print paper or replace the print cartridge without turning the unit off. Press the PRINT/STOP button to resume printing.
Print settings
You can select various settings for the image before printing.
1 Hold down the ENTER button for at least 2 seconds. The print settings mode is activated, and the indication "SHARP" flashes on the display.
2 Use the SELECT (−/+) buttons until the desired setting item flashes on the display.
- Pressing SELECT (+) causes the display to cycle through available items in the order “SHARP” → “BRIGHT” → “DATE” → “FIT” → “MULTI” → “SHARP” etc.
- Pressing SELECT (−) cycles in the opposite direction. The available settings are explained in the table “Print Setting Items” at the end of this section.
3 Press the ENTER button.
The selected setting for the flashing item is shown.
4 Use the SELECT (−/+) buttons to change the setting.
For example, if “DATE” is flashing, each push of the SELECT (−/+) button toggles between “ON” (date is printed) and “OFF” (date is not printed).
5 Press the ENTER button.
- The print setting mode is terminated and the unit returns to the normal mode (print standby).
- The current print setting can be checked by the display indication.

To change another setting
Repeat this procedure from step 1.
Print Setting Items
The following print settings can be made. (■ indicates the default setting.)
Setting item Setting content
| SHARP (Sharpness) ON Images are printed with enhanced outline sharpness.■OFF The image is printed as is. | |||
| BRIGHT (Brightness) ON The image is made brighter for printing.■OFF The image is printed as is. | |||
| DATE ON The image is printed with a date. The date information is taken from the date at which the image file was stored.NoteIf a date was inserted with the Sony CyberShot digital camera or Handycam camcorder, the date will be printed twice.■OFF The image is printed without a date.NoteA date inserted with the Sony CyberShot digital camera or Handycam camcorder may exceed the printable range and may be cut off. | |||
| FIT ON The image is scaled so that the entire image fits on the paper and no section is cut off. (There is a rim around the image.)■OFF The image is printed as is, to the maximum printable range. Depending on the size ratio of the image, some sections (top/bottom or left/right) may be cut off. (There is no rim around the image.) | |||
| MULTI ON Multiple copies of the same image are printed on one paper. You can select division into 2, 4, or 8 segments. | |||
 |  |  | |
| ■OFF Division is not carried out. | |||
PC Interface Kit
This PC interface kit allows you to print images to the DPP-MP1 from your computer. The DPP-MP1 comes with a USB cable and CD-ROM.
Supported Computers
The DPP-MP1 can be used with computers running under the following pre-installed operating systems.
• Windows 2000/ME/98/98SE
• Mac OS 8.6/9.0/9.1
Preparation
Install the printer driver.
To print from your computer, you must install the DPP-MP1 printer driver on your computer from the “digital photo printer for DPP-MP1” CD-ROM.
Refer to the Installation Guide for printer driver installation.
The Installation Guide is included on the “digital photo printer for DPP-MP1” CD-ROM as a PDF file. Double-click the Driver(English).pdf file contained in the “Document” - “English” folder that corresponds to your operating system.
Note
In order to read the Installation Guide, Adobe Acrobat Reader must be installed on your computer. If it is not already installed, you can install it from the “digital photo printer for DPP-MP1” CD-ROM. With Windows, double-click the file ar500eng.exe file in the “Acrobat” - “English” folder. With the Macintosh, install by double-clicking the Acrobat Reader Installer.
Connect to your computer.
1 Connect the DPP-MP1 to your computer using the supplied USB cable.

2 Connect the AC adapter to the DPP-MP1, then turn on the power switch.
Notes
- We recommend using the DPP-MP1 with the AC adapter whenever the USB cable is connected.
- When the USB cable is connected, the DPP-MP1's auto power-off function is disabled.
- Operation is not assured if the DPP-MP1 is connected through a USB hub. Some USB devices may prevent proper operation of the DPP-MP1 if they are used simultaneously.
- If the computer's suspend-resume function (sleep function) operates, communication between the DPP-MP1 and the computer may not be restored when normal computer operation is resumed.
- When USB connection is made to the computer while printing directly from a Memory Stick, the computer will not detect the DPP-MP1 until printing is completed.
Printing
The DPP-MP1 does not include image processing software. Image processing software must be obtained separately in order to print to the DPP-MP1 from your computer.
1 On the computer, select the DPP-MP1 as the destination printer.
2 Make any required print settings.
When the DPP-MP1 is connected by USB cable, print settings are made from the computer. For the print settings, see Installation Guide included on the “digital photo printer for DPP-MP1” CD-ROM.
3 Print from your image processing software.
Note
When the DPP-MP1 is connected by USB cable, all controls other than the power switch are disabled. When using the DPP-MP1 to print images directly from a Memory Stick, be sure to disconnect the USB cable.
Precautions
On safety
- Operate the printer on 12 V DC only.
- Be careful not to set or drop any heavy objects on the power cord, or to damage the power cord in any way. Never operate this printer with a damaged power cord.
- Should any solid object or liquid fall into the cabinet, unplug the printer and have it checked by qualified personnel before operating it any further.
- Never disassemble the printer.
- To disconnect the power cord, pull it out by the plug. Never pull the power cord itself.
- When the printer is not going to be used for an extended period of time, disconnect the power cord from the wall outlet.
- Do not handle the printer roughly.
- To reduce the risk of electrical shock, always unplug the printer from the electrical outlet before cleaning and servicing the printer.
On installation
- Avoid placing the printer in a location subject to:
- vibration
– high humidity - excessive dust
– direct sunlight -
extremely high or low temperatures
-
Do not use electrical equipment near the printer. The printer will not work properly in electromagnetic fields.
- The printer is designed to operate horizontally. Never attempt to operate the printer in a tilted position.
- Do not place heavy objects on the printer.
- Leave enough room around the printer so that the ventilation holes are not blocked. Blocking these holes may cause internal heat build-up.
On moisture condensation
If the printer is brought directly from a cold location to a warm location or placed in an extremely warm or humid room, moisture may condense inside the unit. In such cases the printer will probably not work properly and may even develop a fault if you persist in using it. If moisture condensation occurs, turn off the power and do not use the printer for at least one hour.
Continued
On cleaning
Clean the cabinet, panel and controls with a soft dry cloth, or a soft cloth lightly moistened with a mild detergent solution. Do not use any type of solvent, such as alcohol or benzine, which may damage the finish.
On restrictions on duplication
If duplicating documents with the printer, pay special attention to the following:
- Duplication of banknotes, coins, or securities is against the law.
- Duplication of blank certificates, licenses, passports, private securities, or unused postal stamps is also against the law.
- TV program, films, video tapes, others' portraits or other materials may be copyrighted. Unauthorized video printing of such materials may infringe the provisions of the copyright law.
Print Cartridge Storage Precautions
- Avoid exposure to high temperatures or humidity, high levels of dust, and direct sunlight.
- When removing a partly used print cartridge from the unit for long-term storage, return it to the original packing bag or another suitable container.
Print Paper Storage Precautions
- Avoid exposure to high temperatures or humidity, high levels of dust, and direct sunlight.
- Do not store two sheets with the printed side facing each other. Avoid prolonged contact of the printed side with PVC, erasers or any other objects containing plasticizers. Otherwise discoloration or fading can occur.
- When removing partly used print paper from the unit for long-term storage, return it to the original packing bag or another suitable container.
"Memory Stick"
The “Memory Stick” is a compact and lightweight IC-based high-capacity storage medium, ideally suited for a multitude of applications.
There are two types of memory sticks: a conventional type and a type using a copy protection technology called Magic Gate*. The DPP-MP1 is compatible with both of these Memory Stick types.
* Magic Gate uses encryption technology to protect copyrighted material.
Caution
- While the “Memory Stick” is being accessed, the MS ACCESS indicator lights up. Do not remove the “Memory Stick” from the unit during this interval.
- Data on the “Memory Stick” may be damaged or destroyed if - power to the unit is turned off while the “Memory Stick” is being accessed. - strong electrostatic or noise interference is encountered.
- Do not attach anything except the designated label to the label field on the "Memory Stick".
- Put the “Memory Stick” in its case for carrying or storing.
- Do not touch the connector section with your hand or with any metal object.
- Do not bend or drop the “Memory Stick”, and protect it from strong shocks.
- Do not try to disassemble or modify the “Memory Stick”.
- Protect the “Memory Stick” from water and moisture.
- A Memory Stick formatted in a PC may not work in the DPP-MP1.
"Memory Stick", "Magic Gate Memory Stick", and are trademarks of Sony Corporation.
“ MAGICGATE ” is a trademark of Sony Corporation.
Image Files and File Names
The DPP-MP1 can print image files that are in JPEG format and TIFF format.
Image files created with a Sony CyberShot digital camera or Handycam camcorder are stored on the “Memory Stick” according to certain conventions.
For example, when you take still images with the Sony CyberShot, the resulting file structure when viewed under Windows Me will look as follows.
Assuming that the “Memory Stick” has been recognized as drive E

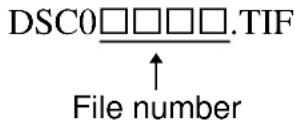
- File numbers for still image data in JPEG format are allocated automatically and the files are stored in the “100MSDCF” folder, using the following file name pattern:

- File numbers for still image data in TIFF format are allocated automatically and the files are stored in the “IMCIF100” folder, using the following file name pattern:
Troubleshooting
If a problem occurs during operation of the unit, first check the points listed in this troubleshooting guide. If the problem persists, contact your supplier, an authorized Sony service station, or a Sony Technical Information Center. When you are using a computer, you should also consult the documentation of the software.
| Symptom Cause/Remedy | |
| Unit does not operate when turned on. | Power cord is disconnected.→ Is the power cord connected correctly? (Page 9)Battery Kit is not mounted properly.→ Refer to the documentation of the Battery Kit. |
| Some images cannot be printed. | Image files are not compatible with DPP-MP1.→ Image files whose file format is not compatible with the DPP-MP1 may display on a computer but sometimes cannot be printed (page 34). |
| Image is cut off at top and bottom or left and right. | The horizontal/vertical size ratio of image file and print paper are different.→ Set the print setting “FIT” to “ON” (page 22). |
Folder number/file number error display
When a hyphen [-] appears in the folder number/file number display area when a folder number or file number is selected or while printing an image with the Print Mark, conditions indicated are corresponding remedies are as follows.
Condition Meaning and remedy

natural_image
Simple line drawing of a rounded rectangle with a small dot and dashed line at the center (no text or symbols)Folder number

natural_image
Simple diagram with a horizontal rectangle and a vertical line with a dot at the center (no text or symbols)File number
- You cannot select the image for printing. Or, there are duplicate folder numbers.
→ Image cannot be printed due to a problem with the image folder number.
- You cannot select an image for printing. Or, there are duplicate file numbers.
→ Image cannot be printed due to a problem with the image file number.
- The image has a Print Mark, but it cannot be printed using this unit.
→ The image file is corrupt and cannot be printed. When this error occurs while printing an image that has a Print Mark, printing is suspended. To start printing the next image, press PRINT/STOP.
Warning Messages
Messages that may appear on the display are listed and explained in the table below.
Message Meaning
| WAIT | • Printing was stopped.→The indication is shown while the last image is being printed. When the image is finished, the indication “STOP” is shown briefly and then goes out.• The temperature inside the printer is too high, and printing has been temporarily disabled.→Wait until printing resumes automatically. |
| RIBON | • No print cartridge is inserted, or the print cartridge is used up.→Insert or replace the print cartridge (page 10). |
| PAPER | • No paper tray is inserted, or the print paper is used up.→Insert a paper tray loaded with paper (page 11). |
| Message Meaning | |
| NO MS | No “Memory Stick” is inserted. Insert a “Memory Stick” (page 13). |
| NO IMAGE | The “Memory Stick” contains no images. Insert a “Memory Stick” that contains image files.The “Memory Stick” does not contain any images that can be printed by the unit. Image files whose file format is not compatible with the DPP-MP1 may display on a computer but sometimes cannot be printed (page 34). |
| NO ORDER | There are no images with appended Print Mark on the “Memory Stick”. Insert a “Memory Stick” that contains images that have been assigned a Print Mark on a Sony CyberShot digital camera or Handycam camcorder.The “Memory Stick” does not contain any images with appended Print Mark that can be printed by the DPP-MP1. Append the Print Mark with a Sony CyberShot digital camera or Handycam camcorder (page 15). |
| CAN'T PRINT | An attempt was made to print an image file in an incompatible format. Printing such an image on the DPP-MP1 is not possible.When this error occurs while printing an image that has a Print Mark, printing is suspended. To start printing the next image, press PRINT/STOP. |
| FILE ERROR | An error occurred when reading an image file from the “Memory Stick”. The image file is corrupt and cannot be printed. |
| MS ERROR | The “Memory Stick” was not inserted correctly. Reinsert the “Memory Stick” properly (page 13).The “Memory Stick” was not properly formatted. A Memory Stick formatted in a PC may not work in the DPP-MP1. Use a Memory Stick formatted in a Sony CyberShot digital camera or Handycam camcorder.A “Memory Stick” of a type not supported by the DPP-MP1 was inserted, or the “Memory Stick” is defective. Insert a supported “Memory Stick”. |
| RIBON (+ ERROR indicator lit) | • There is a problem with the print cartridge.→Try turning the unit off and then on again. If this does not solve the problem, remove the print cartridge from the unit and check whether the ribbon is jammed inside the cartridge. If the ribbon is loose, take up the slack (page 11). |
| PAPER (+ ERROR indicator lit) | • A paper jam has occurred.→Try turning the unit off and then on again. The paper should be ejected automatically. |
| ERROR (+ ERROR indicator lit) | • An internal error has occurred.→Try turning the unit off and then on again. |
What to Do in Case of a Paper Jam Caution
Do not try to pull out the paper by hand, because this can lead to damage and malfunction. Always turn power to the unit off, wait a moment, and then turn the unit on again, so that the paper will be automatically ejected. If you still cannot remove the paper, contact your supplier, an authorized Sony service station, or a Sony Technical Information Center.
Warranty and Service
Warranty card
- This product comes with a warranty card. Make sure that you receive the card at the time of purchase.
- Fill out the required items on the card, verify that the information on the card is correct, and store it in a safe place.
- The warranty period is one year from the date of purchase.
Service
If there seems to be a problem with the unit, first check the applicable sections in this manual again.
If the problem persists, contact your supplier, an authorized Sony service station, or a Sony Technical Information Center.
Repairs within the warranty period
Repairs shall be carried out according to the conditions listed on the warranty card. For details, carefully read the warranty card.
Repairs after the warranty period
Repairs can be carried out if requested by the customer. All costs will have to be borne by the customer.
Availability of parts
All major parts that are necessary for maintaining operation of the digital photo printer will be held available by the manufacturer for a period of at least 8 years after production of this model has ceased. Also after the warranty period has expired, a non-functioning unit may still be repaired using such parts, depending on the nature of the problem. For details, contact your supplier or an authorized Sony service station. When requesting service, please supply the following information.
- Model name: DPP-MP1
- Detailed description of problem
- Date of purchase
Specifications
Print Method
Dye sublimation thermal printing (YMC + overcoat)
Print resolution
307 · 307 dpi
Gradations
YMC image process using 8 bits/256 gradations per color for approx. 16.77 million colors/pixel.
Print size
81.6 (H) · 50 (V) mm
Print time
Approx. 90 seconds per print (excluding time for data transfer from computer or “Memory Stick” and processing time)
Input connector
USB (Mini-B)
Recording media slot
Memory Stick slot (1)
Supported file formats 1)
DPOF compatible (number of prints)
Power supply
AC adapter
Input: 100 - 240 V AC, 50/60 Hz
Output: 12 V DC, 3 A
Power consumption
Input: 12 V DC, 2.1 A
25 W (during printing with the AC adapter)
Ambient temperature for operation
5 - 35°C
External dimensions
Approx. 66 · 39 · 111 (W/H/D) mm (without paper tray and protruding parts)
Mass
Approx. 260 g (without paper tray)
Supplied accessories
AC adapter/power cord
Paper tray
Carrying pouch
Card size color printing pack (SVM-24CS)
Clamp filter
USB cable
CD-ROM
Operating Instructions
Owner registration card
Warranty
Sony End User Software License Agreement
^1) Some special file formats may not be supported.
^2) DCF (Design rule for Camera File system) is a standard defined by the JEIDA (Japan Electronic Industry Development Association) for ensuring compatibility between digital still cameras, printers, and other equipment.
^3) Exif is an image file format that comprises additional data about display resolution, creation date, and other information.
Design and specifications are subject to change without notice.
Optional accessories
Card size color printing pack SVM-24CS
Battery Kit MPA-BT1A
AVERTISSEMENT
1) DPOF = Digital Print Order Format
natural_image
Line drawing of a rectangular electronic device with a coiled cable and connector (no text or symbols)natural_image
Line drawing of a straight cord with two connectors, no text or symbols present- Europe

natural_image
Line drawing of a cable with a connector and plug (no text or symbols)natural_image
Line drawing of a flat electronic device with ventilation slots and connectors (no text or symbols)natural_image
Isometric line drawing of a rolled-up document or scroll resting on a flat base (no text or symbols)natural_image
Isometric line drawing of a cylindrical mechanical component with mounting holes (no text or symbols)natural_image
Line drawing of a USB cable with two connectors (no text or symbols)- CD-ROM

natural_image
Line drawing of a portable electronic device with ventilation slots and ports (no text or symbols)MPA-BT1A DPP-MP1
natural_image
Line drawing of a portable electronic device with ports and a button, labeled with number 1 (no text or symbols on the device itself)
natural_image
Line drawing of a printer with ports and a paperclip, labeled with number ② (no text or symbols on the diagram itself)natural_image
Technical line drawing of a battery pack assembly (no text or symbols)Attention
natural_image
Diagram showing a printer being inserted into a flatboard, with no text or symbols present.natural_image
Line drawing of a hand inserting a card into a printer (no text or symbols)Remarques
natural_image
Simple line drawing of a folded paper or sheet with two curved arrows indicating rotation (no text or symbols)Mise hors tension
natural_image
Simple line drawing of a folded paper or sheet with two curved arrows indicating direction (no text or symbols)Mise hors tension
natural_image
Simple line drawing of a rounded rectangle with a small dot and dashed line at the center (no text or symbols)Numéro de dossier
natural_image
Simple diagram with a horizontal rectangle and a vertical line with a dot at the center (no text or symbols)Numéro de fichier
natural_image
Line drawing of a rectangular electronic device with a coiled cable and connector (no text or symbols)natural_image
Line drawing of a straight cord with two connectors (no text or symbols)- Europa

natural_image
Line drawing of a cable with a plug and connector (no text or symbols)- Bandeja de papel

natural_image
Line drawing of a flat electronic device with ventilation slots and connectors (no text or symbols)natural_image
Isometric line drawing of a rolled-up document or scroll resting on a flat base (no text or symbols)- Filtro-abrazadera (3)
natural_image
Line drawing of a cylindrical mechanical component with mounting holes and internal features (no text or symbols)natural_image
Line drawing of a USB cable with two connectors (no text or symbols)- CD-ROM

natural_image
Line drawing of a portable electronic device with ventilation slots and ports (no text or symbols)MPA-BT1A DPP-MP1
natural_image
Two technical line drawings of a device with labeled parts, showing front and side views (no text or symbols present)natural_image
Technical line drawing of a battery pack assembly (no text or symbols)Precaución
natural_image
Diagram showing a printer being inserted into a flat sheet of paper (no text or symbols present)natural_image
Line drawing of a printer with ventilation slots and paper feed (no text or symbols)2 Extraiga el "Memory Stick".
natural_image
Line drawing of a hand inserting a card into a printer (no text or symbols)Notas
natural_image
Simple line drawing of a folded paper or sheet with two curved arrows indicating direction (no text or symbols)natural_image
Simple line drawing of a folded paper or sheet with two curved arrows indicating direction (no text or symbols)natural_image
Simple line drawing of a rounded rectangle with a small dot and dashed line at the center (no text or symbols)Número de carpeta
natural_image
Simple diagram with a horizontal rectangle and a vertical line with a dot at the center (no text or symbols)Número de archivo


- Digital Photo Printer
- WARNING
- Declaration of Conformity
- CAUTION (U.S.A. only)
- For the Customers in Canada
- Table of Contents
- Features 4
- Before Use 5
- Preparations 9
- Printing...... 14
- PC Interface Kit ...... 23
- Others...... 25
- Features
- Simple printing of images with Print Mark
- Direct-selection printing
- Compact and lightweight
- Photo quality printing
- Versatile print functions
- USB connection allows printing of images stored on a PC
- Battery powered operation (option)
- Supplied Accessories
- About the Printing Pack
- Printing pack Application
- Note
- Names of Parts
- Power Connection
- Auto power-off function
- Battery Kit (option)
- Loading the Print Cartridge
- Replacing the print cartridge
- If print cartridge does not go in smoothly
- Caution
- Loading the Print Paper
- Close the paper tray cover.
- Pull out the protective sheet.
- Pull the paper tray door open, and insert the paper tray into the unit.
- When printing is completed
- Notes
- Inserting the "Memory Stick"
- To remove the "Memory Stick"
- Printing
- Operation During Printing
- Print paper moves back and forth
- Printing Images With Print Mark (DPOF Print)
- Assigning a Print Mark
- Bulk printing of images with Print Mark
- Insert the "Memory Stick" into the unit.
- Press the DPOF button.
- Make the print settings as required.
- Turning the power off
- To cancel the operation while printing is in progress
- If unit runs out of paper or print cartridge ribbon while printing
- To turn off DPOF mode
- Changing the number of duplicates
- Repeat steps 1 - 3 as necessary.
- Direct-Select Printing
- Selecting an image
- Printing images in TIFF (non-compressed) format
- Print settings
- To change another setting
- Print Setting Items
- PC Interface Kit
- Supported Computers
- Preparation
- Install the printer driver.
- Connect to your computer.
- Precautions
- On safety
- On installation
- On moisture condensation
- On cleaning
- On restrictions on duplication
- Print Cartridge Storage Precautions
- Print Paper Storage Precautions
- "Memory Stick"
- Image Files and File Names
- Assuming that the “Memory Stick” has been recognized as drive E
- Troubleshooting
- Folder number/file number error display
- Warning Messages
- What to Do in Case of a Paper Jam Caution
- Warranty and Service
- Warranty card
- Service
- Repairs within the warranty period
- Repairs after the warranty period
- Availability of parts
- Specifications
- Print Method
- Print resolution
- Gradations
- Print size
- Print time
- Input connector
- Recording media slot
- Supported file formats 1)
- Power supply
- AC adapter
- Power consumption
- Ambient temperature for operation
- External dimensions
- Mass
- Optional accessories
- AVERTISSEMENT
- Attention
- Remarques
- Mise hors tension
- Precaución
- Extraiga el "Memory Stick".
- Notas
Brand : SONY
Model : DPP-MP1
Category : Printer