
DPP-M55 - Printer SONY - Free user manual and instructions
Find the device manual for free DPP-M55 SONY in PDF.


| Product Type | Digital Color Printer |
| Brand | Sony |
| Model | DPP-M55 |
| Dimensions (W × H × D) | 274 × 65.5 × 242 mm |
| Weight | Approx. 2.5 kg |
| Power Supply | 220-240 V AC, 50/60 Hz, 0.5 A |
| Printing System | Thermal dye sublimation printing (yellow/magenta/cyan overlay) |
| Effective Resolution | 448 (V) × 640 (H) dots |
| Print Size | 85 × 113 mm |
| Gradations and Colors | 256 levels (8 bits), approx. 16.77 million colors |
| Print Duration | Approx. 70 seconds per sheet |
| Connectors | Centronics parallel, serial DIN 8-pin, infrared sensor |
| Operating Temperature | 5 to 35 °C |
| Operating Humidity | 20 to 80% |
| Print Cartridge | Use only VP cartridge |
| Print Paper | Use only VP paper (100 × 140 mm) |
| Supplied Accessories | Power cord, CD-ROM, user guides (Windows and Mac), 1 paper + cartridge set |
| Optional Accessories | Print sets VPM-P50STA (standard) and VPM-P50WSA (adhesive) |
| Main Functions | Direct printing from Sony DSC-F1 camera via infrared, printing from PC/Mac, image processing utility (calendar, etc.) |
| Care and Cleaning | Clean the chassis with a soft dry cloth or slightly moistened with mild detergent. Do not use alcohol or benzene. |
| Safety | Operate on 220-240 V, do not expose to rain/moisture, do not disassemble, unplug before cleaning, use only on a horizontal surface. |
| Indicator Lights | Ribbon error indicator, paper indicator, print indicator, data transmission indicator |
| Basic Troubleshooting | In case of paper jam, turn off power and remove paper from front or rear slot. Check indicators for ribbon or paper errors. |
| Regulatory Information | Rating plate located under the device. Respect copyrights. |
Frequently Asked Questions - DPP-M55 SONY
User questions about DPP-M55 SONY
0 question about this device. Answer the ones you know or ask your own.
Ask a new question about this device
Download the instructions for your Printer in PDF format for free! Find your manual DPP-M55 - SONY and take your electronic device back in hand. On this page are published all the documents necessary for the use of your device. DPP-M55 by SONY.
USER MANUAL DPP-M55 SONY
Digital Color Printer
Operating Instructions GB
Mode d'emploi
natural_image
Exterior view of a modern office building (no signage)DPP-M55
WARNING
To prevent fire or shock hazard, do not expose the unit to rain or moisture.
To avoid electrical shock, do not open the cabinet. Refer servicing to qualified personnel only.
CAUTION
TV programs, films, video tapes and other materials may be copyrighted.
Unauthorized video printing of such materials may be contrary to the provisions of the copyright laws.
PRECAUTION
The nameplate is located on the bottom of the unit.
- IBM PC/AT is a registered trademark of International Business Machines Corporation of the U.S.A.
- MS-DOS and Windows are registered trademarks licensed to Microsoft Corporation, registered in the U.S.A. and other countries.
• Macintosh is a trademark licensed to Apple Computer Inc., registered in the U.S.A. and other countries. - Adobe and Photoshop are trademarks of Adobe Systems Incorporated.
- All other product names mentioned herein may be the trademarks or registered trademarks of their respective companies.
Furthermore, “☐” and “®” are not mentioned in each case in this manual.

This PRINTER is designed to use PRINT PACK bearing the VP trademark to yield quality prints.
VP Logomark and Design is a trademark used under license.
Table of Contents
Getting Started
What you can do with the Digital Color Printer DPP-M55 4
Loading the print cartridge 5
Inserting the print paper 6
Printing
Printing an image recorded by Sony Digital Still Camera DSC-F1 7
Preparation....7
Printing 7
For Your Information
Precautions 8
Troubleshooting 9
If the indicators are on....9
If the print paper jammed 10
Specifications....10
Identifying the parts 11
Optional supplies 11
Supplied accessories
Make sure that the following accessories are supplied with your printer.
- Power cord (1)
• CD-ROM (for Windows 95 and Macintosh) (1)

- User's Guide (for Windows 95) (1)
- User's Guide (for Macintosh) (1)
• Print paper and cartridge (1 set)
What you can do with the Digital Color Printer DPP-M55
The Digital Color Printer DPP-M55 enables you to directly print the image you recorded using the Sony Digital Still Camera DSC-F1 without connecting the printer to the camera.
By connecting the DPP-M55 to your PC or Macintosh, you can edit images and make prints.
Direct printing of the image recorded by the Sony Digital Still Camera
→ page 7
You don't have to connect the printer to the camera. The image data is transmitted from the DSC-F1 to the DPP-M55 via infrared data communication system.
The image data can then be transmitted from the DPP-M55 to the connected PC or Macintosh computer.
Exclusive software to edit images
The DPP-M55 is supplied with a CD-ROM in which you will find the printer driver and the Printer Utility software.
You can use the DPP-M55 to print images processed not only on the supplied Printer Utility but also on an image processing software such as Adobe Photoshop.
Various printouts from the Printer Utility
You can edit images and make printouts from the Printer Utility.
For details, see the "User's Guide" either for Windows 95 or for Macintosh depending on your computer.
- Calendar

- Cropping

natural_image
Black-and-white photo of a young girl with pigtails inside a heart-shaped frame, outdoors on grass (no text or symbols)- Greeting card

• 1/16-size stickers

natural_image
Grid of identical grayscale images showing a 3x3 grid pattern with no visible text, numbers, or symbols.Loading the print cartridge
Insert the print cartridge with the WIP mark into the printer.
Use only the video print cartridge supplied with the video print paper packed in the same carton.
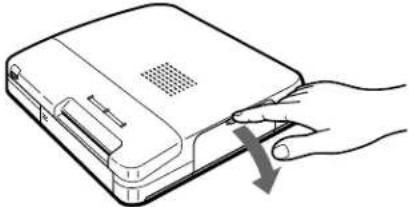
1 While pressing down the lever, open the cartridge compartment lid.
natural_image
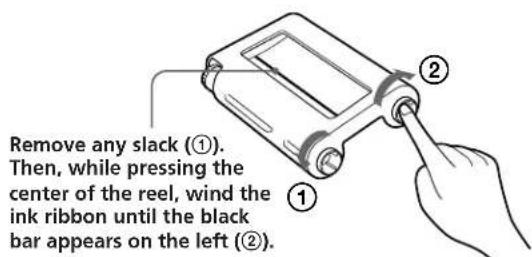
Line drawing of a hand holding a device with a handle, showing no text or symbols2 Wind up the ink ribbon to remove the slack.
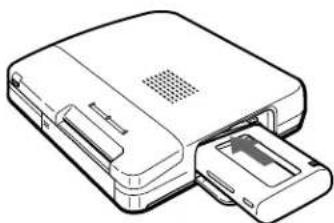
3 Insert the print cartridge firmly until it clicks into place and close the cartridge compartment lid.
natural_image
Line drawing of a computer case with an attached drive (no text or symbols)If the cartridge compartment lid does not close
Remove the print cartridge, and then reinsert it.
Caution
Never put your hand into the cartridge compartment. The thermal head reaches high temperatures, especially after repeated printing.
Notes
- When you put the print cartridge, stand it as illustrated so that dust will not get on the ink ribbon.
- Do not touch the ink ribbon or place the print cartridge in a dusty location. Fingerprints or dust on the ink ribbon may result in imperfect printing.


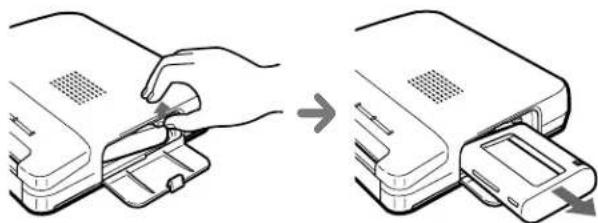
To remove the used print cartridge
Open the cartridge compartment lid and push up the eject lever.
natural_image
Illustration of a hand inserting a device into a device, showing the process (no text or symbols present)To load the half-used print cartridge

If ink ribbon should tear
Repair the ribbon with transparent tape. There should be no problem with using the remaining portion of the ribbon. Before loading the print cartridge into the printer, turn the reel until the transparent tape hides.

natural_image
Line drawing of a battery pack with a curved cable inserted (no text or symbols)Repair with transparent tape.
Inserting the print paper
You can use the print paper with the 📌IP mark. Insert the print paper only one sheet at a time.
1 Connect the supplied power cord, and turn on the power.
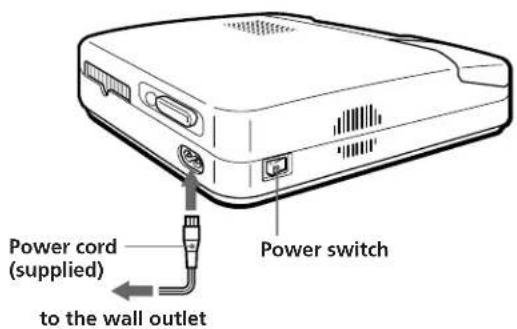
2 Send the print command from the computer or Sony digital still camera.
First the data transmission indicator starts flashing and then the print paper indicator starts flashing.
3 Insert a sheet of print paper into the paper inlet until less than 2 cm (13/16 inches) of the print paper is left out of the paper inlet.
The print paper automatically loaded into the printer.
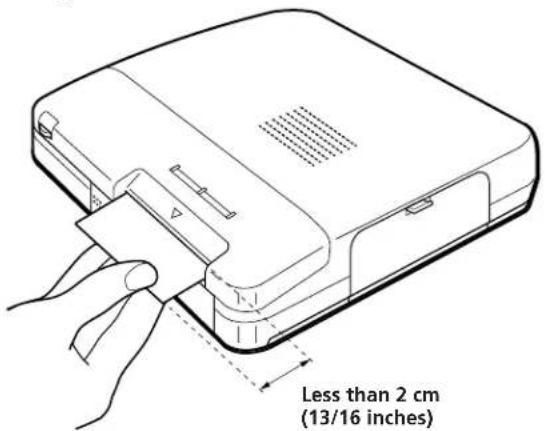
Notes
- Do not touch the printing surface (the side where nothing is printed).
- Do not place the print paper in a dusty location. Fingerprints or dust on the printing surface may result in imperfect printing.
- Use the print paper recommended for this printer only. If you use a different type of paper, it may cause problems and the printer may not print properly.
- To prevent paper from jamming, do not insert another sheet of print paper before you take out the printout.
- Do not hand-write or type an address or other characters or drawings in the reverse side of the print paper before printing. This may cause paper jamming, or failure in printing.
- You cannot type on the printing surface; use an oil ink pen to write greetings or other characters or drawings on the printing surface.
Printing an image recorded by Sony Digital Still Camera DSC-F1
You can directly print the image recorded by the Sony Digital Still Camera DSC-F1.
Preparation
Point the printer's infrared port to the camera's infrared port face to face. Controllable area is about 10 - 30 cm (4 - 12 inches) in terms of straight line distance and an angle of 15 degrees right or left.
Notes
- Position the infrared ports of both equipment within the controllable area. Do not place them outside the area nor place them too close, which may interrupt transferring or results in noises.
- Do not cover the infrared port with your hand or any other objects.
- Infrared rays cannot pass through a wall, opaque glass, etc. If they pass through glass, etc., the controllable distance becomes short.
- Keep other infrared devices such as infrared cordless headphones away during printing.
• Very bright lighting may cause malfunction. - Use the camera on the AC power adapter.

Printing
As you must operate the camera to print, refer to the camera's manual for the procedure.
When the printer receives the first data from the camera, it sounds a short beep.
When the printer receives all data successfully, it sounds a long beep and starts printing.
Printing takes about 70 seconds per sheet.
Notes
- Do not move the printer and the camera during printing.
- You may move the printer and the camera after you hear a long beep, except when making several prints.
- The printer will sound intermittent beeps when it cannot receive data properly. If this happens, reposition the camera and the printer as described above.
- To use other functions of the printer, open and read "Readme" file in the supplied CD-ROM. The file contains up-to-date information on the printer.
Precautions
On safety
- Operate the printer on 220 – 240 V AC, 50/60 Hz only.
- Be careful not to put or drop any heavy objects on the power cord, or to damage the cord in any way. Never operate this printer with a damaged power cord.
- Should any solid object or liquid fall into the cabinet, unplug the printer and have it checked by qualified personnel before operating it any further.
- To disconnect the cord, pull it out by the plug. Never pull the cord itself.
- When the printer is not going to be used for an extended period of time, disconnect the power cord from the wall outlet.
- Never disassemble the printer.
- Do not handle the printer roughly.
- To reduce the risk of electrical shock, always unplug the printer from electrical outlet before cleaning and servicing the printer.
On installation
- Avoid placing the printer in a location subject to:
- vibration
– high humidity - excessive dust
- direct sunlight
-
extremely high or low temperatures
-
Do not use electronic equipment near the printer. The printer will not work properly in electromagnetic fields.
- The printer is designed to operate horizontally. Never attempt to incline the printer.
- Do not place heavy objects on the printer.
- Leave enough room around the printer so that the ventilation holes are not blocked. Blocking these holes may cause internal heat build-up.
- Do not cover the printer with cloth or other materials.
On moisture condensation
If the printer is brought directly from a cold location to warm location or placed in an extremely warm or humid room, moisture may condense inside the unit. In such cases the printer will probably not work properly and may even develop a fault if you persist in using it. If moisture condensation occurs, turn off the power and do not use the printer for at least one hour.
On cleaning
Clean the cabinet, panel and controls with a soft dry cloth, or a soft cloth lightly moistened with a mild detergent solution. Do not use any type of solvent, such as alcohol or benzine, which may damage the finish.
On the print cartridge and print paper
Notes on storing the print cartridge
- Avoid placing the cartridge in a location subject to:
– high temperatures
– high humidity
- excessive dust
- direct sunlight
- When you are going to store a partially-used cartridge for an extended period of time, store it in its original bag.
Notes on storing the print paper
- Avoid placing the print paper in a location subject to:
– high temperatures
– high humidity
- excessive dust
- direct sunlight
- When you are going to store the partially-used print paper for an extended period of time, store it in its original bag.
Troubleshooting
If you run into any problems using the printer, use the following check list.
Should any problem persist after you have made the checks below, consult your nearest Sony dealer or Sony service facility.
Refer to the software manual as well.
The power is not turned on.
Connect the AC power cord to an AC outlet securely.
Cannot remove the print cartridge.
Turn off and on the printer. After the motor sound stops, try to remove the cartridge.
Printing takes longer than usual.
If the printing indicator is flashing, see "If the indicators are on."
Cannot print.
Connect the printer to the computer properly.
→ Install the software to the computer.
If the data transmission indicator is not on, see "If the indicators are on."
The beeps sound.
→ Insert the print paper properly.
Make sure that the correct print cartridge is loaded for the print paper.
→ See "If the indicators are on."
If the indicators are on
If you cannot print, check the indicators on the front panel.
The ribbon error indicator is on.
The print cartridge is not loaded.
The ink ribbon has run out. Change the print cartridge. The printer will start printing automatically.
The print paper indicator ( ) is flashing.
No print paper is inserted.
The print paper indicator ( ) is on.
No print paper is inserted in the auto paper feeder (not supplied.)
The ribbon error indicator and the print paper indicator ( ) are flashing.
The print cartridge does not match the print paper. Use the print cartridge and the print paper supplied in the same carton.
The ribbon error indicator is flashing.
The print cartridge does not match the paper type set on the computer. Change the print cartridge or paper type setting and try printing again.
The printing indicator is flashing.
→ Next printing command is input during printing. Wait as it is.
The data transmission indicator does not turn on.
The print paper is jammed. Remove the paper from the paper inlet or outlet.
(continued)
Troubleshooting
If the print paper jammed
If the print paper jammed, all indicators flash and printing stops. Turn off the power and remove the jammed paper.
Remove the jammed paper from the paper outlet on the rear panel.

Remove the jammed paper from the paper inlet on the front panel.

Note
If the data transmission indicator does not turn on after having removed the jammed paper, turn the power off and on again. Try printing from the camera or computer again.
Specifications
Printing system Sublimation heat transfer printing (Yellow/Magenta/Cyan overlay)
Effective pixels 448 (V) x 640 (H) dot
Printing size 85 (V) x 113 (H) mm (3^3/8 × 4^1/2 inches)
Gradations 256 levels (8 bits), Approx. 16,770,000 colors
Printing time (excluding data transmission time) Approx. 70 seconds per sheet
Input/output connectors
Centronics Parallel Interface Mini DIN 8-pin Serial Interface Infrared port
Video Print Cartridge and Video Print Paper Video Print Cartridge for regular and sticker print paper for use only with PRINTERS bearing the VP trademark. Video Print Paper for use only with PRINTERS bearing the VP trademark (100 x 140 mm (4 x 5 ^5 /s inches)/sheet)
Power requirements 220 – 240 V AC, 50/60 Hz, 0.5 A
Operating temperature 5°C to 35 °C (40 °F to 95 °F)
Operating humidity 20% to 80%
Dimensions Approx. 274 x 65.5 x 242 mm (w/h/d, excluding protruding parts) (10 ^7 /8 x 2 ^5 /8 x 9 ^5 /8 inches)
Mass Approx. 2.5 kg (5 lb 8 oz)
Supplied accessories See page 3.
Design and specifications are subject to change without notice.
Identifying the parts
See the pages given in parenthesis for use of the parts.


Optional supplies (print packs)
You need an optional print pack containing print paper and print cartridge for printing.
Make sure to use the following print packs with the MP mark.
Video Print Pack VPM-P50STA (Standard type)
One print cartridge and 50 sheets of standard print paper for 50 printouts
Video Print Pack VPM-P50WSA (Sticker type)
One print cartridge and 50 sheets of sticker print paper for 50 printouts
Avertissement
• Détourage

natural_image
Black-and-white photo of a young girl with pigtails inside a heart-shaped frame (no text or symbols)- Carte de voeux

- Etiquettes 1/16e

natural_image
Grid of 16 identical grayscale images showing abstract human-like figures (no text or symbols)natural_image
Line drawing of a hand holding a device with a scroll, showing a right-hand rule (no text or symbols)2
natural_image
Line drawing of a device with ports and a clip, no text or symbols presentnatural_image
Illustration of a hand holding a device with an arrow indicating transformation (no text or symbols present)natural_image
Line drawing of a cylindrical battery with a curved arrow indicating direction (no text or symbols)Impression impossible
natural_image
Diagram of a device with an arrow pointing to a component, showing no text or symbols.natural_image
Black-and-white photo of a young girl with pigtails inside a heart-shaped frame, outdoors on grass (no text or symbols)• Grußkarte

natural_image
Grid of identical grayscale images showing a 3x3 grid pattern with no visible text, numbers, or symbols.natural_image
Line drawing of a hand inserting a device into a device (no text or symbols)natural_image
Line drawing of a portable electronic device with ports and a clip (no text or symbols)natural_image
Illustration of a hand inserting a component into a device, showing the process (no text or symbols present)natural_image
Line drawing of a battery pack with a curved arrow indicating direction (no text or symbols)

- Digital Color Printer
- WARNING
- CAUTION
- PRECAUTION
- Table of Contents
- Getting Started
- Printing
- For Your Information
- Supplied accessories
- What you can do with the Digital Color Printer DPP-M55
- Direct printing of the image recorded by the Sony Digital Still Camera
- → page 7
- Exclusive software to edit images
- Various printouts from the Printer Utility
- Loading the print cartridge
- While pressing down the lever, open the cartridge compartment lid.
- Wind up the ink ribbon to remove the slack.
- Insert the print cartridge firmly until it clicks into place and close the cartridge compartment lid.
- If the cartridge compartment lid does not close
- Notes
- To remove the used print cartridge
- To load the half-used print cartridge
- If ink ribbon should tear
- Inserting the print paper
- Connect the supplied power cord, and turn on the power.
- Send the print command from the computer or Sony digital still camera.
- Insert a sheet of print paper into the paper inlet until less than 2 cm (13/16 inches) of the print paper is left out of the paper inlet.
- Printing an image recorded by Sony Digital Still Camera DSC-F1
- Preparation
- Precautions
- On safety
- On installation
- On moisture condensation
- On cleaning
- On the print cartridge and print paper
- Notes on storing the print cartridge
- Notes on storing the print paper
- Troubleshooting
- The power is not turned on.
- Cannot remove the print cartridge.
- Printing takes longer than usual.
- Cannot print.
- The beeps sound.
- If the indicators are on
- The ribbon error indicator is on.
- The print paper indicator ( ) is flashing.
- The print paper indicator ( ) is on.
- The ribbon error indicator and the print paper indicator ( ) are flashing.
- The ribbon error indicator is flashing.
- The printing indicator is flashing.
- The data transmission indicator does not turn on.
- If the print paper jammed
- Remove the jammed paper from the paper outlet on the rear panel.
- Remove the jammed paper from the paper inlet on the front panel.
- Note
- Specifications
- Identifying the parts
- Optional supplies (print packs)
- Video Print Pack VPM-P50STA (Standard type)
- Video Print Pack VPM-P50WSA (Sticker type)
- Avertissement
- 2
- Impression impossible
Brand : SONY
Model : DPP-M55
Category : Printer