
HP 8540 - Solar bench PHILIPS - Free user manual and instructions
Find the device manual for free HP 8540 PHILIPS in PDF.


| Product type | Sunbed (full solarium) |
| Brand | Philips |
| Model | HP 8540 |
| Tanning surface | 1,80 × 0,70 m |
| Number of lamps | 3 |
| Lamp type | Philips HPA FlexPower 400-600 |
| UV filter | Integrated, replaceable |
| Recommended tanning distance | 70 cm between the UV filter and the body |
| Timer | Programmable up to 45 minutes, with audible signals |
| Memory buttons | 2 (for two users) |
| Folding system | Yes, for compact storage |
| Overheat protection | Automatic shut-off in case of excessive temperature |
| Power supply | Mains, 16 A protected circuit |
| Protective goggles included | 2 pairs (model HB071) |
| Maximum number of hours per year | 17 hours (1020 minutes) |
| Typical session duration | 7 to 30 minutes depending on skin type |
| UV filter cleaning | With a soft cloth moistened with denatured alcohol |
| Exterior cleaning | Damp cloth, without abrasive products |
| Storage | Horizontal position under a bed or vertical in a closet |
| Warranty | International, does not cover lamps |
| Spare parts | Lamps, UV filter, power cord (replacement by authorized service) |
Frequently Asked Questions - HP 8540 PHILIPS
User questions about HP 8540 PHILIPS
0 question about this device. Answer the ones you know or ask your own.
Ask a new question about this device
Download the instructions for your Solar bench in PDF format for free! Find your manual HP 8540 - PHILIPS and take your electronic device back in hand. On this page are published all the documents necessary for the use of your device. HP 8540 by PHILIPS.
USER MANUAL HP 8540 PHILIPS
natural_image
Black office desk lamp with adjustable arm and black base (no text or symbols visible)
natural_image
Diagram of three open panels with grid patterns and directional arrows indicating rotation or movement (no text or symbols)
ENGLISH 6
DANSK 13
DEUTSCH 20
ΕΛΛΗΝΙΚΑ 27
ESPAÑOL 35
FRANÇAIS 42
ITALIANO 49
NEDERLANDS 56
NORSK 63
POLSKI 70
PORTUGUÊS 77
РУССКИЙ 84
SVENSKA 92
TÜRKÇE 99
УКРАЇНСЬКА 106
Introduction
Congratulations on your purchase and welcome to Philips! To fully benefit from the support that Philips offers, register your product at www.philips.com/welcome.
This full-body solarium allows you to obtain nice tanning results in the comfort of your own home.
The 3 HPA tanning lamps ensure a beautiful tan. The full-body tanning field of 1.80 × 0.70m ensures that the light reaches your entire body.
The folding system makes it easy to unfold the appliance. The height of the full-body solarium can be adapted to the height of your bed. The appliance has a compact size when folded, so you can conveniently store it out of sight.
General description (Fig. 1)
A Wheels
B Mains cord in storage compartment
C Handgrip
D Timer
E Memory knobs (for two persons)
F Slides
G Stand
H Locking collar for height adjustment
Locking collar for lamp unit
J Handgrip
K Fan (cooling)
Lamp unit
M UV filter
N Tanning lamps (type Philips HPA flexpower 400-600)
Reflector
P Measuring tape
Q Protective goggles (2 pairs)
(type no. HB071/service no. 4822 690 80123)
R Base
S Type plate
Important
Read this user manual carefully before you use the appliance and save it for future reference.
Danger
- Water and electricity are a dangerous combination. Do not use this appliance in wet surroundings (e.g. in the bathroom or near a shower or swimming pool).
Warning
- Check if the voltage indicated on the appliance corresponds to the local mains voltage before you connect the appliance.
- If the mains cord is damaged, you must have it replaced by Philips, a service centre authorised by Philips or similarly qualified persons in order to avoid a hazard.
- This appliance is not to be used by people who get sunburnt without tanning when exposed to the sun, by persons who suffer from sunburn, by children under the age of 18, by persons who suffer (or have previously suffered) from skin cancer or who are predisposed to skin cancer, and by persons with a family history of melanoma.
-
This appliance is not to be used by persons who tend to freckle, who have more than 20 moles of any size on any part of the body and by persons who have asymmetrical moles larger than 5mm in diameter with variable pigmentation and irregular borders. If in doubt, consult your doctor.
-
This appliance is not intended for use by persons with reduced physical, sensory or mental capabilities, or lack of experience and knowledge, unless they have been given supervision or instruction concerning use of the appliance by a person responsible for their safety.
- Children should be supervised to ensure that they do not play with the appliance.
Caution
- If the wall socket used to power the appliance has poor connections, the plug of the appliance becomes hot. Make sure you plug the appliance into a properly connected wall socket.
- The appliance must be connected to a circuit that is protected with a 16A standard fuse or a slow-blow automatic fuse.
- If you have just been swimming or have just taken a shower, dry yourself thoroughly before you use the appliance.
- Always unplug the appliance after use.
- Let the appliance cool down after use for approx. 15 minutes before you fold it back into transport position and store it.
- Make sure the vents in the lamp unit and in the base remain open during use. Keep your hair away from the air inlet of the lamp unit.
- The UV filter becomes very hot when you use the appliance. Do not touch it.
- The appliance contains hinging parts, so be careful not to get your fingers stuck between these parts.
- Never use the appliance when a UV filter is damaged, broken or missing.
- Never use the appliance when the control panel is defective.
- Do not exceed the recommended tanning time and the maximum number of tanning hours (see section ‘Tanning sessions: how often and how long?’).
- Do not choose a tanning distance of less than 70cm.
- Do not tan a particular part of your body more than once a day. Avoid excessive exposure to natural sunlight on the same day.
- Do not use the tanning appliance if you have a disease and/or use medication or cosmetics that increase the sensitivity of your skin. Be extra careful if you are hypersensitive to UV light. Consult your doctor in case of doubt.
- Do not use the tanning appliance and consult your doctor if unexpected effects such as itching occur within 48 hours after the first session.
- Consult your doctor if persistent lumps or sores appear on the skin, or if there are changes in pigmented moles.
- Always wear the protective goggles provided with the appliance while you are tanning, to protect your eyes against overexposure (see chapter 'Tanning and your health').
- Remove creams, lipstick and other cosmetics well in advance of a tanning session.
- Do not use any sunscreens or suntan accelerators.
- Only move the appliance when it is in transport position.
General
- The appliance is fitted with an automatic protection against overheating. If the appliance is insufficiently cooled (e.g. because the vents are covered), the appliance switches off automatically. Once you have removed the cause of overheating and the appliance has cooled down, it switches on automatically again.
- If your skin feels taut after the tanning session, you can apply a moisturising cream.
- To acquire an even tan, lie straight below the lamp unit.
- Colours fade under the influence of the sun. The same effect may occur when you use this appliance.
- Do not expect the appliance to yield better results than the natural sun.
ENGLISH8
Electromagnetic fields (EMF)
This Philips appliance complies with all standards regarding electromagnetic fields (EMF). If handled properly and according to the instructions in this user manual, the appliance is safe to use based on scientific evidence available today.
Tanning and your health
Just as with natural sunlight, the tanning process takes some time. The first effect only becomes visible after a few sessions (see section 'Tanning sessions: how often and how long?').
Overexposure to ultraviolet light (natural sunlight or artificial light from your tanning appliance) can cause sunburn.
Besides many other factors, such as overexposure to natural sunlight, incorrect and excessive use of a tanning appliance may increase the risk of skin and eye problems. The degree to which these effects occur is determined by the nature, intensity and duration of the exposure on the one hand and the sensitivity of the person involved on the other.
The more the skin and the eyes are exposed to UV light, the higher the risk of keratitis, conjunctivitis, damage to the retina, cataracts, premature skin ageing and the development of skin tumours will be. Some medications and cosmetics increase the sensitivity of the skin.
Therefore it is highly important:
- that you follow the instructions in chapter 'Important' and section 'Tanning sessions: how often and how long?';
- that the tanning distance (distance between the UV filter and the body) is 70cm.
- that you do not exceed the maximum number of tanning hours per year (i.e. 17 hours or 1020 minutes);
- that you always wear the goggles provided while you are tanning.
Tanning sessions: how often and how long?
- Do not take more than one tanning session a day, over a period of 5 to 10 days.
- Take a break of at least 48 hours between the first and the second session.
- After this 5 to 10-day course, we advise you to stop tanning for a while.
- Approximately one month after a course, your skin will have lost much of its tan. You can then start a new course.
- If you want to keep your tan, do not stop tanning after the course, but continue with one or two tanning sessions a week.
- Whether you choose to stop tanning for a while or whether you continue tanning on a lower frequency, always keep in mind that you must not exceed the maximum number of tanning hours.
- For this appliance the maximum is 17 tanning hours (=1020 minutes) a year.
- If you have stopped a course and have not continued with it for a long period, do not proceed with the remaining number of sessions of this course but start a new course.
Example
Suppose you take a 10-day tanning course, with a 7-minute session on the first day and a 20-minute session on the nine following days.
The entire course then lasts (1 × 7 minutes) + (9 × 20 minutes) = 187 minutes.
This means you can take 5 of these courses in a year, as 5 × 187 minutes = 935 minutes
Of course, the maximum number of tanning hours applies to each separate part or side of the body that is tanned (e.g. the back or front of the body).
Tip: For a beautiful all-over tan, turn your body slightly during the session so that the sides of your body are better exposed to the tanning light.
Tip: If your skin feels slightly taut after tanning, you can apply a moisturising cream.
As the table shows, the first session of a tanning course must always last 7 minutes, irrespective of the sensitivity of the skin.
If you think that the sessions are too long for you (e.g. because your skin feels taut and tender after the session), we advise you to reduce the length of the sessions by e.g. 5 minutes.
| Duration of the tanning session for each separately treated part of the body | For persons with very sensitive skin | For persons with normal sensitive skin | For persons with less sensitive skin |
| 1st session 7 minutes 7 minutes 7 minutes | |||
| rest of at least 48 hours | |||
| 2nd session 10 minutes 20 minutes 30 minutes* | |||
| 3rd session 10 minutes 20 minutes 30 minutes* | |||
| 4th session 10 minutes 20 minutes 30 minutes* | |||
| 5th session 10 minutes 20 minutes 30 minutes* | |||
| 6th session 10 minutes 20 minutes 30 minutes* | |||
| 7th session 10 minutes 20 minutes 30 minutes* | |||
| 8th session 10 minutes 20 minutes 30 minutes* | |||
| 9th session 10 minutes 20 minutes 30 minutes* | |||
| 10th session 10 minutes 20 minutes 30 minutes* | |||
*) or longer, depending on your skin sensitivity.
Preparing for use
- You can easily move and store the appliance in transport position.
- The appliance is easier to lift if you do so together with another person (Fig. 2).
- If you have to lift the appliance by yourself, use the handle (Fig. 3).
1 To open the appliance, move the slides in the direction of the arrow (Fig. 4).
2 Pull up the stand and the lamp unit (Fig. 5).
3 Put the tanning appliance in the position indicated (Fig. 6).
4 Pull up the lamp unit to horizontal position. Use the handle to do this. (Fig. 7)
You hear clicks when you move the lamp unit past certain fixed positions.
Note: Instead of using the above step-by-step method, you can also pull the lamp unit up by its handgrip in one single movement (Fig. 8).
5 Turn the lamp unit a quarter turn (Fig. 9).
6 Place the tanning appliance beside a bed. (Fig. 10)
The distance between the UV filter and the surface on which you are lying down (e.g. the bed) must be 90cm.
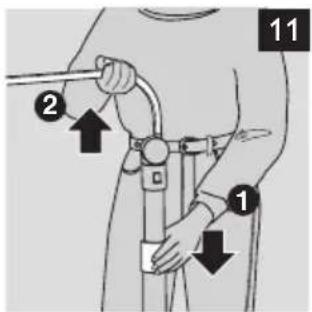
7 Slide the collar down the stand to unlock the height adjustment lock. Pull up the lamp unit at the same time to a height of 90cm above the bed. Let go of the collar to lock the lamp unit into position (Fig. 11).
- You can check the distance between the lamp unit and the bed by pulling out the measuring tape.
ENGLISH10
- The measuring tape automatically rewinds when you move the red tab sideways. The appliance is now ready for use.
Using the appliance
1 Fully unwind the mains cord.
2 Put the plug in the wall socket.
3 Consult chapter ‘Tanning and your health’ and your own notes for the correct tanning time.
4 Put on the protective goggles.
- Only use these protective goggles when you tan with a Philips tanning appliance. Do not use them for other purposes.
- The protective goggles comply with protection class II according to directive 89/686/EEC.
5 Set the timer to the appropriate time for the tanning session (Fig. 12).
The maximum tanning time that can be set is 45 minutes.
6 Lie down under the lamp unit.
The appliance beeps during the last minute of the session.
During this minute, you can reset the timer to tan the other side of your body. If you reset the timer during this minute, you avoid the 3-minute waiting time which is necessary to let the tanning lamps cool down after they have switched off.
The timer automatically switches off the tanning appliance when the set tanning time has elapsed.
After the tanning session
1 Use the memory knobs to keep track of the number of tanning sessions you have had. The appliance has two memory knobs: one for each person (Fig. 13).
Cleaning
Never use scouring pads, abrasive cleaning agents or aggressive liquids such as petrol or acetone to clean the appliance.
Do not let any water run into the appliance.
1 Unplug the appliance and let it cool down before you clean it.
2 Clean the outside of the appliance with a damp cloth.
3 Clean the outside of the UV filter with a soft cloth sprinkled with some methylated spirits.
4 Clean the protective goggles with a moist cloth.
Storage
1 Let the appliance cool down for 15 minutes before you put it in transport position and store it.
2 In the meantime, you can wind up the cord and put it in the base of the appliance.
Note: Make sure the cord is stored properly and does not get stuck between the hinging parts of the appliance when you put the appliance in transport position.
3 Slide the collar down the stand (1) to unlock the height adjustment lock. Push the stand down at the same time (2). Then let go of the collar (Fig. 14).
4 Turn the lamp unit a quarter turn (Fig. 15).
5 Lift the lamp unit a little with one hand (1). Push down the two unlocking slides with your other hand (2) to be able to fold the lamp unit (3) (Fig. 16).
6 Hold the two unlocking slides down with one hand and fold the lamp unit into vertical position with your other hand. Then let go of the unlocking slides (Fig. 17).
7 Lower the stand and the lamp unit carefully onto the base of the appliance (Fig. 18).
8 Push the slides on the base in the direction of the arrow to lock the lamp unit onto the base (Fig. 19).
9 Store the tanning appliance.
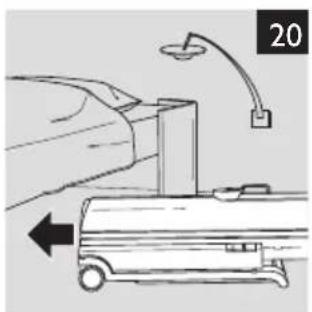
- You can store the tanning appliance under a bed (Fig. 20).
- You can also store the tanning appliance in a cupboard in upright position (Fig. 21).
Replacement
The light that the tanning lamps emit becomes less bright in time (i.e. after a few years in case of normal use). When this happens, you notice a decrease in the tanning capacity of the appliance. You can solve this problem by setting a slightly longer tanning time or by having the tanning lamps replaced.
The UV filter protects against exposure to undesired UV light. It is therefore important to have a damaged or broken filter replaced right away.
Have the tanning lamps (Philips HPA flexpower 400-600), the UV filter and the mains cord replaced by a dealer or service centre authorised by Philips. Only they have the knowledge and skills required for this job and the original spare parts for the appliance.
Environment
- The lamps of the appliance contain substances that can be harmful to the environment. When you discard the lamps, do not throw them away with the normal household waste but hand them in at an official collection point.
- Do not throw away the appliance with the normal household waste at the end of its life, but hand it in at an official collection point for recycling. By doing this, you help to preserve the environment (Fig. 22).
Guarantee & service
If you need service or information or if you have a problem, please visit the Philips website at www.philips.com or contact the Philips Consumer Care Centre in your country (you find its phone number in the worldwide guarantee leaflet). If there is no Consumer Care Centre in your country, go to your local Philips dealer.
Guarantee restrictions
The terms of the international guarantee do not cover the tanning lamps.
Troubleshooting
This chapter summarises the most common problems you could encounter with the appliance. If you are unable to solve the problem with the information below, contact the Consumer Care Centre in your country.
Problem Solution
The appliance does not work.
The lamp unit may not be in the right position (see chapter ‘Preparing for use’. Put the lamp unit in the right position.
| Problem Solution | |
| The plug may not be inserted properly in the wall socket. Put the plug properly in the wall socket. | |
| There may be a power failure. Test if the power supply works by connecting another appliance. | |
| The tanning lamps may still be too hot to go on. Let them cool down for 3 minutes first. | |
| The overheat protection may have switched off the appliance automatically because it overheated. Remove the cause of overheating (e.g. a towel that blocks one or more vents). Let the appliance cool down for a while and then switch the appliance back on. | |
| The fuse of the circuit to which the appliance is connected cuts off the power when I switch on or use the appliance. | The fuse of the circuit to which the appliance is connected must be a 16A standard fuse or a slow-blow automatic fuse. You may also have connected too many appliances to the same circuit. |
| The tanning results are not as good as I expected. | You may have followed a tanning course that is not appropriate for your skin type. Check the table in chapter 'Tanning and your health', section 'Tanning sessions: how often and how long?'. |
| The distance between the lamps and the surface you lie on may be larger than prescribed. See chapter 'Preparing for use'. | |
| When the lamps have been used for a long time, the tanning capacity decreases. This effect only becomes noticeable after several years. To solve this problem, select a slightly longer tanning time or have the lamps replaced. | |
Introduktion
natural_image
Illustration of two people handling a large cylindrical object, possibly a cart or device, with no visible text or symbols.
natural_image
Line drawing of a person holding a cylindrical object, no text or symbols present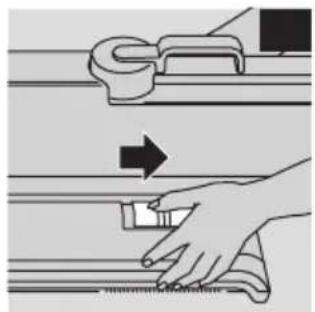
natural_image
Illustration of a hand using a tool to adjust or install a mechanical component, showing motion and assembly (no text or symbols)
natural_image
Illustration of a hand gripping a flatboard device with an arrow indicating motion (no text or symbols)
natural_image
Diagram of a vertical mechanical device with an arrow indicating rotation or movement (no text or symbols present)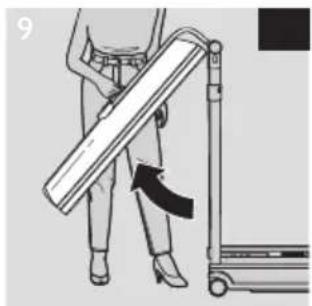
natural_image
Illustration of a person using a lift tool to lift a rectangular object, with no visible text or symbols
natural_image
Illustration of a person using a laptop stand to lift a wooden plank, with an upward arrow indicating motion (no text or symbols present)
natural_image
Line drawing of a person using a walking cane to lift a wooden plank (no text or symbols)

natural_image
Diagram of a washing machine control panel with three circular gauges (no text or symbols)
natural_image
Technical line drawing of a door handle with three circular gauges (no text or symbols)

natural_image
Illustration of a person using a walking cane to handle a wooden object (no text or symbols visible)

natural_image
Illustration of a person using a cart to lift a pole, showing motion arrows (no text or symbols)
natural_image
Diagram of a vertical mechanical device with an arrow indicating rotation or movement (no text or symbols present)
natural_image
Diagram showing a hand holding a car with an attached lamp and a hanging weight, next to a vehicle (no text or symbols present)
natural_image
Line drawing of a person standing beside a vertical doorbell (no text or symbols)
natural_image
Symbol of a trash bin crossed with no text or numbers, representing waste sorting or disposal (no text present)22
- Introduction
- General description (Fig. 1)
- Important
- Danger
- Warning
- Caution
- General
- ENGLISH8
- Electromagnetic fields (EMF)
- Tanning and your health
- Tanning sessions: how often and how long?
- Example
- Preparing for use
- ENGLISH10
- Using the appliance
- After the tanning session
- Cleaning
- Storage
- Replacement
- Environment
- Guarantee & service
- Guarantee restrictions
- Troubleshooting
- Problem Solution
- Introduktion
Brand : PHILIPS
Model : HP 8540
Category : Solar bench