
BMG 5612 - Sphygmomanometer AEG - Free user manual and instructions
Find the device manual for free BMG 5612 AEG in PDF.


| Product type | Automatic blood pressure monitor |
| Brand | AEG |
| Model | BMG 5612 |
| Measurement method | Oscillometric, automatic inflation and measurement |
| Dimensions | 104 x 45 x 154 mm |
| Weight | Approx. 269 g (batteries not included) |
| Power supply | 4 AA batteries (1.5 V) or DC 6 V, 600 mA power adapter (not included) |
| Battery life | Approx. 300 measurements |
| Pressure measurement range | 0 – 300 mmHg |
| Systolic measurement range | 60 – 260 mmHg |
| Diastolic measurement range | 40 – 199 mmHg |
| Pulse measurement range | 40 – 180 beats/min |
| Pressure accuracy | ± 3 mmHg |
| Pulse accuracy | ± 5% |
| Memory | 3 x 40 measurements with date and time |
| WHO classification | Blood pressure level indicator on the screen |
| Irregular pulse detection | Yes (♥ symbol) |
| Cuff circumference | 22-30 cm, 30-42 cm, 42-48 cm (depending on model) |
| Standards | IEC 60601-1, EN 80601-2-30, EN 1060-1, ANSI/AAMI SP-10 |
| Protection type | BF type applied part, IPX0 |
| Operating temperature | +5 °C to +40 °C |
| Operating humidity | ≤ 90% RH |
| Maintenance | Clean with a dry soft cloth; cuff washable by hand with mild detergent |
| Safety | Do not use on children, avoid shocks, do not immerse |
| Maintainability | Recommended check every 2 years; spare parts available (cuff, adapter) |
Frequently Asked Questions - BMG 5612 AEG
User questions about BMG 5612 AEG
0 question about this device. Answer the ones you know or ask your own.
Ask a new question about this device
Download the instructions for your Sphygmomanometer in PDF format for free! Find your manual BMG 5612 - AEG and take your electronic device back in hand. On this page are published all the documents necessary for the use of your device. BMG 5612 by AEG.
USER MANUAL BMG 5612 AEG
Location of Controls ...... Page 3
User manual...... Page 80
Specifications ...... Page 82
Język polski
Spis treści
natural_image
Pure electrical circuit lines without any symbolsNetzteilbetrieb
natural_image
Simple line drawing of a cable with a connector and a dashed box (no text or symbols)natural_image
Simple line drawing of a sock or towel (no text or symbols)
12 Deutsch
natural_image
Line drawing of a person lying on their back with a heart symbol drawn at the knee point (no text or labels)
Abb. 6-1
Abb. 7

Abb. 7-1
14 Deutsch
Abb. 8-1
9. HOHEN BLUTDRUCK BEI ERWACHSENEN BEURTEILEN
15 Alexandra Road, London UK, NW8 0DP
Tel: +0044-20-75868010 Fax: +0044-20-79006187
Importeur:
ETV
D-47909 Kempen / Germany
HERSTELLER:

ANDON HEALTH CO., LTD. NO.3 JINPING STREET, YAAN ROAD, NANKAI DISTRICT,
TIANJIN 300190, CHINA. TEL.: 86-22-60526081
Voeding: DC 6 V, 600 mA ---
- Meetbereik:
Manchetdruk: 0-300 mm Hg
natural_image
Pure electrical circuit lines without any symbols


natural_image
Simple line drawing of a cable with a connector and a dashed box (no text or symbols)natural_image
Simple line drawing of a sock or towel (no text or symbols)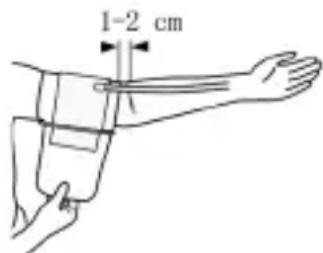
Opmerking:
natural_image
Line drawing of a human leg with a heart symbol placed on the knee, no text or labels presentNederlands
Liggend meten
Afb. 7

Afb. 7-1
natural_image
Pure electrical circuit lines without any symbolsFig. 2 Fig. 2-1 Fig. 2-2 Fig. 2-3
natural_image
Simple line drawing of a cable with a connector, next to a dashed rectangular outline (no text or symbols)natural_image
Line drawing of a human leg with a heart symbol placed on the knee, no text or labels presentFig. 6-3

Fig. 6-4
Fig. 8-1
9. ÉVALUATION DE L'HYPERTENSION CHEZ L'ADULTE
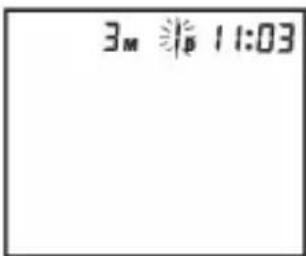


Fig. 2 Fig. 2-1 Fig. 2-2 Fig. 2-3
natural_image
Simple line drawing of a cable with a connector, next to a dashed rectangular object (no text or symbols)natural_image
Simple line drawing of a sock or towel (no text or symbols)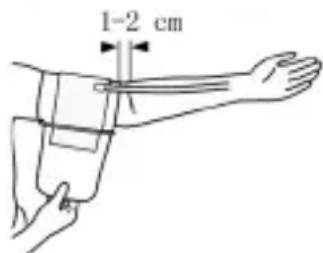
Nota:
natural_image
Line drawing of a human leg with a heart symbol placed on the knee, no text or labels presentMedición tumbado
Fig. 6-1
INDICE E INDICATORI DISPLAY 67
USO PREVISTO 68
INDICE E INDICATORI DISPLAY


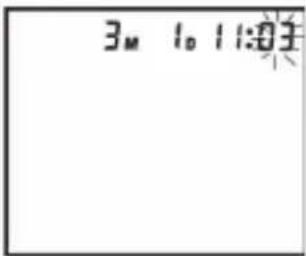
Fig. 2 Fig. 2-1 Fig. 2-2 Fig. 2-3
natural_image
Simple line drawing of a cable with a connector and a dashed outline (no text or symbols)natural_image
Line drawing of a person lying on the ground with a heart symbol drawn at the knee (no text or labels)74 Italiano
Fig. 6-3
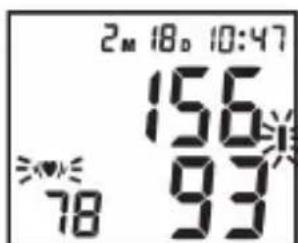
Fig. 6-4
Fig. 7-1
Fig. 8-1
9. ACCERTAMENTO DI PRESSIONE SANGUIGNA ALTA PER ADULTI
Thank you for choosing our product. We hope you will enjoy using the appliance.
CONTENTS
IMPORTANT INFORMATION 80
CONTENTS AND DISPLAY INDICATORS 81
INTENDED USE 81
CONTRAINDICATION 82
PRODUCT DESCRIPTION 82
SPECIFICATIONS......82
NOTICES 83
SETUP AND OPERATING PROCEDURES 85
-
BATTERY LOADING 85
-
CLOCK AND DATE ADJUSTMENT 86
-
CONNECTING THE CUFF TO THE MONITOR 86
-
APPLYING THE CUFF 86
-
BODY POSTURE DURING MEASUREMENT 87
-
TAKING YOUR BLOOD PRESSURE READING ....87
-
DISPLAYING STORED RESULTS 89
-
DELETING MEASUREMENTS FROM THE MEMORY 89
-
ASSESSING HIGH BLOOD PRESSURE FOR ADULTS 90
-
TROUBLESHOOTING (1) 91
-
TROUBLESHOOTING (2) 92
MAINTENANCE....92
EXPLANATION OF SYMBOLS ON UNIT 93
IMPORTANT INFORMATION
NORMAL BLOOD PRESSURE FLUCTUATION
All physical activity, excitement, stress, eating, drinking, smoking, body posture and many other activities or factors (including taking a blood pressure measurement) will influence blood pressure value. Because of this, it is mostly unusual to obtain identical multiple blood pressure readings.
Blood pressure fluctuates continually ---- day and night. The highest value usually appears in the daytime and the lowest one usually at midnight. Typically, the value begins to
increase at around 3:00 AM, and reaches to highest level in the daytime while most people are awake and active.
Considering the above information, it is recommended that you measure your blood pressure at approximately the same time each day.
Too frequent measurements may cause injury due to blood flow interference, please always relax a minimum of 1 to 1.5 minutes between measurements to allow the blood circulation in your arm to recover. It is rare that you obtain identical blood pressure readings each time.
CONTENTS AND DISPLAY INDICATORS
1 Battery compartment
2 Button START
3 Button MEM
4 LCD display
5 Cuff
6 Low Battery Indicator
7 Month Display
8 Day Display
9 Hour Display
10 Minute Display
11 Systolic Pressure
12 Diastolic Pressure
13 Blood Pressure Level Classification Indicator
14 Pulse Rate Display
15 Irregular Heartbeat Symbol
16 The pressure in cuff is instable, or much remnant air in cuff
17 Memory Indicator
18 Find an error, please re-inflate
INTENDED USE
The fully automatic electronic sphygmomanometer is for use by medical professionals or at home. It is a non-invasive blood pressure measurement system intended to measure the diastolic and systolic blood pressures and pulse rate of an adult individual by using a non-invasive technique in which an inflatable cuff is wrapped around the upper arm. The cuff circumference is limited to 22 cm-48 cm.

It is inappropriate for people with serious arrhythmia to use this Electronic Sphygmomanometer.
PRODUCT DESCRIPTION
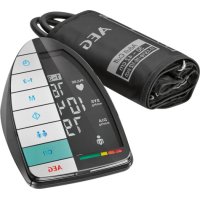
Based on Oscillometric methodology and silicon integrated pressure sensor, blood pressure and pulse rate can be measured automatically and non-invasively. The LCD display will show blood pressure and pulse rate. The most recent 3x40 measurements can be stored in the memory with date and time stamp. The monitor can also show the average reading of the last three measurements.
The Electronic Sphygmomanometers corresponds to the below standards: IEC 60601-1:2005/EN 60601-1:2006/AC:2010 (Medical electrical equipment -- Part 1: General requirements for basic safety and essential performance), IEC60601-1-2:2007/EN 60601-1-2:2007/AC:2010 (Medical electrical equipment -- Part 1-2: General requirements for basic safety and essential performance - Collateral standard: Electromagnetic compatibility - Requirements and tests), IEC 80601-2-30:2009+Cor.2010/EN 80601-2-30:2010(Medical electrical equipment -Part 2-30: Particular requirements for the basic safety and essential performance of automated non-invasive sphygmomanometers) EN 1060-1: 1995 + A1: 2002 + A2: 2009 (Non-invasive sphygmomanometers - Part 1: General requirements), EN 1060-3: 1997 + A1: 2005 + A2: 2009 (Non-invasive sphygmomanometers - Part 3: Supplementary requirements for electro-mechanical blood pressure measuring systems), ANSI/AAMI SP-10:2002+A1:2003+A:2006.
SPECIFICATIONS
- Product name: Blood Pressure Monitor
- Model: BMG 5612 (BM-091)
- Classification: Internally powered, Type BF applied part, IPX0, No AP or APG, Continuous operation
- Device size: Ca 104 mm x 45 mm x 154 mm
- Cuff circumference: 22 cm-30 cm (Optional), 30 cm-42 cm, 42 cm-48 cm (Optional)
- Weight: Approx 269 g (batteries and cuff excluded)
- Measuring method: Oscillometric method, automatic inflation and measurement
- Memory volume: 3 x 40 measurements with time and date stamp
-
Power source: Batteries: 4 x 1.5 V type AA • Mignon • LR6
Power supply: DC 6 V, =600 mA -
Measurement range:
Cuff pressure: 0 – 300 mm Hg
Systolic: 60–260 mm Hg
Diastolic: 40–199 mm Hg
Pulse rate: 40 – 180 beats/minute
- Accuracy:
Pressure: 3 mm Hg
Pulse rate: 5%
-
Environmental temperature for operation: +5 °C to +40 °C (41 °F to 104 °F)
-
Environmental humidity for operation: ≤ 90 % RH
-
Environmental temperature for storage and transport: -20 °C to 55 °C (-4 °F to 131 °F)
-
Environmental humidity for storage and transport: ≤ 95 % RH
-
Environmental pressure: 80 kPa to 105 kPa
-
Battery life: Approx 300 measurements
-
A list of all components belonging to the pressure measuring system, including accessories: Pump, valve, LCD, cuff, sensor
Note:
These specifications are subject to change without notice.
NOTICES
-
Read all of the information in the operation guide and any other literature in the box before operating the unit.
-
Stay still, calm and rest for 5 minutes before blood pressure measurement.
-
The cuff should be placed at the same level as your heart.
-
During measurement, neither speak nor move your body and arm.
-
Measuring on same arm each time.
-
Please always relax at least 1 or 1.5 minutes between measurements to allow the blood circulation in your arm to recover. Prolonged over-inflation (cuff pressure exceed 300 mm Hg or maintained above 15 mm Hg for longer than 3 minutes) of the bladder may cause ecchymoma of your arm.
-
Consult your physician if you have any doubt about below cases:
1) The application of the cuff over a wound or inflammation diseases;
2) The application of the cuff on any limb where intravascular access or therapy, or an arterio-venous (A-V) shunt, is present;
3) The application of the cuff on the arm on the side of a mastectomy;
4) Simultaneously used with other monitoring medical equipments on the same limb;
5) Need to check the blood circulation of the user.
English
- This Electronic Sphygmomanometer is designed for adults and should never be used for infants or young children. Consult your physician or other health care professionals before use on older children.
- Do not use this unit in a moving vehicle, This may result in erroneous measurement.
- Blood pressure measurements determined by this monitor are equivalent to those obtained by a trained observer using the cuff/stethoscope auscultation method, within the limits prescribed by the American National Standard Institute, Electronic or automated sphygmomanometers.
- If an irregular heartbeat (IHB) from common arrhythmias is detected in the procedure of blood pressure measurement, this sign (♥) will be displayed. Under this condition, the Electronic Sphygmomanometers can keep function, but the results may not be accurate, it's suggested that you consult with your physician for accurate assessment.
There are 2 conditions under which the signal of IHB will be displayed:
1) The coefficient of variation (CV) of the pulses is > 25 %.
2) The deviation of the following pulse period is ≥ 0.14 s, and the number of such pulses amounts to more than 53 % of the total number of measured pulses.
-
Please do not use the cuff other than supplied by the manufacturer, otherwise it may bring biocompatible hazard and might result in measurement error.
-
The monitor might not meet its performance specifications or cause a safety hazard if stored or used outside the temperature and humidity ranges specified in the specifications.
-
⚠️ Please do not share the cuff with other contagious persons to avoid cross-infection.
-
This equipment has been tested and found to comply with the limits for a Class B digital device, pursuant to part 15 of the FCC Rules. These limits are designed to provide reasonable protection against harmful interference in a residential installation. This equipment generates, uses and can radiate radio frequency energy and, if not installed and used in accordance with the instructions, may cause harmful interference to radio communications. However, there is no guarantee that interference will not occur in a particular installation. If this equipment does cause harmful interference to radio or television reception, which can be determined by turning the equipment off and on, the user is encouraged to try to correct the interference by one or more of the following measures:
-
Reorient or relocate the receiving antenna.
- Increase the distance between the equipment and the receiver.
- Connect the device to an outlet on a circuit different from that to which the receiver is connected.
-
Consult the dealer or an experienced radio/TV technician for help.
-
This blood pressure monitor is verified by auscultatory method. It is recommended that you check annex B of ANSI/AAMI SP-10:2002+A1:2003+A2:2006 for details of verification method if you need.
SETUP AND OPERATING PROCEDURES
1. BATTERY LOADING
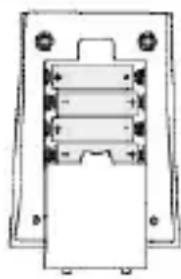
a. Open battery cover at the back of the monitor.
b. Load four batteries of the type "AA". Please pay attention to polarity.
c. Close the battery cover.
When the LCD shows the battery symbol 📋 replace all batteries with new ones.
Rechargeable batteries are not suitable for this monitor.
Remove the batteries if the monitor will not be used for a month or more to avoid relevant damage of battery leakage.
Do not let battery fluid get into your eyes. If it should get in your eyes, immediately rinse with plenty of clean water and contact a physician.
natural_image
Pure electrical circuit lines without any symbolsPower supply operation
You can operate the device also with a power supply unit (power supply unit not included in the scope of delivery).
When using a power supply unit, take care that the listed voltage matches the voltage of the outlet. Also check that the output current and the polarity of the power supply unit match the data on the sphygmomanometer. (Power supply unit output: DC 6 V, 600 mA, ⊖—⊕)
Before operating the device with a power supply unit, make sure that the device is switched off and that no batteries have been inserted. Do not disconnect the power supply unit while operating the device.
a. Plug the power supply unit into a correctly installed safety socket.
b. Connect the device to the power supply unit by inserting the plug of the power supply unit into the DC 6 V socket (right side of the device).
If the device is not to be used for some time, disconnect the power supply unit from the outlet. Also pull the plug of the power supply unit from the DC 6 V socket of the device.
86 English

The monitor, the batteries and the cuff, must be disposed of according to local regulations at the end of their usage.
2. CLOCK AND DATE ADJUSTMENT
a. Once you install the battery or turn off the monitor, the unit will enter Clock Mode and the display will display the time and the date.
b. When the unit is in Clock Mode, press the "START" button and the "MEM" button simultaneously for 2 seconds; the month will flash first. Press the button "START" repeatedly; the day, the hour and the minute will flash in turn. See Fig. 2 to 2-3. While a number is flashing, press the button "MEM" to increase the number. Hold the button "MEM" depressed, the number will increase rapidly.

Fig. 2 Fig. 2-1 Fig. 2-2 Fig. 2-3
c. You can turn off the monitor by pressing the "START" button when the minutes are flashing, then the time and the date are confirmed.
d. The monitor will turn off automatically after 1 minute of no operation; with the time and date unchanged.
e. After replacing the batteries, you should set the time and the date again.
3. CONNECTING THE CUFF TO THE MONITOR
Insert the cuff tubing connector into the socket in the left side of the monitor. Make certain that the connector is completely inserted to avoid air leakage during blood pressure measurements.

natural_image
Simple line drawing of a cable with a connector and a dashed outline (no text or symbols)Avoid compression or restriction of the connection tubing during measurement, as this may cause an inflation error or harmful injury due to continuous cuff pressure.
4. APPLYING THE CUFF
a. If required, pull the cuff end through the medal loop (the cuff is packaged like this already).
b. Place the cuff around a bare arm 1 to 2 cm above the elbow joint.

natural_image
Simple line drawing of a sock or towel (no text or symbols)c. While sitting, place your hand with the palm facing up onto a flat surface like a table or similar. Position the air tube in the middle of your arm in line with your middle finger
d. Tighten the cuff and close the Velcro fastener. The cuff
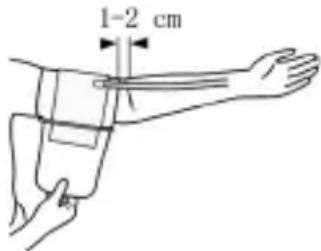
should fit comfortably, yet snugly around your arm. You should be able to insert one finger between your arm and the cuff.
Note:
-
Please refer to the cuff circumference range in "SPECIFICATIONS" to make sure that the appropriate cuff is used.
-
Measuring on same arm each time.
-
Do not move your arm, body, or the monitor and do not move the rubber tube during measurement.
-
Stay quiet, calm for 5 minutes before blood pressure measurement.
-
Please keep the cuff clean. If the cuff becomes dirty, remove it from the monitor and clear it by hand in a mild detergent, then rinse it thoroughly in cold water. Never dry the cuff in clothes dryer or iron it. Clean the cuff after the usage of every 200 times is recommended.
5. BODY POSTURE DURING MEASUREMENT
Sitting Comfortably Measurement
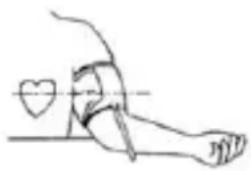
a. Be seated with your feet flat on the floor, and don't cross your legs.
b. Place palm upside in front of you on a flat surface such as table.
natural_image
Line drawing of a person sitting on the knee with a heart symbol drawn between the knee and horizontal line (no text or labels)c. The middle of the cuff should be at the level of the right atrium of the heart.
Lying Down Measurement
a. Lie on your back.
b. Place your arm straight along your side with your palm upside.
c. The cuff should be placed at the same level as your heart.

6. TAKING YOUR BLOOD PRESSURE READING
a. After applying the cuff and with your body in a comfortable position, press the "START" button. A beep is heard and all display characters are shown for self-test.. You can check the LCD display according to Fig. 6. Please contact the service center if a segment is missing.
English
b. Then the current memory bank (U1, U2, or U3) is displayed. See Fig. 6-1. Press the "MEM" button to change to the other bank. Confirm your selection by pressing the "START" button. The current bank will also be confirmed automatically after 5 seconds with no operation.

Fig. 6

Fig. 6-1
c. When the current memory bank has stored results, the display momentarily displays the newest one. If no result was stored, a zero appears in the display. See Fig. 6-2 & 6-3.
d. The monitor inflates the cuff until sufficient pressure has built up for a measurement. Then the monitor slowly releases air from the cuff and carries out the measurement. Finally the blood pressure and pulse rate will be calculated and displayed on the LCD screen separately. The blood pressure classification indication and (possibly) the "arrhythmia" symbol will flash on the display. See Fig. 6-4. The result will be automatically stored in the current memory bank.
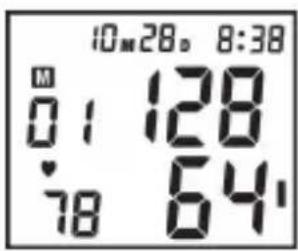
Fig. 6-2

Fig. 6-3

Fig. 6-4
e. After measurement, the monitor will turn off automatically after 1 minute of no operation. You can also press the "START" button to turn off the monitor manually.
f. During measurement, you can press the "START" button to turn off the monitor manually.
Note:
Please consult a health care professional for interpretation of pressure measurements.
7. DISPLAYING STORED RESULTS
a) In Clock Mode, press "MEM" button to display the stored results. The memory bank and the amount of results in this bank will be displayed. Press "START" button to change over to other bank. Confirm your selection by pressing "MEM" button. The current bank can also be confirmed automatically after 5 seconds with no operation. See Fig. 7.
b) After selecting the memory bank, the average of the last three measurements is displayed on the LCD. The symbol of "A" (Average) appears. See Fig. 7-1.

Fig. 7

Fig. 7-1
c) Press "MEM" button, the last result will be displayed with date and time. Irregular heartbeat symbol (if any) and the indicator of blood pressure classification will blink at the same time. See Fig. 7-2. Press "MEM" button repeatedly to review the results measured previously. See Fig. 7-3.
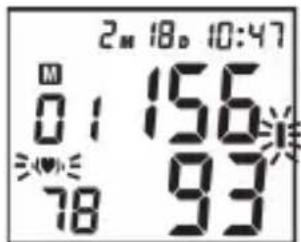
Fig. 7-2

Fig. 7-3
d) When displaying the stored results, the monitor will turn off automatically after 2 minutes of no operation. You can also press the button "START" to turn off the monitor manually.
8. DELETING MEASUREMENTS FROM THE MEMORY
When any result (except average reading of the last three results) is displayed and you keeping pressing the "MEM" button for three seconds, all results in the current memory bank will be deleted after three "beeps". See Fig. 8 and Fig. 8-1. The unit is switched off when you press the "MEM" or the "START" button.

Fig. 8

Fig. 8-1
9. ASSESSING HIGH BLOOD PRESSURE FOR ADULTS
The following guidelines for assessing high blood pressure (without regard to age or gender) have been established by the World Health Organization (WHO). Please note that other factors (e.g. diabetes, obesity, smoking, etc.) also must be taken into consideration. Consult with your physician for accurate assessment, and never change your treatment by yourself.
Blood pressure classification for adults

bar
| Systolic (mm HG) | 80 | 85 | 90 | 100 | 110 | |---|---|---|---|---|---| | Severe hypertension (level 3) | 180 | 160 | 140 | 130 | 120 | | Hypertension (level 2) | 160 | 140 | 130 | 120 | 120 | | Light hypertension (level 1) | 140 | 130 | 120 | 110 | 110 | | Slightly increased blood pressure | 130 | 120 | 110 | 100 | 100 | | Normal | 120 | 110 | 100 | 90 | 80 |Diastolic (mm HG)
| Blood pressure classification | SYS (mm HG) DIA | (mm HG) Colour | Indication |
| Optimal <120 <80 Green | |||
| Normal 120 - 129 80 - 84 Green | |||
| high - normal 130 - 139 85 – 89 | Green | ||
| Hypertension level 1 140 - 159 | 90 – 99 Yellow | ||
| Hypertension level 2 160 - 179 | 100 – 109 | Orange | |
| Hypertension level 3 | ≥180 ≥110 Red | ||
Definition and classification of the blood pressure values according to WHO/ISH
- TROUBLESHOOTING (1)
| PROBLEM | POSSIBLE CAUSE | SOLUTION |
| LCD Display shows battery symbol | Low Battery | Change all the batteries |
| LCD Display shows “EE” | Arm or blood pressure monitor was moved during testing | Re-test taking care to not move your arm or the blood pressure monitor |
| The cuff does not inflate properly or pressure falls quickly during testing | Make certain the rubber tube is fully inserted into the blood pressure monitor | |
| Irregular heartbeat (arrhythmia) | It is inappropriate for people with serious arrhythmia to use this blood pressure monitor. |
11. TROUBLESHOOTING (2)
| PROBLEM POSSIBLE CAUSE SOLUTION | ||
| LCD Display shows “EE” | The cuff was not properly applied or the rubber tube was bent or pressed. | Review the cuff applying and testing sections of the instructions and re-test. |
| LCD Display shows abnormal result | The cuff position was not correct or it was not properly tightened | Apply the cuff correctly and try again |
| Body posture was not correct during testing | Review the body posture and testing sections of the instructions and re-test. | |
| Speaking, arm or body movement, angry, excited or nervous during testing | Re-test when calm and without speaking or moving during the test | |
| No response when you press button or load battery | Incorrect operation, or strong electromagnetic interference | Take out batteries for five minutes, and then reinstall all batteries. |
MAINTENANCE
- Do not drop this monitor nor subject it to strong impacts.
- Avoid high temperatures and direct sunlight. Do not immerse the monitor in water as this will result in damage to the monitor.
- If this monitor was stored at a temperature near the freezing point, allow it to come to room temperature before use.
- ⚠️ Do not attempt to disassemble this monitor.
- If you do not use the monitor for a long time, please remove the batteries.
- It is recommended the performance should be checked every 2 years or after repair. Please contact the service center.
- Clean the monitor with a dry, soft cloth or a soft cloth squeezed well after moistened with water, diluted disinfectant alcohol, or diluted soapsuds.
- No component in the monitor can be serviced by the user. The circuit diagrams, component part lists, descriptions, calibration instructions, or other information which will assist the user's appropriately qualified technical personnel to repair those parts of equipment which are designated repairably can be supplied.
- The monitor can maintain the safety and performance characteristics for a minimum
of 10,000 measurements or three years, and the cuff can maintain the performance characteristics for a minimum of 1000 measurements.
- It is recommended that the cuff should be disinfected 2 times every week if needed (for example, in a hospital or in a clinic). Wipe the inner side (the side that contacts skin) of the cuff with a soft cloth moistened with ethyl alcohol (75-90%) and squeezed, then dry the cuff by airing.
EXPLANATION OF SYMBOLS ON UNIT

Symbol for "THE OPERATION GUIDE MUST BE READ"

Symbol for "WARNING"

Symbol for "TYPE BF APPLIED PARTS" (the cuff is a type BF applied part)

- bol for "ENVIRONMENT PROTECTION" - Waste electrical products should not be disposed of with household waste. Please recycle where facilities exist. Check with your local Authority or retailer for recycling advice.

Symbol for "MANUFACTURER"

0197 Symbol for "COMPLIES WITH MDD93/42/EEC REQUIREMENTS"

Symbol for "DATE OF MANUFACTURE"

Symbol for "EUROPEAN REPRESENTATION"

Symbol for "SERIAL NUMBER"

Symbol for "KEEP DRY"

natural_image
Simple line drawing of a cable with a connector, no text or symbols presentnatural_image
Line drawing of a person performing a leg exercise with a heart symbol (no text or labels)Rys. 6-1
Rys. 8

Rys. 8-1
9. OCENA CIŚNIENIA KRWI W PRZYPADKU OSOBY DOROSŁEJ
natural_image
Pure electrical circuit lines without any symbolsnatural_image
Simple line drawing of a cable with a connector, next to a dashed rectangular object (no text or symbols)natural_image
Line drawing of a human leg with a heart symbol placed on the knee, no text or labels presentMérés fekve
7-1. ábra
natural_image
Simple line drawing of a cable with a connector and a dashed box (no text or symbols)natural_image
Line drawing of a person lying on the knee with a heart symbol indicating pressure or pressure point (no text or labels)
Мал. 6-1
132
Українська
Мал. 6-3

Мал. 6-4
Мал. 8

Мал. 8-1
natural_image
Simple line drawing of a cable with a connector, next to a rectangular object (no text or symbols)natural_image
Simple line drawing of a sock or cushion (no text or symbols)
natural_image
Line drawing of a human leg with a heart symbol drawn on the knee joint (no text or labels)146
Русский
Рис. 6-1
Рис. 7

Рис. 7-1
Рис. 8

Рис. 8-1
1-8 شكل

8 شكل
3-6 شكل

2-6 شكل
1-7 شكل

شکل 7
natural_image
Line drawing of a person lying on the knee with a heart symbol above, no text or labels present
natural_image
Line drawing of a person lying down with hands on head (no text or symbols)natural_image
Simple line drawing of a cable with a connector, next to a dashed rectangular object (no text or symbols)natural_image
Simple line drawing of a sock or towel (no text or symbols)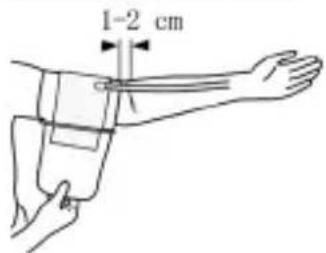
- retirement bxportality




- Język polski
- Spis treści
- Netzteilbetrieb
- Deutsch
- Deutsch
- HOHEN BLUTDRUCK BEI ERWACHSENEN BEURTEILEN
- ETV
- Opmerking:
- Nederlands
- Liggend meten
- ÉVALUATION DE L'HYPERTENSION CHEZ L'ADULTE
- Nota:
- Medición tumbado
- INDICE E INDICATORI DISPLAY
- Italiano
- ACCERTAMENTO DI PRESSIONE SANGUIGNA ALTA PER ADULTI
- CONTENTS
- IMPORTANT INFORMATION
- NORMAL BLOOD PRESSURE FLUCTUATION
- CONTENTS AND DISPLAY INDICATORS
- INTENDED USE
- PRODUCT DESCRIPTION
- SPECIFICATIONS
- Note:
- NOTICES
- English
- SETUP AND OPERATING PROCEDURES
- BATTERY LOADING
- Power supply operation
- English
- CLOCK AND DATE ADJUSTMENT
- CONNECTING THE CUFF TO THE MONITOR
- APPLYING THE CUFF
- BODY POSTURE DURING MEASUREMENT
- Sitting Comfortably Measurement
- Lying Down Measurement
- TAKING YOUR BLOOD PRESSURE READING
- DISPLAYING STORED RESULTS
- DELETING MEASUREMENTS FROM THE MEMORY
- ASSESSING HIGH BLOOD PRESSURE FOR ADULTS
- TROUBLESHOOTING (2)
- MAINTENANCE
- EXPLANATION OF SYMBOLS ON UNIT
- OCENA CIŚNIENIA KRWI W PRZYPADKU OSOBY DOROSŁEJ
- Mérés fekve
- 132
- Українська
- 146
- Русский
Brand : AEG
Model : BMG 5612
Category : Sphygmomanometer