GNS-2000 - Server LEVELONE - Free user manual and instructions
Find the device manual for free GNS-2000 LEVELONE in PDF.

User questions about GNS-2000 LEVELONE
0 question about this device. Answer the ones you know or ask your own.
Ask a new question about this device
Download the instructions for your Server in PDF format for free! Find your manual GNS-2000 - LEVELONE and take your electronic device back in hand. On this page are published all the documents necessary for the use of your device. GNS-2000 by LEVELONE.
USER MANUAL GNS-2000 LEVELONE
text_image
level® oneLevelOne
GNS-2000
2-Bay Gigabit Network Storage
V1.0
Quick Installation Guide
English
Slovenščina
Deutsch
Ελληνικά
Dansk
Español
Svenska
Italiano
Table of Contents
ENGLISH....2
DEUTSCH 17
DANSK....32
SVENSKA 47
SLOVENŠČINA....62
ΕΛΛΗΝΙΚΑ 76
ESPAÑ OL....92
ITALIANO....108
Default Settings
| IP Address | http://192.168.0.100/ |
| User Name | admin |
This guide covers only the most common situations. All detail information is described in the user manual.
English
System
Package Contents
The following items should be included in the GNS-2000
packaging.
If any of these items are damaged or missing, please contact your dealer for replacements.
- GNS-2000
- CD Utility/UM
- Ethernet Cable
- Power Adapter
- Quick Installation Guide
System Requirements
- Window's NT 4.0, Windows 95, 98, 2000, ME, XP and Vista.
- Ethernet Network employing 10BaseT, 100BaseTX or 1000BaseTx.
- TCP/IP protocol.
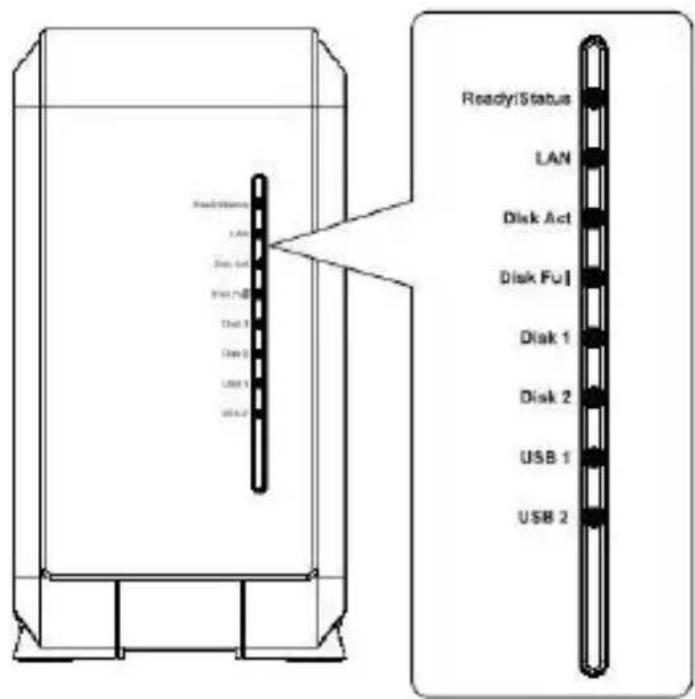
Front Panel

text_image
Read/Status LAN Disk Act Disk FU Disk 1 Disk 2 USB 1 USB 2 Ready/Status LAN Disk Act Disk FU Disk 1 Disk 2 USB 1 USB 2Rear Panel
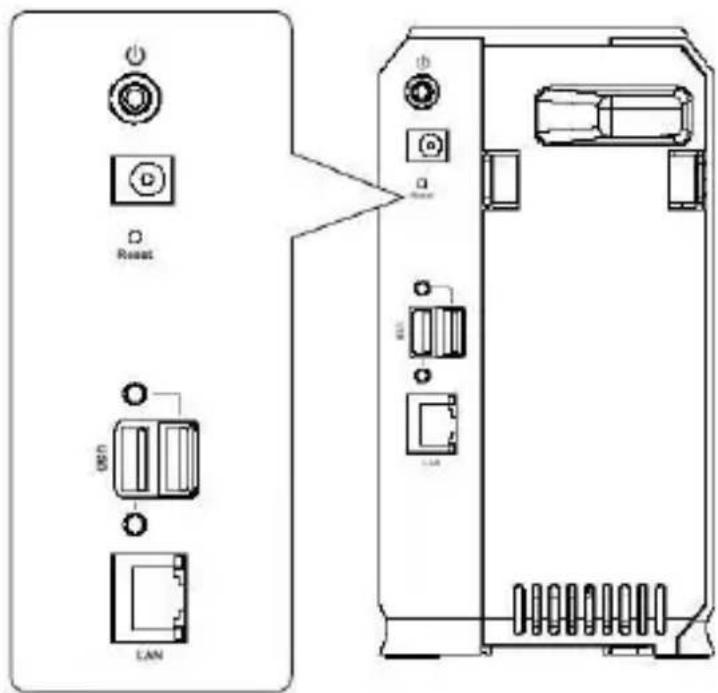
text_image
Reset LANHDD Install/Remove
The NAS Server supports two 3.5-inch Serial-ATA (SATA) hard drives and does not support low profile or half high hard drive.
HDD Install
- Make sure the NAS Server is powered off.
-
Open rear cover of NAS Server.
-
Make sure your hard drive is SATA interface and make sure you back up all pre-existing data before use it on NAS Server.
-
To install Disk 1 that located on left side (rear view), make sure HDD top face to left and connector side in front then slide the HDD into slot.
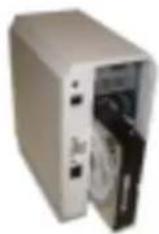
- To install Disk 2 that located on right side (rear view), make sure HDD top face to right and connector side in front then slide the HDD into slot.

natural_image
Exterior view of a beige server unit with an open door (no visible text or symbols)
HDD Remove
- Make sure the NAS Server is power off.
-
Open rear cover of NAS Server.
-
Pull out the HDD till HDD connector release then the HDD can slide out of slot.
System Installation
Boot up
- Connect the network cable to LAN port on the rear of NAS Server. Connect the others end to your hub or switch.
- Connect the supplied power adapter to a power outlet and plug the power cord into NAS Server's power input on the rear panel.
- Power on
Locate the NAS Server's power switch on the NAS Server real panel. Press it once to power on the NAS. - The NAS Server self-test
The NAS Server will run a brief self-test. During the self-test, all of NAS Server's LED will be illuminated or flashing. - Booting up
When the self-test is complete, boot up will start. The Ready LED will blink continuously, and the LAN LED will blink occasionally. Boot up should take approximately 1-3 minutes. - Boot up completed
When the Ready LED stops blinking, and remains on, boot up is complete. If the Status (Orange) LED stays on, or if the NAS Server repeatedly beeps, there is a hardware problem. Consult the Troubleshooting section of the User Guide for possible solutions.
Shutdown
To shutdown the NAS Server, press the power switch to start the shutdown sequence. Wait for all LEDs to turn off.
Removing a USB device
- Press the USB eject button (for USB 1 or 2) on the rear panel.
- Wait for the "USB" LED turn off.
- Remove the USB device.
You can also use the Windows utility installed from the CD-ROM:
- Select "Safely Remove USB Device"
-
Select the desired NAS and USB device, and click the "Eject" button.
-
Wait for the message telling you it is safe to remove the USB device.
Note: If the USB device is not removed, it will not be re-connected. You must remove and re-insert the USB device to have it re-connected.
Configuration
This procedure only needs to be done ONCE, by the NAS Server's Administrator.
Other LAN users should follow the advice given in the following section.
Quick Setup with the NAS Wizard
- Insert the NAS Server CD into your CD-ROM drive of your computer.
- If the installation program does not start automatically, run the program NAS_Setup.exe in the root (top) folder of your CD-ROM.
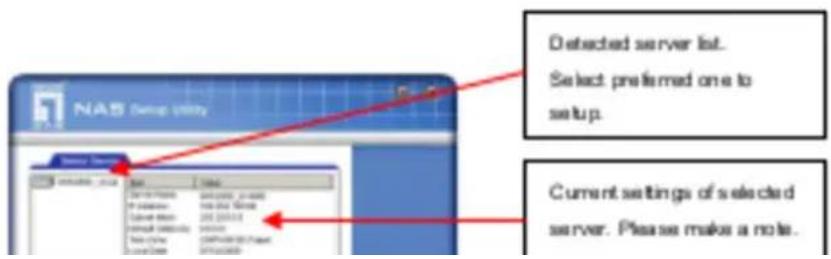
- Click "Setup" to start the Setup Utility. The Utility will begin scanning your network for installed NAS Servers, and a screen like the following will be displayed.
text_image
NAS Setup Utility Detected server list. Select preferred one to set up. Current settings of selected server. Please make a note.If the desired GNS-2000 is not listed, check the following:
- The NAS Server has finished the start up and boot process.
- Your PC and the NAS Server are on the same LAN segment (there is no Router between your PC and the NAS Server).
Otherwise, select the desired NAS Server, and click the "Next" button.
- The following screen will then be displayed.
Select this if your LAN has a DHCP server, otherwise select “ Fixed IP
Suggested values are compatible with your LAN. Suggested IP address is currently unused.
Obtain an IP address automatically (DHCP Client)
Select this only if your LAN has a DHCP Server. Normally, it is better for servers to use a Fixed IP address
Fixed IP Address
This option is recommended. You need to enter the following data.
- IP address - The utility will suggest an unused IP address within the address range used on your LAN. If you wish, you can change this, but you must ensure the address is unused.
- Network Mask - This must match the value used by PCs on your LAN.
- Gateway - This must match the value used by PCs on your LAN.
Click "Next" to continue. The following screen will then be displayed:
Each interNAS/USB comes with an unique server name. You may change it if you wish.
All workgroups on the network are listed. You may select one from the pull-down menu, or create a new one.
Set the proper Time-Zone, Date and Time here.
Ser ver
Name:
- The Default Name is shown. Change this if you wish.
Workgroup Name:
- Normally, this name should match the Workgroup name used by PCs on your LAN.
Time Zone
- Select your time zone from the list.
Local Date/Time
- Enter the local date (mm/dd/yyyy format) and time.
Click "Next" to continue. The following screen is displayed.

text_image
NAS Setup Utility Setup Completed! Please confirm they are corrected, then click " Save" .
text_image
NAS Setup Utility Welcome! Cancel the opportunity to Ask "What is to confirm your own" Ask "What is to wait for your own" Cancel you're going to start your websiteOther Configuration
After the configuration above, all Windows users can access the NAS Server with "guest" access rights.
However, we recommend creating a GNS-2000 "User" for each person on your LAN. This will provide each person on your LAN with their own login (name and password) as well as their own personal folder on the GNS-2000.
See the House Manual for details on question (see in the Mark
- Double click on the GNS-2000 icon. You will then see a list of shares (shared folders). You can read and write files to these shares, unless the GNS-2000 administrator has blocked access.
- To create a shortcut to an GNS-2000 folder, drag its icon to the desktop, and accept Windows offer to create a shortcut.
Mapping a Network Drive
- Right-click on the desired share.
- On the pop-up menu, select "Map Network Drive...".
- Select a drive letter for this folder, check the Reconnect at Logon checkbox, then click "OK".
- This drive will now be available in Windows Explorer, and from the File-Open or File-Save As dialog in all Windows applications.
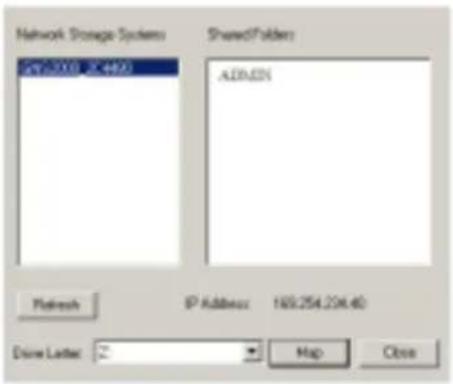
You can also use the Windows utility installed from the CD-ROM:
- Select "Share Folder Mapping", and a screen like the following will be displayed.
text_image
Network Storage System 247-3208 22-4803 SharedFolder: ADMIN Refresh IP Address: 169.254.204.40 Done Letter: 2 Map Close- A list of all the GNS-2000 on your network will show on the left side. The right side displays share folders of the currently selected NAS
- Select which share folder you want to map and select a drive letter for this share folder then click "Map" button.
- This drive will now be available in Windows Explorer, and from the File-Open or File-Save As driving in all Windows
To connect to the NAS with your Web Browser:
- In your Browser's Address or Location bar, enter "HTTP 97" and the GNS-2000's IP Address. (To connect via the Internet, additional setup is required. See the User Manual for details.)
- To browse the files and folders on the GNS-2000, click Disk (Public data) on the main screen.
- To view or download a file, click on its name. To download any file, right-click its name and choose "Save target as..."
Deutsch
System
Packungsinhalt
HDD Installation/Deinstallation
natural_image
Exterior view of a beige server tower with an open door (no visible text or symbols)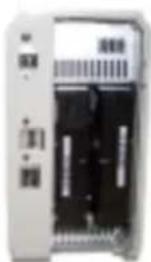
natural_image
Front view of a device with ports and modules (no visible text or symbols)甲。
HDD Deinstallation
text_image
Setup Remove Network GRID Select the device set could be matching its own and then call it next. Web for the network setting that is necessary to allow previously following the device. TCP Refresh Change Guide: 0412005_214483 http://www.rsc.org/ Back Refresh CancelIn the NLP test question
- GNS-2000
- Quick InstallationsGuide
- CD Utility/UM
- Ethernet kabel
- Strøm adapter
System krav
- Windows NT 4.0, Windows 95, 98, 2000, ME, XP og Vista.
- Ethernet netværks adgang 10BaseT, 100BaseTX eller 1000BaseTx.
- TCP/IP protokol.
Front Panel
text_image
Read/Status LAN Disk Act Disk FU Disk 1 Disk 2 USB 1 USB 2 Ready/Status LAN Disk Act Disk FU Disk 1 Disk 2 USB 1 USB 2Bag Panel

text_image
Reset USB LANHDD Installering/fjernelse
NAS serveren understøtter to 3.5-toms Serial-ATA (SATA) harddiske og supporterer IKKE low profile eller halv højde harddiske.
HDD Installing
natural_image
Exterior view of a gray rectangular electronic enclosure or cabinet (no visible text or symbols)甲、
text_image
Select Remove Network USB Select the server you read to mapping to wins, then click Next. Web for the coverage evolving that removed in a file In order physically removing the device. USB Network Storage Linux SEL200_1C400 Select ORDER_1.1 Next Refresh Cancel甲、
text_image
NAS Group Utility Detected server list. Select preferred one to setup. Current settings of selected server. Please make a note.text_image
NAS Security Utility Select this if your LAN has a DHCP server, otherwise select " Fixed IP" Suggested values are compatible with your LAN.Fast IP Adresse
Each interNAS/USB comes with an unique server name. You may change it if you wish.
All workgroups on the network are listed. You may select one from the pull-down menu, or create a new one.
Set the proper Time-Zone, Date and Time here.
text_image
NAS Setup Complete! Setup Completed! New Settings Current Name: 2000000000 IP Address: 9610478754 All settings are displayed. Please confirm they are corrected, then click " Save" .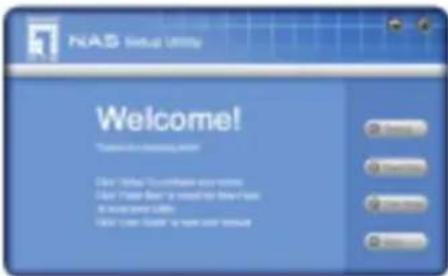
text_image
NAS Setup Utility Welcome! Thank you for your app at www.nasup.org Click "What You can't have any likes" Ask "You can't have any likes" to wait for your app at www.nasup.org. Ask "You can't have any likes" to wait for your app at www.nasup.org.Andre konfigurationer
On how the model can find details are based on mean values
text_image
Network Storage Systems GNS2000 2C4480 Shared Folder ADMIN Refresh IP Address: 169.254.234.40 Drive Letter: Z: Map Closetext_image
Setup Network Access SIM Select the device will need to replace or update any other disk Disk. Find the average activating blockchain or mini disk in place to stop the device. TCP Networks Storage Limits: C:\WINDOWS\_2014\08\ns\temp\www.cbsv.com OK Cancel Network Canceltext_image
NAS Setup Utility Welcome! Thanks for choosing NAS? Click "Startup" to configure your server Click "Flash Map" to install the Map-Flash to local drive Utility Click "User Guide" to read other manual Setup Press Map User Guide ExitYtterligare konfigurering
To Use the NAS storage
Mapping a Network Drive
text_image
Network Storage Systems GNS2000 2C4480 Shared Folder ADMIN Refresh IP Address: 169.254.234.40 Drive Letter: Z: Map Closenatural_image
Exterior view of a beige computer case with open door and internal compartments (no text or symbols visible)-
Prepricajte se, da je vas disk SATA disk in shranite vse podatke, preden disk uporabite v NAS strezniku.
-
Disk 1 vstavite na levo stran (pogled zadaj), namestite disk tako, da bo zgornja stran obrnjena levo, nato potisnite disk v rezo.


- Disk 2 vstavite na desno stran (pogled zadaj), nameštite disk tako, dab o zgornja stran obrnjena desno, nato potisnite disk v rezo.
natural_image
Exterior view of a beige server tower with an open door (no visible text or symbols)
natural_image
Front view of a computer RAM module with drive bays and indicator lights (no visible text or labels)Odstranjevanje
text_image
Setup Remove Network GRID Select the device to set out a network with two fields and three fields. Next: Web has the network advancing that continues to be before provided for selecting the device. TCP Refreshs Change Guide: 0123008_274400 New 0123008_274400 Back Refresh Canceltext_image
NAS Setup Utility Welcome! Thanks for choosing NAS? Click "Startup" to configure your server Click "Flash Map" to install the Map-Flash to local drive Utility Click "User Guide" to read other manual Setup Press Map User Guide ExitDruge nastavitve
text_image
Network Storage Systems GNS2000 2C44B0 Shared Folderx ADMIN Refresh IP Address: 769.254.234.40 Drive Letter: Z: Map Close- Seznam vseh GNS-2000 v vasem omrezju je na levi strani. Desna stran prikazuje mape v skupni rabi dolo-cenega streznika
- Izberite zeljeno mapo in dolocite crko pogona. Nato kliknite gumb "Map".
- Ta mapa bo sedaj na voljo v Raziskovalcu.
Uporaba spletnega brskalnika
Spletni vmesnik streznika GNS-2000 ima tri glavne funkcije:
natural_image
Exterior view of a beige industrial enclosure or housing unit with internal compartments and mounting brackets (no visible text or symbols)natural_image
Exterior view of a beige server unit with an open door (no visible text or symbols)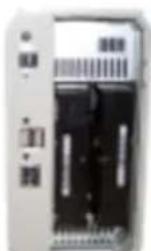
HDD Απεγκατάσταση
text_image
Safely Remove Network USB Select the device you want to unplug or eject, and then click Expect. Wait for the message advising that removal is safe before physically detach the device. USB Network Storage Link: GMS2008_2C4400 FLASH_1_!text_image
Network Storage Systems GNS2000 2C4480 Shared Folders ADMIN Refresh IP Address: 169.254.234.40 Drive Letter: Z: Map Closenatural_image
Exterior view of a gray computer case with open door and internal components (no text or symbols visible)natural_image
Exterior view of a beige computer tower with an open drive bay (no visible text or labels)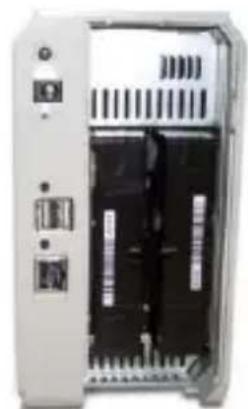
natural_image
Interior view of a server rack unit showing drive bays and ports (no visible text or labels)natural_image
Exterior view of a beige server or computer chassis unit (no visible text or symbols)text_image
Level and NAS Setup Utility Welcome! Thanks for choosing NAS? Click "Startup" to configure your server Click "Flash Map" to install the Map-Hash to local drive Utility Click "User Guide" to read other manual Settings Flash Map User Guide Exitnatural_image
Exterior view of a beige server unit with a black open door, showing internal components (no visible text or symbols)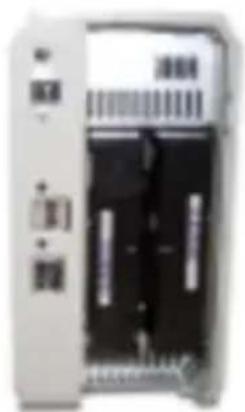
natural_image
Exterior view of a server rack unit with drive bays and indicator lights (no visible text or labels)natural_image
Exterior view of a beige server or server unit with ports and indicator lights (no visible text or symbols)Rimozione HDD
text_image
Setup Remove Network GRID Select the server set could be routing to next and then call it. Next: Web for the network advancing that increased in with before physically following the device. TCP Refreshs Change Guide: 0412005_214483 http://www.rsc.org/ Back Refresh Canceltext_image
NAS Setup Utility Setup Completed! I'm looking at a social, information. You'll offer a new setup. For you need your help? I will give any updates. New Settings Service Number: 012358_21469 Verranno mostrate tutte le impostazioni. Per confermare e premere " Save".