
KV-32CS71K - Television SONY - Free user manual and instructions
Find the device manual for free KV-32CS71K SONY in PDF.


| Product Type | FD Trinitron WEGA WIDE Colour Television |
| Brand | Sony |
| Model | KV-32CS71K |
| Screen Size (diagonal) | 32 inches (approx. 82 cm) |
| Display Technology | Flat FD Trinitron with 100Hz processing |
| Color Systems | PAL, SECAM, NTSC 3.58/4.43 (Video In only) |
| TV Systems | B/G/H, D/K (depending on country selection) |
| Channel Coverage | VHF E2-E12, UHF E21-E69, CATV S1-S20, HYPER S21-S41, D/K R1-R12, R21-R69 |
| Sound Output | 2 x 14 W (music power), 2 x 7 W (RMS) |
| Power Consumption | 102 W |
| Standby Power Consumption | 0.4 W |
| Dimensions (W x H x D) | Approx. 933 x 562 x 572 mm |
| Weight | Approx. 60 kg |
| Rear Connectors | 3 Scart sockets (1 with RGB input and TV AV output, 2 with RGB and monitor output, 3 with S-Video and Smartlink), Audio outputs L/R (phono jacks) |
| Side Connectors | S-Video input (4-pin DIN), Video input (phono), Audio inputs (phono), Headphones jack |
| Remote Control | RM-947 with batteries supplied |
| Teletext | Fastext and TOPtext with 250-page memory |
| Audio Enhancements | BBE High Definition Sound System, Dolby Virtual Surround |
| Special Features | 100Hz picture, Auto Format, Noise Reduction, RGB Centring, Picture Rotation, Sleep Timer, Smartlink |
| Safety and Maintenance | Unplug before cleaning; use soft damp cloth; no abrasive cleaners; maintain 10 cm ventilation space |
| Disposal | Do not dispose as household waste; recycle at designated collection points |
Frequently Asked Questions - KV-32CS71K SONY
User questions about KV-32CS71K SONY
0 question about this device. Answer the ones you know or ask your own.
Ask a new question about this device
Download the instructions for your Television in PDF format for free! Find your manual KV-32CS71K - SONY and take your electronic device back in hand. On this page are published all the documents necessary for the use of your device. KV-32CS71K by SONY.
USER MANUAL KV-32CS71K SONY
FD Trinitron WEGA WIDE Colour Television
Operating Instructions
GB

Before operating the TV, please read the “Safety Information” section of this manual. Retain this manual for future reference.
BG
Thank you for choosing this Sony FD Trinitron Colour Television.
Before operating the TV, please read this manual thoroughly and retain it for future reference.
- Symbols used in the manual:
- Important information.
• Information on a feature.
• 1,2... Sequence of instructions.
- Shaded buttons on the remote control show you the buttons you have to press to follow the sequence of the instructions.
- Informs you of the result of instructions.
Table of Contents
Introduction 3
Safety Information....4
Overview
Overview of Remote Control Buttons....5
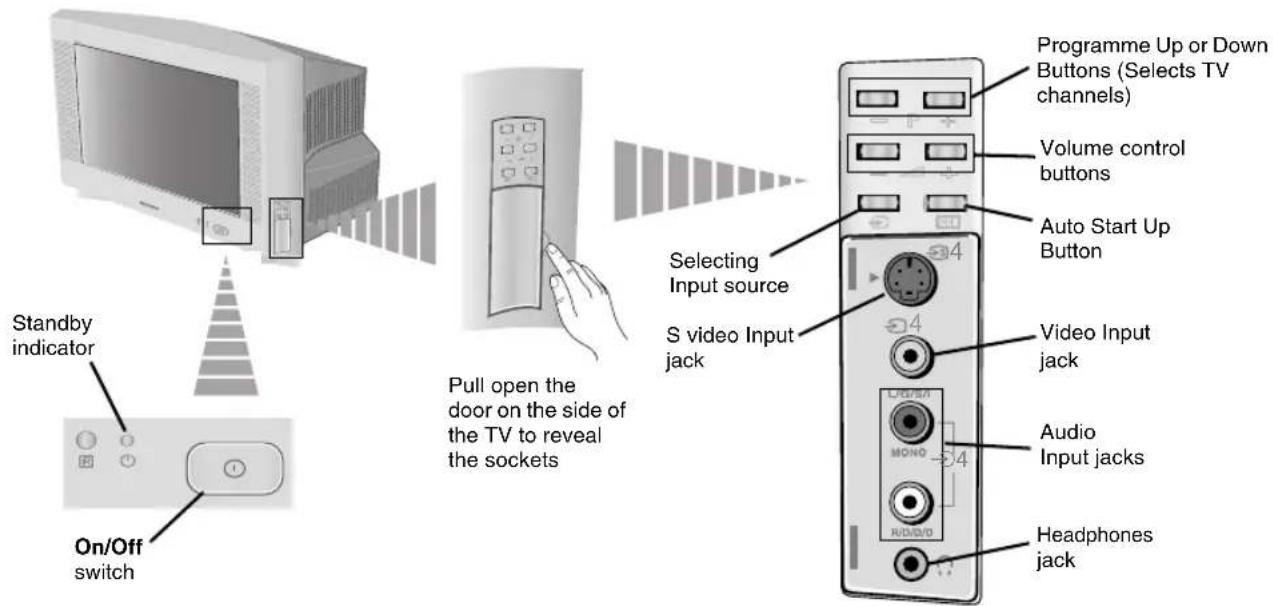
Overview of TV Buttons 6
Installation
Inserting Batteries into the Remote Control 6
Connecting the Aerial and VCR 6
First Time Operation
Switching On the TV and Automatically Tuning 7
Menu system
Introducing and Using the Menu System....9
Menu Guide:
Picture Adjustment....9
Sound Adjustment 10
Sleep Timer 11
Language/Country 11
Auto Tuning 11
Programme Sorting....12
Programme Labels 12
AV Preset....12
Manual Programme Preset....13
Auto Format 15
Noise Reduction 16
AV3 Output 16
TV Speakers 16
RGB Centring 17
Picture Rotation 17
Teletext....18
Additional Information
Connecting Optional Equipment 19
Using Optional Equipment 20
Specifications....21
Disposal of Old Electrical & Electronic Equipment 21
Troubleshooting 22
 This set is to operate on a 220-240V AC supply only. Take care not to connect too many appliances to the same power socket as this could result in fire or electric shock. This set is to operate on a 220-240V AC supply only. Take care not to connect too many appliances to the same power socket as this could result in fire or electric shock. |  For environmental and safety reasons, it is recommended that the TV set is not left in standby mode when not in use. Disconnect from the mains.However, some TVs may have features which require they are left in standby. The instructions in this manual will inform you if this applies. For environmental and safety reasons, it is recommended that the TV set is not left in standby mode when not in use. Disconnect from the mains.However, some TVs may have features which require they are left in standby. The instructions in this manual will inform you if this applies. |  Never push objects of any kind into the set as this could result in a fire or electric shock. Never spill liquid of any kind on the set. If any liquid or solid object does fall into the cabinet, do not operate the TV. Have it checked immediately by qualified personnel. Never push objects of any kind into the set as this could result in a fire or electric shock. Never spill liquid of any kind on the set. If any liquid or solid object does fall into the cabinet, do not operate the TV. Have it checked immediately by qualified personnel. |
 Do not open the cabinet and the rear cover of the TV. Refer to qualified service personnel only. Do not open the cabinet and the rear cover of the TV. Refer to qualified service personnel only. |  For your own safety, do not touch any part of the TV, power lead or aerial lead during lightning storms. For your own safety, do not touch any part of the TV, power lead or aerial lead during lightning storms. | 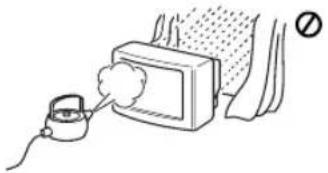 To prevent fire or shock hazard, do not expose the TV to rain or moisture. To prevent fire or shock hazard, do not expose the TV to rain or moisture. |
 Do not cover the ventilation openings of the TV For ventilation, leave a space of at least 10cm all around the set. Do not cover the ventilation openings of the TV For ventilation, leave a space of at least 10cm all around the set. |  Never place the TV in hot, humid or excessively dusty places. Do not install the TV where it may be exposed to mechanical vibrations. Never place the TV in hot, humid or excessively dusty places. Do not install the TV where it may be exposed to mechanical vibrations. |  To prevent fire, keep inflammable objects or naked lights (eg candles) away from the TV. To prevent fire, keep inflammable objects or naked lights (eg candles) away from the TV. |
 Clean the screen and cabinet with a soft, lightly dampened cloth. Do not use any type of abrasive pad, alkaline cleaner, scouring powder or solvent, such as alcohol or benzine, or antistatic spray. As a safety precaution, unplug the TV before cleaning it. Clean the screen and cabinet with a soft, lightly dampened cloth. Do not use any type of abrasive pad, alkaline cleaner, scouring powder or solvent, such as alcohol or benzine, or antistatic spray. As a safety precaution, unplug the TV before cleaning it. |  Pull out the power lead by the plug. Do not pull on the power lead itself. Pull out the power lead by the plug. Do not pull on the power lead itself. |  Take care not to place heavy objects on the power lead as this could result in damage.We recommend you wind any excess lead around the holders provided on the rear of the TV. Take care not to place heavy objects on the power lead as this could result in damage.We recommend you wind any excess lead around the holders provided on the rear of the TV. |
 Place the TV on a secure stable stand. Never attempt to move the TV and stand together - always move the TV and stand separately. Do not place the TV on its side or face up. Do not allow children to climb on to it. Place the TV on a secure stable stand. Never attempt to move the TV and stand together - always move the TV and stand separately. Do not place the TV on its side or face up. Do not allow children to climb on to it. |  Unplug the power lead before moving the TV. Avoid uneven surfaces, quick steps or excessive force. If the set has been dropped or damaged, have it checked immediately by qualified service personnel. Unplug the power lead before moving the TV. Avoid uneven surfaces, quick steps or excessive force. If the set has been dropped or damaged, have it checked immediately by qualified service personnel. |  Do not cover the ventilation openings of the TV with items such as curtains or newspapers etc. Do not cover the ventilation openings of the TV with items such as curtains or newspapers etc. |

To Temporarily Switch Off TV: Press to temporarily switch off TV (standby indicator on TV lights up). Press again to switch on TV from standby mode. To save energy we recommend switching off completely when TV is not in use. After 15 minutes without a signal and without any button being pressed, the TV switches automatically into standby mode.
② Selecting input source: Press repeatedly until the desired input symbol of the source appears on the TV screen.
③ Selecting channels: Press to select channels. For double-digit programme numbers, enter the second digit within 2.5 seconds.
4 Press to watch the last channel selected (watched for at least 5 seconds).
⑤This button only works in Teletext mode.
⑥ This button only works in Teletext mode.
⑦ Selecting Teletext: Press to switch on teletext.
8 When MENU is switched on, use these buttons to operate the menu system. For details refer to "Introducing and Using the Menu System" on page 9. When MENU is switched off, press OK to show a channel overview. Then press ↓ or ↑ to select the channel and then press the OK button to watch the selected channel.
⑨ Selecting Screen format: Press this button repeatedly to change the screen format. For more details refer to 'Auto Format' on page 15.
10 Selecting channels: Press to select the next or previous channel.
⑪ Muting the Sound: Press to mute TV sound. Press again to restore the sound.
12 Adjusting TV volume: Press to adjust the volume of the TV.
13 Displaying the menu system: Press to display the menu on the TV screen. Press again to remove the menu display from the TV screen.
14 Selecting TV mode: Press to switch off teletext or video input.
⑮ Selecting Picture mode: Press repeatedly to change the picture mode.
16 Selecting Sound mode: Press repeatedly to change the sound mode.
⑰ Displaying on Screen information: Press to display all on-screen indications. Press again to cancel.
Besides TV functions, all coloured buttons as well as green symbols are also used for Teletext operation. For more details, please refer to "Teletext" section of this instruction manual.
Inserting Batteries into the Remote Control

Make sure you insert the supplied batteries observing the correct polarities.
Always remember to dispose of used batteries in an environmental friendly way.

natural_image
Three-step diagram showing a battery inside a cylindrical device, with arrows indicating direction of movement (no text or symbols present)Connecting the Aerial and VCR

Connecting cables are not supplied.
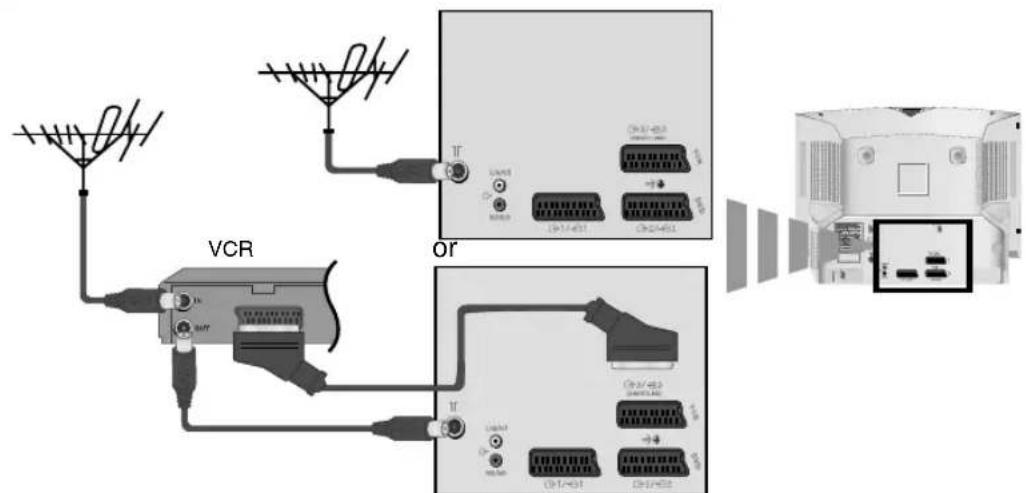
Scart lead is optional

For more details of VCR connection, please refer to the section "Connecting Optional Equipment" of this instruction manual.
The first time you switch on your TV, a sequence of menu screens appear on the TV enabling you to: 1) choose the language of the menu screen, 2) choose the country in which you wish to operate the TV, 3) adjust the picture slant 4) search for and store all available channels (TV Broadcasts) and 5) change the order in which the channels (TV Broadcasts) appear on the screen. However, if you need to change any of these settings at a later date, you can do that by selecting the appropriate option in the ☑ (Set Up menu) or by pressing the Auto Start Up Button ▶ on the TV set.
1 Connect the TV plug to the mains socket (220-240V AC, 50Hz).
Press the ☐on/off button on the TV set to turn on the TV. The first time you switch on the TV, a Language menu appears automatically on the TV screen.

2 Press the ↓ or ↑ button on the remote control to select the language, then press the OK button to confirm your selection. From now on all the menus will appear in the selected language.


3 The Country menu appears automatically on the TV screen. Press the ↓ or ↑ button to select the country in which you will operate the TV set, then press the OK button to confirm your selection.
- If the country in which you want to use the TV set does not appear in the list, select “-” instead of a country.
- In order to avoid wrong teletext characters for Cyrillic languages we recommend you select Russia as the country if your own country does not appear in the list.


4 Because of the earth's magnetism, the picture might slant. The Picture Rotation menu allows you to correct the picture slant if it is necessary.
a) If it is not necessary, press the ↓ or ↑ button to select Not necessary and press OK.
b) If it is necessary, press the ↓ or ↑ button to select Adjust now, then press OK and correct any slant of the picture between -5 and +5 by pressing the ↓ or ↑ button. Finally press OK to store.


continued...
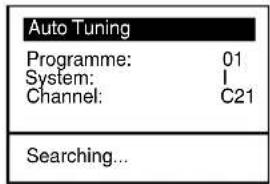
5 The Auto Tuning menu appears on the screen. Press the OK button to select Yes.
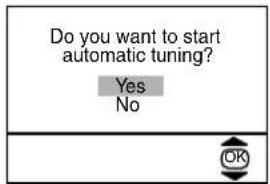

6 The TV starts to automatically search and store all available broadcast channels for you.

This procedure could take some minutes. Please be patient and do not press any buttons, otherwise the automatic tuning will not be completed.

If no channels were found during the auto tuning process then a new menu appears automatically on the screen asking you to connect the aerial. Please connect the aerial (see page 6) and press OK. The auto tuning process starts again.


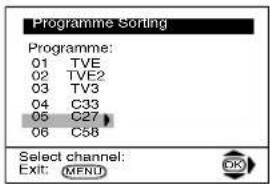
7 After all available channels are captured and stored, the Programme Sorting menu appears automatically on the screen enabling you to change the order in which the channels appear on the screen.
a) If you wish to keep the broadcast channels in their tuned order, go to step 8.
b) If you wish to store the channels in a different order:
1 Press the ↓ or ↑ button to select the programme number that has the channel (TV Broadcast) you wish to rearrange, then press the ➤ button.
2 Press the ↓ or ↑ button to select the new programme number position for your selected channel (TV Broadcast), then press the ← button.
3 Repeat steps b)1 and b)2 if you wish to change the order of the other channels.


8 Press the MENU button to remove the menu from the screen.
MENU


Your TV is now ready for use.

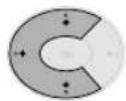
Your TV uses an on-screen menu system to guide you through the operations. Use the following buttons on the Remote Control to operate the menu system:
1 Press the MENU button to switch the first level menu on.
MENU

2 • To highlight the desired menu or option, press ↓ or ↑ button.
- To enter to the selected menu or option, press →.
- To return to the last menu or option, press ←.
- To alter the settings of your selected option, press ↓/↑/← or →.
- To confirm and store your selection, press the OK button.

3 Press the MENU button to remove the menu from the screen.
MENU

GB
Menu Guide
Level 1 Level 2 Level 3 / Function

PICTURE ADJUSTMENT
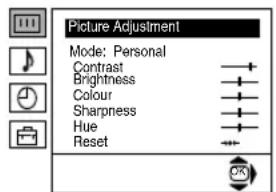
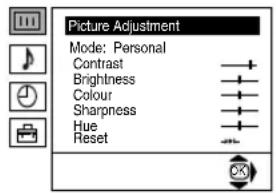
The “Picture Adjustment” menu allows you to alter the picture adjustments.
To do this:
After selecting the item you want to alter press the ➤ button, then repeatedly press the ↓/↑/← or ➤ buttons to make any adjustments and finally press the OK button to store.
This menu also allows you to customise the picture mode based on the programme you are watching:
↓ Personal (for individual settings)
Live (for live broadcast programmes, DVD and Digital Set Top Box receivers).
↓ Movie (for films).
- Brightness, Colour and Sharpness can only be altered if "Personal" mode is selected.
- Hue is only available for NTSC colour signal (e.g: USA video tapes).
- Select Reset and press the OK button to return the picture settings to their factory preset levels.
Introducing and Using the Menu System
Level 1 Level 2 Level 3 / Function
Mode: Personal
Contrast
Brightness
Brightness Colour
Colour Shavvance
Sharpness
Hue Reset
OK
Effect: Natural
Treble
Bass
Balance
Balance Report
Reset Dual Sound: Mono
Dual Sound: Mo Auto volume: On
Effect: Natural
Treble
Bass
Balance
Dalian Bongi
Reset
Dual Sound: Mono
Auto volume:
OK
SOUND ADJUSTMENT
The "Sound Adjustment" menu allows you to alter the sound settings.
To do this:
After selecting the item you want to alter press the ➤ button, then repeatedly press the ↓/↑/← or ➤ buttons to make any adjustments and finally press the OK button to store.
| Effect | Natural: | Enhances clarity, detail and presence of sound by using the “BBE High Definition Sound system”*. | |
| Dynamic: | “BBE High Definition Sound system”* intensifies clarity and presence of sound for better intelligibility and musical realism. | ||
| Dolby**Virtual: | Simulates the sound effect of “Dolby Surround Pro Logic”. | ||
| Off: | Flat response. |
| Treble | → | ← Less | → More |
| Bass | → | ← Less | → More |
| Balance | → | ← Left | → Right |
Reset κ Resets the sound to the factory preset levels.
Dual Sound → • For a stereo broadcast:
↓ Mono.
↓ Stereo.
- For a bilingual broadcast:
↓ Mono (for mono channel if available).
↓ A (for channel 1).
↓ B (for channel 2).
Auto Volume→ ↓ Off: volume level changes according to the broadcast signal.
On: volume level of the channels will stay the same, independent of the broadcast signal (e.g. in the case of advertisements).
- If you are listening to the TV through headphones, the "Effect" option is automatically switched to "Off".
- If you select “Dolby Virtual” in the “Effect” option, the “Auto Volume” option is automatically switched to “Off” and vice versa.
* The “BBE High Definition Sound system” is manufactured by Sony Corporation under license from BBE Sound, Inc. It is covered by U.S. Patent No. 4,638,258 and No. 4,482,866. The word “BBE” and BBE Symbol are trademarks of BBE Sound, Inc.
**This TV has been designed to create the “Dolby Surround” sound effect by simulating the sound of four speakers with only two speakers, when the broadcast audio signal is Dolby Surround encoded. The sound effect can also be improved by connecting a suitable external amplifier (for details refer to “Connecting to external audio Equipment” on page 20).
**Manufactured under license from Dolby Laboratories. "Dolby", "Pro Logic" and the double-D symbol are trademarks of Dolby Laboratories.
Level 1 Level 2 Level 3 / Function


SLEEP TIMER
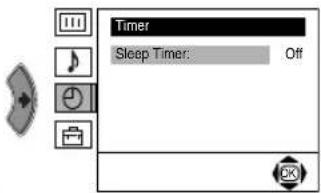
The "Sleep Timer" option in the "Timer" menu allows you to select a time period for the TV to automatically switch itself into the standby mode.
To do this:
After selecting the option, press the → button then press the ↓ or ↑ button to set the time period delay (max. of 4 hours) and finally press the OK button to store.
- While watching the TV, you can press the Ⓗ button on the remote control to display the time remaining.
- One minute before the TV switches itself into standby mode, the time remaining is displayed on the TV screen automatically.
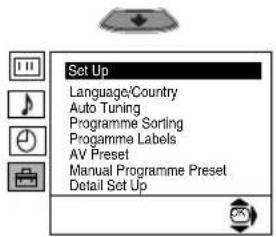
LANGUAGE / COUNTRY
The "Language/Country" option in the "Set Up" menu allows you to select the language in which the menus are displayed. It also allows you to select the country in which you wish to operate the TV set.
To do this:
After selecting the option, press the ➤ button then proceed in the same way as in the steps 2 and 3 of the section "Switching On the TV and Automatically Tuning" on page 7.




AUTO TUNING
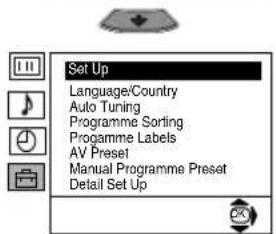
The "Auto Tuning" option in the "Set Up" menu allows you to automatically search for and store all available TV channels.
To do this:
After selecting the option, press the ➤ button then proceed in the same way as in TV steps 5 and 6 of the section "Switching On the TV and Automatically Tuning" on page 8.
Level 1 Level 2 Level 3 / Function


PROGRAMME SORTING
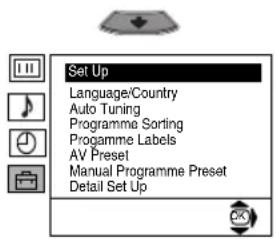
The “Programme Sorting” option in the “Set Up” menu allows you to change the order in which the channels (TV Broadcasts) appear on the screen.
To do this:
After selecting the option, press the ➤ button then proceed in the same way as in step 7 b) of the section "Switching On the TV and Automatically Tuning" on page 8.


PROGRAMME LABELS
The “Programme Labels” option in the “Set Up” menu allows you to name a channel using up to five characters (letters or numbers).
To do this:
1 After selecting the option, press the ➤ button, then press the ↓ or ↑ buttons to select the programme number of the channel you wish to name.
2 Press the ➔ button. With the first element of the Label column highlighted, press the ↓ or ↑ buttons to select a letter or number (select “-” for a blank), then press the ➔ button to confirm the character. Select the other four characters in the same way. Finally press the OK to store.


AV PRESET
The “AV Preset” option in the “Set Up” menu allows you to designate a name to the external equipment you have connected to the sockets of this TV.
To do this:
1 After selecting the option, press the ➤ button, then press the ↓ or ↑ buttons to select the input source you wish to name (AV1, AV2 and AV3 represent the rear Scart sockets and AV4 is for the side connectors). Then press the ➤ button to confirm.
2 A predefined label automatically appears in the label column:
a) If you want to use one of the 6 predefined labels (CABLE, GAME, CAM, DVD, VIDEO or SAT), press the ↓ or ↑ buttons to select the desired label, then press the OK button to store.
b) If you want to set a different label, select Edit and press the ➤ button. Then with the first element highlighted, press the ↓ or ↑ buttons to select a letter, number or “-” for a blank, then press the ➤ button to confirm the character. Select the other four characters in the same way. Finally press the OK button to store.
continued...
Level 1 Level 2 Level 3 / Function

MANUAL PROGRAMME PRESET
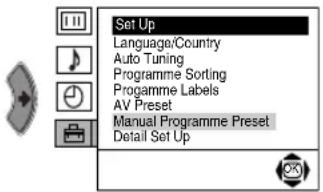
The “Manual Programme Preset” option in the “Set Up” menu allows you to:
a) Preset channels or the VCR channel one by one to the programme order of your choice.
To do this:
1 After selecting the "Manual Programme Preset" option, press the ➤ button then with Programme option highlighted press the ➤ button.
Press the ↓ or ↑ buttons to select which programme number you want to preset the channel to (for VCR, select programme number "0"). Then press the ← button.
2 The availability of this option depends on the country you have selected in the "Language/Country" menu.
After selecting the System option, press the ➤ button. Then press the ↓ or ↑ buttons to select the TV Broadcast system (B/G for western European countries or D/K for eastern European countries). Press the ← button.
3 After selecting the Channel option, press the ➤ button. Then press the ↓ or ↑ buttons to select the channel tuning ("C" for terrestrial channels or "S" for cable channels). Next press the ➤ button. After that, press the numbered buttons to directly enter the channel number of the TV Broadcast or the VCR channel. If you do not know the channel number, press the ↓ or ↑ buttons to search for it. When you have tuned to the desired channel, press the OK button twice to store.
Repeat all the above steps to tune and store more channels.
b) Label a channel using up to five characters.
To do this:
After highlighting the Programme option, press the PROG +/- button to select the programme number of the channel you wish to name. When the programme you want to name appears on the screen, select the Label option and press the ➤ button. Next press the ↓ or ↑ buttons to select a letter, number or “-” for a blank. Press the ➤ button to confirm the character. Select the other four characters in the same way. After selecting all the characters, press the OK button twice to store.
continued...
Level 1 Level 2 Level 3 / Function

flowchart
graph TD
    A["Picture Adjustment"] --> B["Set Up"]
    B --> C["Set Up"]
    A --> D["Language/Country"]
    A --> E["Auto Tuning"]
    A --> F["Programme Sorting"]
    A --> G["Programme Labels"]
    A --> H["AV Preset"]
    A --> I["Manual Programme Preset"]
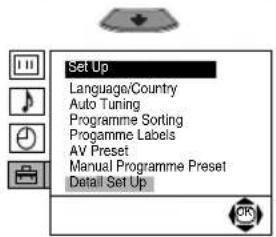
    A --> J["Detail Set Up"]
c) Manually fine tune the TV to obtain a better picture reception if the picture is distorted. Normally the automatic fine tuning (AFT) is in operation, but you can alter it manually.
To do this:
Whilst watching the channel (TV Broadcast) you wish to fine tune, select the AFT option and press the button. Next press the or buttons to adjust the fine tuning between -15 and +15. Finally press the OK button twice to store.
d) Skip any unwanted programme numbers when they are selected with the PROG +/- buttons.
To do this:
After highlighting the Programme option, press the PROG +/- button to select the programme number you want to skip. When the programme you want to skip appears on the screen, select the Skip option and press the → button. Next press the ↓ or ↑ buttons to select Yes. Finally press the OK button twice to confirm and store.
To cancel this function later on select "No" instead of "Yes" in the step above.
e) View and record scrambled channels when using a decoder connected directly to the Scart socket 3/3 or through a VCR.
The availability of this option depends on the country you have selected in the "Language/Country" menu.
To do this:
Select the Decoder option and press the ➤ button. Next press the ↓ or ↑ buttons to select On. Finally press the OK button twice to confirm and store.
To cancel this function later on, select "Off" instead of "On" in the step above.
continued...
Level 1 Level 2 Level 3 / Function

flowchart
graph TD
    A["Picture Adjustment"] --> B["Mode: Personal"]
    B --> C["Contrast"]
    C --> D["Brightness"]
    D --> E["Colour"]
    E --> F["Sharpness"]
    F --> G["Hue"]
    G --> H["Reset"]
    I["Set Up"] --> J["Language/Country"]
    J --> K["Auto Tuning"]
    K --> L["Programme Sorting"]
    L --> M["Programme Labels"]
    M --> N["AV Preset"]
    N --> O["Manual Programme Preset"]
    O --> P["Detail Set Up"]
    Q["Detail Set Up"] --> R["Auto format: On"]
    Q --> S["Noise Reduction: Auto"]
    Q --> T["AV3 output: TV"]
    Q --> U["TV speakers: On"]
    Q --> V["RGB Centring: 0"]
    Q --> W["Picture Rotation: 0"]
AUTO FORMAT
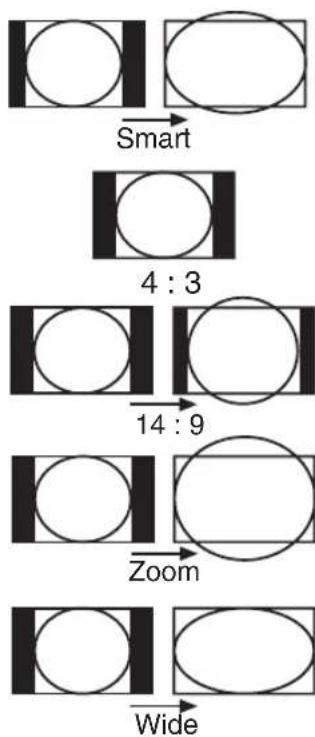
The "Auto Format" option in the "Detail Set Up" menu allows you to automatically change the aspect ratio of the screen.
To do this:
After selecting the option, press the ➤ button. Then press the ↓ or ↑ buttons to select On (if you wish the TV set to automatically switch to the screen format used on the broadcast signal) or Off (if you wish to keep your preference). Finally press the OK button to store.

Even if you have selected "On" or "Off" in the "Auto Format" option, you can always modify the format of the screen by pressing repeatedly on the remote control to select one of the following formats.
flowchart
graph TD
    A["Grid with circles"] -->|Smart| B["Grid with circles"]
    B --> C["Grid with circles"]
    C --> D["Grid with circles"]
    D --> E["Zoom"]
    E --> F["Grid with circles"]
    F --> G["Wide"]
Smart: Imitation of wide screen effect for 4:3 broadcasts.
4:3: Conventional 4:3 picture size, full picture information.
14:9: Compromise between 4:3 and 16:9 picture size
Zoom: Widescreen format for letterbox movies
Wide: For 16:9 broadcast. Full picture information

In "Smart", "Zoom" and "14:9" modes, a part of the top and bottom of the screen are cut off. Press the ↓ or ↑ buttons to adjust the position of the image on the screen (to read subtitles for example).
Level 1 Level 2 Level 3 / Function


NOISE REDUCTION
The "Noise Reduction" option in the "Detail Set Up" menu allows you to automatically reduce any picture noise visible in the broadcast signal.
To do this:
After selecting the option, press the ➤ button. Then press the ↓ or ↑ buttons to select Auto. Finally press the OK button to confirm and store.
To cancel this function later on, select "Off" instead of "Auto" in the step above.

AV3 OUTPUT
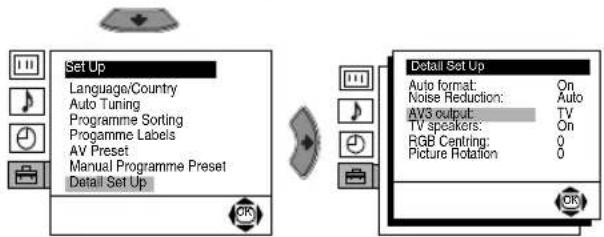
The "AV3 Output" option in the "Detail Set Up" menu allows you to select the source to be output from the Scart connector 3/3 so you can record from this Scart any signal coming from the TV or from external equipment connected to Scart connectors 1/1 or 2/2 or the side connectors 4 or 4 and 4.

If your VCR supports Smartlink, this procedure is not necessary.
To do this:
After selecting the option, press the ▶ button. Then press the ▼ or ↑ buttons to select the desired output signal: TV, AV1, AV2, AV4, YC4 or AUTO.

If you select "AUTO", the output signal will always be the same one that is displayed on the screen.

If you have connected a decoder to the Scart socket 3/3 or to a VCR connected to that Scart socket, please remember to set the "AV3 Output" to "AUTO" or "TV" for correct unscrambling.


TV SPEAKERS
The "TV Speakers" option in the "Detail Set Up" menu allows you to mute the TV speakers in order to listen to the TV from an external amplifier connected to the audio outputs on the rear of the TV set.
To do this:
After selecting the option, press the ➤ button. Then press the ↓ or ↑ buttons to select Off. Finally press the OK button to confirm and store.
To cancel this function later on, select "On" instead of "Off" in the step above.
continued...
Level 1 Level 2 Level 3 / Function


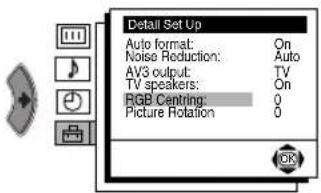
RGB CENTRING
When connecting an RGB source, such as a "PlayStation", you may need to readjust the horizontal position of the picture. In that case, you can readjust it using the "RGB Centring" option in the "Detail Set Up".
To do this:
While watching an RGB source select the "RGB Centring" option and press the button. Then press the or buttons to adjust the centre of the picture between -10 and +10. Finally press the OK button to confirm and store.


PICTURE ROTATION
Because of the earth's magnetism, the picture might slant. If this is the case, you can correct the pictures slant by using the option "Picture Rotation" in the "Detail Set Up" menu.
To do this:
After selecting the option, press the ➤ button. Then press the ↓ or ↑ buttons to correct any slant of the picture between -5 and +5 and finally press the OK button to store.

Teletext is an information service transmitted by most TV stations. The index page of the teletext service (usually page 100) gives you information on how to use the service. To operate teletext, use the remote control buttons as indicated below.

Teletext errors may occur if you use a channel (TV Broadcast) with a weak signal.
To Switch on Teletext:
After selecting the TV channel which carries the teletext service you wish to view, press the button.
To Select a Teletext page:
Input the 3 digits of the page number, using the numbered buttons.
- If you have made a mistake, retype the correct page number. - If the counter on the screen continues searching, it is because the page is not available.
In that case, input another page number.

To access the next or preceding page:
Press PROG + (≡) or PROG - (≡) buttons.
To superimpose teletext onto the TV:
Whilst you are viewing teletext, press the ☐ button. Press again to cancel teletext mode.
To freeze a teletext page:
Press the ↕ button. Press again to cancel freeze.
To reveal concealed information (e.g: answer to a quiz):
Press the ⓘ/☐ button. Press again to conceal the information.
To select a sub page:
A teletext page may consist of several sub pages. In this case the page number that appears on the upper left corner changes colour from yellow to green, and one or more arrows will appear next to the page number. Repeatedly press the or buttons on the remote control to watch the desired sub page.
To Switch Off Teletext:
Press the button.
Fastext

The Fastext service lets you access pages with one button push.
While you are in Teletext mode and providing Fastext is broadcast, a colour coded menu appears at the bottom of the teletext page. Press one of the coloured buttons (red, green, yellow or blue) to access the corresponding page.

Using the following instructions you can connect a wide range of optional equipment to your TV set. (Connecting cables are not supplied).
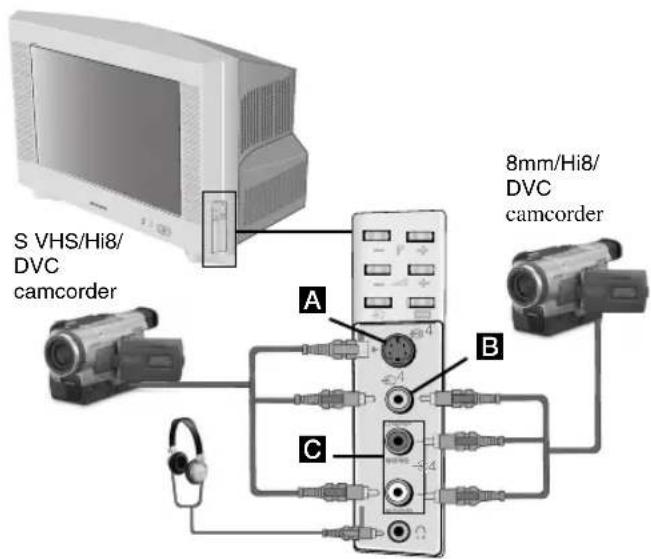

When you connect the headphones, the TV speakers will automatically be muted.
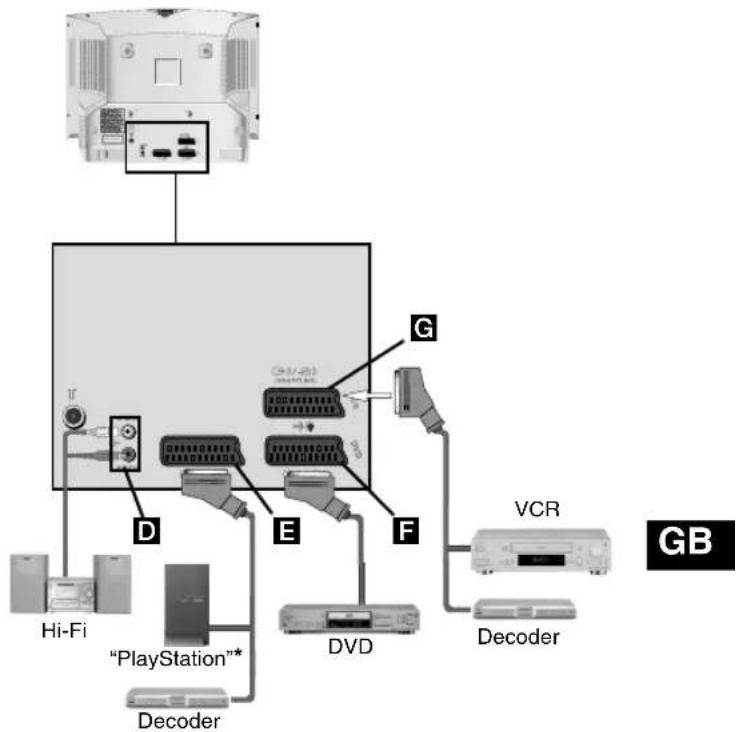
* "PlayStation" is a product of Sony Computer Entertainment, Inc.
* "PlayStation" is a trademark of Sony Computer Entertainment, Inc.

• To avoid picture distortion, do not connect external equipment to connectors A and B at the same time.
- Do not connect a Decoder to the Scart connector F.
- Games that use a “gun” attachment to point at the screen do not work correctly due to the 100Hz technology used in this television
Connecting a VCR:
To connect a VCR, please refer to the section "Connecting the aerial and VCR" of this instruction manual. We recommend you connect your VCR using a Scart lead. If you do not have a Scart lead, tune in the VCR test signal to the TV programme number "0" by using the "Manual Programme Preset" option. (for details of how to manually programme these presets, see page 13, step a).
Refer to your VCR instruction manual to find out the output channel of your VCR.
Connecting a VCR that supports Smartlink:

Smartlink is a direct link between the TV set and the VCR. For more information on Smartlink, please refer to the instruction manual of your VCR.
If you use a VCR that supports Smartlink, please connect the VCR by using a Scart lead to the Scart socket 3/3
continued...
Connecting to external Audio Equipment:
Plug in your Hi-Fi equipment to the audio output sockets D if you wish to amplify the audio output from your TV. Next, using the menu system, select the "Set Up" menu. Enter the "Detail Set Up" menu and set "TV Speakers" to "Off".
The audio level of the external speakers can be modified by pressing the volume buttons on the remote control. Also, treble and bass settings can be modified through the "Sound Adjustment" menu.
To enjoy "Dolby Virtual" sound effect through your Hi-Fi equipment:
Place the speakers of your equipment in front of your sitting position and besides the TV set, but keeping a distance of 50 cm from each speaker to the TV set.
Then, using the menu system, select the menu "Sound Adjustment", and select "Dolby Virtual" on the "Effect" option.


Using optional Equipment
1 Connect your equipment to the designated TV socket, as indicated in the previous page.
2 Switch on the connected equipment.
3 To watch the picture from the connected equipment, press the ⏻ button repeatedly until the correct input symbol appears on the screen.
Symbol Input Signals
1 • Audio/video input signal through the Scart connector E.
-1 RGB input signal through the Scart connector E. This symbol appears only if a RGB source has been connected.
2 Audio/video input signal through the Scart connector F.
-2 RGB input signal through the Scart connector F. This symbol appears only if a RGB source has been connected.
3 Audio/video input signal through the Scart connector G.
3 S Video Input signal through the Scart connector G. This symbol appears only if a S Video source has been connected.
4 • Video input signal through the phono socket B and Audio input signal through phono socket C.
- S Video Input signal through the front S Video input jack A and Audio signal through phono socket C. This symbol appears only if a S Video source has been connected.
4 Press the button on the remote control to return to the normal TV picture.
For Mono Equipment
Connect the phono plug to the L/G/S/I socket on the side of the TV and select 4 or 4 input signal using the instructions above. Finally, refer to the "Sound Adjustment" section of this manual and select "Dual Sound" "A" on the sound menu screen.
TV system:
Depending on your country selection:
B/G/H. D/K
Colour system:
PAL, SEČAM
NTSC 3.58, 4.43 (only Video In)
Channel Coverage:
VHF: E2-E12
UHF: E21-E69
CATV: S1-S20
HYPER: S21-S41
D/K R1-R12, R21-R69
Picture Tube:
Flat Display FD Trinitron WIDE:
32" (approx. 82 cm. measured diagonally)
Rear Terminals:
1/-23-pin scart connector (CENELEC standard) including audio/video input, RGB input, TV audio/video output.
2/-23-pin scart connector (CENELEC standard) including audio/video input, RGB input, monitor audio/video output.
3/23-pin Scart connector (CENELEC (SMARTLINK)standard) including audio / video input, S video input, selectable audio / video output and Smartlink interface.
G Audio outputs (Left/Right) - phono jacks
Side Terminals:
4 S Video input - 4 pin DIN
4 video input – phono jack
- 4 audio input – phono jacks
headphones jack
Sound Output:
2 x 14 W (music power)
2 x 7 W (RMS)
Power Consumption:
102 W
Standby Power Consumption:
0.4 W
Dimensions (w x h x d):
Approx. 933 x 562 x 572 mm.
Weight:
Approx. 60 Kg.
Accessories supplied:
1 Remote Control (RM-947)
2 Batteries (IEC designated, AA/R6 size)
Other features:
- 100Hz picture
- Teletext, Fastext, TOPtext (250 page Text memory)
- Sleep Timer
- Smartlink (direct link between your TV set and a compatible VCR. For more information on Smartlink, please refer to the Instruction Manual of your VCR)
- Dolby Virtual
• BBE - Autoformat
Design and specifications are subject to change without notice
Ecological Paper - Totally Chlorine Free

Disposal of Old Electrical & Electronic Equipment (Applicable in the European Union and other European countries with separate collection systems)
This symbol on the product or on its packaging indicates that this product shall not be treated as household waste. Instead it shall be handed over to the applicable collection point for the recycling of electrical and electronic equipment. By ensuring this product is disposed of correctly, you will help prevent potential negative consequences for the environment and human health, which could otherwise be caused by inappropriate waste handling of this product. The recycling of materials will help to conserve natural resources. For more detailed information about recycling of this product, please contact your local city office, your household waste disposal service or the shop where you purchased the product.

Here are some simple solutions to problems which may affect the picture and sound.
| Problem Suggested Remedy | |
| No picture (screen is dark), and no sound. • Check the aerial connection.• Plug the TV in and press the Button on the front of the TV.• If the standby indicator is on press the button or a numbered button on the remote control. | |
| Poor or no picture (screen is dark), but good sound. | • Using the MENU system, select the “Picture Adjustment” display and select “RESET” to return to the factory settings. |
| No picture or menu information from equipment connected to the Scart socket. | • Check that the optional equipment is on, and press the Button of the remote control repeatedly until the correct input symbol is displayed on screen. |
| Good picture, no sound. • Press the button on the remote control• Check that “TV Speakers” is “On” in the “Detail Set Up” menu.• Check the Headphones are not connected. | |
| No colour on colour programmes. • Using the MENU system, select the “Picture Adjustment” and select “RESET” to return to the factory settings. | |
| Distorted picture when changing programmes or selecting Teletext. | • Turn off any equipment connected to the scart connectors on the rear of the TV. |
| Wrong characters appear when viewing teletext. | • Using the menu system, display the “Language/ Country” menu and select the country in which you are operating the TV set. |
| Picture slanted. • Using the menu system, select the “Picture Rotation” option in the “Detail Set Up” menu to correct the picture slant. | |
| Snowy picture when viewing a TV channel. • Using the menu system, select the “Manual Programme Preset” menu and adjust Fine Tuning (AFT) to obtain better picture reception.• Using the menu system, select the “Noise Reduction” option in the “Detail Set Up” menu and select “Auto” to reduce the noise in the picture. | |
| No unscrambled picture whilst viewing un unscrambled channel with a decoder connected through the scart connector 3/3. | • Using the menu system, display the “Set Up” menu. Then select the “Detail Set Up” option and set “AV3 Output” to “TV”.• Check that the decoder is not connected to the 2/3-2 scart socket. |
| Remote control does not function. • Replace the batteries. | |
| The standby indicator on the TV flashes. • Contact your nearest Sony service centre. | |
- If you continue to have problems, have your TV serviced by qualified personnel.
- NEVER open the casing yourself.
natural_image
Three-step diagram showing a cylindrical device with internal components and directional arrows indicating movement (no text or symbols)natural_image
Three-step diagram showing a cylindrical device with internal components and arrows indicating direction (no text or symbols)natural_image
Three-step diagram showing a cylindrical device with internal components and an arrow indicating direction (no text or symbols)natural_image
Three-step diagram showing a battery inside a cylindrical device, with arrows indicating direction of movement (no text or symbols present)natural_image
Three-step diagram showing a battery inside a cylindrical device, with arrows indicating direction of movement (no text or symbols present)natural_image
Three-step diagram showing a battery inside a cylindrical device, with arrows indicating direction of movement (no text or symbols present)Pripojenie antény a videorekordéra

flowchart
graph TD
    A["Grid with circles"] -->|Smart| B["Grid with circles"]
    B --> C["Grid with circles"]
    C --> D["Grid with circles"]
    D --> E["Zoom"]
    E --> F["Grid with circles"]
    F --> G["Wide"]
AUTO FORMÁT
Prepnutie na teletext:
Pribl. 933 x 562 x 572 mm.
Hmotnost':
Pribl. 60 kg.
natural_image
Line drawing of two figures assembling a car chassis (no text or symbols)

- FD Trinitron WEGA WIDE Colour Television
- Operating Instructions
- GB
- BG
- Thank you for choosing this Sony FD Trinitron Colour Television.
- Table of Contents
- Overview
- Installation
- First Time Operation
- Menu system
- Additional Information
- Inserting Batteries into the Remote Control
- Connecting the Aerial and VCR
- Menu Guide
- PICTURE ADJUSTMENT
- To do this:
- Introducing and Using the Menu System
- Level 1 Level 2 Level 3 / Function
- SOUND ADJUSTMENT
- SLEEP TIMER
- LANGUAGE / COUNTRY
- AUTO TUNING
- PROGRAMME SORTING
- PROGRAMME LABELS
- AV PRESET
- MANUAL PROGRAMME PRESET
- AUTO FORMAT
- NOISE REDUCTION
- AV3 OUTPUT
- TV SPEAKERS
- RGB CENTRING
- PICTURE ROTATION
- To Switch on Teletext:
- To Select a Teletext page:
- To access the next or preceding page:
- To superimpose teletext onto the TV:
- To freeze a teletext page:
- To reveal concealed information (e.g: answer to a quiz):
- To select a sub page:
- To Switch Off Teletext:
- Fastext
- Connecting a VCR:
- Connecting a VCR that supports Smartlink:
- Connecting to external Audio Equipment:
- To enjoy "Dolby Virtual" sound effect through your Hi-Fi equipment:
- Using optional Equipment
- Symbol Input Signals
- For Mono Equipment
- TV system:
- Colour system:
- Channel Coverage:
- Picture Tube:
- Rear Terminals:
- Side Terminals:
- Sound Output:
- Power Consumption:
- Standby Power Consumption:
- Dimensions (w x h x d):
- Weight:
- Accessories supplied:
- Other features:
- Ecological Paper - Totally Chlorine Free
- Disposal of Old Electrical & Electronic Equipment (Applicable in the European Union and other European countries with separate collection systems)
- Pripojenie antény a videorekordéra
- AUTO FORMÁT
- Prepnutie na teletext:
- Hmotnost':
Brand : SONY
Model : KV-32CS71K
Category : Television