SDLT 1500 A1 DOUBLE LONG SLOT TOASTER - Toaster SILVERCREST - Free user manual and instructions
Find the device manual for free SDLT 1500 A1 DOUBLE LONG SLOT TOASTER SILVERCREST in PDF.
| Product type | Double long slot toaster |
| Brand | SILVERCREST |
| Model | SDLT 1500 A1 |
| Power supply | 220 - 240 V ~ 50 Hz |
| Rated power | 1300 - 1500 W |
| Number of slots | 2 long slots |
| Main functions | Toasting, reheating, defrosting, auto shut-off, lift function |
| Browning control | 7 electronic levels (from light to dark) |
| Automatic bread centering | Yes |
| Pause/Stop | Stop button |
| Included accessories | Roll baskets, removable crumb tray |
| Cleaning and maintenance | Clean the exterior with a damp cloth; empty the crumb tray regularly |
| Safety | Automatic shut-off, do not immerse in water, do not insert metal objects |
| Storage | Cool and dry place; wrap the cord around the base |
| Warranty | 3 years |
| Customer service | GB DES UK LTD (United Kingdom), Kompernass Service (other countries) |
| Importer | KOMPERNASS GMBH, BURGSTRASSE 21, 44867 BOCHUM, GERMANY |
Frequently Asked Questions - SDLT 1500 A1 DOUBLE LONG SLOT TOASTER SILVERCREST
User questions about SDLT 1500 A1 DOUBLE LONG SLOT TOASTER SILVERCREST
0 question about this device. Answer the ones you know or ask your own.
Ask a new question about this device
Download the instructions for your Toaster in PDF format for free! Find your manual SDLT 1500 A1 DOUBLE LONG SLOT TOASTER - SILVERCREST and take your electronic device back in hand. On this page are published all the documents necessary for the use of your device. SDLT 1500 A1 DOUBLE LONG SLOT TOASTER by SILVERCREST.
USER MANUAL SDLT 1500 A1 DOUBLE LONG SLOT TOASTER SILVERCREST
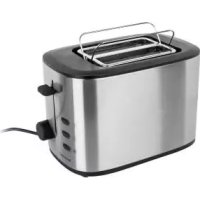
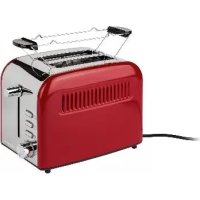
Double Long Slot Toaster SDLT 1500 A1
GB Double Long Slot Toaster
IE Operating instructions
SE Brödrost med länge, dubbla rosfack
Bruksanvisning
Leivänpaahdin
Käytöohje
DK Brødrister med to ristabninger
| Content | Page |
| Intended use | 2 |
| Technical Data | 2 |
| Items supplied | 2 |
| Operating Elements | 2 |
| Important safety instructions | 2 |
| Tips on usage | 3 |
| Before taking into use | 3 |
| Adjusting the level of browning (Toasting time) | 3 |
| Toasting | 3 |
| Interrupting the toasting process | 3 |
| Warming function | 4 |
| Thaw function | 4 |
| Crumb tray | 4 |
| Bread roll holder | 4 |
| Cleaning and Care | 4 |
| Storage | 5 |
| Disposal | 5 |
| Warranty and Service | 5 |
| Importer | 6 |
Read the operating instructions carefully before using the appliance for the first time and preserve this booklet for later reference. Pass the manual on to whomsoever might acquire the scale at a later date.
Double Long Slot Toaster
Intended use
This appliance is intended for the toasting of slices of bread, rolls and waffles in domestic environments. It is not intended for use with other foodstuffs, other materials or for use in commercial or industrial environments. Any other use, or alteration to the appliance, is regarded as contrary to the intended use and could increase the risk of accidents.
Technical Data
Power supply: 220 - 240V ~ 50 Hz
Nominal power: 1300 - 1500 W
Items supplied
Double Long Slot Toaster
Operating Instructions
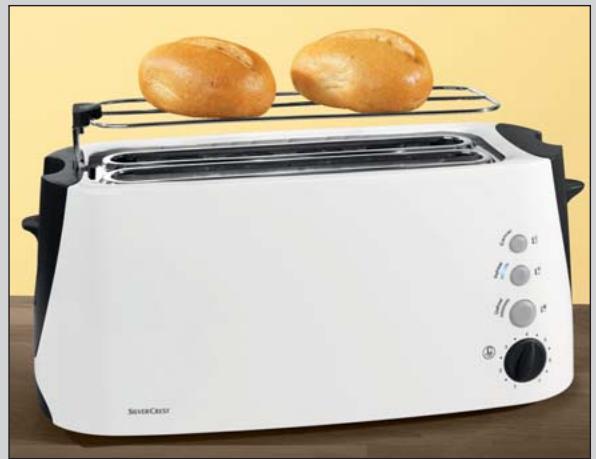
Operating Elements
1 Bread roll holder
Operator button
Stop button for interrupting the toasting process
4 Button for the warming function
5 Button for the thaw function
Browning regulator (electronic, for infinitely adjustable toasting time)
7 Crumb tray
Button for bread roll holder
9 Toast slot
To avoid potentially fatal risks through electric shock:
- NEVER insert cutlery or other metallic objects into the toaster slots.
- Ensure that the appliance never comes into contact with water when the power plug is inserted into a wall socket, especially if it is being used in a kitchen and close to the sink.
- Ensure that the power cable never becomes wet or moist when the appliance is in use. Lay the cable such that it does not get clamped or otherwise damaged.
- Arrange for defective power plugs and/or cables to be replaced immediately by qualified technicians or by our Customer Service Department.
After use, always remove the power plug from the wall socket, this prevents the unintentional switching on of the appliance.
To avoid the risks of fire or injury:
- The appliance can become hot when it is in use. Therefore, only touch the operating elements.
- Bakery products can burn! You should therefore NEVER locate the appliance close to or underneath inflammable objects, especially not under curtains or suspended cupboards.
- The appliance may not be used in close vicinity to flammable material.
- NEVER cover the toaster when it is in use.
- This appliance is not intended for use by individuals (including children) with restricted physical, physiological or intellectual abilities or deficiencies in experience and/or knowledge unless they are supervised by a person responsible for their safety or receive from this person instruction in how the appliance is to be used.
Children should be supervised in order to make sure that they do not play with the device. -
Operate the appliance only on a stable, non-slippery and level surface.
-
Do not use an external timing switch or a separate remote control system to operate the appliance.
- Unwind the power cable completely from the cable winder before using the appliance.
Tips on usage
- Toast mixed-flour breads at higher browning levels than white bread. Matured, dry bread browns faster than fresh bread.
- Avoid using slices that are too big or too thick, as these can easily become jammed in the appliance.
Attention:
In the event of a malfunction and when cleaning the appliance, remove the power plug from the wall socket. Risk of electrical shock!
- Loosen jammed slices of bread with a blunt wooden object (e.g. a wooden spatula or spoon). Do NOT touch the heater elements.
- Differences in bread sorts, moisture and the thickness of individual slices influence the browning of the toast. Bread for toasting should be kept in sealed packaging until required.
Before taking into use
Heat the appliance up at least five times, at the maximum setting, without insertion of bread slices. For details on cleaning the appliance read the section «Cleaning and Care».
Please take note:
The operator button 2 only engages when the power cable is connected to a power socket. With the first usage a slight smell may occur (minimal smoke development is also possible). This is normal and dissipates after a short time. Please provide for adequate ventilation.
Adjusting the level of browning (Toasting time)
The desired level of browning, from "light" (1) to "dark" (7), can be adjusted infinitely with the browning regulator 6 of theasting time electronics.
Take note that, dependant on the loading of the toaster, the browning level varies with an unchanged setting of the browning regulator 6! The fewer the number of slices inserted, the higher their level of browning. Therefore, always turn the browning regulator 6 down a little when inserting fewer slices.
Toasting
Attention:
NEVER cover the toasting slots when operating the toaster! There is a risk of fire! The appliance could become damaged!
After setting the desired browning level, place the bread into the toasting slots 9.
- Press the operator button ② downwards.
- The automatic bread centering device of the Toaster centres the bread inserted into the toasting slots 9.
- When the desired level of browning has been reached the toaster switches itself off automatically and the slices are ejected.
- The toaster has a lifting function, which makes it easier and safer for you to take the hot slices of toast from the TOASTING SLOTS. For this, slide the operator button ② upwards.
Interrupting the toasting process
If you wish to interrupt the toasting procedure, press the STOP button ③. The toaster switches itself off.
Warming function
The warming function 4 makes it possible for you to warm bread without browning it. For example, for toast that has gone cold. The bread is only briefly warmed. This function can be selected in the illuminated operating button display.
- Insert the bread and press the operator button 2 down.
- Activate the button for the warming function ④.
- The toaster switches itself off automatically and the bread slices are ejected.
Thaw function

Through activation of the thaw function ⑤ frozen bread can also be thawed. The toaster slowly warms the bread without browning it. This function can be selected in the illuminated operating button display.
- Insert the bread and press the operator button 2 down.
- Activate the button for the thaw function ⑤.
- The toaster switches itself off automatically and the bread slices are ejected.
Dependent on the setting of the browning level, the bread is either thawed or browned.
Crumb tray
When toasting, crumbs that fall from the bread are collected in the crumb tray 7. To empty it, please pull the crumb tray 7 out to the side.
Bread roll holder

- NEVER lay bread rolls directly onto the toaster, ALWAYS use the bread roll holder ①.
- Press the button for the bread roll holder ⑧ down until it is completely extended.
- Place the bread rolls onto the holder and start the toasting procedure. Set the browning regulator ⑥ to a maximum of level of 3.
① Place the rolls onto the bread roll holder ① so that they cannot fall through the holder. After toasting, the rolls will be very hot.
- As soon as the toaster switches itself off, turn the rolls to toast the other side of them then switch the toaster back on.
- Return the bread roll holder ① back into its starting position by sliding the button for the bread roll holder ⑧ back to the top.
Cleaning and Care
Warning!
Before cleaning, remove the power plug from the wall socket and allow the toaster to cool down. Risk of injury!

NEVER submerse the appliance in water or other liquids! The appliance could be irreparably damaged!
- Do not use aggressive or abrasive cleaning agents. These can damage the upper surfaces of the appliance.
- Clean the appliance housing only with a dry or lightly moistened cloth.
- To avoid the risk of fire, empty the crumb tray ⑦ at regular intervals.
Storage
- Store the toaster at a cool and dry location.
- Clean the appliance as described in the chapter "Cleaning and Care".
- Wrap the power cable around the cablewinder on the underside of the appliance.
Disposal

Under no circumstances may the appliance be disposed of with normal household waste. This appliance is subject to the European Guidelines 2002/96/EC.
Dispose of the appliance through an approved disposal centre or at your community waste facility. Observe the currently applicable regulations. In case of doubt, please contact your local waste disposal centre.

Dispose of packaging materials in an environmentally responsible manner.
Warranty and Service
The warranty for this appliance is for 3 years from the date of purchase. The appliance has been manufactured with care and meticulously examined before delivery. Please retain your receipt as proof of purchase. In the event of a warranty claim, please make contact by telephone with our Service Department. Only in this way can a post-free despatch for your goods be assured.
The warranty covers only claims for material and manufacturing defects, but not for transport damage, for wearing parts or for damage to fragile components, e.g. buttons or batteries. This product is for private use only and is not intended for commercial use. The warranty is void in the case of abusive and improper handling, use of force and internal tampering not carried out by our authorized service branch. Your statutory rights are not restricted in any way by this warranty.
The warranty period will not be extended by repairs made under warranty. This applies also to replaced and repaired parts. Any damage and defects extant on purchase must be reported immediately after unpacking the appliance, at the latest, two days after the purchase date. Repairs made after the expiration of the warranty period are subject to payment.
GB DES UK LTD
Tel.: 0871 5000 700 (£ 0.10 / minute)
e-mail: support.uk@kompernass.com
IE Kompernass Service Ireland
Tel.: 1850 930 412 (0,082 EUR/Min.)
Standard call rates apply. Mobile operators may vary.
e-mail: support.ie@kompernass.com
Cyt Kompernass Service Cyprus
Tel.: 800 944 01
e-mail: support.cy@kompernass.com
Importer
KOMPERNASS GMBH
BURGSTRASSE 21
44867 BOCHUM, GERMANY
www.kompernass.com