XL-BD601PH - Audio System SHARP - Free user manual and instructions
Find the device manual for free XL-BD601PH SHARP in PDF.

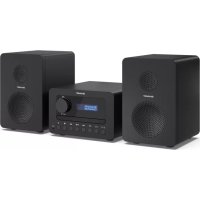
| Product type | Mini hi-fi system |
| Brand | SHARP |
| Model | XL-BD601PH |
| Dimensions (W x H x D) | Approx. 200 x 300 x 250 mm (main unit, estimate) |
| Weight | Approx. 4.5 kg (estimate) |
| Power supply | 220-240 V AC, 50/60 Hz |
| Power consumption | Approx. 50 W (estimate) |
| Audio output power | 2 x 30 W (estimate) |
| Speakers | 2-way, bass-reflex (estimate) |
| Disc player | CD, CD-R/RW |
| Tuner | FM/AM with RDS |
| Connectivity | Bluetooth, USB, auxiliary input (3.5 mm) |
| Functions | Radio, CD, USB, Bluetooth, clock, timer, equalizer |
| Remote control | Yes, included |
| Display | LCD screen |
| Maintenance and cleaning | Unplug before cleaning; use a soft dry cloth |
| Safety | Do not expose to water; do not open; dangerous laser radiation |
| Spare parts and repairability | No user-serviceable parts; contact a professional |
| General information | WEEE compliant disposal; separate batteries |
Frequently Asked Questions - XL-BD601PH SHARP
User questions about XL-BD601PH SHARP
0 question about this device. Answer the ones you know or ask your own.
Ask a new question about this device
Download the instructions for your Audio System in PDF format for free! Find your manual XL-BD601PH - SHARP and take your electronic device back in hand. On this page are published all the documents necessary for the use of your device. XL-BD601PH by SHARP.
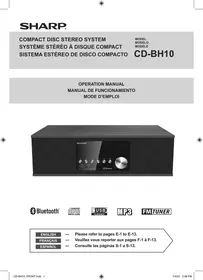
USER MANUAL XL-BD601PH SHARP
iPad, iPhone, iPod, iPod classic, iPod nano and iPod touch are trademarks of Apple Inc., registered in the U.S. and other countries.
Blu-ray

(2)
Blu-rayDisc

BLIVETM

dtshD
Master Audio | Essential

DIGITAL PLUS
DOLBY
TRUE:

layaTM
POWERED

HD MKV PLAYBACK

HIGH-DEFINITION MULTIMEDIA INTERFACE
AVCHD

VIDEO
USB
PLAYBACK


Hinweis:
This System can be used only where the power supply is AC 220-240V, 50/60Hz. It cannot be used elsewhere.
AC Power Lead Protection
To avoid any malfunctions of the unit, and to protect against electric shock, fire or personal injury, please observe the following.
- Hold the plug firmly when connecting or disconnecting the AC power lead.
- Keep the AC power lead away from heating appliances.
- Never put any heavy object on the AC power lead.
- Do not attempt to repair or reconstruct the AC power lead in any way.
- When the ON/STAND-BY button is set at STAND-BY position, mains voltage is still present inside the unit.
When the ON/STAND-BY button is set at STAND-BY position, the unit may be brought into operation by the timer mode or remote control.
Warning:
This unit contains no user serviceable parts. Never remove covers unless qualified to do so. This unit contains dangerous voltages, always remove mains plug from the socket before any service operation and when not in use for a long period.
När ON/STAND-BY-knappen er sat i STAND-BY positionen, er der stadig netspaending til stede i apparatet.
När ON/STAND-BY-knappen er sat i STAND-BY position, kan apparatet startes v.hj.a. timer-funktionen eller fjernbetjeningen.
Advarsel:
| ● Warning: To prevent fire or shock hazard, do not expose this appliance to dripping or splashing. No objects filled with liquids, such as vases, shall be placed on the apparatus. |
Use of controls, adjustments or performance of procedures other than those specified herein may result in hazardous radiation exposure.
As the laser beam used in this compact disc player is harmful to the eyes, do not attempt to disassemble the cabinet. Refer servicing to qualified personnel only.
VYSTRAHA: VYROBEK JE VYBAVEN LASEREM. PRI NESPRAVNÉ MANIPULACI S PRISTROJEM V ROZPORU S TÍMTO NÁVODEM MÜZE DOJIT K NEBEZPECNÉMU OZÁRENÍ. NEOTVÍREJTE A NESNIIMEJTE PROTO ZADNÉ KRYTY A PRISTROJ NEOPRAVUJTE. OPRAVU A SERVIS SVÉRTE ODBORNÉMU SERVISU.
VYSTRAHA: VYROBOK JE VYBAVENY LASEROM. PRI NESPRAVNOM
MANIPULOVANI S PRISTROJOM V ROZPORES T YMTO
NAVODOM MOZE DOJST K NEBEZPECNEMU OZIARENIU.
NEODKRYVAJE PRETO ZIADNE KRYTYA PRISTROJ NEOPRAVUJE
OPRAVU A SERVIS PRENECHAJE ODBORNEMU SERVISU.
SA172WJ

CAUTION:CLASS 2 VISIBLE AND INVISIBLE LASER RADIATION WHEN OPEN. DO NOT STARE INTO THE BEAM. ACHTUNG:BE GOEFFNETER ABDECKING IST SIGHTBARE UND UNSICHTBARE LASER STRAHLING DER KLASKE.2 IM GERAETINEREN VORHANDEN.NICHT IN DEN STRAHL SEHEN. ATTENTION:RADIATIONS LASER VISIBLES ET INVISIBLES DE CLASSE 2 OUAND OUVERT. NE PAS REGARDER FIXEMENT LE FAISCEAU.
VARNING: KCLASS 2 SYNLIG OCH OSYNLIG LASERSTRALNING NAR DENNA DEL AR OPPNAD. TITA INTE IN I STRALEN.
HUOMO: AVATAESS OLE ALTJINA JAKNYVALLEJA NAKYMMATOLLLE LUOKAN2 LASERSATEILVLE.A LA KATO SATESEESN.
ADVARSE: KLASSE 2 SYNLYG OG USYNLIG LASERSTRALING HVIS DENNE DELEN APNES, STIRR IKK INN I STRALEN.
ADVARSEL: KLASSE 2 SYNLIG OS USYNLIG LASERSTRALING VED ABINGIK IG KIKE IND I STRALEN.
Information on Proper Disposal


Attention: Your product is marked with this symbol. It means that used electrical and electronic products should not be mixed with general household waste. There is a separate collection system for these products.
A. Information on Disposal for Users (private households)
1. In the European Union
Attention: If you want to dispose of this equipment, please do not use the ordinary dustbin!
Used electrical and electronic equipment must be treated separately and in accordance with legislation that requires proper treatment, recovery and recycling of used electrical and electronic equipment.
Following the implementation by member states, private households within the EU states may return their used electrical and electronic equipment to designated collection facilities free of charge*.
In some countries* your local retailer may also take back your old product free of charge if you purchase a similar new one.
*) Please contact your local authority for further details. If your used electrical or electronic equipment has batteries or accumulators, please dispose of these separately beforehand according to local requirements. By disposing of this product correctly you will help ensure that the waste undergoes the necessary treatment, recovery and recycling and thus prevent potential negative effects on the environment and human health which could otherwise arise due to inappropriate waste handling.
2. In other Countries outside the EU
If you wish to discard this product, please contact your local authorities and ask for the correct method of disposal.
For Switzerland: Used electrical or electronic equipment can be returned free of charge to the dealer, even if you don't purchase a new product. Further collection facilities are listed on the homepage of www.swico.ch or www.sens.ch.
B. Information on Disposal for Business Users
1. In the European Union
If the product is used for business purposes and you want to discard it:
Please contact your SHARP dealer who will inform you about the take-back of the product. You might be charged for the costs arising from take-back and recycling. Small products (and small amounts) might be taken back by your local collection facilities.
For Spain: Please contact the established collection system or your local authority for take-back of your used products.
2. In other Countries outside the EU
If you wish to discard of this product, please contact your local authorities and ask for the correct method of disposal.

Pb
Information on Battery Disposal
The battery supplied with this product contains traces of Lead. For EU: The crossed-out wheeled bin implies that used batteries should not be put to the general household waste! There is a separate collection system for used batteries, to allow proper treatment and recycling in accordance with legislation. Please contact your local authority for details on the collection and recycling schemes.
For Switzerland: The used battery is to be returned to the selling point. For other non-EU countries: Please contact your local authority for correct method of disposal of the used battery.
- XL-BD601PH BD Hi Fi Component System consisting of XL-BD601PH (main unit) and CP-BD601PH (speaker system).
Introduction
Thank you for purchasing this SHARP product. To obtain the best performance from this product, please read this manual carefully. It will guide you in operating your SHARP product.
Special Note:
Supp 10
MPEG Layer-3 audio coding technology licensed from Fraunhofer IIS and Thomson.
Accessories
The following accessories are included.
| Adaptors for iPhone x 3 | Remote control x 1 | “AAA” size battery (UM-4, R03, HP-16 or similar) x 2 | |||
| HDMI cable x 1 | FM aerial x 1 | Speaker wires x 2 | Stand for iPad x 1 | ||
CONTENTS
Introduction. 1
Special Note: 1
Accessories 1
Precautions 3
General 3
Volume control. 3
About Media Types 3
Blu-ray Disc 3
Types of Discs/Media Formats that Can Be Used with This Unit 3
Discs that Cannot Be Used with This Unit. 4
About Disc Contents 5
The Icons Used in This Operation Manual 5
Important Information. 6
Disc Precautions 6
License and Copyright 6
Controls and indicators 7
Front panel 7
Display 7
Speaker system 7
Speaker grilles are removable 7
Remote Control 8
System connections. 9
USB 1, USB 2 terminals and Video Out socket. 9
Aerial connection. 9
Speaker connection 9
Demonstration mode. 10
Connecting iPod or iPhone to TV 10
AC power connection 10
HDMI connection (TV, projector) 10
Connecting to an amplifier/AV receiver 10
Digital audio connection 11
Line input connection (TV, etc.) 11
Wired connection (LAN cable). 11
Broadband Internet Connection 11
Subwoofer pre-out connection 11
Remote control. 12
Battery installation. 12
Test of the remote control. 12
General control 12
Turning the Power On 12
Display brightness control. 12
Volume auto fade-in 12
Volume control. 12
Speaker output selection (HDMI connection) 12
Auto power on function 12
Auto power off function 12
Muting 12
X-Bass control. 12
Bass control 13
Treble control 13
Function Selector 13
Setting the clock (Remote control only) 13
Before StartingPlayback. 13
Language Setting 13
Operating a TV Using the Remote Control 13
To change the TV manufacturer setting 14
Using AQUOS LINK. 16
Audio Return Channel (ARC) (Audio Return Channel submenu). 16
Using 3D. 16
Control Panel. 17
Contents (continued)
Video/Picture/MusicPlayback 18
Loading a Disc. 18
BD/DVD Video Playback 18
BD/DVD Menus 18
Enjoying BONUSVIEW or BD-LIVE 19
DVD-R/-RW (VR format) / BD-RE/-R (BDAV format) Playback. 20
Audio CD Playback 21
Audio Data (MP3 File) Playback 21
Displaying Still Images (JPEG files) 22
Accessing DLNA servers 23
Playback Functions 24
Fast Forward/Reverse (Search) 24
Skipping to the Next or the Start of the Current Chapter (Track/Title).....24
Pause/Frame Advance Playback 24
SlowPlayback(Forward/Reverse) 24
RepeatPlaybackofaTitleorChapter(RepeatPlayback) 25
Partial Repeat Playback (Repeat Playback of a Specified Part) 25
Displaying the Audio Information 25
Switching Subtitles 25
Switching the Angle 25
Displaying the Angle Mark 26
Settings DuringPlayback 26
Function Control 26
Settings 27
Common operations 27
Setting the PIN code for the first time 27
Parental Control Setting 27
Audio Video Settings 27
Smart Settings. 28
AQUOSLINK 28
Playback Setting 28
On Screen Language 29
Version 29
System. 29
Communication Setup. 29
USB Memory Management 31
Software Update Settings 31
Playing back video on demand streaming content 34
Playing back YouTube content 34
Listening to the iPod, iPhone or iPad 34
iPod, iPhone and iPad connection (USB 2 only) 35
iPod, iPhone or iPad playback (USB 2) 35
iPhone playback 35
iPod and iPhone connection (Dock only) 35
To insert adaptor for iPod or iPhone 35
To remove adaptor for iPod or iPhone 35
iPod or iPhone playback (Dock only). 35
To disconnect iPod, iPhone or iPad 36
Watching videos on a TV connected to iPod or iPhone 36
Navigating the iPod, iPhone or iPad menus 36
Various iPod, iPhone and iPad functions 36
Listening to the radio 36
Tuning 36
Memorising a station 37
To recall a memorised station 37
To scan the preset stations. 37
To erase entire preset memory 37
Using the Radio Data System (RDS) 37
Information provided by RDS 37
Using the Auto Station Programme Memory (ASPM) 38
Notes: for RDS operation 38
To recall stations in memory 38
Timer and sleep operation (Remote control only) 39
Timer playback 39
Sleep operation 40
To use timer and sleep operation together 40
Enhancing your system. 40
Listening to the playback sounds of portable audio unit, etc. 40
Headphones 40
Troubleshooting chart. 41
Tuner 41
USB 41
iPod, iPhone or iPad 41
Power. 41
Basic Operation 41
Playback 41
Picture 41
Sound 42
Network 42
Other. 42
Condensation 42
If problem occurs 42
Factory reset, clearing all memory 42
Before transporting the unit 42
Maintenance 42
Cleaning the cabinet. 42
On-screen Error Messages 43
Specifications 43
General 43
Amplifier 43
BD player 43
USB 43
Tuner 43
Speaker 43
Glossary 44
Network Service Disclaimer 45
About Software License 46
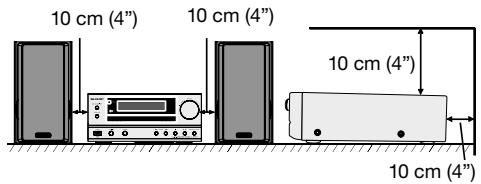
General
- Please ensure that the equipment is positioned in a well ventilated area and ensure that there is at least 10cm (4") of free space along the sides, top and back of the equipment.
- Use the unit on a firm, level surface free from vibration.
- Place the speakers at least 30~cm (12") away from any CRT TV to avoid colour variations across theTV screen. If the variations persist, move the speakers further away from theTV. LCDTV is not prone to such variation.
- Keep the unit away from direct sunlight, strong magnetic fields, excessive dust, humidity and electronic/electrical equipment (home computers, facsimiles, etc.) which generate electrical noise.
- Do not place anything on top of the unit.
- Do not expose the unit to moisture, to temperatures higher than 60^ (140^) or to extremely low temperatures.
- If your system does not work properly, disconnect the AC power lead from the wall socket. Plug the AC power lead back in, and then turn on your system.
- In case of an electrical storm, unplug the unit for safety.
- Hold the AC power plug by the head when removing it from the wall socket, as pulling the lead can damage internal wires.
- The AC power plug is used as a disconnect device and shall always remain readily operable.
- Do not remove the outer cover, as this may result in electric shock. Refer internal service to your local SHARP service facility.
- The ventilation should not be impeded by covering the ventilation openings with items, such as newspapers, tablecloths, curtains, etc.
- No naked flame sources, such as lighted candles, should be placed on the apparatus.
- Attention should be drawn to the environmental aspects of battery disposal.
- This unit should only be used within the range of 5^ - 35^ ( 41^ - 95^ ).
The apparatus is designed for use in moderate climates.
Warning:
The voltage used must be the same as that specified on this unit. Using this product with a higher voltage other than that which is specified is dangerous and may result in a fire or other type of accident causing damage. SHARP will not be held responsible for any damage resulting from use of this unit with a voltage other than that which is specified.
Volume control
The sound level at a given volume setting depends on speaker efficiency, location, and various other factors. It is advisable to avoid exposure to high volume levels. Do not turn the volume on to full at switch on. Listen to music at moderate levels. Excessive sound pressure from earphones and headphones can cause hearing loss.
Precautions on viewing stereoscopic 3D images
- Do not view stereoscopic 3D images if you have a history of photosensitivity, heart disease or poor health. This may cause the symptoms to worsen.
- If you experience any health problems such as fatigue and discomfort while viewing stereoscopic 3D images, immediately discontinue viewing. Continuing viewing after symptoms appear may cause health risks. Take a break until the symptoms have completely disappeared.
- Ages of 5-6 or over are recommended for viewing stereoscopic 3D images. Symptoms such as fatigue and discomfort are difficult to determine in young children, therefore they may suddenly become ill. When viewing 3D images with children, please watch for eye strain symptoms.
- When viewing stereoscopic 3D images, take a moderate break after watching one title. Viewing for extended periods may cause visual strain.
Precautions when cleaning this product
- Turn off the main power and unplug the AC power lead from the wall socket before handling.
- To clean the outer cabinet, periodically wipe it with a soft cloth (cotton, flannel, etc.).
- For severe dirt, soak a soft cloth (cotton, flannel, etc.) in some neutral detergent diluted with water, wring the cloth out thoroughly, wipe off the dirt, then wipe again with a soft, dry cloth.
- Do not use chemicals or a chemically treated cloth for cleaning. It may damage the cabinet finish.
About Media Types
Blu-ray Disc
Blu-ray Disc is the ultimate next generation optical media format, offering the following key features:
- Largest capacity (25 GB single layer - 50 GB dual layer) - with over 5 times the amount of content possible with current DVDs, particularly well suited for high definition feature films with extended levels of interactive features
- Pristine picture quality with the capability for full high definition 1920 x 1080p resolution
- Best audio possible with uncompressed surround sound (higher quality than even theatre audio)
- Broadest industry support - ensuring more choice for consumers in the marketplace
-
Hardware products will be backward compatible with DVDs, allowing continued enjoyment of existing DVD libraries.
-
Disc Durability - new breakthroughs in hard coating technologies gives Blu-ray Discs the strongest resistance to scratches and finger prints.
Types of Discs/Media Formats that Can Be Used with This Unit
- The following discs can be played back in this Unit. Do not use an 8 cm to 12 cm adapter.
- Use discs that conform to compatible standards as indicated by the presence of official logos on the disc label. Playback of discs not complying with these standards is not guaranteed. In addition, the image quality or sound quality is not guaranteed even if the discs can be played back.
| Disc Type | Recording Format | Contents | Disc Size | |
| BD Video | Region code B/ALL | — | Audio + Video (Movie) | 12 cm |
| BD-RE DL BD-R DL | BDMV/BDAV format | |||
| DVD Video | Region code 2/ALL | Video format | Audio + Video (Movie) | 12 cm 8 cm |
| DVD+RW/DVD+R DVD-RW/DVD-R DVD+R DL/DVD-R DL | Video/VR/AVCHD format (finalised disc only) | Audio + Video (Movie) | 12 cm 8 cm | |
| DivX+HD (H.264/MKV) | ||||
| JPEG*2 | Still image (JPEG file) | |||
| MP3*3 | Audio | |||
| Audio CD*1 | Audio CD (CD-DA) | Audio | 12 cm 8 cm | |
| CD-RW/CD-R | Audio CD (CD-DA) | Audio | ||
| JPEG*2 | Still image (JPEG file) | |||
| MP3*3 | Audio | |||
| Media Format | Recording Format | Contents |
| USB memory device | DivX+HD (H.264/MKV) | Audio + Video (Movie) |
| JPEG*2 | Still image (JPEG file) | |
| MP3*3 | Audio |
-
BD/DVD video units and discs have region codes, which dictate the regions in which a disc can be played. This Unit's region code is B for BD and 2 for DVD. (Discs marked ALL will play in any unit.
-
BD/DVD video operations and functions may be different from the explanations in this manual and some operations may be prohibited due to disc manufacturer's settings.
- If a menu screen or operating instructions are displayed during playback of a disc, follow the operating procedure displayed.
Note:
- Playback for some of the discs in the left side column tables may not be possible depending on the disc.
- "Finalise" refers to a recorder processing a recorded disc so that it will play in other DVD units/recorders as well as this unit. Only finalised DVD discs will play back in this unit. (This unit does not have a function to finalise discs.)
- Some discs cannot be played back depending on the recording format.
- DivX playback may not be available depending on the DivX content and file.
Discs that Cannot Be Used with This Unit
The following discs cannot be played back or will not play back properly on this Unit. If such a disc is mistakenly played back, speaker damage may occur. Never attempt to play back these discs.
CDG, Video CD, Photo CD, CD-ROM, CD-TEXT, SVCD, SACD, PD, CDV, CVD, DVD-RAM, DVD-Audio, BD-RE with the cartridge, CD-WMA
Discs with unusual shapes cannot be played.
- Discs with unusual shapes (heart-shaped or hexagonal discs, etc.) cannot be used. The use of such discs will cause malfunction.
The following BD video discs cannot be played.
- Discs not displaying "B" or "ALL" for the region code (discs sold outside the authorised marketing area).*
- Discs produced illegally.
-
Disks recorded for commercial use.
-
The region code for this product is B.
The following DVD video discs cannot be played.
- Discs not displaying "2" or "ALL" for the region code (discs sold outside the authorised marketing area).*
- Discs produced illegally.
- Disks recorded for commercial use.
- The region code for this product is 2.
The following BD-RE/R, DVD-RW/R and DVD+RW/R discs cannot be played.
- Discs on which data has not been recorded cannot be played back.
- Sharp cannot guarantee playback compatibility for all self-recorded BD-discs because Blu-ray is a new and evolving format. The playback compatibility will be affected by your choice of BD-recorder, BD-disc and BD-burning software. Please always ensure you are using the latest software versions on all units and contact the individual manufacturers for further help if required.
To avoid inconveniences, please check the playback compatibility of your self-recorded disc before you purchase this BD-unit. For maximum playback compatibility of self-recorded BD-discs Sharp recommends that the BDMV/BDAV standards are used. If a playback issue occurs after purchase, please download the latest software version for your BD-unit from the Sharp internet page or ask your Sharp-Dealer.
This BD-unit uses the latest technology available at the time
of development and cannot guarantee support for future enhancements or changes to the standard.
The following Audio CD\*1 discs cannot be played.
- Disks containing a signal for the purpose of protecting copyrights (copy control signal) may not be played back with this Unit.
- This Unit has been designed on the premise of playing back Audio CDs that comply with CD (Compact Disc) standards.
The following CD-RW/R discs cannot be played.
- Discs on which data has not been recorded cannot be played back.
- Discs recorded in a format other than an Audio CD and JPEG/MP3 file format cannot be played back.
- Discs may not be played back depending on their recording status or the status of the disc itself.
- Discs may not be played back depending on their compatibility with this Unit.
*2 About the JPEG file format
JPEG is a type of file format for storing still-image files (photos, illustrations, etc.). The Unit lets you play JPEG format still-image files.
File formats that are not compatible.
- Still images in formats other than JPEG (such as TIFF) cannot be played.
-
There may be some files that cannot be played even if they are in JPEG format.
-
Progressive JPEG files cannot be played.
- Moving image files as well as Motion JPEG format files cannot be played, even though they are JPEG files.
Other files that cannot be played back.
- You may not be able to play some still images which you have created, touched up, copied or otherwise edited on your computer.
- You may not be able to play some still images you have processed (rotated or saved by overwriting other images you have imported from the Internet or e-mail).
You may experience one or more of the following symptoms when playing files.
- It may take some time to play files depending on the number of folders, number of files and volume of data involved.
- EXIF information will not be displayed. EXIF stands for Exchangeable Image File Format, and is a standard for storing interchange information in image files, especially those using JPEG compression. (Refer to http://exif.org for more information.)
^*3 About the MP3 file format
MP3 files are audio data compressed in the MPEG1/2 Audio layer-3 file format. "MP3 files" have ".mp3" as extensions. (Some files that have ".mp3" extensions or files that have not been recorded in MP3 format will produce noise or cannot be played.)
Playing the MP3 file format
- The MP3 files are not played in the order they were recorded.
- It is recommended to record data at a lower speed as data recorded at a fast speed can produce noise and may not be able to be played.
The more folders there are, the longer the reading time. - Depending on the folder tree, reading MP3 files can take time.
- The playing time may not be correctly displayed during MP3 file playback.
The following files cannot be played on this unit.
- When both Audio CD [CD-DA] format and JPEG/MP3 file formats are recorded on a disc. (The disc is recognised to be an Audio CD [CD-DA] only tracks in Audio CD [CD-DA] format are played back.)
- Multi-session discs cannot be played.
About the DivX+HD (H.264/MKV) file format
- DivX playback may not be available depending on the DivX content and file.
About files/folders for Still images (JPEG files) and audio data (MP3 files)
You can play still images (JPEG files) /audio data (MP3 files) with this unit by making folder(s) on discs or USB memory devices as shown below.
Example of a folder structure:
Root

*4 Including the root directory, the maximum number of folders and files in each folder is limited to 256 in total.
File and folder requirements
- The discs or USB memory devices which this unit can play back (recognise) are limited to the following properties:
Contains EXIF format files (only JPEG files)
Picture resolution: Between 32 x 32 and 7680 x 4320 pixels (only JPEG files)
Maximum number of folders and files in each folder: 256
Maximum hierarchy level of folders: 5
File size: 20 MB or less (JPEG files)
200 MB or less (MP3 files)
Note:
- File and folder names displayed on this unit may differ from those displayed on PCs.
ABOUT DivXVIDEO
- DivX® is a digital video format created by DivX, Inc. This is an official DivX Certified device that plays DivX video. Visit divx.com for more information and software tools to convert your files into DivX video.
DivX Certified® to play DivX® and DivX Plus™ HD (H.264/MKV) video up to 1080p HD including premium content.
ABOUT DivXVIDEO-ON-DEMAND
- This DivX Certified® device must be registered in order to play purchased DivX Video-on-Demand (VOD) movies. To obtain your registration code, locate the DivX VOD section in your device setup menu. Go to vod.divx.com for more information on how to complete your registration.
About Disc Contents
BD Video
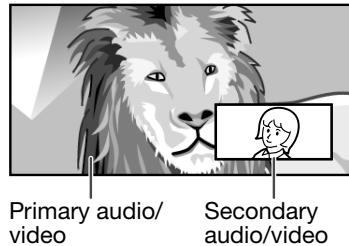
Enjoy BD-specific functions including BONUSVIEW (BD-ROM Profile 1 Version 1.1), such as picture-in-picture, and BD-LIVE (page 19).
For the BD video discs compatible with BONUSVIEW/BD-LIVE, you can enjoy additional contents by copying the data from the discs or downloading it via the Internet. For instance, this function is capable of playing the original movie as the primary video while playing video commentary from the film director on a small screen as a secondary video.
Note:
The available functions differ depending on the disc.
Title, Chapter and Track
- Blu-ray discs and DVDs are divided into "Titles" and "Chapters". If the disc has more than one movie on it, each movie would be a separate "Title". "Chapters", on the other hand, are subdivisions of titles. (See Example 1.)
- Audio CDs are divided into "Tracks". You can think of a "Track" as one tune on an Audio CD. (See Example 2.)
Example 1: Blu-ray disc or DVD
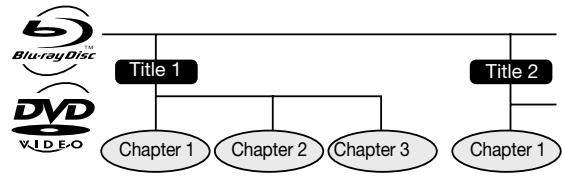
Example 2: Audio CD

Icons Used on BD/DVD Video Disc Cases
The back of the case of a BD/DVD that is commercially available usually contains various information about the contents of the disc.
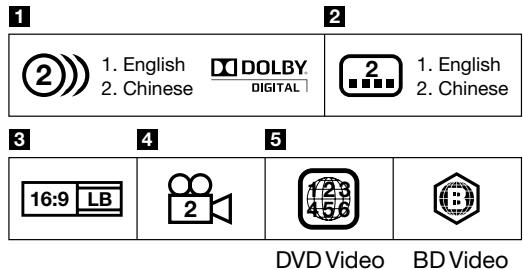
Audio tracks and audio formats
BD and DVD discs can contain up to 8 separate tracks with a different language on each. The first in the list is the original track. This section also details the audio format of each soundtrack — Dolby Digital, DTS, MPEG etc.
Dolby Digital
A sound system developed by Dolby Laboratories Inc. that gives movie theatre ambience to audio output when the Unit is connected to a Dolby Digital processor or amplifier.
DTS
DTS is a digital sound system developed by DTS, Inc. for use incinemas.
Linear PCM
Linear PCM is a signal recording format used for Audio CDs and on some DVD and Blu-ray discs. The sound on Audio CDs is recorded at 44.1 kHz with 16 bits. (Sound is recorded between 48 kHz with 16 bits and 96 kHz with 24 bits on DVD video discs and between 48 kHz with 16 bits and 192 kHz with 24 bits on BD video discs.)
2 Subtitle languages
This indicates the kind of subtitles.
Screen aspect ratio
Movies are shot in a variety of screen modes.
4 Camera angle
Recorded onto some BD/DVD discs are scenes which have been simultaneously shot from a number of different angles (the same scene is shot from the front, from the left side, from the right side, etc.).
5 Region code
This indicates the region code (playable region code).
The Icons Used in This Operation Manual
BDVIDEO Indicates the functions that can be performed for BD Video discs.
BD-RE Indicates the functions that can be performed for BD-RE discs.
BD-R Indicates the functions that can be performed for BD-R discs.
DVDVIDEO Indicates the functions that can be performed for DVD Video discs.
DVD-RW Indicates the functions that can be performed for DVD-RW discs.
DVD-R Indicates the functions that can be performed for DVD-R discs.
AUDIO CD Indicates the functions that can be performed for Audio CDs.
CD-R Indicates the functions that can be performed for CD-R discs.
CD-RW Indicates the functions that can be performed for CD-RW discs.
USB Indicates the functions that can be performed for USB memory devices.
iPod Indicates the functions that can be performed for iPod, iPhone and iPad.
Disc Precautions
Be Careful of Scratches and Dust
- BD, DVD and CD discs are sensitive to dust, fingerprints and especially scratches. A scratched disc may not be able to be played back. Handle discs with care and store them in a safe place.
Proper Disc Storage
| Place the disc in the centre of the disc case and store the case and disc upright. | |
| Avoid storing discs in locations subject to direct sunlight, close to heating appliances or in locations of high humidity. | |
| Do not drop discs or subject them to strong vibrations or impacts. | |
| Avoid storing discs in locations where there are large amounts of dust or moisture. |
Handling Precautions
- If the surface is soiled, wipe gently with a soft, damp (water only) cloth. When wiping discs, always move the cloth from the centre hole toward the outer edge.

- Do not use record cleaning sprays, benzene, thinner, static electricity prevention liquids or any other solvent.
- Do not touch the surface.
- Do not stick paper or adhesive labels to the disc.
- If the playing surface of a disc is soiled or scratched, the Unit may decide that the disc is incompatible and eject the disc tray, or it may fail to play the disc correctly. Wipe any dirt off the playing surface with a soft cloth.
Cleaning the Pick Up Lens
- Never use commercially available cleaning discs. The use of these discs can damage the lens.
- Request the nearest service centre approved by SHARP to clean the lens.
Warnings about dew formation
-
Condensation may form on pick up lens or disc in the following conditions:
-
Immediately after a heater has been turned on.
- In a steamy or very humid room.
- When the Unit is suddenly moved from a cold environment to a warm one.
When condensation forms:
- It becomes difficult for the Unit to read the signals on the disc and prevents the Unit from operating properly.
To remove condensation:
- Take out the disc and leave the Unit with the power off until the condensation disappears. Using the Unit when there is condensation may cause malfunction.
License and Copyright
Audio-visual material may consist of copyrighted works which must not be recorded without the authority of the owner of the copyright. Refer to relevant laws in your country.
- "This item incorporates copy protection technology that is protected by U.S. patents and other intellectual property rights of Rovi Corporation. Reverse engineering and disassembly are prohibited."
Manufactured under license from Dolby Laboratories. "Dolby" and the double-D symbol are trademarks of Dolby Laboratories.
Manufactured under license under U.S. Patent Nos: 5,956,674; 5,974,380; 6,226,616; 6,487,535; 7,392,195; 7,272,567; 7,333,929; 7,212,872 & other U.S. and worldwide patents issued & pending. DTS-HD, the Symbol, & DTS-HD and the Symbol together are registered trademarks & DTS-HD Master Audio | Essential is a trademark of DTS, Inc. Product includes software. © DTS, Inc. All Rights Reserved. - DVD is a trademark of DVD Format/Logo Licensing Corporation.
- "HDMI, the HDMI logo and High-Definition Multimedia Interface are trademarks or registered trademarks of HDMI Licensing LLC in the United States and other countries."
- "x.v.Color" and "x.v.Color" logo are trademarks of Sony Corporation.
- Java and all Java-based trademarks and logos are trademarks or registered trademarks of Sun Microsystems, Inc. in the United States and/or other countries.
- "AVCHD" and the "AVCHD" logo are trademarks of Panasonic Corporation and Sony Corporation.
- Blu-ray Disc^TM , Blu - ray^TM , Blu - ray3D^TM , BD - Live^TM , BONUSVIEW^TM , and the logos are trademarks of the Blu-ray Disc Association.
YouTube is a trademark of Google Inc. - DivX®, DivX Certified®, DivX Plus™ HD and associated logos are trademarks of DivX, Inc. and are used under license.
-
LCFantastic、LCFONT、ルシーフONT and LC logo mark are registered trademarks of SHARP Corporation. This product is embedded with LC Font technology, which was developed by SHARP Corporation for clearly displaying easy-to-read characters on an LCD screen. However, other non-LCD fonts are used for displaying some screen pages.
-
"Made for iPod," "Made for iPhone," and "Made for iPad" mean that an electronic accessory has been designed to connect specifically to iPod, iPhone, or iPad, respectively, and has been certified by the developer to meet Apple performance standards. Apple is not responsible for the operation of this device or its compliance with safety and regulatory standards. Please note that the use of this accessory with iPod, iPhone, or iPad may affect wireless performance.
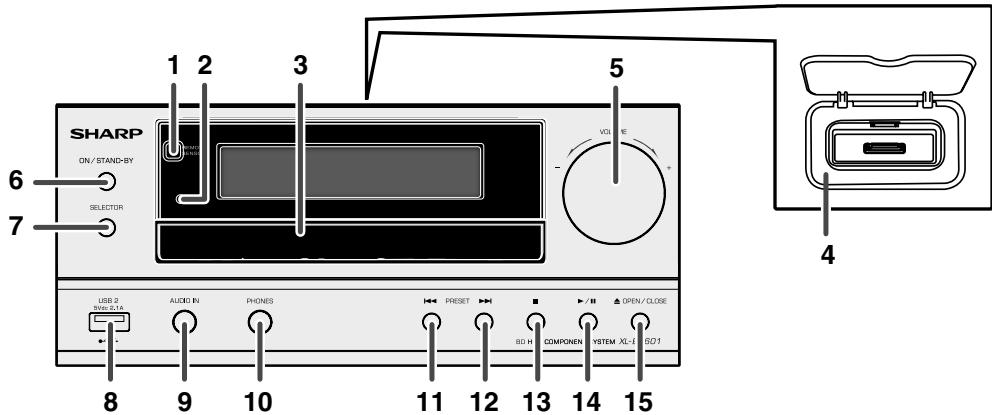
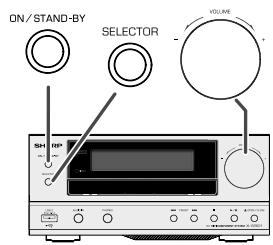
Front panel
- Remote sensor 12
- Timer indicator 39
3.Disc Tray. 18 - Docking Station for iPod or iPhone 35
- Volume Control 12
- ON/STAND-BY Button 18, 35, 36, 42
- SELECTOR Button 11, 13, 18, 22, 35
- USB 2Terminal .9,13
Page
- Audio In Socket 11, 40
- Headphone Socket 40
- Tuner Preset Down, DISC/USB Track Down, iPod/iPhone/iPad Skip Down/Fast Reverse .... 22, 36
- Tuner Preset Up, DISC/USB Track Up, iPod/iPhone/iPad Skip Up/Fast Forward 22, 36
- Disc/USB/iPod/iPhone/iPad Stop Button 22, 36
- Disc/USB/iPod/iPhone/iPad Play or Pause Button 22, 36
- Disc Tray Open/Close Button 12, 18
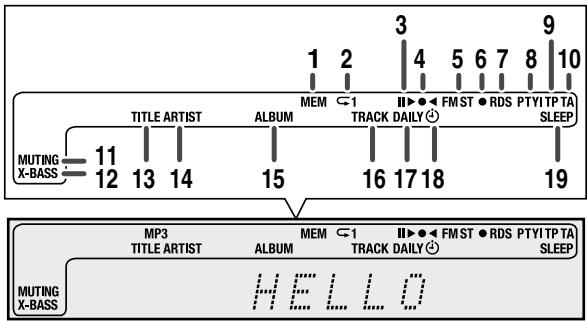
Display
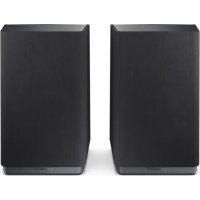
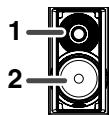
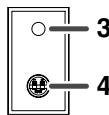
■ Speaker system
- MEM (Memory) Indicator
- Repeat Indicator
- Play/Pause Indicator
- Tuning FM Indicator 37
- FM Stereo Mode Indicator 37
- Stereo Station Indicator 37
7.RDS Indicator 37 - PTY Indicator 37
- TP Indicator 37
- TA Indicator 37
- Muting Indicator
- X-bass Indicator 12
- Title Indicator
- Artist Indicator
- Album Indicator
- Track Indicator
- Daily Timer Indicator 39
8.OnceTimerIndicator 39 - Sleep Indicator 40
Page
- Dome-Tweeter
2.Woofer - Bass Reflex Duct
- Speaker Terminal
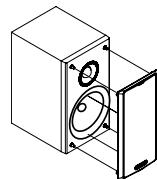
Speaker grilles are removable
Make sure nothing comes into contact with the speaker diaphragms when you remove the speaker grilles.
Keylock function
You can set the keylock to prevent accidental operations.
This function allows TVs compatible with AQUOS LINK to also perform a Key Lock on the unit.
To activate this function, press and hold CHILD LOCK button. "CHILD LOCK ON" will appear
- To deactivate, press and hold CHILD LOCK button. "CHILD LOCK OFF" will appear
- If you try to operate the unit while the keylock function is set, "CHILD LOCK" appear on the front display panel to indicate that the keylock function is set.
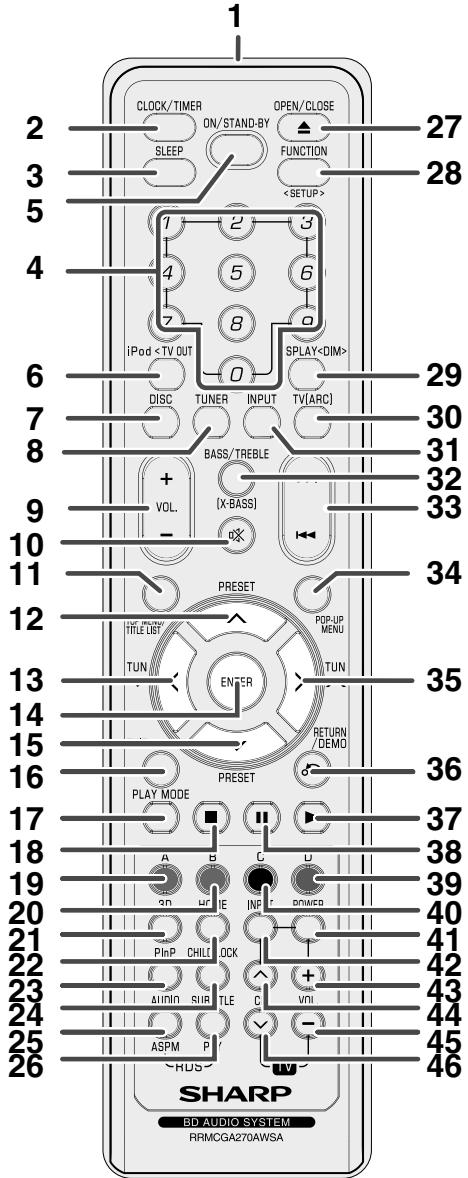
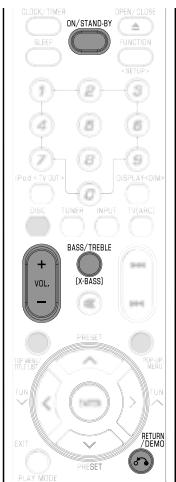
Remote Control
Page
- Remote Control Transmitter 12, 42
- Clock/Timer Button 13, 39, 40
- Sleep Button 40
- Numeric Buttons 14, 40
- ON/STAND-BY Button 13, 39
- iPod
Button 35, 36 - Disc Button 18, 22, 23
8.Tuner Button 36,37,38 - Volume Up/Down Button 12
- Mute Button 12
11.Top Menu/Title List Button 19,36 - Tuner Preset Up Button, iPod/iPhone Cursor Up Button 27, 29, 36
13.Tuning Down,Time Down Button 13,27,29,36 - Enter Button 13, 18, 20
- Tuner Preset Down Button, iPod/iPhone Cursor Down Button 27, 29, 36
16.ExitButton 21,22,23 - Play Mode Button 26
- Stop Button 18, 21, 22, 36
- Red (A) Button 20, 23
20.Green (B)Button 20,21,30
21.3D Button 16 - Home Button 21, 22, 24
- Picture in Picture Button 19
24.Child Lock Button 8 - Audio/RDS ASPM Button 38
- Subtitle / RDS PTY Button 38
27.Open/CloseButton 21,22 - Function
Button 25, 26 - Display
Button 12, 18, 25, 37 - TV (ARC) Button 12, 16
- Input Button 11, 40
- Bass Treble (X-BASS) Button 12, 13
- Skip Up, Fast Forward, Time Up/ Skip Down, Fast Reverse, Time Down Button ....13, 22, 24, 36
- Pop-Up Menu Button 18
35.TuningUp,TimeUpButton 13,27,29,36 - Return/Demo Button 10, 21, 23, 30
- Play Button 16, 17, 20, 23, 36
38.Pause Button 22,23,36 - Blue (D) Button 20, 23, 30
- Yellow (C) Button 20, 23, 30
- TV Power Button 13
- TV Input Button 13
- TV Volume Up Button 13
- TV Channel Up Button 13
- TV Volume Down Button 13
- TV Channel Down Button 13
Make sure to unplug the AC power lead before making any connections.
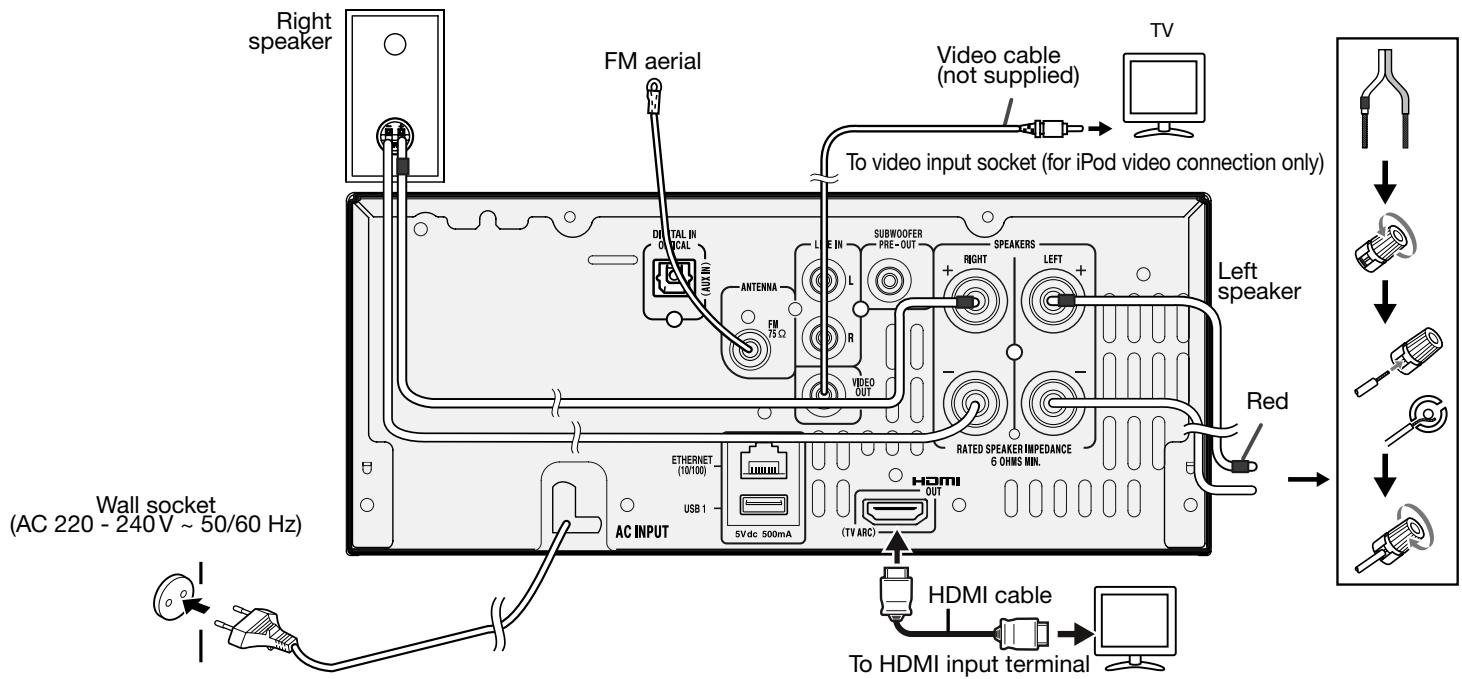
USB 1, USB 2 terminals and Video Out socket
HDMI Terminal
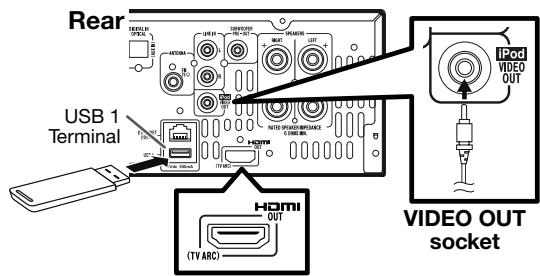
USB 1 terminal:
This terminal is only for USB memory devices to support music, video, photo and memory expansions for BD-LIVE.
VIDEO OUT socket:
This socket is only for iPod and iPhone video out connection.
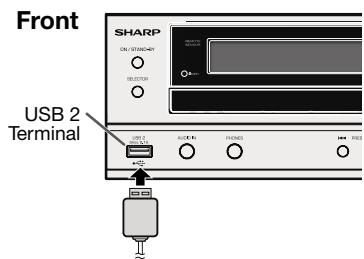
USB 2 terminal:
This terminal is only for iPod, iPhone and iPad. It does not support USB memory device.
HDMI terminal:
This terminal supports DISC function (BD, DVD, CD and USB 1), TV ARC and AQUOS LINK.
Aerial connection
Supplied FM aerial:
Connect the FM aerial wire to the FM 75 Ω socket and position the FM aerial wire in the direction where the strongest signal can be received.
External FM aerial:
Use an external FM aerial (75 ohms coaxial cable) for better reception. When an external FM aerial is used, disconnect the supplied FM aerial wire.
Note:
Placing the aerial on the unit or near the AC power lead may cause noise pickup. Place the aerial away from the unit for better reception.
Speaker connection
- Connect the wire without insulation tube to the minus (-) terminal, and the wire with red insulation tube to the plus (+) terminal.
- Use speakers with an impedance of 6 ohms or more, as lower impedance speakers can damage the unit.
- Do not mistake the right and the left channels. The right speaker is the one on the right side when you face the unit.
- Do not let the bare speaker wires touch each other.
- Do not allow any objects to fall into or to be placed in the bass reflex ducts.
- Do not stand or sit on the speakers. You may be injured.
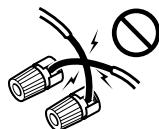
Incorrect
■ Demonstration mode
- The first time the unit is plugged in, the unit will enter the demonstration mode.
- To cancel the demonstration mode, press the RETURN/DEMO button (remote control) during power stand-by mode. The unit will enter the low power consumption mode.
- To return to the demonstration mode, press the RETURN/DEMO button again.
- If iPod or iPhone is docked, the unit will begin charging. "Charge Mode" will be displayed. Demonstration mode is invalid during charge mode.
Connecting iPod or iPhone to TV
Photo and video files from iPod or iPhone can be viewed by connecting the system to TV/monitor.
If the TV/monitor has a video input, connect it to the iPodVIDEO OUT socket at the back of the unit and set the TV Out on the iPod or iPhone unit to "ON" position. (Refer page 36.)
Note:
Please make sure to set iPod unit to either NTSC or PAL to match your TV signal. Please visit Apple's homepage for further information.
AC power connection
After checking all the connections have been made correctly, plug the AC power lead of this unit into the wall socket.
Note:
Unplug the AC power lead from the wall socket if the unit will not be in use for a prolonged period of time.
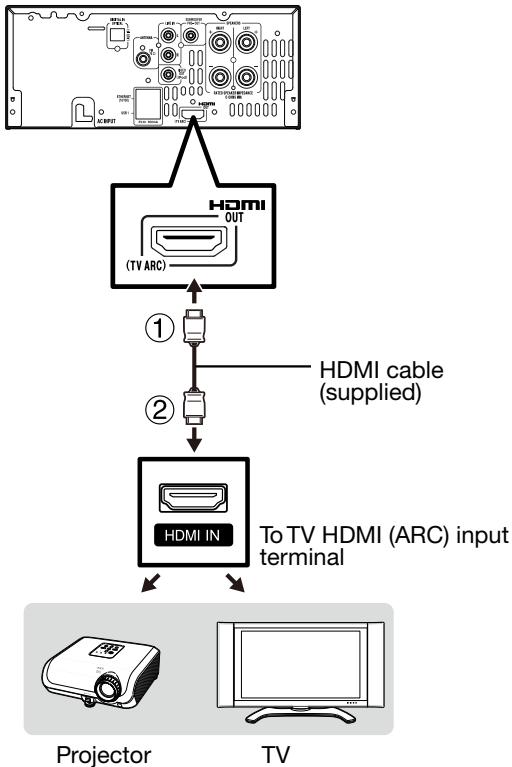
HDMI connection (TV, projector)
You can enjoy high quality digital picture and sound using an HDMI cable. (Only TVs/projectors with an HDMI terminal can be connected to this unit.)
When using HDMI ARC (Audio Return Channel) Connection
When this unit is connected to TV, there might be a necessity to adjust the TV menu.
Refer the operation manual of the respective TV, concerning ARC. In case of incompatibility between this unit and your TV HDMI ARC, please use the analog or digital connection. (Refer Line In and Digital In connection on page 11.)
When you use AQUOS LINK or TV ARC, make sure to use a certified HDMI cable.
1 Be sure to turn off this Unit and the TV/projector before making any connections.
2 Firmly connect an HDMI cable to the HDMI OUT (TV ARC) terminal on this unit (①) and the HDMI IN terminal of the TV/projector (②).
Notes:
- In this unit, "HDMI Video Out" is set to "Auto" as a default (See page 27). (Normally set to "Auto".) If you don't get a stable image with "HDMI Video Out" set to "Auto", select the output resolution which corresponds to the connected equipment.
- This unit supports HDMI which enables ARC (Audio Return Channel).
- To enable ARC make sure to use High Speed HDMI cable.
This structure also needs TV that supports ARC. - To enjoy 3D images, connection to a 3D compatible TV is needed.
- For connection to a TV/projector, refer to the TV/projector's operation manual.
After connecting
- If necessary, perform the Audio Video Settings. (Page 27)
Refer to AQUOS LINK function. (Pages 16 and 28) - Prepare the desired disc or content and start playback. (Pages 18-23, 24-25)
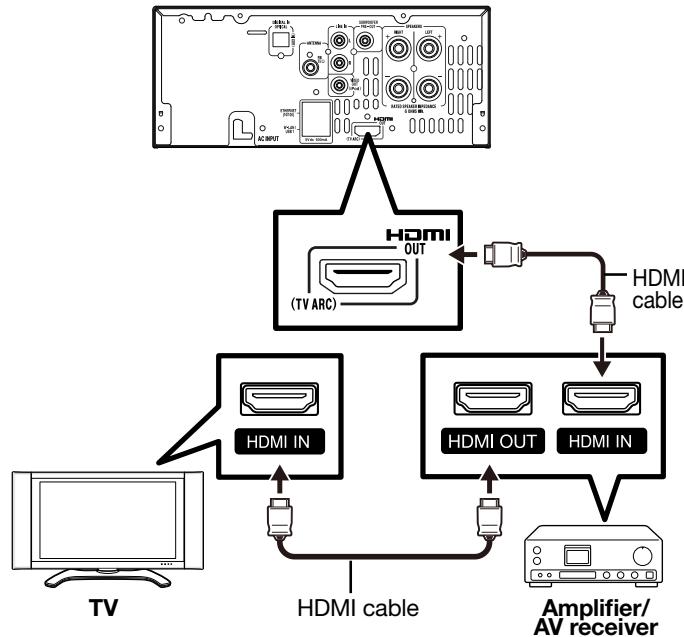
- Connecting to an amplifier/AV receiver
You can connect this unit to an amplifier/AV receiver to enjoy digital surround sound. With this unit, the audio connection can be made using HDMI connection depending on the capabilities of the amplifier/ AV receiver you connect.
Note:
- Be sure to turn off this Unit and the equipment before making any connections.
- For details on output of audio formats, see page 34.
Notes:
- When using an HDMI output, 7.1 ch Digital Output is available.
- Audio transmitted in DTS-HD High Resolution Audio and DTS-HD Master Audio formats is output from the HDMI terminal as Bitstream. Connect an amplifier with a built-in decoder to enjoy the fine sound quality.
- When a connection to a 3DTV is made via an amplifier/AV receiver, it is necessary to connect to a 3D compatible amplifier/AV receiver.
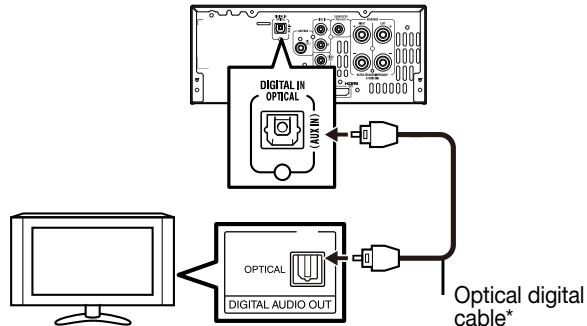
Digital audio connection
You can connect TV unit or other similar device using an optical digital audio cable (commercially available).
TV unit or other similar device
- Commercially available
After connecting
- If necessary, perform the Audio Video Settings. (Page 27)
- Prepare the desired disc or content and start playback. (Pages 18-23, 24-25)
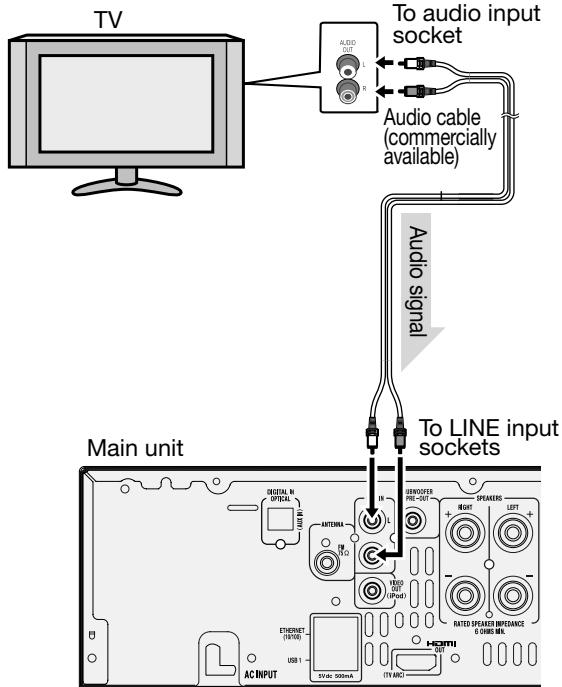
Line input connection (TV, etc.)
Connect to the TV using an audio cable.
To select Line In function:
- On main unit: Press SELECTOR button repeatedly until Line In is displayed.
- On remote control: Press INPUT button repeatedly until Line In is displayed.
Wired connection (LAN cable)
Connect a LAN cable (commercially available) to the ETHERNET terminal of this unit (①) and the LAN port of the broadband router (②).
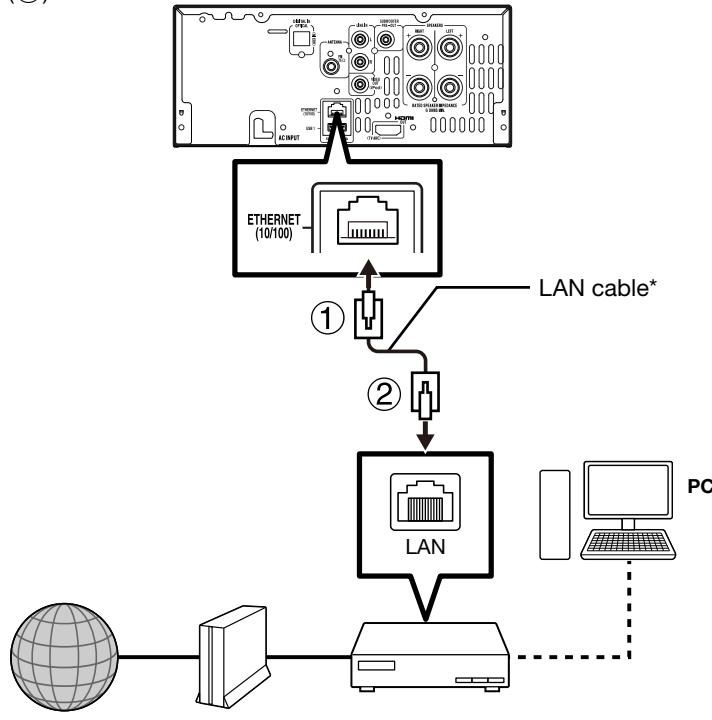
Internet
Modem
Broadband router
- Commercially available
Notes:
Use a LAN cable/rodert supporting 10BASE-T/100BASE-TX.
- SHARP cannot guarantee that all brands' broadband routers will operate with this unit.
After connecting
Perform the communication settings. (Pages 29-30)
- When enjoying BD-LIVE functions, see pages 19 and 20.
- When enjoying video on-demand services (e-Contents), see pages 29, 34.
- To play back files via the Home Network, see page 23.
- To update the software via the Internet, perform Software Update Settings. (Pages 31-34)
Broadband Internet Connection
By connecting this unit to the Internet, you can enjoy a variety of content on your TV using BD-LIVE functions, video on-demand services (e-Contents), home networks and also perform software updates. In this unit, the Internet connection can be made using wired connection (LAN cable)
Notes:
- Be sure to turn off this Unit and the equipment before making any connections.
Caution:
- When using a broadband Internet connection, a contract with an Internet service provider is required. For more details, contact your nearest Internet service provider.
Refer to the operation manual of the equipment you have as the connected equipment and connection method may differ depending on your Internet environment.
Subwoofer pre-out connection
You can connect a subwoofer with an amplifier to the SUBWOOFER PRE OUT socket.
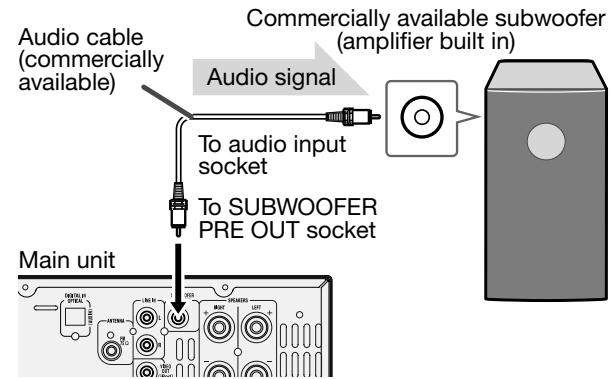
Notes:
- No sound is heard from the subwoofer without a built-in amplifier.
- Subwoofer Pre-out (audio signal): 200mV / 10k ohms at 70Hz .
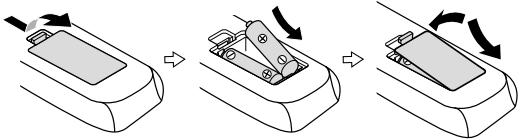
Battery installation
1 Open the battery cover.
2 Insert the supplied battery according to the terminal indicated in the battery compartment.
3 When inserting or removing the battery, push it towards the (-) battery terminals.
4 Close the cover.
Caution:
- Replace all old batteries with new ones at the same time.
- Do not mix old and new batteries.
- Remove the battery if the unit will not be used for a long period of time. This will prevent potential damage due to battery leakage.
- Do not use rechargeable battery (nickel-cadmium battery, etc.).
- Installing the battery incorrectly may cause the unit to malfunction.
- Batteries (battery pack or batteries installed) shall not be exposed to excessive heat such as sunshine, fire or the like.
Notes: concerning use:
- Replace the battery if the operating distance is reduced or if the operation becomes erratic. Purchase two "AAA" size batteries (UM-4, R03, HP-16 or similar).
- Periodically clean the transmitter on the remote control and the sensor on the unit with a soft cloth.
- Exposing the sensor on the unit to strong light may interfere with operation. Change the lighting or the direction of the unit if this occurs.
- Keep the remote control away from moisture, heat, shock, and vibrations.
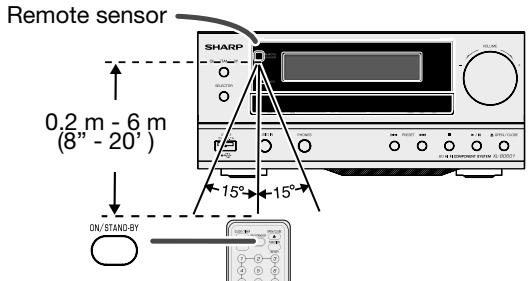
Test of the remote control
Check the remote control after checking all the connections.
Point the remote control directly at the remote sensor on the unit. The remote control can be used within the range shown below:
General control
Turning the Power On
Press ON/STAND-BY on the remote control or on the main unit to turn on the power.
Entering standby
Press ON/STAND-BY on the remote control or on the main unit to enter standby.
Note:
- When you turn on this unit for the first time after purchase or when you turn on this unit after you perform "System Reset" (see page 29), the language setting screen will be displayed, so please perform the language setting (see step 3 of page 13).
- If you press ON/STAND-BY again immediately after entering standby, the Unit may not turn on. If this happens, wait for 10 seconds or more and then turn on the power again.
About the Home screen
When turning on the unit on DISC function, the Home screen appears.
Home screen
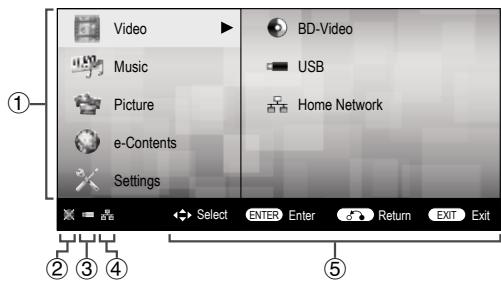
① Main menu
② Icon for disc inserted
③ Icon for USB memory device connected
④ Icon for LAN connection
⑤ Button Guide
Display brightness control
To dim the display brightness, press and hold the DISPLAY
- The display brightness will change each time the DISPLAY
button is pressed for more than 2 seconds.

Volume auto fade-in
If you turn off and on the main unit with the volume set to 80 or higher, the volume starts at 40 and fades in to the last set level.
Volume control
Turn the volume knob towards VOLUME + / - (on main unit) or press VOL. + / - (on remote control) to increase or decrease the volume.
Speaker output selection (HDMI connection)
By using HDMI connection, you have an option to listen to the sound output either from this unit or your TV.
To select the preferred speaker output, press and hold TV (ARC) button on the remote control until "TV Speaker" or "BD601 Speaker" appears on the display.
Auto power on function
When you press any of the following buttons, the unit turns on.
- iPod
, DISC, INPUT, TUNER, TV (ARC) on the remote control: Selected function is activated. - or OPEN/CLOSE button on the main unit: The unit turns on and playback of the last function will start (DISC, TUNER, USB-2 (iPod), iPod, AUDIO IN, LINE IN, DIGITAL IN, TV ARC)
Auto power off function
The main unit will enter the stand-by mode (when iPod or iPhone is not docked) after 15 minutes of inactivity during:
iPod/USB-2 (iPod): No connection.
DISC: In the stop mode.
AUDIO IN/LINE IN/DIGITAL IN/ TV ARC: No detection of input signal or very low sound audibility
Note:
However, if iPod or iPhone is docked, the unit will begin charging. "Charge Mode" will be displayed.
Muting
The volume is muted temporarily when pressing the 品 button on the remote control. Press again to restore the volume.
X-Bass control
When the power is first turned on, the unit will enter the extra bass mode which emphasises the bass frequencies, and X-BASS ON will appear. To cancel the extra bass mode, press and hold BASS/TREBLE [X-BASS] button on the remote control.
General control (continued)
Bass control
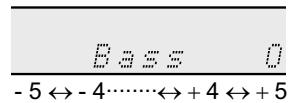
1 Press the BASS/TREBLE [X-BASS] button to select "Bass".
2 Within 5 seconds, press the VOLUME (+ or -) button to adjust the bass.
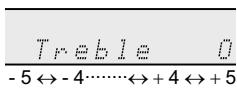
Treble control
1 Press the BASS/TREBLE [X-BASS] button to select "Treble".
2 Within 5 seconds, press the VOLUME (+ or -) button to adjust the treble.
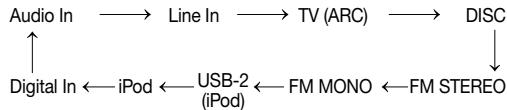
Function Selector
When the SELECTOR button on main unit is pressed, the current function will change to different mode. Press the SELECTOR button repeatedly to select desired function.
Note:
The backup function will protect the memorised function mode for a few hours should there be a power failure or the AC power lead becomes disconnected.
Setting the clock (Remote control only)
In this example, the clock is set for the 24-hour (0:00) display.
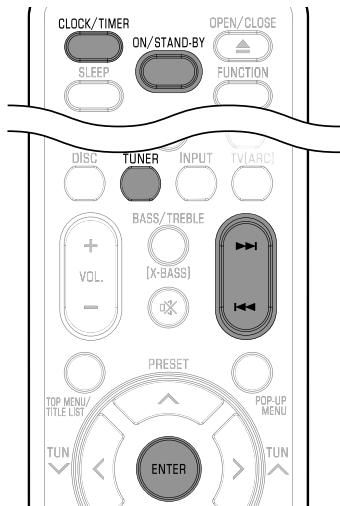
1 Press the ON/STAND-BY button to turn the power on.
2 Press the CLOCK/TIMER button.
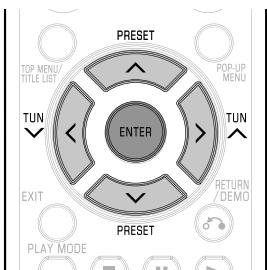
3 Within 10 seconds, press the ENTER button. To adjust the day, press the or button and then press the ENTER button.
4 Press the or button to select 24-hour or 12-hour display and then press the ENTER button.

5 To adjust the hour, press the or button and then press the ENTER button. Press the or button once to advance the time by 1 hour. Hold it down to advance continuously.
6 To adjust the minutes, press the or button and then press the ENTER button. Press the or button once to advance the time by 1 minute. Hold it down to advance the time by 10 minutes interval.
To confirm the time display:
Press the CLOCK/TIMER button. The time display will appear for about 10 seconds.
Note:
When power supply is restored after unit is plugged in again or after a power failure, reset the clock (page 42).
To readjust the clock:
Perform "Setting the clock" from step 1. If the "Clock" does not appear in step 2, step 4 (for selecting the 24-hour or 12-hour display) will be skipped.
To change the 24-hour or 12-hour display:
1 Clear all the programmed contents. [Refer to "Factory reset, clearing all memory" on page 42 for details.]
2 Perform "Setting the clock" from step 1 onwards.
Before Starting Playback
Language Setting
Changing the on-screen display language
1 At the Home Screen, press / to select "Settings", then press > or ENTER.
2 Press / to select "On Screen Language", then press > or ENTER.
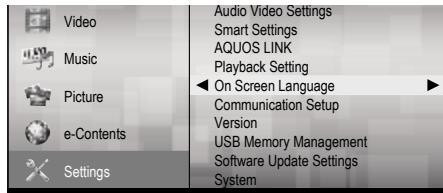
3 Press / to select the language you want to display on the screen, then press ENTER.
| English | Nederlandlands | Česky |
| Deutsch | Svenska | Magyar |
| François | Dansk | Slovensky |
| Italiano | Norsk | Slovenščina |
| Espanol | Suomi | |
| Português | Polski |
Note:
To select the DVD disc language, such as subtitle language, etc., see page 19.
Operating aTV Using the Remote Control
The Universal Remote Control may operate the basic functions of the SHARP TV.
TV function control
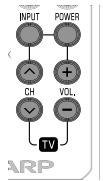
TV Power: POWER
TV-AV Selector: INPUT
TVVolume up/down: VOL + / -
TV Channel up/down: CH /
To change theTV manufacturer setting
Notes:
Some models of Sharp's TVs may not be operable.
- As for manufacturers with 2 or more setting numbers, test them to select the right number.
- Registering the manufacturer number deletes the number previously memorised.
- When replacing the batteries of the remote control, the manufacturer number may return to default. In this case, register it again.
- The manufacturer number cannot be registered depending on the TV. Even if the number can be set, some buttons may not work.
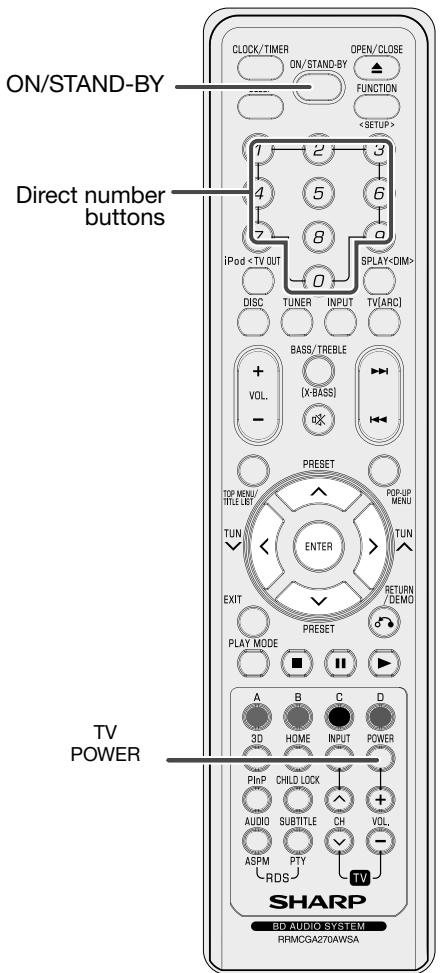
Whilst holding down the TV POWER button, enter the manufacturer setting number (3 digits) with the direct number buttons.
- Check the TV setting number to change the TV manufacturer setting (see pages 14 to 16).
After setting, check it operates properly.
| Manufacturer/Brand | Set-Up Code Number |
| ADMIRAL | 072 081 160 161 096 |
| ADVENT | 247 |
| AIKO | 103 |
| AKAI | 006 146 248 150 157 167 078 184 185 255 |
| ALARON | 028 |
| AMARK | 112 143 |
| AMERICA ACTION | 043 |
| AMPRO | 073 |
| ANAM | 043 054 055 056 080 112 |
| AOC | 058 006 004 112 121 |
| APEX | 227 |
| APEX DIGITAL | 015 226 037 |
| AQUAVISION | 148 |
| ASTER | 189 |
| AUDIOVOX | 076 103 043 035 145 197 |
| AVION | 219 |
| BAYSONIC | 043 |
| BELL&HOWELL | 072 |
| BENQ | 241 |
| BRADFORD | 043 |
| BROKSONIC | 096 |
| CANDLE | 006 002 003 004 |
| CAPEHART | 058 |
| CARVER | 164 |
| CELEBRITY | 001 |
| CETRONIC | 043 |
| CINERAL | 103 120 |
| CITIZEN | 006 002 003 004 101 103 143 |
| CLASSIC | 043 |
| CONCERTO | 004 |
| CONTEC | 043 051 |
| Manufacturer/Brand | Set-Up Code Number |
| CORONADO | 143 |
| CRAIG | 043 054 028 |
| CROSLEY | 164 |
| CROWN | 043 143 |
| CURTIS MATHES | 006 004 101 143 011 072 081 120 164 |
| CXC | 043 |
| DAEWOO | 076 103 055 004 127 143 016 043 044 125 120 |
| DAYTRON | 004 143 |
| DELL | 041 142 |
| DENON | 011 |
| DIGITAL PROJECTION | 224 |
| DUMONT | 004 073 |
| DWIN | 102 104 161 |
| DYNASTY | 043 |
| DYNATECH | 062 |
| DYNEX | 145 |
| FISHER | 007 057 |
| ELECTROBAND | 001 |
| ELECTROGRAPH | 182 |
| ELECTROHOME | 024 076 143 |
| ELEMENT | 084 190 |
| EMERSON | 005 028 043 048 076 096 155 004 051 143 151 153 154 213 |
| EPSON | 026 235 |
| ESA | 078 |
| FUJITSU | 164 028 198 246 066 138 |
| FUNAI | 028 043 052 249 |
| FUTURETECH | 043 |
| GATEWAY | 242 078 |
| GE | 006 073 144 160 161 004 008 009 034 056 074 091 155 081 120 |
| GEM | 078 |
| GIBRALTER | 004 073 |
| GOLDSTAR | 004 106 119 110 112 113 127 143 |
| GRUNPY | 028 043 |
| HAIER | 084 196 |
| HALL MARK | 004 |
| HANNSPREE | 046 |
| HARLEY DAVIDSON | 028 |
| HARMAN KARDON | 164 |
| HARVARD | 043 |
| HISENSE | 170 179 |
| HITACHI | 163 004 007 009 011 072 010 012 023 075 143 158 166 254 232 |
| HP | 027 039 214 085 |
| HUMAX | 069 |
| HYPERION | 253 |
| HYUNDAI | 049 067 |
| ILO | 183 145 |
| INFINITY | 164 |
| INFOCUS | 068 092 097 240 |
| INSIGNIA | 024 145 147 148 149 180 244 128 |
| INKEL | 129 |
| INTEQ | 073 |
| JBL | 164 |
| JCB | 001 |
| JCPENNEY | 004 006 008 024 030 065 101 143 156 160 |
| JENSEN | 013 |
| JVC | 038 001 034 083 206 159 |
| KENWOOD | 006 001 |
| KLEGG | 182 |
| KLOSS | 002 059 |
| KONKA | 180 |
| KREISEN | 090 |
| KTV | 006 043 143 154 |
| LG | 004 106 119 110 112 113 127 143 084 223 |
| LOGENET | 072 |
| LOEWE | 207 164 |
| LOGIK | 072 |
| LUXMAN | 004 |
| LXI | 007 015 052 081 160 164 |
| Manufacturer/Brand | Set-Up Code Number |
| MAGNAVOX | 006 003 004 022 059 060 061 063064 127 164 094 160 028 035 |
| 124 181 215 | |
| MAJESTIC | 072 |
| MARANTZ | 164 006 230 231 |
| MATSUI | 164 |
| MATSUSHITA | 080 |
| MEGATRON | 004 |
| MINTEK | 108 168 |
| MITSUBISHI | 109 024 042 004 040 146 028 081225 |
| MOTOROLA | 081 |
| MTC | 006 004 062 101 |
| MULTITECH | 043 |
| NAD | 015 025 |
| NIKO | 220 |
| NEC | 004 006 016 019 040 109 134 167 |
| NORCENT | 124 |
| NUVISION | 221 |
| OLEVIA | 216 084 132 |
| OPTIMUS | 080 |
| OPTOMA | 029 032 |
| ORION | 096 |
| PANASONIC | 080 098 243 251 |
| PHILCO | 006 003 004 024 056 059 060 063064 127 143 164 |
| PHILIPS | 164 005 038 093 127 006 003 004059 210 215 161 239 |
| PIONEER | 023 025 135 176 004 018 006 209 234118 131 140 |
| POLAROID | 015 077 078 079 070 177 178 190 199200 212 |
| PORTLAND | 004 143 103 |
| PRISM | 034 |
| PROSCAN | 144 160 161 |
| PROTON | 004 058 143 171 173 112 086 |
| PROTRON | 130 141 192 193 195 |
| PROVIEW | 190 |
| Manufacturer/Brand | Set-Up Code Number |
| QUASAR | 034 056 250 |
| RADIO SHACK | 004 019 127 143 043 |
| RCA | 160 161 144 156 065 006 004 023 024 056 074 152 081 233 |
| REALISTIC | 007 019 |
| RUNCO | 072 073 050 137 169 |
| SAMPO | 006 004 058 242 |
| SAMSUNG | 004 101 127 133 143 160 089 105 211 228 229 |
| SANSEI | 120 |
| SANSUI | 096 145 255 |
| SANYO | 007 053 057 082 020 |
| SCEPTRE | 036 |
| SCOTCH | 004 |
| SCOTT | 004 005 028 043 048 143 191 |
| SEARS | 004 007 015 028 030 057 082 094 143 160 052 164 |
| SEMIVOX | 043 |
| SEMP | 015 |
| SHARP | 081 014 019 028 004 022 143 175 |
| SHERWOOD | 100 |
| SIGNATURE | 072 |
| SONY | 001 126 139 252 |
| SOUNDESIGN | 003 004 028 043 |
| SOYO | 086 |
| SPECTRICON | 112 |
| SPECTRONIQ | 193 195 |
| SQUAREVIEW | 052 |
| SSS | 004 043 |
| STARLITE | 043 |
| SUNBRITETV | 245 |
| SUPRE MACY | 002 |
| SUPREME | 001 |
| SVA | 079 |
| SYLVANIA | 006 003 059 060 063 064 127 160 164 044 249 213 238 |
| SYMPHONIC | 052 249 |
| SYNTAX OLEVIA | 216 084 132 |
Before Starting Playback (continued)
| Manufacturer/Brand | Set-Up Code Number |
| TANDY | 081 |
| TATUNG | 056 062 |
| TECHNICS | 034 080 |
| TECHNOL ACE | 028 |
| TECHVIEW | 099 |
| TECHWOOD | 004 |
| TEKNIKA | 002 003 004 024 028 043 072 101 143 103 164 |
| TELEFUNKEN | 255 |
| TELERENT | 072 |
| TERA | 172 |
| TMK | 004 |
| TNCI | 073 |
| TOSHIBA | 015 030 007 040 062 101 045 |
| TOTEVISION | 143 |
| TRUTECH | 087 |
| UNIVERSAL | 008 009 |
| VIDEO CONCEPTS | 146 |
| VIDIKRON | 174 188 164 050 |
| VIDTECH | 004 |
| VIEWSONIC | 122 |
| VIORE | 183 236 |
| VISCO | 190 |
| VITO | 084 |
| VIZIO | 078 |
| WARDS | 004 064 164 008 009 019 028 060 061 063 072 074 143 |
| WESTING HOUSE | 076 036 001 217 218 |
| WINBOOK | 031 |
| YAMAHA | 004 006 115 116 162 165 |
| YORK | 004 |
| YUPITERU | 043 |
| ZENITH | 072 073 095 103 011 096 |
| ZONDA | 112 |
Using AQUOS LINK
Controlling the unit using AQUOS LINK
What is AQUOS LINK?
Using the HDMI CEC (Consumer Electronics Control), with AQUOS LINK you can interactively operate this unit with your SHARP AQUOSTV.
What you can do with AQUOS LINK
When you connect this unit to the LCD TV compatible with AQUOS LINK using an HDMI cable, you can perform the functions listed below. (See page 9 for connecting to the HDMI terminal).
Automatic input select function
When you start playback of this unit, the input selector of the LCD TV will automatically switch to the LCD TV input terminal connected to the unit and the playback image will appear on the screen, even if you are watching a TV programme.
Automatic power off function
Turning off the LCD TV under different condition will set this unit as below:
| Condition | Unit will turn off automatically |
| DISC function | YES (during stop mode only) |
| TV(ARC) function | YES |
| Other functions (iPod/USB-2 (iPod)/Tuner/Audio In/Line In/Digital In) | NO |
Automatic power on function
When you switch to the LCD TV input terminal connected to this unit, the power of this unit will be turned on automatically.
AQUOS PURE MODE
When you connect this unit to an AQUOS LCD TV compatible with AQUOS LINK and set "AQUOS LINK" to "Yes", images automatically adjusted to the most suitable image quality for the AQUOS TV are output from the HDMI OUT terminal of this unit.
Note:
- In order to make AQUOS LINK available, set "AQUOS LINK" to "Yes" (See page 28).
Refer to the Operation Manual of the TV for details regarding setup.
Audio Return Channel (ARC) (Audio Return Channel submenu)
The audio return channel (ARC) enables an HDMI ARC-capable TV to send the audio stream to the HDMI OUT socket of this unit. To use this function, press TV (ARC) button on the remote control.
Using 3D
This sets output of 3D images.
To view 3D images, playback of 3D content (3D BD video) is necessary with a 3D compatible TV and 3D glasses in addition to this unit.

Press 3D to change to the 3D mode.
- Each time the button is pressed, the mode switches between "Auto(3D)" and "2D".
- The status of the selected mode will be displayed on the TV screen.
Auto: Video signals are output as 3D when 3D content (3D BD video) is played or as 2D when 2D content is played.
2D: Even if 3D content (3D BD video) is played, video signals are output as 2D at all times.
- This setting (Auto(3D)/2D) can also be performed using the menu screen (See page 28).
Notes:
- The 3D mode can be switched only when playback is stopped.
- Depending on the connected TV, the images during playback may switch to 2D images due to changes in the resolution, etc. Make sure the 3D image setting is performed on the TV.
- The 3D images may not be output as set in "HDMI Video Out".
- When performing Fast Forward/Reverse, images are shown in 2D.
Caution:
- When viewing 3D images, viewing for a long period of time or lying on your back may cause eye strain and discomfort. In addition, 3D images may affect the eyesight of young children/infants, so keep them from viewing the images.
Control Panel
This function allows you to operate this unit using the TV remote control by displaying the control panel on the TV screen.
- To operate this function, connect this unit to a TV compatible with HDMI CEC (Consumer Electronics Control) using an HDMI cable (See page 9). Make sure that "Control Panel" is set to "Yes" (See page 28). When the settings are completed, perform the following operations.
Notes:
- The control panel may not be displayed depending on the TV. Also, it may not be available depending on the content.
- When operating using the remote control of the unit, the control panel does not appear.
-
When playing video on demand streaming content available with this unit, the control panel cannot be displayed.
1 Switch the TV input to the input source to which this unit is connected (HDMI input).
2 Press the PLAY button on the TV remote control. -
The control panel appears on the TV screen.
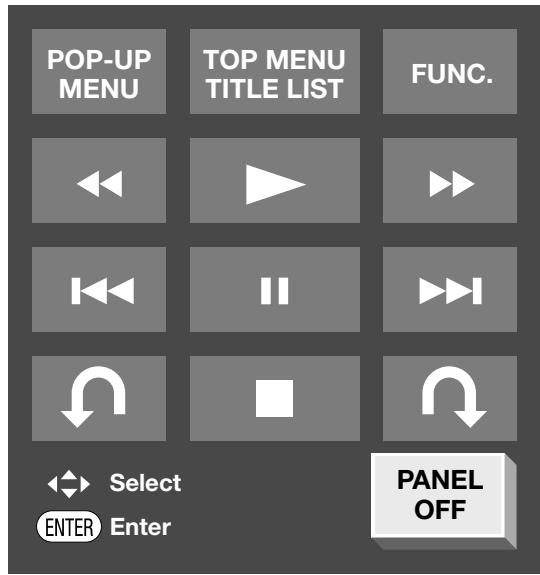
Control Panel
- When there is no operation for approximately 10 seconds, the control panel disappears automatically. To display the control panel, press the PLAY button on the TV remote control.
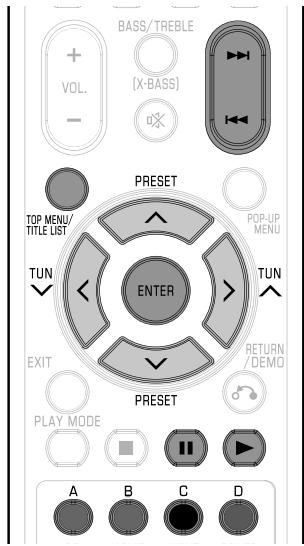
3 Press / / on the TV remote control to select the desired button icon, then press ENTER.
The function of the selected button icon is available.
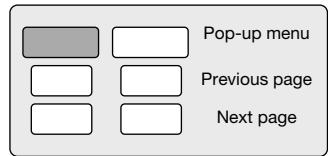
Major functions of each button icon
POP-UP MENU
- Display the pop-up menu screen for BD video and the menu screen for DVD video.
TOP MENU TITLE LIST
- Display the top menu screen for BD video and DVD video.
FUNC.
- Display the Function Control screen for BD video, DVD video, etc.

- Fast reverse (search).

Play.

Fast forward (search).

- Skip to the beginning of a chapter.

Pause.

- Skip to the next chapter.

- Jump backward (approx. 10 seconds). (This function is used when you want to re-watch a scene that has just been shown.)

- Stop.

- Jump ahead (approx. 30 seconds).
PANEL OFF
- Turn off the control panel.
Loading a Disc

1 Press ON/STAND-BY to turn on the power.
2 Press DISC button on the remote control or SELECTOR button repeatedly on the main unit to select DISC function.
3 Press OPEN/CLOSE to open the disc tray.
4 Load a disc on the disc tray.
- Insert the disc with the label face up.
In case of disc recorded on both sides, face down the side to play back.
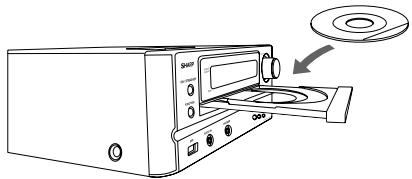
5 Press OPEN/CLOSE to close the disc tray.
BD/DVD Video Playback
BDVIDEO| BD-RE
BD-R
DVDVIDEO
DVD-R
DVD-RW
This section explains playback of commercially available BD Video and DVD Video discs (like movies) and recorded DVD-RW/R discs.
- This unit supports DVD upscaling during DVD playback.
- For a description of other playback functions, refer to "Playback Functions" on pages 24-26.

1 Load a disc.
- Playback may begin automatically, depending on the disc.
- Playback begins from the first title.
- The menu may be displayed first, depending on the disc. Perform playback operation by following the directions on the screen.
- When loading a disc containing 3D content (3D BD video) with "Yes" selected in the "3D Notice" setting (page 29), playback will be stopped and the 3D notice will be displayed on the TV screen. In such cases, press ENTER for confirmation, and then playback will start.
2 Press if playback does not begin automatically or playback is stopped.
Note:
- The disc load time may vary depending on the disc.
Regarding playback of BD video discs
- Some of the newly released BD video discs cannot be played back unless you update the unit software to the latest version. Therefore, it may be required to update the software of the unit.
Refer to pages 31-34 for more information regarding software updates for the unit.
To stop playback
Press
Resume playback function
- If you press next, playback will resume from the point where the unit was previously stopped. To playback from the beginning, cancel resume mode by pressing , then press . (This may not work depending on the type of disc. In this case, open the disc tray or enter standby.)
Notes:
- Resume playback may not function depending on the disc.
- The resume playback function for discs will be cancelled if video on demand streaming content is viewed after disc playback. Disc playback will start from the beginning after viewing streaming content.
Displaying the disc information
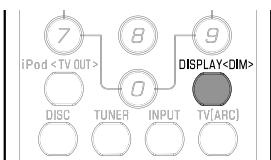
Press DISPLAY
- Each time you press DISPLAY
, the display switches as follows.
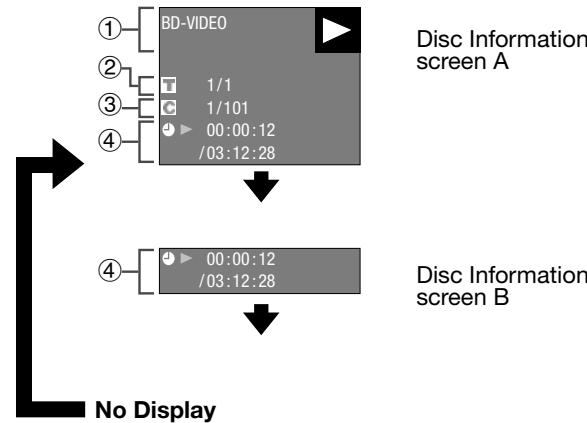
① Type of disc
(2) Title number being played / Total number of Titles
③ Chapter number being played /Total number of Chapters
④ Elapsed playback time / Total playback time for the Title
Notes:
- Disc Information Screen A disappears after about 1 minute elapses without performing any operations.
- For some commercially-released BD VIDEO discs, the total playback time display for the Chapter/Title may not appear.
BD/DVD Menus
- This section explains how to play back a BD/DVD video disc with a top menu, disc menu or pop-up menu.
- The titles listed in the top menu and a disc guide (for options like subtitles and audio languages) are given in the disc menu.
Start playback by selecting a title from the top menu
BDVIDEO DVDVIDEO
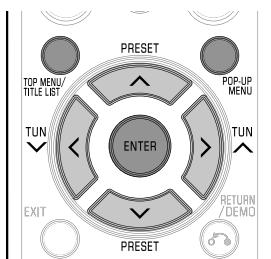
1 Press TOP MENU/TITLE LIST.
- The top menu screen is displayed if present on the BD/DVD video disc.
Example

2 Press / / to select the title, then press ENTER.
The selected title is played back.
Note:
- The procedure explained on this page is the basic operation procedure. Procedures vary depending on the BD/DVD video disc, so you may need to follow the instructions in the BD/DVD video disc manual or the instructions displayed on the screen.
Top menu
- With some BD/DVD discs, the top menu may be referred to as the "Title Menu". Use TOP MENU/TITLE LIST on the remote control when the instructions refer to "Title Menu".
- If no top menu is available, the TOP MENU/TITLE LIST button will have no effect.
Using the disc menu
DVDVIDEO
Example: Select "SUBTITLE LANGUAGE".
1 Press TOP MENU/TITLE LIST.
- The disc menu screen is displayed if present on the DVD video disc.
2 Press / to select "SUBTITLE LANGUAGE", then press ENTER.
The screen for selecting the subtitle language is displayed.
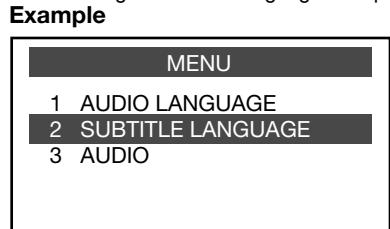
3 Press / to select the subtitle language, then press ENTER.
4 Press TOP MENU/TITLE LIST to exit.
Using the pop-up menu
BDVIDEO
1 Press POP-UP MENU during playback.
- The pop up menu screen is displayed.
- The menu contents displayed vary depending on the disc. For details on how to see and operate the pop-up menu, refer to the manual for the disc.
Example
2 Press / / to select the desired item, then press ENTER.
3 Press POP-UP MENU to exit.
- The pop-up menu will automatically disappear for some discs.
Enjoying BONUSVIEW or BD-LIVE
BDVIDEO
This Unit is compatible with additional functions of BD-Video, BONUSVIEW (BD-ROM Profile 1 Version 1.1) and BD-LIVE.
For BD-Video discs compatible with BONUSVIEW, the functions of Picture in Picture and Virtual Package are available. For BD-LIVE compatible discs, you can enjoy a variety of functions via the Internet in addition to the BONUSVIEW functions.
Virtual Package/BD-LIVE data is saved in Local Storage (USB memory device connected to this Unit). To enjoy these functions, connect a USB memory device (2GB or greater) supporting USB 2.0 High Speed (480Mbit/s) to the USB1 terminal on this unit.
- USB memory device can be used only on USB 1 terminal. (When you insert or remove a USB memory device, be sure to turn the main power off and make sure that "Quick Start" is set to "No" (See page 28).)
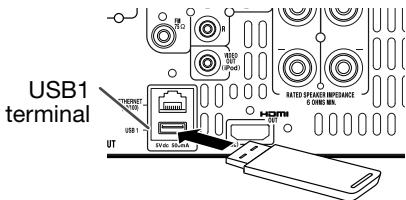
Rear
USB memory device
- If there is insufficient storage space, the data will not be copied/ downloaded. Delete unneeded data or use a new USB memory device.
- If a USB memory device containing other data (previously recorded) is used, the video and audio may not play back properly.
- If the USB memory device is disconnected from this unit during playback of Virtual Package/BD-LIVE data, playback of the disc will stop.
- Some time may be required for the data to load (read/write).
Refer to "USB Memory Management" on page 31 for erasing the Virtual Package data and the BD-LIVE data in the USB memory device.
Notes:
- SHARP cannot guarantee that all brands' USB memory devices will operate with this unit.
- Only USB memory devices formatted with FAT 32/16 are compatible.
When formatting a USB memory device using a PC, perform the following settings.
Format File System: FAT32
- Allocation Unit Size: Default Allocation Size
- Do not use a USB extension cable when connecting a USB memory device to the USB terminal of the unit.
Using a USB extension cable may prevent the unit from performing correctly.
Use of Picture in Picture function (secondary audio/video playback)
BD-Video that includes secondary audio and video compatible with Picture in Picture can be played back with secondary audio and video simultaneously as a small video in the corner.
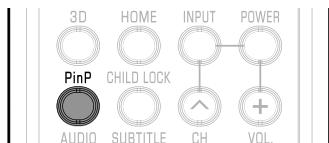
1 Press PinP during playback to show the 2-picture screen.
2 To remove the secondary video, press PinP again.
Notes:
- To listen to secondary audio, make sure that "Secondary Audio" is set to "On". (See page 28.)
- The secondary audio and video for Picture In Picture may automatically play back and be removed depending on the content. Also, playable areas may be restricted.
Virtual Package
For BD-Video discs compatible with Virtual Package, data is copied from the discs or Internet to local storage. It is automatically copied to the local storage prior to playback. You can enjoy a variety of additional functions including secondary video, secondary audio, subtitles, movie trailers, etc.
- The playback methods vary depending on the disc. For details, refer to the disc manual.
BD-LIVE
In this Unit, a variety of contents with interactive functions are available through BD-LIVE compatible Blu-ray discs by connecting to the Internet. You can enjoy the download of bonus features such as latest movie trailers to the USB memory device, communication compatible BD-J interactive games, etc.
The available functions differ depending on the disc.
Notes:
- Regarding playback method of BD-LIVE contents, etc., perform the operations in accordance with the instructions in the BD disc manual.
- To enjoy BD-LIVE functions, perform the broadband Internet connection (page 11) and communication settings (pages 29-30).
- Before using this function, please read "Network Service Disclaimer" (page 45).
Refer to page 28 regarding the setup to restrict access to BD-LIVE contents. - If the BD-LIVE screen does not appear for a while after you select the BD-LIVE function in the BD disc menu, the USB memory device may not have enough free space. In such cases, eject the disc from the unit, and then erase the data in the USB memory device in the "USB Memory Management" menu on page 31.
DVD-R/-RW (VR format) / BD-RE/-R (BDAV format) Playback
DVD-R DVD-RW BD-RE BD-R
You can play back a recorded disc (DVD: VR format finalised disc only / BD: BDAV format disc only).
- For a description of other playback functions, refer to "Playback Functions" on pages 24-26.
Notes:
- "Finalise" refers to a recorder processing a recorded disc so that it will play in other DVD units/recorders as well as this unit. Only finalised DVD discs will play back in this unit. (This unit does not have a function to finalise discs.)
- Some discs cannot be played back depending on the audio format.
- BD-RE/-R discs recorded from a BD recorder comply with AACS copyright protection technology. As this unit is not intended to be compliant with AACS, such discs cannot be played back. (AACS: Advanced Access Content System)
Playback by selecting a title
1 Load a recorded disc.
The Title List screen is displayed.
Example: Thumbnail screen
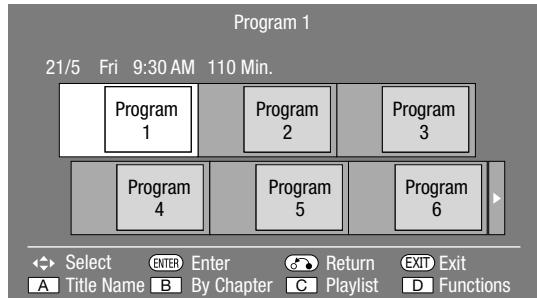
- If the Title List screen is not displayed, press TOP MENU/TITLE LIST.
- When loading a BD disc with usage restrictions placed by a BD recorder, the password input screen appears. Then, input your password.
If you input a wrong password three times, the disc tray will open. Close the disc tray, and then input a correct password.
2 Press / / to select the desired title, then press ENTER to start playback.
- If you want to select additional titles, switch pages by pressing or.
- You can playback by pressing A (Red) instead of pressing ENTER.
3 Press to stop playback.
Note:
- The Title List screen also can be displayed by pressing TOP MENU/TITLE LIST when playback is stopped.
AboutTitleList
- The Title List can be displayed in two types, Thumbnail and Title Name.
- Each time you press A (Red), the screen changes between Thumbnail and Title Name.
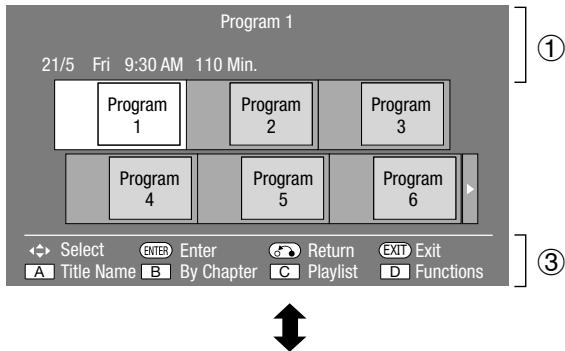
Thumbsail
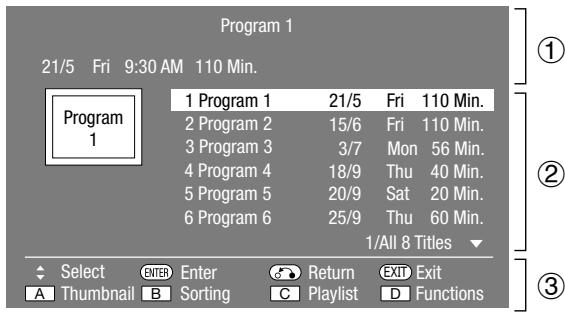
Title Name
(1) Information of selected title
② Title Name
Recording Date
Recording Duration
③ Button Guide
Playback by selecting a chapter
1 Press B (Green) while the Thumbnail screen is displayed.
The chapter screen is displayed.
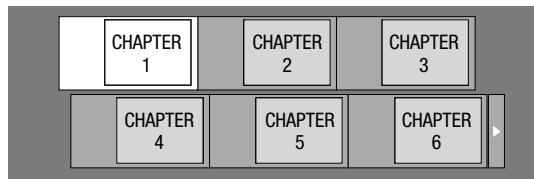
- If you want to select additional chapters, switch pages by pressing or .
To return to the Thumbnail screen, press B (Green).
2 Press / / to select the desired chapter, then press ENTER to start playback.
- You can playback by pressing▶ instead of pressing ENTER.
3 Press to stop playback.
Sorting the titles
Each time you press B (Green) while the Title Name screen is displayed, the Title Name display changes between displaying the newest title first and the oldest title first.
Playback by selecting a Playlist
1 Press C (Yellow) while the Title List screen is displayed.
The Playlist screen is displayed.
Example: Thumbnail screen
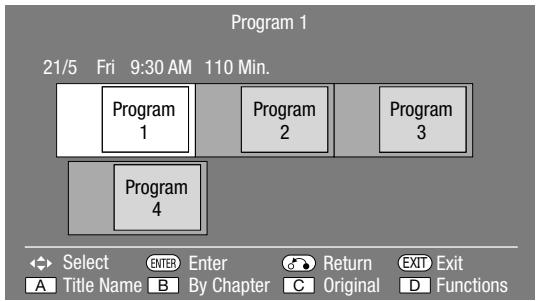
2 Press / / to select the desired title, then press ENTER to start playback.
3 Press to stop playback.
Playback from the beginning or resume playback
When you play back the title from the Title List after you stopped playback, you can select playback from the beginning or from the point where it was last stopped.
1 Press D (Blue) when the desired title is selected while the Title List screen is displayed.
2 Press / to select the type of Playback, then press ENTER to start playback.
The type of Playback may be selected from "From Beginning" or "From Continued".
3 Press to stop playback.
Audio CD Playback
AUDIO CD
This Unit can play back audio CDs.
- For a description of other playback functions, refer to "Playback Functions" on pages 24-26.

Playback from the beginning
1 Load an audio CD.
The CD screen is displayed.
(The CD screen is displayed only when a compact disc recorded in the CD-DA format is inserted.)
- Playback may begin automatically, depending on the disc.
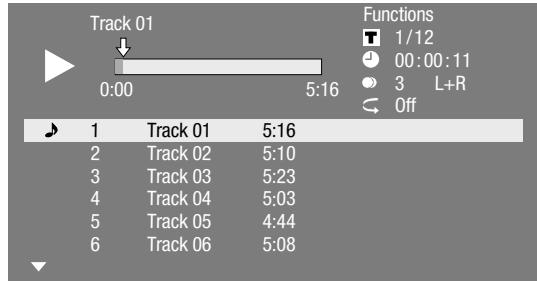
2 Press if playback does not begin automatically or playback is stopped.
3 To pause the playback at any time, press I.
Press or to return to playback.
4 Press to stop playback.
5 To return to the HOME screen, press again, and then press HOME or EXIT.
Playback by selecting a track
1 Press / to select the track, then press ENTER during playback or when playback is stopped.
- Playback of the selected track will begin.
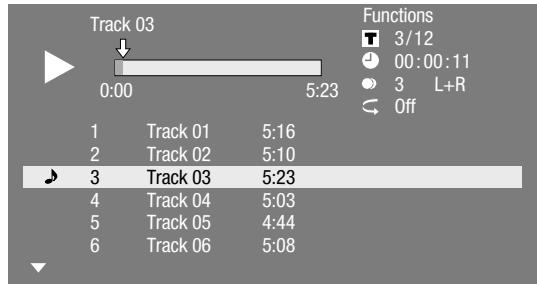
2 Press to stop playback.
Operation procedure for the "Functions" menu
1 Press D (Blue) (Functions) when the CD screen is displayed.
The "Functions" menu is activated.
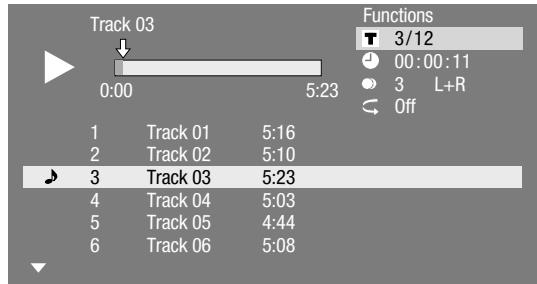
2 Press / to select the desired setting, then press ENTER.
- When playback is stopped, only "Track" can be selected.
- For a description of each setting, see "Functions which can be set" (Page 26).
3 Press / / to set, then press ENTER.
- Operations vary depending on the setting. Follow the operation instructions on the screen.
4 Press RETURN/DEMO or D (Blue) to exit the "Functions" menu.
Note:
The displayed items vary depending on the disc.
Audio Data (MP3 File) Playback
CD-R CD-RW DVD-R DVD-RW USB
This Unit can play back audio data (MP3 files) recorded on CD-R/ RW discs, DVD-R/RW discs and USB memory devices or via a home network.
- For details on the audio data that you can play using this unit, refer to page 3.
- When data in the USB memory device is played back, playback from the USB memory device will stop when OPEN/CLOSE on the remote control or the unit is pressed or when a disc is inserted into the unit.
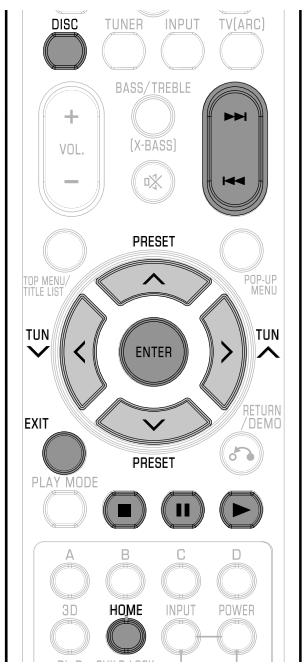
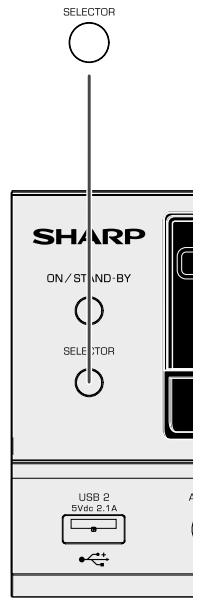
1 Press DISC button on the remote control or SELECTOR button repeatedly on the main unit to select DISC function.
2 Load a disc or a USB memory device* containing audio data (MP3 files).
* When you insert or remove a USB memory device, be sure to turn the main power off and make sure that "Quick Start" is set to "No" (See page 28).
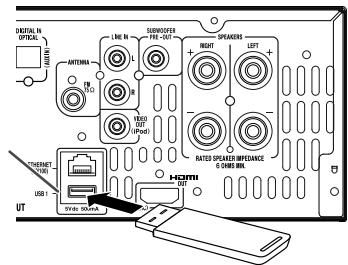
Rear
USB1 terminal
USB memory device
Note:
- A USB memory device can be used only on USB1 terminal.
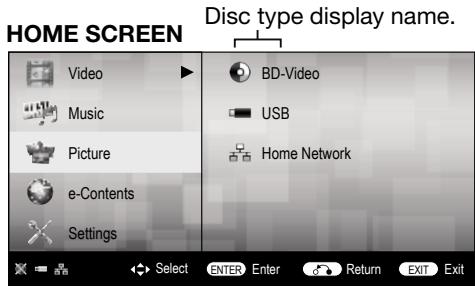
3 Press / to select "Music", then press > or ENTER.
4 Press / to select "DVD", "CD", "USB" or "Home Network", then press > or ENTER.
5 Press / to select a folder or file.
- When you select a folder, press ENTER to open it, and then press / to select a file in the folder.
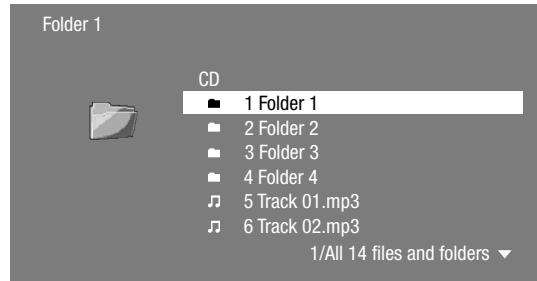
6 Press ENTER to play back the selected file.
- Playback of the selected file will begin.
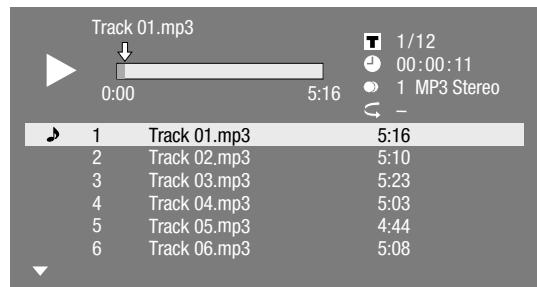
- When MP3 files are played, the "Functions" menu is not available.
7 To return to the HOME screen, press (press twice if during playback), and then press HOME or EXIT.
List of available buttons during playback
| Buttons | Description |
| ^/√ | Select a desired audio file. |
| ENTER | Play back audio file. |
| Buttons | Description |
| II | Pause audio file playback. ● Return to playback when paused. |
| K4 | Skip backward. |
| K4 | Skip forward. |
| ■ | Stop playback. |
Notes:
The Fast Forward/Reverse function does not work.
The Repeat function does not work.
The Random (Shuffle) function does not work.
Displaying Still Images (JPEG files)

This Unit can display still images (JPEG files) recorded on CD-R/RW discs, DVD-R/RW discs and USB memory devices or via a home network.
- For details on the still images that you can display using this unit, refer to page 3.
- Still images are played one by one while during "Slide show", they are automatically replaced one after another.
- When data in the USB memory device is played back, playback from the USB memory device will stop when OPEN/CLOSE on the remote control or the unit is pressed or when a disc is inserted into the unit.
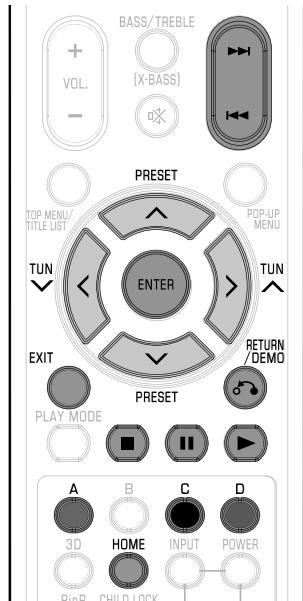
1 Press DISC button on the remote control or SELECTOR button repeatedly on the main unit to select DISC function.
2 Load a disc or a USB memory device containing Still Images (JPEG files).
When you insert or remove a USB memory device, be sure to turn the main power off and make sure that "Quick Start" is set to "No" (See page 28).
Note:
- A USB memory device can be used only on USB1 terminal.
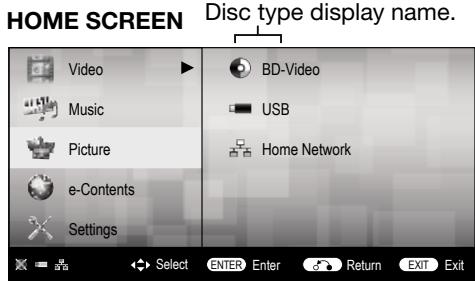
3 Press / to select "Picture", then press > or ENTER.
4 Press / to select "DVD", "CD" or "USB" or "Home Network", then press > or ENTER.
5 Press / to select a folder or file.
- When you select a folder, press ENTER to open it, and then press / to select a file in the folder.
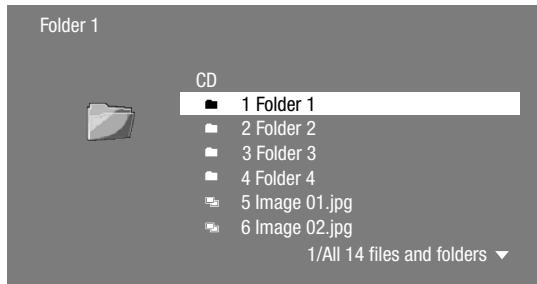
- To set slide show speed/repeat playback, press D (Blue) (Slide Show Menu).
Slide Show Menu
| Slide Show Speed | Setting of slide show playback speed |
| Repeat Mode Setting | Setting of slide show repeat playback |
| Guide Display Setting | Guide display setting during still image display |
6 Press ENTER to display the selected file.
The selected still image appears on the screen.

7 To return to the HOME screen, press , and then press HOME or EXIT.
Operational buttons during still image display
| Buttons | Description |
| →/→ | Go to the previous/next picture in the same directory. |
| RETURN/DEMO | Return to the selection screen. |
| C (Yellow) | Rotate the picture by 90 degrees to the left. |
| D (Blue) | Rotate the picture by 90 degrees to the right. |
| ▲ | Play back Slide Show. Return to slide show playback when paused. |
| II | Pause slide show playback. |
| ■ | Stop still image display/slide show playback. |
| A (Red) | Guide display on/off |
Notes:
- Thumbnail data will be displayed when JPEG files from a digital camera contain thumbnail data.
- An icon will be displayed for JPEG files which do not contain thumbnail data.
■ Accessing DLNA servers
The unit can browse and play movies, music and photos stored on your DLNA Certified media servers connected within your home network.
About a home network
This unit can display and play movies, photos and music content from your DLNA-compatible digital media servers (such as a PC and consumer electronics).
Before accessing DLNA servers:
- DLNA servers and this unit must be connected to the same local area network. Specify the settings required for connecting this unit to the local area network.
-
DLNA servers must be turned on.
-
When a PC running DLNA server software or other DLNA-compatible devices are connected to this unit, some setting changes of software or other devices may be required.
- Please refer to the operating instructions for the software or devices for more information.
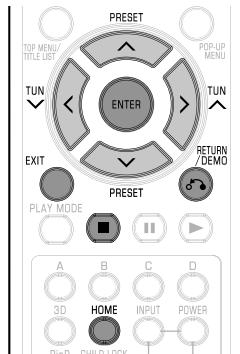
Types of playable files
| Video | DivX Plus HD (avi/divx/mkv) |
| Music | mp3 |
| Picture | jpg |
Notes:
- Even if DLNA compatible, a connection may not be able to be made depending on the server, or playback may not be available even if a connection is made successfully.
- Some files may not be playable depending on the file. For details, refer to page 3 of the operation manual disc.
- To enjoy this function, make a broadband Internet connection to both your PC and this unit (See page 11 of the operation manual disc), and then set communication settings (See pages 29-30 of the operation manual disc), then perform the following operation.
- To use this function, we recommend setting "Auto Power Off" to "No". (See page 12 of the operation manual disc.)
- Before using this function, please read "Network Service Disclaimer" (page 45).
Playback by selecting a file list
1 Press DISC button on the remote control or SELECTOR button repeatedly on the main unit to select DISC function.
2 Press / to select Video/Music/Picture, then press > or ENTER.
3 Press / to select "Home Network" in the sub window.
Video/Picture/MusicPlayback(continued)
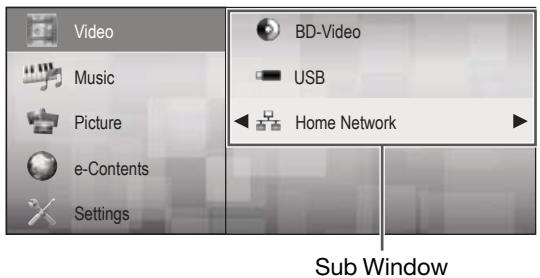
4 Press ENTER or >.
- The unit automatically scans and displays DLNA servers within your local network.
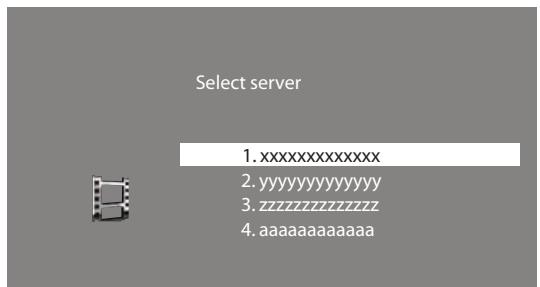
5 Press / to select a DLNA server which you want to access, then press ENTER or
- The folder list or file list of the DLNA server which you accessed is displayed.
The previous screen appears when RETURN/DEMO is pressed.
6 Press / to select the folder or file which you want to access, then press ENTER.
- When you select a folder, the file list of the folder is displayed. Press / to select the file which you want to play, then press ENTER.
- Playback starts.
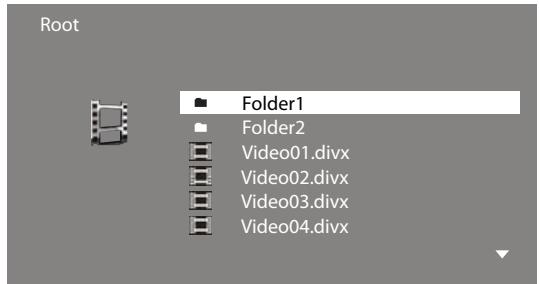
- For operation during playback, refer to pages 24-26.
7 Press to stop playback.
The file list reappears.
The previous screen appears when RETURN/DEMO is pressed.
8 Press EXIT or HOME to exit playback.
The HOME screen reappears.
Playback Functions
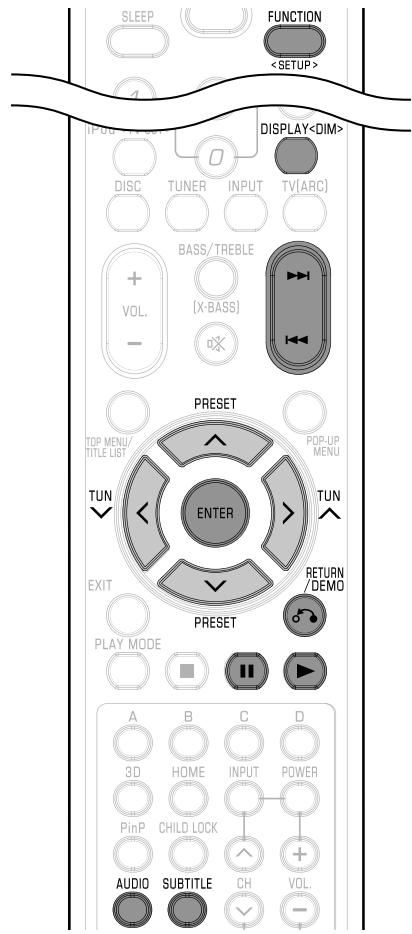
Note:
- Some operations in the following playback functions cannot be performed depending on the specifications of the disc.
Fast Forward/Reverse (Search)
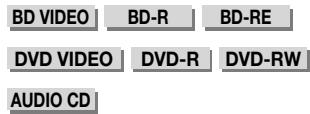
The Fast Forward/Reverse function is enabled when or is pressed for more than 2 seconds during playback.
The speed change each time the button is pressed and hold.
When playing back a DVD
- You cannot perform Fast Forward/Fast Reverse from one title and continue to another title (except when playing audio CDs). At the end or beginning of the title, Fast Forward/Fast Reverse will be cancelled and normal playback will automatically resume.
Note:
- Subtitles are not played back with BD/DVD video discs during Fast Forward and Fast Reverse.
- Skipping to the Next or the Start of the Current Chapter (Track/Title)
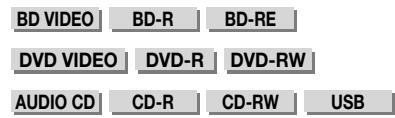
The Skip (to the beginning of a chapter, track or title) function is enabled when or is pressed during playback.
Pause/Frame Advance Playback
The Pause function is enabled when is pressed during playback. (If you are playing back an audio CD, audio data [MP3 files] or still images [JPEG files], these will also pause.)
The Frame Advance Playback function is enabled when is pressed during pause.
- Frame Advance Playback may not function properly with discs other than DVD-RW/R (VR format).
Notes:
- Some BD/DVD Video discs are not compatible with Pause/Frame Advance Playback.
- Frame Advance/Reverse playback can be performed for DVD discs by pressing or during pause.
- Frame Reverse Playback cannot be performed for DivX video.
SlowPlayback(Forward/Reverse)
The SlowPlayback(Forward/Reverse)function is enabled whenor is pressed for more than 2 seconds during pause.
Press to return to normal playback.
Notes:
- This doesn't work for audio CDs.
- You cannot perform Slow Playback between titles. At the end of the title, Slow Playback will be cancelled and normal playback will automatically resume.
- Reverse SlowPlayback cannot be performed for BD video and DVD discs in AVCHD format.
- Reverse SlowPlayback cannot be performed for DivX video.
RepeatPlaybackofaTitleorChapter(RepeatPlayback)
BDVIDEO| BD-R
BD-R
BD-RE
DVDVIDEO DVD
DVD-RW
AUDIO CD
1 Play back the title or chapter you want to repeat.
2 Press PLAY MODE, then press / to select the type of Repeat Playback.
- Playback Title: Repeats the title currently being played back.
- Playback Chapter: Repeats the chapter currently being played back.
- Scene Selection: Repeats the specified scene of title or chapter.
Playback Title
Playback Chapter
Scene Selection
Notes:
- Press RETURN/DEMO to cancel without setting the type of Repeat Playback.
- For Audio CD, you can select "Playing Disc", "Playing Track" and "Specify The Part" as Repeat Playback options.
- Repeat Playback cannot be performed for DivX video.
4 Press ENTER.
Example: Repeat playback of a title (TITLE)
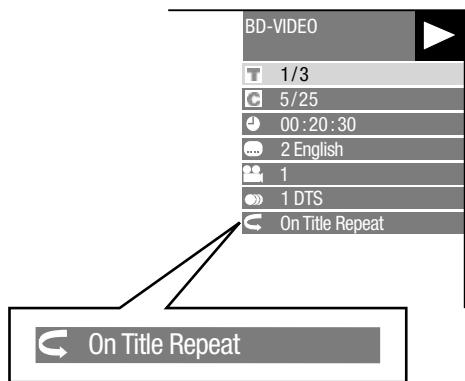
5 Press PLAY MODE to return to normal playback.
Note:
- "Scene Selection" operation is not available for BD video.
Partial RepeatPlayback (Repeat Playback of a Specified Part)
DVDVIDEO
DVD
DVD-RW
AUDIO CD
1 Press PLAY MODE during playback.
2 Press / to select "Scene Selection", then press ENTER.
- "Set Start Point" displays.
Playback Title
Playback Chapter
Scene Selection
Set Start Point
3 Press ENTER at the scene where you want to set the start point.
- "Set End Point" displays.
4 Press ENTER at the scene where you want to set the end point.
- You can press▶▶ to fast forward to the scene where you want to set the end point. When you reach the desired scene, simply press▶ and then ENTER to set the end point. To cancel Repeat Playback, press PLAY MODE.
Notes:
- Press▶▶, the Repeat Playback is cancelled and the next chapter being play back.
- Press once, the Repeat Playback is cancelled and the unit returns to the start of current chapter (track).
- If you press again (within about 5 seconds) the unit will skip to the beginning of the previous chapter (track).
- For Partial Repeat Playback, set the start and end points within the same title.
- Repeat Playback may be forbidden depending on the disc.
- Partial Repeat Playback may not work in multi-angle scenes.
- If you press DISPLAY
, you can confirm the Repeat Playback status.
Displaying the Audio Information
You can display the audio information on the disc currently being played back by pressing AUDIO.
The displayed contents vary depending on the disc.
BDVIDEODVDVIDEO
The audio channel currently being played back will be displayed.
If multiple audio channels are recorded, you can switch the audio channel by pressing AUDIO.
DVD-RW DVD-R
When a recorded broadcast with stereo or monaural audio is played back:
"Stereo" is displayed. (Audio cannot be switched.)
Notes:
- When you play a programme recorded in stereo or monaural, and if you are listening to the Bitstream sound via the digital output jack, you cannot select the audio channel. Set "Audio Out" to "PCM" (page 28).
- Settings for audio can also be changed in the Function Control screen (Page 26).
- The operation of audio differs according to each disc. You may need to refer to the operation manual of the disc.
- The display for audio information automatically disappears after 5 seconds.
Switching Subtitles
BDVIDEODVDVIDEO
If subtitles are provided in multiple languages, you can switch between them.
Press SUBTITLE during playback.
- The display indicates the subtitle number currently being played back, and the subtitles appear.
Each time SUBTITLE is pressed, the subtitles change.
- " -" is displayed if a disc has no subtitles.
- You can also select "Off".
Notes:
- Settings for subtitles can also be changed in the Function Control screen (Page 26).
- The operation of subtitles differs according to each disc. You may need to refer to the operation manual of the disc.
- The display for subtitle information automatically disappears after 5 seconds.
Switching the Angle
BDVIDEO|DVDVIDEO
If multiple angles are recorded, you can switch between them.
1 Press FUNCTION
The Function Control screen is displayed on the TV.
2 Press / to select the Angle Number column, then press ENTER.
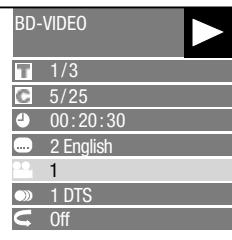
3 Press / to select the desired Angle Number, then press ENTER.
4 Press RETURN/DEMO or FUNCTION
Notes:
The displayed items vary depending on the disc.
- If you access the Function Control screen during playback of a BD/DVD video, it may be impossible to operate the BD/DVD video playback. In cases like this, close the Function Control screen.
- The operation of angles differs according to each disc. You may need to refer to the operation manual of the disc.
- The display for angle information automatically disappears after 5 seconds.
Playback Functions (continued)
Displaying the Angle Mark
BDVIDEODVDVIDEO
You can change settings so that Angle Mark appears in the right bottom part of the screen when multiple angles are recorded. The settings can be changed in "Settings" - "Playback Setting" - "Angle Mark Display" (Page 28).
Settings During Playback
Function Control
BDVIDEO BD-R BD-RE
DVDVIDEO DVD-R DVD-RW
AUDIO CD
This allows you to adjust various settings at once, like subtitles, angle settings and the title selection for Direct Playback. You can adjust the video and audio to suit your preferences. The operations are the same for BD and DVD.
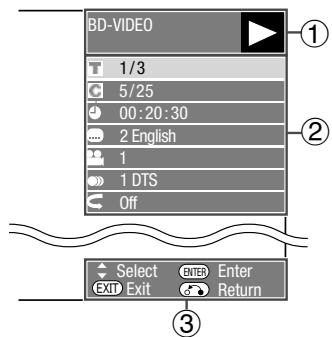
Function Control screen
①Playback status display
Shows the operation status and the disc type.
② Setting items
Selects a title (or track) or chapter for playback, or performs video/ audio settings.
- Title/Track Number (Direct Title/Track Skip)
Chapter Number (Direct Chapter Skip) - Playback Elapsed Time (Direct Time Skip)
Subtitle Language
Angle Number
Audio
Repeat
③ Operation guide display
Provides help on remote control button operations.
Function control operation procedure
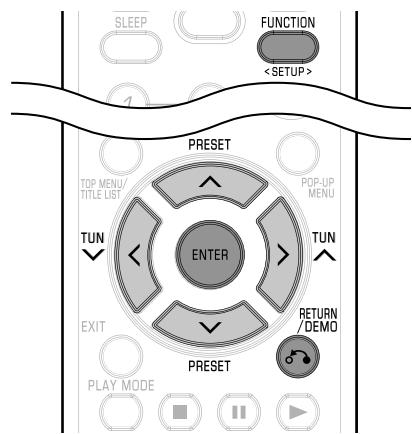
1 Press FUNCTION
The Function Control screen is displayed on the TV.
2 Press / to select the desired setting, then press ENTER.
- For a description of each setting, see "Functions which can be set" (on this page).
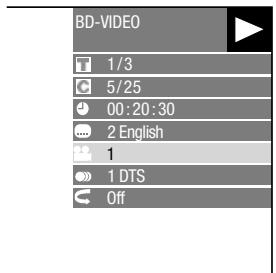
3 Press / / to set, then press ENTER.
- Operations vary depending on the setting. Follow the operation instructions on the screen.
4 Press RETURN/DEMO or FUNCTION
Notes:
- If “- -” is displayed for an option like title number or subtitles, the disc has no titles or subtitles which can be selected.
The displayed items vary depending on the disc. - If you access the Function Control screen during playback of a BD/DVD video, it may be impossible to operate the BD/DVD video playback. In cases like this, close the Function Control screen.
Functions which can be set

Title/Track Number (Direct Title/Track Skip)
- Shows the title number being played back (or track number when playing back an audio CD). You can skip to the start of the title (or track).
- To skip to the start of a selected title (or track), press the Number buttons to enter the title (or track) number when this option is highlighted.

Chapter Number (Direct Chapter Skip)
- Shows the chapter number being played back. You can skip to the start of the chapter.
- To skip to the start of a selected chapter, press the Number buttons to enter the chapter number when this option is highlighted.

Playback Elapsed Time (DirectTime Skip)
- Shows the time elapsed from the beginning of the current disc title (or track). This lets you skip to a specific time.
- Press / to select the Hour, Minute or Second, then press / or the Number buttons to set the time. Press ENTER to start playback at the set time.

Subtitle Language
- Shows the currently selected subtitle language. If subtitles are provided in other languages, you can switch to your preferred language.

Angle Number
- Shows the currently selected angle number. If the video is recorded with multiple angles, you can switch the angle.

Audio
- Shows the currently selected type of audio. You can select the desired type of audio.

Repeat
- The current Title (or Chapter) or partial segments can be repeatedly played back. Repeat Playback is also possible with the PLAY MODE button on the remote control.
Note:
These functions may not work with all discs.
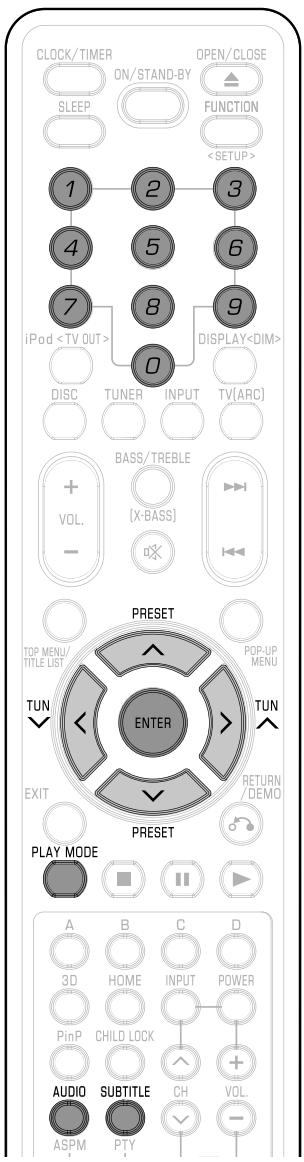
Settings
Common operations
The "menu" enables various audio/visual settings and adjustments on the functions using the remote control unit. You need to call up the On Screen Display to perform settings for this unit. The following is the explanation for the basic operations of the "menu".
Example: Setting "AQUOS LINK"
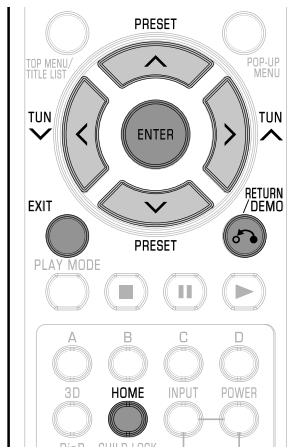
1 Home screen display
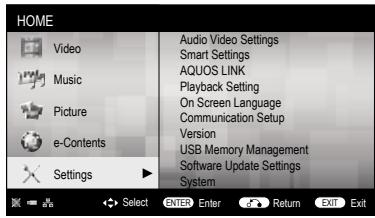
Press / to select "Settings", then press > or ENTER.
2 Select a menu item

Press / to select "AQUOS LINK", then press > or ENTER.
3 Select the next item
Press / to select the desired item, then press ENTER.
Press o RETURN/DEMO to return to the previous "menu" page.
4 Exit the menu screen
Press HOME or EXIT to exit.
Setting the PIN code for the first time
1 Press / to select "Settings", then press > or ENTER.
2 Press / to select "Playback Setting", then press > or ENTER.
3 Press / to select "PIN Code Setting", then press > or ENTER.
4 Press / to select "Yes" to enter the PIN code setting menu.
5 Enter a 4-digit number for the PIN code setting.
6 Press ENTER to complete the PIN code setting.
Parental Control Setting
PIN code must be set first before setting the Parental Control.
1 Press / to select "Settings", then press > or ENTER.
2 Press / to select "Playback Setting", then press > or ENTER.
3 Press / to select "Parental Control", then press > or ENTER.
4 Enter your 4-digit PIN code.
- You cannot move to the next setting screen until you input the correct PIN code.
5 Press / to select the parental control level for DVDVIDEO, BD-ROM, and then select the country code.
Press ENTER after making each selection.
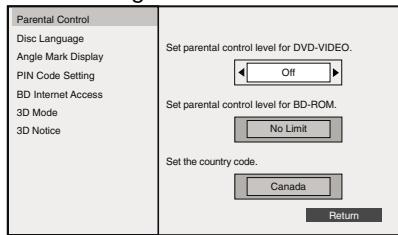
6 Press HOME or EXIT to exit.
Audio Video Settings
HDMI Video Out
This sets the resolution of the video output for the HDMI terminal of this unit.
Normally set to "Auto" (factory preset value).
Item
Auto, 1080p, 1080i, 720p, 576/480p
Note:
- When the BD unit is connected to a 1080p 24Hz compatible TV and the "HDMI Video Out" is set to "Auto", 1080p 24Hz will automatically be displayed when compatible discs are played back.
Secondary Audio
This toggles the clicking sound on the menu and audio with secondary video in picture in picture mode for BD-Video.
- Select "Off" when enjoying the high quality sounds of BD-Video.
Item
On, Off
Audio Out
You can set the audio output when connecting to SURROUND equipment.
1 This sets the audio output connected to SURROUND equipment.
Item
HDMI Output: Select this when you connect using HDMI OUT terminal.
2 You can set the audio output mode.
This sets the audio output mode for HDMI OUT terminal when selecting "HDMI Output".
Note:
- When the secondary audio is set to "On", PCM is automatically selected as the audio output mode.
Item
Bitstream:
- Select this when connecting to HDMI equipment with a built-in decoder for DOLBY DIGITAL, etc.
- Setting to Bitstream will output each audio signal by Bitstream. PCM (Surround):
- Select this when connecting to multi-channel HDMI equipment.
- Setting to PCM (Surround) will output by LINEAR PCM by decoding audio signals recorded in each audio output mode such as DOLBY DIGITAL, DTS.
Note:
See page 34 for information on output of audio formats.
Dynamic Range Control
This lets you adjust the range between the loudest and softest sounds (dynamic range) for playback at average volume. Use this when it is hard to hear dialogue.
Item
Normal: The same audio output range is played as the original recorded audio output range.
Shift*: When Dolby Digital audio is played back, the dynamic range of the audio is adjusted so that the dialogue portion can be heard easily. (If the audio sounds abnormal, set to "Normal".)
Auto: When you play back audio in the Dolby TrueHD format, the dynamic range is automatically adjusted.
- Lower the audio volume before setting. If you do not do so, the speakers may emit a loud sound or excessive output may be applied to the speakers.
SUPER PICTURE
This enhances the quality of video streaming images with pixel by pixel processing technology.
Item
On, Off
Smart Settings
Quick Start
This turns the Quick Start function on and off.
When the Quick Start function is on:
The startup time of the Unit is reduced.
However, power consumption will increase.
When the Quick Start function is off:
- The unit will enter the low power consumption mode when in standby condition.
Item
Yes, No
Note:
- When "Quick Start" is set to "Yes", the Unit requires some time to turn off.
Control Panel
This lets you set display of the control panel on the TV screen to on or off.
Item
Yes, No.
AQUOS LINK
This lets you set the Unit to receive the control signal from the AQUOS LINK remote control via the HDMI cable.
Item
Yes, No
Note:
- For details, refer to the operation manual of TV.
Playback Setting
Parental Control
This lets you set the Parental Control depending on the disc content. The available Parental Control Levels are shown below.
The 4-digit PIN code number needs to be entered before the Parental Control Levels and the Country Code are set. The Parental Control Levels and the Country Code cannot be set if a PIN code has not been created or the PIN code is not entered.
- Select the rating level appropriate for the age of the user.
Item (Parental control level for DVD-video)
8 and Off: All DVD-video can be played.
1-7: Prohibits play of DVD-video with corresponding ratings recorded on them.
Item (Parental control level for BD-video)
No Limit: All BD-video can be played.
0-99 year(s): Prohibits play of BD-video with corresponding ratings recorded on them.
Item (Country code)
Select the country code.
The ratings differ according to the country.
Note:
Refer to "Basic Operation for Playback Setting" on page 27 for details.
Disc Language (Disc Priority Language)
This lets you select the language for subtitles, audio and menus displayed on the screen.
Item (Subtitle)
Select the subtitle language you want to display.
Item (Audio)
Select the audio language you want to hear.
Item (Menu)
Select the menu language you want to display.
Note:
- When "Auto" is selected, the priority language of the disc will be played back.
Angle Mark Display
This lets you turn the Angle Mark Display on or off when BD/DVD video recorded with multiple angles is played back. (The Angle Mark is displayed in the lower right screen.)
Item
Yes, No
PIN Code Setting
This sets the PIN code for setting or changing the Parental Control Level.
Item
Yes: Enter the 4-digit number.
No
Notes:
- When you forget the PIN code, you can reset the current PIN code using "System Reset" under "Settings". (See page 29.)
- You can also set the new PIN code if desired.
BD Internet Access
This allows you to set access restriction to BD-LIVE contents.
Item
Permit: Allows all BD-LIVE discs.
Limit: Allows only discs with owner certification.
Prohibit: Prohibits all BD-LIVE discs.
Notes:
The available functions differ depending on the disc.
- Regarding playback method of BD-LIVE contents, etc., perform the operations in accordance with the instructions in the BD disc manual.
- To enjoy BD-LIVE functions, perform the broadband Internet connection (page 11) and communication settings (pages 29-30).
3D Mode
This sets output of 3D images.
To view 3D images, playback of 3D content (3D BD video) is necessary with a 3D compatible TV and 3D glasses in addition to this unit.
Item
Auto: Video signals are output as 3D when 3D content (3D BD video) is played or as 2D when 2D content is played.
2D: Even if 3D content (3D BD video) is played, video signals are output as 2D at all times.
Caution:
- When viewing 3D images, viewing for a long period of time or lying on your back may cause eye strain and discomfort. In addition, 3D images may affect the eyesight of young children/infants, so keep them from viewing the images.
3D Notice
This sets whether or not a notice is displayed ("Yes" or "No") on the connected TV every time 3D content (3D BD video) is played.
Item
Yes, No

On Screen Language
You can set the language you want to display on the screen.
Item
English, Deutsch, Français, Italiano, Espanol, Portugues, Nederlands, Svenska, Dansk, Norsk, Suomi, Polski, Cesky, Magyar, Slovensky, Slovenicina

Version
When you select "Version", the system software version is displayed.

System
System Reset
You can reset all settings to the factory presets.
Item
Reset, Not Reset
DivX(R) Registration
The DivX registration code is displayed.
Item
Yes, No
Note:
To learn more, visit www.divx.com/vod.
DivX(R) Deregistration
You can deactivate your DivX information on the unit.
Item
Yes, No
Note:
To learn more, visit www.divx.com/vod.

Communication Setup
This allows you to perform and/or change the communication settings and the Internet connection. This setting is required to use BD-LIVE functions, video on-demand services (e-Contents), home networks and software updates that connect to the Internet.
Notes:
- Make sure that the LAN cable is connected to this unit.
- For manually performing the setting, the following information of the connected router or modem is required. Confirm the information prior to the setting.
- IP address, netmask, gateway, DNS address
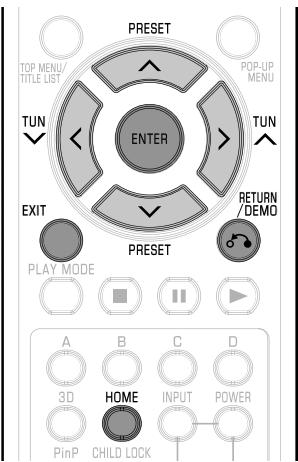
1 Press / to select "Settings", then press > or ENTER.
2 Press / to select "Communication Setup", then press > or ENTER.
3 Press / to select "Ethernet Setup", then press > or ENTER.
4 Press / to select "Change", then press ENTER.
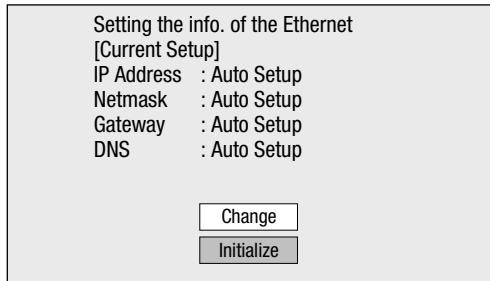
- For initializing the current setting, select "Initialize", then press ENTER.
5 For setting the IP address, press / to select "Yes" or "No", then press ENTER.
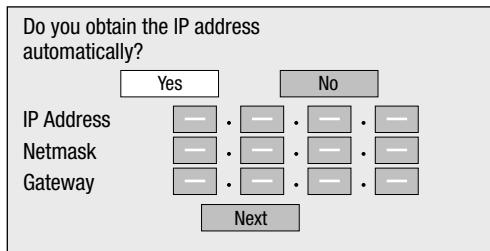
- If selecting "Yes": The IP address is automatically obtained.
- If selecting "No": The IP address, netmask and gateway are manually entered using the screen for inputting characters. (See page 29-30.)
Regarding each of the setup values, confirm the specifications of your broadband router.
6 Select "Next", then press ENTER.
- If selecting "Yes" in the step 5, go to the step 8.
7 Enter your DNS address.
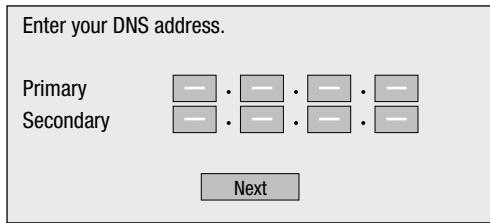
- The primary and secondary DNS addresses are entered using the screen for inputting characters. (See pages 29-30.)
Regarding each of the setup values, confirm the specifications of your broadband router.
8 Select "Next", then press ENTER.
9 For testing the connection to the Internet, after confirming the settings, press / to select "Test", then press ENTER.
- "Test" is available only when setting to obtain the IP address automatically. "Test" cannot be selected if the IP address has not been obtained automatically.
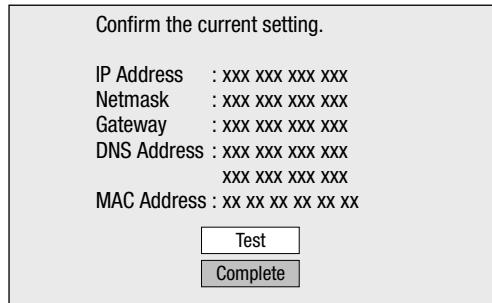
- As a result of the test, if the Internet connection fails, enter the setup values manually.
10Press / to select "Complete", then press ENTER.
11Press HOME or EXIT to return to the HOME screen.
To perform other settings, press RETURN/DEMO.
The operation procedure for inputting characters manually
Note:
- Numeric characters such as IP address can be entered on the input screen either by selecting each of the characters in the "Numeric" mode or using the Number buttons on the remote control.
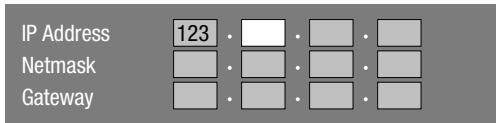
1 Press ENTER at the boxes in which characters are to be entered, and the input screen will appear.
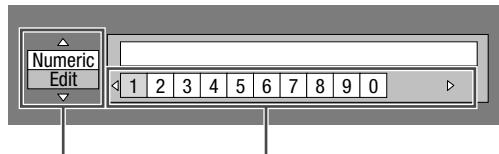
Selected by pressing / Selected by pressing
2 Press / to select the desired input mode.
3 Press / to select a number/character, then press ENTER.
4 Repeat the step 3 to display all of the desired characters/numbers in the input field.
Example: The screen for inputting numeric characters
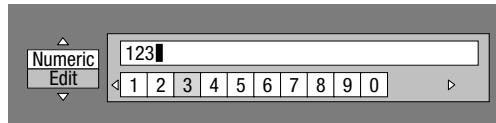
Notes:
- Press RETURN/DEMO (Del.Char.) to delete a number/ character you have input.
- To change a number/character you have input, press B (Green) (Left) or C (Yellow) (Right) to select the number/character you want to change, and press RETURN/DEMO (Del.Char.). Then, press to select a new number/character you want to input, and press ENTER.
5 Press D (Blue) (Complete) to fix the numbers which have been input.
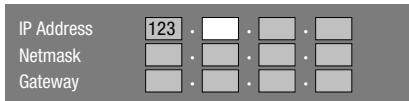
6 Repeat step 1 to 5 to finish inputting all the required characters.
Input character list
| Numeric | 1 2 3 4 5 6 7 8 9 0 | ||||||
| Edit | Cancel | Left | Right | Complete | Del.Char. | ||
| The same operation as the coloured buttons and RETURN/DEMO can be performed by selecting each of the items and pressing ENTER. “Del.Char.” stands for deleting characters. | |||||||
Before using the USB memory device
Caution:
- Do not remove the USB memory device or unplug the AC power lead while the operations for "USB Memory Management" or "Software Update Settings (Manual Update from USB memory device)" are being performed.
- Do not use a USB extension cable when connecting a USB memory device to the USB1 terminal.
Using a USB extension cable may prevent the unit from performing correctly.
Notes:
- SHARP cannot guarantee that all brands' USB memory devices will operate with this unit.
- Only USB memory devices formatted with FAT 32/16 are compatible.
When formatting a USB memory device using a PC, perform the following settings.
Format File System: FAT32
Allocation Unit Size: Default Allocation Size
USB Memory Management
The following instructions explain how to delete data such as the Virtual Package data and the BD-LIVE data in a USB memory device.
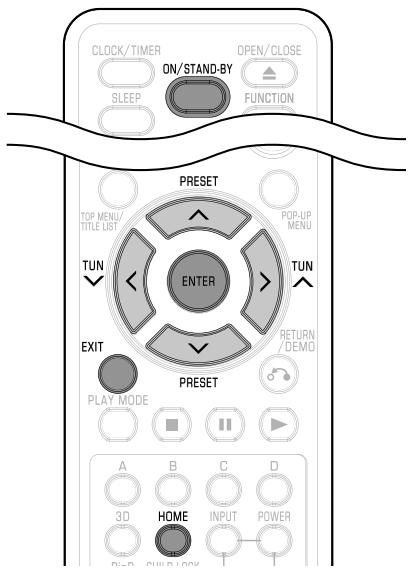
When you insert or remove a USB memory device, be sure to turn the main power off and make sure that "Quick Start" is set to "No" (See page 28).
1 Insert the USB memory device into the USB terminal on this unit.
Note:
A USB memory device can be used only with USB1 terminal.
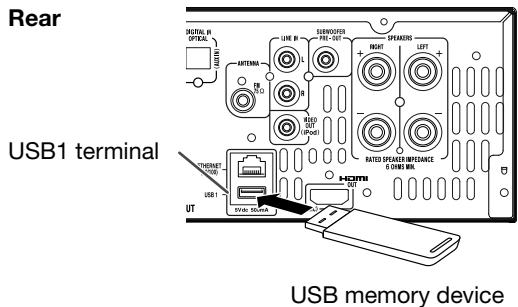
2 Press ON/STAND-BY to turn on the power.
3 Press / to select "Settings", then press > or ENTER.
4 Press / to select "USB Memory Management", then press > or ENTER.
- The "USB Memory Management" screen is displayed.
- “No USB Memory” appears when no USB memory is inserted.
5 Press / to select "Erase" or "Format", then press ENTER.
Erase: Deletes only BD-VIDEO data written on the USB memory device such as BD-LIVE data.
Format: Be aware that all data including BD-VIDEO data and software update data will be deleted.
- If you want to delete only the unneeded software update data after the software is updated, delete the data on the USB memory device using a PC.
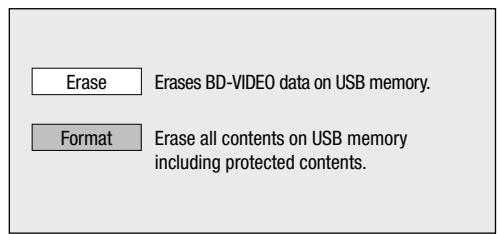
6 Press / to select "Yes", then press ENTER.
- A confirmation message is displayed. Check that the correct USB memory device is displayed, and then continue.
7 Start the process.
The screen for the current operation will display.

8 Press ENTER.
9 Press HOME or EXIT to exit.
Note:
Data which has been saved to the unit's internal memory (game score, etc.) will also be deleted.
Software Update Settings
In this unit, the software version can be updated using either one of the following methods.
- Auto Update from Network
- Manual Update from Network
- Manual Update from USB memory device
Auto Update from Network
This function allows you to perform the update by accessing an Internet connection automatically to check if there is a new firmware version every time the unit is turned on.
When using this function, it is required to perform the following settings in advance.
Notes:
- Make sure that the LAN cable is connected to this unit.
- Make sure to perform the communication settings. (See pages 29-30.)
- It may take time to access and download the update depending on the Internet connection and other factors.
Caution:
- Do not remove the LAN cable or unplug the AC power lead while downloading or updating software.
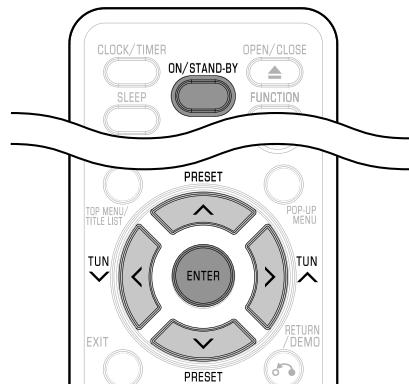
Setup
1 Press / to select "Settings", then press > or ENTER.
2 Press / to select "Software Update Settings", then press > or ENTER.
3 Press / to select "Auto Update Setting", then press > or ENTER.
4 Press / to select "Yes", then press ENTER.
- After this, an Internet connection will be made automatically every time this unit is turned on.
Update process
1 When this unit is turned on, the Internet connection starts automatically.
- "Accessing..." blinks on the screen.

- The current version of this unit software and the latest version of the update file on the network are displayed when latest version of firmware has been found.
To update this unit software with update file, select "Yes", and go to step 2.
Latest version of firmware has been found.
Firmware update is available.
Proceed with update?
Current Version :
XXXXXX
Latest Version :
yyyyyy
If "Yes" will be selected, version update will start.

- If the latest firmware version has been already updated, nothing is displayed on the screen.
2 Press ENTER to start updating.
Downloading latest firmware...
Version: yyyyMMdd

3 When the software is successfully updated, a screen is displayed indicating that the update process is completed.
- If the update has failed, an error message appears.
Retry the update after checking if the broadband Internet connection (page 11) and communication settings (pages 29-30) are performed properly.
4 Press ON/STAND-BY to turn off the unit before using again.
Manual Update from Network
This function allows you to perform the update operation by accessing an Internet connection manually to check if there is a new firmware version.
Notes:
- Make sure that the LAN cable is connected to this unit.
- Make sure to perform the communication settings. (See pages 29–30.)
- It may take time to access and download the update depending on the Internet connection and other factors.
Caution:
- Do not remove the LAN cable or unplug the AC power lead while downloading or updating software.
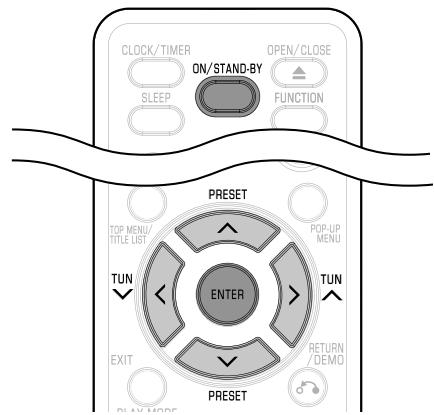
1 Press / to select "Settings", then press > or ENTER.
2 Press / to select "Software Update Settings", then press > or ENTER.
3 Press / to select "Manual Update", then press > or ENTER.
4 Press / to select "Network", then press ENTER.
5 During access to the network and checking the latest version of firmware, "Accessing" blinks.
- The current version of this unit software and the latest version of the update file on the network are displayed when latest version of firmware has been found.
To update this unit software with update file, select "Yes", and go to step 6.
Latest version of firmware has been found.
Firmware update is available.
Proceed with update?
Current Version :
xxxxxx
Latest Version :
yyyyyyyy
If "Yes" will be selected, version update will start.

- If the Internet connection has failed, an error message appears. Retry the update after checking if the broadband Internet connection (page 11) and communication settings (pages 29- 30) are performed properly.
6 Press ENTER to start updating.

7 When the software is successfully updated, a screen is displayed indicating that the update process is completed.
- If the update has failed, an error message appears.
Retry the update after checking if the broadband Internet connection (page 11) and communication settings (pages 29-30) are performed properly.
8 Press ON/STAND-BY to turn off the unit.
Manual Update from USB memory device
This function allows software updates by inserting a USB memory device with the update file into the USB1 terminal on this unit.
- When a software update is performed, the software update data must be written onto the USB memory device in advance using a PC.
- The USB memory device must be clear of all files except software update data to allow new software uploading.
To check for the availability of a software update, visit www sharkp.de
- When software update data is released, copy the data onto a USB memory device after downloading it to a PC.
- For methods such as downloading and copying to a USB memory device, carefully read the description shown on the website before performing the operation.
Notes:
- Only USB memory devices formatted with FAT 32/16 are compatible.
When formatting a USB memory device using a PC, perform the following settings.
Format File System: FAT32
Allocation Unit Size: Default Allocation Size
- Do not extract the firmware update file to any folders other than the root directory on the USB memory device. The firmware update file must be only one file directly in the root directory.
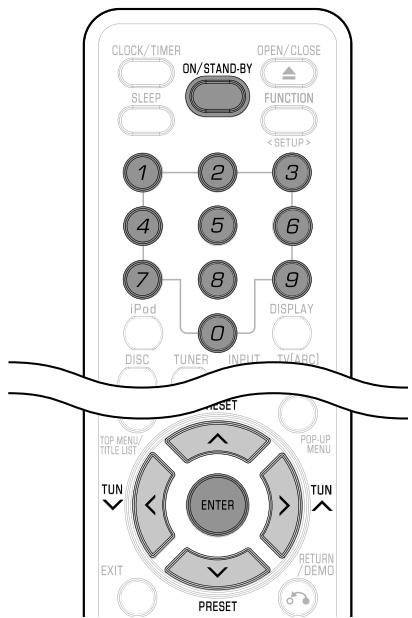
Caution:
- Do not remove the USB memory device or unplug the AC power lead while the software is being updated.
When you insert or remove a USB memory device, be sure to turn the main power off and make sure that "Quick Start" is set to "No" (See page 28).
1 Insert the USB memory device with the update file into the USB1 terminal on this unit.
Note:
- A USB memory device can be used only with USB1 terminal.
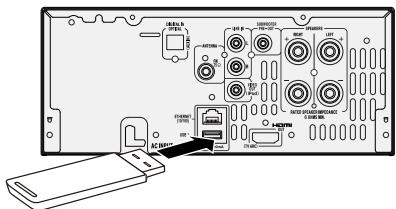
Rear
USB memory device
2 Press ON/STAND-BY to turn on the power.
3 Press / to select "Settings", then press > or ENTER.
4 Press / to select "Software Update Settings", then press > or ENTER.
5 Press / to select "Manual Update", then press > or ENTER.
6 Press / to select "USB Memory", then press ENTER.
- If you have set the PIN code, go to step 7, otherwise go to step 8.
7 Enter the 4-digit number using 0-9.

8 Press ENTER to start checking data in the USB memory device.
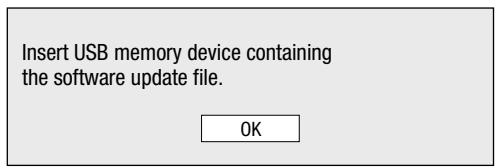
9 During the data checking, "Checking" blinks.
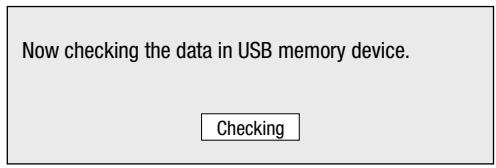
- The current version of this unit software and the version of the update file on the USB memory device are displayed. To update this unit software with update file, select "Yes", and press ENTER.
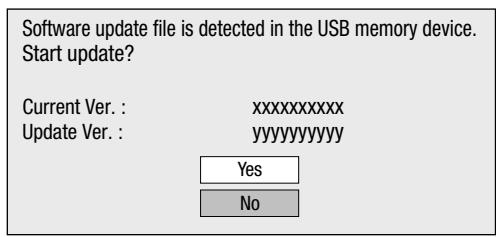
- If the USB memory device is not properly installed or the correct update file cannot be found on the USB memory device, an error message is displayed.
Check the file on the USB memory device, and then reinsert the USB memory device correctly.
Software update file is not detected in the USB memory device.
Confirm that you have transferred the file
to the USB memory device and retry software update.
Confirm that you have inserted the USB memory device
into the correct device.
OK
There is more than one software file
in the USB memory device.
Confirm that only the software update file is
in the USB memory device.
OK
10 Press ENTER to start updating.
- The screen becomes dark for a while until the update screen can be displayed. Please wait for the update screen to appear. Do not unplug the AC power lead.
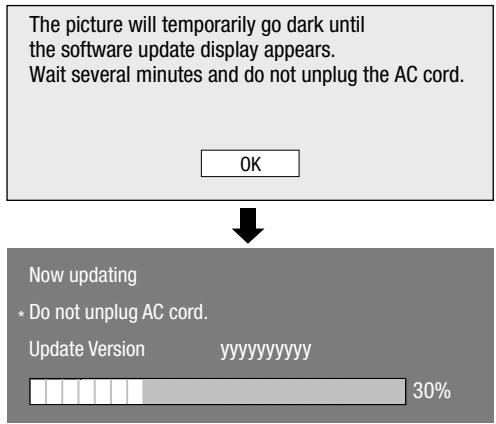
11 When the software is successfully updated, a screen is displayed indicating that the update process is completed.
- If the update has failed, check the file in the USB device and try Software Update again.
12 Press ON/STAND-BY to turn off the unit.
- Delete unneeded software update data using a PC after the software update process is completed.
13 Remove the USB memory device.
About Output of Audio Formats
| Audio format | Maximum number of channels | HDMI | |
| PCM | Bitstream | ||
| Dolby TrueHD | 7.1ch (48kHz/96kHz) | 7.1ch *1 | 7.1ch *2 |
| 5.1ch (192kHz) | 5.1ch *1 | 5.1ch *2 | |
| Dolby Digital PLUS | 7.1ch (48kHz) | 7.1ch | 7.1ch *2 |
| DTS-HD Master Audio | 7.1ch (48kHz/96kHz) | 7.1ch *1 | 7.1ch *2 |
| 5.1ch (192kHz) | 5.1ch *1/*3 | 5.1ch *2 | |
| DTS-HD High Resolution Audio | 7.1ch (48kHz/96kHz) | 7.1ch *1 | 7.1ch *2 |
| LPCM | 7.1ch (48kHz/96kHz) | 7.1ch *1 | - |
| 5.1ch (192kHz) | 5.1ch *1 | - | |
Playing back video on demand streaming content
In this unit, you can enjoy a variety of video on demand streaming content by connecting to the Internet.
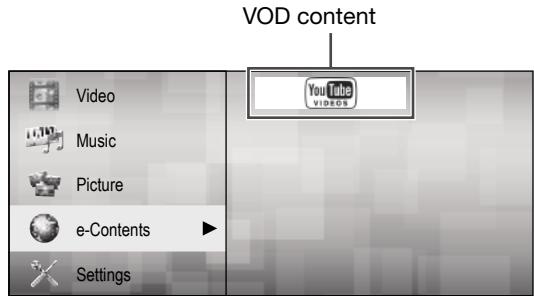
VOD content
YouTube
- Playing back YouTube video content streaming
Notes:
- To enjoy this function, make a broadband Internet connection to both your PC and this unit (See page 11), and then set communication settings (See pages 29-30), then perform the following operation.
- To use this function, we recommend setting "Auto Power Off" to "No". (See page 12.)
- Before using this function, please read "Network Service Disclaimer" (page 45).
Playing back YouTube content
This unit can play back YouTube video content streaming through the Internet.
- For more information about YouTube, see the YouTube website using a PC (http://www.youtube.com).
Notes:
- Some video content may not be played back with this unit.
- The actual functions which can be operated may differ from the descriptions shown.
- It may take time to access and download the update depending on the Internet connection and other factors.
Playing back
1 Press / to select "e-Contents", then press > or ENTER.
2 Press / to select "YouTube", then press > or ENTER.
3 The YouTube screen is displayed.
4 Follow the instruction on the screen.
5 To exit the screen, press EXIT.
Operational buttons for playback control
| Item | |
| Pause the video content. To resume playing paused content, press▶on the playback controls. | |
| Skip to the previous video content on the video list. | |
| Skip to the next video content on the video list. | |
| Play back all the video content on the video list repeatedly. | |
| HQ | Switch the video quality to high resolution. |
| Toggle the playback screen between normal and full screen. | |
| Progress bar | Determine the point where you want to play back a video content by pressing〈〉on the progress bar. |
Notes:
- To turn the playback controls on during full screen display, press POP-UP MENU.
- To return to the main page screen, press TOP MENU/TITLE LIST.
^1 When "Secondary Audio" is set to "On", the audio is output as 48kHz .
2 When "Secondary Audio" is set to "On", the audio is output as PCM.
3 When 5.1ch (192kHz), the audio output is downsampled to 96kHz.
3 When 2ch, the audio is output as 192kHz .
Listening to the iPod, iPhone or iPad
iPod
Made for:
iPod touch (4th generation)
- iPod touch (3rd generation)
- iPod touch (2nd generation)
- iPod touch (1st generation)
- iPod classic
- iPod nano (6th generation)
- iPod nano (5th generation)
- iPod nano (4th generation)
- iPod nano (3rd generation)
- iPod nano (2nd generation)
iPhone 4
iPhone 3GS
iPhone 3G
iPhone
iPad2
iPad
Caution:
Please update your iPod, iPhone and iPad unit to the latest software version before using it. Please visit Apple's homepage to download the latest version for your iPod, iPhone and iPad.
Notes:
- Charging terminal for iPod, iPhone and iPad:
| Condition | DOCK | USB 2 |
| USB-2 (iPod) function | YES | YES (without iPod or iPhone docking) |
| Other function (iPod/DISC/Tuner/Audio In/Line In/Digital In/TV ARC) | YES | YES (without iPod or iPhone docking) |
| Stand-by | YES | NO |
- The message "This accessory is not made to work with iPhone" or similar, may appear on the iPhone screen when:
-battery is low.
- the iPhone is not properly docked (eg. slanting).
If this occurs, remove and re-dock the iPhone.
You may also experience brief audio interference during incoming calls.
- iPod, iPhone and iPad connection (USB 2 only)
1 Insert the connector to the iPod, iPhone or iPad.
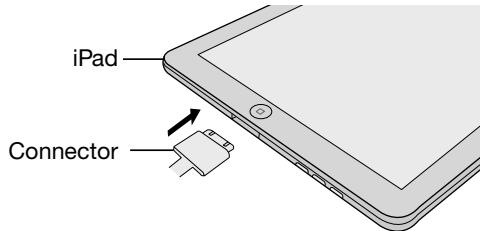
2 Place the iPad to the stand for iPad.
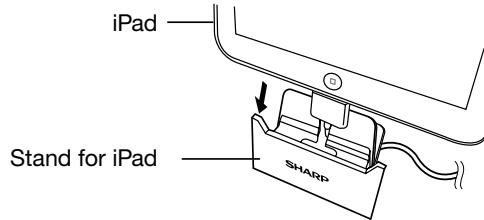
3 Connect the iPod, iPhone or iPad to the unit via USB connector.
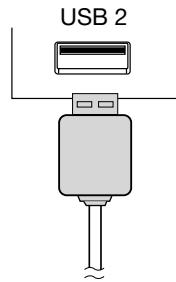
Caution:
- At USB-2 (iPod) mode, once the iPod or iPhone is docked onto the unit, the iPod or iPhone will automatically start charging. 'iPod Dock Charge Mode' will be displayed. In order to use USB-2 (iPod) function, the iPod or iPhone must be removed from the docking station.
- This product is made for iPod, iPhone and iPad. To prevent random interference when iPod, iPhone or iPad is connected, the headphone output is disabled, and "HP INVALID" will be displayed.
You may also experience brief audio interference during incoming calls. - USB 2 terminal does not supportVIDEO out.
- iPod, iPhone and iPad can be used on USB 2 terminal.
- iPod, iPhone or iPad playback (USB 2)
1 Press the ON/STAND-BY button to turn the power on.
2 Press the iPod
3 Connect iPod, iPhone or iPad to the unit. USB - 2 (iPod) will appear.

4 Press the on the main unit or button on the remote control to start playback.
iPhone playback
Sound will only switch from iPhone to the main unit after authentication process is completed in approximately 10 seconds.
- Incoming calls will pause the playback.
- Once the calls are answered, the conversation can only be heard through the built-in iPhone speaker. Turn on the iPhone speaker or undock the iPhone to start conversation.
iPod and iPhone connection (Dock only)
Note:
- Docking station is not recommended for iPad connection.
Adaptor for iPod and iPhone connection
Notes:
- Please use the adaptor supplied with your iPod or iPhone unit.
-
You can use an audio cable to connect your iPod to the AUDIO IN socket if:
-
your iPod adaptor does not fit into the iPod dock on the main unit.
- you have an iPod that does not have an iPod adaptor.
- you have an iPod that does not have an iPod 30 pin connector.
| Adaptor No. | iPhone Description | Capacity |
| 12 | iPhone | 4GB & 8GB & 16GB |
| 15 | iPhone 3G | 8GB & 16GB |
| 15 | iPhone 3GS | 16GB & 32GB |
| 19 | iPhone 4 | 16GB & 32GB |
To insert adaptor for iPod or iPhone
Open the docking station for iPod and iPhone by pulling up.
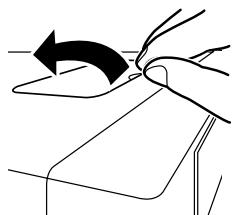
Insert the adaptor for iPod or iPhone into unit and connect your iPod or iPhone.
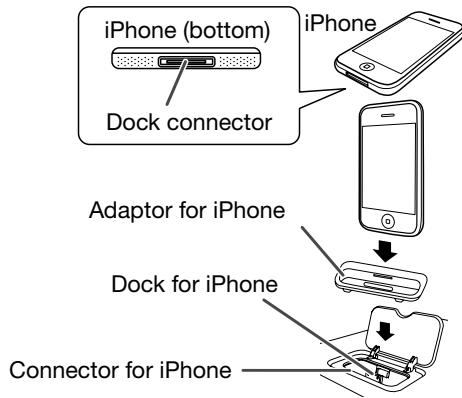
Caution:
Unplug all accessories from the iPod or iPhone before inserting it into the dock.
To remove adaptor for iPod or iPhone
Insert the tip of a screwdriver ("-” type, small) into the adaptor hole as shown and lift upward to remove.

iPod or iPhone playback (Dock only)
1 Press the ON/STAND-BY button to turn the power on.
2 Press the iPod
3 Insert iPod or iPhone unit into the dock of main unit. "iPod" will appear.
4 Press the (iPod or iPhone II) button to start playback.
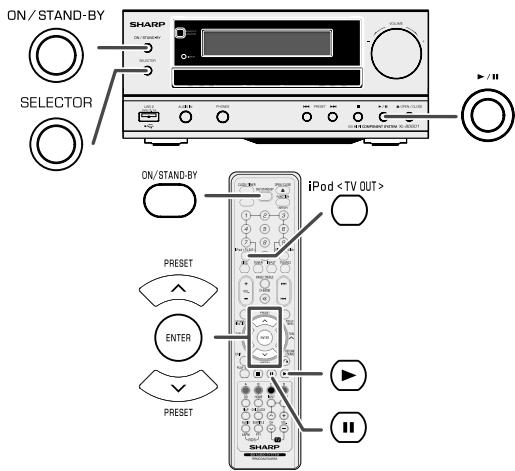
To disconnect iPod, iPhone or iPad
Simply remove the iPod or iPhone from the docking station or iPad connector from USB 2 terminal. It is safe to do so even during playback.
- Watching videos on a TV connected to iPod or iPhone
1 Press and hold iPod
2 Press the ENTER button to start playback.
Notes:
- If the TV Out setting is already turned on at video menu, the video is automatically displayed on the TV screen when ENTER key is pressed.
- TV out display is not support through USB terminal. (iPad)
- To return to watching video on iPod or iPhone screen, press the MENU button to enter video menu. Then press and hold iPod
button for more than 2 seconds until "TV OUT OFF" appears. - During iPod or iPhone video playback, press and hold iPod
button will not toggle video out display between iPod and TV.
Caution:
- Unplug all accessories for the iPod or iPhone before inserting it into the docking station.
Navigating the iPod, iPhone or iPad menus
1 Press the TOP MENU/TITLE LIST button to view the menu on iPod, iPhone or iPad unit. Press it again to go back to previous menu.
2 Use the PRESET (√ or ∧) button to select an item on the menu and then press ENTER button.
Note:
When navigating the iPod, iPhone or iPad menu with remote control, do not operate any of the buttons on the iPod or iPhone unit. The volume level is adjusted by pressing the VOL (+ or -) button on the remote control or VOLUME (+ or -) knob on the main unit. Adjusting the volume on the iPod, iPhone or iPad units give no effect.
iPod, iPhone and iPad operations:
The operations described below depend on the generation iPod, iPhone and iPad you are using.
System on operation:
When the main unit is powered on, the iPod, iPhone or iPad units will automatically power on when docked or connected in the unit.
System off (stand-by operation):
When the main unit is turned to stand-by mode, the docked iPod, iPhone or connected iPad unit will automatically turn to stand-by mode.
Various iPod, iPhone and iPad functions
| Function | Main unit | Remote control | Operation |
| Dock/USB 2 | Dock/USB 2 | ||
| Play | Press in the pause mode. | ||
| Pause | Press in the playback mode. | ||
| Stop | Press to stop playback | ||
| Track up/down | Press in the playback or pause mode. If you press the button in the pause mode, press the ➔/II button to start the desired track. | ||
| Fast forward/reverse | Press and hold down in the playback mode. Release the button to resume playback. | ||
| Display Toggle | — | iPod <TV OUT> | Press for more than 2 seconds to toggle the video out display between iPod or TV. |
| Repeat | — | PLAY MODE | Press to toggle repeat mode. |
| Shuffle | — | PLAY MODE | Press and hold to toggle shuffle mode. |
| Menu | — | TOP MENU/TITLE LIST | Press to view the iPod menu during iPod function. |
| Enter | — | ENTER | Press to confirm the selection. |
| Cursor Up/Down | — | PRESS | Press to select the iPod menu. |
Listening to the radio
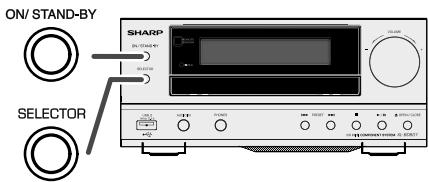

Tuning
1 Press the ON/STAND-BY button to turn the power on.
2 Press the TUNER button repeatedly to select FM Stereo or FM Mono.
3 Press the TUNING (√ or ∧) button on the remote control to tune in to the desired station.
- Manual tuning:
Press the TUNING (√ or ∧) button repeatedly to tune in to the desired station.
- Auto tuning:
When the TUNING (√ or ∧) button is pressed for more than 0.5 seconds, scanning will start automatically and the tuner will stop at the first receivable broadcast station.
Notes:
- When radio interference occurs, auto scan tuning may stop automatically at that point.
- Auto scan tuning will skip weak signal stations.
- To stop the auto tuning, press the TUNING (√ or ∧) button again.
- When an RDS (Radio Data System) station is tuned in, the frequency will be displayed first, and then the RDS indicator will light up. Finally, the station name will appear.
- Full auto tuning can be achieved for RDS stations "ASPM", see page 38.
Listening to the radio (continued)
To receive an FM stereo transmission:
- Press the TUNER button to select stereo mode and "ST" indicator will be displayed. "▶●▲" and "●" will appear when an FM broadcast is in stereo.
- If the FM reception is weak, press the TUNER button to extinguish the "ST" indicator. The reception changes to monaural, and the sound becomes clearer.
■ Memorising a station
You can store 40 FM stations in memory and recall them at the push of a button. (Preset tuning)
1 Perform steps 1 - 3 in "Tuning".
2 Press the ENTER button.

3 Within 30 seconds, press the PRESET (√ or ∧) button to select the preset channel number. Store the stations in memory, in order, starting with preset channel 1.
4 Within 30 seconds, press the ENTER button to store that station in memory. If the "ENTER" and preset number indicators disappear before the station is memorised, repeat the operation from step 2.
5 Repeat steps 1 - 4 to set other stations, or to change a preset station. When a new station is stored in the memory, the station previously memorised for that preset channel number will be erased.
Note:
The backup function protects the memorised stations for a few hours should there be a power failure or the AC power lead become disconnected.
To recall a memorised station
1 Press the PRESET ( or ) button to select the desired station.
To scan the preset stations
The stations saved in the memory can be scanned automatically. (Preset memory scan)
1 Press the PRESET (√ or ∧) button for more than 0.5 seconds. The preset number will flash and the programmed stations will be tuned in sequentially, for 5 seconds each.
2 Press the PRESET (√ or ∧) button again when the desired station is located.
To erase entire preset memory
1 Press the ON/STAND-BY button to enter the stand-by mode.
2 Whilst pressing down the button, press the ON/STAND-BY button until "Tuner Clear" appears.


Using the Radio Data System (RDS)
RDS is a broadcasting service which a growing number of FM stations provide. These FM stations send additional signals along with their regular programme signals. They send their station names, and information about the type of programme such as sport, music, etc.
When tuned to an RDS station, "RDS" and the station name will be displayed.
"TP" (Traffic Programme) will appear on the display when the received broadcast carries traffic information, and "TA" (Traffic Announcement) will appear whilst a traffic information is on air.
"PTYI" (Dynamic PTY Indicator) will appear whilst the Dynamic PTY station is received.
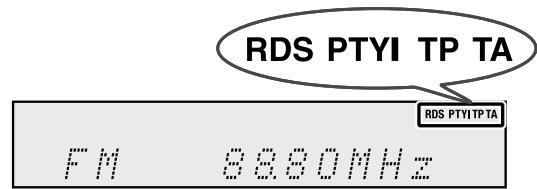
You can control the RDS by using the buttons on the remote control only.
Information provided by RDS
Each time the DISPLAY
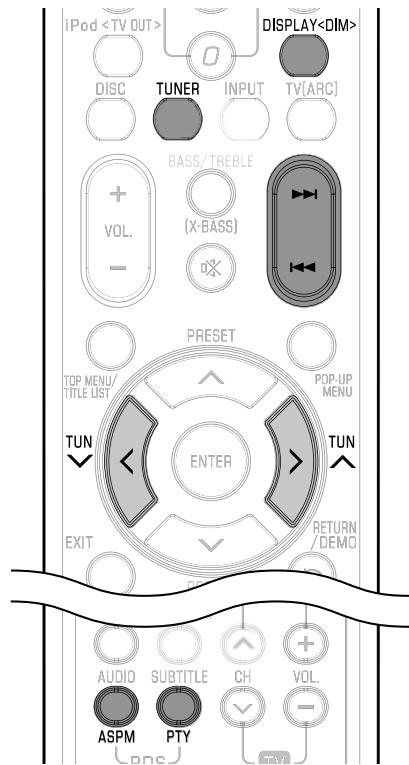

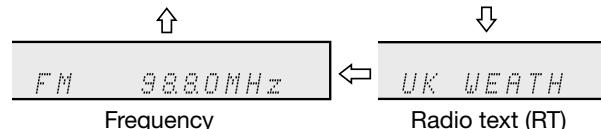
When tuning in to a station other than an RDS station or to an RDS station which sends weak signal, the display will change in the following order:
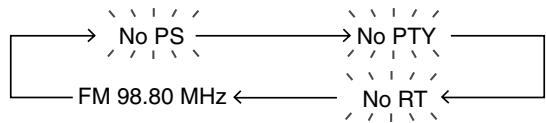
Using the Auto Station Programme Memory (ASPM)
Whilst in the ASPM operation mode, the tuner will automatically search for new RDS stations. Up to 40 stations can be stored.
If you have already stored some stations in memory, the number of new stations you can store will be less.
1 Press the TUNER button on the remote control or SELECTOR button repeatedly on the main unit to select TUNER function.
2 Press and hold down the RDS ASPM button on the remote control.
1 After "ASPM" has flashed for about 4 seconds, scanning will start (87.50 - 108.00 MHz).

2 When an RDS station is found, "RDS" will appear for a short time and the station will be stored in memory.

3 After scanning, the number of stations stored in memory will be displayed for 4 seconds, and then "END" will appear for 4 seconds.

To stop the ASPM operation before it is complete:
Press the RDS ASPM button whilst it is scanning for stations.
The stations which are already stored in memory will be kept there.
Notes:
- If the same station is broadcasting on different frequencies, the strongest frequency will be stored in memory.
- Any station which has the same frequency as the one stored in memory will not be stored.
- If 40 stations have already been stored in memory, the scan will be aborted. If you want to redo the ASPM operation, erase the preset memory.
- If no station have been stored in memory, "END" will appear for about 4 seconds.
- If the RDS signals are very weak, station names may not be stored in memory.
The same station name can be stored in different channels. - In a certain area or during certain time periods, the station names may temporarily be different.
Notes: for RDS operation
If any of the following events occur, it does not mean that the unit is faulty:
- "PS", "No PS" and a station name appear alternately, and the unit does not operate properly.
- If a particular station is not broadcasting properly or a station is conducting tests, the RDS reception function may not work properly.
-
When you receive an RDS station whose signal is too weak, information like the station name may not be displayed.
-
"No PS", "No PTY" or "No RT" will flash for about 5 seconds, and then the frequency will be displayed.
Notes: for radio text:
- The first 14 characters of the radio text will appear for 4 seconds and then they will scroll across the display.
- If you tune in to an RDS station which is not broadcasting any radio text, "No RT" will be displayed when you switch to the radio text position.
- Whilst radio text data is received or when the text contents change, "RT" will be displayed.
To recall stations in memory
To specify programmed types and select stations (PTY search):
You can search a station by specifying the programme type (news, sports, traffic programme, etc. ... see pages 38-39) from the stations in memory.
1 Press the TUNER button on the remote control or SELECTOR button repeatedly on the main unit to select TUNER function.
2 Press the RDS PTY button on the remote control.

"SELECT" and "PTY TI" will appear alternately for about 6 seconds.
3 Within 6 seconds, press the PRESET (√ or ∧) button to select the programme type.

Each time the button is pressed, the programme type will appear. If the button is held down for more than 0.5 seconds, the programme type will appear continuously.
4 Whilst the selected programme type is flashing (within 6 seconds), press the RDS PTY button again.

After the selected programme type has been lit for 2 seconds, "SEARCH" will appear, and the search operation will start.
Notes:
- If the display has stopped flashing, start again from step 2. If the unit finds a desired programme type, the corresponding channel number will lit for about 8 seconds, and then the station name will remain it.
- If you want to listen to the same programme type of another station, press the RDS PTY button whilst the channel number or station name is flashing. The unit will look for the next station.
- If no station can be found, "NOT FOUND" will appear for 4 seconds.
If you select the traffic programme:
If you select the traffic programme (TP) in step 3, "TP" will appear.
(This does not mean that you can listen to the traffic information at that time.)
When the traffic information is broadcast, "TA" will appear.
Descriptions of the PTY (Programme Type) codes, TP (Traffic Programme) and TA (Traffic Announcement)
You can search for and receive the following PTY, TP and TA signals.
| NEWS | Short accounts of facts, events and publicly expressed views, reportage and actuality. |
| AFFAIRS | Topical programme expanding or enlarging upon the news, generally in different presentation style or concept, including debate, or analysis. |
| INFO | Programmes whose purpose is to impart advice in the widest sense. |
| SPORT | Programme concerned with any aspect of sport. |
| EDUCATE | Programme intended primarily to educate, of which the formal element is fundamental. |
| DRAMA | All radio plays and serials. |
| CULTURE | Programmes concerned with any aspect of national or regional culture, including language, theatre, etc. |
| SCIENCE | Programmes about the natural sciences and technology. |
| VARIED | Used for mainly speech-based programmes usually of light-entertainment nature, not covered by other categories. Examples include: quizzes, panel games, personality interviews. |
| POP M | Commercial music, which would generally be considered to be of current popular appeal, often featuring in current or recent record sales charts. |
| ROCK M | Contemporary modern music, usually written and performed by young musicians. |
| EASY M | Current contemporary music considered to be “easy-listening”, as opposed to Pop, Rock or Classical, or one of the specialised music styles, Jazz, Folk or Country. Music in this category is often but not always, vocal, and usually of short duration. |
| LIGHT M | Classical music for general, rather than specialist appreciation. Examples of music in this category are instrumental music, and vocal or choral works. |
| CLASSICS | Performances of major orchestral works, symphonies, chamber music, etc., and including Grand Opera. |
| OTHER M | Musical styles not fitting into any of the other categories. Particularly used for specialist music of which Rhythm & Blues and Reggae are examples. |
| WEATHER | Weather reports and forecasts and meteorological information. |
| FINANCE | Stock Market reports, commerce, trading, etc. |
| CHILDREN | For programmes targeted at a young audience, primarily for entertainment and interest, rather than where the objective is to educate. |
| SOCIAL | Programmes about people and things that influence them individually or in groups. Includes: sociology, history, geography, psychology and society. |
| RELIGION | Any aspect of beliefs and faiths, involving a God or Gods, the nature of existence and ethics. |
| PHONE IN | Involving members of the public expressing their views either by phone or at a public forum. |
| TRAVEL | Features and programmes concerned with travel to near and far destinations, package tours and travel ideas and opportunities. Not for use for announcements about problems, delays, or roadworks affecting immediate travel where TP/TA should be used. |
| LEISURE | Programmes concerned with recreational activities in which the listener might participate. Examples include, Gardening, Fishing, Antique collecting, Cooking, Food & Wine, etc. |
| JAZZ | Polyphonic, syncopated music characterised by improvisation. |
| COUNTRY | Songs which originate from, or continue the musical tradition of the American Southern States. Characterised by a straightforward melody and narrative story line. |
| NATION M | Current Popular Music of the Nation or Region in that country's language, as opposed to International "Pop" which is usually US or UK inspired and in English. |
| OLDIES | Music from the so-called “golden age” of popular music. |
| FOLK M | Music which has its roots in the musical culture of a particular nation, usually played on acoustic instruments. The narrative or story may be based on historical events or people. |
| DOCUMENT | Programme concerned with factual matters, presented in an investigative style. |
| TEST | Broadcast when testing emergency broadcast equipment or receivers. |
| ALARM! | Emergency announcement made under exceptional circumstances to give warning of events causing danger of a general nature. |
| TP | Broadcasts which carry traffic announcements. |
| TA | Traffic announcements are being broadcast. |
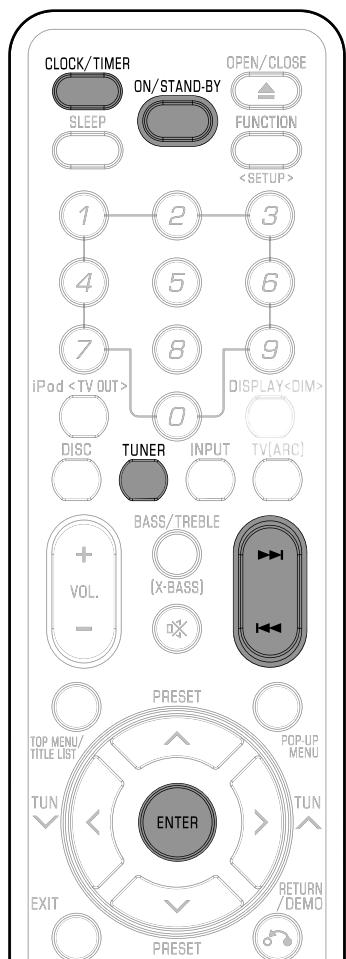
Timer playback:
The unit turns on and plays the desired source (DISC, TUNER, USB-2 (iPod), AUDIO IN, LINE IN, DIGITAL IN) at a preset time.
This unit has 2 types of timer: ONCETIMER and DAILY TIMER.
Once timer:
Once timer play works for one time only at a preset time.
(“②”indicator).
Daily timer:
Daily timer play works at the same preset time every day that we set.
For example, set the timer as a wake-up call every morning.
"DAILY" indicator).
Using the once timer and daily timer in combination:
For example, use the once timer to listen a radio programme, and use the daily timer to wake up.
1 Set the daily timer (pages 39-40).
2 Set the once timer (pages 39-40).
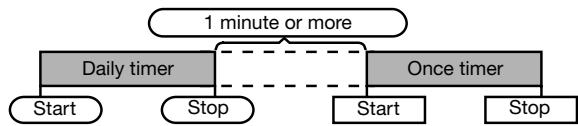
Timer playback
Before setting timer:
- Check that the clock is set to the correct time (refer to page 13). If it is not set, you cannot use the timer function.
- For timer playback: Plug in USB or load discs or dock iPod to be played.

1 Press the ON/STAND-BY button to turn the power on.
2 Press and hold the CLOCK/TIMER button.
3 Within 10 seconds, press the or button to select "Once" or "Daily", and press the ENTER button.
4 Within 10 seconds, press the or button to select "Timer Set", and press the ENTER button.
5 To select the timer playback source (DISC, TUNER, USB-2 (iPod), iPod, DIGITAL IN, AUDIO IN, LINE IN, TV ARC), press the or button. Press the ENTER button.
When you select the tuner, select a station by pressing the or button, and then press the ENTER button. If a station has not been programmed, "No Preset" will be displayed and timer setting will be cancelled.
6 To adjust the day, press the or button and then press the ENTER button.
7 Press the ENTER button to adjust the hour. Press the or button and then press the ENTER button.
8 To adjust the minutes, press the or button and then press the ENTER button.
9 Set the time to finish as in steps 7 and 8 above.
10 Adjust the volume using the VOLUME control, and then press the ENTER button. Do not turn the volume up too high.
11 Press the ON/STAND-BY button to enter the power stand-by mode. The "TIMER" indicator lights up and the unit is ready for timer playback.
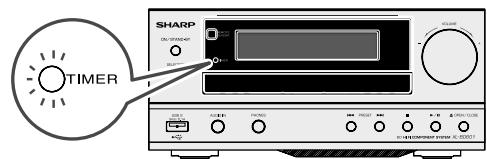
12 When the preset time is reached, playback will start. The volume will increase gradually until it reaches the preset volume. The timer indicator will blink during timer playback.
13 When the timer end time is reached, the system will enter the power stand-by mode automatically.
Once timer:
The timer will be cancelled.
Daily timer:
The timer operates at the same time every selected day. It will continue until the daily timer setting is cancelled. Cancel the daily timer when it is not in use.
Notes:
- When performing timer playback using another unit connected to the USB 2, AUDIO IN, LINE IN or DIGITAL IN socket select "USB-2 (iPod)" or "AUDIO IN" or "LINE IN" or "DIGITAL IN" in step 5.
- This unit will turn on or enter the power stand-by mode automatically. However, the connected unit will not turn on or off. To stop the timer playback, follow step "Cancelling the timer setting" of this page.
Checking the timer setting:
1 Turn the power on and press and hold down the CLOCK/TIMER button.
2 Within 10 seconds, press the or button to select "Once" or "Daily", and press the ENTER button.
3 Within 10 seconds, press the or button to select "Timer Call", and press the ENTER button.
Cancelling the timer setting:
1 Turn the power on and press and hold down the CLOCK/TIMER button.
2 Within 10 seconds, press the or button to select "Once" or "Daily", and press the ENTER button.
3 Within 10 seconds, press the or button to select "Timer Off", and press the ENTER button. Timer will be cancelled (the setting will not be cancelled).
Reusing the memorised timer setting:
The timer setting will be memorised once it is entered. To reuse the same setting, perform the following operations.
1 Turn the power on and press and hold down the CLOCK/TIMER button.
2 Within 10 seconds, press the or button to select "Once" or "Daily", and press the ENTER button.
3 Within 10 seconds, press the or button to select "Timer On", and press the ENTER button.
4 Press the ON/STAND-BY button to enter the power stand-by mode.
Sleep operation
The radio, disc, iPod, USB, Audio In, Line In, TV (ARC) and Digital In can all be turned off automatically.
1 Play back the desired sound source.
2 Press the SLEEP button.
3 Within 5 seconds, press the Numeric button to set the time. (1 minute ~ 99 minutes)
4 "SLEEP" will appear.
5 The unit will enter the power stand-by mode automatically after the preset time has elapsed. The volume will be turned down 1 minute before the sleep operation finishes.
To confirm the remaining sleep time:
1 Whilst "SLEEP" is indicated, press the SLEEP button.
To cancel the sleep operation:
Press the ON/STAND-BY button whilst "SLEEP" is indicated. To cancel the sleep operation without setting the unit to the stand-by mode, proceed as follows.
1 Whilst "SLEEP" is indicated, press the SLEEP button.
2 Within 5 seconds, press the "0" button twice until "SLEEP 00" appears.
To use timer and sleep operation together
Sleep and timer playback:
For example, you can fall asleep listening to the radio and wake up to iPod in the next morning.
1 Set the sleep time (see above, steps 1 - 5).
2 Whilst the sleep timer is set, set the timer playback (steps 2 - 9, page 39).

Enhancing your system
The connection lead is not included. Purchase a commercially available lead as shown below.
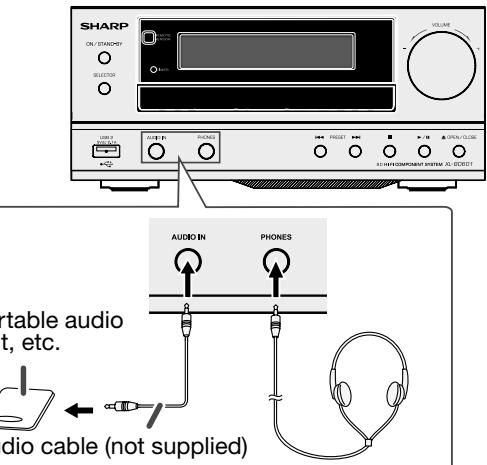
- Listening to the playback sounds of portable audio unit, etc.
1 Use a connection lead to connect the portable audio unit etc. to the AUDIO IN socket. When using video equipment, connect the audio output to this unit and the video output to a television.
2 Press the ON/STAND-BY button to turn the power on.
3 Press the INPUT button on the remote control or SELECTOR button repeatedly on main unit to select AUDIO IN function.
4 Play the connected equipment. If volume level of the connected device is too high, sound distortion may occur. Should this happen, lower the volume of the connected device. If volume level is too low, increase the volume of the connected device.
Note:
To prevent noise interference, place the unit away from the television.
Headphones
- Do not turn the volume on to full at switch on and listen to music at moderate levels. Excessive sound pressure from earphones and headphones can cause hearing loss.
- Before plugging in or unplugging the headphone, reduce the volume.
- Be sure your headphone has a 3.5 ~mm (1/8) diameter plug and impedance between 16 and 50 ohms. The recommended impedance is 32 ohms.
- Plugging in the headphone disconnects the speakers automatically. Adjust the volume using the VOLUME control.
Troubleshooting chart
Many potential problems can be resolved by the owner without calling a service technician.
If something is wrong with this product, check the following before calling your authorised SHARP dealer or service centre.
Tuner
| Symptom | Possible cause and solutions |
| ● The radio makes unusual noises continuously. | ● Is the unit placed near the TV or computer?● Is the FM aerial placed properly? Move the aerial away from the AC power lead if it is located nearby. |
| Symptom | Possible cause |
| ●Device cannot be detected. | ●Is there any MP3/WMA file available?●Is the device properly connected?●Is it an MTP device?●Does the device contain AAC file only? |
| ●Playback does not start. | ●Is it a false MP3 file? |
| ●Wrong time display.●Wrong file name display. | ●Is Variable Bitrate file being played back?●Is the File Name written in Chinese or Japanese characters? |
iPod, iPhone or iPad
| Symptom | Possible cause and solutions |
| ● No sound is produced. ● No image appears on the TV/monitor. | ● The iPod, iPhone or iPad is not playing. ● The iPod, iPhone or iPad is not properly connected to the unit. ● Is the AC power lead of the unit plugged in? ● The video cable is not properly connected. ● The TV/monitor's input selection is not properly set. ● The iPod TV out feature has not been set to output video. ● USB terminal do not support video. |
| ● iPod, iPhone or iPad will not charge. | ● The iPod, iPhone or iPad is not making full contact with the connector. ● Using iPod (3rd generation). ● The iPod or iPhone is not supported. Refer to page 34 for compatible models. |
| ● “This accessory is not made to work with iPhone” or “This accessory is not supported by iPhone” appears on iPhone screen. | ● The iPhone battery is low. Please charge the iPhone. ● iPhone is not properly docked. |
Power
| Problem | Possible causes and solutions |
| The power cannot be turned on. | ● Is the power cord firmly plugged into the AC socket? (Page 9) ● Perform a reset. (Page 42) |
Basic Operation
| Problem | Possible causes and solutions |
| The remote control does not work. | ● Use the remote control within its operating range. (Page 12)● Replace the batteries. (Page 12) |
| Cannot operate the Unit. | ● Are you operating the Unit within the specified operating temperature range? (Page 3) |
Playback
| Problem | Possible causes and solutions |
| The Unit cannot play a disc. | Take out the disc and clean it. (Page 6)Make sure that the disc is loaded properly (aligned in disc tray and label-side up). (Page 18)Make sure that region code on the disc matches that of this Unit. (Page 3)Allow any condensation in or near the Unit to dry. (Page 6)Check that the disc is recorded in the compatible TV system (PAL or NTSC).The Unit cannot play back video which was not recorded normally. (Page 3)Proper playback may be impossible due to the state of the disc recording, a scratched, warped or dirty disc, the state of the pick-up, or compatibility issues between this Unit and the disc being used. (Pages 3-4, 6)When the recorded time of a disc is unusually short, playback may not be possible.BD-RE/R discs recorded in a format other than BDMV/BDAV cannot be played back. (Page 3) |
| The disc is automatically ejected after closing the disc tray. | Make sure that the disc is loaded properly (aligned in disc tray and label-side up). (Page 18)Take out the disc and clean it. (Page 6)Make sure that the disc is playable. (Page 3) |
| Video stops. | Has the Unit been subjected to shock or impact? Are you using it in an unstable location? The Unit will stop if it senses shock or vibration. |
| The Unit makes a snapping sound when starting playback or loading a disc. | The unit may sometimes make a snapping sound when starting playback if it has not been operated in a while. These sounds are not malfunctions of the unit but are normal operating conditions. |
Picture
| Problem | Possible causes and solutions |
| No picture. | ●Make sure that the cable is connected correctly. (Page 11) ●Make sure that the connected TV or the AV receiver is set to the correct input. (Page 9) ●Take out the disc and clean it. (Page 6) ●Make sure that region code on the disc matches that of this Unit. (Page 3) ●There is no picture from the HDMI output. - Are the settings performed correctly? Please check the settings. (Page 28) |
| Screen freezes and operation buttons do not work. | ●Turn off the power and turn on the power again. ●If the power is not turned off, perform a reset. (Page 42) ●Is the disc damaged or dirty? Check the condition of the disc. (Page 6) |
| Square noise (mosaic) appears on the screen. | ●Blocks in images may be visible in scenes with rapid movement due to the characteristics of digital image compression technology. |
| Audio is not output, or images are not played back properly. | ●The audio may not be output or the images may not be played back properly for some discs in which copyright-protected contents are recorded. (Page 3) |
| 3D images cannot be output to a TV. | ●Is an HDMI cable used? ●Are a 3D compatible TV and 3D glasses used? ●Is a proper connection made between the HDMI OUT terminal of the unit and the HDMI input terminal of the 3D compatible TV? (Page 9) ●Are all devices (amplifier, AV receiver, etc.) between the TV and the unit connected by HDMI and 3D compatible? (Pages 9-11) ●Is the 3D setting on this unit correct? (Pages 10, 16) ●Is the 3D setting on the TV correct? ●Is a 3D compatible BD disc being played back? |
| Noise appears on the screen. | ●When you watch TV broadcasts with the power of this unit turned on, noise may appear on the TV screen. In such cases, turn off the power to this unit or keep this unit away from the TV. |
Sound
| Problem | Possible causes and solutions |
| No sound, or sound is distorted. | ● If the volume of the TV or amplifier (XL-BD601PH) is set to minimum, turn the volume up. ● Check that the audio cable is connected correctly. (Page 9) ● Check that the cable plugs are clean. ● Take out the disc and clean it. (Page 6) ● Audio may not be output depending on the audio recording status, such as when audio other than an audio signal or non-standard audio is recorded for the audio content of the disc. (Page 3) |
| Audio is not output, or images are not played back properly. | ● The audio may not be output or the images may not be played back properly for some discs in which copyright-protected contents are recorded. |
Network
| Problem | Possible causes and solutions |
| Cannot connect to the Internet. | When the wired Internet connection is made ● Is the LAN cable connected properly? (Page 11) ● Is the wrong cable such as a modular cable used? Connect a LAN cable to the ETHERNET terminal. (Page 11) ● Is the power for the connected equipment, such as a broadband router or modem turned on? ● Is the broadband router and/or modem properly connected? ● Is the proper value(s) set in the network setting? Check “Communication Setup”. (Pages 29–30) |
| Cannot download BD-LIVE contents. | ● Is the LAN cable connected properly? (Page 11) ● Is the USB memory device properly connected? Check that the USB memory device is connected to the USB1 terminal of this Unit. (Page 9) ● Check if the BD disc supports BD-LIVE. ● Check the setting for “BD Internet Access”. (Page 28) |
Other
| Problem | Possible causes and solutions |
| The TV operates incorrectly. | ● Some TVs with wireless remote control capability may operate incorrectly when using the remote control of this Unit. Use such TVs away from this Unit. |
| The Unit heats up during use. | ● When using this Unit, the console cabinet may heat up depending on the usage environment. This is not a malfunction. |
Condensation
Sudden temperature changes, storage or operation in an extremely humid environment may cause condensation inside the cabinet (BD pickup, etc.) or on the transmitter on the remote control. Condensation can cause the unit to malfunction. If this happens, leave the power on with no disc in the unit until normal playback is possible (about 1 hour). Wipe off any condensation on the transmitter with a soft cloth before operating the unit.
If problem occurs
When this product is subjected to strong external interference (mechanical shock, excessive static electricity, abnormal supply voltage due to lightning, etc.) or if it is operated incorrectly, it may malfunction.
If such a problem occurs, do the following:
1 Set the unit to the stand-by mode and turn the power on again.
2 If the unit is not restored in the previous operation, unplug and plug in the unit again, and then turn the power on.
Note:
If neither operation above restores the unit, clear all the memory by resetting it.
Factory reset, clearing all memory
1 Press the ON/STAND-BY button to enter the power stand-by mode.
2 Whilst pressing down the OPEN/CLOSE button, press the ON/STAND-BY button until "Clear All" appears.
OPEN / CLOSE

ON/STAND-BY


Caution:
This operation will erase all data stored in memory including clock, timer settings and tuner preset.
Before transporting the unit
Remove the iPod, iPhone, iPad, USB memory device and disc from the unit. Then, set the unit to the power stand-by mode. Carrying the unit with iPod, iPhone, iPad or USB memory device left connected or discs left inside might damage the unit.
Maintenance
Cleaning the cabinet
Periodically wipe the cabinet with a soft cloth and a diluted soap solution, then with a dry cloth.
Caution:
- Do not use chemicals for cleaning (petrol, paint thinner, etc.). It may damage the cabinet.
- Do not apply oil to the inside of the unit. It may cause malfunctions.
The following messages appear on the TV screen in case of an error during operation.
| Error message | Possible Error | Suggested Solution |
| Cannot play. | ● The disc cannot be played back with this Unit. | ● Check the disc, and load it correctly. |
| Incompatible disc. | ● If you load a disc which cannot be played with this Unit (i.e. a scratched disc), or if you load a disc upside down, this message will appear, and the disc tray will automatically pop out. | |
| ● Occurs if the loaded disc cannot be played because it is a non-standard disc or scratched, etc. | ● Remove the disc. | |
| Cannot operate. | ● Occurs if an operation is incorrect. | — |
| This USB memory is not formatted properly. Please format the memory in USB memory management. | ● Occurs if there is a formatting error.● Occurs if the USB memory is not formatted with FAT 32/16. | ● Format the USB memory again.● Format the USB memory with your PC. |
| The Connected USB Memory cannot be used. It should be compliant with USB 2.0 | ● Occurs if USB memory not compliant with USB 2.0 High Speed (480Mbit/s) is used (i.e. USB 1.0/USB 1.1). | ● Connect USB 2.0 High Speed (480Mbit/s) compliant USB memory. |
Specifications
As part of our policy of continuous improvement, SHARP reserves the right to make design and specification changes for product improvement without prior notice. The performance specification figures indicated are nominal values of production units. There may be some deviations from these values in individual units.

General
| Power source | AC 220 - 240V ~ 50/60 Hz |
| Power consumption | Power on: 52 W Power stand-by: 0.5 W (*) |
| Dimensions | Width: 215 mm (8 - 1/2")Height: 96 mm (3 - 4/5")Depth: 335 mm (13 - 1/5") |
| Weight | 2.75 kg (6.06 lbs.) |
| Operating temperature | 5°C to 35°C |
| Storage temperature | -20°C to 60°C |
| Operating humidity | 10 % to 80 % (no condensation) |
| TV systems | PAL system/NTSC system (The system recorded on the disc is output.) |
(*) This power consumption value is obtained when the demonstration mode is cancelled in the power stand-by mode. Refer to page 10 to cancel the demonstration mode.

Amplifier
| Output power | PMPO: 200 W MPO: 100 W (50 W + 50 W) (10% T.H.D.) RMS: 100 W (50 W + 50 W) (10% T.H.D.) RMS: 66 W (33 W + 33 W) (1% T.H.D.) |
| Output terminals | Speakers: 6 ohms 20Hz - 20kHz Subwoofer Pre-out (audio signal): 200 mV/10 k ohms at 70 Hz Video output: 1 Vp-p Headphones: 16 - 50 ohms (recommended: 32 ohms) HDMI 19-pin standard connector (1080p 24Hz output) HDMI™ (Deep Colour, x.v.Color, Dolby TrueHD, DTS-HD Master Audio | Essential) |
| Input terminals | Audio In (audio signal): 500 mV/47 k ohms Line in (Analogue input): 500 mV/47 k ohms Digital audio optical input terminal: Square Optical terminal Ethernet: 10BASE-T/100BASE-TX |

BD player
| Type | Single disc multi-play disc unit |
| Signal readout | Non-contact, 3-beam semiconductor laser pickup |
| Playable discs/ media formats | BD-ROM, BD-RE, BD-R, DVD Video, DVD+RW/+R/-RW/-R (Video/ VR/AVCHD/JPEG file/MP3 file/DivX (H.264/MKV) format), Audio CD (CD-DA), CD-RW/R (CD-DA/JPEG file/MP3 file format) |
| Region code | B or marked ALL for BD, 2 or marked ALL for DVD |
| D/A converter | Multi bit D/A converter |
| Frequency response | 20 - 20,000 Hz |
| Dynamic range | 90 dB (1 kHz) |

USB
| USB | ● USB 1 (5V dc 500 mA USB 2.0 High Speed (for Local Storage/ Software Update/JPEG/MP3 and DivX (H.264/MKV) playback) ● USB 2 (5V dc 2.1 A) (iPod/iPhone and iPad compatibility) |

Tuner
| Frequency range | FM: 87.5 - 108 MHz |
| Preset | 40 (FM station) |

Speaker
| Type | 2-way type speaker system 2.5 cm (1") Dome-Tweeter 12 cm (4-3/4") woofer |
| Maximum input power | 100 W |
| Rated input power | 50 W |
| Impedance | 6 ohms |
| Dimensions | Width: 148 mm (5-13/16") Height: 262 mm (10-5/16") Depth: 203.5 mm (8") |
| Weight | 2.50 kg (5.51 lbs.)/each |
AVCHD (page 3)
AVCHD (Advanced Video Codec High Definition) refers to a recording format (specification) for digital video cameras which can record to a disc such as 8 cm DVD disc and play back digital high definition images.
BDAV (page 3)
BDAV (Blu-ray Disc Audio/Visual, BD-AV) refers to one of the application formats used for writable Blu-ray discs such as BD-R, BD-RE, etc. BDAV is a recording format equivalent to DVD-VR (VR mode) of the DVD specifications.
BD-J application
The BD-ROM format supports Java for interactive functions. "BD-J" offers content providers almost unlimited functionality when creating interactive BD-ROM titles.
BD-LIVE (page 19)
A variety of interactive content is available from BD-LIVE compatible Blu-ray discs via the Internet.
BDMV (page 3)
BDMV (Blu-ray Disc Movie, BD-MV) refers to one of the application formats used for BD-ROM which is one of the Blu-ray Disc specifications. BDMV is a recording format equivalent to DVD-video of the DVD specification.
BD-R (pages 3-4)
A BD-R (Blu-ray Disc Recordable) is a recordable, write-once Blu-ray Disc. Since contents can be recorded and cannot be overwritten, a BD-R can be used to archive data or for storing and distributing video material.
BD-RE (pages 3-4)
A BD-RE (Blu-ray Disc Rewritable) is a recordable and rewritable Blu-ray Disc.
BD-ROM (pages 3-4)
BD-ROMs (Blu-ray Disc Read-Only Memory) are commercially produced discs. Other than conventional movie and video contents, these discs have enhanced features such as interactive content, menu operations using pop-up menus, selection of subtitle display, and slide shows. Although a BD-ROM may contain any form of data, most BD-ROM discs will contain movies in High Definition format for playback on Blu-ray Disc units.
Blu-ray Disc (BD) (page 3)
A disc format developed for recording/playing high-definition (HD) video (for HDTV, etc.), and for storing large amounts of data. A single layer Blu-ray Disc holds up to 25 GB, and a dual-layer Blu-ray Disc holds up to 50 GB of data.
Chapter number (page 26)
Sections of a movie or a music feature that are smaller than titles. A title is composed of several chapters. Some discs may only be comprised of a single chapter.
Control Panel (page 16)
This function allows you to operate this unit using the TV remote control by displaying the control panel on the TV screen.
Copy guard
This function prevents copying. You cannot copy discs marked by the copyright holder with a signal which prevents copying.
Deep Colour
Deep Colour can reproduce rich colours, increasing the number of bits describing colours.
This Unit is compatible with Deep Colour. You can enjoy this function by connecting to a Deep Colour compatible TV using an HDMI cable.
Disc menu (page 19)
This lets you select things like the subtitle language or audio format using a menu stored on the DVD video disc.
Dolby Digital (page 5)
A sound system developed by Dolby Laboratories Inc. that gives movie theatre ambience to audio output when the product is connected to a Dolby Digital processor or amplifier.
Dolby Digital Plus (page 34)
A sound system developed as an extension to Dolby Digital. This audio coding technology supports 7.1 multi-channel surround sound.
Dolby TrueHD (page 34)
Dolby TrueHD is a lossless coding technology that supports up to 8 channels of multi-channel surround sound for the next generation optical discs. The reproduced sound is true to the original source bit-for-bit.
DTS (page 5)
This is a digital sound system developed by DTS, Inc. for use incinemas.
DTS-HD High Resolution Audio (page 34)
DTS-HD High Resolution Audio is a new technology developed for the next generation high definition optical disc format.
DTS-HD Master Audio (page 34)
DTS-HD Master Audio is a lossless audio compression technology developed for the next generation high definition optical disc format.
DTS-HD Master Audio | Essential
DTS-HD Master Audio | Essential is a lossless audio compression technology developed for the next generation high definition optical disc format.
DVD upscaling (page 18)
Upscaling (upconverting) refers to a function of various units and devices that enlarge the image size to fit the size of the screen of video equipments such as a TV.
DVD video (pages 3-4)
A disc format that contains up to eight hours of moving pictures on a disc the same diameter as a CD. A single-layer single-sided DVD holds up to 4.7 GB; a double layer single-sided DVD, 8.5 GB; a single layer double-sided DVD, 9.4 GB; double-layer double-sided DVD, 17 GB. The MPEG 2 format was adopted for efficient video data compression. It is a variable rate technology that encodes the data to according to the status of the video for reproducing high-quality images. Audio information is recorded in a multi-channel format such as Dolby Digital, allowing for a realistic audio presence.
DVD+/-R (pages 3-4)
A DVD+/-R is a recordable, write-once DVD. Since contents can be recorded and cannot be overwritten, a DVD+/-R can be used to
archive data or for storing and distributing video material. The DVD+/ -R has two different formats: VR format and Video format. DVDs created in Video format have the same format as a DVD video, while discs created in VR (Video Recording) format allow the contents to be programmed or edited.
DVD+/-RW (pages 3-4)
A DVD+/-RW is a recordable and rewritable DVD. The re-recordable feature makes editing possible. The DVD+/-RW has two different formats: VR format and Video format. DVDs created in Video format have the same format as a DVD video, while discs created in VR (Video Recording) format allow the contents to be programmed or edited.
HDMI (page 34)
HDMI (High-Definition Multimedia Interface) is an interface that supports both video and audio on a single digital connection. The HDMI connection carries standard to high definition video signals and multi-channel audio signals to AV components such as HDMI equipped TVs, in digital form without degradation.
Interlace format
Interlace format shows every other line of an image as a single "field" and is the standard method for displaying images on television. The even numbered field shows the even numbered lines of an image, and the odd numbered field shows the odd numbered lines of an image.
JPEG (pages 3-4, 22-23)
JPEG (Joint Photographic Experts Group) is a still image data compression format and is used in most of digital cameras.
Linear PCM Sound (page 5)
Linear PCM is a signal recording format used for Audio CDs and on some DVD and Blu-ray discs. The sound on Audio CDs is recorded at 44.1 kHz with 16 bits. (Sound is recorded between 48 kHz with 16 bits and 96 kHz with 24 bits on DVD video discs and between 48 kHz with 16 bits and 192 kHz with 24 bits on BD video discs.)
MP3 (pages 3-4, 22-23)
MP3 files are audio data compressed in the MPEG1/2 Audio layer-3 file format. "MP3 files" have ".mp3" as extensions.
MPEG-2
MPEG-2 (Moving Picture Experts Group phase 2) is one of the video data compression schemes, which is adopted for DVD videos and digital broadcasts worldwide. Some Blu-ray Discs also use high bitrate MPEG-2.
Multi Angle (page 25)
This is a feature of DVD and BD video discs. In some discs, the same scene is shot from different angles, and these are stored in a single disc so you can enjoy playback from each angle. (This function can be enjoyed if the disc is recorded with multiple angles.)
Multi Audio (page 28)
This is a feature of DVD and BD video discs. This function makes it possible to record different audio tracks for the same video, so you can enhance your enjoyment by switching the audio. (You can enjoy this function with discs recorded with multiple audio tracks.)
Parental control (page 28)
In some digital broadcasts and BD/DVD video discs, a control level for disc viewing is set depending on the age of the viewer. With this Unit, you can set the control level for viewing such broadcasts and discs.
Pop-up menu (pages 17, 19)
An enhanced menu operation available on BD video discs. The pop-up menu appears when POP-UP MENU is pressed during playback, and can be operated while playback is in progress.
Progressive format
Compared to the Interlace format that alternately shows every other line of an image (field) to create one frame, the Progressive format shows the entire image at once as a single frame. This means that while the Interlace format can show 30 frames/60 fields in one second, the Progressive format can show 60 frames in one second. The overall picture quality increases and still images, text, and horizontal lines appear sharper.
Region code (pages 3-4)
Code identifying a geographic region of compatibility for a BD/DVD.
Resume playback (pages 18, 21)
If you stop playback while it is in progress, the Unit stores the stop position in memory, and this function lets you playback from that point.
Skip (pages 17, 22, 24-26, 34)
This returns to the start of the chapter (or track) being played, or skips to the next chapter (or track).
Subtitles (pages 5, 19, 25)
These are the lines of text appearing at the bottom of the screen which translate or transcribe the dialogue. They are recorded on many DVD and BD video discs.
Time number (pages 18, 26)
This indicates the play time which has elapsed from the start of a disc or a title. It can be used to find a specific scene quickly. (It may not work with some discs.)
Title number (pages 18, 26)
These numbers are recorded on DVD and Blu-ray discs. When a disc contains two or more movies, these movies are numbered as title 1, title 2, etc.
Top menu (pages 17-19)
In a BD/DVD video, this is the menu for selecting things like the chapter to be played back and the subtitle language. In some DVD videos, the top menu may be called the "Title Menu".
Track number (pages 5, 26)
These numbers are assigned to the tracks which are recorded on audio CDs. They enable specific tracks to be located quickly.
x.v.Color
x.v. Colour reproduces a greater range of colour than before, showing almost all of the colours that the human eye can detect. (Applicable for JPEG files only with this system)
YouTube (page 34)
YouTube is a website where users can upload and view video content, such as video clips and TV clips. You can watch the content streamed on your TV.
Network Service Disclaimer
This Sharp device facilitates the access to content and services provided by third parties. The content and services accessible via this device belong to and may be proprietary to third parties. Therefore, any use of such third party content and services must be in accordance with any authorisation or terms of use provided by such content or service provider. Sharp shall not be liable to you or any third party for your failure to abide by such authorisation or terms of use. Unless otherwise specifically authorised by the applicable content or service provider, all third party content and services provided are for personal and non-commercial use; you may not modify, copy, distribute, transmit, display, perform, reproduce, upload, publish, license, create derivative works from, transfer or sell in any manner or medium any content or services available via this device.
Sharp is not responsible, nor liable, for customer service-related issues related to the third party content or services. Any questions, comments or service-related inquiries relating to the third party content or service should be made directly to the applicable content or service provider.
You may not be able to access content or services from the device for a variety of reasons which may be unrelated to the device itself, including, but not limited to, power failure, other Internet connection, or failure to configure your device properly. Sharp, its directors, officers, employees, agents, contractors and affiliates shall not be liable to you or any third party with respect to such failures or maintenance outages, regardless of cause or whether or not it could have been avoided.
ALL THIRD PARTY CONTENT OR SERVICES ACCESSIBLE VIA THIS DEVICE IS PROVIDED TO YOU ON AN "AS-IS" AND "AS AVAILABLE" BASIS AND SHARP AND ITS AFFILIATES MAKE NO WARRANTY OR REPRESENTATION OF ANY KIND TO YOU, Either EXPRESS OR IMPLIED, INCLUDING, WITHOUT LIMITATION, ANY WARRANTYES OF MERCHANTABILITY, NON-INFRINGEMENT, FITNESS FOR A PARTICULAR PURPOSE OR ANY WARRANTYES OF SUITABILITY, AVAILABILITY, ACCURACY, COMPLETENESS, SECURITY, TITLE, USEFULNESS, LACK OF NEGLIGENCE OR ERROR-FREE OR UNINTERRUPTED OPERATION OR USE OF THE CONTENT OR SERVICES PROVIDED TO YOU OR THAT THE CONTENT OR SERVICES WILL MEET YOUR REQUIREMENTS OR EXPECTATIONS.
SHARP IS NOT AN AGENT OF AND ASSUMES NO RESPONSIBILITY FOR THE ACTS OR OMISSIONS OF THIRD PARTY CONTENT OR SERVICE PROVIDERS, NOR ANY ASPECT OF THE CONTENT OR SERVICE RELATED TO SUCH THIRD PARTY PROVIDERS.
IN NO EVENT WILL SHARP AND/OR ITS AFFILIATES BE LIABLE TO YOU OR ANY THIRD PARTY FOR ANY DIRECT, INDIRECT, SPECIAL, INCIDENTAL, PUNITIVE, CONSEQUENTIAL OR OTHER DAMAGES, WHETHER THE THEORY OF LIABILITY IS BASED ON CONTRACT, TORT, NEGLIGENCE, BREACH OF WARRANTY, STRICT LIABILITY OR OTHERWISE AND WHETHER OR NOT SHARP AND/OR ITS AFFILIATES HAVE BEEN ADVISED OF THE POSSIBILITY OF SUCH DAMAGES.
Information on the Software License for This Product
Software composition
The software included in this product is comprised of various software components whose individual copyrights are held by SHARP or by third parties.
Software developed by SHARP and open source software
The copyrights for the software components and various relevant documents included with this product that were developed or written by SHARP are owned by SHARP and are protected by the Copyright Act, international treaties, and other relevant laws. This product also makes use of freely distributed software and software components whose copyrights are held by third parties. These include software components covered by a GNU General Public License (hereafter GPL), a GNU Lesser General Public License (hereafter LGPL) or other license agreement.
Obtaining source code
Some of the open source software licensors require the distributor to provide the source code with the executable software components.
GPL and LGPL include similar requirements. For information on obtaining the source code for the open source software and for obtaining the GPL, LGPL, and other license agreement information, visit the following website: http://www-strong-eu.com/gpl
We are unable to answer any questions about the source code for the open source software. The source code for the software components whose copyrights are held by SHARP is not distributed.
Acknowledgements
The following open source software components are included in this product:
- cairo - Curl - DirectFB - Droid Sans font - Droid SansFallback font - Fltk - FreeType - Giflib - glib - Icu - Jpeg - Libpng - LibPThread
- Librt • libsoup • Libstdc++ • libxml2 • OpenSSL • pango • swfdec
- Webkit · zlib · linux kernel · uClibc · modutils · NanoXML
- org.apache.oro.text.regex • libsysfs • mtd/jffs2 • ncurses • libiconv
- libusb - busybox - bash - libmpeg2 - libjpeg - FontConfig
Software License Notice
Software License Notice Requirements
The software components incorporated into this product include components whose copyright holders require license notices. The license notices for these software components are shown below.
OpenSSL License
This product includes software developed by the OpenSSL Project for use in the OpenSSL Toolkit. (http://www.openssll.org)
Original SSLeay License
This product includes cryptographic software written by Eric Young (eay@cryptsoft.com).
BSD License
This product includes software developed by the University of California, Berkeley and its contributors.
SHARP®
SHARP ELECTRONICS (Europe) GmbH