CA-DVIAT - Émetteur AV CYP - Free user manual and instructions
Find the device manual for free CA-DVIAT CYP in PDF.

User questions about CA-DVIAT CYP
0 question about this device. Answer the ones you know or ask your own.
Ask a new question about this device
Download the instructions for your Émetteur AV in PDF format for free! Find your manual CA-DVIAT - CYP and take your electronic device back in hand. On this page are published all the documents necessary for the use of your device. CA-DVIAT by CYP.
USER MANUAL CA-DVIAT CYP
text_image
DVI to CAT 5 / TRANSMITTER DVI-D IN COAX IN L/R IN AUDIO CA-DVIATRevision History
Version No Date Summary of Change
V1 20090401 Preliminary Release
Precaution
Failure to follow the precautions described below may cause damage to DVI over CAT 5 Transmitter and Receiver Box and void the warranty.
- DO NOT open the case. Doing so will void the warranty. If you find problem with it, please return back to your retailer or seller who will assist you or provide you with solution.
● DO NOT use third-Party AC adapter or power cord. Doing so may damage DVI over CAT 5 Transmitter and Receiver Box. - DO NOT bump, jar or drop contents of the products as it may damage it and result in warranty void.
● DO NOT set any liquids or beverages on the drive as they may damage DVI over CAT 5 Transmitter and Receiver Box.
Table of Contents
- Introduction......1
- Application ....1
- Contents ....1
- System Requirements....1
- Features....1
- Operation Controls and Functions......2
6.1 Transmitter's Front Panel....2
6.2 Transmitter's Rear Panel 3 - Connection and Installation....4
- Specifications ....5
1. Introduction
DVI transmitter and receiver over CAT 5 is a pair of extender for DVI signal up to 100/250 meters long. Not only can this device transfer the HD image signal but also the analog/digital audio signal with coaxial and L/R audio port.
Through the DDC cable the device can also support HDCP and CEC. This extender is perfect for extending high resolution digital signage with crystal clear images over low cost network solution.
2. Application
- For long distance DIV/HDMI source display in a separate room or class.
- For long distance digital or analog sounds transferring up to 100/250M long.
- Any PC source equipment with output DVI connector.
3. Contents
• DVI over CAT 5 Transmitter x 1
• Operational Manual x 1
- 5V/2.6A Power Adaptor x 1
4. System Requirements
PC/DVI/HDMI source with DVI output connector, DVI to DVI or HDMI to DVI cable(s), CAT 5 cable(s) and DVI display monitor or HDMI TV/Monitor.
5. Features
- Compliant with HDMI 1.2, HDCP 1.1 and DVI 1.0 specifications.
- Support Equalizer, Gain, CTI (Color Transient Improvement) adjustment.
- Supports high definition input up to 1080P/UXGA, output resolution follows input.
- Easy to install and simple to operate.
- Connect CAT 5 back to DVI without signal loss after 100/250 meter's transmission.
• Supports DDC/HDCP signal transferring through DDC cable.
• Build-in EDID at transmitter - Support both external Coaxial and Stereo Sound.
6. Operation Controls and Functions
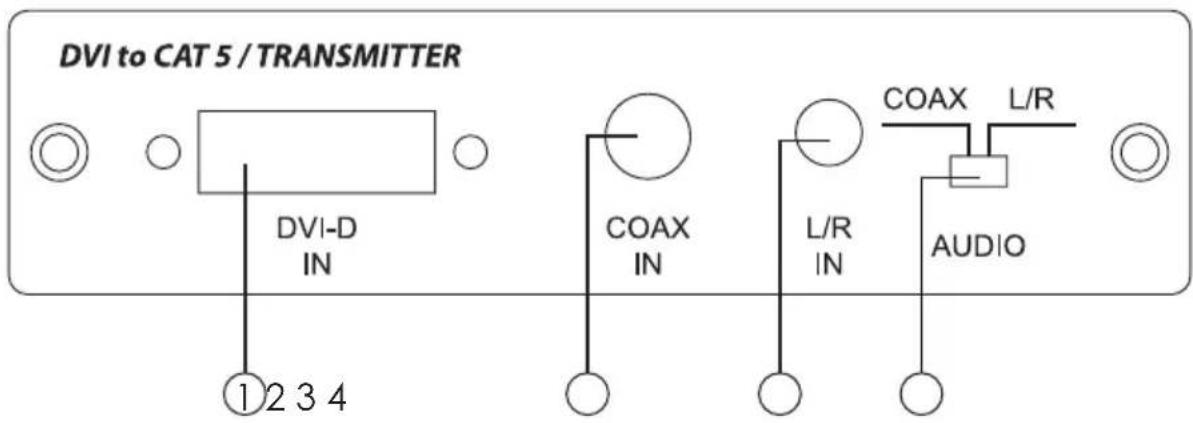
6.1 Transmitter's Front Panel
text_image
DVI to CAT 5 / TRANSMITTER DVI-D IN COAX IN L/R IN AUDIO 1 2 3 4①. DVI-D IN – Plug from DVI/HDMI source equipment's video output with DVI in cable.
Note: Duo to this device has build-in EDID therefore, when HDMI's audio signal is send the device may not perform. Hence, it may be adjust from the HDMI source equipment (eg. DVD play) to set the audio output to LPCM or AC3 or DTS or ... etc.
②. COAX IN – Plug from DVI/HDMI source equipment's audio output with coaxial cable.
Note: This audio signal is received from CAT 5 with SPDIF format and therefore, LPCM sound will perform 2CH.
③. L/R IN – Plug from DVI/HDMI source equipment's audio output with L/R phone jack cable.
④. AUDIO switch – Switch your audio source by COAX in or L/R in.
Note: When audio source input is bit stream format, L/R output will not display hence, audio input source should select LPCM for displayable format. Coaxial output will perform the same signal as to Coaxial inputs'.
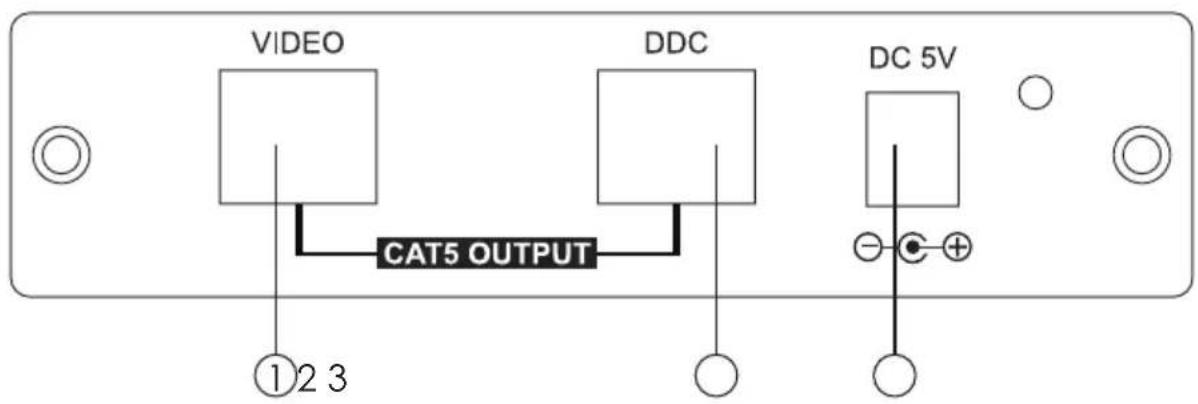
6.2 Transmitter's Rear Panel
text_image
VIDEO DDC CAT5 OUTPUT ①②③ DC 5V①. with CAT-5/CAT-5E/CAT-6 cable.
②. DDC CAT 5 INPUT – Connect the DDC input to the DDC output of the transmitter with CAT-5/CAT-5E/CAT-6 cable.
Note: For advanced user only, if it's known that the DDC or HDCP data are required for the source and the display, you can use a single CAT-5 cable for the VIDEO connection only.
③. Power Jack – Connect with 5V / 2.6A power adaptor with power supply.
7. Connection and Installation

flowchart
graph TD
    A["PC"] -->|DVI Cable| B["DVD Player"]
    B -->|HDMI to DVI Cable| C["Coax Cable"]
    C -->|L/R Cable| D["Transmitter unit Front"]
    D --> E["Transmitter unit Rear"]
    E --> F["Receiver Unit Rear"]
    F --> G["Receiver Unit Front"]
    G --> H["PC / DVI Display"]
    G --> I["LCD Monitor"]
    G --> J["Audio Amplifier"]
    style A fill:#99ccff,stroke:#333
    style B fill:#99ccff,stroke:#333
    style C fill:#99ccff,stroke:#333
    style D fill:#99ccff,stroke:#333
    style E fill:#99ccff,stroke:#333
    style F fill:#99ccff,stroke:#333
    style G fill:#99ccff,stroke:#333
    style H fill:#99ccff,stroke:#333
    style I fill:#99ccff,stroke:#333
    style J fill:#99ccff,stroke:#333
8. Specifications
Transmitter Input port 1 x DVI-I female port (Accept DVI-D signal only)
1 x Coaxial
1 x L/R Audio
Transmitter Output port 2 x CAT5 RJ 45 8pin
Resolution HD- 480i/p 60, 576p 60, 720P 50/60,
1080i 50/60Hz, 1080p 50/60Hz
PC- 640 x 480=VGA72, VGA75, VGA85
800 x 600=SVGA56, SVGA60, SVGA72, SVGA75,
SVGA85
1024×768=XGA60,XGA70,XGA75,XGA85
1280×1024=SXGA60, SXGA75, SXGA85
1600×1200=UXGA60
1920 x 1200=Reduced blanking WUXGA
Power Supply 5V / 2.6A DC power supply
Dimensions (mm) 125 x 130 x 30
Weight (g) 700
Material Aluminum
Color Silver
Power Consumption Transmitter: 7W