
AY-XP12GHR - Air conditioner SHARP - Free user manual and instructions
Find the device manual for free AY-XP12GHR SHARP in PDF.
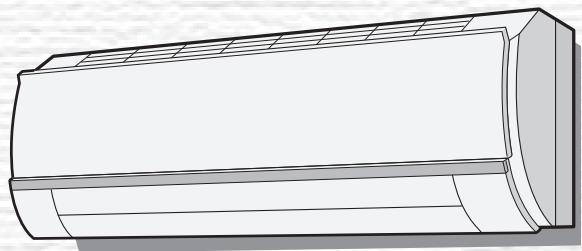
| Product type | Reversible wall-mounted split air conditioner |
| Brand | SHARP |
| Model | AY-XP12GHR |
| Operating modes | COOL, HEAT, AUTO, DRY |
| Cooling capacity | Approximately 12,000 BTU/h (estimated) |
| Power supply | 230 V / 50 Hz (single phase) |
| Refrigerant | R410A (GWP = 1980) |
| Main functions | Plasmacluster, 24-hour timer, 1-hour off, progressive airflow, full power, auto clean |
| Remote control | Wireless, range 7 m, AAA batteries |
| Filters | Air filter (washable) + deodorizing filter (replaceable) |
| Filter maintenance | Clean air filter every 2 weeks; clean deodorizing filter every 3 to 6 months |
| Deodorizing filter replacement part | Type AZ-F900G (replace every 3 years) |
| Safety | Mandatory grounding, automatic shutdown in case of anomaly, child lock |
| Indicator lights | On (red), Timer (orange), Plasmacluster (blue), Full power (green), Indoor/outdoor temperature |
| Operating temperatures | COOL: indoor 21-32°C, outdoor -10 to 46°C; HEAT: indoor 20-27°C, outdoor -15 to 24°C |
| Weight and dimensions | Not provided in the manual |
Frequently Asked Questions - AY-XP12GHR SHARP
User questions about AY-XP12GHR SHARP
0 question about this device. Answer the ones you know or ask your own.
Ask a new question about this device
Download the instructions for your Air conditioner in PDF format for free! Find your manual AY-XP12GHR - SHARP and take your electronic device back in hand. On this page are published all the documents necessary for the use of your device. AY-XP12GHR by SHARP.
USER MANUAL AY-XP12GHR SHARP
AY-XP9GHR AY-XP12GHR
Eco inverter
Air Conditioner

Uses Refrigerant R410A
INDOOR UNIT
UNITE INTERIEURE
UNIDAD INTERIOR
UNITÀ INTERNA
BHYTPEHHI BLOK
AY-XP9GHR
AY-XP12GHR
OUTDOOR UNIT
UNITE EXTERIEURE
UNIDAD EXTERIOR
UNITÀ ESTERNA
HAPYXHbIbJOK
AE-X9GHR AE-X12GHR

Device of this mark is a trademark of Sharp Corporation.
Plasmacluster is a registered trademark
or a trademark of Sharp Corporation.
SPLIT TYPE
ROOM AIR CONDITIONER
OPERATION MANUAL
CLIMATISEUR INDIVIDUEL EN DEUX PARTIES
MODE D'EMPLOI
Attention: Your product is marked with this symbol. It means that used electrical and electronic products should not be mixed with general household waste. There is a separate collection system for these products.

Pb
A. Information on Disposal for Users (private households)
1. In the European Union
Attention: If you want to dispose of this equipment, please do not use the ordinary dust bin!
Used electrical and electronic equipment must be treated separately and in accordance with legislation that requires proper treatment, recovery and recycling of used electrical and electronic equipment.
Following the implementation by member states, private households within the EU states may return their used electrical and electronic equipment to designated collection facilities free of charge. In some countries your local retailer may also take back your old product free of charge if you purchase a similar new one.
*) Please contact your local authority for further details.
If your used electrical or electronic equipment has batteries or accumulators, please dispose of these separately beforehand according to local requirements.
By disposing of this product correctly you will help ensure that the waste undergoes the necessary treatment, recovery and recycling and thus prevent potential negative effects on the environment and human health which could otherwise arise due to inappropriate waste handling.
2. In other Countries outside the EU
If you wish to discard this product, please contact your local authorities and ask for the correct method of disposal.
For Switzerland: Used electrical or electronic equipment can be returned free of charge to the dealer, even if you don't purchase a new product. Further collection facilities are listed on the homepage of www.swico.ch or www.sens.ch.
B. Information on Disposal for Business Users.
1. In the European Union
If the product is used for business purposes and you want to discard it:
Please contact your SHARP dealer who will inform you about the take-back of the product. You might be charged for the costs arising from take-back and recycling. Small products (and small amounts) might be taken back by your local collection facilities.
For Spain: Please contact the established collection system or your local authority for take-back of your used products.
2. In other Countries outside the EU
If you wish to discard of this product, please contact your local authorities and ask for the correct method of disposal.
The battery supplied with this product contains traces of Lead.
For EU: The crossed-out wheeled bin implies that used batteries should not be put to the general household waste! There is a separate collection system for used batteries, to allow proper treatment and recycling in accordance with legislation. Please contact your local authority for details on the collection and recycling schemes.
For Switzerland: The used battery is to be returned to the selling point.
For other non-EU countries: Please contact your local authority for correct method of disposal of the used battery.
Contains fluorinated greenhouse gases covered by the Kyoto Protocol R410A (Global warming potential 1980)
CONTENTS
- IMPORTANT SAFETY INSTRUCTIONS GB-1
PART NAMES. GB-3 - SETTING DEODORANT FILTER ....... GB-5
- USING THE REMOTE CONTROL...... GB-6
- BASIC OPERATION. GB-8
ADJUSTING THE AIR FLOW DIRECTION... GB-10 - PROGRESSIVE AIRFLOW ..... GB-11
FULL POWER OPERATION GB-11 - PLASMACLUSTER OPERATION ..... GB-12
SELF CLEAN OPERATION. GB-13
- ONE-HOUR OFF TIMER. GB-13
- TIMER OPERATION GB-14
AUXILIARY MODE. GB-16
MAINTENANCE GB-16
- ADDITIONAL NOTES ON OPERATION...... GB-18
TIPS ON SAVING ENERGY. GB-18
BEFORE CALLING FOR SERVICE..... GB-19
IMPORTANT SAFETY INSTRUCTIONS
WARNING FOR USE
1 Do not pull or deform the power supply cord. Pulling and misuse of the power supply cord can result in damage to the unit and cause electrical shock.
2 Be careful not to expose your body directly to the outlet air for a long time. It may affect your physical conditions.
3 When using the air conditioner for infants, children, elderly, bedridden, or disabled people make sure the room temperature is suitable for those in the room.
4 Never insert objects into the unit. Inserting objects can result in injury due to the high speed rotation of internal fans.
5 Ground the air conditioner without fail. Do not connect the grounding wire to gas pipe, water pipe, lightning rod or telephone grounding wire. Incomplete grounding may cause electric shock.
6 If anything is abnormal with the air conditioner (ex. a burning smell), stop the operation immediately and turn the circuit breaker OFF.
7 The appliance shall be installed in accordance with national wiring regulations. Improper cable connection can cause the power supply cord, plug and the electrical outlet to overheat and cause fire.
If the supply cord is damaged, it must be replaced by the manufacturer or its service agent or a similarly qualified person in order to avoid a hazard. Use only the manufacture-specified power cord for replacement.
9 Do not splash or pour water directly on the unit. Water can cause electrical shock or equipment damage.
WARNING FOR INSTALLATION/REMOVAL/REPAIR
- Do not attempt to install/remove/repair the unit by yourself. Incorrect work will cause electric shock, water leak, fire etc. Consult your dealer or other qualified service personnel for the installation/removal/repair of the unit.
IMPORTANT SAFETY INSTRUCTIONS
CAUTIONS FOR USE
1 Open a window or door periodically to ventilate the room, especially when using gas appliances. Insufficient ventilation may cause oxygen shortage.
2 Do not operate the buttons with wet hand. It may cause electric shock.
3 For safety, turn the circuit breaker off when not using the unit for an extended period of time.
4 Check the outdoor unit mounting rack periodically for wear and to make sure it is firmly in place.
5 Do not put anything on the outdoor unit nor step on it. The object or the person may fall down or drop, causing injury.
This unit is designed for residential use. Do not use for other applications such as in a kennel or greenhouse to raise animals or grow plants.
7 Do not place a vessel with water on the unit. If water penetrates into the unit, electrical insulations may deteriorate and cause electric shock.
8 Do not block the air inlets nor outlets of the unit. It may cause insufficient performance or troubles.
9 Be sure to stop the operation and turn the circuit breaker off before performing any maintenance or cleaning. A fan is rotating inside the unit and you may get injured.
This appliance is not intended for use by young children or infirm persons without supervision.
Young children should be supervised to ensure that they do not play with the appliance.
CAUTIONS FOR LOCATION/INSTALLATION
- Make sure to connect the air conditioner to power supply of the rated voltage and frequency. Use of a power supply with improper voltage and frequency can result in equipment damage and possible fire.
- Do not install the unit in a place where inflammable gas may leak. It may cause fire. Install the unit in a place with minimal dust, fumes and moisture in the air.
- Arrange the drain hose to ensure smooth drainage. Insufficient drainage may cause wetting of the room, furniture etc.
- Make sure a leak breaker or a circuit breaker is installed, depending on the installation location, to avoid electrical shock.
PART NAMES
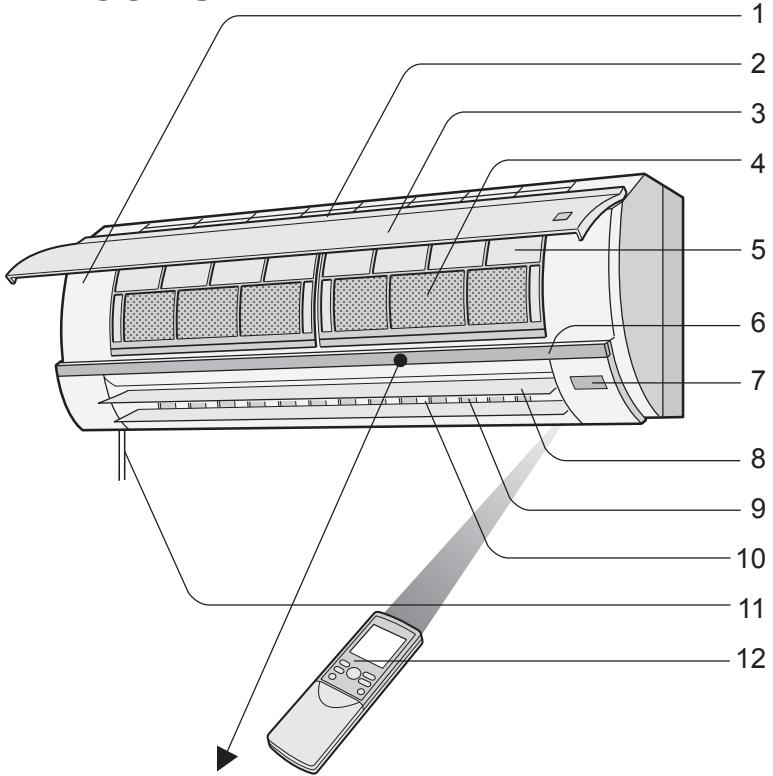
INDOOR UNIT
1 AUX. Button
2 Inlet (Air)
3 Open Panel
4 Deodorant Filter
5 Air Filters
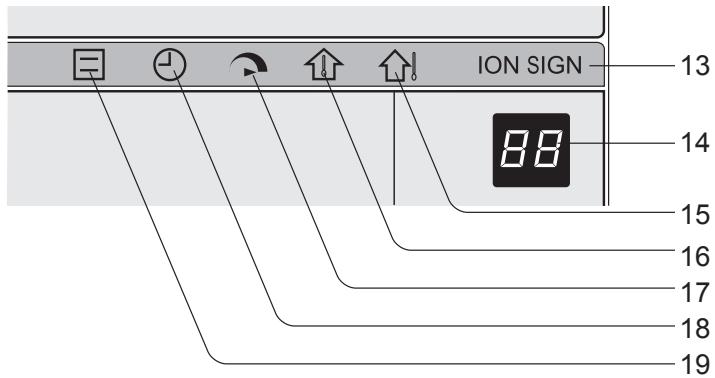
6 Indicator
7 Receiver Window
8 Vertical Adjustment Louvres
9 Horizontal Adjustment Louvres
10 Outlet (Air)
11 Power Supply Cord
12 Remote Control
13 PLASMACLUSTER Lamp (blue)
14 TEMPERATURE INDICATOR
15 OUTDOOR Temp. Lamp (green
16 ROOM Temp. Lamp (green
17 FULL POWER Lamp (green
18 TIMER Lamp (orange ①)
19 OPERATION Lamp (red)
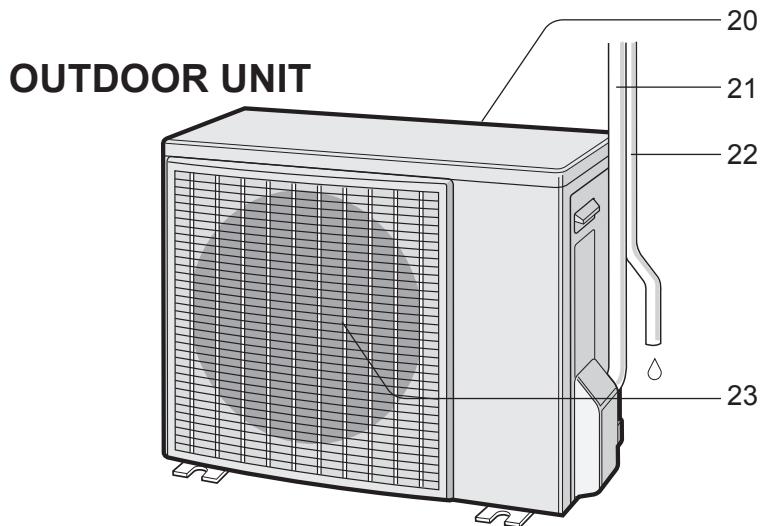
20 Inlet (Air)
21 Refrigerant Tube and Interconnecting Cord
22 Drainage Hose
23 Outlet (Air)
PART NAMES
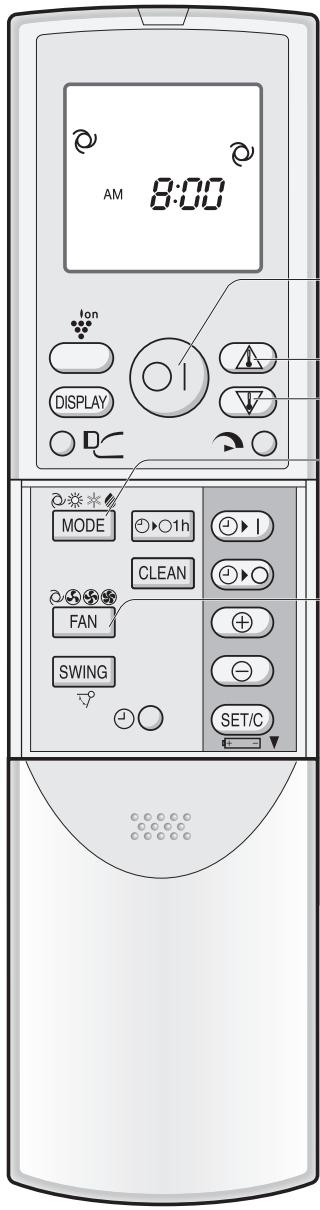
REMOTE CONTROL
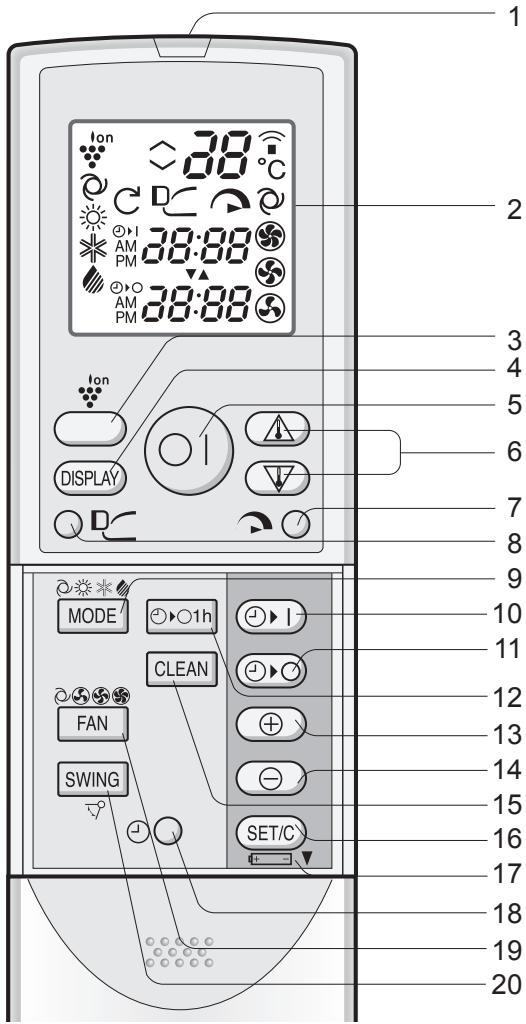
1 TRANSMITTER
2 DISPLAY (Liquid Crystal Display)
3 PLASMACLUSTER Button
4 DISPLAY Button
5 ON/OFF Button
6 THERMOSTAT Button
7 FULL POWER Button
8 PROGRESSIVE AIRFLOW Button
9 MODE Button
10 TIMER ON Button (for setting the timer)
11 TIMER OFF Button (for setting the timer)
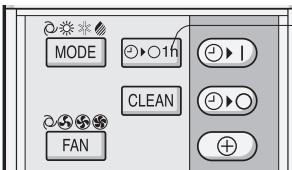
12 ONE-HOUR OFF TIMER Button
13 TIME ADVANCE Button
14 TIME REVERSE Button
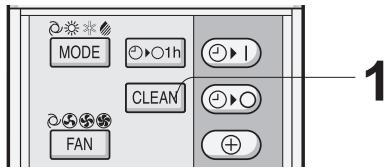
15 SELF CLEAN Button
16 TIMER SET/CANCEL Button
17 Indicates BATTERY COMPARTMENT is below this mark
18 CLOCK Button
19 FAN Button
20 SWING Button
L.C.D. REMOTE CONTROL DISPLAY
21 PROGRESSIVE AIRFLOW SYMBOL
22 SELF CLEAN SYMBOL
23 PLASMACLUSTER SYMBOL
24 MODE SYMBOLS


25 THERMOSTAT SETTING FOR AUTO AND DRY MODES
26 TEMPERATURE INDICATOR
27 TRANSMITTING SYMBOL
28 FULL POWER SYMBOL
29 FAN SPEED SYMBOLS


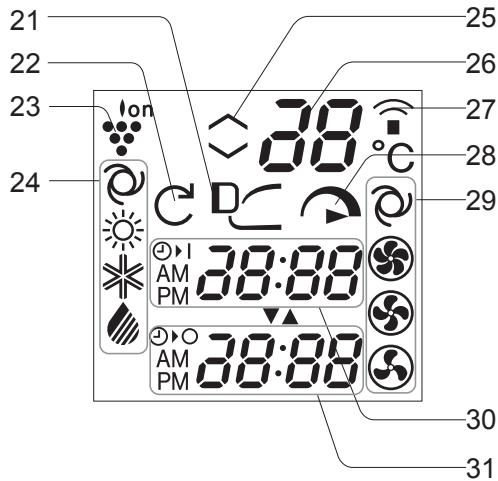
30 TIMER ON INDICATOR/CLOCK
Indicates the on timer preset time or current time.
31 TIMER OFF INDICATOR
Indicates the preset time for off timer or one-hour off timer.
SETTING DEODORANT FILTER
The deodorant filters are packed as accessory of this unit. During operation of the air conditioner, the filters remove dust and tobacco smoke from the air and discharges clean air.
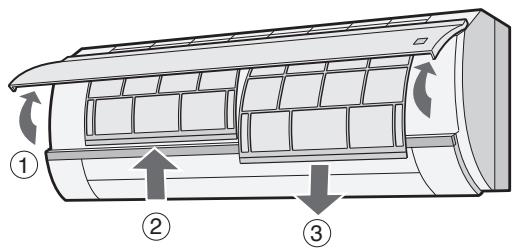
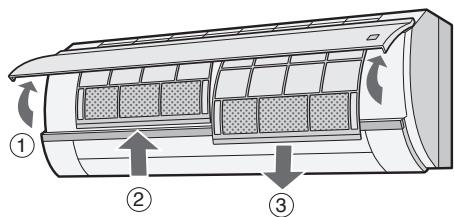
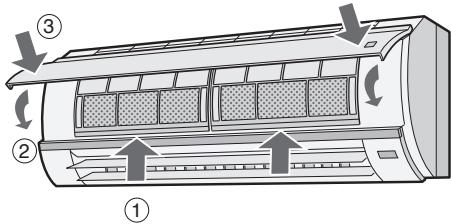
Take out the air filters.
① Open the open panel.
② Push the air filters up slightly to unlock them.
③ Pull the air filters down to remove them.
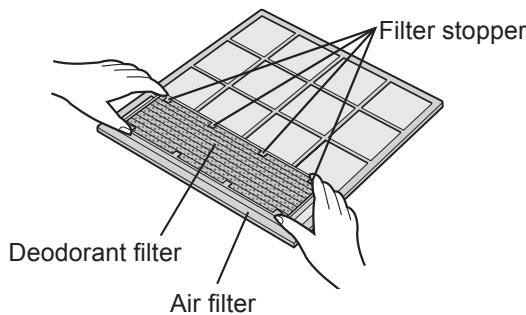
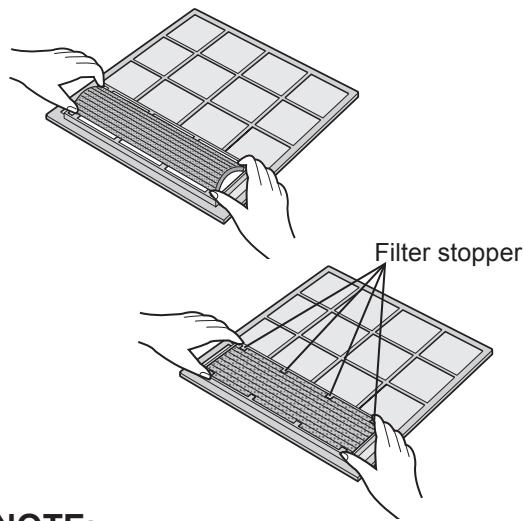
2 Set the deodorant filter under the filter stoppers located on the air filter.
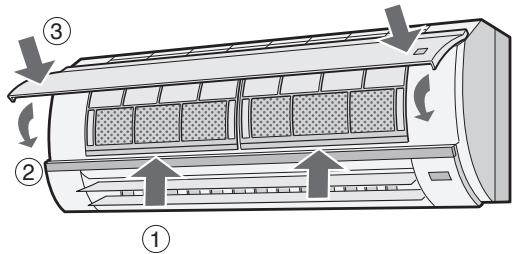
3 Reinstall the air filters. ① Reinstall the air filter
① Reinstall the air filters in the original positions.
② Close the open panel.
③ Push the arrow-marked of the panel firmly to lock it in place.
Precautions
- The filters are sealed in a plastic bag to keep their dust collection effect. Do not open the bag until using the filters. (Otherwise the filters life may get shorter.)
- Do not expose the filters to direct sunlight. (Otherwise they may deteriorate.)
USING THE REMOTE CONTROL
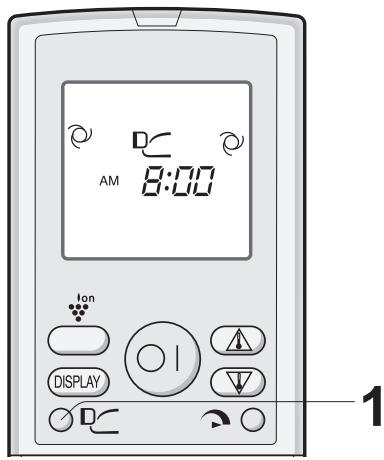
LOADING BATTERIES Use two size-AAA (R03) batteries.
1 Remove the remote control cover.
2 Insert batteries in the compartment, making sure the (+) and (-) polarities are correctly aligned.
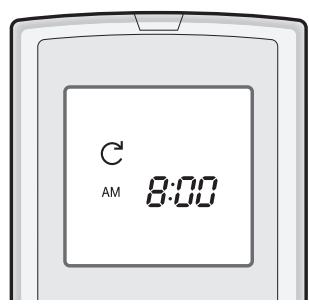
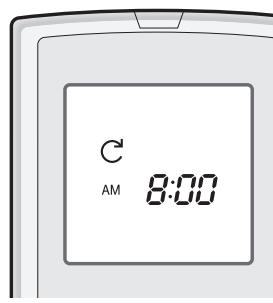
- The display indicates "AM 6:00" when batteries are properly installed.
3 Reinstall the cover.

NOTES:
- The battery life is approximately one year in normal use.
- When you replace the batteries, always change both batteries, and make sure they are the same type.
- If the remote control does not operate properly after replacing the batteries, take out the batteries and reinstall them again after 30 seconds.
- If you will not be using the unit for a long time, remove the batteries from the remote control.
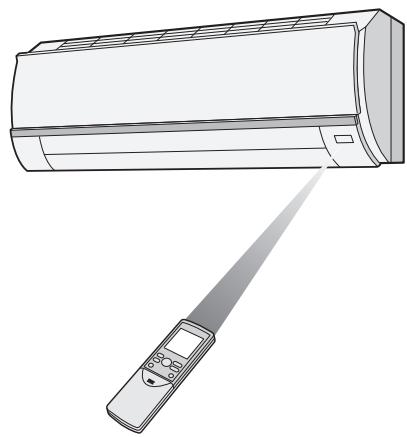
HOW TO USE THE REMOTE CONTROL
Point the remote control towards the unit's signal receiver window and press the desired button. The unit generates a beep when it receives the signal.
- Make sure there is no curtain or other object between the remote control and the unit.
- The remote control can send signals from up to 7 metres away.

CAUTION
- Do not allow the signal receiver window to receive strong direct sunlight, since it can adversely affect its operation. If the signal receiver window is exposed to direct sunlight, close a curtain to block the light.
- Using a fluorescent lamp with a quick starter in the same room may interfere with transmission of the signal.
- The unit can be affected by signals transmitted from the remote control of a television, VCR or other equipment used in the same room.
- Do not leave the remote control in direct sunlight or near a heater. Also, protect the unit and remote control from moisture and shock which can discolour or damage them.
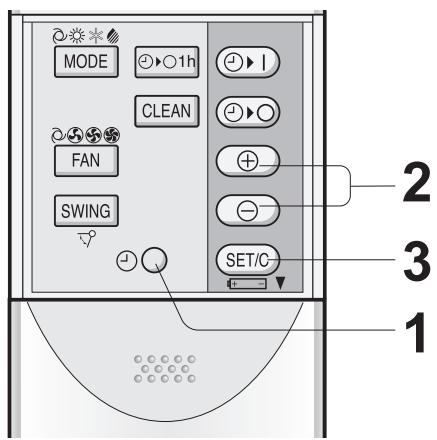
SET CURRENT CLOCK TIME
There are two clock modes: 12-hour mode and 24-hour mode.
Example: 5 o'clock in the afternoon
| Clock | Display |
| 12-hour mode | PM 5:00 |
| 24-hour mode | 17:00 |
1 To set to the 12-hour mode, press the CLOCK button once in the first step. To set to the 24-hour mode, press the CLOCK button twice in the first step.
2 Press the TIME ADVANCE or REVERSE button to set the current time.
- Keep the button pressed to advance or reverse the time display quickly.
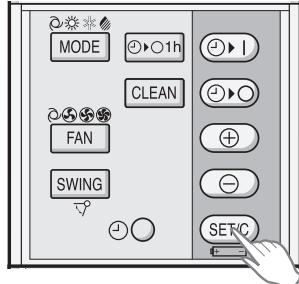
Press the SET/C button.
- The colon (:) blinks to indicate that the clock is functioning.
NOTE:
- The current time cannot be set when the timer is operating.
BASIC OPERATION
2
5
3
1
4
1
Press the MODE button to select the operation mode.
AUTO H
HEAT
COOL
DRY

2
Press the ON/OFF button to start operation.
- The red OPERATION lamp ( ) on the unit will light.
3
Press the THERMOSTAT button to set the desired temperature.
AUTO/DRY MODE
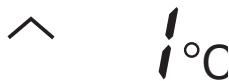
- The temperature can be changed in 1^ increments within the range of 2^ higher to 2^ lower from the temperature automatically determined by the air conditioner.
(Example: 1^ higher)
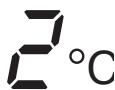
COOL/HEAT MODE
- The temperature can be set within the range of 18 to 32^ C .
(Example: 2^ lower)
4
Press the FAN button to set the desired fan speed. AUTO, SOFT, LOW, HIGH

- In the DRY mode, the fan speed is preset to AUTO and cannot be changed.
5
To turn off the unit, press the ON/OFF button again.
- The red OPERATION lamp ( ) on the unit will turn off.
TIPS ABOUT AUTO MODE
In the AUTO mode, the temperature setting and mode are automatically selected according to the room temperature and outdoor temperature when the unit is turned on.
Modes and Temperature Settings
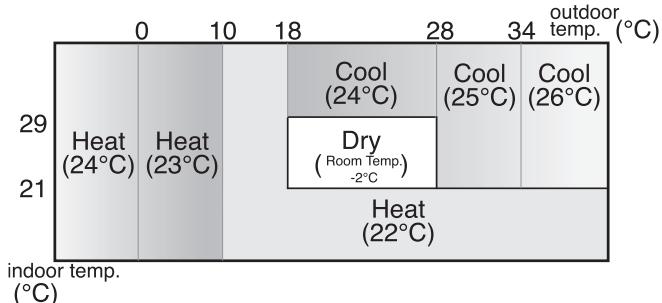
the figures in ( ) are temperature settings
During operation, if the outdoor temperature changes, the temperature settings will automatically slide as shown in the chart.
TIPS ABOUT INDICATOR PANEL
The indicator panel will change each time you press the DISPLAY button in the following manner.
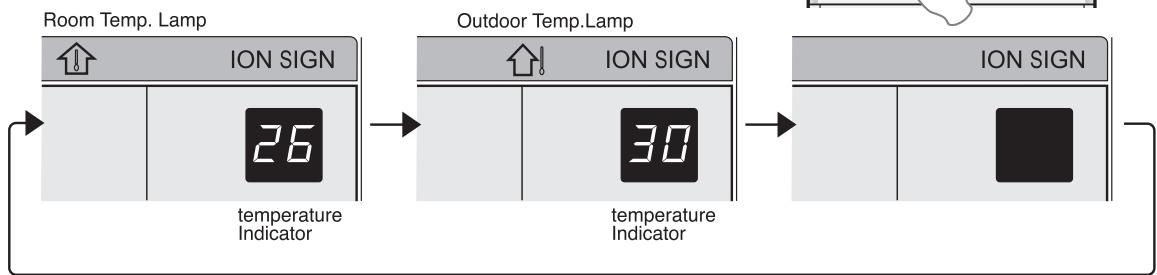
The room temperature is displayed.
The outdoor temperature is displayed.
No display.
NOTES:
- The displayed temperatures are rough estimates and may vary from the actual temperatures.
- Temperature display ranges
- Room temperature: 0^ 40^ ( L_ is displayed when less than 0^ and H , when higher than 40^ )
- Outdoor temperature: -9^ 45^ ( L_ is displayed when less than -9^ and H , when higher than 45^ )
- is displayed during the first 60 seconds of operation while the temperatures are being detected.
- Only the room temperature can be displayed for 5 seconds when the unit is not in operation.
- During SELF CLEAN operation, the indicator panel will display remaining time of the operation. Room and outdoor temperature will not be displayed even if you press the DISPLAY button.
ADJUSTING THE AIR FLOW DIRECTION
VERTICAL AIR FLOW DIRECTION
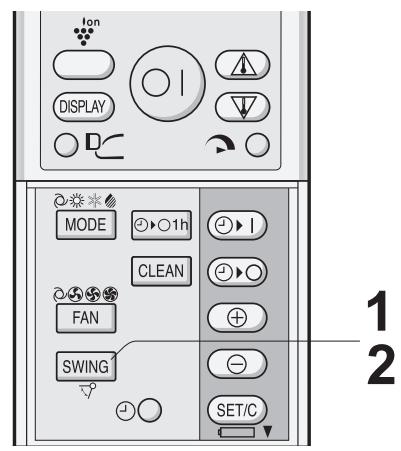
1 Press the SWING button on the remote control once.
- The vertical adjustment louvres will change its angle continuously.
2 Press the SWING button again when the vertical adjustment louvres are at the desired position.
- The louvre will stop moving within the range shown in the diagram.
- The adjusted position will be memorized and will be automatically set to the same position when operated the next time.
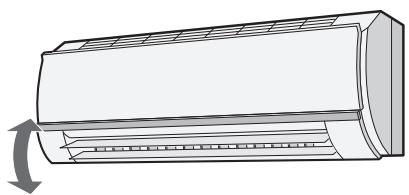
Adjustment range
COOL and DRY modes
HEAT mode
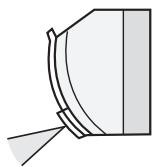
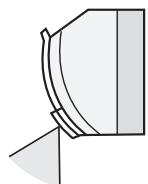
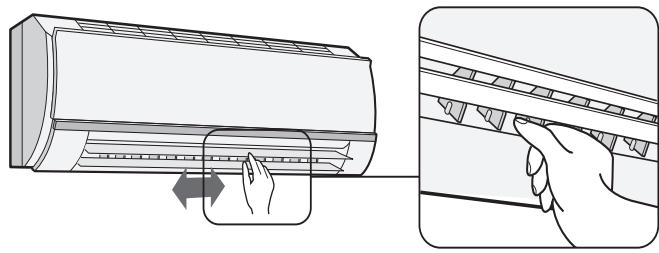
HORIZONTAL AIR FLOW DIRECTION
Hold the horizontal adjustment louvre as shown in the diagram and adjust the air flow direction.

CAUTION
Never attempt to adjust the vertical adjustment louvres manually.
- Manual adjustment of the vertical adjustment louvre can cause the unit to malfunction when the remote control is used for adjustment.
- When the vertical adjustment louvre is positioned at the lowest position in the COOL or DRY mode for an extended period of time, condensation may result.
Do not adjust the horizontal adjustment louvre to the extreme left or right in the COOL mode with the fan speed set to "SOFT (S)" for an extended period of time.
Condensation may form on the louvres.
PROGRESSIVE AIRFLOW
Press the PROGRESSIVE AIRFLOW button during cooling or dry operation when you do not want to feel cold air. Vertical adjustment louvres are set obliquely upward to deliver cool air to the ceiling.
Press the button during heating operation. Vertical adjustment louvres are set downward to deliver the warm air down to the floor and warm you.
1 During operation, press the PROGRESSIVE AIRFLOW button.
- The remote control will display D
TO CANCEL
Press the PROGRESSIVE AIRFLOW button.
NOTES:
- The PROGRESSIVE AIRFLOW setting is cancelled when you press FULL POWER button while PROGRESSIVE AIRFLOW is set.
- If you want PROGRESSIVE AIRFLOW operation in FULL POWER mode, press PROGRESSIVE AIRFLOW button during FULL POWER operation.
In this operation, the air conditioner works at maximum power to make the room cool or warm so rapidly that you can use it just after you come home.

1 To activate the FULL POWER operation, press the FULL POWER button during operation.
- The remote control will display
- The temperature display will go off.
- The green FULL POWER lamp ( ) on the unit will light up.
TO CANCEL
Press the FULL POWER button again.
- FULL POWER operation will also be cancelled when the operation mode is changed, or when the unit is turned off.
- The green FULL POWER lamp ( ) on the unit will turn off.
NOTE:
- You can not set the temperature or fan speed during the FULL POWER operation.
PLASMACLUSTER OPERATION
The Plasmacluster Ion generator inside the air conditioner will release positive and negative plasmacluster ions into the room.
Approximately the same numbers of positive and negative ions released into the air will reduce some airborne mold.
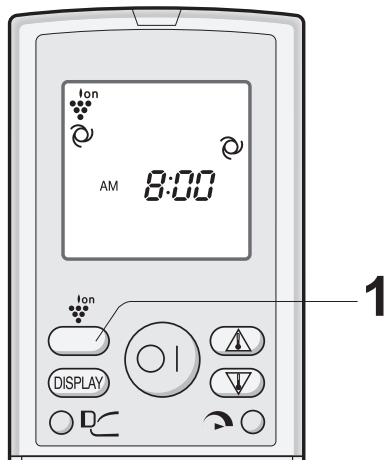
1 During operation, press the PLASMACLUSTER button.
The remote control will display "lon
- The blue PLASMACLUSTER lamp on the unit will light up.
TO CANCEL
Press the PLASMACLUSTER button again.
- The PLASMACLUSTER lamp on the unit will turn off.
NOTES:
- Use of the PLASMACLUSTER operation will be memorized, and it will be activated the next time you turn on the air conditioner.
- To turn off the PLASMACLUSTER lamp, press the DISPLAY button.
- When the PLASMACLUSTER button is pressed while the unit is not operating, the PLASMACLUSTER operation will be performed without accompanying air conditioning mode (eg, HEATING or COOLING).
The mode symbol of the remote control will go off and the fan speed can not be set AUTO.
SELF CLEAN OPERATION
SELF CLEAN operation will provide effect to reduce the growth mold fungus, and to dry inside of the air conditioner unit with Plasmacluster ions. This operation is accompanied by FAN or HEAT mode. Utilize the operation at seasonal change over terms. Mold fungus already grown can not be eliminated by this operation.
1 Press the SELF CLEAN button when the unit is not operating.
- The remote control displays "C".
- The blue PLASMACLUSTER lamp on the unit will light up.
- The unit will stop operation after forty minutes.
- The remaining operation time will be indicated on the TEMPERATURE INDICATOR of the indoor unit in minute decrements.
TO CANCEL
Press the SELF CLEAN button.
Alternatively, turn the unit off by pressing the ON/OFF button.
- The blue PLASMACLUSTER lamp on the unit will turn off.
NOTE:
- You cannot set the temperature, fan speed, air flow direction or timer setting during the SELF CLEAN operation.
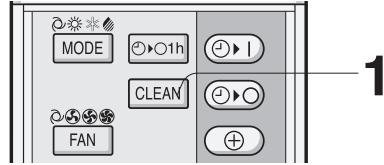
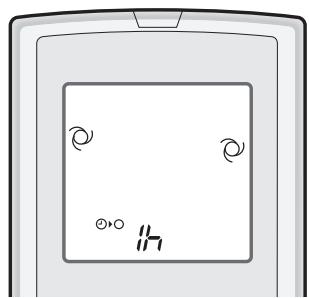
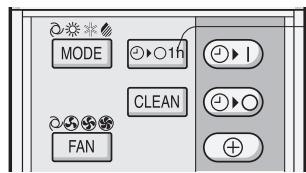
ONE-HOUR OFF TIMER
When the ONE-HOUR OFF TIMER is set, the unit will automatically turn off after one hour.
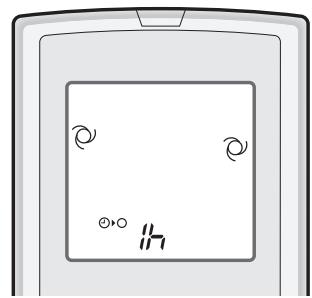
1 Press the ONE-HOUR OFF TIMER button. The remote control displays " ① "
- The orange TIMER lamp (①) on the unit will light up.
- The unit will stop operating after one hour.
TO CANCEL
Press the TIMER CANCEL (SET/C) button.
- The orange TIMER lamp ( ① ) on the unit will turn off.
Alternatively, turn the unit off by pressing the ON/OFF button.
- The red OPERATION lamp ( ) and the orange TIMER lamp ( ) on the unit will turn off.
NOTES:
- The ONE-HOUR OFF TIMER operation has priority over TIMER ON and TIMER OFF operations.
- If the ONE-HOUR OFF TIMER is set while the unit is not operating, the unit will operate for an hour at the formerly set condition.
- If you wish to operate the unit for another hour before the ONE-HOUR OFF TIMER is activated, press the ONE-HOUR OFF TIMER button again during operation.
- If TIMER ON and/or TIMER OFF are set, TIMER CANCEL button cancels every setting.
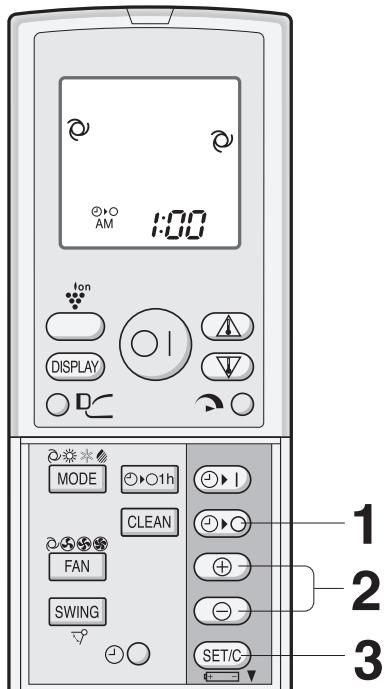
TIMER OPERATION
NOTE:
Before setting the timer, make sure the clock is properly set with the current time.
TIMER OFF
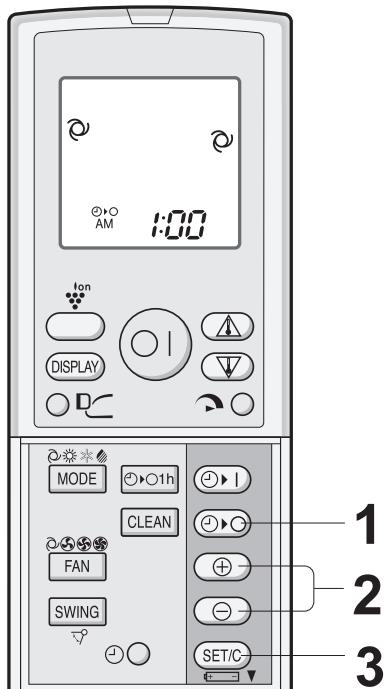
Press the TIMER OFF ( ) button.
The TIMER OFF indicator will blink; press the TIME ADVANCE or REVERSE buttons to set the desired time. (The time can be set in 10-minute increments.)
3 Point the remote control at the signal receiver window on the unit and press the TIMER SET (SET/C) button.
- The orange TIMER lamp ( Ⓞ ) on the unit will light.
- The unit will generate a beep when it receives the signal.
When the TIMER OFF mode is set, the temperature setting is automatically adjusted to prevent the room from becoming excessively hot or too cold while you sleep. (Auto Sleep function)
COOL/DRY MODE:
- One hour after the time operation begins, the temperature setting rises 1^ higher than the original temperature setting.
HEAT MODE:
One hour after the timer operation begins, the temperature setting drops 3^ lower than the original thermostat setting.
TO CANCEL TIMER MODE
Press the TIMER CANCEL (SET/C) button.
- The orange TIMER lamp ( Ⓞ ) on the unit will turn off.
- The current clock time will be displayed on the remote control.
NOTE:
- If any TIMER ON, TIMER OFF and ONE-HOUR OFF TIMER are set, the TIMER CANCEL button cancels all settings.
TO CHANGE TIME SETTING
Cancel the TIMER setting first, then set it again.
TIMER ON
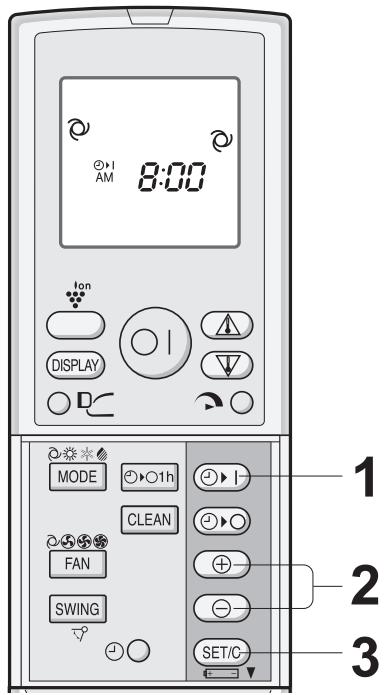
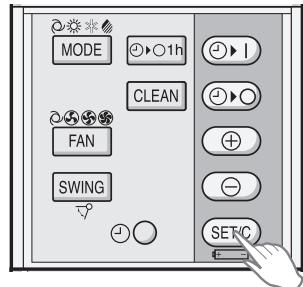
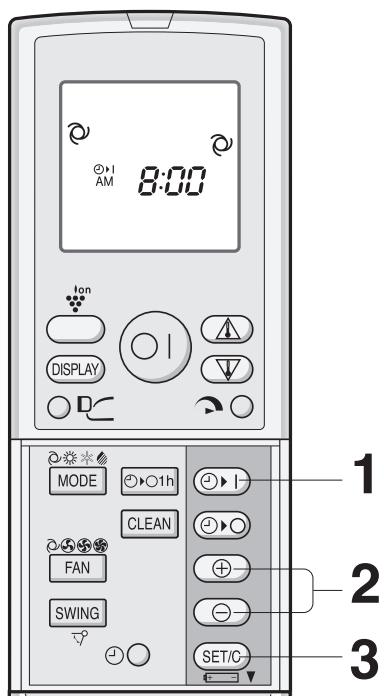
Press the TIMER ON (▶ |) button.
The TIMER ON indicator will blink; press the TIME ADVANCE or REVERSE buttons to set the desired time. (The time can be set in 10-minute increments.)
3 Point the remote control at the signal receiver window on the unit and press the TIMER SET (SET/C) button.
- The orange TIMER lamp ( Ⓞ ) on the unit will light.
- The unit will generate a beep when it receives the signal.
4 Select the operation condition.
4. The unit will turn on prior to the set time to allow the room to reach the desired temperature by the programmed time. (Awaking function)
COMBINED USE OF ON AND OFF TIMERS
You can use the ON and OFF timers in combination.

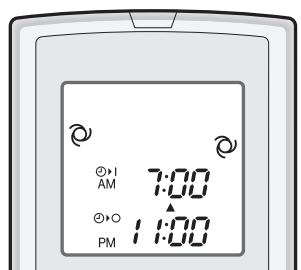
Example:
To stop operation at 11:00 p.m. and resume operation (With the same mode and temperature settings) to bring the room temperature to the desired level by 7:00 a.m.
1 Set the TIMER OFF to 11:00 p.m. during operation.
2 Set the TIMER ON to 7:00 a.m.
The arrow (▼ or ▲) between the TIMER ON indicator and the TIMER OFF indicator shows which timer will activate first.
NOTES:
- You cannot programmed the ON-TIMER and OFF-TIMER to operate the unit at different temperatures or other settings.
- Either timer can be programmed to activate prior the other.
AUXILIARY MODE
Use this mode when the remote control is not available.
TO TURN ON
- Lift the front panel of the indoor unit and press the AUX.
-
button on the operation panel.
-
The red OPERATION lamp ( ) on the unit will light and the unit will start operating in the AUTO mode.
- The fan speed and temperature setting are set to AUTO.
TO TURNOFF
Press the AUX. button on the operation panel again.
- The red OPERATION lamp ( ] ) on the unit will turn off.

NOTE:
If the AUX. button is pressed during normal operation, the unit will turn off.
MAINTENANCE
Be sure to disconnect the power cord from the wall outlet or turn off the circuit breaker before performing any maintenance.
CLEANING THE FILTERS
The air filters should be cleaned every two weeks.
1 TURN OFF THE UNIT
2 REMOVE THE FILTERS
① Lift the open panel.
② Push the air filters up slightly to unlock them.
③ Pull the air filters down to remove them.
3 TAKE OFF THE DEODORANT FILTERS FROM THE AIR FILTERS
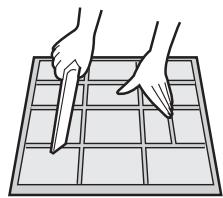
4 CLEAN THE FILTERS
Use a vacuum cleaner to remove dust. If the filters are dirty, wash them with warm water and a mild detergent. Dry filters in the shade before reinstalling.
5 REINSTALL THE DEODORANT FILTERS
6 REINSTALL THE FILTERS
① Reins tall the filters in the original positions.
② Close the front panel.
③ Push the arrow-marked of the panel firmly to lock it in place.
MAINTENANCE
CLEANING THE UNIT AND THE REMOTE CONTROL
- Wipe them with a soft cloth.
- Do not directly splash or pour water on them. We can cause electrical shock or equipment damage.
- Do not use hot water, thinner, abrasive powders or strong solvents.
MAINTENANCE AFTER AIR CONDITIONER SEASON
1 Operate the unit in the SELF CLEAN OPERATION to allow the mechanism to thoroughly dry.
2 Stop the operation and unplug the unit. Turn off the circuit breaker, if you have one exclusively for the air conditioner.
3 Clean the filters, then reinstall them.
MAINTENANCE BEFORE AIR CONDITIONER SEASON
1 Make sure that the air filters are not dirty.
2 Make sure that nothing obstructs the air inlet or outlet.
3 Check the outdoor mounting rack periodically for wear and to make sure it is firmly in place.
CLEANING THE DEODORANT FILTER
The filter should be cleaned every 3 ~ 6 months
1 REMOVE THE AIR FILTER
2 CLEAN THE DEODORANT FILTER
1 Take off the deodorant filter from the air filter.
2 Soak the deodorant filter in mild detergent dilution for 10 to 20 minutes. Rinse thoroughly with water, dry completely under sunlight.
3 Set the clean deodorant filter under the filter stoppers located on the air filter.
3 REINSTALL THE AIR FILTER
NOTE:
- Replacement is necessary at the interval of 3 years, as the deodorising effect will deteriorate. The new filter is available at your nearest dealer.
Replacement filter: Type AZ-F900G
Disposal of Filters
Please dispose of replaced filters according to the local disposal laws and regulations.
DEODORANT Filter materials:
Polyester
ADDITIONAL NOTES ON OPERATION
- The built-in protective device may prevent the unit from operating when used out of this range.
- Condensation may form on the air outlet if the unit operates continuously in the COOL or DRY mode when humidity is over 80 percent.
WHEN POWER FAILURE OCCURS
This air conditioner has a memory function to store settings when a power failure occurs. After power recovery, the unit will automatically re-start in the same settings which were active before the power failure, except for timer settings. If the timers were set before a power failure, they will need to be re-set after power recovery.
PREHEATING FUNCTION
In the HEAT operation, the indoor fan may not start for two to five minutes after the unit is turned on to prevent cold air from blowing out of the unit.
DE-ICING FUNCTION
- When ice forms on the heat exchanger in the outdoor unit during the HEAT operation, an automatic de-icer provides heat for about 5 to 10 minutes to remove the ice. During de-icing, the inside and outside fans stop operating.
- After de-icing is completed, the unit automatically resumes operation in the HEAT mode.
HEATING EFFICIENCY
- The unit employs a heat pump that draws heat from the outside air and releases it into the room. The outside air temperature therefore greatly affects the heating efficiency.
- If the heating efficiency is reduced due to low outside temperatures, use an additional heater.
It takes time to warm up and heat the entire room because of the forced air circulation system.
TIPS ON SAVING ENERGY
Below are some simple ways to save energy when you use your air conditioner.
SET THE CORRECT TEMPERATURE
- Setting the thermostat 1^ higher than the desired temperature in the COOL mode and 2^ lower in the HEAT mode will save approximately 10 percent in power consumption.
- Setting the temperature lower than necessary during cooling operation will result in increased power consumption.
BLOCK DIRECT SUNLIGHT AND PREVENT DRAFTS
- Blocking direct sunlight during cooling operation will reduce power consumption.
- Close the windows and doors during cooling and heating operations.
SET PROPER AIR FLOW DIRECTION TO OBTAIN THE BEST AIR CIRCULATION KEEP FILTER CLEAN TO ENSURE THE MOST EFFICIENT OPERATION
MAKE MOST OF THE TIMER OFF FUNCTION
DISCONNECT THE POWER CORD WHEN THE UNIT IS NOT USED FOR AN EXTENDED PERIOD OF TIME
- The indoor unit still consumes a small amount of power when it is not operating.
BEFORE CALLING FOR SERVICE
The following conditions do not denote equipment malfunctions
| UNIT DOES NOT OPERATE The unit will not operate if it is turned on immediately after it is turned off. The unit will not operate immediately after the mode is changed. This is to protect the internal mechanisms. Wait 3 minutes before operating the unit. | SWISHING NOISE The soft, swishing noise is the sound of the re-frigerant flowing inside the unit. |
| WATER VAPOUR • In the COOL and DRY operation, water vapour can sometimes be seen at the air outlet due to the difference between the room air tempera-ture and the air discharged by the unit. • In the HEAT operation, water vapour may flow out of the outdoor unit during de-icing. | |
| UNIT DOES NOT SEND OUT WARM AIR The unit is preheating or de-icing. | |
| ODORS Carpet and furniture odors that entered into the unit and the air conditioner's inner component odors at the early stage of installation may be sent out from the unit. | |
| CRACKING NOISE The unit may produce a cracking noise. This sound is generated by the friction of the front panel and other components expanding or connecting due to a temperature change. | THE OUTDOOR UNIT DOES NOT STOP After stopping the operation, the outdoor unit will rotate its' fan for about a minute to cool down the unit. |
| ODOR EMITTED FROM THE PLAS-MACLUSTER AIR OUTLET This is the smell of ozone generated from the Plasmacluster Ion generator. The ozone concent- tration is very small, posing no adverse effect on your health. The ozone discharged into the air rapidly decomposes, and its density in the room will not increase. | |
| A LOW BUZZING NOISE EMITTED This is a sound emitted when the unit is generating Plasmacluster ions. |
If the unit appears to be malfunctioning, check the following points before calling for service.
| IF THE UNIT FAILS TO OPERATE |
| Check to see if the circuit breaker has tripped or the fuse has blown. |
| IF THE UNIT FAILS TO COOL (OR HEAT) THE ROOM EFFECTIVELY | ||
| Check the filters. If dirty, clean them. | Check the outdoor unit to make sure nothing is blocking the air inlet or outlet. | Check the thermostat is proper setting. |
| Make sure windows and doors are closed tightly. | A large number of people in the room can prevent the unit from achieving the desired temperature. | Check whether any heat-gen-erating appliances are operat-ing in the room. |
| IF THE UNIT FAILS TO RECEIVE THE REMOTE CONTROL SIGNAL | ||
| Check whether the remote control batteries have become old and weak. | Try to send the signal again with the remote control pointed properly towards the unit's signal receiver window. | Check whether the remote control batteries are installed with the polarities properly aligned. |
Please call for service when TEMPERATURE INDICATOR on the indicator panel blink.


DEBIT D'AIR PROGRESSIF
PABOTA HA NOJIHUYO MOUHOCTb
B daHHom pexKme KOHNiOnoHep Bo3dyxa pa6OtaeT Ha NOJHyo MoUHocTb Ha oxJaXdEHe NOMESeHnra TAK 6bICTpo, YTO 3TO ydo6Ho nCNoJb3OBaTb, KOrDa Bbl npNXODHTe DOMoI.

1 Chobb BkHouHb peKm pa60t bHa IOJHyO MOUHOCTb, HaxMnte KhoNky IOJHOI MOnHOCTN BO BpeMa pa60t b annapaTa.
Ha npIbTe DnCTaHcUOHHO ynpaBJIeHn IOBNTCA
- OTKJIIOUHTCnIcPnIe TEmpeaTpybl.
Ha annapate 3aropntc 3eIeHna lamna IONHO MOUHCOTN ( ).
YTOBbl OTMEHNTb
CHOBa HaxMnte KhONkY POJHOI MOLsHOCtN.
- PexkIM pa60tBHa NOJHUYIO MOUHOCTb TaKKe OTKJIQUHTCRA,ecINnI3MeHReTcpeXkIM pa60tB,IJIe ECINn aannapAT OTKJIQUHaETcR.
- 3eJeha Jama TIOJIHOI MOUHOCTN ( ) Ha annapate norachet.
ПРИМЕЧАНЕ:
- Bbl He MoKeTe yCTaHaBnBaTb Tempeatpy nIeCKOpocTb BpaueHn BeHTnJIaTopa BO BpeMa pa60Tb Ha IIOJHyO MOLUHOCTb.
CHOBA HaxMnTe KhoNky IJIa3MEHHOJ rpyPiIbI.
- Tony6aJ lamna PJIa3MEHHOJ rpyPi bI na annapate noracheT.
ПРИМЕЧАЙ:
Pa60Ta PIIA3MEHHOJ IpyIbI 6yTe 3aHeCeHa B namrBn BKJIoueHa B CJeDuOu pa3, KOrDa BbI BKJIouHte KOHNzUHOpe.
- YTo6bI BbIKJIIOUHTb JAmNv IJIa3MEHHOH IpyiIbI, HaxMITE KhoNky DISPLAY.
- Ecnn Haxnmaetc KhoNka PIIA3MEHHOI rpyPibl, a annapat He pa6oTaET, pa6oTa IJIa3MEHHOI rpyPiB1 6ydt BbIOJHrTbC 6e3 BKJIOUeHnpeKIMa KOHNIOHnPOBaHnBaO3dyxa (Haep., OBOΓPEBAHNE nn OXIAJKDEHNE).
CnmboI pexima Ha nyIbTe IncTaHcUOnHOrO ynpaBJeHH nChe3HeT, a ckopoCTb BpaueHn BeHTnJIaTopa HeIb3r 6ydt YcTaHOBnTb Ha ABTO.
PABOTA CAMOOUUNCTKIN
Pa6oTa CAMOOHCTKN B pe3yIbTaTe yMehbaaet O6pa3OBAHne rpn6koN PJIeCEHN BBICyUWBaET KOHNzIOHep N3HyTpN IOHAMN PIIa3MeHHoR rpynnbl. 3Ta onepaunocyuaceTBJAEcraBmecTe cpejKumom BEHTNJARTOPA nIn OBOrPEBAHnI.NcnoJIb3yIte 3Tu fynKcIIO npn CmeHe BpeMEn rOda.
Bbipocsa npeceHb He moKet 6bItb ydaJeHa TaKIM cnOCO6OM.
1 Haxmnte KhoNky CLEAN, korga annapat Hepa6oTaeT.
Ha npIbTe nCTaHcNOHHOro ynpaBHeHn NOABNTcA“
Ha annapate 3aropntc rojy6a lamna IJIa3MEHHOJ rPynbl.
- Annapat npekpatnT pa60Tu chepe3 copok mHyT.
- OctabweecBpempa60tbiB y6bibaOux MNHyTHbIX INTEpbalax 6ydet NOKa3bBaTbcHa INHINKATOPE TEMNEPATyPbI BHytpenHoro 6noka.
YTObI OTMEHHTb
HaxmTe KhONky CLEAN.
IIN BbIKIOHTe aannapat HaKaTneM KHOKN BKJI/ BblKJI.
- Toly6aJ lamna PJIa3MEHHOI rpyPiI ha annapate norachet.
ПРИМЕЧАНЕ:
- Bы He можete установпь Temпатур, ckopoctь врашени BeHTиларopa, habpaBneHne Notoka Bo3dyxa Или таймер BO Время onepaци CAMOOYNCTKI.
TAIMEPOTKJIIOUeyHnY UPE3 YAC
Ecnn yctaHOBlen TAIIMEP OTKJIIOUeHnA YEPE3 YAC,To annapaT aBTOMaTHueckn OTKJIIOHTcYpe3 Yac.
1 HaXmTe KhoNky TAIMEPA OTKJIIOUeHnA YEPE3 YAC.
Ha npyIbTe DnCTaHcNIOHHOrO ynpaBNeHnI NOABNTCA
- Ha annapaTe 3aropntcra opaHkeBaJ lamna TAIIMEPA (①).
- Annapat npekpatntpa60ty uepe3 qac.
YTObI OTMEHHTb
HaxmTe KhoNky CBPOCA BPEMEHN (SET/C).
- OpaHxEBAJ lamna TAYMEPA ( ) Ha annapaTe noracheT.
IJIIN BbIKJIOUHTe annapaT HaXaTNEm KHOIPK IN BKJI/BbIKJI.
- Kpacna Jama PABOTbl ( ) n opaHkeBaJama TAYMEPA ( ) Ha annapaTe norachyt.
ПРИМЕЧАнЯ:
-ФункцЯ TаймЕРОТКЛIOчEHИЧЕРЗЧАС ИМeETпрeнMuистВОпepeДФункцяMu TаймЕРВ BKЛIOчEHИИТаймЕРОТКЛIOчEHИ.
- Ecni TAVMEP OTKJIIOUCHEN YEPE3 YAC yCTaHOBJeH KOrga annapaT hepa6oTaet, To annapaT byeT pa60TaTB OINH Yac B paHee yCTaHOBJeHHbIX npaMeTpax.
- Ecnn Bbl 3axoTnte 3KcnnyaTnpOBaTb annapaT eue OdnH yac, nepei TeM, kaK cpa6otaet TAIIMEP OTKJIIOUeyEHnY CEPE3 YAC, HaxmTe KhoNky TAIIMEPA OTKJIIOUeyEHnY CEPE3 YAC eue pa3 BO Bpemra pa60tbl.
- Ecnn yctaHOBJIeHbI TAIMEP BKJIIOUeyHn/IIIN TAIMEP OTKJIIOUeyHn, KhoNka CBPOCA BPEMEHN OTMeHHET BCE npdeblduyue yctaHOBKn.
PABOTA CTAYMEPOM
ПОНМЕЧАНЕ:
Ipeed yctaHOBKO TaMepa, npOBepTe npabNbHOCb yCTaHOBKn YacOB.
TAIMEPOTKJIIOUCHNIA
1 HaxmTe KhoNky TAIMEPA OTKJIIOUeHnA (O).
2 3amnraet lamna TAIIMEPA OTKJIIOUOHEHNA; Haxmte KhoNk INPEBODA BPEMEHN BNEPED nIi HA3AD, yTo6bl yCTaHOBtB Jeklaemoe Bpem. (BpeM moKeT 6bITb yCTaHOBJIeHO C DECAITUMNHHTbIMN INHTepBaJAMn.)
3 HanpaBbTe nyIbT dNCTaHcNoHOro ynpabLeHnHa OKHO pecNBepa CnHaJa Ha annapate n haXmTe KhONky YCTAHOBKN BPEMEHN (SET/C).
Haannapate 3aropntc opanxkeBaJ lamna TAIIMEPA().
- Annapat nodaet 3BykoBOn cnHaJ, KOrda OH npHnMaet cnHaJ noDaHHo BamKOMaHdbI.
COBETBI KACAOUINECFAYHKUIN TAIIMEPA OTKJIIOUeyHn
Ecn yctaHOBne TAIIMEP OTKJIO- YEHNA, TemnepaTyPhbI peXm ycTaHabnBaetcA bTOMaTnueckN, UTO6bI n36eKaTb nepeRpeBaHnI nnpeoxlaXdEHH NOMEseHnB TO BpEmK, KOrda Bbl cnte. (ФункцЯ aTOMaTnueckoro cHa)
PEKIM OXJIAXDEHNA/CYUKN:
- Yepe3 yac nocne haujra paobTbI taHmepa yCTaHOBka TEMpepaTypbl NOBbICNTcR Ha 1 ^ C no cpaBHeHIO c IcxOJHOy UCTaHOBKOI TEMpepaTypbl.
PEKIM OBOPTEBAHNA:
- Yepe3 yac nocne haua pa6oTbI TaMepa yCTaHOBka TempepatypbI NOHN3NTcH a 3 ^ C no cpaBHeHIO C NcXOHDn yCTaHOBkoI TepMOcTaTata.
YTO6bI N3MEHHTb YCTAHOBKY BPEMEH
HaXMMTe KhoNky CBPOCA BPEMEHn (SET/C).
- OpanxeBaJ lamna TAIIMEPA ( ) Ha annapate norachet.
Ha npIbTe nIcTaHnIOHHORynpaBHeHn6bJeT NOKa3bIBaTbcrTeKyuuee Bpem.
ПОНМЕЧАНЕ:
- EcπуctaHOBJeHbTAYMEP BKJIQUEHNRA TAYMEP OTKJIQUEHNr nIu TAYMEP OTKJIQUEHnY CEPE3 YAC, KhoNka CBPOCA BPEMEHn OTMeHnT BCE yCTaHOBKn.
CHTObI N3MEHHTb YCTAHOBKY BPEMEHN
Chaujana OTMeHnTe yCTaHOBky TAIIMEPA, 3aTEM yCTaHOBnTe eE CHOBA.
TAIMEP BKJIQUEHEN
1 Haxmnte KhoNky TAIMEPA BKJIIOUeHnA (O|).
2 3amnraet lamna TAIIMEPA BKJIOUCHENI; Haxmnte KhoNkne PEPEBODA BPEMEHIN BIPEPED nIi HA3AD, yTO6bI yCTaHOBNTb XeJaemoe Bpem. (Bpem MoXeT 6bITb yCTaHOBJIeHO C DeCAYIMNHyTHbIMN INHTepBa- lamn.)
3Ha npabBte nyIbT dIscTaHcNoHnOуnpaBJIeHЯ OKHO pecuBepa CnHaJa Haannapateи habkmite KhoNky UCTAHOBKN BPEMEHN (SET/C).
-
Ha annapaTe 3arOpuTc8 opaHxVeBaJ lamna TAI-MEPA (①).
-
AnnapaT noJaET 3ByKOBoN cRHaJ, KOrJa OH npHnMaET cRHaJ noDaHHoB Bamn KomaHdbI.
4 BbI6epNTe ycIOBnra pa6oTbl.
-Даннь annapat BKIIOUHTcnapeud yctaHOBLeHnblm BpemeHem,уTObI TeMnepaTpyaВnomeueHINdoCTnrrla yCTaHOBJIeHHORO yPOBnK 3anporpAMNipoBaHHOMy BpemeHn.(Функци npobxJdeHn)
KOMBUNHOBAHHOE ICNoJIb3OBAHNE TAIIMEPA BKJIIOUeHENI N OTKJIIOUeHENI
BbI MoXeTe IcNoJIb3OBAtB TaMep OTKJIIOUeyHn B KJIIOUeyHn B KOM6HaCuIn.
ПРИМЕЧАЙ:
Pnmupe:
П配电иь pa60уВ 11:00 Вechepa в ВOSTOBHOBtB pa60у (пр Такнх Лу установке Temператypы в ТаКOM Лу ржиме) и ДовECTN Temператувnomeшениdo Heo6xOДIMORO ypoBня K7:00уТpa.
1 UctaHOBuTe TAIIMEP OTKJIUOYEHNHa Ha 11:00 Beuepa BO BpeMa pa6oTbI.
2 UcTaHOBnTe TAIMEP BKJIIOUeHENHa 7:00 yTpa.
CTpeIka(▼nII▲)mexdy lamnamTAYMEPA BKJIIOUeHnI TANMEPAOTKJIIOUeHnI noka3bIbAet KaKoI n3 TaIMepOB 6ydet aKTINBIpOBAH nepBbIM.
- Bы He можete поррамповаь TайМЕР BKЛIOЧЕНЯ и TайМЕР OTКЛIOЧЕНЯ дя pa6OTы annapaТа в ра3ЛИчных Temпepатурах Илв Дугнх установкax.
- KaЖдыи n3 taɪmepoB MOxHо 3aIpOrpaMMIpObaTb TaK, yTo6bl OH BKJIQUaJIcR ČePbBIM.
Cleyuoune ycNoBn He O3HaayoT noIOMky annapata.
| ANPAPAT HE PABOTAET Annapat He 6ydeT pa60TaB, ecn OH BkIIOaEcTc HEnocpeDCTBENHO pOcne TOrO, kaK 6bIe N BvIKNoUeH. Annapat He 6ydeT pa60TaB HEnocpeDCTBENHO pOcne m3MeHNHnRApeXIMAp a60Tb. 3To DnT OTO, YTO6bI npedoxpAHNTB BVHTpeHHne MEXAHN3MbI. PiooJdnte TPn MINyTb IpePeT Tem, KaK NaYAtb 3KcPnLyaTcuu annapata. | CBNCTAaNII Shum MЯrkni, CBNCTaIaNII Shum 3To 3Byk OXJaXdaIooSei XnIdkoCTn BVHTprn Annapata. |
| NCNAPINHA • Bo Bpemra pa60Tb B pexime OXJIAXDEHInr iIin CUYKNI, INHOJa MOxHO yBvIDeTb IcNapunHy Ha OTBepCTn BVIXOJa BO3DyXa BCNEdCTBne pa3HnCIbI MeXJy TEMpePATyPoB N PomeSeHnI N TEMpePa- TypoB BVIXOJaIeRo IV3 annapata BO3DyXa. • B pexime OBOITPEBAHInr, BOnHbI KOnDeHcat MOXeT BVIXOJITb IV3 HApXHOrO 6bIOKa BO Bpemr pa3MOPaXKBaHnR. | |
| ANPAPAT HE IODAET TETNLBI BO3DyX Annapat ocUseCTBnAE TpeDvapitelbHbI HarpeB IINI pa3MopaxKbVahne. | |
| 3ANAXN 3aIaxn KOboBbIX POKpbTn I Me6JI, nonaDaIOuSHe BO BVHTpeHHn KOMNoHENT KOHdIaIOHepa BO3DyXa Ha NaayalbHc STaDiN UcTAHOBVMOYr BVIXOJITb IV3 annapata. | HAPYXHbI BLOK HE NEPECTAET PABOTATb Piocne ppeKpaSeHn rpa60Tb, BeHTnJIaTOp HapXHOrO 6bIOK bApSaTbcr eIe MInHtU dIy OXLAXDeHn CnCTeMbI. |
| NOTPECKNBAIOUaNII SHUM DanHbI annapat MoXet rHeepropBaTb NotpecknBaOuSsH WM. 3ToT 5WM Bv3bIAeTc TpeHHeM nepeDnH nAHEIn I INpyHX ChAteT BCLeDCTBne PaSCHPeHn IIN CxatnA IV-3a I3MeHennr TempePaTpybl. | 3ANAX, BVlDEJIaEMbI N3 OTBEPCTN BvIXOJa BO3DyXa PILA3MEHHO rpyPbI 3To - 3anax 03OHa, prOIN3BOIDMOrO IOHN3aTOpom PILA3MeHNO rpyPbI. KOHcENTpaZn O3OHa OeyH MaJa I Ne Oka3bIAeT HeratINBHOrO BImHne Ha BaWe 3DopOBBe. BVInyckaEmbI B KomHAty 03OH 6bICTpo pa3NaRaTeTcR, erO PIOTHOCTb B BO3DyXe KomHaTbI He yBeJInuHTcR. |
| HN3KIn JxJxKAAUaNII SHUM 3ToT 3ByK BOCpOIN3BOIDTcR BO Bpemr rHeepauznn MOHOB PIA3MeHNO rpyPbI. |
Ecn annapat He pa6oTaet, nepeid Tem KaK Bbl3BaTb cepBnC, npOBepbTe cJeDyUouee.
- AY-XP9GHR AY-XP12GHR
- Information on Disposal for Users (private households)
- In the European Union
- In other Countries outside the EU
- Information on Disposal for Business Users.
- CONTENTS
- IMPORTANT SAFETY INSTRUCTIONS
- WARNING FOR USE
- WARNING FOR INSTALLATION/REMOVAL/REPAIR
- CAUTIONS FOR USE
- CAUTIONS FOR LOCATION/INSTALLATION
- PART NAMES
- REMOTE CONTROL
- L.C.D. REMOTE CONTROL DISPLAY
- SETTING DEODORANT FILTER
- Precautions
- USING THE REMOTE CONTROL
- LOADING BATTERIES Use two size-AAA (R03) batteries.
- NOTES:
- HOW TO USE THE REMOTE CONTROL
- CAUTION
- SET CURRENT CLOCK TIME
- NOTE:
- BASIC OPERATION
- AUTO/DRY MODE
- COOL/HEAT MODE
- TIPS ABOUT AUTO MODE
- TIPS ABOUT INDICATOR PANEL
- ADJUSTING THE AIR FLOW DIRECTION
- VERTICAL AIR FLOW DIRECTION
- Adjustment range
- HORIZONTAL AIR FLOW DIRECTION
- PROGRESSIVE AIRFLOW
- TO CANCEL
- PLASMACLUSTER OPERATION
- SELF CLEAN OPERATION
- ONE-HOUR OFF TIMER
- TIMER OPERATION
- TIMER OFF
- COOL/DRY MODE:
- HEAT MODE:
- TO CANCEL TIMER MODE
- TO CHANGE TIME SETTING
- TIMER ON
- COMBINED USE OF ON AND OFF TIMERS
- Example:
- AUXILIARY MODE
- TO TURN ON
- TO TURNOFF
- MAINTENANCE
- CLEANING THE FILTERS
- CLEANING THE UNIT AND THE REMOTE CONTROL
- MAINTENANCE AFTER AIR CONDITIONER SEASON
- MAINTENANCE BEFORE AIR CONDITIONER SEASON
- CLEANING THE DEODORANT FILTER
- Disposal of Filters
- ADDITIONAL NOTES ON OPERATION
- WHEN POWER FAILURE OCCURS
- PREHEATING FUNCTION
- DE-ICING FUNCTION
- HEATING EFFICIENCY
- TIPS ON SAVING ENERGY
- SET THE CORRECT TEMPERATURE
- BLOCK DIRECT SUNLIGHT AND PREVENT DRAFTS
- SET PROPER AIR FLOW DIRECTION TO OBTAIN THE BEST AIR CIRCULATION KEEP FILTER CLEAN TO ENSURE THE MOST EFFICIENT OPERATION
- MAKE MOST OF THE TIMER OFF FUNCTION
- DISCONNECT THE POWER CORD WHEN THE UNIT IS NOT USED FOR AN EXTENDED PERIOD OF TIME
- BEFORE CALLING FOR SERVICE
- The following conditions do not denote equipment malfunctions
- DEBIT D'AIR PROGRESSIF
- PABOTA HA NOJIHUYO MOUHOCTb
- YTOBbl OTMEHNTb
- ПРИМЕЧАНЕ:
- ПРИМЕЧАЙ:
- PABOTA CAMOOUUNCTKIN
- YTObI OTMEHHTb
- TAIMEPOTKJIIOUeyHnY UPE3 YAC
- ПРИМЕЧАнЯ:
- PABOTA CTAYMEPOM
- ПОНМЕЧАНЕ:
- TAIMEPOTKJIIOUCHNIA
- COBETBI KACAOUINECFAYHKUIN TAIIMEPA OTKJIIOUeyHn
- PEKIM OXJIAXDEHNA/CYUKN:
- PEKIM OBOPTEBAHNA:
- YTO6bI N3MEHHTb YCTAHOBKY BPEMEH
- CHTObI N3MEHHTb YCTAHOBKY BPEMEHN
- TAIMEP BKJIQUEHEN
- Pnmupe:
- Cleyuoune ycNoBn He O3HaayoT noIOMky annapata.
- Ecn annapat He pa6oTaet, nepeid Tem KaK Bbl3BaTb cepBnC, npOBepbTe cJeDyUouee.
Brand : SHARP
Model : AY-XP12GHR
Category : Air conditioner