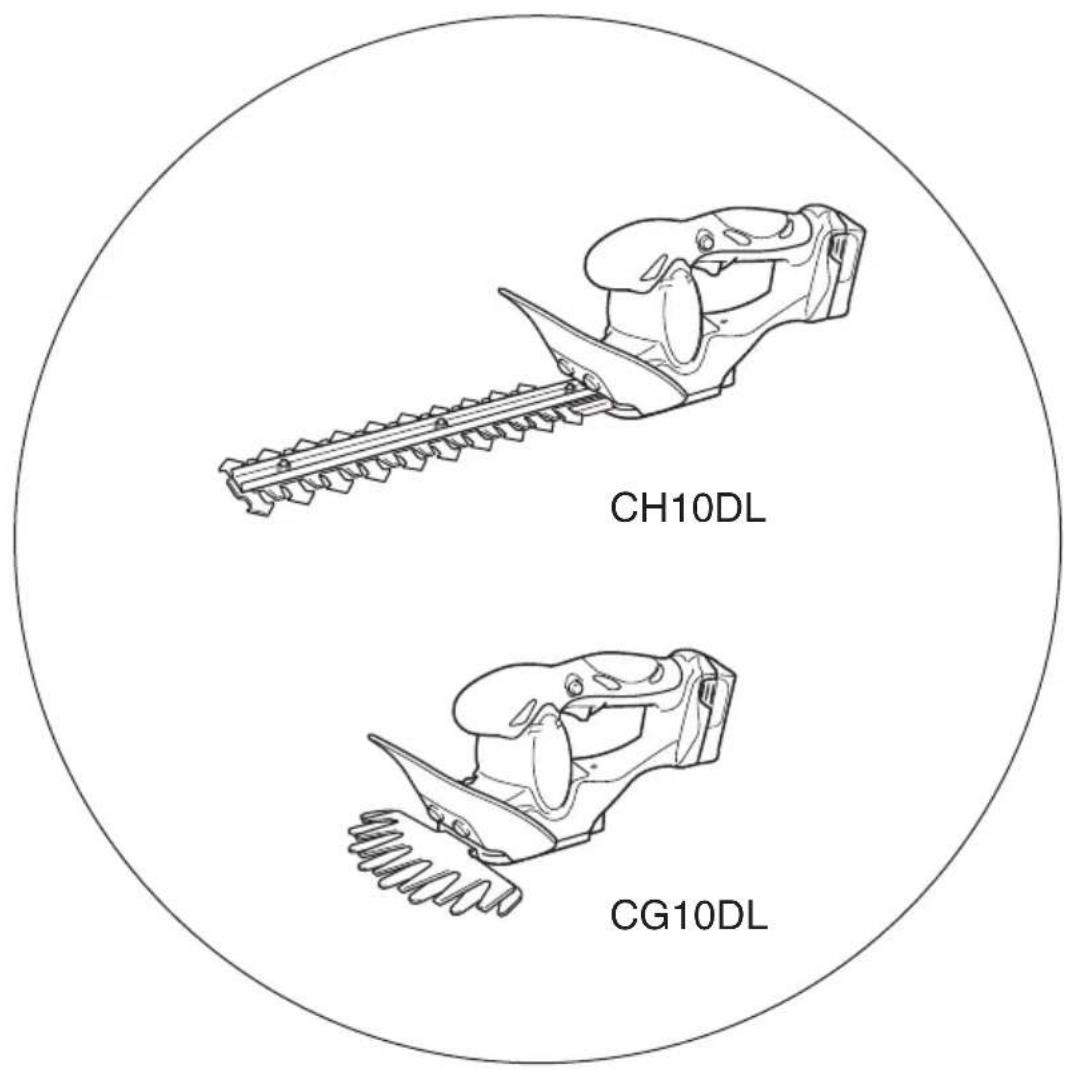
CH10DL - Lawn mower HiKOKI - Free user manual and instructions
Find the device manual for free CH10DL HiKOKI in PDF.

User questions about CH10DL HiKOKI
0 question about this device. Answer the ones you know or ask your own.
Ask a new question about this device
Download the instructions for your Lawn mower in PDF format for free! Find your manual CH10DL - HiKOKI and take your electronic device back in hand. On this page are published all the documents necessary for the use of your device. CH10DL by HiKOKI.
USER MANUAL CH10DL HiKOKI
Cordless Shrub Shear Cordless Grass Shear
CH 10DL
CG 10DL
text_image
CH10DL CG10DL保留备用
Keep for future reference

使用说明书
Handling instructions
中文
目次
电动工具通用安全警告 2
绿篱机安全警告....4
割草机安全警告....5
绿篱机和割草机的注意事项……6
电池和充电器注意事项……6
锂离子电池使用注意事项....7
符号....8
规格....8
标准附件....9
选购附件(分开销售) 9
用途....10
电池的拆卸 / 安装法.....10
充电....11
功能说明....13
更换刀片....15
使用方法....16
维护和检查....19
故障排除....20
维修零部件一览表....22
电动工具通用安全警告
警告!
阅读所有警告和所有说明。
natural_image
Line drawing of a cylindrical battery with cooling fins and a flat top (no text or symbols)- 绿篱机刀片组套
(包含刀片箱、曲柄凸轮和刀片盒)
natural_image
Technical line drawing of a mechanical assembly with spring-loaded components and a rectangular housing (no text or symbols)中文
3. 割草机刀片组套
(包含刀片防护罩、曲柄凸轮和刀片盒)

natural_image
Line drawing of a mechanical tool set including a flat blade, coiled spring, and two rectangular enclosures (no text or symbols)4. 调节器(割草机)

5. 箱

用途
○ 绿篱机
修剪树篱
修剪园林树木
○ 割草机
修剪草坪
电池的拆卸 / 安装法
1. 电池的拆卸法
natural_image
Line drawing of hands using a handheld device to interact with a device (no text or symbols present)图 11
natural_image
Illustration of hands using a tool to adjust or install a mechanical component (no text or symbols visible)插销
图 12
更换刀片
刀片是易耗品,变钝后必须更换新刀片。
请按照以下步骤更换刀片。
natural_image
Diagram of a tree with trapezoid branches and leaves, no text or symbols present图 19
natural_image
Two technical illustrations showing a person using a tool to cut through a slope, and another holding a measuring tool with an upward arrow (no text or symbols present)图 21
注:
natural_image
Illustration of a hand using a tool to cut or spread material on a surface, with no visible text or symbols.图22
在石墙和路边周边修剪
natural_image
Illustration of a hand pressing down on a shoe with a magnifying glass, surrounded by square buttons (no text or symbols)图 23
3. 连续操作时间
约 30 分钟(视工作条件而定)
维护和检查
警告!
SHRUB SHEAR SAFETY WARNINGS ....29
GRASS SHEAR SAFETY WARNINGS....29
PRECAUTIONS FOR SHRUB SHEAR AND GRASS SHEAR ......30
PRECAUTIONS FOR BATTERY AND CHARGER 31
CAUTION ON LITHIUM-ION BATTERY 31
SYMBOL....33
SPECIFICATIONS....33
STANDARD ACCESSORIES 34
OPTIONAL ACCESSORIES (sold separately)....34
APPLICATIONS....35
BATTERY REMOVAL/INSTALLATION 35
CHARGING 36
FUNCTIONAL DESCRIPTION ....38
REPLACING THE BLADE 40
HOW TO USE 41
MAINTENANCE AND INSPECTION 44
TROUBLESHOOTING....46
SERVICE PARTS LIST 48
GENERAL POWER TOOL SAFETY WARNINGS

WARNING
Read all safety warnings and all instructions.
Failure to follow the warnings and instructions may result in electric shock, fire and/or serious injury.
Save all warnings and instructions for future reference.
The term “power tool” in the warnings refers to your mains-operated (corded) power tool or battery-operated (cordless) power tool.
1) Work area safety
a) Keep work area clean and well lit.
Cluttered or dark areas invite accidents.
b) Do not operate power tools in explosive atmospheres, such as in the presence of fl ammable liquids, gases or dust.
Power tools create sparks which may ignite the dust or fumes.
c) Keep children and bystanders away while operating a power tool.
Distractions can cause you to lose control.
2) Electrical safety
a) Power tool plugs must match the outlet.
Never modify the plug in any way.
Do not use any adapter plugs with earthed (grounded) power tools.
Unmodified plugs and matching outlets will reduce risk of electric shock.
b) Avoid body contact with earthed or grounded surfaces, such as pipes, radiators, ranges and refrigerators.
There is an increased risk of electric shock if your body is earthed or grounded.
c) Do not expose power tools to rain or wet conditions.
Water entering a power tool will increase the risk of electric shock.
d) Do not abuse the cord. Never use the cord for carrying, pulling or unplugging the power tool.
Keep cord away from heat, oil, sharp edges or moving parts.
Damaged or entangled cords increase the risk of electric shock.
e) When operating a power tool outdoors, use an extension cord suitable for outdoor use.
Use of a cord suitable for outdoor use reduces the risk of electric shock.
f) If operating a power tool in a damp location is unavoidable, use a residual current device (RCD) protected supply.
Use of an RCD reduces the risk of electric shock.
3) Personal safety
a) Stay alert, watch what you are doing and use common sense when operating a power tool.
Do not use a power tool while you are tired or under the influence of drugs, alcohol or medication.
A moment of inattention while operating power tools may result in serious personal injury.
b) Use personal protective equipment. Always wear eye protection.
Protective equipment such as dust mask, non-skid safety shoes, hard hat, or hearing protection used for appropriate conditions will reduce personal injuries.
c) Prevent unintentional starting. Ensure the switch is in the off position before connecting to power source and/or battery pack, picking up or carrying the tool.
Carrying power tools with your finger on the switch or energising power tools that have the switch on invites accidents.
d) Remove any adjusting key or wrench before turning the power tool on.
A wrench or a key left attached to a rotating part of the power tool may result in personal injury.
e) Do not overreach. Keep proper footing and balance at all times.
This enables better control of the power tool in unexpected situations.
f) Dress properly. Do not wear loose clothing or jewellery. Keep your hair, clothing and gloves away from moving parts.
Loose clothes, jewellery or long hair can be caught in moving parts.
g) If devices are provided for the connection of dust extraction and collection facilities, ensure these are connected and properly used.
Use of dust collection can reduce dust-related hazards.
English
4) Power tool use and care
a) Do not force the power tool. Use the correct power tool for your application.
The correct power tool will do the job better and safer at the rate for which it was designed.
b) Do not use the power tool if the switch does not turn it on and off.
Any power tool that cannot be controlled with the switch is dangerous and must be repaired.
c) Disconnect the plug from the power source and/or the battery pack from the power tool before making any adjustments, changing accessories, or storing power tools.
Such preventive safety measures reduce the risk of starting the power tool accidentally.
d) Store idle power tools out of the reach of children and do not allow persons unfamiliar with the power tool or these instructions to operate the power tool. Power tools are dangerous in the hands of untrained users.
e) Maintain power tools. Check for misalignment or binding of moving parts, breakage of parts and any other condition that may affect the power tool's operation.
If damaged, have the power tool repaired before use.
Many accidents are caused by poorly maintained power tools.
f) Keep cutting tools sharp and clean.
Properly maintained cutting tools with sharp cutting edges are less likely to bind and are easier to control.
g) Use the power tool, accessories and tool bits etc. in accordance with these instructions, taking into account the working conditions and the work to be performed.
Use of the power tool for operations different from those intended could result in a hazardous situation.
5) Battery tool use and care
a) Recharge only with the charger specified by the manufacturer.
A charger that is suitable for one type of battery pack may create a risk of fire when used with another battery pack.
b) Use power tools only with specifi cally designated battery packs.
Use of any other battery packs may create a risk of injury and fire.
c) When battery pack is not in use, keep it away from other metal objects, like paper clips, coins, keys, nails, screws or other small metal objects, that can make a connection from one terminal to another.
Shorting the battery terminals together may cause burns or a fire.
d) Under abusive conditions, liquid may be ejected from the battery; avoid contact. If contact accidentally occurs, flush with water. If liquid contacts eyes, additionally seek medical help.
Liquid ejected from the battery may cause irritation or burns.
6) Service
a) Have your power tool serviced by a qualified repair person using only identical replacement parts.
CAUTION
Keep children and infi rm persons away.
When not in use, tools should be stored out of reach of children and infirm persons.
SHRUB SHEAR SAFETY WARNINGS
Keep all parts of the body away from the cutter blade. Do not remove cut material or hold material to be cut when blades are moving. Make sure the switch is off when clearing jammed material.
A moment of inattention while operating the shrub shear may result in serious personal injury.
○ Carry the shrub shear by the handle with the cutter blade stopped. When transporting or storing the shrub shear always fit the cutting device cover.
Proper handling of the hedge trimmer will reduce possible personal injury from the cutter blades.
○ Keep cable away from cutting area.
During operation the cable may be hidden in shrubs and can be accidentally cut by the blade.
GRASS SHEAR SAFETY WARNINGS
IMPORTANT
READ CAREFULLY BEFORE USE
KEEP FOR FUTURE REFERENCE
Safe operation practices
● Training
a) Read the instructions carefully. Be familiar with the controls and the proper use of the machine.
b) Never allow people unfamiliar with these instructions or children to use the machine. Local regulations can restrict the age of the operator.
c) Keep in mind that the operator or user is responsible for accidents or hazards occurring to other people or their property.
● Preparation
a) Before use, check the supply and extension cord for signs of damage or aging. If the cord becomes damaged during use, disconnect the cord from the supply immediately. DO NOT TOUCH THE CORD BEFORE DISCONNECTING THE SUPPLY. Do not use the appliance if the cord is damaged or worn.
b) Never operate the machine while people, especially children, or pets are nearby.
c) Wear eye protection and stout shoes at all times while operating the machine.
Operation
a) Keep supply and extension cords away from cutting means.
b) Use the machine only in daylight or good artificial light.
English
c) Never operate the machine with damaged guards or shields or without guards or shields in place.
d) Switch on the motor only when the hands and feet are away from the cutting means.
e) Always disconnect the machine from the power supply (i.e. remove the plug from the mains or remove the disabling device)
– whenever leaving the machine unattended;
– before clearing a blockage;
– before checking, cleaning or working on the machine;
– after striking a foreign object;
- whenever the machine starts vibrating abnormally.
f) Take care against injury to feet and hands from the cutting means.
g) Always ensure that the ventilation openings are kept clear of debris.
● Maintenance and storage
a) Disconnect the machine from the power supply (i.e. remove the plug from the mains or remove the disabling device) before carrying out maintenance or cleaning work.
b) Use only the manufacturer's recommended replacement parts and accessories.
c) Inspect and maintain the machine regularly. Have the machine repaired only by an authorized repairer.
d) When not in use, store the machine out of the reach of children.
● Recommendation
a) The appliance should be supplied via a residual current device (RCD) with a tripping current of not more than 30 mA.
PRECAUTIONS FOR SHRUB SHEAR AND GRASS SHEAR
- Before starting work make sure there are no power cables in the work area. The blade could come into contact with the power cable causing electric shock, ground faults and other accidents.
- Hold the tool firmly with both hands during use to prevent injury.
- Keep your hands and all parts of the body away from the blade to prevent contact that could lead to injury.
- Make sure the blade and all accessories are properly installed. Improper installation could cause the blade or accessories to come loose resulting in an injury.
- Make sure the blade is not cracked, deformed or excessively worn before starting work. Do not use a blade in this condition as it could break and cause injury.
- Do not use the tool to cut wire, metal plates or other hard objects. The tool could be damaged and cause injury.
- If the tool does not work normally and is producing strange noise, turn it off immediately and have it inspected and repaired.
-
If the tool falls or strikes against an object, check the blade and the body for damage, cracking and deformation. Use of a damaged, deformed or cracked blade could result in injury.
-
Do not disassemble the blade. This may result in injury.
- This product generates vibration during operation. This makes long continuous work physically strenuous so avoid a poor work posture and be sure to take frequent rests. Also during short work periods, stop work immediately to take a rest when your fingers, hands, arms or shoulders become tired.
- Use gloves, or cloth to protect your hands when handling the blade. Careless handling may lead to injury.
- Do not expose the blade to excessive pressure during cutting as the blade could be damaged.
- The blade is extremely hot after cutting. Do not touch it to prevent burn injuries.
- When working in high places, make sure that no one is standing below. They could be injured should you accidentally drop the tool or other object.
- To prevent unforeseen accidents, never leave the tool running unattended on a stand or on the floor.
- Do not expose the tool to insecticide and other chemicals. Such chemicals could cause cracking and other damage.
PRECAUTIONS FOR BATTERY AND CHARGER
- Always charge the battery at a temperature of 0 – 40°C. Charging the battery at temperatures outside the range of 0 – 40°C may prevent proper charging and reduce battery life.
The most suitable temperature for charging is that of 20 - 25°C.
- When one charging is completed, leave the charger for about 15 minutes before the next charging of battery.
- Do not allow foreign matter to enter the hole for connecting the rechargeable battery.
- Never disassemble the rechargeable battery and charger.
- Never short-circuit the rechargeable battery. Short-circuiting the battery will cause a great electric current and overheat. It results in burn or damage to the battery.
- Do not dispose of the battery in fire. If the battery is burnt, it may explode.
CAUTION ON LITHIUM-ION BATTERY
To extend the lifetime, the lithium-ion battery equips with the protection function to stop the output.
In the cases of 1 to 3 described below, when using this product, even if you are pulling the switch, the motor may stop. This is not the trouble but the result of protection function.
- When the battery power remaining runs out, the motor stops.
In such case, charge it up immediately. - If the tool is overloaded, the motor may stop. In this case, release the switch of tool and eliminate causes of overloading. After that, you can use it again.
- If the battery is overheated under overload work, the battery power may stop.
In this case, stop using the battery and let the battery cool. After that, you can use it again.
English
Furthermore, please heed the following warning and caution.
WARNING
In order to prevent any battery leakage, heat generation, smoke emission, explosion and ignition beforehand, please be sure to heed the following precautions.
- Make sure that swarf and dust do not collect on the battery.
○ During work make sure that swarf and dust do not fall on the battery.
○ Make sure that any swarf and dust falling on the power tool during work do not collect on the battery.
○ Do not store an unused battery in a location exposed to swarf and dust.
Before storing a battery, remove any swarf and dust that may adhere to it and do not store it together with metal parts (screws, nails, etc.).
-
Do not pierce battery with a sharp object such as a nail, strike with a hammer, step on, throw or subject the battery to severe physical shock.
-
Do not use an apparently damaged or deformed battery.
-
Do not use the battery in reverse polarity.
-
Do not connect directly to an electrical outlets or car cigarette lighter sockets.
-
Do not use the battery for a purpose other than those specified.
-
If the battery charging fails to complete even when a specified recharging time has elapsed, immediately stop further recharging.
-
Do not put or subject the battery to high temperatures or high pressure such as into a microwave oven, dryer, or high pressure container.
-
Keep away from fire immediately when leakage or foul odor are detected.
-
Do not use in a location where strong static electricity generates.
-
If there is battery leakage, foul odor, heat generated, discolored or deformed, or in any way appears abnormal during use, recharging or storage, immediately remove it from the equipment or battery charger, and stop use.
CAUTION
- If liquid leaking from the battery gets into your eyes, do not rub your eyes and wash them well with fresh clean water such as tap water and contact a doctor immediately.
If left untreated, the liquid may cause eye-problems.
- If liquid leaks onto your skin or clothes, wash well with clean water such as tap water immediately.
There is a possibility that this can cause skin irritation.
- If you find rust, foul odor, overheating, discolor, deformation, and/or other irregularities when using the battery for the first time, do not use and return it to your supplier or vendor.
SYMBOL
WARNING
The following show symbols used for the machine. Be sure that you understand their meaning before use.

Read all safety warnings and all instructions.
SPECIFICATIONS
POWER TOOL
| Model CH10DL CH10DL (CG) CG10DL | ||||
| No-load speed 1100 /min | ||||
| Capacity * (Thickness of branch that can be trimmed.) | With shrub shear blade installed | 8 mm —— | ||
| Blade size (Trimming width) | With shrub shear blade installed | 190 mm —— | ||
| With grass shear blade installed | — 170 mm | |||
| Rechargeable battery BCL1015: Li-ion DC 10.8 V (1.5 Ah 3 cells) | ||||
| Weight | With shrub shear blade installed | 1.2 kg —— | ||
| With grass shear blade installed | — 1.2 kg | |||
* Actual performance depends on the type of vegetation cut and the sharpness of the blade.
CHARGER
| Model UC10SFL | |
| Charging voltage 10.8 V | |
| Weight 0.35 kg |
STANDARD ACCESSORIES
See the list below to check the accessories for CH10DL, CG10DL and CH10DL (CG).
| CH10DL CG | 10DL CH10DL (CG) | ||||
| 1 | Battery(BCL1015) |  | 1 | 1 | 1 |
| 2 | Charger(UC10SFL) |  | 1 | 1 | 1 |
| 3 | Shrub blade | 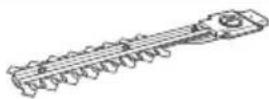 | 1 | — | 1 |
| 4 | Grass blade | 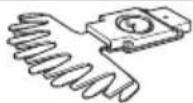 | — | 1 | 1 |
| 5 | Blade case | 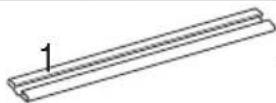 | — | 1 | |
| 6 | Blade cover — |  1 1 | 1 | ||
| 7 | Adjuster | 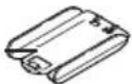 1 1 | 1 | ||
| 8 | Blade box — |  | 1 | ||
| 9 | Case 1 |  1 1 | 1 | ||
OPTIONAL ACCESSORIES (sold separately)
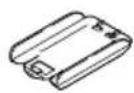
- Battery (BCL1015)
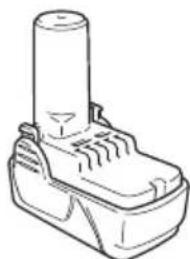
natural_image
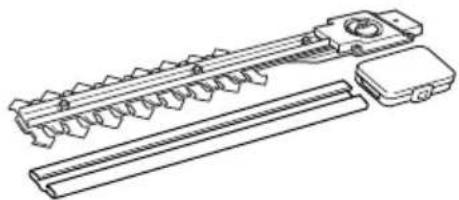
Line drawing of a cylindrical electronic component with ports and casing (no text or symbols)- Shrub shear blade set
(with blade case, crank cam and blade box)
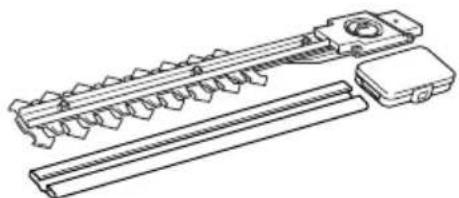
natural_image
Technical line drawing of a mechanical component with spring-loaded parts and a housing (no text or symbols)3. Grass shear blade set
(With blade cover, crank cam and blade box)

natural_image
Line drawing of a tool kit with a flat blade, coiled spring, and accessories (no text or symbols)4. Adjuster (for Grass shear)
5. Case
APPLICATIONS
○ Shrub shear
Fine trimming hedges
Trimming and pruning garden trees
○ Grass shear
Trimming lawns
BATTERY REMOVAL/INSTALLATION
1. Battery removal
Hold the handle tightly and push the battery latch to remove the battery (see Figs. 1 and 2).
CAUTION
Never short-circuit the battery.
2. Battery installation
Insert the battery while observing its polarities (see Fig. 2).

text_image
Latch Rechargeable battery Fig. 1 Handle Insert Pull out Latch Rechargeable battery PushFig. 2
CHARGING
Before using the power tool, charge the battery as follows.
-
Connect the charger power cord to the receptacle When connecting the plug of the charger to a receptacle, the pilot lamp will blink in red (At 1-second intervals).
-
Insert the battery into the charger Firmly insert the battery into the charger till it contacts the bottom of the charger as shown in Fig. 3.
3. Charging
When inserting a battery in the charger, the pilot lamp will light up continuously in red. When the battery becomes fully recharged, the pilot lamp will blink in red (At 1-second intervals). (See Table 1)
(1) Pilot lamp indication
The indications of the pilot lamp will be as shown in Table 1, according to the condition of the charger or the rechargeable battery.
Rechargeable battery

text_image
geable Insert Hole for connecting the rechargeable battery Pilot lampFig. 3
Table 1
| Indications of the pilot lamp | ||||
| Pilot lamp(red) | Before charging | Blinks | Lights for 0.5 seconds. Does not light for 0.5 seconds. (off for 0.5 seconds) | |
| While charging | Lights | Lights continuously | ||
| Charging complete | Blinks | Lights for 0.5 seconds. Does not light for 0.5 seconds. (off for 0.5 seconds) | ||
| Overheat standby | Blinks | Lights for 1 second. Does not light for 0.5 seconds. (off for 0.5 seconds) | Battery overheated. Unable to charge (Charging will commence when battery cools). | |
| Charging impossible | Flickers | Lights for 0.1 second. Does not light for 0.1 seconds. (off for 0.1 seconds) | Malfunction in the battery or the charger. | |
(2) Regarding the temperatures of the rechargeable battery
The temperatures for rechargeable batteries are as shown in the Table 2, and batteries that have become hot should be cooled for a while before being recharged.
Table 2 Recharging ranges of batteries
| Rechargeable batteries Temperatures at which the battery can be recharged | |
| BCL1015 0°C – 50°C | |
(3) Regarding recharging time
Depending on the combination of the charger and batteries, the charging time will become as shown in Table 3
Table 3 Charging time (At 20°C)
| Battery\Charger | UC10SFL |
| BCL1015 Approx. 40 min. |
NOTE
The charging time may vary according to temperature and power source voltage.
- Disconnect the charger's power cord from the receptacle.
- Hold the charger firmly and pull out the battery.
NOTE
Be sure to pull out the battery from the charger after use, and then keep it.
Regarding electric discharge in case of new batteries, etc.
As the internal chemical substance of new batteries and batteries that have not been used for an extended period is not activated, the electric discharge might be low when using them the first and second time. This is a temporary phenomenon, and normal time required for recharging will be restored by recharging the batteries 2 – 3 times.
How to make the batteries perform longer
(1) Recharge the batteries before they become completely exhausted.
When you feel that the power of the tool becomes weaker, stop using the tool and recharge its battery. If you continue to use the tool and exhaust the electric current, the battery may be damaged and its life will become shorter.
(2) Avoid recharging at high temperatures.
A rechargeable battery will be hot immediately after use. If such a battery is recharged immediately after use, its internal chemical substance will deteriorate, and the battery life will be shortened. Leave the battery and recharge it after it has cooled for a while.
CAUTION
☐ If the battery is charged while it is heated because it has been left for a long time in a location subject to direct sunlight or because the battery has just been used, the pilot lamp of the charger lights for 1 second, does not light for 0.5 seconds (off for 0.5 seconds).
In such a case, fi rst let the battery cool, then start charging.
When the pilot lamp flikers (at 0.2-second intervals), check for and take out any foreign objects in the charger's battery connector. If there are no foreign objects, it is probable that the battery or charger is malfunctioning. Take it to your authorized Service Center.
○ Since the built-in micro computer takes about 3 seconds to confirm that the battery being charged with UC10SFL is taken out, wait for a minimum of 3 seconds before reinserting it to continue charging. If the battery is reinserted within 3 seconds, the battery may not be properly charged.
FUNCTIONAL DESCRIPTION
1. Battery Level Warning Lamp
The battery level can be checked by pulling the trigger switch while the power tool is in a no-load state. The battery level warning lamp lights when the battery power is very low. If this happens, charge the battery. (Fig. 4)
NOTE
☐ The level at which the battery level warning lamp lights may vary due to the ambient temperature, characteristics of the battery, etc. and is intended only as a guide.
○ The battery level warning lamp may light when the power tool is overloaded. This does not mean that the battery power is very low.
Be sure to check the battery level while the tool is in a no-load state.
- Lock Off button (Fig. 5)
WARNING
Never lock the Lock Off button in depressed position.
Pulling back the switch would then cause the tool to suddenly start operating, which could result in injury.
The tool will not start unless the Lock Off button is pressed while the switch is pulled back.
The Lock Off button can be engaged by pressing it either from the right or left.
When the switch is released, the Lock Off button automatically disengages to prevent inadvertent motor startup.
- Blade case (Fig. 6) (Standard accessory with CH10DL (CG), CH10DL)
When the shrub shear blade is to be attached to or removed from the tool, or when the shear is not used, place the blade in the blade case to prevent injury.
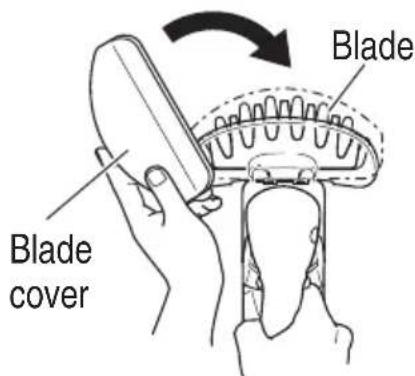
- Blade cover (Fig. 7) (Standard accessory with CH10DL (CG), CG10DL)
When the grass shear blade is to be attached to or removed from the tool, or when the shear is not used, place the blade in the blade cover to prevent injury.

text_image
Battery level warning lampFig. 4
Lock off button

text_image
Trigger switchFig. 5

text_image
Blade case BladeFig. 6
text_image
Blade Blade coverFig. 7
- Blade box (Fig. 8) (Standard accessory with CH10DL (CG))
Place the shrub shear blade and the grass shear blade in the blade box when they are not used.
Also place the crank cam (B) in the blade box to prevent losing it.
WARNING
Be sure to turn the tool off and remove the battery from the tool before attaching and removing the blade case or blade cover.

text_image
Blade box Crank cam (B)Fig. 8
CAUTION
To prevent injury, take care when placing the blade in the blade case, blade cover or blade box.
- Adjuster (Standard accessory with CH10DL (CG), CG10DL)
WARNING
Be sure to turn the saw off and remove the battery from the tool before attaching and removing the adjuster.
CAUTION
Be sure to place the blade in the blade case before attaching and removing the adjuster to prevent injury by the blade coming into contact with your hands or face.
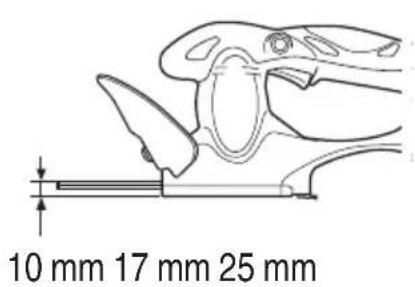
[Trimming height guide]
The trimming height of the tool can be adjusted to three heights by not attaching the adjuster or changing adjuster orientation. (Fig. 9)
text_image
10 mm 17 mm 25 mm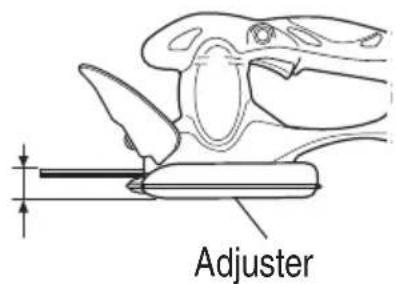
text_image
Adjuster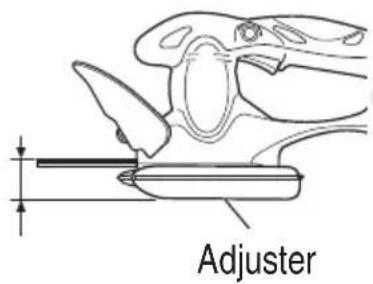
text_image
AdjusterFig. 9
[Adjuster attachment]
(1) Turn the tool over and slide the adjuster tab in the direction of the ribs on the tool. (Fig. 10)
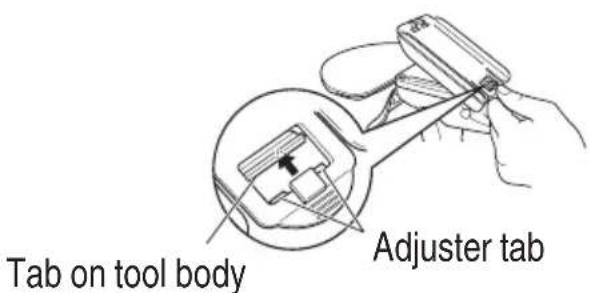
text_image
Tab on tool body Adjuster tabFig. 10
English
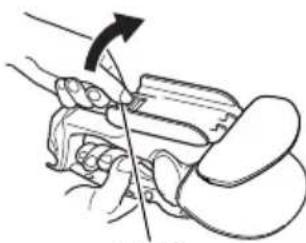
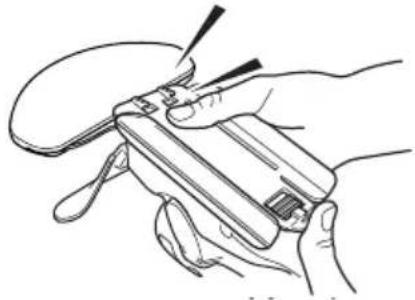
(2) Press the front end of the adjuster to fit the adjuster onto the tool. (A clicking sound will be heard) (Fig. 11)
[Adjuster removal]
Raise the adjuster latch to remove the adjuster. (Fig. 12)
natural_image
Line drawing of a hand holding a handheld electronic device with a pen inserted (no text or symbols)Fig. 11

natural_image
Illustration of a mechanical assembly with a tool and directional arrow (no text or symbols)Latch
Fig. 12
REPLACING THE BLADE
The blade is a consumable that has to be replaced with a new blade when it loses sharpness.
Follow the steps below to replace the blade.
The tool shown in the illustration is the shrub shear, and it is used in examples to explain features it shares with the grass shear.
Before replacement, turn the switch on and off until the teeth in the upper blade are positioned over the openings between the teeth in the lower blade.
At this time, be careful of the moving blade.
WARNING
Be sure to turn off the power switch and remove the battery from the tool to prevent accidents.
CAUTION
Before blade replacement, be sure to use gloves and attach the blade case or blade cover to prevent the blade from coming into direct contact with your hands or face.
- Remove the blade (Fig. 13)
(1) Turn the tool over, remove the four screws using a Phillips screwdriver, remove the bottom plate and the blade (with blade case).
(2) Remove the remaining crank holder and crank cam (A) from the tool. The grease used may cause the crank holder and crank cam (A) to stick to the blade.
(3) Remove any chips and other debris from inside the housing.
2. Getting a new blade ready
Taking care to prevent injury from contact with the blade, adjust the crank cam position as shown in Fig. 14.
This places the teeth in the upper blade over the openings in the teeth in the lower blade.
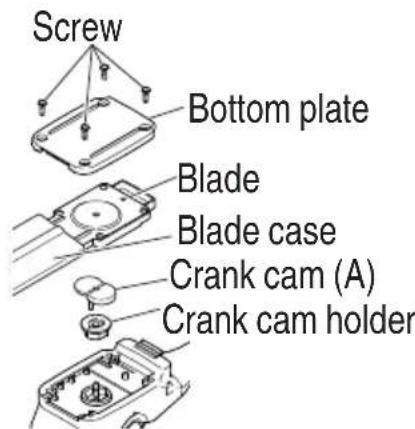
text_image
Screw Bottom plate Blade Blade case Crank cam (A) Crank cam holderFig. 13

text_image
Crank cam (A) Crank cam (B) CG10DLCH10DLFig. 14
3. Attach the crank cam and crank cam holder to the blade (Fig. 15)
The same type of crank cam holder is used in the shrub shear and the grass shear. Use the crank holder installed in the product.

text_image
Crank cam holder Crank cam (A) Blade case Blade Blade cover Crank cam holder Crank cam (B) BladeFig. 15
4. Attach the new blade
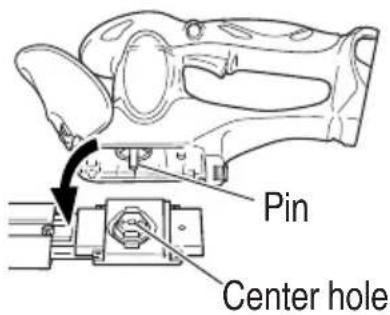
(1) Align the pin on the tool with the center hole in the crank holder. (Fig. 16)
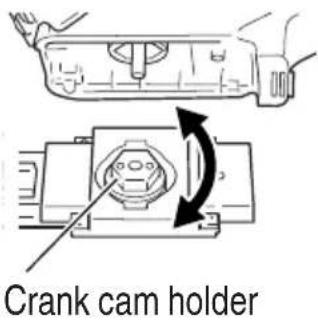
(2) When the hexagonal part in the crank holder and the grooves in the gear do not align, fi ne adjust so that the crank holder aligns with the gear grooves. (Fig. 17)
(3) Turn over the tool making sure that the blade does not fall out, attach the bottom plate and secure it with the 4 screws. (Fig. 18)
NOTE
Be sure to check blade operation after it has been attached. The blade and the crank cam has not been properly fitted if the blade does not operate correctly. Do the instructions over from the beginning.
text_image
Pin Center holeFig. 16
text_image
Crank cam holderFig. 17

text_image
Screw Bottom plateFig. 18
HOW TO USE
WARNING
○ To prevent accidents, make sure there are no people in the work area.
- Keep your hands and all parts of the body away from the blade to prevent contact that could lead to injury.
○ Use protective goggles during work to prevent injury from twigs and wood chips.
Do not use to tool to cut wire, metal plates or other hard objects. The tool could be damaged and cause injury.
English
1. Trimming hedges and garden trees [Shrab shear]
CAUTION
○ Use a pair of pruning shears to cut thick branches before using the shrub shear. Do not force the tool to prevent it from breaking.
- Stop the tool immediately if the blade stalls against a too heavy branch. Do not allow the motor to seize up as it could damage the motor.
○ Use a sturdy ladder or step ladder when cutting tall garden trees.
○ Use only for cutting shrub.
(1) Clear the area around the garden tree you want to prune and set up a stable platform to work from.
(2) Place the blade in the blade case to prevent accidental contact.
(3) Install the battery in the tool.
(4) Press the Lock Off button and pull back the switch to start trimming.
NOTE
☐ Lubricate (using sewing machine oil, mineral oil, etc.) the blade before starting and then every hour. Use an adequate amount of oil and wipe away excess oil.
During work (for example, when taking rests) do not leave the tool in a place exposed to direct sunlight or high temperature. This will prevent proper cooling and could result in damage.
☐ Do not use the tool for work that exceeds its capacity. Such operation could cause the motor to lock up or slow down and will damage it.
Trimming garden trees
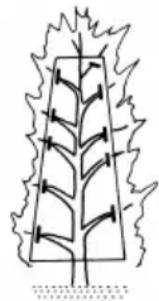
○ Use a pair of pruning shears to remove 10 cm of branches that are 8 mm or thicker so that they do not interfere with trimming. (Fig. 19)
natural_image
Diagram of a tree with flame-like patterns and directional arrows, no text or symbols presentFig. 19
○ Trees with luxuriant foliage should be trimmed starting from the bottom and work up to achieve the desired shape. (Fig. 20)
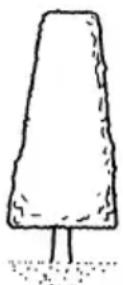
Fig. 20
Trimming hedges
○ Trim the top of hedges by moving the tool from right to left (or left to right) and trim the sides by starting from below and working up. (Fig. 21)

natural_image
Two technical illustrations showing a worker using a tool to cut through a pile of material, with arrows indicating direction (no text or symbols present)Fig. 21
NOTE
○ Do not use the tool for cutting the lawn or weeds. Grass or weeds could stick to the blade.
○ Cut thick branches by gently pressing the blades against the branch.
- Trimming lawns [Grass shear]
CAUTION
○ Use only for cutting grass.
- Stop the tool immediately should gravel or branches enter the blade during trimming and remove the battery.
Do not allow the motor to seize up as it could damage the motor. Use a pair of tongs to gently remove gravel from the blade. To prevent injury, keep hands, fingers and other body parts away from the blade.
(1) Remove gravel and branches from the lawn to be trimmed.
(2) Place the blade in the blade cover to prevent accidental contact.
(3) Install the adjuster when required to adjust trimming height.
(4) Install the battery in the tool.
(5) Press the Lock Off button and pull the switch to start trimming.
Place the tool on the lawn and slide the tool forward. (Fig. 22)

natural_image
Illustration of a hand using a tool to cut or spread material on a surface, with no visible text or symbols.Fig. 22
NOTE
○ Lubricate (using sewing machine oil, mineral oil, etc.) the blade before starting and then every hour. Use an adequate amount of oil and wipe away excess oil.
During work (for example, when taking rests) do not leave the tool in a place exposed to direct sunlight or high temperature. This will prevent proper cooling and could result in damage.
Do not use the tool for work that exceeds its capacity. Such operation could cause the motor to lock up or slow down and will damage it.
Do not lower the front end of the blade to prevent sand, gravel or soil from entering the blade and damaging it by making it less sharp.
Trimming tall grass
Attempting to cut tall grass at one go will expose the blade to excessive load and wear the blade. First remove 1/3 of the height starting from the top before trimming it to the desired height.
English
Trimming around stone walls and curbs
When trimming around curbs, move the blade sideways along the curb. (Fig. 23)
This makes it possible to trim without leaving untrimmed edges.
3. Continuous operating time
Approx. 30 minutes (depending on the work conditions)

text_image
Diagram illustrating foot contact technique with hand using footbrush and directional arrow indicating movementFig. 23
MAINTENANCE AND INSPECTION
WARNING
○ Be sure to turn the tool off and remove the battery from the tool before making inspections or carrying out maintenance.
○ Do not disassemble to blade. Failure to heed this warning may result in injury.
○ Use gloves, or cloth to protect your hands when handling the blade. Failure to heed this warning may result in injury.
1. Sharpening the blade (Fig. 24)
Move an iron file in the direction of the arrow for a rough sharpening then use an oil stone to give the blade a good finish.
(1) Use a fine iron file or one of intermediate coarseness.
(2) Coat the oil stone with machine oil (bicycle oil or the like).
(3) Use a whetstone to gently remove any burrs from the back of the blade edge.
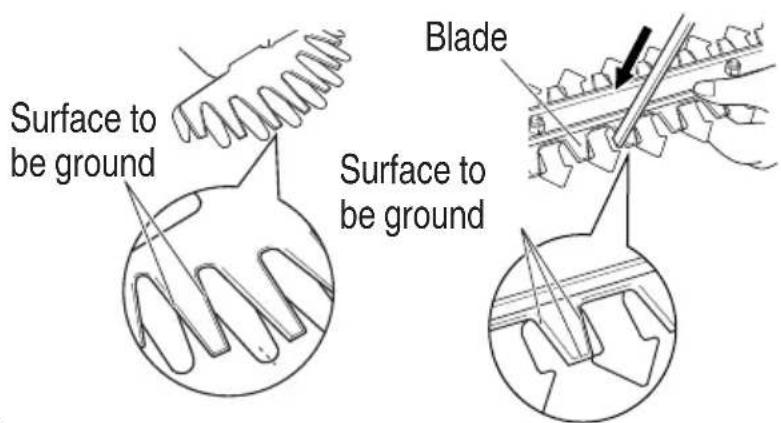
text_image
Surface to be ground Blade Surface to be groundFig. 24
When to sharpen the blade
While this will vary the type of trees that are trimmed and how often it is used, it is a good idea to sharpen the blade about once a year to maintain a sharp edge.
NOTE
Do not use water for cleaning the blade to prevent rust or other damage.
2. Lubricating the blade
During trimming, sap adhering to the blade edge will increase load and wear down the battery more rapidly. Use machine oil (or bicycle oil or the like) to lubricate the blade and wipe the blade with a cloth. To prevent the blade from rusting, be sure to lubricate the blade after use and when it will not be used for an extended period of time before placing it in the blade case.
3. Inspecting the mounting screws
Regularly inspect all mounting screws and ensure that they are properly tightened. Should any of the screws be loose, retighten them immediately. Failure to do so could result in serious hazard.
- Maintenance of the motor
The motor unit winding is the very "heart" of the power tool.
Exercise due care to ensure the winding does not become damaged and/or wet with oil or water.
- Cleaning on the outside
When the power tool is stained, wipe with a soft dry cloth or a cloth moistened with soapy water. Do not use chloric solvents, gasoline or paint thinner, for they melt plastics.
- Storage
Store the power tool in a place in which the temperature is less than 40^ C and out of reach of children.
- Service parts list
CAUTION
Repair, modification and inspection of Hitachi Power Tools must be carried out by a Hitachi Authorized Service Center.
This Parts List will be helpful if presented with the tool to the Hitachi Authorized Service Center when requesting repair or other maintenance.
In the operation and maintenance of power tools, the safety regulations and standards prescribed in each country must be observed.
Important notice on the batteries for the Hitachi cordless power tools
Please always use one of our designated genuine batteries. We cannot guarantee the safety and performance of our cordless power tool when used with batteries other than these designated by us, or when the battery is disassembled and modified (such as disassembly and replacement of cells or other internal parts).
TROUBLESHOOTING
Use the inspections in the table below if the tool does not operate normally. If this does not remedy the problem, consult your dealer or the Hitachi Authorized Service Center.
| Symptom Possible cause Remedy | ||||
| Charger The Charge lamp does not go on. | The power plug is not connected to an AC outlet. | Connect the power plug to an AC outlet. | ||
| The battery is not properly connected to the charger. | Insert the battery so that it is properly seated in the charger. | |||
| The battery or charger electrodes are soiled. | Use a cotton swab or other tool to clean the electrodes. | |||
| The battery is extremely hot. | Allow the battery to properly cool before charging. | |||
| The charge lamp does not go off after 4 hours of charging. | The battery or charger is faulty. | |||
| Tool Does not operate. | The battery is depleted. (The battery level warning lamp does not go on.) | When a storage battery with little power left is not used for an extended period of time, battery power may drop so low that it cannot turn on the battery level warning lamp. Charge the battery. | ||
| The battery has not been properly installed. | Remove the storage battery from the battery compartment in the tool and check for foreign matter. Also check the battery electrodes for soiling. Make sure that the battery is pressed in until it clicks into place. | |||
| The blade has been incorrectly installed. | If the blade does not move but the motor is turning, the blade has probably been incorrectly installed. Make sure that the crank holder and crank cam has been installed. | |||
| Tool Does not operate. | Foreign matter is lodged in the blade. | When there is foreign matter in the blade, remove the battery and use a pair of tongs or similar tool to remove it. Take great care since the tool may start operating when the foreign matter has been removed.Sap or rust may also prevent the blade from operating. Use a wire brush or similar tool to remove sap or rust. | ||
| The tool has been used for heavy work. | This is the effect of a function that protects the battery by turning off the motor when the tool is exposed to an excessive load. Release the switch and remove what caused the excessive load and pull back the switch to resume work. | |||
| The Lock Off button was not pressed when the switch was pulled back. | To prevent accidents from incorrect operation, the Lock Off switch must be pressed while the switch is pulled back to start the motor. | |||
| The tool does not trim well. | The blade has become dull. | Use a wire brush or other tool to remove sap and rust and use a fi le or whetstone to sharpen the blade. If these eff orts fail to make the blade sharper, the blade has reached the end of its service life. Replace the blade with a new one. | ||
| [Shrub shear]The blade stopped because it was used to cut a branch whose width exceeded the blade's cutting capacity.NOTEWork that will repeatedly cause the blade to stop will eventually damage the motor. | Some garden trees have wood that is very hard and may be beyond the capacity of the tool even if it is of a width that is within normal capacity. Use a pair of pruning shear to remove thick branches before starting work.An oblique cut may also exceed the capacity of the tool since the length of the cut increases. Be sure to trim thick branches at right angles. | |||
SERVICE PARTS LIST
CH10DL
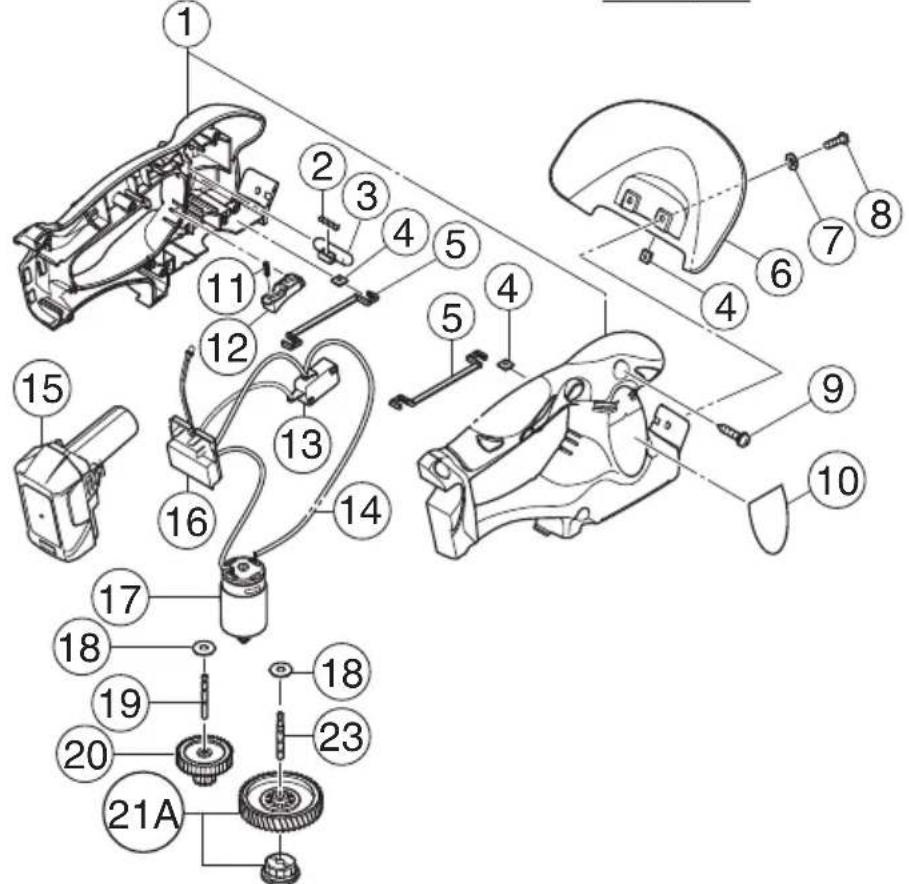
text_image
Exploded view diagram of a car body assembly with numbered parts for identification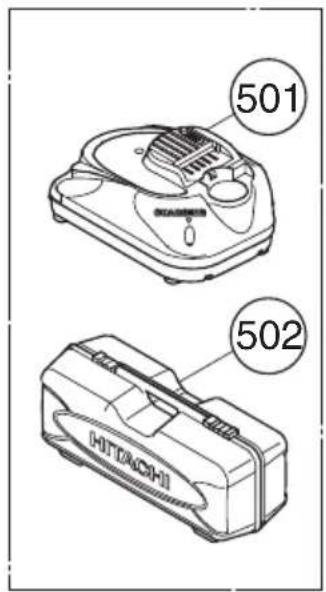
text_image
501 502 HITACHI
text_image
Exploded view diagram of a mechanical assembly with numbered components for identification
text_image
39 40 41 4 27 28 45 42 43 46 47 48 49| Item No. | Code No. | No. Used | Remarks |
1 330882 1
2 324306 1
3 324298 1
4 330056 10 M4
5 329837 2
6 330879 1
7 949423 6 M4
8 949217 6 M4×12
9 301653 6 D4×20
10——1
11 324307 1
12 324299 1
13 320786 1
14 330058 1
15 331067 1 BCL1015
16 329839 1
17 330880 1 DC 10.8V
18 329835 2 D15
19 329832 1
20 330055 1
21A 330055 1
23 329830 1
24 330878 1 INCLUD. 25, 26
25——1
26——1
27 331507 1
28 331508 1
29 323211 4 M4×8
30 330883 1
32 —— 1
33 319931 3 M4
34 996689 3
35 949217 3 M4×12
36 —— 1 “33, 34, 35”
37 330884 1
| Item No. | Code No. | No. Used | Remarks |
38 330811 1 "4, 24, 27-29, 32, 36, 37, 601"
39 330886 1 "40, 41"
40 —— 1
41——1
42 —— 1
43 323211 4 M4×8
45 —— 1
46 328030 1
47 330057 1
48 330887 1 "4, 27, 28, 39, 42, 45-47"
49 328023 1
501 —— 1 UC10SFL
502 330885 1
601 330057 1
English
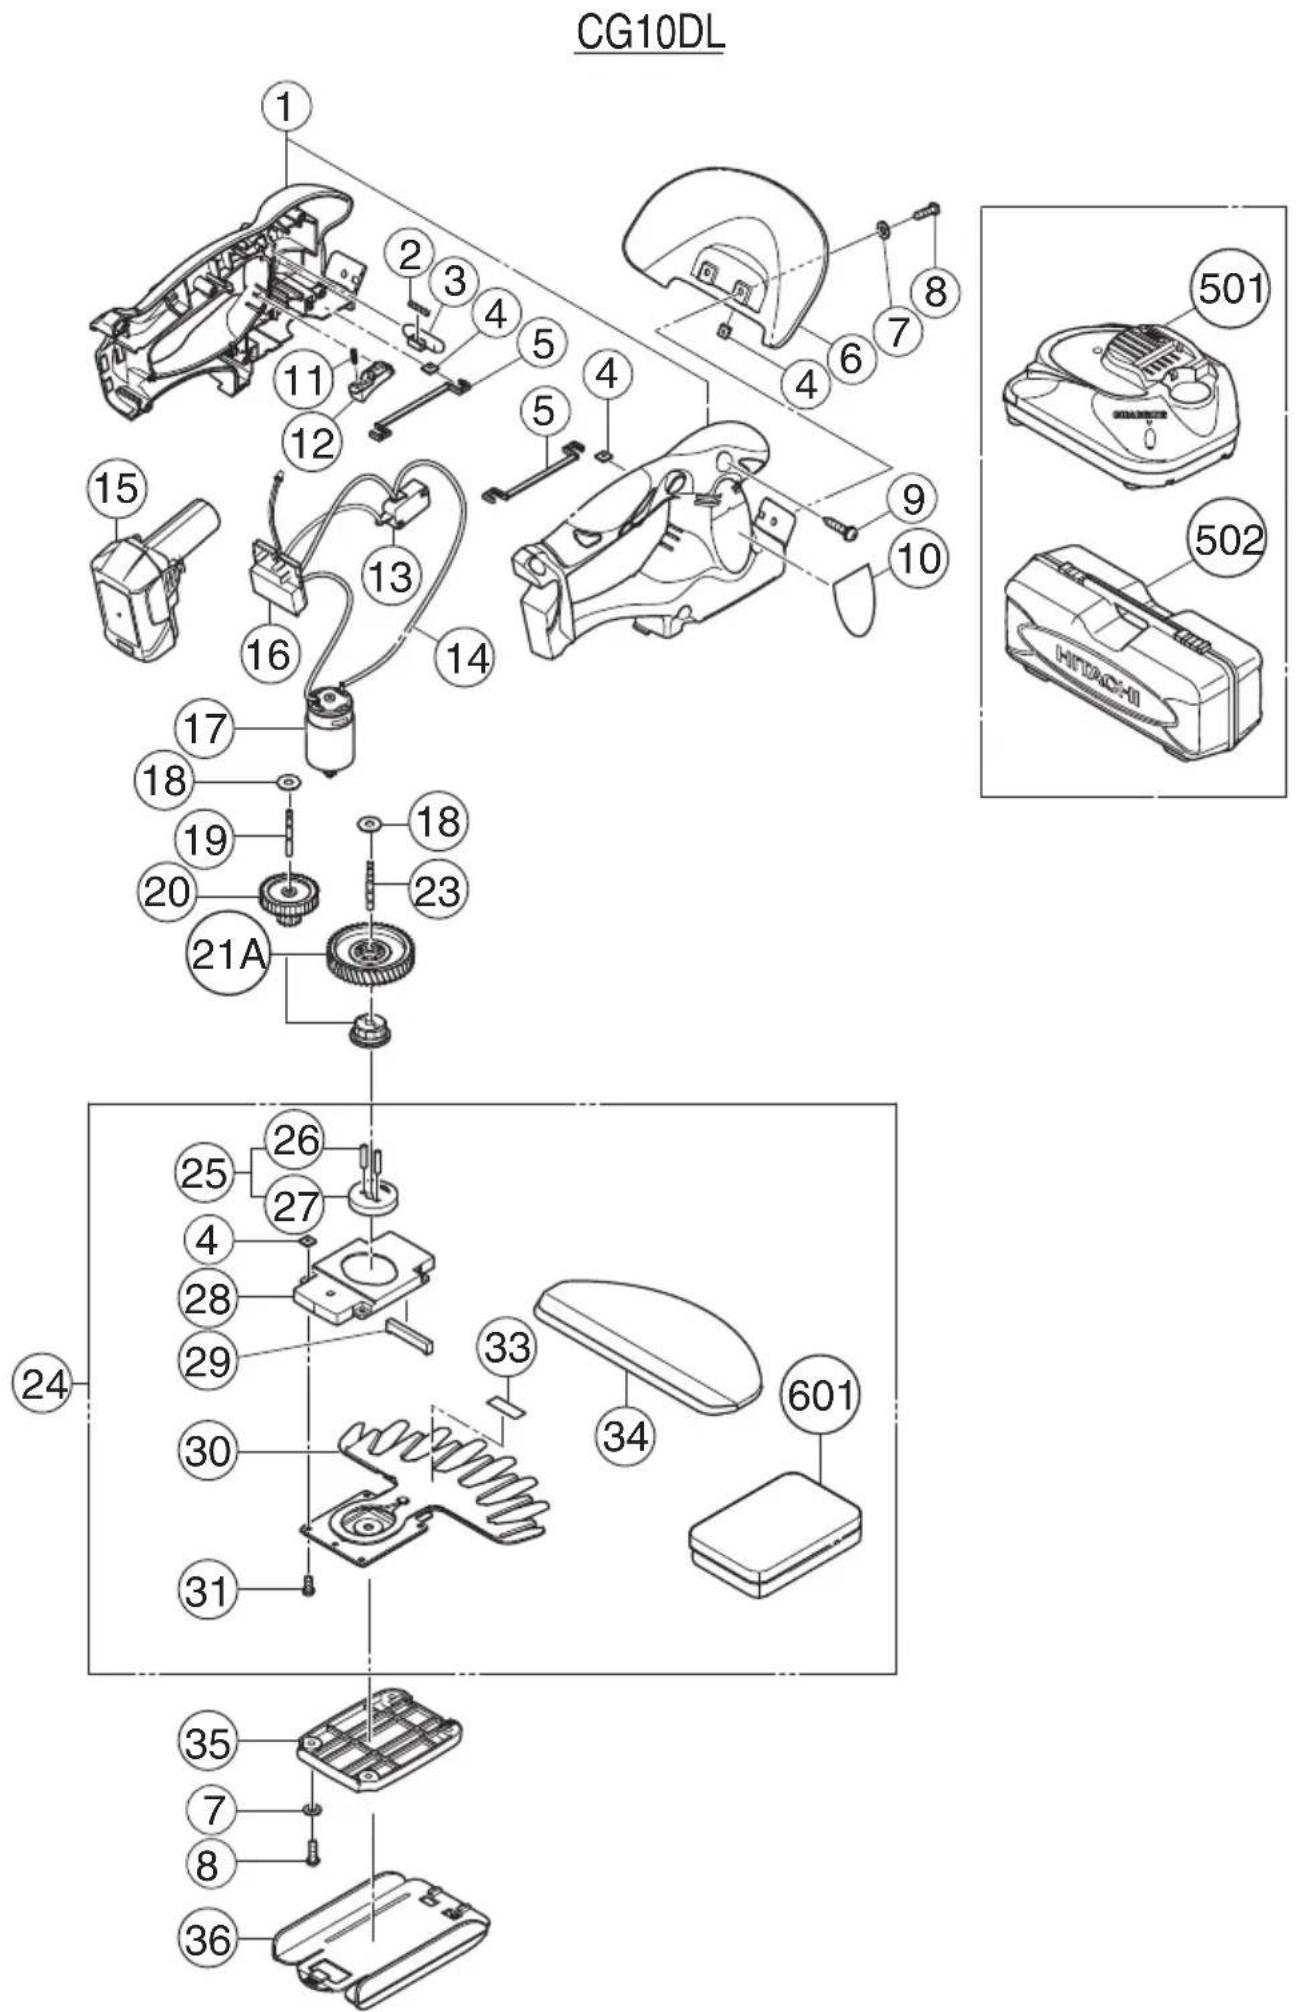
text_image
CG10DL 1 2 3 4 5 4 6 7 8 9 10 11 12 13 14 15 16 17 18 19 20 21A 23 24 25 26 27 4 28 29 30 31 33 34 35 36 501 502| Item No. | Code No. | No. Used | Remarks |
| 1 | 330882 | 1 | |
| 2 | 324306 | 1 | |
| 3 | 324298 | 1 | |
| 4 | 330056 | 10 M4 | |
| 5 | 329837 | 2 | |
| 6 | 330879 | 1 | |
| 7 | 949423 | 6 M4 | |
| 8 | 949217 | 6 M4×12 | |
| 9 | 301653 | 6 D4×20 | |
| 10 | —— | 1 | |
| 11 | 324307 | 1 | |
| 12 | 324299 | 1 | |
| 13 | 320786 | 1 | |
| 14 | 330058 | 1 | |
| 15 | 331067 | 1 BCL1015 | |
| 16 | 329839 | 1 | |
| 17 | 330880 | 1 DC 10.8V | |
| 18 | 329835 | 2 D15 | |
| 19 | 329832 | 1 | |
| 20 | 330055 | 1 | |
| 21A | 331755 | 1 | |
| 23 | 329830 | 1 | |
| 24 | 330887 | 1 “4, 25, 28-31, 33, 34, 601” | |
| 25 | 330886 | 1 “26, 27” | |
| 26 | —— | 1 | |
| 27 | —— | 1 | |
| 28 | 331507 | 1 | |
| 29 | 331508 | 1 | |
| 30 | —— | 1 | |
| 31 | 323211 | 4 M4×8 | |
| 33 | —— | 1 | |
| 34 | 328030 | 1 | |
| 35 | 330883 | 1 | |
| 36 | 328023 | 1 | |
| 501 | —— | 1 UC10SFL |
| Item No. | Code No. | No. Used | Remarks |
| 502 | 330885 1 | ||
| 601 | 330057 1 |
服务中心
日立工机商业(中国)有限公司