TS222I - Cellphone TOSHIBA - Free user manual and instructions
Find the device manual for free TS222I TOSHIBA in PDF.

User questions about TS222I TOSHIBA
0 question about this device. Answer the ones you know or ask your own.
Ask a new question about this device
Download the instructions for your Cellphone in PDF format for free! Find your manual TS222I - TOSHIBA and take your electronic device back in hand. On this page are published all the documents necessary for the use of your device. TS222I by TOSHIBA.
USER MANUAL TS222I TOSHIBA
TS222i User Manual - English
TABLE OF CONTENTS
Warranty and Safety 1
After Sales Service 1
Safety Guidelines 1
SOS soft key. 2
SAR Information 2
Care and Maintenance 2
Setting Up the Phone 3
SIM Card 3
Battery 4
PINs 5
Clock Settings 5
Setting the Time and Date 5
Setting and Cancelling Alarms 6
Setting the Time and Date Display 6
Setting the Time Zone 7
General Information 7
Keys. 7
Switching Phone On or Off. 10
Locking and Unlocking the Keypad 10
Entering Text and Numbers 10
Making and Receiving Calls 12
Roaming 12
Screen Icons. 13
Accessories 13
Phone book 13
Adding Entries 14
Searching the phone book. 15
Deleting Entries 15
Grouping Entries. 16
Phone Book Memories 17
Speed Dials 17
Storing or Changing Your Details 18
Service Numbers 18
In-Call Options 18
Handling Simultaneous Calls. 18
Conference Calls 20
Ending Calls 21
Using the Phone Book and Messages .... 22
Muting and Unmuting Calls 22
Call History 22
Using Call History 22
Deleting Call History Records. 23
Profiles 24
Activating a Profile 24
Customising a Profile 24
Ring Tones and Pictures 25
Messages 25
Composing Messages 25
Message Folders 27
Message Settings 28
Info service 29
Voice Mail 30
Deleting All Messages 30
Using Templates 30
Using i-mode 31
Starting i-mode 31
Accessing a Webpage 31
In-Page Options 31
Bookmarks 32
Saved Webpages 33
Email 34
MMS 38
SMIL 40
SMS 42
Internal i-mode Settings 42
External i-mode Settings 43
Calendar 43
Navigating the Calendar 43
Entering Notes 44
Using Notes 44
Viewing all Notes 45
Deleting Notes 45
Phone Setup 45
Setting the Language 45
Display options 45
Key Settings. 47
Factory Reset 47
Phone Password 48
Security Settings 48
PIN Settings 48
Call Barring 49
Fixed Dialling Numbers (FDN) 49
Call Meter 49
Using the Call Timer 49
Using the Call Charges Meter. 50
Using Call Tariff 51
Network 51
Setting the Network 51
Games 51
Hurricane 51
Fillip 52
My Stuff 53
Tones and Melodies 53
Viewing images. 54
Viewing animations 55
Viewing Bookmarks 56
Viewing available Memory 57
Troubleshooting 57
Index 60
Warranty and Safety
This section addresses important warranty and safety issues. You should read and thoroughly familiarise yourself with this section before using your phone.
After Sales Service
Your Toshiba mobile telephone contains no user serviceable parts, for further information on service please contact your retailer or service provider.
Safety Guidelines
Follow the guidelines below to use your phone in a safe and legal manner.
General
- Use your phone in the intended manner (holding it to your ear). Incorrect usage may affect its performance. Only qualified service personnel should install or repair the phone and its accessories.
- Use only compatible batteries and accessories. Using incompatible items may permanently damage the phone.
- Do not connect the phone to any other device without reading the provided documentation. The other device may be incompatible.
- When making emergency calls from your phone, ensure that the phone is switched on and in service.
- Interference may affect your phone's performance. Once you move away from the source of the interference, the phone should operate as usual
Operating environment
- Do not use a hand-held phone while driving or otherwise operating machinery. If using a hand-held phone, park the vehicle before conversing. If using an integrated hands-free device, make sure the phone is securely in its holder.
- Switch your phone off if you are entering a hospital or other such institution. Medical equipment may be affected by the phone so
you should observe any building regulation governing phone usage.
- Switch your phone off when on an aircraft. The aircraft's systems may be affected by the phone signal. You are legally obliged to comply with this recommendation.
- Switch your phone off in any facility where posted notices so require.
- Do not use your phone when refuelling. You should keep your phone away from fuel and chemicals.
- Switch your phone off when blasting is in progress. Observe any provided guidelines or regulations.
- Switch your phone off when in an area with a potentially explosive atmosphere (for example fuel storage areas, spray paint facilities etc.).
Electronic devices
- If you wear a pacemaker, or are in the company of someone who does, you should be aware that there is small risk of your phone interfering with the operation of the pacemaker. Only certain types of pacemaker are affected and only if the mobile phone is placed next to it. You should contact your doctor or the manufacturer of the pacemaker for more information.
- Your phone may interfere with some hearing aids. If this happens you should contact your service provider or doctor.
- Your phone may interfere with the functionality of inadequately shielded medical devices. Consult a physician or the manufacturer of the device to ensure safe procedure.
- Your phone may interfere with the functionality of any inadequately shielded electronic system in a motor vehicle. Examples of this type of system include air-bags and fuel injection. You should contact the manufacturer of the vehicle to ensure that it is properly shielded.
Battery safety
- Only use batteries approved by Toshiba and only recharge the battery with the recommended charger supplied by Toshiba.
-
When the charger is not in use disconnect it from the power source.
-
Do not leave the battery connect to the charger and power source for longer then necessary as overcharging it will shorten its life.
- Do not short-circuit the battery. Accidental short-circulating can occur when a metallic object causes a direct connection between the + and - terminals of the battery.
- Do not leave the battery in a cold (for example, a fridge) or hot place (for example, in a car exposed to direct sunlight) as this will effect its performance.
- Do not dispose of the battery in a fire.
- Do not dispose of the battery in an ordinary bin. The battery contains toxic chemicals and must be disposed of in the correct manner. Contact your local authority for more information.
SOS soft key
The SOS soft key enables you to call the emergency services without entering your PIN or when your phone is blocked.
The SOS soft key is only active prior to entering the PIN. To use it simply press and confirm with the Yes soft key.

This is a network-dependent feature. Contact your service provider for more information.
SAR Information
Your TS222i meets all EU requirements and recommended limits for exposure to radiowaves. These limits were developed and established by independent scientific organisations.
In recent times there has been a lot of speculation about the risks users may be exposing themselves to by using mobile phones. Toshiba is fully committed to providing consumers with all relevant and useful information about such risks. It is also important to bear in mind that all Toshiba products are rigorously tested to ensure that they meet all relevant safety guidelines.
All electrical devices emit radiation. Mobile phones are low power radio devices that transmit and receive microwave radiation at frequencies of about 900 Megahertz (MHz) and 1800 MHz. There are many other sources of radio waves. Television broadcasts in the UK operate at
frequencies between 400 MHz and 860 MHz and microwave communication links (dishes) operate at frequencies above 1000 MHz.
The international standard for measuring how much radiation a user absorbs, when using a mobile phone, is known as the Specific Absorption Rate (SAR). SAR measures the amount of radiation exposure to weight. The EU limit is 2.0 watts/kilogram averaged over 10 grams of tissue (averaged over six minutes exposure). This limit incorporates a substantial safety margin.
Toshiba conducts rigorous testing and is fully committed to providing consumers with all the relevant information available.
For more information about mobile phones and radiation, please visit the websites listed below:
http://www.who.int/inf/fs/en/fact193.html
http://www.who.int/inf-fs/en/fact183.html
Care and Maintenance
If you maintain your phone in good condition, the quality of your phone usage as well as the phone life span will be greatly enhanced. If you follow the suggestions below, this will also help you to fulfil warranty obligations.
- Keep the phone and all the parts and accessories out of the reach of small children.
- Keep the phone dry as moisture of any kind can contain minerals that will corrode the electronic circuits.
- Do not use or store the phone in dusty or dirty locations as the moving parts of the phone can be damaged.
- Do not use or store the phone in hot areas. High temperatures will shorten the life span of the phone, damage the battery or warp/ melt the plastic used in the phone's manufacture.
- Do not store the phone in cold areas. When there is a difference in temperature between the room and the phone, condensation can form inside the phone, causing damage to the electronic circuits.
- Do not open the phone unless absolutely necessary, for example, to install the battery or SIM card. We recommend that you go to your dealer when problems arise with either of these items and allow their experts to handle the phone instead.
-
Do not mishandle or abuse the phone. Dropping it, knocking or shaking it can damage the internal circuits.
-
Do not use harsh chemicals, strong detergents, or cleaning solvents to clean the phone. If you must clean it, then use a soft cloth that has been slightly dampened with a mild soap and water solution.
- Do not apply paint or other such substances to the phone. This could clog the phone's moving parts.
- If the phone or any of the accessories are not working as they should, please consult your dealer who can provide you with the expert assistance that you require.
- Interference may affect your phone's performance. This is perfectly normal and once you move away from the source of the interference, the phone should operate as usual.
Setting Up the Phone
This section describes basic operations such as inserting your SIM card, charging the battery, and entering your PIN.
The following must be done before you begin using the phone:
- Ensure that the SIM card is inserted
- Ensure that the battery is inserted
- Charge the phone's battery
SIM Card
Your SIM card identifies your phone on the network and stores your details, including your PIN, call history, and subscription details. It can also be used to store some phone book information - see "Phone Book Memories" on page 17 for more information.
You should only remove your SIM card if absolutely necessary. If it gets lost or damaged, the information stored on it cannot be retrieved.
Inserting or removing the SIM card
To insert or remove your SIM card (Steps 1-3):
- With the back of the phone facing you, slide the release button and remove the battery cover and battery, as shown in Diagrams A-C.
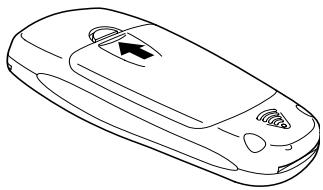
Diagram A:
Slide the release button.
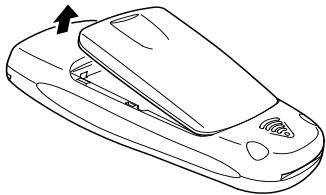
Diagram B:
Lift the battery cover away from the phone.
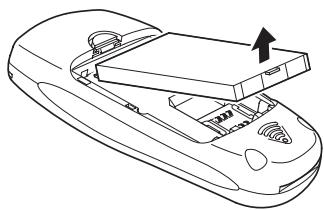
Diagram C:
Lift the battery away from the phone.
- Insert your SIM card into place, with the gold connectors facing down and the bevelled corner to the left, as shown in Diagram D below. Diagram E shows the SIM correctly inserted. or
Remove the SIM card by carefully sliding it out of its slot.
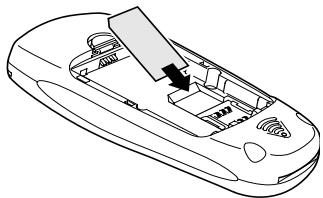
Diagram D: Insert the SIM card.
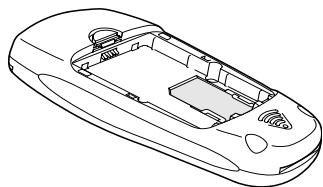
Diagram E: SIM card inserted.
- Replace the battery and battery cover as shown in Diagrams F and G.
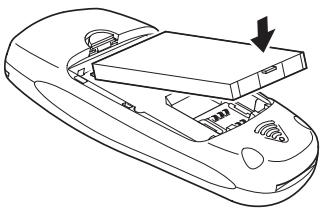
Diagram F: Slot the battery into place at the top of the phone and place down.
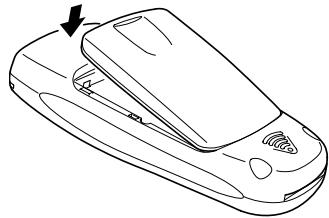
Diagram G: Slot the battery cover into place at the base of the phone and place down.
Battery
The first time you charge your battery, you should leave it charging for 8 hours. The battery only achieves optimum performance after two or three complete charges.
When the battery power is low, the phone starts beeping and 'Battery Low' is displayed.
| Icon | Description | Icon | Description |
| Battery full | Battery nearly empty | ||
| Battery nearly full | Battery empty |
For safety information regarding the battery, please refer to "Battery safety" on page 1.

Always turn the phone off before removing the battery.
Charging the battery
To charge the battery (Steps 1-2):
- Connect the charger in the right direction, as shown in Diagram I and J. The arrow should be face side up.
The charger connection screen will be displayed
- Connect the charger to an AC power socket.

Diagram I: The charger socket.
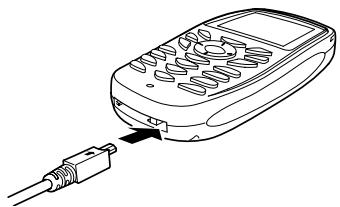
Diagram J: Connect the charger with the arrow face side up.
Disconnecting the charger
To disconnect the charger, grip it tightly and pull. You should disconnect the charger from the power outlet before disconnecting the charger from the phone.
PINS
When you switch on your phone, you will be requested to enter your PIN (personal identification number). This number should be in the documentation supplied by your service provider.
When requested, simply enter your PIN and press Select or press Right on the 4-Way key.

If you enter the wrong PIN three times in a row, your phone will become blocked. You will require your PUK number to unblock it.
For more information about your PIN and PUK numbers, see "PIN Settings" on page 48.

Clock Settings
This section describes how to set and use your phone's clock and alarm. It also describes how to control the display of the clock on your phone.
| Icon | Description |
| An alarm has been set on your phone. | |
Setting the Time and Date
You should set the time and date on your phone as soon as you receive it.
Setting the time
To set the time (Steps 1-4):
- Press
- Scroll to Time and date and press Select.
- Select Set time and press Select.
- Enter the correct time and press the Set soft key.
Setting the date
To set the date (Steps 1-4):
- Press
- Scroll to Time and date and press Select.
- Select Set date and press Select.
- Enter the date in the form DD/MM/YYYY and press the Set soft key.
Setting and Cancelling Alarms
You can have up to five alarms set for any time of the day or night. The alarms can be set to go off once, daily, on weekdays only or once weekly.
To turn an alarm off when it goes off press the Back soft key. To access the alarm settings menu (Steps 1-3):
- Press
- Scroll to Time and date and press Select.
- Select Set alarm clock and press Select.
Setting an alarm
To set an alarm (Steps 1-3 and 4-10):
- Access the alarm settings menu as described in steps 1-3.
- Select an alarm slot and press Select.
- Select On and press Select.
- Select Once only if you want the alarm to go off once, press Select, enter the date you want it to go off and press Select. or Select Daily alarm if you want the alarm to go off every day and press Select.
or
Select Weekday alarm if you want the alarm to go off Monday to Friday only and press Select.
or
Select Weekly alarm if you want the alarm to go off once a week, press Select, select a day and press Select.
- Enter the time for the alarm (use the 4-Way key to move across and set the alarm).
-
Press the Set soft key.
-
Select a ring type and press Select.
Cancelling an alarm setting
You can choose to cancel alarm settings individually or to cancel the alarms all at once.
Cancelling alarms individually
To cancel a set alarm (Steps 1-3 & 11-13):
- Access the alarm settings as described in steps 1-3.
- Select the alarm that you want to cancel and press Select.
- Select Off and press Select.
Cancelling all alarms
To cancel all set alarms (Steps 1-3 & 14-16):
- Access the alarm settings as described in steps 1-3.
- Press the Menu soft key, select Delete all and press Select.
- Press the Yes soft key to delete all the alarms or Press the No soft key to return to the list of alarms.
Setting the Time and Date Display
You can hide the clock completely, display just the time (in 12 or 24-hour format) or display both the date and the time. You can also select the format in which the date will be displayed.
Setting the clock display format
To set the clock display (Steps 1-5):
- Press
- Scroll to Time and date and press Select.
- Select Show clock and press Select.
- Select Hide to hide the clock or Select Clock to display the time only or SelectClock&date to display the date and the time.
- If you selected Clock, or Clock & date, select 12 hour or 24 hour and press Select.
Setting the date display format
To set the date display format (Steps 1-4):
- Press
- Scroll to Time and date and press Select.
- Select Date format and press Select.
- Select a format and press Select.
Setting the Time Zone
You can adjust your phone's clock to another time zone.
To set the time zone (Steps 1-4):
- Press
- Scroll to Time and date and press Select.
- Select Set time zone and press Select.
- Use the 4-Way key to pick a time zone and press the Set soft key.
General Information
This section describes how to use the keypad, switch the phone on and off and make and receive calls.
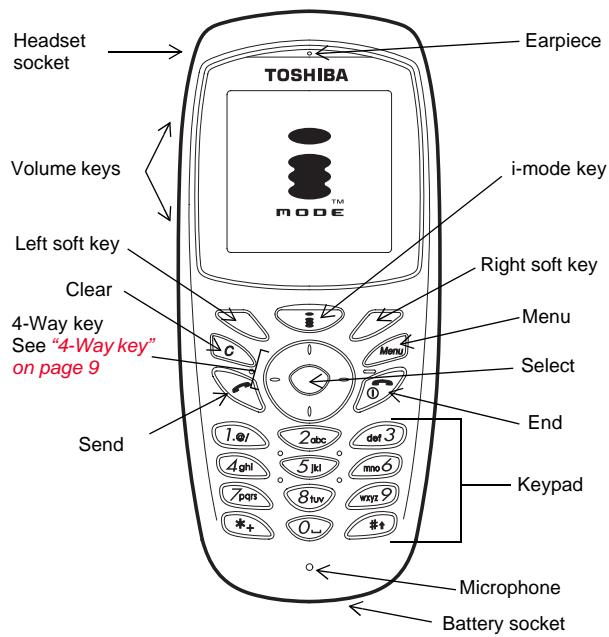
Keys
Each of the keys on your phone has one or more functions. The table below explains the various functions that each key has.
Key functions
| Key | Function(s) |
| Volume keys | To turn volume up or down when on a call To scroll up and down lists |
| i-mode key | To access i-mode services |
| Soft keys | Depends on text displayed above key. For more information see “Soft keys” on page 9. |
| 4-Way key | To navigate the phone's menu system. For more information see “4-Way key” on page 9. |
| Select | To enter a selected menu To confirm a selection To submit an entered number or piece of text |
| To dial an entered or selected number To accept an incoming call | |
| To turn the phone on or off To reject an incoming call To end a call To terminate an i-mode session To cancel a selection To return to standby from anywhere in the phone's menu system | |
| To enter: 1,., @, / etc. (T9 must be switched off) | |
| To enter: 2, a, b, c, à, à, à, à, à, A, B, C, À, Á, Á, Á, Á, Á, Á, Á, Á, Á, Á, Á, Á, Á, Á, Á, Á, Á, Á, Á, Á, Á, Á, Á, Á, Á, Á, Á, Á, Á, Á, Á, Á, Á, Á, Á, Á, Á, Á, Á, Á, Á, Á, Á, Á, Á, Á, Á, Á, Á, Á,Á, Á, Á, Á, Á, Á, Á, Á, Á, Á, Á, Á, Á, Á, Á, Á, Á, Á, Á, Á, Á, Á, Á, Á, Á, Á, Á, Á, Á, Á, Á, Á, Á, Á, Á, Á, Á, Á, Á, Á, Á, Á, Á, Á, Á, Á, Á, Á, Á, Á,á,á,á,á,á,á,á,á,á,á,á,á,á,á,á,á,á,á,á,á,á,á,á,á,á,á,á,á,á,á,á,á,á,á,á,á,á,á,á,á,á,á,á,á,á,á,á,á,á,á,Á,Á,Á,Á,Á,Á,Á,Á,Á,Á,Á,Á,Á,Á,Á,Á,Á,Á,Á,Á,Á,Á,Á,Á,Á,Á,Á,Á,Á,Á,Á,Á,Á,Á,Á,Á,Á,Á,Á,Á,Á,Á,Á,Á,Á,Á,Á,Á,Á,Á,á,á,á,á,á,á,á,á,á,á,á,á,á,á,á,á,á,á,á,á,á,á,á,á,á,á,á,á,á,á,á,á,á,á,á,á,á,á,á,á,á,á,á,á,á,á,á,á,á,í,á,á,á,á,á,á,á,á,á,á,á,á,á,á,á,á,á,á,á,á,á,á,á,á,á,á,á,á,á,á,á,á,á,á,á,á,á,á,á,á,á,á,á,á,á,á,á,á,á,ú,á,á,á,á,á,á,á,á,á,á,á,á,á,á,á,á,á,á,á,á,á,á,á,á,á,á,á,á,á,á,á,á,á,á,á,á,á,á,á,á,á,á,á,á,á,á,á,á,á,à,á,á,á,á,á,á,á,á,á,á,á,á,á,á,á,á,á,á,á,á,á,á,á,á,á,á,á,á,á,á,á,á,á,á,á,á,á,á,á,á,á,á,á,á,á,á,á,á,á,ó,á,á,á,á,á,á,á,á,á,á,á,á,á,á,á,á,á,á,á,á,á,á,á,á,á,á,á,á,á,á,á,á,á,á,á,á,á,á,á,á,á,á,á,á,á,á,á,á,á,é,á,é,á,é,á,á,á,á,á,á,á,á,á,á,á,á,á,á,á,á,á,á,á,á,á,á,á,á,á,á,á,á,á,á,á,á,á,á,á,á,á,á,á,á,á,á,á,á,á,á,á,á,á,â,á,á,á,á,á,á,á,á,á,á,á,á,á,á,á,á,á,á,á,á,á,á,á,á,á,á,á,á,á,á,á,á,á,á,á,á,á,á,á,á,á,á,á,á,á,á,á,á,á,Í,á,á,á,á,á,á,á,á,á,á,á,á,á,á,á,á,á,á,á,á,á,á,á,á,á,á,á,á,á,á,á,á,á,á,á,á,á,á,á,á,á,á,á,á,á,á,á,á,á,É,É,É,É,É |
Key functions
| Key | Function(s) |
| 4gnl | To enter: 4, g, h, i, i, i, i, i, G, H, I, i, i, i, i, i, i, i, i, i, i, i, i, i, i, i, i, i, i, i, i, i, i, i, i, i, i, i, i, i, i, i, i, i, i, i, i, i, i, i, i, i, i, i, i, i, i, i, i, i, i, o |
| 5ki | To enter: 5, j, k, l, J, K, L |
| mno | To enter: 6, m, n, o, ò, ò, ò, ò, ò, M, N, O, ò, ò, ò, ò, ò, ò, ò, ò, ò, ò, ò, ò, ò, ò, ò, ò, ò, ò, ò, ò, ò, ò, ò, ò, ò, ò, ò, ò, ò, ò, ò, ò, ò, ò |
| pans | To enter: 7, p, q, r, s, P, Q, R, S,β |
| 8hw | To enter: 8, t, u, v, ñ, ñ, ñ, ñ, T, U, V, ñ, ñ, ñ, ñ, ñ, ñ, ñ, ñ, ñ, ñ, ñ, ñ, ñ, ñ, ñ, ñ, ñ, ñ, ñ, ñ, ñ, ñ, ñ, ñ, ñ, ñ, ñ, ñ, ñ, ñ, ñ, ñ, ñ, ñ |
| *+ | To enter: 9, w, x, y, z, W, X, Y, Z |
| 0- | To turn predictive text on and off To enter: ", + (press twice) |
| 0- | To enter: 0 or a space |
| #+ | • To switch between upper and lower case letters • To enter: # |
| Mensu | To display the menu or a sub-menu |
| C | • To delete a number or character • To delete an item in a list (press and hold) |
4-Way key
Your TS222i phone has an easy-to-use menu system that you navigate by using the 4-Way key.

Up
To scroll up lists
To view Missed call history
To navigate the i-mode menu
Left
To enter the phone book
- To retreat in the menu system
To navigate the i-mode menu
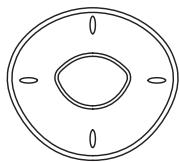
Right
To scroll down lists
- To view Incoming call history
To navigate the i-mode menu

Select
- To enter a selected menu
To confirm a selection
To submit an entered number or piece of text
To navigate the i-mode menu
Soft keys
Your TS222i has two keys called 'soft keys'. The function of these keys depends on the menu being displayed at the time. The available function is displayed above the soft key, as shown below
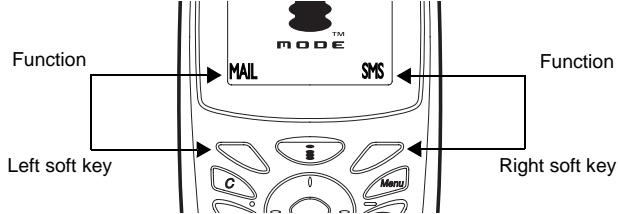
The default soft keys (that is, the ones displayed in stand-by mode) are MAIL and SMS. Pressing either of these soft keys will take you directly to the function in question.

When you turn your phone on, an SOS soft key is displayed before you enter your PIN. See "SOS soft key" on page 2 for more information.
Quick keys
Your phone has several keypad shortcuts.
Quick keys
| To: | Key sequence | Mode |
| View recently called numbers | Press once | Standby |
| Call voice mail | Press and hold | Standby |
Quick keys
| To: | Key sequence | Mode |
| Speed dial | Press and hold any key from 2 to 8, depending on the number you want to call. | Standby |
| Enter missed calls history | Press Up | Standby |
| Enter incoming call history | Press Down | Standby |
| Enter the phone book | Press Left | Standby |
| Enter the menu | Press Right | Standby |
| Select a menu item | Press Select or Right | When in the menu |
| Exit a menu | Press | When in a menu |
| Delete an item from a list (for example, a name) | Select the item and press and hold | When viewing a list |
| Put a call on hold or retrieve a call on hold | Press the Hold or Retrieve soft key | During a call |
| Reject or end a call | Press | When receiving a call |
| Switch between lower case and upper case | Press | When entering text |
| Turn T9 (predictive text) on or off | Press and hold | When entering text |
| Enter a space | Press 0 once | When entering text |
Quick keys
| To: | Key sequence | Mode |
| Enter a symbol | Press 1 until the correct symbol appears (T9 must be switched off) | When entering text |
| Erase a character | Press | When entering text |
Switching Phone On or Off
To switch the phone on or off, press and hold
Locking and Unlocking the Keypad
If you carry your phone in your pocket or bag it is a good idea to lock the keypad.
| Icon | Description |
| ½ | Keypad is locked |
To lock or unlock the keypad, press right soft key quickly followed by the * key. For more information about keypad locking please see "Keypad Locking" on page 47.
Entering Text and Numbers
The keypad of your TS222i is alphanumeric. This means that it is used for entering both text and numbers. You can also enter special symbols and cut and paste text and numbers. Your phone also comes equipped with a predictive text input facility. For a full listing of what each key can enter, see the table "Key functions" on page 8.
Using upper and lower case and numbers
To switch between upper and lower case, press the key. The current setting is displayed at top of the screen.
There are three possible settings:
- abc - all characters are in lower case
ABC - all characters are in upper case
123
Inserting symbols
There are two ways to insert special characters:
Press the correct key repeatedly until the special character appears on the screen (see the table "Key functions" on page 8 for the correct key). Note that this method will only work if you have predictive text turned off. See "Using predictive text" on page 11.
An alternative method is as follows:
- When entering text, press the Menu soft key.
- Scroll to Insert symbol and press Select.
- Select the symbol you want to insert and press Select.
Using predictive text

TEXT INPUT
T9 text is used under licence from Tegic Communications. T9 Text Input is licensed under one or more of the following: U.S. Pat. Nos. 5,818,437,5,953,541,5,187,480, 5,945,928,6,011,554 and 6,307,548; Australian Pat. No. 727539; Canadian Pat. No.1,331,057United Kingdom Pat.No. 2238414B; Hong Kong Standard Pat. No. HK0940329Republic of Singapore Pat.No. 51383Euro.Pat.No.0842463 (96927260.8) DE/DK, FI, FR
IT,NL,PT.ES,SE,GB; and additional patents are pending worldwide"
T9 text input enables you to enter words by making a series of single key presses. The text input is based on a built-in dictionary and software which recognises the word you are trying to enter.
For example, to enter the word 'how' you would press three keys, 4-6-9. T9 recognises that the most commonly used word with the 4-6-9 numeric sequence is 'how'.
If your intended word is not initially displayed, it means it is not the most frequently used word with that particular key sequence.
To view alternative suggestions press Up or Down on the 4-Way key.

You should ignore how a word appears until you have made the last keypress.
Turning T9 Text Input on or off
To turn T9 Text Input on or off when writing a message:
Press and hold the _* key to turn T9 off temporarily
or to turn T9 off globally:
- Press the Menu soft key.
- Scroll to Input select and press Select.
- Select Enable T9 to turn predictive text on or Select Disable T9 to turn predictive text off.
- Press Select.
Cutting, copying and pasting
You can cut, copy, or paste text from one email or message to another.
To copy text (Steps 1-5):
- Place the cursor at the start or the end of the text that you want to copy.
- Press the Menu soft key.
- Select Copy and press Select.
- Select to the end of the text that you want to copy, using Left and Right on the 4-Way key.
- Press Select.
The text is copied onto the phone's clipboard; you can now paste the text into any message.
To cut text (Steps 1-4):
- Press the Menu soft key.
- Select Cut and press Select.
- Place the cursor at the start of the text that you want to cut and press Select.
- Use Left and Right on the 4-Way key to select where to stop cutting and press Select.
The text is copied onto the phone's clipboard; you can now paste the text into any message.
To paste text (Steps 1-2):
- Cut or copy some text following the steps above.
- Place the cursor where you want the text to appear in a message, press the Menu soft key and select Paste.
Making and Receiving Calls
This section explains how to make, end and receive calls.
Making and ending a call
To make a call (Steps 1-3):
- Enter the phone number (including area codes if necessary).
- Press Send.
Talk normally once connected.
- Press to end the call.

To make international calls, you must include the +^ symbol and the international dialling code of the country you are calling.
Making a call from the phone book
Each entry in the phone book can have up to three phone numbers (home, office, mobile) associated with it. For more information about using the phone book see the "Phone book" chapter on page 13.
To make a call using the phone book (Steps 1-5):
- Press
- Scroll to Phone book and press Select.
- Select Search and press Select. A list of your phone book entries is displayed in alphabetical order, sorted by name.

You can also enter the phone book (when in standby mode) by pressing Left on the 4-Way key.
-
Scroll to the name you want and press Select to display the full entry details.
-
Select a number and press

Speed dialling
Speed dialling is a way of dialling a number by pressing just one key.
To make a call using speed dialling:
Hold down one of the keys from 2 to until the phone starts dialling.
For more information about speed dialling, see "Speed Dials" on page 17.
Receiving or rejecting a call
When you receive a call, the phone rings and the screen displays 'Incoming Call' and the name (if stored in your phone book) or number of the caller (this is a network-dependent feature).
Press to accept the call
or
Press to reject the call. The caller will either hear a busy tone or be diverted to your voice mailbox.
See also "Using Call History" on page 22 and "Grouping Entries" on page 16.
Roaming
Call roaming involves using your phone abroad. This is a network-dependent feature and requires setting up.
| Icon | Description |
| You are roaming - this means you have left your network and been recognised by another network. |
Screen Icons
The icons displayed on your phone are explained in the table below. These icons will be displayed above and below the main screen area.
| Icon | Description | Icon | Description |
| Signal at maximum | Connected to i-mode | ||
| Signal strength 70% | i-mode available | ||
| Signal strength 20% | Email received | ||
| No signal | Roaming | ||
| Message inbox full | Ring tones on | ||
| Message received | Ring tones off | ||
| Voice mail received | Battery full | ||
| Alarm on | Battery nearly full | ||
| Missed call | Battery less then half full | ||
| Vibration alert on | Battery empty | ||
| Call divert on | Note saved for the selected calendar date. | ||
| Alarm set for the selected calendar date | Keypad lock on |
Accessories
The following accessories are available for your Toshiba TS222i. Contact you service provider or local distributor for details, or see www.toshiba-europe.com/mobile.
Travel charger TM-T01
- Spare battery TM-B02
- Headset TM-H01
Car charger TM-V01
Simple car kit TM-L02
- Carry case TM-L01

Phone book
The phone book is used to store names, phone numbers, and other personal details.
The phone book has two storage areas; the SIM card and the phone's own memory. For more information about this, see "Phone Book Memories" on page 17.
When you open the phone book, the following icons are displayed to indicate the type of information stored.
| Icon | Description |
| Select this icon to view or enter a person's name. | |
| Select this icon to view or enter a person's home phone number. | |
| Select this icon to view or enter a person's office (work) phone number. | |
| Select this icon to view or enter a person's mobile phone number. | |
| Select this icon to view or enter a person's email address. | |
| Select this icon to choose a ring tone and ring volume for calls received from a phone number already entered into the phone book. You can also select whether you want the vibrate alert on or off when you receive a call from that person. | |
| Select this icon to choose a picture that you want displayed when receiving a call from a person already entered into the phone book. | |
| Select this icon to view the groups you have created already or to create a group and add members to it. |
Adding Entries
You can add entries to your phone or SIM card memory. When you are saving to the SIM card not all the options detailed below will be available; for more information see "Phone Book Memories" on page 17.
To add an entry to the phone book (Steps 1-10):
- Press
- Scroll to Phone book and press Select.
- Select Add and press Select.
- Select to enter a name, press Select, enter the name and press Select.
- Select , , or to enter a home, office, or mobile phone number respectively, press Select, enter the number and press Select.
- Select to enter an email address, press Select, enter the email address and press Select.
- Select to choose a ring tone, ring volume and vibrate alert setting. See "Selecting ring settings" below for more information on this.
- Select to associate a picture with the phone book entry. See "Selecting a picture" on page 14 for more information on this.
-
Select to add your new entry to a group.
-
Simply press Select once you have selected the group icon and select the group to which you want to add the entry.
- Press Select and the group name is displayed with the rest of the entry details.
See "Grouping Entries" on page 16 for more information.
- Press the Save soft key when you have finished adding details.
Selecting ring settings
Once you have entered a name for an entry, you can choose a ring tone, ring volume and vibrate alert to associate with the entry.
To adjust the ring settings (Steps 1-6 & 11-20):
-
Add new entry details as described in steps 1-6.
-
Select and press Select.
- Select Ring type and press Select. The available ring tones are displayed.
- Choose a ring tone and press Select if you want to use the ring tone.
- Press the Back soft key, or Left on the 4-Way key, to return to the Ring select menu.
- Select Ring volume and press Select.
- Press Left or Right on the 4-Way key to adjust the volume.
- Press Select to confirm and return to the Ring select menu.
- Select Ring or vibrate to adjust the vibrate alert. There are four options for the vibrate alert:
Ring only
Vibrate only
Vibrate then ring
Ring and vibrate
- Pick an option and press Select.
Selecting a picture
Once you have entered a name for an entry, you can choose a picture to associate with the entry.
To select a picture (Steps 1-6 & 21-24):
- Add new entry details as described in steps 1-6.
- Select and press Select.
-
Select a picture from the list and press Select to view it.
-
Press the Yes soft key to keep the selection
or
Press the No soft key to select another picture from the list.
Adding entries to the SIM card
The process of entering details into the SIM card memory is the same as creating entries in the phone book (see "Adding Entries" on page 14).
The only difference is that the SIM card cannot store as many entry details; that is, it can only hold one number per entry.
For information on how to select the SIM card memory, see "Phone Book Memories" on page 17.
Searching the phone book
You can search through your phone book to call, modify, copy or delete entries.
Searching for entries
To search for a phone book entry (Steps 1-5):
- Press
- Scroll to Phone book and press Select.
- Select Search and press Select.
A list of your phone book entries is displayed in alphabetical order, sorted by name.

You can also enter the phone book (when in standby mode) by pressing Left on the 4-Way key.
- Scroll to the name you want and press Select to display the full entry details
or
Press the enter the initial letter of the name that you are searching for by pressing the relevant key
or
With the list displayed, press the Menu soft key to display a submenu.
- Select Enter name and press Select to enter the name that you are searching for.
or
-
Select Group search and press Select to enter the name of the group that you are searching for.
-
Select a detail in the entry and press Select to display another sub-menu.
From this menu, you can:
- Dial the selected number
- Modify the selected detail - see "Editing entry details" on page 15 for more information
- Copy a number from the phone to the SIM card or from the SIM card to the phone, depending on which is in use - see "Phone Book Memories" on page 17.
- Delete the selected detail - see "Deleting Entries" on page 15 for more information
Editing entry details
To edit an entry (Steps 1-7):
- Press
- Scroll to Phone book and press Select.
- Select Search and press Select.
A list of your phone entries is displayed in alphabetical order, sorted by name.
- Select the entry that you want to edit and press Select.
- Select the particular detail you want to edit and press Select.
- Edit the details and press Select.
- Press the Save soft key to keep your changes.

If you press the Back soft key without pressing the Save soft key first, your changes will not be saved.
Deleting Entries
There are three options for deleting information from your phone books:
- Delete each entry individually
- Delete a single item from an individual entry
- Delete all your phone book entries at once using the Delete all menu
Deleting an individual entry
To delete an entry (Steps 1-5):
- Press
- Scroll to Phone book and press Select.
- Select Search and press Select. Scroll down to the name of the contact you wish to delete.
- Whilst the contact name is highlighted press the Menu soft key
- Select Delete and press Select.
Deleting all entries
To delete all the entries in a memory (Steps 1-5):
- Press
- Scroll to Phone book and press Select.
- Scroll to Delete all and press Select.
- Select SIM to delete the SIM card memory or Select Handset to delete the phone's memory.
- Press the Yes soft key to confirm that you want to delete or Press the No soft key to cancel the deletion.
Grouping Entries
It can be a good idea to sort your entries into groups for easier access. You can have a maximum of 15 groups in your phone. Information about groups is stored in your phone's memory and is not transferable. Only numbers stored in your phone's memory can be added to a group. See "Phone Book Memories" on page 17.
Creating a group
To create a group (Steps 1-8):
- Press
- Scroll to Phone book and press Select.
- Select Group and press Select.
- Select Add new group and press Select.
- Enter the group name and press Select.
-
Select Add new member and press Select. A list of all your phone book entries is displayed.
-
Select an entry and press Select.
- Repeat the last step until you have finished adding members.
Editing groups
You can add or delete members in existing groups, edit the group title and delete the entire group.
To select a group (Steps 1-5):
- Press
- Scroll to Phone book and press Select.
- Select Group and press Select.
- Select List groups and press Select.
- Select the group name and press Select.
Adding members
To add numbers to an existing group (Steps 1-5 & 6-9):
- Select a group as described in steps 1-5.
- Select Add new member and press Select. A list of all your phone book entries is displayed.
- Select the entry that you want to add and press Select.
- Repeat the last step until you have finished adding members.
Deleting members
To delete members from a group (Steps 1-5 & 10-14):
- Select a group as described in steps 1-5.
- Select List members and press Select.
- Select the member you want to delete and press Select.
- Select Delete and press Select.
- Repeat the last two steps until you have finished deleting members.
Deleting an entire group
To delete an entire group (Steps 1-5 & 15-17):
- Select a group as described in steps 1-5.
- Select Delete and press Select.
- Press the Yes soft key to delete the group or Press the No soft key to keep the group.
Editing group title
To edit a group's title (Steps 1-5 & 18-20):
- Select a group as described in steps 1-5.
- Select Edit group name and press Select.
- Enter the new name and press Select.
Phone Book Memories
Your phone's memory holds 200 entries (three numbers and an email address per entry). The number of entries your SIM card can hold depends on the type of SIM card you have; contact your service provider for more information.
Your SIM card can only hold a name and one number per entry. Certain features are only available to numbers stored on your SIM card (for example "Fixed Dialling Numbers (FDN)" on page 49).
| Icon | Indication |
| Indicates the number is stored in your phone's memory | |
| Indicates the number is stored on your SIM. |
Selecting memory for use
Selecting a memory for use means that all the new numbers saved will be saved to that memory.
To select the memory to use (Steps 1-4):
- Press
- Scroll to Phone book and press Select.
- Select Memory In Use and press Select.
- Select SIM and press Select to use the SIM card memory or Select Handset and press Select to use the phone's memory.
Viewing memory status
Memory status displays the number of entries that have already been saved and the full capacity of both memories.
To view the memory status (Steps 1-3 & 5-6):
- Access the Memory in use menu as in steps 1-3.
- Select Status and press Select.
Copying from one memory to another
You can copy the phone book entries to the SIM card or the SIM card entries to the phone's memory.
If the phone's memory has insufficient space to contain all the SIM numbers, it will only copy as many as can be added. Existing numbers will not be deleted; only the available space will be used.
To select a memory to copy (Steps 1-3):
- Press
- Scroll to Phone book and press Select.
- Select Copy all and press Select.
Copying from SIM to phone
To copy from the SIM to the phone (Steps 1-3 & 4-5):
- Access the Copy all menu as described in steps 1-3.
- Select SIM to phone and press Select. The SIM numbers are copied to the phone's memory.
Copying from phone to SIM
To copy from the phone to the SIM (Steps 1-3 & 6-8):
- Access the Copy all menu as described in steps 1-3.
- Select Phone to SIM and press Select.
- Select the home, office or mobile slot and press Select.
Speed Dials
Your phone has seven 'spaces' (keys 2-8) for speed dialling numbers that are stored in your phone book. Only numbers stored on your SIM card can be added to your speed dial list. See "Phone Book Memories" on page 17.
To speed dial a number, press and hold one of the keys on your keypad until it starts to dial the number.

If you keep a speed dial slot highlighted (selected), the slot will alternate every three seconds to display the name it is assigned to.
Activating Speed Dialling
To activate or deactivate speed dialling (Steps 1-4):
- Press
- Scroll to Phone book and press Select.
- Select Speed dial and press Select.
- Select On and press Select to activate speed dialling or Select Off and press Select to deactivate speed dialling.
Assigning a speed dial key
To assign or re-assign a speed dial key (Steps 1-6):
- Press
- Scroll to Phone book and press Select.
- Select Speed dial and press Select.
- Select On and press Select.
- Select a speed dial slot and press Select.
- Select Assign and press Select.
A list of your phone book entries is displayed.
Select the entry you wish to assign the speed dial key to and press Select.
Erasing a speed dial key
To erase a speed dial key association (Step 1-6):
- Press
- Scroll to Phone book and press Select.
- Select Speed dial and press Select.
- Select On and press Select.
- Select a speed dial slot and press Select.
- Select Delete and press Select.
Storing or Changing Your Details
The Own number option in the phone book enables you to save details of your own mobile phone, data and fax numbers for quick reference. To store or change your details (Steps 1-5):
- Press
- Scroll to Phone book and press Select.
- Select Own number and press Select.
- Select Own name to enter or edit your name.
- Select Own number to enter or edit your number.
Service Numbers
Your service provider may program in some special phone numbers (for example the number of your voice mailbox) into your phone.
To call a service numbers (Steps 1-4):
- Press
- Scroll to Phone book and press Select.
- Select Service number and press Select.
- Select a number and press Select.
In-Call Options
Your phone has several useful features that you can use during a call. When you receive an incoming call or make an outgoing call, you can access the 'in-call menu'. When you have two calls in progress, one incoming and one outgoing, you can access the 'two-call menu'. These menus provide you with several service options.

In-call options are network-dependent. You should contact your service provider for more information regarding availability and instructions regarding use.
Handling Simultaneous Calls
Handling simultaneous calls includes:
- Holding calls
- Making a new call while holding the other call
- Swapping between calls
- Transferring one call to another
Conference calls also involve handling simultaneous calls but they are described in a section of their own. See "Conference Calls" on page 20 for more information.
Holding calls
Before you can handle simultaneous calls, you must first know how to put calls on hold.
Putting a call on hold
To put an incoming call on hold (Steps 1-3):
- Answer an incoming call by pressing

- During the call, press the Hold soft key.
The call is now on hold, with the number displayed.
Taking a call off hold (retrieving)
To take a call off hold (retrieve it), press the Retrieve soft key.
Making a new call
After you have put a call on hold, you can make a new call in two ways:
- Dial the other number
- Use a phone book entry to make the call
If you want to make a call while another call is in progress, ensure that you put the first call on hold. If you do not, the original call will be ended as soon as you try ringing the other number.
Making a call by dialling
To make a new call by dialling (Steps 1-2):
- Put a call on hold.
- Enter the number that you want to call and press You can now swap between the calls. For more information, see "Swapping between calls" on page 19.
Making a call from the phone book
Rather than dialling in a second number while holding a call, you can select a number from the phone book. Remember to put the first call on hold before you make the second call.
To make a call from the phone book (Steps 1-4):
- Put a call on hold.
- Press
- Select Phone book and press Select. Your phone book entries are displayed. See "Using the phone book menu" below for more information on searching for a number that you want to call.
- Select an entry and press Select. The phone dials the number that you have selected.
Using the phone book menu
Apart from selecting a name and number from the phone book entry list, you can also do the following:
-
Select a number from the phone book groups (Group List) To use a number from a group:
-
Press the Menu soft key.
- Select Search group and press Select.
- Press Select to display a list of your groups.
- Select a group and press Select.
-
Select a group member name and press Select.
-
Select a number from the incoming, outgoing and missed call histories (Incoming call, Outgoing call and Missed call) To use a call history number:
-
Use the 4-Way key to select one of the call history options and press Select.
- Select a number and press Select. If you select a number that is also a phone book entry (the name instead of the number is displayed so that you will know) you must also select which number (home, office, mobile) you want to use.
Swapping between calls
When you are handling two calls simultaneously, the in-call menu differs slightly from the standard in-call menu; you are given the additional
menu options of creating a conference call and swapping between calls. This menu is called the 'two-call menu'.
While two calls are in progress (one active and one on hold), you can easily swap between these calls.
To swap between calls (Steps 1-3):
- Put a call on hold.
- Make a new call by entering the number manually or using the phone book.
- Press the Swap soft key You can now continue to swap between the two calls.
In this instance (when two calls are in progress), you have the option of creating a conference call. For more information, see "Conference Calls" on page 20.
Transferring one call to another
During a call, it is possible to call another number and disconnect from both calls, connecting those calls to each other. This is called transferring. This service is network-dependent.
Conference Calls
You can create a conference call using the two-call menu. This menu is described in "Swapping between calls" on page 19.
You can include a maximum of five other participants in a conference call.
Creating conference calls
To create a conference call, you must have one call on hold and one active call.
To create a conference call (Steps 1-4):
- Call the first person that you want to include in the conference call.
- Put that call on hold by pressing the Hold soft key.
- Call the second intended conference participant. You now have two calls in progress, which means that you can access the conference option in the two-call menu.
- Include the original call in the conference by pressing, selecting Conference and pressing Select.
You and the other participants are now connected together in a conference call.
The conference feature has its own menu, (accessed by pressing during a conference call) which enables you to:
-
Hold the conference call To hold a conference ca
-
Press
-
Select Hold and press Select.
-
Add a participant from a new call to the conference call See "Adding new participants" on page 20 for more information.
- Retrieve a call
-
To retrieve a call on hold:
-
Press
-
Select Retrieve and press Select. See "Holding and retrieving" on page 21 for more information.
-
End all the calls participating in the conference call To end all the calls in a conference call:
-
Press
-
Select End all and press Select.
-
Access the phone book during the conference call To access the phone book:
-
Press
-
Select Phone book and press Select.
-
Access the main menu during the conference call. To access the main menu:
-
Press
- Select Menu and press Select.
Adding new participants
To add a new participant (Steps 1-5):
- Create a conference call as described in "Creating conference calls" on page 20.
- While the conference call is in progress, press
- Select New call and press Select.
- Enter the new number and press
You can also make a new call using the phone book. See "Using the phone book" on page 21 below for more information.
5. Once the other person has accepted the call, you can bring them into the existing conference by pressing ,selecting Join a conference and pressing Select. The new participant is then connected to the conference call.
Holding and retrieving
You can use the Conference menu to hold and retrieve calls. The procedure for retrieving varies, depending on the number of calls you have on hold; if you have more than one call on hold, you must specify which call you want to retrieve.
To access the Conference menu:
- Create a conference call as described in "Creating conference calls" on page 20.
- Press
Putting conference calls on hold
To put a conference call on hold (Steps 1-2 & 3-4):
- Access the Conference menu as described in steps 1-2.
- Select Hold and press Select. The conference call is now on hold.
Retrieving conference calls
To retrieve a conference call (Steps 1-2 & 5-6):
- Access the Conference menu as described in steps 1-2.
-
Select Retrieve and press Select. You are now participating again in the conference call. If you have more than one call on hold, when you select Retrieve, the numbers on hold are displayed:
-
Select the call that you want to retrieve by using the 4-Way key.
- Press the Select soft key to confirm your choice.
When you have retrieved one of the calls, you can swap between the active call and the call on hold by pressing the Swap soft key. See "Swapping between calls" on page 19 for more information on this.
Using the phone book
You can use the phone book during a conference call to make a new call or simply to check entry details.
For more information, see "Using the phone book during a call" on page 22.
Ending Calls
From the standard in-call menu, you can only choose to end all calls simultaneously. However, from the two-call menu, you can also choose to end calls individually.
Ending calls individually
To access this menu option, you must have two calls in progress, making the two-call menu available.
To end calls individually (Steps 1-3):
-
Have two calls in progress (one outgoing and one incoming), making sure that the call that you want to end is the active call.
-
Press
- Select End this call and press Select. The call that was active is now ended, while the other call still remains on hold.
Ending all calls
You can access this menu option from both the standard in-call menu and the two-call menu.
To end all the calls that are in progress (Steps 1-3):
- Have more than one call in progress.
This will be two or more outgoing calls or incoming calls.
Remember that if the calls are not of the same type, the two-call menu will be displayed.
- Press
- Select End all and press Select.
All calls are ended at once.
Using the Phone Book and Messages
You can access the phone book during a call to check entry details or make a call to a phone book entry. You can also access the main Messages menu to write or send messages during a call.
Using the phone book during a call
To access the phone book during a call (Steps 1-2):
- During a call, press
- Select Phone book and press Select. You can now make a call from the phone book or search for phone book entry details in the normal way. The other call will be automatically put on hold. See the "Phone book" chapter on page 13 for more information.
Using messages during a call
To use messages during a call (Steps 1-2):
- During a call, press
- Select Message and press Select. You can now write and send messages in the normal way. See the "Messages" chapter on page 25 for more information.
Muting and Unmuting Calls
You can mute your phone so that the other caller(s) cannot hear you.
Muting calls
To mute or unmute your outgoing call (Steps 1-4):
- During a call, press
- Select Mute to and press Select. A message is displayed confirming that your call is muted.
- When you want to 'unmute' your call, press
- Select Unmute and press Select.
Ending a muted call
You may want to end a call without unmuting it and returning to the conversation.
To end a call without unmuting (Steps 1-3):
- During a call, press
- Select Mute and press Select to mute the call.
- When you want to end the call, press , select End all and press Select.
Accessing the main menu from mute
You can directly access the main menu when you mute a call. To access the main menu (Steps 1-3):
- During a call, press
- Select Mute and press Select to mute the call.
- When you want to access the main menu, press , select Menu and press Select. You can now perform whatever task you need on the main menu with your call still muted.

Call History
Call history is a detailed record of your outgoing, incoming and missed calls (10 of each). The details recorded are:
- Date of the call
Time of the call - Name (if the number is stored in your phone book)
Number
Using Call History
From call history, you can save or call any of the stored numbers. To access call history numbers when in stand-by mode:
Outgoing calls - press once
- Incoming calls - press Down on the 4-Way key
Missed calls - press Up on the 4-Way key
Viewing call history details
To view a call history (Steps 1-4):
- Press
- Scroll to Call history and press Select.
- Select the type of call and press Select. The ten most recent numbers are displayed.
- Scroll to a call and press Select. The call details are displayed.

If you keep a call highlighted (selected), the name or number will alternate every three seconds to display the time and date of the call.
Saving a number from call history
To save a number from call history (Steps 1-7):
- Press
- Scroll to Call history and press Select.
- Select the type of call and press Select.
- Scroll to a call and press Select. The call details are displayed.
- Select Save number and press Select.
- Select Add new if it is a new entry, enter a name and press Select. or
Select Select phonebook if some of the person's details are already stored in your phone book, select a name and press Select.
- If you are using your phone's memory, you must select a phone book slot in which to store the number, for example, to store the number in the mobile phone slot, select Mobile number and press Select.
The name and number are saved to the memory that you have selected for use. See "Phone Book Memories" on page 17 for more information.
Calling a number from call history
To call a number from a call history (Steps 1-4):
- Press
- Scroll to Call history and press Select.
-
Select the type of call and press Select.
-
Scroll to a call and press
Deleting Call History Records
With each new incoming, outgoing or missed call, the oldest relevant record in the call history is overwritten. This means that you do not have to constantly clear the call history.
However, you can choose to delete all the records from a particular class (e.g. missed calls or incoming calls) or you can delete all the records stored in Call history simultaneously.
Deleting records from a class
To delete all records from a particular class (Steps 1-6):
- Press
- Scroll to Call history and press Select.
- Select the type of call and press Select.
- Scroll to a call and press Select.
- Select Delete all and press Select.
Clearing call history
To clear call history (Steps 1-4):
- Press
- Scroll to Call history and press Select.
- Select Clear all and press Select.
- Press the Yes soft key to delete the entire call history or Press the No soft key to cancel the deletion.
Profiles allow you to adjust and customise your phone for different environments. For example, you can use the Silent profile when you are in a restaurant and are awaiting an important call.
Your phone has six profiles:
Normal
- Silent
Meeting
- Indoor
- Outdoor
Car
You cannot create new profiles but you can change a profile's settings to suit your requirements.
Activating a Profile
To activate a profile (Steps 1-4):
- Press

- Scroll to Profiles and press Select.
- Select a profile and press Select.
- Select Activate and press Select.

If any profile other than Normal is selected, its title will be displayed when the phone is in standby.
Customising a Profile
Customising a profile enables you to turn keypad tones on or off and create different types of alerts to let you know of an incoming call, message, or email.
Adjusting profile settings
To select a profile (Steps 1-4):
- Press
-
Scroll to Profiles and press Select.
-
Select a profile and press Select.
- Select Voice for incoming calls and press Select or Select Messages for SMS and press Select or Select E-mail for emails and press Select.
Selecting a ring tone
To select a ring tone (Steps 1-4 & 5-7)
- Select a profile option as described in steps 1-4.
- Select Ring type and press Select.
- Select the ring tone and press Select.
Setting the ring volume
To set the ring volume (Steps 1-4 & 8-10)
- Select a profile option as described in steps 1-4.
- Select Ring volume and press Select.
- Use Left and Right on the 4-Way key to increase and decrease the volume and press Select.
Selecting a ring or vibrate alert
To select ring and vibrate settings (Steps 1-4 & 11-13):
- Select a profile option as described in steps 1-4.
- Select Ring or vibrate and press Select.
- Select an option and press Select.
Selecting a picture alert
To set picture alert (Steps 1-4 & 14-17):
- Select a profile option as described in steps 1-4.
- Select Image select and press Select.
- Select a picture and press Select. The picture is displayed.
- Press the Yes soft key to keep the picture or Press the No soft key to reject the picture.
Setting the keypad tones
To turn tones on or off and set the level (Steps 1-3 & 18-20):
-
Select a profile as described in steps 1-3
-
Select Keytone and press Select.
- Select On, press Select, select a level from 1-3 or DTMF tones and press Select.
or
Select Off and press Select.

Dual Tone Multi-Frequency (DTMF), is the system used by touch-tone telephones. DTMF assigns a specific frequency (tone) to each key so that it can be identified by another device.
Resetting a profile
Rather than changing all the profile settings individually, you can reset them to the factory settings using the Reset option.
To reset a profile to its default setting (Steps 1-4):
- Press
- Scroll to Profiles and press Select.
- Select a profile and press Select.
- Select Reset and press Select.
Ring Tones and Pictures
Your phone comes with 10 polyphonic ring tones (and space to download another 40), each of which can be used with a profile. You can also use any ring tones that you have downloaded or received as an attachment.

The ring tones and pictures already in your phone cannot be deleted or overwritten.

Messages
Your TS222i phone can send SMS messages of up to 160 characters, including punctuation marks and spaces.
The following icons are used to display information about messages:
| Icon | Description | Icon | Description |
| Message received | Message inbox full | ||
| Mail read or sent | Mail not read or sent |
Composing Messages
When a message has been written it can be sent, saved, modified or deleted.
To compose (write) a message (Steps 1-4):
- Press
- Scroll to Messages and press Select.
- Select Compose and press Select.
- Enter your message and press Select.
For more information on text input methods, see "Entering Text and Numbers" on page 10.
You should also refer to "Modifying message content" on page 26 for more information on modifying the message content.
Sending and saving message
Messages can be sent to any number stored in your phone (for example a number in your phone book) or you can enter a number.
To send a message (Steps 1-6):
- Press
- Scroll to Messages and press Select.
- Select Compose and press Select.
- Enter your message and press Select.
-
Select Send and press Select. or Select Send and save and press Save or Select Save and press Select. Your phone book entries are displayed
-
Select a number and press Select
or
Press the Menu soft key, select an option and press Select. The available options are:
- Group search (select the group title, press Menu and select Send group all to send the message to all the members of the group)
Enter number - Incoming call
Outgoing call
Missed call
Select a name from the relevant list or enter the number and press Select.
Modifying message content
Whenever you are entering message text, you can access the editing sub-menu by pressing the Menu soft key.
You can use this sub-menu to:
- Copy, cut and paste
- Insert a new line in the message
- Select a different language
- Turn T9 Text Input on or off
- Insert symbols
- Insert a template
To modify a message (Steps 1-5):
- Compose the message as described in "Composing Messages" on page 25
or
Open a message as described in "Using your message folders" on page 27.
- Press Select, select Edit and press Select again.
- Edit the message as you require.
- Press the Menu soft key. See the sections "Copying, cutting and pasting" below to "Inserting symbols" on page 27 for more information on the submenu options.
- After making any changes with the sub-menu, you can send the message as normal.
See "Sending and saving message" on page 25 for more information on sending messages.
Copying, cutting and pasting
To copy, cut or paste text, see "Cutting, copying and pasting" on page 11 for more information.
Inserting a new line
Inserting a new line is the same as hitting carriage return on a keyboard.
To insert a new line (Steps 1-2):
- Press the Menu soft key.
- Select New line and press Select. A new line is entered into your messag
Selecting a predictive text language
Your TS222i can operate in four different languages, they are:
- English
German
French
Dutch
To select a different language for T9 Text Input (Steps 1-3):
- Press the Menu soft key.
- Select Language and press Select.
- Select the language and press Select.

It is not possible to select a different language (while writing a message) if T9 Text Input is off. Changing the language T9 operates in will not change the display language.
Turning predictive text on or off
Predictive text can be turned on and off globally or just while writing a message.
To turn T9 Text Input on or off, when writing a message, press and hold
For more information on how to use the predictive text, see "Using predictive text" on page 11.
Inserting symbols
To insert a symbol into a message (Steps 1-3):
- When entering text, press the Menu soft key.
- Scroll to Insert symbol and press Select.
- Scroll to the symbol you want to insert and press Select.

Symbols can also be inserted by pressing the appropriate key, see the table "Key functions" on page 8 for more information about this.
Using templates
To insert a template (Steps 1-3):
- Press the Menu soft key.
- Select Insert template and press Select.
- Select a template and press Select. The template is inserted into your message. You can now edit the content or add to it as required.
See "Using Templates" on page 30 for more information on creating new templates and editing the existing ones.
Message Folders
You have three messages folders. They are:
- Inbox - for received messages
Outbox - for saved sent messages - Unsent - for saved unsent messages
Using your message folders
To open a message (Steps 1-4):
- Press
- Scroll to Messages and press Select.
- Select a folder and press Select. The contents of the folder are displayed.
- Select a message and press Select. The message content is displayed.
Replying to, forwarding and sending unsent messages
From your message folders you can reply to or forward a received message and you can send an unsent message.
To reply to, forward or send a message (Steps 1-4 & 5-8):
- Open a message as described in steps 1-4 and press Select.
- Select the appropriate option (Reply, Forward or Send) and press Select.
- Write (Reply option) or modify (Forward or Send options) your message as normal and press Select.
- If you are replying to a message, your message is sent to the original sender of the message when you press Select or If you are forwarding a message or sending an unsent message, select a number in the normal way. See "Sending and saving message" on page 25 for more information.
Editing or deleting messages
To edit or delete a message (Steps 1-4 & 9-11):
-
Open a message as described in steps 1-4 and press Select.
-
Select Delete to delete the message and press Select. or Select Edit to edit the message, press Select, make your changes and press Select again.
-
If you select the Edit option, when you press Select, select one of the following options:
-
Send
- To send the message - see "Sending and saving message" on page 25 for more information.
- Save
- To save the message - see "Modifying message content" on page 26 for more information.
Saving a message sender's number
To save a message sender's number (Step 1-4 & 12-14):
- Open a message in your Inbox folder, as described in steps 1-5 and press Select.
- Select Save number and press Select.
- Select Add new if it is a new entry, enter a name and press Select. or
Select Select phonebook if some of the person's details are already stored in your phone book, select a name and press Select.
If you are using your phone's memory you must select a phone book slot in which to store the number.
Calling a message sender
To call a message sender (Step 1-4 & 15-16):
- Open a message in your Inbox folder, as described in steps 1-5 and press Select.
- Select Voice call and press Select.
Checking Message Count
To check your message count (1-3):
- Press
- Scroll to Messages and press Select.
- Select Message count and press Select. The message statistics are displayed.
Message Settings
From Settings, you can change your message centre number, set the valid time, change the message format and turn the receipt request on or off.
Message centre
Your message centre number is a preprogrammed number required to send messages.

You should contact your service provider before changing this number as it may affect the operation of the phone.
To enter or check your message Select number (Steps 1-5)
- Press
- Scroll to Messages and press Select.
- Select Settings and press Select.
-
Select Message centre and press Select.
-
Enter the correct number and press Select.
Valid time
If your message cannot be delivered (for example because the recipient has switched off their phone) you can set the maximum time for the phone to continue to attempt sending the message. After the maximum time limit has been reached, the phone will stop sending the message.
To set the valid time (Steps 1-5):
- Press
- Scroll to Messages and press Select.
- Select Settings and press Select.
- Select Valid time and press Select.
- Select the valid time and press Select.
Message format
You can send messages as faxes, pager messages or emails.

This is a network-dependent feature. Contact your service provider for more information.
To set the message format (Steps 1-5):
- Press
- Scroll to Messages and press Select.
- Select Settings and press Select.
- Select Format and press Select.
- Select the format and press Select.
Receipt request
Requesting a delivery receipt means that when the message is delivered you will receive a notification text message.
To turn the receipt request on or off (Steps 1-5):
- Press
- Scroll to Messages and press Select.
- Select Settings and press Select.
-
Select Status report and press Select.
-
Select On to turn request on and press Select or Select Off to turn request off and press Select.
Info service
Info service is a network dependent feature that enables you to receive messages about topics of your choice. You should contact your service provider for more information.
Turning Info service messages on or off
You can choose to turn off all Info service messages or cancel individual Info service topics.
To access the Info service menu (Steps 1-3):
- Press
- Scroll to Messages and press Select.
- Scroll to Info service and press Select.
Turning all info service messages on or off
To turn all info service messages on or off (Steps 1-3 & 4-5:
- Access the Info service menu as described in steps 1-3.
- Select On to turn Info service on and press Select or Select Off to turn Info service off and press Select.
Turning Info service topics on or off
To turn a Info service topic on or off (Steps 1-3 & 6-10):
- Access the Info service menu as described in steps 1-3.
- Select Topics and press Select.
- Select Select and press Select.
- Select a topic and press Select.
- Select On to turn the topic on and press Select or Select Off to turn the topic off and press Select.
Adding and deleting Info service topics
You can also add new topics and delete topics that you no longer require.
Adding Info service topics
To add a Info service topic (Steps 1-3 & 11-15):
- Access the Info service menu as described in steps 1-3.
- Select Topics and press Select.
- Select Add and press Select.
- Enter the topic ID and press Select.
- Enter a title for the topic and press Select.
Deleting topics
To delete a topic (Steps 1-3 & 16-19):
- Access the Info services menu as described in steps 1-3.
- Select Topics and press Select.
- Select Delete and press Select.
- Select a topic and press Select.
Selecting a Info service language
The default Info service language is the same as the default language for your phone (See "Setting the Language" on page 45).
To select a different Info service language (Step 1-3 & 20-24):
- Access the Info services menu as described in steps 1-3.
- Select Language and press Select.
- Select a language and press Select.
- Select On to display Info service messages in that language or Select Off to display Info service messages in the default language.
- Press Select.
Reading Info service messages
To read your Info service messages (Steps 1-5):
- Press
- Scroll to Messages and press Select.
- Scroll to Info service and press Select.
-
Select Read and press Select.
-
Select a message and press Select.

When you receive Info service messages, they are displayed in the same way as messages in your Inbox.
Voice Mail
Voice mail is a network-dependent feature that enables you to retrieve recorded messages from people who have called your number when you were out of coverage or had your phone switched off.
The following icon is used with voice mail:
| Icon | Description |
| Voice mail received |
Calling your voice mailbox
If you have your speed dials enabled (see "Activating Speed Dialling" on page 18) simply press and hold to access your voice mailbox.
To call your voice mailbox (Steps 1-5):
- Press
- Scroll to Messages and press Select.
- Scroll to Voice mail and press Select.
- Select Listen. The phone dials the voice mailbox number and you can listen to any voice mails that have been left for you.
- Press the key to end the call.
Changing your voice mailbox number
To change your voice mailbox number (Steps 1-5):
- Press
- Scroll to Messages and press Select.
- Scroll to Voice mail and press Select.
-
Select Enter number and press Select.
-
Enter the number and press Select.

You should consult your service provider before changing this number.
Deleting All Messages
This deletes all the mail in all three of your message folders.
To delete all your messages (Steps 1-4):
- Press
- Scroll to Messages and press Select.
- Scroll to Delete all and press Select.
- Press the Yes soft key to delete all messages or Press the No soft key to keep all messages.
Using Templates
Your phone has several templates for inserting into messages.
Editing and adding templates
To edit a template (Steps 1-5):
- Press
- Scroll to Messages and press Select.
- Scroll to Edit template and press Select.
- To edit a template select the template and press Select or To add a template select an empty space and press Select.
- Make your changes or create your template and press Select.
Using i-mode
i-mode is NTT DoCoMo's mobile internet access system. The 'i' in i-mode represents information and internet.
| The blue i-mode icon is displayed (shown on the left) when you are in an i-mode broadcast area. This means you can access webpages and send and receive email. | |
| The i-mode icon turns red when you are connected to an i-mode service and flashes when you are downloading something. |

For more information about i-mode tariffs and available services contact your service provider.
CompactNetFrontPlus
Copyright (c) 2003 ACCESS Co., Ltd. ACCESS and CompactNetFront are registered trademarks or trademarks owned by ACCESS Co., Ltd. in Japan and selected countries worldwide.
The browser in this mobile phone terminal should not be modified and reproduced. The browser also should not be separated from this mobile phone terminal.
ACCESS Co., LTD. is granted by Unisys Corporation, USA, the license to use GIF module in this mobile phone terminal only as the browser. If you want to use the GIF module for any other purposes, you need to obtain the appropriate license on your own.
In addition, the license which ACCESS Co., LTD obtained from Unisys Corporation, USA, applies only to browser in this mobile phone terminal, and not to the other products that are used with this browser in this mobile phone terminal. A portion of this software includes software modules developed by the Independent JPEG Group.
Starting i-mode
To start i-mode press from standby.
i-mode menu
To view the i-mode menu press , select i-mode menu and press Select.
Accessing a Webpage
Webpages can be viewed from your phone's history, from bookmarks (see "Viewing bookmarked pages" on page 32) and directly, by entering the address.
To access a webpage (Steps 1-2):
- Press
- Select Go to webpage.
Accessing a webpage directly
To access a webpage directly (Steps 1-2 & 3-6):
- Access the menu as described in steps 1-2.
- Select Enter address and press Select.
- Enter the URL.
- Select Ok and press Select.
Accessing a webpage from history
Your phone keeps a record of the most recent sites you visited. To access a webpage from your history (Steps 1-2 & 7-10):
- Access the menu as described in steps 1-2.
- Select Address history and press Select.
- Select an address and press Select.
- Select Ok and press Select.
In-Page Options
Pressing displays a number of options, including saving the page and saving an image displayed on the page.

This section assumes that you are viewing a webpage.
The available options are:
- Add bookmark
See "Bookmarking webpages" on page 32
See "Saving a webpage" on page 33
- Save image
- Save page
- Go to webpage
- Reload
Page info
Saving images
You can save an image displayed on a webpage and use it as wallpaper or as a screen saver (see "Wallpaper" on page 46 and "Screen saver" on page 46).
To save an image while using i-mode (Steps 1-5):
- Press
- Select Save image and press Select.
- Select an image (press Down to select the next image if there is more than one on the page) and press Select.
- Select Ok to save the image and press Select or
Select Cancel not to save the image and press Select.
- Select a location to save the image and press Select.
Go to webpage
To go to a webpage while viewing another (Steps 1-4):
- Press
- Select Go to webpage and press Select. The enter address page will open with the Address field selected.
- Press Select to open the field and enter the URL.
- Select Ok and press Select.
Reloading webpages
If you are viewing a webpage that updates regularly (for example a news or traffic information website) or if you have your phone set to Cache (see "Showing or hiding tables" on page 42) it is a good idea to reload
(refresh) the site every now and then. This ensures that you are viewing the most up-to-date information.
To reload a webpage (Steps 1-2):
- Press
- Scroll to Reload and press Select.
Page info
To view the URL of the webpage currently loaded (Steps 1-2):
- Press
- Scroll to Page info and press Select.
Bookmarks
Bookmarking webpages means saving the address of a previously visited webpage in your phone's memory.
Bookmarking webpages
To bookmark a webpage (Steps 1-3):
- Press
- Select Add bookmark and press Select.
- Select Ok and press Select.
Using bookmarks
You can view, delete and change the title of bookmarks.
To access the bookmarks menu (Steps 1-3):
- Press to start i-mode.
- Select Bookmarks and press Select.
- Select a bookmark and press the Menu key.
Viewing bookmarked pages
To view a bookmarked page (Steps 1-3 & 4-5):
- Access the Bookmarks menu as described in steps 1-3.
- Select Open and press Select.
Editing bookmark titles
To edit the title of a bookmark (Steps 1-3 & 6-8):
- Access the Bookmarks menu as described in steps 1-3.
- Select Edit title and press Select.
- Edit the title and press Select.
Deleting bookmarks
You can delete bookmarks one by one or delete them all in a single action.
To delete bookmarks (Steps 1-3 & 9-11):
- Access the Bookmarks menu as described in steps 1-3.
- Select Delete one to delete the selected bookmark or Select Delete all to delete all your bookmarks.
- Press Select.
Copying addresses
You can copy the address of a bookmark for pasting into an email or message. The address will be copied to the input screen from where you can copy it.
To copy a bookmarked address (Steps 1-3 & 12-13):
- Access the Bookmarks menu as described in steps 1-3.
- Select Copy address and press Select. The address is now saved onto the clipboard for pasting.
Saved Webpages
Saving a webpage means that you can view it without being online. You can also save images from webpages and use them as wallpaper and screen savers.
For more information about wallpaper and screen savers see "Wallpaper" on page 46 and "Screen saver" on page 46.
Saving a webpage
To save a webpage, you must be connected to the i-mode service and viewing a live webpage.
To save a webpage (Steps 1-3):
- Press
- Select Save page and press Select.
- Select Ok and press Select.
Using saved webpages
Saved webpages can be viewed even when you are outside an i-mode reception area.
Opening saved webpages
To open a saved webpage (Steps 1-3):
- Press to start i-mode (you do not have to be in an i-mode area).
- Select Saved pages and press Select.
- Select a page and press Select.
Saving images from a saved webpage
To save an image (Steps 1-3 & 4-9):
- Open a saved webpage as described in steps 1-3.
- Press
- Select Save image and press Select.
- Select an image (press Down to select the next image if there is more than one on the page) and press Select.
- Select Ok to save the image and press Select or Select Cancel not to save the image and press Select.
- Select a location to save the image and press Select.
Editing the title of a saved page
To edit the title of a saved webpage (Steps 1-3 & 10-13):
- Open a saved webpage as described in steps 1-3.
- Press
- Select Edit title and press Select.
- Enter the new title and press Select.
Viewing the URL of a stored page
You can view the URL (address) of stored pages.
To view the URL of a stored page (Steps 1-3 & 14-17):
-
Open a saved webpage as described in steps 1-3.
-
Press
- Select Page info and press Select.
- Select Ok and press Select. You return to the Saved pages menu.
Protecting saved pages
To protect a saved webpage from being deleted (Steps 1-3 & 18-21):
- Open a saved webpage as described in steps 1-3.
- Press
- Select Protect on/off and press Select. A list of the saved webpages is displayed.
- Select a webpage and press Select.
Deleting all saved webpages
To delete all saved webpages (Steps 1-3 & 22-24):
- Open a saved webpage as described in steps 1-3.
- Press
- Select Delete all and press Select.
Deleting saved webpage individually
To delete a single saved webpage (Steps 1-3 & 25-27):
25. Open a saved webpage as described in steps 1-3.
26. Press
27. Select Delete one and press Select.
With your TS222i phone you can send and receive emails. Ring tones can be sent as attachments and emails can have a personalised signature and/or a message header attached to them.
| Icon | Description |
| Email received |
Sending emails
To send an email (Steps 1-10):
- Press the MAIL soft key to access i-mode mail directly from standby mode: or
Press to start i-mode, select Mail and press Select.
- Select Compose mail and press Select.
- Select the Subject field. When it is selected there will be a blue box around it.
- Press Select, enter the subject and press Select.
- Press Down and select the Address field. When it is selected there will be a blue box around it.
- Press Select to open the Address field, enter the address and press Select to return to theCompose mail page. or
Press , select Open phonebk to view your phonebook, select relevant Phone or Sim location and press Select, select a name and press Select then scroll to email address and press Select.
- Press Down and select the Message field. When it is selected there will be a blue box around it.
- Press Select to open the message field, enter the message and press Select.
- Press Down and select the Send field. When it is selected the box will turn blue.
- Press Select to send the email.
Attaching ring tones
To attach a ring tone to an email (Steps 1-8 & 11-13 & 9-10):
- Create a mail as described in steps 1-8.
- Press Down to select the ring tone attachment field. When it is selected there will be a blue box around it.
- Press Select, select Melody, pick a melody and press Select.

The maximum size of a ring tone attachment is 10kb.
Attaching signatures
To attach a signature (Steps 1-8 & 14-16):
-
Create a mail as described in steps 1-8.
-
Press
- Select Attach sign and press Select.
Attaching headers
To attach a header (Steps 1-8 & 17-19):
- Create a mail as described in steps 1-8.
- Press
- Select Attach header and press Select.
Removing ring tones
To remove an attached ring tone (Steps 1-3):
-
Open a mail. For more information, see "Opening an email" on page 35.
-
Press
- Select Del attachment and press Select.
- Select OK and press Select.
Using the mailboxes
| Icon | Description | Icon | Description |
| New mail received. | Mailboxes full - start deleting mail. |
You have four mailboxes:
- Inbox - for your received mail
- Sent mail - for the mail you have sent
- Draft - for mail you have composed but not sent
- New mail - for your unread received mail
Opening an email
To open an email (Steps 1-6):
- Press the MAIL soft key to access i-mode mail directly from standby: or Press to start i-mode.
- Select Mail and press Select.
- Select Inbox or
Select Sent mail or Select Draft or Select Check net
- Press Select.
- If you select Check new mail, Select iMail. or Select All, and select Mail.
- Select the email you want to open and press Select.
Replying to emails ( Inbox only)
To reply to an email (Steps 1-6 & 7-9):
- Open an email as described in steps 1-6 and press
- Select Reply to reply without including the original email body or Select Reply Quoted to reply including the original email body.
- See "Sending emails" on page 34 for more information on how to send an email.
Forwarding emails (inbox only)
To forward an email (Steps 1-6 & 10-13):
- Open an email as described in steps 1-6 and press
- Select Forward and press Select.
- Enter the address or
Press , select Open phonebk to view a list of names, select a name and press Select.
- See "Sending emails" on page 34 for more information on how to send an email.
Protecting emails
Protecting an email stored in one of your mailboxes means that it cannot be deleted.
To protect a message (Steps 1-6 & 14-15):
- Open an email as described in steps 1-6 and press
- Select Protect On/Off and press Select.
Copying and pasting email content
You can copy part or all of a received email and paste it into another email or message. You can copy the subject, the body of the message or the sender's address.

You can only have one item on the clipboard at a time.
To copy part or all of an email (Steps 1-7):
- Open an email as described in "Opening an email" on page 35.
- Press
- Select Copy message to copy the body of the message or Select Copy subject to copy the subject or
Select Copy address to copy the address.
- Press Select to open the field and place the cursor at the start of the text you want to copy.
- Use the 4-Way key to select the text you want to copy and press Select.
The copied text is now saved on your clipboard.
- Press when in another message field.
- Select Paste and press Select.
Saving the address of an email sender
You can save the email address of an email sender. You do this by either creating a new entry in your phone book or by updating an existing entry.
The address will be saved in the email address slot in your phone's memory.

You can only save an email address to your phone's memory. If you attempt to save to the SIM card's memory you will see an error message. For more information about memories see "Phone Book Memories" on page 17.
To access the Store address menu (Steps 1-3):
- Open an email as described in "Opening an email" on page 35 and press
- Scroll to Save address and press Select.
- Select Ok and press Select.
To save a new address (Steps 1-3 & 4-7):
- Access the Save address menu as in steps 1-3.
- Select Add new and press Select.
- Enter the person's name and press Select.
- Press the Save soft key to save the address.
Updating an existing entry means either adding the email address of a person who is in your phone book, but has yet to have their email address added, or replacing an old email address with a new one.
To update an existing address (Steps 1-3 & 8-11):
- Access the Save address menu as in steps 1-3.
- Select Select phonebook and press Select.
- Select the person's name and press Select.
- Press the Save soft key to save the address.
Playing and/or saving melody attachments
If someone sends you a melody as an attachment you can play and/or save it as a ring tone.
To save a melody as a ring tone (Steps 1-5):
- Open an email as described in "Opening an email" on page 35 and press
- Scroll to Save melody and press Select.
- Press the OK soft key. To listen to the ring tone, press the Play soft key and press the Stop soft key to stop it playing.
- Press Select.
- To save the ring tone, select a location and press Select.
Editing and deleting emails
Deleting emails
There are several ways to delete emails. You can delete all the mails in one your folders, you can delete mails one by one from a folder view or you can delete an open email.

You cannot delete protected messages.
To delete all mails or a single mail in a folder (Steps 1-5):
- Press the MAIL soft key to access i-mode mail directly from standby:
or
Press to start i-mode.
- Select Mail and press Select.
- Select Inbox and press Select, or
Select Sent mail and press Select,
or
Select Draft and press Select,
The contents of the folder are displayed.
- Press
- Select Delete one to delete one by one, select a mail, press Select, select Ok and press Select
or
Select Delete all to delete all the mails in the folder, press Select, select Ok and press Select
To delete an open email (Steps 1-3):
- Open an email as described in "Opening an email" on page 35 and press
- Scroll to Delete and press Select.
- Select Ok and press Select.
Editing emails (Sent mail only)
To edit a sent email (Steps 1-4):
- Open an email as described in “Opening an email” on page 35 and press
- Select Re-edit and press Select.
- Make your edits.
- Select Send or Save and press Select.
Email settings
This section explains how to adjust your email settings.
To access email settings (Steps 1-2):
- Press the MAIL soft key to access email directly from standby: or
Press to start i-mode, select Mail and press Select.
- Select Mail settings and press Select.
Editing headers and signatures
A header is a piece of text that is inserted at the top of an email and a signature is the piece of text that is automatically added to the end of an email.
You can create the header or signature and set the phone to automatically insert that header or signature into every message (for information about manually inserting headers and signatures see "Attaching headers" on page 35 and "Attaching signatures" on page 34).
To edit the message header or signature (Steps 1-2 & 3-9):
- Access the Mail settings menu as described in steps 1-2.
- Select Edit header and press Select or
Select Edit signature and press Select.
- Press Select if you want the header or signature to be automatically attached to all outgoing emails.
When this option is selected the Auto Attach box will have an X in it. Press Select again to unselect it. - Press Down to select the text entry field.
- Press Select and enter the header or signature text and enter the text.
-
Press Select to return to the Edit header or Edit Signature page.
-
Press Down, select Ok and press Select to keep the header or signature or Press Down, select Cancel, press Select, select Ok and press Select to quit editing the header or signature. Your changes will not be kept.
Setting reply markers
The reply marker is the character that is used to indicate the original message when replying. A good reply marker is >
To set the reply marker (Steps 1-2 & 10-14):
- Access the Mail settings menu as described in steps 1-2.
- Select Reply marker and press Select.
- Press Select to enter the text entry field.
- Enter the marker and press Select to return to the Reply marker page.
- Press Down, select Ok and press Select to keep the reply marker or Press Down, select Cancel, press Select, select Ok and press Select to quit editing the reply marker. Your changes will not be kept.
Turning auto-reception on and off
Auto-reception enables you to receive notification of a new email even when you are not connected to an i-mode service. You must be in an i-mode reception area.
To turn auto-reception on or off (Steps 1-2 & 15-18):
- Access the Mail settings menu as described in steps 1-2.
- Select Auto reception and press Select.
- Select a setting and press Select.
- Press Down, select Ok and press Select to keep the setting or Press Down, select Cancel and press Select to quit the Auto reception menu. Your changes will not be kept
Receiving attachment
You can decide whether or not to receive attachments.
To set your attachment settings (Steps 1-2 & 19-23):
-
Access the Mail settings menu as described in steps 1-2.
-
Select Receive attachment and press Select.
- Select Image to receive images.
- Select MIDI to receive ring tones.
- Press Down, select Ok and press Select to keep the setting or Press Down, select Cancel and press Select to quit the Receive attachment menu. Your changes will not be kept
Checking email settings
To check your email settings (Steps 1-2 & 27-28):
- Access the Mail settings menu as described in steps 1-2.
- Select Check settings and press Select.
MMS
Your TS222i phone can send MMS messages that contain SMIL slideshows with text, images, animations and sounds.
Composing an MMS message
When an MMS message has been composed, it can be sent, saved, modified or deleted.
To compose a message (Steps 1-9)
- Press the MAIL soft key to access i-mode directly from standby mode: or Press to start i-mode, select Mail and press Select.
- Select Compose MMS and press Select.
- Select the Subject field. When it is selected, there will be a blue box around it.
- Press Select, enter the subject and press Select.
- Press Down and select the Address field, enter the address and press Select to return to theCompose MMS page. or
With the address field highlighted, press Menu , and select Open phonebk to view your phonebook, select relevant Phone or Sim location and press Select, select a name and press Select then scroll to relevant address and press Select.
-
Press Down and select the field marked SMIL. When it is selected, there will be a blue box around it.
-
Add a SMIL to the MMS message.
For more information on SMILs, see "Composing a SMIL" on page 40. - Press Down and select the Send field. When it is selected the field will turn blue.
or
Press Down and select the Save field. When it is selected the field will turn blue. - Press Select to send or save the MMS message.
Editing an MMS message
MMS messages are stored in the same mailboxes as your email, and work much the same way. You can:
- Open an MMS message
- Reply to an MMS message ( Inbox only)
Forward an MMS message - Protect an MMS message
For more information on these actions, see "Using the mailboxes" on page 35.
- Copy the subject of an MMS message
- Copy the address of an MMS message
For more information on these actions, see "Copying and pasting email content" on page 36.

You cannot copy the message of an MMS message.
- Save the address of an MMS message
- Save the phone number of an MMS message
For more information on these actions, see "Saving the address of an email sender" on page 36.
- Edit an MMS message (Sent mail only)
For more information on this action, see "Editing emails (Sent mail only)" on page 37.
- Play an MMS message
- Browse an MMS message
For more information on these actions, see "Playing and saving SMIL content" on page 41.
Adding addresses to an MMS message
You can only add an address to an MMS message if it has at least one address, but less than 5 addresses.
To add an address to an MMS message (Steps 1-4):
- Open an MMS message.
- To add an address to the To field, select Menu, select Add To and select
Open phonebk to select a name from the phonebook.
or
Enter address to key in an address.
- To add an address to the Cc field, select Menu, select Add Cc and select
Open phonebk to select a name from the phonebook.
or
Enter address to key in an address.
- To add an address to the Bcc field, select Menu, select Add Bcc.
Open phonebk to select a name from the phonebook.
or
Enter address to key in an address.
Removing addresses from an MMS message
You can only remove an address if there are at least 2 addresses, and an address field is selected.
To remove an address from an MMS message (Steps 1-2):
- Open an MMS message.
- Select Del. address and select Ok.
Moving between address fields in an MMS message
You can move between the To, Cc, and Bcc fields of an MMS message.
To move between address fields in an MMS message (Steps 1-2):
- Open an MMS message.
-
Select
-
Change to To to select the To field.
You can only select Change to To if the To field is not already selected. - Change to Cc to select the Cc field.
You can only select Change to Cc if the Cc field is not already selected.
- Change to Bcc to select the Bcc field.
You can only select Change to Bcc if the Bcc field is not already selected.
Deleting an MMS message (Steps 1-3)
To delete an open MMS message (Steps 1-3)
- Open an MMS message.
- Select Enter.
- Scroll to Del.mail and select Ok.
SMIL
SMIL is a way of defining content and presentation for a set of slides that can be included in an MMS message. Slides may contain text, an image or animation and an audio file.
Composing a SMIL
To compose a SMIL (Steps 1-21)
- Compose an MMS message. For more information, see
"Composing an MMS message" on page 38.
or
Open a saved MMS message.
- Select the word SMIL below the address field and press Select.
- The SMIL editor is shown
Adding text
You can only add text to a slide if it does not already contain text.
To add text to a slide (Steps 1-3 & 4-6):
- Open the first slide of a slideshow as described in steps 1-3.
- Select Add text.
- Write your text and press select to see the slide
Adding an image or animation
You can only add an image or animation to a slide if it does not already contain an image or animation.
To add an image or an animation to a slide (Steps 1-3 & 7-9):
- Open the first slide of a slideshow as described in steps 1-3.
- Select Add image.
- Select Image, select an image from the Image folder and press OK.
or
Select Animation, select an animation from the Animation folder and press OK.
Adding an audio file
You can only add an audio file to a slide if it does not already contain an audio file.
To add an audio file to a slide (Steps 1-3 & 10-12):
- Open the first slide of a slideshow as described in steps 1-3.
- Select Add audio.
- Select an audio file from the Audio folder and press OK.

You need to press c to exit out of the editor and get back to the main SMIL composite screen.
Adding a slide
You can only add a slide to an MMS message if there is one or more slide in the message that has content.
To add a slide to an MMS message (Steps 1-3 & 13-14):
- Open the first slide of a slideshow as described in steps 1-3
- Scroll to Add slide and press Select to add a slide to the end of the slideshow. or
- Scroll to Insert slide and press Select to add a slide after the current slide.
Specifying the display options of a slide
To specify how a SMIL slideshow is displayed (Steps 1-3 & 15-22):
- Open the first slide of a slideshow as described in steps 1-3.
- Select Menu.
- Scroll to Text color, select a colour, and press OK to set the colour of the text.
You can only set text colour for slides that already contain text.
-
Scroll to Background color, select a colour, and press OK to set the background colour of a slide.
-
Scroll to Set Fit mode, and select:
-
Hidden to display the image at its actual size, with the bottom and right side of the image being cut if it is too large.
- Fill to enlarge or reduce all sides of an image to make it fit.
- Meet to enlarge or reduce the longer side of an image to fit the width or height of the image. The other side will be enlarged or reduced by the same percentage.
- Slice to enlarge or reduce the shorter side of an image to fit the width or height of the image. The width or height of the other side will be enlarged or reduced by the same percentage, resulting in the image being cut if it is larger than the screen.
-
You can only select Set Fit mode if the slide contains an image.
-
Scroll to Options, and select
-
Slide time and key in a value in seconds to specify how long a slide will be displayed.
Text begin to display text first on a slide. This option is only available if a slide contains text. - Text end to display text last on a slide. This option is only available if a slide contains text.
- Image begin to display an image or animation first on a slide. This option is only available if a slide contains an image or animation.
- Image end to display an image or animation last on a slide. This option is only available if a slide contains an image or animation.
- Audio begin to play an audio file first on a slide. This option is only available if a slide contains an audio file.
-
Audio end to play an audio file last on a slide. This option is only available if a slide contains an audio file.
-
Scroll to Change region size, press Select, press Up or Down to select a region, and press Enter to change the region size. This option is only available if a slide contains an image or text.
- Scroll to Swap image/text and press Select to switch the order in which the image or animation and the text appear on the slide. This option is only available if a slide contains an image or text.
Viewing and previewing slides
When composing a SMIL, you can move between different slides and preview the SMIL content.
To move between slides (Steps 1-3):
- Open the first slide of a slideshow. For more information, see "Composing a SMIL" on page 40.
- Press Menu.
- Scroll to Previous slide and press Select. or Scroll to Next slide and press Select.
To preview a slideshow (Steps 1-3)
- Open the first slide of a slideshow. For more information, see "Composing a SMIL" on page 40.
- Press Menu.
- Scroll to Preview and press Select.
Playing and saving SMIL content
To play SMIL content (Steps 1-2):
- Open an MMS message.
-
Scroll to
-
Play SMIL to play the SMIL based upon the display options of the slides.
-
Browse SMIL to view the slide show one slide at a time.
-
Press Right to view the next slide.
- Press Left to view the previous slide.
To save content from a SMIL (Steps 1-2 & 3-6):
- Press select
- Copy text to save the text of the current slide.
For more information on copying text, see "Cutting, copying and pasting" on page 11.
- Save image and select Ok to save the image of the current slide in the Image folder. or
- Save image and select Ok to save the animation of the current slide in the Animation folder.
- Save audio and select Ok to save the audio file in the Melody folder.
SMS
Sending an SMS via i-mode requires the same steps as sending a normal SMS. Please see the "Messages" chapter on page 25 for more information.
Internal i-mode Settings
This section addresses i-mode settings that can be adjusted from the i-mode menu.
To access the i-mode Settings menu (Steps 1-2):
- Press to start i-mode.
- Scroll to Settings and press Select.
Setting time out
Setting the time out means that if your phone cannot connect to a webpage after a certain period of time (for example if the network is busy) it will automatically disconnect.
There are three timeout settings:
- 60 seconds
90 seconds - Disabled
To set time out (Steps 1-2 & 3-6):
- Access the i-mode Settings menu as in steps 1-2.
- Select Set time out and press Select.
- Select a setting and press Select.
- Press Down, select Ok and press Select to keep the setting or Press Down, select Cancel and press Select to quit the Set time out page. Your changes will not be kept
Showing or hiding tables
You can set your phone so that it will not download information presented in tables. This increases the speed at which your phone accesses webpages.
To show or hide tables (Steps 1-2 & 7-10):
- Access the i-mode Settings menu as in steps 1-2.
-
Select Show tables and press Select.
-
Select a setting and press Select.
- Press Down, select Ok and press Select to keep the setting or Press Down, select Cancel and press Select to quit the Show tables page. Your changes will not be kept.
Showing or hiding images
You can set your phone so that it will not download images. This increases the speed at which your phone accesses webpages.
To show or hide images (Steps 1-2 & 11-14):
- Access the i-mode Settings menu as in steps 1-2.
- Select Load images and press Select.
- Select a setting and press Select.
- Press Down, select Ok and press Select to keep the setting or Press Down, select Cancel and press Select to quit the Load images page. Your changes will not be kept.
Setting text wrapping
Turning text wrapping on means that full words will always be displayed. Turning text wrapping off means that if there is not enough room to display a word at the end of a line then all of the word will not be displayed.
To turn text wrapping on or off (Steps 1-2 & 15-18):
- Access the i-mode Settings menu as in steps 1-2.
- Select Wrap text and press Select.
- Select a setting and press Select.
- Press Down, select Ok and press Select to keep the setting or Press Down, select Cancel and press Select to quit the Wrap text page. Your changes will not be kept.
Check settings
To view your i-mode settings (Steps 1-2 and 19-20):
- Access the i -mode settings menu as in steps 1-2.
- Select Check settings and press Select.
External i-mode Settings
This section describes i-mode settings that can be adjusted from the Phone setup menu.
To access the external i-mode settings menu (Steps 1-3):
- Press
- Scroll to Phone setup and press Select.
- Scroll to i -mode settings and press Select.
Selecting a host
To select an i-mode host (Steps 1-3 & 4-6):
- Access the i -mode settings menu as in steps 1-3.
- Select Host selection and press Select.
- Select a host and press Select.
Defining an i-mode host

You should contact your service provider before changing any of these settings.
To define an i-mode host (Steps 1-3 & 7-10):
- Access the i -mode settings menu as in steps 1-3.
- Select Host selection and press Select.
- Select User defined and press Select.
- Enter the appropriate details and press Select.
i-mode lock
You can prevent your phone from accessing i-mode.
To turn the i-mode lock on or off (Steps 1-3 & 11-14):
- Access the i -mode settings menu as in steps 1-3.
- Select i -mode lock and press Select.
- Select On or Off and press Select.
- Enter your password and press Select. See "Phone Password" on page 48 for more information about your password.

Calendar
Your TS222i phone has a calendar that enables you to arrange and organise a schedule, as well as set reminders regarding events entered on the calendar.
Navigating the Calendar
To move from date to date, or month to month, see below:

Up
To go to the same day of the previous week

left
To go to the previous day
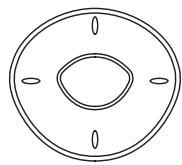
Right
To go to the next day
Press
to go to the us month.
To go to the same day of the following week:
Down
Press
to go to the
The table below shows the icons that are used to display information about the calendar.
Icon
Description

Alarm on
Entering Notes
Whenever you want to add details about a certain date on the calendar, you can enter them in the form of a note. This note is then associated with the particular date and saved in your phone's memory.
To enter notes (Steps 1-9)
- Press
- Scroll to Calendar and press Select. The calendar is displayed.
- Select the date for entering a note and press Select.
- Select Make note and press Select.
- Enter the note and press Select.

For more information on entering text for the note, see "Entering Text and Numbers" on page 10 and "Modifying message content" on page 26.
- Press Select to confirm the original date that you had selected. or
Edit the date for the note and press Select You must now choose whether to set an alarm for the note.
- If you want to set an alarm, select Alarm on, press Select and press Select to confirm the original date that you had selected. or
Edit the date for the note and press Select or
If you do not want to set an alarm, select Alarm off and press Select. Your note is saved.
If you selected Alarm on you must now enter the time.
-
Enter the time at which you want the alarm to go off and press Select. Press Right on the 4-Way key to scroll across the time.
-
Select a melody from the list and press Select.

You can enter a maximum of 50 notes in the calendar.
Using Notes
Once you have entered notes, you can simply select a date on your calendar to view the attached note. After viewing, you can edit or send a note.
Viewing notes
To view notes (Steps 1-4):
- Press
- Scroll to Calendar and press Select.
- Use the 4-Way key to select a date and press Select.
- Select View notes and press Select.
The note is displayed.
To move to the next note (if there are several entered for the one date), press the Next soft key. To move back press the Back soft key. You can also use Left and Right on the 4-Way key to navigate between notes.
Editing notes
To edit a note (Steps 1-4 and 5-11):
- Open a note as described in steps 1-4.
- Press Select.
- Select Edit.
- Edit the content as you require and press Select.
- Edit the date if required and press Select.
- Select Alarm on or Alarm off, depending on your requirements.
- If you select Alarm on, ensure that the date and time are correct and press Select to save your edits
or
If you select Alarm off, simply press Select to save your edits.
Sending notes
You may want to send the contents of a note to someone in your phone book. The recipient receives the note as an SMS.
To send to a number in your phone book (Steps 1-4 and 12-16):
- Select and display a note as described in steps 1-4.
- Press Select.
- Select Send note.
- Enter the number
or
Press the Menu soft key and select an option.
The available options are:
- Name list
- Group list
-
Incoming call
Outgoing call
Missed call -
Press Select, select a name from the relevant list and press Select.
Viewing all Notes
The View all menu option enables you to scroll through each of your notes, without entering the individual dates.
The various options are the same as the View notes menu option discussed earlier (for more information, see "Using Notes" on page 44).
The Delete and Edit menu options are used in the same way as View notes. See "Editing notes" on page 44.
Deleting Notes
You can choose to delete notes from the calendar.
When deleting notes you have the option of:
- Deleting the notes entered for particular dates
- Scrolling through all the notes and deleting them one by one
- Deleting all notes at once
To delete notes (Steps 1-5):
- Press
- Scroll to Calendar and press Select.
-
Select a date and press Select.
-
Select Delete note and press Select.
- Select Of chosen day and press Select.
Scroll through each note for that particular date and delete each one as required by pressing Select.
or
Select One by one and press Select.
The first note on the calendar (with regard to date) is displayed.
Scroll through the notes by pressing the Next soft key and delete them one by one by pressing Select.
or
Select All at once and press Select.
Press the Yes soft key to delete all the notes (press the No soft key to keep the notes).

Phone Setup
Setting the Language
The languages the TS222i can operate in are:
- English
German - French
Dutch
To set the language (Steps 1-4):
- Press
- Scroll to Phone setup and press Select.
- Select Language and press Select.
- Scroll to the language of your choice and press Select.
Display options
Make the most of your TS222i's 4096 colours by personalising your phone's display.
To access the display options menu:
- Press
- Scroll to Phone setup and press Select.
- Select Display options and press Select.
Wallpaper
Your phone's wallpaper is the image displayed in the background when your phone is in use. Your phone is supplied with five images and space to download and store 15 more.
Turning the wallpaper on or off and viewing
To turn the wallpaper on or off or view it (Steps 1-3 and 4-8)
- Access the Display options menu as described in steps 1-3.
- Select Image and press Select.
- Select On and press Select or Select Off and press Select.
- If you choose On, select the wallpaper of your choice and press Select. The wallpaper is displayed.
- Press the Yes soft key to use the wallpaper or Press the No soft key to return to the list of wallpapers.
Screen saver
Your screen saver appears after you have not used your phone for 10 seconds. Your phone is supplied with one screen saver and space to download and store five more. See the "To set an animation as a screenshot" chapter on page 56
Turning the screen saver on or off and viewing
To turn the screen saver on or off or view it (Steps 1-3 and 9-13)
- Access the Display options menu as described in steps 1-3.
- Select Animation and press Select.
- Select On and press Select or Select Off and press Select.
-
If you choose On, select a screen saver and press Select. The screen saver is displayed
-
Press the Yes soft key to use the screen saver or
Press the No soft key to return to the list of screen savers.
Contrast
Contrast refers to the difference in brightness between the light and dark areas of your phone's screen.
To change the contrast level (Steps 1-3 & 14-17):
- Access the Display setting menu as in steps 1-3.
- Scroll to Contrast and press Select.
- Press Up and Down on the 4-Way key to set the contrast.
- Press Select to save or the Back soft key to cancel.
Backlight
Turning your phone's backlight off saves battery power. It switches off automatically after a period of inactivity and switches on again as soon as a button is pressed.
To turn the backlight on or off (Steps 1-3 & 18-21):
- Access the Display setting menu as in steps 1-3.
- Scroll to Back light and press Select.
- Select On to turn the back light on or Select Off to turn the back light off.
- Press Select.
Background colour
Your phone's screen has three background colours. They are:
White
Light blue
Tan
To set the background colour (Steps 1-3 & 22-25):
- Access the Display options menu as in steps 1-3.
- Select Background colour and press Select.
- Select the background colour of your choice.
- Press Select.
Start-up greeting
You can set your phone to display a text greeting or an animation when you switch it on.
To set the type of greeting (Steps 1-4 and 26-29):
- Select Greeting and press Select.
- Select Animation and press Select to use the animation or Select Text and press Select.
- If you selected Text enter your greeting and press Select. You can also press Menu at this stage to access the text editing sub-menu.
- Select Save and press Select.

To delete your text greeting, select Erase at Step 29 instead of Save.
Partial display
Partial display switches off the main section of your phone's screen after 30 seconds of inactivity. This is a power-saving feature.
To turn the screen on again simply press any key.
To turn partial display on or off (Steps 1-3 & 30-32):
- Access the Display options menu as in steps 1-3.
- Scroll to Partial display and press Select.
- Select On to turn partial display on or Select Off to turn partial display off.
Key Settings
From Key settings you can turn emergency key 9 on or off and set your keypad locking status.
Emergency key 9
Emergency key 9 allows you to call the local emergency services by simply pressing and holding . Your phone then dials the internationally recognized emergency services number 112.
To turn emergency key 9 on or off:
- Press
- Scroll to Phone setup and press Select.
- Scroll to Key settings and press Select.
- Select Emergency key and press Select.
- Select a setting and press Select.
Keypad Locking
Locking the keypad means that the phone is prevented from making unintended calls.
There are two ways in which the keypad can be locked:
- Auto lock
Key lock
Auto lock
When you turn Auto lock on, the keypad will automatically lock if the phone is left idle for more than 20 seconds.
To turn the Auto lock on or off (Steps 1-5):
- Press
- Scroll to Phone setup and press Select.
- Scroll to Key settings and press Select.
- Select Keypad lock and press Select.
- Select Auto lock on to turn the Auto lock on or
Select Auto lock off to turn the Auto lock off.
Key lock
The key lock can also be turned on and off by pressing the SMS Soft key followed by the _* key within one second.
Factory Reset
This section explains how to return your phone's settings to the default factory settings. This undoes any of the changes you have made to the settings.
To reset your phone settings (Steps 1-4):
-
Press
-
Scroll to Phone setup and press Select.
- Scroll to Reset settings and press Select. A warning will appear asking you if you are sure you want to do this.
- Press the Yes soft key to reset the phone or Press the No soft key to leave the phone as it is and return to the Phone setup menu.
Phone Password
Your password is defined by you and is used to access certain functions on your phone (for example the i-mode lock, see "i-mode lock" on page 43).
To define or alter your password (Steps 1-6):
- Press
- Scroll to Phone setup and press Select.
- Scroll to Password and press Select.
- Enter your password (the default password is 0000) and press Select.
- Enter the new password and press Select.
- Re-enter the new password and press Select.

Security Settings
Your phone has a number of security features to safeguard it against misuse by others. These include:
PINs
- Call barring
- Fixed Dialling Numbers (FDN)
PIN Settings
Your PINs are two sets of four digit numbers that are supplied in the documentation you received with your phone.
Your PIN1 is used to fully activate your phone when you switch it on. Your PIN2 is required to access some functions such as changing the setting on the call meter.
Turning PIN1 request on or off
To turn your PIN1 request on or off (Steps 1-5):
- Press
- Scroll to Security and press Select.
- Select PIN and press Select.
- Select On to turn the PIN request on or
Select Off to turn the PIN request off.
- Enter your PIN1 and press Select.
Changing a PIN
To change a PIN (Steps 1-7):
- Press
- Scroll to Security and press Select.
- Select PIN and press Select.
- Select Change PIN1 to change your PIN1 or Select Change PIN2 to change your PIN2.
- Enter the requested PIN and press Select.
- Enter a new four-to-eight digit PIN and press Select.
- Re-enter the new PIN to verify and press Select.
Unblocking your SIM card
Your PUK (Personal Unblocking Code) is used to access your phone when it has become blocked as a result of the wrong PIN code being entered three times. If this happens, 'Enter PUK' is displayed when you turn on your phone.
This code is supplied in the documentation you received with your phone. If you lose this code or enter the wrong PUK ten times, contact your service provider.
To unblock your SIM card (Steps 1-3):
- When requested, enter your PUK.
- Enter a new four-to-eight-digit PIN and press Select.
- Re-enter the new PIN and press Select.
Call Barring
Call barring is a network dependent feature that allows you to prevent certain types of calls being made or received on your phone.
If this feature is enabled, your service provider will have supplied you with a password and details of how to use this feature.
The type of calls you can bar are:
- All outgoing calls
Outgoing international calls - ICHE (All outgoing international calls except to home country when roaming).
- All incoming calls
- Incoming calls when roaming
Turning call barring on or off
The password used to activate and deactivate call barring will be supplied by your service provider.
To turn call barring on or off (Steps 1-6):
- Press
- Scroll to Security and press Select.
- Select Barring and press Select.
- Select a type of call and press Select.
- Select On to turn barring on or Select Off to turn barring off
- Enter your password and press Select.

To deactivate all call barrings, select Cancel all at Step 4.
Viewing call barring status
To view the call barring status of a type of call (Steps 1-5):
- Press
- Scroll to Security and press Select.
- Select Barring and press Select.
-
Select a type of call and press Select.
-
Select Status and press Select. The call barring status is displayed.
Fixed Dialling Numbers (FDN)
FDN is a network dependent feature that allows you top restrict your phone to calling only numbers in your phone book.
If this feature is enabled, your service provider will have supplied you with a PIN 2, and details of how to use this feature.

Call Meter
Your phone contains an internal counter that calculates the duration and the cost of your calls. You can view:
Duration of each call
Cost of each call
- Tariff associated with each call

You can only view your call charges if this feature is available through your service provider subscription.
Using the Call Timer
The call timer in your phone can display the duration of your last call as well as the total duration of all your calls since you last cleared the counter.
Viewing the duration of your last call
To view the duration of your last call (Steps 1-4):
- Press
- Scroll to Call meter and press Select.
- Select Timers and press Select.
- Select Last call and press Select. The duration of your last call is displayed.
Viewing the total duration of your calls
To view the total call duration (Steps 1-4):
- Press
- Scroll to Call meter and press Select.
- Select Timers and press Select.
- Select Total and press Select. Your total call duration is displayed.
Clearing the time counter
To clear the time counter on your phone (Steps 1-5):
- Press
- Scroll to Call meter and press Select.
- Select Timers and press Select.
- Select Clear and press Select.
- Press the Yes soft key to confirm the deletion or Press the No soft key to keep the counter values.
Using the Call Charges Meter
You can view the total costs of your outgoing phone calls and the cost of your last call. You can also set a cost limit alarm on your phone.
Viewing the total cost of your calls
To view the total cost of your calls (Steps 1-4):
- Press
- Scroll to Call meter and press Select.
- Select Charge and press Select.
- Select Total charge and press Select. The total cost of your calls to date is displayed.
Viewing the cost of your last call
To view the cost of your last call (Steps 1-4):
- Press
- Scroll to Call meter and press Select.
-
Select Charge and press Select.
-
Select Last and press Select. The cost of your last call is displayed.
Viewing the maximum phone charge
You can set a maximum limit for your individual call charges. Once this limit has been reached, the phone will alert you with an alarm.
To view the maximum charge of a call (Steps 1-4):
- Press
- Scroll to Call meter and press Select.
- Select Charge and press Select.
- Select Max charge and press Select. The maximum charge limit is displayed.
Clearing the charges
To clear the charges on your phone (Steps 1-5):
- Press
- Scroll to Call meter and press Select.
- Select Charge and press Select.
- Select Clear and press Select.
- Enter your PIN2 and press Select. The charge counter is reset to '0'.
Setting a cost limit for your calls
To set a limit for the charge cost (Steps 1-7):
- Press
- Scroll to Call meter and press Select.
- Select Charge and press Select.
- Select Limit and press Select.
- Enter your PIN2 code and press Select.
- Select On and press Select. or Select Off to deactivate the feature.
- Enter your personal call limit and press Select. Your personal call limit is now stored on the phone.
Using Call Tariff
You can specify the price per call unit on your phone. This information is stored onto your phone's SIM card and the call meter uses the entered price to calculate the cost of your calls.
Setting the call tariff
You can enter the currency and the cost per unit of your tariff.
To set up the call tariff (Steps 1-7):
- Press
- Scroll to Call meter and press Select.
- Select Tariff and press Select.
- Select Settings and press Select.
- Enter your PIN2 code and press Select.
- Select the appropriate currency and press Select.
- Enter the price per unit and press Select.
Your tariff is now set.
Viewing the call tariff
To view the call tariff (Steps 1-4):
- Press
- Scroll to Call meter and press Select.
- Select Tariff and press Select.
- Select Show and press Select.
The call tariff is displayed.

The charge costs as displayed in the Charges menu are dependent on the network and service provider, while the tariff costs are dependent on the amount that you have entered in the Tariff menu.

Network
Setting the Network
Your phone automatically searches for the network of the company to which you have subscribed.
To change networks or to see a list of the available networks (Steps 1-4):
- Press
- Scroll to Network and press Select.
- Select Manual and press Select. A list of the available networks is displayed.
- Select the network of your choice and press Select.

To revert to automatic network selection select Automatic instead of Manual at Step 3 above.

Games
Your TS222i phone comes supplied with two games, Hurricane and Fillip.
Hurricane
The evil Zorac and its mindless followers are terrorising the universe. They are developing devices disturbing communication and interfering with human brainwaves. The Hurricane Space Fighters are mankind's only chance to survive. As a pilot you will need to manoeuvre through their fierce defence system and destroy their headquarters on planet Ivon ensuring continued prosperity of the human race.
Equipped with guns and missiles your objective is to kill as many of the enemy as possible while at the same time avoiding being hit. If you do get hit you will lose one life. Initially you start with 3 lives but if you last
long enough you will eventually be rewarded with additional lives and more powerful weapons.

The game has 3 different levels and each level is divided into stages. The farther you venture into the game the more resistance you will encounter.
If you manage to stay alive long enough you will be rewarded with extra lives and powerups. The power-ups increase the number of missiles you fire.
The enemies you encounter will fly in formation and try to hit you using their homing missiles. The farther you venture into the game, the more aggressive the enemies become.
Playing Hurricane
To play Hurricane (Steps 1-9):
- Press
- Scroll to Games and press Select.
- Select Hurricane and press Select.
- Select one of the options: Play or Instructions and press Select. Selecting Instructions displays the rules of the game.
- Select Play and press Select.
- Use the 4-Way keys to move your ship around the screen.
- Use the key to fire your guns.
- Use the key to fire your missiles.
- Press the right soft key to exit the game at any time.
Fillip
Having crash-landed in the jungle our hero Fillip must now collect the parts of his plane and assemble them so that he can continue his
voyage. The parts of his plane are scattered throughout the jungle and Fillip must collect all of them while at the same time avoiding getting killed by the wild animals.
When Fillip touches an enemy he loses energy. The longer he's in physical contact with the enemy, the more energy he loses. If he runs out of energy, he loses a life. Fillip has three lives, and if all are lost the game ends. However, if Fillip jumps and then hits the enemy from above, the enemy dies (except piranha fish which Fillip cannot kill).

You will see a small intro sequence showing Fillip crash-landing in the jungle. You can skip the intro at any time by pressing one of the keys 0 - 9 on the numerical keypad. The game will not start until you press a key.
The top line displays your current score, your health (measured in %), the number of airplane parts you have collected so far and the total number of airplane items you must collect before you can proceed to the next level. All levels begin at the far left and progress to the right. Fillip does not lose energy from falling from great heights.
The enemies and objects that you will encounter when playing are:
Airplane parts: Engine, propeller and wing.
Airplane parts: Glass and exhaust pipe.
Airplane parts: Chassis and wheel.
- Coin: Collect these to score more points.
- Egg: Collect these to get health points.
- Enemy: Spider.
- Enemy: Snake.
- Enemy: Mosquito.
- Enemy: Piranha fish.
Fillip must collect all airplane parts on a level before he can continue to the next level. That is, collect 3 parts on level 1, 2 parts on level 2 and 3 parts on level 3. Collect as many coins as you can in order to maximize your score. There is a time bonus for each level, the faster you complete a level, the bigger bonus you get. Collect eggs to score extra points and gain health points.
The animals Fillip encounters in the jungle are unfriendly to say the least. The longer Fillip is in physical contact with an enemy, the more energy he loses. If his energy level reaches 0% , Fillip dies. If he dies 3 times, the game is over. Fortunately, Fillip is not completely defenceless. If he jumps and lands on top of an animal, it dies: An exception to this rule is piranha fish which Fillip cannot kill.
If you manage to collect all airplane parts on all levels you can watch an end-sequence with Fillip taking off in his plane. The sequence can be interrupted at any time by pressing a key.
If you have scored enough points to enter the high score list you will be prompted for your name. Use the left and right 4-way keys to select a letter. A letter is selected when it appears in the flashing square. If you press the jump (Up) key when the letter is selected, it will appear on the dotted line. You can delete one or more letters by selecting the symbol. When you are done, finish by selecting the symbol. The game will then enter the main menu. If you select High scores you should see your name.
Playing Fillip
To play Fillip (Steps 1-7):
- Press
- Scroll to Games and press Select.
- Select Fillip and press Select.
- Select one of the options: Play or Instructions and press Select. Selecting Instructions displays the rules of the game.
- Select Play and press Select.
- Use the 4-way keys to move Fillip:
Up: Cursor up - Down: Cursor down
- Centre: Select
- Right: move (scroll) right
-
Left: move (scroll) left
Up: jump -
Press the right soft key to quit the game at any time.

My Stuff
This menu gives you access any of the following:
Tones and Melodies
Images
- Animations
- Bookmarks
Memory
Tones and Melodies
To listen to a tone or melody (Steps 1-4):
- Press
- Scroll to My Stuff and press Select
- Select Melody and press Select. A list of your tones and melodies is displayed.
- Select a sound to hear it play. You do not have to press Select.
Rename a Melody
To rename a tone or melody (Steps 1-4):
- Highlight the tone or melody that you want to rename and press the Menu soft key.
- Select Rename and press Select.
- Type in the new name (max 20 character) and press Select.
- You will be returned to the tones and melodies screen.

Preloaded content cannot be renamed.
Send a Melody via Mail/MMS
To send a tone or melody (Steps 1-10):
- Highlight the tone or melody that you want to send and press the Menu soft key.
- Select Send via Mail and press Select.
- Select the Subject field. When it is selected there will be a blue box around it.
- Press Select, enter the subject and press Select.
- Press Down and select the Address field. When it is selected there will be a blue box around it.
- Press Select to open the Address field, enter the address and press Select to return to theCompose mail page. or
Press , select Open phonebk to view your phonebook, select a name and press Select.

You need to press

to exit out ofComposeMail.
- Press Down and select and select the Message field. When it is selected there will be a blue box around it.
- Press Select to open the message field, enter the message and press Select.
- Press Down and select the Send field. When it is selected the box will turn blue.
- Press Select to send the email.
To set a tone or melody as a ringtone
To set a tone or melody as a ringtone (Steps 1-5):
- Highlight the tone or melody that you want to send and press the Menu soft key.
- Select Set as ringtone and press Select
- Select the profile that you want to associate this ringtone with, See "Activating a Profile" on page 24:
Normal
Meeting
- Indoor
- Outdoor
Car
- Select the service that you want to associate this ringtone with:
Voice
- Messages.
- Mail/MMS.
- Press Select.
Show detail
To view the details of a tone or melody (Steps 1-3):
- Highlight the tone or melody that you want to view the details of, and press the Menu soft key.
- Select Show Details and press Select
-
The next screen list the details of the selected tone or melody:
-
Format.
Size.
Time and Date.
Delete a tone or melody
To delete a tone or melody (Steps 1-4):
- Highlight the tone or melody that you want to delete and press the Menu soft key.
- Select Delete and press Select.
- Press the No soft key if you don't wish to delete it at this time. or
- Press the Yes soft key to delete it now. If you don't press the Yes key within 10 seconds you will be returned to the Tones and Melodies screen.
Viewing images
To display an image (Steps 1-5):
- Press
- Scroll to My Stuff and press Select.
- Select Image and press Select. A list of your images is displayed.
Rename an image
To rename an image (Steps 1-4):
- Highlight the image that you want to rename and press the Menu soft key.
- Select Rename and press Select.
- Type in the new name (max 20 character) and press Select.
- You will be returned to the Images screen.

Preloaded content can not be renamed.
Send an image via Mail/MMS
To send an image (Steps 1-10):
- Highlight the image that you want to send and press the Menu soft key.
- Select Send via Mail and press Select.
- Select the Subject field. When it is selected there will be a blue box around it.
- Press Select, enter the subject and press Select.
- Press Down and select the Address field. When it is selected there will be a blue box around it.
- Press Select to open the Address field, enter the address and press Select to return to theCompose mail page. or
Press , select Open phonebk to view your phonebook, select a name and press Select.
- Press Down and select and select the Message field. When it is selected there will be a blue box around it.
- Press Select to open the message field, enter the message and press Select.
- Press Down and select the Send field. When it is selected the box will turn blue.
- Press Select to send the email.
To set an image as wallpaper
To set an image as wallpaper (Steps 1-4):
-
Highlight the image that you want to set and press the Menu soft key.
-
Select Set as wallpaper and press Select
- The image will be displayed, press the Yes soft key to accept it. or
- Press the No soft key to select another image.
Show detail
To view the details of an image (Steps 1-2):
- Highlight the image that you want to view the details of and press the Menu soft key.
- Select Show Details and press Select
-
The next screen list the details of the selected image:
-
Format.
- Resolution and Size.
Time and Date.
Delete an image
To delete an image (Steps 1-4):
- Highlight the image that you want to delete and press the Menu soft key.
- Select Delete and press Select.
- Press the No soft key if you don't wish to delete it at this time. or
- Press the Yes soft key to delete it now. If you don't press the Yes key within 10 seconds you will be returned to the images screen.
Viewing animations
To display an animation (Steps 1-5):
- Press
- Scroll to My Stuff and press Select.
- Select Animation and press Select. A list of your animations is displayed.
- Select an animation and press Select to display it.
- Press the Back soft key to return to the list of animations.
Rename an animation
To rename an animation (Steps 1-4):
- Highlight the image that you want to rename and press the Menu soft key.
- Select Rename and press Select.
- Type in the new name (max 20 character) and press Select.
- You will be returned to the Images screen.
Send an animation via Mail/MMS
To send an animation (Steps 1-10):
- Highlight the image that you want to send and press he Menu soft key.
- Select Send via mail and press Select
- Select the Subject field. When it is selected there will be a blue box around it.
- Press Select, enter the subject and press Select.
- Press Down and select the Address field. When it is selected there will be a blue box around it.
- Press Select to open the Address field, enter the address and press Select to return to theCompose mail page. or
Press , select Open phonebk to view your phonebook, select a name and press Select.
- Press Down and select and select the Message field. When it is selected there will be a blue box around it.
- Press Select to open the message field, enter the message and press Select.
- Press Down and select the Send field. When it is selected the box will turn blue.
- Press Select to send the email.
To set an animation as a screenshot
To set an animation as wallpaper (Steps 1-3):
- Highlight the image that you want to set and press he Menu soft key.
- Select Set as screenshot and press Select
- The image will be displayed, press the Yes soft key to accept it. or
- Press the No soft key to select another image.
Show detail
To view the details of an animation (Steps 1-2):
- Highlight the image that you want to view the details of and press he Menu soft key.
- Select Show Details and press Select
-
The next screen lists the details of the selected image:
-
Format.
- Resolution and Size.
Time and Date.
Delete an animation
To delete an animation (Steps 1-4):
- Highlight the image that you want to delete and press the Menu soft key.
- Select Delete and press Select.
- Press the No soft key if you don't wish to delete it at this time. or
- Press the Yes soft key to delete it now. If you don't press the Yes key within 10 seconds you will be returned to the images screen.
Viewing Bookmarks
To display your Bookmarks (Steps 1-5):
- Press
- Scroll to My Stuff and press Select.
- Select Bookmarks and press Select. A list of your bookmarks is displayed.
Menu
To perform the bookmark options.
- Select a bookmark and press Select to display it.
-
Press the Menu soft key to display the bookmark menu which has the following options:
-
Open.
-
Copy address.
Edit title. -
Compose mail.
- Delete one.
Open
- Select Open and press Select to display the highlighted bookmark.
Copy address
- Select Copy address and press Select. The address is copied onto the phone's clipboard; you can now paste the address into any message.
Edit title
- Select Edit title and press Select to open the highlighted bookmark in edit mode.
- Edit the details and press the Save soft key to keep your changes.

If you press the Back soft key without pressing the Save soft key first, your changes will not be saved.
Compose mail
- Select Compose mail and press Select.
- See "Sending emails" on page 34.
Delete one
- Select Delete one and press Select.
- Press the No soft key if you don't wish to delete it at this time. or
- Press the Yes soft key to delete it now. If you don't press the Yes key within 10 seconds you will be returned to the menu screen.
Viewing available Memory
To view the available memory (Steps 1-5):
- Press
- Scroll to My Stuff and press Select.
-
Select Memory and press Select.
-
Memory allocation is shown for:
Melodies.
Images
- Animations.
Available memory is displayed, for example 15/50, would mean that you have 15 items stored out of a possible maximum of 50 (depending upon the file size).
- Press the Back soft key to return to My Stuff.
Troubleshooting
This section addresses some of the error messages you might see and explains what to do if you encounter them.
Message
Problem and suggested solution

Send Failure
Your message has not been sent. This could be due to network conditions. Try re-sending the message.

Save Failure
Your phone was unable to save the requested item. This could be because you are using the wrong memory. See "Phone Book Memories" on page 17 for more information.

Wrong PINI
You have entered the wrong PIN1. See "Unblocking your SIM card" on page 48 for more information.

Wrong PIN2
You have entered the wrong PIN2, see "PIN Settings" on page 48 for more information.
Message
Problem and suggested solution

Search Network Failure
Your phone is unable to locate a network. Try again later. If this condition persists contact your service provider.

SIM Full
Your SIM card is unable to store any more data. You should delete any unnecessary messages and telephone numbers.

Call Failure
For some reason (for example, network conditions) your call has been 'dropped'. Try reconnecting.

Connect Failure
Your phone is unable to connect to an i-mode service. This could be because you are outside an i-mode broadcast area.

Wrong Password
Try again later when the symbol is displayed.

Number Not Permitted
You have entered the wrong password. Enter the correct password. See "Phone Password" on page 48 for more information about your password.
You have attempted to dial a barred number. See "Call Barring" on page 49 for more information.
DECLARATION OF CONFORMITY
We, Toshiba Information Systems UK (Ltd), Mobile Communications Division
of
of Toshiba Court
Weybridge
Addleston
Weybridge KT15 2UL
declare under our sole responsibility that the product
T
Type (Model) Nami GSM/DCS Termi
COMBUSTORS TERM
to which this declaration relates, is in conformity with the following standards and/or other normative documents.
EN 301 511, EN 301 489-1, EN 301 489-07, EN 60950 and EN 50360
We hereby declare that all essential radio test suites, EMC & safety requirements have been carried out and that the above named product is in conformity to all the essential requirements of Directive 1999/5/EC.
The conformity assessment procedure referred to in Article 10(5) and detailed in Annex IV of Directive 199/5/EC has been followed with the involvement of the following Notified Body(ies):
BABT, Claremont House, 34 Molesey Road, Walton-on-Thames, KT12 4RQ
Identification mark: 0168
The technical documentation relevant to the above equipment will be held at:
Toshiba Information Systems UK (Ltd), Mobile Communications Division Riverside Way, Camberley, Surrey, GU15 3YA
Name:- Toshiharu Hirose
Title:- Deputy Managing Director Mobile Communications Division
Signature:

m - 1 0 ;
INDEX
A
adding
member to groups 16
alarm clock
cancelling an alarm 6
setting 6
turning an alarm off 6
Animations
deleting 56
renaming 55
sending via mail 56
setting as screenshot 56
viewing 55
viewing detail 56
assigning
speed dials 18
auto key lock 47
B
battery 4
charging 5
icons 4
information 1
battery charger
disconnecting 5
bookmarks 32
accessing webpages from 32
changing title 32
deleting 33
viewing 56
webpages 32
broadcast
adding topics 29
deleting a topic 29
reading messages 29
selecting language 29
turning all messages on/off 29
turning single messages on/off
29
C
calendar
navigating 43
notes 44
using 43
call barring 49
turning on/off 49
viewing status 49
call charges meter
clearing 50
using 50
viewing cost of all calls 50
viewing cost of last call 50
viewing maximum charge 50
call history
clearing 23
call holding 19
cancelling 19
making a new call during 19
call meter 49
call tariff
setting 51
using 51
viewing 51
call timer
clearing 50
using 49
viewing call duration 50
call transferring 20
calls
ending 12, 21
holding 19
making 12
muting 22
receiving 12
rejecting 12
retrieving 19
speed dialling 12
swapping 19
unmuting 22
care & maintenance 2
clock
setting 5
clock display
setting 6
setting the format 6
conference calls 20
adding a new participant 20
creating 20
holding 21
menu 20
retrieving 21
using the phone book during 21
copying
memory to memory 17
cost limit
setting 50
creating
groups 16
cutting, copying and pasting 11
D
date
setting 6
date display
setting the format 7
deleting
email 37
entire group 16
members from groups 16
notes 45
phone book entries 15
saved webpages 34
display settings 45
back light 47
partial display 47
screen saver 46
start-up greeting 46
wallpaper 46
E
editing
group title 17
groups 16
notes 44
phone book entries 15
sent email 37
email 34
attaching header 35
attaching ring tone 34
attaching signature 34
copying and pasting 36
deleting 37
editing sent mail 37
forwarding 35
mailboxes 35
opening 35
protecting from deletion 35
replying 35
saving address of sender 36
sending 34
settings 37
email settings
checking 38
editing headers and signatures
37
editing signature 38
setting reply markers 38
turning auto-reception on/off 38
emergency key 9 47
ending a call 12
ending calls 21
entering text
cutting, copying and pasting 11
entering text and numbers 10
inserting symbols 11
erasing speed dials 18
F
factory reset 47
fixed dialling numbers 49
forwarding
email 35
4-way key 9
G
Games 51
Fillip 52
Hurricane 51
groups 16
adding members 16
creating 16
deleting entire group 16
deleting members 16
editing 16
editing title 17
H
holding calls 19
cancelling 19
1
icons 13
Image
viewing 54
Images
deleting 55
renaming 54
sending via mail 55
set as wallpaper 55
viewing detail 55
i-mode
history 31
in-page options 31
settings 43
starting 31
i-mode settings
defining host 43
selecting host 43
in-call menu 18
in-call options 18
in-page options 31
go to another webpage 32
page info 32
reloading 32
saving an image 32
K
key settings 47
auto key lock 47
emergency key 9 47
key lock 47
keypad
locking/unlocking 10
keys 7
functions 8
quick keys 9
soft keys 9
L
language
setting 45
M
maintenance 2
making calls 12
Melody
delete 54
rename 53
send via mail 53
set as ringtone 54
show detail 54
Memory
viewing available 57
memory 17
copying 17
selecting 17
viewing status 17
message centre 28
message settings 28
format 28
receipt request 28
valid time 28
messages
checking message count 28
composing 25
deleting 27
deleting all messages 30
editing 27
forwarding 27
modifying 26
replying to 27
saving 25
saving sender's number 27
sending 25
sending unsent 27
using during calls 22
muting 22
ending a call during 22
using the main menu during 22
N
navigating
calendar 43
menu system 9
network
setting 51
notes 44
deleting 45
editing 44
entering 44
maximum 44
sending 45
setting an alarm 44
viewing 44
viewing all 45
0
opening email 35
P
Phone book
deleting entries 15
phone book
groups 16
icons 13
memories 17
searching 15
using during calls 22
phone settings
reset 47
PIN
changing 48
entering 5
request 5
turning request on/off 48
PIN Settings 48
playing
ring tone attachments 36
predictive text
about 11
turning on/off 11
profiles 24
activating 24
customising 24
Q
quick keys 13
R
receiving calls 12
replying
email 35
retrieving calls 19
ring settings 14
ring tones
attachments 36
s
safety guidelines 1
saved webpages
changing title 33
deleting title 34
saving
email address of mail sender
36
message sender's number 27
ring tone attachments 36
webpages 33
screen icons 13
screen saver 46
turning on 46
viewing 46
Screensaver
setting animation as 56
Search menu
using 19
security features 48
selecting
memory 17
sending
email 34
notes 45
service numbers 18
setting
alarm 6
clock display 6
date 6
date format 6
language 45
network 45
time 6
settings
i-mode 43
i-mode mail 37
messages 28
PIN48
SIM card 3
inserting 3
unblocking 48
simultaneous calls
handling 18
soft keys 9
SOS soft key 2
speed dialling 12
activating 18
speed dials 17
assigning 18
erasing 18
swapping calls 19
T
T9
turning on/off 11
time
setting 5
transferring calls 20
troubleshooting 57
two-call menu 20
U
unblocking
SIM 48
unmuting 22
V
voice mail 30
voice mailbox
calling 30
changing number 30
W
wallpaper 46
turning on 46
viewing 46
warranty 2
webpages
accessing 31
accessing directly 31
accessing from history 31
accessing saved 33
bookmarking 32
in-page options 31
saving 33
saving images 33