KIAK1240 - Alarme voiture American International - Free user manual and instructions
Find the device manual for free KIAK1240 American International in PDF.

User questions about KIAK1240 American International
0 question about this device. Answer the ones you know or ask your own.
Ask a new question about this device
Download the instructions for your Alarme voiture in PDF format for free! Find your manual KIAK1240 - American International and take your electronic device back in hand. On this page are published all the documents necessary for the use of your device. KIAK1240 by American International.
USER MANUAL KIAK1240 American International
text_image
K1240 Mounting KitVEHICLE APPLICATIONS
KIA
2001-05 OPTIMA
2001-05 RIO
2002-05 SEDONA
1999-02 SEPHIA
2000-03 SPECTRA
1998-02 SPORTAGE
DASH DISASSEMBLY
- Remove the (2) Phillips screws above the instrument panel gauges.
- Remove the (3) Phillips screws from the bottom side of the steering wheel column.
- Carefully remove the steering column cover.
- Carefully unsnap the Radio/ instrument cluster trim panel.
- Disconnect all harnesses from the instrument trim panel, and remove the trim panel.
- Remove the (4) Phillips screws securing the radio to the sub-dash.
-
Carefully pull the radio forward, disconnect the wire harness and antenna lead and remove the radio.
-
Remove the ashtray.
- Remove the (1) Phillips screw from inside the ashtray location.
- Remove the button on the lever below the heater, A/C control knobs.
- Gently unsnap the trim from around the Radio/ heater A/C controls and remove.
- Remove the (2) Phillips screws securing the radio to the sub-dash.
- Carefully pull the radio forward, disconnect the wire harness and antenna lead and remove the radio.
2001-05 Kia Rio
DASH DISASSEMBLY
1998-2002 Kia Sephia/ 2000-01 Kia Spectra 2001-05 Rio
For 2002-03 Spectra Kit Assembly Instructions see page 5
KIT ASSEMBLY INSTRUCTIONS
DIN & SHAFT MOUNT RADIOS
text_image
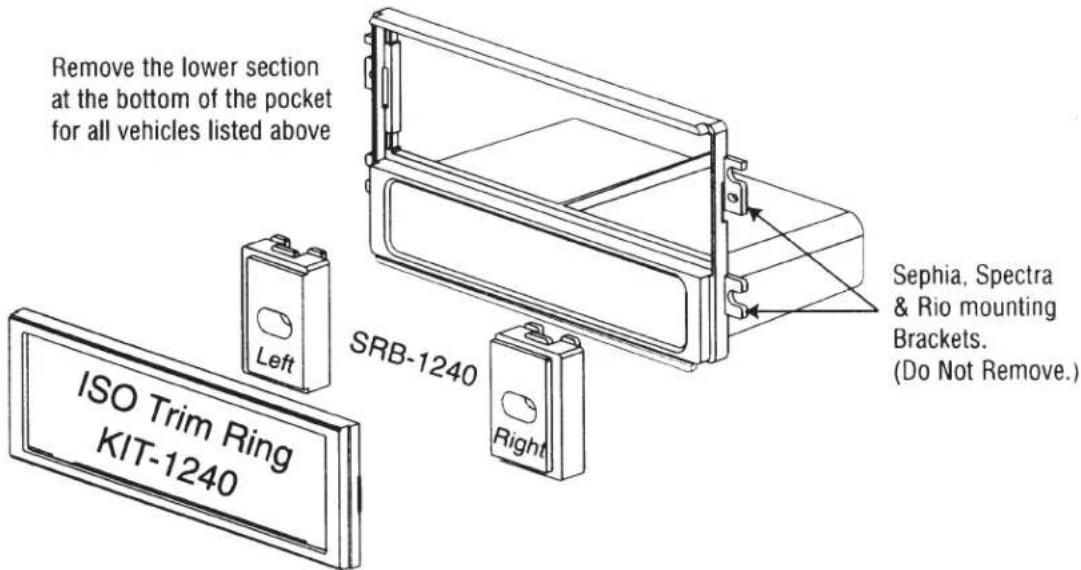
Remove the lower section at the bottom of the pocket for all vehicles listed above Left ISO Trim Ring KIT-1240 SRB-1240 Right Sephia, Spectra & Rio mounting Brackets. (Do Not Remove.)ISO MOUNT ASSEMBLY INSTRUCTIONS
ISO MOUNT RADIOS ONLY
- Remove mounting tabs from both sides of ISO mount brackets for these vehicle applications.
- Insert shift spacers into ISO mount brackets (see Figure A).
- Attach left and right ISO mounting brackets to main bracket.
- Install ISO trim ring into main bracket.
- Install radio into kit using screws supplied with radio (do not tighten screws at this time).
- Adjust radio forward or backward for best look.
- Tighten screws after adjusting radio.
text_image
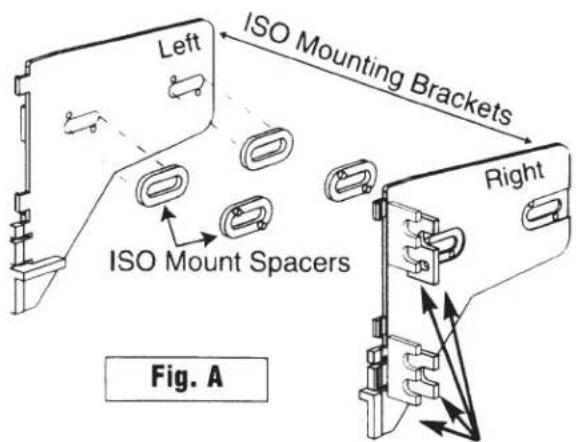
Left ISO Mounting Brackets ISO Mount Spacers Right Fig. ARemove All mounting tabs on left & right brackets for all vehicles listed above
1998-2000 Kia Sportage
DASH DISASSEMBLY
- Carefully unsnap the trim bezel from around the Radio/ heater/ A/C controls, disconnect all harnesses and remove the trim.
- Remove the (4) Phillips screws securing the radio to the sub-dash.
- Carefully pull the radio forward, disconnect the wire harness and antenna lead and remove the radio.
2001-02 Kia Sportage
DASH DISASSEMBLY
- Remove the (2) Phillips screws above the instrument gauges.
- Carefully unsnap the center Heater/ A/C vent panel, disconnect all harnesses and remove.
- Remove the (1) Phillips screw from the far left side of the dash (you must open the driver door to access this screw)
- Loosen the nut on the hood release cable from under the dash, and remove the (2) Phillips screws from beside the hood latch.
-
Remove the (2) upper top beauty covers hiding the 5/16 plastic bolts from the panel below the steering column. (CONT.)
-
Remove the (2) upper 5/16 plastic bolts from this panel, and loosen the (2) lower plastic bolts to allow access to the (1) phillips screw securing the left sidepanel (with pocket). Remove this (1) Phillips screw and remove the side trim panel.
- Remove the (1) Phillips screw from under the edge of the dash below the dimmer control.
- Remove the (3) Phillips screws from the bottom of the steering column cover, and remove the top and bottom covers.
- Remove the (1) Phillips screw from under the upper edge of the dash in the center of the radio opening.
- Remove the (2) Phillips screws securing the drink tray to the dash panel and remove the drink tray.
- Carefully unsnap the dash trim and disconnect all harnesses and remove.
- Remove the (4) Phillips screws securing the radio to the sub-dash.
- Carefully pull the radio forward and disconnect the wire harness and antenna lead from the radio and remove radio.
2002-03 Kia Spectra
KIT ASSEMBLY INSTRUCTIONS
DIN, SHAFT, & ISO MOUNT RADIOS
text_image
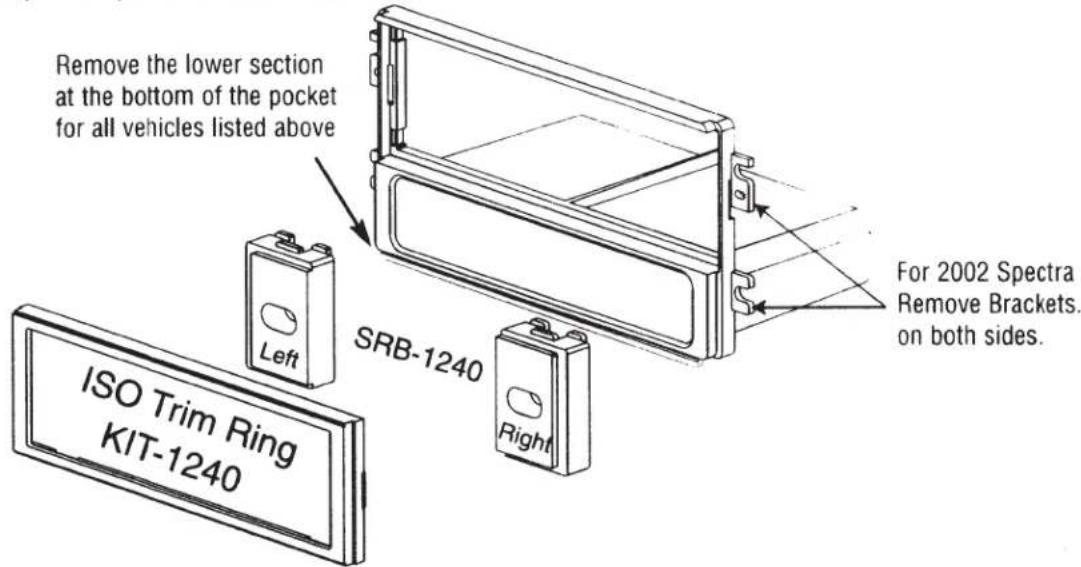
Remove the lower section at the bottom of the pocket for all vehicles listed above Left SRB-1240 Right For 2002 Spectra Remove Brackets. on both sides. ISO Trim Ring KIT-1240DIN & ISO MOUNT RADIOS
For DIN mount radios follow steps 1, 2, & 4 only. For ISO mount installation follow all steps 1 thru 7.
- Remove the rear mounting tabs from both sides of mount brackets for this vehicle application (see Figure A).
- See note in Figure B.
- Only insert ISO spacers when ISO mounting radio. Insert spacers into ISO mount brackets (see Figure A).
- Attach left and right mounting brackets to main bracket.
- Install ISO trim ring into main bracket.
- Install radio into kit using screws supplied with radio (do not tighten screws at this time).
- Adjust radio forward or backward for best look.
- Tighten screws after adjusting radio.

text_image
Left ISO Mounting Brackets ISO Mount Spacers Right Remove Rear mounting tabs on left & right brackets for 2002-03 Spectra Fig. A
text_image
LEFT BRACKET CUT OR TRIM PLASTIC 5/16" INWARD FROM THE OUTER EDGE OF THE LOWER MOUNTING TABS AS ILLUSTRATED ON BOTH LEFT AND RIGHT MOUNTING BRACKETS SHOWN IN FIGURE B 5/16" 5/16" RIGHT BRACKET Fig. B1998-2002 Kia Sportage
KIT ASSEMBLY INSTRUCTIONS
DIN & SHAFT MOUNT RADIOS
text_image
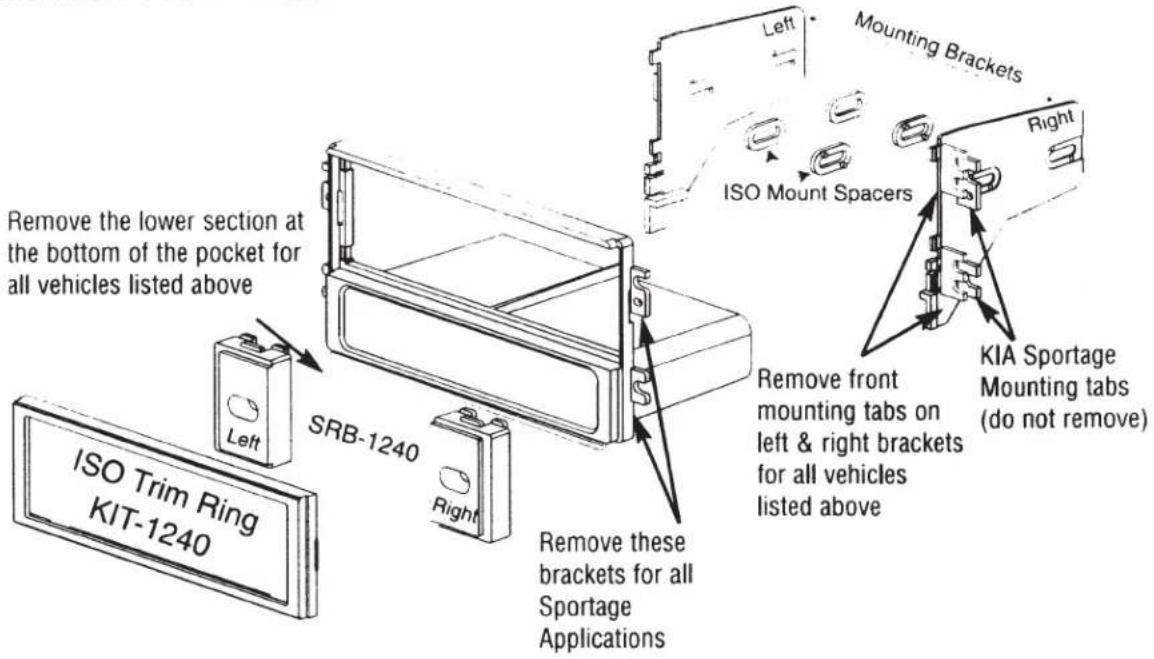
Remove the lower section at the bottom of the pocket for all vehicles listed above ISO Trim Ring KIT-1240 SRB-1240 Left Right Mounting Brackets ISO Mount Spacers Remove front mounting tabs on left & right brackets for all vehicles listed above Remove these brackets for all Sportage Applications KIA Sportage Mounting tabs (do not remove)ISO MOUNT ASSEMBLY INSTRUCTIONS
ISO MOUNT RADIOS ONLY
- Insert shaft spacers into ISO mount brackets (see Figure B).
- Attach left and right ISO mounting brackets to main bracket.
- Install ISO trim ring into main bracket.
- Install radio into kit using screws supplied with radio (do not tighten screws at this time).
- Adjust radio forward or backward for best look.
- Tighten screws after adjusting radio.

text_image
Left ISO Mounting Brackets ISO Mount Spacers Right Do NOT Remove rear tabs Fig. B Remove Front mounting tabs on left & right brackets for all vehicles listed above2001-05 Kia Optima
DASH DISASSEMBLY
- Open the ashtray.
- Starting at the bottom, carefully unsnap the trim bezel around the radio.
- Disconnect all harnesses from the climate controls, hazard button and clock and remove the trim bezel.
- Remove the (4) phillips screws securing the radio to the sub-dash.
- Pull the radio forward, disconnect the wire harness and antenna lead and remove the radio.
KIT ASSEMBLY INSTRUCTIONS
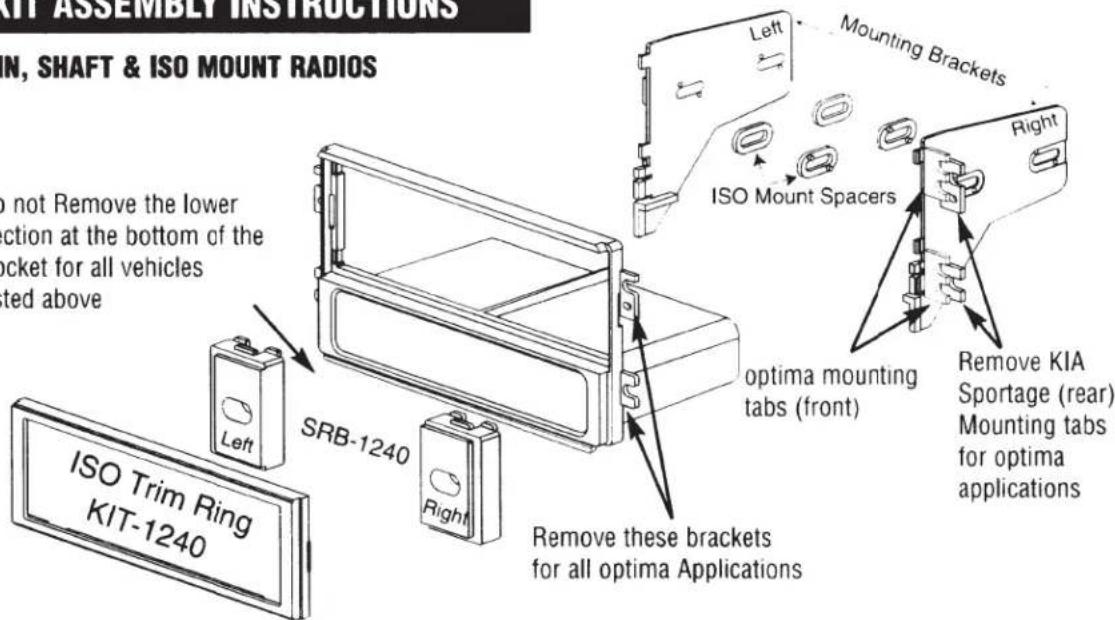
DIN, SHAFT & ISO MOUNT RADIOS
do not Remove the lower section at the bottom of the pocket for all vehicles listed above
text_image
KIT ASSEMBLY INSTRUCTIONS N, SHAFT & ISO MOUNT RADIOS do not Remove the lower action at the bottom of the bucket for all vehicles ted above Left Mounting Brackets ISO Mount Spacers Right SRB-1240 optima mounting tabs (front) Remove KIA Sportage (rear) Mounting tabs for optima applications ISO Trim Ring KIT-1240 Remove these brackets for all optima ApplicationsDASH DISASSEMBLY
- Set the emergency brake.
- Open the ashtray lid and remove the ash cup.
- Remove the (1) Phillips screw from under the ash cup location.
- Carefully unsnap the ashtray assembly / dash trim bezel, disconnect all harnesses from the ashtray / lighter assembly and remove the trim.
- Remove the (4) Phillips screws securing the climate control panel to the sub-dash.
- Turn the ignition key to the on position, depress the brake pedal and place the shift lever in the LOW position.
- Carefully pull the Climate control panel / vent assembly forward, disconnect all harnesses connected to the control panel / vent assembly, and remove the panel.
- Remove the (4) Phillips screws securing the factory radio to the steel sub-dash frame.
- Gently pull the radio forward, disconnect the wire harness and antenna lead, and remove the radio.
KIT ASSEMBLY INSTRUCTIONS
DIN, SHAFT & ISO MOUNT RADIOS

text_image
Remove the lower section at the bottom of the pocket for vehicle listed above SRB-1240 Left Right Mounting Brackets ISO Mount Spacers Remove front tabs Do not Remove rear tabs Remove these brackets for all optima Applications ISO Trim Ring KIT-1240For information about other American International automotive accessories visit our website at:
http://www.americaninternational.net