GEC5 - Hi-Fi System KORG - Free user manual and instructions
Find the device manual for free GEC5 KORG in PDF.

User questions about GEC5 KORG
0 question about this device. Answer the ones you know or ask your own.
Ask a new question about this device
Download the instructions for your Hi-Fi System in PDF format for free! Find your manual GEC5 - KORG and take your electronic device back in hand. On this page are published all the documents necessary for the use of your device. GEC5 by KORG.
USER MANUAL GEC5 KORG
TEACHING WITH THE KORG
GEC5
A Practical Guide to Using the Korg GEC5 in the Classroom
OVERVIEW OF TECHNOLOGY IN THE CLASSROOM 03
HARDWARE OVERVIEW
04
INTRODUCTION
TEACHER UNIT FRONT
TEACHER UNIT BACK
STUDENT INTERFACE UNIT FRONT
STUDENT INTERFACE UNIT BACK
SET UP OVERVIEW
WIRED TEACHER WORKSTATION
WIRELESS TEACHER WORKSTATION
KEYBOARD OR PIANO LAB
KEYBOARD OR PIANO LAB WITH COMPUTER
GUITAR LAB
GUITAR LAB WITH COMPUTER
LANGUAGE LAB
MULTI-PURPOSE TECHNOLOGY LAB
SOFTWARE CONTROL APPLICATION
INSTALLING THE APPLICATION
WINDOWS COMPUTER
MAC COMPUTER
IPAD
ANDROID TABLET
ROOM SETUP
TEACHER AND CLASS SETUP
CALL BUTTON
GEC5 MODES OF FUNCTIONALITY
LECTURE MODE
PRACTICE MODE
GROUP MODE
ALL CALL
INSTALLATION 30
THE PLANNING STAGE
SITE PLAN CHECKLIST
CABLING ESTIMATES AND REQUIREMENTS
SIZING CABLES
POSITIONING EQUIPMENT
MOUNTING THE STUDENT INTERFACE UNITS
POSITIONING THE TEACHER UNIT
CONNECT CABLING
MORE ON THE CAT5 CABLES
SETTING UP THE APPLE AIRPORT EXPRESS/EXTREME WI-FI NETWORK
TROUBLESHOOTING
The purpose of technology in the classroom is to improve instruction. I simply don't believe in technology for the sake of technology. When looking at a piece of music tech gear, I'm always trying to evaluate and develop ways to use the gear as a tool to teach a musical concept in a more efficient and/or interesting manner. Music technology, in particular, has the ability to make musical concepts more accessible to students and can serve as the "on ramp" to a lifelong appreciation of music. Sure, any student can drag in loops to make a beat using music production software, but in my classroom I use loops to teach the concepts of form and texture. The piano keyboard is often an intimidating piece of music making equipment, however, by starting with some simple percussion rhythm, venturing to a 2-note bass line, and finally playing notated melodies, students can slowly get their feet wet and eventually feel comfortable playing on the keyboard.
Some pieces of gear go beyond teaching a concept and actually allow a classroom to function. Over my 13 years of teaching music technology both in high school and higher education, the one indispensable piece of gear that makes my classroom work is the Korg GEC. Administrators are always amazed at how quiet my classroom is and how efficiently I can address student needs and differentiate my instruction. Students can work independently, interact 1-on-1 with the teacher, share audio with the class, and work collaboratively with a peer. The GEC is the audio nerve center of my classroom and provides the perfect teaching environment for all audio-based activities.
The GEC has steadily improved over the years and the new GEC5 is a dramatic upgrade. The GEC5's rack-mounted Teacher Unit and a computer/tablet application provide a much more user-friendly environment. With the addition of a wireless router, the teacher can manage the classroom while walking around the room with an iPad or Android tablet. Students no longer need proprietary T4 headphone connections and can instead use standard 3.5mm jack headphones (including iPhone style headphones with microphones!).
The goal of this text is to provide teachers with the practical functionality of all aspects of the GEC5 from a teacher's perspective. I hope it will serve as a teaching resource as you begin managing your class with the GEC5. I will start with a brief overview of the student interface units, rack-mounted Teacher Unit, and how to make all of the connections. Next, I will delve into the software that controls the GEC5. The GEC5 Controller application is available for Mac/Windows and iPad/Android tablets. Finally, I will conclude with an appendix discussing the layout of the lab, a site plan checklist, and step-by-step instructions on how to install the Korg GEC5 system. Throughout the text, I include numerous TIP boxes that offer real-world advice from my years of working with the GEC Learning System in the classroom.
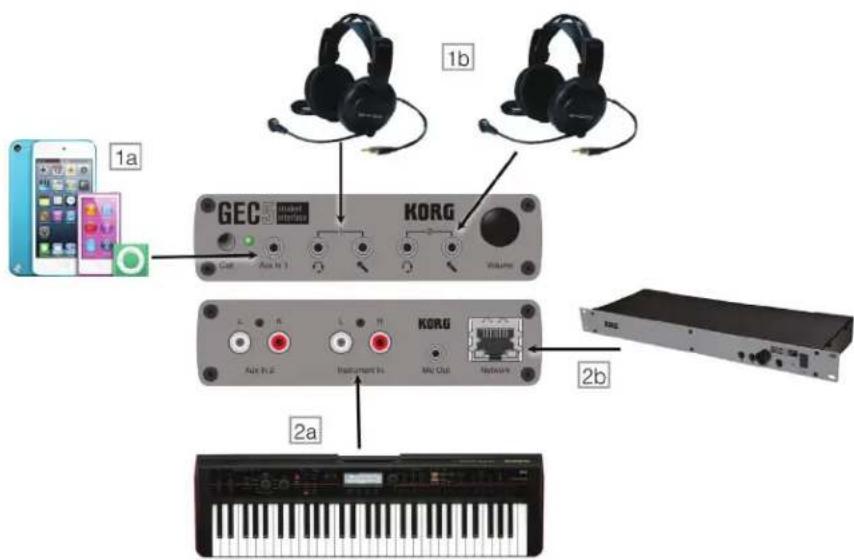
The GEC5 lab system hardware consists of a single rack-mountable Teacher Unit and one Student Interface Unit per student workstation in your classroom. The Teacher Unit comes with an external power supply that you will plug into an electrical outlet and the Student Interfaces are powered by the Teacher Unit via Cat5 cables.
Teacher Unit Front:
Examine the front of the Teacher Unit (see Fig. 1). With the exception of the Call Button, the Teacher Unit front is very similar to the Student Interface Unit front.

text_image
KORG GEC5 Worker set Powerless in line(Fig. 1)
- Headphone Input: Connect the teacher headphones here for audio playback and microphone communication. Similar to Student Interface Units, teachers can connect any standard 3.5mm headphones to the Headphone Input jacks. If the headphones include a microphone (such as the Koss SB40 headphones), connect the 3.5mm mic cable from the headphones to the microphone input jack. It is especially important for the teacher to have a headset with attached microphone to improve hands-free class communication.
- Volume Knob: Rotate the knob clockwise to increase the overall volume in the teacher headphones. Rotate the knob counter-clockwise to decrease the overall volume.
NOTE: The teacher volume knob does not impact the volume output of the teacher microphone or Aux inputs to the students. In other words, if the teacher increases the volume with the volume knob it will only impact the volume to the teacher headphones and this will have zero impact on the volume of teacher devices to the student stations.
- Aux In 1: This is a stereo input to connect any external device such as a laptop, tablet, or MP3 player.
TIP: Connect a stereo 3.5mm male to stereo 3.5mm male cable and leave this connected at all times. Teachers can then easily incorporate sound from an external device and broadcast this sound to all student workstations without having to reach to the back of the Teacher Unit. I suggest keeping this cable connected to a device (MP3 player, iPod, laptop, etc.) at all times to avoid unwanted noise.
- Power: Toggle the switch to turn the power on or off.
TIP: I suggest shutting down the Teacher Unit when it will not be in use for an extended period of time. I usually turn the Teacher Unit on first thing in the morning and off at the end of my teaching day.
TIP: Be sure to turn off your classroom speakers and/or the power amplifier for your speakers before turning off the Teacher Unit. This will avoid popping sounds from your speaker that can damage your speakers over time. Generally, turn the speakers and/or power amp ON last and OFF first.
Teacher Unit Back:
Examine the back of the Teacher Unit (see Fig. 2). You can connect up to 32 student stations to the back of the Teacher Unit using CAT5 cables (see #6). You do not need to connect all 32 stations; simply use as many student workstations as you have in your classroom.

text_image
KORG Power Network Fork Power Honey GND 1 2 3 4 5 6 7 8 9 10 11 12 13 14 15 16 17 18 19 20 21 22 23 24 25 26 27 28 29 30 31 32 33 34 35 36 37 38 39 40(Fig. 2)
- Power: Connect the AC adapter to the power jack. Connect the included 3-prong cable to the AC adapter and then into a standard 3-prong wall outlet.
TIP: The 3-prong cable is a standard cable that often comes with other electronic devices such as monitor speakers and computer towers. These cables are interchangeable.
-
Instrument Input: Connect your teacher instrument to this input. You will mostly likely need dual TS male 1/4" (out of your instrument) to dual TS male 1/4" (into Teacher Unit). Be sure to check the user manual of your instrument to confirm the proper cabling for your specific device.
-
Aux In 2: This is a stereo input to connect any external device to the Teacher Unit. Most commonly you will use this jack for the teacher computer or audio interface. If you are going directly from the teacher computer to the Teacher Unit, you will need a stereo 3.5mm male (out of your computer) to stereo 3.5mm male (into Teacher Unit). If you are using an audio interface you will mostly likely need dual TS male 1/4" (out of your interface) to stereo 3.5mm male (into Teacher Unit). Be sure to check the user manual of your audio interface to confirm the proper cabling for your specific device.
-
Room Out: Connect your room speakers to this jack.
a. If you have active (self-powered) speakers, use two cables (for Left/Right stereo sound) with a balanced (TRS) 1/4" (into Teacher Unit Room Out) to the required input of your active speakers. Most commonly your active speakers will require a balanced (TRS) 1/4" male or XLR male cable.
b. If you have passive (unpowered) speakers, use two cables (for Left/Right stereo sound) with a balanced (TRS) 1/4" (into Teacher Unit Room Out) to the required input of your power amplifier. Most commonly your power amplifier will require a balanced (TRS) 1/4" male or XLR male cable. Then, connect your power amp to your passive speakers.
TIP: Turn your power amp or active speakers ON last and OFF first to avoid pops.
- Record Out: This jack allows you to record the overall output of the Teacher Unit. Use two cables (for Left/Right stereo sound) with a balanced (TRS) 1/4" (into Teacher Unit Record Out) to the required input of your recording device.
TIP: Use this Record Out jack to capture live recordings of student performances. Save the file as an MP3 and build digital portfolios of student work for assessment.
TIP: There are many options for recording. Here are a few suggestions:
- Use any portable digital recording device to capture the audio. These devices often record to an SD card and can store many hours of MP3 audio. There are many makes/models of portable digital recording devices currently available at very affordable prices. Be sure to take note of the inputs available on your portable digital recording device (some use 3.5mm jacks while others use a pair of 1/4" jacks) and connect with a cable with the corresponding end.
-
Connect directly to a computer audio interface using Aux Inputs 1 or 2. Record the audio using music production software such as Audacity (free download).
-
Student Interface Inputs: Using CAT5 cables, connect each Student Interface Unit to the Teacher Unit station inputs (1-32). Be sure to connect student workstation 1 to Teacher Unit station input 1, and so forth.
TIP: Label each CAT5 with the student station that it is connected to in the event that you need to disconnect the Teacher Unit. I suggest labeling the CAT5 cable on both the Teacher Unit end and the Student Interface Unit end.
7. Network:
Wireless configuration: If you are going to use the iOS or Android app or just want to connect to the Teacher Unit wirelessly through your Mac/PC computer app, you will need a wireless router. Connect a CAT5 cable from the Teacher Unit network jack to your router's LAN ports (this is NOT the internet input on the router). Be sure to connect to your wireless router through the wi-fi settings on your device.
NOTE: The Apple AirPort Express and Apple AirPort Extreme are the recommended wireless routers for the Korg GEC5 system. See the Installation section of this manual for detailed instructions on setting up your AirPort Express/Extreme for use with the Korg GEC5.
• For more information on the Apple AirPort Express visit: http://www.apple.com/airport-express/
• For more information on the Apple AirPort Extreme visit: http://www.apple.com/airport-extreme/
TIP: To have internet access while using the wireless configuration, connect your internet connection cable to the wireless router's internet input.
TIP: Remember to check your devices wi-fi network and confirm that it is seeing the wireless router connected to your Teacher Unit. The wi-fi network can change when you restart your device, walk out of range of the wireless router, or a variety of other reasons. Check the selected wi-fi network FIRST when you are troubleshooting a GEC5 issue. If you lose connectivity, your GEC5 application will display a screen indicating that it is searching for your GEC5.
TIP: I strongly suggest using the wireless configuration. This gives the teacher flexibility to use the Mac/PC app or tablet app since they both access the same wireless router.
Wired configuration: If you are only going to use the Mac/PC app simply connect a CAT5 cable from the Teacher Unit network jack to your computer's Ethernet jack. NOTE: It can take 1-3 minutes for the computer application to recognize the GEC5 in this configuration if you do not have an active internet connection connected to the other Teacher Unit network jack.
TIP: Although I prefer to have both GEC5 access AND internet access on my device while working the GEC5, it is perfectly fine to use and operate the GEC5 as a stand-alone unit with no internet connectivity.
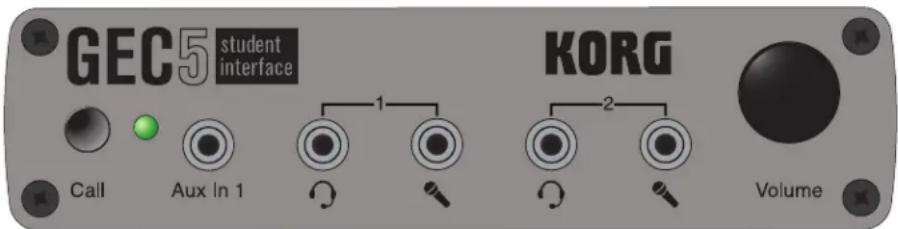
Student Interface Unit Front:
Install a single Student Interface Unit at each student station. You do not need a Student Interface at the teacher station. These Student Interface Units can be mounted with screws either on top of or below the desk depending on what works best for your situation.
TIP: When mounting each Student Interface to the student workstation, be sure to set them back about 1-2" to allow for the cable heads. If the Student Interface is set even with the desk, the cable heads will stick out and be subject to much more wear-and-tear and this will inevitably shorten the life of the Student Interface Unit jacks and headphone cables.
TIP: You can also mount the Student Interface to stations using Velcro. I've seen some teachers apply Velcro to the bottom of the Student Interface unit and the top corner of the keyboard at each student workstation.
text_image
GEC5 student interface KORG Call Aux In 1 Volume(Fig. 3)
GEC5
Hardware Overview
GO TO WEBSITE
- Call Button: Students will press this button whenever they need to get the teacher's attention.
TIP: I ask my students to press the Call Button whenever they have a question or want to play/perform a completed assignment for me.
TIP: Get students comfortable pressing the Call Button for help from day 1. In my music production classes, I invite students to share their first project with the class and I offer bonus points for doing so. Any student who would like to share and earn bonus points must press his/her Call Button to alert me during our sharing time. This gets students comfortable with sharing as well as making use of the Call Button.
- Aux In 1: This is a stereo input to connect any external device such as a laptop, tablet, or MP3 player.
TIP: Connect a stereo 3.5mm male to stereo 3.5mm male cable and have this cable available for student use at all times. Students can then easily incorporate sound from an external device without switching headphones.
TIP: Consider posting custom accompaniment files to a website for students to access on their personal devices. For example, a student could download an accompaniment for a piano exercise on his/her iPhone, connect the device via the Aux In 1 input, and then play along with the accompaniment using the lab keyboard.
- Headphone Input 1 and 2: This is where students connect headphones for audio playback. Students can connect any standard 3.5mm headphones to the Headphone Input jacks. If the headphones include a microphone (such as the Koss SB40 headphones), connect the 3.5mm mic cable from the headphones to the microphone input jack.
TIP: Using headphones with a built-in microphone is highly recommended to improve communication with students in the room.
TIP: Current standard iPhone style headphones that include stereo headphones plus a mic do work with the GEC5! Simply connect the 3.5mm headphone cable into the headphone input on the Student Interface unit and you can hear audio output and use the headset microphone for student/teacher communication.
- Volume Knob: Rotate the knob clockwise to increase the overall volume of the station. Rotate the knob counter-clockwise to decrease the overall volume.
TIP: I suggest turning the volume mostly all the way up on your external devices (keyboard, computer, audio interface, other audio device, etc.). Then slowly increase the overall volume using the Student Interface Volume Knob. This will reduce the presence of system noise.
Student Interface Unit Back:
Examine the back of the Student Interface units (see Fig. 4).

text_image
L R Aux In 2 L R Instrument In Mic Out KORG Network(Fig. 4)
- Aux In 2: Most commonly you will connect the audio output of your computer or audio interface to this jack. If you are going directly from a student computer to the Student Interface, you will need a stereo 3.5mm male (out of your computer) to stereo RCA male (into Student Interface unit). If you are using an audio interface you will mostly likely need dual TS male 1/4" (out of your interface) to stereo RCA male (into Student Interface unit). Be sure to check the user manual of your audio interface to confirm the proper cabling for your specific device (see Fig. 5).
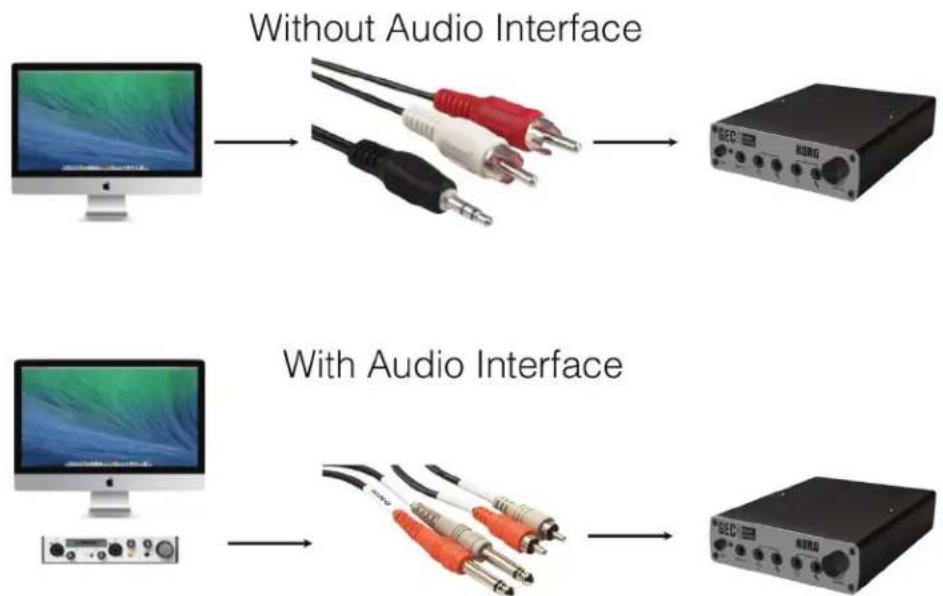
flowchart
graph LR
    A["Computer monitor"] --> B["Without Audio Interface"]
    C["Computer monitor"] --> D["With Audio Interface"]
    B --> E["Analog/Amplifier"]
    D --> F["Analog/Amplifier"]
(Fig. 5)
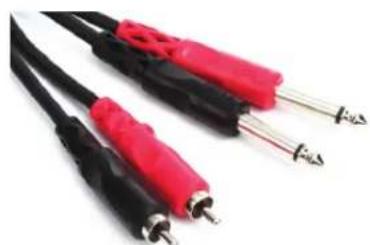
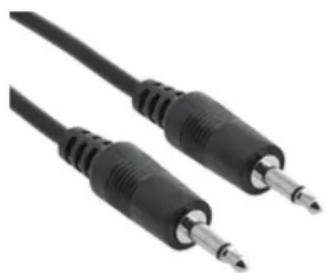
- Instrument In: Connect your keyboard/instrument to this input. If your keyboard/instrument has a Left and Right audio output, you will most likely need dual TS male 1/4" out of your keyboard/instrument to stereo RCA male into Student Interface unit (see Fig. 6). If your keyboard/instrument only has a single audio output, you will most likely need a single TRS male 1/4" to stereo RCA male cable (see Fig. 7). Be sure to check the user manual of your keyboard/instrument to confirm the proper cabling for your specific device.
natural_image
Close-up of black and red electrical cables with metallic pins (no text or symbols visible)(Fig. 6: Dual TS male 1/4" to RCA male cable)

natural_image
Close-up of three audio/video cables (black, red, gray) with no visible text or symbols(Fig. 7: TRS male 1/4" to RCA male cable)
- Mic Out: This jack sends the headset microphone audio out to any device. Most commonly, teachers will connect the Mic Out to a computer's Audio Input or Mic In so students can record their voice into audio software such as Audacity. Using an 3.5mm TS male to 3.5mm TS male cable, connect one end into the Mic Out jack on the Student Interface and connect the other to your computer's audio input (see Fig. 8). If you are using an audio interface to cable the microphone audio, you will likely need a 3.5mm TS male (to Student Interface) to 1/4" TS male (to audio interface) cable (see Fig. 9).
natural_image
Close-up of two black audio/video cables with metallic connectors (no text or symbols visible)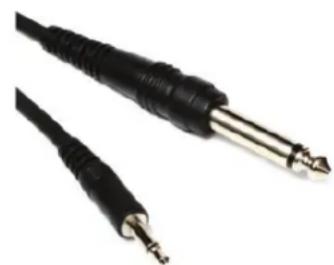
natural_image
Close-up of two black audio/video cables with metallic connectors (no text or symbols visible)(Fig. 8: 3.5mm TS male cable) (Fig. 9: 3.5mm TS male to 1/4" TS male)
- Network: This all-important jack connects each Student Interface Unit to the main Teacher Unit at the teacher station. Use a CAT5 cable to make this connection.
TIP: Since each Student Interface Unit is hard-wired to the Teacher Unit, it is important to plan the layout of the room prior to installation. It is difficult to move stations more than a few feet after installation and it could require you to re-cable individual stations. I would also suggest working with your janitorial staff so they know not to move stations from their current location. If you ever need to move a station, label each CAT5 cable with the name of the station and unplug it from the Student Interface Unit before moving.
GEC5
Set Up Overview

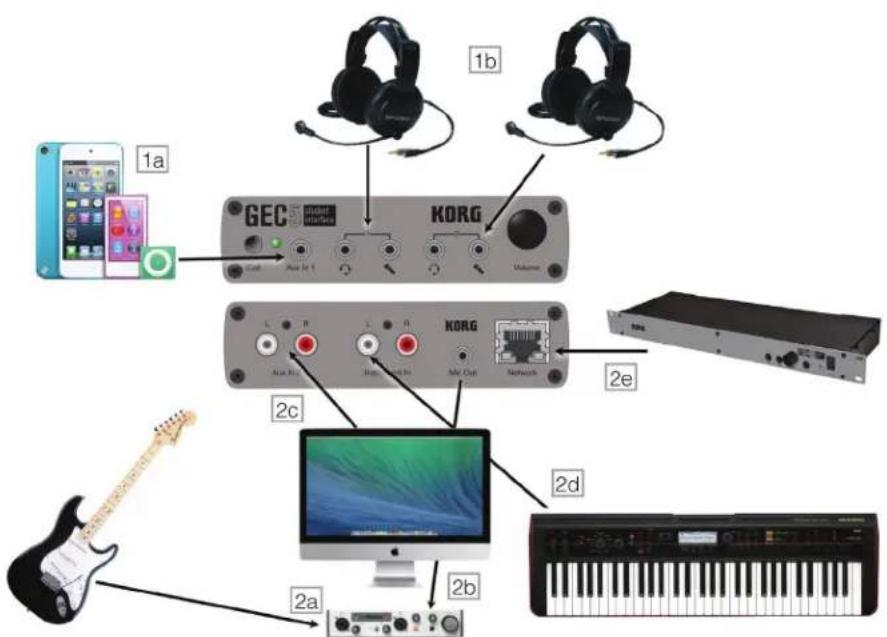
The GEC5 is a very flexible system that can be used in a number of different learning situations with any combination of digital instruments regardless of brand. Both with and without computers, below, are some common lab situations using the GEC5: Keyboard and Piano Lab, Guitar Lab, Language Lab, and Multi-Purpose Technology Lab. When you are ready to set up your Teacher Unit, you will need to decide if you are going to have a wired connection (Cat5 cable directly from your Teacher Unit to your computer) or a wireless connection (with the help of a wireless router).
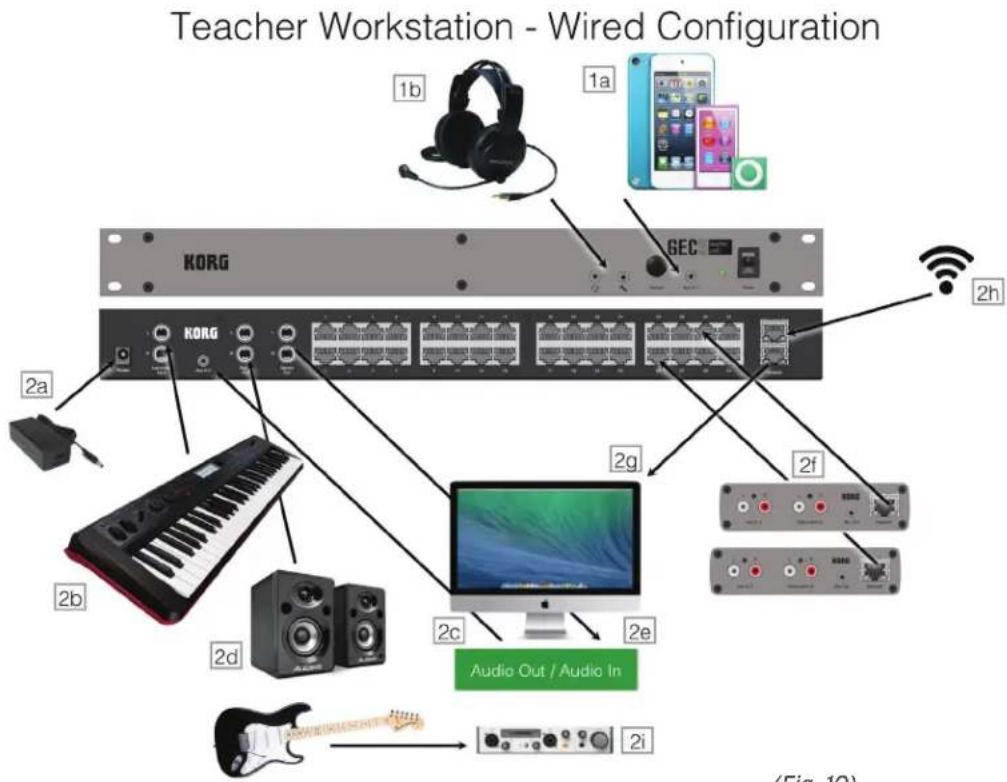
Wired Teacher Workstation:
This setup is for labs without a wireless router. In this setup there is no option for tablet connectivity. See Fig. 10 for a detailed diagram.
1. Front:
a. Audio device (iPod, laptop, etc.) to Teacher Unit Aux In 1.
b. Headphones to headphone input.
2. Back:
a. AC power adapter to power input.
b. Keyboard audio output to Instrument In.
c. Computer audio interface output to Aux In 2.
d. Room Out to active speakers (or power amp if using passive speakers).
e. Record out to computer audio interface input 1/2 (stereo).
f. CAT5 cables connecting each Student Interface to Teacher Unit.
g. CAT5 cable from one of the network jacks on the Teacher Unit to teacher computer Ethernet input.
h. Optional: CAT5 cable from internet connection to the other network jack on the Teacher Unit. Only required for internet connectivity.
i. Optional: Guitar output to computer audio interface input.
text_image
Teacher Workstation - Wired Configuration 1b 1a KORG GEC 2h 2a 2b 2d 2c 2e Audio Out / Audio In 2f 2i (Fig. 10)(Fig. 10)
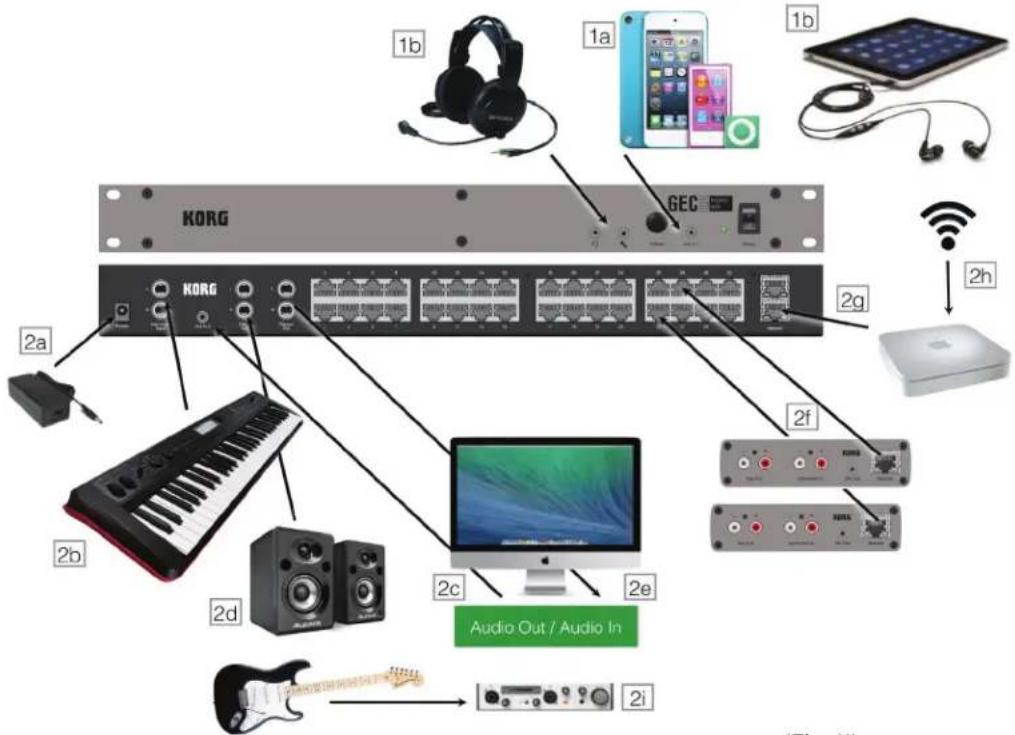
Wireless Teacher Workstation:
This is the most common way to setup the teacher station. This setup provides the opportunity to use both the Mac/PC and tablet applications. When utilizing the tablet application, you can connect teacher headphones to the tablet's headphone jack OR the Teacher Unit for audio playback. See Fig. 11 for a detailed diagram.
**Be sure to select your wireless router in the Wi-Fi settings of your device!
1. Front:
a. Audio device (iPod, laptop, etc.) to Teacher Unit Aux In 1.
b. Headphones to headphone input (for use when utilizing the Mac/PC application) or tablet head phone jack (for use when utilizing the tablet application).
2. Back:
a. AC power adapter to power input.
b. Keyboard audio output to Instrument In.
c. Computer audio interface output to Aux In 2.
d. Room Out to active speakers (or power amp if using passive speakers).
e. Record out to computer audio interface input 1/2 (stereo).
f. CAT5 cables connecting each Student Interface to Teacher Unit.
g. CAT5 cable from one of the network jacks on the Teacher Unit to a LAN port on the wireless router.
h. Optional: CAT5 cable from internet connection to internet input on wireless router. Only required for internet connectivity.
i. Optional: Guitar output to computer audio interface input.
Teacher Workstation - Wireless Configuration
text_image
1b 1a 1b KORG GEC 2a 2b 2d 2c 2e Audio Out / Audio In 2f 2g 2h (Fig 41)(Fig. 11)
GEC5
Set Up Overview

Once the Teacher Unit is set up, you are ready to connect the Student Interfaces to each station and corresponding instrument or computer, or both.
Keyboard or Piano Lab:
In this situation, you will connect the keyboard output to the Student Interface instrument input. See Fig. 12 for a detailed diagram.
1. Front:
a. Audio device (iPod, laptop, etc.) to Student Interface Aux In 1 (optional).
b. Headphones to each headphone input.
2. Back:
a. Keyboard audio output to Instrument In.
b. Network to Teacher Unit using CAT5 cable.
Keyboard/Piano Lab without Computer - Student Workstation
text_image
1a GEC 1b KORG 2a Instrument In 2b Audio Out Audio In 1 Audio In 2(Fig. 12)
GEC5
Set Up Overview

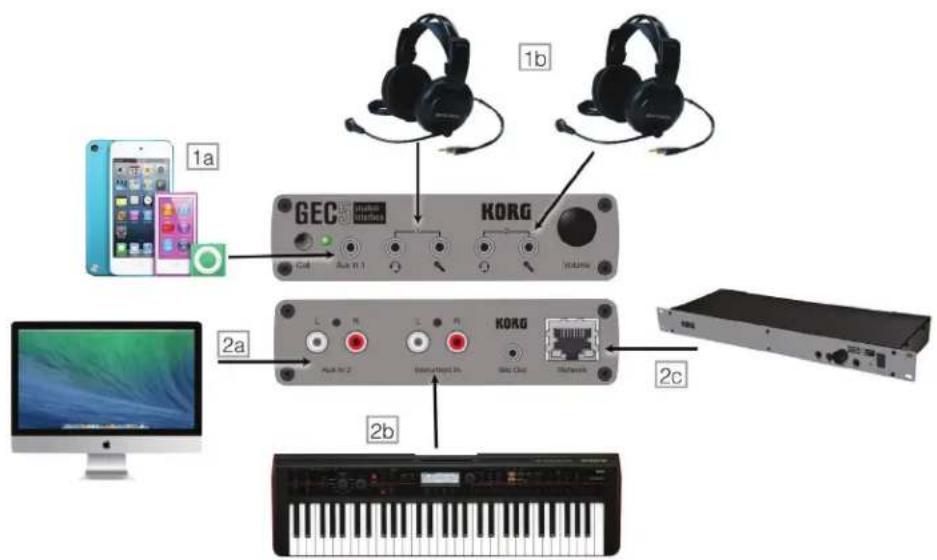
Keyboard or Piano Lab with Computer:
In this situation, you will connect the keyboard output to the Student Interface instrument input jack and the computer audio output to the Student Interface Aux In 2 jack. You could also use an audio interface for computer audio output and connect the output of your audio interface to the Student Interface Aux In 2 jack. See Fig. 13 for a detailed diagram.
3. Front:
a. Audio device (iPod, laptop, etc.) to Student Interface Aux In 1.
b. Headphones to each headphone input.
4. Back:
a. Computer audio output to Aux In 2.
b. Keyboard audio output to Instrument In.
c. Network to Teacher Unit using CAT5 cable.
Keyboard/Piano Lab with Computer - Student Workstation
flowchart
graph TD
    A["1a: iPhone with app"] --> B["GEC"]
    B --> C["Aut 1.1"]
    C --> D["KORG"]
    D --> E["2b: Keyboard"]
    D --> F["KORG"]
    F --> G["2c: Audio jack"]
    style A fill:#f9f,stroke:#333
    style B fill:#ccf,stroke:#333
    style C fill:#cfc,stroke:#333
    style D fill:#fcc,stroke:#333
    style E fill:#ffc,stroke:#333
    style F fill:#cff,stroke:#333
    style G fill:#fcf,stroke:#333
(Fig. 13)
GEC5
Set Up Overview

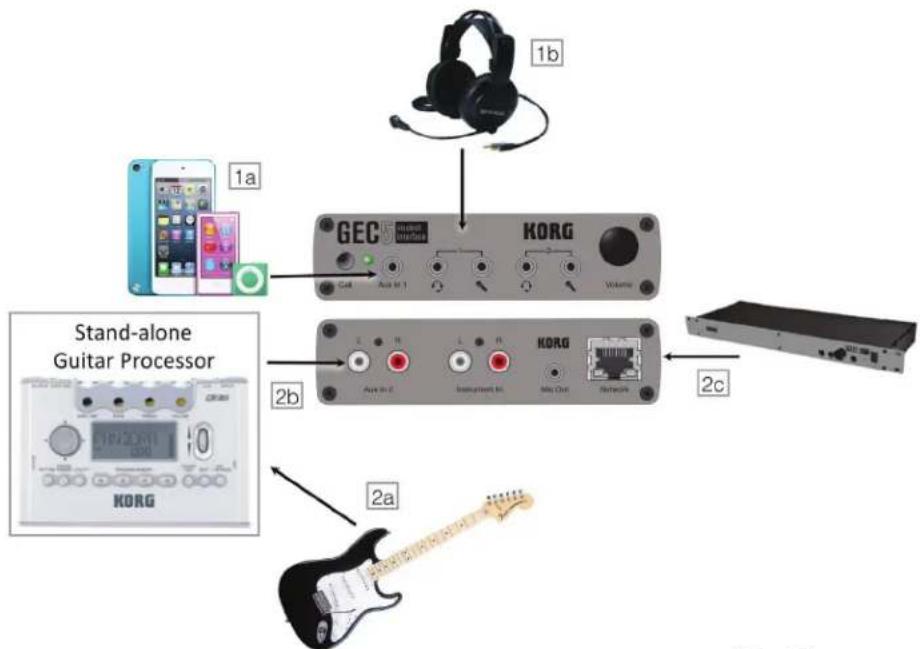
Guitar Lab:
Connect an electric guitar to the input of a stand-alone guitar processor/external amp simulator (such as the Korg PXmini). Then connect the output that device to the Student Interface Instrument In jack. See Fig. 14 for a detailed diagram.
1. Front:
a. Audio device (iPod, laptop, etc.) to Student Interface Aux In 1.
b. Headphones to each headphone input.
2. Back:
a. Guitar output to stand-alone guitar processor/external amp simulator.
b. Stand-alone guitar processor/external amp simulator output to Instrument In 2.
c. Network to Teacher Unit using CAT5 cable.
Guitar Lab without Computer - Student Workstation
flowchart
graph TD
    A["Stand-alone Guitar Processor"] --> B["GEC"]
    B --> C["KORG"]
    C --> D["Audio jack 2"]
    D --> E["Instrument kit"]
    E --> F["Radio/Out"]
    F --> G["Switch"]
    G --> H["Audio jack 2c"]
    H --> I["Audio jack 2a"]
    I --> J["Handheld guitar"]
(Fig. 14)
GEC5
Set Up Overview
GO TO WEBSITE
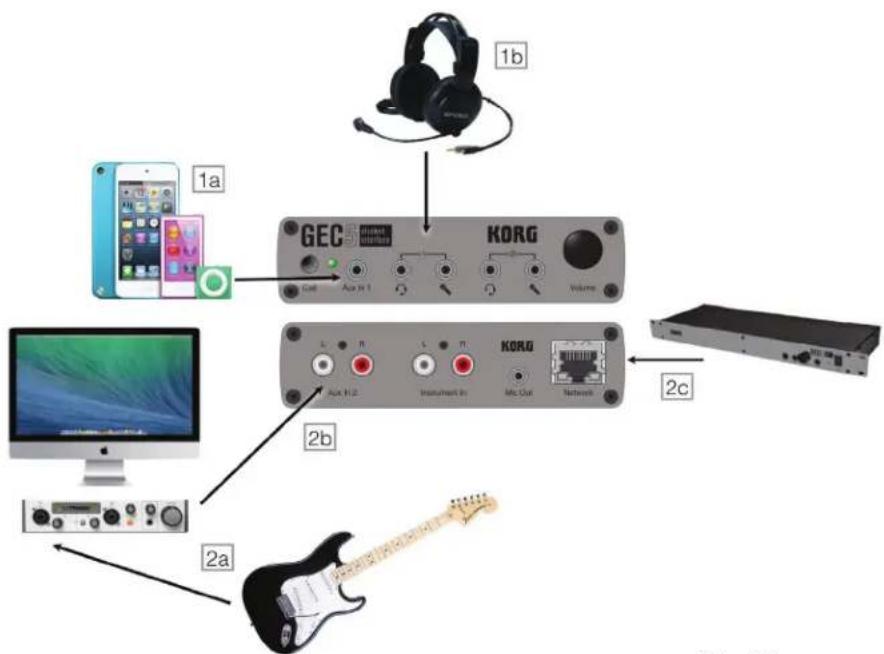
Guitar Lab with Computer:
Connect an electric guitar to the input of a computer audio interface and the output of the audio interface to the Student Interface Aux In 2 jack. In this situation you do not need to connect anything to the Student Interface Instrument In jack. See Fig. 15 for a detailed diagram.
1. Front:
a. Audio device (iPod, laptop, etc.) to Student Interface Aux In 1.
b. Headphones to each headphone input.
2. Back:
a. Guitar output to computer audio interface input.
b. Computer audio interface output to Aux In 2.
c. Network to Teacher Unit using CAT5 cable.
Guitar Lab with Computer - Student Workstation
flowchart
graph TD
    A["1b"] --> B["GEC Interface"]
    B --> C["KORG"]
    C --> D["2c"]
    D --> E["Mac"]
    F["1a"] --> G["Mobile Device"]
    H["2b"] --> I["Instrument In"]
    J["2a"] --> K["Guitar"]
(Fig. 15)
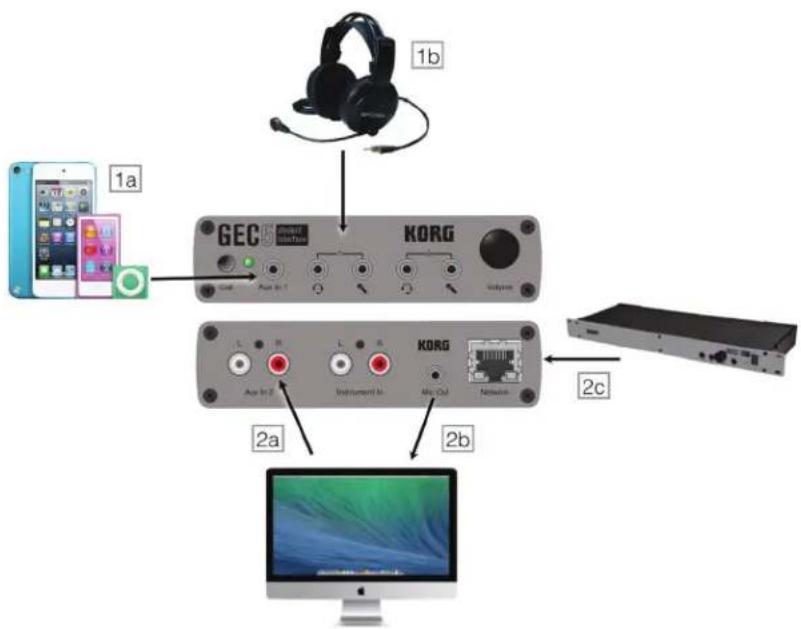
Language Lab:
Connect the Student Interface Mic Out to the input of the computer audio interface. If you computer has a mic input jack, you may connect directly to the computer and skip the computer audio interface. Use software such as Audacity on your computer to record the audio output of the student headset microphones. See Fig. 16 for a detailed diagram.
1. Front:
a. Audio device (iPod, laptop, etc.) to Student Interface Aux In 1.
b. Headphones to each headphone input.
2. Back:
a. Computer audio output to Aux In 2.
b. Mic Out to computer audio input.
c. Network to Teacher Unit using CAT5 cable.
Language Lab - Student Workstation
flowchart
graph TD
    A["1a: Smartphone with app icons"] --> B["1b: Headphones"]
    B --> C["GEC Interface"]
    C --> D["2a: Audio/Instrument interface"]
    C --> E["2b: Micro-Cell Network"]
    C --> F["2c: Display unit"]
(Fig. 16)
GEC5
Set Up Overview

Multi-Purpose Technology Lab:
If your lab will be used for multiple purposes consider this setup. Essentially this is a combination of the 3 setups listed above and it would allow for the use of guitar, keyboard, and voice recording. See Fig. 17 for a detailed diagram.
1. Front:
a. Audio device (iPod, laptop, etc.) to Student Interface Aux In 1.
b. Headphones to each headphone input.
2. Back:
a. Guitar output to computer audio interface input 1.
b. Mic Out to computer audio interface input 2.
c. Computer audio interface output to Aux In 2.
d. Keyboard output to Instrument In.
e. Network to Teacher Unit using CAT5 cable.
Multi-Purpose Lab - Student Workstation
text_image
1a GEC InterSec KORG 1b 2c KORG 2d 2e 2a 2b(Fig. 17)
Installing the Application:
Now that you have completed your hardware set up in your lab, it's time to configure the GEC5 Software Control Application for your new lab. The Teacher Unit will act as a server for the room and save any customizations you make along with setting up Teachers, assigning Classes and even creating presets. The Korg GEC5 Software Control Application is available for any desktop or laptop using a Windows or Mac operating system or tablets using iOS or Android. Because the Teacher Unit saves the information you input for your room set up, you can transition from desktop to tablet with ease.
First, choose the device option that fits your needs best and follow the download instructions provided online:
- Windows Computer
Visit http://www.korg.com/us/support/download/software/0/576/2983/ - Mac Computer
Visit http://www.korg.com/us/support/download/software/0/576/2984/ - iPad
Visit https://itunes.apple.com/us/app/korg-gec5-controller/id1073023302?mt=8 - Android
Visit https://play.google.com/store/apps/details?id=org.korg.gec5
Room Setup:
Once you have the application installed on your device, you are ready to really begin using the GEC5. Be sure that all cables are securely connected (especially all CAT5 cables) and the Teacher Unit is powered on. Launch the application from your device. The very first time you launch the application, you will go through a brief room setup. If the application does not find your GEC5 hardware, quit the application, recheck your CAT5 connections, verify the power to the Teacher Unit is on, and re-launch the application. Follow the on-screen prompts to setup your virtual room in the GEC5 application.
- Welcome: Click Next (see Fig. 18).
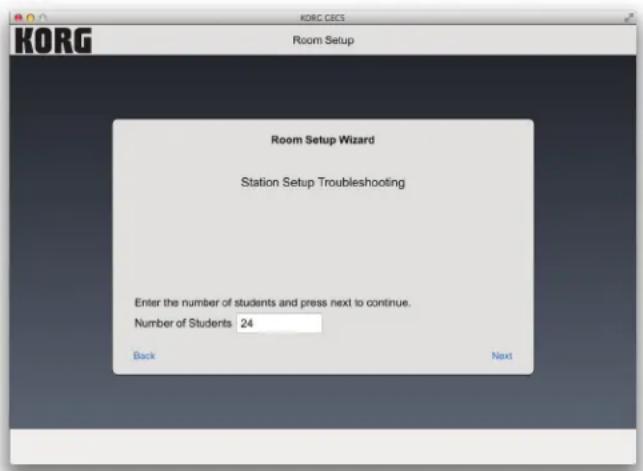
text_image
KORG Room Setup Room Setup Wizard Station Setup Troubleshooting Enter the number of students and press next to continue. Number of Students 24 Back Next(Fig. 18)
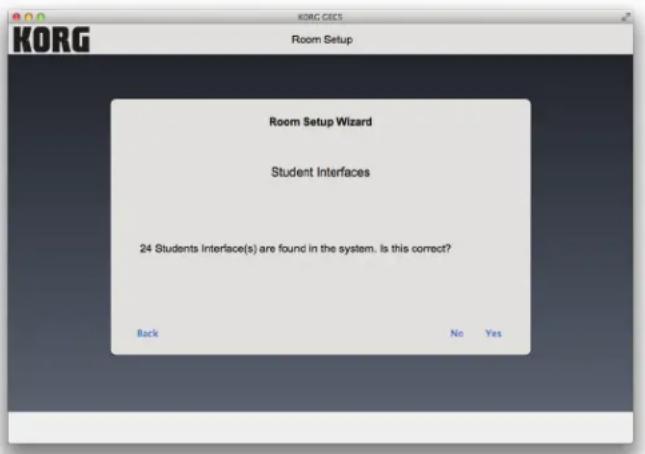
- Student Interfaces: The system will automatically detect the number of student interfaces (see Fig. 19). Confirm the number of interfaces found in the system. If the number of Student Interface is correct, click "Yes." If the number of Student Interfaces is incorrect, click "No," enter the correct number of student workstations in the next screen, and click "Next" (see Fig. 20).
text_image
KORG Room Setup Room Setup Wizard Student Interfaces 24 Students Interface(s) are found in the system. Is this correct? Back No Yes(Fig. 19)
text_image
KORG CEC5 Room Setup Room Setup Wizard Station Setup Are there one or two students per student interface? • 24 individual student station(s) • 48 split student station(s) Back Next(Fig. 20)
TIP: Be sure the number of stations is accurate during the initial room set up. Adding stations is easy; a new Student Interface Unit is automatically detected when plugged in, but once added, stations cannot be deleted.
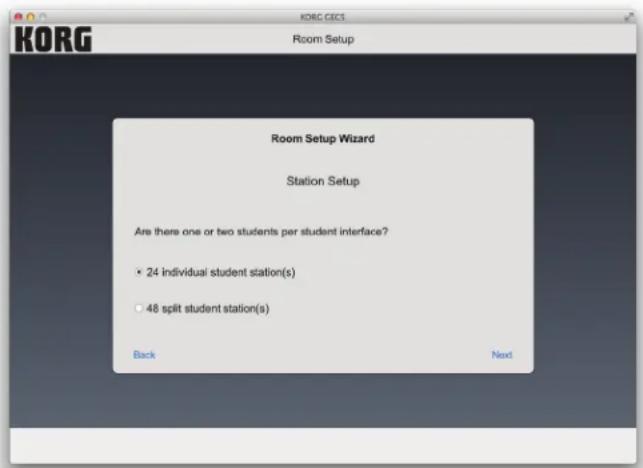
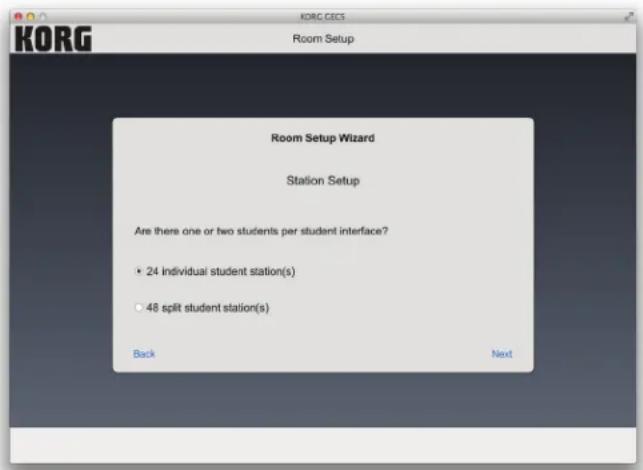
- Station Setup: Select either individual stations or split stations (see Fig. 21). If you have one student working at each station or two students working collaboratively, select individual stations. If you have two students working independently at each station, select split stations. Click "Next" after you have confirmed your selection.
text_image
KORG Room Setup Room Setup Wizard Station Setup Are there one or two students per student interface? • 24 individual student station(s) • 48 split student station(s) Back Next(Fig. 21)
TIP: Setting a class up in split mode allows the GEC5 system to accommodate 2 students per station, sharing a single keyboard.
For the best results, you'll need keyboards that are programmed with Korg's GEC5 Split programs. These presets split the audio from the keyboard down the middle so that only the student on the left will hear notes below Middle C, and the student on the right will only hear the keys above Middle C; both halves of the keyboard are transposed so that they are in the same middle octave, as well.
These Korg Split Programs, along with the Split Station capability of the GEC5 system, will allow the two students to function completely independently, and the teacher will have all the same audio functionality as if the students were at separate keyboards. Split Station mode is ideal for labs where space restrictions are a factor, as it essentially allows you to have double the number of keyboard students as you have keyboards.
NOTE: You must load specialized Korg Split Sounds into your Korg keyboard to make use of the Split feature.
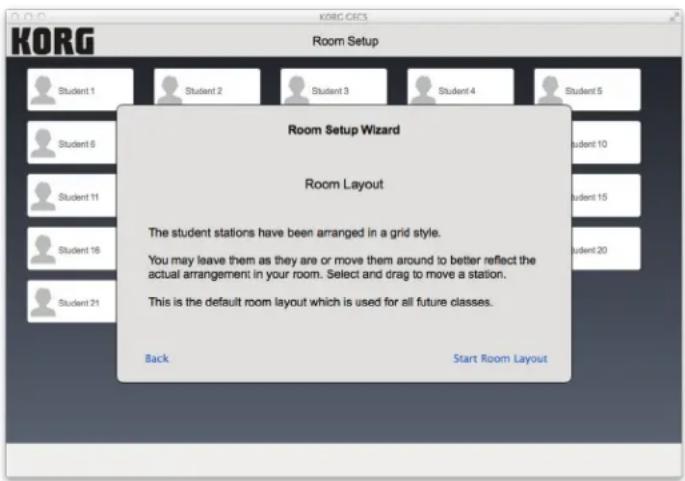
- Room Layout: Click "Start Room Layout" (see Fig. 22). You can leave the stations as-is or drag them around the screen to more accurately reflect the true layout of your lab. Click "Done" when you are satisfied with the layout and then click "Done" again when the popup window comes up to confirm that your room setup is complete (see Fig. 23).
text_image
KORG CIGS Room Setup Wizard Room Layout The student stations have been arranged in a grid style. You may leave them as they are or move them around to better reflect the actual arrangement in your room. Select and drag to move a station. This is the default room layout which is used for all future classes. Back Start Room Layout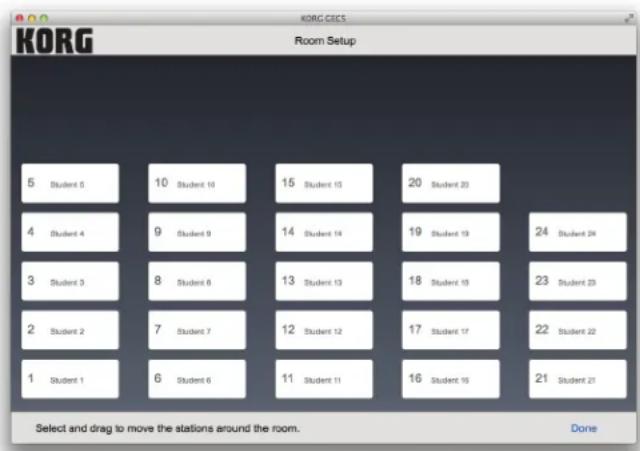
text_image
KORG CECs Room Setup 5 Student 6 10 Student 10 15 Student 15 20 Student 20 4 Student 4 9 Student 9 14 Student 14 19 Student 19 24 Student 24 3 Student 3 8 Student 8 13 Student 13 18 Student 18 23 Student 23 2 Student 2 7 Student 7 12 Student 12 17 Student 17 22 Student 22 1 Student 1 6 Student 6 11 Student 11 16 Student 16 21 Student 21 Select and drag to move the stations around the room. Done(Fig. 22) (Fig. 23)
Note: This setup will be the new default setup for all classes created in your system.
TIP: When you are finished setting up the room, simply log out to create a Teacher Profile and and classes.
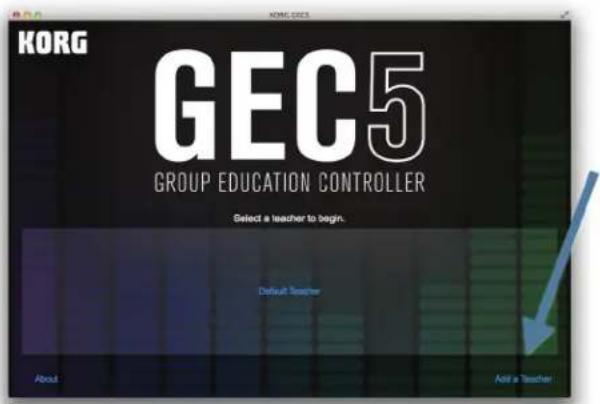
Teacher and Class Setup:
Now that the room setup is complete, you can setup teacher accounts and classes.
- Click "Add a Teacher" in the bottom right corner of the main GEC5 screen (see Fig. 24).
text_image
KORG GEC5 GROUP EDUCATION CONTROLLER Select a teacher to begin. Default Teacher About Add a Teacher(Fig. 24) (Fig. 25)
- Enter a name and click "OK" (see Fig. 25).
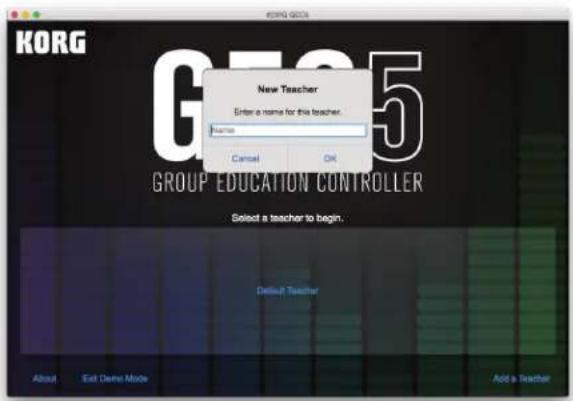
text_image
KORG G125 G125 GROUP EDUCATION CONTROLLER New Teacher Enter a name for this teacher. Name Cancel OK Select a teacher to begin. Default Teacher About Salt Demo Mode Add a Teacher-
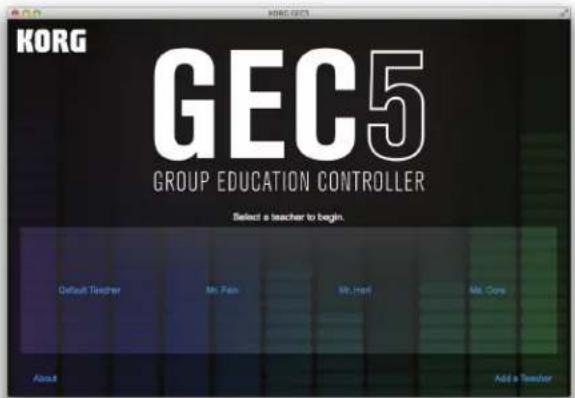
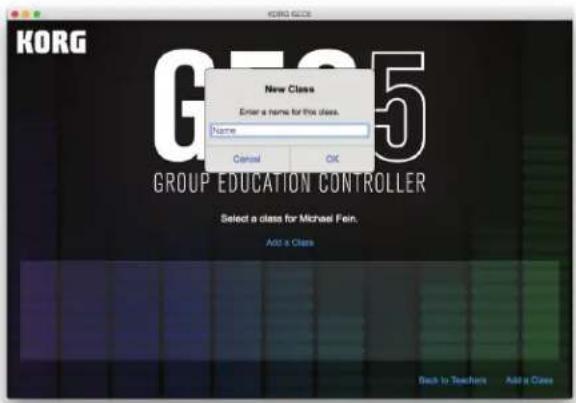
Click any of the Teacher Profiles to begin adding classes. Click "Add a Class" and enter a name for the class (see Fig. 27).
-
Continue adding as many teachers as needed (see Fig. 26).
text_image
KORG GEC5 GROUP EDUCATION CONTROLLER Select a teacher to begin. Default Teacher Mr. Pan Mr. Heli Mr. Core About Add a Teacher(Fig. 26) (Fig. 27)
text_image
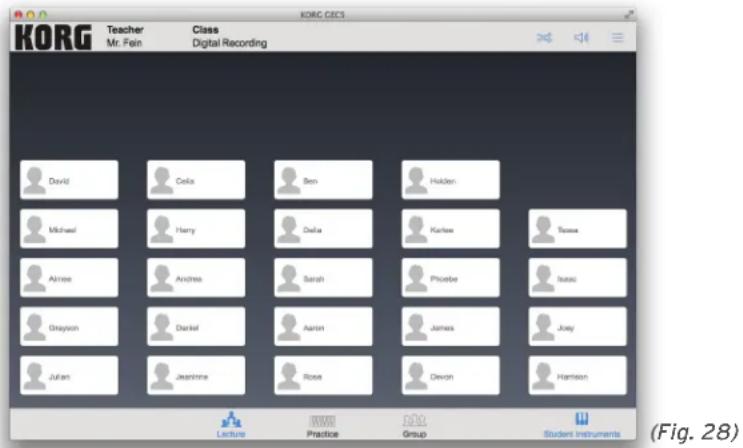
KORG G165 New Class Enter a name for this class. Name Cancel OK GROUP EDUCATION CONTROLLER Select a class for Michael Fein. Add a Class Back to Teachers Add a Class- Station Assignment: For ease of use, you can enter in the name of each student in your class in their assigned seats (see Fig. 28). Click "Next" to enter names or "Save and Exit" to skip this step. After entering student names, click "Done."
TIP: In the Mac/PC application, you can press TAB to advance to the next student station.
text_image
KORG CECs Teacher Mr. Fein Class Digital Recording David Cela Ben Hulden. Michael Harry Della Karles Tusaa Almee Andrea Sarah Phoebe Isaac Grayson Daniel Aaron James Joey Julian Jeantrina Rose Devon Harrison Lecture Practice Group Student Instruments (Fig. 28)TIP: Alternatively, when using Mac or Windows software applications you can also use the "GEC5 Station Assignment Template.xlsx" file to create classes with students in your GEC5 Software Control Application.
- Download the "GEC5 Station Assignment Template.xlsx" template file from http://www.korg.com/us/support/download/product/0/576/
- Open the "GEC5 Station Assignment Template.xlsx" template file.
- Enter information such as student names into the GREEN fields in the template file.
- Select File > Save As. Set the Format to Comma Separated Values (.csv) and save the file to a memorable location. NOTE: Click Continue to ignore any warnings about incompatible features of this new CSV file.
- Launch the GEC5 Software Controller Application and login.
- Select Settings > Teacher and Class.
- Click CSV Class Import and locate the CSV file you generated in the previous steps.
-
The new class information will be imported from the CSV file and be available for use.
-
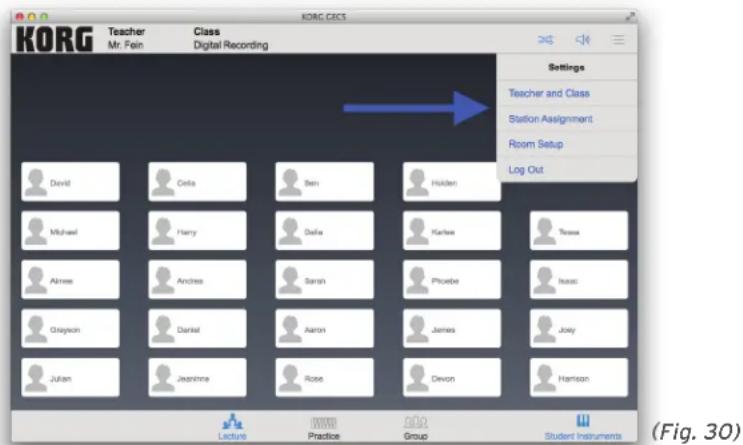
Click the Setup icon (see Fig. 29) in the upper right corner to modify your setup options (see Fig. 30).
a. Teacher and Class: In this screen you can add, edit, or delete a teacher account.
Click on "Edit" next to the teacher account to add, edit, or delete a class.
b. Station Assignment: In this screen you can modify the names for each student station.
c. Room Setup: In this screen you can drag the student stations around the screen to modify the layout of your virtual room.
d. Log Out: Click here to log out the current teacher and return to the opening screen.

(Fig. 29)
TIP: To save time, you can skip creating teacher accounts and classes all together. Simply use the Default Teacher account for all users.
text_image
KORG CECs Teacher Mr. Fein Class Digital Recording Settings Teacher and Class Station Assignment Room Setup Log Out David Celia Ben Hulden Michael Harry Della Karlee Tissue Almee Andrea Sarsin Phoebe Isaac Glayson Daniel Aaron James Joey Julian Jeanine Rose Devon Harrison Lecture Practice Group Student Instruments (Fig. 30)- Click the Volume Adjustment icon (see Fig. 31). In this screen you can modify the volume of the teacher headset, room output, and record output (see Fig. 32). You can also use the Teacher Unit volume knob to adjust the teacher headset volume.

(Fig. 31)
TIP: To minimize system noise, I suggest turning the Room volume all the way up. When playing through your speakers, start with the volume all the way down and slowly turn the speaker volume up to a comfortable level. You can do the same for the Record volume and adjust the input level of your recording device accordingly.

text_image
KORG CECs Teacher Mr. Fein Class Digital Recording Volume Headset Room Record David Celia Ben Holden Michael Harry Delta Karles Teasse Almee Andreas Sarah Phoebe Isaac Grayson Daniel Aaron James Joey Julian Jeashne Rose Devon Harrison Lecture Practice Group Student Instruments(Fig. 32)
KORG
EDUCATION
- Click the Class icon (see Fig. 33). Select any class listed to change classes (see Fig. 34).

text_image
KORG CECs Teacher Mr. Fain Class Digital Recording Change Class Digital Recording Plano Lab Guitar Lab David Celia Ben Holden Michael Harry Dalia Karlee Tessa Aimiea Andrea Sarah Phoslie Isaac Grayson Daniel Aaron James Joey Julian Jeaninne Rosa Devon Harrison Lecture Practice Group Student Instruments(Fig. 34)

(Fig. 33)
TIP: In the application, you will see a thin red bar at the bottom of any student stations that are not recognized by the GEC5 system. Check to make sure all CAT5 cables are securely connected. You can also try restarting the application and/or the Teacher Unit. If the problem persists, try replacing the CAT5 cable.
Call Button:

(Fig. 35)
The Call Button exists on each Student Interface Unit. When students press the Call Button, the student station on the GEC5 application screen will light up yellow (see Fig. 35). To answer the call, double-click twice on the student station. To remove the yellow tag, double-click again. You can also press the Clear All Calls button in the lower left corner to clear off all calls at once.
Lecture Mode:

(Fig. 36)
To access Lecture Mode, click the Lecture icon at the bottom of the screen (see Fig. 36). Lecture Mode is used when you (the Teacher) want to present material in a lecture format. Students hear the Teacher Station output plus their own station. To mute all student station sound while in Lecture Mode, click the "Student Instruments" icon in the bottom right corner of the application. This icon will turn gray indicating that all students hear the teacher microphone, instrument, and Aux devices (such as the teacher computer) ONLY.
You can also bring students into the lecture so they can be a part of the presentation by double clicking (see Fig. 37). A blue headset icon will appear next to the student's name and they are now broadcasting their station's audio to the class (mic, instrument, Aux devices).

(Fig. 37)
TIP: My most common uses for Lecture mode include:
• Students playing along with the Teacher. I use this mode for a class warm-up or to introduce a new song.
• Teacher lecture. I use this mode if I want to address the entire class and instruct from the front station.
• Students share/perform for the entire class. Simply double-click one or more students to allow those students to broadcast their work to the entire class. Students can share a completed project or piano song with their peers. Consider hosting a virtual recital using the GEC5...and record it with the Record Out feature on the back of Teacher Unit using a hand-held recorder or computer software!
Note: Students can perform duets, trios, quartets, etc. for the class by clicking on more than one student in Lecture Mode. To practice duets, trios, quartets, etc. you will use Group Mode (discussed later in this section of the text).
Practice Mode:

(Fig. 38)
To access Practice Mode, click the Practice icon at the bottom of the screen (see Fig. 38). Practice mode is used when the students are working independently. Each student hears only his/her own instrument. You have the option of hearing the student, or hearing and speaking with the student.
To eavesdrop on a student, double click the student station. You will see a headphone icon without a microphone (see Fig. 39).
(Fig. 39)
To communicate 1-on-1 with a student, double click the student station again. You will now see a headphone with microphone icon (see Fig. 40).
(Fig. 40)


TIP: My most common uses for Practice Mode include:
- Individual student practice time. Students can work on their material in a quiet classroom setting.
- Eavesdropping. As the teacher, I can monitor student progress to help manage my class and keep students moving ahead on class material.
- 1-on-1 student/teacher interaction. 1-on-1 communication is my favorite aspect of the GEC5. I get a chance to talk to each and every student on a daily basis throughout class. I can also answer questions and check completed assignments/projects extremely efficiently.
Group Mode:

(Fig. 41)
To access Group Mode, click the Group icon at the bottom of the screen (see Fig. 41). Group mode is used when you want to allow students at different workstations to work together. Group Mode allows you to define groups of two or more student workstations so they can collaborate on projects with complete audio capabilities. Each student hears their own instrument and the mic(s) and instrument(s) of the other students working in their assigned group. You have the option of eavesdropping on the groups or having 2-way communication with them.
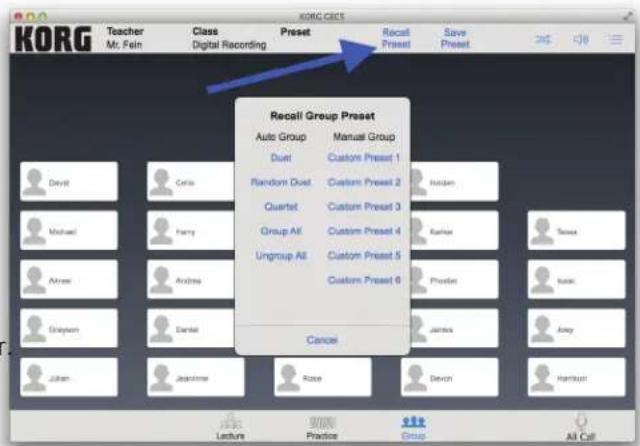
To group students using the existing Auto Group presets:
- Click the "Recall Preset" icon (see Fig. 42).
- Select one of the Auto Group presets (Duet, Random Duet, Quartet, Group All, and Ungroup All).
a. Duet: Groups are automatically created for stations 1/2, 3/4, 5/6, etc.
b. Random Duet: Each time you click on Random Duet, the GEC5 groups
different
stations
c. Quartet: Groups are automatically created for stations 1/2/3/4, 5/6/7/8, etc.
d. Group All: This groups all of the students together.
together
text_image
KORG GOTS Teacher M: Fein Class Digital Recording Preset Recall Preset Save Preset Recall Group Preset Auto Group Duet Random Duet Quartet Group All Ungroup All Custom Preset 1 Custom Preset 2 Custom Preset 3 Custom Preset 4 Custom Preset 5 Custom Preset 6 Custom Preset 7 Custom Preset 8 Custom Preset 9 Custom Preset 10 Custom Preset 11 Custom Preset 12 Custom Preset 13 Custom Preset 14 Custom Preset 15 Custom Preset 16 Custom Preset 17 Custom Preset 18 Custom Preset 19 Custom Preset 20 Custom Preset 21 Custom Preset 22 Custom Preset 23 Custom Preset 24 Custom Preset 25 Custom Preset 26 Custom Preset 27 Custom Preset 28 Custom Preset 29 Custom Preset 30 Custom Preset 31 Custom Preset 32 Custom Preset 33 Custom Preset 34 Custom Preset 35 Custom Preset 36 Custom Preset 37 Custom Preset 38 Custom Preset 39 Custom Preset 40 Custom Preset 41 Custom Preset 42 Custom Preset 43 Custom Preset 44 Custom Preset 45 Custom Preset 46 Custom Preset 47 Custom Preset 48 Custom Preset 49 Custom Preset 50 Custom Preset 51 Custom Preset 52 Custom Preset 53 Custom Preset 54 Custom Preset 55 Custom Preset 56 Custom Preset 57 Custom Preset 58 Custom Preset 59 Custom Preset 60 Custom Preset 61 Custom Preset 62 Custom Preset 63 Custom Preset 64 Custom Preset 65 Custom Preset 66 Custom Preset 67 Custom Preset 68 Custom Preset 69 Custom Preset 70 Custom Preset 71 Custom Preset 72 Custom Preset 73 Custom Preset 74 Custom Preset 75 Custom Preset 76 Custom Preset 77 Custom Preset 78 Custom Preset 79 Custom Preset 80 Custom Preset 81 Custom Preset 82 Custom Preset 83 Custom Preset 84 Custom Preset 85 Custom Preset 86 Custom Preset 87 Custom Preset 88 Custom Preset 89 Custom Preset 90 Custom Preset 91 Custom Preset 92 Custom Preset 93 Custom Preset 94 Custom Preset 95 Custom Preset 96 Custom Preset 97 Custom Preset 98 Custom Preset 99 Custom Preset 100(Fig. 42)
TIP: Since Group All has ALL students sharing all sound output, I would only suggest using this preset with small classes or when each student has a clear task. I do NOT suggest using this preset for sharing class projects. Use Lecture Mode instead.
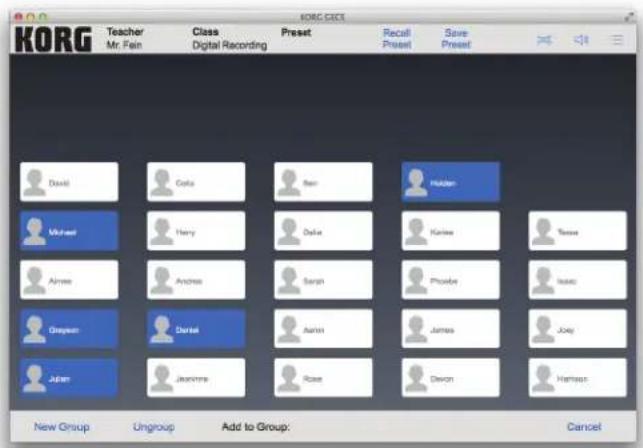
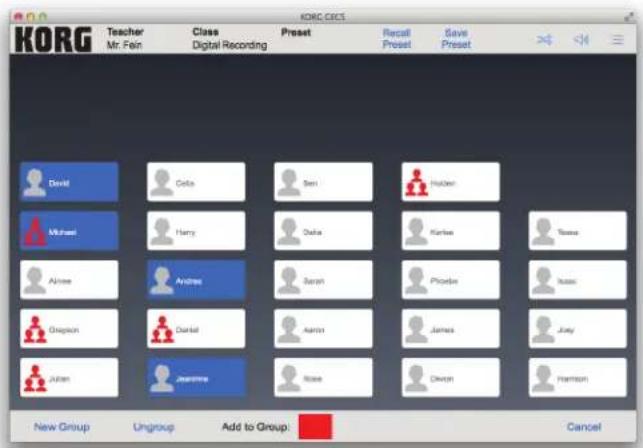
To group students into custom groups:
- Click and hold on a student station until it turns blue.
- Continue to click and hold on additional students so multiple students are blue (see Fig. 43).
text_image
KORG CICE Teacher Mr. Fein Class Digital Recording Preset Recall Preset Save Preset David Celia Sean Huslon Michael Harry Dale Kamex Tessel Aimee Andreas Sarah Phosbe Isaac Oregon Daniel Aaron James Joey Julian Jeansha Rose Gordon Hamsup New Group Ungroup Add to Group: Cancel(Fig. 43)
GEC5
GEC5 Modes of Functionality
GO TO WEBSITE
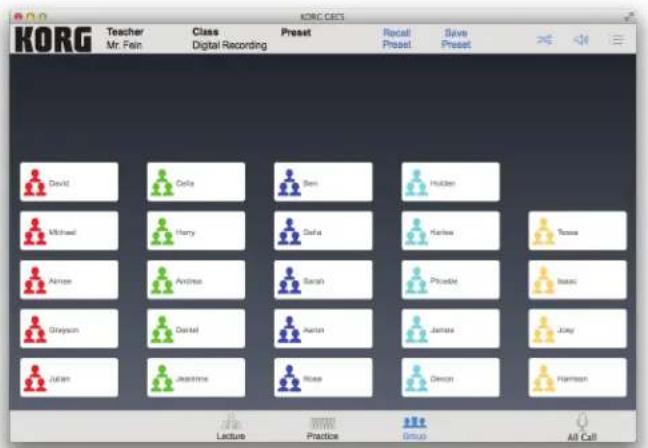
- Click "New Group". The students will now display a group icon and a red color. Each new group will have a different color (see Fig. 44).
text_image
KORG Teacher Mr. Fein Class Digital Recording Preset Repeat Preset Save Preset David Colta Sara Hulden Michael Harry Dufa Karlias Tosa Airbus Andreas Sarah Pruedie Isaac Grayson Daniel Aaron Jammas Jolly Julien Jeachine Roos Devon Harrison Lecture Practice Group All Cells(Fig. 44)
text_image
KORG CIFS Teacher Mr. Fan Class Digital Recording Preset Recall Preset Save Preset Divid Cola Seri Hatten Michael Harry Della Kurtse Tissue Alkree Andreas Sarah Pricardie Texas Groupon Darrell James Jayy Julian Javanthe Nose Clevon Harrison New Group Ungroup Add to Group: Cancel(Fig. 45)
- To add a student to an existing group, click and hold on a student in the group and then click and hold the new student(s). Click the colored box next to "Add to Group" (see Fig. 45).
- To remove a student from an existing group, click and hold on the student you want to remove until the icon turns blue and click "Ungroup" (see Fig. 45).
TIP: If you want to quickly remove all groupings, Select "Recall Preset" and choose the "Ungroup all" Auto Group.
TIP: If you have a set grouping that you commonly use, you can create you own custom preset.
- Manual group the students as desired.
- Select "Save Preset" from the top center of the screen.
- Select one of the custom presets.
- Type a name for the preset and click "Save."
- To recall this custom preset in the future, click "Recall Preset" and then select from your listing of manual presets.
All Call:

(Fig. 46)
All Call is available in Practice and Group mode (see Fig. 46). Press it to route signal from the teacher mic to every headphone set connected in the studio or classroom. This is the quickest way to establish communication with the students in Practice or Group mode.
By pressing the All Call button, you turn off all student instrument and voice audio, and students will only hear you (the Teacher) and your instrument. All other selections and button presses (like student box, two way communication, etc.) are disabled.
TIP: My most common uses for All Call include:
- To avoid distraction during a lesson lecture. Since All Call mutes the student station audio, I can be sure the students are focused on my instruction and not distracted by any other audio source from their own station.
- To signal a transition to a new topic or activity. As students are working in Practice or Group mode, I will often use All Call to quickly mute all student sound and pivot to a new activity. Example: Students are working on the melody to piano piece in Practice Mode. After 15 minutes, I press All Call and instruct the students to pause their practicing while we discuss the music theory concepts behind the chord progression for the piano piece. I'm always amazed at how quickly the students look up when I press the All Call button!
When installing your music or language lab, adhere to local building and electrical codes. If you are not familiar with local building regulations for the installation of electrical equipment in your school or studio, seek assistance from maintenance personnel, electrical contractors, and/or local government (county or township) offices for information.
The Planning Stage:
The more time and thought you give to planning your music or language lab, the fewer problems you are likely to face when installing and using it in a teaching situation. The checklist below will assist you in preliminary planning. We recommend that you use the checklist to design a teaching environment that will meet your needs.
Before you begin, consider the following:
- Allow for future expansion: If possible, leave sufficient room for additional equipment and cabling. The GEC5 allows for easy expansion of additional student stations, up to 32 total.
- When planning teacher and student workstations, don't forget that some instruments are freestanding and others require stands, which add to their length, width, and/or depth.
• Take into account student sight lines. It will be important for students to see the Teacher, LCD projector screen, whiteboard, and other teaching aids. - If students are to work and perform in duets, quartets, or customized groups, make an effort to place
student keyboard/workstations so that students within groups can easily establish eye contact. - Ensure that the teacher can easily access his or her instrument, as well as external audio equipment (such as additional instruments, computer/keyboard, digital recorders, CD players/burners, etc.).
- Position the room speakers so that the Teacher, as well as the Students can hear them
Site Plan Checklist:
- Diagram the dimensions of the physical site where the GEC5 will be located. Make sure that the diagram is drawn to scale.
- Note on the diagram the placement of all doors, windows, AC outlets, and Ethernet drops (if there will be computers using a wired internet connection).
- List the equipment that will be used by the teacher including the Teacher Unit, teacher's instrument, any additional MIDI devices/instruments, computer, and audio accessories such as tape decks, CD players/burners, stereo amplifier/receiver, self-powered monitors, and/or speakers.
- How many student stations will the lab contain?
- List the equipment that will be used by each student.
- What are the approximate dimensions of each student station? Include the student bench or chair, allowing sufficient space between the instrument and bench for the student to be seated comfortable and for the teacher and other students to walk between stations.
TIP: I suggest using seats with backs. Students often find piano benches without backs rather uncomfortable if the class lasts more than 30 minutes.
- Draw to scale a diagram of teacher and student workstations, as well as all additional audio and/or MIDI accessories.
- Once the teacher station and student stations are positioned in the diagram, add AC and CAT5 Cable routings. Finally, add the cable routings for the audio accessories (such as tape decks, CD players/burners, stereo amplifiers, etc.).
Cabling Estimates and Requirements:
Here are the different kinds of cable that will be essential to the lab installation:
- AC Cable: carries electrical current to all devices. Be sure that there are enough grounded AC outlets to accommodate the teacher and student stations. The installer must check with the school regarding power requirements, use of extension cords, fire code, etc. to insure that the lab adheres to code. The GEC5 Student Interface Unit does not require an AC outlet, but instruments and computers will.
- Audio Cable carrying:
a. Signals from the teacher's instruments and external audio equipment to the Teacher Unit.
b. Signals from the Teacher Unit to an amplifier (or powered monitors) and a digital recorder.
c. Signals from the student instruments and student computers to the Student Interface Units. - CAT5 Communications Cable: carries audio and communication signals between the Teacher Unit and the Student Interface Units. You will also need CAT5 cable to connect your computer and/or wireless router to the Teacher Unit for GEC5 Controller Application functionality
- Speaker Cable. If your monitors are not self -powered, you will also require speaker wire to carry audio signals from the room amplifier (which may be a standard stereo receiver) to the room speakers. This wire should be of the heaviest gauge practical.
Sizing Cables:
The placement of the equipment in your lab will determine the lengths of cabling required. In order to select the appropriate lengths of communications cable, measure the distance from the Teacher Unit to the floor, floor distance from teacher station to student station, floor to Student Interface, and include an additional twelve to twenty-four inches for movement and slack.
Positioning Equipment:
Begin your installation by:
- Positioning the teacher and student stations in accordance with your site plan.
- Placing all audio accessories in their designated areas.
- Positioning the Teacher Unit and each Student Interface Unit.
Mounting the Student Interface Unit:
Each Student Unit Interface should be mounted on or near the student instruments, making it easier for students to access volume controls and call buttons. This will also minimize the length of audio cables required between student instrument and Student Interface Unit.
Position Student Interface Units so that student headset cables will not be in the way, inhibiting students' natural movement in playing. Position the Student Interface units 1"-2" back from the table edge to help protect the headphone jack and headphone cable from accidental damage. Student Interface units may be attached to desks or wooden tables using wood screws or on top of desks/keyboards using Velcro.
Positioning the Teacher Unit:
The Teacher Unit should be placed near the teacher instrument and close to external audio devices and the room amplifier, for ease of use. The unit can sit on a desktop or be rack-mounted.
Connect Cabling:
Once all equipment is in place, you are ready to lay down the wiring that will connect all lab equipment:
- Start with the AC cabling.
- Next, connect the audio and CAT5 cables at both teacher and student stations.
a. Having permanently mounted the Student Interface units to or near the student instruments, connect all student instrument outputs to the Student Interface inputs.
b. If the student workstations include a computer or other auxiliary devices, connect the audio signals to each Student Interface unit's auxiliary input. Also connect the Mic Out on the back of the Student Interface unit to the student computer's audio input.
c. Connect a CAT5 cable from the Teacher Unit to each Student Interface Unit.
d. Connect the teacher instrument output to the Teacher Unit's instrument inputs.
e. Connect the audio signals from the teacher computer or other auxiliary devices to the Teacher Unit auxiliary inputs.
f. Connect the audio signals from the Record Out jack on the back of the Teacher Unit to any digital recording device or computer audio interface.
g. If the Teacher Unit is to be connected to an external amplification system, connect the Room Outs to the amplifier, receiver, or powered monitors at this time.
h. Using CAT5 cables:
i. Connect your internet cable to one of the network jacks in the back of the Teacher Unit.
ii. Wired: Connect the computer's Ethernet jack to one of the network jacks in the back of the Teacher Unit.
iii. Wireless: Connect your wireless router's Ethernet jack to one of the network jacks in the back of the Teacher Unit.
TIP: In the interest of neatness and in order to avoid potential accidents, you should use many cable ties. In order to minimize potential interference, always try to keep AC, audio, and communications cables as far apart as possible, always attempting to avoid parallel runs. In addition, avoid exposed and/or loose cabling, avoiding cable runs across walkways and aisles.
Setting Up the Apple AirPort Express/Extreme Wi-Fi Network:
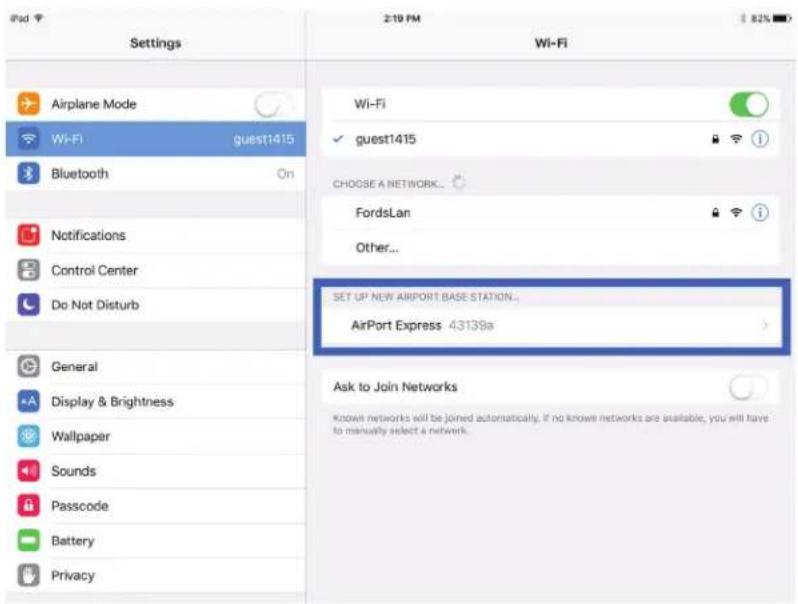
- Open the Wi-Fi settings on your device and select AirPort Express or AirPort Extreme (see Fig. 47).
text_image
Settings Airplane Mode Wi-Fi guest1415 Bluetooth On Notifications Control Center Do Not Disturb General Display & Brightness Wallpaper Sounds Passcode Battery Privacy 2:10 PM Wi-Fi Wi-Fi guest1415 CHOOSE A NETWORK... FordsLan Other... SET UP NEW AIRPORT BASE STATION... AirPort Express 43139a Ask to Join Networks Known networks will be joined automatically. If no known networks are available, you will have to manually select a network.(Fig. 47)
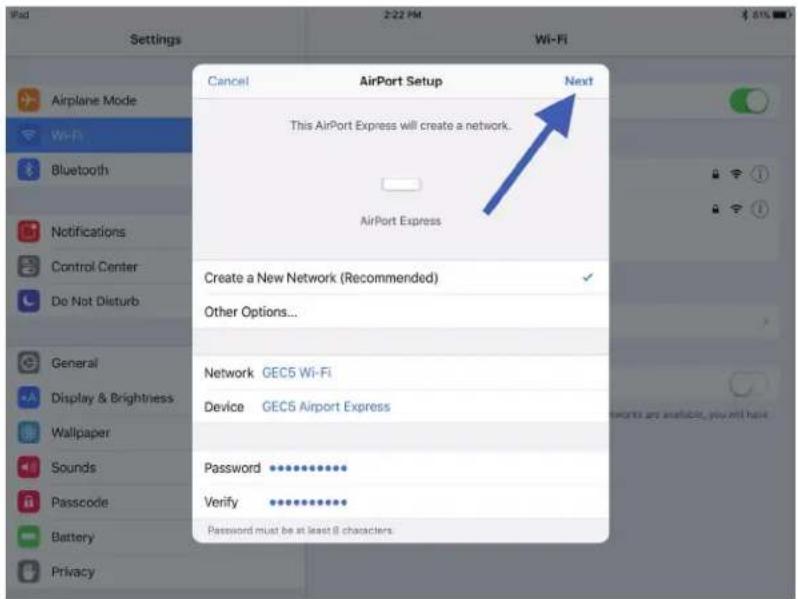
- Select Create a New Network and enter a name and password for your network. If asked to Extend this Network, choose Other Options and select Next (see Fig. 48).
text_image
Airplane Mode Wi-Fi Bluetooth Notifications Control Center Do Not Disturb General Display & Brightness Wallpaper Sounds Passcode Battery Privacy Settings 2:22 PM Wi-Fi Cancel AirPort Setup Next This AirPort Express will create a network. AirPort Express Create a New Network (Recommended) Other Options... Network GEC5 Wi-Fi Device GEC5 Airport Express Password •••••••••••• Verify •••••••••••• Password must be at least 8 characters.(Fig. 48)
GEC5
Installation
GO TO WEBSITE
a. If you do not need access to the Internet and have not plugged an Ethernet cable into the WAN port of the base station select Next (see Fig. 49). Select Continue Anyway in the next screen (see Fig. 50) and then select Done (see Fig. 50).
b. If you need access to the Internet, plug in an Ethernet cable between the WAN port of the AirPort and your upstream network and select Next and then select Done (see Fig. 51).

text_image
Setup Complete Done "GEC5 Wi-Fi" is now available. AirPort Express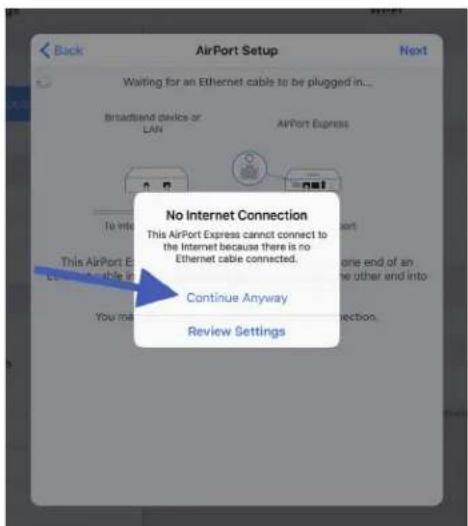
text_image
AirPort Setup Waiting for an Ethernet cable to be plugged in... Broadband device or LAN AirPort Express No Internet Connection This AirPort Express cannot connect to the Internet because there is no Ethernet cable connected. Continue Anyway Review Settings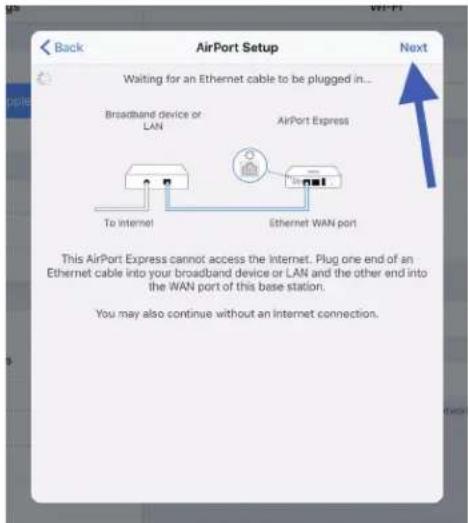
text_image
Back AirPort Setup Waiting for an Ethernet cable to be plugged in... Broadband device or LAN AirPort Express To internet Ethernet WAN port Next This AirPort Express cannot access the Internet. Plug one end of an Ethernet cable into your broadband device or LAN and the other end into the WAN port of this base station. You may also continue without an internet connection.(Fig. 49) (Fig. 50) (Fig. 51)
- Download the AirPort Utility application.
a. Mac and iPad users: Download the AirPort Utility from the App Store.
b. Windows users: Download the AirPort Utility from the the Apple website
https://support.apple.com/kb/DL1547?locale=en_US
c. Tablet users: The AirPort Utility is not currently available for non-iPad tablet users. Setup your Apple AirPort Express/Extreme using the Mac, iPad, or PC application. You can then connect to the network using your tablet.
GEC5
Installation
GO TO WEBSITE
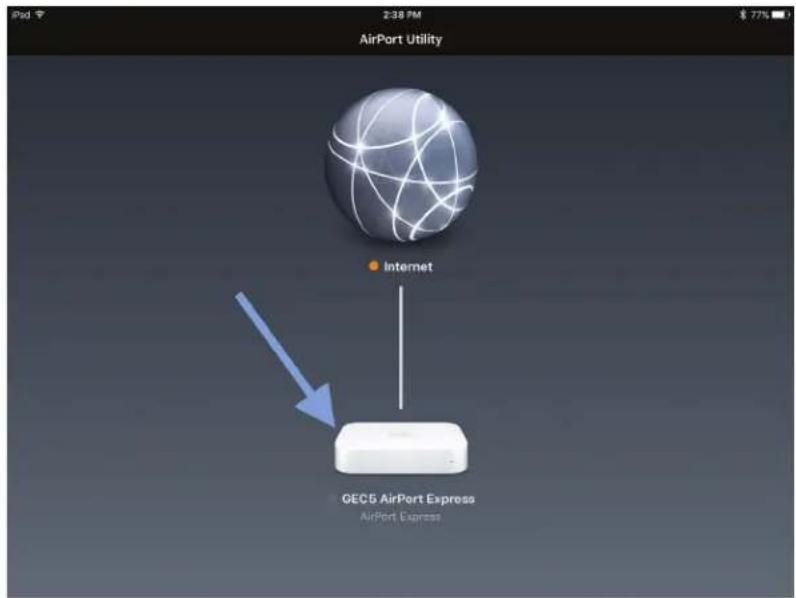
- Open the AirPort Utility and select your AirPort Express/Extreme router (see Fig. 52).
text_image
AirPort Utility Internet GEC5 AirPort Express AirPort Express(Fig. 52)
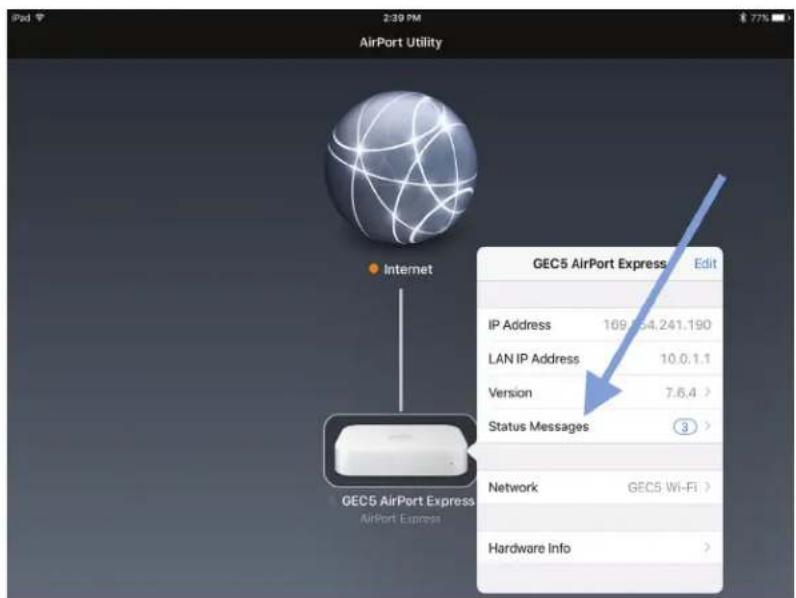
a. If you connected your AirPort to the Internet (step 2b), you may have a Double NAT status message. This is normal and can be safely ignored.
text_image
AirPort Utility Internet GEC5 AirPort Express AirPort Express GEC5 AirPort Express Edit IP Address 109.854.241.190 LAN IP Address 10.0.1.1 Version 7.6.4 > Status Messages ③ > Network GEC5 Wi-Fi > Hardware Info >(Fig. 53)
a. If you connected your AirPort to the Internet (step 2b), you may have a Double NAT status message. This is normal and can be safely ignored.

text_image
AirPort Utility Back Status Messages Ignore this issue More Info Internet Connection Your AirPort base station does not have a valid IP address. Make sure your AirPort base station is connected to your broadband modem or local network, verify your settings, and try again. If you still can't connect, contact your Internet service provider. Ignore this issue More Info No DNS Servers This AirPort base station doesn't have any DNS server addresses and might have trouble connecting to the internet. ignore this issue AirPort Utility Back Status Messages Ignore this issue More Info Internet Connection Your AirPort base station does not have a valid IP address. Make sure your AirPort base station is connected to your broadband modem or local network, verify your settings, and try again. If you still can't connect, contact your Internet service provider. Ignore this issue More Info No DNS Servers This AirPort base station doesn't have any DNS server addresses and might have trouble connecting to the internet. ignore this issue(Fig. 54)
- The LED on the front of the AirPort should be green. Your AirPort is now ready to use.
TIP: For additional Apple AirPort support visit: https://www.apple.com/support/airport/
Troubleshooting:
If your GEC system is not working properly, always first check instrument volume levels, the Student Interface and Teacher Unit volume levels, audio connections, and communications connections. As with any computer or software driven product, rebooting can solve many issues. If after trying all these suggestions the issues are not resolved, contact your Korg-Authorized Educational Dealer or Korg U.S.A. Technical Support via email at support@korgusa.com
As a thank you to our customers, we offer complimentary product support via e-mail for products within their warranty period. For operational support for products outside of their warranty period, please refer to our extensive on-line support materials (manuals, FAQs, videos, etc.).
For more information, visit us online: http://www.korg.com/us/support/contact/
Note: This equipment has been tested and found to comply with the limits for a Class A digital device, pursuant to part 15 of the FCC Rules. These limits are designed to provide reasonable protection against harmful interference when the equipment is operated in a commercial environment. This equipment generates, uses, and can radiate radio frequency energy and, if not installed and used in accordance with the instruction manual, may cause harmful interference to radio communications. Operation of this equipment in a residential area is likely to cause harmful interference in which case the user will be required to correct the interference at their own expense.