
Nu:Tekt HA-S - Hi-Fi System KORG - Free user manual and instructions
Find the device manual for free Nu:Tekt HA-S KORG in PDF.


| Product Type | Hi-Fi Headphone Amplifier & DAC |
| Brand | Korg |
| Model | Nu:Tekt HA-S |
| Dimensions (W x D x H) | 100 mm x 60 mm x 20 mm |
| Weight | 150 g (without cable) |
| Power Supply | USB-C 5V DC, 500mA |
| Audio Input | USB-C (digital), 3.5mm stereo (analog) |
| Audio Output | 3.5mm stereo headphone jack, 1/4" adapter included |
| Frequency Response | 20 Hz - 40 kHz (+/-0.5 dB) |
| Maximum Output Power | 150 mW + 150 mW (32 Ω) |
| Supported Audio Formats | PCM up to 384 kHz/32-bit, DSD up to 11.2 MHz |
| Gain Switch | Low / High (0 dB / +10 dB) |
| Battery | Built-in rechargeable, 1000 mAh, up to 8 hours playback |
| Display | LED indicator for power and signal |
| Construction | Aluminum chassis, compact and portable |
| Compatible Devices | PC, Mac, Android, iOS (with OTG adapter) |
| Cleaning Instructions | Wipe with a soft, dry cloth. Do not use solvents. |
| Safety Warnings | Do not expose to moisture or extreme temperatures. Avoid prolonged listening at high volume to prevent hearing damage. |
| Spare Parts Availability | Micro USB cable, 3.5mm adapter, foam case available separately. |
| Repairability | Professional repair only due to compact design. Contact Korg service center. |
Frequently Asked Questions - Nu:Tekt HA-S KORG
User questions about Nu:Tekt HA-S KORG
0 question about this device. Answer the ones you know or ask your own.
Ask a new question about this device
Download the instructions for your Hi-Fi System in PDF format for free! Find your manual Nu:Tekt HA-S - KORG and take your electronic device back in hand. On this page are published all the documents necessary for the use of your device. Nu:Tekt HA-S by KORG.
USER MANUAL Nu:Tekt HA-S KORG
Cautions Before Assembly....5
Tools to prepare....5
Checking the parts....5
Assembly 6
Preparing the main circuit board and Nutube circuit board.....6
Install the main circuit board into the case 8
Part Names and Functions .... 11
How to Use the Nu:Tekt HA-S....11
Adjusting the main circuit board 11
Troubleshooting....12
Replacing the operational amplifier....12
Specifications....12
Mounting Diagram....13
List of mounted parts....14
CIRCUIT DIAGRAM....16
Thank you for purchasing the Nu:Tekt HA-S.
To help you get the most out of your new headphone amp, please read this manual carefully.
Main features
- The HA-S is a kit to assemble a hi-fi headphone amp that utilizes a Korg Nutube vacuum tube.
- Although this headphone amp is powered with only two batteries, it can drive the Nutube with a line voltage of 26 V for an authentic vacuum tube sound.
- The filament is powered by a DC to DC converter, which consumes less electric current.
- An NFB (negative feedback) switch is used, which lets you switch the NFB circuit on and off as you like.
- The headphone amp output uses an IC socket, which allows the operational amplifier to be replaced. Two types of operational amplifiers are included.
- The Nutube anode load resistance value can be adjusted, letting you enjoy different sounds by changing the steepness of the load curve for the vacuum tube.
- This unit is shaped like a mint can case, which is familiar to fans of these kinds of cases. –The unit also includes a protector for the power switch.
- An acrylic cover is provided that features the Nu:Tekt design, letting you see the light from the Nutube through the cover.
About Nutube
Nutube is a new vacuum tube developed by KORG INC. and Noritake Itron Corporation and that utilizes technology from vacuum fluorescent displays. As with conventional vacuum tubes, the Nutube is constructed with an anode, grid and filament, and operates as a complete triode tube. Furthermore, it generates the response and same rich harmonic characteristics of conventional vacuum tubes.

If a strong impact is applied to this unit, high-frequency noise may be output. This is due to the structure of the Nutube; it is not a malfunction.
Precautions
Location
Using the unit in the following locations can result in a malfunction.
• In direct sunlight
- Locations of extreme temperature or humidity
• Excessively dusty or dirty locations
- Locations of excessive vibration
- Close to magnetic fields
Power supply
Be sure to turn the power switch to OFF when the unit is not in use. Remove the battery in order to prevent it from leaking when the unit is not in use for extended periods.
Handling
To avoid breakage, do not apply excessive force to the switches or controls.
Care
If the exterior becomes dirty, wipe it with a clean, dry cloth. Do not use liquid cleaners such as benzene, alcohol or thinner, or cleaning compounds or flammable polishes.
Keep this manual
After reading this manual, please keep it for later reference.
Keeping foreign matter out of your equipment
Never set any container with liquid in it near this equipment. If liquid gets into the equipment, it could cause a breakdown, fire, or electrical shock. Be careful not to let metal objects get into the equipment.
Notice regarding disposal (EU only)

If this symbol is shown on the product, manual, battery, or package, you must dispose of it in the correct manner to avoid harm to human health or damage to the environment. Contact your local administrative body for details on the correct disposal method. If the battery contains heavy metals in excess of the regulated amount, a chemical oil is displayed below the symbol on the battery or battery package.
IMPORTANT NOTICE TO CONSUMERS
This product has been manufactured according to strict specifications and voltage requirements that are applicable in the country in which it is intended that this product should be used. If you have purchased this product via the internet, through mail order, and/or via a telephone sale, you must verify that this product is intended to be used in the country in which you reside.
WARNING: Use of this product in any country other than that for which it is intended could be dangerous and could invalidate the manufacturer's or distributor's warranty. Please also retain your receipt as proof of purchase otherwise your product may be disqualified from the manufacturer's or distributor's warranty. Company names, product names, and names of formats etc. are the trademarks or registered trademarks of their respective owners.
Cautions Before Assembly
Be careful of injury when handling parts
Use caution not to injure yourself due to the protruding parts when handling the circuit board. Use cotton work gloves to protect your hands when working. Also, be sure to wash your hands thoroughly after working.
Tighten screws and nuts at a perpendicular angle
Tightening screws and nuts that are inserted diagonally may damage the threads, making it impossible to tighten them again. Be sure to tighten screws so that they are inserted perpendicular to the surface. Use caution, as applying too much torque and tightening the screws too tightly may damage the parts.
Do not injure yourself or scratch the surface with the tools.
When using tools to tighten screws and nuts, make sure not to injure yourself, such as by getting your fingers pinched. Work carefully to avoid scratching the case or circuit board with the tools. Provide a sufficiently large work space to complete the assembly procedure, and prepare work mats so parts will not be scratched.
Avoid losing the screws and nuts
Handle the screws and nuts with caution, to avoid losing them. Do not use other screws or nuts aside from the ones included with this kit, and do not use the screws and nuts included with this kit for any other purpose.
Tools to prepare
You will need the following tools in order to assemble this kit.
Note: You will also need the AA alkaline batteries and so on. These items are not included, so please obtain them separately.
- Precision screwdriver (Phillips head No. 0, No. 1, flathead 2.4 mm) Use a screwdriver that matches the size of the screw. Using the wrong size of screwdriver may damage the screw or make it impossible to tighten.
• Wrench (two-sided, 10 mm wide)
Checking the parts
Before assembly, make sure that all parts are on hand. (Page 6, Page 8)
Contact us at www.nutekt.org if any parts are missing or damaged.
TIP If you are concerned about whether you can assemble this kit or whether you might make a mistake, refer to the video explanations available on the Web (www.nutekt.org), or use our assembly service support (chargeable).
Assembly
Preparing the main circuit board and Nutube circuit board
Parts List
| 1 Circuit board cushion PORON 7t, 8x19 1 | ||
| 2 Cushion N1 Sponge 1t, 5x40 2 | ||
| 3 Cushion N2 Sponge 1t, 5x15 2 | ||
| 4 Harness | -- | 1 |
| 5 Hex spacers M2, L=3mm 2 | ||
| 6 Hex spacers M2, L=16mm 4 | ||
| 7 Internal tooth lock washers M2 4 | ||
| 8 Screws M2, L=5mm, Black 2 |
Building the Nutube circuit board unit
- Peel off the release paper from one side of the circuit board cushion (1), and attach it to the back side of the Nutube circuit board.
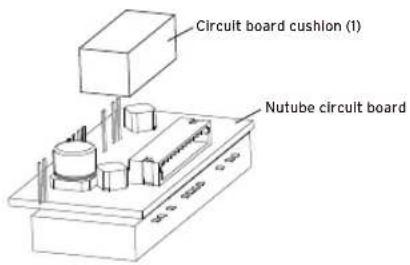
- Attach the cushion onto the Nutube circuit board unit.
Attach cushion N1 (2) onto the edge of the Nutube circuit board. Attach cushion N2 (3) onto both upper edges of the Nutube.
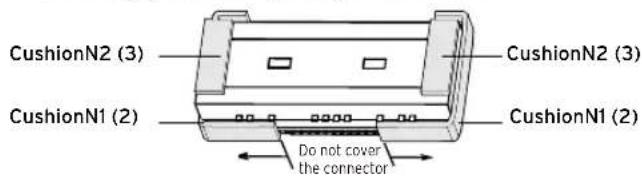
Attaching the Nutube circuit board unit
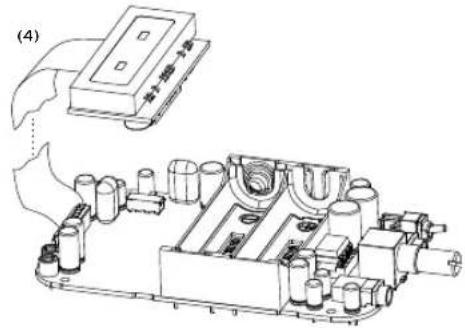
- Connect the Nutube circuit board unit and the main circuit board with the harness (4).
Do not use excessive force, as the wire can easily break. Also, do not repeatedly connect and disconnect the harness.
- Remove the release paper on the circuit board cushion (1) that you attached to the Nutube circuit board, and attach the circuit board unit to the main circuit board.
Make sure that the Nutube does not touch the adjacent parts or the case.
natural_image
Technical line drawing of a mechanical assembly with components and a labeled part (4), no readable text or symbols present.Attaching the hex spacers
1. Mount the hex spacers (5, 6) onto the circuit board.
Use the screws (8) to affix the two hex spacers (6) and the internal tooth lock washers (7) for the volume and jack side. In the same way, tighten the hex spacers (6) on the Nutube circuit board side and the internal tooth lock washers (7) by tightening the screws for the lower hex spacers (5).
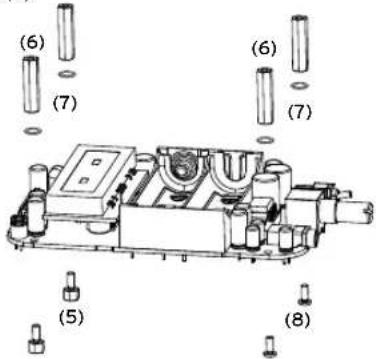
Since the screws (8) cannot be retightened from the outside of the case, use a precision screwdriver (Phillips #1) to firmly tighten the screws.
Install the main circuit board into the case
Parts List
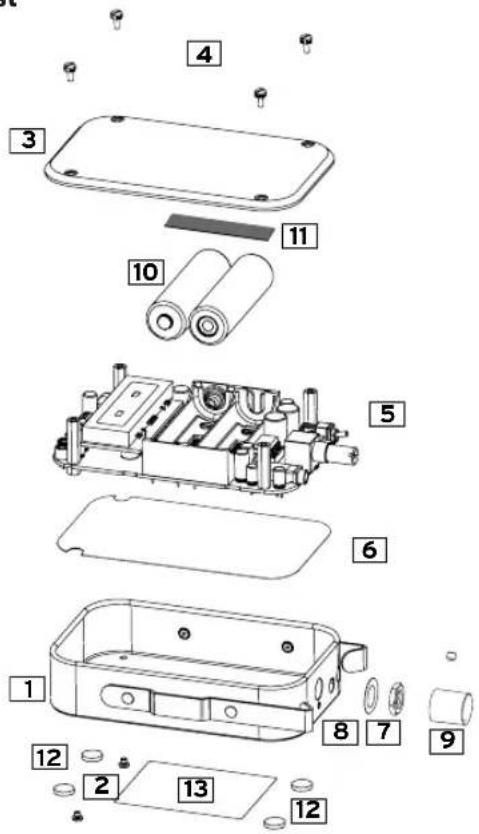
| 1 | Case Mint-tin size case 1 | ||
| 2 | Pan head screws M2, No.0, L=2mm, Silver 2 | ||
| 3 | Cover Resin treatment 1 | ||
| 4 | Knurled screw M2, L=6mm | 4 | |
| 5 | Main circuit board Parts for assembly on pages 6 and 7 1 | ||
| 6 | Insulation sheet PET 1 | ||
| 7 | Volume nut Included with Volume 1 | ||
| 8 | Volume washer | Included with Volume | 1 |
| 9 | Volume knob | -- | 1 |
| 10 | Battery | AA alkaline batteries (sold separately) | 2 |
| 11 | Battery cushion | 1t, 30 x 10 | 1 |
| 12 | Rubber feet | -- | 4 |
| 13 | Rating label | -- | 1 |

Make sure not to lose any of the small screws.
Fix the main circuit board in place on the case
1. Put the insulation sheet [6] into the case [1].
Peel off the release paper on the double-sided tape attached to the insulation sheet [6], and attach it to the case [1].
Double-sided tape (bottom side)
![KORG Nu:Tekt HA-S - Put the insulation sheet [6] into the case [1]. - 1](/content/2026/05/1002540/images/edc5d09c6362a83dc95f39f6c47446522527a50da25aa877b9ef039107a913ae.jpg)
Be careful not to cover the screw holes
![KORG Nu:Tekt HA-S - Put the insulation sheet [6] into the case [1]. - 2](/content/2026/05/1002540/images/b023e375fc41f8cb6a2041f335b859ceba881245f2c32dbf24a8bb192a84d59b.jpg)
natural_image
Technical line drawing of a rectangular metal enclosure with mounting holes and a handle (no text or symbols)![KORG Nu:Tekt HA-S - Put the insulation sheet [6] into the case [1]. - 3](/content/2026/05/1002540/images/ec80a1363cfb45c202e715e7964f8b31d575239163cec6c10f23228b62939d7b.jpg)
natural_image
Pure technical line drawing of a rectangular frame with mounting holes and diagonal lines (no text or symbols)- Slide the main circuit board (assembled) into the case [1] to mount.
![KORG Nu:Tekt HA-S - Put the insulation sheet [6] into the case [1]. - 4](/content/2026/05/1002540/images/9abe3b6aea18245fdbb4e8ef25198273c790ff5bc78dd2c44c22f6d9a746c985.jpg)
natural_image
Technical line drawing of a mechanical device with no visible text or symbolsTIP If the volume control is attached to the circuit board using a washer and nut, remove the washer and nut and then mount the main circuit board onto the case.
- Attach the washer [8] to the volume, and then use the volume nut [7] to temporarily tighten the volume onto the case.
Make sure that the stereo mini jack protrudes from the hole in the case.
![KORG Nu:Tekt HA-S - Put the insulation sheet [6] into the case [1]. - 5](/content/2026/05/1002540/images/639d1d1c09c79f051cf4d37b03f1989f5c942972757fdf51b7053d80ffd55835.jpg)
natural_image
Technical line drawing of a mechanical device interior with labeled parts (no text or symbols present)- Fix the main circuit board in place by screwing the pan head screws [2] into the two holes at the bottom of the case.
![KORG Nu:Tekt HA-S - Put the insulation sheet [6] into the case [1]. - 6](/content/2026/05/1002540/images/ac31b5fa5eaf3c5331abfff4d7bb0b4a16e13071659a602f7ca290d07a2e265d.jpg)
natural_image
Line drawing of a mechanical device with mounting brackets and a handle (no text or symbols)TIP Use a precision screwdriver (Phillips #0) to tighten the screws.
-
Retighten the volume nut [7] to be fixed in place.
-
Attach the knob [9] onto the volume.
Mount the volume knob onto this spindle.
Tighten the fastener screw with a hex wrench.
![KORG Nu:Tekt HA-S - Put the insulation sheet [6] into the case [1]. - 7](/content/2026/05/1002540/images/c62d88fcbbd2e62377fc74ca4ef4a5d49f7a51e16022889ebe871c8bd134ac02.jpg)
Put the batteries and close the case
1. Put the batteries [10] in.
![KORG Nu:Tekt HA-S - Put the batteries [10] in. - 1](/content/2026/05/1002540/images/4979753792c42fafd486ad895f2d1c3f43e0e5e0c63d811d502f08b909b030d0.jpg)
natural_image
Technical line drawing of an open battery pack with two batteries above it (no text or symbols)Batteries are not included. You will need to purchase a commercially available AA alkaline batteries.
2. Peel off the protective sheet on the cover [3], and attach the battery cushion [11].
A protective sheet is attached to both sides of the cover. After peeling off the protective sheet on the back side, attach the battery cushion in the position shown in the diagram below.
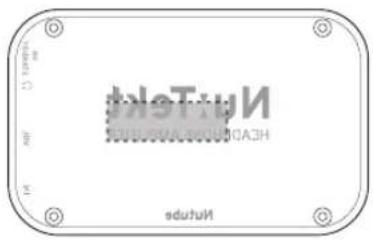
3. With the printed jack names facing the jack side, put the cover [3] on, and fasten the knurled screws [4] in four places.
Take care not to pinch the harness or other parts when closing the cover.
Tighten the knurled screws by hand. Overtightening the screws using a screwdriver or other tool may damage the screws or the main unit.
![[4] Nu:Tekt HEADPHONE AMPLIFIER NutTube [3]](/content/2026/05/1002540/images/f8870ed424883c24a40aa596f154184469796c46d9b01c3f29c70048c6e71f34.jpg)
4. Attach the rubber feet [4] onto the case.
Attach the rubber feet [12] and rating label [13] so that they do not overlap, as shown in the diagram.
![KORG Nu:Tekt HA-S - Attach the rubber feet [4] onto the case. - 1](/content/2026/05/1002540/images/e1f54f728219378237608dc16687221425652147bc6c7919f662186933331cd7.jpg)
natural_image
Technical line drawing of a rectangular electronic device with mounting holes and a central rectangular component (no text or symbols)Part Names and Functions
natural_image
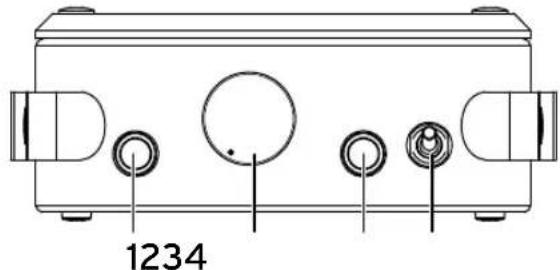
Technical line drawing of a mechanical component with four circular features and labeled dimension 1234 (no text or symbols beyond label)- IN jack: Connect a portable music player or similar device here.
- VOL (VOLUME) knob: Used for adjusting the volume.
- ♩ jack: Connect a pair of headphones or stereo earphones.
- ON/STANDBY switch: Turns on/off the device.
How to Use the Nu:Tekt HA-S
Do not connect headphones, an audio player or other device to the jack or the IN jack before turning on the power.
- Turn the volume all the way down (counter-clockwise), and set the ON/STANDBY switch to the upper position to turn on the power. If the NuTube does not light up, turn off the power immediately and check to make sure that there are no mistakes in assembly.
TIP Note that the brightness of the Nutube may look different from left to right. - Connect a pair of headphones or earphones to the ☐ jack, and connect an audio player or other device to the IN Jack.
- Adjust the volume using the VOLUME knob. Turn the volume up gradually (clockwise) while checking the sound.
Adjusting the main circuit board
The main circuit board comes preadjusted at the factory. The main circuit board generally does not need to be adjusted, but if you notice a difference in volume between left and right, adjust VR 4, 5, 6, and 7 to balance the levels between left and right. The tonal character will also change when adjusting the sound. Adjust the settings to get the sound you like.
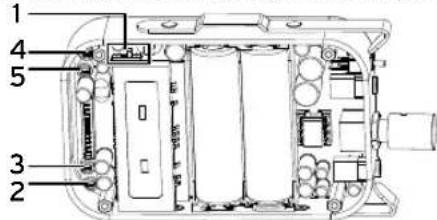
- NFB switch: Setting the switch to "A" will set the circuit to a non-NFB circuit. The harmonics present in the Nutube will be amplified to create a sound that is even closer to that of a vacuum tube. Setting the switch to "B" will enable the NFB circuit, offering a hi-fi sound.
Setting the switch to "A" will increase the output level, due to the characteristics of the circuit.
The vacuum tube effect will change depending on the output level of the device connected to the input of the HA-S. Although, the effect is more prominent at higher levels, if the sound distorts, however, adjust by lowering the levels.
2. BIAS(L)(VR6)
- BIAS(R)(VR7): This sets the Nutube bias voltage. Adjust VR6 and 7 while listening to the sound, in order to achieve maximum volume.
4. Anode Load(L)(VR4)
- Anode Load(R)(VR5): This adjusts the Nutube's anode load resistance. In general, the unit is used with VR 4 and 5 turned all the way to the right. However, since the tonal character of the sound changes according to the load resistance, adjust VR 4 and 5 to get the sound that you like.
TIP Turning the fixed resistors (VR 4, 5) all the way to the left will result in no sound.
TIP You may hear a crackling sound when turning the VR4, 5, 6 or 7 fixed resistors while playing sound, but this is not a malfunction.
Troubleshooting
When you have successfully finished assembling the unit, test its operation while reading "Part Names and Functions".
If you have found any problems with assembly or operation, use the troubleshooting steps below.
Some parts are left over.
- The kit may contain some extra parts that are not used, such as resistors or capacitors.
There aren't enough parts.
• If you have lost some parts, contact us at www.nutekt.org.
- Also, contact us at www.nutekt.org if any parts were missing or damaged before you started to assemble the unit.
I can't assemble the unit, because I broke a part.
- Please contact us at www.nutekt.org.
The unit makes an abnormal sound when I tilted it or shook it after assembly.
- A loose screw or other part might be left inside the unit. Open the lower case and check the inside.
The volume or jacks are loose.
- Make sure that the nuts are fastened tightly. Remove the knobs from the volume and retighten the nuts.
The sound is distorted.
- The input levels may be set too high. Adjust the volume level on the input device.
A pop noise is heard when turning on the power
- This product makes a popping sound when the power is turned on, This is not a malfunction because the muting circuit is not equipped in pursuit of the superior sound. Connect a pair of headphones or the like to the jack after you turn on the power.
Replacing the operational amplifier
The operational amplifier can be replaced with a DIP8 type operational amplifier. The power supply for the OP amp is a 24–28 V single power supply system. When replacing the operational amplifier, be sure that the replacement uses the same rated voltage.
Replacing the operational amplifier with any other operational amplifier besides the one included with this kit is to be done on your own responsibility.
Use care when replacing the operational amplifier, so as not to bend or break the legs.
Make sure that the components to mount are faced correctly when replacing the operational amplifier. Install the pin #1 of the operational amplifier (shown with a mark) so that it lines up with the dot on the circuit board.
Specifications
· Vacuum tube: Nutube 6P1
- Connectors and jacks: IN jack (stereo mini phone jack), 📄 jack (stereo mini phone jack)
- Controls: Volume, NFB switch (internal)
- Output Impedance: 10Ω; recommended load: 15Ω or greater
· Power: AA alkaline batteries (sold separately)
· Battery life: Approx. 9 hr. (using alkaline batteries)
· Dimensions (W x D x H): 111 x 65 x 29 mm / 4.37" x 2.56" x 1.14"
· Weight: 110 g / 3.88 oz. (without batteries)
- Included items: Owner's Manual
* Specifications and appearance are subject to change without notice for improvement.
Mounting Diagram
![C11 + C15 UR4 UR5 [C B] SW2 + [A] C17 C26 + CN2 C24 CN1 C22 UR7 UR6 C21 + KLM55126 AA SIZE AA SIZE C18 + SWI BATTI C19 + C20 + PH2 IC1S IC1 UR1 C9 C23 + HA-S + C12 + PH1 + C13 + CB](/content/2026/05/1002540/images/8c9afab18655c38acc8d8e050c6d13a52658f46362056c5c8c1d98023cad45c0.jpg)
List of mounted parts
Main circuit board
| Part number | Circuit number | Part name | Rating | Quantity |
| 1 IC1 | Operational amplifier | NJM4580 1 | ||
| MUSESO1 1 | ||||
| 2 IC1S | Operational amplifier socket | 8pin DIP 1 | ||
| 3 C10, C14 | Chip ceramic capacitor | 10PF CH 2 | ||
| 4 C27, C28 | Chip ceramic capacitor 0.0022μF B | 2 | ||
| 5 C16, C17 | Film capacitor 0.012μF FILM | 2 | ||
| 6 C8, C11, C12, C15, C23 | Electrolytic capacitor 10μF/25V over | 5 | ||
| 7 C9, C13 Non-polar | capacitor | 10μF/25V over BP | 2 | |
| 8 C21, C22 | Electrolytic capacitor 47μF/16V over | 2 | ||
| 9 C26 | Electrolytic capacitor 100μF/35V over | 1 | ||
| 10 C19, C20 | Electrolytic capacitor 220μF/25V over | 2 | ||
| 11 C24 | Electrolytic capacitor | 220μF/6.3V over | 1 | |
| 12 C18 | Electrolytic capacitor | OPEN -- | ||
| 13 R16 | Chip resistor | 0 | 1 | |
| 14 R29, R30 | Chip resistor | 10 1/4W | 2 | |
| 15 R32 | Chip resistor | 1K | 1 |
| Part number | Circuit number | Part name | Rating | Quantity |
| 16 | R35, R36 | Chip resistor | 4.7K | 2 |
| 17 | R6, R7, R21, R24, R26, R28 | Chip resistor | 10K | 6 |
| 18 | R8, R9 | Chip resistor | 22K | 2 |
| 19 | R10, R12, R17, R18 | Chip resistor | 47K | 4 |
| 20 | R14, R15, R20, R23 | Chip resistor | 100K | 4 |
| 21 | BATT1 | Battery box | BATTERY BOX 1 | |
| 22 | “+” side electrode | -- | 2 | |
| 23 | “-” side electrode | -- | 2 | |
| 24 | CN2 | Connector | B12B-ZR | 1 |
| 25 | PH1, PH2 | Stereo mini phone jack | PJ-321 | 2 |
| 26 | SW2 | Slide switch | MK-22D10-G2 | 1 |
| 27 | SW1 | Toggle switch | 2UDI-T1 | 1 |
| 28 | VR6, VR7 | Trimmer Potentiometer | 10K B | 2 |
| 29 | VR1 | Volume | 100K A | 1 |
| 30 | VR4, VR5 | Trimmer Potentiometer | 200K B 2 |
Nutube circuit board
| Part number | Circuit number | Part name | Rating | Quantity |
| 31 | IC3 Voltage regulator TLV61046A 1 | |||
| 32 | IC2 Voltage regulator TPS62510 1 | |||
| 33 | Q1, Q2 J-FET 2$K209 2 | |||
| 34 | C4 | Chip ceramic capacitor | 22PF CH 1 | |
| 35 | C5 | Chip ceramic capacitor 0.001μF B | 1 | |
| 36 | C3 | Chip ceramic capacitor 0.1μF B | 1 | |
| 37 | C6 | Chip ceramic capacitor 4.7μF B | 1 | |
| 38 | C7 | Chip ceramic capacitor 4.7μF B | 1 | |
| 39 | C1, C2 | Chip ceramic capacitor 22μF B | 2 | |
| 40 | C25 | Chip Electrolytic capacitor | 390μF/2.5V over | 1 |
| 41 | C29, C30, C31, C32 | Chip ceramic capacitor 10μF B | 4 | |
| 42 | R33 | Chip resistor | 0 | 1 |
| 43 | R1 Chip resistor 1 | |||
| 44 | R31 Chip resistor 6.2 | 1 | ||
| 45 | R11, R13 | Chip resistor | 10K | 2 |
| 46 | R3, R5 | Chip resistor | 62K | 2 |
| 47 | R2 | Chip resistor | 120K | 1 |
| 48 | R4 | Chip resistor | 2M | 1 |
| 49 | R34 | Chip resistor | OPEN | -- |
| 50 | L1 | Chip inductor | 2.2μH | 1 |
| 51 | L2 | Chip inductor | 10μH | 1 |
| 52 | CN1 | Connector | S12B-ZR | 1 |
| 53 | V1 | Nutube (vacuum tube) | Nutube 6P1 | 1 |
CIRCUIT DIAGRAM
![Q1 2SK209 R11 10K Q2 2SK209 R13 10K V1 SP1 CN1 S12B-ZR GND 26V 1.8V-3.6V R33 0 R34 OPEN C1 C3 22uF B C3 0.1uF B IC2 TPS62510 R2 120k R3 62K C4 2219F CH R31 0.2 C25 22uF B C26 100uF/35V L2 10uH Co IC3 11.761046A R4 2M C5 0.001uF B R5 62K C7 4.7uF B C29 10uF B C30 10uF B C31 10uF B C32 100uF B [ INPUT ] PH1 PJ-321 CN2 H12H/R CN1 S12B-ZR R16 0 R32 1K C18 OPEN VR4 200K B R17B OPEN R17 R37 OPEN C16 R38 OPEN SW2A 47K R15B OPEN R15 R39 OPEN C17 R40 OPEN SW2B 47K R20B OPEN R20 C9 VR1A 100K_A CW 100k/25V BP C10 10PF C1I IC1A 4.7K R35 10kW NJM4580 C27 0.0022oF B R29 10 1/4W C19 220uF/25V R26 10K OXD [ OUTPUT ] PH2 PJ-321 SWIB 2UDI-TI SWIA 2UDI-TI BATT1 BATTERY_BOX C8 R6 10kV/25V VCC 2 R8 47K R10 47K VR6 10K B C21 47eF/16V C12 R7 10kV/25V VCC 2 R9 47K R12 47K VR7 10K B C22 47eF/16V C24 220uF/6.3V VCC 5 VR5 200K B VCC 5 R14 100K AC 47k C23 10uF/25V IC1C NJM4580 R36 4.7K C28 0.0022oF B R30 10 1/4W NJM4580 C20 220uF/25V R36 4.7K C28 0.0022oF B R36 4.7K C28 0.0022oF B R36 4.7K C28 0.0022oF B R36 4.7K C28 0.0022oF B R36 4.7K C28 0.0022oF B R36 4.7K C28 0.0](/content/2026/05/1002540/images/e2a41ad8a23e9350c47a0574585e47227df54d74a80e9b14d7538fe9ecbf3605.jpg)

- Main features
- About Nutube
- Precautions
- Location
- Power supply
- Handling
- Care
- Keep this manual
- Keeping foreign matter out of your equipment
- Notice regarding disposal (EU only)
- IMPORTANT NOTICE TO CONSUMERS
- Cautions Before Assembly
- Be careful of injury when handling parts
- Tighten screws and nuts at a perpendicular angle
- Do not injure yourself or scratch the surface with the tools.
- Avoid losing the screws and nuts
- Tools to prepare
- Checking the parts
- Assembly
- Preparing the main circuit board and Nutube circuit board
- Building the Nutube circuit board unit
- Attaching the Nutube circuit board unit
- Attaching the hex spacers
- Mount the hex spacers (5, 6) onto the circuit board.
- Install the main circuit board into the case
- Fix the main circuit board in place on the case
- Put the insulation sheet [6] into the case [1].
- Put the batteries and close the case
- Put the batteries [10] in.
- Peel off the protective sheet on the cover [3], and attach the battery cushion [11].
- With the printed jack names facing the jack side, put the cover [3] on, and fasten the knurled screws [4] in four places.
- Attach the rubber feet [4] onto the case.
- Part Names and Functions
- How to Use the Nu:Tekt HA-S
- Adjusting the main circuit board
- BIAS(L)(VR6)
- Anode Load(L)(VR4)
- Troubleshooting
- Some parts are left over.
- There aren't enough parts.
- I can't assemble the unit, because I broke a part.
- The unit makes an abnormal sound when I tilted it or shook it after assembly.
- The volume or jacks are loose.
- The sound is distorted.
- A pop noise is heard when turning on the power
- Replacing the operational amplifier
- Specifications
- List of mounted parts
Brand : KORG
Model : Nu:Tekt HA-S
Category : Hi-Fi System