Superfone Canvas A100 - Smartphone Micromax - Free user manual and instructions
Find the device manual for free Superfone Canvas A100 Micromax in PDF.

User questions about Superfone Canvas A100 Micromax
0 question about this device. Answer the ones you know or ask your own.
Ask a new question about this device
Download the instructions for your Smartphone in PDF format for free! Find your manual Superfone Canvas A100 - Micromax and take your electronic device back in hand. On this page are published all the documents necessary for the use of your device. Superfone Canvas A100 by Micromax.
USER MANUAL Superfone Canvas A100 Micromax
Congratulations on becoming a proud owner of the Micromax A100 Android mobile phone. You have now joined the millions of satisfied Micromax customers spread across the Globe. Your A100 device offers you these exciting features and much more:
■ Android 4.0.4 (ICS)
■ 4.95 inch full touch display
■ Dual SIM (3G Support)
■ 5 MP camera
■ 1GHz processor
■ External Memory (Expandable to 32 GB)
■ Dual Band
■ Multimedia
■ Gravity Sensor
- Bluetooth
User Guide
Contents
1 Welcome 2
1 Phone Layout 5
1.1 Icons and Indicators....6
2 Getting Started 7
2.1 Insert SIM card....7
2.2 Insert Memory card 8
2.3 Unlock the phone....8
3 Placing and Receiving Calls 9
3.1 Make a call 10
3.2 Conference Call.... 10
3.3 End a call.... 11
3.4 Disable Phone Calls (Airplane mode).... 11
3.5 Using the Touch screen....11
4 The Home Screen 13
4.1 Customize Home Screen.... 14
4.1.1 Set wallpapers....14
4.1.2 Add Widget to home screen .... 14
5 Working With Menus 14
5.1 Menu Icons.... 15
5.2 Open and Close the Launcher 16
5.3 Context Menus.... 17
5.4 Options menus....17
6 Connect to the Internet 18
6.1 Access Internet via Wi-Fi.... 18
7 Managing Notifications 19
7.1 Open the Notifications Panel.... 19
7.2 Respond to Notifications.... 19
User Guide
7.3 Close Notifications Panel.... 20
8 Messaging 21
8.1 Create and Send Multimedia Message.... 22
8.2 Forward a message 23
8.3 Lock a Message.... 23
8.4 Using the Onscreen Keyboard 24
8.5 Enter Various Characters 25
9 Multimedia 25
9.1 Camcorder 25
9.2 Gallery 26
9.2.1 Share anA bum....26
9.3 Music....27
9.4 FM Radio 28
10 Manage Accounts 28
10.1 Why Use a Google Account.... 28
11 Connect to Networks and Devices 29
11.1 Connect to Internet.... 29
11.2Connect to Wi-Fi Networks 29
11.3Pair With Bluetooth Devices.... 29
11.4 Install Secure Certificate from SD Card.... 30
12 Applications 30
2 Health and Safety Precautions 31
3 Taking Care of Your Device 33
1 Phone Layout
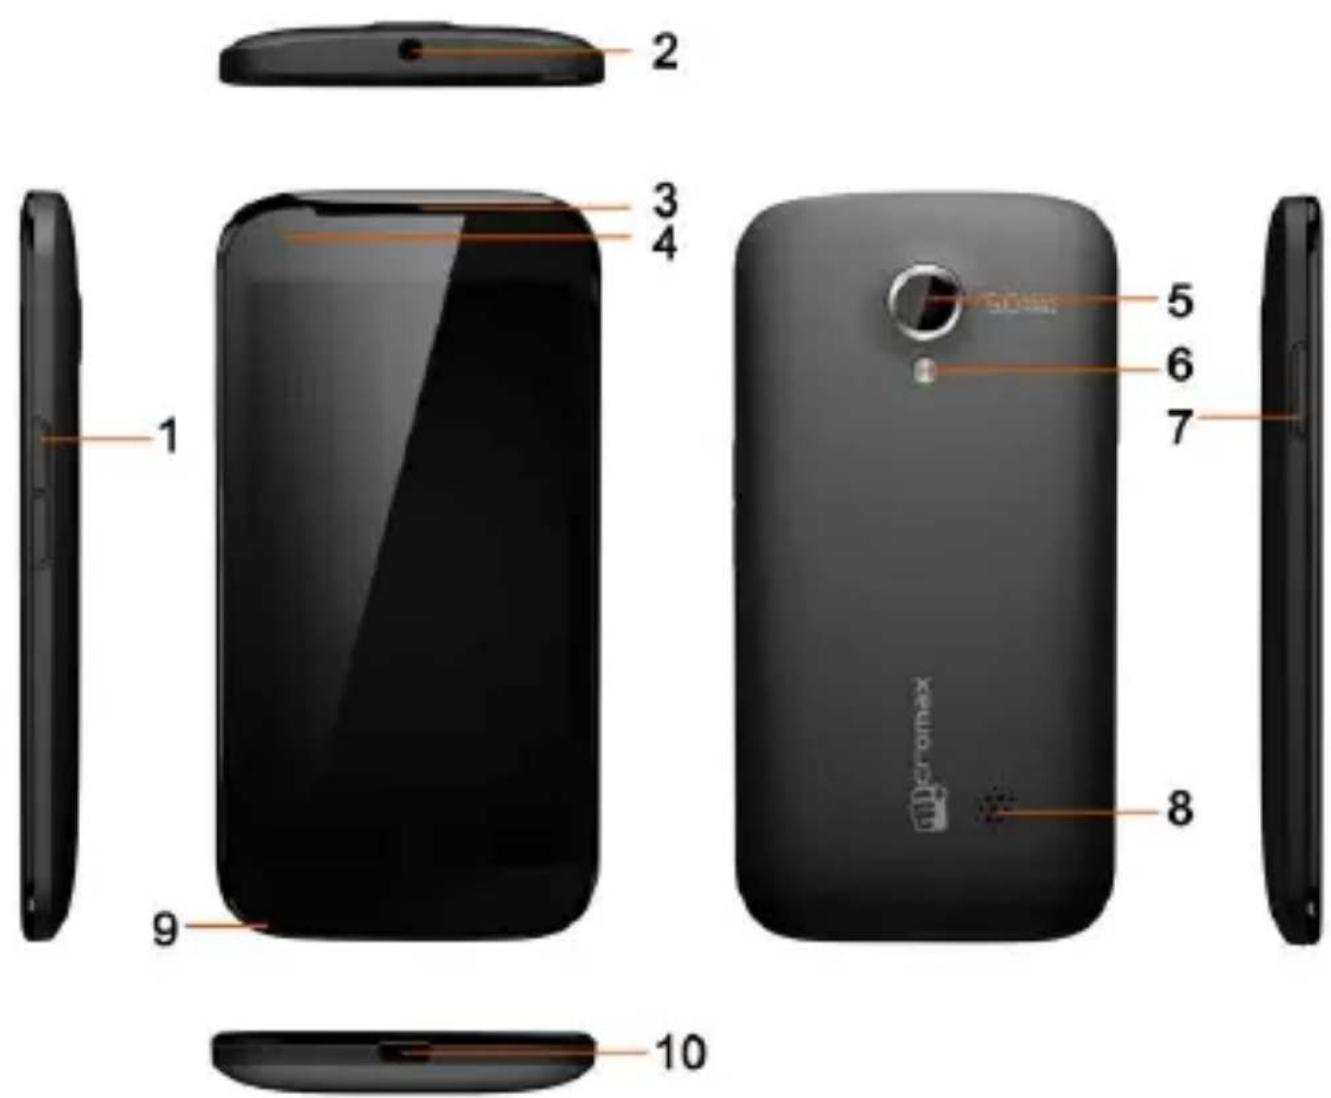
text_image
1 2 3 4 5 6 7 8 9 10User Guide
1 Power key 6 Flashlight
2 Earpiece socket 7 Volume up / down
3 Earpiece 8 Speaker
4 Proximity sensor 9 Microphone
5 Camera lens 10 USB Connector
1.1 Icons and Indicators
| Icons | Indicators | Icons | Indicators |
 | Signal strength indicator | Alarm has been set | |
 | New missed calls | WLAN is activated | |
 | USB is connected | Bluetooth is on | |
 | The headphone is being used | Battery symbol |
User Guide
 | New message |  | Airplane mode is activated |
2 Getting Started
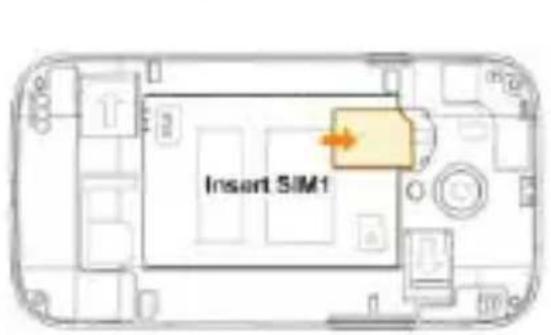
2.1 Insert SIM card
The A100 is a Dual SIM mobile phone allowing you to use the facility of two SIM cards.
To insert SIM card(s):
- Switch off the mobile phone and remove the rear cover and battery.
- Insert the SIM card correctly in the card slot(s) (See figure below).
text_image
Insert SIM1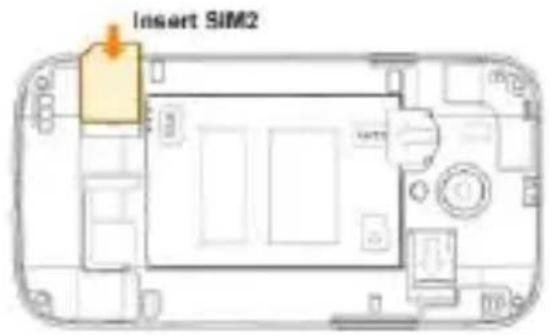
text_image
Insert SIM2- Finally insert the battery and replace the rear cover of the mobile phone.
User Guide
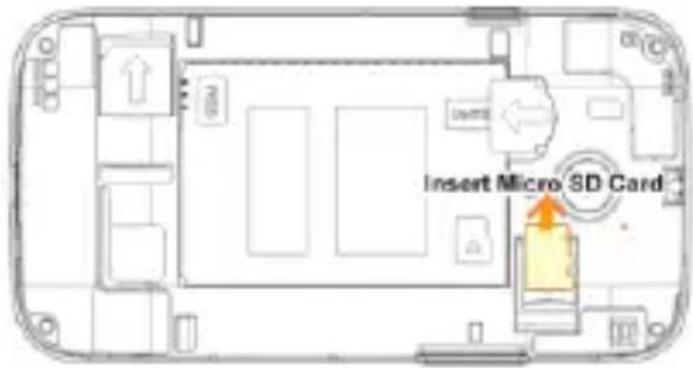
2.2 Insert Memory card
-
Power off the mobile phone, then remove the rear cover and battery.
-
Insert the memory card into the slot.
text_image
Insert Micro SD Card- Finally insert the battery and the rear cover of the mobile phone.
Use only compatible memory cards approved by Micromax with this device. Incompatible memory cards may damage the card or the device and corrupt the data stored in the card.
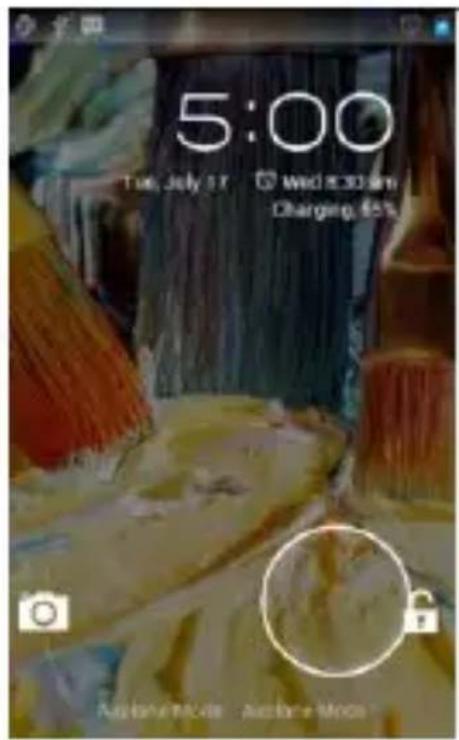
2.3 Unlock the phone
You may need to provide PIN, Password, or draw a pattern to unlock your phone To unlock the screen:
- Press the power key to wake up the phone.
User Guide
text_image
5:00 Tue, July 17 Wed 3:30 am Changgng, 65%
text_image
5:00 Tue, July 17 07 wed 8:30 a.m. Changgng 60%- Hold and drag the unlock icon right to unlock.
You may be required to unlock your phone based on the unlock method in settings.
To set the unlock method:
- On the main menu, touch Settings > Security.
- Touch Screen bck.
- Choose the type of locking as desired.
3 Placing and Receiving Calls
You can dial a phone number or touch a number in your contacts.
You can also place from the Call bg or contacts.
3.1 Make a call
- Tap the icon on main menu or the home screen to dial the desired number.
- Tap on any of the Phone, Call Logs, Favorite tabs to make a call.
- Tap the icon - on the home screen to make a call from contacts.
- To dial an international number, touch and hold the 0 key to enter the Plus (+) symbol, and then enter the international country prefix, followed by the phone number
- Touch the icon to dial the number from the desired SIM.
- Press the Volume Up/ Down keys on the left to adjust the call volume.
3.2 Conference Call
If you dial or accept a new call when you are already on a call, you can or merge the calls into a conference call.
- Place a call to the first participant.
- When you are connected, touch the Add call icon, the first participant is put on hold and you are prompted to dial the
User Guide
second contact.
- Place the next call, using the phone tab, the Call log, or your contacts.
- When you are connected, touch Merge calls. The participant is added to the conference call.
3.3 End a call
While during a call touch the
icon.
3.4 Disable Phone Calls (Airplane mode)
Some locations may require you to turn off your mobile, Wi-Fi, and Bluetooth wireless connections.
Press and hold the Power button and then choose Airplane Mode.
Drag notification panel down then touch the Airplane mode.
3.5 Using the Touch screen
You can use the touch screen into the following ways:
Touch: Acts on items on the screen, such as application and settings icons, to type letters and symbols using the onscreen keyboard, or to press onscreen buttons.
Touch and hold: Touch and hold an item on the screen until an action occurs.
User Guide
- Drag: Touch and hold an item and move your finger on the screen until you reach the target position.
- Swipe or slide: Quickly slide your finger across the surface of the screen, (without dragging an item). For example, slide the screen up or down to scroll a list.
- Double-tap: Tap quickly twice on a webpage, map, or other screen to zoom. For example, double-tap a section of a webpage in Browser to zoom that section to fit the width of the screen.
- Pinch: In some applications (Such as Maps, Browser, and Gallery) you can zoom in and out by placing two fingers on the screen at once and pinching them together (to zoom out) or spreading them apart (to zoom in).
- Rotate the screen: On most screens, the orientation of the screen changes as you rotate it. You can turn this feature on and off.
4 The Home Screen
When you sign in, the home screen opens.
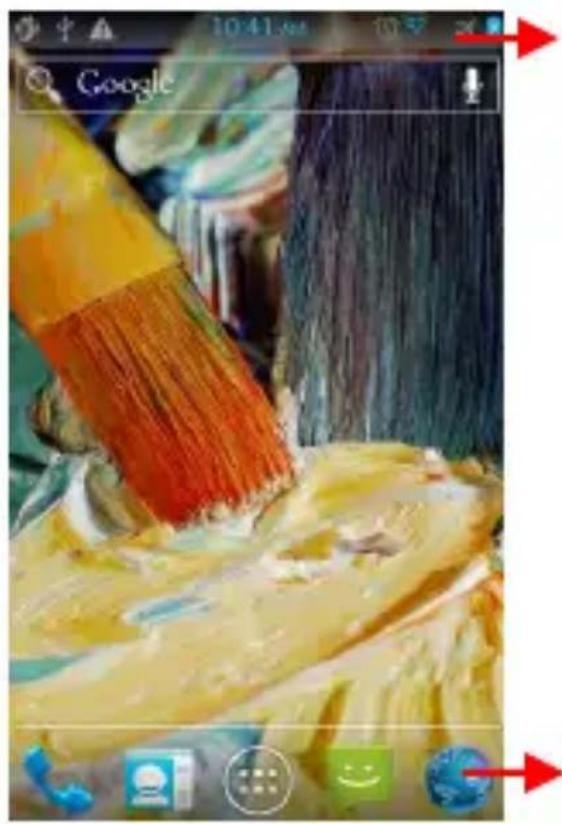
natural_image
Close-up of a makeup brush applying yellow paint to a bowl, with no visible text or symbols in the main image area.The status bar shows the time, signal strength, battery status, and notification icons.
Touch the menu icons to open the menus on the screen such as home screen, main menu, call logs and so on.
■ The main menu screen is your starting point to access all the features on your phone.
- At the top of the screen, the Status bar displays the time, status, and notifications.
- Touch the main menu icon at the bottom of the screen to view all installed applications.
4.1 Customize Home Screen
You can add applications, shortcuts, widgets, and other items to any part of the Homescreen or change the wallpaper.
You can add an application icon to the Home screen bypressing and holding it until it vibrates and enters Home screen and then release your finger.
4.11 Set wallpapers
On home screen, touch empty area and hold, a menu for setting wallpaper pops up.
4.1.2 Add Widget to home screen
On main menu screen, tap "Widgets" tab, there's a lot of application ( widgets) here. You can add any of them to the home screen. Also, you can download widget from Android Market.
5 Working With Menus
The phone's buttons and keys offers a bit of functions and shortcuts.
User Guide
| Button | Press |
 | Home key: Opens the Home screen. |
 | Opens recently used applications. |
 | Back key: Opens the previous screen you were working on. |
 | Menu key: Opens a context menu related with current screen or Application. |
5.1 Menu Icons
You have the folb wing menu icons to easily let you access its important features:
 | Opens the dialer |
 | Opens contacts |
 | Opens the main menu |
 | Opens messaging |

Opens the browser
5.2 Open and Close the Launcher
Touch the Launcher Icon

to open the main menu.
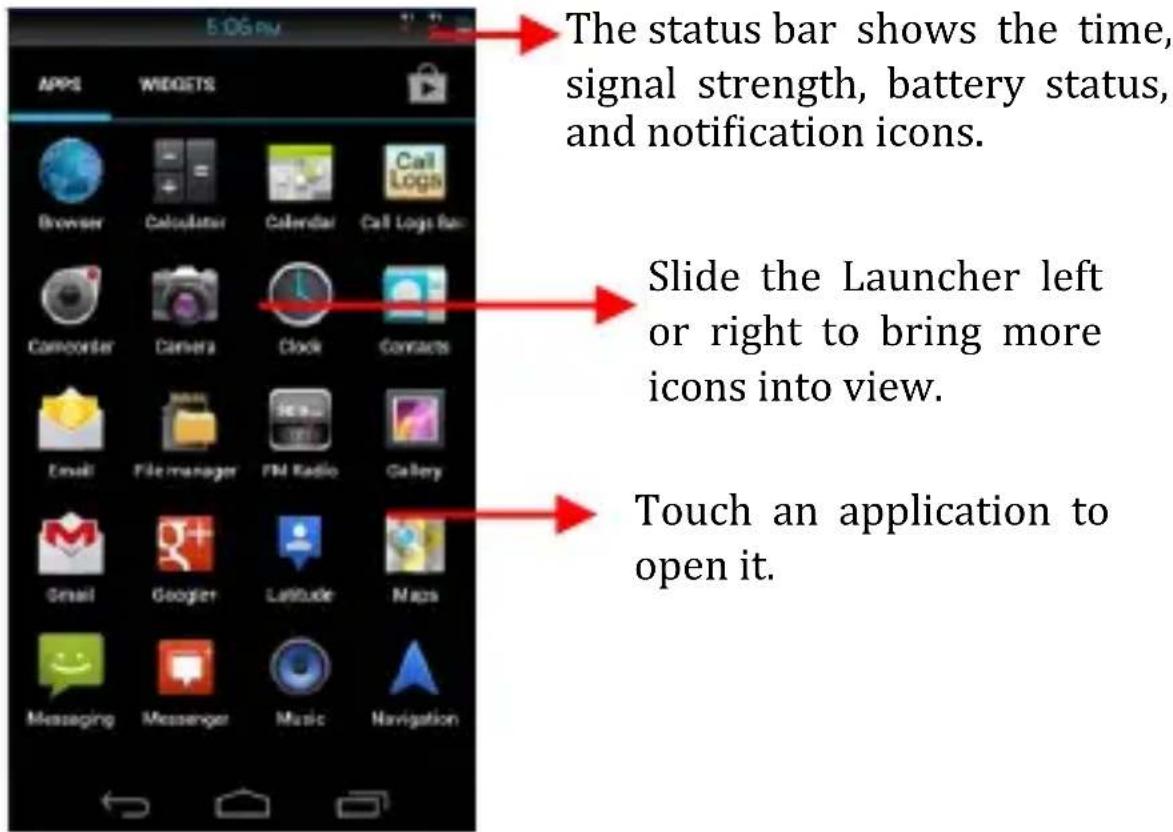
text_image
The status bar shows the time, signal strength, battery status, and notification icons. Slide the Launcher left or right to bring more icons into view. Touch an application to open it.The status bar shows the time, signal strength, battery status, and notification icons.
Slide the Launcher left or right to bring more icons into view.
Touch an application to open it.
Press Home icon or Back icon to close the Launcher.
5.3 Context Menus
The phone provides you with Context menus and Options menus for accessing the feature in an intuitive way.
- You can open context menu by touching on some screen.
■ Not all screens have context menus.
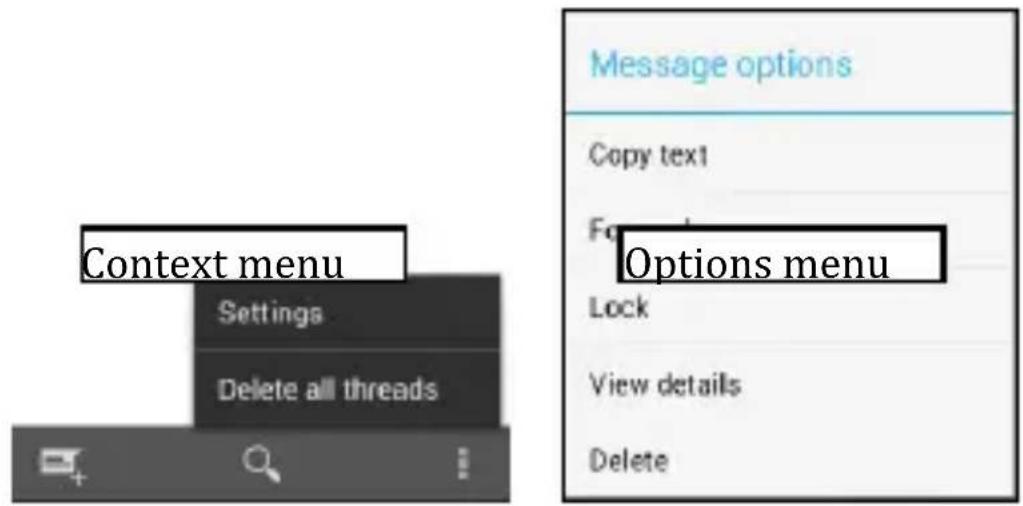
text_image
Context menu Settings Delete all threads Message options Copy text Options menu Lock View details Delete5.4 Options menus
Options menus contain tools that apply to specific items on the screen. You can open an option by touching and holding an item on the screen. Not all items have options menus
When you touch and hold some items on a screen, an Options
menu opens.
6 Connect to the Internet
To configure your Internet:
- Go to Settings> Wireless & Networks >More...> Mobile Networks> Network settings> Access point names.
- Select the access point name or change the access point name for your Internet connectivity as provided by the service provider of your SIM card.
- After you have selected or configured the access point name, go to Settings> Wireless & networks > More...> Mobile networks and tap Data enabled to enable Internet connection.
Similarly, you can perform step 3 to disable data connection on your SIM card.
6.1 Access Internet via Wi-Fi
To browse the Internet via Wi-Fi:
- Go to Menu> settings> wireless & networks and then tap Turn ON/OFF button to turn on WLAN.
- Next, tap WLAN item and then select the WIFI connection listed under Wi-Fi networks.
7 Managing Notifications
Notification icons inform you of new messages and events.
When you receive a notification, its icon appears in the status bar, along with a summary that appears only briefly.
7.1 Open the Notifications Panel
Drag the status bar down from the top of the screen as shown below.
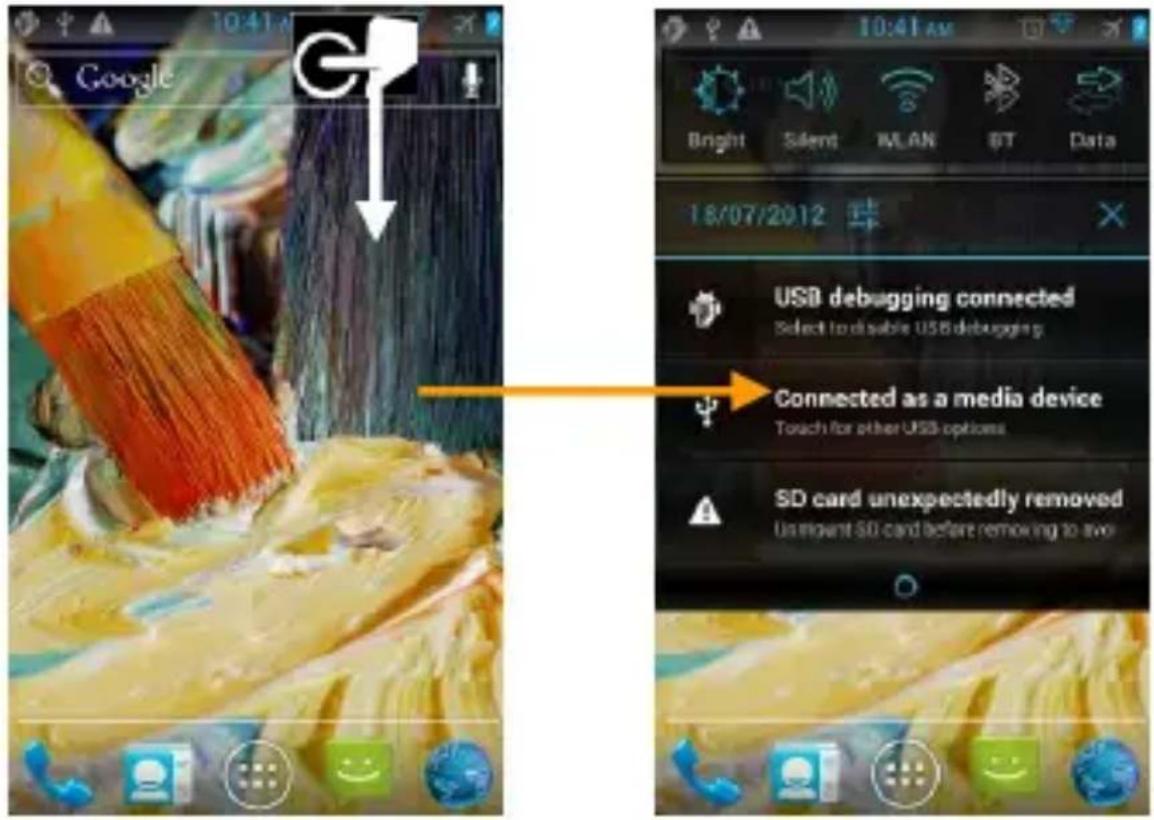
text_image
Google Bright Silent MLAN BT Data 18/07/2012 USB debugging connected Select to disable USB debugging Connected as a media device Touch for other USB options SD card unexpectedly removed Unmount SD card before removing to two7.2 Respond to Notifications
- Open the notification panel and touch a notification to
respond to it.
- What happens next depends on the notification.
7.3 Close Notifications Panel
Drag the tab at the bottom of the Notifications panel to the top of the screen. Or just press the 📄. The panel also closes when you touch a notification to respond to it.
8 Messaging
You can use Messaging to exchange text messages and multimedia messages with your friends.
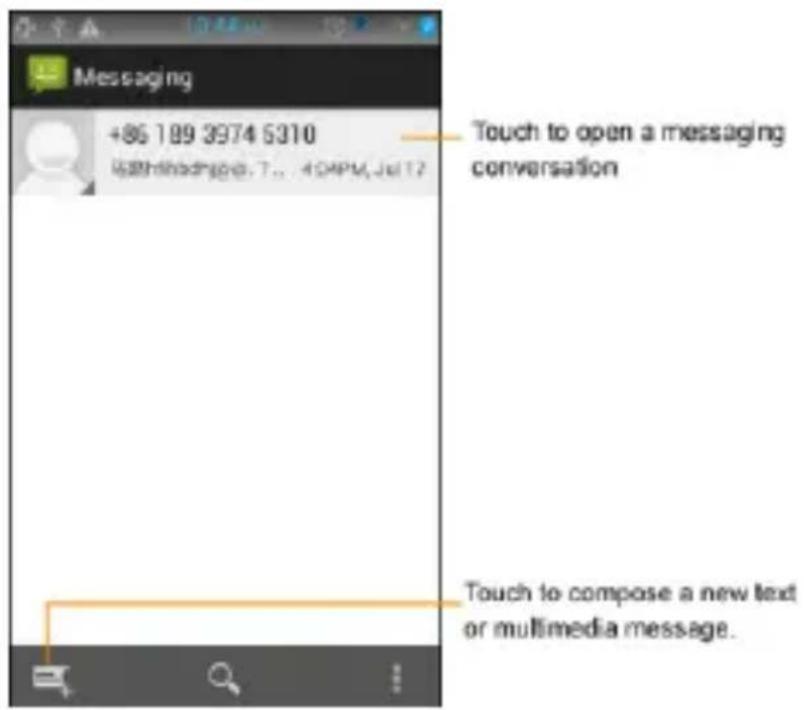
text_image
Messaging +86 189 3974 5310 @athadhagga.7...40HPM.Jul12 Touch to open a messaging conversation Touch to compose a new text or multimedia message.You can also press the E key and open the context menu to work on messages and their settings.
User Guide
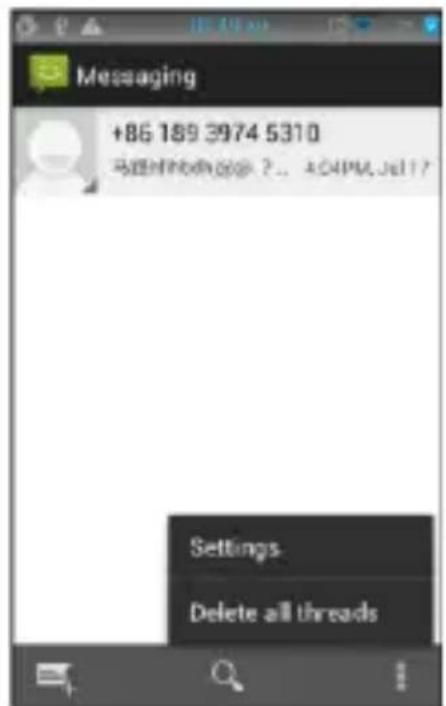
text_image
Messaging +86 189 3974 5310 马超尔@bdr.org?... A04PM.Jel17? Settings Delete all threadsA Message becomes an MMS if you send it to an email address, or add multimedia media file(s).
8.1 Create and Send Multimedia Message
- Touch compose new message.
- Enter or select a mobile phone number.
- Touch the composition text box and enter your message body.
- Touch the key to open the context menu.
- Touch icon to attach various types of files.
- Send the MMS.
8.2 Forward a message
- Open a message and then touch that message in a message conversation window.
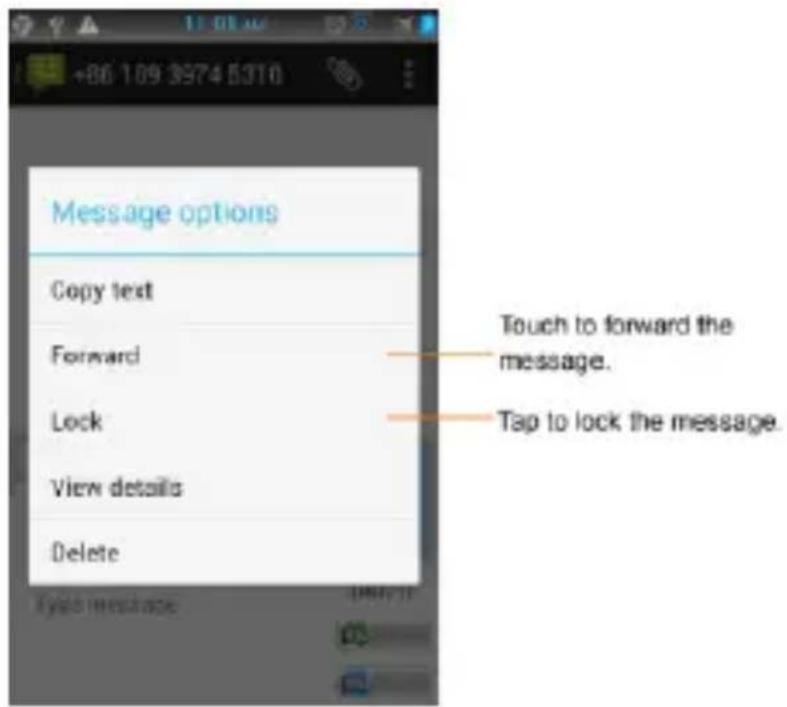
text_image
Message options Copy text Forward Lock View details Delete Touch to forward the message. Tap to lock the message.- Touch Forward in the menu that opens.
- Add a contact
- Touch Send to send the message.
You can also Copy message text, View message details and delete message.
8.3 Lock a Message
You can lock a message so it won't be deleted if you reach your storage limits.
User Guide
- Touch and hold message in a message window.
- Touch Lock message in the menu that opens. Unlock a message by touching and holding it and then touch Unlock message.
8.4 Using the Onscreen Keyboard
Some applications display the keyboard by default. In others, you touch a text field where you want to enter text, to open the keyboard.
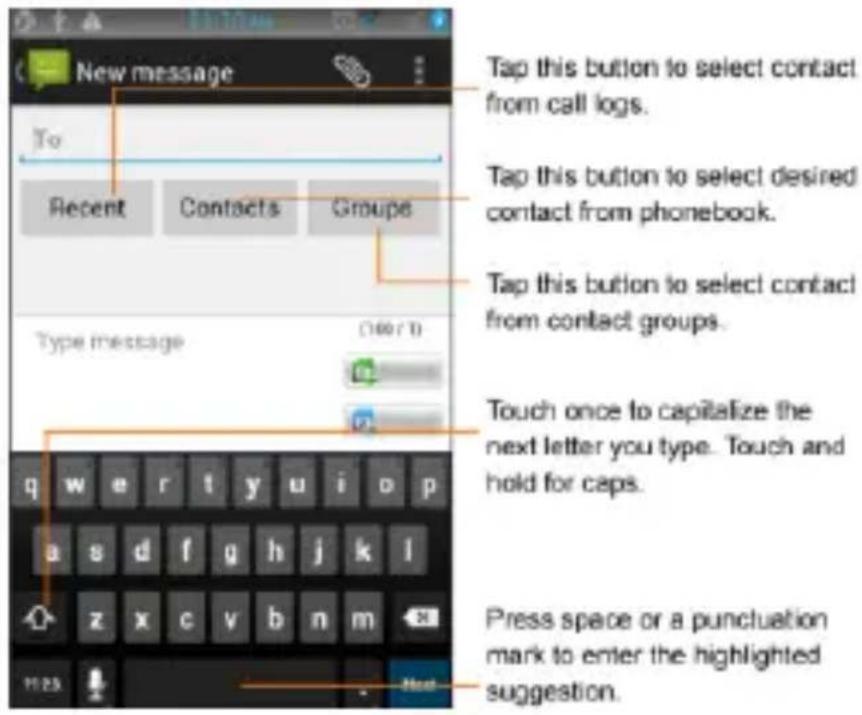
text_image
New message Tap this button to select contact from call logs. Tap this button to select desired contact from phonebook. Tap this button to select contact from contact groups. Touch once to capitalize the next letter you type. Touch and hold for caps. Press space or a punctuation mark to enter the highlighted suggestion.- Use the icon to erase characters.
■ After typing, press icon to close the keyboard.
8.5 Enter Various Characters
- Press the symbols key ?123 / ABC to switch to the numbers and symbols keyboard.
- Touch and hold the text field to open a menu and to "Select
all" / "Cut" / "Copy"
9 Multimedia
9.1 Camcorder
Your camcorders pictures and videos are stored in the SD card, so you must insert one to use the Camera. You can copy pictures and videos from the SD card to a PC and vice versa.
User Guide
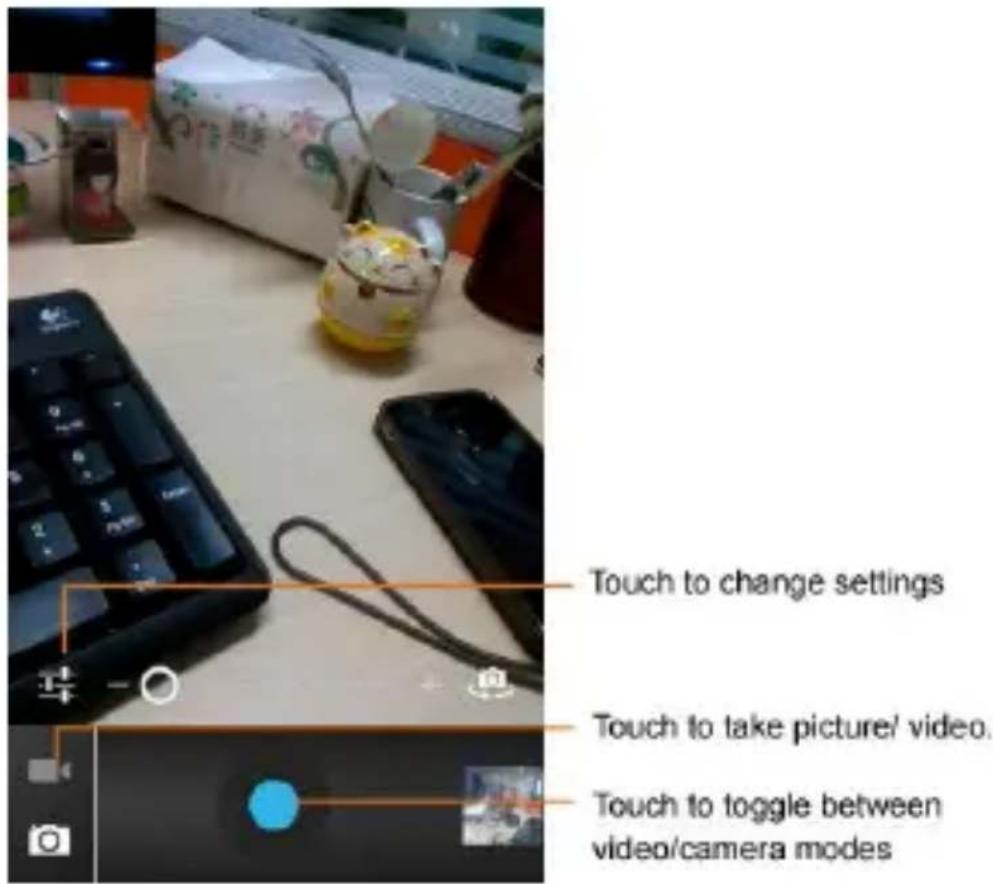
text_image
Touch to change settings Touch to take picture/ video. Touch to toggle between video/camera modes9.2 Gallery
You can use the Gallery to view pictures and play videos and share files.
- Touch the Gallery icon in the main menu.
- Touch an album to open and view its contents.
- Touch a picture or a video in an album to view it.
9.2.1 Share an Album
- Open the email Gallery window.
User Guide
- Tap the key and then touch Select album.
- Check or un checked the albums you want to share.
- Touch and then select the application to use to share the selected albums.
You can share via email, Bluetooth, Gmail messaging and so on.
9.3 Music
You can easily transfer your favorite music from your PC to the SD card and experience a whole world of interesting and melodious music.
- Touch the intuitive buttons and icons on music interface to enjoy the features of your music player.
- Press the phone’s volume up/down keys on the left side of the mobile phone to adjust the volume.
- Pay attention that, when move some music files from PC to your phone, you should tap on music list screen, and the touch "Refresh the list" to refresh your music list.
9.4 FM Radio
You can listen to your favorite FM channels using the inbuilt FM receiver of your phone.
- Touch the key or the intuitive buttons and icons on the phone in Radio interface to enjoy the features of your inbuilt FM radio.
- Press the phone’s volume up/down keys on the left side of the mobile phone to adjust the volume.
10 Manage Accounts
You can set up a corporate, Google account etc on your device. You can do this by tapping Settings> Accounts & sync> Add Account
10.1 Why Use a Google Account
Your Google Account lets you take full advantage of Google applications and services that you may want to use, such as Gmail, Maps, Navigation, and various applications.
11 Connect to Networks and Devices
Your phone can connect to a variety of networks and devices, including Wi-Fi, GPRS, Bluetooth, devices, such as headsets. You can also transfer files to/from your PC through the data cable.
11.1 Connect to Internet
Refer to section 6 for details.
11.2 Connect to Wi-Fi Networks
Refer to Section 6.1 for details.
11.3 Pair With Bluetooth Devices
- Go to Settings > Wireless & Networks > Bluetooth.
- If Bluetooth is off, touch Bluetooth button to turn it on, and then touch the Bluetooth item. Your phone scans and displays the Bluetooth devices in range.
- If the device you want to pair with is not in the list, make it discoverable.
- If your phone stops scanning before you make the other device discoverable, touch Search for devices.
- Touch the ID of the other device in the list in Settings to pair them. If you are prompted to for a password, enter any password on one device and enter the same password you entered in the other device to be paired.), If the pairing is successful, your phone connects to the device.
11.4 Install Secure Certificate from SD Card
If your VPN or Wi-Fi Network relies on secure certificates, you must obtain the certificates and store them in your phone's storage, before you can configure access to those VPN or Wi-Fi networks on your phone.
You may need to download the certificates from a website.
- Copy the certificate from your computer to the root of the SD card.
- Touch Settings> Security.
- Touch Install from SD card under Security Settings.
- Touch the file name of the certificate to install. Only the names of certificates that you have not already installed on your phone are displayed.
- If prompted, enter the certificate's password and touch OK.
- Enter a name for the certificate and touch OK.
12 Applications
You phone comes with a host of applications to make your life easier and more convenient. Explore the various applications and the features that comes with your A100 handset and enjoy the advantage.
2 Health and Safety Precautions
Please read these simple guidelines. Not following them may be dangerous or illegal.
SAR Compliance
- Your phone is designed not to exceed the limits of emission of radio waves recommended by international guidelines.
■ SAR (specific absorption rate) is the measurement of body-absorbed RF quantity when the phone is in use. SAR value is ascertained according to the highest RF level generated during laboratory tests.
■ The SAR value of the phone may depend on factors such as proximity to the network tower, use of accessories or other accessories.
■ The highest SAR value of the device at the head and body are 0.520 W/kg and 1.513 W/kg respectively averaged over 1 gm of human tissue.
SAR Recommendations
■ Use a wireless hands-free system (headphone, headset) with a low power Bluetooth emitter.
■ Make sure the cell phone has a low SAR.
User Guide
- Please keep your calls short and use SMS whenever more convenient. This advice applies especially to children, adolescents and pregnant women
- Prefer to use your cell phone when the signal quality is good.
■ People having active medical implants should preferably keep the cell phone at least 15 cm away from the implant. - Maintain a preferable distance of 15 mm from the device.
Safe Driving
- Do not use the phone while driving. When you have to use the phone, please use the personal hands-free kit.
■ Please do not put the phone onto any passenger seat or any place from which it may fall down in case of vehicular collision or emergency braking.
During Fight
- Flight is influenced by interference caused by the phone. It is illegal to use a phone on the airplane. Please turn off your phone during a flight.
In HOSPITALS
- Your Phone’s radio waves may interfere with the functioning of inadequately shielded medical devices. Consult a physician or the manufacturer of the medical device to determine whether they are adequately shielded from external Radio Frequency. Switch off
User Guide
your device when regulations posted instruct you to do so.
- To avoid potential interference with implanted medical devices such as a pacemaker or cardioverter defibrillator:
■ Always keep your phone at least 15.3 centimeters (6 inches) from the medical device. - Do not carry the wireless device in a breast pocket.
- Turn off the phone if there is any reason to suspect that interference is taking place.
■ Follow the manufacturer directions for the implanted medical device.
■ If you have any questions about using your wireless device with an implanted medical device, consult your health care provider.
Unsafe Areas
- Please turn off your phone when you are close to a gas station or in the vicinity of any place where fuel and chemical preparations, or any other dangerous goods are stored.
3 Taking Care of Your Device
Your device is a product of superior design and craftsmanship and should be handled with care: The following suggestions will help you protect your phone:
- Keep the device dry. Precipitation, humidity, and all types of
User Guide
liquids or moisture can contain minerals that will rust electronic circuits. If your device does get wet, remove the battery without turning on the device, wipe it with a dry cloth and take it the service center.
- Do not store the device in high or cold temperature. High temperatures can shorten the life of electronic devices and damage batteries.
- Do not use or store the device in dusty, dirty areas. Its moving parts and electronic components can be damaged.
- Do not attempt to open the device other than as instructed in this guide. Repairing this phone by yourself other than our authorized service agents/centers goes against the warranty rules.
- Do not drop, knock, or shake the device. Rough handling can break internal circuit boards and fine mechanics.
- Do not use harsh chemicals, cleaning solvents, or strong detergents to clean the device. Only use a soft, clean, dry cloth to clean the surface of the device.
- Do not store your device near magnetic fields or allow your device to come in contact with magnetic fields for extended period of time.
Battery Recommendations:
- Please put the battery in a cool and well-ventilated place out of
User Guide
direct sunlight. We recommend you to charge the battery at room temperature range.
■ Batteries have life cycles. If the time that the battery powers equipment becomes much shorter than usual, the battery life is at an end. Replace the battery with a new battery of the same make and specification.
- Use manufacturer approved batteries, chargers, accessories and supplies. Micromax will not be held responsible for user’s safety when using unapproved accessories or supplies.
- Do not discard the battery with household trash. Please dispose of used battery according to your local environmental laws and guidelines.
User Guide
Recy de Your Phone

natural_image
Simple line drawing of a trash bin with crossed diagonals (no text or symbols)The WEEE logo (shown at the left) appears on the product (battery, handset, and charger) to indicate that this product must not be disposed off or dumped with your other household wastes. You are liable to dispose of all your electronic or electrical waste equipment by relocating over to the specified collection point for recycling of such hazardous waste.
Collection and proper recovery of your electronic waste equipments at the time of disposal will allow us to help preserve the environment. Recycling of the electronic waste equipment will ensure safety of human health and environment. For more information on best practices for disposal of electronic and electrical waste, please refer to our website link: weee.micromaxinfo.com.
Disclaimers
■ The colors and specifications shown/mentioned in the user manual may differ from the actual product. Images shown are for representation purpose only. Other product logos and company names mentioned herein may be trademarks or trade names of their respective owners.
■ Micromax keeps the right to make modifications to any of the
User Guide
content in this user guide without public announcement in advance. The content of this manual may vary from the actual content displayed in the mobile phone. In such a case, the latter shall govern.
Copyrights
All rights reserved. Reproduction, transfer, distribution or storage of part or all of the contents in this document in any form without the prior written permission of Micromax is strictly prohibited.
For Product Support:
■ Helpline number: 011-44770044
■ Working Hours: Monday to Saturday 10:00 AM to 6:30 PM (Except National & Public holidays)
■ Email Support: service.superfone@micromaxinfo.com
■ For more information, please visit our website www.micromaxsuperfone.com.