NVR-TAB9Q S5 (8GB) - Tablet NEVIR - Free user manual and instructions
Find the device manual for free NVR-TAB9Q S5 (8GB) NEVIR in PDF.

User questions about NVR-TAB9Q S5 (8GB) NEVIR
0 question about this device. Answer the ones you know or ask your own.
Ask a new question about this device
Download the instructions for your Tablet in PDF format for free! Find your manual NVR-TAB9Q S5 (8GB) - NEVIR and take your electronic device back in hand. On this page are published all the documents necessary for the use of your device. NVR-TAB9Q S5 (8GB) by NEVIR.
USER MANUAL NVR-TAB9Q S5 (8GB) NEVIR
natural_image
Close-up of a lion's face with open mouth and tongue, no visible text or symbolstext_image
CE R RoHSPrecaución
text_image
CE R RoHSOperación Básica
Botón de encendido
natural_image
Close-up of a lion's face with open mouth and tongue, no visible text or symbolsUser Guide
About this manual
This product features a number of sophisticated functions ensuring superior reception and operation. All are designed for the easiest possible use, but many are not self-explanatory. This operation manual is intended to help you benefit fully from their potential and to maximize your browsing and surfing enjoyment.
We recommend that you familiarize yourself with the functions and their operation by reading through the manual before you begin using this product. It is especially important that you read and observe the “Precaution” on this page and in other sections.
Handle your tablet with care:
Do not drop, bend, puncture, insert foreign objects, or place heavy objects on your tablet. Sensitive components inside might become damaged.
Your tablet screen is made of glass. The glass might break if the tablet is dropped on a hard surface, is the subject of a high impact, or is crushed by a heavy object. If the glass chips or cracks, do not touch the broken glass or attempt to remove it from the tablet. Stop using the tablet immediately and contact Nevir Technical support for repair, replacement, or disposal information.
Do not disassemble or modify your tablet:
Your tablet is a sealed unit. There are no end-user serviceable parts inside. All internal repairs must be done by a Nevir-authorized repair facility or a Nevir-authorized technician. Attempting to open or modify your tablet will void the warranty.
Do not attempt to replace the internal battery:
Replacement of the internal rechargeable battery must be done by a Nevir-authorized repair facility or a Nevir-authorized technician.
Prevent your tablet and charger from getting wet:
- Do not immerse your tablet in water or leave it in a location where it can get saturated with water or other liquids.
- Do not use the Tablet AC Charger outdoors.
Prevent hearing damage:
Your tablet has a headphone connector. Always use the headphone connector for headphones (also called a headset) or earphones.
CAUTION:
Excessive sound pressure from earphones and headphones can cause hearing loss. Adjustment of the equalizer to maximum increases the earphone and headphone output voltage and the sound pressure level. Therefore, to protect your hearing, adjust the equalizer to an appropriate level.
Keep your tablet and accessories away from small children:
Your tablet contains small parts that can be a choking hazard to small children. Additionally, the glass screen can break or crack if dropped on or thrown against a hard surface.
Precaution
When you use this device, please follow the safety notice below to prevent fire, electric shock and injury.
- Keep this manual handy as a reference for operating procedure and precautions.
- Keep the device away from rain and moisture.
- Keep the device away from direct sunlight and heat source.
- Protect the power cord. When the power cord is connected, avoid stepping on it or place any object on it, which may cause power interruption and program or data corruption.
- Please use the original power adaptor for charging. Non-conforming chargers may cause harm to the device.
- Protect the screen at all time. Avoid pressing hard on the screen. To clear the fingerprints or dust on the screen, use soft cloth specially made for screen or lens.
- Should this product fail to operate properly, do not attempt to disassemble it or repair it. Contact your dealer or nearest authorized Nevir Service Outlet.
Diagram
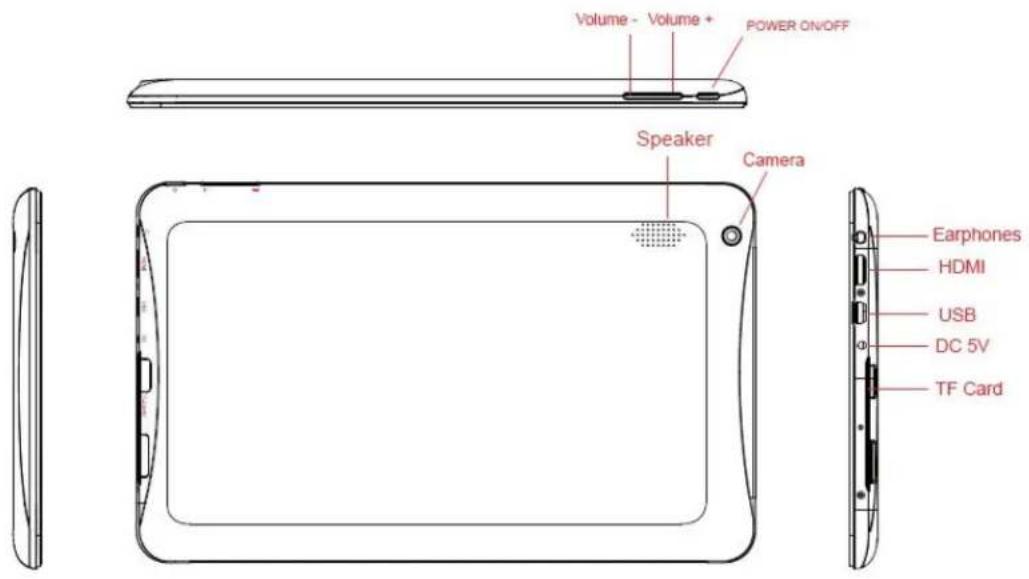
text_image
Volume - Volume + POWER ON/OFF Speaker Camera Earphones HDMI USB DC 5V TF Card
text_image
CE R RoHSBasic Operation
Power button
Press and hold the power button for a few seconds to turn on the tablet. To turn off the tablet, prehold the power button for a few seconds, and then touch OK from the Power off menu.
When the tablet is on, press the power button once to lock or unlock the screen.
Front-facing camera
Your tablet has a 0.3-megapixel front-facing camera, which you can use to take pictures, create videos, make video calls in collaboration with Web applications.
Rear-facing camera
Your tablet has a 2-megapixel rear-facing camera, which you can use to take pictures and create videos.
Headphone or microphone connector
Connect headphones to the connector to listen to stereo sound from the tablet or connect a microphone record audio or make calls. You also can connect a headset with an integrated microphone that uses a combined audio/microphone connector.
Micro USB connector
Use the supplied USB cable to connect a personal computer to the micro USB connector for data trans
SD SLOT
Up to 32 gb
HDMI Connector (HDMI cable not included)
Multitouch screen
Touch the screen to use the controls on the screen including buttons, menu items, and the onscreen keyboard.
- Touch Tap gently on the screen with your fingertip to launch an application, select an item, open a 1 or type text using the onscreen keyboard.
- Touch and hold Touch and hold an object or a blank area on the screen until an action occurs.
- Drag To move an item such as an image and an icon on the screen, touch and hold your finger item, move your finger to the desired location, and then take your finger off the screen.
- Swipe or slide Move your finger in a vertical or horizontal direction on the screen to scroll through Home scr Webpages, lists, picture thumbnails, and so on.
- Zoom
- Zoom out: Move two fingers close together on the screen as if you are picking something u reduce the view of an image or a Web page.
- Zoom in: Move two fingers apart on the screen to enlarge the view of an image or a We
- Double-tap For some applications, quickly tap twice on the screen to zoom in. Double-tap again to zoom c
On the bottom of screen status bar, there are three operation icons on the left side
| Status icons Implication | |
Back up soft key Turn  | back to previous interface, its function is similar to BACK key |
Home soft key Back to main interface, its function is the same as HOME key.  | |
Shortcut  key key | List the common applications and its thumbnail, then click to enter directly. |
| Status icons Implication | ||
USB connecting state Display the USB connecting status | ||
USB debugging state state | Display whether it connected the USB debugger. | |
SD card connecting state It prompts when SD card was pulled out. | ||
Time  | Display current time | |
Wi-Fi  | MID has join up the internet via Wi-Fi. the more the signal, the stronger the signal is | |
Battery  | Showing the volume of battery or charging state. | |
Applications
An application is a software program that enables you to perform a specific task.
Note: Preinstalled applications vary by geographic locations and are subject to change.
Downloading games and applications
To extend the functionality of your tablet, download and install additional applications from any of the different markets on the web.
Application Settings
Use the Applications settings to view details about the applications installed on your tablet, to manage their data, to force them to stop if they do not function correctly, and to set whether you want to installation of applications that you obtain from Web sites and e-mail.
To enable a setting, touch the setting item to select the check box. When a setting is enabled, a gre is displayed in the check box. To disable a setting, touch the setting item to clear the check box. If actions are required, follow the instruction on the screen.
Accounts
Use the Accounts settings to add, remove, and manage your Accounts. You also use these settings to control how and whether applications send, receive, and synchronize data on their own schedules, and whether applications can synchronize user data automatically.
To enable a setting, touch the setting item to select the check box. When a setting is enabled, a gre is displayed in the check box. To disable a setting, touch the setting item to clear the check box. If actions are required, follow the instruction on the screen.
Accessibility
Accessibility services are special features to make using the tablet easier for those with certain physical disabilities. Use the Accessibility settings to configure any accessibility plug-ins you have installed on your tablet.
To enable a setting, touch the setting item to select the check box. When a setting is enabled, a gre is displayed in the check box. To disable a setting, touch the setting item to clear the check box. If actions are required, follow the instruction on the screen.
Note: If no accessibility-related applications are installed, after you touch Accessibility from the settings panel, you are prompted to download accessibility software. Touch OK if you want to download. Otherwise, touch Cancel.
Date & time
Use Date & time settings to set your preferences for how dates are displayed. You also can use these settings to set your own time and time zone, rather than obtaining the current time from the network.

text_image
CE R RoHSTo enable a setting, touch the setting item to select the check box. When a setting is enabled, a gre is displayed in the check box. To disable a setting, touch the setting item to clear the check box. If actions are required, follow the instruction on the screen.
Connecting to wireless networks and devices
Your tablet can connect to a variety of networks and devices, including mobile networks (2G or 3G), data networks,
Note: Some tablet models can connect to both mobile networks (2G or 3G) and Wi-Fi networks, while
others can connect to Wi-Fi networks only. If your tablet supports Wi-Fi connection only, the information related to mobile networks does not apply to your tablet.
Connecting to a Wi-Fi network
Wi-Fi is a wireless networking technology that provides network access at distances of up to 100 meter (328 feet) depending on the Wi-Fi router and your surroundings.
A Wi-Fi connection requires access to a functioning Wireless Access Point (WAP), also called a hotspot. Some hotspots are open to the public, but some others implement security features to limit access to specific groups or individuals.
Note: The range and quality of the Wi-Fi signal is affected by the number of connected devices, the infrastructure, and the objects through which the signal is transmitted.
Connecting to a Wi-Fi network
To establish a Wi-Fi network connection, do the following:
- From the main Home screen, touch the Android Settings to reach the
Applications icon from the action bar and then touch Settings. The Android Settings screen opens. - Touch Wireless & networks - Wi-Fi settings. Touch Wi-Fi to turn it on.
- A list of available networks is displayed under Wi-Fi networks. Touch a Wi-Fi network to connect to it.
- If the network is open, you are prompted to confirm that you want to connect to that network by touching Connect. If the network is secured, you are prompted to type a password or other credentials.
When you are connected to a Wi-Fi network, touch its name on the Wi-Fi settings screen for details the speed, security, address, and related information.
Adding a Wi-Fi network
If you want to access a Wi-Fi network that does not broadcast its network name (also called a servic identifier or SSID), you must add that Wi-Fi network before you can connect to it.
To add a Wi-Fi network, do the following:
- From the main Home screen, touch the Android Settings touch the
applications icon from the action bar and then touch Settings. The Android Settings screen opens. - Touch Wireless & networks - Wi-Fi settings - Wi-Fi to turn it on.
- Scroll to the bottom of the Wi-Fi settings screen and touch Add Wi-Fi network.
- Type the required information for the network.

text_image
CE R RohS- Touch Save. The information about the network is saved. The Wi-Fi connection will be established automatically the next time you come within the range of this network.
Disabling an automatic Wi-Fi connection
If you do not want the tablet to automatically connect to a specific Wi-Fi network that you had previ configured, do the following:
-
From the main Home screen, touch the Android Settings touch the applications icon from the action bar and then touch Settings. The Android Settings screen opens.
-
Touch Wireless & networks.
-
If the Wi-Fi function is off, touch Wi-Fi to turn it on.
-
Touch the name of the Wi-Fi network.
-
Touch Forget. The details of the Wi-Fi network are erased.
Browsing the Internet
Read this topic to learn more about browsing the Internet.
Using the browser
To open the browser, do one of the following:
- Touch the Browser icon
- Press the Browser button on the right side of your tablet.
- Touch the applications #from the action bar and then touch Browser.
Navigating the Web
• Using the browser control bar

Back Go back to the previous Web page.
- Forward Go forward to a recently visited Web page.
- Refresh Refresh the current Web page.
- Web address field Touch and type the address of the Web page to which you want to go.
- Bookmark Bookmark the current Web page.
- Search Use Google Search to search for information.
- Bookmarks View all bookmarks and the browsing history.
- Using the browser menu
While you are browsing a Web page, touch the Männ icba top right corner to access the following options:
- New tab: Open a new tab for a new Web page.
- New incognito tab: If you touch this option to open a new Web page, the Web page is not recorded into the browsing history.
- Find on page: Search for text or content on the current Web page.
- Share page: Share the Web page with a friend or colleague through Bluetooth, e-mail, message, or other ways.
- Save page: Save the current page.
- Page info: View the details of the current Web page.
- Downloads: View and manage downloaded files.
- Settings: Configure your browser settings, such as setting a home page, clearing cache, setting text size, and so on.
- Viewing Web pages
To view a specific Web page, do the following:
- Touch the applications led from the action bar and then touch Browser.
-
Touch the Web page address field and type the address of the Web page to which you want to type the address, matching Web page addresses are displayed on a list.
-
Do one of the following:
Touch an address displayed on the screen to go directly to that Web page.
- Complete typing the Web page address. Then touch the enter key on the Android keyboard (or touch Go if you are using the FlexT9 keyboard).
- Scroll your finger horizontally or vertically on the screen to scroll and view desired areas of a We To zoom out on a Web page, pinch-in a desired area by bringing two fingers closer together on the To zoom in on a Web page, pinch-out a desired area of a Web page by moving two fingers apart screen.
To select an item on a Web page, do the following:
- For text, touch and hold a word to bring up the text selector tabs and the edit menu. The text pair of selection tabs. Drag either of the selection tabs to highlight the text you want to select. Then edit menu that is displayed at the top of the screen to copy the text.
- For hyperlinks or Web page addresses, touch the desired hyperlink or Web page address to go to the directed page.
Using your tablet for entertainment
Read this topic to learn more about using headphones or earphones, using cameras, viewing pictures, playing videos, playing music, and transferring media files between external devices and your tablet.
Using headphones or earphones
Your tablet has a headphone connector that you can use for a variety of listening devices such as headphones, earphones, and ear buds. Listening with the volume turned up too high for too long can be hearing loss. The symptoms of hearing damage might be progressive and not noticed at first.
Take the following precautions:
-
Limit the amount of time you use headphones, earphones, ear buds, or other devices that provide so directly into your ears.
-
Avoid using high volume to block surrounding noise.
-
Decrease the volume if you are unable to hear people speaking around you.
Using cameras
Your tablet has two cameras, a front-facing camera and a rear-facing camera, each with an auto-focus feature that enables you to capture high-quality pictures and videos.
To use a camera, touch the applications from the action bar, and then touch Camera to turn on the camera.
Taking a picture
To take a picture, do the following:
- Touch the applications icon from the action bar and then touch Camera to turn on the camera.

text_image
CE R RoHS- Make sure that the camera mode is set for capturing pictures.
- Select to use the front-facing camera or the rear-facing camera.
- Use camera settings controls to adjust the settings, and then touch the Shutter button. The picture is saved to the picture gallery automatically and displayed at the bottom left corner of the screen.
Recording a video
To record a video, do the following:
- Touch the applications led from the action bar and then touch Camera to turn on the camera.
- Slide the camera mode switch to the camcorder mode.
- Select to use the front-facing camera or the rear-facing camera.
- Use the camera settings controls to adjust the settings, and then touch the Record button. While recording, the Record button changes to Stop.
- Touch the Stop button to stop recording. The video is saved into the video gallery automatically.
Viewing pictures
You can view and manage pictures stored on your tablet, perform basic editing tasks on pictures, and picture as your wallpaper or as a contact picture. You also can share your pictures with friends through mail or a messaging application, or by uploading them to the YouTube Web site.
To view pictures stored on your tablet, do the following:
- Touch the applications led from the action bar, and then touch Gallery.
- Touch Images and videos - Images only to display all pictures.
- Touch an album and then touch a picture to view it.
While you are viewing a picture, touch the screen to bring up the following options:
• : View pictures in a slide-show mode.
• Share the selected picture through Bluetooth, e-mail, or a messaging application.
• Delete the selected picture.
- Touch the menu icon to view the picture details, rotate the picture, crop the picture, or set the pic the wallpaper or as a contact photo.
- Touch the menu icon to view the picture details, rotate the picture, crop the picture, or set the pic the wallpaper or as a contact photo.
Watching videos
You can watch movies online directly from your tablet using one of the preinstalled video applications, play videos that you have taken with cameras. You also can share your videos with friends through e-or a messaging application, or by uploading them to the YouTube Web site.
To play a video from your video gallery, do the following:
- Touch the applications from the action bar.
- Touch Gallery.
- Touch Images and videos - Videos only to display all the videos you have taken with cameras.
- Touch a video to play it.
- Use the controls on the screen to control playback.
To share a video with your friends, touch and hold the video from the video gallery. Touch the Share icon ☐, and then touch a data transfer method.

text_image
CE R RoHSListening to music
To listen to music stored on your tablet, do the following:
- Touch the applications from the action bar to open the application library.
- Touch Music. The Android music player is launched.
- Touch an album and touch a song to play it.
- Use controls on the screen to control playback.
Note: The Android Music application finds your music files anywhere you put them on your tablet.
You can return to the playback screen from any other application by opening the notifications panel and touching the ongoing music notification. To open the notification panel, touch the time area from the system bar; the notifications are listed under Details Status.
If you want to create a playlist of your favorite songs or sort songs by type, do the following:
-
Touch the triangular menu button to the right of an album, an artist, a song, or a genre, and touch Add to playlist.
-
On the Add to playlist screen, touch New.
-
Type the name for your new playlist in the text field and then touch Save.
To remove a song from a playlist, touch and hold the song, and then touch Delete from the pop-up menu.
Working with USB devices
You tablet has a micro USB connector and a full-size USB connector to connect USB compatible devices. Read this topic to learn how to use each connector to connect different devices.
Using the micro USB connector
Use the micro USB connector together with the supplied USB cable to connect your tablet to your per computer to charge the tablet battery, transfer files, or share your mobile data connection.
USB settings
Use the USB settings to decide how you want to use your tablet when attached to a computer through the micro USB connector. You can choose to use your tablet as a massive storage device or to charge your tablet only.
Working with the clock
Use the Clock application to display the date and time in large characters on your screen and to set to sound once or on a repeating schedule.
Setting date and time
By default, your tablet automatically synchronizes the date and time with the Internet. If you want to set date and time manually, do the following:
- From the main Home screen, touch the Android Settings touch the applications icon from the action bar and then touch Settings. The Android Settings screen opens.
- Touch Date & Time - Automatic to disable the auto-synchronization function.
- Touch Set date, Set time, Select time zone, and other items to set up date and time.
Setting an alarm
To set an alarm, do the following:
-
Launch the Clock application.
-
Touch Set alarm and touch Add alarm to set the alarm time.
-
Touch Set. A dialog box with details about the alarm opens.
-
Touch Repeat to open a dialog box to select the days on which you want the alarm to sound.
-
Touch Ringtone to select a ringtone for the alarm. The ringtone plays briefly when you select it.
-
Touch Label to type a label for the alarm.
-
Touch Done to save your setting.
About tablet
Use About tablet settings to check for information about your tablet, including the status, battery use, legal information, hardware and software versions, and build number.
To enable a setting, touch the setting item to select the check box. When a setting is enabled, a gre is displayed in the check box. To disable a setting, touch the setting item to clear the check box. If actions are required, follow the instruction on the screen
SPECIFICATIONS
Product features, specifications and appearances are subject to change without notice
| Model | NVR-TAB9Q S5 (8GB) |
| OS | Android 4.2 |
| CPU | A31S Cortex A7@ 1.0GHz |
| Memory | 1GB |
| InternalMemory | 8GB |
| Display | 9" |
| Resolution | 800*480 |
| Panel | G+P |
| WiFi | 802.11b/g/n |
| USB | 1XUSB 2.0 |
| Sdcard | Be extendable from 512MB to 32GB |
| Cámara | Front 0.3 Mega Pixel, back 2.0 Mega Pixel |
| Acadapter | DC 5V 2A |
| Audio | Support |
| Video | Support |
| Batery | 3.7V 4000mah |
| Speaker | 1W8Ω |
DeclarationofCEConformity


This symbol on the product or on the container indicates that this product cannot be eliminated with the general waste. The user is responsible for eliminating this kind of waste by throwing them away at a “recycling point” specifically for electrical and electronic waste. Selective collection and electrical equipment recycling contribute to preserve natural resources and warrant waste recycling to protect environment and health. In order to receive further information about electrical and electronic waste collecting and recycling, contact your Local Council, the service of household waste or the establishment where the product was acquired.

At full volume, prolonged listening to the portable audio device may damage the user's hearing.
For warranty information and technical support, please visit www.nevir.es
