NVR-TAB7 S13G (8GB) - Tablet NEVIR - Free user manual and instructions
Find the device manual for free NVR-TAB7 S13G (8GB) NEVIR in PDF.

User questions about NVR-TAB7 S13G (8GB) NEVIR
0 question about this device. Answer the ones you know or ask your own.
Ask a new question about this device
Download the instructions for your Tablet in PDF format for free! Find your manual NVR-TAB7 S13G (8GB) - NEVIR and take your electronic device back in hand. On this page are published all the documents necessary for the use of your device. NVR-TAB7 S13G (8GB) by NEVIR.
USER MANUAL NVR-TAB7 S13G (8GB) NEVIR
natural_image
Close-up of a lion's open mouth with teeth and tongue, no visible text or symbols7" (17,78cm) 3G MID with 8GBs
NVR-TAB7 S13G (8GB)

natural_image
Close-up of a lion's open mouth with teeth and tongue, no visible text or symbolsUSER MANUAL
Content
Content ....1
- Safety Instruction ....2
- Quick Start Guide....3
2.1 Startup and Shutdown....3
2.1 Home Page....3
2.3 USB Connection....4
- Basic Setting ....5
3.1 SIM Management ....5
3.2 Wireless and Internet....5
3.3 Bluetooth 6
3.4 Date and Time ....6
3.5 Fixed-time Startup and Shutdown....7
- Multi-Media 7
4.1 Music....7
4.2 Video 8
4.3 Photo Gallery....8
4.4 Camera....10
4.5 FM Radio....10
- Communication Function....11
5.1 Phone 11
5.2 Text Message....12
5.3 Contact List....12
- Installation of Procedures....13
6.1 Installation....13
6.2 Uninstall 13
- Troubles Shooting....14
1. Safety Instruction
Before the operation of the MID, please read this chapter and teach your kids about these information. For further details, please refer to the safety instructions and announcement.
● Never use the MID when driving car, in order to ensure safe driving.
- In the medical area, please abide by related rules and regulations. Please shut down the MID when it is near to the medical area.
- To avoid the wireless signal to interrupt the plane-controlled signal, please shut down the MID or using airplane mode when you are boarding a flight,
- To avoid electronic equipment failure, please shut down the MID in the vicinage of high-accuracy electronic equipments.
- Please don't disassemble the MID and accessories. Only authorized agent has access to service the MID.
- Please keep the MID far away from magnetic equipments, the radiation of MID may erase the data stored in the magnetic equipments.
- Never use the MID in the vicinage of high temperature, inflammable gas (gas station).
- Protect the MID and accessories from kids reach scope, and avoid the kids to use the MID without parents' supervision.
- Please comply with related rules and regulations, and respect others' privacy and legal rights while using the MID.
- Please strictly adhere to related instructions in the manual when using USB cable to ensure the safety of the MID or PC.
- Never use the MID in bathroom or other humid environment, and please protect the MID from liquid wash or wet.
2. Quick Start Guide
2.1 Startup and Shutdown
Startup
Long press POWER key for three seconds, you can enter into startup picture. The system enters into screen lock status, please unlock it.
Shutdown
- Long press POWER, it will popup shutdown window.
- Shutdown window contains mute mode, airplane mode, reboot mode and shutdown four options.
- Click Shutdown is the last step.
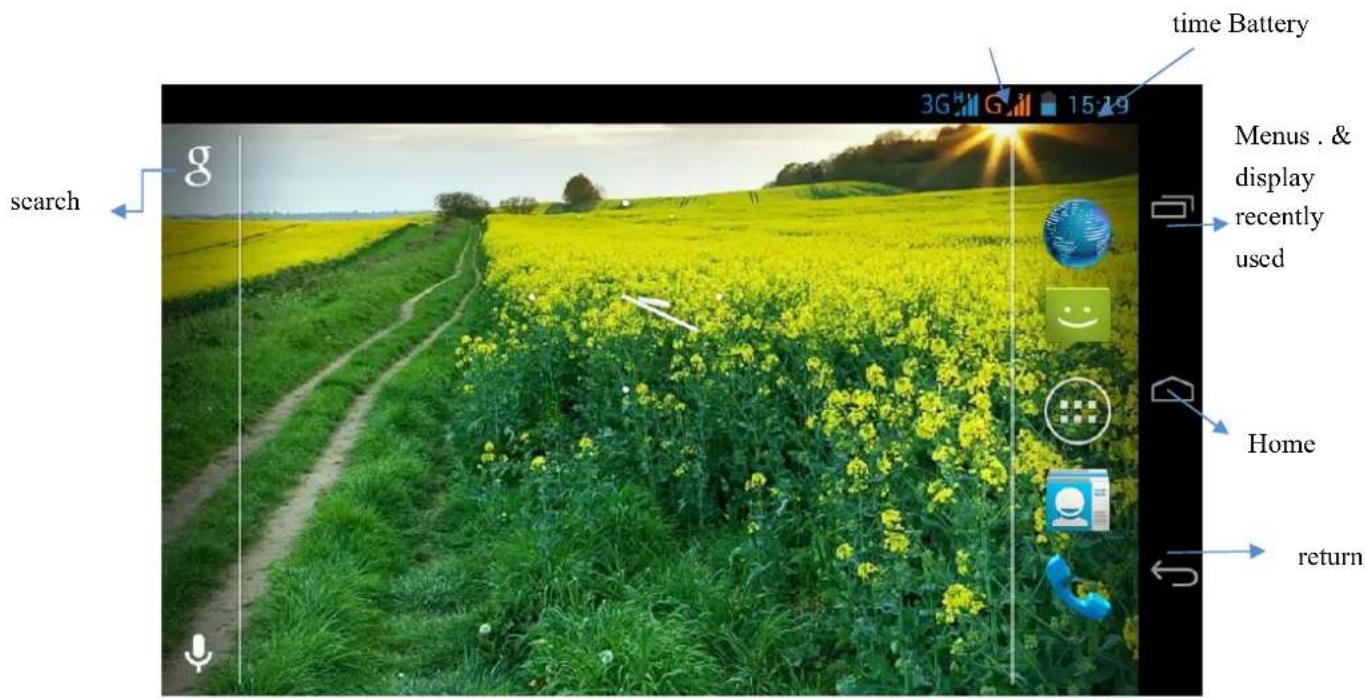
2.1 Home Page
Main interface as below picture, long press the blank and it will popup windows to set wallpaper, folder, widgets, and shortcut.
text_image
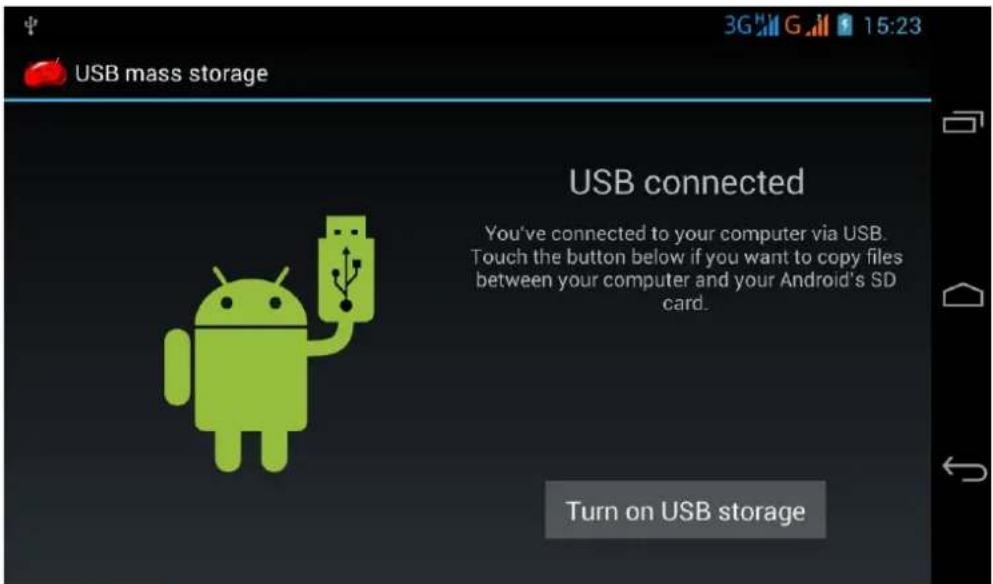
search time Battery 3G 15:19 g Menus . & display recently used Home return2.3 USB Connection
MID storage configuration
Before transmitting documents, you have to conduct storage configuration for your MID:
-
Connect the MID and computer by USB cable, the reminder column will show the remind information.
-
Open the reminder board; please view the MID status and reminder to learn how to open the board.
-
In the reminder board, click the "USB Connected", it will as below Picture, then click "open USB storage configuration".
-
Now the USB is connected successfully.
text_image
USB mass storage USB connected You've connected to your computer via USB. Touch the button below if you want to copy files between your computer and your Android's SD card. Turn on USB storageCopy the document into memory card
- Connect the MID to computer with USB cable.
- As MID storage configuration, it is connected with computer successfully.
- Open the "My computer" in your computer, check the items in "removable disc".
- Copy the documents you need into "removable disc".
- After copying finishes, click "shutdown the USB storage configuration" to uninstall.
Notice: When the MID is connected with USB cable, and you open the USB storage configuration, you can't view the memory card through the MID. Only after you detach the USB cable, you can view the memory card in the MID.
3. Basic Setting
3.1 SIM Management
3.1-1 Voice call
Click settings in main menu, choose SIM Management
Click voice call, choose defaulted SIM card
3.1-2 Video Call
Click settings in main menu, choose SIM Management, and click video call, choose defaulted SIM card when makes video call
3.1-3 Message
Click settings in main menu, choose SIM Management, click message, choose the defaulted SIM card when sends message
3.1-4 Data Connection
Click setting application in main menu, choose SIM management, click data connection, choose the defaulted SIM card
3.2 Wireless and Internet
1. Connect Wi-Fi
1) In the main menu or interface, choose setting application procedure.
2) Click WLAN, open wifi, MID will automatically search the available Wifi wireless internet.
3) Choose the Wi-Fi internet you want to connect, if it has password, it will popup the password window, enter password, click connect.
2. Add Network
1) Click ADD NETWORK right top
2) Input network SSID, the wireless network name, click save.
3) Click user name already saved, click connect to use network,
3. Network Notice
If you open Network Notice, when WIFI signal appears, the right bottom will remind you available WLAN network,
4. Keep WI-Fl on during sleep..
a) Click : icon in right top, select advanced.
b) Click Keep WI-FI on during sleep,
3.3 Bluetooth
. Bluetooth function operation
- Click setting application in main menu interface
- Click bluetooth and open it.
- If somebody open bluetooth in your surroundings, click search device in right above, then MID will automatically search the bluetooth device nearby.
- Click the available Bluetooth device, it will popup request window, enter into related password, and match the device to connect.
- After match successfully, choose the operation you want to, click

3.4 Date and Time
According to the preset, system will voluntarily apply the date, zone, and time provided by internet.
Manual set date, time and zone
- Click Setting application procedure.
- Slide down the screen, then click date and time.
- Turn off "auto setting of date and time".
- Turn off "auto setting zone".
- Click Zone Selecting, then choose the zone lists. Slide down the list to view more zones.
- Click Date setting, then click upper or down buton to adjust date, month, and year, click setting when you finish selection.
- Click Time setting, then click upper or down button to adjust hour and minute, click AM or PM to change morning or afternoon (there is no such selection when you see 24-hour format). Click Setting to finish.
- Click 24-hour format, switch between 12-hour or 24-hour format, the time format you choose will be used on the alarm clock.
- Click date format setting, then choose the time format you want to show on MID.
Note: If you use the time internet provided, you will not able to set the date, time and time zone.
3.5 Fixed-time Startup and Shutdown
- Click Setting application procedure
- Click fixed-tine startup and shutdown.
4. Multi-Media
4.1 Music
Enter into music player: in menu or desktop click music on to enter into music player, click the music you want to play
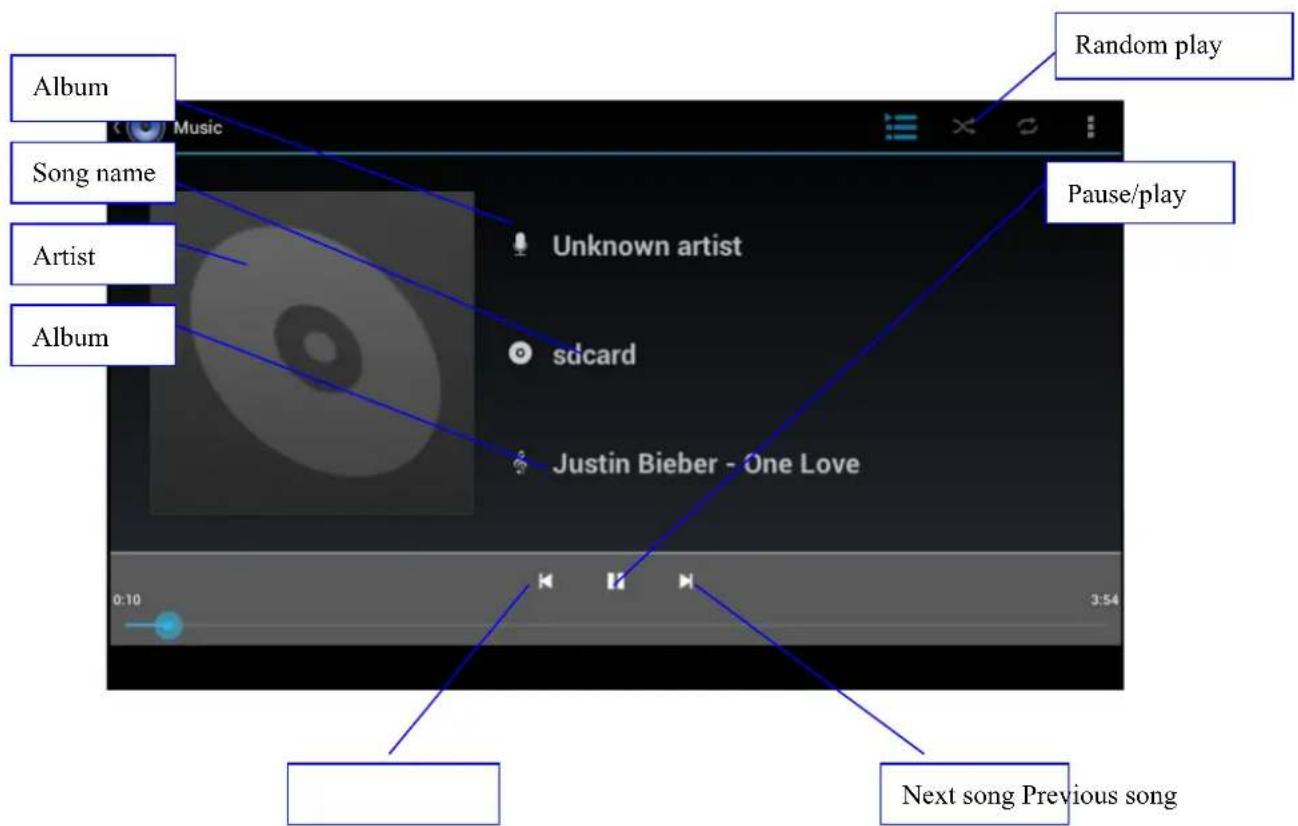
text_image
Album Song name Artist Album Music Unknown artist sdcard Justin Bieber - One Love Random play Pause/play 0:10 3:54 Next song Previous song- Drag the progress bar to adjust play progress.
● Operation of music player button
4.2 Video

- Enter video player: choose application in main menu, choose the video you want to play.
● Operation of video player button as below picture

text_image
Cat Adjust play progress Play/pause Choose the screen mode 00:29 03:524.3 Photo Gallery
Photo gallery application can auto search photos and video files in SD card, and photo gallery will classify these photos and videos in folder. You can apply photo gallery to view and edit photos, set the photos as wallpaper and watch the video.
View pictures
- Click gallery application in main interface.
- Enter into gallery, click the folder you want to view.
- Click the picture you want to view, the system will play it in full screen mode automatically.
- The pictures can be zoom in and zoom out, put two fingers on the screen, the separate the fingers(gather up the fingers, the picture will be zoom in) or double click the screen.
Note: when you browse the pictures, slide left or right to view more pictures.
Edit and set pictures
When check the pictures in full screen mode, click menu key to display menu selection, you can choose the selection you need to edit and setting pictures.
- Slide Show
-
Open a picture, use virtual key to click menu key, display menu selection.
-
Click slide show, it will auto loop play(or choose ▶ button in picture folder)
- Crop
- Click menu key to display menu selection.
- Then click crop, click and drag related area to adjust the cropper.
- Click cropper and drag it inside and outside to adjust the image.
- After adjust the size you want, click crop.
- If you wish to give up to crop, click cancel to return to picture browse.
- Edit
- Click menu key, display the menu selection.
- Click edit.
- Adjust teh brightness, style, color, antialias setting in selection.
- Click save.
- If you want to give up edit, click return key, click not to return to picture browse.
4.4 Camera
In the main interface or desktop, click camera application procedure , enter into camera
- Operation of camera ,Switch camera: choose Menu key, click switch front/back camera, as below picture

text_image
view the pictures and videos Switch front/back camera Click it to take pictures Sub menu Camera mode Full screen play mode. camera shooting 23274.5 FM Radio
Click in the main interface or desktop to enter into FM radio interface:
Click search to search FM band,
- RDS setting: click Menu key in interface, click the munu button, and choose RDS settings, enter into RDS setting, and choose the selection you want to add
- Save channels: Click ★ on in the main interface to save
the channel, and the channel will be saved in channels list.
Note: You need to insert earphone as antenna when using FM radio, If no antenna, your MID can't search any frequency band.
5. Communication Function
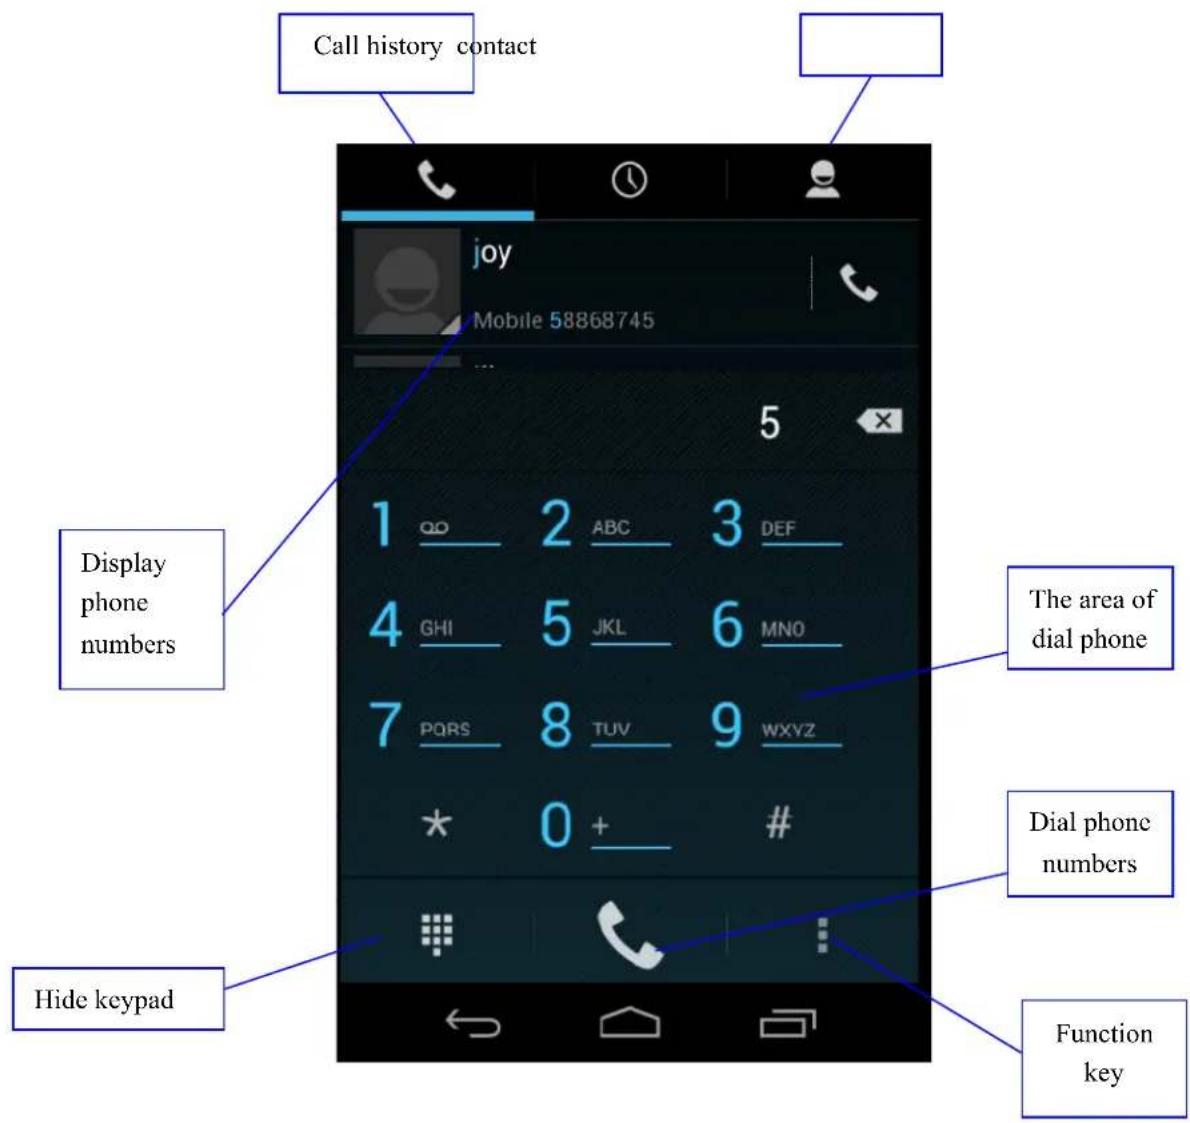
5.1 Phone
1 Click Phone application procedure
2 Operate as below picture
text_image
Call history contact Joy Mobile 58868745 Display phone numbers The area of dial phone 4 GHI 5 JKL 6 MNO 7 PQRS 8 TUV 9 WXYZ * 0 + # Dial phone numbers Hide keypad Function key5.2 Text Message

text_image
1 Enter into main menu, choose "application procedure." 2 Click "Edit new message" Directly input phone number New message To Attach some files Menu(discard,insert text and settings) Add receiver Send message 160/1 Type message5.3 Contact List
Click Contact list the main interface, enter into the contact list
- Search contact: click button, enter into search function
- Add contact: click button, enter into add contact interface.
6. Installation of Procedures
6.1 Installation
Install the third party application procedure
- Click "file manager" application procedure; choose the application procedure you need to install.
- Hold the application procedure you need to install.
- It popup install, click install apk.
- Finish the installation as guide, it will operate.
Note: The third party procedure searched from internet to use on the system are all suffixed with .apk.
6.2 Uninstall
Uninstall application procedure
- Click setting icon in main interface.
- Click manage application procedure, list all the application procedures installed in the system.
- Click the APK you want to uninstall, click uninstall.
- Click confirm to finish uninstallation.
Skill: The procedure manager installed by system has many convenient methods to uninstall after opening procedure manager, click uninstall, it will list all the application procedures installed by system.
7. Troubles Shooting
5. The first startup of MID is slow
After the MID system upgraded, the first startup need to install the pre-installed application softwares, the lead time is around 2-3 minutes, the startup afterwards will be much quicker.
6. MID can't connect Wi-Fi
● Make sure the wireless router of internet service can work in normal.
- Ensure the MID and wireless router in certain distance, and no wall or other barrier between them.
- Ensure the user name and password both correct.
7. MID feels hot
When many application procedures are used in meanwhile, or the brightness of screen open to the lightest or under charging, MID may feel fever. It is normal.
8. Email can't be set or Registration of application procedure.
- Ensure your internet is well connected.
● Make sure your email setting way is correct. - Keep your system time and local time consistent.
5. The system is abnormal and can't work.
When you install some third party application procedure, it may cause abnormal work, you can press Reset key(next to power port) to reset the system.
6. The webpage can't be opened
- Please keep the distance between from route to MID in effective range.
- Please restart WIFI and try again.
7. MID works terribly slow sometimes
It is normal phenomenon. Please turn off some application you don't need in advanced task management, or uninstall some third party application to release more system resource.

This symbol indicates that when the end-user wishes to discard this product, it must be sent to separate collection facilities for recovery and recycling. By separating this products from other household-type waste, the volume of waste sent to incinerators or land fields is reduced and natural resources will thus be conserved.