XW-NAC3R-K - Bluetooth speaker PIONEER - Free user manual and instructions
Find the device manual for free XW-NAC3R-K PIONEER in PDF.
| Product Type | Bluetooth Speaker |
| Brand | Pioneer |
| Model | XW-NAC3R-K |
| Dimensions (W x H x D) | 410 mm x 135 mm x 153 mm |
| Weight (without packaging) | 2.9 kg |
| Power Supply | 220 V - 240 V AC, 50/60 Hz |
| Power Consumption | 24 W (standby: 0.5 W) |
| Output Power | 2 x 10 W RMS (1 kHz, 10% distortion, 8 Ω) |
| Speakers | Full-range 6.6 cm + passive radiator 7.7 cm |
| Frequency Response | 60 Hz - 20 kHz |
| Bluetooth Connectivity | Yes, with built-in AS-BT100 adapter, A2DP and AVRCP profiles |
| iPod/iPhone Playback | Yes, via dock connector (compatible models) |
| Network Functions | Home Media Gallery (DLNA), Internet radio, USB playback |
| Special Functions | SHUFFLE ^2 (mixed playback of two iPods), Sound Retriever, HI-LITE SCAN |
| Auxiliary Inputs | AUX IN jack (mini jack) |
| Video Output | Yes (composite) for iPod/iPhone display on TV |
| Timer | Wake-up and sleep timer |
| Display | Backlit LCD screen |
| Remote Control | Yes, with CR2025 lithium battery |
| Included Accessories | Remote control, CR2025 battery, power cord, USB cover, warranty card, manual |
| Maintenance | Clean with a dry, soft cloth. Avoid solvents, alcohol, etc. |
| Safety | Do not expose to water or open flames. Maintain minimum 10 cm ventilation around. |
| Repairability | No user-serviceable parts. Refer to qualified personnel. |
| Operating Temperature | +5 °C to +35 °C |
Frequently Asked Questions - XW-NAC3R-K PIONEER
User questions about XW-NAC3R-K PIONEER
0 question about this device. Answer the ones you know or ask your own.
Ask a new question about this device
Download the instructions for your Bluetooth speaker in PDF format for free! Find your manual XW-NAC3R-K - PIONEER and take your electronic device back in hand. On this page are published all the documents necessary for the use of your device. XW-NAC3R-K by PIONEER.
USER MANUAL XW-NAC3R-K PIONEER
Discover the benefits of registering your product online at http://www.pioneer.co.uk (or http://www.pioneer.eu).
Operating Instructions
Mode d'emploi
natural_image
Abstract geometric diagram with intersecting lines and concentric circles (no text or symbols)

natural_image
Pure geometric diagram with intersecting lines and shapes, no text or symbols presentIMPORTANT

The lightning flash with arrowhead symbol, within an equilateral triangle, is intended to alert the user to the presence of uninsulated “dangerous voltage” within the product’s enclosure that may be of sufficient magnitude to constitute a risk of electric shock to persons.
CAUTION
RISK OF ELECTRIC SHOCK DO NOT OPEN
CAUTION:
TO PREVENT THE RISK OF ELECTRIC SHOCK, DO NOT REMOVE COVER (OR BACK). NO USER-SERVICEABLE PARTS INSIDE. REFER SERVICING TO QUALIFIED SERVICE PERSONNEL.

The exclamation point within an equilateral triangle is intended to alert the user to the presence of important operating and maintenance (servicing) instructions in the literature accompanying the appliance.
D3-4-2-1-1_A1_En
Information for users on collection and disposal of old equipment and used batteries
(Symbol for equipment)
(Symbol examples) for batteries
These symbols on the products, packaging, and/or accompanying documents mean that used electrical and electronic products and batteries should not be mixed with general household waste.
For proper treatment, recovery and recycling of old products and used batteries, please take them to applicable collection points in accordance with your national legislation.
By disposing of these products and batteries correctly, you will help to save valuable resources and prevent any potential negative effects on human health and the environment which could otherwise arise from inappropriate waste handling.
For more information about collection and recycling of old products and batteries, please contact your local municipality, your waste disposal service or the point of sale where you purchased the items.
These symbols are only valid in the European Union.
For countries outside the European Union:
If you wish to discard these items, please contact your local authorities or dealer and ask for the correct method of disposal.
K058a_A1_En
WARNING
This equipment is not waterproof. To prevent a fire or shock hazard, do not place any container filled with liquid near this equipment (such as a vase or flower pot) or expose it to dripping, splashing, rain or moisture.
D3-4-2-1-3_A1_En
WARNING
Before plugging in for the first time, read the following section carefully.
The voltage of the available power supply differs according to country or region. Be sure that the power supply voltage of the area where this unit will be used meets the required voltage (e.g., 230 V or 120 V) written on the rear panel.
D3-4-2-1-4*_A1_En
WARNING
To prevent a fire hazard, do not place any naked flame sources (such as a lighted candle) on the equipment. D3-4-2-1-7a_A1_En
Operating Environment
Operating environment temperature and humidity: +5 °C to +35 °C (+41 °F to +95 °F); less than 85 %RH (cooling vents not blocked)
Do not install this unit in a poorly ventilated area, or in locations exposed to high humidity or direct sunlight (or strong artificial light)
D3-4-2-1-7c*_A1_En
WARNING
Store small parts out of the reach of children and infants. If accidentally swallowed, contact a doctor immediately.


D3-4-2-1-7a_A1_En


natural_image
Pure geometric diagram with intersecting lines and shapes, no text or symbols presentVENTILATION CAUTION
When installing this unit, make sure to leave space around the unit for ventilation to improve heat radiation (at least 10 cm at top, 10 cm at rear, and 10 cm at each side).
WARNING
Slots and openings in the cabinet are provided for ventilation to ensure reliable operation of the product, and to protect it from overheating. To prevent fire hazard, the openings should never be blocked or covered with items (such as newspapers, table-cloths, curtains) or by operating the equipment on thick carpet or a bed.
D3-4-2-1-7b* A1 En
natural_image
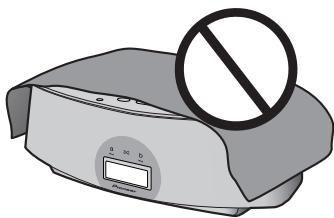
Illustration of a device with a prohibition symbol overlay (no text or symbols present)If the AC plug of this unit does not match the AC outlet you want to use, the plug must be removed and appropriate one fitted. Replacement and mounting of an AC plug on the power supply cord of this unit should be performed only by qualified service personnel. If connected to an AC outlet, the cut-off plug can cause severe electrical shock. Make sure it is properly disposed of after removal. The equipment should be disconnected by removing the mains plug from the wall socket when left unused for a long period of time (for example, when on vacation).
D3-4-2-2-1a_A1_En
POWER-CORD CAUTION
Handle the power cord by the plug. Do not pull out the plug by tugging the cord and never touch the power cord when your hands are wet as this could cause a short circuit or electric shock. Do not place the unit, a piece of furniture, etc., on the power cord, or pinch the cord. Never make a knot in the cord or tie it with other cords. The power cords should be routed such that they are not likely to be stepped on. A damaged power cord can cause a fire or give you an electrical shock. Check the power cord once in a while. When you find it damaged, ask your nearest PIONEER authorized service center or your dealer for a replacement.
S002*_A1_En
CAUTION
The ⏻ STANDBY/ON switch on this unit will not completely shut off all power from the AC outlet. Since the power cord serves as the main disconnect device for the unit, you will need to unplug it from the AC outlet to shut down all power. Therefore, make sure the unit has been installed so that the power cord can be easily unplugged from the AC outlet in case of an accident. To avoid fire hazard, the power cord should also be unplugged from the AC outlet when left unused for a long period of time (for example, when on vacation).
D3-4-2-2-2a*_A1_En
This product is for general household purposes. Any failure due to use for other than household purposes (such as long-term use for business purposes in a restaurant or use in a car or ship) and which requires period.
K041_A1_En
When using this product, confirm the safety information shown on the bottom of the unit.
D3-4-2-2-4_B1_En
[For UK model]
Replacement and mounting of an AC plug on the power supply cord of this unit should be performed only by qualified service personnel.
IMPORTANT: THE MOULDED PLUG
This appliance is supplied with a moulded three pin mains plug for your safety and convenience. A 5 amp fuse is fitted in this plug. Should the fuse need to be replaced, please ensure that the replacement fuse has a rating of 5 amps and that it is approved by ASTA or BSI to BS1362.
Check for the ASTA mark ATA or the BSI mark on the body of the fuse.
If the plug contains a removable fuse cover, you must ensure that it is refitted when the fuse is replaced. If you lose the fuse cover the plug must not be used until a replacement cover is obtained. A replacement fuse cover can be obtained from your local dealer.
If the fitted moulded plug is unsuitable for your socket outlet, then the fuse shall be removed and the plug cut off and disposed of safely. There is a danger of severe electrical shock if the cut off plug is inserted into any 13 amp socket.
If a new plug is to be fitted, please observe the wiring code as shown below. If in any doubt, please consult a qualified electrician.
IMPORTANT: The wires in this mains lead are coloured in accordance with the following code: Blue : Neutral Brown : Live
As the colours of the wires in the mains lead of this appliance may not correspond with the coloured markings identifying the terminals in your plug, proceed as follows;
The wire which is coloured BLUE must be connected to the terminal which is marked with the letter N or coloured BLACK. The wire which is coloured BROWN must be connected to the terminal which is marked with the letter L or coloured RED.
How to replace the fuse: Open the fuse compartment with a screwdriver and replace the fuse.
D3-4-2-1-2-2*_A2_En
Thank you for buying this Pioneer product.
Please read through these operating instructions so that you will know how to operate your model properly. After you have finished reading the instructions, put them in a safe place for future reference.
Contents
01 Before you start
Features 5
What's in the box 5
Before using the remote control ..... 6
Replace the battery 6
Using the remote control 7
Installing the unit 7
Plugging in....7
02 Controls and displays
Remote control....8
Front/top panel 10
03 iPod/iPhone playback
Confirm what iPod/iPhone models are supported
......11
Connecting your iPod/iPhone ..... 11
Connecting your TV 12
Playing your iPod/iPhone 12
SHUFFLE ^2 14
HI-LITE Scan....14
04 Bluetooth® AUDIO for Wireless Enjoyment of Music
Wireless music play 16
Remote control operation....16
About Bluetooth wireless technology ..... 16
Setting the PIN code....17
Pairing this unit and Bluetooth wireless
technology device....17
Listening to Music Contents of Bluetooth wireless
technology device with Your System ..... 18
Radio wave caution....18
Scope of operation....19
Radio wave reflections 19
Precautions regarding connections to products
supported by this unit. 19
05 Playback with HOME MEDIA GALLERY inputs
Enjoying the Home Media Gallery....20
Steps to enjoy the Home Media Gallery.....21
About playable file formats....22
Connecting to the network through LAN interface
23
Playback with Home Media Gallery.....23
About the playback screen .....25
About the Favorites folder .....25
Registering audio files and Internet radio
stations in the Favorites folder .....25
Deleting audio files and Internet radio stations
from the Favorites folder....25
Registering broadcast stations not on the vTuner
list from the special Pioneer site .....26
Advanced operations for Internet radio .....27
Saving Internet radio stations....27
Retrieving saved Internet radio stations ....27
Setting up the network .....27
Checking the network settings .....29
Ext. Vol Limit 29
About network playback 30
Windows Media Player 30
Windows Media DRM....30
DLNA 30
Content playable over a network....30
About playback behavior over a network....31
Authorizing this unit....31
aacPlus....31
FLAC....31
06 Other connections
Connecting auxiliary components....33
07 Sound settings
Using the Sound Retriever .....34
Using the sound effects ....34
Adjusting the bass and treble .....35
08 Using the timer
Setting the clock....36
Changing the clock's display mode .....36
Setting the wake-up timer....37
Turning the wake-up timer on/off .....37
Using the sleep timer ....37
09 Additional information
Troubleshooting 38
Resetting the system....41
About Sound Retriever .....41
About iPod/iPhone 41
Specifications 42
Cleaning the unit....42


natural_image
Pure geometric diagram with intersecting lines and shapes, no text or symbols presentBefore you start
Chapter 1: Before you start
Features
1. Alternating mix playback using two iPod/iPhone units with SHUFFLE ^2 function
Alternating mix playback (SHUFFLE ^2 ) can be enjoyed by merely connecting two Apple iPod/iPhone units to this unit's connector, and by pressing ✗ on the unit or remote control. In addition to the automated SHUFFLE ^2 playback, you can also manually operate and switch between two iPod/iPhone units, or play a digest of the music on the two iPod/iPhone units (HI-LITE SCAN).
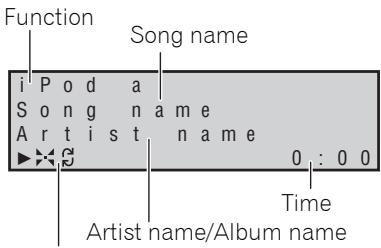
2. Wireless Playback Using Bluetooth wireless technology
Since this speaker system is equipped with Bluetooth wireless technology, you can listen to other Bluetooth-enabled devices (cell phones, digital music players, etc.) without the need for a cable connection. Even when using a wireless connection, high quality sound is assured by means of the Sound Retriever Air function, which helps prevent signal deterioration.
3. Network Multimedia Function
This unit can be used to listen to the newest kinds of digital content, including music libraries stored within a network-connected computer, Internet radio, or music files stored on USB memory devices.
4. High Fidelity Sound Design
In addition to its 2-channel full-range speaker, this unit also features a low-range passive radiator speaker, producing powerful, high-quality sound. In addition, the Sound Retriever function augments sound quality lost in compression, allowing rich sound like that produced by conventional CDs.
5. Enjoy iPod/iPhone Images
Since this unit is equipped with a video output connector, the unit can be connected to a TV in order to view photographs and music videos stored in your iPod/iPhone.
What's in the box
Please confirm that the following accessories are in the box when you open it.
- Remote control
- Lithium battery (CR2025) (The lithium battery has been factory installed in the remote control unit.)
- Power cord
- USB terminal cover (included with product)
- Warranty card
- Operating instructions (This document)

natural_image
Abstract geometric pattern with intersecting lines and shaded circles (no text or symbols)01 ( Before you start
Before using the remote control
natural_image
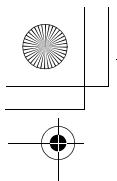
Illustration of a hand holding a small object with a downward arrow, no text or symbols presentThe battery supplied with this unit is stored in the battery casing.
- Remove the protective seal from the battery casing.
When you notice a decrease in the operating range, replace the battery (see below).
Replace the battery
When replacing the battery, use a commercially available Lithium CR2025 battery.

text_image
Diagram showing a device component with labeled parts and directional arrows indicating movement or assembly.1 While pushing the release tab, pull out the battery casing.
2 Remove the battery from the casing.
3 Place a new battery in the casing.
Make sure the ⊕ side of the battery is facing up when you place it in the space provided.
Caution
When using lithium batteries, please observe the following:
- There is danger of explosion if the battery is incorrectly replaced. Make sure to replace only with the same or equivalent type recommended by the manufacturer.
- Dispose of used battery cells immediately after replacement. Keep away from children.
- If swallowed, please contact a doctor immediately.
- Lithium batteries may present a fire or chemical burn hazard if misused. Do not disassemble, heat above 100 °C, or incinerate.
- Remove the battery if the unit isn't going to be used for a month or more.
- When disposing of used batteries, please comply with governmental regulations or environmental public instruction's rules that apply in your country or area.
- WARNING
Do not use or store batteries in direct sunlight or other excessively hot place, such as inside a car or near a heater. This can cause batteries to leak, overheat, explode or catch fire. It can also reduce the life or performance of batteries.


natural_image
Pure geometric diagram with intersecting lines and shapes, no text or symbols present
Before you start
Using the remote control
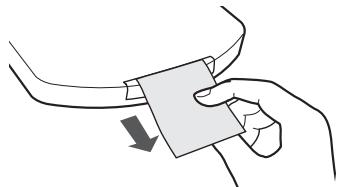
The remote has a range of about 7 m at an angle of about 30^ from the remote sensor.
text_image
30° 30° 7 mKeep in mind the following when using the remote control:
- Make sure that there are no obstacles between the remote and the remote sensor on the unit.
- Remote operation may become unreliable if strong sunlight or fluorescent light is shining on the unit's remote sensor.
- Remote controllers for different devices can interfere with each other. Avoid using remotes for other equipment located close to this unit.
- Replace the batteries when you notice a fall off in the operating range of the remote.
Installing the unit
- When installing this unit, make sure to put it on a level and stable surface.
Don't install it on the following places:
- on a color TV (the screen may distort) - near a cassette deck (or close to a device that gives off a magnetic field). This may interfere with the sound.
- in direct sunlight
- in damp or wet areas
– in extremely hot or cold areas
– in places where there is vibration or other movement
– in places that are very dusty
– in places that have hot fumes or oils (such as a kitchen)
Plugging in
After you've finished making all connections, plug the unit into an AC outlet.
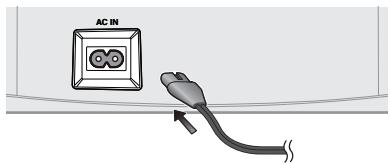
text_image
AC IN1 Plug the supplied power cord into the AC IN socket on the back of the unit.
2 Plug the other end into a power outlet.

Important
- Before making or changing any connections, switch off the power and disconnect the power cord from the AC outlet.


natural_image
Abstract geometric pattern with intersecting lines and shaded circles (no text or symbols)02 (Controls and displays
Chapter 2:
Controls and displays
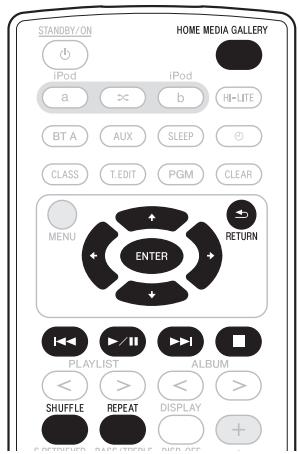
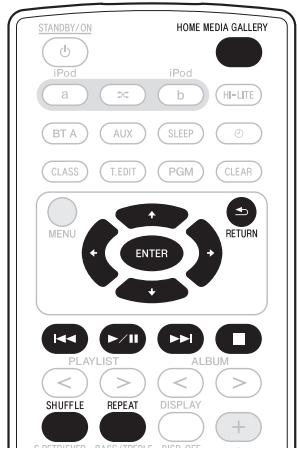
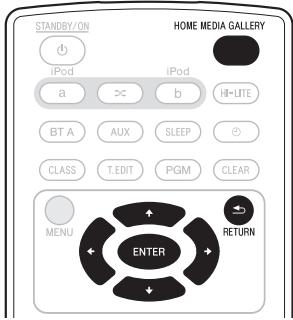
Remote control
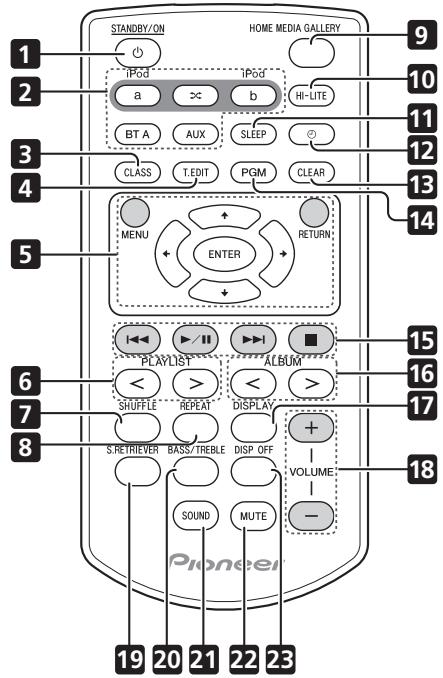
text_image
STANDBY/ON HOME MEDIA GALLERY 9 1 2 IPoD a × b Hi-LITE 10 3 BT A AUX SLEEP ○ CLASS T.EDIT PGM CLEAR 12 4 MENU ENTER RETURN: 13 14 5 PLAYLIST ALBUM 15 < > < > SHUFFLE REPEAT DISPLAY + VOLUME: 16 7 8 S.RETRIVER BASS/TREBLE DISP OFF SOUND MUTE - 18 19 20 21 22 23 Pioneer1 ⏻ STANDBY/ON
Switches the unit between standby and on.
2 iPod a
Switches the input to the iPod/iPhone connected to the iPod a connector port.
×
When iPod/iPhone are connected to both connector ports iPod a and iPod b, the
SHUFFLE ^2 function can be used to alternately play tracks on iPod a and iPod b (page 14).
iPod b
Switches the input to the iPod/iPhone connected to the iPod b connector port.
BT A
Switches the input to Bluetooth AUDIO.
AUX
Switches the input to external input.
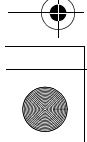
3 CLASS
Switches between the three banks (classes) of radio station presets (page 27).
4 T.EDIT (TUNER EDIT)
Use to save Internet radio stations (page 27).
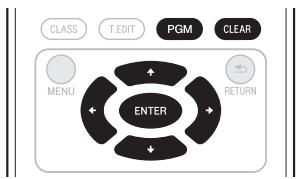
5 MENU
Press to make various settings.

Use these to select items, change settings.
ENTER
Use this to implement the selected item or enter a setting that you have changed.
RETURN
Use to return to the previous menu or the category list screen.
6 PLAYLIST
Use these to select playlists to be played on iPod/iPhone.
7 SHUFFLE
Perform shuffle play of tracks on the selected iPod/iPhone or USB memory device (page 13).
8 REPEAT
Perform repeat play of tracks on the selected iPod/iPhone or USB memory device (page 13).


8
En


natural_image
Pure geometric diagram with intersecting lines and shapes, no text or symbols present

natural_image
Abstract geometric diagram with intersecting lines and shaded circles (no text or symbols)02
Controls and displays
9 HOME MEDIA GALLERY
Switches the input to internet radio, a USB storage device or server components on the network (page 21).
10 HI-LITE
If an iPod/iPhone is connected to the connector port, the HI-LITE function can be used to playback part of the track (page 14).
11 SLEEP
Use to put the unit in sleep mode and select the amount of time before sleep (page 37).
12
Use to turn the wake-up timer function ON/OFF (page 37). Also use to switch the clock display functions (page 36).
13 CLEAR
Use to delete audio files and Internet radio stations from the Favorites folder (page 25).
14 PGM
Use to register audio files and Internet radio stations in the Favorites folder (page 25).
15 Playback control buttons
Use when operating an iPod/iPhone, Bluetooth wireless technology device, USB storage device, internet radio and the music files stored in PC's with this remote control (page 12, 18, 23).
16 ALBUM < / >
Use these to select albums to play on iPod/iPhone.
17 DISPLAY
Switches the track information (artist name/album name) each time the button is pressed during playback.
18 VOLUME +/-
Use to set the listening volume.
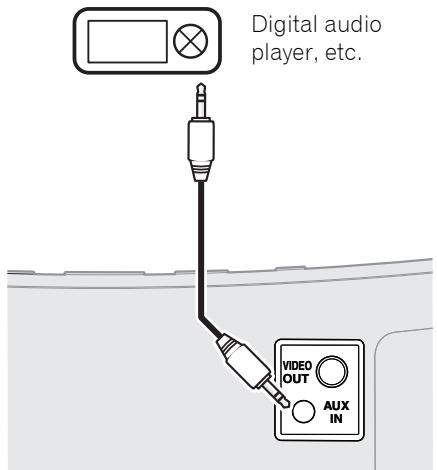
19 S.RETRIEVER
Use to turn the Sound Retriever function ON/OFF (page 34).
20 BASS/TREBLE
Use the bass and treble controls to adjust the overall tone (page 35).
21 SOUND
Switches Sound modes (page 34).
22 MUTE
Press to temporarily silence the sound.
23 DISP OFF
Turns the display off except when pressing the buttons.
English


natural_image
Abstract geometric diagram with intersecting lines and concentric circles (no text or symbols)
text_image
9 En02 (Controls and displays
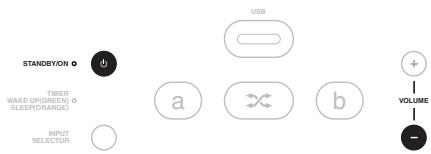
Front/top panel
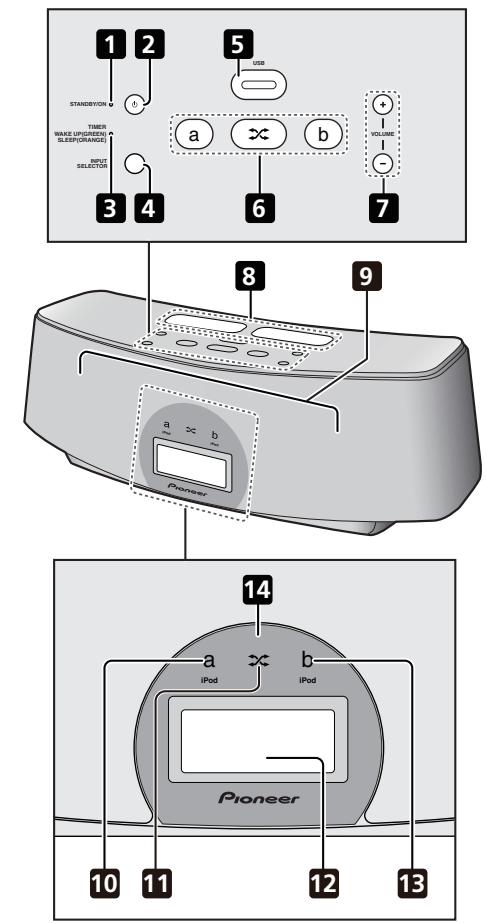
1 Power Indicator
Lights when the power is on.
2 ⏻ STANDBY/ON
Switches the unit between standby and on.
3 TIMER indicator
When the wake-up timer is set to ON, this indicator lights green. When the sleep timer is set to ON, this indicator lights orange.
4 INPUT SELECTOR
Use to select an input source. Press repeatedly to switch between iPod a, iPod b, Bluetooth AUDIO (BT AUDIO), Home Media Gallery and external input (AUX).
5 USB terminal
When no USB storage device is connected, install the USB terminal cover.
WARNING
Store the USB terminal cover out of the reach of children and infants. If accidentally swallowed, contact a doctor immediately.
6 a
Switches the input to the iPod/iPhone connected to the iPod a connector port.
×
When iPod/iPhone are connected to both connector ports iPod a and iPod b, the
SHUFFLE ^2 function can be used to alternately play tracks on iPod a and iPod b (page 14).
b
Switches the input to the iPod/iPhone connected to the iPod b connector port.
7 VOLUME +/-
Use to set the listening volume.
8 iPod/iPhone connector ports
9 Speaker units
10 iPod a indicator
Lights when the iPod a input is selected.
11 SHUFFLE ^2 indicator
Lights when the SHUFFLE ^2 function is on.
12 Display
13 iPod b indicator
Lights when the iPod b input is selected.
14 Remote control sensor

text_image
10 En

natural_image
Pure geometric diagram with intersecting lines and shapes, no text or symbols presentiPod/iPhone playback
Chapter 3:
iPod/iPhone playback
Merely by connecting your iPod/iPhone to this speaker system, you can enjoy high-quality sound from your iPod/iPhone. This unit can also be connected to a television set, letting you view images from your iPod/iPhone.
Playback and volume level setting for iPod/iPhone music and images can be performed from this unit or the iPod/iPhone itself.
Confirm what iPod/iPhone models are supported
The iPod/iPhone playable on this unit are shown below. ^1
| iPod/iPhone | Audio | Control | Video |
| iPod nano 1/2G | √ | √ | |
| iPod nano 3/4/5G | √ | √ | √ |
| iPod 5G | √ | √ | √ |
| iPod classic 2007 | √ | √ | √ |
| iPod classic 2008 | √ | √ | √ |
| iPod classic 2009 | √ | √ | √ |
| iPod touch 1G | √ | √ | √ |
| iPod touch 2G | √ | √ | √ |
| iPod touch 2G 2009 | √ | √ | √ |
| iPhone | √ | √ | √ |
| iPhone 3G/3GS | √ | √ | √ |
Always use the most recent version of iPod/iPhone software available. Operation compatibility may vary depending on the version of the software used. You can confirm your software version by operating your iPod/iPhone as follows:
1 Select 'Settings' from the top menu.
When using iPod touch or iPhone, select 'General' after selecting 'Settings'.
2 Select 'About'.
The software version will be displayed.
- Consult the Apple website regarding the newest software versions and instructions on how to update your version.

Tip
- When using an iPod/iPhone not supported by this unit, use a commercially available cable to connect the iPod/iPhone to the AUX IN connector of this unit.
Connecting your iPod/iPhone

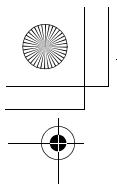
Caution
- When connecting one or two iPod/iPhone units, always use the dock adapter provided with your iPod/iPhone, or a commercially adapter designed to support iPod/iPhone. The iPod/iPhone cannot be connected without a dock adapter; attempting to connect an iPod/iPhone without a dock adapter will cause damage or malfunction.
Note
1 • Pioneer does not guarantee that this unit plays iPod/iPhone other than the ones specified.
- Some functions may be restricted depending on the model or software version.
- iPod/iPhone is licensed for reproduction of non-copyrighted materials or materials the user is legally permitted to reproduce.
- Features such as the equalizer cannot be controlled using this system, and we recommend switching the equalizer off before connecting.
- Pioneer cannot under any circumstances accept responsibility for any direct or indirect loss arising from any inconvenience or loss of recorded material resulting from the iPod/iPhone failure.
- For detailed instructions on using the iPod/iPhone, please refer to the manual supplied with the iPod/iPhone.

natural_image
Abstract geometric pattern with intersecting lines and shaded circles (no text or symbols)03 iPod/iPhone playback
text_image
iPod nano/ iPod classic/ iPod touch/ iPhone Dock adapter1 Attach the Dock adapter to iPod/iPhone connector port on the top panel of this unit.
- An iPod/iPhone Dock adapter is not supplied with this unit.
When attaching the Dock adapter, be sure to orient the front-back directions of the Dock adapter correctly. To attach, first place the protruding tabs on the front side of the adapter into the depressions on the iPod/iPhone connector port and press into position. When attaching the adapter, be careful not to strike the connectors.
2 Connect your iPod/iPhone.
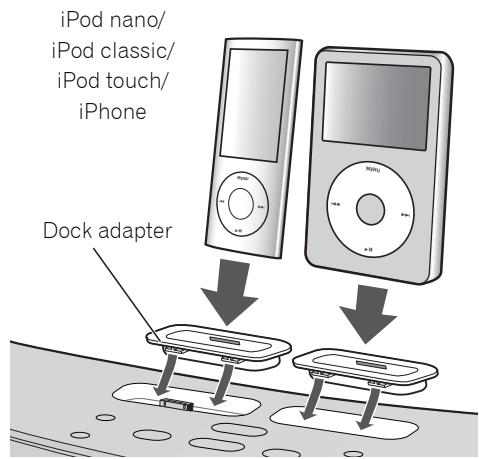
Connecting your TV
To watch iPod/iPhone images on a television, perform connections using a composite video cable.
- When an iPod/iPhone is connected to this unit, the iPod/iPhone's TV output setting is automatically set to ON. ^1
Caution
- Before making or changing the connections, switch off the power and disconnect the power cord from the power outlet. Plugging in should be the final step.
text_image
TV Composite video cable (commercially available) VIDEO OUT AUX INPlaying your iPod/iPhone
Caution
- When your iPod is connected to this unit and you wish to operate the iPod/iPhone by touching it directly, be sure to hold the iPod/iPhone steady with the other hand to prevent malfunctions due to faulty contacts.
When the iPod/iPhone function is selected, if an iPod/iPhone is connected to the connector port iPod a or b, 'iPod a/b Connecting' will be displayed while the device is being confirmed. ^2
Playback and volume level setting for iPod/iPhone music and images can be performed from this unit or the iPod/iPhone itself.
Note
1 • Some iPods allow the TV output setting to be changed while connected.
- When the iPod/iPhone is disconnected from this unit, the iPod/iPhone's TV output setting returns to its original state.
2 If an iPod/iPhone is connected when the iPod/iPhone is in playback mode and this unit is in standby mode, the power will turn on and playback of the iPod/iPhone will begin.
12
En


natural_image
Pure geometric diagram with intersecting lines and shapes, no text or symbols present
iPod/iPhone playback
- When using the iPod/iPhone to adjust sound volume, the adjustment will be applied only to the sound produced from this unit's speakers. ^1 If the iPod/iPhone is disconnected from this unit, the iPod's sound volume will return to its original setting.
When playing a single iPod/iPhone, press iPod a or iPod b to switch to the respective mode.
The following operations are possible for iPod/iPhone, using the remote control.
| Button | What it does |
| ▶/II | Starts normal playback and pauses/unpauses playback. |
| ■ | Pauses playback. |
| |◀◀ | Press to skip to the start of the current file, then previous files. Press and hold to start fast reverse scanning. |
| ▶▶I | Press to skip to the next file. Press and hold to start fast forward scanning. |
| VOLUME+/- | Use to set the listening volume. |
| SHUFFLE | The currently selected iPod/iPhone tracks are played back in random order (shuffle play). |
| REPEAT | The currently selected iPod/iPhone tracks are played back repeatedly.a |
| MENU | Use to access the iPod/iPhone menu. |
| ↑/↓/ENTER | Use to control the iPod/iPhone menu. |
| PLAYLIST< / > | Use these to select playlists to be played on iPod/iPhone. |
| ALBUM< / > | Use these to select albums to be played on iPod/iPhone. |
Button What it does
DISPLAY Switches the track information (artist name/album name) each time the button is pressed during playback.
DISP OFF Turns the display off except when pressing the buttons.
a Press repeatedly to switch between repeat play options. 'Repeat' plays the currently playing file repeatedly. 'Repeat ALL' plays all the files repeatedly.
When no device is connected to the selected iPod/iPhone connector ports (iPod a or iPod b) and this unit is not operated for 30 minutes or more after the respective function is selected, power will automatically turn OFF.
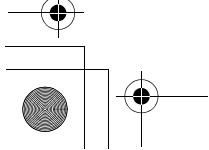
While playing an iPod/iPhone unit, the track information is displayed on this unit's display.
text_image
Function Song name i P o d a S o n g n a m e A r t i s t n a m e ▶ ▶ 0 : 0 0 Time Artist name/Album namePlay mode
Q : Repeat 1
: Repeat all
: Shuffle
When playing two iPod/iPhone units alternately, press ✗ to perform SHUFFLE ^2 play.
Note
1 These adjustments are applied to all inputs to the unit.
03 iPod/iPhone playback
SHUFFLE ^2
Two iPod/iPhone units can be played alternately with no break in sound (SHUFFLE ^2 ). A bit before the currently playing iPod/iPhone track ends, playback begins on the other iPod/iPhone track and the volume is gradually raised to fade in seamlessly (Cross fade).
During the SHUFFLE ^2 operation, the order of track playback is set by the shuffle function.
1 Connect two iPod/iPhone units to the iPod/iPhone connector ports (iPod a, iPod b), then press iPod a or iPod b.
2 Press MENU to access the iPod/iPhone menu.
3 Select the track area that you want to play back, then press ENTER.
4 Press ✗.
The SHUFFLE ^2 mode is set, and the SHUFFLE ^2 indicator lights; the unit connected to the iPod a connector port will playback.
A bit before the currently playing iPod/iPhone track ends, the other iPod/iPhone unit begins cross fade playback. The same operation is repeated thereafter until all tracks on both units have been played. ^1
- To cancel the SHUFFLE ^2 mode, press either ✗ once again, or ■.
- The SHUFFLE ^2 mode will also be canceled if the function is switched to any another input (including iPod a or iPod b).
HI-LITE Scan
Each track is played back for a few seconds at a certain time from the track beginning, thus allowing desired tracks to be found quickly.
1 Connect an iPod/iPhone to the iPod/iPhone connector ports, then press iPod a or iPod b.
2 Press MENU to access the iPod/iPhone menu.
3 Select the track area that you want to play back, then press ENTER.
4 Press HI-LITE.
HI-LITE scan function will begin from the first track on the selected iPod/iPhone.
If playback was already underway, the HI-LITE scan will begin from the currently playing track.
After a track is played for a few seconds, the next track will be found and a certain time ^2 from the track beginning will be played for a few seconds.
When two iPod/iPhone units are connected simultaneously, the first track on the alternate iPod/iPhone will be found and a certain time from the track beginning will be played for a few seconds.
Thereafter, the same process will be repeated until all tracks have been found and played for a few seconds each.
- To cancel the HI-LITE Scan operation, press HI-LITE once more.
- The HI-LITE Scan mode will also be canceled if the function is switched to any another input (including iPod a or iPod b).

Note
1 During Cross Fade operation, ◀◀/▶▶I, and ▶/■ are deactivated.
2 If a track's total length is too short, the track will be played back from the track beginning for a few seconds.
text_image
14 En
[Non-Text]
En
![PIONEER XW-NAC3R-K - [Non-Text] - 1](/content/2024/12/119005/images/3b2ac4af1cc2f8e174876d733d8d5d8e423736aa50bd2419ceac0b0fd47ae63c.jpg)
![PIONEER XW-NAC3R-K - [Non-Text] - 2](/content/2024/12/119005/images/d398613872e2cb81ae48791b2b8f0218f3c275785b81a0f0be15b4b65e59ddbc.jpg)
natural_image
Pure geometric diagram with intersecting lines and shapes, no text or symbols present![PIONEER XW-NAC3R-K - [Non-Text] - 3](/content/2024/12/119005/images/dcf94db72202ccd149c69cecc3a0694ae7f879cb97dff77fc770ea07ad410c9e.jpg)
iPod/iPhone playback
03

Important
If the power indicator and iPod/iPhone indicator flash simultaneously, a connection fault is indicated. Perform the following troubleshooting checks:
- Check whether the iPod/iPhone was supported by this unit.
- Reconnect the iPod/iPhone to the unit. If this doesn't seem to work, try resetting your iPod/iPhone.
- Update the iPod/iPhone software to the latest version.
If the iPod/iPhone cannot be operated, check the following items:
- Is the iPod/iPhone connected correctly? Reconnect the iPod/iPhone to the unit.
- Is the iPod/iPhone experiencing a hangup? Try resetting the iPod/iPhone, and reconnect it to the unit.

Tip
- iPod/iPhone recharging occurs whenever an iPod/iPhone is connected to this unit. (This function is supported in standby mode as well.)
- If an iPod/iPhone unit is connected to this unit when it is already in play mode, turning the unit's power ON or switching input to iPod will cause iPod/iPhone playback to automatically begin.
- When this unit's power is turned ON with another function is selected, even if an iPod/iPhone in play mode is connected, playback will not automatically begin.
- When input is switched from iPod to another function, the iPod/iPhone's power will be turned OFF automatically.
- If the unit is set to standby when an iPod/iPhone is connected, the iPod/iPhone's power will be turned OFF automatically.


natural_image
Abstract geometric pattern with intersecting lines and shaded circles (no text or symbols)04
Bluetooth® AUDIO for Wireless Enjoyment of Music
Chapter 4:
Bluetooth® AUDIO for Wireless Enjoyment of Music
Remote control operation
Wireless music play
This unit is furnished with a built-in Bluetooth® ADAPTER (Pioneer Model No. AS-BT100); as a result, any product equipped with Bluetooth wireless technology (portable cell phone, digital music player, etc.) can be used to listen to music wirelessly. ^1 Also, by using a commercially available transmitter supporting Bluetooth wireless technology, you can listen to music on a device not equipped with Bluetooth wireless technology. This unit supports SCMS-T contents protection, so music can also be enjoyed on devices equipped with SCMS-T type Bluetooth wireless technology.
Remote control operation
The remote control supplied with this unit allows you to play and stop media, and perform other operations. ^2
About Bluetooth wireless technology
The Bluetooth word mark and logos are owned by the Bluetooth SIG, Inc. and any use of such marks by Pioneer Corporation is under license. Other trademarks and trade names are those of their respective owners.
Note
1 • It must be necessary that the Bluetooth wireless technology enabled device supports A2DP profiles.
Pioneer does not guarantee proper connection and operation of this unit with all Bluetooth wireless technology enabled devices.
2 • It must be necessary that the Bluetooth wireless technology enabled device supports AVRCP profiles.
- Remote control operations cannot be guaranteed for all Bluetooth wireless technology enabled devices.
16
En


natural_image
Pure geometric diagram with intersecting lines and shapes, no text or symbols present

natural_image
Abstract geometric diagram with intersecting lines and shaded circles (no text or symbols)04
Bluetooth® AUDIO for Wireless Enjoyment of Music
Setting the PIN code
Set this unit's PIN code to the same setting as that for the Bluetooth wireless technology device used. Supported PIN code setting values include 0000, 1234 or 8888.
- Default setting: 0000
text_image
STANDBYON TIMER WAKE UP(UREEN) + SLEEP(ORANGE) INPUT SELECTOR USB a b + - VOLUME -1 Press BT A.
When the Bluetooth wireless technology device is not connected, 'Device Disconnected' is displayed. If the Bluetooth wireless technology device is connected, disconnect it.
2 When 'Device Disconnected' is displayed, press and hold VOLUME – on the top panel, and then press and hold ⏻ STANDBY/ON for three seconds.
The PIN code will be changed, and the newly set PIN code will be displayed. Choose between '0000', '1234' and '8888'.
Repeat step 2 until the PIN code is reset to the value desired.
These settings are preserved in memory even when the power is turned OFF. When resetting the PIN code, turn the power ON, and perform step 2 without any unit connected.
Pairing this unit and Bluetooth wireless technology device
"Pairing" must be done before you start playback of Bluetooth wireless technology content using Bluetooth AUDIO. Make sure to perform pairing first time you operate the system or any time pairing data is cleared. "Pairing" is the step necessary to register Bluetooth wireless technology device to enable Bluetooth communications. ^1 For more details, see also the operating instructions of your Bluetooth wireless technology device.

1 Press BT A.
When the Bluetooth wireless technology device is not connected, 'Device Disconnected' is displayed. If the Bluetooth wireless technology device is connected, disconnect it.
2 When 'Device Disconnected' is displayed, press ▶/II.
'Pairing' will be displayed, and the unit will enter the pairing standby mode.
3 Switch on the Bluetooth wireless technology device that you want to perform pairing with, place the device within 1 meter of the system, and set it to the pairing mode. Pairing begins.
4 Check to see that the Bluetooth AUDIO is detected by the Bluetooth wireless technology device.
‘Device Connected’ is displayed when Bluetooth wireless technology device is connected. Then the connected device name is displayed.

Note
1 • Pairing is required when you first use Bluetooth wireless technology device and this unit.
- To enable Bluetooth communication, pairing should be done with both of your system and Bluetooth wireless technology device.
04 Bluetooth® AUDIO for Wireless Enjoyment of Music
‘Device Disconnected’ is displayed when Bluetooth wireless technology device is not connected. In this case, perform the connection operation from the side of the Bluetooth wireless technology device.
Listening to Music Contents of Bluetooth wireless technology device with Your System
1 Press BT A to switch to Bluetooth AUDIO input mode.
'Device Disconnected' is displayed.
2 Connect the Bluetooth wireless technology device to the Bluetooth AUDIO.
3 Start playback of music contents stored in Bluetooth wireless technology device.
The following operations are now possible for Bluetooth wireless technology devices, using the remote control. ^1
| Button | What it does |
| ▶/II | Starts normal playback and pauses/unpauses playback. |
| ■ | Stops playback. |
| I◀◀ | Press to skip to the start of the current file, then previous files. Press and hold to start fast reverse scanning. |
| ▶▶I | Press to skip to the next file. Press and hold to start fast forward scanning. |
| VOLUME+/- | Use to set the listening volume. |
When no Bluetooth wireless technology device is connected and this unit is not operated for 30 minutes or more after the Bluetooth AUDIO function is selected, power will automatically turn OFF.
Radio wave caution
This unit uses a 2.4 GHz radio wave frequency, which is a band used by other wireless systems (see list below). To prevent noise or interrupted communication, do not use this unit nearby such devices, or make sure these devices are switched off during use.
- Cordless phones
- Cordless facsimiles
- Microwave ovens
• Wireless LAN devices (IEEE802.11b/g) - Wireless AV equipment
- Wireless controllers for game systems
• Microwave-based health aids - Some baby monitors
Other, less common, equipment that may operate on the same frequency:
- Anti-theft systems
- Amateur radio stations (HAM)
- Warehouse logistic management systems
• Discrimination systems for train or emergency vehicles

Note
- In the event noise appears in your television image, there is the possibility that a Bluetooth wireless technology enabled device or this unit (including products supported by this unit) are causing signal interference with the antenna input connector of your television, video, BS tuner, CS tuner, etc. In this event, increase the distance between the antenna input connector and the Bluetooth wireless technology enabled device or this unit (including products supported by this unit).
Note
- Bluetooth wireless technology device should be compatible with AVRCP profile.
- Depending on Bluetooth wireless technology device you use, operation may differ from what is shown in this table.


natural_image
Abstract geometric diagram with intersecting lines and shaded circles (no text or symbols)04
Bluetooth® AUDIO for Wireless Enjoyment of Music
- If there is something obstructing the path between this unit (including devices supported by this unit) and the device equipped with Bluetooth wireless technology (such as a metal door, concrete wall, or insulation containing tinfoil), you may need to change the location of your system to prevent signal noise and interruptions.
Scope of operation
Use of this unit is limited to home use. (Transmission distances may be reduced depending on communication environment).
In the following locations, poor condition or inability to receive radio waves may cause the audio to be interrupted or stopped:
- In reinforced concrete buildings or steel framed or iron-framed buildings.
• Near large metallic furniture. - In a crowd of people or near a building or obstacle.
- In a location exposed to the magnetic field, static electricity or radio wave interference from radio communication equipment using the same frequency band (2.4 GHz) as this unit, such as a 2.4 GHz wireless LAN device (IEEE802.11b/g) or microwave oven.
- If you live in a heavily populated residential area (apartment, townhouse, etc.) and if your neighbor's microwave is placed near your system, you may experience radio wave interference. If this occurs, move your unit to a different place. When the microwave is not in use, there will be no radio wave interference.
Radio wave reflections
The radio waves received by this unit include the radio wave coming directly from the device equipped with Bluetooth wireless technology (direct wave) and waves coming from various directions due to reflections by walls, furniture and building (reflected waves). The reflected waves (due to obstacles and reflecting objects) further produce a variety of reflected waves as well as variation in reception condition depending on locations. If the audio cannot be received properly due to this phenomenon, try moving the location of the device equipped with Bluetooth wireless technology a little. Also note that audio may be interrupted due to the reflected waves when a person crosses or approaches the space between this unit and the device equipped with Bluetooth wireless technology.
Precautions regarding connections to products supported by this unit
- Complete connections for all devices supported by this unit, including all audio cords and power cables before connecting them to this unit.
• After completing connections to this unit, check the audio and power cables to confirm that they not twisted together. - When disconnecting this unit, confirm that you have sufficient working space in the surrounding area.
- When changing connections of audio or other cables for products supported by this unit, confirm that you have sufficient working space in the surrounding area.

Playback with HOME MEDIA GALLERY inputs
Chapter 5:
Playback with HOME MEDIA GALLERY inputs

Enjoying the Home Media Gallery
This unit's Home Media Gallery function allows you to listen to audio files or listen to Internet radio stations on a computer or other component connected to this unit's LAN terminal. This chapter describes the connection, setup, and playback procedures required to enjoy these features. It is advisory that you also refer to the operation manual supplied with your network component.

Important
- The Home Media Gallery allows you to play music on media servers connected on an identical Local Area Network (LAN) as the receiver. This unit allows for the playing of files stored on the following:
- PCs running Microsoft Windows Vista or XP with Windows Media Player 11 installed
- PCs running Microsoft Windows 7 with Windows Media Player 12 installed
-
DLNA-compatible digital media servers (on PCs or other components)
-
Files stored in a PC or DMS (Digital Media Server) as described above can be played via command from an external Digital Media Controller (DMC). The device used to play files under the control of the DMC is called a Digital Media Renderer (DMR*). The XW-NAC3 unit supports the use of such DMR components. When selecting a DMC or DMS, use only those that have received DLNA certification.
*: DMR is a device class certified by DLNA. - During use of a DMR, an external controller can be used to start and stop playback of files. Control of sound volume and the MUTE function are also possible. ^1
- When a DMR is in use, if the XW-NAC3's remote control is operated, DMR operation will be canceled (this excludes the use of certain buttons including VOLUME, MUTE, and DISPLAY).
- To play back audio files stored on components on the network or listen to Internet radio stations, you must turn on the DHCP server function of your router. In case your router does not have the built-in DHCP server function, it is necessary to set up the network manually. Otherwise, you cannot play back audio files stored on components on the network or listen to Internet radio stations. See page 27.

Note
1 Depending on the external controller used, playback may be interrupted when the controller is used to adjust the sound volume. In this event, perform sound volume adjustments from the main unit or the remote control unit.
text_image
20 En
natural_image
Pure geometric diagram with intersecting lines and shapes, no text or symbols present
natural_image
Abstract geometric diagram with intersecting lines and shaded circles (no text or symbols)Playback with HOME MEDIA GALLERY inputs
05
Steps to enjoy the Home Media Gallery
1 Connect to the network through LAN interface.
See page 23.
2 Configure the network settings.
The setup is necessary only when the router to be connected does not have the built-in DHCP server function. See page 27.
3 Playback with Home Media Gallery.
See page 23.
- Playback the music files stored in USB storage devices or PCs ^1
You can playback a lot of music stored in USB storage devices or your PCs using this unit. See page 22.
• Listening to Internet radio stations
You can select and listen to your favorite Internet radio station from the list of Internet radio stations created, edited, and managed by the vTuner database service exclusively for use with the Pioneer products. See page 26.
English
Note
1 Besides a PC, you can also play back audio files stored on your other components with the built-in media server function based on DLNA 1.0 and 1.5 framework and protocols (i.e. network-capable hard disks and audio systems).
21
En


05 (Playback with HOME MEDIA GALLERY inputs
About playable file formats
| Category | Extension | Stream | ||
| MP3^a | .mp3 | MPEG-1 Audio Layer-3 | Sampling frequency | 8 kHz to 48 kHz |
| Quantization bitrate | 16 bit | |||
| Channel | 2 ch | |||
| Bitrate | 8 kbps to 320 kbps | |||
| VBR/CBR | Not supported/Supported | |||
| LPCM | _b | LPCM | Sampling frequency | 8 kHz to 48 kHz |
| Quantization bitrate | 16 bit, 20 bit, 24 bit | |||
| Channel | 2 ch | |||
| WAV | .wav | LPCM | Sampling frequency | 8 kHz to 48 kHz |
| Quantization bitrate | 16 bit, 20 bit, 24 bit | |||
| Channel | 2 ch | |||
| WMA | .wma | WMA2/7/8 | Sampling frequency | 8 kHz to 48 kHz |
| Quantization bitrate | 16 bit | |||
| Channel | 2 ch | |||
| Bitrate | 5 kbps to 320 kbps | |||
| VBR/CBR | Not supported/Supported | |||
| WMA9 | Sampling frequency | 8 kHz to 48 kHz | ||
| Quantization bitrate | 16 bit | |||
| Channel | 2 ch | |||
| Bitrate | 5 kbps to 320 kbps | |||
| VBR/CBR | Not supported/Supported | |||
| AAC | .m4a | MPEG-4 AAC LC | Sampling frequency | 32 kHz to 48 kHz |
| .aac | MPEG-4 HE AAC | Quantization bitrate | 16 bit | |
| .3gp | (aacPlus v1/2) | Channel | 2 ch | |
| .3g2 | Bitrate | 16 kbps to 320 kbps | ||
| VBR/CBR | Not supported/Supported | |||
| FLAC | .flac | FLAC | Sampling frequency | 8 kHz, 16 kHz, 22 kHz, 32 kHz, 44.1 kHz, 48 kHz |
| Quantization bitrate | 8 bit, 16 bit | |||
| Channel | 2 ch (8-bit monaural audio is not supported) | |||
| Bitrate | — | |||
| VBR/CBR | Not supported/Supported |
a. "MPEG Layer-3 audio decoding technology licensed from Fraunhofer IIS and Thomson multimedia."
b Only streaming data from servers is concerned, so there is no extension.


natural_image
Abstract geometric diagram with intersecting lines and shaded circles (no text or symbols)Playback with HOME MEDIA GALLERY inputs
05
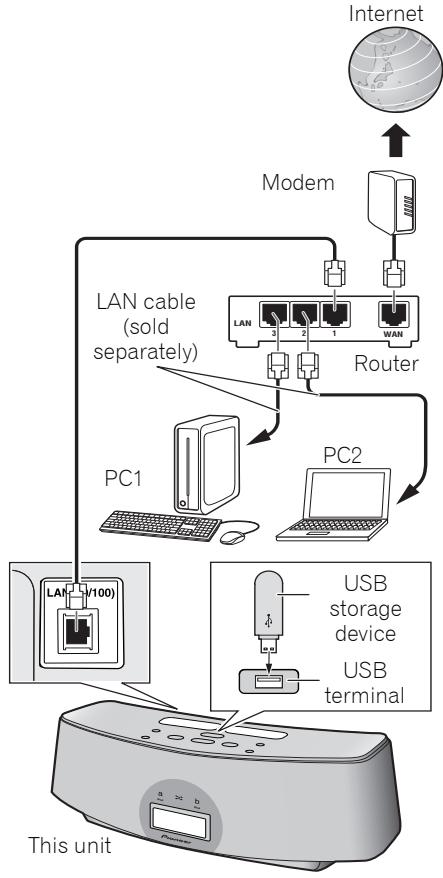
Connecting to the network through LAN interface

Caution
Before making or changing the connections, switch off the power and disconnect the power cord from the power outlet. Plugging in should be the final step.
flowchart
graph TD
    A["Internet"] --> B["Modem"]
    B --> C["Router"]
    C --> D["PC1"]
    C --> E["PC2"]
    D --> F["LAN cable (sold separately)"]
    E --> G["PC2"]
    F --> H["LAN (V/100)"]
    G --> I["USB storage device"]
    G --> J["USB terminal"]
    H --> K["This unit"]
By connecting this unit to the network via the LAN terminal, you can play back audio files stored on components on the network, including your PC or USB storage device, and listen to Internet radio stations. ^1
Connect the LAN terminal on this unit to the LAN terminal on your router (with or without the built-in DHCP server function) with a straight LAN cable (CAT 5 or higher).
Turn on the DHCP server function of your router. In case your router does not have the built-in DHCP server function, it is necessary set up the network manually. For details, see page 27.
Playback with Home Media Gallery

Important
- When you play back audio files, 'Connecting...' is displayed before playback starts. The display may continue for several seconds depending on the type of file.
- In case a domain is configured in a Windows network environment, you cannot access a PC on the network while you are logged onto the domain. Instead of logging onto the domain, log onto the local machine.
English
Note
• To listen to Internet radio stations, you must sign a contract with an ISP (Internet Service Provider) beforehand.
- Photo or video files cannot be played back.
- With Windows Media Player 11 or 12, you can even play back copyrighted audio files on this unit.
- In order to connect to the Internet, you must conclude a contract with an Internet Service Provider (ISP).
23
En
natural_image
Pure geometric diagram with intersecting lines and shaded circles, no text or symbols present
text_image
23 En

natural_image
Abstract geometric pattern with intersecting lines and shaded circles (no text or symbols)05 (Playback with HOME MEDIA GALLERY inputs
- There are cases where the time elapsed may not be correctly displayed.
text_image
STANDBY/ON HOME MEDIA GALLERY iPod a b Hi-Lite BT A AUX SLEEP CLASS T.EDIT PGM CLEAR MENU ENTER RETURN PLAYLIST ALBUM SHUFFLE REPEAT DISPLAY +1 Press HOME MEDIA GALLERY.
It may take several seconds for this unit to access the network. The following screen appears when the Home Media Gallery is selected as the input function.
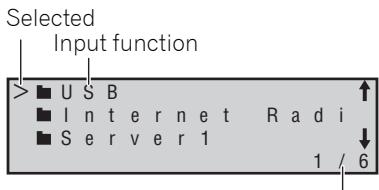
text_image
Selected Input function U S B I n t e r n e t R a d i S e r v e r 1 1 / 6Current page/Total pages
2 Use ↑/↓ to select the category, and then press → or ENTER.
Select a category from the following list ^1 :
- USB* - the USB storage device
- Server Name* - Server components on the network
- Internet Radio** - Internet radio
-
Favorites** - Favorite songs currently being registered
-
Setup**- Allows the user to perform various network settings and confirm information.
- Recently played** - Internet Radio listening history (most recent 20 incidents)
*: Is only displayed when connected.
**: Is displayed at all times.
3 Use ↑/↓ to select the folder, music files or Internet radio station, and then press →, ENTER or ▶/II.
Press ↑/↓ to scroll up and down the list and select the desired item.
Only audio files with ♪ can be played. When you press ENTER, playback starts with the playback screen being displayed for the selected item.
To return to the list screen, press RETURN.
In case of the folders with ■, use ↑/↓ and → or ENTER to select the desired folder and audio files.
For detailed operating instructions, refer to the section shown below.
- Playback screen - See page 25.
- Favorites folder - See page 25.
You can perform the following operations with the remote control of this unit. Note that some buttons are not available for operation depending on the category currently being played back.
| Button | What it does |
| ▶/II | Starts normal playback and pauses/unpauses playback. |
| ■ | Stops playback. |
| I◀◀ | Press to skip to the start of the current file, then previous files. |
| ▶▶I | Press to skip to the next file. |
| VOLUME+/- | Use to set the listening volume. |

1 When RETURN is pressed from this menu, the last internet radio station listed to will be selected.
24
En


natural_image
Pure geometric diagram with intersecting lines and shapes, no text or symbols presentPlayback with HOME MEDIA GALLERY inputs
Button What it does
| SHUFFLE | The currently selected tracks are played back in random order (shuffle play). |
| REPEAT | The currently selected tracks are played back repeatedly. |
| DISPLAY | Switches the track information (artist name/album name) each time the button is pressed during playback. |
| DISP OFF | Turns the display off except when pressing the buttons. |
When the top menu is displayed on this unit's display and this unit is not operated for 30 minutes or more after the Home Media Gallery function is selected, power will automatically turn OFF.
About the playback screen
The following screen appears when you play back audio files. Note that some items may not be displayed depending on the type of file.

text_image
Input source Song name U S B S o n g n a m e A r t i s t n a m e ▶ ▶ 0 : 0 0 Time Artist name/Album name Play modeQ : Repeat 1
: Repeat all
: Shuffle
- During playback, each time DISPLAY is pressed, the displayed information (artist name/album name) alternates.
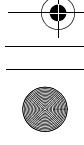
The following screen appears when audio streams from an Internet radio station are received.
text_image
Song name Radio station name n t e : n e t R a d i o S o n g : n a m e 1 . R a d i o s t a t i o n 0 : 0 0The list of Internet radio stations on this unit is created, edited, and managed by the vTuner database service exclusively for use with this unit. See page 26.
About the Favorites folder
You can register up to 20 of your favorite songs or Internet radio stations in the Favorites folder. Note that only the audio files stored on components on the network can be registered.
flowchart
graph TD
    A["ENTER"] --> B["CLASS"]
    A --> C["T.EDIT"]
    A --> D["PGM"]
    A --> E["CLEAR"]
    A --> F["RETURN"]
    G["MENU"] --> A
    H["↓"] --> A
    I["↓"] --> A
Registering audio files and Internet radio stations in the Favorites folder
- Press PGM while a song or an Internet radio station is being played back or stopped.
Deleting audio files and Internet radio stations from the Favorites folder
- Use ↑/↓ to select the folder, music files or Internet radio station, and then press CLEAR.
05 (Playback with HOME MEDIA GALLERY inputs
Registering broadcast stations not on the vTuner list from the special Pioneer site
With this unit, broadcast stations not included on the list of station distributed by vTuner can be registered and played. Check the access code required for registration on this unit, use this access code to access the special Pioneer Internet radio site and register the desired broadcast stations in your favorites. The address of the special Pioneer Internet radio site is:
http://www.radio-pioneer.com
text_image
STANDBY/ON HOME MEDIA GALLERY iPod a b Hi-Lite BT A AUX SLEEP CLASS T.EDIT PGM CLEAR MENU ENTER RETURN PLAYLIST ALBUM SHUFFLE REPEAT DISPLAY +1 Display the Internet Radio list screen.
To display the Internet Radio list screen, perform steps 1 to 3 at Playback with Home Media Gallery on page 23
2 Use ↑/↓ to select 'Help', then press ENTER.
3 Use ↑/↓ to select 'Get access code', then press ENTER.
The access code required for registration on the special Pioneer Internet radio site is displayed. Make a memo of this address.
The following can be checked on the Help screen:
- Get access code – The access code required for registration on the special Pioneer Internet radio site is displayed.
- Show Your WebID/PW – After registering on the special Pioneer Internet radio site, the registered ID and password are displayed.
- Reset Your WebID/PW – Resets all the information registered on the special Pioneer Internet radio site. When reset, all the registered broadcast stations are also cleared. If you want to listen to the same stations, re-register after resetting.
4 Access the special Pioneer Internet radio site from your computer and perform the registration process.
Access the above site and use the access code in step 3 to perform user registration, following the instructions on the screen.
5 Register the desired broadcast stations as your favorites, following the instructions on the computer's screen.
Both broadcast stations not on the vTuner list and stations on the vTuner list can be registered. In this case they are registered on the unit as favorite broadcast stations and can be played.


natural_image
Pure geometric diagram with intersecting lines and shapes, no text or symbols presentPlayback with HOME MEDIA GALLERY inputs
Advanced operations for Internet radio
Saving Internet radio stations
text_image
STANDBY/ON HOME MEDIA GALLERY iPod a iPod b Hi-UITE BT A AUX SLEEP ○ CLASS T. EDIT PGM CLEAR MENU ENTER RETURNThis unit can remember the Internet radio stations that you often listen to in three classes (A to C) with up to ten stations in each class to make the total of 30 stations at its maximum capacity.
Before proceeding with the following steps, check whether you have followed Steps 1 to 3 at Playback with Home Media Gallery on page 23.
1 Tune into the Internet radio station.
Tune into the desired Internet radio station by following Steps 1 to 3 at Playback with Home Media Gallery on page 23.
2 Press T.EDIT to switch to the station saving mode.
3 Press CLASS.
Select the desired class from A to C.
4 Use ↑/↓ to select the number, and then press ENTER.
Select the desired number from 0 to 9.
Retrieving saved Internet radio stations
You need to save Internet radio stations first before retrieving them. If there are no Internet radio stations currently being saved, see Saving Internet radio stations above and save at least one Internet radio station before proceeding with the following steps.
1 Press CLASS.
Each time you press CLASS, the class switches to A to C in turn.
2 Use / to select the station number.
'No Preset' appears when you select an Internet radio station currently not being saved.
Setting up the network
In case the router connected to the LAN terminal on this unit is a broadband router (with the built-in DHCP server function), simply turn on the DHCP server function, and you will not need to set up the network manually. You must set up the network as described below only when you have connected this unit to a server without the DHCP server function. ^1
text_image
STANDBY/ON HOME MEDIA GALLERY iPod a iPod b HI-LITE BT A AUX SLEEP - CLASS T.EDIT PGM CLEAR MENU ENTER RETURNNote
1 In case you make changes to the network configuration without the DHCP server function, make the corresponding changes to the network settings of this unit. Before you set up the network, consult with your ISP or the network manager for the required settings. It is advisory that you also refer to the operation manual supplied with your network component.

natural_image
Abstract geometric pattern with intersecting lines and shaded circles (no text or symbols)05 (Playback with HOME MEDIA GALLERY inputs
1 Press HOME MEDIA GALLERY to select 'Home Media Gallery' as the input function. It may take several seconds for this receiver to access the network.
2 Select 'SETUP' and press ENTER.
The SETUP screen appears.
3 Select 'Network Setup' and press ENTER.
The Network Setup screen appears.
Either 'Network Found' or 'No Network
Found' appears on the Network Setup screen.
- Network Found - Connected to a component on the network.
- No Network Found – Not connected to a component on the network.
4 Check the network connection status and press ENTER.
The Network IP Settings screen appears.
5 Select 'Automatic (DHCP) 'or 'Static IP' and press ENTER.
- Automatic (DHCP) – The network is automatically set up.
- Static IP ^1 – The network is manually set up. Proceed with the following steps.
1 Select 'Change' and press ENTER.
The Edit IP address screen appears.
2 Enter the IP address.
Press ↑/↓ to select a number and ←/
→ to move the cursor. After you select
the last number, press → or ENTER. The
Proxy Server screen appears.
6 Select 'No' or 'Yes' for the proxy server setting to deactivate or activate the proxy server, and press ENTER.
- No - The Top Menu screen appears.
- Yes – The Proxy Name screen appears. Proceed with the following steps.
1 Select 'Change' and press ENTER.
The Edit Proxy Name screen appears.
2 Enter the address of your proxy server or the domain name.
After entry, press → or ENTER. The Proxy Port screen appears.
3 Select 'Change' and press ENTER.
The Edit Proxy Port screen appears.
4 Enter the address of your proxy server or the domain name.
Press ↑/↓ to select a number and ←/
→ to move the cursor. After you select
the last number, press → or ENTER. The Settings OK? screen appears.
5 Press ENTER to complete the network setup procedure.
The Top Menu screen appears.
Note
IP Address
The IP address to be entered must be defined within the following ranges. If the IP address defined is beyond the following ranges, you cannot play back audio files stored on components on the network or listen to Internet radio stations. Class A: 10.0.0.1 to 10.255.255.254 / Class B: 172.16.0.1 to 172.31.255.254 / Class C: 192.168.0.1 to 192.168.255.254
Subnet Mask
In case an xDSL modem or a terminal adapter is directly connected to this unit, enter the subnet mask provided by your ISP on paper. In most of the cases, enter 255.255.255.0.
Gateway IP
In case a gateway (router) is connected to this unit, enter the corresponding IP address.
DNS (1st)/DNS (2nd)
In case there is only one DNS server address provided by your ISP on paper, enter 'DNS (1st)'. In case there are more than two DNS server addresses, enter 'DNS (2nd)' in the other DNS server address field.
Proxy Name/Proxy Port
This setting is required when you connect this receiver to the Internet via a proxy server. Enter the IP address of your proxy server in the 'Proxy Name' field. Also, enter the port number of your proxy server in the 'Proxy Port' field.


text_image
28 En

natural_image
Pure geometric diagram with intersecting lines and shapes, no text or symbols present

natural_image
Abstract geometric diagram with intersecting lines and shaded circles (no text or symbols)05
Playback with HOME MEDIA GALLERY inputs
Checking the network settings
You can check the following network settings of this unit: the MAC address, the IP address, the gateway IP address, the proxy server, the Subnet mask, and the firmware version (for the Home Media Gallery of this unit).
Before proceeding with the following steps, check whether you have followed Steps from 1 to 2 at Setting up the network on page 27.
1 Select 'Information' and press ENTER to confirm your selection.
The Firmware Version (for the Home Media Gallery of this unit) screen appears.
2 Check the network settings.
Press ↑/↓ to switch the display. Each time you press ↑/↓, the display switches as follows.
Firmware Ver. MAC Address IP Address Gateway IP Proxy Server Subnet Mask
3 Press RETURN.
The Setup screen appears. To return to the Top Menu screen, press RETURN again.
Ext. Vol Limit
“Ext. Vol Limit” controls the maximum value when adjusting the sound volume from an external controller (Digital Media Controller ^1 (DMC)). The maximum of volume is changed from ‘50’ into ‘30’.

Important
- When Home Media Gallery function is selected and both the iPod/iPhone connector ports is not connected, Ext. Vol Limit works.
1 Press HOME MEDIA GALLERY.
2 Disconnect iPod/iPhone units from the iPod/iPhone connector ports.
3 Press ✗, and then ⏻ STANDBY/ON for three seconds to switch Ext. Vol Limit between on and off.
When Ext. Vol Limit is on, 'Ext. Vol Limit On' is displayed on this unit's display.

Note
1 Refer to Enjoying the Home Media Gallery on page 20.


natural_image
Abstract geometric pattern with intersecting lines and shaded circles (no text or symbols)05 (Playback with HOME MEDIA GALLERY inputs
About network playback
The network playback function of this unit uses the following technologies:
Windows Media Player
Windows Media Player is software to deliver music, photos and movies from a Microsoft Windows computer to home stereo systems and TVs.
With this software, you can play back files stored on the PC through various devices wherever you like in your home.
This software can be downloaded from Microsoft's website.
Windows Media Player 11 (for Windows XP, Vista)
Windows Media Player 12 (for Windows 7)
For more information check the official Microsoft website.
Windows Media DRM
Microsoft Windows Media Digital Rights Management (WMDRM) is a platform to protect and securely deliver content for playback on computers, portable devices and network devices. Home Media Gallery functions as a WMDRM 10 for networked devices. WMDRM protected content can only be played on media servers supporting WMDRM.
Content owners use WMDRM technology to protect their intellectual property, including copyrights. This device uses WMDRM software to access WMDRM protected content. If the WMDRM software fails to protect the content, content owners may ask Microsoft to revoke the software's ability to use WMDRM to play or copy protected content. Revocation does not affect unprotected content. When you download licenses for protected content, you agree that Microsoft may include a revocation list with the licenses. Content owners may require you to upgrade WMDRM to access their content. If you decline an upgrade, you will not be able to access content that requires the upgrade. This product is protected by certain intellectual property rights of Microsoft. Use or distribution of such technology outside of this product is prohibited without a license from Microsoft.
DLNA

dlna™
CERTIFIED
DLNA CERTIFIED™ Audio Player
The Digital Living Network Alliance (DLNA) is a cross industry organization of consumer electronics, computing industry and mobile device companies. Digital Living provides consumers with easy sharing of digital media through a wired or wireless network in the home.
The DLNA certification logo makes it easy to find products that comply with the DLNA Interoperability Guidelines. This unit complies with DLNA Interoperability Guidelines v1.5.
When a PC running DLNA server software or other DLNA compatible device is connected to this player, some setting changes of software or other devices may be required. Please refer to the operating instructions for the software or device for more information.
DLNA and DLNA CERTIFIED are trademarks and/or service marks of the Digital Living Network Alliance.
Content playable over a network
- Even when encoded in a compatible format, some files may not play correctly.
- Movie or Photo files cannot be played back.
- There are cases where you cannot listen to an Internet radio station even if the station can be selected from a list of radio stations.
- Some functions may not be supported depending on the server type or version used.
- Supported file formats vary by server. As such, files not supported by your server are not displayed on this unit. For more information, check with the manufacturer of your server.


natural_image
Pure geometric diagram with intersecting lines and shapes, no text or symbols presentPlayback with HOME MEDIA GALLERY inputs
About playback behavior over a network
- Playback may stall when the PC is switched off or any media files stored on it are deleted while playing content.
- If there are problems within the network environment (heavy network traffic, etc.) content may not be displayed or played properly (playback may be interrupted or stalled). For best performance, a 100BASE-TX connection between player and PC is recommended.
- If several clients are playing simultaneously, as the case may be, playback is interrupted or stalled.
- Depending on the security software installed on a connected PC and the setting of such software, network connection may be blocked.
Pioneer is not responsible for any malfunction of the player and/or the Home Media Gallery features due to communication error/malfunctions associated with your network connection and/or your PC, or other connected equipment. Please contact your PC manufacturer or Internet service provider.
'Windows Media™' is a trademark of Microsoft Corporation. This product includes technology owned by Microsoft Corporation and cannot be used or distributed without a license from Microsoft Licensing, Inc.
Microsoft®, Windows®7, Windows®Vista, Windows®XP, Windows®2000, Windows®Millennium Edition, Windows®98, and WindowsNT® are either registered trademarks or trademarks of Microsoft Corporation in the United States and/or other countries.
Authorizing this unit
In order to be able to play with Home Media Gallery, this unit must be authorized. This happens automatically when the unit makes a connection over the network to the PC. If not, please authorize this unit manually on the PC. The authorization (or permission) method for access varies depending on the type of server currently being connected. For more information on authorizing this unit, refer to the instruction manual of your server.
aacPlus
coding □ V technologies

The AAC decoder uses aacPlus developed by Coding Technologies (www.codingtechnologies.com).
FLAC
FLAC Decoder
Copyright © 2000, 2001, 2002, 2003, 2004, 2005, 2006, 2007 Josh Coalson
Redistribution and use in source and binary forms, with or without modification, are permitted provided that the following conditions are met:
- Redistributions of source code must retain the above copyright notice, this list of conditions and the following disclaimer.
- Redistributions in binary form must reproduce the above copyright notice, this list of conditions and the following disclaimer in the documentation and/or other materials provided with the distribution.
- Neither the name of the Xiph.org Foundation nor the names of its contributors may be used to endorse or promote products derived from this software without specific prior written permission.
THIS SOFTWARE IS PROVIDED BY THE COPYRIGHT HOLDERS AND CONTRIBUTORS "AS IS" AND ANY EXPRESS OR IMPLIED WARRANTIES, INCLUDING, BUT NOT LIMITED TO, THE IMPLIED WARRANTIES OF MERCHANTABILITY AND FITNESS FOR A


natural_image
Abstract geometric pattern with intersecting lines and shaded circles (no text or symbols)05 Playback with HOME MEDIA GALLERY inputs
PARTICULAR PURPOSE ARE DISCLAIMED. IN NO EVENT SHALL THE FOUNDATION OR CONTRIBUTORS BE LIABLE FOR ANY DIRECT, INDIRECT, INCIDENTAL, SPECIAL, EXEMPLARY, OR CONSEQUENTIAL DAMAGES (INCLUDING, BUT NOT LIMITED TO, PROCUREMENT OF SUBSTITUTE GOODS OR SERVICES; LOSS OF USE, DATA, OR PROFITS; OR BUSINESS INTERRUPTION) HOWEVER CAUSED AND ON ANY THEORY OF LIABILITY, WHETHER IN CONTRACT, STRICT LIABILITY, OR TORT (INCLUDING NEGLIGENCE OR OTHERWISE) ARISING IN ANY WAY OUT OF THE USE OF THIS SOFTWARE, EVEN IF ADVISED OF THE POSSIBILITY OF SUCH DAMAGE.


text_image
32 En
natural_image
Pure geometric diagram with intersecting lines and shapes, no text or symbols present
- Before making or changing the connections, switch off the power and disconnect the power cord from the AC outlet.
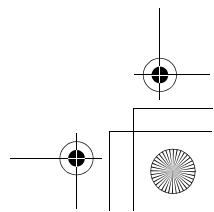
Connecting auxiliary components
Connect the rear panel AUX IN mini-plug jack to your auxiliary playback component.
- This method can be used to play music on this unit from iPod/iPhones that do not support use of an iPod Dock.
text_image
Digital audio player, etc. VIDEO OUT AUX IN- Press AUX to switch to AUX input mode.
'AUX' is displayed on this unit's display.
When no device is connected to the AUX IN connector and this unit is not operated for 30 minutes or more after the AUX function is selected, power will automatically turn OFF.
English

33
En


natural_image
Abstract geometric pattern with intersecting lines and shaded circles (no text or symbols)07 (Sound settings
Chapter 7:
Sound settings
Using the Sound Retriever
When audio data is removed during the WMA/MP3/MPEG-4 AAC compression process, sound quality often suffers from an uneven sound image. The Sound Retriever feature employs new DSP technology that helps bring CD quality sound back to compressed by restoring sound pressure and smoothing jagged artifacts left over after compression.
- Default setting: ON
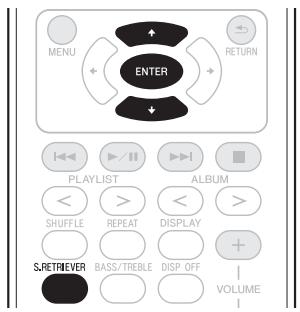
text_image
MENU ENTER RETURN PLAYLIST ALBUM < > < > SHUFFLE REPEAT DISPLAY + S.RETBEVER BASS/TREBLE DISP OFF VOLUME1 Press S.RETRIEVER.
The newly set value displays for 5 seconds.
- Use ↑/↓ or S.RETRIEVER to set the Sound Retriever to ON/OFF as desired.
Using the sound effects
You can add exciting effects to audio sources.
- Default setting: OFF
text_image
MENU ENTER RETURN PLAYLIST ALBUM < > < > SHUFFLE REPEAT DISPLAY + S.RETRIEVER BASS/TREBLE DISP_OFF VOLUME SOUND MUTE1 Press SOUND.
The newly set value displays for 5 seconds.
Vivid ^1 – Produces a sharpened effect similar to that experienced at a live concert.
Lo-Fi (Low Fidelity) – Produces a retro-feel to music play.
ALC (Auto Level Control) – This unit equalizes playback sound levels.
OFF – Revert sound to its natural state.
- Use ↑/↓ or SOUND to switch Sound modes.
Note
1 When Bluetooth AUDIO function is selected, 'Vivid' is not displayed.

text_image
34 En
natural_image
Pure geometric diagram with intersecting lines and shapes, no text or symbols present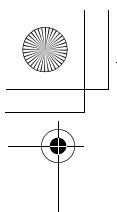
natural_image
Abstract geometric diagram with intersecting lines and shaded circles (no text or symbols)Sound settings
07
Adjusting the bass and treble
Use the bass and treble controls to adjust the overall tone.
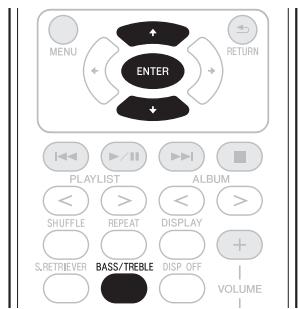
text_image
MENU ENTER RETURN PLAYLIST ALBUM < > < > SHUFFLE REPEAT DISPLAY + S.RETRIEVER BASS/TREBLE DISP_OFF VOLUME1 Press BASS/TREBLE.
2 Use ↑/↓ to select 'Bass' or 'Treble', then press ENTER.
3 Use ↑/↓ to adjust the bass or treble, then press ENTER.
You can adjust low and high sounds on a scale of -6 to +6.
English


natural_image
Abstract geometric diagram with intersecting lines and concentric circles (no text or symbols)
text_image
35 En08 Using the timer
Chapter 8:
Using the timer
Setting the clock
Setting the clock allows you to use the timer. ^1
text_image
BT A AUX SLEEP CLASS T.EDIT PGM CLEAR MENU ENTER RETURN1 With the power turned ON, press ⏻.
The current time and day are displayed.
- If the clock is not set, the Timer Setup screen will be displayed. Proceed with Step 3.
2 Press ⏻ again.
The Timer Setup screen is displayed.
3 Use ↑/↓ to select 'Clock Adjust', then press ENTER.
The Clock Adjust screen is displayed.
4 Use ↑/↓ to set the day, then press ENTER.
5 Use ↑/↓ to set the hour, then press ENTER.
6 Use ↑/↓ to set the minute, then press ENTER.
When the setting is completed, the newly set value displays for 2 seconds.
Changing the clock's display mode
You can choose to display the clock in 12-hour mode or 24-hour mode.
- Default setting: 12H (12-hour mode)
1 With the power turned ON, press ⏻.
The current time and day are displayed.
2 Press ⏻ again.
The Timer Setup screen is displayed.
3 Use ↑/↓ to select 'Hour Display', then press ENTER.
The Hour Display screen is displayed.
4 Use ↑/↓ to select '12H' or '24H', then press ENTER.
When the setting is completed, the newly set value flashes for 2 seconds.

1 You'll need to set the clock again if you unplug the unit (or in case of a power failure).

text_image
36 En

natural_image
Pure geometric diagram with intersecting lines and shapes, no text or symbols present
Using the timer
Setting the wake-up timer
Use the wake-up timer to set the unit to switch on at any time and start playing iPod or AUX.
If iPod is selected as the timer sound, when the wake-up timer operates, the iPod's power will automatically turn ON and playback will begin.
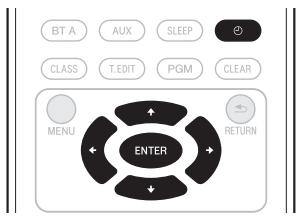
text_image
BT A AUX SLEEP CLASS T.EDIT PGM CLEAR MENU ENTER RETURN1 With input set to iPod or AUX ^1 , press ⏻.
The current time and day are displayed.
2 Press ⏻ again.
The Timer Setup screen is displayed.
3 Use ↑/↓ to select 'Wake-up', then press ENTER.
The Wake-up screen is displayed.
4 Use ↑/↓ to select 'Timer Edit', then press ENTER.
The Timer Edit screen is displayed.
5 Set the desired time for the wake-up timer.
Use ↑/↓ to set the hour, then press →. Set the minute in the same way, pressing → when you're done.
6 Use ←/→ to select the day. Use ↑/↓ to set the wake-up timer to ON/OFF as desired, then press ENTER.
The wake-up timer is set to OFF on days marked with ‘*’.
7 Press ENTER.
The Timer Check screen is displayed.
When the wake-up timer is set to ON, the TIMER indicator lights green.
Turning the wake-up timer on/off
1 With input set to iPod or AUX, press ⏻. The current time and day are displayed.
2 Press ⏻ again.
The Timer Setup screen is displayed.
3 Use ↑/↓ to select 'Wake-up', then press ENTER.
The Wake-up screen is displayed.
4 Use ↑/↓ to select 'Timer On', then press ENTER.
When the timer is set to ON, 'Timer On' is displayed.
Using the sleep timer
The sleep timer switches off the unit after a specified time so you can fall asleep without worrying about it.
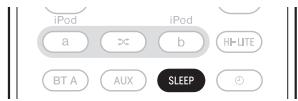
- Press SLEEP repeatedly to select a switch off time.
During operation of the sleep timer, the TIMER indicator will light orange.
- If you press SLEEP while the sleep timer is set, the remaining time will be displayed. ^2
Note
1 In order to use the wake-up timer when the AUX function is selected, you must first begin playback on the connected device.
2 The sleep timer can be reset by pressing SLEEP while the remaining time is displayed.
Additional information
Chapter 9:
Additional information
Troubleshooting
Incorrect operations are often mistaken for trouble and malfunctions. If you think that there is something wrong with this component, check the points below. Sometimes the trouble may lie in another component. Investigate the other components and electrical appliances being used. If the trouble cannot be rectified even after exercising the checks listed below, ask your nearest Pioneer authorized service center or your dealer to carry out repair work.
- If the unit does not operate normally due to external effects such as static electricity disconnect the power plug from the outlet and insert again to return to normal operating conditions.
| Problem | Remedy |
| The power does not turn on. | Disconnect the power plug from the outlet, and insert again.If the power shuts off automatically, take the unit to your nearest Pioneer authorized service center or your dealer for servicing. |
| Power automatically switches to standby without user action. | When no device is connected to the selected iPod/iPhone connector ports (iPod a or iPod b), the built-in Bluetooth ADAPTER or the AUX IN connector, and this unit is not operated for 30 minutes or more after the respective function is selected, power will automatically turn OFF.Also, when the top menu is displayed on this unit's display and this unit is not operated for 30 minutes or more after the Home Media Gallery function is selected, power will automatically turn OFF. |
| No sound is output when a function is selected. | Make sure the component is connected correctly (refer to Connecting auxiliary components on page 33). |
| Can't operate the remote control. | Replace the battery (refer to Replace the battery on page 6).Operate within 7 m, 30° of the remote sensor on the front panel (refer to Using the remote control on page 7).Remove the obstacle or operate from another position.Avoid exposing the remote sensor on the front panel to direct light.Make sure the iPod/iPhone is connected correctly (refer to Connecting your iPod/iPhone on page 11). |
| Can't operate the iPod/iPhone. | Make sure the iPod/iPhone is connected correctly (refer to Connecting your iPod/iPhone on page 11).If the iPod/iPhone is experiencing a hangup, try resetting the iPod/ iPhone, and reconnect it to the unit. |


natural_image
Pure geometric diagram with intersecting lines and a central circle, no text or symbols presentAdditional information
09
| Problem | Remedy |
| Cannot access the network. | The LAN cable is not firmly connected. Firmly connect the LAN cable (see page 23).The router is not switched on. Switch on the router.The corresponding IP address is not properly set. Switch on the built-in DHCP server function of your router, or set up the network manually according to your network environment (see page 27).The IP address is being automatically configured. The automatic configuration process takes time. Please wait.Internet security software is currently installed in the connected component. There are cases where a component with Internet security software installed cannot be accessed. |
| The audio files stored on components on the network, such as a PC, cannot be played back. | Install Windows Media Player 11 or 12 on your PC (see page 30).Play back audio files recorded in MP3, WAV (LPCM only), MPEG-4 AAC, FLAC, or WMA. Note that some audio files recorded in these formats may not be played back on this unit.Audio files recorded in MPEG-4 AAC or FLAC are being played back on Windows Media Player 11 or 12. Try using another server. Refer to the operation manual supplied with your server.The component connected to the network is not properly operated. Check whether the component is affected by special circumstances or is in the sleep mode. Try rebooting the component if necessary.The component connected to the network does not permit file sharing. Try changing the settings for the component connected to the network.The folder stored on the component connected to the network has been deleted or damaged. Check the folder stored on the component connected to the network. |
| Cannot access the component connected to the network. | The component connected to the network is not properly set. If the client is automatically authorized, you need to enter the corresponding information again. Check whether the connection status is set to “Do not authorize”.There are no playable audio files on the component connected to the network. Check the audio files stored on the component connected to the network.The audio component on the network which has been switched off is switched on. Switch on the audio component on the network before switching on this unit. |
| Audio playback is undesirably stopped or disturbed. | Check whether the audio file was recorded in a format supported by this unit (see page 22).Check whether the folder has been damaged or corrupted.Note that there are cases where even the audio files listed as playable on this receiver cannot be played back or displayed.There is heavy traffic on the network with the Internet being accessed on the same network.When in the DMR mode, and depending on the external controller used, playback may be interrupted when the controller is used to adjust the sound volume. In this event, perform sound volume adjustments from the main unit or the remote control unit (see page 20). |
English

39
En


09 (Additional information
| Problem | Remedy |
| Cannot access Windows Media Player 11 or 12. | ·You are currently logged onto the domain through your PC with Windows XP, Vista or Windows 7 installed. Instead of logging onto the domain, log onto the local machine. |
| Cannot listen to Internet radio stations. | ·The firewall settings for components on the network are currently in operation. Check the firewall settings for components on the network.·You are currently disconnected from the Internet. Check the connection settings for components on the network, and consult with your network service provider if necessary.·There are cases where you cannot listen to some Internet radio stations even when they are listed in the list of Internet radio stations on this unit. |
| The folders/files stored on a USB memory device are not displayed. | ·The folders/files are currently stored in a region other than the FAT (File Allocation Table) region. Store the folders/files in the FAT region.·Limit the maximum number of levels in a folder to 8.·Limit the maximum number of folders/files stored in a single folder to 2000.·Copyrighted audio files stored on a USB memory device cannot be played back. |
| A USB memory device is not recognized. | ·The USB memory device does not support the mass storage class specifications. Try using a USB memory device compatible with the mass storage class specifications. Note that there are cases where even the audio files stored on a USB memory device compatible with the mass storage class specifications are not played back on this unit.·This unit does not support a USB hub.·This unit recognizes the USB memory device as a fraud. Switch off and on again this unit. |
| A USB memory device is connected and displayed, but the audio files stored on the USB memory device cannot be played back. | ·Check whether the format of your USB memory device is either FAT 16 or FAT 32. Note that the FAT 12, NTFS, and HFS formats cannot be played back on this unit.·The files may be subjected to DRM copy protection. WMA and MPEG-4 AAC files subjected to DRM copy protection cannot be played back. When using a computer to load music data from a CD or other device, digital rights management copy protection may be applied, depending on the settings involved.·See the list of file formats that can be played back on this unit. |
| The track name, artist name, or album name is not displayed. | ·When playing network audio, the network server used may not support display of name information for artists and albums. Or, when playing music from a USB memory device, the version of ID3 tags is not supported. Playing network audio relies on the support of the server used. For details, consult the operating manual for the server. Also, when playing music from USB memory devices, only ID3 tag version 2.x or WMA metatags are supported. |


Additional information
Problem Remedy
The Bluetooth wireless technology device cannot be connected or operated. Sound from the Bluetooth wireless technology device is not emitted or the sound is interrupted.
- Check that no object that emits electromagnetic waves in the 2.4 GHz band (microwave oven, wireless LAN device or Bluetooth wireless technology apparatus) is near the unit. If such an object is near the unit, set the unit far from it. Or, stop using the object emitting the electromagnetic waves.
- Check that the Bluetooth wireless technology device is not too far from the unit and that obstructions are not set between the Bluetooth wireless technology device and the unit. Set the Bluetooth wireless technology device and the unit so that the distance between them is less than about 10m^* and no obstructions exist between them.
- The Bluetooth wireless technology device may not be set to the communication mode supporting the Bluetooth wireless technology. Check the setting of the Bluetooth wireless technology device.
- Check that pairing is correct. The pairing setting was deleted from this unit or the Bluetooth wireless technology device. Reset the pairing.
- Check that the profile is correct. Use a Bluetooth wireless technology device that supports A2DP profile and AVRCP profile.
* The line-of-sight transmission distance is an estimate. Actual transmission distances supported may differ depending on surrounding conditions.
Resetting the system
Use this procedure to reset all system settings to the factory default.
- When performing reset, first disconnect all components connected to this unit.
1 Switch the unit on.
2 Press and hold INPUT SELECTOR on the top panel, and then press and hold ⏻ STANDBY/ON for three seconds.
Power is set to standby mode.
The next time you switch on, all the system settings should be reset.
About Sound Retriever
The “Sound Retriever” function utilized in this unit has been uniquely developed by Pioneer. This function enhances sound data lost during compression of MP3 and other file types, allowing the user to enjoy sound quality closer to that of the original signal data. In the case of Bluetooth AUDIO, the “Sound Retriever Air” function is used to enhance data lost by compression during Bluetooth transmission.
About iPod/iPhone

Made for iPod

Works with iPhone
"Made for iPod" means that an electronic accessory has been designed to connect specifically to iPod and has been certified by the developer to meet Apple performance standards.
“Works with iPhone” means that an electronic accessory has been designed to connect specifically to iPhone and has been certified by the developer to meet Apple performance standards.
Apple is not responsible for the operation of this device or its compliance with safety and regulatory standards.
iPod is a trademark of Apple Inc., registered in the U.S. and other countries. iPhone is a trademark of Apple Inc.

09 (Additional information
Specifications
- Amplifier section
RMS Power Output:
Front Left/Right.... 10 W + 10 W
(1 kHz, 10 %, T.H.D., 8 Ω)
- Speaker section
Enclosure....Passive radiater
System....1-way system
Speakers:
Fullrange 6.6 cm cone
Passive radiator....7.7 cm cone
Frequency range....60 Hz to 20 kHz
• Network section
LAN terminal.... Ethernet jack
10BASE-T/100 Bse-TX
- Miscellaneous
iPod a....5 V, 500 mA
iPod b. 5 V, 500 mA
USB 5 V, 500 mA
Bluetooth Adapter....5 V, 100 mA
Power requirements
AC 220 V to 240 V, 50 Hz/60 Hz
Power consumption 24 W
In standby 0.5 W
Dimensions
Weight (without package) 2.9 kg
- Accessories
Remote control 1
Lithium battery (CR2025) 1
Power cord 1
USB terminal cover (included with product) . . 1
Warranty card 1
Operating instructions (This document)

Note
- Specifications and the design are subject to possible modifications without notice, due to improvements.
Cleaning the unit
- Use a polishing cloth or dry cloth to wipe off dust and dirt.
- When the surface is dirty, wipe with a soft cloth dipped in some water, and wrung out well, and then wipe again with a dry cloth. Do not use furniture wax or cleansers.
- Never use thinners, benzine, insecticide sprays, ethyl alcohol, neutral cleanser or other chemicals on or near this unit, since these will corrode the surface.
Published by Pioneer Corporation.
Copyright © 2010 Pioneer Corporation.
All rights reserved.

text_image
42 En

natural_image
Pure geometric diagram with intersecting lines and a central circle, no text or symbols present
natural_image
Illustration of a portable device with a prohibition symbol on top (no text or symbols present)Exploration HI-LITE....14
natural_image
Pure geometric diagram with intersecting lines and shapes, no text or symbols presentAvant de commencer
Chapitre 1 :
Avant de commencer
Caractéristiques
natural_image
Illustration of a hand holding a medical or surgical device with a downward arrow indicating force (no text or symbols present)text_image
Diagram showing a device component with labeled parts and directional arrows indicating movement or assembly.text_image
30° 30° 7 mnatural_image
Abstract geometric pattern with intersecting lines and shaded circles (no text or symbols)02 (Commandes et affichages
Chapitre 2 :
4 T.EDIT (TUNER EDIT)
natural_image
Pure geometric diagram with intersecting lines and shapes, no text or symbols present
02
natural_image
Abstract geometric diagram with intersecting lines and concentric circles (no text or symbols)
text_image
9 Fr02 (Commandes et affichages
natural_image
Pure geometric diagram with intersecting lines and shapes, no text or symbols presentnatural_image
Pure geometric diagram with intersecting lines and shapes, no text or symbols presentnatural_image
Pure geometric diagram with intersecting lines and shapes, no text or symbols present
natural_image
Abstract geometric pattern with intersecting lines and shaded circles (no text or symbols)natural_image
Pure geometric diagram with intersecting lines and shapes, no text or symbols present
natural_image
Abstract geometric diagram with intersecting lines and shaded circles (no text or symbols)04
natural_image
Pure geometric diagram with intersecting lines and shapes, no text or symbols present
natural_image
Abstract geometric pattern with intersecting lines and shaded circles (no text or symbols)

natural_image
Abstract geometric diagram with intersecting lines and shaded circles (no text or symbols)05
natural_image
Abstract geometric diagram with intersecting lines and shaded circles (no text or symbols)05
text_image
STANDBY/ON HOME MEDIA GALLERY iPod a > b Hi-Jite BT A AUX SLEEP CLASS T.EDIT PGM CLEAR MENU ENTER RETURN PLAYLIST ALBUM SHUFFLE REPEAT DISPLAY +natural_image
Abstract geometric diagram with concentric circles and intersecting lines, no text or symbols presenttext_image
STANDBY/ON HOME MEDIA GALLERY iPod a iPod b Hi-UITE BT A AUX SLEEP + CLASS T:EDIT PGM CLEAR MENU ENTER RETURNtext_image
STANDBY/ON HOME MEDIA GALLERY iPod a >= b Hi-LITE BT A AUX SLEEP ○ CLASS T.EDIT PGM CLEAR MENU ENTER RETURNRemarque
DNS (1st)/DNS (2nd) [DNS (1er)/DNS (2ème)]
natural_image
Pure geometric diagram with intersecting lines and shapes, no text or symbols present

natural_image
Abstract geometric diagram with intersecting lines and shaded circles (no text or symbols)05
natural_image
Pure geometric diagram with intersecting lines and shapes, no text or symbols present
natural_image
Abstract geometric pattern with intersecting lines and shaded circles (no text or symbols)natural_image
Pure geometric diagram with intersecting lines and shapes, no text or symbols presentAutres raccordements
Chapitre 6 :
Autres raccordements
natural_image
Pure geometric diagram with intersecting lines and shapes, no text or symbols present
natural_image
Abstract geometric pattern with intersecting lines and circles (no text or symbols)
text_image
35 Fr08
text_image
BT A AUX SLEEP CLASS T.EDIT PGM CLEAR MENU ENTER RETURNtext_image
BT A AUX SLEEP CLASS T.EDIT PGM CLEAR MENU ENTER RETURNPublication de Pioneer Corporation.
© 2010 Pioneer Corporation.
natural_image
Pure geometric diagram with intersecting lines and shapes, no text or symbols present

natural_image
Abstract geometric diagram with intersecting lines and shaded circles (no text or symbols)09
natural_image
Abstract geometric pattern with intersecting lines and a central circular motif (no text or symbols)
text_image
43 Fr
natural_image
Abstract geometric pattern with intersecting lines and shaded circles (no text or symbols)IMPORTANTE

text_image
a b a = b
natural_image
Pure geometric diagram with intersecting lines and a circular pattern (no text or symbols)Antes de comenzar
natural_image
Illustration of a hand holding a small object with a downward arrow, no text or symbols presenttext_image
Diagram showing a device component with labeled parts and directional arrows indicating movement or assembly.text_image
30° 30° 7 mnatural_image
Abstract geometric pattern with intersecting lines and circles (no text or symbols)
text_image
7 Es
natural_image
Abstract geometric pattern with intersecting lines and shaded circles (no text or symbols)02 (Controles e indicaciones
Capítulo 2:
4 T.EDIT (TUNER EDIT)
natural_image
Pure geometric diagram with intersecting lines and shapes, no text or symbols present
02
natural_image
Abstract geometric diagram with intersecting lines and concentric circles (no text or symbols)
text_image
9 Es
natural_image
Abstract geometric pattern with intersecting lines and shaded circles (no text or symbols)02 (Controles e indicaciones
Panel frontal/superior

flowchart
graph TD
    1["STANDIDATION"] --> 2["Node"]
    2 --> 3["TIME: WAVE UPDRUM/UP SLEEP(ORANGE)"]
    3 --> 4["INPUT SELECTUR"]
    4 --> 5["USB"]
    5 --> 6["a"]
    5 --> 7["b"]
    6 --> 7
    7 --> 8["+ VOLUME"]
    7 --> 9["-"]

text_image
8 9 a × b Pioneer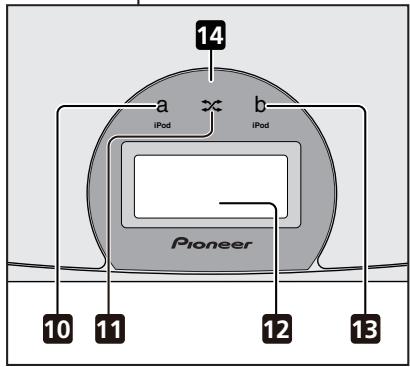
text_image
14 a b iPod iPod Pioneer 10 11 12 13natural_image
Pure geometric diagram with intersecting lines and shapes, no text or symbols presentnatural_image
Pure geometric diagram with intersecting lines and shapes, no text or symbols present
natural_image
Pure geometric diagram with intersecting lines and shapes, no text or symbols present
03
natural_image
Abstract geometric pattern with intersecting lines and shaded circles (no text or symbols)natural_image
Pure geometric diagram with intersecting lines and shapes, no text or symbols presentnatural_image
Pure geometric diagram with intersecting lines and shapes, no text or symbols presenttext_image
STANDBY/ON HOME MEDIA GALLERY iPod a b Hi-Jite BT A AUX SLEEP CLASS T.EDIT PGM CLEAR MENU ENTER RETURN PLAYLIST ALBUM < > < > SHUFFLE REPEAT DISPLAY +1 Pulse HOME MEDIA GALLERY.
natural_image
Pure geometric diagram with intersecting lines and shapes, no text or symbols present
05
text_image
STANDBY/ON HOME MEDIA GALLERY iPod a b Hi+Lite BT A AUX SLEEP CLASS T.EDIT PGM CLEAR MENU ENTER RETURN PLAYLIST ALBUM SHUFFLE REPEAT DISPLAY +natural_image
Abstract geometric diagram with intersecting lines and shaded circles (no text or symbols)05
text_image
STANDBY/ON HOME MEDIA GALLERY iPod a b HI-UTE BT A AUX SLEEP ○ CLASS T:EDIT PGM CLEAR MENU ENTER RETURNnatural_image
Pure geometric diagram with intersecting lines and shapes, no text or symbols present

natural_image
Abstract geometric diagram with intersecting lines and shaded circles (no text or symbols)05
natural_image
Abstract geometric diagram with intersecting lines and shaded circles (no text or symbols)05
natural_image
Pure geometric diagram with intersecting lines and shapes, no text or symbols present
text_image
BT A AUX SLEEP CLASS T.EDIT PGM CLEAR MENU ENTER RETURNnatural_image
Pure geometric diagram with intersecting lines and shapes, no text or symbols present
text_image
BT A AUX SLEEP CLASS T.EDIT PGM CLEAR MENU ENTER RETURNnatural_image
Pure geometric diagram with intersecting lines and shapes, no text or symbols presentCopyright © 2010 Pioneer Corporation.
natural_image
Pure geometric diagram with intersecting lines and shapes, no text or symbols present
Declaration of Conformity with regard to the R&TTE Directive 1999/5/EC
Manufacturer:
Pioneer Corporation
1-1, Shin-ogura, Saiwai-ku, Kawasaki-shi, Kanagawa 212-0031, Japan
EU Representative's:
Pioneer Europe NV
Haven 1087, Keetberglaan 1, 9120 Melsele, Belgium http://www.pioneer.eu
C€
English:
Hereby, Pioneer, declares that this XW-NAC3 is in compliance with the essential requirements and other relevant provisions of Directive 1999/5/EC.
Suomi:
natural_image
Pure geometric diagram with intersecting lines and circles, no text or symbols presentPortuguês:
natural_image
Pure geometric diagram with intersecting lines and shaded circles, no text or symbols present
natural_image
Pure geometric diagram with intersecting lines and a circular pattern (no text or symbols)
http://www.pioneer.co.uk
http://www.pioneer.fr
http://www.pioneer.es
http://www.pioneer.eu
Published by Pioneer Corporation.
Copyright © 2010 Pioneer Corporation.
All rights reserved.

J1120231B SH 10/05 K
Publication de Pioneer Corporation.
© 2010 Pioneer Corporation.
PIONEER ELECTRONICS (USA) INC.
P.O. BOX 1540, Long Beach, California 90801-1540, U.S.A. TEL: (800) 421-1404
PIONEER ELECTRONICS OF CANADA, INC.
300 Allstate Parkway, Markham, Ontario L3R 0P2, Canada TEL: 1-877-283-5901, 905-479-4411
PIONEER EUROPE NV
Haven 1087, Keetberglaan 1, B-9120 Melsele, Belgium TEL: 03/570.05.11
PIONEER ELECTRONICS ASIACENTRE PTE. LTD.
253 Alexandra Road, #04-01, Singapore 159936 TEL: 65-6472-7555
PIONEER ELECTRONICS AUSTRALIA PTY. LTD.
178-184 Boundary Road, Braeside, Victoria 3195, Australia, TEL: (03) 9586-6300
PIONEER ELECTRONICS DE MEXICO S.A. DE C.V.
Blvd.Manuel Avila Camacho 138 10 piso Col.Lomas de Chapultepec, Mexico, D.F. 11000 TEL: 55-9178-4270
K002_B1_En
natural_image
Abstract geometric pattern with intersecting lines and shaded circles (no text or symbols)

natural_image
Pure geometric diagram with intersecting lines and circles, no text or symbols present