M4 Slim - Cellphone Allview - Free user manual and instructions
Find the device manual for free M4 Slim Allview in PDF.

User questions about M4 Slim Allview
0 question about this device. Answer the ones you know or ask your own.
Ask a new question about this device
Download the instructions for your Cellphone in PDF format for free! Find your manual M4 Slim - Allview and take your electronic device back in hand. On this page are published all the documents necessary for the use of your device. M4 Slim by Allview.
USER MANUAL M4 Slim Allview
User's Manual for GSM/GPRS Digital Mobile Phone Model No. M4 SLIM
Congratulations on your purchase of the GSM mobile phone. Please read this User Guide before you use your mobile phone. Notice: If there is any difference (such as features etc.) between the User Guide and the mobile phone, please refer to the mobile phone. Improvements and changes to this User Guide maybe made by our company at any time and without notice. Such changes will, however, be incorporated into new editions of this User Guide. We have checked the User Guide very carefully, however there may still be some mistake.
Table of Contents
1.FOR YOUR SAFETY......6
2.PRODUCTS INSIDE PACKAGE ....7
3.SPECIFICATIONS....7
4.APPEARANCE SKETCH 9
5.DESCRIPTION OF KEYS....10
- ICON INDICATORS.... 11
7.GET STARTED.... 12
7.1 INSERT / REMOVE THE BATTERY....12
7.2 INSERT / REMOVE SIM CARD....13
7.3 INSERT / REMOVE T-FLASH CARD....14
7.4CHARGE THE BATTERY....14
8.PHONE CALL 15
8.1MAKE A CALL 15
8.2 ANSWER A CALL....16
8.3 DURING A CALL 16
9.CONNECTIVITY 17
10.2MESSAGES....18
1.1.1SMS.... 1
1.1.2MMS 2
1.1.3Chat 2
1.1.4 Voice mail server 2
1.1.5 Broadcast message.... 2
10.3 CALL CENTER....23
1.1.6Call history 2
1.1.7 General call settings.... 2
10.4 SETTINGS 26
1.1.8User profiles 2
1.1.9Phone Setup.... 2
1.1.10 General call setting 2
1.1.11Network setup.... 2
1.1.12 Security setup 2
1.1.13 Dual SIM Settings 2
1.1.14Restore factory settings.... 3
10.5 MULTIMEDIA....31
1.1.15Camera 3
1.1.16Image viewer 3
1.1.17Video recorder 3
1.1.18Video player 3
1.1.19Audio player 3
1.1.20Sound recorder 3
1.1.21FM radio 3
MY INFORMATION....35
10.6FUN AND GAMES 36
1.1.22Games.... 3
1.1.23E-Book reader.... 3
10.7ORGANIZER....36
1.1.24Bluetooth 3
1.1.25Alarm 3
1.1.26Calendar 3
1.1.27Day Schedule.... 3
1.1.28Word Clock.... 3
1.1.29Calculator 3
1.1.30Stopwatch 3
10.8S ERVICE....
1.1.31STK 3
1.1.32WAP 4
1.1.33Data account 4
-
INPUT METHOD ...... 41
-
FAQ 42
1. For your safety
■ SWITCH ON SAFETY
Do not switch your product on when mobile phone use is prohibited or when it may cause interference or danger.
■ DRIVE SAFETY
Obey all local law. Unless there is an emergency, otherwise do not use the device when you are driving a vehicle without safety wireless equipment.
■ SWITCH OFF IN HOSPITALS
Follow any restrictions. Switch your product off when near the medical equipments. Otherwise it may affect the normal operation of medical instruments.
■ SWITCH OFF IN AIRCRAFT
Follow any restrictions. Switch your device off when you are in aircraft. The use of mobile phone in an aircraft may be dangerous to the operation of the aircraft.
■ SWITCH OFF WHEN REFUELING
Do NOT use the device near fuel or chemicals
■ SWITCH OFF NEAR BLASTING
Do NOT use your product when blasting is in progress.
■ WATER-RESISTANCE
Your product is NOT water-resistant; keep it dry at any time, especially when it is charging.
INTERFERENCE
All wireless devices may be susceptible to interference, which could affect performance.
■ BATTERIES AND CHARGERS
Use only approved batteries and chargers. The use of any other types may invalidate any approval or warranty, and maybe dangerous.
2. Products inside package
Unpack the phone gift box and confirm that the following products are perfect. If any item is missed, please contact with the local distributor.
➢ GSM mobile phone
Travel charger
Li-ion Battery
Earphone
USB cable
User manual
3. Specifications
Dimension: 112.5 mm [Height] * 48.8 mm [Width] * 11.5 mm [Thickness]
Weight: 77.5g (Include battery)
GSM850 / GSM900 / DCS1800 / PCS1900MHz
2.2" TFT screen
Dual SIM cards dual standby
Bluetooth
FM Radio
High definition camera with flashlight
Audio and Video player
Built-in speaker
Torch
SMS/MMS
GPRS / WAP
Support T-flash card
Nokia charger and battery compatible
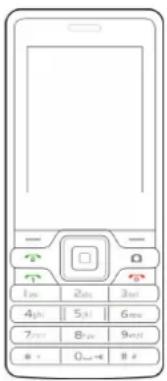
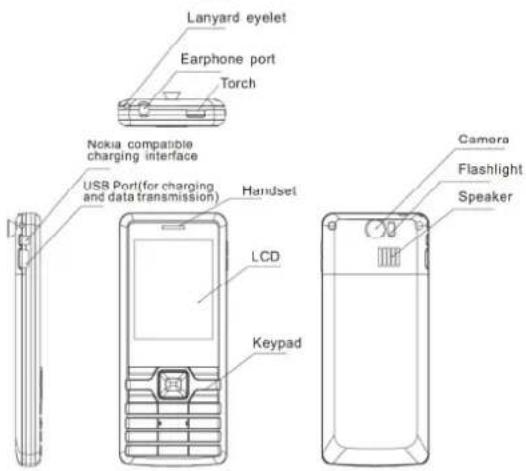
- Appearance Sketch
5.Description of Keys
Short press: Press the key briefly
Long press: Press the key for more the 2 seconds
| Key Type | Function description (in standby mode) | |
| LSK | Short press Enter Shortcuts | |
| RSK | Short press Enter phonebook | |
| Short press Show call log of SIM card 1 | ||
| Short press Show call log of SIM card 2 | ||
| Long press Enter camera application | ||
| Short press End a call | ||
| Long press Power off | ||
| OK | Short press Enter main menu | |
| 0..9,*,# | Short press Input number in dialing screen | |
| 0 | Long press Turn on torch | |
| 1 | Long press Make a call to the voice mail number when it is valid | |
| 2..9 | Long press Make a call to the associated speed-dial number when they arc sct. | |
| # Long press Switch on/off silence mode. | ||
| * | Long press Character “+”, “+”, “P”, “W” appear alternately in dialing screen. | |
Locking the keypad: press
Unlocking the keypad: Press
6. Icon indicators
| Icons | description |
 | The signal strength of network attached to SIM Card 1 |
| [42SH] | The signal strength of network attached to SIM Card 2 |
| [08W2] | The electric quantity indicator |
 | You have one or more unread messages received by SIM Card 1 |
 | You have one or more unread messages received by SIM Card 2 |
 | You have one or more unread MMS received by SIM Card 1 |
 | You have one or more unread MMS received by SIM Card 2 |
 | You have one or more missed phone calls in SIM Card 1 |
| [X7W] | You have one or more missed phone calls in SIM Card 2 |
| [0W3D] | General mode of profiles is active now |
 | Meeting mode of profiles is active now |
| [20W8] | Outdoor mode of profiles is active nowIndoor mode of profiles is active now |
| Headset mode of profiles is active now | |
| Bluetooth mode of profiles is active now | |
| Calls to SIM Card 1 are forwarded to another number according to the scheduled “call divert” conditions | |
| Calls to SIM Card 2 are forwarded to another number according to the scheduled “call divert” conditions | |
| One or more alarms are active | |
| Keypad lock |
7.Get Started
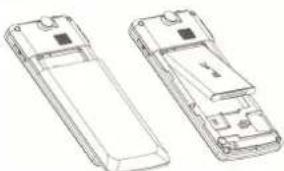
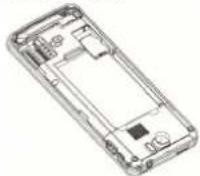
7.1 Insert / Remove the battery
natural_image
Line drawing of two mobile phone modules showing front and side views (no text or symbols)■ Take off the rear cover of the mobile phone.
■ Align the contacts of battery with the corresponding connectors on the battery compartment.
■ Then gently press the battery downward using the finger,
and then press the other end to install the battery.
■ Lift the battery up from the bottom end of the battery and take the battery out.
WARNING: Always switch your product off and disconnect the charger before removing the battery.
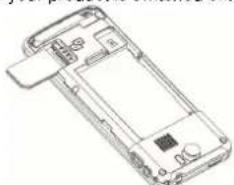
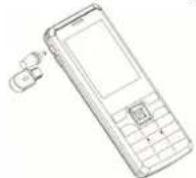
7.2Insert / Remove SIM card
The device is dual SIM cards dual standby phone. It can support 2 SIM cards. Card inserted in card slot 1 is SIM 1; Card inserted in card slot 2 is SIM 2. Before changing the SIM card, please make sure your product is switched off.
natural_image
Line drawing of a mobile phone casing with visible internal components (no text or symbols)■ Make sure that the contact area on the card is facing the connectors on your product and that the beveled corner is correct with the indicator, then insert the SIM card.
■ When taking out SIM card, directly pull it outward and then can take out SIM card.
7.3 Insert / Remove T-flash card
■ Make the end of T card with metal surface face inside and downward and aim at the T card slot of the phone, then insert SIM card to the card slot of the phone.
■ When taking out T card, directly pull it outward and then can take out the card.
7.4 Charge the battery
The phone will release the warning tone indicating the insufficient electric quantity with the indication of the empty battery icon when the electric quantity is lower. Under this case, the phone may not be used in partial functions. The phone will power off automatically when the electric quantity is too low. Please charge the battery.
■ Please make sure the battery is inserted correctly.
■ Connect the power cord to the device and then connect a compatible charger to a wall outlet or connect with the computer via USB data cable. (There are two charging interfaces, one is Nokia compatible charging interface and the other is normal USB charging interface.)
The battery icon on the screen will flash when the phone is being charged. After completion of charging, the full battery icon will display on the screen. The charging animation will be displayed on the screen when the phone is being charged under the power-off state. After completion of charging, the charging animation stops. (If not using your mobile phone for a long time, it will take a few minutes to show the charging animation.)
☒ WARNING: Taking off the battery during charging is forbidden. Please make sure to use the designated charger.
8.Phone Call
The device is a dual SIM cards dual standby single pass phone. Dual SIM cards means it supports two SIM cards, dual standby means all the SIM cards work in standby mode, single pass means only one SIM card can answer or make a call, the other is sleeping at the same time until the call ends.
8.1 Make a call
■ To Make a call, input the phone numbers (sometimes including the area code when you call a foreign area number), and press or key if "Dual SIM open"
mode in settings is active and these 2 SIM cards are all available, you need chose which one is the initiator: SIM1 or SIM2.
■ Also, you can make a call through phonebook list or call history directly.
8.2 Answer a call
■ To answer a call, press on key when the call is incoming.
■ To reject the call, press key.
- Or you can press
■ If you set "any key answer" in profile, press any key (except
8.3 During a call
There are some options available when you press
■ Hold / Retrieve single call – to keep / retrieve current call.
■ End single call – to end current call.
■ New call – to make a new call via input numbers.
■ Phonebook – you can enter the phonebook and conduct the relevant operations.
■ Message center – to enter message center to conduct the relevant operations. During a call, you can't send and receive MMS.
■ Sound recorder – to start phone call recording. The file is stored in Audio folder in memory card.
■ Mute – to make the other side can not hear what you say.
■ DTMF – to enable/disable DTMF.
9. Connectivity
This mobile phone offers options to connect to another device or computer. Wireless solution includes Bluetooth. It also supports a wired solution with a USB (Universal Serial BUS) cable connection.
■ USB cable connection
Using a USB data cable, you can connect the mobile phone to a compatible computer. If the phone is powered off, you will see the driver in your computer. If the phone is powered on, you can select the feature you want to use: storage or webcam.
Bluetooth
See chapter 10.8.1 Bluetooth
10.Main menu
10.1Phonebook
■ Quick search
To search the name you want to use in the phonebook list. You can look for the name according to your input alphabet.
■ Search contact
Search the name you want to use in the phonebook list. You can look for the name according to your input.
■ Add new contact
Add a new record to phonebook list, including name, number, etc. you can select the position to store: phone, SIM1 or SIM2. The content of every record in SIM card is composed of name and ONE number.
■ Batch operations
➢ Multi Delete – delete the selected items in phonebook list
➢ Copy all—copy items from SIM Card 1 to phone, or from phone to SIM Card 1, or from SIM Card 2 to phone, or from phone to SIM Card 2, or from SIM Card 1 to SIM Card 2, or from SIM Card 2 to SIM Card 1.
➢ Delete all —delete all the records in SIM Card 1 or SIM Card 2 or phone, you need to input password 1122. You can also delete the records one by one.
■ Settings
To set the feature of phonebook, you can view the memory status, set caller groups, owner numbers for SIM Card 1 or SIM Card 2, preferred storage position to save number, set the contents included in recorders stored in the phone, caller picture, ring tone, etc.
10.2Messages
1.1.1 SMS
■ Before you use SMS
You must have a service center number. The number is supplied by your service provider and is usually saved on the SIM card, or you must enter the number yourself.
To enter a service center number
- From standby mode, select Menu > messages > SMS
SMS setting > SIM1/SM2 message settings > profile settings > profile (1..4) > Edit
- If there no number shown, chose the item to EDIT, especially the SC address, enter the service number, when finished, press
to save.
You are notified when you receive a message. Messages are automatically saved in the phone memory or SIM card according to your setting.
■ To save messages on phone/SIM
From standby mode, select MENU > Messages > SMS > SMS settings > SIM 1/SIM 2 message setting > preferred storage.
■ To write and send a SMS
- From standby select MENU > Messages > SMS > write message.
- write the message and press
, options are as below:
➢ Use templates – to insert a template to message content.
Insert card – to insert a name and number from phonebook list to message content,
➢ Insert Call History – to insert a call history to message content.
➢ Insert message – to insert a existing message to message content.
Insert bookmark— to insert a bookmark in wap to message content.
➢ Format text – to set the content format.
➢ Input method – to change the input method you want to use.
Inbox
List all received SMS (including read and unread).
SIM Card 1 Inbox: received messages via SIM card 1.
SIM Card 2 Inbox: received messages via SIM card 2.
When a message is focused, press
➢ Delete – to delete this message directly.
➢ Delete all – to delete all the messages in this Inbox (SIM, Phone or both)
➢ Edit – to edit a new message.
Forward – to transfer this message to some other.
➢ Copy to SIM/Phone – to copy this message between SIM and phone.
➢ Move to SIM/Phone – to move this message between SIM and phone.
➢ Copy all – to copy all messages between SIM and phone.
Move all – to move all messages between SIM and phone.
➢ Use number – to extract the number from message content and sender.
Use URL – to extract the URL from message content.
Outbox
List all sent out SMS (including sent or unsent).
SIM Card 1 Outbox: messages sent via SIM card 1.
SIM Card 2 Outbox: messages sent via SIM card 2.
Options are same as Inbox, please see Inbox
■ Templates
To view the list of templates, Press
➢ Edit – to edit this template
➢ Erase – to set this template empty
Write message – to use this template to write a new message.
■ SMS settings
Profile setting – to edit the profile name, SMS service center number, SMS validity period, SMS type.
➢ Common settings – to enable / disable the delivery report and reply path
➢ Memory status – to show the status of storage (SIM card and phone)
➢ Preferred storage – to set where the message store firstly.
SMS Firewall
To prevent some messages from special number
SMS Firewall – press
➢ Number setting – to set the special number according to input number or insert from phonebook list.
1.1.2 MMS
MMS means Multimedia Message Service. The content can be text, pictures, ring tone, melody and animation.
■ Write Message
To write the MMS, you can set the number or email for To, Cc, Bcc and edit the message content.
When editing the content, you can press
Done – to finish editing the content
Input method – to select the input method you want to
use
- Add picture – to add a picture to the message content
- Add audio – to add a audio resource to the message content
Add video – to add a video resource to the message content - Add attachment – to add some files to the message content
Add slide before – to insert a new slide before this slide - Add slide after – to insert a new slide after this slide
- Delete slide – to delete current slide
Next / Previous slide – to change to next / previous slide
Add bookmark text – to insert a bookmark in WAP to message content. - preview – to preview the content
- Slide timing—to Set the delay time of the slide
■ Inbox / Outbox / Drafts
To list all received / sent / stored MMS
When one message is focused, press
■ Templates
To choose the template defined by user himself or system.
■ MMS settings
To set the MMS parameters such as compose parameters (Parameter when writing message), send parameters (parameters when sending message), retrieve parameter (parameters when retrieving message), filter parameter, server profile (choose the operator's supporting network or MMS's profile), also you can see the memory status.
1.1.3 Chat
You can chat with others through SMS. Input your nickname and your friend's phone number, then start to chat. Please act it follows menu hints.
1.1.4 Voice mail server
This function needs support from the OPERATOR, Please consult with them about the details and voice mail number.
You need to input your name and voice mail number. You can connect to the voice mail server to listen to the voice mail.
1.1.5 Broadcast message
You can choose to receive or reject broadcast message; read the broadcast messages; select the language; Edit the channels.
10.3 Call center
1.1.6 Call history
■ SIM Card 1 / SIM Card 2 call history
Press
SIM Card 1 / SIM Card 2 missed calls
SIM Card 1 / SIM Card 2 dialed calls
SIM Card 1 / SIM Card 2 received calls
In every call list, highlight the record and press
you can choose:
Delete – to delete current record;
Save to phonebook – to save current record's
number to phonebook
Call – to make a call to current record
Edit – to edit the number and save it to the phone
book
Send SMS – to write a new SMS and send to current record
Send MMS – to write a new MMS and send to current record
Add to black list – to add current record to blacklist
➢ Delete SIM Card 1 / SIM Card 2 call log
To delete missed calls, dialed calls, received calls or delete all.
SIM Card 1 / SIM Card 2 call time
To see the duration of last call, total send call time, total received call time, or to reset all time to zero.
SIM Card 1/ SIM Card 2 call cost
To see the cost of last call, total cost, to reset all cost to zero, to set the max cost, or to set the price per unit (Needs PIN 2 code). The function need network operator's support.
■ SIM Card 1/ SIM Card 2 SMS counter
To see the count of sent and received SMS, select
■ SIM Card A/ SIM Card B GPRS counter
To see the flowrate of last sent, last received, total sent, total received, or to reset every value to zero.
1.1.7 General call settings
Speed dial
Speed dial allows you to make a call by pressing and holding <2\~9> key in the standby mode.
➢ Enable Speed dial – to active or inactive speed dial
Set number –To assign a number key a phone number, press
■ SIM Card 1 / SIM Card 2 call settings
➢ Caller ID – Set by network, hide ID or Send ID.
Call Waiting – Activate, deactivate or query status. If activate this function, there will be prompt sound in the handset when third party call comes when you are making a call.
Call divert – When this function is activated, you can transfer the incoming call to voice inbox or other phone number according to the scheduled "call divert" conditions: "Divert all voice calls"; "Divert if unreachable"; "Divert if no answer"; "Divert if busy"; "Divert all data calls". This function needs support of network operator.
Call barring – set the condition for barring, and the password. This function needs support of network operator.
Line switch -There are two lines can be selected: line 1 and line 2. But the function is just for the SIM card with two numbers. If your SIM card is not the type like that, please just select line 1, because if you choose line 2, dialing will be barred.
Call Time display
To show / hide the duration of current call when you are making a call.
■ Call time reminder
To set the reminder as none, single or periodic, when select periodic, you should enter the period (from 30 to 60 seconds)
Black list
To disable a call from number stored in black list when the status is on. You can input black list number directly or select from phone book.
■ Auto redial
To enable / disable auto redial function.
■ Auto quick end
To set the status and the limited call time (from 1 to 9999 seconds)
10.4 Settings
1.1.8 User profiles
There are 6 profiles for you to select one as current profile:
▶ General
▶ Meeting
Outdoor
Indoor
Headset
Bluetooth
In every profile item, press
"Customize"
In "Customize", you can choose
➢ Tone setup – to customize the tone of SIM Card 1 / SIM Card 2 incoming call, Power on / Power Off, SIM Card 1 / SIM Card 2 message, keypad tone, there is a list for you to choose.
Volume – to set the volume for ring tone and keypad tone.
➢ Alert type – to select one type from ring, vibrate only, vibrate and ring or vibrate then ring.
➢ Ring type – to set the type from Single (only once), repeat to Ascending.
➢ Extra tone – to enable warning, error, camp on, and connect tone. If one of them is marked, the associated information will cause a sound.
➢ Answer mode – If "any key" is marked, When this function is activated, you can answer a call by press any key except
As a hide profile, the device will enter / exit SILENCE when you long press <#> in standby mode, which without vibration and without any sound or melody.
1.1.9 Phone Setup
■ Display characteristic
Wallpaper – set the wallpaper image
Screen saver – set the screen saver status, images / animation and waiting time.
Power On/Power off display – set the image / animation when system turn on / turn off
➢ Show date and time – show / hide date and time in standby mode
Show owner number – show / hide the number of SIM Card 1 / SIM Card 2.
■ Time and date
You can set the home city, current time and date, and the format to show
■ Schedule Power on/off
To set scheduled power on /power off time as you like.
Language
To change the system language as you like.
■ Preferred input method
To set the default input method when you write messages, or edit character strings, sometimes you also can changed the method during editing via 'input method' or press <#>.
■ Greeting text
To set the greeting status (On or off) and the text, when the status is on, the text will appear when system power on.
■ Shortcuts
Select the options in Shortcuts list.
■ Dedicated key
To set the function of navigation key (UP, DOWN, LEFT, RIGHT) from the function list. When it is set, when press the navigation key; it will enter the associated function directly in standby mode.
■ Torch
To turn on / turn off torch. Long press <0> key will turn on / turn off the torch in standby mode.
■ LCD backlight
To set the brightness level and duration of backlight
1.1.10 General call setting
Same as General call setting in Call center
1.1.11 Network setup
To set network selection mode and Preferred network for SIM Card 1 / SIM Card 2.
1.1.12 Security setup
To manage your mobile phone security and to make it safe.
■ SIM Card 1 / SIM Card 2 security setup
> SIM Card 1 / SIM Card 2 Lock
If "SIM card lock" is activated, each time when you power on your phone, you will have to input PIN code. If you input mistaken PIN code three times continuously, SIM card will be locked. You will have to get PUK1 code to unlock it. Please contact network operator to get PUK1 code when necessary.
The default PIN code is 1234.
> Fixed dial
Edit the FDN list. You can open or close the FDN function.
Barred dial
After “Barred dial” function is activated according to different restricted conditions, you can restrict the call under the corresponding conditions (need to apply to network operator for support).
■ Phone lock
To change the phone lock status, if the status is on, the phone password is needed when power on.
NOTES: the default phone password is 1122, please change it as soon as possible after you get your mobile phone.
■ Auto keypad lock
To enable (also need set the waiting time) or disable the automatic keypad lock in standby mode.
NOTES: If the keypad is locked, please do the action according the popup hint on the screen to unlock the keypad, or the keypad does NOT work.
■ Change password
To change the password of your mobile phone.
■ Private Protect
To protect the call log (call history), phonebook, messages, when the status is on, every time you or some others want to see the associated content, the phone password is needed. To enter this menu, the phone password is also asked to input.
1.1.13 Dual SIM Settings
To set the work status of this two SIM cards: Dual SIM open, Only SIM Card 1 open, Only SIM Card 2 open or Flight mode (no SIM Card open).
NOTES: an existed SIM card may NOT be open, but the content in this SIM can also be viewed, such as phonebook, message, etc.
1.1.14 Restore factory settings
To restore the original device settings. To do this, you need your phone password. After resetting, the device will power off.
10.5 Multimedia
1.1.15 Camera
To preview and capture the images. In preview state, press
Photos – to view the images already exist in photo album and specific operation you could refer to chapter 10.5.2 image viewer..
Camera settings – to set the camera parameters: Flash, Shutter sound, EV, Banding, Delay timer and the status of continue shot.
Image settings – to set the image size and the quality of image you want to capture.
White balance – to select one balance mode to use, the default mode is auto
Scene mode – to set the mode normal or night in order to capture image in day and night.
Effect setting – to set the image color effect according to your interest.
Restore default – to restore the original parameter settings
1.1.16 Image viewer
To view the image exists in photo album. Press
➢ View – to view current image
➢ Browse style – to change the display style of image list
Forward – to set current image as wallpaper, screen saver, power on / power off display, image for somebody or caller group in phonebook, or to transfer current image via MMS, or Bluetooth.
➢ Rename – to rename the file name of current image
➢ Delete – to delete current image
➢ Delete all files – to delete all files in current folder
Sort by – to sort all the image files according to name, type, time, size when you view image list.
1.1.17 Video recorder
When enter this function, you can view video effect through screen, press
➢ Camcorder settings – to set the parameters of white balance, EV, Night mode and banding.
➢ Video settings – to set the quality level of video
➢ Effect settings – to set the effect according to your interesting
➢ Restore default – to restore the original parameter settings
1.1.18 Video player
To view the video files stored in T card, focused on one file, press
➢ Play – to play current video file
Forward – to transfer current file via MMS or Bluetooth to some others.
➢ Rename – to change name of current video file
➢ Delete – to delete current video file
➢ Delete all files – to delete all video files in current folder
Sort by – to sort the files in view list according to name, type, time, or size.
Bluetooth settings – to set the Bluetooth parameter when use Bluetooth headset
1.1.19 Audio player
To play the audio files stored in T card.
On the MP3 player interface, the arrow keys control playing: UP means play or pause, LEFT means choosing previous song or rewind, RIGHT means choosing next song or fast forward, DOWN means stop.
Press on the MP3 player interface, you can see the audio files list. Select one and press
Play – to play current audio file
➢ Details – to view information of current audio file
- Add to rings – to add current audio file to ring list.
➢ Refresh list – to refresh the list in order to synchronize files in current storage.
Settings – to set the parameters for audio player, including list auto generate, repeat type, shuffle, background play, Bluetooth, headset, sound effect, lyrics display status.
1.1.20 Sound recorder
To list all the record files, if the folder is empty, press
When start a new record, the animation and time will start, the process is working, you can press
When a record file is focused, press
Record – to start a new record
➢ Play – to Play current record file
- Append – to append new record to current record file
➢ Rename – to rename current record file
➢ Delete – to delete current record file
➢ Delete all files – to delete all record file in current folder
➢ Settings – to set file format and audio quality
Forward – to add current file to ring list or to transfer current file via MMS or Bluetooth to some others.
1.1.21 FM radio
☒ Warning: If you want to use FM radio, please insert headset first.
In FM screen, the arrow key control playing: RIGHT means next channel / frequency, LEFT means previous channel / frequency, UP means start / stop auto search, DOWN means Power on /
Power off FM radio.
Press
➢ Channel list – to view the channel list already exist, you can play, delete or edit the channels.
➢ Manual input – to set current frequency as you input
➢ Preset auto search – to search channel automatically and save the available channels.
Settings – to set the status of background play and whether use loud speaker.
My information
To view the files and folders in memory card.
For every folder, the options for them are:
➢ Open – to open current folder
New folder – to create a new folder in the selected folder
➢ Rename – to rename current folder
➢ Delete – Delete the current folder
➢ Sort by – to sort the folders by name, type, time or size.
Default folders description
- Received – to store the files received through Bluetooth.
➢ Ebook – to store the files that can read by E-book application directly.
My music -- to store the audio files played by audio player directly.
➢ Photos – to store the images captured by camera or viewed by image viewer.
➢ Video – to store the video file played by video player
or record by video recorder.
➢ Audio – to store the voice memo recorded by sound recorder.
10.6Fun and Games
1.1.22 Games
There are several built-in games.
1.1.23 E-Book reader
To read the text stored in storage. Now only support .txt format files. When focused one file, press
➢ Open E-Book – to open current file
Clean up bookshelf – to delete all the bookshelf
Global settings – to set the view parameter, including font style, font size, scroll type, auto scroll, scroll speed, full screen status and encoding format.
Book info – to view the information of current file
▶ Delete – to delete current file
➢ Delete all files – to delete all files in current folder
Sort by – to sort the files in list according to name, type, time or size
➢ Apply global setting – to use the default global parameter as current setting
Help – to know how to use this application.
10.7 Organizer
1.1.24 Bluetooth
To set parameters for the Bluetooth connectivity. When enter
this application, you can choose
Power – to power on or power off the Bluetooth in your mobile phone.
➢ Inquiry audio device – to search the Bluetooth devices around your mobile phone.
My device – to list records of all Bluetooth devices you found or search new one. Highlight one device and press
➢ Active device – show the current connected device and the service; press
➢ Settings – to set the Bluetooth parameters, including visibility, changing device name, whether need authentication and changing audio path and FTP setting.
About – to view the information of your Bluetooth.
NOTES: for safety, when pairing with other Bluetooth device, the password may need input, please input the same password as the device you want to connect.
1.1.25 Alarm
There are 5 alarms can be used. For every alarm, press
1.1.26 Calendar
Show the calendar according to the date of mobile phone. Press
View tasks – to view current day's tasks list. You can also add a new task.
➢ Add task – to add a new task.
➢ Jump to date – to jump to the date you input.
1.1.27 Day Schedule
To add a schedule to a special day. If there is no task, you can press
➢ View – to view the detail of current task
- Add – to add a new task
➢ Edit – to edit current task content
➢ Delete – to delete current task
➢ Delete all – to delete all tasks
Send vCalendar – to send current task as vCalendar via SMS, MMS, Bluetooth or save to file
1.1.28 Word Clock
You can view the time of different location. If you travel to a country or city with different time zone, you can move the time zone graph to the country or city in world map by pressing Left or Right key, and you can find the local time then.
1.1.29 Calculator
To enter calculator, the functions of key pad are as below:
| Keys Press type Function | |
| UP Short press + | |
| UP Long press M+ | |
| Down Short press - | |
| DOWN Long press M- | |
| RIGHT Short press ÷ | |
| RIGHT Long press MR | |
| LEFT Short press × | |
| LEFT Long press MC | |
| 0..9 Short press 0..9 | |
| # Short press Point | |
| OK Short press Get the result | |
1.1.30 Stopwatch
You can measure the lapsed time with this function.
Typical Stopwatch: provided with the functions: Split Timing,
Lap Timing and View or Delete Record.
nWay Stopwatch: used to record time in multi-way form
severally.
10.8Service
1.1.31 STK
To show all the service inside in your SIM card, the name and
service should be different according to your SIM card and OPERATOR
1.1.32 WAP
This service is support by OPERATOR, if you do NOT know whether your SIM card supports, please connect with the OPERATOR for more information.
Enter this service menu, you can choose
➢ Homepage – to enter the homepage via WAP web.
Bookmarks – to list all the book marks, you can edit them or enter the bookmark directly; add new bookmarks.
Recent pages – to view recent viewed websites and enter them directly.
➢ Offline pages – to view offline pages
➢ Input address – to input the address and enter directly
➢ Service inbox – to list all the push messages sent by service provider.
➢ Settings – to set the WAP parameters, including SIM Cards selection, Profile you want to use, browser settings, service message settings, and to clear cache and cookies.
1.1.33 Data account
To list all the data account supported, you should select one of them and edit them according to the real parameter.
The account parameters sometimes may changed by the OPERATOR, so if there is some error, please connect with your OPERATOR and change it.
11.Input method
There are several input methods supported by your mobile phone, the number of them may change according to the number of languages.
■ Smart ABC/abc Press number keys <2-9> to input word. Each letter is input by pressing a key once. The English input method will forecast your inputting word. For example, you press <2, 3, 6> key the screen will show "ADO" with special background color, you can press arrow key UP or DOWN to change the string, and press
■ Multitap ABC/abc When you press number keys <2-9>, the screen will show the character according to the keypad print, for example, you press <3>, the screen will show "D" with special background color, you can continue press <3> to change the character to "D", then to "E", then to "F".
■ Numeric Press the [0\~9] number keys, corresponding number will appear on the screen.
NOTES: in edit screen, you can change the input method via press <#> key, press <*> key to enter symbol selection screen and press<0> to input a space.
12. FAQ
These lists just for reference, if your problems can NOT be resolved according them, please contact with the local distributor.
| Question | Reason and Solution |
| Can NOT power on | Must long press the key at least 3 seconds.Check the battery is installed correctly.Whether the battery runs out, charge it and wait a few minutes |
| Can NOT connect the network | The strength of signal is weak, please move to other place where the signal is stronger.Maybe you are out of the service area of your network operator.Check whether your SIM card is valid. |
| There are some popup messages | Check whether the SIM Card is inserted correctly. |
| ☑ The mobile phone is locked, you must input the password.☑ The PIN code is needed if your SIM card is locked by you or some others.☑ The PUK code is needed when you input wrong PIN code 3 times continuously, input the correct PUK code or contact with your network operator. | |
| The voice quality is NOT good during call | ☑ Check whether the volume is suitable.☑ Check the signal strength in signal indicator. If the level is low, you should move to another place where the level is high.☑ The time is the call rush hour, the network can not carry so many calls. |
| The standby time of battery becomes short | ☑ The low signal strength will shorten your battery standby time.☑ The battery runs out its life, please change the battery. |
| SIM card error | ☑ SIM card connect point is dirty, please clean it with soft and dry cloth or something.☑ SIM card is NOT inserted correctly.☑ SIM card is broken, please contact with your network operator. |
| Can NOT make a call | ☑ Make sure you press or after dialing numbers.☑ Make sure you have enough money associated with your SIM card.☑ Make sure your SIM card is valid.☑ Check whether the dialing out function is barred in call settings.☑ Check whether the FDN is set in call settings. |
| Can NOT be called by others | ☑ Make sure your mobile phone is ON, and the network is connected.☑ Make sure there is enough money associated with your SIM card.☑ Make sure your SIM card is valid.☑ Check whether the incoming call is barred in Call Settings.☑ Check whether the caller number is in black list. |
| Can NOT charge the battery | ☑ Check the connector connects well.☑ Check the temperature is suitable.☑ Battery or charger is damaged, please change a new one. |
| Some functions do NOT work | ☑ Check the operation is correct☑ Make sure the operation is support by yournetwork operator or your SIM card.☑ Make sure the condition needed by this function is meted. |
WARRANTY CERTIFICATE
IMPORTANT:
When buying please verify the integrity and all aspects of the product. Any ulterior claim will not be taken in consideration.
In the warranty period the customer needs to keep the original package of the product.
WARRANTY CONDITIONS:
To benify the warranty, the customer needs to respect the attached instructions. Only authorised persons may intervene on the product for service.
In case of claims, the customer needs to present the warranty certificate with the original proof of purchase, which clearly indicates the name and address of the seller, the date and place of purchase, the product type and the IMEI or other serial number.
The warranty do not cover the accessories as charger, battery, housing, earphones, USB cables, manual. The service is free of charge only in the warranty period.
The warranty extends with the period of the claim until the customer recovers the product from the service in functioning condition.
Any claim shall be solutioned in 10 working days beginning with the date of registering it to one of the authorised services.
If necessary, Visual Fan will replace the product in accordance with this warranty (unless otherwise required by law).
Visual Fan Ltd warrants that the products do not have material or workmanship defects.
The products are according to all applicable certification standards, as electrosecurity and low voltage.
All the certificates and test result are available at the headquarter of Visual Fan.
The warranty period is 24 months and it starts at the time of product's original purchase by the first end-user.
The lifetime of the products is 5 years in normal usage conditions.
WARRANTY IS NOT APPLIED IN THE FOLLOWING CONDITIONS:
-if the product has been opened, modified or repaired by anyone other than an authorized service centre, if it is repaired using unauthorised spare parts or if the Product's serial number, the mobile accessory date code or the IMEI number has been removed, erased, defaced, altered or are illegible in any way
-customer does not respect the usage instructions
-other charger was used for battery charge, than the original one
-partial or total ripp of any seal on the product
-product has scratched display, ripped of keypad, broken housing
-defects caused by the fact that the battery has been short-circuited or by the fact that the seals of the battery enclosure or the cells are broken or show evidence of tampering or by the fact that the battery has been used in equipment other than those for which it has been specified.
- if the Product has been exposed to moisture, to dampness or to extreme thermal or environmental conditions or to rapid changes in such conditions, to corrosion, to oxidation, to spillage of food or liquid or to influence from chemical products.
Visual Van Ltd.
16 Liliacului street, 500314 Brasov, Romania
Tel:+40 268 337 085. Fax:+40 268 338 368 /
www.allview.ro