Alldro box 2 - Media player Allview - Free user manual and instructions
Find the device manual for free Alldro box 2 Allview in PDF.

| Product Type | Media Player (Android TV Box) |
| Brand | Allview |
| Model | Alldro box 2 |
| Dimensions (approx.) | 100 x 100 x 20 mm |
| Weight (approx.) | 200 g |
| Power Supply | DC 5V, 2A (via included adapter) |
| Operating System | Android (likely Android 9 or higher) |
| Video Output | HDMI 2.0 up to 4K@60fps |
| Audio Output | HDMI, optical (if available) or 3.5mm jack |
| Connectivity | Wi-Fi 802.11 b/g/n, Ethernet (RJ45), Bluetooth 4.0 |
| Ports | 2x USB 2.0, 1x microSD card slot, 1x HDMI out, 1x AV out (optional) |
| Main Functions | Streaming (Netflix, YouTube, etc.), local media playback, app installation, screen mirroring |
| Remote Control | Infrared remote with navigation, volume, and power buttons |
| Cleaning and Maintenance | Wipe with a soft, dry cloth; do not use liquids or abrasive cleaners |
| Safety Precautions | Keep away from water, heat sources, and ensure proper ventilation |
| Spare Parts and Repairability | Remote control and power adapter available; device not user-serviceable |
| General Information | Supports HDR10, DLNA, and Miracast; user manual available for download |
Frequently Asked Questions - Alldro box 2 Allview
User questions about Alldro box 2 Allview
0 question about this device. Answer the ones you know or ask your own.
Ask a new question about this device
Download the instructions for your Media player in PDF format for free! Find your manual Alldro box 2 - Allview and take your electronic device back in hand. On this page are published all the documents necessary for the use of your device. Alldro box 2 by Allview.
USER MANUAL Alldro box 2 Allview
- When first time power up, You’ll see Welcome Page. It will help you to config your device.
Welcome
Thank you for your chosen! Configuration your Android TV before enjoy your SMART LIFE.
Start configuration
■ Select Language
Language
Nederlandse
Deutsch
Gaeilge
English
Choose your language:
中文简体
Kovean
Polska
Italiano
■ Select WIFI AP
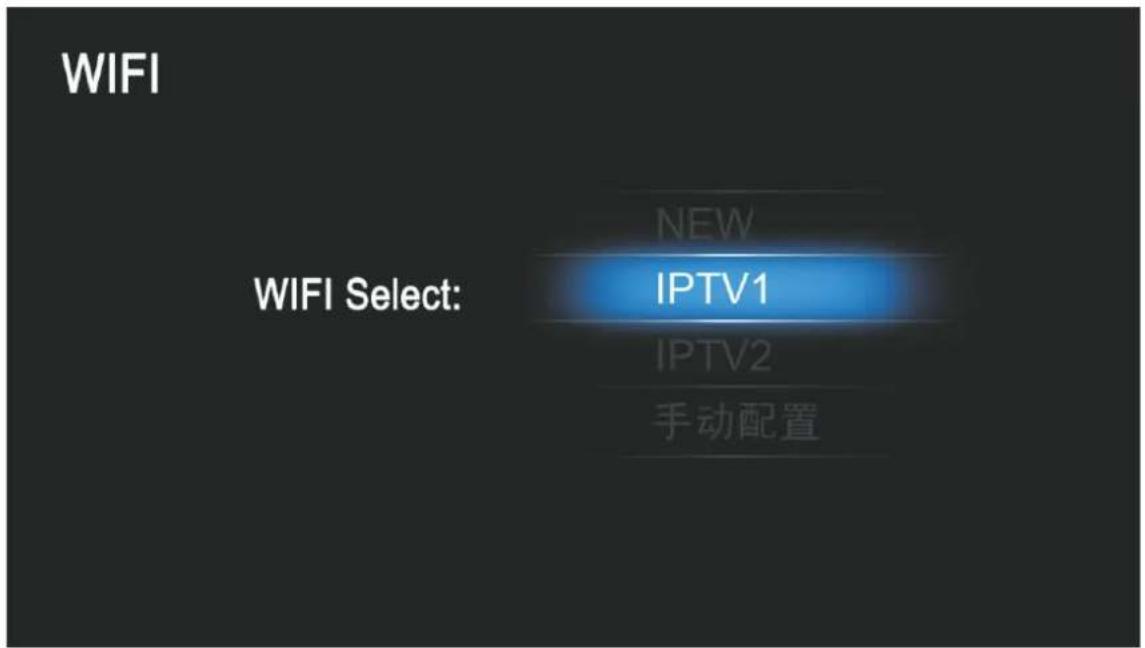
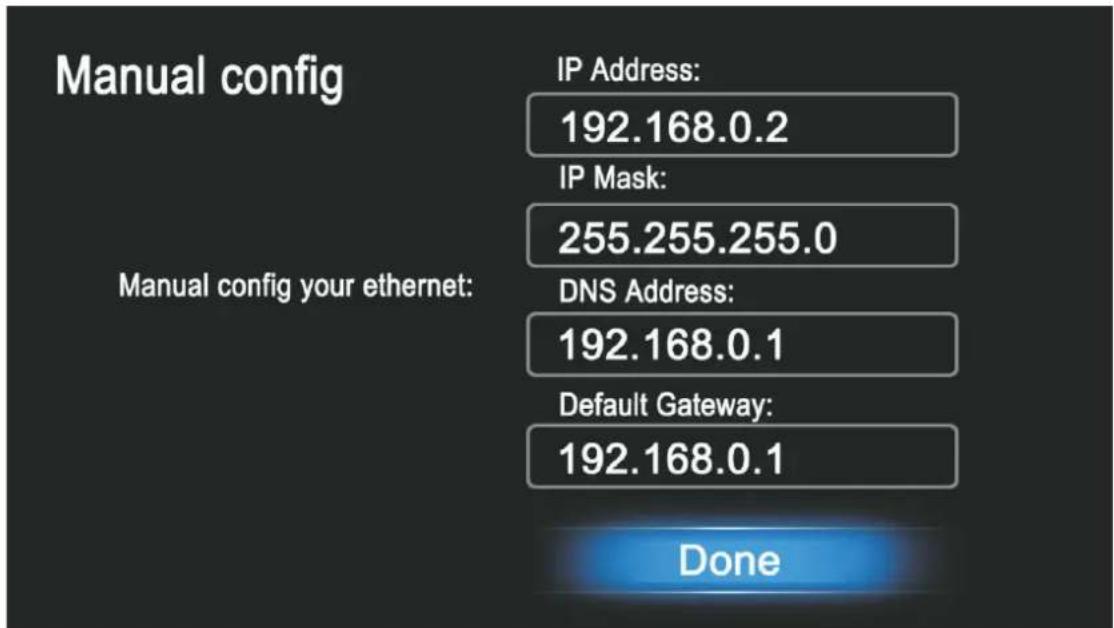
- Ethernet config
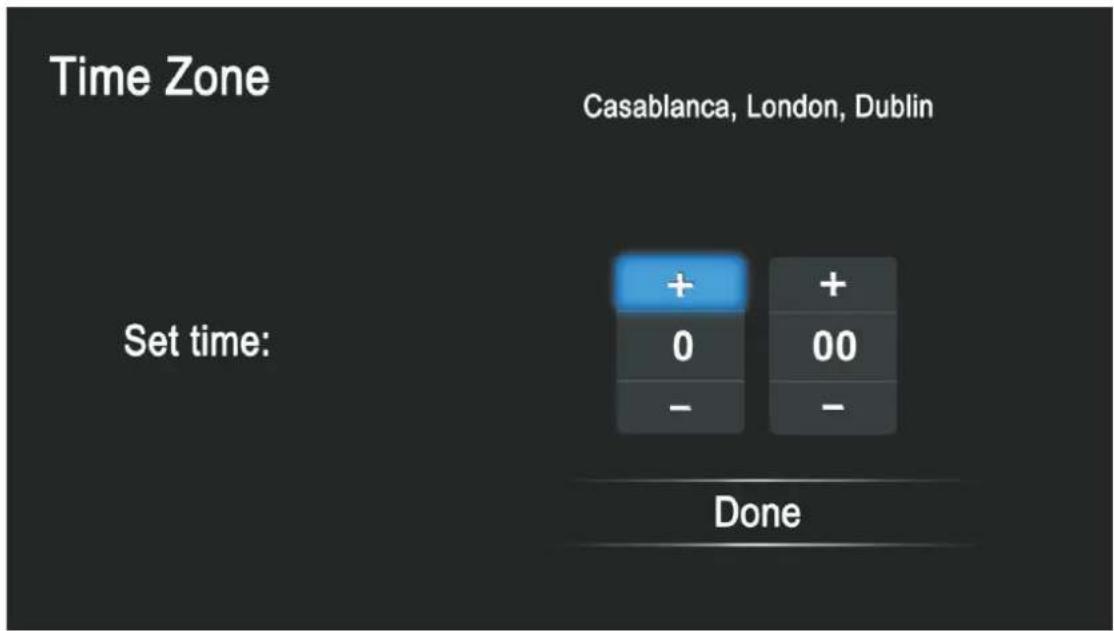
■ Setup Time zone
■ Configuration View
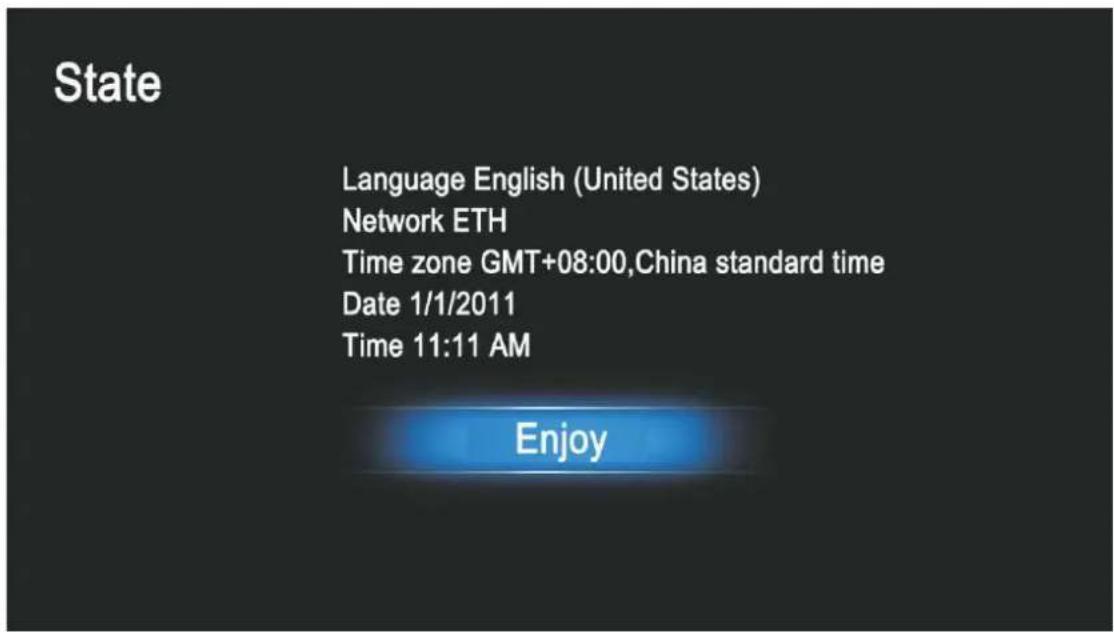
About ALLDRO BOX
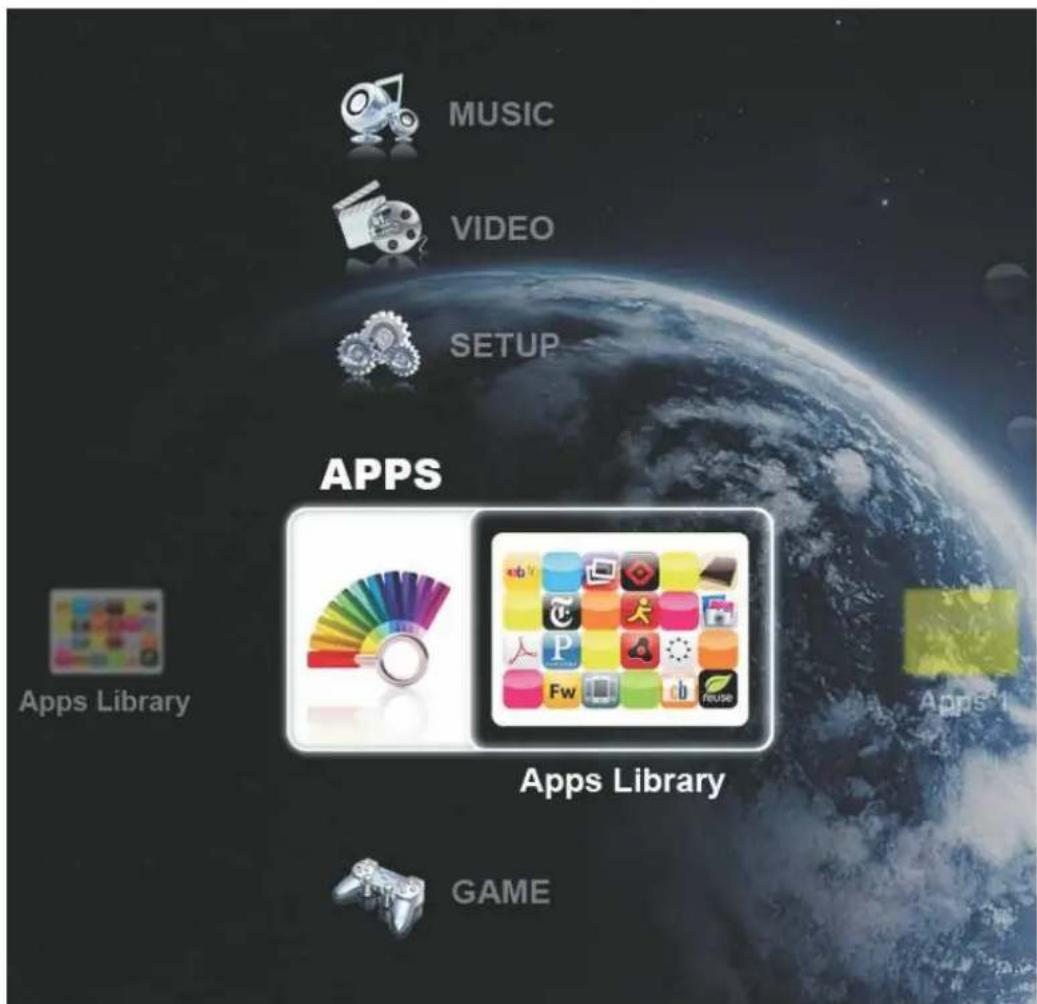
Home Screen
Press
to select the icon and ENTER to enter the sub-screen.
Function
Description
MUSIC

natural_image
Product display of CDs including a laptop and various colorful discs (no visible text or labels)Music Library
Where you can enjoy kinds of music.
VIDEO

Video Library
Media Player, you can play local video files here.
SETUP

The Set-up application contains most of the customizing and configuring, such as language, aspect ratio, password, date&time, Wi-Fi. And you can upgrade the system here.
Function
Description
APPS

natural_image
Colorful app icons arranged in a grid, including a rainbow palette and a grid of colorful app icons (no text or symbols)Apps Library
Application Library, You can launch selected application here, such as Weather.
PICTURE

natural_image
Collage of digital camera icons and a grid of product photos (no text or symbols)Picture Library
You can enjoy high quality picture.
INTERNET

natural_image
Two abstract icons: a blue globe with a yellow '€' and a green @ symbol, both on a white background (no text or symbols)You can use browser to view webpages and to search for information on the web.
Remot e Contro | Button s
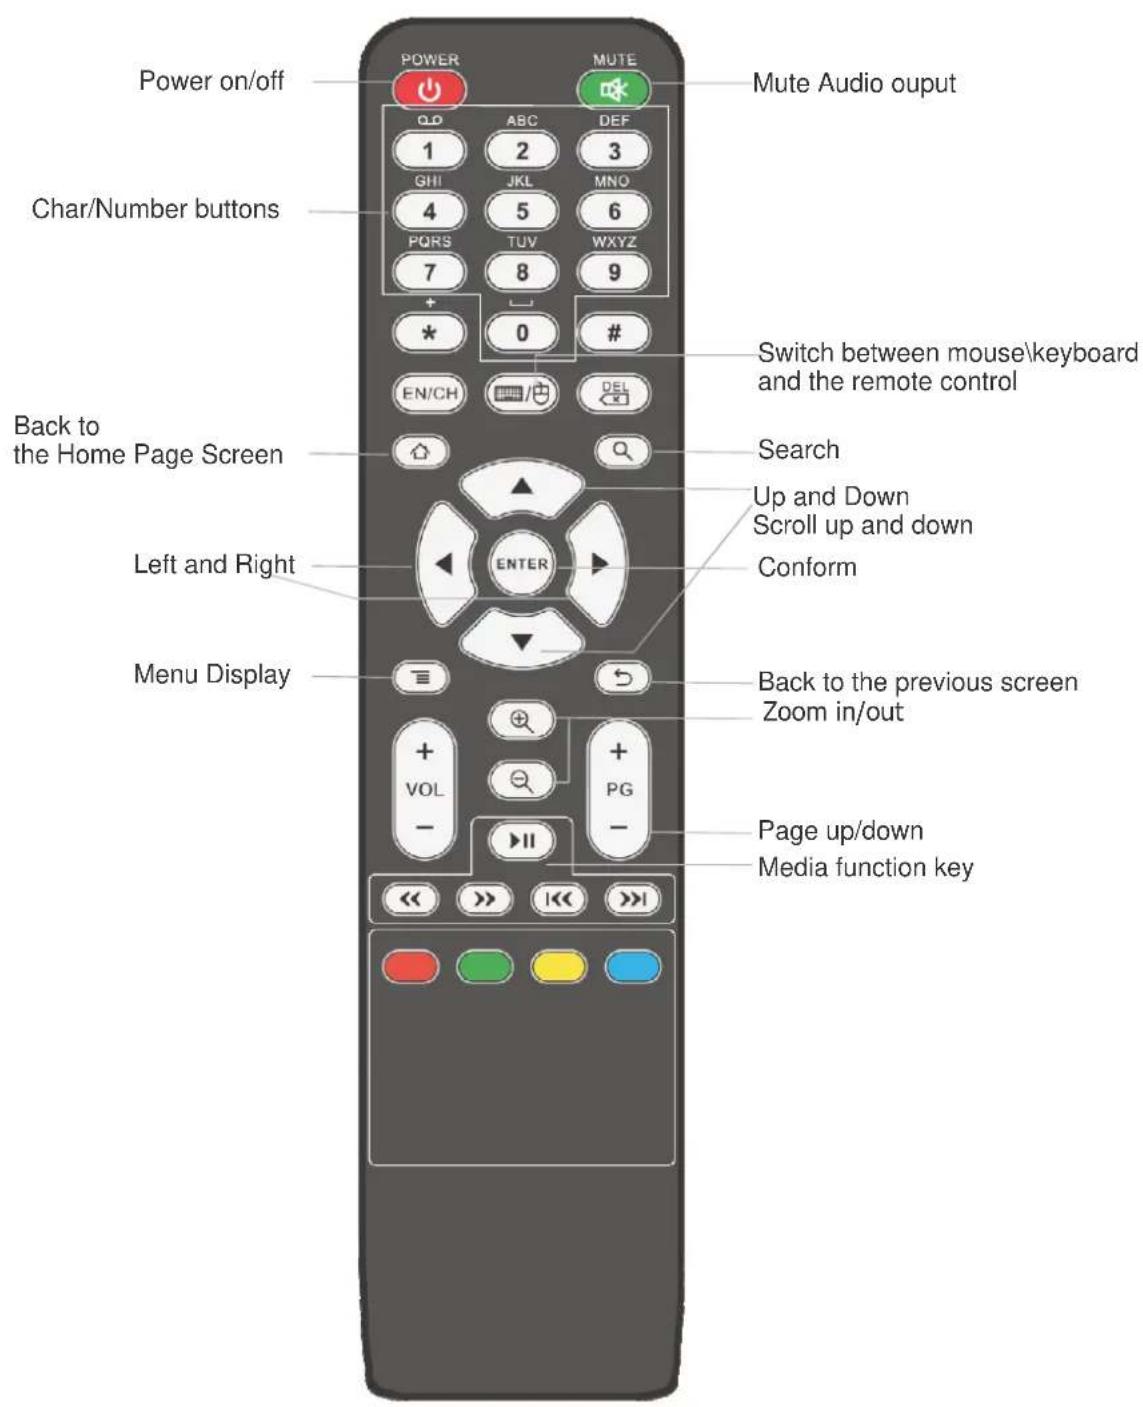
Although most time the number buttons are not used, but when setting password or operating the internet, it'll be pressed frequently. Hope that you can use more efficiently through this chapter.
In the text field, you need to press a button times to select the current one.
For example, you want to input "DE3010", please follow the order :
DE: Press the 3 button twice, and wait 3 seconds, than press the 3 button 3 times.
3010: press 3-0-1-0 by turn. Press ENTER to end the input.
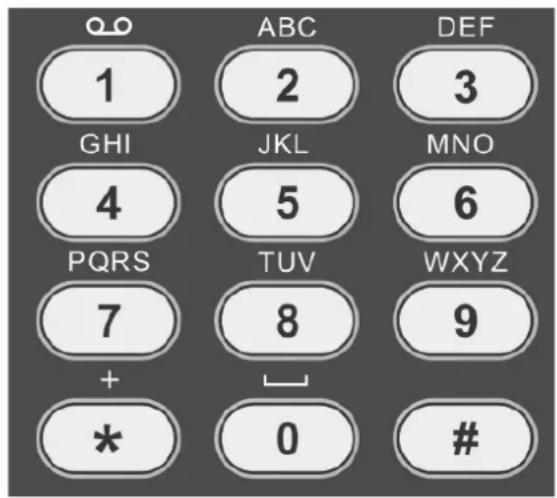
| 1, .?!‘ | |
| 2 a b c A B C | |
| 3 d e f D E F | |
| 4 g h I G H I | |
| 5 j k l J K L | |
| 6 m n o M N O | |
| 7 p q r s P Q R S | |
| 8 t u v T U V | |
| 9 w x y z W X Y Z | |
| 0 ‘ ’ |
Using the onscree n keyboard d
You enter text using the onscreen keyboard. Some applications open the keyboard automatically. In others, you press ENTER at a text field where you want to enter text to open the keyboard. But first, you should make sure the Android keyboard setting is open: Set up > Language & keyboard settings > Android keyboard".

To enter text
1 Select a text field where you want to type.
The onscreen keyboard opens.
For most text fields, the keyboard starts with letter keys. Text fields for the numbers and other special purposes may display number and symbol keys or custom keyboards, to make it easier to enter the required information.
You can also use the mouse to select a text field and then press ENTER to open the onscreen keyboard.
2 Press . to switch to mouse mode.
Choose the correct character by moving the mouse / Press to erase characters to the left of the cursor.
DEL
GO to close the keyboard.
To enter numbers, symbols, and characters
Click the ?123 button to switch to the numbers and character keyboard.
character keyboard
Click the A It button to switch to the capital letters and small letters.
num b ers key board
Click the A It button to view additional symbols; press it again to switch back .
You use the Setup application to configure the output, language, and others. For details, see the sections about individual applications.
1. Wi-Fi settings
Wi-Fi Checkto turn on Wi-Fi so you can connect to Wi-Fi networks.
Network notification Check to receive an alert when an open Wi-Fi network becomes available.
AddWi-Fi network Opens a dialog where you can addWi-Fi network by entering its SSID ( the name it broadcasts ) and security type. For details, see page 13
NOTE: For the pre-installed driver, please use the special USB wireless card.
2. Ethernet configuration
Ethernet Opens the ethernet.
Ethernet configuration
1 Ethernet Devices Select the corresponding devices.
2 DHCP/Static IP
If you check use Static IP, you can enter IP address/Netmask/DNS address/Default manually, rather than n DHCP protocol to obtain network setting from the network itself. (For details, please ask the administrator of the network.)
3 Save
3. Proxy Settings
If you must visit the internet un-directly, A proxy service should be set here: the Hostname and the Port. For details, you can search from internet or ask somebody.
4. Display
The player outputs video signals of the highest resolution for you TV(default) If the picture is not clear, natural or to your satisfaction, try another option that suits your TV.
Resolution Setting Select the type of video signals output from the HDMI out jack. 480i/480p/720p/1080i/1080p(Default)
Adjust screen size After entering the screen, first press ENTER, then adjust screen size to fit display thought ◄/▶ /
5. security
Visible pa sswords Check to briefly show each character of passwords as you enter them, so that you can see what you enter.
6. Internal storage
Displays details about the amount of installed storage that an application can use. For this version, the function of self-help installing is not open.
7. Language & Keyboard
Select Language Opens the screen, where you can select the language to use for the text on the system.
A nd roid Key boa rd For the system with physical keyboards, uncheck to disable the onscreen keyboard.
A nd roid Keyboard This setting is available only if you has a physical keyboard. For details, see page 14.
User dictionary Opens a list of the words you've added to the dictionary. as described in "Using the onscreen keyboard" on page 7.
8. Date & Time
Automatic “√” means use network-provided values, and the system time will synchronize with the network.
Set date & Set time You can set manually.
Select time zo ne Select the local time zone.
Use 24 - hour format 24-hour(default)
Select date format 2010/10/29 & 29/10/2010 & 20/29/2010
9. System upgrade
Warning! If the system deteces file(*.img)in the root of USB, it will upgrade. During upgrading, no progress bar, and the system will restart itself.
10. About device
Information about the system can be viewed here.
Connecting to Wi-Fi networks
Wi-Fi is a wireless networking technology that can provide Internet access at distances of up to 100 meters, depending on the Wi-Fi router and your surroundings.
To use Wi-Fi on DE3010.1X, you access a wireless access point, or "hotspot". Some access points are open and you can simply connect to them. Others are hidden or implement other security features, so you must configure the set so it can connect to them.
There are numerous systems for securing Wi-Fi connections, including some that rely on secure certificates or other schemes to ensure that only authorized users can connect. For details, you can ask the network administrator.
The Status bar displays icons that indicate Wi-Fi status.
| Connected to a Wi-Fi network(wave indicate connection strength) | |
| Notification that an open Wi-Fi network is in range |
Connecting to Wi-Fi networks
If you're adding a Wi-Fi network when first setting up, Wi-Fi is turned on automatically, so you can skip to step 3.
1 Press Heme, press Set-up, and select Wi-Fi Setting.
2 Check Wi-Fi to turn it on. Blue indicate the Wi-Fi is on, Gray is off.
3 Choose a network to connect to it.
If the network is open, you are prompted to confirm that you want to connect to that network by pressing ENTER for connection.
if the network is secured, you're prompted to enter a password or other credentials.(You can ask your network administrator for details.)
To receive no tifications when open networks are in range
By default, when Wi-Fi is on, you receive notifications in the Status bar when the system detects an open Wi-Fi network.
1 Turn on Wi-Fi, if it's not already on.
2 In the Wi-Fi settings screen, check Network notification.
You can uncheck this option to stop notification.
To add a Wi-Fi network
You can add a Wi-Fi network so the system will remember it, along with any security credentials, and connect to it automatically when it is in range. You must also add a Wi-Fi network to connect to it, if it does not broadcast its name(SSID), or to add a Wi-Fi network when you are out of range of it.
To join a secured network, you need to contact the network's administrator to learn what security scheme is deployed on it and to obtain the password or other required security credentials. For more information about installing secure certificates, see "Working with secure certificates" on page **.
1 Turn on Wi-Fi, if it's not already on.
2 In the Wi-Fi settings screen, select A d d Wi-Fi network (the item will high-lighted), and press ENTER.
3 Enter the SSID of the network.
4 Enter any required security credentials.
5 Save.
The system connects to the wireless network. Any credentials that you entered are saved, so you are connected automatically the next time you come within range of this network.
To forget a Wi-Fi network
You can make the system forget about the details of a Wi-Fi network that you added, for example, if you don't want the system to connect to it automatically or if it's a network that you no longer use.
1 Turn on Wi-Fi, if it's not already on.
2 In the Wi-Fi setting screen, select the name of the network and press ENTER.
3 Select Forget network and press ENTER.
Android Keyboard On screen keyboard settings
The Android Keyboard setting apply to the onscreen keyboard that is included with the system. The correction and capitalization features affect only the English version of the keyboard.
Auto-capitalization Check to have the screen keyboard automatically capitalize the first letter of the first word after a period, the first word in a text field, and each word in name fields.
Input languages Change the input language.
S h o w s u g g s t i o n s Check to show suggested words in a strip above the onscreen keyboard as you type. see "Using the onscreen keyboard" on page 7.
Auto-complete Check to automatically enter a suggested word, highlighted in orange in the strip above the keyboard, when you enter a space or punctuation. See “Using the onscreen keyboard” on page 7.
Working with secure certificates
If your organization's VPN or Wi -Fi networks rely on secure certificates, you must obtain the certificates and store them in the system's secure credential storage, before you can configure access to those VPN or Wi -Fi networks on the system. If your network administrator instructs you to download the certificates from a website, you're prompted to set a password for the credential storage when you download the certificates.