
MJ-L11 - Blender PIONEER - Free user manual and instructions
Find the device manual for free MJ-L11 PIONEER in PDF.

| Product type | MiniDisc recorder (MD) |
| Brand | Pioneer |
| Model | MJ-L11 |
| Dimensions (W × H × D) | 220 mm × 65 mm × 313 mm |
| Weight | 2.5 kg |
| Power supply | AC 220-230 V, 50/60 Hz |
| Power consumption | 11 W (0.9 W standby) |
| Sampling frequency | 44.1 kHz, 32 kHz, 48 kHz |
| Frequency response | 20 Hz - 20 kHz |
| Recording method | Magnetic field modulation overwrite type |
| Playback method | Contactless optical |
| Main functions | Digital recording, playback, editing (naming, dividing, combining, moving, erasing), programming, random playback, repeat, MDLP (LP2/LP4), synchro recording, timer |
| Inputs | Optical digital, analog (via associated CD/DVD tuner) |
| Safety | Class 1 laser diode; grounding plug; do not open; erase protection (tab) |
| Maintenance and cleaning | Wipe with a soft dry cloth; for stubborn dirt, use a cloth moistened with mild soapy water, then dry |
| Spare parts and repairability | No user-serviceable parts; refer all servicing to qualified personnel |
| Supplied accessories | Optical digital cable, power cord, instruction manual, warranty card |
| Operating conditions | Temperature: +5°C to +35°C; humidity: 5% to 85% (no condensation) |
Frequently Asked Questions - MJ-L11 PIONEER
User questions about MJ-L11 PIONEER
0 question about this device. Answer the ones you know or ask your own.
Ask a new question about this device
Download the instructions for your Blender in PDF format for free! Find your manual MJ-L11 - PIONEER and take your electronic device back in hand. On this page are published all the documents necessary for the use of your device. MJ-L11 by PIONEER.
USER MANUAL MJ-L11 PIONEER
The lightning flash with arrowhead symbol, within an equilateral triangle, is intended to alert the user to the presence of uninsulated "dangerous voltage" within the product's enclosure that may be of sufficient magnitude to constitute a risk of electric shock to persons.
CAUTION
RISK OF ELECTRIC SHOCK DO NOT OPEN

CAUTION:
TO PREVENT THE RISK OF ELECTRIC SHOCK, DO NOT REMOVE COVER (OR BACK). NO USER-SERVICEABLE PARTS INSIDE. REFER SERVICING TO QUALIFIED SERVICE PERSONNEL.
The exclamation point within an equilateral triangle is intended to alert the user to the presence of important operating and maintenance (servicing) instructions in the literature accompanying the appliance. H002_En
IMPORTANT

The wires in this mains lead are coloured in accordance with the following code:
Blue: Neutral Brown: Live
If the plug provided is unsuitable for your socket outlets, the plug must be cut off and a suitable plug fitted.
The cutoff plug should be disposed of and must not be inserted into any 13 amp socket as this can result in electric shock. The plug or adaptor of the distribution panel should be provided with a 5 amp fuse. As the colours of the wires in the mains lead of this appliance may not correspond with coloured markings identifying the terminals in your plug, proceed as follows:
The wire which is coloured blue must be connected to the terminal which is marked with the letter N or coloured black.
The wire which is coloured brown must be connected to the terminal which is marked with the letter L or coloured red.
Do not connect either wire to the earth terminal of a three-pin plug.
NOTE
After replacing or changing a fuse, the fuse cover in the plug must be replaced with a fuse cover which corresponds to the colour of the insert in the base of the plug or the word that is embossed on the base of the plug, and the appliance must not be used without a fuse cover. If lost, replacement fuse covers can be obtained from your dealer.
Only 5 A fuses approved by B.S.l. or A.S.T.A. to B.S. 1362 should be used.
These labels can be found on the unit's rear panel.


This product complies with the Low Voltage Directive (73/23/ EEC, amended by 93/68/EEC), EMC Directives (89/336/EEC, amended by 92/31/EEC and 93/68/EEC). H015AEn
This product contains a laser diode of higher class than 1. To ensure continued safety, do not remove any covers or attempt to gain access to the inside of the product.
Refer all servicing to qualified personnel.
The following caution label appears on your player.
Location: on the bottom panel of the unit

WARNING: THIS PRODUCT EQUIPPED WITH A THREE-WIRE GROUNDING (EARTHLING) TYPE PLUG, A PLUG HAVING A THIRD (GROUNDING, EARTHLING) PIN, IT WILL ONLY FIT INTO A GROUNDING (EARTHLING) TYPE POWER OUTLET. THIS IS A SAFETY FEATURE, IF YOU ARE UNABLE TO INSERT THE PLUG INTO THE OUTLET, CONTACT YOUR ELECTRICIAN TO REPLACE YOUR OBSOLETE OUTLET. DO NOT DEFEAT THE SAFETY PURPOSE OF THE GROUNDING (EARTHLING) TYPE PLUG. H043 En
WARNING: NO NAKED FLAME SOURCES, SUCH AS LIGHTED CANDLE, SHOULD BE PLACED ON THE APPARATUS. IF NAKED FLAME SOURCES ACCIDENTALLY FALL DOWN, FIRE SPREAD OVER THE APPARATUS THEN MAY CAUSE FIRE.
H044 En
CAUTION: These speaker terminals can be under HAZARDOUS VOLTAGE. When you connect or disconnect the speaker cables, to prevent the risk of electric shock, do not touch uninsulated parts before disconnecting the power cord. H047 En
Operating Environment
H045 En
Operating environment temperature and humidity:
+5°C - +35°C (+41°F - +95°F); less than 85% RH (cooling vents not blocked)
Do not install in the following locations
- Location exposed to direct sunlight or strong artificial light
- Location exposed to high humidity, or poorly ventilated location
VENTILATION: When installing this unit, make sure to leave space around the unit for ventilation to improve heat radiation (at least 30~cm at top, 15~cm at rear, and 15~cm at each side).
WARNING: Slot and openings in the cabinet are provided for ventilation and to ensure reliable operation of the product and to protect it from overheating, to prevent fire hazard, the openings should never be blocked and covered with items, such as newspapers, table-cloths, curtains, etc. Also do not put the apparatus on the thick carpet, bed, sofa, or fabric having a thick pile. H040 En
ATTENTION
This component cannot be operated alone, please use in combination with the XC-L11 CD (or XV-DV77/DV88 DVD/CD) tuner.
1 Before You Start
Opening the box 6
Using this manual 6
Hints on installation 7
Avoiding condensation problems 7
About minidiscs 8
About MiniDisc Long Play (MDLP) 8
Different kinds of MD available 9
Handling MDs 9
Storing and labelling MDs 10
Avoiding accidental erasure 10
Analog and digital recording 11
Copying restrictions 11
About the Table of Contents (TOC) 12
About MD system limitations 12
2 Connecting Up
Connecting the XC-L11 CD (or XV-DV77 /DV88 DVD/CD) tuner 15
Connecting the power 16
3 Controls and Displays
Front panel 17
Display 17
4 Getting Started
Playing an MD 18
Basic playback controls 19
Changing the display 20
When an MD is stopped 20
When an MD is playing 21
When recording an MD 21
Introduction to recording MDs 22
Recording levels 22
Track numbering 22
Automatically recording from a CD 23
Automatically recording from the optional tape deck (CT-L11) 25
Using the menu system 27
The MD menu functions 28
5 More Playback Features
Using Groups 29
Making a group 30
Selecting a group 31
Using Group Mode 31
Editing a group 32
Canceling groups 33
Programming the track order 34
Checking the playlist order 35
Deleting the playlist 35
Using repeat play 36
Using random play 37
6 More Recording Features
Recording options 38
Numbering tracks 38
Recording extra-long material 39
Adjusting the digital volume 41
Manually recording from a source 42
Recording via the analog inputs 43
Recording over unwanted material 44
Setting up a future recording 45
Cancelling the record timer 47
7 Editing
About MD editing 48
Naming a disc 49
Naming a track 51
Naming a group of tracks 52
Dividing a track into two 53
Combining two tracks into one 54
Moving tracks on a disc 55
Erasing tracks on a disc 57
Erasing all tracks on the disc 57
Erasing individual tracks 58
Undoing a mistake 59
8 Additional Information
Understanding error messages 60
Troubleshooting 62
Specifications 66
Table des matieres
Thank you for buying this Pioneer product. Before starting to set up your new minidisc recorder, please check that you've received the following supplied accessories in the box:
- Optical digital cable
Power cord - Operating instructions
Warranty card
Important: Take care when installing or handling optical cable.
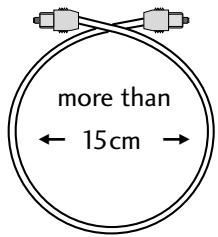
Do not bend the cable around sharp corners. Coil loosely when storing.
Using this manual
This manual is for the MJ-L11 Minidisc Recorder. It is split into two sections, the first covering set up, and the second, operation. Set up, which starts here, covers all aspects of getting your new minidisc recorder up and running with your XC-L11 CD tuner or XV-DV77/DV88 DVD/CD tuner. If this is the first time you've used minidiscs, we recommend reading the About minidiscs section starting on the following page before using the recorder for the first time.
In the second section of the manual, starting on page 18, you'll learn how to use all the features of this recorder, from basic playback to disc editing. The final part of the manual provides reference information on error messages you might encounter during use, a troubleshooting page, and technical specifications.
Hints on installation
We want you to enjoy using this recorder for years to come, so please bear in mind the following points when choosing a suitable location for it:
Do...
- Use in a well-ventilated room.
- Place on a solid, flat, level surface, such as a table, shelf or stereo rack.
Don't...
- Use in a place exposed to high temperatures or humidity, including near radiators and other heat-generating appliances.
- Place on a window sill or other place where the recorder will be exposed to direct sunlight.
- Use in an excessively dusty or damp environment.
- Place directly on top of an amplifier, or other component in your stereo system that becomes hot in use.
- Use near a television or monitor as you may experience interference—especially if the television uses an indoor antenna.
- Use in a kitchen or other room where the recorder may be exposed to smoke or steam.
- Place on an unstable surface, or one that is not large enough to support all four of the unit's feet.
Avoiding condensation problems
Condensation may form inside the recorder if it is brought into a warm room from outside, or if the temperature of the room rises quickly. Although the condensation won't damage the recorder, it may temporarily impair its performance. For this reason you should leave it to adjust to the warmer temperature for about an hour before switching on and using.
Minidisc, or MD as it's usually called, is an extremely flexible and convenient format on which you can both playback and record high-quality digital audio. Because it's a disc, MD has many of the advantages of compact disc—you can jump directly to any track on the disc, program the playing order, instantly skip over tracks you don't want to play or back to tracks you want to play again, and so on. The really great thing about MD though is the flexibility it offers when recording. Things that were impossible using analog cassette tape, such as reordering tracks, programming track names, and deleting tracks without leaving any gaps are all easily achieved if you're using MD. Minidiscs have other advantages over cassette tape; the recorder automatically finds the next blank space to record on, and can tell you how much room there is left on a disc before you start recording. When you delete something from the disc, the time available for recording is automatically updated.
If this is the first time you've used MD, please take a few minutes to read through this section of the manual. It gives information on how to handle the discs properly, the different kinds of disc available, and some basic MD characteristics.
About MiniDisc Long Play (MDLP)
With MiniDisc Long Play (MDLP) you have two long play recording options in addition to regular mono and stereo. One option (LP2) gives you double the recordable length of a regular MD, whereas the second option (LP4) will give you four times the length of the disc in recordable time. This means you can record up to 320 minutes on a regular 80 minute MD! There's a slight difference in sound quality between recording modes, so you might want to choose LP2 for your more important recordings. Discs recorded with MDLP can only playback on MD players with the long play feature. MD players that are not compatible with MDLP can't recognize the format and show LP: in the display when you play a track recorded with LP2 or LP4. However, it isn't necessary to buy a special type of disc to record with the long play feature, any disc with the MiniDisc logo will work.
Minidisques
Different kinds of MD available

Minidisc mark all MDs carry this logo.
All MDs carry the MD logo shown above. Do not use any disc which does not have this mark.
There are both recordable and non-recordable (playback-only) MDs. Commercially available music on MD generally comes on discs which are playback only. The diagrams below show the differences between the two types.
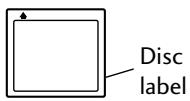
Disc has shutter on one side only
Playback-only MD
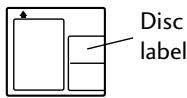
Disc has shutters on both sides
Recordable MD
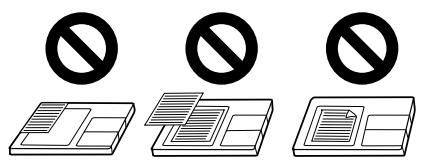
Handling MDs
The actual disc that contains the audio is quite delicate and so is protected against dust, fingerprints and so on by an outer cartridge. Don't force open the disc shutters to expose the disc, and never touch the disc itself. Also, do not attempt to disassemble the disc cartridge.
If the disc cartridge becomes dirty or stained, wipe clean with a soft, dry cloth.
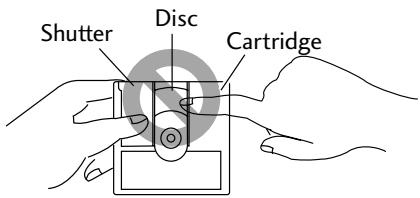
Don't touch the disc!
Storing and labelling MDs
When you're not playing a minidisc, put the disc cartridge back in the case for storage. Avoid storing or leaving discs in very hot or humid areas, such as in a car in summer. Also avoid leaving discs in direct sunlight, or in places where sand or grit might get into the disc cartridge.
Recordable MDs come with self-adhesive labels to stick on the disc cartridge to tell you what's recorded on the disc. Always stick the label in the area provided, avoiding the disc shutter and the edges of the disc.
If the disc label starts to peel off at the corners, remove the label and replace it with a fresh one—don't simply stick another label on top of the old one.
Avoiding accidental erasure
Once you've recorded a disc, it's a good idea to protect it against accidental erasure by sliding the tab on the side of the disc to the open position.
If you want to erase or re-record the disc, simply slide the tab back to the closed position before loading the disc into the recorder.
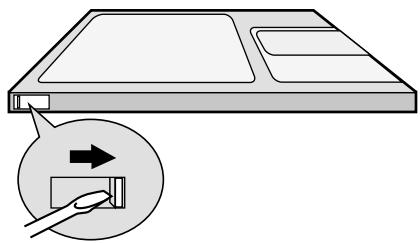
Use a screwdriver, pen, or fingernail to open or shut the erase-protect tab.
Analog and digital recording
Whatever you record onto an MD is stored on the disc as digital data (in other words, numbers). This is what we mean when we say that MD is a digital format. However, what you feed into this unit to record can be either analog (such as the output from a turntable or a tuner), or digital (such as the direct digital output from a CD player, or another MD recorder).
If you record an analog signal, the recorder has to first change it into a digital form before writing it onto the disc. If you're recording from another digital format, like a CD, it makes sense to just record the digital data directly. For this purpose this MD recorder has a digital input which you can connect to the XC-L11 CD (or XV-DV77/DV88 DVD/CD) tuner. All digital audio has something called a 'sampling rate', which is measured in kHz (kilohertz). The quality of the final sound depends to a large extent on this: the higher the better. This unit has a sampling rate converter for most digital sources under 96kHz, which means you shouldn't run into any problems making digital recordings of CDs or other MDs. However, keep in mind you won't be able to make digital recordings of DVDs with a 96kHz sampling rate.
Copying restrictions below explains other limitations of digital recording.
Copying restrictions
Certain restrictions on digital copying comes from something called SCMS, which stands for Serial Copy Management System. This stops you making multiple-generation digital recordings and is aimed at preventing illegal digital copying of copyright material. The number of generations that SCMS will let you make depends on the source. With most sources, you are limited to one generation only.
About the Table of Contents (TOC)
When you load any kind of minidisc into the recorder, the first thing it does is read a section of the disc called the Table of Contents, or TOC. Just as the contents page of a book tells the reader what each chapter is about and where to find it in the book, the TOC tells the recorder where the tracks are on the disc, the name and length of each track, the name of the disc, and so on. In the couple of seconds it takes to read all this, the recorder's display shows the message MD TOC READ.
Since you can change what's on a recordable MD, the Table of Contents is rewritten, and so is called the User Table of Contents, or UTOC for short. If you have a recordable disc loaded in the recorder and hit eject, the recorder automatically updates the UTOC before giving you the disc back. In both cases, the message MD TOC WRITE appears in the display during the UTOC updating process.
The UTOC is vital for the recorder to be able to play a disc correctly. Until you hit eject, the recorder stores all the current session's recording and editing information in its memory. If there's a power failure or you accidentally unplug the recorder before it's had a chance to write the UTOC there's a danger that all that disc information will be lost.
About MD system limitations
The sophisticated playback, editing and recording features available to you with MD are possible because of the way in which the sound data is stored on the disc together with the system of TOCs and UTOCs described above. There are times however when you might encounter odd side-effects of the way the system works. These are not malfunctions, but limitations of the system. On the following page is a list of symptoms you may run across depending on the way you record or edit discs.
Connecting the XC-L11 CD (or XV-DV77/DV88 DVD/CD) tuner
The MJ-L11 connects directly to the XC-L11 CD (or XV-DV77/ DV88 DVD/CD) tuner. If you are setting the whole system up for the first time, be sure to also refer to the XC-L11 or XV-DV77/DV88 manual for full installation and connection details.

Important
Before making or changing any rear panel connections, make sure that all the components are switched off and unplugged from the power supply.

Note
The following illustrations are for the CD tuner rear panel only. However, connections for the DVD/CD tuner are the same.
1 Connect the MD recorder system cable to the the CD tuner or DVD/CD tuner
On the CD tuner and DVD/CD tuner, the socket is labelled FROM MODEL MJ-L11 OR CT-L11.
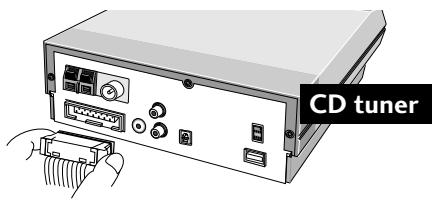
2 Connect the optical digital output of the MD recorder to the optical digital input of the CD Tuner or DVD/CD tuner
Use the supplied optical digital cable to make the connection.

IMPORTANT: Never connect or disconnect the system ribbon cables while the power plug is connected to the wall outlet. Doing so may damage the unit.
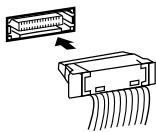
To insert, hold the connector and push firmly into the socket until you hear it click home.
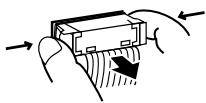
To remove, hold the connector securely on either side with thumb and forefinger and pull out from the socket.
Cables plats
Connecting the power
1 Plug one end of the supplied power cord into the AC INLET.
2 Plug the other end into a household power outlet.
Handle the power cord by the plug. Do not pull out the plug by tugging the cord and never touch the power cord when your hands are wet as this could cause a short circuit or electric shock. Do not place the unit, a piece of furniture, etc., on the power cord, or pinch the cord. Never make a knot in the cord or tie it with other cords. The power cords should be routed such that they are not likely to be stepped on. A damaged power cord can cause a fire or give you an electrical shock. Check the power cord once in a while. When you find it damaged, ask your nearest PIONEER authorized service center or your dealer for a replacement.
NOTE IMPORTANTE SURLECABLED'ALIMENTATION
1 Character display
2 Lights when an MD is playing, blinks when paused.
3 Lights when the the MD deck is recording, blinks during record-pause.
4 REC Lights when recording to an MD.
5 DIGITAL Lights when a digital source is selected—page 43.
6 SYNCHRO Synchro recording- page 23-24.
7 MONO LP Lights when recording, or during playback of a track in MONO LP long-play recording.
8 LP2 Lights when recording, or during playback of a track in LP2 long-play recording.
9 LP4 Lights when recording, or during playback of a track in LP4 long-play recording.
10 MD Lights when auto mark recording is on - page 38-39
11 ALL Lights when group indexing is switched off - page 31
12 RPT-1 Lights during one track repeat play - page 36
RPT Lights during all track repeat play - page 36
13 D. VOL Lights when the digital volume is at a level other than 0 dB—page 41
14 PGM Lights during program play - page 34-35
15 RDM Lights during random play - page 37
Panneau avant
You should now have your MD recorder connected up to the rest of the system, and plugged into the power outlet. This chapter takes you through the basics of using the MD recorder—playing discs and making a recording from the CD (or DVD/CD) tuner. When following the steps below, use either a playback-only disc, or a recordable MD that already has some tracks recorded on it.
1 Switch on.
You can use the STANDBY/ON button on either the remote control or the main unit to do this.
2 Load an MD.
Gently push the MD into the slot in the direction indicated on the disc cartridge. The recorder pulls the MD into the recorder automatically.
MD TOC READ
MD recorder reads the table of contents when you load the disc.
MD 5 43:24
Display showing an MD with 5 tracks and a total playing time of 43:24.
If you've just loaded a playback-only disc, then the disc should already be playing.
3 Press the MD button to start playback.
Alternatively, touch the / sensor on the front panel of the recorder.
IT'S A BUST
If a track has been named, the name appears in the display while the track is playing.
Lecture d'un MD
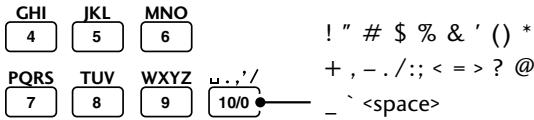
If you are using the XV-DV77/DV88 remote control, you can use the number buttons to select tracks directly:
For track numbers 1 to 10, use the corresponding number button.
For track numbers over 10, press the >10 button, then enter the track number. For example, to select track 28:


For track numbers over 100, press the >10 button twice, then enter the track number. For example, to select track 108:


Note
You must use and to select tracks during program and random play, as well as when using the group play mode.
Basic playback controls
| Button | What it does |
| MD (►/II) | Starts playback or pauses a disc that's playing. |
| ■ | Stops playback. |
| ←▲ | Press & hold for fast reverse scanning. |
| ► | Press & hold for fast forward scanning. |
| ►▲ | Skipping to the start of the current track, then to previous tracks. |
| ►■ | Skipping to the next track. |
| ▲ | Ejects the disc. |

Tip
If there's already a MD in the recorder, you can press the MD button (even in standby) to switch on and start the MD playing.
You can choose to display various kinds of information during playback, recording and while the MD is stopped. Switch between them by pressing SYSTEM DISP (DISP).
When an MD is stopped
If the display shows the disc name/total playing time:
DISC NAME - displays the name of the disc, if one has been programmed
JAZZ: Pfeuti
DISC TOTAL - displays the total playing time of the disc
MD 255 159:59
REC REMAIN- displays the amount of recording time available (not shown on playback-only discs)
MD 74:54
CLOCK - displays the current time
4:12 am
If the display shows a track name/playing time of a track:
TRACK NAME - displays the name of the current track, if one has been programmed
IT'S A BUST
TRACK TIME - displays the playing time of the current track
MD 1 0:59
GROUP NAME - displays the name (or if not named, the start and end tracks) of the group to which the current track belongs, if one has been programmed
BONUS TRACKS
CLOCK - displays the current time
When an MD is playing
TRACK NAME - displays the name of the current track, if one has been programmed
TRACK TIME ELAPSED - displays time into the current track
MD 1 0:59
TRACK REMAIN - displays how long the current track still has to play
MD 1 0:50
ALL REMAIN - displays how long the disc still has to play
MD ALL 21:28
GROUP NAME - displays the name (or if not named, the start and end tracks) of the group to which the current track belongs, if one has been programmed
CLOCK - displays the current time
When recording an MD
TRACK NAME - displays the name of the current track, if one has been programmed
RECORDING TIME ELAPSED - displays time into the current track
REC REMAIN - displays the amount of recording time available
MD 11 64:34
CLOCK - displays the current time
SOURCE DISPLAY - displays information about the source being recorded.
Introduction to recording MDs
If you've already read the About minidiscs section (pages 8-14), you'll already have a good idea of what MD is capable of.
Recording levels
Whether you're recording from an analog or digital source, normally there's no need to set the recording level. However, with digital recording, you can use the DIGITAL VOLUME (p. 41) menu option to change the level if necessary. Otherwise, the data that makes up the sound is simply copied to the disc unaltered. Also, when recording, the volume, tone and balance controls have no effect on the recording. This means that you can record something with the volume turned right down, if you want.
Track numbering
This unit also takes care of numbering tracks for you. When recording a CD digitally, track numbers follow the material being recorded. When recording from any component through the analog inputs, the recorder starts a new track whenever it detects more than 1.5 seconds of silence in the source material. If you want to change the track numbers that are assigned automatically, there are various editing features at your disposal to renumber tracks as you wish.
Once recording has started, you can't switch to another component until either the recording has stopped, or you pause the recording. So, for example, you can't switch over to the tuner while you're recording a CD.

Note
The remote contol button names for both the XC-L11 CD tuner and the XV-DV77/DV88 DVD/CD tuner have been included in all instructions in this manual. In cases where the operation is the same, the button names for the DVD/CD tuner will appear first, followed by those for the CD tuner in parentheses.
Automatically recording from a CD
This feature makes recording a CD as simple as possible by automatically starting and stopping the CD and MD together. There are two modes: all-track synchro records the whole disc; 1 track synchro records just a single track, then stops (XC-L11 CD tuner only).
1 Load a recordable MD.
Make sure that the erase-protect tab on the disc is closed so that you can record.
MD BLANK DISC
Display shows that you've loaded a blank disc.
If there's already material recorded on the disc, the recorder automatically records new material after what's already there—there's no need to search for blank space to record on.
You can find out how much blank space you have left on the disc by switching the display mode. See page 21 for how to do this.
2 Press DVD/CD (CD) to switch to the CD player.
3 Load the CD you want to record.
Press to make sure the disc is stopped.
CD
14
59:47
The CD display showing a disc with 14 tracks and a total playing time of 59:47.
4 If you want to record just one CD track, select it using the | and buttons (XC-L11 CD tuner only).
5 Press (front panel only).
The recorder goes into record-pause mode, waiting for you to start the CD.
CD 14 59:47
The SYNCHRO and indicators flash and the red REC indicator lights up.
6 Press DVD/CD (CD) to start the CD playing.
Recording starts automatically with the CD.
CD 1 0:02
Once recording starts, the SYNCHRO and indicators remain lit.
Should you want to stop recording before the track/disc has finished playing, simply press any time during the recording.
Once the track or disc has finished, the recorder goes into record-pause mode. At this point, you can either press to finish the recording session, or continue recording a different disc (or tracks) by repeating steps 3, 4 and 6.
Automatically recording from the optional tape deck (CT-L11)
This feature makes recording a tape as simple as possible by automatically starting and stopping the tape and MD together. You can choose to record the whole tape or alternatively, to start recording at any point you want, but you'll have to stop the recording manually.

Note
This feature is only available if you have connected the optional CT-L11 tape deck to your system. Refer to the manual supplied with the tape deck for more information. Note that syncro recording won't work with other tape deck models.
1 Load a recordable MD.
Make sure that the erase-protect tab on the disc is closed so that you can record.
MD BLANK DISC
Display shows that you've loaded a blank disc.
If there's already material recorded on the disc, the recorder automatically records new material after what's already there—there's no need to search for blank space to record on.
You can find out how much blank space you have left on the disc by switching the display mode. See page 20 for how to do this.
2 Press TAPE (▲▶) then load a cassette into the tape deck.
3 Select the tape play direction. If you need to change the direction, press TAPE (▶) twice, then ■.
4 Use and to locate the point from which you want to start recording then press.
If you are recording the whole tape, use and to rewind the tape to the beginning of the side you want to start recording from. Press TAPE (▲▶) to start playback, then stop the tape just before the beginning of the first song.
5 Turn Dolby NR on or off and set the reverse mode as required.
Refer to the manual supplied with the tape deck for more information on Dolby NR and setting the reverse mode.
6 Press (front panel only).
The recorder goes into record-pause mode, waiting for you to start the tape. The SYNCHRO and indicators flash and the red REC indicator lights up.
7 Press TAPE (▲▶) to start the tape playing. Recording starts automatically with the tape.
TAPE 0002
Once recording starts, the SYNCHRO and indicators remain lit.
Should you want to stop recording before the tape has finished playing, simply press any time during the recording.
Once the tape has finished, the recorder goes into record-pause mode. At this point, you can either press to finish the recording session, or continue recording a different tape by inserting the tape and repeating steps 5 and 7. If the tape is longer than the time remaining on the MD, the tape player stops at the same time as the MD.

Note
During the recording, track marks will be inserted automatically when the recorder detects a space (a silence of 1.5 seconds or more) in the source material.
- Dolby noise reduction manufactured under license from Dolby Laboratories Licensing Corporation.
- “DOLBY” and the double-D symbol are trademarks of Dolby Laboratories Licensing Corporation.
Using the menu system
Access to many of the less commonly used functions of the MJ-L11 is via a menu system. Each component (CD player, tuner, auxiliary, and this MD recorder) has its own set of menu options, but access to all of them is from the SYSTEM MENU (MENU) button.
Pressing SYSTEM MENU (MENU) displays the menu options for the system, and from that menu you can choose the menu for the component you're currently using. For example most of the features associated with this MD recorder will be found under MD MENU. You can change the displayed option by pressing and (1 and 1).
To select the menu option currently displayed, press the ENTER (SET) button. If you make a mistake while in the menu system, simply press to cancel and exit.

Note
The remote contol button names for both the XC-L11 CD tuner and the XV-DV77/ DV88 DVD/CD tuner have been included in all instructions in this manual. In cases where the operation is the same, the button names for the DVD/CD tuner will appear first, followed by those for the CD tuner in parentheses.
The MD menu functions
Playback features accessed via the MD menu are:
PROGRAM - Specify the track order of a disc (page 34)
RANDOM PLAY - The recorder plays the tracks in a random order (page 37)
REPEAT MODE - Set the current track or disc to repeat play (page 36)
PLAY MODE - Limit playback to one group only (page 31)
Recording features accessed via the MD menu are:
AUTO MARK - Specify when a new track should be started (pages 38)
INPUT SELECT - Select either analog- or digital-input recording (page 43)
REC MODE - Specify regular stereo, LP2, LP4 or long-play mono recording (page 39)
DIGITAL VOLUME - Set the digital recording level (page 41)
Editing features accessed via the MD menu are:
ALL ERASE - Delete all tracks on a disc (page 57)
COMBINE - Join two tracks together into one new track (page 54)
DISC NAME - Give a disc a name that will show up when you load the disc (page 49)
DIVIDE - Split a single track into two separate tracks (page 53)
GROUP CANCEL - Cancel either one or all of the groups (page 33)
GROUP EDIT - Change previously set groups (page 32)
GROUP NAME - Name a group (page 52)
MOVE - Give a track on the disc a new track number (page 55)
NEW GROUP - Make a track grouping (page 30)
TRACK ERASE - Delete a track from the disc (page 58)
TRACK NAME - Give a track a name that will show up when the track is played (page 51)
UNDO - Undo the last edit operation (page 59)
With so much recordable space possible on an MD, manually skipping from track-to-track can become a bit of a chore. For this reason, you can divide your MD into several groups of songs for easy and quick access. To make a group, the songs within that group have to follow in a consecutive order on the disc. See Moving tracks on a disc on page 55 if you need to change song order of an MD to do this. You can create up to ten groups on one MD, and each group can contain as many songs as you like. After setting, the groups on the disc will automatically be updated if you edit the disc using move, erase, divide, or other editing features. Note that songs can't belong to more than one group. If you try to assign a track to two groups, the later group will take the song.

Important
Even though not in use, MD players without the group feature can still play grouped discs; all of the group information will appear next to the disc name in the display. However, if you edit the disc on such a unit the groups on the disc will not be updated and you may lose the correct group settings.
Other MD recorders with the group feature may function differently from this system. Editing grouped MDs (including group edit functions) from such systems could result in deleted groups or lost group settings.

Note
The remote contol button names for both the XC-L11 CD tuner and the XV-DV77/DV88 DVD/CD tuner have been included in all instructions in this manual. In cases where the operation is the same, the button names for the DVD/CD tuner will appear first, followed by those for the CD tuner in parentheses.
Use the and (I and I ) buttons to change the currently displayed option in the menu. Press ENTER (SET) to select. Press anytime to cancel and exit the menu.
2 Select NEW GROUP from the MD menu.
NEW GROUP
3 Use and (i and ) to choose the track marking the beginning of your group then press ENTER (SET).
TRACK


4 Use and (i and ) to choose the track marking the end of your group then press ENTER (SET).
TRACK


COMPLETE
The display shows COMPLETE once the group has been made.
1 Make sure the MD component is selected.
2 Use - FOLDER/GROUP + (GROUP - / + ) to choose the group you want.
MD
5-13
BONUS TRACKS
The starting and ending tracks in the group are shown briefly and then the group name scrolls across the display.
If the group has not been named, NO NAME shows in the display.
Using Group Mode
You can also choose to limit playback to one group exclusively, rather than listening to the entire disc. This can be used with repeat, and random play.

Note
You can't any of the MD edit functions (including group edit/ cancel or new group functions) while group mode is on.
1 Press SYSTEM MENU (MENU) and select MD MENU.

Remember
Use the and (I and ) buttons to change the currently displayed option in the menu. Press ENTER (SET) to select. Press anytime to cancel and exit the menu.
2 Select PLAY MODE from the MD menu.
PLAY MODE
3 Select a play mode.
Two options are available:
- ALL MODE?—plays all tracks
GROUP MODE? plays only currently selected group of tracks
When ALL MODE? (normal playback) is selected, ALL lights in the display.
Songs can't belong to more than one group. If you try to assign a track to two groups, the later group will take the song.
1 Select the group on the disc you want to edit.
If the disc is stopped, the group must still be selected—use - FOLDER/GROUP + (GROUP +/-) to select groups while stopped.
2 Press SYSTEM MENU (MENU) and select MD MENU.

Remember
Use the and (I and ) buttons to change the currently displayed option in the menu. Press ENTER (SET) to select. Press anytime to cancel and exit the menu.
3 Select GROUP EDIT from the MD menu.
GROUP EDIT
4 Use and (i and ) to change the track marking the beginning of the group then press ENTER (SET).
TRACK

If it isn't necessary to change the starting track, you can just press ENTER (SET).
5 Use and (I and ) to change the track marking the end of the group then press ENTER (SET).
TRACK

If it isn't necessary to change the ending track, you can just press ENTER (SET).
COMPLETE
The display shows COMPLETE once the group edit has been made.
Edition d'un groupe

Remarque
This feature will simply "ungroup" the songs in the group that you have selected. It will not delete the songs from the disc.
1 While the disc is stopped, select the group(s) on the disc you want to cancel.
If you want to cancel all groups on a disc, press here.
Otherwise, use FOLDER/GROUP (GROUP + / - ) to select the group you want to cancel.
2 Press SYSTEM MENU (MENU) and select MD MENU.

Remember
Use the and (I and ) buttons to change the currently displayed option in the menu. Press ENTER (SET) to select. Press anytime to cancel and exit the menu.
3 Select GROUP CANCEL from the MD menu.
GROUP CANCEL
TRACK 5-13 ?
The currently selected group flashes.
If you did not choose a group in step 1, ALL CANCEL will show in the display.
ALL CANCEL?
4 Press ENTER (SET) to confirm.
You can also press here if you don't want to remove the track grouping.
COMPLETE
The display shows COMPLETE once the group has been canceled.
Programming the track order
You can program a sequence (a playlist) of up to 24 tracks to play. Tracks can appear more than once in the playlist, or can be left out entirely. Once you eject the disc, (or switch the power off), the playlist is lost. If you start recording, the playlist is also lost.
CD tuner remote control:
1 With the MD stopped, press MENU and select MD MENU.

Remember
Use the and buttons to change the currently displayed option in the menu. Press SET to select.
2 Select PROGRAM from the MD menu.
PROGRAM
P 1 -- 0:00
3 Select a track to add to the playlist using and .
For example, to add track 3, press three times. Or, to add the second-to-last track, press twice.
P 1 3 4:18
Track 3 programmed as the first item in the playlist.
4 Press SET to add the track to the playlist.
5 Repeat steps 3 and 4 to continue adding tracks to the playlist.
If you make a mistake, press CANCEL to delete the last (most recent) track programmed. (Delete multiple tracks by pressing CANCEL repeatedly.)
6 When you're happy with the playlist, press MENU.
P15 21:39
Display shows the number of tracks in the playlist and the total running time.
7 Press MD to start playback.
PGM shows in the display and program play starts.
DVD tuner remote control:
1 Press PROGRAM (SHIFT & 8).
2 Using the number buttons, enter the track numbers in the order you want them played.
Using the number buttons
For track numbers 1 to 10, use the corresponding number button.
For track numbers over 10, press the >10 button, then enter the track number. For example, to select track 28:


For track numbers over 100, press the >10 button twice, then enter the track number. For example, to select track 108:


If you make a mistake, press CLR to delete the last (most recent) track programmed. (Delete multiple tracks by pressing CLR repeatedly.)
3 Press MD to start playback.

Note
- You can use random play together with the program feature to listen to a playlist in random order.
- Group mode playback can't be used with program play.
- With very long playlists, the total time may not be shown.
Checking the playlist order
You can only check the playlist order when the disc is stopped. Once stopped, you can step through the playlist using and . Each track number on the playlist is displayed. If you then press , the number of steps, and total playing time of the playlist is displayed.
■ Deleting the playlist
If you want to delete the playlist without ejecting the disc, simply press twice.
You can set the MD player to repeat just a single track, or the whole disc (or the group selected with the group mode feature).
CD tuner remote control:
1 Press MENU and select MD MENU.

Remember
Use the and buttons to change the currently displayed option in the menu. Press SET to select.
2 Select REPEAT MODE from the MD menu.
REPEAT MODE
3 Select a repeat mode.
Three options are available:
- REPEAT TRACK?—repeats one track
- REPEAT ALL?—repeats all tracks
- REPEAT OFF?—turns repeat off
4 Start playback if necessary.
In one track repeat mode (RPT-1 in the display), any track you choose will repeat. If you jump to another track (using track skip), then the new track will start repeating.
In all track repeat mode (RPT in the display), whenever the end of the disc is reached, the player will jump back to the first track and continue playback. You're still free to skip tracks and use manual search.

Note
The repeat mode you set stays active until you:
- select another repeat mode, or switch repeat mode off using the menu
- eject the disc
- switch to standby mode
DVD tuner remote control:
To repeat the current track, press REPEAT (SHIFT & 4) once.
The RPT-1 indicator lights up in the display and the current track repeats until you press REPEAT twice. Either way, repeat is canceled.
You can use repeat track during normal, program play.
To repeat the whole disc, press REPEAT (SHIFT & 4) twice.
The RPT indicator lights up in the display and the MD repeats until you press REPEAT again (in which case the disc continues playing to the end, then stops).
You can use repeat disc during normal, random or program play.

Tip
You can use either of the repeat modes together with program play.
Setting repeat play to REPEAT ALL plays the tracks in the playlist over and over.
When repeat track is selected, just the current track in the playlist repeats.
Using random play
To have the MD recorder play the tracks on a disc (or in the group selected with the group mode feature) in a different order each time you play the disc, use random play. Each track will play just once, but the order will be random. When all tracks have been played, the disc stops.
CD tuner remote control:
1 Press MENU and select MD MENU.

Remember
Use the and buttons to change the currently displayed option in the menu. Press SET to select.
2 Select RANDOM PLAY from the MD menu.
RANDOM PLAY
3 Random playback begins automatically.
RDM shows in the display and random playback begins.
4 Press to stop playback and cancel random play.
DVD tuner remote control:
To start random playback press RANDOM (Shift & 6).
RDM shows in the display and random playback continues until you press or eject the MD.

Tip
You can use either of the repeat options together with random play.
Setting repeat play to REPEAT ALL endlessly plays all the tracks on the disc at random. When set to REPEAT TRACK, just the current randomly selected track repeats.
Although this unit can make recording largely automatic, you can also manually control a number of settings if you prefer. For any kind of recording, including the synchro-recording mode covered on page 23, you can:
- switch on or off auto track numbering
- record in stereo, mono, or in one of the long-play modes When recording from the internal CD player, you can specify whether this unit should record from the analog or digital input, as well as setting the digital recording level. The above settings will be remain set to your preference until you change them back, even if you switch the system to standby.
Numbering tracks
If you're recording from CD or MD via the digital input, track numbers are always automatically copied along with the audio. When recording other digital or analog sources, Auto Mark (track numbering) works by detecting spaces (silence) in the source material. Although this usually works fine and is often convenient, there may be times when you'd rather have complete control over where the track numbers go as you record.
Once recording is underway (with Auto Mark on or off), you can start a new track number anytime by pressing (front panel only).

Tip
Even if the track numbers that end up on a recording are not quite what you had in mind, you can change them later using the divide and combine editing features—see pages 53-55 for more on this.
Make sure you have selected the source you wish to record (DVD/CD (CD),VIDEO 1,2,3 (AUX) or the optional tape deck).

Remember
Use the and (I and ) buttons to change the currently displayed option in the menu. Press ENTER (SET) to select. Press anytime to cancel and exit the menu.
2 Select AUTO MARK from the MD menu.
AUTO MARK
By default, auto mark is on.
3 Choose either ON or OFF using the and (i and ) buttons.
AUTO MARK ON?
AUTO MARK OFF?
4 Press ENTER (SET) to confirm and exit the menu.

Note
If you record from the tuner, Auto Mark automatically switches off.
Recording extra-long material
There may be times when you'd like to be able to record continuously for longer than the usual 74 or 80 minutes that MD provides for. This recorder can record in four different modes: stereo, mono, or in one of the long-play modes (these are covered in detail on page 8). You can freely mix mono, stereo, LP2, or LP4 recordings on the same disc—the recorder automatically detects the mode on playback. Note that MD players that are not compatible with the long play format will not play discs properly if they have been recorded with LP2 or LP4.
Make sure you have selected the source you wish to record (CD, AUX or Tuner).

Remember
Use the and (I and ) buttons to change the currently displayed option in the menu. Press ENTER (SET) to select. Press anytime to cancel and exit the menu.
2 Select REC MODE from the MD menu.
REC MODE
3 Choose between recording modes using the and (I and i ) buttons.
STEREO?
LP2?
L P4?
MONO LP?
4 Press ENTER (SET) to confirm and exit the menu.
Adjusting the digital volume
With pre-recorded CDs, there's normally no need to set the recording level, but it's possible to use the DIGITAL VOLUME menu option to change the level if necessary.
1 Press DVD/CD (CD) to switch to the CD player and start playback.
The CD player should be loaded with the disc you want to record.
2 Press (front panel only).
The MD recorder goes into record-pause mode and REC shows in the display. Make sure that you only press one time (pressing repeatedly will select syncro recording).
3 Press SYSTEM MENU (MENU) and select MD MENU.

Remember
Use the and (14 and 15) buttons to change the currently displayed option in the menu. Press ENTER (SET) to select. Press anytime to cancel and exit the menu.
4 Select DIGITAL VOLUME from the MD menu.
DIGITAL VOLUME
5 Set the level using the and (i and 1 ) buttons.
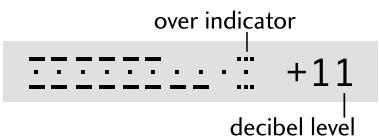
You can set the level between MIN (no level) and +20 dB. D.VOL shows in the display when the level is changed from 0 db (default). Set the level as high as possible without reaching the over indicator.
6 Press ENTER (SET) to confirm and exit the menu.
Manually recording from a source
On page 23 we covered synchro-recording from a CD. Here's how to record any source, including components connected via the AUX inputs on the CD tuner (the VIDEO inputs on the XV-DV77/DV88 DVD/CD tuner).

Note
If you see the message CAN'T COPY in the display (for example, when recording from a CD-R or DVD), switch the input select to analog (see the following page), then start recording. With VIDEO 1 and 2 on the DVD/CD tuner, both the digital and analog connections of the selected VIDEO source must be connected to the same component to do this. If there's no analog connection, the source can't be recorded.
1 Prepare for recording.
- load a recordable MD
- switch on/off the auto mark (track numbering)
choose the record mode you want (p. 39)
2 Switch to the source you're going to record.
For example, to record from the auxiliary input, press the AUX button (VIDEO on the XV-DV77/DV88 DVD/CD tuner).
AUX
Recording will be from the auxiliary inputs.
3 Prepare the source for recording.
Switch on the component and load the source material, etc.
4 Press (front panel only).
The MD recorder goes into record-pause mode, the indicator flashes, and REC shows in the display.
5 Press the MD button to start recording.
Alternatively, press on the MD recorder's front panel. The indicator stops flashing and lights continuously during recording.
6 Playback the source (if necessary).

Note
During recording:
- To pause the recording, press MD (or on the front panel). To resume, press again.
- To start a new track on the MD, press (front panel only).
7 When you're done, press on the front panel to stop recording.
AUX
The l and REC indicators disappear once you stop recording.
Eject the disc (press on the front panel) before switching off the system.
Recording via the analog inputs
When recording from the main unit, you can specify that the recording should be via the analog input of the MD recorder rather than the digital input.
1 Select the source you want to record.
If you are using the CD tuner, press CD. Press either DVD/CD or choose Video 1 or 2 on the XV-DV77/DV88 DVD/CD tuner.

Note
Since VIDEO 1 and VIDEO 2 on the XV-DV77/DV88 DVD/CD tuner have both digital and analog inputs, select the analog input that corresponds with the component that you want to record. For sources connected to only the digital VIDEO inputs, make sure the digital input is selected. If you see the message CAN'T COPY in the display, and there's no analog connection, you can't record the source.
2 With the MD stopped, press SYSTEM MENU (MENU) and select MD MENU.

Remember
Use the and (I and t ) buttons to change the currently displayed option in the menu. Press ENTER (SET) to select. Press anytime to cancel and exit the menu.
3 Select MD INPUT SELECT from the MD menu.
INPUT SELECT
By default, the DIGITAL indicator is lit.
4 Switch to ANALOG (or DIGITAL) using the and (I and ) buttons.
ANALOG?
5 Press ENTER (SET) to confirm and exit the menu.
The DIGITAL indicator on the front panel disappears when ANALOG is selected.
Recording over unwanted material
One of the convenient features of recording on MD is that it will automatically record on the next available section of the disc. Sometimes though, you'll want to record over something that's already on the disc. Unlike a cassette tape, all the material after the point at which you start recording is lost. So, if you just want to erase a track in the middle of the disc, use the erase track function instead (see page 57 for more on this), then simply record as usual.
If you do want to record from midway through a disc, here's how to do it:
1 Find the place in the disc you want to record from and pause playback.
MD
4
0:05
MD paused on track 4.
The track that you stop on will be completely overwritten, as well as all the tracks following.
2 Press (front panel only).
OVERWRITE?
The display reminds you that you're about to overwrite the disc.

Important
You can press here to abort record overwrite.
3 Press ENTER (SET) to confirm.
The indicator flashes, and REC shows in the display.
4 Select the source and prepare for recording.
For example, press AUX (VIDEO on the DVD/CD tuner remote) and load up the source material.
AUX
Recording will be from the analog auxiliary inputs.
5 Press MD to start recording.
Alternatively, press on the front panel.
Setting up a future recording
You can set the timer to record something from either the tuner or a component connected to the auxiliary inputs. For example, you might want to record a program on the radio that is broadcast while you're at work. If you're recording from an auxiliary component it must also be able to switch on at the time the recording starts—this system can't control it—or you have to leave it switched on until the recording has finished. During the actual recording, the volume is automatically set to minimum.
1 Prepare for recording.
- load a recordable MD
- switch on/off the auto mark (track numbering)
- choose the record mode you want (p. 39)
2 Set up the tuner/auxiliary component.
If you're recording from the tuner, switch to the tuner, and tune into the station (see your CD tuner manual for more detailed instructions on this).
If you're recording from the auxiliary component, switch to that component and set it up for playback.
3 Press CLOCK/TIMER (TIMER) and select TIMER REC.
TIMER REC

Remember
Use the and (I and ) buttons to change the currently displayed option in the menu. Press ENTER (SET) to select. Press anytime to cancel and exit the menu.
4 Select TIMER EDIT, then press ENTER (SET).
TIMER EDIT

Note
If you have previously set the timer, then switched it off (p. 47), TIMER ON will be displayed as an option. Select TIMER ON here to recall your switch on/off times.
5 Set the recording start time:
First, set the hour:
Use the and (1-4 and ) buttons to change the flashing hour display, then press ENTER (SET).
Next, set the minute:
Use the and (1 and ) buttons to change the flashing minute display, then press ENTER (SET).
ON 10:00 am
6 Set the recording end time:
First, set the hour:
Use the and (1-1 and 1 ) buttons to change the flashing hour display, then press ENTER (SET).
Next, set the minute:
Use the and (I and I) buttons to change the flashing minute display, then press ENTER (SET).
OFF 11:00 am
7 Set the recording component to MD REC.
Use the and (I and I ) buttons to select MD REC then press ENTER (SET).
After pressing ENTER (SET), the display shows you the settings you've just made, including the switch on and off times, and the component you're recording from.
The clock and record symbols in the display indicate that the record timer is set.
8 Switch the system into standby mode before timer recording starts.
In standby mode you can check the timer settings by pressing CLOCK/TIMER (TIMER).
After the recording has finished, the timer recording mode is automatically canceled.
Cancelling the record timer
Once the timer recording has finished, the timer is automatically canceled. However, if you need to cancel it before the recording has started, (either because you made a mistake setting it, or simply because you no longer want to make the recording), here's how you do it.
1 Press Tuner or AUX (VIDEO on the DVD/CD tuner remote).
2 Press CLOCK/TIMER (TIMER) and select TIMER REC.
TIMER REC

Remember
Use the and (I and t ) buttons to change the currently displayed option in the menu. Press ENTER (SET) to select. Press anytime to cancel and exit the menu.
3 Use and (I and to select TIMER OFF, then press ENTER (SET).
TIMER OFF
After pressing ENTER (SET), the timer indicator in the display goes out.
The MD system allows for very flexible editing of discs. Using the editing features described on the following pages you can easily: create names for discs, individual tracks, or groups of tracks; combine two tracks into one long one, or divide a track into two short ones; move tracks; erase single tracks or erase the whole disc.
Not all of these functions are available in any mode: the table below shows what editing functions you have access to in each MD mode.
Edition de MD
You can name a recordable MD so that when you load the disc into the recorder, the disc's name appears in the display. The name can be up to 100 characters long, including spaces. You can change disc names on recordable MDs (if you've recorded something else on the disc, for example), but you can't change the name of a playback-only disc.
1 Make sure the MD is stopped, then press to display the disc name/total track time.
2 Press SYSTEM MENU (MENU) and select MD MENU.

Remember
Use the and (I and ) buttons to change the currently displayed option in the menu. Press ENTER (SET) to select. Press anytime to cancel and exit the menu.
3 Select DISC NAME from the MD menu.
DISC NAME
4 Enter a name for the disc.
Names can be up to 100 characters long and can contain letters (upper and lower case), numbers, spaces and other symbols.

Display shows a flashing cursor where the first character will go.
CD tuner remote control (or DVD tuner):
Use and ( and on the DVD tuner) to select a character from the current list:
ABCDEFGHJKLMNOPQRST
UVWXYZ.,'/
abcdefghijklmnopqrst
uvwxyz.,/
0123456789
Use the CHARACTER DISP button to switch between character lists:
Alphabet (uppercase) - Alphabet (lowercase) - numbers (0-9)/punctuation/symbols
DVD tuner remote control:
Use numbers keys 1-9 for the corresponding number and the letters shown above each key below. Press a key repeatedly to cycle through the letters and numbers on that key.
Use the CHARACTER DISP button to switch between character lists:
Alphabet (uppercase) - Alphabet (lowercase) - numbers (0-9)/punctuation/symbols
5 Confirm the character and move the cursor to the next character position by pressing ENTER (SET).
J
The character being selected flashes...
J
...until you press ENTER (SET), then the cursor moves to the next position
- Move the cursor backwards or forwards along the display using and ( and ).
- Erase the character at the current cursor position by pressing CLR (CANCEL).

Note
When using the number buttons on the DVD/CD tuner remote, it is only necessary to press ENTER after characters which are found on the same number button.
6 When you've finished naming the disc, press SYSTEM MENU (MENU) to exit.
JAZZ: Pfeuti
In addition to naming the disc, you can name each track on a disc too. Again, the names can be up to 100 characters long.
1 Select the track on the disc you want to name. You can name tracks in any mode, but if the disc is stopped, the track must still be selected—use the and buttons to select tracks while stopped.
If the disc is playing or recording, you must finish entering the name before the track finishes, otherwise only the characters input before the track ends will be entered. Don't worry—you can still edit the name later.
2 Press SYSTEM MENU (MENU) and select MD MENU.

Remember
Use the and (I and I ) buttons to change the currently displayed option in the menu. Press ENTER (SET) to select. Press anytime to cancel and exit the menu.
3 Select TRACK NAME from the MD menu.
TRACK NAME
4 Enter a name for the track.
The input method is exactly the same as for naming discs.

Display shows a flashing cursor where the first character will go.
5 When you've finished naming the track, press SYSTEM MENU (MENU) to exit.
IT'S A BUST
Naming a group of tracks
If you have alot of tracks on an MD, they can be sorted into groups for easy access. In total, group names can be up to about 200 characters, but it really depends on the length of your disc name—the longer the disc name, the less space you will have to name groups. See pages 29-33 for more on groups.
1 Select the group on the disc you want to name.
If the disc is stopped, the group must still be selected—use FOLDER/GROUP (GROUP +/−) to select groups while stopped.
2 Press SYSTEM MENU (MENU) and select MD MENU.

Remember
Use the and (I and ) buttons to change the currently displayed option in the menu. Press ENTER (SET) to select. Press anytime to cancel and exit the menu.
3 Select GROUP NAME from the MD menu.
GROUP NAME
4 Enter a name for the group.
The input method is exactly the same as for naming tracks and discs.

Display shows a flashing cursor where the first character will go.
5 When you've finished naming the group, press SYSTEM MENU (MENU) to exit.
BONUS TRACKS
Dividing a track into two
If you recorded two pieces of music that run into each other without a break through the analog inputs, the recorder wouldn't have automatically given them their own track numbers. After the recording is complete, you might want to assign the two tracks different track numbers. Use the divide function to do this. The recorder inserts the new track number and moves all the subsequent tracks up one automatically. You can split any track into two at anytime using the divide function, so you can, for example, divide up a long track into several parts for easy searching, and so on.

Note
- Program, random, and group mode playback must be off for you to use the divide feature.
- Dividing tracks that have been recorded in LP4 can result in a audible 'click' where the track has been cut.
1 Start playing the track you want to divide.
2 Press the MD button at the point where you want to divide it.
The recorder pauses playback. (You can also use the / button on the front panel to do this.)
MD 3 6:50
Display showing MD paused on track 3 at 6:50.
3 Press SYSTEM MENU (MENU) and select MD MENU.

Remember
Use the and (I and ) buttons to change the currently displayed option in the menu. Press ENTER (SET) to select. Press anytime to cancel and exit the menu.
4 Select DIVIDE from the MD menu.
DIVIDE
5 Confirm that you want to divide the track.
DIVIDE OK?
Press ENTER (SET) to divide the track, or to cancel the edit.
COMPLETE
The display shows COMPLETE once the edit has been made
Combining two tracks into one
If there are two consecutive tracks on a disc that you'd rather were a single track, you can 'glue' them together using the Combine function. All the tracks following the newly combined tracks are automatically renumbered.
There are a few limitations when using this feature: it will not work if either track is less than 8 seconds long in stereo recording (16 seconds for LP2 and mono; 32 seconds for LP4); you cannot combine tracks recorded in different recording modes (for example LP2 and stereo); and you can't combine tracks if one was recorded using the digital input and the other using the analog inputs.
If both the tracks are named, then the new single track takes the name of the first track. In the case where the tracks belong to separate groups, the newly combined track will become part of the first track's group after combining.

Note
- Program, random, and group mode playback must be off for you to use the combine feature.
- Combining tracks that have been recorded in LP4 can result in a audible 'click' where the track has been joined.
1 During playback of the later track of the two, press the MD button.
The recorder pauses playback. (You can also use the / button on the front panel to do this.)
Combine only works with two consecutive tracks, so if you wanted to combine tracks 3 and 4, pause during playback of track 4.
MD
4
4:12
Display shows track 4 selected. Tracks 3 and 4 will become one track after combining.

Note
If you want to combine two tracks which are not consecutive, you'll have to first move them next to each other—see p. 55 for how to do this.
Use the and (I and t ) buttons to change the currently displayed option in the menu. Press ENTER (SET) to select. Press anytime to cancel and exit the menu.
3 Select COMBINE from the MD menu.
COMBINE
4 Confirm that you want to combine the tracks.
COMB 3+ 4?
Press ENTER (SET) to combine the tracks, or to cancel the edit.
COMPLETE
The display shows COMPLETE once the edit has been made.
■ Moving tracks on a disc
Although you can use the program playback feature to temporarily play a disc out of the 'regular' track order, you can also change the track order permanently (unless, of course, you edit the track order again) by moving tracks to a different position on the disc. This is useful for setting up consecutive tracks for groups (p. 30).
If you have already made some groups on the disc, you don't need to worry about resetting them when you move a track. If the new track position belongs to different group, the song order will automatically be adjusted so that the track will join the new group and be canceled out of the old one.

Note
Program, random, and group mode playback must be off for you to use the move feature.
1 Select the track you want to move.
MD
4
4:12
Display shows track 4 selected.
The disc can be stopped (with the track information shown in the display), or during play-pause.
2 Press SYSTEM MENU (MENU) and select MD MENU.

Remember
Use the and (I and ) buttons to change the currently displayed option in the menu. Press ENTER (SET) to select. Press anytime to cancel and exit the menu.
3 Select MOVE from the MD menu.
MOVE
MOVE
4
1?
Display after pressing ENTER (SET).
4 Use and (I and ) to select a new track number, then press ENTER (SET).
The display shows the track you're moving and its new number. You can't select a track number higher than the total number of tracks on the disc.
MOVE
4
6?
Track 4 will become the new track 6 (the current tracks 5 and 6 will become 4 and 5).
5 Confirm that you want to move the track.
Press ENTER (SET) to move the track, or to cancel the edit.
COMPLETE
The display shows COMPLETE once the edit has been made.
Erasing tracks on a disc
Erasing unwanted tracks on a disc frees up disc space for further recording. When you erase a track, all the tracks following it are automatically renumbered. Erasing the whole disc erases not only all the tracks on the disc, but also names and groups (if you've entered them).

Note
Program, random, and group mode playback must be off for you to erase tracks on a disc.
Erasing all tracks on the disc
1 Make sure the MD is stopped, then press to display the disc name/total track time.
JAZZ: Pfeuti
2 Press SYSTEM MENU (MENU) and select MD MENU.

Remember
Use the and (I and I ) buttons to change the currently displayed option in the menu. Press ENTER (SET) to select. Press anytime to cancel and exit the menu.
3 Select ALL ERASE from the MD menu.
ALL ERASE
4 Confirm that you want to erase the disc.
ALL ERASE?
Press ENTER (SET) to erase, or to cancel the edit.
COMPLETE
The display shows COMPLETE once the edit has been made.
Erasing individual tracks
1 Press MD while playing the track you want to erase to pause the disc.
Alternatively, press on the front panel.
MD
4
4:12
2 Press SYSTEM MENU (MENU) and select MD MENU.

Remember
Use the and (I and ) buttons to change the currently displayed option in the menu. Press ENTER (SET) to select. Press anytime to cancel and exit the menu.
3 Select TRACK ERASE from the MD menu.
TRACK ERASE
4 Confirm that you want to erase the track.
ERASE 4?
Press ENTER (SET) to erase, or to cancel the edit.
COMPLETE
The display shows COMPLETE once the edit has been made.
Although this unit always lets you abort an edit before completing it, there will probably still be times when you complete an edit operation only to find that it wasn't what you had intended. As long as you haven't switched the power off, updated the UTOC by ejecting the disc, or recorded anything else on the disc, you can still undo the last edit operation.
The only exceptions to this are the undo operation itself (for example, you can't redo an edit), and track/disc naming while recording.

Note
This feature does not work with grouped MDs.
1 With the MD stopped, press SYSTEM MENU (MENU) and select MD MENU.

Remember
Use the and (I and ) buttons to change the currently displayed option in the menu. Press ENTER (SET) to select. Press anytime to cancel and exit the menu.
2 Select UNDO from the MD menu.

Note
You can't use undo during program play.
UNDO
3 Confirm that you want to undo the last edit.
UNDO?
Press ENTER (SET) to undo, or to cancel.
COMPLETE
The display shows COMPLETE once the undo is complete.
| Message | Description | Action |
| NO DISC | MD is not loaded. | Load an MD. |
| The MD data can't be read. | Reload the MD. | |
| DISC ER* | The disc is damaged. | Reload the MD. |
| The MD doesn't contain the TOC or the data is corrupted. | Use another MD. | |
| ?DISC | The MD is corrupted or the MD is out of standard. | Use another MD. |
| DISC FULL | The MD has no space available for recording. | Erase some tracks or use another recordable MD. |
| BLANK DISC | The MD doesn't contain any recorded information. | The disc is ready to be recorded on. |
| Playback MD | An attempt is made to record or edit a playback-only MD. | Use a recordable MD. |
| PROTECTED | The MD is protected against accidental erasure. | Close the accidental erase-protect tab. |
| TOC FULL | The disc does not have the space for recording the track number and character data. | Erase the disc or use another recordable MD. |
| Can't REC | Recording cannot be completed successfully due to shock or disc damage. | Restart recording or use another recordable MD. |
| TEMP OVER | The temperature is too high. | Turn power off and leave to cool. |
| Can't EDIT | Editing is not possible. | Retry at another position on the disc. |
| NAME FULL | There is no space left for registering a disc/track/group name. | Shorten the disc/track/group name. |
| DEFECT | Recording interrupted due to disc damage. | Use another recordable MD. |
| MECH E* | The MD recorder is not functioning properly. | Turn power off then on again. |
Understanding error messages cont.
| Message | Description | Action |
| Can’t COPY | An attempt is made to record copy-prohibited material. | ·Use a copy-permitted source (an ordinary CD, etc.). ·Record via the analog input. |
| NOT AUDIO | The disc contains non-audio material. | ·Use another track. ·Use another MD. |
| UTOC ER W | The UTOC data can’t be written properly due to physical shock or disc damage. | ·Turn power off then on again, then retry UTOC writing. Make sure the unit isn’t moved during UTOC writing. |
| UTOC ER* | The recorded UTOC data doesn’t conform to MD standard or is otherwise unreadable. | ·Erase the disc or use another recordable MD. |
| DIN UNLOCK | The signal at the digital input isn’t recognized by the recorder. | ·Check the connections, and the output mode of the source component. ·Switch the VIDEO 1 or 2 of the DVD unit is analog. |
| The signal coming from theVIDEO 1 or 2 of the DVD unit is analog. | ||
| TOC ERR* | The TOC data can’t be read, the MD is out of standard, or the disc is damaged. | ·Use another MD. |
| SIO ERROR | Internal communication in the unit has broken down. | ·Turn power off then on again. |
Note: Error messages marked with an asterisk are followed by a number or other symbol.
Troubleshooting
Incorrect operation is often mistaken for trouble or malfunction. If you think that there is something wrong with this component, check the points below. Sometimes the trouble may lie in another component. Inspect the other components and electrical appliances being used. If the trouble cannot be rectified after checking the items below, ask your nearest Pioneer authorized service center or your dealer to carry out repair work.
| Problem | Remedy |
| No sound | ·Make sure the system is connected to an AC power outlet and that the cables are connected correctly; see Connecting up on pages 15-16. |
| Can’t record | ·Make sure the accidental erase-protect tab is closed (see page 10). ·Check that the disc in the player is not a playback-only MD. ·Even on MDs that have empty space for recording, the TOC may become full after repeated recording and editing operations. Execute the all-track erase command (page 57) and record the disc from the beginning, or use another disc. ·Make sure the optical cable is connected properly. |
| Can’t record in stereo | ·Make sure you are either in stereo, or one of the LP recording modes. |
| NO DISC is displayed when an MD is loaded | ·Use another MD. The disc could be damaged. |
| Sound is intermittent | ·There could be condensation inside the recorder. Leave the unit for about an hour before retrying playback. |
| The remaining time doesn’t increase even after erasing some short tracks | ·Tracks shorter than 12 seconds are sometimes not counted in the recording time information. This is not a malfunction. |
| The total of recorded time and remaining recording time of an MD doesn’t match the maximum recording time of the MD | ·All tracks consist of a number of two-second blocks. Often, the end of a track will fall right at the beginning of one of these blocks. As a result, the actual available recording time may be slightly shorter than the value calculated based on the displayed time information. This is not a malfunction. ·The disc contains a damaged section, making that part unusable. This is not a malfunction. |
| Tracks can’t be combined | ·It is not possible to combine two tracks where one was recorded using the digital input, while the other was recorded using the analog input. ·It is not possible to combine two tracks recorded in different modes (for example, LP2 and stereo). |
| Group feature won’t work | ·The groups were created on a different MD recorder and the unit doesn’t recognize them. Delete the disc name and set the groups again to restore use of the group feature. ·The MD has been edited on another MD recorder that is not compatible with this unit’s group feature. Delete the disc name and set the groups again. |
| Edit and group feature menus won’t display | ·Make sure that group play mode is switched off (page 31). |
- It is possible that this unit will cause interference on nearby television sets, especially if you're using the TV with an indoor antenna. If you experience this problem, either use an outdoor television antenna, or move the MD player away from the television.
- Static electricity and other external interference can cause the unit to temporarily malfunction. Try switching the power off and unplugging from the wall outlet, then plugging in and switching on again.
Recording method Magnetic field modulation.
overwriting type
Playback method. Non-contact optical type
Sampling frequency 44.1 kHz, 32 kHz, 48 kHz
Frequency response 20 Hz - 20 kHz
Wow and flutter . Limit of measurement (± 0.001% W.PEAK) or less (EIAJ)
Power requirements
Europe model AC 220 V to 230 V, 50/60Hz
UK model AC 230 V, 50/60Hz
Power consumption 11W (0.9W in standby)
Dimensions. 220 (W) 65 (H) 313 (D) mm
Weight 2.5 kg
Operating conditions:
Temperature +5^ to +35^
Humidity 5% to 85% (without condensation)
Accessories
Optical digital cable 1
Power cord 1
Operating instructions 1
Warranty card 1
Note: Specifications and design subject to possible modification without notice, due to improvement.
US and foreign patents licensed from Dolby Laboratories Licensing Corporation.
Cleaning external surfaces
To clean this unit, wipe with a soft, dry cloth. For stubborn dirt, wet a soft cloth with a mild detergent solution made by diluting one part detergent to 5 or 6 parts water, wring well, then wipe off the dirt. Use a dry cloth to wipe the surface dry. Do not use volatile liquids such as benzene and thinner which may damage the surfaces.
Published by Pioneer Corporation.
Copyright © 2001 Pioneer Corporation.
All rights reserved.
Spécifications
Publication de Pioneer Corporation.
© 2001 Pioneer Corporation.
Published by Pioneer Corporation.
Copyright © 2001 Pioneer Corporation.
All rights reserved.
PIONEER CORPORATION
4-1, Meguro 1-Chome, Meguro-ku, Tokyo 153-8654, Japan
PIONEER ELECTRONICS [USA] INC.
P.O. BOX 1540, Long Beach, California 90801-1540, U.S.A.
PIONEER ELECTRONICS OF CANADA, INC.
300 Allstate Parkway, Markham, Ontario L3R OP2, Canada
PIONEER EUROPE NV
Haven 1087, Keetberlaan 1, B-9120 Melsele, Belgium TEL: 03/570.05.11
PIONEER ELECTRONICS AUSTRALIA PTY. LTD. 178-184 Boundary Road, Braeside, Victoria 3195, Australia, TEL: [03] 9586-6300
PIONEER ELECTRONICS DE MEXICO S.A. DE C.V.
San Lorenzo 1009 3er Piso Desp. 302 Col. Del Valle Mexico D.F. C.P. 03100
TEL: 5-688-52-90