Carolina 1.1 - Élément Havsö - Free user manual and instructions
Find the device manual for free Carolina 1.1 Havsö in PDF.

| Product Type | Heating Element |
| Brand | Havsö |
| Model | Carolina 1.1 |
| Dimensions (H x W x D) | 600 x 400 x 80 mm |
| Weight | 2.5 kg |
| Power Supply | 230 V ~ 50 Hz |
| Power Consumption | 1500 W |
| Heating Type | Convection with fan |
| Thermostat Control | Adjustable digital thermostat |
| Timer | 24-hour programmable timer |
| Safety Features | Overheat protection, tip-over switch, child lock |
| Material | Steel body with powder coating |
| Color | White |
| Mounting | Wall-mounted or freestanding |
| IP Rating | IP24 (splash-proof) |
| Noise Level | < 35 dB |
| Cleaning | Wipe with damp cloth; do not use abrasive cleaners |
| Warranty | 2 years |
| Included Accessories | Wall mounting kit, user manual |
Frequently Asked Questions - Carolina 1.1 Havsö
User questions about Carolina 1.1 Havsö
0 question about this device. Answer the ones you know or ask your own.
Ask a new question about this device
Download the instructions for your Élément in PDF format for free! Find your manual Carolina 1.1 - Havsö and take your electronic device back in hand. On this page are published all the documents necessary for the use of your device. Carolina 1.1 by Havsö.
USER MANUAL Carolina 1.1 Havsö
natural_image
Exterior view of a coiled outdoor heater with visible heat dissipation and a hanging cable (no text or symbols)Carolina 1.1
Infravärmare
Contents and assembly 12–13
How to use 14–15
Cleaning and maintenance 16
Safety Instructions 17-18
Info 19
CE
Carolina 1.1
Infravärmare
text_image
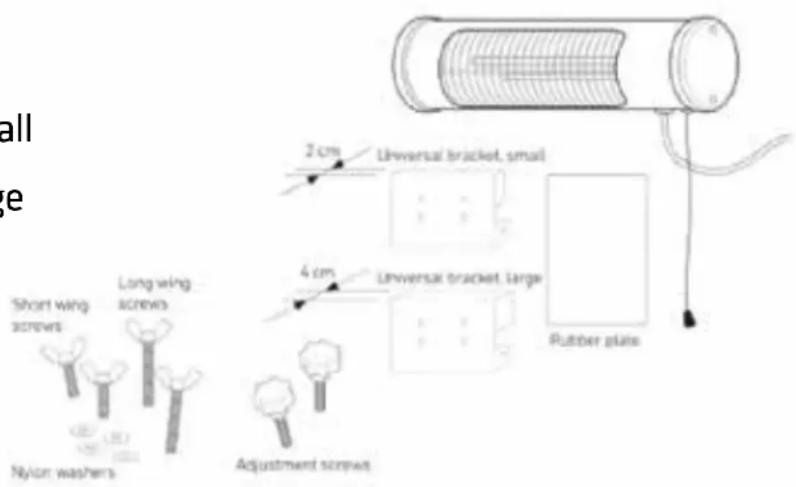
Short wing screws Long wing screws Nylon washers 2 cm Universal bracket, small 4 cm Universal bracket, large Rubber plate Adjustment screwsMontering
text_image
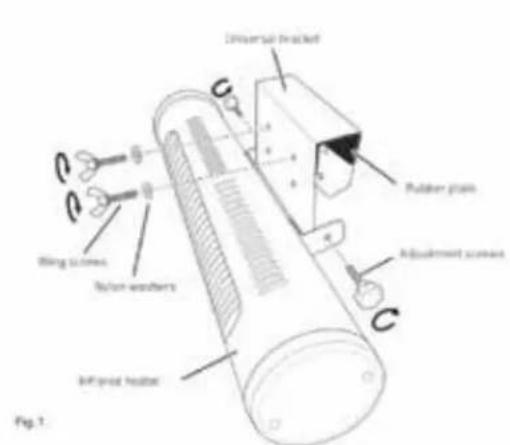
Inertial Bracket C Pulsescrew Roller pan Adjustment sensor C Fig. 1.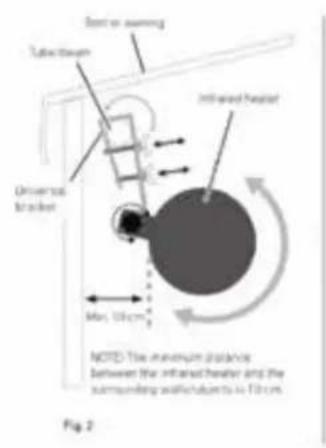
text_image
Start or swing Tube length Infrared heater Universal block Max. 10 cm NOTE: The maximum distance between the infrared heater and the supplementary walls subjects in 10 cm. Fig. 2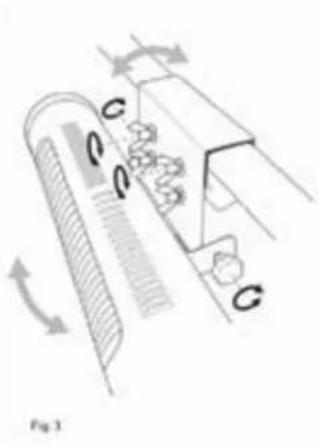
natural_image
Diagram of a conveyor belt system with rotating arrows and labeled components (no readable text or symbols)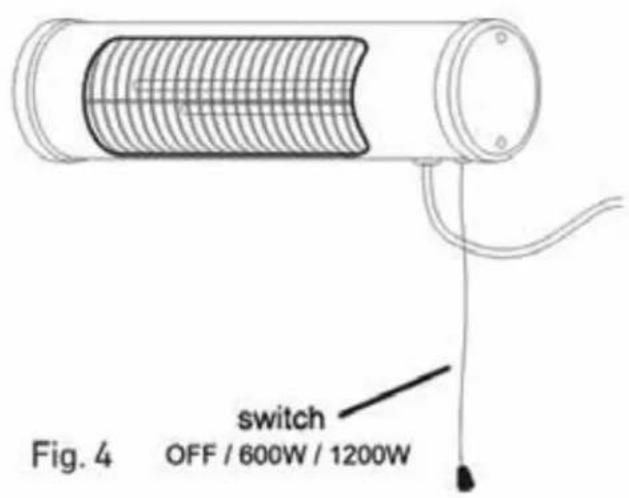
text_image
Fig. 4 switch OFF / 600W / 1200WAnvändning
text_image
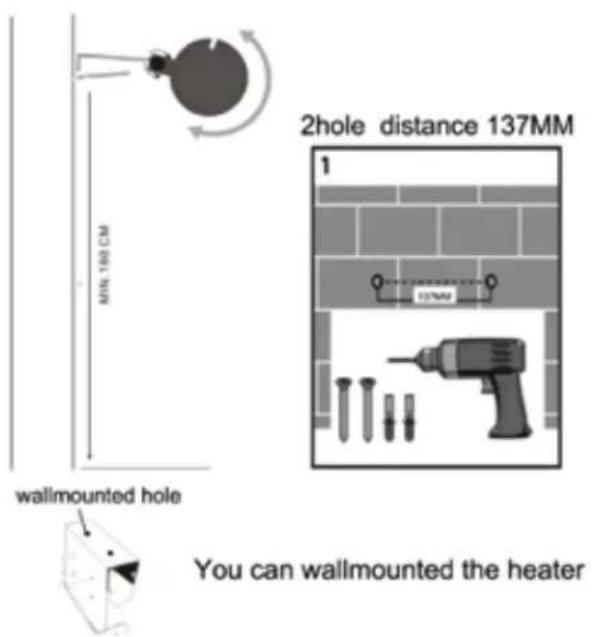
MIN 100 CM wallmounted hole 2hole distance 137MM You can wallmounted the heater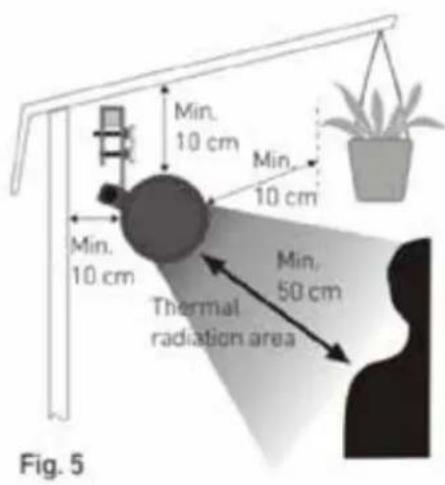
text_image
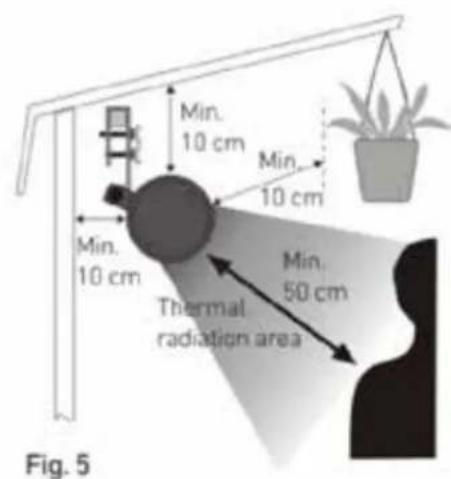
Min. 10 cm Min. 10 cm Min. 10 cm Min. 50 cm Thermal radiation area Fig. 5natural_image
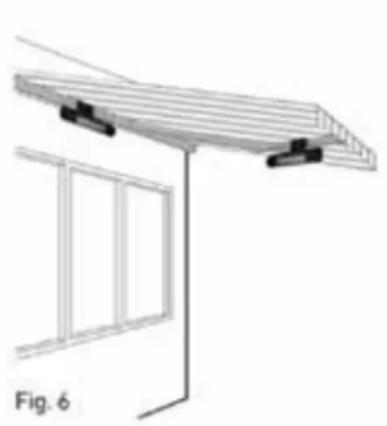
Architectural diagram showing a window frame structure with support beams and a labeled section (Fig. 6), no text or symbols present.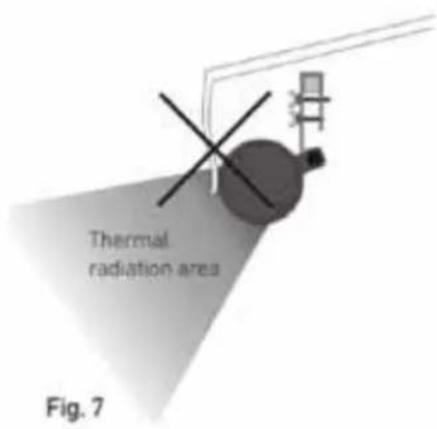
text_image
Thermal radiation area Fig. 7Markis:
Contents and assembly
Please read through the entire user manual before you start assembling and deciding where to put your infrared heater. Read the instructions carefully to make sure that the infrared heater is installed, used and maintained correctly, as described in these instructions. Keep the user manual for future reference.
Package contents
- 1st. Infrared heater
• 1st. Universal bracket, small
• 1st. Universal bracket, large - 1st. Rubber plate
• 2 st. Adjustment screws
• 2 st. Long wing screws
• 2 st. Short wing screws
• 4 st. Nylon washers
text_image
all e Short wing screws Long wing screws Nylon washers 2 cm Universal bracket, small 4 cm Universal bracket, large Rubber plate Adjustment screwsMontering
- The back of the brackets is pliable and flexible to make it easy to install the heater. Look at the following pages when deciding where to put your heater.
- When you have selected the location and the universal bracket you are going to use, adapt the rubber plate to the universal bracket by cutting it to size and then putting it on the inside of the universal bracket. Make sure that you do not cover any of the holes that you need to use for the wing nuts. This prevents damage and rust, and also ensures that the heater is firmly attached to the tube/beam. See figure 1.
- Attach the universal bracket to the infrared heater using the adjustment screws. See figure 1.
- You can then hang the infrared heater on the tube/beam that you have chosen.
Contents and assembly
- Angle the infrared heater so that the distance between the infrared heater and the surrounding surfaces/objects is at least 10cm from every direction. You angle the infrared heater using the adjustment screws by turning the entire universal bracket with the infrared heater. See figures 2 and 3.
- You can bend the back of the universal bracket around the tube/beam, attaching it securely using the wing screws. When you angle the heater, make sure that the wing screws are tightened securely to fix the angle. Put the nylon washers between the wing screw and the universal bracket to prevent rust. Se figure 1.
- Connect the power cable to a grounded 230 V power socket. We recommend using a ground fault circuit interrupter.
- Pull the cord to switch the infrared heater on and off. See figure 4.
text_image
Differential fracked Puller tray Adjustment screen Inflationer heater Bing is comes. Button-washers C Fig. 1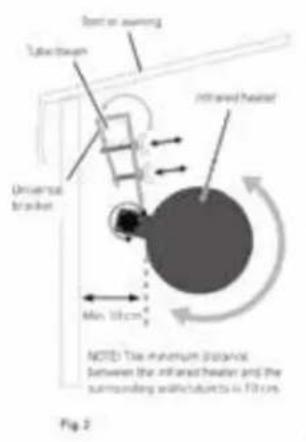
text_image
Band or awning Tube/beam Infrared heater Unispherical beam Min. 10 cm NOTED: The minimum distance between the infrared heater and the surrounding white subjects in FT cm. Fig. 2
natural_image
Diagram of a conveyor belt system with rotating arrows and gear mechanism (no text or labels)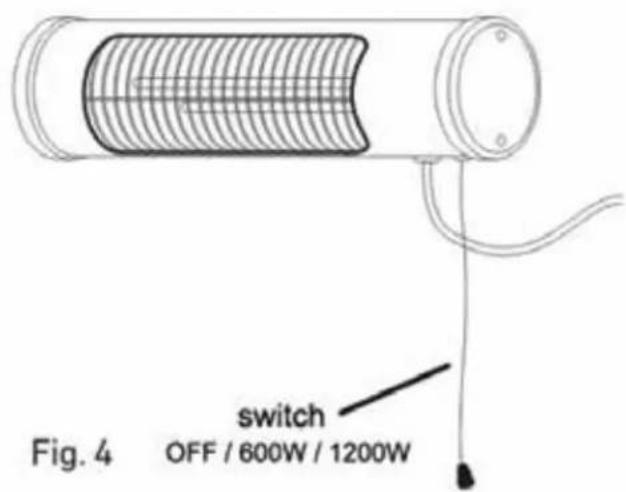
text_image
switch OFF / 600W / 1200W Fig. 4How to Use
This infrared heater is intended for outdoor use. The universal bracket enables you to put the infrared heater in, for example, a pavilion, awning or party tent. You can attach the infrared heater to tubes or beams up to a maximum of 4 cm. Choose the universal bracket depending on where you want to put the heater. You need to put the infrared heater at least 10 cm away from other objects. Note that the back and top of the infrared heater will also get hot.
text_image
MIN. 100 CM wallmounted hole 2hole distance 137MM You can wallmounted the heaterSuggestions on where to put your infrared heater
text_image
Min. 10 cm Min. 10 cm Min. 10 cm Min. 50 cm Thermal radiation area Fig. 5Warning! When deciding where to put your infrared heater, make sure there is plenty of space for the thermal radiation area.
Party tents and gazebos:
- When you put your infrared heater in a party tent, you have to make sure that it is not directly against the edge of the party tent's canopy. The infrared heater should either hang down under the edge of the party tent's canopy, or you can angle the infrared heater at a distance of at least 10 cm from the edge of the party tent's canopy using the universal bracket. Make sure that you tighten the wing screws securely in the universal bracket to ensure that the infrared heater is stable. See figure 5.
How to Use
- If the party tent has walls, you need to angle the infrared heater so that it is at least 10 cm away from the wall of the party tent using the universal bracket. Tighten the wing screws in the universal bracket to secure the angle.
- You can choose to put the infrared heater on one of the tubes in the party tent roof. This would mean that the infrared heater would be at an angle, but this is not a problem if you tighten the wing screws on the universal bracket to ensure that the infrared heater is stable and in place. The infrared heater must be at least 10 cm away from all parts of the party tent.
natural_image
Architectural diagram showing a window frame structure with support beams and a labeled section (Fig. 6), no text or symbols present.
text_image
Thermal radiation area Fig. 7Awning:
- You can choose to put your infrared heater in your awning. You can either attach it to one of the awning arms or on the awning beam against the wall. See the example in figure 6.
- Make sure that the awning valance does not hang down onto the infrared heater. Make sure there is a distance of at least 10 cm between the infrared heater and the awning valance. Se figure 7.
- Depending on where you put the infrared heater, there is a risk that the awning valance will get closer than 10 cm to the infrared heater when the awning is being closed. You therefore have to make sure that the infrared heater has been switched off and has cooled down before closing the awning.
Cleaning and maintenance
Important information when deciding where to put your heater and when using it
- Remember that the infrared heater will get very hot when it is on, including the top and back of the heater. You should therefore make sure that it is a safe distance, a minimum 10 cm from other objects.
- Hang the infrared heater in a safe location. Make sure it is high up, somewhere where no-one can walk into it, and where it is out of the reach of children.
- The infrared heater must be at least 10 cm away from other objects, as the heat can damage or discolor fabric or other objects nearby.
- Remember to always switch off your infrared heater when it is not in use (pull the cord of the main switch). Pull out the plug and make sure the infrared heater has cooled down before leaving it unsupervised.
Cleaning and storage
- You need to clean the infrared heater regularly and before you store it away.
- Switch off the infrared heater by pulling the cord (main switch) and then pull the plug out of the electric socket. Allow it to cool before cleaning and storing it.
- Use a dry cloth to clean the casing. Do not use water, wax, polish or other cleaning agents.
- Store the infrared heater in a dry and well ventilated place.
Safety instructions
- Read the user manual carefully before using the heater for the first time and save it for future reference.
- Remember that the infrared heater will get hot when it is switched on. Do not touch any of the hot surfaces.
- Pay particular attention when using the infrared heater close to children.
- Do not leave the infrared heater unsupervised when it is switched on.
- Always pull the plug out of the socket when the infrared heater is not in use.
- Do not use the infrared heater if the plug or the electric cable is damaged or if the infrared heater is not working correctly.
- The infrared heater may be used in both indoors and outdoors, and must under supervision.
- The infrared heater must be connected to an earthed electric socket.
- Extra protection is recommended by installing a ground fault circuit interrupter.
- Do not use the infrared heater right next to bathrooms, showers or swimming pools.
- Do not put any objects in the grating of the infrared heater – there is a risk of electric shock.
- Make sure the infrared heater is at least 10 cm from flammable objects.
- Avoid the risk of fire – do not cover the infrared heater when it is switched on.
Safety instructions
- The infrared heater can overheat when covered.
- Do not use the infrared heater in areas where petrol, paint or other flammable liquids are stored.
- Only use the infrared heater for its intended purpose.
- Let the infrared heater cool before storing it.
- Do not connect the infrared heater to any equipment that automatically switches the infrared heater on/off, for example, a timer or automatic temperature control equipment.
- If the electric cable is damaged, it must be replaced by a qualified electrician.
- The infrared heater is not intended to be used by people (including children) with reduced physical, sensory or mental capabilities or with a lack of experience and knowledge, unless they are supervised or are given instructions on how to use the infrared heater by a person who is responsible for their safety.
- Children must be supervised to ensure that they do not play with the infrared heater.
• The infrared heater is rated IPX4.
Reklamation
By law the product must be returned to the place of purchase along with a stamped receipt in the event of a complaint. The user is liable for any damage to the product that is caused by not using the product for its intended purpose or by not following this user manual correctly. The right of complaint will not apply in these instances.
Tekniska data
Voltage: 230 V - 50 Hz
Power: 600 W/1200 W
Safety class: IPX4
This marking indicates that this product should not be disposed with other household wastes throughout the EU. To prevent possible harm to the environment or human health from uncontrolled waste disposal, recycle it responsibly to promote the sustainable reuse of material resources. To return your used device, please use the return and collection systems or contact the retailer where the product was purchased. They can take this product for environmental safe recycling.
HAVSÖ
Diff naturliga val!