AGM1024 - Angle Grinder Ferm - Free user manual and instructions
Find the device manual for free AGM1024 Ferm in PDF.


| Product Type | Angle Grinder |
| Model | AGM1024 |
| Brand | Ferm |
| Power Supply | 240 V ~ 50 Hz |
| Power Consumption | 850 W |
| No-Load Speed | 11000 rpm |
| Disc Diameter | 115 mm |
| Spindle Thread | M14 |
| Weight | 2.1 kg |
| Dimensions (L x W x H) | 310 x 120 x 110 mm |
| Main Functions | Cutting, grinding, sanding, wire brushing |
| Soft Start | Yes |
| Spindle Lock | Yes |
| Safety Guard | Adjustable, quick-release |
| Vibration Control | Anti-vibration side handle |
| Maintenance | Clean air vents regularly; replace carbon brushes when worn |
| Spare Parts Available | Carbon brushes, guard, side handle, flanges, screw |
| Repairability | User-serviceable carbon brushes; professional repair for other parts |
| Certifications | CE, RoHS |
Frequently Asked Questions - AGM1024 Ferm
Use only original Ferm carbon brushes.
User questions about AGM1024 Ferm
0 question about this device. Answer the ones you know or ask your own.
Ask a new question about this device
Download the instructions for your Angle Grinder in PDF format for free! Find your manual AGM1024 - Ferm and take your electronic device back in hand. On this page are published all the documents necessary for the use of your device. AGM1024 by Ferm.
USER MANUAL AGM1024 Ferm
UK Subject to change
natural_image
Fermis grater with three CD/DVD discs in the foreground (no visible text or symbols)UK USERS MANUAL 03
D GEBRAUCHSANWEISUNG 06
NL GEBRUIKSAANWIJZING 09
F MODED'EMPLOI12
E MANUAL DE INSTRUCCIONES IS
P ISTRUÇÖNAUSAR18
I MANUALE UTILIZZATI 21
S BRUKSANVISNING 24
SF KÄYTTÖOHJE 27
N BRUKSANVISNING 30
DK BRUGERVEJLEDNING 33


www.ferm.com

Fig.1

Fig.4

Fig.2
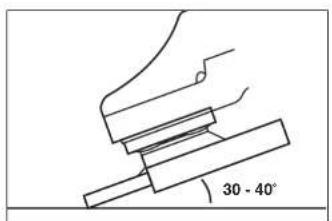
Fig.5

Fig.3

natural_image
Diagram of a mechanical component rolling on a circular surface with motion arrows indicating rotation (no text or symbols)Fig.6

Ferm 39
SPARE PARTS LIST FAG 230/2000K
REF.NR. DESCRIPTION FERM NR.
| 01 FLANGE INSIDE 406940 |
| 03 FLANGE OUTSIDE 406941 |
04 WHEEL COVER 406942
| 18 SPINDLE GEAR 406943 |
| 28 PINION GEAR 406944 |
32 ROTOR 406945
| 35 STATOR 406946 |
| 42 BRUSH HOLDER 406947 |
43 CARBON BRUSH SET (2 PCS) 406948
| 44 BRUSH CAP 406949 |
| 51 SWITCH 406950 |
59 SIDE HANDLE 406877
| 60 SPANNER 406814 |

THE NUMBERS IN THE FOLLOWING TEXT CORRESPOND WITH THE PICTURES AT PAGE 2
ANGLE GRINDER
CONTENTS:
- Machine data
- Safety instructions
- Assembly
-
Use
-
Service & maintenance
I. MACHINEDATA
INTRODUCTION
This machine is developed for grinding and roughing of metal and stone.
PACKAGE CONTENTS
| 1 | Angle grinder |
| 1 | Slide handle |
| 1 | Spanner |
| 2 | Cut off grinding wheels |
| 1 | Set carbon brushes |
| 1 | Instruction manual |
| 1 | Safety instructions |
| 1 | Warranty card |
TECHNICAL SPECIFICATION
| Voltage | 230 V~ |
| Frequency | 50 Hz |
| Power input | 2000 W |
| No-load speed | 6000/min |
| Disc diameter | 230 mm |
| Spindle dimension | M 14 |
| Weight | 4,9 kg |
| Lpa (sound pressure) | 97,9 dB (A) |
| Lwa (sound power) | 110,9 dB (A) | |
| Vibration value | 3,2 m/s ^2 |
FEATURES
Fig. I
- on/off switch
- screw-on lid carbon brush (both sides)
- spindle lock
- grinding disc
- side handle
- lock-off button
2. SAFETY INSTRUCTIONS
EXPLANATION OF SYMBOLS
In this manual and/or on the machine the following symbols are used:
CE In accordance with essential applicable safety standards of European directives
Class II machine – Double insulation – You don't need any earthed plug.
Denotes risk of personal injury, loss of life or damage to the tool in case of non-observance of the instructions in this manual.
Indicates electrical shock hazard.
Risk off fire
Keep bystanders away

Wear safety glasses and car protection
Wear protective gloves
Read instructions carefully
Faulty and/or discarded electrical or electronic apparatus have to be collected at the appropriate recycling locations.
SAFETYINSTRUCTIONS
When using electric machines always observe the safety regulations applicable in your country to reduce the risk of fire, electric shock and personal injury. Read the following safety instructions and also the enclosed safety instructions. Keep these instructions in a safe place!
- Check that the maximum speed indicated on the grinding disc corresponds to the maximum speed of the machine. The speed of the machine must not exceed the value on the grinding disc.
• Make sure that the dimensions of the grinding disc correspond to the specifications of the machine. - Make sure that the grinding disc has been mounted and fastened properly. Do not use reducing rings or adapters to make the grinding disc fit properly.
- Treat and store grinding discs in conformance with the supplier's instructions.
- Do not use the machine for grinding workpieces with a maximum thickness exceeding the maximum grinding depth of the grinding disc.
- Do not use grinding discs for deburring.
-
When grinding discs have to be mounted on the thread of the spindle, make sure that the spindle has sufficient thread. Make sure that the spindle is sufficiently protected and does not touch the grinding surface.
-
Before use, inspect the grinding disc for any damage. Do not use grinding discs which are crack-ed, ripped or otherwise damaged.
• Before use, let the machine run idle for 30 seconds. Immediately switch off the machine in case of abnormal vibrations or occurrence of another defect. Carefully inspect the machine and grinding disc before switching the machine on again.
• Make sure that sparks do not put people into danger or that they contact highly flammable substances.
• Make sure that the workpiece is sufficiently supported or clamped. Keep your hands away from the surface to be cut.
• Always wear safety goggles and hearing protection. If desired or required also use another kind of protection like for example an apron or helmet. - Ensure that mounted wheels and points are fitted in accordance with the manufacturer's instructions.
- Ensure that blotters are used when they are provided with the bonded abrasive product and when they are required.
- If a guard is supplied with the tool never use the tool without such a guard.
- For tools intended to be fitted with threaded hole wheel, ensure that the thread in the wheel is long enough to accept the spindle length.
- Ensure that ventilation openings are kept clear when working in dusty conditions. If it should become nessesary to clear dust, first disconnect the tool from the mains supply (use non metallic objects) and avoid damaging internal parts.
- Though poor conditions of the electrical mains, shortly voltage drops can appear when starting the equipment. This can influence other equipment (eq. blinking of a lamp). If the mains-impedance Zmax <0.348 Ohm, such disturbances are not expected. (In case of need, you may contact your local supply authority for further information.
3. ASSEMBLY

Prior to mounting an accessory always unplug the tool.
MOUNTING A GRINDING DISC.
Fig 2 Use grinding discs of the correct dimension. Use fibre reinforced grinding discs only. The grinding disc must not touch the edge of the guard.
- Press the spindle lock (6) and turn the spindle (9) until it engages in the lock. Keep the spindle lock pressed during this procedure.
- Remove the flange nut (12) from the spindle using the spanner (11).
- Position the grinding disc (7) on the flange (5). - Place the flange nut on the spindle an tighten it using the spanner.
- Release the spindle lock and check that the spindle is unlocked by rotating it.
MOUNTING THE SIDE HANDLE
Fig 1 The side handle can be used for both left-hand and right-hand control.
- Fasten the side handle (Fig. 5) for left-hand operation on the right-hand side of the machine.
- Fasten the side handle for right-hand operation on the left-hand side of the machine.
- Fasten the side handle for upright working at the top of the machine.

Make sure that the side handle is fastened properly and cannot loosen unexpectedly.
MOUNTING GRINDING DISCS AND ROUCHING DISCS
ROUGHING DISCS
Fig. 3 and 4 show how to mount the flange (10) when using thick (4–8 mm) and thin (2,5–4 mm) discs.
4. USE
SPECIAL ATTENTION WHEN STARTING THE MACHINE
- Clamp the workpiece and make sure that the workpiece cannot slide from under the machine during the cutting activities.
- When working with the machine, always hold it firmly with both hands and provide for a secure stance.
• Always direct the cable to the rear away from the machine.
- Insert the mains plug only when the machine is switched off.
- Apply the machine to the workpiece only when switched on

Never use the machine for grinding magnesium workpieces.
SWITCHING ON AND OFF
- This machine is equipped with a safety switch. - Start the machine by pressing the "lock off" button (to disengage the switch) and switch on the machine.

Before start working, the machine must be run according to the max. speed.
OPERATION
- Hold the machine firmly and move it against the workpiece. Move the grinding disc evenly across the workpiece.
- Move the machine during roughing under an angle of 30^ - 40^ across the workpiece (fig. 5).

Never use grinding discs for roughing!
• The machine must always work opposite to the direction of rotation. Therefore, never move the machine in the other direction! Otherwise, the danger exists of it being pushed uncontrolled out of the cut (fig. 6).
- Inspect the grinding disc regularly. Worn discs have a negative effect on efficiency of the machine. Replace the grinding disc on time.
- Do not put the machine down when the motor is still running. Do not place the machine on a dusty surface. Dust particles may enter the mechanism.
• Always switch off the machine first before removing the plug from the wall socket.

Never use the spindle lock to stop the motor.
TROUBLESHOOTING
I. Machine fails to operate:
• Power turned off
• (Extension) cable damaged
- The elektromotor hardly reaches maximum
speed:
• The extension cable is too thin and/or too long
• The mains voltage is lower than 230 V
- Machine overheats:
• Air vents are blocked. Clean them with a dry cloth.
• The machine has been overloaded. Use the machine for the purpose it is made for.
- Excessive sparking or elektromotor runs
irregular. - There's dirt inside the motor or the carbon brushes are worn. Replace the carbon brushes or bring the machine to a specialized repair centre.
5. SERVICE & MAINTENANCE
MAINTENANCE
Make sure that the plug is removed from the mains when carrying out maintenance work on the motor.
The Ferm machines have been designed to operate over a long period of time with a minimum of maintenance. Continuous satisfactory operation depends upon proper machine care and regular cleaning.
CLEANING
Regularly clean the machine housing with a soft cloth, preferably after each use. Keep the ventilation slots free from dust and dirt. If the dirt does not come off use a soft cloth moistened with soapy water. Never use solvents such as petrol, alcohol, ammonia water, etc. These solvents may damage the plastic parts.
LUBRICATION
The machine requires no additional lubrication.
FAULTS
Should a fault occur, e.g. after wear of a part, please contact the service address on the warranty card. In the back of this manual you find an exploded view showing the parts that can be ordered.
ENVIRONMENT
To prevent damage during transport, the appliance is delivered in a solid packaging which consists largely of reusable material. Therefore please make use of options for recycling the packaging.

recycling locations.
Faulty and/or discarded electrical or electronic
apparatus have to be collected at the appropriate
ocations.
WARRANTY
The warranty conditions can be found on the separately enclosed warranty card.

DECLARATION OF CONFORMITY (UK)
We declare under our sole responsibility that this product is in conformity with the following standards or standardized documents
EN50144-1, EN50144-2-3,
EN55014-1, EN55014-2,
EN61000-3-2, EN61000-3-3
in accordance with the regulations.
98/37/EEC, 73/23/EEC
89/336/EEC
from 01-06-2005
ZWOLLENL
W.Kamphof
Quality department

D Deutsch
98/37/EOF, 73/23/EOF
89/336/E0F
01-06-2005
ZWOLLENL
W. Kamphof
Quality department

5. SERVICE OG VEDLIKEHOLD
VEDLIKEHOLD
DEMARRANT LA MACHINE
- La machine surchauffe :
CE DÉCLARATION DE CONFORMITÉ (F)
98/37/EEC, 73/23/EEC 89/336/EEC
fràn 01-06-2005
ZWOLLENL
W. Kamphof
Avdelning
Kvalitetsbevalkning

E Español
98/37/CEE, 73/23/CEE 89/336/CEE
del01-06-2005
ZWOLLENL
W. Kamphol
- SPARE PARTS LIST FAG 230/2000K
- THE NUMBERS IN THE FOLLOWING TEXT CORRESPOND WITH THE PICTURES AT PAGE 2
- ANGLE GRINDER
- CONTENTS:
- MACHINEDATA
- INTRODUCTION
- FEATURES
- Fig. I
- SAFETY INSTRUCTIONS
- EXPLANATION OF SYMBOLS
- SAFETYINSTRUCTIONS
- ASSEMBLY
- MOUNTING A GRINDING DISC.
- MOUNTING THE SIDE HANDLE
- MOUNTING GRINDING DISCS AND ROUCHING DISCS
- USE
- SPECIAL ATTENTION WHEN STARTING THE MACHINE
- SWITCHING ON AND OFF
- OPERATION
- TROUBLESHOOTING
- SERVICE & MAINTENANCE
- MAINTENANCE
- CLEANING
- LUBRICATION
- FAULTS
- ENVIRONMENT
- WARRANTY
- DECLARATION OF CONFORMITY (UK)
- D Deutsch
- SERVICE OG VEDLIKEHOLD
- VEDLIKEHOLD
- CE DÉCLARATION DE CONFORMITÉ (F)
- E Español
Brand : Ferm
Model : AGM1024
Category : Angle Grinder