
EA150 - Automatic coffee maker AEG-ELECTROLUX - Free user manual and instructions
Find the device manual for free EA150 AEG-ELECTROLUX in PDF.
| Product type | Automatic espresso coffee maker |
| Brand | AEG-ELECTROLUX |
| Model | EA150 |
| Supply voltage | 230 V ~ 50 Hz |
| Rated power | 1000 W |
| Main functions | Espresso, steam for cappuccino, hot water |
| Filters included | 1-cup filter, 2-cup filter, single-sachet filter |
| Recommended grind type | Medium grind for espresso |
| Water tank | Removable, max capacity (MAX mark) |
| Steam nozzle | With removable frothing tip for milk |
| Cup warming tray | Integrated, for preheating cups |
| Drip tray | With removable grid and level indicator |
| Finger guard | Yes, on the filter holder |
| Safety device | Overheat protection for pump (automatic shut-off) |
| Daily maintenance | Rinse the system without coffee after each use |
| Recommended descaling | Every 3 months with liquid descaling agent |
| Coffee filter cleaning | Removable using a coin |
| Housing material | Metal (heats up during operation) |
| After-sales service | Contact customer service or an authorized dealer |
| Spare parts | Filters, filter gasket, filter holder, steam nozzle, drip tray |
Frequently Asked Questions - EA150 AEG-ELECTROLUX
User questions about EA150 AEG-ELECTROLUX
0 question about this device. Answer the ones you know or ask your own.
Ask a new question about this device
Download the instructions for your Automatic coffee maker in PDF format for free! Find your manual EA150 - AEG-ELECTROLUX and take your electronic device back in hand. On this page are published all the documents necessary for the use of your device. EA150 by AEG-ELECTROLUX.
USER MANUAL EA150 AEG-ELECTROLUX
Operating Instructions
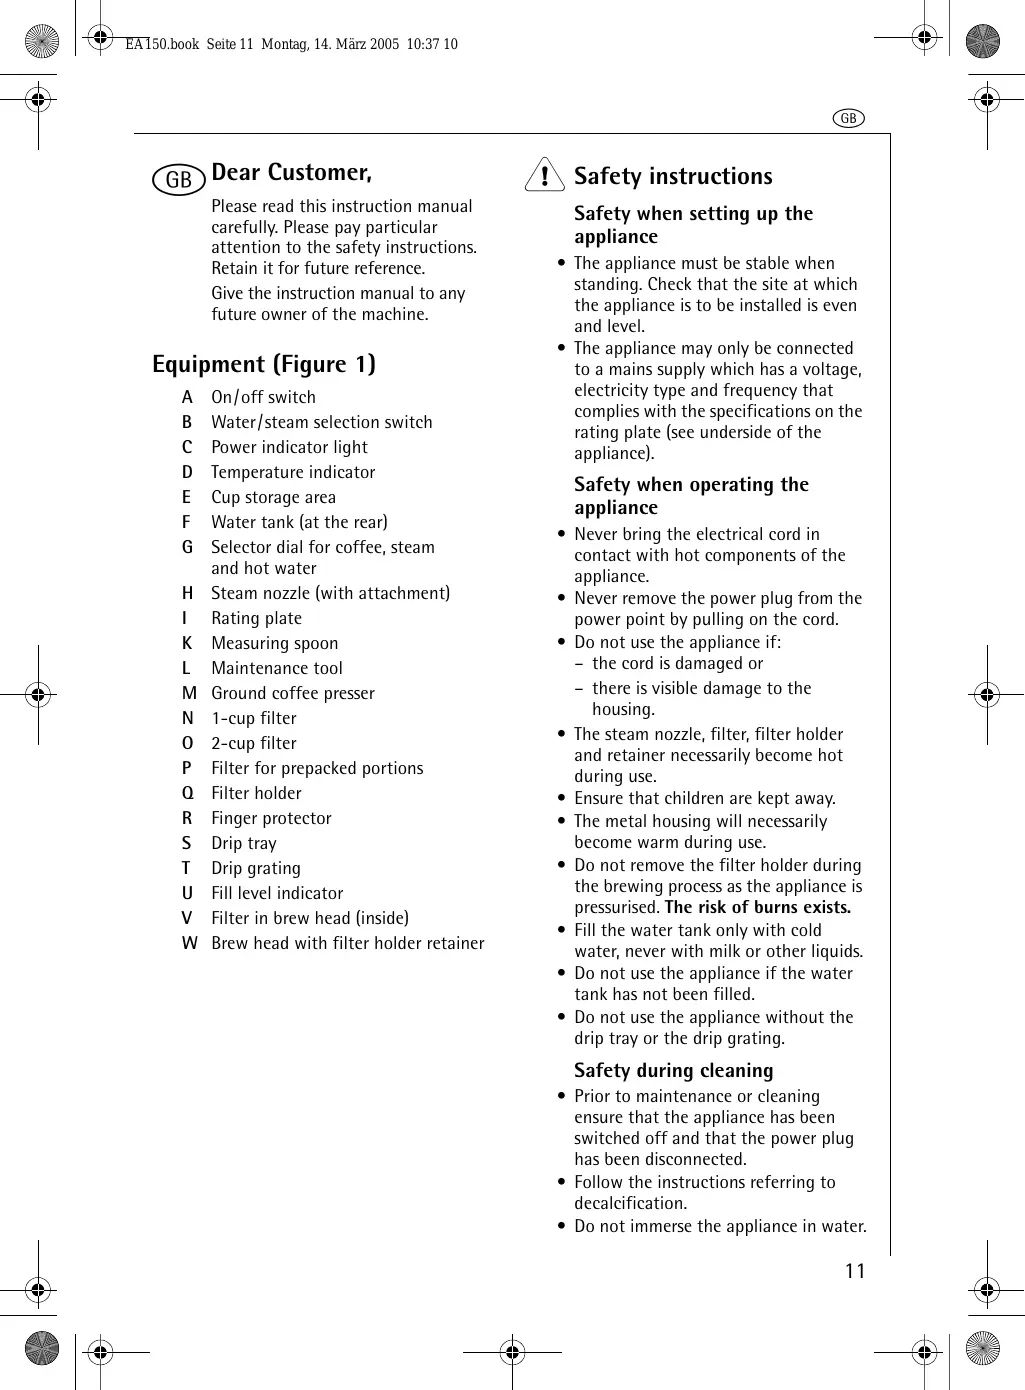
Please read this instruction manual carefully. Please pay particular attention to the safety instructions. Retain it for future reference. Give the instruction manual to any future owner of the machine.
Equipment (Figure 1)
A On/off switch
B Water/steam selection switch
C Power indicator light
D Temperature indicator
E Cup storage area
F Water tank (at the rear)
G Selector dial for coffee, steam and hot water
H Steam nozzle (with attachment)
Rating plate
K Measuring spoon
L Maintenance tool
M Ground coffee presser
N 1-cup filter
0 2-cup filter
P Filter for prepacked portions
Q Filter holder
R Finger protector
S Drip tray
T Drip grating
U Fill level indicator
V Filter in brew head (inside)
W Brew head with filter holder retainer
!
Safety instructions
Safety when setting up the appliance
- The appliance must be stable when standing. Check that the site at which the appliance is to be installed is even and level.
- The appliance may only be connected to a mains supply which has a voltage, electricity type and frequency that complies with the specifications on the rating plate (see underside of the appliance).
Safety when operating the appliance
- Never bring the electrical cord in contact with hot components of the appliance.
- Never remove the power plug from the power point by pulling on the cord.
-
Do not use the appliance if: - the cord is damaged or
-
there is visible damage to the housing.
-
The steam nozzle, filter, filter holder and retainer necessarily become hot during use.
- Ensure that children are kept away.
- The metal housing will necessarily become warm during use.
- Do not remove the filter holder during the brewing process as the appliance is pressurised. The risk of burns exists.
- Fill the water tank only with cold water, never with milk or other liquids.
- Do not use the appliance if the water tank has not been filled.
- Do not use the appliance without the drip tray or the drip grating.
Safety during cleaning
- Prior to maintenance or cleaning ensure that the appliance has been switched off and that the power plug has been disconnected.
- Follow the instructions referring to decalcification.
- Do not immerse the appliance in water.
GB
Safety during repairs
Repairs to this appliance may only be carried out by qualified service engineers. Considerable danger may result from improper repairs. If repairs become necessary, please contact the Customer Care Department or your authorised dealer.
If the appliance is used for purposes other than those for what it was intended or is operated wrongly, no liability for possible damages can be accepted.
This appliance conforms with the following EU Directives:
- 73/23/EEC dated 19.02.1973 "Low Voltage Directive", including Modification Directive 93/68/EEC
89/336/EEC dated 03.05.1989 "EMC Directive", including Modification Directive 92/31/EEC
Prior to using the appliance for the first time
Please read the safety instructions in order to prevent danger to yourself and damage to the appliance.

Insert the power plug into the power outlet.
Prior to preparing an espresso for the first time you should rinse out the heating system once by filling the tank. Proceed exactly as described in the section "Making an espresso" and "Frothing milk", but without placing any ground coffee in the filter. Place a container that is as large as possible in the middle of the drip grating (figure 1/T) and under the steam nozzle (figure 1/H).
Making an espresso
After having been brewed, the espresso should be covered with a dense frothy layer, the so-called crema.
To achieve an aromatic espresso with crema, fresh, clear water, the correct
size grounds and the water temperature are important.
1. Adding water (Figure 2)
Pull the water tank upwards and out of the appliance (figure 2).
Open the tank lid.
Fill the water tank with cold, clear water only.
Ensure that the water line does not lie below the MIN (minimum) line or above the MAX (maximum) line.
Close the tank lid.
Replace the water tank and press it downwards so that it is sitting firmly in the appliance (figure 2).
You can also lift the tank lid and fold it to the side. This enables you to fill the water tank directly when it is in the appliance, e.g. with a jug.
2. Switching on the appliance / preheating cups
Switch the appliance on using the on/off switch (figure 1/A). The power indicator (figure 1/C, red) and the temperature indicator (figure 1/D, orange) will illuminate.
As soon as the operating temperature has been attained, the temperature indicator will go out. The temperature indicator may illuminate again while the appliance is being used to indicate that the appliance is re-heating.
You can place one or more cups with the opening facing downwards on the cup storage area (figure 1/E).
3. Adding espresso grounds (figures 3,4,5)
Take the filter holder, fold back the finger protector and place the 1-cup filter or the 2-cup filter into the filter holder (figure 3).
When using prepacked portions, insert the filter for prepacked portions (figure 1/P and figure 5).
Fill the filter with espresso grounds. Use:
1 full measuring spoon for the 1-cup filter, 2 full measuring spoons for the 2-cup filter.
Lightly press the espresso grounds into the filter (figure 4) using the ground coffee presser (figure 1/M). Ensure that after pressing the coffee, the filter is still filled to the rim with espresso grounds. Clean any espresso grounds away from the rim of the filter.
1 Do not press the espresso grounds too firmly into the filter. In such an event the flow of water through the coffee can decrease significantly. (See also "What to do if...")
If you grind espresso grounds yourself, choose the "middle" fineness level.
4. Screwing on the filter holder (Figures 6, 7)
Position the filter holder in the filter retainer such that the handle of the filter holder is located below the left white triangle (figure 6, "1").
Twist the filter holder to the right as far as it will go (figure 6, "2"), so that the handle is pointing forwards and is located beneath the white line between the two points (figure 7, "3").
5. Placing cup(s) underneath (Figure 8)
Place one or two cups under the openings in the filter holder (figure 8).
6. Brewing an espresso
Switch the water/steam selection switch (figure 1/B) to the symbol
When the appliance has attained its operating temperature, turn the selector dial (figure 1/G) to the symbol. The water will now be forced through the espresso grounds under high pressure.
When the desired amount of espresso has been brewed, turn the selector dial left again to the "●" position.
Please note that when making an
espresso the water-steam selection
switch (figure 1/B) is always at the position. If the espresso is brewed at the position, the taste of the coffee can be adversely affected due to the higher brewing temperature.
Each time after making an espresso or after using steam/hot water when the selector dial is turned to the "●" position, any remaining water is directed to the drip tray. Each additional cup is brewed using fresh water. This is how to obtain the total enjoyment out of espresso. This is why the drip tray must be emptied regularly.
7. Removing the drip tray (Figure 9)
Twist the filter holder to the left and out of the retainer.
Fold the finger protector forwards and hold it down. Tap the used espresso grounds out of the filter holder and out of the filter (figure 9).
Rinse the filter holder and the filter with warm water. Do not clean the filter holder in the dishwasher!
If the appliance is not going to be used for a longer period of time, do not screw the filter holder back in. This will increase the life of the seal located on the brew head.
GB
Creating steam/frothing milk (Figures 10, 11)
The hot steam can be used to froth milk for a cappuccino or to heat liquids.
1. Switch on the appliance.
Place the attachment provided onto the steam nozzle (figure 10).
Switch on the appliance using the on/off switch (figure 1/A). Wait until the appliance has attained its operating temperature and the orange temperature indicator has gone out (figure 1/D).
Switch the water/steam selection switch (figure 1/B) to the symbol 岛
2. Creating steam/frothing milk
Pour some milk or other liquid to be heated into a heat-proof container.
Immerse the steam nozzle into the milk or liquid to be heated (figure 11).
Turn the selector dial (figure 1/G) to the left onto the symbol. The appliance will now begin to create steam. At the beginning some drops of water may drip out of the nozzle as well. Important: So as not to prevent the steam from exiting, the steam nozzle must not touch the base of the container.
Stop steam from being emitted by turning the selector dial (figure 1/G) back to the right into the "●" position.
Place the steamed liquid to one side and turn the steam selection switch back to the symbol for a couple of seconds. This will remove any milk residue or residue from other liquids out of the nozzle. Caution: The steam is hot.
To achieve a fine, creamy milk froth it is best to use cool low-fat milk.
Making a cappuccino
Fill a large coffee cup from 12 to 34 full of espresso. Pour the frothed milk over the top. Sprinkle a little cocoa over the milk froth.
3. Heating water
Turn the water/steam selection switch (figure 1/B) to the position.
Place a container under the steam nozzle (figure 1/H).
Turn the selector dial for coffee, steam and hot water (figure 1/G) to the position. Hot water will be emitted from the steam nozzle.
After the desired amount of hot water has been obtained, turn the selector dial for coffee, steam and hot water (figure 1/G) to the "●" position.
Cleaning and care
Daily care
We recommend that, each day prior to the first and after the last espresso, you rinse out the system for approx. 10 seconds without espresso grounds in order to prevent particles coffee from becoming lodged in the appliance. Proceed as for making an espresso, but without using espresso grounds.
^忍 Afterwards, turn the selector dial (figure 1/G) briefly to the position.
Pour any remaining water out of the water tank.
Cleaning
(figures 12, 13, 14, 15, 16)
Prior to cleaning the appliance, switch it off and disconnect the power plug. Do not clean any part of the appliance in the dishwasher.
Wipe all the appliance's surfaces using a damp cloth. Do not use harsh or scratching cleaning agent.
Rinse out the water tank at least once a week in normal rinse water.
Clean the 1-cup filter and the 2-cup filter from time to time using a brush.
Steam nozzle
Remove the attachment from the steam nozzle and rinse the attachment in normal rinse water.
Wipe the steam nozzle clean using a damp cloth. You can use the maintenance guide (figure 1/L) to screw off the nozzle head to clean it or decalcify it.
Drip grating and drip tray
The drip tray must be emptied when the level indicator (figure 1/U) is protruding above the drip grating.
Insert your fingers into the holes in the drip grating. Remove the drip grating and rinse it under running water (figure 12).
To empty it, hold the drip tray on both sides and pull it forwards and out of the appliance (figure 13).
Remove the plastic attachment with the level indicator and rinse both under running water (figure 14).
Place the plastic attachment with the level indicator back into the drip tray.
Push the clean drip tray back into the appliance and place the drip grating back in.
Cleaning the brew filter
The brew filter through which the hot water flows is located on the brew head. Check from time to time to ensure that the holes in the brew filter have not become blocked by coffee particles.
If the holes have become blocked:
Unscrew the brew filter using a coin (figure 15).
Remove the brew filter and seal (figure 16/1) and remove the brew filter's seal (figure 16/2).
Clean the brew filter with warm water and a brush.
Rinse the seal with warm rinse water.
If the appliance is to be transported at temperatures below zero:
Empty the water tank.
Turn the selector dial (figure 1/G) to the position and let the appliance dry.
Decalcifying
If the espresso is flowing through the filter at a slower rate than usual, it is time for the appliance to be decalcified.
We recommend that you decalcify the machine once every three months with liquid decalcifier. If you live in an area with hard water the decalcifying procedure may have to be carried out more often. When doing this follow the instructions provided by the manufacturer of the decalcifier.
Important: Prior to decalcifying, remove the brew filter (figure 1/V) and the brew filter's seal, as described in the section "Cleaning the brew filter" (figures 15, 16).
First pour the water into the water tank, then add the decalcifier; never in the reverse order. At least 0.5 litres of water must be used. The decalcifier should be added accordingly.
Remove the power plug from the power point and allow the appliance to cool.
Remove the steam nozzle with the attachment (figure 1/H).
Place the filter holder in position without the filter.
Place a sufficiently large container under the filter holder.
Insert the power plug into the power point and switch on the appliance.
Afterwards, turn the selector dial (figure 1 / 6 to the position and let approx. ^1/4 of the decalcifier flow through the system.
GB
Then switch off the appliance and allow the decalcifying solution to act for approx. 10 minutes.
Repeat this procedure with an additional 1/4 of the decalcifying solution.
Turn the selector dial (figure 1/G) to the position. Allow the remaining decalcifying solution to flow over the nozzle and act for another 10 minutes.
Then thoroughly clean the water tank.
Fill the water tank with fresh water and allow half to flow over the brew head and the other half to flow over the nozzle.
Repeat the procedure if there is a lot of limescale.
After decalcifying the appliance, replace the brew filter and seal.
What to do if...
-
the espresso temperature is too low:
-
Carry out the brewing procedure without using espresso grounds, but using the filter and filter holder, in order to preheat the system.
- Preheat the cups.
-
Decalcify the appliance.
-
the flow speed decreases noticeably:
-
Do not press the espresso grounds too firmly into the filter.
- Do not grind the espresso grounds too finely ("medium" fineness).
-
Decalcify the appliance.
-
the espresso is flowing out of the side of the filter holder:
-
Ensure that the filter holder has been placed in the retainer correctly.
- Twist the filter holder a little more firmly into the retainer.
-
Clean any espresso grounds away from the rim of the filter holder.
-
no espresso is coming out:
-
Ensure that the water tank has been filled and is correctly in place.
- Ensure that the filter holder has been placed in the retainer correctly.
- Ensure that the water/steam selection switch (figure 1/B) is in the position and the selector dial for water, steam and hot water (figure 1/G) has been turned right to the position.
- Do not press the espresso grounds too firmly into the filter.
- Clean the brew filter.
-
Decalcify the appliance.
-
the crema is no longer being produced as it should:
-
Ensure that there are enough espresso grounds in the filter.
- Always use fresh espresso grounds.
-
Press the espresso grounds lightly.
-
too little milk froth is created when steaming milk:
-
Always use cool, fresh and low-fat milk.
-
Clean the steam nozzle.
-
the flow increases:
- the espresso grounds have been ground too rough:
- Ensure that there are enough espresso grounds in the filter.
- the coffee machine switches itself off while operating:
The appliance pump is equipped with a temperature fuse that protects it from overheating. The temperature fuse interrupts the machine's operation, if the machine is operated for too long or if the pump is run without water. - Set the on / off switch to "off" and remove the plug from the mains socket.
- Leave the machine to cool for at least 20 minutes. Fill up with water.
- Plug the appliance into the mains again and switch it on. If the appliance still does not work, please contact our Customer Care Department.
Technical data
- Input supply voltage: 230 v,50 Hz
Power consumption: 1000 W
(See rating plate on the underside of the appliance.)
Disposal

Packaging material
The packaging materials are environmentally friendly and can be recycled. The plastic components are identified by markings, e.g. >PE< , >PS< , etc.
Please dispose of the packaging materials in the appropriate container at the community waste disposal facilities.

Old appliance
The symbol on the product or on its packaging indicates that this product may not be treated as household waste. Instead it shall be handed over to the applicable collection point for the recycling of electrical and electronic equipment. By ensuring this product is disposed of correctly, you will help prevent potential negative consequences for the environment and human health, which could otherwise be caused by inappropriate waste handling of this product. For more detailed information about recycling of this product, please contact your local city office, your household waste disposal service or the shop where you purchased the product.
F
F
Chere cliente, Cher client,
(figures 12, 13, 14, 15, 16)
(Fig. 12, 13, 14, 15, 16)

2. Ligar o aparelho / Pré-aquecer as chávenes
(Figura 12, 13, 14, 15, 16)
! Antes de proceder a qualquer limpeza deslgue o aparelho e retire a ficha da tomada de alimentacao.
BbIBHHTe BHeBO N BbIbTe DepeKaTeB HnIbTpHa N3 KpeJIeHna.

OTKNHbTe UNTOK 3aUHTbI naJIbueB H epKHe erO HaKaTbIM. BbIeTe n3 depKaTeIaFbTp aNn I3 FmNbTa p OtpoAotAHbI KoFe 3cnpcecco (Pnc.9).

ПROMOTe DePkaTeB ΦnIbTpA n ΦnIbTpTeNToB ODoH. HnKOrDa He MoTte DePkaTeB ΦnIbTpA B IocydomoEuHoM MaunHe!

EcIn BbHe nCnObn3yTe MaunHy B TeueHne DnIteNbHoro nepNoJa, He BBOpauBaIte DeprKaTeNbΦnIbTpacCHOBA KpePenneHne.3To npOdInT cPOK CnyKbI yNlOTHeHn 3aBapouHoro 6noka.
PonyuHenpe npa/B36nBaHne moJOnHoN neHbI (Pnc. 10, 11)
Topnyn nap MOKet npMMeHrbcBc
IIN B36bAHN MOnOCHN PeHbI
KOe KaNyUHHo N IIN HaRpeBaHN
KNIDKOCTei.
1. BkJIIOUeHnMaUNHbI

HaedeHbTe Ha cOnIIO IJIaB36uBaHHaMOJUHOI neHbI HacaIKy, KOTOPaI NOCTaBJIReTc BMeCte C MaSHINHOI (Pnc. 10).

BkIouHtE MaunHy nepeKlOuTaTeMe BkI./BbIK. (Pnc. 1/A). IIOJoxJnte, noka MaunHa He Ha6epet CBOHO pa6oyUo TempeaTypy Hne noracet opaHKeBbI TempeaTyPhbI INDnKaTOp (Pnc. 1/D).

YcTaHOBInTe nepeKIOUoAteIb peKIMOB "Boa/Ipap" (Pnc. 1/B) Ha 3HaOcK
2. Пolyчени па/B36нване Mолочип

3aJIeIte MOnoKo IINI npEHa3NaueHHyU DnI HaRpeBaHnI KJIKOCtB B JkapOpnpHuBl cocyd.

Iorpy3HTe BMOJOKO HINB npEHa3HaueHHYIO IaHarpeBaHNKnIKoCTb COIIIO IaB36NbAHN MoJIoCHNoIeHbI (Pnc.11).

Ipebeinte nobopoTHbI celenkTOp (Pnc.1/G) BJIeBO Ha 3NaUOK . MaunHa NaHcHT npOn3BOdntb nap. BNaUane n3 coPnla MOryt TaKxke Bblteyb HeCKoNbKO KaneJb ropRyeh BObl.
BaxnH HOpMaun: YTo6bI He npenTCTBOBaT BbIXOy npa, CONIO JINB B36uBaH NMOUHOI neHl He DOJHXo KAcTaBcA DHa cocya.

BbMOKeTe OcTaHOBHTNoJaCy napa,nepeBeJa NOBOPoTHbI ceJIeKToP (Pnc.1/G)OnTb BnPaBO B noJIOKeHHe *
RUS
OTCTaBbTe BcneHEnHHyO JxNkOcTb B CTOpOHy, npeBeDenIte ceneKTop npapa Ha 3NaOH K HocTaBbTe eRO B 3TOM NIOJKeHN eEe Ha HeCKoJIbKO cekyHd. TaKIM O6pa3OM Bby UdaJIte H3 COIIa CnyaHbIe OCTaTKM MOnoka I dpyTHX JxNkOcTei. OctopoxHo! Nap ouehb ropruH.
I IJIIOJUyHnTOnKo KpeMOBOI neHKn JyUe BCErO HcNoJb3OBaTb npoxlaADHO HeXKnHoe MOJOKO.
PnpiroTOBneHne KanyuHHo
3aJIeTe KoFe 3cnpceco B 6oIbIyIO
uAiky Ha 1 / 2 - 3 / 4 ee O6bema.
Oobabte B3bHTyIO MONOHyIO neHy.
PiocbInBe MOOnHyIO neHy KaKaONopOswkOM.
3. HarpeBaHne BOdBi
UcTaHOBInTe nepeKIOuChaIb peKIMOB "Boa/Plap" (Pnc.1/B) B noLoXKeHne
Подставытей сорлпь в36иваня моюнй пehь Кakуюлбб emkoctb (Pnc.1/H).
Перевдente noboporotnbicelenktopДЯ KoFe,napa n ropryeB Odbi(Pnc.1/G)В noIoxKeHne .N3conla DЯ B36nBaHnMOnOuHOnпeHbI noteueT ropraa BOda.
Iocne TOrO, KaK MaUNHa BbIdaCt HxKHOe KOJIueCTBO rOpRyEe BObl, nepeBeDHTe NOBOPOTHb CEJIeKTOp dJa KoFe, npa n rOpRyEe BObl (Pnc.1/G) ChOBa BV noJIOKeHne "●".
UHCTKa n yXoJ
EkeHHeBHyxOa
YTo6bI npEDoTbpaTbHaKnPaHHe
aCTNt KoFe Ha CTeHN MaunHbI,
peKoMeHdyem Bam eKeJdHeBHO
nepei nepBbIM n NocLe nocLe
nocJeHrO NO cHTy pInrTOBLeHnR
KoFe 3cnpcecco B TeueHne np6bl.10
CEKYD BbINOnHbTb POMbIBKy
CNCTEmbl 6e3 MOnOTOro KoFe
3cnpceco.DeiCTByte npn 3tOM Tak
Jke,Kak npn pInrTOBLeHnR KoFe,Ho
6e3 HcNoJIb3OBaHnR MoIOTOro KoFe
3cnpceco.
3aTeM Ha KOPOTKOE BpeM CHOBA nepeBedeHte NOBOPOTHbI CEleKTop (Pnc.1/G) B noJoxKeHne
BbIeIte n3 pe3epByapa dIa BObl OCTaBsuOcR B HEM BOy.
UHCTka
(Pnc. 12, 13, 14, 15, 16)
! PpeI npOBeHHeM YnCTKn BCaKn pa3 OTKnHouaTe N MaUHy N BbIHMaJTe CteBOB uTKeP n3 po3ETKn!
Hnkakyo qactb MaunnbI HeIb3 MybTB NocydomoeuHO MaunHe!
Bce noBepxHocTH MaunHbI npOTnpaTe BLnXHoMATEpnei. He npIMeHnTe ocTpblx n a6pa3nBhbIX qCTAuNX cpeDCTB.
ПоMeHbIeM Mepe OdIN pa3В HeJeIIO npOMbIaIte pe3epByap 06bIuHOI BOIo.
ΦnIbTpДЯ1ЧашкиИФиIbTpДЯ2-XчашекКофeВремOTВрemeHIn npOuHuaTeUcTkoI.
ConnoДЯВ36HbAHMaMOJouHOn neHbI
CHIMITE HacaIky c conla IIN B36BbAHNA MOIOUHOI peHbI IN IpOMOHTe ee OboUHOI BOIoJ.
TsqaTeIbHo npotpnte coNIO BlaJxHOn MaTePnei.ДЯ npOBeDeHnYuCTKnUydaJeHnHaKINBbMoKeTe OTBnHTnTb rONOBky CoIIA BCnOMoTaIeJIbHbIM HnCTpyMeHToM (Pnc.1/L).
KaneIbHaPeWetKa H KaneIbHbI noDoH
EcInnHdNkatop 3anOpHeHHa KaenbHoro noDoHa (Pnc.1/U) NoHNCLBaIe KaenbHoPeWetKN, 3NaHTKaenbHbI NOdoH HeOxOdmo ONopoKHNb.

BLOKHTe naIbIbI B OTBepCTne KaIeIbHOI peIeTKn. BbIbTe KaIeIbHyIO peIeTKy I npOMoITe ee NOI npOTouHoi BOIo (Pnc. 12).

YTO6bI ONOPOXHnTB KaneJIbHbI NOdON, BO3bMNTeCb 3a Hero C O6eHX CTOpOH N BbITAHnTE n3 MaunHbI BnpeD (Pnc.13).

BbHbTe PnactKOByU HacaKy C nHdNkATOpOM 3aNoJIHeHHa KaIeNbHOr POJDoHa N IpOMoHTe o6e 3tN DeTaII npOTouHoi BODO (Pnc.14).

BcTaBbTe nIpaTnKOByU HacaKy c INHdkaTOPOM 3aONJIHeHHa KaIeNbHO rO IOdoHa o6paTHo B KaIeNbHbI IIOdIoH.

CHOBA 3aDbHbTe YIcTbI KaJIbHbI INoIOH B MaUINHy I BCTaBbTe KaJIbHyIO peWETky Ha npexKHee MecTO.
UcTka 3abapouhoro OnIbItpa
BHytpn 3aBapOCHoro 6Ioka
HaxoDNTcR CNEUHaNBHy 3aBapOHyB
ΦNlbTp, Upe3 KOtOpb IPOXoHT
rOpya BODa. BpEmr O T BpEmeH
npOBepYTe, He 3a6nncb IIN RaeyKIn
3aBapOCHoro ΦNbTp aactNuamn
KOfe.
EcnIyueKInΦnIbTa 3aKynopeHbI:

BbINHTte 3aBaOpHuB hIbTp MoHeToi (Pnc.15).

BbHbTe 3aBaOpHbI Φnltp c yNtTheHnEM (Pnc. 16/1) n CnHmTe yNtTheHne Φnltpa (Pnc. 16/2).

OuHCTHTe 3aBapOHybI ΦnIbTp TEPNOB BODoN U SETKOI.

ПROMОЛТЕТENNOIBODOI yNPTHHeHne.

Ecni Heo6xOdmo TpaHcnpTnpoBaTb MaunHy npMmHycBOI TeMpeaType:

OnopoxHnTe pe3epByap nIy BoIbI.

IpebeDnte noBopOTbIc eTeKTOp (Pnc.1/G) B noloxKeHne Ⅲn daTte yNeTcyuHtbcra HaxOJaUeMycBa MaunHe napy.
YdaJIeHne HAKINN
Ecni KcΦe 3cnpecco npoxoHt uepe3 fIbTp cNlukOM dONrO, npa npOn3BecTH OChCTKy MaunHbI OT HAKIN.
PekomEnyem exKebBapTaIbHo OunuTaB MaunHy OT HAKINN C NOMOusbO JnDKoRO cpeDCTBa DJIYdAeHnHaKnH.EcN B1 npOKnBaTe B MeCTHOCTCN KecTKO BODO, PPOeDpyU dAaHEnHn HAKINN, BO3MOxH0, PnpDcTc npOBoDntb qaue. Co6JIOdaTpe pni 3tOM yKa3aHn N3rTOBHTeN CpeDCTBa DJIYdAeHn HaKnH.
Bakha HhOpma: PpeJde cem npNCTyNTb K ydaJIeHIO HaKINn, n3BLeKHTe n3 MaIINHbI 3aBapOHybI fNtbp (Pnc.1/V) nynloTHHeNe 3aBapOHyo fNtpa, KaK oNcAHO B pa3JeIe "UncTa 3aBapOHyo fNtpa" (Pnc.15, 16).
Chauana 3aene Te B pe3epByap BDOy, n TOJbKO NOCNE 3TOTO BHEcHTe CpeDCTBO Dnla ydaIeHna KaNPi, Hn B KOem cnyae He HAO6OpOT. HeoXoIMIO hCNoJIb3OBAtB He MeHee 0,5 n Bobl. CpeDCTBO Dnla ydaIeHna KaNII CNeDyET Do3InPOBaTb COOTBETCTBEHNO.

BbHbTe ceTeBOI uTeKepe n3 po3eTKn n daTte MaUNHe OCTbITb.

CHIMITE COJIO IJI B36IbHnMOLOuHOI PeHbI BMcTe C HacaIKOI(Pnc.1/H).

BCTaBbTe B KOΦeBapKy DepeKHaTeIb ΦIbTpα 6e3 ΦIbTpα.

IoNCTaBbTe noI depKaTeIb fHbTpapnoXOJaUyIO ObEmy EMKocTb.
RUS
BcTaBbTe ceTeBOI uTEKeP Bpo3eTKy IN BKJIIOHHTe MaJINHy.
I IepeBeDInTe NOBOPOTbHcEKeKTOp (Pnc.1/G) B noLoXKeHne n npOnyCTIne Upe3 cNCTeMy npImeRHO 1/4 pactBopa dJa ydaJIeHnHaKINi.
I Pocne 3TOrO OTKIOUChTE MaUNHy n npIMepHn Ha 10 MNHyT OCTaBbTe pactBop DeNCTBOBaTb. TaKyo Je pnoeDpyp npOBeNiTe n co CNeDuOSei 14 pactBopa dJa ydaJeHnHaKnPi.
UcTaHOBHTe NOBOPOTHbI cTeKTOp (Pnc.1/G) B noIOJKeHne .OcTaTOK pactBopa dIy ydaJIeHnHaKnPi npOnyCTIte uepe3 conIIO n CHOBa OCTaBBTe erO deIcTBoBaTb B TeueHne 10 MInHyT.
I Oocne 3toro pe3epByap Ia BObbl cNe dyET TsaTeBHo IpombITb.
3anonHnTe pe3epByap cBeKei BOIOJ. OndHy nOBoHNy 3ToI BObl npOnyCTHe cepE 3aBapOuHbI 6LoK, dpyryo nOBoHNy -pee3 coNIO. Pn HAnuHn 6OJIbUoro KOInueCTBa haknn IOBTOPiTe yKa3aHHyo npOceDpy.
I OOKHauHH ydaJIeHnHaKINn CHOBA BCTaBbTe Ha MeCTO 3aBaOpHuIΦNbTp nYyPiOTHeHne.
UTo DeJaTb,ecnH...
Kofoe 3cnpcecco NOJyuaeTcHedOctaTOUHO TOPAHM:
- UTo6bl npOrpeTb cnCTemy, nPoBeDHTe OOnH cIKn 3aBaPnBaHN 6e3 MoIOToro KoΦe 3cnpceco, HO C fNlbTpom I DepkatEnem fNlbTpa.
In these countries our AEG sales organisations own guarantee conditions are applicable. Please obtain further details direct.
Österreich, 4010 Linz, 0732 / 770101 - 30
Belgique/Belgié, 1502 Lembeek, 02/363.04.44
Czech Republic, Hanusova ul., Praha 4, 02/6112 6112
Danmark, 7000 Fredericia, 70 11 74 00
Espana, Madrid, 1-885-2700
France, 60307 Senlis, 03-44 62 24 24
Great Britain, Service Force 08705 929 929
Hellas, 18346 MOxXATO, 01/4822646
Island, Reykjavik (Braóurnir Ormsson hf), 91-3 88 20
Italia, 33080 Porcia (PN), 0434 39 41
Kratien, 10000 Zagreb, 385 1 6323 333
Luxembourg, 1273 Luxembourg-Hamm, 4 24 31-443
Copyright by Electrolux
822 949 255 - 1205
Subject to change without notice
- Equipment (Figure 1)
- !
- Safety instructions
- Safety when setting up the appliance
- Safety when operating the appliance
- Safety during cleaning
- Safety during repairs
- This appliance conforms with the following EU Directives:
- Prior to using the appliance for the first time
- Making an espresso
- Adding water (Figure 2)
- Switching on the appliance / preheating cups
- Adding espresso grounds (figures 3,4,5)
- Screwing on the filter holder (Figures 6, 7)
- Placing cup(s) underneath (Figure 8)
- Brewing an espresso
- Removing the drip tray (Figure 9)
- Creating steam/frothing milk (Figures 10, 11)
- Switch on the appliance.
- Creating steam/frothing milk
- Making a cappuccino
- Heating water
- Cleaning and care
- Daily care
- Cleaning
- (figures 12, 13, 14, 15, 16)
- Steam nozzle
- Drip grating and drip tray
- Cleaning the brew filter
- Decalcifying
- GB
- What to do if...
- Technical data
- Disposal
- Packaging material
- Old appliance
- F
- Chere cliente, Cher client,
- (Fig. 12, 13, 14, 15, 16)
- Ligar o aparelho / Pré-aquecer as chávenes
- (Figura 12, 13, 14, 15, 16)
- PonyuHenpe npa/B36nBaHne moJOnHoN neHbI (Pnc. 10, 11)
- BkJIIOUeHnMaUNHbI
- Пolyчени па/B36нване Mолочип
- RUS
- PnpiroTOBneHne KanyuHHo
- HarpeBaHne BOdBi
- UHCTKa n yXoJ
- EkeHHeBHyxOa
- UHCTka
- (Pnc. 12, 13, 14, 15, 16)
- Hnkakyo qactb MaunnbI HeIb3 MybTB NocydomoeuHO MaunHe!
- ConnoДЯВ36HbAHMaMOJouHOn neHbI
- KaneIbHaPeWetKa H KaneIbHbI noDoH
- UcTka 3abapouhoro OnIbItpa
- YdaJIeHne HAKINN
- UTo DeJaTb,ecnH...
Brand : AEG-ELECTROLUX
Model : EA150
Category : Automatic coffee maker