Cute9 T2 - Portable DVD Player Ferguson - Free user manual and instructions
Find the device manual for free Cute9 T2 Ferguson in PDF.

User questions about Cute9 T2 Ferguson
0 question about this device. Answer the ones you know or ask your own.
Ask a new question about this device
Download the instructions for your Portable DVD Player in PDF format for free! Find your manual Cute9 T2 - Ferguson and take your electronic device back in hand. On this page are published all the documents necessary for the use of your device. Cute9 T2 by Ferguson.
USER MANUAL Cute9 T2 Ferguson
Ferguson receivers support recording on external hard disk drives (HDDs) and flash memories (pendrives). In all instances, the correct operation of the recording function depends on the type of connected memory! You must read the following limitations.
REMEMBER:
- In order to use an external USB memory, the memory must support the USB 2.0 standard. To ensure stable recording and playback, you must use a memory with a recording speed of 9.0 MB/s or greater. Slower hard disk drives and flash memories may not function properly, have problems with recording (image jitter), or not function at all!!!
- Only disks with one basic NTFS or FAT32 partition (we recommend using the NTFS format) will function properly. If you do not have such a format, prepare the disk on your computer before connecting it to the receiver.
- Highly fragmented or used memories may also not operate smoothly or correctly.
- External hard disk drives should be autonomously powered, since the built-in USB port is unable to provide sufficient power.
CAUTION
- Under no circumstances should you disconnect the USB device from the receiver during recording or playback. Disconnecting during operation may cause damage to the receiver and/or flash memory, and to the recorded data.
- Do not touch the working device (and in particular the USB connector) with wet hands. Risk of electric shock and permanent damage to the receiver!
Table of contents
SAFETY MEASURES....4
DOWNLOADABLE SOFTWARE....4
ABOUT THE INSTRUCTION MANUAL....4
MARKINGS AND SIGNS APPLIED TO THE RECEIVER....5
BASIC INFORMATION ABOUT THE RECEIVER....6
- Main features....6
- Contents of box....6
- Important instructions concerning handling of the device....6
- Remote control....7
- Panels....9
- DVB-T....10
6.1 Connecting an aerial....10
6.2 Auto search....10
6.3 Recordings....10
- HD Media Player....11
- DVD playback....11
- Basic TV functions supported by the remote control....11
GLOSSARY OF TERMS....13
SPECIFICATION....14
SAFETY MEASURES
We request that you read the instruction manual and recommendations set forward therein. Also remember to correctly position the antenna!

In order to avoid an electric shock, never open the housing. Damage to the warranty seal shall void the warranty.

Disconnect the device from the mains during thunderstorms or when it is not to be used for an extended period of time. Please remember that the warranty does not cover damage to the equipment caused by a lightning strike.
Do not expose the device to direct sunlight. Place it away from sources of heat and humidity. Do not cover ventilation ducts, in order to ensure the correct circulation of air.

Place the device horizontally on a flat, even and stable surface.

If you move the device from a room that is warm to one that is cold (or vice versa), wait at min. 1 hour before connecting it to the mains. Otherwise, problems may arise.
The device should be placed away from vases, bottles, aquariums and other water containers in order to avoid damage. Do not touch the mains plug with your bare hands.

Do not place any objects on the housing of the device. This may cause overheating and reception problems.
Before commencing maintenance or installation work, disconnect the receiver from the mains. Do not clean the receiver with alcohol or liquids containing ammonia. If necessary, clean it with a soft, lint-free cloth wetted with a gentle solution of water and soap.
- Do not connect any cables when the mains plug is in the socket.
- Check the condition of your cables. Damaged cables may cause a fire.
- Please disconnect the receiver from the mains before connecting any cables.
DOWNLOADABLE SOFTWARE
Ferguson has taken every effort to provide users with software updates in order to ensure that the parameters of the television receiver are up to date. Ferguson reserves itself the right to amend, change or modify the software used in the television receiver as it shall choose and without prior notification. The latest version of the software is available on the website http://www.ferguson-digital.eu
ABOUT THE INSTRUCTION MANUAL
Ferguson has made every effort to provide the most current information about its products. Ferguson does not grant any guarantee as to the contents of the present instruction manual and disclaims any implied guarantees concerning market value or suitability for specific purposes. The information contained herein is an instruction intended to enable the correct usage and
maintenance of the receiver.
Ferguson reserves itself the right to introduce amendments, changes or translations of the instruction manual without prior notification thereof. For this reason, we recommend you regularly visit our website in order to obtain the latest information.
MARKINGS AND SIGNS APPLIED TO THE RECEIVER

Digital Video Broadcasting
Digital signal transmission logo.
This logo informs that the receiver conforms to the Digital Video Broadcasting standards.

Risk of electric shock - do not open.
This notice warns the user not to open the receiver housing. The housing may be opened solely by authorised service technicians.

CE logo.
This mark tells you that the device is following the provisions of Council Directive 2004/108/EC on the approximation of the laws of the Member States relating to the electromagnetic compatibility and the provisions of Council Directive 2006/95/EC and 93/68/EEC on the approximation of the laws of the Member States relating to low voltage and electrical safety.

Double insulation logo.
This logo informs that the receiver is an electrically safe device, provided that it is used in accordance with the recommendations set forward in the chapter concerning safety.

Take an active part in protecting the natural environment!
- Your device is made from materials that can be processed or recycled.
• To this end, you should deliver it to a designated collection point.

The RoHS mark
This mark tells you that the device is following The Directive on the Restriction of the Use of Certain Hazardous Substances in Electrical and Electronic Equipment 2011/65/EU (commonly referred to as the Restriction of Hazardous Substances Directive or RoHS)

compliant 2011/65/FU
BASIC INFORMATION ABOUT THE RECEIVER
1. Main features
Play DVD-video discs
» Reception of high definition channels FTA DVB-T2 channels
Play multimedia files
2. Contents of box
Unpack the receiver and check whether all of the following elements are present
→ remote control unit
→ instruction manual
→ Portable DVD player and DVB-T2 receiver
DVB-T2 antenna
AC adapter
→ car adapter
earphones
3. Important instructions concerning handling of the device
The screen menu (OSD) simplifies operation of the receiver and has made it possible to reduce the number of keys on the remote control. All of the functions are displayed on the screen and may be controlled by means of a small number of keys. Common functions have been connected in one "MENU". The selected function is coloured. Depending on the selected option, various "function keys" are displayed: red, yellow, green, blue and white in the form of graphics and descriptions. The colours represent various functions in individual "Menus". The selected function is activated by pressing a key on the remote control unit. The so-called function keys are active only when in the appropriate field there is information about it. The user interface makes it possible to navigate within a menu and between functions in a number of different ways. Certain buttons on the remote control allow direct access to functions. The buttons are multi-functional, i.e. their functions depend on previously activated elements.
NOTE:

Please keep in mind that new software may change the functionality of the receiver. Photographs and descriptions included in the instruction manual are for informational purposes only. If you should notice an error, please report it - we shall make every effort to have it rectified.
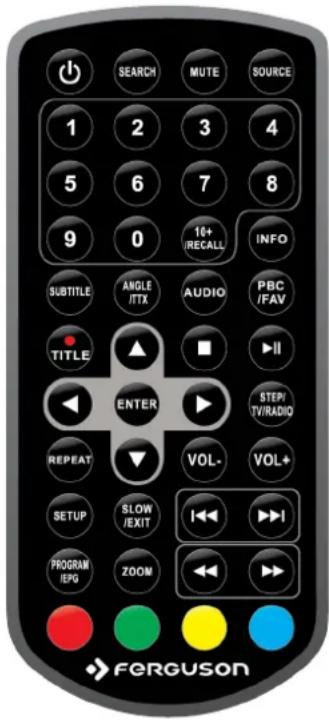
4. Remote control
| POWER Turn On/Off | |
| SEARCH DVD: select title, chapter | |
| MUTE Switch the sound on and off. | |
| SOURCE Switch source: DVD, DVB-T2 and HDplayer, SDplayer. | |
| 1, 2, 3, 4, 5, 6, 7, 8, 9, 0 | Select particular channel number on a channel list.Enter numeric values. |
| 10+/RECALL DVD: Enter tens digit valueDVB-T2: Returns to the previously displayed channel. | |
| INFO | Display information about the current programme. |
| SUBTITLE | Switch the on-screen captions on and off, if these are available. |
| ANGLE/TTX DVD: Switch camera view, if this is available.DVB-T2: Switch on the teletext on-screen, if this is available. | |
| PBC /FAV DVD: Menu navigation on VideoCD discs.DVB-T2: List of favorite channels | |
| AUDIO | DVD: Switching between soundtrack versions, if these are available. |
| • /TITLE | DVD: Jump to title DVD menuDVB-T2: record channel on connected USB device |
| ◀▶▲▼ | Menu navigation.DVB-T2: Switches to the next or previous channel. |
| ■ | Stop playback |
| |▶ | Start/pause playback |
| ENTER Confirm changes. | |
| STEP/TV/RADIO DVD: Enter setup menuDVB-T2: Switch between the list of television and radio channels. | |
| REPEAT | Switch repeat modes |
| VOL- VOL+ | Used to change the volume level (lower, higher). |
| SETUP | Displays the main menu on-screen. |
| SLOW/EXIT | DVD: Slow motion playbackDVB-T2: Exit the menu. |
| |◀◀ ▶▶| | Previous, next file/chaper/track |
| ◀◀ ▶▶ | Rewind or fast foreward |
| PROGRAM/EPG | DVD: Program playback order (only DVD-Video) |
text_image
SEARCH MUTE SOURCE 1 2 3 4 5 6 7 8 9 0 10+ /RECALL INFO SUBTITLE ANGLE /ITX AUDIO PBC /FAV TITLE ENTER I-II STEP/ TV/RADIO REPEAT VOL- VOL+ SETUP SLOW /EXIT I-I PROGRAM /IEPG ZOOM FERGUSON| DVB-T2: Displays the electronic programme guide. | |
| ZOOM DVD: Zoom |
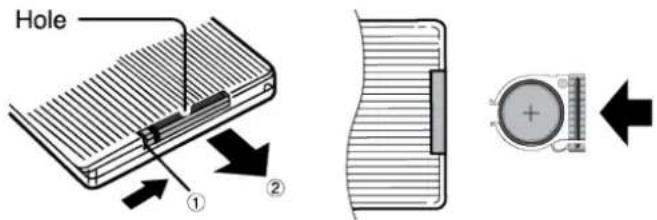
Installation of batteries
text_image
Hole ① ②Remove the cover of the battery compartment on the rear panel of the remote control unit. Insert CR2025 battery into the compartment, observing the indicated polarity. Slide in cover until it locks in place.
-
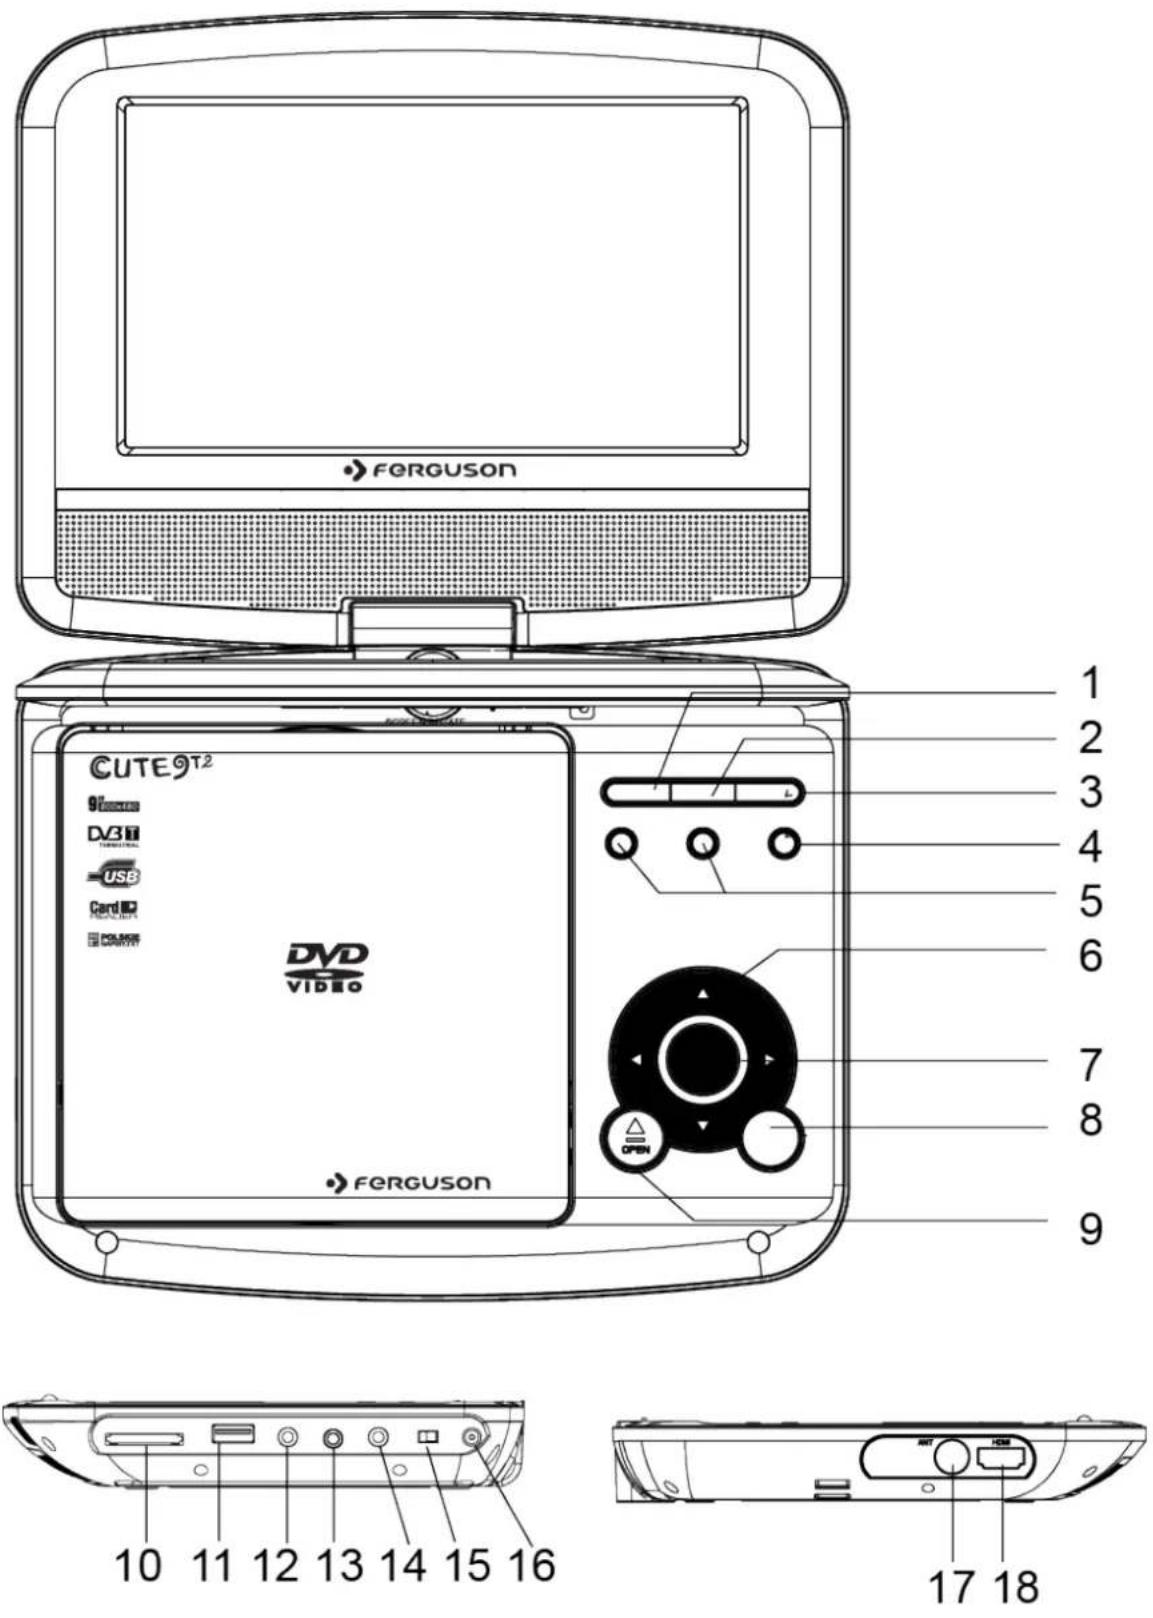
Panels
-
Start/pause playback
- Stop playback
- SOURCE Switch source: DVD, DVB-T2 and HDplayer, SDplayer
-
MENU Displays the main menu on-screen.
-
VOL- VOL+ Used to change the volume level (lower, higher).
-
Menu navigation.
-
ENTER Confirm changes
-
SETUP Displays the main menu on-screen.
-
OPEN Open DVD loader
-
SD/MMC/MS Flash card reader
-
USB Port for connecting an external USB memory device.
-
AV OUT CVBS video + stereo audio output
-
Minijack Earphone Socket
-
COAXIAL Digital coaxial SPDIF audio output.
-
ON/OFF: Turn the Ferguson on or off
-
DC IN 9-12V Power socket
-
ANT IN: Input of the concentric cable from the DVB-T2 antenna.
-
HDMI: Digital image and sound output to HD TV.
6. DVB-T2
6.1 Connecting an aerial
In order to check the correctness of connection of external equipment, for example a terrestrial antenna, read the installation manual or hire a professional technician!
Good reception is conditional on the precise placement of the antenna. Even the best antenna will cause reception problems if it is incorrectly adjusted. Even slight placement errors may render reception impossible or considerably impair image/sound quality. Before installation make sure that the location is suitable. The proper direction may be initially determined by making a comparison with other antennas. There should be no objects directly in front of the antenna, for these may block the signal from reaching the bowl! Once you select an optimal location for the antenna, fix and adjust it initially, and then proceed to a precise adjustment. Each antenna is fitted with regulating screws that make it possible to correct its vertical and horizontal placement.
Adjusting is somewhat more difficult in the case of digital tuners. You cannot perform adjustments on the basis of the image, because this appears with a certain delay. What is more, the indicators available in the settings menu also act with a delay, and therefore adjustment may take considerable time and be very imprecise. An antenna signal meter will be indispensable for setting up the antenna. The meter must be connected to the antenna cable between the antenna and the receiver. We strongly recommend hiring a professional technician!
6.2 Auto search
Switch to DVB-T2 mode – press SOURCE and then select "DVB-T2 HDplay" from the menu. Press SETUP. Go to "Channel Search" and select "Auto search". In this menu, you can search for channels automatically - the receiver searches only frequency by frequency according to the saved list of DVB-T2. This list can not be edited in a separate menu.
6.3 Recordings
Switch to DVB-T2 mode – press SOURCE and then select "DVB-T2 HDplay" from the menu. To view recordings press SETUP. Go to "USB" then "Multimedia" and select "PVR". This tab is used to play back recordings made using the receiver.
7. HD Media Player
The receiver is equipped with a simple multimedia player (SDplayer) and more advanced player (HDplayer). You can use it to listen to music, watch photographs and films for example mkv or avi from USB memory.
SDplayer has limited capabilities. It can play only selected formats. Resolution is limited to PAL (SD resolution).
HDplayer has more multimedia capabilities. It can play multimedia files up to 1080p (HD resolution).
Switch to HDplayer mode – press SOURCE and then select "DVB-T2 HDplay" from the menu. Go to "USB" then "Multimedia" and select "Movie" or "Photo" or "Music".
There are a few additional functions that can be operated by means of the functional keys described in the lower part of the screen.
CAUTION!!!
→ Playback of some files may fail or be incorrect.
- Copy protected content is not playable.
» Playback may suffer temporary interruptions (image freeze, faster/slower playback, etc) when the audio language (audio track) is changed.
A damaged movie file may not be played correctly.
Videos with resolution higher than 1920x1080@25/30P or 1280x720@50/60P may not work properly.
We do not guarantee smooth playback of movies encoded in profiles level 4.1 or higher in H.264.
Playback of movie files with video bitrate over 30 Mbps may be incorrect.
8. DVD playback
Switch to DVD mode - press SOURCE and then select "DVD" from the menu.
Open DVD loader - press OPEN button.
Insert DVD-video disc and close loader cover. Disc menu will appear on the screen. Use RCU or buttons on panel to select desired content and start playback.
9. Basic TV functions supported by the remote control
EPG
This function displays a programme guide. The contents of current, future and detailed information depend on what a given station broadcasts.
Having selected a programme, you can use the timer function (OK button) to automatically plan the viewing or recording of a given programme.
→ ANGLE/TTX - teletext
This function displays the teletext, provided that it is broadcast by the selected television station. Keep in mind that the correct code page (diacritical marks) is displayed depending on the language settings made in the language settings menu!
AUDIO
The AUDIO audio button displays a window with available audio soundtracks. You can select any of the broadcast soundtracks. Please keep in mind, however, that audio soundtracks with AC3/DD+ surround sound may be played back solely through an amplituner connected to the digital audio out – Coaxial.
This function is also available when playing back a recording. Audio soundtracks other than those recorded by default will be available during playback only if they are not scrambled.
SUBTITLE
The SUBTITLE button displays a window with available on-screen captions /subtitles. You can select any of the broadcast subtitles. If subtitles for a given language have been activated in the menu, these will be marked as default on the list. You can, however, select any of the broadcast subtitles. Keep in mind that the availability of subtitles and the way in which they are displayed depends on the broadcaster!
This function is also available when playing back a recording.
/ TITLE - recording
This function is available only when an external USB memory device is correctly connected!!!
-
Select a channel and press the ●/TITLE button. The present channel will now be recorded.
-
If you press the ●/TITLE button again, a list of options will be displayed, where you can determine the duration of the recording (by default, this is 2 hours).
-
In order to terminate recording, press the ■ button and confirm your decision.
INFO
Pressing the INFO button will call up the information bar for the current channel. This contains information about the current and next programmes (if such information is made available by the broadcaster)
If you press it twice, the receiver will display detailed information about the current and next programme – provided that such information is made available by the broadcaster.
GLOSSARY OF TERMS
DVB-T2 the Digital Video Broadcasting standard that defines modulation and e correction in terrestrial transmissions. MPEG-2 is used as the transport stream.
EPG - Electronic Programme Guide - service that displays detailed information about current and future programmes on the television screen.
FTA - Free-to-air - uuencoded radio an television channels that may be received on any television set.
STB - Set-top box - an electronic device connected to the television set, which processes the signal received from the ground-based, cable or network satellite antenna. It enables the playback of video and sound.
HD (High Definition) - Used to describe video content that is in one of the high definition video formats. These are broad 720i/p and 1080i/p. The 720 or 1080 refers to the number of horizontal lines used to define the picture and the "i" and "p" refer to "interlaced" or "progressive scan". Ordinary "SD / Standard Definition" TV used 576 lines (PAL standard).
Full-HD - HD television standard for 108 quality video, with 1080 horizontal lines.
HD Ready - HD television standard for 720p quality video, with 720 horizontal lines.
Aspect ratio: The ratio of vertical and (horizontal sizes of a displayed image. The horizontal vs. vertical ratio of conventional TVs is 4:3, and that of widescreens is 16:9.
JPEG: A very common digital still picture format. A still-picture data compression system proposed by the Joint Photographic Expert Group, which features small decrease in image quality in spite of its high compression ratio.
XviD: MPEG-4 based video compression technology, that can shrink digital video to sizes small enough to be transported over the internet, while maintaining high visual quality.
H.264: is a next-generation video compression format. H.264 is also known as MPEG-4 AVC. Developed for use in high definition systems such as HDTV, Blu-ray as well as low resolution portable devices, H.264 offers better quality at lower file sizes than both MPEG-2 and MPEG-4 ASP (DivX or XviD). H.264 is sometimes referred (erroneously) as x264 - x264 is the name of a popular freeware encoder for the H.264 format. H.264 is also sometimes referred to as MP4, again this is technically incorrect. MP4 is a container format much like AVI or MKV and it can be used to "house" many different types of compression codecs, not just H.264.
Container. The multimedia container file is used to identify and interleave different data types. Simpler container formats can contain different types of audio codecs, while more advanced container formats can support multiple audio and video streams, subtitles, chapter-information, and meta-data (tags) — along with the synchronization information needed to play back the various streams together. There are many container formats, such as AVI, Matroska (MKV), MOV, MP4, OGM, WAV, etc.
PCM (Pulse Code Modulation): A system for converting analog sound signal to digital signal for later processing, with no data compression used in conversion.
S/PDIF - Format for carrying audio digitally over either optical (TOSLINK) or electrical (Coaxial) cable. Can carry high quality DTS or Dolby Digital audio.
SPECIFICATION
Main Features
DVD chipset Mediatek
DVB-T2 chipset MSTAR 7818-L2
Screen TYPE & resolution Hannstar/CPT panel/ 800x480
Ports & Jacks
USB 2.0 port, SD/MMC card reader, headphone jack, AV out, coaxial, HDMI out
Battery Capacity 1000mAh
Charging time 3\~4hrs
Playback Time 2hrs
Mechanical
Dimension 240*186*44