721-428 - Snowplows Meec Tools - Free user manual and instructions
Find the device manual for free 721-428 Meec Tools in PDF.

User questions about 721-428 Meec Tools
0 question about this device. Answer the ones you know or ask your own.
Ask a new question about this device
Download the instructions for your Snowplows in PDF format for free! Find your manual 721-428 - Meec Tools and take your electronic device back in hand. On this page are published all the documents necessary for the use of your device. 721-428 by Meec Tools.
USER MANUAL 721-428 Meec Tools
natural_image
Red and black snowman push cart with attached power plug (no visible text or symbols)EN User instructions for electric snow blower
SE - Bruksanvisning i original
EN - Operating instructions (Translation of the original instructions)
Date of production: 2015-06-15
© Jula AB
SVENSKA....4
SÄKERHETSANVISNINGAR....4
TEKNISKA DATA....7
BESKRIVNING 8
ILLUSTRATIONER....9
MONTERING....12
HANDHAVANDE 12
UNDERHÅLL 14
FELSÖKNING 15
NORSK 17
SIKKERHETSANVISNINGER 17
TEKNISKE DATA 20
BESKRIVELSE....21
ILLUSTRASJONER....22
MONTERING....25
BRUK....25
VEDLIKEHOLD 27
FEILS∅KING....28
POLSKI 30
ZASADY BEZPIECZEŃSTWA 30
DANE TECHNICZNE 33
OPIS 34
RYSUNKI 35
MONTAŻ 38
OBSŁUGA 38
KONSERWACJA 40
WYKRYWANIE USTEREK 41
ENGLISH 43
SAFETY INSTRUCTIONS 43
TECHNICAL DATA 46
DESCRIPTION 47
ILLUSTRATIONS 48
ASSEMBLY....51
USE....51
MAINTENANCE ....53
TROUBLESHOOTING 54
SÄKERHETSANVISNINGAR
natural_image
Technical line drawing of a mechanical assembly with no visible text or symbols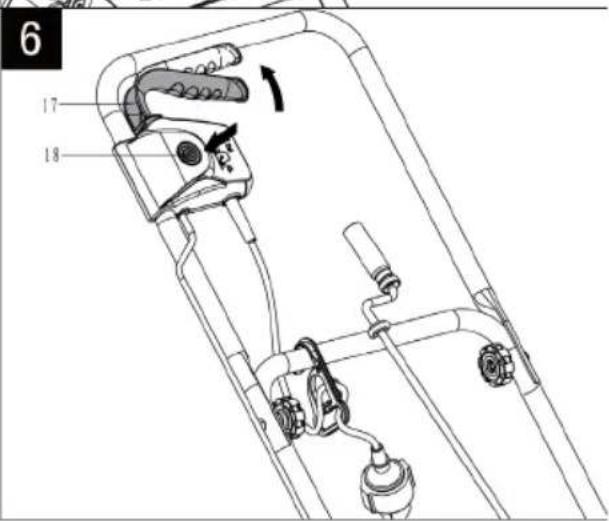
7

natural_image
Pure diagram of a coiled spring with directional arrows indicating flow or pressure (no text or symbols)A

natural_image
Pure diagram of a coiled spring with no text, numbers, or symbolsB
8


natural_image
Technical line drawing of a mechanical component or bracket assembly (no text or symbols)9
10

MONTERING
natural_image
Technical line drawing of a mechanical assembly with no visible text or symbols
7

natural_image
Pure diagram of a coiled spring without any text, numbers, or symbolsA
natural_image
Pure diagram of a coiled spring with no text, numbers, or symbolsB
8


natural_image
Technical line drawing of a mechanical component or bracket assembly (no text or symbols)9
10
MONTERING
natural_image
Symbol of a trash bin with no visible text or labelsVerne om miljøet!
natural_image
Technical line drawing of a mechanical assembly with no visible text or symbols
7
natural_image
Pure diagram of a coiled spring without any text, numbers, or symbolsA

natural_image
Pure diagram of a coiled spring with no text, numbers, or symbolsB
8

natural_image
Technical line drawing of a mechanical component or bracket assembly (no text or symbols)9

10

MONTAŽ
natural_image
Pure electrical circuit lines without any symbolsDBAJ O ŚRODOWISKO!
Read the user instructions carefully before use!
Save them for future reference.
General safety instructions
- The device must be assembled before use.
- Check that the mains voltage corresponds to the rated voltage on the type plate.
- Never move the machine by pulling the power cord. Do not pull the power cord to unplug the plug.
- Switch off the machine, unplug the power cord, and wait until all moving parts have completely stopped before moving the machine.
- Switch off the machine before unplugging the power cord/extension cord.
- Keep onlookers, especially children, and pets at a safe distance.
- The user is responsible for any accidents or risks to other persons or property.
- Plan the work so that thrown snow does not hit windows, walls, cars, etc., to avoid the risk of damage to property and/or personal injury. Never direct the ejector towards people and never let anyone stand in front of the machine.
- Never allow children, or anyone who is unfamiliar with the machine and these instructions, to use it. Never use the machine when you are tired or under the influence of drugs, alcohol or medication.
- Do not use the machine for any other purpose than the one it is designed for.
- Do not use the machine without the ejector tube fitted.
- Keep your hands and feet away from moving parts.
- Never insert your hands or other body parts in the ejector opening or close to the rotor. If the rotor is blocked, it can kickback and cause personal injury when it is released, even if the machine is switched off. Use a long stick, a shovel or the like to remove blockages.
- Wear sturdy, non-slip shoes. Make sure you always have a good footing on slopes.
- Wear safety glasses. Do not wear loose-fitting clothes, jewellery, or watches etc. that can fasten in moving parts. Wear a hair net if you have long hair.
- Only use the machine in daylight, or in good artificial lighting.
- The rotor must be able to move freely in order to start the machine.
- The operator must always be behind the handles when the machine is running.
- Hold the handles firmly. Never run with the machine.
- Do not overload the machine by trying to remove too much snow too quickly.
- Drive slowly around corners and when turning.
- IMPORTANT: The rotor does not stop immediately when the machine is switched off.
-
Switch off the machine, unplug the power cord and wait until all moving parts have completely stopped before carry out maintenance and/or cleaning.
-
Be careful when cleaning and carrying out maintenance. DANGER: Wear safety gloves.
- Never modify the safety devices in any way.
- Carefully inspect the area where the machine is to be used and remove any stones, wires, bones or other foreign objects.
- Switch off the machine immediately if the brushes hit a foreign object. Check the machine and repair any damage before you use it again.
- Switch off the motor immediately if the machine starts vibrating abnormally. Identify the cause. Vibration usually indicates a problem.
- Before using the machine, check that it is not damaged and that it is working properly as designed. Before using the machine, check that it is not damaged and that it is working properly as designed. Any faults must be rectified immediately before using the machine.
- Replace any worn or damaged parts to keep the machine safe. Only use spare parts recommended by the manufacturer. The use of other parts can lead to personal injury or material damage.
Electrical safety
- The minimum cable cross section for the mains connection is 1.5 mm ^2 for cable lengths up to 25 m and 2.5 mm ^2 for cable lengths greater than 25 m. Longer cables cause a voltage drop
- Only use extension cords approved for outdoor use, otherwise there is a risk of electric shock.
- Route the power cord so that it is not folded or in the way. Make sure that the connection to the extension cord does not get wet.
- If you use a cord reel as an extension cord, always make sure to reel out the full length of cord.
- Do not drive the machine over the extension cord. The cord should always be behind you. Pull the power cord along a cleared surface.
- Use the power cord only for its intended purpose. Keep the power cord away from heat, oil and sharp edges. Do not pull the power cord to unplug the plug.
- Avoid the risk of electric shock. Avoid body contact with earthed surfaces such as pipes, radiators, cookers and refrigerators.
- Check extension cords regularly and replace if damaged.
- Do not use the machine if the power cord or plug are damaged, or touch the cord before it is unplugged – risk of electric shock.
- If the machine is used outdoors, only use an extension cord approved for outdoor use.
- Do not make temporary electrical connections.
-
Never dismantle or bypass the machine's guards and other safety devices.
-
The machine must be connected to the mains supply with a residual current device with a maximum tripping current of 30 mA. Electrical machines must only be repaired by an authorised electrician or at an authorised service centre. The electrical installation must comply with local regulations. A damaged power cord must be replaced by an authorised service centre, or qualified person, to ensure safe use.
- Repairs of parts must be carried out by an authorised service centre. Only use spare parts and accessories recommended by the manufacturer. The use of other spare parts or accessories can result in fire, electric shock and/or personal injury. The manufacturer is not liable for any personal injury or damage to equipment resulting from the use of other spare parts and/or accessories.
Symbols
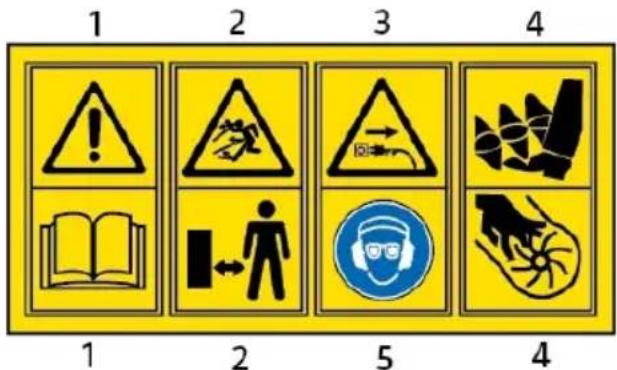
1 IMPORTANT: Read all the instructions and safety instructions before use.
2 Keep children, onlookers and pets away from the work area. There is a risk that they will be hit by flying objects.
3 Immediately disconnect the device from the mains supply if the power cord and/or plug become damaged.
4 Keep your hands and feet away from moving parts.
5 Wear ear protection and safety glasses.
TECHNICAL DATA
| Rated voltage 230 VAC / 50 Hz |
| Output 1600 W |
| Speed no load 2000 rpm |
| Working width 400 mm |
| Max working depth 180 mm |
| Max throw length 4 m |
| Safety class II |
| Weight 11.5 kg |
| Sound pressure level LpA 83 dB(A), K=3 dB |
| Sound power level, LwA 98 dB(A), K=3 dB |
| Guaranteed sound power level, LwA 101 dB(A), K=3 dB |
| Vibration level 6.0 m/s ^2 , K=1.5 m/s ^2 |
Always wear ear protection!
The declared vibration value, which has been measured by a standardised test method, can be used to compare different tools with each other and for a preliminary assessment of exposure.
Warning: The actual vibration level when using power tools may differ from the specified maximum value, depending on how the tool is used. It is therefore necessary to determine which safety precautions are required to protect the user, based on an estimate of exposure in actual operating conditions (taking into account all stages of the work cycle, e.g. the time when the tool is switched off and when it is idling, in addition to the start-up time).
DESCRIPTION
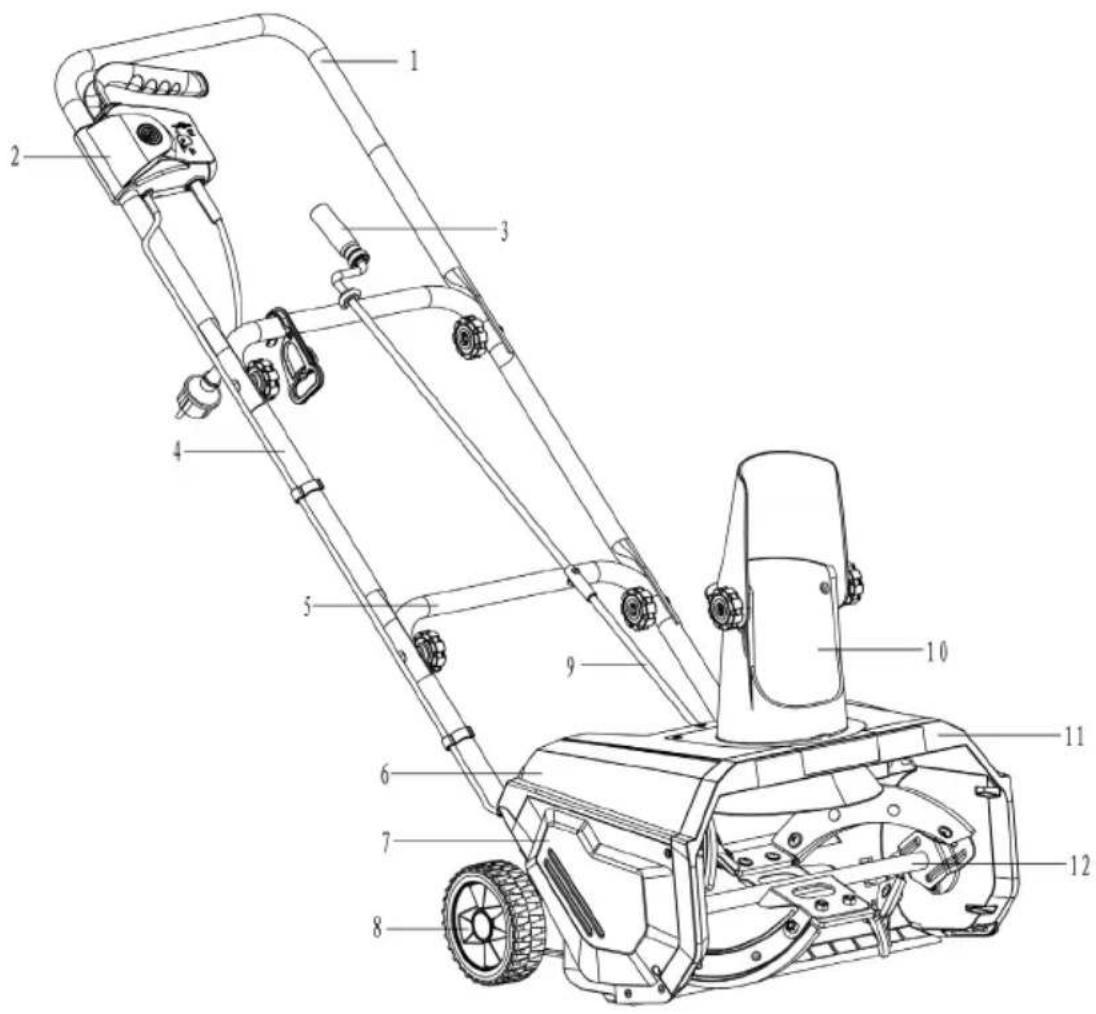
- Handle, upper section
- Power switch and plug
- Handle
- Handle, centre section
- Handle, lower section
-
Top casing
-
Cover
- Wheels
- Casing
- Ejector tube
- Motor unit
- Rotor
ILLUSTRATIONS
3
4
5
natural_image
Technical line drawing of a mechanical assembly with no visible text or symbols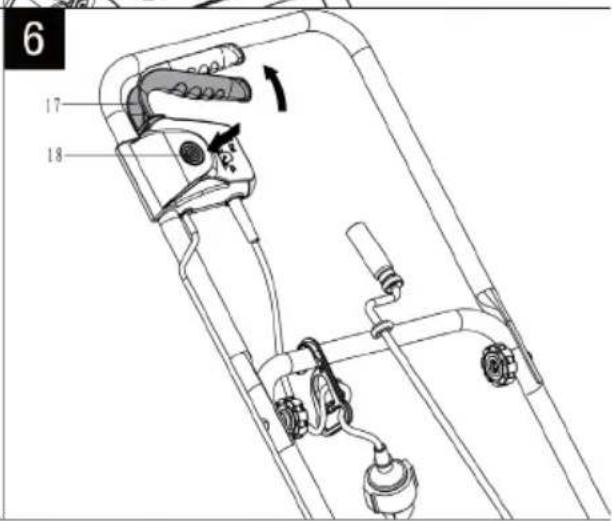
7

natural_image
Pure diagram of a coiled spring with directional arrows indicating flow or pressure (no text or symbols)A

natural_image
Pure diagram of a coiled spring with no text, numbers, or symbolsB
8


natural_image
Technical line drawing of a mechanical component or bracket assembly (no text or symbols)9

10

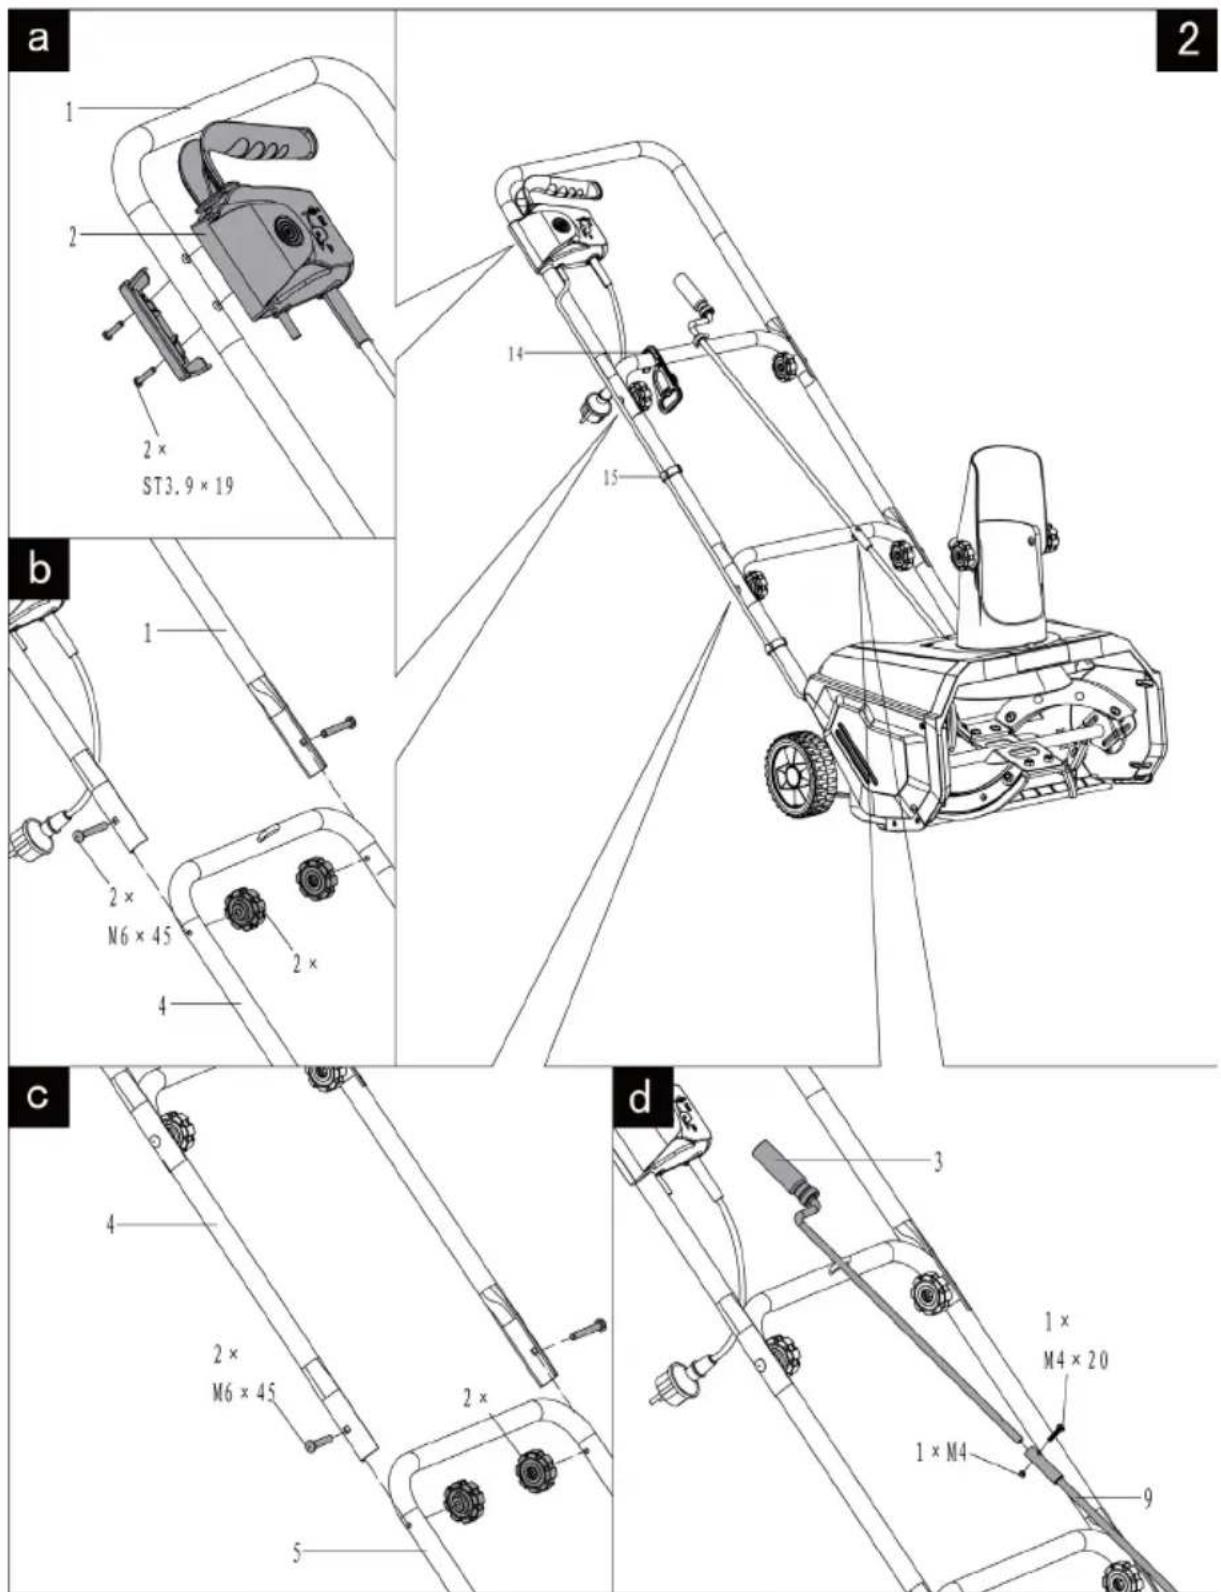
ASSEMBLY
Power switch and plug (fig. 2a)
Mount the power switch (2) on the upper part of the handle (1) and fasten using the two screws provided.
Handle (fig. 2, fig. 3)
- Position the upper part of the handle (1) on the centre handle section (4) and fasten using the two screws and wing nuts provided (fig. 2b).
- Position the centre section of the handle (4) on the lower handle section (5) and fasten using the two screws and wing nuts provided (fig. 2b).
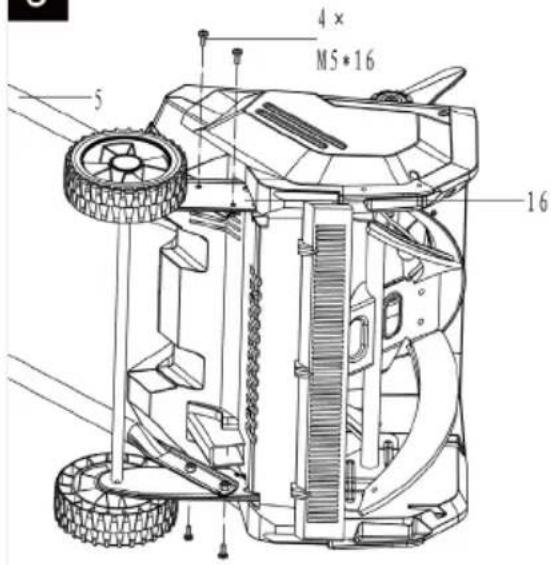
- Mount the lower section of the handle (5) on the rear wheel bracket (16) and fasten using the four screws and wing nuts provided (fig. 3)
- Tighten all the screw connections firmly.
- Fit the strain relief (14) for the power cord on the handle's centre section.
- Fasten the power cord with the two supplied clips (15).
Crank (fig. 2d)
- Connect the crank (3) to the casing of the motor housing.
- Secure the crank using the supplied screws and nuts.
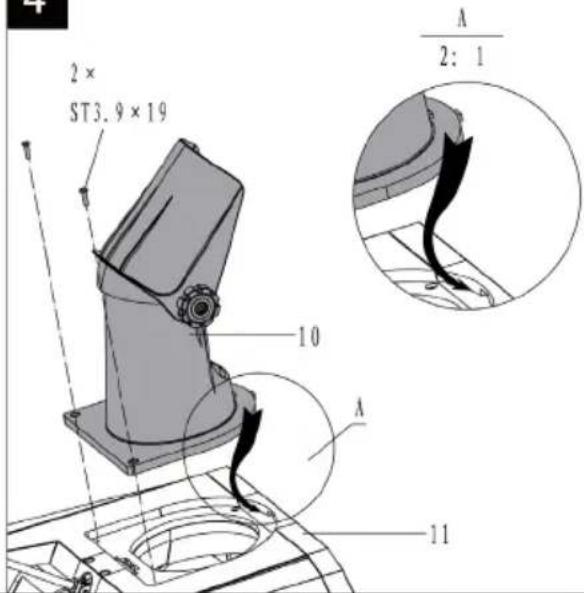
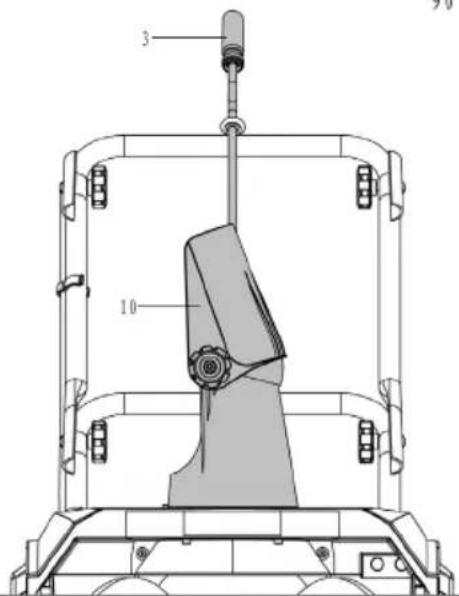
Ejector tube (fig. 4)
- Position the ejector tube (10) in the hole in the cover.
- Fasten the ejector tube using the two supplied screws.
USE
Intended use
The machine is designed for snow clearing on steps, patios, etc. in residential gardens. It is not intended for public areas, parks or sports grounds and not for agricultural or forestry applications. The machine must only be used on flat, hard surfaces, free from sand, stones, debris, wires and other objects. The machine must only be used as it is intended to be used and in accordance with these instructions. The manufacturer cannot accept liability for personal injury or material damage resulting from improper use.
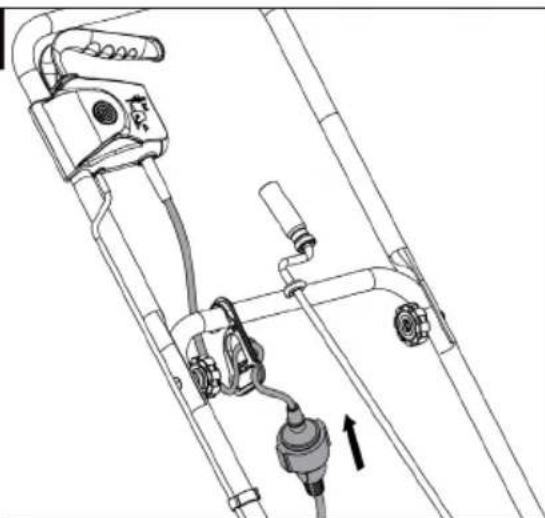
Mains connection (fig. 5)
Make a loop in the extension cord, pull this through the handle and hang on the cable holder. This reduces the risk of the power cord being pulled loose from the machine while working. WARNING: Do not handle the machine, power cord, plug or charger with wet hands or when you are standing in water – risk of electric shock.
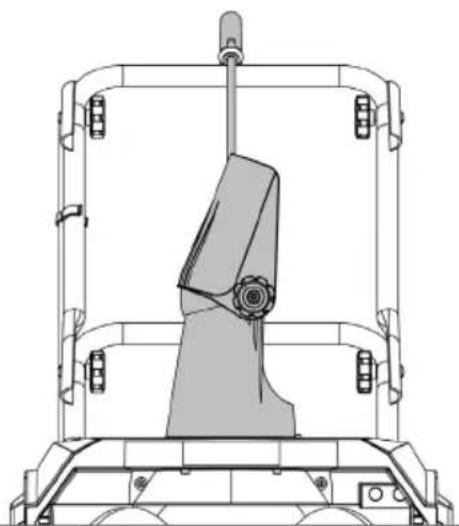
Power switch (fig. 6)
WARNING: The rotor starts rotating immediately when the power switch is set to the ON position. Keep your hands and feet away from the rotor. To start, hold the handle firmly with both hands, hold in the power switch catch and press the power switch to start. Keep the power switch catch pressed in and release the power switch. Switch off the machine by releasing the power switch. The power switch returns automatically to the off position.
Use
- Carefully inspect the area where the machine is to be used and remove any stones, wires, bones or other foreign objects.
- Check that all bolted joints are properly tightened.
- Check the rotor regularly for wear.
- Point the ejector in a safe direction, away from operator and bystanders.
- Clear before the snow becomes too deep. It is easiest to clear as soon as possible after it has snowed.
- Lift the rotor slightly off the ground before you start.
- Start the machine and lower the rotor until the scraper blade reaches the ground. Push the machine forwards. Adjust your speed so that the snow is cleared completely. A suitable speed depends on the snow depth.
- Direct the snow to the left or right by tilting the machine slightly. For the best results, throw the snow downwind and run with overlapping movements.
- The machine can remove up to 18 cm deep snow one pass. If the snow is deeper, hold the machine at the top and bottom of the handle and work with sweeping movements to remove the upper layer. Make several passes to clear all the snow.
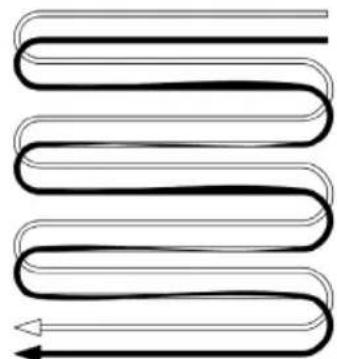
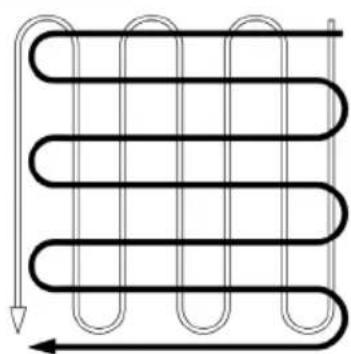
- When clearing large areas, plan the work so you do not throw snow in the wrong places and must then make a number of unnecessary passes (fig. 7).
Work pattern A (fig. 7 a)
Direct snow to the left or right. On roads or paths it may be suitable to start in the middle. Run from one end to the other and back again and throw snow on both sides.
Work pattern B (fig. 7 a)
If it is only possible to throw snow to one side, start at the opposite side of the work area.
NOTE:
- The scraper blade and rotor will wear if you clear all the way down to the ground. You can spare the equipment by leaving a few centimetres of snow, which you can shovel away or salt.
- Let the rotor run a few minutes after work, so that ice does not form on the moving parts. Switch off the machine, unplug the power cord, and wait until all moving parts have completely stopped and then wipe any snow and ice from the machine.
WARNING: Never clear the ejector tube by hand or other parts of the body – risk of serious personal injury.
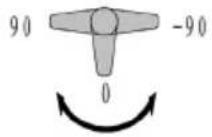
Setting the ejector direction (fig. 8)
Set in the required ejection direction by using the crank.
MAINTENANCE
NOTE: Switch off the machine, unplug the power cord and wait until all moving parts have completely stopped before carry out maintenance and/or cleaning.
- Proper maintenance and regular cleaning are essential for the machine to work satisfactorily.
- Remove snow and ice from the rotor and other parts after each use.
- Clean the machine with a damp cloth and a soft brush. Never pour or spray water on the unit.
- Do not use cleaning agents or solvents that can damage plastic parts.
- Apply or spray some oil on all unpainted metal surfaces to protect them from corrosion.
- Store the machine in a dry place out of the reach of children.
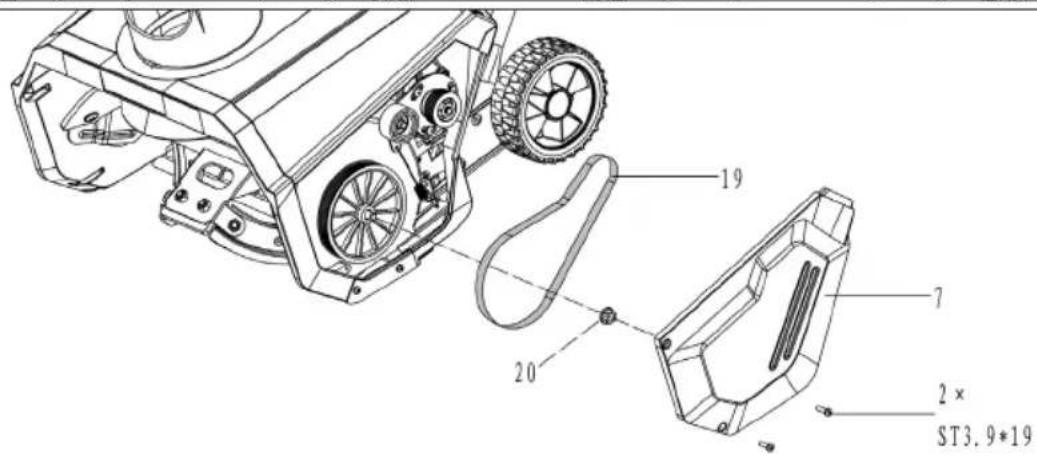
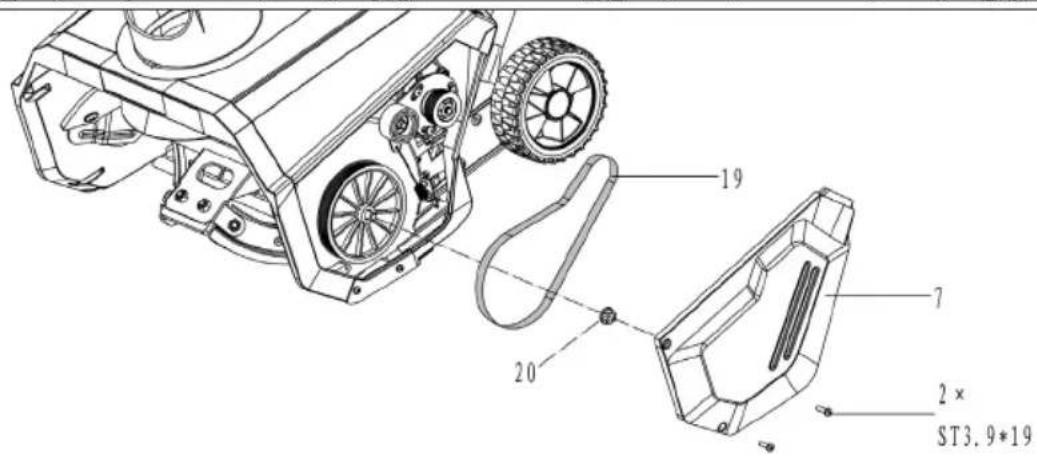
Replacing the drive belt (fig. 9)
The drive belt (19) must be replaced when worn.
- Loosen the screws and remove the cover (7).
- Remove the nut (20) and lift off the belt (19) from belt pulley.
- Fit the new drive belt.
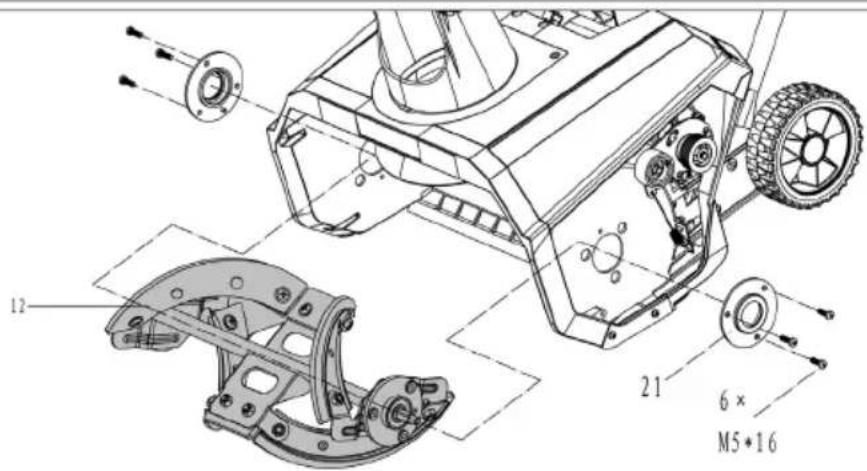
Replacement of the rotor (fig. 10)
IMPORTANT: Check the joints on the rotor before use. A loose rotor causes vibrations and can damage the machine.
- Remove the cover (7), the nut (20) and belt (19).
- Loosen the screws (12) and (21) on each side of the rotor.
- Remove the rotor and fit a new one.
TROUBLESHOOTING
| Problem Cause Action | ||
| The motor will not start. Mains voltage fault. Check that the mains voltage corresponds to the rated voltage on the type plate. | ||
| Throws snow poorly. Drive belt worn or damaged. Replace the belt. | ||
| Abnormal vibration. Drive belt worn or damaged. Replace the belt. | ||
Jula reserves the right to make changes. In the event of problems, please contact our service department. www.jula.com
natural_image
Pure mechanical diagram showing a binocular device with no text or symbolsCare for the environment!
Must not be discarded with household waste!
This product contains electrical or electronic components that should be recycled.
Leave the product for recycling at the designated station e.g. the clocal authority's recycling station.
CE
EC DECLARATION OF CONFORMITY
EG FÖRSÄKRAN OM ÖVERENSSTÄMMELSE
EF SAMSVARSERKLÆRING
DEKLARACJA ZGODNOŚCI WE

Jula AB, Box 363, SE-532 24 SKARA, SWEDEN
Electromagnetic Compatibility Directive 2004/108/EC
EN 55014-1:2006+A1+A2, EN 55014-2:1997+A1+A2
EN 61000-3-2:2006+A1+A2, EN 61000-3-3:2008
EN 61000-3-11:2000
Outdoor Noise Directive 2000/14/EC, amended by 2005/88/EC
RoHS Directive 2011/65/EU
This product was CE marked in year -15
natural_image
Abstract blue line drawing with intersecting strokes and a horizontal dashed line (no text or symbols)Stefan Rundberg
PRODUCT MANAGER