
AI-S TC-16/ TC-16S - Video Converter NIKON - Free user manual and instructions
Find the device manual for free AI-S TC-16/ TC-16S NIKON in PDF.

| Product type | AF teleconverter |
| Brand | Nikon |
| Model | AI-S TC-16 / TC-16S |
| Conversion factor | 1.6x |
| Aperture loss | 1-1/3 stops |
| Optical construction | 5 lenses in 5 groups, Nikon Integrated Coating (NIC) |
| Effective aperture range | f/2.9 to f/51 |
| Focusing | Automatic via built-in micromotor; detection range varies depending on lens |
| Focus lock | Yes, via dedicated button |
| Power supply | Via batteries of the AF DX-1 viewfinder (electrical contacts) |
| Dimensions | Approx. 88 mm diameter × 43.5 mm length |
| Weight | Approx. 285 g |
| Mount | Nikon F mount (both sides) |
| Compatibility | Nikon F3AF with AF DX-1 viewfinder; Nikkor AI and Nikon Series E lenses |
| Included accessories | Front lens cap BF-1, rear cap LF-1 |
| Optional accessories | Soft case No. 61 |
| Maintenance | Clean with a soft cloth; use a blower for lenses; avoid shocks |
| Safety | Use only with F3AF and DX-1 viewfinder; do not mount incompatible lenses |
| Spare parts and repairability | Accessories available; repair by an authorized Nikon technician |
| General information | Manual available in multiple languages; free download in PDF format |
Frequently Asked Questions - AI-S TC-16/ TC-16S NIKON
User questions about AI-S TC-16/ TC-16S NIKON
0 question about this device. Answer the ones you know or ask your own.
Ask a new question about this device
Download the instructions for your Video Converter in PDF format for free! Find your manual AI-S TC-16/ TC-16S - NIKON and take your electronic device back in hand. On this page are published all the documents necessary for the use of your device. AI-S TC-16/ TC-16S by NIKON.
USER MANUAL AI-S TC-16/ TC-16S NIKON
③、開放F值为1.8,0,8,8,8,8,8,8,8,8,8,8,8,8,8,8,8,8,8,8,8,8,8,8,8,8,8,8,8,8,8,8,8,8,8,8,8,8,8,8,8,8,8,8,8,8,8,8,8,8,8,8,
(表3)
-
Focus lock button
-
Lens mounting index
-
ON/OFF switch
-
Lens speed indexing post
-
Lens type signal pin
-
Focal length indexing ridge
-
AF connecting pins for F3AF
-
Lens release button
-
Camera mounting index
-
Meter coupling ridge
BEFORE USING THE TC-16
(Read the following carefully and get the most out of your new AF teleconverter TC-16 now and in the many years to come.)
Like Nikon cameras and lenses, your new teleconverter is a high-precision instrument. Mounted between the Nikon F3AF camera body with the DX-1 AF Finder installed, the only camera assembly the TC-16 can work with, it increases the prime lens's effective focal length to 1.6X with but a 1-1/3 f/stop loss in effective aperture.
You'll find your TC-16 able to work with a large number of lenses, providing autofocus operation only (i.e., focus-aid function not available) with Nikkor and Nikon Series E lenses. A built-in micromotor enables the teleconverter lens elements to move, assuring virtually instantaneous focus detection and pinpoint subject focus.
An advanced, multiple-element lens construction ensures your teleconverter will deliver optimum optical performance with but negligible decrease in image quality. As with most Nikon optics, the TC-16 benefits from Nikon Integrated Coating (NIC), applied to all air-to-glass surfaces to reduce ghost images and flare and to make color rendition more natural-looking.
LENS/TELECONVERTER COMPATIBILITY
The following table lists a variety of Al-type Nikkor and Nikon Series E lenses which can be used with the Nikon AF Teleconverter TC-16.
| Wideangle | A Nikkor 24mm f/2 A Nikkor 24mm f/2S A Nikkor 28mm f/2 (Product number 540021 or higher) A Nikkor 28mm f/2S A Nikkor 35mm f/1.4S A Nikkor 35mm f/2 (Product number 931001 or higher) A Nikkor 35mm f/2S |
| Normal | A Nikkor 50mm f/1.2 A Nikkor 50mm f/1.2S A Nikkor 50mm f/1.4 (Product number 3980001 or higher) A Nikkor 50mm f/1.4S A Nikkor 50mm f/1.8 Nikkor 50mm f/1.8S Series E 50mm f/1.8 A Nikkor 50mm f/2 (Product number 3640001 or higher) A Nikkor 55mm f/1.2 A Noct Nikkor 58mm f/1.2 A Noct Nikkor 58mm f/1.2S |
| Telephoto | A Nikkor 85mm f/1.4S A Nikkor 85mm f/2 A Nikkor 85mm f/2S A Nikkor 105mm f/1.8S A Nikkor 135mm f/2 A Nikkor 135mm f/2S A Nikkor 200mm f/2 IF-ED A Nikkor 200mm f/2S IF-ED A Nikkor 300mm f/2S IF-ED |
Important!
- You can distinguish Al-S from Al lenses through the color of the minimum aperture indication on the aperture-direct-readout (ADR) scales—the Al-S's scale is engraved in orange, that of Al in white.
- It is impossible to attach the TC-16 to any prime lens on which another teleconverter has been mounted.
- If the prime lens is the 300mm f/2 IF-ED, make sure you don't use its dedicated teleconverter TC-14C at the same time.
- Non-Al-type lenses cannot be used with the TC-16.
- Do not attempt to mount any lens other than those listed in the table above (especially any Al-modified lens or other manufacturers' lenses) on the TC-16—this will damage both lens and teleconverter.
CONNECTING LENS AND TELECONVERTER A_1, A_2
Position the lens in the TC-16's bayonet mount with its aperture index aligned with the TC-16's lens mounting index ⑥: then, grasping the lens aperture ring, turn the lens counterclockwise until it click-stops into position. (With either the 300mm f/2 IF-ED or 200mm f/2 IF-ED, you turn the TC-16 clockwise until it click-stops into position.)
To remove: Depress the lens release button ⑨ on the TC-16 while grasping the lens aperture ring, and turn the lens clockwise until the lens aperture index is aligned with the TC-16's lens mounting index. (As for the 300mm f/2 IF-ED or 200mm f/2 IF-ED, turn the TC-16 counterclockwise until the lens aperture index is aligned with the TC-16's lens mounting index.)
MOUNTING ON THE CAMERA BODY B1, B2
Position the lens/teleconverter assembly in the camera's bayonet mount so that the TC-16's camera mounting index ⑤ is aligned with the camera's lens mounting index. Then, grasp the aperture ring of the lens or the TC-16 and turn the lens/teleconverter assembly counterclockwise until it click-stops into position. (In case of the 300mm f/2 IF-ED or 200mm f/2 IF-ED, you turn the F3AF camera body clockwise until it clickstops into place.)
Note:
- When mounting the lens/teleconverter assembly on the F3AF camera body, make sure with your finger that the camera's meter coupling lever is locked in the "down" position. For further information, refer to the F3AF's instruction manual.
To remove: Depress the lens release button on the camera body while grasping the aperture ring of the lens or the TC-16, and turn the lens/teleconverter assembly clockwise until it comes off. (In case of the 300mm f/2 IF-ED or 200mm f/2 IF-ED, you turn the F3AF camera body counterclockwise until it comes off.)
INITIAL PROCEDURES FOR AUTOFOCUS PHOTOGRAPHY C
- First attach the lens to the TC-16, then mount the lens/teleconverter assembly onto the F3AF/DX-1 assembly.
- Slide the TC-16's ON/OF switch ② to the "ON" position as far as it will go—do not slide it only part of the way.
-
Set the lens distance scale to the infinity () mark.
-
At infinity, the focus detection range varies in accordance with the lens in use—see following table.
-
Lightly touching the F3AF's shutter release button will activate the micromotor built into the TC-16; simultaneously, the LED in-focus (▶ or focus-impossible warning indicator ( × ) inside the viewfinder will light up.
-
Press the shutter release button all the way to release the shutter when both LED in-focus indicators (▶ light up to indicate subject in-focus condition. For further information on viewfinder information, etc., refer to the F3AF camera body's instruction manual.
Focus detection range when lens is at infinity ()
| Lens in use | Focus detection range |
| 300mm | Infinity (∞) to 35m (114.8 ft) |
| 200mm | Infinity (∞) to 16m (52.5 ft) |
| 135mm | Infinity (∞) to 7.2m (23.6 ft) |
| 105mm | Infinity (∞) to 4.4m (14.4 ft) |
| 85mm | Infinity (∞) to 2.9m (9.5 ft) |
| 58mm | Infinity (∞) to 1.4m (4.6 ft) |
| 55mm | Infinity (∞) to 1.3m (4.3 ft) |
| 50mm | Infinity (∞) to 1.2m (3.9 ft) |
| 35mm | Infinity (∞) to 0.61m (2 ft) |
| 28mm | Infinity (∞) to 0.42m (1.4 ft) |
| 24mm | Infinity (∞) to 0.33m (1.1 ft) |
Notes:
- All focus detection operating ranges are approximate.
- If your subject is outside the focus detection range, the LED focus-impossible warning indicator (×) or far-focus indicator () will light up inside the DX-1 AF Finder. In this case, turn the prime lens's focusing ring to less than infinity () , the distance set now becomes the maximum shooting distance of the prime lens' focus detection range, so its focus detection range from maximum to minimum is correspondingly decreased. You can then focus on the subject even if it fails outside the range tabled.
For example, when using 50mm f/1.8 as the prime lens, its focus detection range changes as in the following diagram.
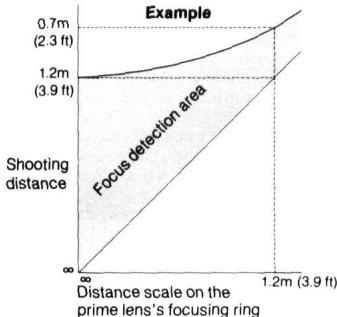
- When the distance scale of the prime lens is set to minimum or around there, you can focus on your subject even if it is beyond the original closest shooting distance. Note, however, that picture quality may somewhat be impaired.
- If the prime lens is the 135mm f/2, make sure you set the distance scale between infinity () and 2m (6.6 ft) in order to obtain precise in-focus indication. You should set it at closer than 2m (6.6 ft), or the precise in-focus indication may not occur.
- It takes around 0.5 sec. to automatically focus on a subject from the maximum to the minimum shooting distance.
SECONDARY PROCEDURES FOR AUTOFOCUS PHOTOGRAPHY
As shown in the focus detection range chart (p. 17), the longer the focal length of the lens in use, the narrower its focus detection range. To shoot a subject that is in motion, you will need a wide autofocus operation range that covers the distance between you and the moving subject. If you set the prime lens's distance scale at infinity, the approaching subject may fall short of the minimum shooting distance for the focus detection range indicated.
For example, when taking a picture of a subject with a TC-16-mounted 300mm f/2 lens within a range of 70m (229.7 ft) to 10m (32.8 ft), which is the prime lens's minimum focusing distance, you won't be able to shoot the subject if it comes closer than 35m (114.5 ft) if you've set the distance scale to infinity because the minimum shooting distance required for autofocus detection to work at this distance is 35mm (114.5 ft).
It is thus best to reset the prime lens's distance scale by observing the following procedures.
- Detach the prime lens in use from the TC-16 and attach it to the F3AF/DX-1 assembly.
- Focus on the subject at its maximum shooting distance; then lock this reading on the prime lens's distance scale. (With the 300mm f/2 IF-ED, use the lens's convenient presettable focusing ring locking screw.)
- Remove the lens in use from the F3AF camera body and insert the TC-16 between the prime lens and the F3AF/DX-1 assembly; then set the TC-16's ON/OFF switch to "ON".
- Focus on the subject at its minimum shooting distance. If both LED in-focus indicators () light up, this means the distance scale preset in Step 2 enables continuous autofocus operation. But if the LED focus-impossible warning indicator (×)^* or the LED far-focus indicator () lights up, this means the subject is closer than the preset minimum shooting distance. So, in this case, reset the distance scale by observing the following procedures.
(1) Turn the focusing ring of the prime lens clockwise (i.e., while maintaining shooting position) until both LED in-focus indicators (▶ light up.
(2) Confirm the position of the distance scale set in Step 2 and the position reset at Step (1).
(3) During autofocus operation, move the distance scale slightly between these two positions in accordance with the camera-to-subject distance, and make the final adjustment with the TC-16 until both LED in-focus indicators light up.
- [It is also possible for the LED in-focus-impossible warning indicator(x) to light up as a result of low subject contrast. For further information, refer to the F3AF camera body's instruction manual.]
FOCUS LOCK BUTTON
Your TC-16 is equipped with a focus lock button ①. Depressing this button during autofocus operation will automatically lock or fix the distance in focus. Autofocus restarts the instant you release the button. To take pictures with the main subject off-center, follow these procedures:
- First, center the main subject within the viewfinder's central focusing frame.
- Lightly touch the shutter release button of the F3AF camera body and make sure both LED in-focus indicators (▶ dark) light up; then depress the focus lock button.
- While holding the focus lock button, recompose the picture, and depress the shutter release button to take the picture.
Notes:
- When the focus lock button is depressed, the F3AF camera body's meter and the DX-1 AF Finder's autofocus detecting system are automatically shut off to save power; you have to lightly touch the camera's shutter release button once more to activate both; even if at times the LED in-focus indicators (▶) do not light up, focus stays locked.
- Sometimes, the LED indication may change after the mirror returns to its original position upon shutter release while the focus lock button is depressed; the focus stays locked.
- The focus stays locked as long as you keep the focus lock button depressed; autofocus operation automatically restarts the instant you take your finger off the button.
EXPOSURE DETERMINATION
Using the TC-16 not only increases the effective focal length by 1.6X, but also decreases the effective aperture by a 1-1/3 f/stop.
Thus, when the TC-16 teleconverter is in use, you should disregard the prime lens's engraved aperture scale.
If the TC-16 is attached to lenses with a maximum aperture larger than f/1.8 (e.g., 50mm f/1.2, 50mm f/1.4, 35mm f/1.4, etc.), the effective aperture becomes f/2.9 even if the aperture is larger than f/1.8. Thus, when using fast lenses, be sure to set the aperture to f/1.8 or smaller; otherwise, incorrect exposure will result.
In addition, some exposure compensation will be required with lenses that have maximum apertures larger than f/1.8. For exposure compensation based on ASA/ISO film speed adjustment, refer to the following table:
| Lens Max. Aperture | Compensation Required (at ASA/ISO 100) |
| f/1.2 | 2/3 f/stop underexposure (set to ASA/ISO 160 position) |
| f/1.4 | 1/3 f/stop underexposure (set to ASA/ISO 125 position) |
NOTES ON THE USE OF THE TC-16
- The AF Teleconverter TC-16 cannot be used with any camera other than the Nikon F3AF with the DX-1 AF Finder attached. It provides only autofocus—nor focus-aid—operation.
- When you're not using the TC-16, set its ON/OFF switch to the "OFF" position; otherwise the batteries of the DX-1 which power the TC-16 may be drained.
- During autofocus operation, hold the TC-16 properly because inadvertent touching of the focus lock button will prevent the teleconverter's lens elements from moving.
- When it is cold, use the optional accessory Anti-Cold Battery Holder DB-4 to stabilize the DX-1 AF Finder's battery power; if the batteries powering the DX-1 are adversely affected by the low temperature, this will likewise affect the TC-16's autofocus response.
TIPS ON TELECONVERTER CARE
Always keep in mind that your TC-16 is a high-precision optical accessory and that rough, careless handling may damage it. Observe the following tips, and the TC-16 will always work as perfectly as the day you bought it.
- Keep clean and protect the surface of the electrical contacts ④ of the TC-16 from dust and dirt; otherwise, electrical malfunction may occur.
- Do not subject the TC-16 to shocks—especially avoid dropping or banging it on anything hard.
- If condensation forms on the TC-16 body, wipe it with a dry soft cloth. If it forms on the lens itself, observe the following—
use a blower brush to clean all glass surfaces; as much as possible avoid using lens tissue. Gently wipe dirt, smudges or fingerprints with soft cotton moistened with a small amount of absolute alcohol, using a spiral motion from center to periphery. Make sure you leave no wiping traces.
If you use ether in cleaning the lens surface, smudges may appear on the surface; should this happen, wipe the smudges with a cotton cloth moistened with absolute alcohol.
- Attach both front and rear lens caps BF-1 and LF-1 to your TC-16 when storing it separately, preferably inside the optional lens pouch No. 61; also, avoid storage in a high-temperature and high-humidity place.
ACCESSIONS
| Supplied | Optional |
| Front lens cap BF-1 | Flexible lens pouch No. 61 |
| Rear lens cap LF-1 |
SPECIFICATIONS
| Lens construction: |
| Focal length: |
| Aperture coupling range: |
| Effective aperture: |
| Focusing: |
| Power switch: |
| Battery source: |
| Focus lock: |
| Diaphragm: |
| Exposure measurement: |
| Reproduction ratio: |
| Depth of field: |
Mount:
Dimensions:
Weight:
| 5 elements in 5 groups |
| 1.6X that of lens in use (with in-focus at infinity) |
| f/1.8 to f/32 |
| f/2.9 to f/51 |
| Via built-in micro motor to move all lens groups |
| Provided; “ON/OFF” type |
| Via electrical contact pins directly from the |
| battery power inside DX-1 AF Finder |
| Possible via one focus lock button provided |
| Automatic diaphragm coupling provided |
| Via full aperture method; meter coupling ridge |
| provided |
| 1.6X that of lens in use |
| 1/1.6X that of lens in use (with in-focus at |
| infinity) |
| Nikon F mount (for both sides); AF electrical |
| coupling pins provided on the rear side |
| Approx. 88mm dia. × 43.8mm long (overall); |
| 21mm extension from flange |
| Approx. 285g |
NOMENKLATUR
FIXATION AU CORPS DE L'APPAREIL PHOTO—B1, B2
Ouverture effective:
Mise au point:
Fourni; type "ON/OFF"
- BEFORE USING THE TC-16
- (Read the following carefully and get the most out of your new AF teleconverter TC-16 now and in the many years to come.)
- LENS/TELECONVERTER COMPATIBILITY
- Important!
- CONNECTING LENS AND TELECONVERTER A_1, A_2
- MOUNTING ON THE CAMERA BODY B1, B2
- Note:
- INITIAL PROCEDURES FOR AUTOFOCUS PHOTOGRAPHY C
- Notes:
- SECONDARY PROCEDURES FOR AUTOFOCUS PHOTOGRAPHY
- FOCUS LOCK BUTTON
- EXPOSURE DETERMINATION
- NOTES ON THE USE OF THE TC-16
- TIPS ON TELECONVERTER CARE
- SPECIFICATIONS
- NOMENKLATUR
- FIXATION AU CORPS DE L'APPAREIL PHOTO—B1, B2
Brand : NIKON
Model : AI-S TC-16/ TC-16S
Category : Video Converter