
MC-36 - Camera remote NIKON - Free user manual and instructions
Find the device manual for free MC-36 NIKON in PDF.

| Product type | Camera remote control |
| Brand | NIKON |
| Model | MC-36 |
| Dimensions (excluding protruding parts) | Approx. 155 × 40 × 18 mm |
| Weight (excluding magnetic core) | Approx. 105 g |
| Cable length | Approx. 850 mm |
| Power supply | Two AAA 1.5V LR03 alkaline batteries |
| Battery life (estimated) | Approx. 2 months with continuous use (delay 5 min, exposure 4 min 56 s, interval 5 min) |
| Operating temperature | -20°C to +50°C |
| Delay (time before release) | 0 s to 99 h 59 min 59 s (in 1-second increments) |
| Exposure time | 0 s to 99 h 59 min 59 s (in 1-second increments) |
| Interval between shots | 1 s to 99 h 59 min 59 s (in 1-second increments) |
| Number of programmable shots | 1 to 399, or unlimited (--) |
| Main functions | Self-timer, manual release, control lock, backlight |
| Compatible cameras (partial) | Nikon D3, D2 series, D1 series, D700, D300, D200, D100 (with MB-D100), F6, F5, F100, F90X, F90 |
| Connection | 10-pin connector (with locking screw) |
| Compatible accessories | Extension cable MC-21, GPS adapter MC-35 |
| Maintenance | Avoid shocks, humidity, sudden temperature changes; remove batteries if not used for long periods |
| Safety | Do not disassemble, do not expose to moisture, use only specified batteries, keep out of reach of children |
| Repairability | Contact an authorized Nikon service center for repairs |
Frequently Asked Questions - MC-36 NIKON
User questions about MC-36 NIKON
0 question about this device. Answer the ones you know or ask your own.
Ask a new question about this device
Download the instructions for your Camera remote in PDF format for free! Find your manual MC-36 - NIKON and take your electronic device back in hand. On this page are published all the documents necessary for the use of your device. MC-36 by NIKON.
USER MANUAL MC-36 NIKON
natural_image
Illustration of a Nikon NC-96 handheld device with attached cable (no text or symbols on the device body)Remote Cord
MC-36
Instruction Manual
目次
リモートコード MC-36
使用説明書
安全上のご注意……2
はじめに......4
各部の名称 5
電池の入れ方 5
電池の交換方法......6
natural_image
Diagram of a remote control switch mechanism with no visible text or symbols電池残量警告について
電池残量が少なくなると、表示パネルの
![DELAY LONG INTVL N 0:10'30" L [ 20]](/content/2019/11/116116/images/1b445ab3d814a3877c3f5dcb7ade1ceb5d4246b3ba3bd1d41e8add69e1685069.jpg)
操作ロック中
カメラとの接続方法
MC-36 の取り外し方
設定画面
The Illuminator/Lock Button 7
Connecting the MC-36 7
Using the MC-36......8
Timed Photography 8
Manual Release 15
Precautions for Use 16
Caring for the MC-36 16
Specifications....17
For Your Safety (1/2)
En
To prevent damage to your Nikon product or injury to yourself or to others, read the following safety precautions in their entirety before using this equipment. Keep these safety instructions where all those who use this equipment will read them.
The consequences that could result from failure to observe the precautions listed in this section are indicated by the following symbol:
This icon marks warnings, information that should be read before using this Nikon product to prevent possible injury.
Do not disassemble or modify
Failure to observe this precaution could result in electric shock or product malfunction. Should the product break open as the result of a fall or other accident, remove the batteries and take the product to a Nikon-authorized service representative for inspection.
Keep dry
Do not handle with wet hands or immerse in or expose to water or rain. Failure to observe this precaution could result in fire or electric shock.
Do not use in the presence of flammable gas
Failure to observe this precaution could result in explosion or fire.
Keep out of reach of children
This device contains small parts which may pose a choking hazard. Consult a physician immediately if a child swallows any part of this device.
Turn off immediately in the event of malfunction
Should you notice smoke or an unusual smell coming from this device, remove the battery immediately and take the device to a Nikon-authorized service representative for inspection, taking care to avoid burns. Continued operation could result in injury.
Do not expose to high temperatures
Do not leave the device in a closed vehicle under the sun or in other areas subject to extremely high temperatures. Failure to observe this precaution could result in fire or in damage to the casing or internal parts.
Observe precaution when handling batteries
Batteries may leak or explode if improperly handled. Observe the following precautions when handling batteries for use in this device:
- Use only batteries listed in this manual. Do not mix old and new batteries or batteries of different types.
For Your Safety (2/2)
- Read and follow all warnings and instructions provided by the manufacturer.
- Do not short or disassemble.
- Do not expose to flame or excessive heat.
- Do not attempt to insert batteries upside down or backwards.
- Batteries are prone to leakage when fully discharged. To avoid damage to the product, be sure to remove the batteries when leaving the product unattended for prolonged periods or when no charge remains.
- Should liquid from the batteries come into contact with skin or clothing, rinse immediately with fresh water.
Notices (1/2)
Notice for Customers in the U.S.A.: Federal Communications Commission (FCC) Radio Frequency Interference Statement
This equipment has been tested and found to comply with the limits for a Class B digital device, pursuant to Part 15 of the FCC rules. These limits are designed to provide reasonable protection against harmful interference in a residential installation. This equipment generates, uses, and can radiate radio frequency energy and, if not installed and used in accordance with the instructions, may cause harmful interference to radio communications. However, there is no guarantee that interference will not occur in a particular installation. If this equipment does cause harmful interference to radio or television reception, which can be determined by turning the equipment off and on, the user is encouraged to try to correct the interference by one or more of the following measures:
- Reorient or relocate the receiving antenna.
- Increase the separation between the equipment and receiver.
- Connect the equipment into an outlet on a circuit different from that to which the receiver is connected.
- Consult the dealer or an experienced radio/television technician for help.
CAUTIONS
Modifications: The FCC requires the user to be notified that any changes or modifications made to this device that are not expressly approved by Nikon Corporation may void the user's authority to operate the equipment.
Interface Cables: Use the interface cables sold or provided by Nikon for your equipment. Using other interface cables may exceed the limits of Class B Part 15 of the FCC rules.
Notice for Customers in the State of California
WARNING: Handling the cord on this product will expose you to lead, a chemical known to the State of California to cause birth defects or other reproductive harm. Wash hands after handling.
Nikon Inc.,
1300 Walt Whitman Road, Melville, New York
11747-3064, U.S.A. Tel.: 631-547-4200
Notice for Customers in Canada
CAUTION: This class B digital apparatus meets all requirements of the Canadian Interference Causing Equipment Regulations.
Notice for customers in Europe
This symbol indicates that this product is to be collected separately.
The following apply only to users in European countries:
- This product is designated for separate collection at an appro-
priate collection point. Do not dispose of as household waste.
- For more information, contact the retailer or the local authorities in charge of waste management.

natural_image
Symbol of a trash bin crossed with no text or numbers, representing waste sorting or restriction (no text present)
Introduction
Thank you for your purchase of an MC-36 remote cord. The MC-36 is equipped with an interval timer suited to a wide variety of tasks, including astronomical photography. See page 17 for a list of compatible cameras.
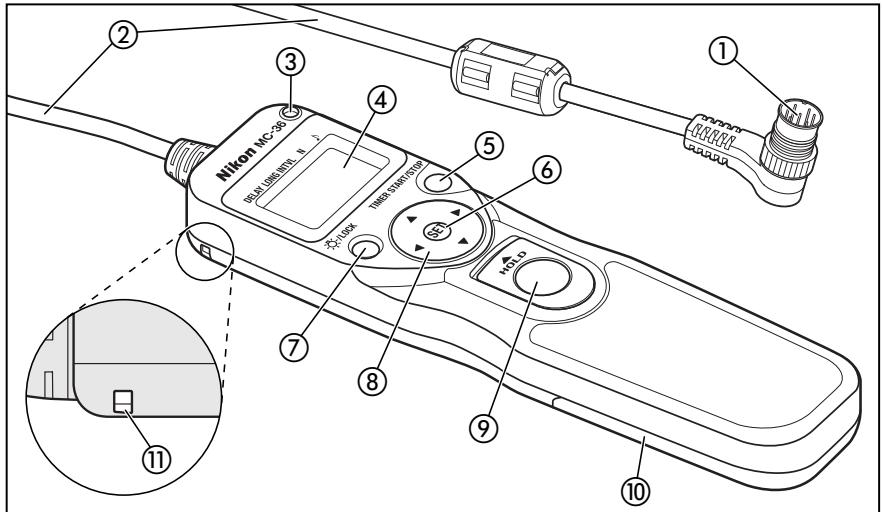
Parts of the MC-36 (1/3)
Refer to the illustrations inside the front cover.
Body
① 10-pin connector....7
② Cord
③ Release lamp 12–13
④ Control panel 6,7,8–13,15
⑤ TIMER START/STOP button 12-13
⑥ SET button 8, 10, 12
⑦ Illuminator/lock button 7
⑧ Arrow button....10-11
⑨ Shutter-release button....15
⑩ Battery-chamber cover 6
⑪ Eyelet for strap (available separately; use cell phone or other similar strap)
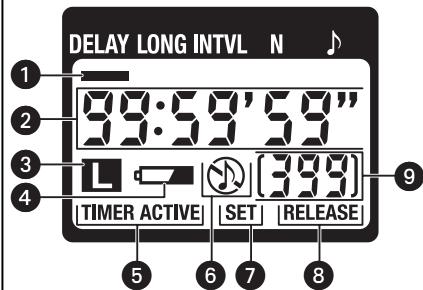
Control Panel\*
① Selection cursor....10–11
② Timer display 10–13, 15
③ Lock indicator....7
4 Low battery indicator....6
⑤ "TIMER ACTIVE" indicator 12–13
⑥ Speaker on/off indicator 9, 11
⑦ "SET" indicator 8, 10–12
⑧ "RELEASE" indicator.... 12–13, 15
9 Number of shots 9–13
* The illustration inside the front cover shows the control panel with all elements lit. In the other illustrations throughout this manual, elements relevant to the explanation in the accompanying text are shown in black. Indicators not mentioned in the text are shown in gray.
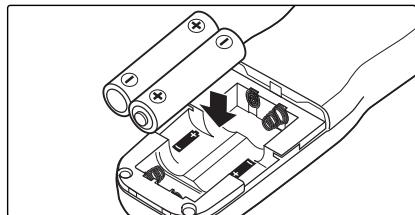
Inserting Batteries
Slide the battery-chamber cover (10) from the back of the MC-36 and insert two AAA 1.5V LR03 alkaline batteries (available separately) as shown.
natural_image
Diagram of a hand holding a remote control box with arrows indicating internal components (no text or symbols)The Low Battery Indicator (☐)
The low battery indicator (4) will blink when the batteries are low. Ready spare batteries.
Replacing Batteries
When replacing batteries:
1 Check that the "TIMER ACTIVE" (5) and "RELEASE" (8) indicators are not displayed (see right).
2 Turn the camera off and disconnect the MC-36.
3 Remove the batteries.
4 Wait until the control panel has gone out and insert new batteries.
When the MC-36 Is Not in Use
The MC-36 is not equipped with an off switch. To reduce the drain on the batteries when the MC-36 is not in use, end shooting and check that the "TIMER ACTIVE" (5), "SEI" (7), and "RELEASE" (8) indicators are not displayed (see right). The drain on the batteries increases when these indicators are flashing.
The "TIMER ACTIVE," "SET," and "RELEASE" Indicators

| If this flashes | It means this; do this to turn it off |
| TIMER ACTIVE | Timer active (page 13); press TIMER START/STOP button (5). |
| SET | Settings can be modified (page 8); press SET button (6). |
| RELEASE(TIMERACTIVE not flashing) | Manual release active (page 15); release shutter-release button (9); if button is in HOLD position, release shutter-release lock). |
The Illuminator/Lock Button
Press the illuminator/lock button (⑦) briefly to activate the control panel backlight. The backlight will remain lit for about six seconds; pressing the arrow button (⑧) while the backlight is on extends the timer for another six seconds.
To lock all controls except the shutter-release (⑨) and illuminator/lock buttons, press the illuminator lock button until the lock icon (L) is displayed in the control panel. To release the lock, press the illuminator/lock button until the lock icon is no longer displayed.
![DELAY LONG INTVL N 0:10'30" L [20]](/content/2019/11/116116/images/9d40498228850746cd12d4cea1a0a71fad18ecec21a3b7999745459391ae44cc.jpg)
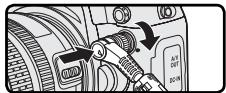
Connecting the MC-36
1 Turn the camera off.
2 Check that the "TIMER ACTIVE" (5) and "RELEASE" (8) indicators are not displayed.
3 Remove the 10-pin terminal cover from the camera. Keeping the mark on the 10-pin connector (①) aligned with the mark on the camera body, insert the connector as shown and then tighten the locking nut.
Disconnecting the MC-36
After checking that the "TIMER ACTIVE" (5) and "RELEASE" (8) indicators are not displayed, turn the camera off and disconnect the MC-36. Replace the 10-pin terminal cover.
Using the MC-36
The MC-36 functions as:
- An automatic timer (pp. 8–14). Choose the delay (time before shooting starts), exposure time, interval, and number of shots for timed interval photography. Shutter speed can be selected with the camera if desired (pg. 14).
- A manual release (pg. 15). Take photographs manually using the shutter-release button on the MC-36. Photographs can be taken manually even when the timer is running.
Timed Photography (1/7)
1. Adjust Camera Settings
1.1 Connect the MC-36 (pg. 7) and turn the camera on. 1.2 Adjust camera settings as follows (see the camera manual for details):
| Exposure mode | M (manual) |
| Shutter speed | Bulb |
| Interval timer | Off |
| Focus mode | AF-C (continuous-servo autofocus)* or M (manual) |
| Continuous | S (single frame) |
* Select "release priority" if available.
2. Set the Timer
2.1 Press the SET button (⑥). "SET" will flash in the control panel.
The MC-36 can be connected to the camera after the timer has been set.
Timed Photography (2/7)
2.2 Adjust the following settings:
| Option | Description | Supported settings |
| DELAY | Delay before shutter is released | 0 s to 99 hrs 59 min 59 s (in one-second increments) |
| LONG | Exposure time | |
| INTVL | Interval | 1 s to 99 hrs 59 min 59 s (in one-second increments) |
| N | Number of shots | 1 to 399, -- (unlimited) |
| ♪ | Speaker on/off | ♪ (on), Ⓤ (off) |
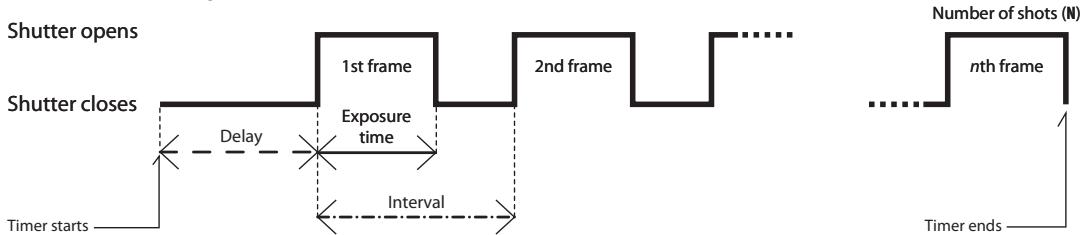
Delay, Exposure, and Interval Settings
flowchart
graph LR
    A["Shutter starts"] --> B["Shutter closes"]
    B --> C["1st frame"]
    C --> D["2nd frame"]
    D --> E["..."]
    E --> F["nth frame"]
    F --> G["Timer ends"]
    style A fill:#f9f,stroke:#333
    style B fill:#ccf,stroke:#333
    style C fill:#cfc,stroke:#333
    style D fill:#fcc,stroke:#333
    style E fill:#cff,stroke:#333
    style F fill:#ffc,stroke:#333
    style G fill:#cfc,stroke:#333
Timed Photography (3/7)
En
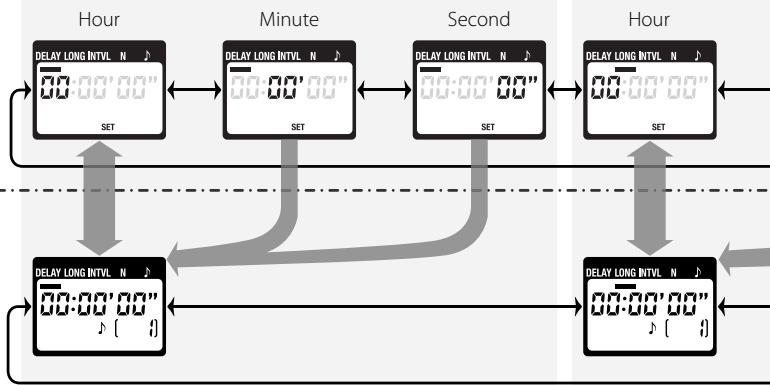
Setting the Timer
Use the arrow button to set the timer. Press left or right to select, up or down to change. The current selection is indicated by the selection cursor (1).

Adjust settings
Press SET (⑥) at any time to complete the operation and display the new settings for the selected item. To view other settings, press the arrow button left or right. The current selection is indicated by the selection cursor (①). Press the SET button to edit the current setting as described above.
Setting complete
Delay (time until shooting starts)
flowchart
graph TD
    A["Hour"] --> B["Minute"]
    B --> C["Second"]
    C --> D["Hour"]
    A --> E["SET"]
    B --> F["SET"]
    C --> G["SET"]
    D --> H["SET"]
    E --> I["Delay LONG INTVL N"]
    F --> J["Delay LONG INTVL N"]
    G --> K["Delay LONG INTVL N"]
    H --> L["Delay LONG INTVL N"]
    I --> M["00:00'00""]
    J --> N["00:00'00""]
    K --> O["00:00'00""]
    L --> P["00:00'00""]
    M --> Q["00:00'00""]
    N --> R["00:00'00""]
    O --> S["00:00'00""]
    P --> T["00:00'00""]
    Q --> U["00:00'00""]
    R --> V["00:00'00""]
    S --> W["00:00'00""]
    T --> X["00:00'00""]
    U --> Y["00:00'00""]
    V --> Z["00:00'00""]
    W --> AA["00:00'00""]
    X --> AB["00:00'00""]
    Y --> AC["00:00'00""]
    Z --> AD["00:00'00""]
Timed Photography (4/7)
flowchart
graph LR
    A["Exposure time"] --> B["Minute"]
    B --> C["Second"]
    C --> D["Hour"]
    D --> E["Interval"]
    E --> F["Number of shots"]
    F --> G["Speaker"]

    subgraph Exposure time
        H1["DELAY LONG INTVL N SET"] --> I1["00:00'00""]
        I1 --> J1["00:00'00""]
        J1 --> K1["00:00'00""]
        K1 --> L1["00:00'00""]
        L1 --> M1["00:00'00"]
    end

    subgraph Interval
        N1["DELAY LONG INTVL N SET"] --> O1["00:00'01""]
        O1 --> P1["00:00'01""]
        P1 --> Q1["00:00'01""]
        Q1 --> R1["00:00'01""]
        R1 --> S1["00:00'01""]
    end

    subgraph Number of shots
        T1["DELAY LONG INTVL N SET [ "]] --> U1["00:00'01""]
        U1 --> V1["00:00'01""]
        V1 --> W1["00:00'01""]
        W1 --> X1["00:00'01""]
        X1 --> Y1["00:00'01""]
    end

    subgraph Speaker
        Z1["DELAY LONG INTVL N SET"] --> AA1["00:00'02""]
        AA1 --> AB1["00:00'02""]
        AB1 --> AC1["00:00'02""]
        AC1 --> AD1["00:00'02"]
    end
En
Timed Photography (5/7)
En
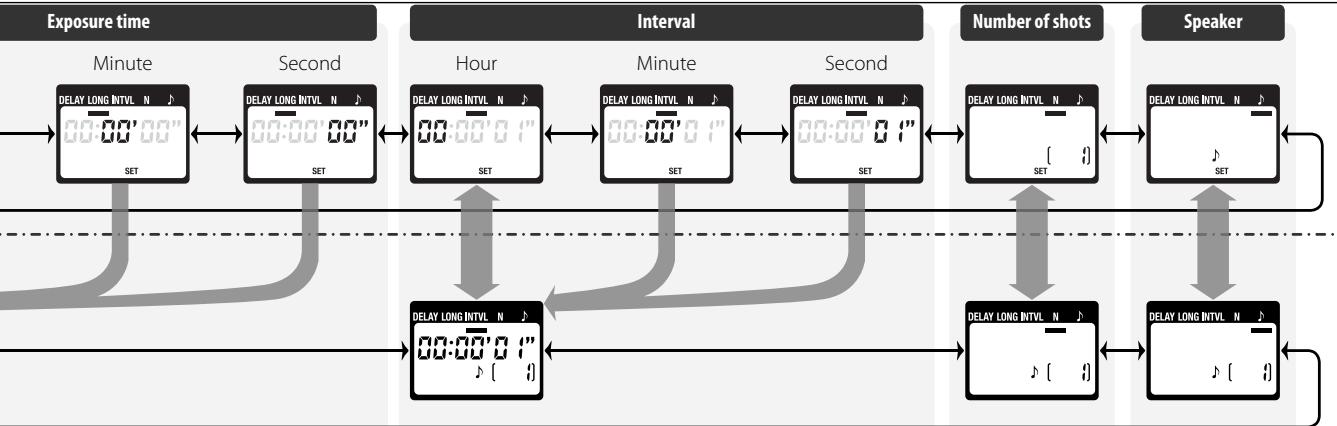
Setting the Timer
To ensure correct operation, choose an interval at least one second longer than the exposure time. When using autofocus, set the delay to two seconds or more and choose an interval at least two seconds longer than the exposure time to ensure that the camera has time to focus. When using long exposure noise reduction (available with some digital cameras), the interval should be at least twice the exposure time.
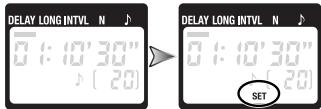
Intervals of 00:00:00 will automatically be reset to 00:00:01 when the SET button (⑥) is pressed to put settings into effect.
To set the number of shots to - - (unlimited), select 1 and press the arrow button (⑧) down or select 399 and press the arrow button up.
2.3 After adjusting all settings as desired, press the SET button (⑥) to put the new settings into effect. A beep will sound (if the speaker is on) and the "SET" indicator will go out.
![DELAY LONG INTVL N 01:10'30" [20] SET DELAY LONG INTVL N 01:10'30" [20]](/content/2019/11/116116/images/f2ca2a4efcf15da633bfb889b7c414ce716b8f8c9bedbd893053375c27137bf5.jpg)
The new settings will remain in effect until changed or until the batteries are removed or exhausted.
3. Start the Timer
Press the TIMER START/STOP button (⑤). The timer will start and "TIMER ACTIVE" (⑤) will flash in the control panel. Between shots, the control panel will show the time remaining until the next photograph is taken. If the speaker is on, a beep will sound three times at one-second intervals before the shutter opens.
While the shutter is open, the control panel will show the time remaining until the shutter closes, and the release lamp and "RELEASE" indicator (8) will flash at one-second intervals. The number of shots remaining will be updated each time a photograph is taken.
Timed Photography (6/7)
Control Panel Display (Timer Active)
Flashes while timer is active

Between shots: Time remaining until next shot
While shutter is open: Time remaining until shutter closes
Number of shots remaining
Flashes while shutter is open
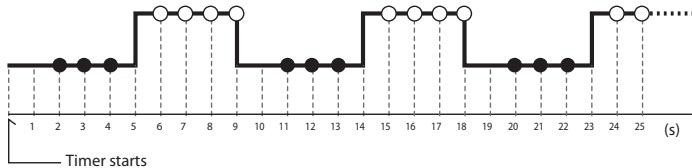
The Speaker and Release Lamp
The following illustration shows when a beep will sound (●) and the release lamp flash (○) with a delay of 5 s, an exposure time of 4 s, and an interval of 9 s.
Shutter open
Shutter closed
flowchart
graph TD
    A["Start"] --> B["1"]
    B --> C["2"]
    C --> D["3"]
    D --> E["4"]
    E --> F["5"]
    F --> G["6"]
    G --> H["7"]
    H --> I["8"]
    I --> J["9"]
    J --> K["10"]
    K --> L["11"]
    L --> M["12"]
    M --> N["13"]
    N --> O["14"]
    O --> P["15"]
    P --> Q["16"]
    Q --> R["17"]
    R --> S["18"]
    S --> T["19"]
    T --> U["20"]
    U --> V["21"]
    V --> W["22"]
    W --> X["23"]
    X --> Y["24"]
    Y --> Z["25"]
    Z --> AA["..."]
4. End Shooting
Shooting will end automatically when the selected number of shots has been taken. To end shooting before all photographs have been taken, press the TIMER START/STOP button (⑤).
Timed Photography (7/7)
En
| Using the Camera to Select Shutter SpeedTo take photographs at the shutter speed selected with the camera, adjust settings as follows: | ||
| Camera | Exposure mode | M (manual) or S (shutter-priority auto) |
| Shutter speed | Any | |
| Interval timer | Off | |
| Focus mode | AF-C (continuous-servo autofocus)* or M (manual) | |
| Shooting mode | S (single frame) | |
| MC-36 | Exposure time | 0 s |
| Interval | Longer than camera shutter speed† | |
| * Select "release priority" if available.†When using autofocus, choose an interval at least two seconds longer than the camera shutter speed to allow the camera time to focus. When using long exposure noise reduction (available with some digital cameras), choose an interval at least double the camera shutter speed. | ||
Using the Timer
Before using the timer for extended periods, check that the batteries have enough charge. Replace the batteries when the low battery indicator (☐) flashes in the control panel (4).
Manual Release
The MC-36 shutter-release button (⑨) functions in much the same way as the camera shutter-release button.
1. Adjust Camera Settings
Connect the MC-36 (pg. 7) and turn the camera on. Choose exposure mode, shutter speed, focus mode, and shooting mode as desired.
2. Take Pictures
2.1 Press the MC-36 shutter-release button (⑨) halfway and check focus and exposure, then press it the rest of the way down to take a picture. While the shutter is open, a beep will sound at one-second intervals, the "RELEASE" indicator (⑧) will flash, and
the control panel will show the time remaining until the shutter closes.
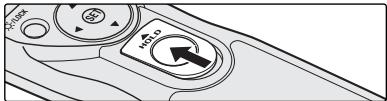
To keep the shutter-release button fully pressed for bulb photography, slide the button to the HOLD position. Slide it in the opposite direction to release the lock.
2.2 Release the button to end shooting.
The MC-36 shutter-release button can be used when no batteries are inserted. The control panel will remain off and no beep will sound.
The shutter-release button can be used to release the shutter manually while the timer is active. Timer count-down (including the control-panel display, release lamp, and beep) continues during manual release. If a manual release overlaps with an automatic release, the shutter will remain open until both exposure times have expired.
Precautions for Use
Check the camera battery level and number of exposures remaining before using the MC-36 (see the camera manual for details). The timer will continue to operate even when no pictures can be recorded due to low battery, lack or film or memory, or lack of space in the memory buffer (digital cameras only). An AC adapter (available separately) is recommended for longer sessions.
Some cameras have an AF activation option that determines whether the camera will focus when the shutter-release button is pressed halfway (see the camera manual for details). Enable shutter-release button AF-activation when using the MC-36.
Please note that the timer is less accurate than most watches or household clocks.
Caring for the MC-36
Do not drop: The product may malfunction if subjected to strong shocks or vibration.
Keep dry: This product is not waterproof and may malfunction if immersed in water or exposed to high levels of humidity. Rusting of the internal mechanism can cause irreparable damage.
Avoid sudden changes in temperature: Sudden changes in temperature, such as occur when entering or leaving a heated building on a cold day, can cause condensation inside the device. To prevent condensation, place the device in a carrying case or a plastic bag before exposing it to sudden changes in temperature.
Keep away from strong magnetic fields: Strong static charges or the electromagnetic fields produced by equipment such as radio transmitters could interfere with the device.
A note on electronically-controlled devices: In extremely rare instances, unusual characters may appear in the control panel and the device may stop functioning. In most cases, this phenomenon is caused by a strong external static charge. Turn the camera off, disconnect the MC-36, remove the batteries, and then replace them once the control panel has turned off. Caution is required when handling the batteries, which may be hot from use. In the event of continued malfunction, contact your retailer or Nikon representative.
The control panel: LCD displays tend to darken at high temperatures and exhibit slower response times at low temperatures. This does not indicate a malfunction.
Specifications
| Supported cameras* | Nikon D3, D2-series, D1-series, D700, D300, D200, and D100 (requires MB-D100 battery pack) digital cameras; Nikon F6, F5, F100, F90X, F90 |
| Timer delay | 0 s to 99 hrs 59 min 59 s in one-second increments |
| Exposure time | 0 s to 99 hrs 59 min 59 s in one-second increments |
| Interval | 1 s to 99 hrs 59 min 59 s in one-second increments |
| Number of shots | 1 to 399, • • (unlimited) |
| Power source | Two AAA 1.5V LR03 alkaline batteries |
| Battery life | Approximately two months of continuous shooting with a delay of 5 min, an exposure time of 4 min 56 s, and an interval of 5 min. Use of the illuminator will reduce battery life. |
| Operating temperature | -20–+50°C (-4–+122°F) |
| Dimensions | Approximately 155×40×18 mm (6.1×1.6×0.7 in.), excluding projections |
| Weight | Approximately 105 g (3.7 oz), excluding ferrite core |
| Length of cord | Approximately 850 mm (33.5 in.) |
| Compatible remote terminal accessories | MC-21 extension cord (operation is not guaranteed if two or more MC-21 extension cords are used), MC-35 GPS adapter cord (connects to 10-pin terminal on MC-35) |
* An MC-26 adapter cord can be used to connect the MC-36 to any camera or accessory with a remote terminal, including motor drives (MD-12 motor drive excluded).
natural_image
Symbol of a trash bin crossed with no text or numbers, representing waste sorting or restriction (no text present)natural_image
Diagram of a hand holding a remote control box with internal components (no text or symbols)![DELAY LONG INTVL N 0:10'30" L [20]](/content/2019/11/116116/images/0cdc314b1ce13ea264a26e42cf602b5e6c138c9ffa3a96bfbf0a0f4070d3782d.jpg)
Anschluss des MC-36

Abklemmen des MC-36
1300 Walt Whitman Road, Melville, New York
11747-3064, U.S.A. Tel.: 631-547-4200
CAUTION : This class B digital apparatus meets all requirements of the Canadian Interference Causing Equipment Regulations.
natural_image
Symbol of a trash bin crossed with no text or numbers, representing waste sorting or restriction (no text present)
Présentation
natural_image
Diagram of a handheld device with internal components and directional arrows, no text or symbols present1300 Walt Whitman Road, Melville, New York
11747-3064, U.S.A. Tel.: 631-547-4200
natural_image
Symbol of a trash bin crossed with no text or numbers, representing waste sorting or restriction (no text present)
Introducción
natural_image
Technical line drawing of a mechanical device with internal components and mounting holes (no text or symbols)![DELAY LONG INTVL N 0 1:10'30" L [20]](/content/2019/11/116116/images/114ad0cae47f756e0748c735e924bfcf569796f418ec721dfcb2cab95c797dc5.jpg)
Conexión del MC-36
![DELAY LONG INTVL N 0:10'30" [20] DELAY LONG INTVL N 0:10'30" [20] SET](/content/2019/11/116116/images/79915a54a3204573dd711f5431a17c82114ddaccbfe2415882e441ef7e564cdc.jpg)
natural_image
Symbol of a trash bin crossed with no text or numbers, representing waste sorting or restriction (no text present)natural_image
Technical line drawing of a mechanical component with no visible text or symbolsAnsluta MC-36
1 Stäng av kameran.
natural_image
Close-up of a camera's internal components with no visible text or symbolsKoppla från MC-36
natural_image
Symbol of a trash bin crossed with no text or numbers, representing environmental restriction (no text present)natural_image
Technical line drawing of a mechanical component with no visible text or symbols
Отсоединение MC-36
natural_image
Symbol of a trash bin crossed with no text or numbers, representing waste sorting or restriction (no text present)natural_image
Diagram of a hand holding a remote control panel with arrows indicating internal components (no text or symbols)flowchart
Signal processing flowchart for Belichtingstijd, showing data flow through Minuut, Uur, Interval, Aantal opnamen, and Luidspreker stages with delay and set signals.NI
Getimede fotografie (5/7)
De timer instellen
natural_image
Symbol of a trash bin crossed with no text or numbers, representing waste sorting or restriction (no text present)Partes do MC-36 (1/3)
natural_image
Diagram of a hand holding a remote control device with arrows indicating internal components (no text or symbols)O indicador de bateria com pouca carga (☐)

Desligar o MC-36
natural_image
Symbol of a trash bin crossed with no text or numbers, representing environmental restriction (no text present)natural_image
Diagram of a handheld device with internal components and arrows indicating movement (no text or symbols)Indicatore di batterie deboli (☐)
Scollegamento del telecomando MC-36
natural_image
Diagram of a handheld device with internal components and arrows indicating movement (no text or symbols)
低电池电量指示()
连接 MC-36
断开与 MC-36 的连接
2.2 释放快门按钮以结束拍摄。
natural_image
Diagram of a hand holding a remote control panel with arrows indicating movement or force (no text or symbols present)低電池電量指示()
連接 MC-36
斷開與 MC-36 的連接
2.2 釋放快門鍵以結束拍攝。
natural_image
Mechanical assembly diagram showing a clamped component with internal components and mounting holes (no text or symbols)전지잔량 경고에 대하여
MC-36의 분리방법
설정 화면
flowchart
graph LR
    A["노광시간"] --> B["「분」을 설정"]
    B --> C["「초」를 설정"]
    C --> D["「시」를 설정"]
    D --> E["「분」을 설정"]
    E --> F["「초」를 설정"]
    F --> G["촬영횟수"]
    G --> H["「분」을 설정"]
    H --> I["「초」를 설정"]
    I --> J["전자음"]

    subgraph 노광시간
        A1["DELAY LONG INTVL N ⋅ SET"]
        A2["DELAY LONG INTVL N ⋅ SET"]
    end

    subgraph 인터벌
        D1["DELAY LONG INTVL N ⋅ SET"]
        D2["DELAY LONG INTVL N ⋅ SET"]
        D3["DELAY LONG INTVL N ⋅ SET"]
    end

    subgraph 촬영횟수
        G1["DELAY LONG INTVL N ⋅ SET"]
        G2["DELAY LONG INTVL N ⋅ SET"]
    end

    subgraph 전자음
        H1["DELAY LONG INTVL N ⋅ SET"]
        H2["DELAY LONG INTVL N ⋅ SET"]
    end
© 2005 Nikon Corporation

natural_image
Abstract illustration of two intersecting curved lines forming an infinity symbol (no text or symbols present)Printed in Japan
8MRG01D3-08 ▲G01
- Remote Cord
- MC-36
- 目次
- リモートコード MC-36
- 使用説明書
- 電池残量警告について
- カメラとの接続方法
- MC-36 の取り外し方
- For Your Safety (1/2)
- En
- Do not disassemble or modify
- Keep dry
- Do not use in the presence of flammable gas
- Keep out of reach of children
- Turn off immediately in the event of malfunction
- Do not expose to high temperatures
- Observe precaution when handling batteries
- For Your Safety (2/2)
- Notices (1/2)
- Notice for Customers in the U.S.A.: Federal Communications Commission (FCC) Radio Frequency Interference Statement
- CAUTIONS
- Notice for Customers in the State of California
- Notice for Customers in Canada
- Notice for customers in Europe
- Introduction
- Parts of the MC-36 (1/3)
- Body
- Control Panel\*
- Inserting Batteries
- The Low Battery Indicator (☐)
- Replacing Batteries
- When the MC-36 Is Not in Use
- The Illuminator/Lock Button
- Connecting the MC-36
- Disconnecting the MC-36
- Using the MC-36
- Timed Photography (1/7)
- Adjust Camera Settings
- Set the Timer
- Timed Photography (2/7)
- Timed Photography (3/7)
- Setting the Timer
- Timed Photography (4/7)
- Timed Photography (5/7)
- Start the Timer
- Timed Photography (6/7)
- End Shooting
- Timed Photography (7/7)
- Using the Timer
- Manual Release
- Take Pictures
- Precautions for Use
- Caring for the MC-36
- Specifications
- Anschluss des MC-36
- Abklemmen des MC-36
- Présentation
- Introducción
- Conexión del MC-36
- Ansluta MC-36
- Koppla från MC-36
- Отсоединение MC-36
- Getimede fotografie (5/7)
- De timer instellen
- Partes do MC-36 (1/3)
- O indicador de bateria com pouca carga (☐)
- Desligar o MC-36
- Indicatore di batterie deboli (☐)
- Scollegamento del telecomando MC-36
- 低电池电量指示()
- 连接 MC-36
- 断开与 MC-36 的连接
- 低電池電量指示()
- 連接 MC-36
- 斷開與 MC-36 的連接
- 전지잔량 경고에 대하여
- MC-36의 분리방법
Brand : NIKON
Model : MC-36
Category : Camera remote