
SB-26 - External Flash NIKON - Free user manual and instructions
Find the device manual for free SB-26 NIKON in PDF.

User questions about SB-26 NIKON
0 question about this device. Answer the ones you know or ask your own.
Ask a new question about this device
Download the instructions for your External Flash in PDF format for free! Find your manual SB-26 - NIKON and take your electronic device back in hand. On this page are published all the documents necessary for the use of your device. SB-26 by NIKON.
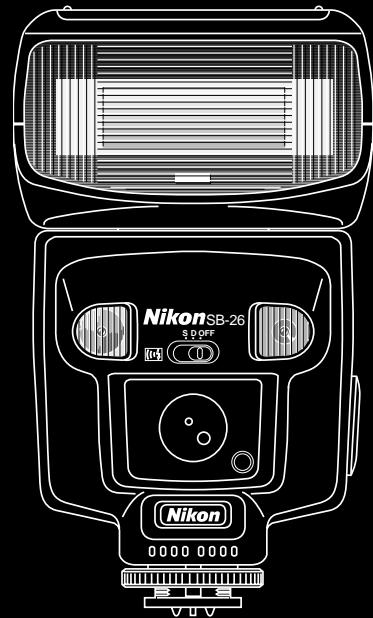
USER MANUAL SB-26 NIKON
Autofocus Speedlight

Instruction Manual
C∈
E
FOREWORD
Thank you for purchasing the Nikon Autofocus Speedlight SB-26. Used with Nikon's newest SLRs (F5, F90X/N90s, F90-Series/N90, F70-Series/N70, F4-Series, F-801/N8008, F-801s/N8008s, F-601/N6006, F-601M/N6000, F50-Series/ N50, F-401x/N5005, F-401/N4004 and F-401s/ N4004s), it offers you the most advanced and complete system for automatic flash photography available.
To get the maximum performance from your new SB-26, be sure to take time to read the instruction manual carefully.
For Effective Use of This Manual
Using this manual is simple. Read the pages with shaded index tabs indicating your camera name. These index tabs lead you to all of the information you need to learn about using the SB-26 with your camera.
The SB-26 and today's newest Nikon models offer exceptionally high performance. They include more features than ever before, all of which can help you make great pictures.
Because there are so many features, the instruction manual is extensive, and may seem a little intimidating. We urge you, however, to thoroughly read the manuals before you begin using the SB-26. That way you will be fully familiar with the features and the way they work.
For the convenience of latest Nikon SLR users, the SB-26 offers automatic adjustment functions when used with certain lenses. Automatic operations is detailed beside manual operation in shaded boxes with mark.
By becoming thoroughly familiar with the SB-26, you will be able to use its advanced features more effectively and enjoy great results from the very beginning.
The Nikon N70, N90s, N90, N8008, N8008s, N6006, N6000, N50, N5005, N4004 and N4004s are sold exclusively in the U.S.A. The Nikon N2020 and N2000 are sold exclusively in the U.S.A. and Canada.
F5, F90X/N90s, F90-Series/N90 and F70-Series/N70 Users
F4-Series, F-801/N8008 and F-801s/N8008s Users
F-601/N6006 and F-601M/N6000 Users
F50-Series/N50 and F-401x/N5005 Users
F-501/N2020 and F-301/N2000 Users
F-401/N4004 and F-401s/N4004s Users
FA, FE2, FG and Nikonos V Users
F3-Series, F2-Series, FM2 and FG-20 Users
Table Of Contents
FOREWORD
For Effective Use of This Manual 2
Table of Contents 4-5
Chapter 1: Introducing the SB-26 Autofocus Speedlight
Nomenclature. 8-9
Main Features/Functions — SB-26's Flash Capabilities 10—17
Fully Automatic Fill Flash 10-13
Automatic Balanced Fill-Flash 11
"TTL Multi-Sensor" Automatic Balanced Fill-Flash With F5, F90X/N90s, F90-Series/N90 and F70-Series/N70. 12
FP High-Speed Sync Flash 13-14
Rear-Curtain Sync Flash 15
Red-Eye Reduction Control. 16
Repeating Flash 16
SB-26 Feature Comparison: Flash Operations Available with Your Camera 17
Chapter 2: Before Flash Shooting
WARNING — TO AVOID INJURY 20
CAUTION - TO PREVENT DAMAGE TO THE SB-26 SPEEDLIGHT 20
Getting Started — SB-26 Set-Up. 20 — 23
Selecting Measurement System,
Meters or Feet 21
Installing Batteries 21-22
Attaching Flash Unit to the Camera Accessory Shoe 22-23
Checking Battery Power 23
Adjustment Functions - Using LCD Panel and Built-in Functions 24-30
Adjusting Flash Head To Horizontal/ Front Position 24-25
Using LCD Panel For Shooting- Distance Computation. 26 - 30
Setting ISO Film Speed (Manual Adjustment). 27 - 28
Setting Aperture Value (Manual Adjustment) 28 - 29
Setting Zoom-Head Position (Manual Adjustment) 29 - 30
Chapter 3: Shooting Practice in Flash Modes
TTL Auto Flash Mode — Fill-Flash with Automatically Compensated Flash Output ...32 — 80
For F5, F90X/N90s, F90-Series/N90 and F70-Series/N70 Camera Users:
Choosing A Flash Method/Set Up and Practice.....36 - 41
For F4-Series, F-801/N8008 and F-801s/N8008s Users:
Choosing A Flash Method/Set Up and Practice.....42 - 49
For F-601/N6006 and F-601M/N6000 Users:
Choosing A Flash Method/Set Up and Practice.....50 — 58
For F50-Series/N50 and F-401x/N5005 Users:
Choosing A Flash Method/Set Up and Practice.....59 - 64
For F-501/N2020 and F-301/N2000 Users:
Choosing A Flash Method/Set Up and Practice....65-70
For F-401/N4004 and F-401s/N4004s Users:
Choosing A Flash Method/Set Up and Practice.....71-76
For FA, FE2, FG and Nikonos V Users:
Choosing A Flash Method/Set Up and Practice. 77 - 80
Non-TTL Auto Flash A Mode - Shooting with Varied Lens Apertures. 81-84
Manual Flash Mode - Manual Light-Output Control 85-90
Synchronization in Continuous Shooting. 90
Repeating Flash Mode - For Multiple Exposure. 91-96
Chapter 4: Flash-Shooting Applications
FP High-Speed Sync Flash — Flash Photography At Higher Shutter Speeds 98-103
Guide number in FP High-Speed Sync Flash ....102 - 103
Red-Eye Reduction Control — For Better Flash Portraits 104
Rear-Curtain Sync Flash - For Natural Light Flows. 105
Flash Exposure Compensation — To Make Flash-Illuminated Subject Lighter or Darker....106 — 107
Exposure Compensation with Camera's Dial — To Make Background Lighter or Darker....108 — 109
Open Flash Button - For Test Firing 110
Built-In Wide Flash Adapter — For Shorter Focal-Length Lenses 111
Zoom-Lock Capability - To Fix Zoom-Head Position 112 - 113
Trouble With Wide Flash Adapter 113
AF Assist LED — Autofocus Flash Photography in Dim Light 114 - 115
Power Switch Standby (STBY) Position - To
Conserve Energy and
Shorten Recycling Time 116-117
Guide Number-To Calculate a Proper Aperture. 118
Diffusing Light — To Soften Harsh
Shadow 119—123
Bounce Flash Photography 122
Using a Diffuser 123
Close-Up Flash Photography in
TTL Auto Flash Mode — To Flash
On A Very Close Subject 124-125
Multiple Flash Photography - Using More Than One Speedlights 126-136
Wireless Slave Flash Photography 128-131
Multiple Flash Photography Using Cord. 131-133
System Chart for TTL Multiple Flash 134-135
Accessories for TTL Multiple Flash 136
Chapter 5: Notes on Speedlight
"Red Eye" 138
Flash Sync Mode Selector (NORMAL) vs. REAR Position 139
Tips on Speedlight Care. 140-141
About Batteries 142
Specifications 143-145
Usable Aperture/Flash Shooting Distance Ranges In TTL Auto And Non-TTL Flash Modes 146
Chapter 1
Introducing the SB-26 Autofocus Speedlight
Nomenclature
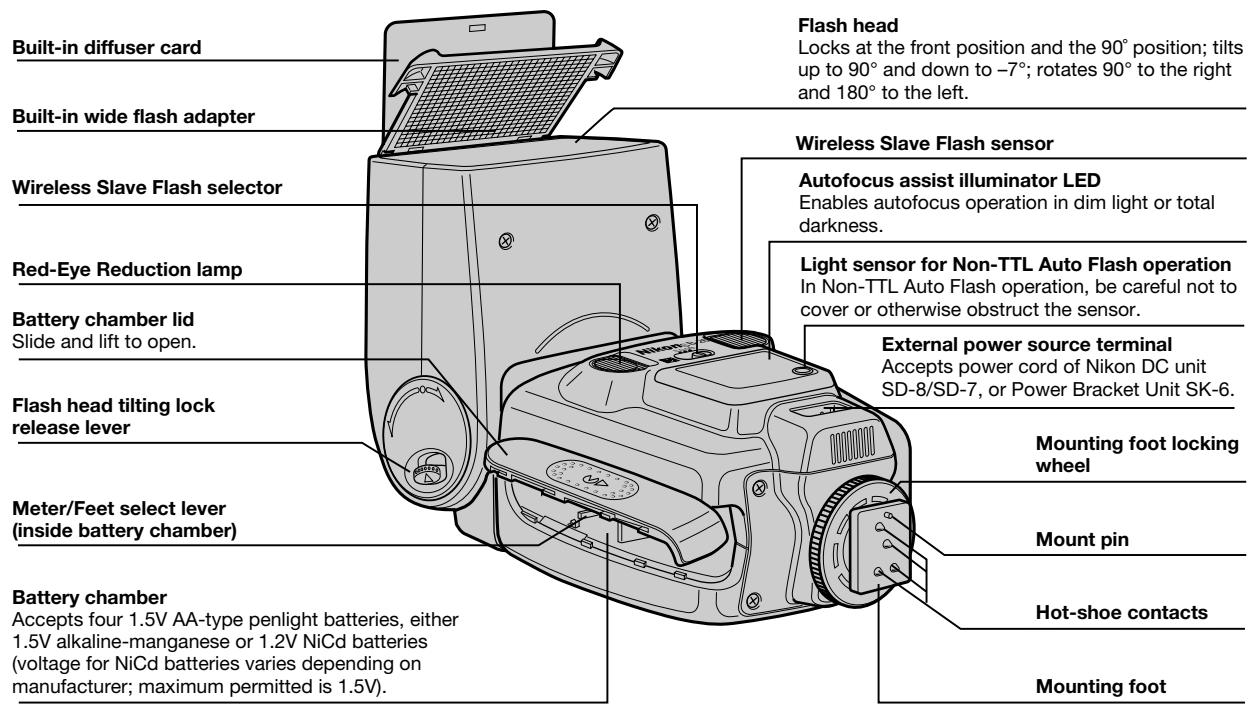
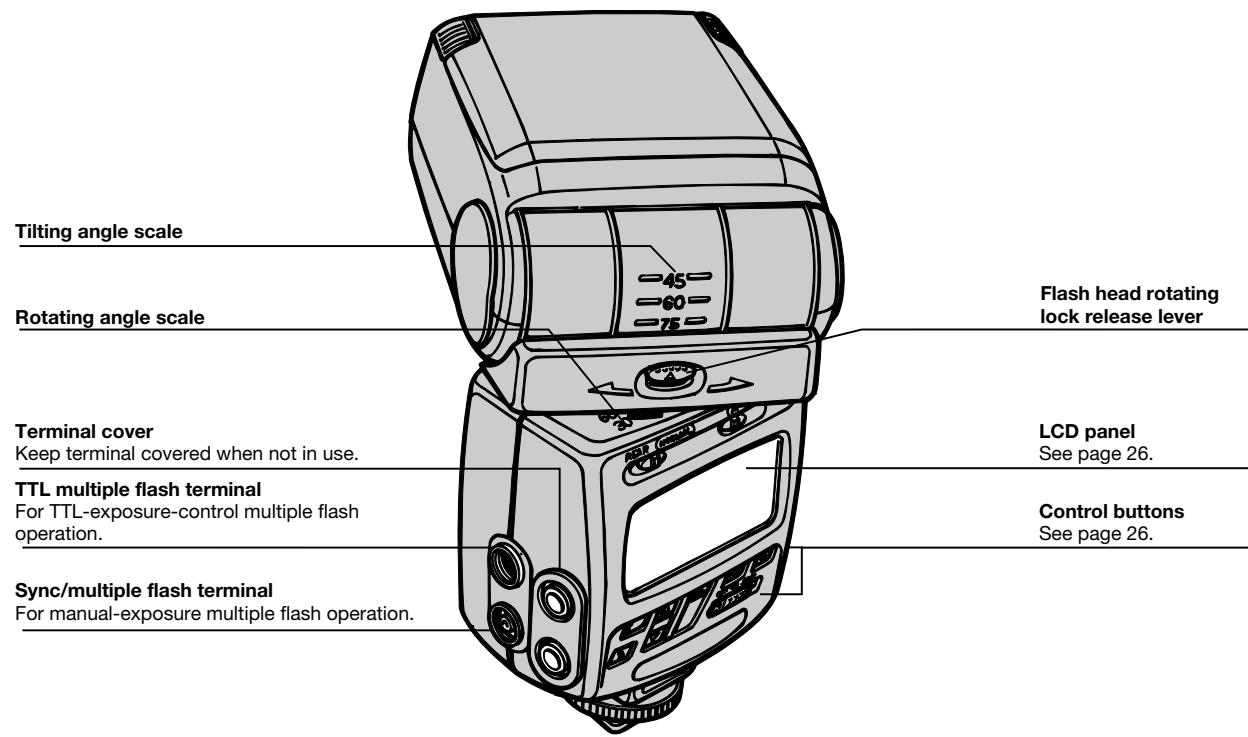
Main Features/Functions — SB-26's Flash Capabilities
The SB-26 is a most versatile Speedlight which offers variety of convenient features to enhance your flash photography. To understand these features/function will help you operate the SB-26 easily, therefore, enjoy more options and creative possibilities. Each of following topics cover particular Nikon SLR models:
- Fully Automatic Fill Flash: F5, F90X/N90s, F90-Series/ N90, F70-Series/N70, F4-Series, F-801/N8008, F-801s/ N8008s, F-601/N6006, F-601M/ N6000, F50-Series/N50 and F-401x/N5005
- Standard TTL Flash: F5, F90X/N90s, F90-Series/N90, F70-Series/N70, F4-Series, F-801/N8008, F-801s/N8008s, F-601/N6006, F-601M/ N6000, F-501/N2020, F-301/ N2000, F-401/N4004, F-401s/N4004s, FA, FE2, FG and Nikonos V
- FP High-Speed Sync Flash: F5, F90X/N90s and F90-Series/N90
- Rear-Curtain Sync Flash: F5, F90X/N90s, F90-Series/ N90, F70-Series/N70, F4-Series, F-801/N8008, F-801s/ N8008s, F-601/N6006 and F-601M/N6000
- Red-Eye Reduction Control: F90X/N90s, F90-Series/ N90 and F70-Series/N70
- Repeating Flash: All the Nikon SLR models covered in this manual
Fully Automatic Fill Flash
Generally performed at night or in dim light, flash photography can also be used to reduce shadows in pictures shot in bright sunlight, resulting in a pleasing, more natural effect.
Using a flash this way, with ambient light, is called "fill-flash." When used with the SB-26, many Nikon SLR cameras provide Automatic Balanced Fill-Flash, to automatically keep flash brightness in balance with the ambient light.

Matrix Balanced Fill-Flash
Automatic Balanced Fill-Flash
Thanks to a computer-controlled exposure meter and TTL (through-the-lens) sensor, shutter speed, aperture, and even flash output can be automatically controlled to keep both subject and background in correct exposure.
In Matrix Balanced Fill-Flash, the camera's Matrix Metering System determines the correct exposure based on ambient light. Flash output is then controlled with the center-bottom-weighted TTL sensor which monitors light reflection from the film surface and regulates timing to terminate output in realtime with flash illumination. This way, flash illumination brightens the scene (mainly foreground subject), but does not overpower the ambient light exposure (background).
The result is brighter shadows, sharper details and more vivid colors. Matrix Balanced Fill-Flash operates in virtually all light conditions within the camera's metering range and available synchronized shutter speeds. Operation is fast and automatic, while it allows manual operation for exposure compensation techniques to vary fill-flash effects.
Center-Weighted Fill-Flash operates when you switch the metering system to Center-Weighted. This metering system measures the entire scene and emphasizes its reading on the center area. By pointing the center-weighted area at different parts of the scene, you can choose which brightness level you want for basic available-light exposure.
By selecting Spot Metering System, Spot Fill-Flash operates in a similar manner as Center-Weighted Fill-Flash, although the meter reads a narrower center area, or "spot."
"TTL Multi-Sensor" Automatic Balanced Fill-Flash with F5, F90X/N90s, F90-Series/N90 and F70-Series/N70
After you depress the shutter release button and prior to the shutter being activated, the SB-26 fires a series of nearly invisible preflash, or Monitor Preflash.
These preflash are detected by the F5, F90X/N90s, F90-Series/N90 and F70-Series/N70's TTL multi-sensor, analyzed for brightness and contrast, then integrated with distance information from the lens (D-type Nikkor) and other exposure control information for a balanced fill-flash exposure.
3D Multi-Sensor Balanced Fill-Flash can be performed with any built-in metering system, and is most effectively used to achieve correct exposure in scenes that include:
- A mirror, white wall or other surface with extremely high reflectivity
- Obstacle(s) in front of subject you wish to avoid
- Sunlight
- Subject against an "infinite" background (empty sky, clouds, etc.)
With non-D-type AF or Al-P Nikkor lenses, Multi-Sensor Balanced Fill-Flash will be performed. Although the TTL multi-sensor does not process distance information, the advanced sensor system generally provides superior results to Matrix Balanced Fill-Flash.

3D Multi-Sensor Balanced Fill-Flash photography: particularly effective for subject standing against a shiny object.
Standard TTL Flash
It is possible to manually select a flash compensation level instead of having the computer do it automatically. Simply press the SB-26's button to cancel Automatic Balanced Fill-Flash.
The camera's computer-controlled TTL flash sensor detects the total amount of light passing through the lens and reflected from the film surface. The system controls flash output so that the combination of ambient light and flash illumination will result in a correct exposure.
Under bright-light conditions, the flash is automatically controlled to provide less light; under dim light conditions, it will produce more light.
This system is not designed to automatically provide a balance between flash and ambient light; it is limited to efficient operation in dim-light conditions and is not recommended for use in very bright lighting conditions. This system does not directly link the ambient light meter and the flash's TTL meter.
FP High-Speed Sync Flash
The SB-26 is capable of flash synchronization at shutter speeds of 1/250 sec. or faster when used with the F5, F90X/N90s and F90-Series/N90. Unlike other flash synchronization methods, the flash consecutively emits light at an extremely rapid cycle and exposure begins with the opening of the front (first) curtain and ends with the closing of the rear (second) curtain.
FP High-Speed Sync Flash: Allows a wider aperture, thus, shallower depth of field for a blurred background.
The combination of high shutter-speed range and flash sync capability provides you with more options for flash photography in day-light conditions. It enables you to use a wider aperture to blur the subject's background (create a shallow depth of field), light up shadowed areas in outdoor photography, or even create light flow for fast moving subjects.
FP high-speed sync flash is only available in the SB-26's Manual flash mode when using the F5, F90X/N90s and F90-Series/N90. For details, see "FP High-Speed Sync Flash — Flash Photography At Higher Shutter Speeds" on page 98.
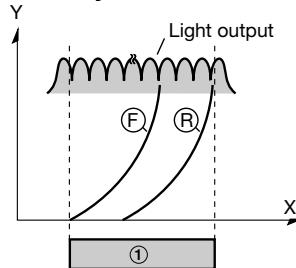
SB-26 sync flash
FP High-Speed Sync Flash

Front-curtain sync flash
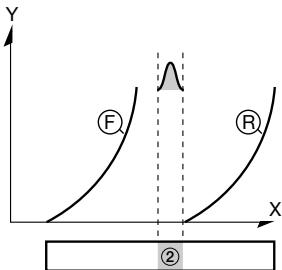
Rear-curtain sync flash
X: Time duration
Y: Shutter curtain movement
: Front-curtain movement
B: Rear-curtain movement
①: Film surface is exposed to flash light throughout the entire duration.
②: Film surface is exposed to flash light for only part of the time that the curtain are open.
Rear-Curtain Sync Flash
In "normal" flash synchronization, the flash fires at an early stage of exposure (i.e., front-curtain sync). At slow shutter speeds with a moving subject, this results in unnatural light patterns.
For more natural lighting, use Rear-Curtain Sync. With this method, the flash fires at a later stage of the exposure, just before the rear, or second, shutter curtain starts to close (i.e., rear-curtain sync), turning available light into a stream of light that follows the flash-illuminated moving subject. Rear-Curtain Sync is available with the F5, F90X/N90s, F90-Series/N90, F70-Series/N70, F4-Series, F-801/N8008, F-801s/N8008s, F-601/N6006 and F-601M/N6000.
For more details, see "Rear-Curtain Sync Flash — For Natural Light Flow," page 105 and "Flash Sync Mode Selector NORMAL vs. REAR," page 139.
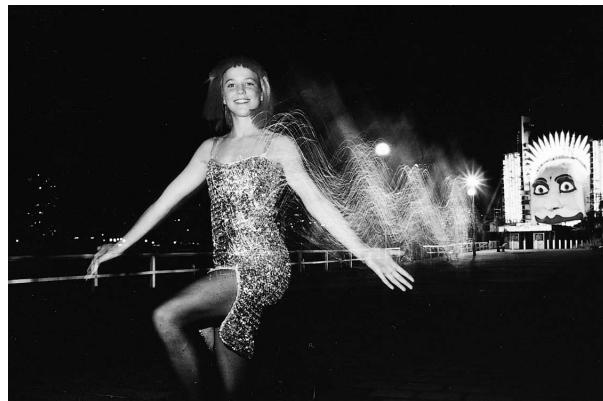
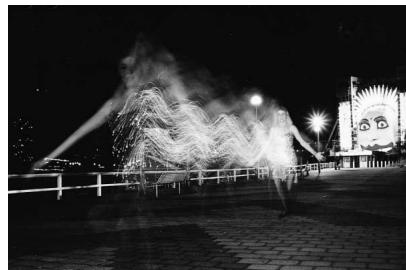
A slow shutter speed could create light flow from a moving subject. Rear-Curtain Sync Flash catches him/her with natural-looking light stream.
Red-Eye Reduction Control
"Red eye" effect occurs in flash photography when flash pictures are taken in dim surroundings where the subject's eye pupils will be dilated (opened very wide). Light from the camera's flash reflects off the interior of the eye through the wide-open pupil and back into the camera's lens; the result in the photo appears as bright red eyes.
With this function, before the shutter is released the SB-26's red-eye reduction lamp illuminates to make the subject's eye pupils become smaller, thus reducing the appearance of red-eye.
The F90X/N90s, F90-Series/N90 and F70-Series/N70 offers this exclusive Red-Eye Reduction Control, for use in any flash mode, except Repeating Flash mode. For more details and setting operation, see page 104, and the camera's instruction manual.
Red-eye effect can also be controlled by the angle at which light strikes the subject and is reflected back to the camera's lens. For further details, see "Red Eye," page 138.
Repeating Flash
When used with any Nikon SLR, the SB-26 is capable of strobo-effect multiple flash exposure at up to 160 flash per frame; it also allows control of the amount of flash light output. Operation becomes simple once you learn how to match the number and speed of flash to your desired shutter speed.
For details, see "Repeating Flash Mode - For Multiple Exposure," pages 91 to 96.

Repeating flash mode offers "strobo effect," multiple exposure on a single frame.
SB-26 Feature Comparison: Flash Operations Available with Your Camera
| For details regarding your camera,see pages:1) 33 to 41. 2) 42 to 49. 3) 50 to 58.4) 59 to 64. 5) 65 to 70. 6) 71 to 76.7) 77 to 80. | See pages | ||||||||||||||||||||||||||||||||||||||||||||||||||||||||||||||||||||||||||||||||||||||||||||||||||||
| TTL Auto Flash3D Multi-Sensor Balanced Fill-Flash | 32 - 80 | ||||||||||||||||||||||||||||||||||||||||||||||||||||||||||||||||||||||||||||||||||||||||||||||||||||
Chapter 2
Before Flash Shooting
WARNING — TO AVOID INJURY
- DO NOT FIRE FLASH NEAR THE EYES: Firing the flash light very close to any person's eyes can injure the retina, thereby weakening eyesight or causing blindness.
- DO NOT TOUCH THE FLASH HEAD WHEN FIRING THE SB-26: The flash head generates significant heat during normal operation, which may cause burns. Also, when using the flash, keep delicate materials away from the flash head.
CAUTION — TO PREVENT DAMAGE TO THE SB-26 SPEEDLIGHT
DO NOT MIX OR USE THE SB-26 WITH OTHER MANUFACTURER'S CAMERAS, FLASH UNITS, OR ACCESSORIES (INCLUDING EXTERNAL POWER SOURCES): Nikon is not responsible for malfunctions or other problems resulting from use of this product with any equipment other than Nikon brand products.
PROPER CARE AND STORAGE OF THE SB-26 SPEEDLIGHT
- SEE PAGES 140 AND 141, "Tips on Speedlight Care."
BATTERIES: CARE AND CAUTION
- SEE PAGE 142, "About Batteries."
Getting Started — SB-26 Set-Up
This section introduces preparations for using the SB-26, such as installing batteries, attaching flash unit to your camera, and finally, turning the unit on. Follow these steps in order, especially when using for the first time. This section should serve as a practical guide for later reference.
ABNORMAL LC (LIQUID CRYSTAL) DISPLAY AND MALFUNCTIONING
In certain cases, due to normal characteristics of the built-in microcomputer, the speedlight may not operate or an abnormal display may appear, even with fresh, properly installed batteries.
If this occurs, turn off flash and remove the batteries, then reinstall batteries and turn the power on. This should properly reset the computer.
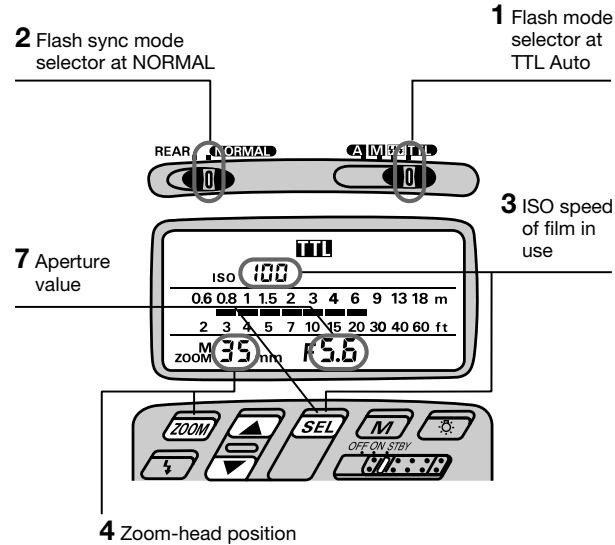
Selecting Measurement System, Meters or Feet
1 Slide the battery chamber cover in the direction and lift to open.
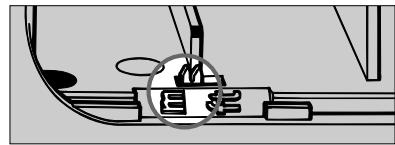
2 Slide the meter/feet lever (small switch in the mouth of the chamber) to select desired indication (m or ft.); this will appear in the LCD panel while the speedlight is in use.
The lever is preset to meters (m) when shipped from the factory.
Installing Batteries
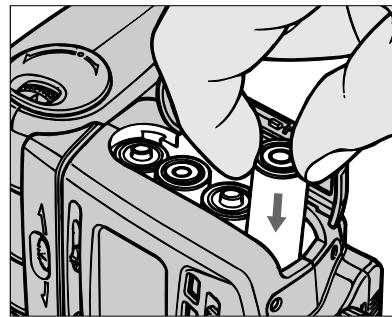
3 Load four 1.5V AA-type penlight alkaline-manganese or 1.2V NiCd batteries into the battery chamber. Be sure to follow the -1.5V + indication inside the chamber to ensure the batteries are properly loaded.
Using an external power source
For an external power source, use optional Nikon DC Unit SD-7 or SD-8 or Power Blacket Unit SK-6. For battery information, see page 142.
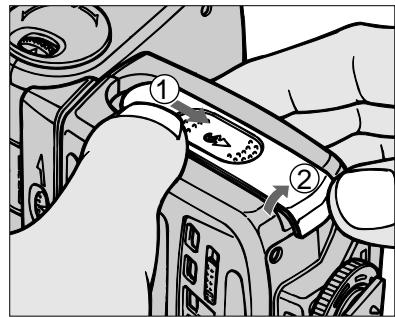
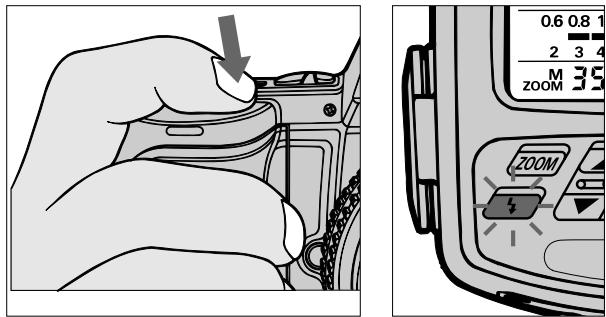
Attaching Flash Unit to Camera Accessory Shoe
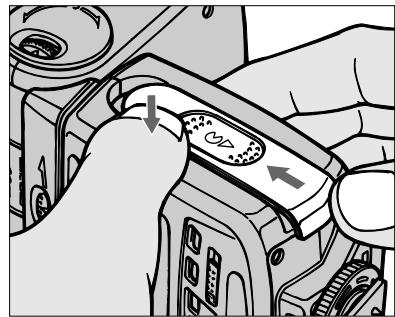
4 Close the battery chamber lid, then slide cover to close.
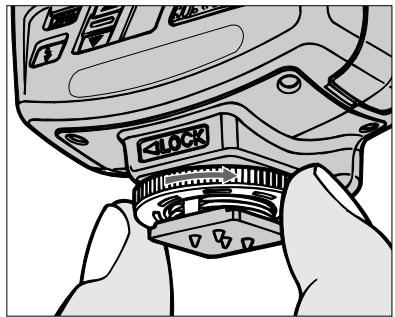
5 Turn the SB-26's mounting foot locking wheel to the loosened position as far as it goes, without forcing.
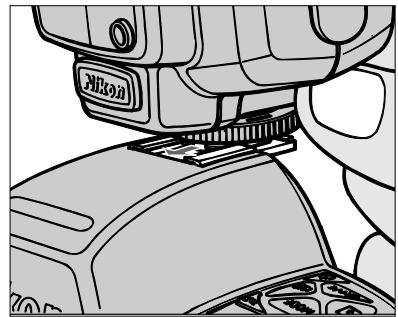
6 Slide the mounting foot forward onto the camera's accessory shoe as far as it goes.
Checking Battery Power
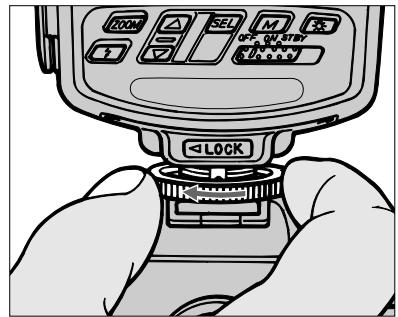
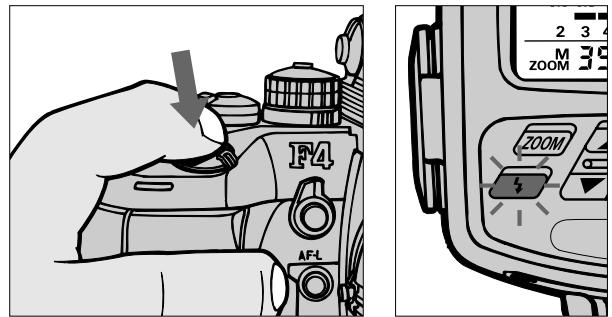
7 Tighten the locking wheel, taking care not to over-tighten.
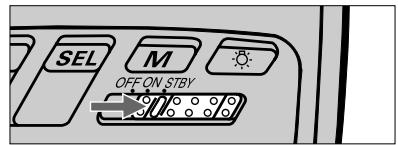
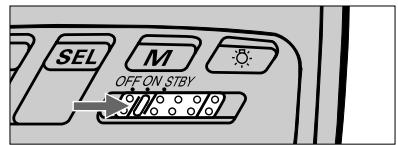
8 Set power switch to STBY (standby position) or ON to turn on the speedlight. If batteries are properly installed/ power is sufficient, ready-light will come on, and LCD indications will appear.
LCD figures and symbols for meters (m) and feet (ft) do not appear simultaneously, as shown above. They are shown together throughout this manual for ease of explanation.
For Nikon F3 Series users
The SB-26 can only be mounted on an F3 Series camera that uses a DE-2 or DE-3 finder. Be sure to attach Flash Unit Coupler AS-4 or AS-7 to the camera's accessory shoe before mounting the SB-26 on the camera.
Precaution for Nikon F5, F90X/N90s, F90-
Series/N90 and F70-Series/N70 users
As the locking wheel is tightened, the SB-26 is firmly attached to the accessory shoe with the mount pin. Be extra careful that the locking wheel is completely loosened before removing the flash unit from the camera or it may cause damage to both units.
Replace batteries with a fresh set:
With alkaline-manganese batteries — replace if ready-light takes more than 30 sec. to light up.
With NiCd batteries — remove if ready-light takes more than 10 sec. to light up.
Adjustment Functions — Using LCD Panel and Built-in Functions
Tilting/rotating flash head, built-in zoom head, LCD panel and control buttons for aperture/distance computation...
The SB-26 features many convenient functions. Proper use will help you perform successful flash photography in every situation.
Before practice, you should understand the adjustments and reasons behind them. Once you have learned them, you can make the most of the SB-26 for all kinds of flash techniques.
Operation can be controlled manually or automatically, depending on which Nikon SLR model is used. Manual operation is described for each feature, then automatic adjustment features are described within the boxed sections (with a mark).
Before proceeding:
ATTACH SPEEDLIGHT TO CAMERA.
TURN ON BOTH SPEEDLIGHT AND CAMERA.
Adjusting Flash Head To Horizontal/Front Position
In "normal" shooting situations, the flash head should face straight forward, tilted in the horizontal position. A tilted/rotated head can be used for special techniques such as close-ups or bounce flash photography.
Tilting/Rotating flash head to a position other than horizontal and straight forward
Downward-tilted flash head (-7^ position) is used for taking pictures of subjects at a distance of less than 1.5m (approx. 5 ft.). When the head is set at this position, the distance indicator bars blink.
An upward-tilted and/or rotated flash head is used for bounce flash photography. When the head is set this way, the distance indicator bars do not appear, to show the distance indication function is not available.
See "Diffusing Light — To Soften Harsh Shadows," pages 119 to 123, for information on bounce flash photography.
Tilt the flash head to the horizontal, until it click-stops.
The flash head locks both at the horizontal, facing straight-forward (0^ degree), and at the vertical, facing straight-up (90^ degrees).
To release from the locked position, slide the lock release lever in the direction, then, while holding the lever, tilt the flash head.
2 Adjust the flash head so it faces straight forward — check that it is not rotated to the right or left.
To unlock from the forward position, slide the lock release lever in direction, then, while holding the lever, rotate flash head to either the right or left.

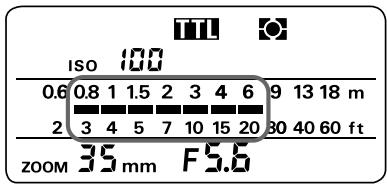
3 Confirm indicator bars appear in the flash shooting distance scale (LCD panel). Bars do not appear or will blink if the flash head is not set horizontal and straight ahead.
If indicator bars do not appear in the LCD panel at all, check whether the camera is turned on. If it is, lightly press the shutter release button. If not, turn on the camera, then lightly press the shutter release button.
Indicator bars appear for eight seconds once activated (they disappear after eight seconds). Lightly pressing the shutter release button causes the bars to reappear.
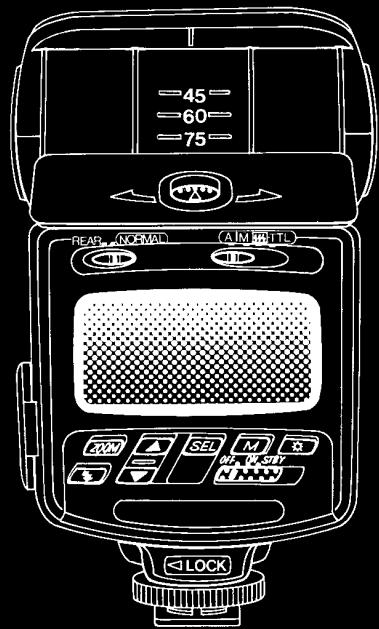
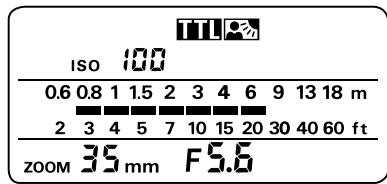
Using LCD Panel For Shooting-Distance Computation
Note: All LCD (liquid crystal display) figures and marks do not appear simultaneously, as shown below. They are shown together for ease of explanation.
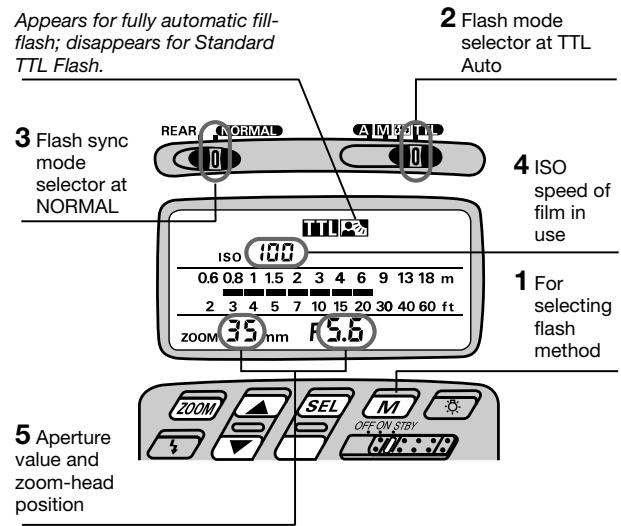
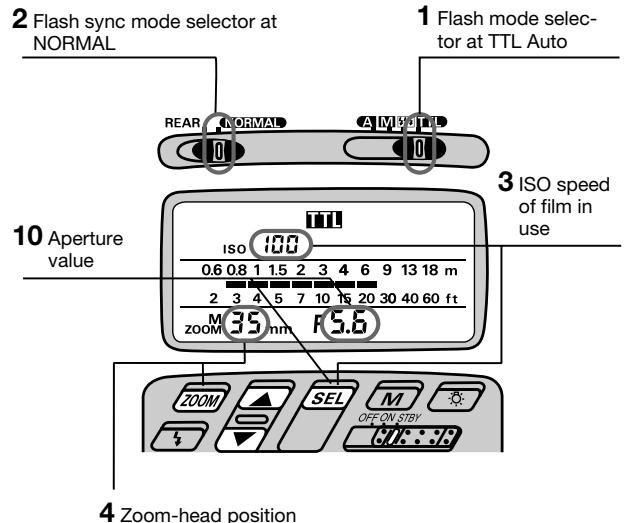
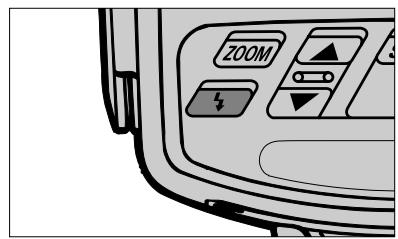
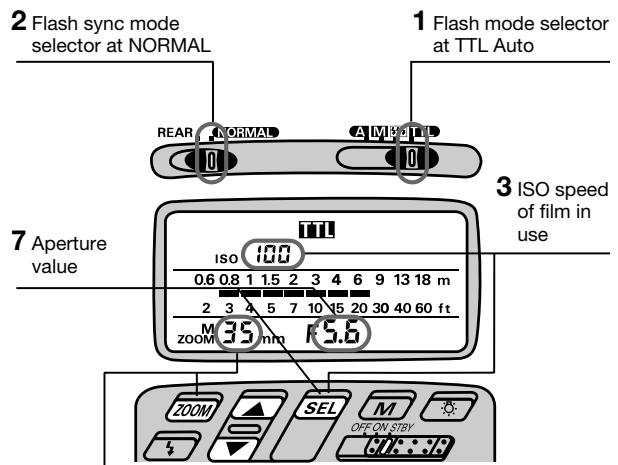
Flash mode selector
A for Non-TTL Auto Flash exposure control
M for Manual Flash exposure control
for repeating flash
TTL for TTL Auto Flash exposure control
Confirming flash shooting distance is an indispensable step for successful flash photography. The SB-26 can be used to compute the appropriate distance range.
An appropriate flash shooting distance is determined using the following variables:
- ISO FILM SPEED IN USE
APERTURE VALUE - ZOOM-HEAD POSITION
Indicator bars will appear to show a proper shooting distance range only after all those variables have been set in the LCD panel.
Setting ISO Film Speed (Manual Adjustment)
Push button so a film speed number starts blinking beside the ISO indication in the LCD panel.
2 Press adjustment button or to set the film speed.

Automatic ISO film speed adjustment: F5,
F90X/N90s, F90-Series/N90, F70-Series/N70,
F4-Series, F-801/N8008, F-801s/ N8008s
No manual adjustment is required with these camera models, because ISO speed of film in use is automatically set and indicated in the SB-26's LCD panel.
When a film is not installed in the camera, ISO 100 is indicated.
If no indication shows in the LCD panel, lightly press the camera's shutter release button.
Operation in Repeating Flash Mode
Setting of ISO film speed is not required. The repeating flash indicator appears in the place of the film speed indicator. For details, see pages 91 to 96.
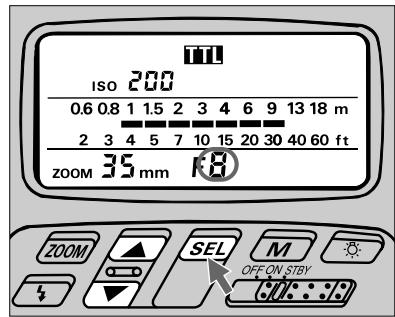
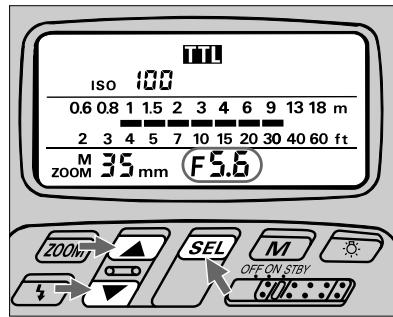
Setting Aperture Value (Manual Adjustment)

3 When the desired number appears, press button to complete setting. The indication will stop blinking.
The film-speed indicator blinks during adjustment, and stops blinking after eight seconds unless an adjustment is made with an adjustment button. The last blinking number is automatically set in this case.
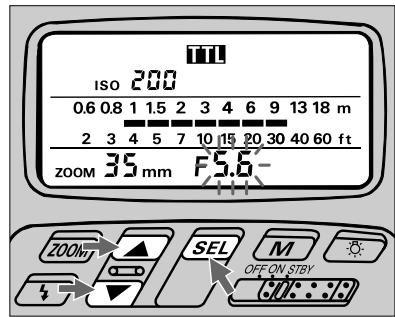
Push button so an aperture value number starts blinking beside the F indication in the LCD panel.
2 Press adjustment button or to set the aperture value. When camera is in programmed auto or shutter-priority exposure mode, be sure to use an aperture indicated in the camera's viewfinder (a "controlled aperture").
In general, first set the aperture on the camera, then use the same value for the SB-26.
Automatic aperture adjustment: F5, F90X/ N90s, F90-Series/N90, F70-Series/ N70, F4-Series, F-801/ N8008 or F-801s/N8008s used with an AF Nikkor lens (including the latest D-Type) or Nikkor lens having a built-in CPU
No manual adjustment is required with these camera/lens combinations, because the controlled aperture is automatically set and indicated in the SB-26's LCD panel (except in Non-TTL Auto Flash A mode).
Setting Zoom-Head Position (Manual Adjustment)
3 When the desired number appears, press button to complete the setting. The indication will stop blinking.
The aperture-value indicator blinks during adjustment, and stops blinking after eight seconds unless an adjustment is made with an adjustment button. The last blinking figure is automatically set in this case.
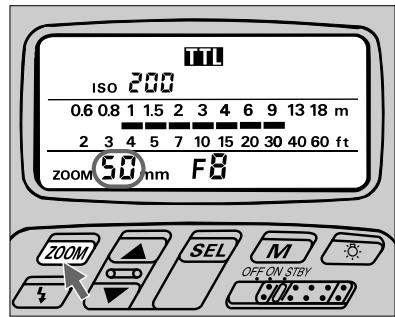
Press the 200M button until the number in the LCD panel shows the focal length of the lens in use or shorter.
When using a zoom lens other than AF Zoom Nikkor, set the shortest focal length of the lens to determine the zoom-head position that covers the full zoom length range.
Also, refer to page 143 on "Angle of coverage," an angle which flash light can cover in a zoom-head position.
Adjustment Functions
Automatic zoom-head position adjustment: F5, F90X/N90s, F90-Series/N90, F70-Series/N70, F4-Series, F-801/N8008, or F-801s/ N8008s used with an AF Nikkor lens (including the latest D-Type) or Nikkor lens having a built-in CPU
No manual adjustment is required with these camera/ lens combinations, because the SB-26 automatically adjusts the zoom-head position to provide an angle of coverage that matches the focal length of the lens in use.
With an AF Nikkor lens of fixed focal length (including the latest D-Type), the zoom head automatically adjusts to the closest available wider focal length setting.
With a zoom lens, the zoom head automatically adjusts within the limits of the available coverage (from 24mm to 85mm).
You must set zoom-head position manually when using your camera with other lenses or to select a specifically desired position.
For manual adjustment (with same camera/lens combinations as above)
Press ZOOM button until your desired zoom-head position appears in the LCD panel, and note the small M above the zoom (shown as z_00M ). Automatic adjustment will resume when the M disappears.
Chapter 3
Shooting Practice and Flash Mode
TTL Auto Flash Mode — Fill-Flash with Automatically Compensated Flash Output
In TTL Auto Flash mode, the SB-26 Speedlight can be used for just about any shooting situation, from bright scenes to dim lights. For precisely controlled exposures in wider brightness ranges or more complex conditions, you can use fill-flash techniques with automatic operation and/or advanced user-controlled options.
The SB-26's TTL Auto Flash mode offers even more flash applications and options, such as flash synchronization with slow shutter speeds (slow sync flash), bounce flash and creative close-up photography.
Even simple snap shots can be taken with a sophisticated touch. By setting the SB-26 to TTL Auto flash mode, you can enjoy flash photography that is simple, yet the most advanced available.
Using this flash mode with your camera
The SB-26 works in different ways, depending on which camera it is used with. TTL Auto Flash mode, in particular, offers several noteworthy features that vary from one model to another. Be sure to read "Fully Automatic Fill-In Flash," pages 10 through 13, to become familiar with these SB-26 capabilities.
Use the following chart to locate pages relevant to your camera model and the flash operation you wish to use.
| TTL Auto Flash Mode: | See pages |
| For F5, F90X/N90s, F90-Series/N90 and F70-Series/N70 Users | 33 — 41 |
| For F4-Series, F-801/N8008, and F-801s/N8000s Users | 42 — 49 |
| For F-601/N6006 and F-601M/N6000 Users | 50 — 58 |
| For F50-Series/N50 and F-401x/N5005 Users | 59 — 64 |
| For F-501/N2020 and F-301/N2000 Users | 65 — 70 |
| For F-401/N4004 and F-401s/N4004s Users | 71 — 76 |
| For FA, FE2, FG and Nikonos V users | 77 — 80 |
For F3-Series, F2-Series, FM2 and FG-20 users
No information is provided for these models in this section, because they do not function in TTL Auto Flash mode.
TTL Auto Flash Mode: For F5, F90X/N90s, F90-Series/N90 and F70-Series/N70 Users
Choosing A Flash Method
The SB-26 enables you to perform any of the following fully automatic fill-flash functions, or choose Standard TTL Flash. (Functions are described in detail on pages 10 to 13.)
3D Multi-Sensor Balanced Fill-Flash
- Multi-Sensor Balanced Fill-Flash
Center-Weighted Fill-Flash
- Spot Fill-Flash
Use the chart at right to confirm which flash method you will perform with the lens in use and metering system set on the camera. In most cases, the lens/meter combination determines the flash method.
If you have extra lens(es), you may be able to select a particular flash method. For example, by replacing a D-Type AF Nikkor with an Al-P lens, you can switch from 3D Multi-Sensor to Multi-Sensor Fill-Flash.
By using the SB-26's M button, you can perform Standard TTL Flash (except for P and Ps exposure modes with F90X/N90s or F90-Series/N90 camera), regardless of lens type.
Flash Methods: F5 Settings and Lenses
| Lens in Use1) | Camera's Exposure Mode | Camera's Metering System | ||
| 3D Color Matrix | Center-Weighted | Spot | ||
| D-Type AF Nikkor Lenses | Programmed auto (P) | 3D Multi-Sensor Balanced Fill-Flash | Standard TTL Flash | |
| Shutter-priority auto (S) | ||||
| Aperture-priority auto (A) | ||||
| Manual (M) | ||||
| AF Nikkor lenses2) Al-P lenses | Programmed auto (P) | Multi-Sensor Balanced Fill-Flash | ||
| Shutter-priority auto (S) | ||||
| Aperture-priority auto (A) | ||||
| Manual (M) | ||||
| Other lenses3) | Aperture-Priority auto (A)3) | Center-Weighted Fill-Flash4) | ||
| Manual (M) | ||||
1)Suitable lenses and use depend on camera; see instruction manual for information.
2) Except D-Type and AF Nikkor lenses for F3AF.
3) Exposure mode (P or S) automatically shifts to aperture-priority auto (A), and the mode indication blinks in the camera's LCD panel; set desired aperture manually.
4)3D Color Matrix Metering system automatically shifts to Center-Weighted, as shown by the indication in the viewfinder
Flash Methods: F90X/N90s or F90-Series/N90 Settings and Lenses
| Lens in Use 1) | Camera's Exposure Mode | Camera's Metering System | ||
| Matrix | Center-Weighted | Spot | ||
| D-Type AF Nikkor Lenses | Programmed auto (P, Ps) 4) | 3D Multi-Sensor Balanced Fill-Flash | ||
| Shutter-priority auto (S) | ||||
| Aperture-priority auto (A) | ||||
| Manual (M) | ||||
| AF Nikkor lenses 2) Al-P lenses | Programmed auto (P, Ps) 4) | Multi-Sensor Balanced Fill-Flash | ||
| Shutter-priority auto (S) | ||||
| Aperture-priority auto (A) | ||||
| Manual (M) | ||||
| Other lenses 3) | Aperture-Priority auto (A) 5) | Center-Weighted Fill-Flash | Spot Fill-Flash | |
| Manual (M) | ||||
1) Suitable lenses and use depend on camera; see instruction manual for information.
2) Except D-Type and AF Nikkor lenses for F3AF.
3) You can not use the Ps mode as the shutter locks.
4) Only 3D Multi-Sensor Balanced or Multi-Sensor Balanced Fill-Flash can be performed; Standard TTL Flash is not available and the M button cannot be used.
5) Exposure mode (P or S) automatically shifts to aperture-priority auto (A), and the mode indication blinks in the camera's LCD panel; set desired aperture manually.
Flash Methods: F70-Series/N70 Settings and Lenses
| Lens in Use 1) | Camera's Exposure Mode | Camera's Metering System | ||
| Matrix | Center-Weighted | Spot | ||
| D-Type AF Nikkor Lenses | Programmed auto (P, Ps) | 3D Multi-Sensor Balanced Fill-Flash | ||
| Shutter-priority auto (S) | ||||
| Aperture-priority auto (A) | ||||
| Manual (M) | ||||
| AF Nikkor lenses 2) Al-P lenses | Programmed auto (P, Ps) | Multi-Sensor Balanced Fill-Flash | ||
| Shutter-priority auto (S) | ||||
| Aperture-priority auto (A) | ||||
| Manual (M) | ||||
| Other lenses 3) | Aperture-Priority auto (A) 4) | Center-Weighted Fill-Flash | Spot Fill-Flash | |
| Manual (M) | ||||
1)Suitable lenses and use depend on camera; see instruction manual for information.
2) Except D-Type and AF Nikkor lenses for F3AF.
3) You can not use the Ps mode as the shutter locks.
4) Exposure mode (P or S) automatically shifts to aperture-priority auto (A), and the mode indication blinks in the camera's LCD panel; set desired aperture manually.
1/300 TTL High-Speed Sync (with F5 only)
With the camera's Custom Setting, you can select 1/300 TTL High-Speed Sync for Shutter-Priority Auto or Manual exposure mode. (For details see camera's instruction manual.)
Tables below show guide number at ISO 100 and adjustment factor for other ISO film speed in 1/300 TTL High-Speed Sync. To calculate a proper aperture using guide number, please see page 118.
Guide number in 1/300 TTL High-Speed Sync
(at ISO 100 for meters/feet)
| Zoom-head position | |||||||
| 18mm | 20mm | 24mm | 28mm | 35mm | 50mm | 70mm | 85mm |
| 8/26 | 8/26 | 11/36 | 12/39 | 14/46 | 16/52 | 18/59 | 19/62 |
Adjustment factor for other ISO film speeds
| ISO film speed | 25 | 50 | 100 | 200 | 400 | 800 | 1600 |
| Factor | x 0.5 | x 0.7 | x 1 | x 1.4 | x 2 | x 2.8 | x 4 |
TTL Auto Flash Mode: For F5, F90X/N90s, F90-Series/N90 and F70-Series/N70 Users
Set Up and Practice
Some operations can be controlled automatically when the camera is used with an AF Nikkor lens (including the latest D-Type) or Nikkor lens having a built-in CPU. In other cases, operate manually.
The following instructions describe a situation where you are using either a D-type Nikkor to operate 3D Multi-Sensor Balanced Fill-Flash, or an AF Nikkor (except for F3AF) or AlP lens to operate Multi-Sensor Balanced Fill-Flash. With other lenses, Center-Weighted or Spot Fill-Flash will be performed.
Before proceeding:
ATTACH SPEEDLIGHT TO CAMERA.
TURNOBOTH SPEEDLIGHTANDCAMERA.
USE SINGLE-SERVO AUTOFOCUS (S) OR MANUAL FOCUS (M).
USE SINGLE-FRAME SHOOTING (S) FILM ADVANCE MODE.
Setting Up SB-26
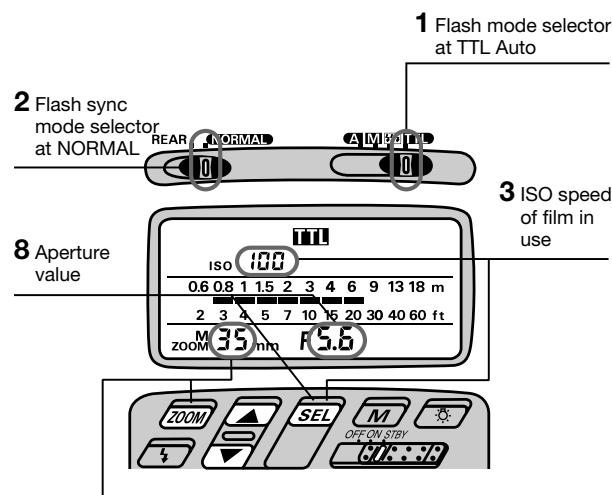
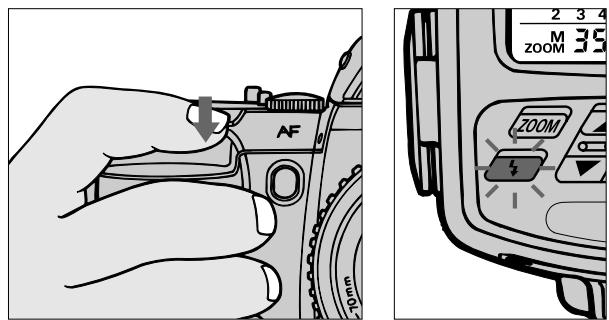
Press the button.
To perform 3D Multi-Sensor Balanced or Multi-Sensor Balanced Fill-Flash, confirm appears in the LCD panel.
To perform Center-Weighted or Spot Fill-Flash, confirm appears.
To perform Standard TTL Flash, press the button so that both 0 and 0 disappears.
2 Choose (flash mode selector). Confirm in the LCD panel.
Choose NORMAL position (flash sync mode selector).
REAR position is used for Rear-Curtain Sync Flash (see page 105).
4 Confirm the ISO film speed has been set and appears in the SB-26's LCD panel (automatic ISO film speed adjustment).
If not shown in the LCD panel, lightly press the camera's shutter release button.
5 Confirm the aperture value chosen on the camera and zoom-head position have been set and appear in the SB-26's LCD panel (automatic aperture/zoom-head adjustment).
Automatic aperture/zoom-head adjustment: AF Nikkor lens (including the latest D-Type) or Nikkor lens having a built-in CPU
The aperture and zoom-head position in use are automatically set and indicated in the SB-26's LCD panel.
For other lenses, set manually according to the shooting situation. See "Setting Aperture Value (Manual Adjustment)," pages 28 and 29, and "Setting Zoom-Head Position (Manual Adjustment)," pages 29 and 30.
Remote TTL Auto Flash operation
The optional SC-17 cord enables you to use the SB-26 off-camera.
When performing 3D Multi-Sensor Balanced Fill-Flash, remote operation of the SB-26 works properly only if the SB-26 is placed at a distance and angle similar to the camera-to-subject distance/angle.
For other situations, switch to a flash method other than 3D Multi-Sensor Balanced Fill-Flash.
TTL Auto Flash Mode: For F5, F90X/N90s, F90-Series/N90 and F70-Series/N70 Users
Setting Up Your Camera
6 Select one of the following exposure modes:
a. Programmed auto (P or Ps)
b.Shutter-priority auto (S)
c. Aperture-priority auto (A)
d. Manual exposure mode (M)
7 Select a metering system:
a. Matrix metering system
b. Center-Weighted metering system
c. Spot metering system
8 Perform other settings:
a. For programmed auto, set lens to minimum aperture (highest f-number).
b. For shutter-priority auto, set lens to minimum aperture (highest f-number), then set desired shutter speed.
c. For aperture-priority auto, set desired aperture.
d. For manual exposure mode, set desired shutter speed and aperture.
- Camera automatically shifts to the fastest synchronization speed if you choose a speed that is not within the synchronization range.
Selecting an exposure-metering system on the F5, F90X/ N90s, F90-Series/N90 and F70-Series/N70 camera
For 3D Multi-Sensor Balanced or Multi-Sensor Balanced Fill-Flash, choose a meter to measure background exposure that most effectively meets the photo requirements you with to achieve. (With F5, Standard TTL Flash will always perform when Spot Metering is selected.)
Quick reference on the relationship between usable apertures and flash shooting distance
Use the table on page 146 in this instruction manual.
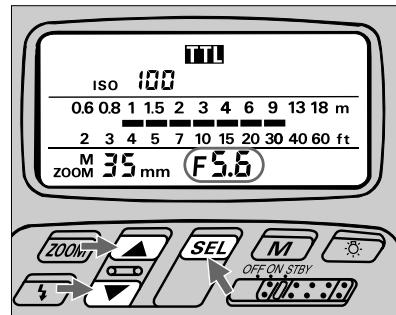
Confirming Settings
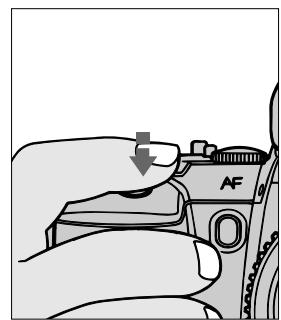
9 Look into camera viewfinder, compose and lightly press the shutter release button.
Use AE-L (Auto Exposure Lock) on the camera to capture exact exposure information for your picture composition (except when in manual exposure mode).
Confirm controlled aperture and shutter speed. These also appear in the camera's LCD panel.
The aperture in use (shown in the viewfinder) and shooting distance indicator bars appear in the SB-26's LCD panel.
If Wide-Area focus is set on the camera, it automatically switches over to Spot Area focus when the SB-26 is turned on. In this case, l blinks in the LCD panel, and appears inside the viewfinder.
Over-/Underexposure warning (background exposure)
For overexposure alert, HI or a “+ (positive)” value appears in the camera’s viewfinder and LCD panel.
For underexposure, electronic analog displays (in viewfinder and LCD panel) show Lo or a “- (negative)” value.
10 Confirm shooting distance.
Check whether subject falls within the range shown by the shooting distance indicator bars in the SB-26's LCD panel.
If not, move closer to subject or select a wide aperture (in aperture-priority auto or manual exposure mode). Then, repeat steps 9 and 10.

11 Confirm ready-light has come on and subject is in focus.
Confirm ready-light is on in the camera's viewfinder or on the SB-26 .
Check whether subject is in focus by using the in-focus indicator in the camera's viewfinder.
Firing Flash
12 Fully depress shutter release button to fire flash.
13 Recheck ready-light and to see if it is blinking.
If ready-light blinks for a few seconds after shooting, the flash has fired at its maximum output but the light may have been insufficient.
Then, reconfirm shooting distance and, if necessary, move closer to subject or select a wider aperture (in aperture-priority auto or manual exposure mode) to compensate under-exposure.
Underexposure indication
When subject may have been underexposed, ±bA mark and amount of underexposure (for example, -2.0) appear in the SB-26's LCD panel after firing.
To compensate underexposure in the above example, you might consider using an aperture at least 2 f/stops wider, or move closer to subject.
button to resume indication
The underexposure indication lasts only three seconds. Use the button to recall the indication last shown in the LCD panel.
TTL Auto Flash Mode: For F4-Series, F-801/N8008 and F-801s/N8008s Users
Choosing A Flash Method
The SB-26 enables you to perform the following flash methods. They are described in detail on pages 10 to 13.
- Matrix Balanced Fill-Flash
Center-Weighted Fill-Flash - Spot Fill-Flash (not available with the F4-Series or F-801/N8008)
- Standard TTL Flash
Use the chart at right to confirm which flash method you will perform with your camera, the lens in use and the metering system set on the camera. In most cases, the lens/meter combination determines the flash method. In other cases, you may have to switch metering systems, change lenses, or both.
By using the SB-26's button, you can also choose Standard TTL Flash, regardless of lens type.
For practice, read "Set Up and Practice," from page 44 on.
Flash Methods in TTL Auto Flash Mode
III.3 Matrix Balanced Fill-Flash
Center-Weighted Fill-Flash
Spot Fill-Flash
Standard TTL Flash
Flash Methods: F4-Series Settings and Lenses
| Lens in Use 1) (with Multi-Finder DP-20) 2) | Camera's Exposure Mode | Camera's Metering System | ||
| Matrix | Center-Weighted | Spot | ||
| AF Nikkor lenses 3) AI-P lenses | Programmed auto (P, PH) | Matrix Balanced Fill-Flash | Center-Weighted Fill-Flash | Standard TTL Flash |
| Shutter-priority auto (S) | ||||
| Aperture-priority auto (A) | ||||
| Manual (M) | ||||
| AF Telecon-verter/ AF Nikkor lenses for F3AF/AI-type Nikkor lenses (including AI-S) | Aperture-priority auto (A) 4) | Matrix Balanced Fill-Flash | Center-Weighted Fill-Flash | Standard TTL Flash |
| Manual (M) | ||||
| Other lenses | Programmed auto (P, PH) | Standard TTL Flash | ||
| Shutter-priority auto (S) | ||||
| Aperture-priority auto (A) | ||||
| Manual (M) | ||||
Flash Methods: F-801/N8008 Settings and Lenses
| Lens in Use 1) | Camera's Exposure Mode | Camera's Metering System | |
| Matrix | Center-Weighted | ||
| AF Nikkor lenses 3) AI-P lenses | Programmed auto (PD, P, P") | Matrix Balanced Fill-Flash | Center-Weighted Fill-Flash |
| Shutter-priority auto (S) | |||
| Aperture-priority auto (A) | |||
| Manual (M) | |||
| Other lenses | Aperture-priority auto (A) 5) | Center-Weighted Fill-Flash 6) | |
| Manual (M) | |||
1)Suitable lenses and use depend on the camera; see instruction manual for information.
2) With AE Action Finder DA-20, Center-Weighted Fill-Flash and Standard TTL Flash can be used. With Waist-Level Finder DW-20 and 6x High-Magnification Finder DW-21, because Matrix and Center-Weighted metering systems cannot be used, only Standard TTL Flash can be used.
3) Includes the latest D-type Nikkor lenses, but excludes AF lenses for F3 Series cameras.
Flash Methods: F-801s/N8008s Settings and Lenses
| Lens in Use 1) | Camera's Exposure Mode | Camera's Metering System | ||
| Matrix | Center-Weighted | Spot | ||
| AF Nikkor lenses 3) AI-P lenses | Programmed auto (Pd, P, P") | Matrix Balanced Fill-Flash | Center-Weighted Fill-Flash | Spot Fill-Flash |
| Shutter-priority auto (S) | ||||
| Aperture-priority auto (A) | ||||
| Manual (M) | ||||
| Other lenses | Aperture-priority auto (A) 5) | Center-Weighted Fill-Flash 6) | Spot Fill-Flash | |
| Manual (M) | ||||
4) Exposure mode (P, P_H or S) automatically shifts to aperture-priority auto (A). Set desired aperture manually.
5) Exposure mode (P_D,P,P^H, or S) automatically shifts to aperture-priority auto (A), shown by the blinking mode indication in the camera's LCD panel. Set desired aperture manually.
6) Matrix metering system automatically shifts to Center-Weighted, as shown by the blinking indication in the camera's LCD panel. Only Center-Weighted Fill-Flash is available.
Set Up and Practice
Some operations can be controlled automatically when the camera uses an AF Nikkor lens (including the latest D-Type) or Nikkor lens having a built-in CPU. In other cases, operate manually.
Note that the following instructions describe a situation where you are using either a D-type Nikkor, an AF Nikkor (except for F3AF) or an Al-P lens.
Before proceeding:
ATTACH SPEEDLIGHT TO CAMERA.
TURNOBOTH SPEEDLIGHTANDCAMERA.
USE SINGLE-SERVO AUTOFOCUS (S) OR MANUAL FOCUS (M).
USE SINGLE-FRAME SHOOTING (S) FILM ADVANCE MODE.
Setting Up SB-26
Press the button.
To perform Matrix Balanced, Center-Weighted or Spot Fill-Flash, confirm appears in the LCD panel.
To perform Standard TTL Flash, press the button so that disappears.
Choose (flash mode selector position). Confirm in the LCD panel.
Choose NORMAL position (flash sync mode selector).
REAR position is used for Rear-Curtain Sync Flash (see page 105).
4 Confirm the ISO film speed has been set and appears in the SB-26's LCD panel (automatic ISO film speed adjustment).
ISO speed of the film in use is automatically set. If not shown in the LCD panel, lightly press the camera's shutter release button.
5 Confirm the aperture value chosen on the camera and zoom-head position have been set and appear in the SB-26's LCD panel (automatic aperture/zoom-head adjustment).
Setting Up Your Camera
6 Select one of the following exposure modes:
a. Programmed auto (either P, PH, PH or PD)
b. Shutter-priority auto (S)
c. Aperture-priority auto (A)
d. Manual (M)
7 Select a metering system:
a. Matrix metering system to perform Matrix Balanced Fill-Flash.
b. Center-Weighted metering system to perform Center-Weighted Fill-Flash.
c. With the F-801s/N8008s, Spot metering system to perform Spot Fill Flash.
d. Any metering system can be chosen to perform Standard TTL Flash.
8 Perform other settings:
a. For programmed auto, set lens to minimum aperture (highest f-number).
b. For shutter-priority auto, set lens to minimum aperture (highest f-number), then set desired shutter speed.
c. For aperture-priority auto, set desired aperture.
d. For manual exposure mode, set desired shutter speed and aperture.
- Camera automatically shifts to the fastest synchronization speed if you choose a speed that is not within the synchronization range.
Confirming Settings

F4-Series

F-801/N8008 and F-801s/N8008s
9 Look into camera viewfinder, compose and lightly press the shutter release button.
Use AE-L (Auto Exposure Lock) on the camera to capture exact exposure information for your picture composition (except when in manual exposure mode).
Confirm controlled aperture and check that the shutter speed falls between 1/60 sec. and 1/250 sec. With F-801/N8008 or F-801s/N8008s, these also appear in the camera's LCD panel.
The aperture in use (shown in the viewfinder) and shooting distance indicator bars appear in the SB-26's LCD panel.
Overexposure warning (background exposure)
For overexposure alert, HI appears (together with lens' minimum aperture for the F-801/ N8008 and F-801s/ N8008s). in the position that indicates the camera's shutter speed.
10 Confirm shooting distance.
Check whether subject falls within the range shown by the shooting distance indicator bars in the SB-26's LCD panel. If not, move closer to subject or select a wider aperture (in aperture-priority auto or manual exposure mode), then repeat steps 9 and 10.

F4-Series

F-801/N8008 and F-801s/N8008s
SB-26
11 Confirm ready-light has come on and subject is in focus.
Confirm ready-light is on in the camera's viewfinder or on the SB-26.
Check whether subject is in focus by using the in-focus indicator in the camera's viewfinder.
Firing Flash
12 Fully depress the shutter release button to fire flash.
13 Check again whether ready-light is blinking.
If ready-light blinks for a few seconds after shooting, flash has fired at its maximum output but the light may have been insufficient.
Reconfirm shooting distance and, if necessary, move closer to subject or select a wider aperture (in aperture-priority auto or manual exposure mode) to compensate underexposure.
Controlled shutter speed and aperture in Matrix Balanced Fill-Flash/Standard TTL Flash
When the SB-26 is set at REAR position (for flash sync mode selector), the camera automatically controls the shutter speed and aperture between 30 — 1/250 sec. in programmed auto and aperture-priority auto exposure mode.
Choosing A Flash Method
Use the camera's Automatic Balanced Fill-Flash button to perform any of the following fully automatic fill-flash functions, or choose Standard TTL Flash. (Functions are described in detail on pages 10 to 13.)
- Matrix Balanced Fill-Flash
Center-Weighted Fill-Flash - Spot Fill-Flash (not available with the F-601M/N6000)
Use the chart below to confirm which flash method you will perform with your camera, the lens in use and the metering system set on the camera. In most cases, the
lens/meter combination determines the flash method. In other cases, you may have to switch metering systems, change lenses, or both.
Standard TTL Flash can be operated regardless of lens type.
For practice, see "Automatic Balanced Fill-Flash button" on the next page and read "Set Up and Practice".
Set Up and Practice
Check the charts on page 50 to determine which flash is available and appropriate before actual shooting.
Note that the following instructions describe a situation where you are using either a D-type Nikkor, an AF Nikkor (except for F3AF) or an AI-P lens. With any other lens, Center-Weighted or Spot Fill-Flash will be performed.
Before proceeding:
ATTACH SPEEDLIGHT TO CAMERA.
TURNOBOTH SPEEDLIGHTANDCAMERA.
USE SINGLE-SERVO AUTOFOCUS (S) OR MANUAL FOCUS (M).
USE SINGLE-FRAME SHOOTING (S) FILM ADVANCE MODE.
USE A FILM BETWEEN ISO 25 TO ISO 1000.
Flash Methods with F-601/N6006
| Lens in Use 1) | Camera's Exposure Mode | Camera's Metering System | ||
| Matrix | Center-Weighted | Spot | ||
| AF Nikkor lenses 2) AI-P lenses | Programmed auto (PM, P) | Matrix Balanced Fill-Flash | Center-Weighted Fill-Flash | Spot Fill-Flash |
| Shutter-priority auto (S) | ||||
| Aperture-priority auto (A) | ||||
| Manual (M) | ||||
| Other lenses | Aperture-priority auto (A) | Center-Weighted Fill-Flash 3) | Spot Fill-Flash | |
1)Suitable lenses and use depend on the camera; see instruction manual for information.
2) Except AF lenses for F3AF cameras.
Flash Methods with F-601M/N6000
| Lens in Use 1) | Camera's Exposure Mode | Camera's Metering System | |
| Matrix | Center-Weighted | ||
| AF Nikkor lenses 2) AI-P lenses | Programmed auto (PM, P) | Matrix Balanced Fill-Flash | Center-Weighted Fill-Flash |
| Shutter-priority auto (S) | |||
| Aperture-priority auto (A) | |||
| Manual (M) | |||
| Other lenses | Aperture-priority auto (A) | Center-Weighted Fill-Flash 3) | |
3) Matrix metering system automatically shifts to Center-Weighted, indicated by a blinking mark in the camera's LCD panel. Only Center-Weighted Fill-Flash is available.
Flash Methods in TTL Auto Flash Mode
Matrix Balanced Fill-Flash
Center-Weighted Fill-Flash
Spot Fill-Flash
Standard TTL Flash
Automatic Balanced Fill-Flash button
To operate any of the fully automatic fill-flash functions (Matrix Balanced, Center-Weighted or Spot Fill-Flash), use the camera's MODE/ button so that appears in the camera's LCD panel.
To activate Standard TTL Flash, use the same button again so that the in the LCD panel disappears.
The SB-26's and buttons cannot be used in either of the above cases for flash method selection.
Also, the mark does not appear in the SB-26's LCD panel.
Setting Up SB-26
1 Choose position (flash mode selector). Confirm in the LCD panel.
Choose NORMAL position (flash sync mode selector).
For SLOW SYNC FLASH or REAR-CURTAIN SYNC FLASH, perform the settings on the camera; setting priorities are determined by the camera and flash sync mode selections on the SB-26 will be ignored.
3 Set ISO speed of the film in use. Usable film speeds are ISO 25 to ISO 1000. For instruction, see "Setting ISO Film Speed (Manual Adjustment)," pages 27 to 28.
4 Set the built-in zoom head position.
For instruction, see "Setting Zoom-Head Position (Manual Adjustment)," pages 29 to 30.
Setting Up Your Camera
5 To perform Matrix Balanced, Center-Weighted or Spot Fill-Flash, use the MODE/按钮, and confirm the mark in the LCD panel.
To perform Standard TTL Flash, use the MODE/ button, and confirm the mark disappears from the LCD panel.
6 Select one of the following exposure modes:
a. Programmed auto (either PM or P)
b.Shutter-priority auto (S)
c. Aperture-priority auto (A)
d. Manual exposure mode (M)
7 Select a metering system:
a. Matrix metering system to perform Matrix Balanced Fill-Flash.
b. Center-Weighted metering system to perform Center-Weighted Fill-Flash.
c. With the F-601/N6006, Spot metering system to perform Spot Fill Flash.
d. Any metering system can be chosen to perform Standard TTL Flash.
8 Perform other settings:
a. For programmed auto, set lens to minimum aperture (highest f-number).
b. For shutter-priority auto, set lens to minimum aperture (highest f-number), then set desired shutter speed.
c. For aperture-priority auto, set desired aperture.
d. For manual exposure mode, set desired shutter speed and aperture.
* Camera automatically shifts to the fastest synchronization speed if you choose a speed that is not within the synchronization range.
Quick reference on the relationship between usable apertures and flash shooting distance
Use table on page 146 in this instruction manual.
Confirming Settings
9 Look into camera viewfinder, compose and lightly press the shutter release button.
Confirm aperture and shutter speed. These also appear in the camera's LCD panel.
Controlled shutter speed and aperture in programmed/aperture-priority auto
Aperture and shutter speed are automatically controlled by the camera as specified in the following tables.
Controlled shutter speeds
| Lens in use (focal length) | Shutter speed |
| 60mm or shorter | 1/(focal length) to 1/125 sec. |
| Longer than 60mm | 1/60 to 1/125 sec. |
Usable maximum apertures in programmed auto
| ISO film speed | 25 | 50 | 100 | 200 | 400 | 800 | 1000 |
| Controlled aperture* | f/4 | f/4.8 | f/5.6 | f/6.7 | f/8 | f/9.5 | f/10 |
| f/2.8 | f/2.8 | f/4 | f/5.6 | f/8 | f/11 | f/11+1/3 f/stop |
- Above figures for F-601/N6006, below for F-601M/N6000.
10 Set the controlled aperture (from step 9)*, then read shooting distance range on the SB-26's LCD panel.
For instruction, see "Setting Aperture Value (Manual Adjustment)," pages 28 to 29.
Once aperture is set, indicator bars show the shooting distance range for that setting.
- This operation is important for reading the appropriate shooting distance from the indicator bars (step 11); setting a wrong aperture value on the SB-26 does not affect all TTL Auto Flash operations — a shot will be taken with the aperture set on the camera.

11 Confirm shooting distance.
Check whether subject falls within range of the shooting distance indicator bars in the SB-26's LCD panel. If not, move closer to subject or select a wide aperture (when aperture-priority auto or manual exposure mode), then repeat steps 10 and 11.

12 Confirm ready-light has come on and subject is in focus.
Confirm ready-light is on in the camera's viewfinder or on the SB-26 .
Check whether subject is in focus by using the in-focus indicator in the camera's viewfinder.
Firing Flash
13 Fully depress shutter release button to fire flash.
14 Recheck ready-light to see if it is blinking.
If ready-light blinks for a few seconds after shooting, the flash has fired at its maximum output but the light may have been insufficient.
Next, reconfirm shooting distance and, if necessary, move closer to the subject or select a wider aperture (in aperture-priority auto or manual exposure mode) to compensate underexposure.
F-601/N6006 and F-601M/N6000 warning indications
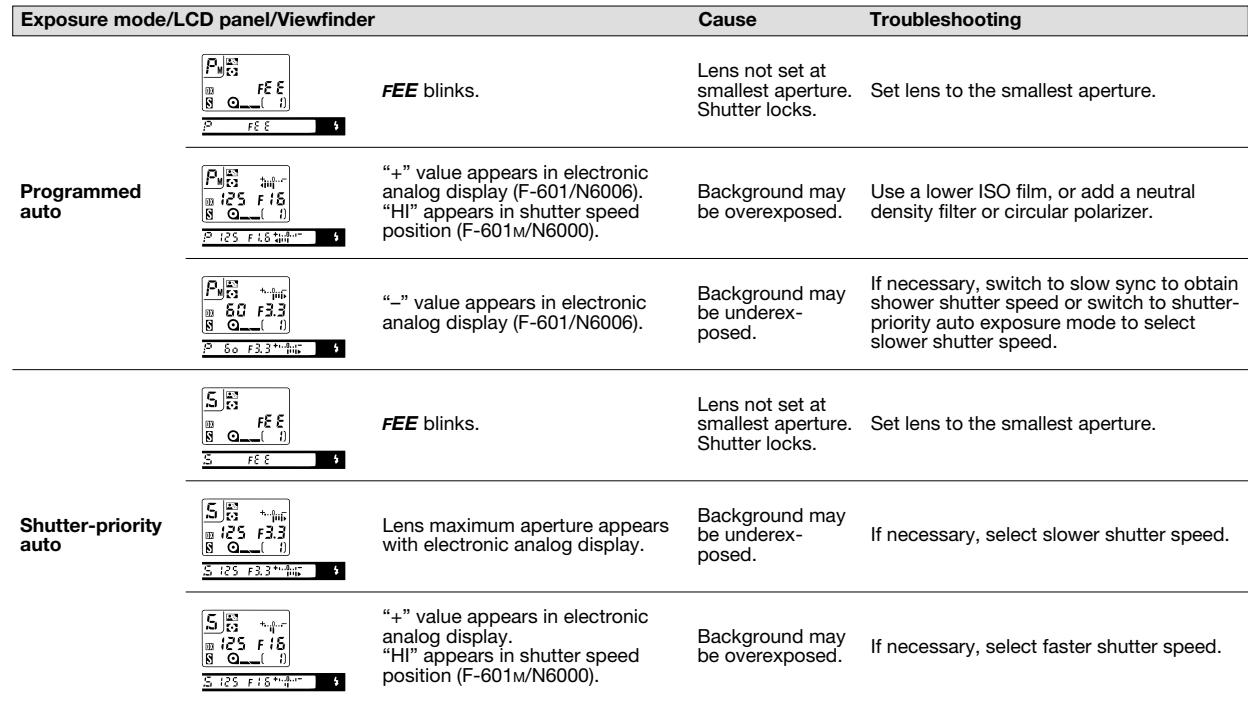
TTL Auto Flash Mode: For F-601/N6006 and F-601M/N6000 Users
F-601/N6006 and F-601M/N6000 warning indications (continued)
| Exposure mode/LCD panel/Viewfinder | Cause | Troubleshooting | |
| Aperture-priority auto | Scale appears | Background may be underex-posed. | If necessary, select a wider aperture. If under exposure display stays on, change from normal to slow sync, though shutter speed becomes slower. |
| “+” value appears in electronic analog display. “HI” appears in shutter speed position (F-601M/N6000). | Background may be overexposed. | If necessary, select a smaller aperture (larger f-number). | |
| Shutter speed display blinks | Selected shutter speed may be too slow for hand-held photography or for movement of subject | Select a wider aperture. | |
TTL Auto Flash Mode: For F50-Series/N50 and F-401x/N5005 Users
Choosing A Flash Method
The SB-26 enables you to perform Matrix Balanced or Center-Weighted Fill-Flash. These functions are described in detail on pages 10 and 11.
You can choose Matrix Balanced Fill-Flash when using programmed auto, shutter-priority or aperture-priority exposure mode, or Center-Weighted Fill-Flash when using manual exposure mode (see the chart at right).
Set Up and Practice
Check the chart on this page to determine which flash is available and suitable for your shooting situation before actual shooting.
Before proceeding:
ATTACH SPEEDLIGHT TO CAMERA.
TURN ON BOTH SPEEDLIGHT AND CAMERA.
SET LENS TO MINIMUM APERTURE (HIGHEST F-NUMBER).
USE A FILM BETWEEN ISO 25 AND ISO 1000.
TTL Auto flash mode with F50-Series/N50 and F-401x/N5005
| Lens in Use 1) | Camera's Exposure Mode | SB-26 Flash |
| AF Nikkor lenses 2) AI-P lenses | Programmed auto (P) | Matrix Balanced Fill-Flash |
| Shutter-priority auto (S) | ||
| Aperture-priority auto (A) | ||
| Manual (M) | Center-Weighted Fill-Flash |
1) Suitable lenses and use depend on the camera; see instruction manual for information.
2) Except AF lenses for F3AF cameras.
Flash Methods in TTL Auto Flash Mode
Matrix Balanced Fill-Flash
Center-Weighted Fill-Flash
Setting Up SB-26
4 Zoom-head position
1 Choose position (flash mode selector). Confirm in the LCD panel.
Choose NORMAL position (flash sync mode selector).
Since TTL Auto Flash operation can be performed regardless of the flash sync mode selector setting, for simplicity, always leave the switch at this position.
3 Set ISO speed of the film in use. Usable speeds are ISO 25 to ISO 1000.
For instruction, see "Setting ISO Film Speed (Manual Adjustment)," pages 27 to 28.
4 Set the built-in zoom head position.
Setting Up Your Camera
5 Select one of the following exposure modes:
a. Programmed auto (P), shutter-priority auto (S) or aperture-priority auto (A) to perform Matrix Balanced Fill-Flash.
b. Manual exposure mode to perform Center-Weighted Fill-Flash.
6 Perform other settings:
a. For shutter-priority auto, set desired shutter speed.
b. For aperture-priority auto, set desired aperture.
c. For manual exposure mode, set desired shutter speed and aperture.
- Camera automatically shifts to the fastest synchronization speed if you choose a speed that is not within the synchronization range.
Confirm Settings

7 Look into camera viewfinder, compose and lightly press the shutter release button.
Confirm exposure indicator LEDs (+, , -) in the viewfinder appear, and make adjustments if necessary.
Use the following chart to read LEDs.
Quick reference on the relationship between usable apertures and flash shooting distance
Use table on page 146 in this instruction manual.
Warning indications
| Selected exposure mode | Viewfinder LED* | Status/cause | Troubleshooting |
| Programmed auto | No indication | — | — |
| Shutter-priority auto | + or + ○ | Background is overexposed. | Select faster shutter speed until only ○ appears. |
| ○ | OK: Background is correctly exposed | — | |
| - ○ or - | Background is underexposed | Select slower shutter speed until only ○ appears. | |
| Aperture-priority auto | + or + ○ | Background is overexposed | Select smaller aperture until only ○ appears. |
| ○ | OK: Background is correctly exposed | — | |
| - ○ or - | Background is underexposed | Select larger aperture until only ○ appears. | |
| Manual | + or + ○ | Background is overexposed | Select faster shutter speed or smaller aperture. |
| ○ | OK: Background is correctly exposed | — | |
| - ○ or - | Background is underexposed | Select slower shutter speed or larger aperture. |
8 Set aperture in the SB-26's LCD panel*, then read the shooting distance range.
For instruction, see "Setting Aperture Value (Manual Adjustment)," pages 28 to 29.
In aperture-priority auto or manual exposure mode, set the aperture value that you have set on the camera (from step 6). In programmed auto or shutter-priority auto exposure mode, aperture is automatically controlled by the camera. Choose and set a value, using the "Guide to determining aperture" in the following page.
Once aperture is set, indicator bars show the shooting distance range.
- This operation is important for reading the appropriate shooting distance from the indicator bars (step 9); setting a wrong aperture value on the SB-26 does not affect all TTL Auto Flash operations — a shot will be taken with the aperture set on the camera.

9 Confirm shooting distance.
Check whether subject falls within the range of the shooting distance indicator bars in the SB-26's LCD panel. If not, move closer to subject or select a wider aperture (when aperture-priority auto or manual exposure mode), then repeat steps 8 and 9.
Guide to determining aperture
Use these suggestions as a guide. To choose a suitable aperture, select aperture-priority auto or manual exposure mode.
For F-50-Series/N50 (at ISO 100)
| For outdoor subjects on a sunny day | f/8 |
| For outdoor subjects on a cloudy day, in shadows | f/5.6 |
| For indoor subjects | f/4 |
In programmed auto
| For subjects backlit by the sun | f/16 |
| For outdoor subjects on a sunny day | f/8 |
| For outdoor subjects on a cloudy day, in shadows, or for indoor subjects | f/5.6 |
In shutter-priority auto
| For subjects backlit by the sun | f/16 at 1/125 sec. |
| For outdoor subjects on a sunny day | f/8 at 1/125 sec. |
| For outdoor subjects on a cloudy day in shadows | f/5.6 at 1/125 sec. |
| For indoor subjects | f/5.6 at 1/30 sec |
TTL Auto Flash Mode: For F50-Series/N50 and F-401x/N5005 Users

10 Confirm ready-light has come on and subject is in focus.
Confirm ready-light is on in the camera viewfinder or on the SB-26 .
Check whether subject is in focus by using the in-focus indicator in the camera's viewfinder.
Firing Flash
11 Fully depress shutter release button to fire flash.
12 Recheck ready-light to see if it is blinking.
If ready-light blinks for a few seconds after shooting, the flash has fired at its maximum output but the light may have been insufficient.
Reconfirm shooting distance and, if necessary, move closer to subject or select a wider aperture (in aperture-priority auto or manual exposure mode) to compensate underexposure.
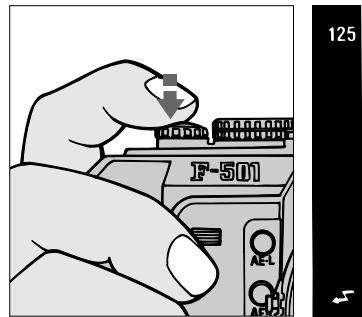
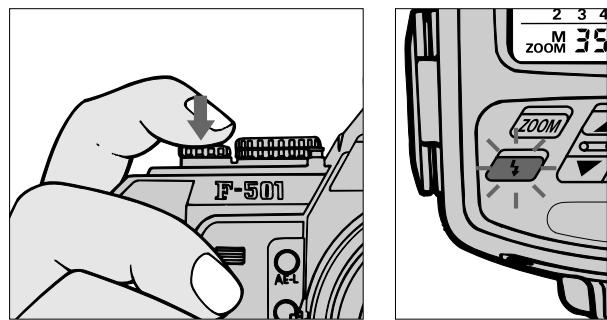
TTL Auto Flash Mode: For F-501/N2020 and F-301/N2000 Users
Choosing A Flash Method
The SB-26 lets you choose between Programmed TTL Auto Flash or Standard TTL Flash in TTL Auto flash mode.
Use the charts at right to confirm available flash/exposure mode combinations.
Programmed TTL Auto Flash
By setting the camera's exposure mode to a programmed auto setting (either P_DUAL, P or PHI), you can choose Programmed TTL Auto Flash.
In Programmed TTL Auto Flash, the camera automatically selects a shutter speed of 1/125 sec. and a controlled aperture that corresponds to the ISO speed of the film in use (see chart on page 68).
Flash output is regulated by the Speedlight to ensure a "correct" subject exposure. This enables you to concentrate on picture composition without worrying about exposure settings (including aperture).
You can also perform Standard TTL Flash with the camera set at aperture-priority auto (A) or manual exposure mode. In Standard TTL Flash, the Speedlight controls the flash output level to correctly expose the subject. Shutterspeed and/or aperture setting(s) can be selected by the user.
TTL Auto flash mode with F-501/N2020 and F-301/N2000
| Lens in Use 1) | Camera's Exposure Mode | SB-26 Flash |
| AI-S type lenses (including AF Nikkor and AI-P) 2) | Programmed auto (PDUAL, P or PHI) | Programmed TTL Auto Flash |
| Aperture-priority auto (A) | Standard TTL Flash | |
| Manual (M) |
1)Suitable lenses and use depend on the camera; see instruction manual for information.
2) Except AF lenses for F3AF cameras. For Programmed TTL Auto Flash, use only Al-S lenses, which include AF Nikkor, Nikkor lenses with a built-in CPU and Series E lenses.
Set Up and Practice
You can choose Programmed TTL Auto Flash against Standard TTL Flash by setting camera to a programmed auto exposure mode (either PQUAL, P or PHI). Check charts on the previous page.
Before proceeding:
ATTACH SPEEDLIGHT TO CAMERA.
TURN ON BOTH SPEEDLIGHT AND CAMERA.
USE SINGLE-SERVO AUTOFOCUS (S) OR MANUAL FOCUS (M).
USE SINGLE-FRAME SHOOTING (S) FILM ADVANCE MODE.
USE FILM WITH A SPEED BETWEEN ISO 25 AND ISO 1000.
USE AN AI-S LENS (AF Nikkor, Nikkor lens with built-in CPU or Series E lens).
Setting Up SB-26
4 Zoom-head position
1 Choose position (flash mode selector). Confirm in the LCD panel.
Choose NORMAL position* (flash sync mode selector).
- Since TTL Auto Flash operation can be performed regardless of the flash sync mode selector setting, for simplicity, always leave the switch at this position.
3 Set ISO speed of film in use. Usable film speeds are ISO 25 to ISO 1000.
For instruction, see "Setting ISO Film Speed (Manual Adjustment)," pages 27 to 28.
4 Set the built-in zoom head position.
For instruction, see "Setting Zoom-Head Position (Manual Adjustment)," pages 29 to 30.
Shooting indicator bars in the LCD panel move as the figure input changes.
Setting Up Your Camera
5 Select one of the following exposure modes:
a. Programmed auto (either PQUAL, P or PHI) to perform Programmed TTL Auto Flash.
b. Aperture-priority auto (A) to perform Standard TTL Flash.
c. Manual exposure mode to perform Standard TTL Flash.
6 Perform other settings:
a. For programmed auto, set lens to minimum aperture (highest f-number).
b. For aperture-priority auto, set desired aperture.
c. For manual exposure mode, set desired shutter speed and aperture.
Camera automatically shifts to the fastest synchronization speed if you choose a speed that is not within the synchronization range.
To distinguish Al-S lenses from others
Look for an orange mark on the minimum aperture scale of the lens.
Quick reference on the relationship between usable apertures and flash shooting distance
Use table on page 146 in this instruction manual.
Confirm Settings
7 Set aperture in the SB-26's LCD panel*.
For instruction, see "Setting Aperture Value (Manual Adjustment)," pages 28 to 29. In programmed auto exposure mode, aperture is automatically controlled by the camera. Choose a value, using "Shutter speed/aperture settings in Programmed TTL Auto Flash" in the following page.
In aperture-priority auto or manual exposure mode, set the aperture value that you have set on the camera (from step 6).
Once aperture is set, indicator bars show the shooting distance range.
- This operation is important for reading the appropriate shooting distance from the indicator bars (step 8); setting a wrong aperture value on the SB-26 does not affect all TTL Auto Flash operations — a shot will be taken with the aperture set on the camera.

8 Confirm shooting distance.
Check whether subject falls within the range of the shooting distance indicator bars in the SB-26's LCD panel. If not, move closer to subject or select a wider aperture (when aperture-priority auto or manual exposure mode), then repeat steps 7 and 8.
9 Look into camera viewfinder, compose and lightly press the shutter release button.
Confirm ready-light has come on and subject is in focus.
Check that ready-light is on in camera viewfinder or on the SB-26.
Check whether subject is in focus.
Shutter speed/aperture settings in Programmed TTL Auto Flash
The camera automatically locks the shutter release at 1/125 sec. Aperture value is automatically controlled to correspond with the film in use.
Film speed and corresponding controlled aperture
| ISO film speed | 25 | 50 | 100 | 200 | 400 | 800 | 1000 |
| Controlled aperture | f/2.8 | f/4 | f/5.6 | f/8 | f/11 | f/16 | f/16+1/3 f/stop |
TTL Auto Flash Mode: For F-501/N2020 and F-301/N2000 Users
Firing Flash
10 Fully depress shutter release button to fire flash.
11 Recheck ready-light to see if it is blinking.
If ready-light blinks for a few seconds after shooting, the flash has fired at its maximum output but the light may have been insufficient.
Reconfirm shooting distance and, if necessary, move closer to subject or select a wider aperture (in aperture-priority auto or manual exposure mode) to compensate underexposure.
TTL Auto Flash Mode: For F-401/N4004 and F-401s/N4004s Users
Choosing A Flash Method
The SB-26 can be used in the same manner as the camera's built-in TTL flash, but offers more powerful light output and a greater shooting distance range.
The SB-26's setting takes full advantage of the F-401/N4004 and F-401s/N4004s' multi-sensor metering system for flash photography.
Is the scene "bright" or "dark," and which is brighter — the subject or background? The algorithm in the metering system checks the amount of light based on these questions, and the camera asks through the viewfinder whether you choose to use the flash or not.
In any case, if you decide to use the flash, the camera automatically sets the most appropriate flash method for your shooting situation: Programmed TTL Auto Flash or Standard TTL Flash.
Use the chart in the next page to confirm available flash/exposure mode combinations.
Programmed TTL Auto Flash
When light is low and the flash is needed, the camera asks you to confirm whether you wish to use the flash. If you decide to use it in programmed auto or shutter-priority exposure mode, the right aperture and shutter speed are automatically selected by the camera. Flash output is controlled by the Speedlight to correctly expose the subject.
Standard TTL Flash
When using aperture-priority auto or manual exposure mode, you will be asked to confirm flash use, the same as above. Flash output is controlled by the Speedlight for a correctly exposed subject. Shutter-speed and/or aperture setting(s) can be selected by the user.
Viewfinder prompt: Use flash or not
When the SB-26 is attached to the camera but turned off, the camera's viewfinder ready-light blinks to suggest you use a flash. You can reject or ignore the prompt simply by leaving the SB-26's power off ( 1 continues blinking).
TTL Auto flash mode with F-401/N4004 and F-401s/N4004s
| Lens in Use 1) | Camera's Exposure Mode | SB-26 Flash |
| AF Nikkor lenses 2) AI-P lenses | Programmed auto (A/S) | Programmed TTL Auto Flash |
| Shutter-priority auto (S) | ||
| Aperture-priority auto (A) | Standard TTL Flash | |
| Manual (M) |
1) Suitable lenses and use depend on the camera; see instruction manual for information.
2) Except AF lenses for F3AF cameras.
For Programmed TTL Auto Flash, use only AF Nikkor lenses (including latest
D-Type), except AF Nikkor 80mm f/2.8, 200mm f/3.5 IF-ED and Autofocus
Converter TC-16/TC-16A.
Set Up and Practice
When camera is set at programmed auto (A/S) or shutter-priority auto (S) exposure mode, it automatically switches into Programmed TTL Auto Flash.
Before proceeding, be sure to:
ATTACH SPEEDLIGHT TO CAMERA.
TURN ON BOTH SPEEDLIGHT AND CAMERA.
SET LENS TO MINIMUM APERTURE (HIGHEST F-NUMBER).
USE FILM WITH A SPEED BETWEEN ISO 25 AND ISO 400.
USE AN AF NIKKOR LENS (including the latest D-Type Lens, but excluding AF Nikkor 80mm f/2.8, 200mm f/3.5 IF-ED and Autofocus Converters TC-16/TC-16A).
Setting Up SB-26
1 Choose position (flash mode selector). Confirm in the LCD panel.
Choose NORMAL position* (flash sync mode selector).
- Since TTL Auto Flash operation can be performed regardless of the flash sync mode selector setting, for simplicity, always leave the switch at this position.
3 Set ISO speed of the film in use. Usable film speeds are ISO 25 to ISO 400.
For instruction, see "Setting ISO Film Speed (Manual Adjustment)," pages 27 to 28.
4 Set the built-in zoom head position.
For instruction, see "Setting Zoom-Head Position (Manual Adjustment)," pages 29 to 30.
Shooting indicator bars in the LCD panel move as the figure input changes.
Setting Up Your Camera
5 Select one of the following exposure modes:
a. Programmed auto (A/S) to perform Programmed TTL Auto Flash.
b. Shutter-priority auto (S) to perform Programmed TTL Auto Flash.
c. Aperture-priority auto (A) to perform Standard TTL Flash.
d. Manual exposure mode to perform Standard TTL Flash.
6 Perform other settings:
a. For shutter-priority auto, set desired shutter speed.
b. For aperture-priority auto, set desired aperture.
c. For manual exposure mode, set desired shutter speed and aperture.
- Camera automatically shifts to the fastest synchronization speed if you choose a speed that is not within the synchronization range.
Quick reference on the relationship between usable apertures and flash shooting distance Use table on page 146 in this instruction manual.
Confirming Settings
7 Set aperture in the SB-26's LCD panel*.
For instruction, see "Setting Aperture Value (Manual Adjustment)," pages 28 to 29.
In programmed auto and shutter-priority auto exposure mode, set an aperture using the "Guide to determine aperture" in the following page.
In aperture-priority auto or manual exposure mode, set the aperture value that you have set on the camera (from step 6).
Once aperture is set, indicator bars show the shooting distance range for that setting.
- This operation is important for reading the appropriate shooting distance from the indicator bars (step 8); setting a wrong aperture value on the SB-26 does not affect all TTL Auto Flash operations — a shot will be taken with the aperture set on the camera.
8 Confirm shooting distance.
Check whether subject falls within the range of the shooting distance indicator bars in the SB-26's LCD panel. If not, move closer to subject or select a wider aperture (when aperture-priority auto or manual exposure mode), then repeat steps 7 and 8.
Guide to determining aperture
Use these suggestions as a guide for choosing aperture.
In programmed auto (ISO 100)
| For subjects backlit by the sun | f/16 |
| For outdoor subjects on a sunny day | f/8 |
| For subjects beside a bright window | f/5.6 |
| For indoor subject | f/5.6 |
In shutter-priority auto
| For subjects backlit by the sun | f/16 at 1/100 sec. |
| For outdoor subjects on a sunny day | f/8 at 1/100 sec. |
| For subjects beside a bright window | f/5.6 at 1/100 sec. |
| For indoor subjects | f/5.6 at 1/30 sec. |
TTL Auto Flash Mode: For F-401/N4004 and F-401s/N4004s Users
Firing Flash
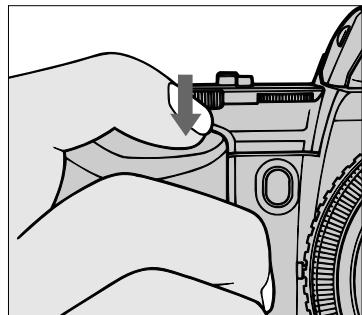
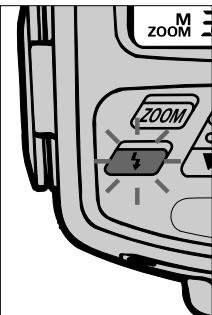
9 Look into camera viewfinder, compose and lightly press the shutter release button.
Confirm ready-light has come on and subject is in focus.
Confirm ready-light is on in the camera's viewfinder or on the SB-26 .
Check whether subject is in focus by using the in-focus indicator in the camera's viewfinder
10 Fully depress the shutter release button to fire flash.
11 Recheck ready-light to see if it is blinking.
If ready-light blinks for a few seconds after shooting, the flash has fired at its maximum output but the light may have been insufficient.
Reconfirm shooting distance and, if necessary, move closer to the subject or select a wider aperture (in aperture-priority auto manual exposure mode) to compensate underexposure.
TTL Auto Flash Mode: For FA, FE2, FG and Nikonos V Users
Choosing A Flash Method
FA, FE2, FG or Nikonos V users can use the SB-26 Speedlight to perform Standard TTL Flash, for fully automatic though-the-lens (TTL) control of flash exposure.
Standard TTL Flash can be performed by setting the SB-26 at 10. In Standard TTL Flash, the flash output level is controlled by the Speedlight to correctly expose subject.
Set Up and Practice
Before proceeding:
ATTACH SPEEDLIGHT TO CAMERA.
TURN ON BOTH SPEEDLIGHT AND CAMERA.
USE FILM WITH A SPEED BETWEEN ISO 25 AND ISO 400.
Setting Up SB-26
2 Flash sync mode selector at NORMAL
1 Flash mode selector at TTL Auto
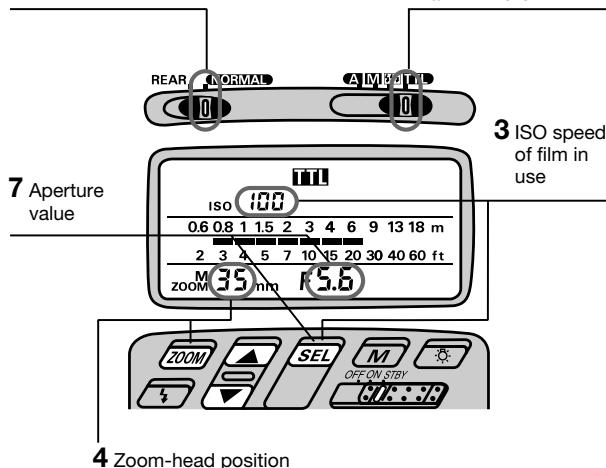
1 Choose position (flash mode selector). Confirm in the LCD panel.
Choose NORMAL position (flash sync mode selector).
Since TTL Auto Flash operation can be performed regardless of the flash sync mode selector setting, for simplicity, always leave the switch at this position.
3 Set ISO speed of the film in use. Usable film speeds are from ISO 25 to ISO 400 For instruction, see "Setting ISO Film Speed (Manual Adjustment)," pages 27 to 28.
4 Set position of the built-in zoom head.
For instruction, see "Setting Zoom-Head Position (Manual Adjustment)," pages 29 to 30.
Shooting indicator bars in the LCD panel move as the figure input changes.
Setting Up Your Camera
5 Set desired shutter speed.
Camera automatically shifts to the fastest synchronization speed if you choose a speed that is not within the synchronization range.
6 Set your chosen aperture.
Confirm Settings
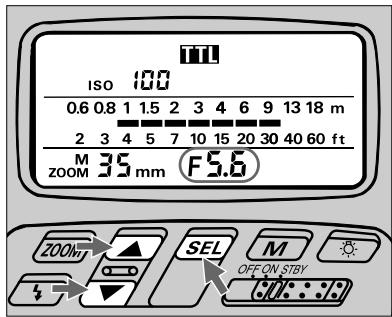
7 Set aperture in use.
For instruction, see "Setting Aperture Value (Manual Adjustment)," pages 28 to 29.
Shooting indicator bars in the LCD panel move as the figure input changes.
Determine approximate flash-shooting distance range by reading indicator bars.
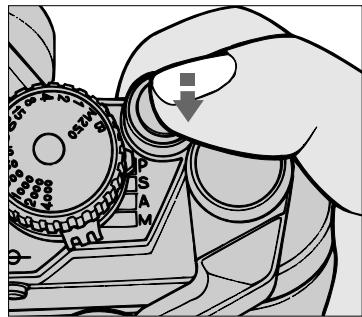
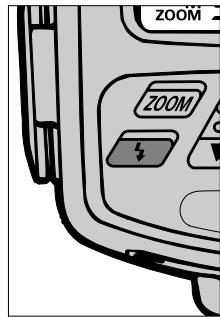
8 Look into camera viewfinder, compose and lightly press the shutter release button.
Confirm ready-light has come on and subject is in focus.
Check if ready-light is on in camera's viewfinder or on the SB-26 .
Quick reference on relationship between usable apertures and flash shooting distance
Use table on page 146 in this instruction manual.
TTL Auto Flash Mode: For FA, FE2, FG and Nikonos V Users
Firing Flash
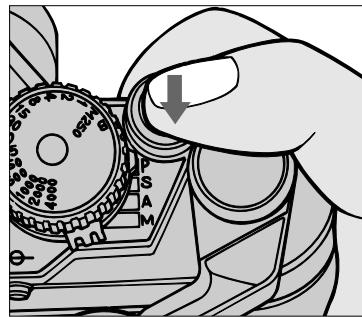
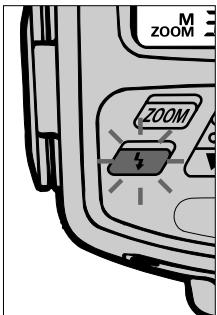

Fully depress the shutter release button to fire flash.
10 Recheck ready-light to see if it is blinking.
If ready-light blinks for a few seconds after shooting, flash has fired at its maximum output but the light may have been insufficient.
Reconfirm shooting distance and, if necessary, move closer to subject or select a wider aperture (in aperture-priority auto or manual exposure mode) to compensate underexposure.
Non-TTL Auto Flash A Mode — Shooting with Various Lens Apertures
To use various lens apertures for the same subject or when camera/lens combination is incompatible with TTL Auto Flash mode, set the SB-26's flash mode selector to A for Non-TTL Auto Flash operation.
In Non-TTL Auto Flash shooting, light output automatically changes to match the flash-to-subject distance, but instead of light being measured through the lens, it is measured by the light sensor on the front of the SB-26.
The SB-26 can be used in Non-TTL Auto Flash mode with any Nikon camera/lens combination.
Before proceeding:
ATTACH SPEEDLIGHT TO CAMERA.
TURN ON BOTH SPEEDLIGHT AND CAMERA.
USE APERTURE-PRIORITY AUTO OR MANUAL EXPOSURE MODE.
USE SINGLE-SERVO AUTOFOCUS (S or A) OR MANUAL FOCUS (M).
Set Up and Practice
2 Flash sync mode selector at NORMAL
1 Flash mode selector at Non-TTL Au
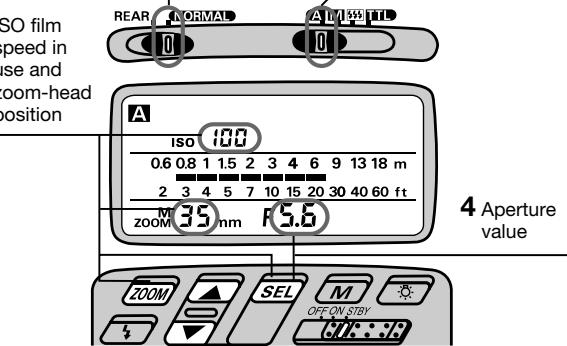
319
5 Appears when flash is fully charged and ready to fire. Push for test firing. Blinks after firing indicates possible underexposure.
| APPLICABLE NIKON SLR MODELS | |||||
| F5 | ✓ | F-601M/N6000 | ✓ | FE2 | ✓ |
| F90X/N90s | ✓ | F50-Series/N50 | ✓ | FG | ✓ |
| F90-Series/N90 | ✓ | F-401x/N5005 | ✓ | Nikonos V | ✓ |
| F70-Series/N70 | ✓ | F-501/N2020 | ✓ | F3-Series | ✓ |
| F4-Series | ✓ | F-301/N2000 | ✓ | F2-Series | ✓ |
| F-801/N8008 | ✓ | F-401/N4004 | ✓ | FM2 | ✓ |
| F-801s/N8008s | ✓ | F-401s/N4004s | ✓ | FG-20 | ✓ |
| F-601/N6006 | ✓ | FA | ✓ | ||
1 Choose A position (flash mode selector). Confirm A appears in the LCD panel.
2 Choose NORMAL position (flash sync mode selector*).
- REAR position is used for Rear-Curtain Sync Flash, and only with the F5, F90X/N90s, F90-Series/ N90, F70-Series/N70, F4-Series, F-801/N8008, and F-801s/N8008s. For details see page 105.
3 Set ISO film speed and position the built-in zoom head. For instructions, see "Setting ISO Film Speed (Manual Adjustment)," pages 27 to 28, and "Setting Zoom-Head Position (Manual Adjustment)," pages 29 to 30.
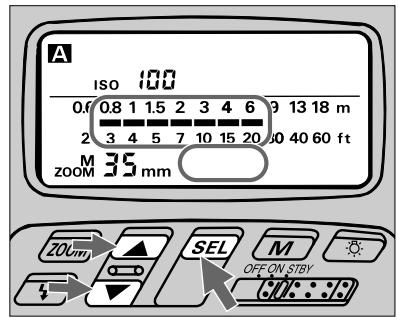
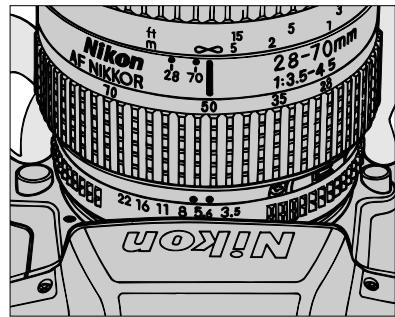
4 Set desired aperture in the SB-26's LCD panel, then set again on the camera. For instructions, see "Setting Aperture Value (Manual Adjustment)," pages 28 to 29. Indicator bars show a appropriate shooting distance range.
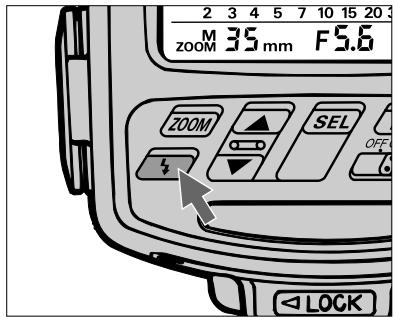
Push button for a test firing (see page 110) when you are not sure whether subject is within the flash shooting range. If ready-light blinks for a few seconds after test firing, flash has fired at its maximum output but light might not have been sufficient. Select a wider aperture or move closer to subject.
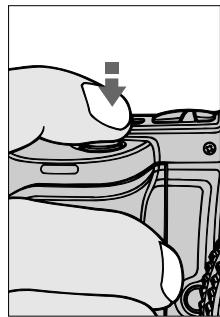
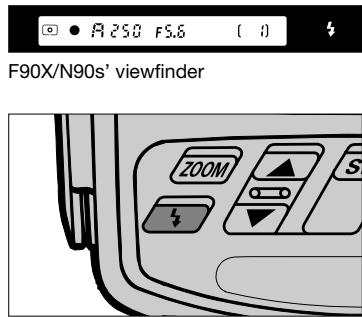
6 Look into the camera viewfinder, compose and lightly the press shutter release button to confirm that subject is in focus. Check that ready-light is on in the camera's viewfinder 14 or on the SB-26
Non-TTL Auto Flash Mode
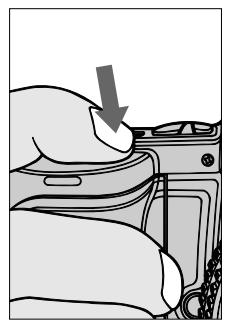
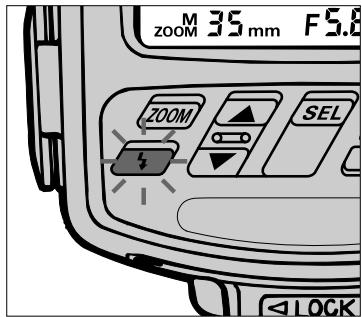
7 Fully depress shutter release button to fire flash.
8 Recheck ready-light to see if it is blinking.
If ready-light blinks for a few seconds after shooting, flash has fired at maximum output but the light may have been insufficient.
Reconfirm shooting distance and, if necessary, move closer to subject or select a wider aperture to compensate under-exposure.
Exposure compensation
Exposure compensation in Non-TTL Auto Flash mode is achieved by purposely setting a different aperture value on the camera (actually on the lens in most cases) than on the SB-26.
Use an aperture 1/3 to one stop smaller for an entirely dark background (low reflectance). For backgrounds that include a highly reflective object, use an aperture 1/3 to one stop larger.
Note that shooting distance range indication corresponds to the aperture value set on the SB-26 — not on the camera.
In general, you may want to take a series of pictures using exposure bracketing.
Manual Flash Mode — Manual Light-Output Control
With the SB-26's flash mode selector at M, you can perform manual flash photography.
For manual flash photography, it is important to choose an appropriate aperture and shooting distance to achieve your desired effect. To help approximate these variables, you can use the SB-26's LCD panel and control buttons as a "calculator", or use "guide numbers" (see page 118).
To enhance this feature, the SB-26 lets you manually adjust flash output levels from full power (1/1) to 1/2, 1/4, 1/8, 1/16, 1/32, 1/64, and FP1 and FP2.
Before proceeding:
ATTACH SPEEDLIGHT TO CAMERA.
TURNOBOTH SPEEDLIGHTANDCAMERA.
USE APERTURE-PRIORITY AUTO OR MANUAL EXPOSURE MODE.
USE SINGLE-SERVO AUTOFOCUS (S or A) OR MANUAL FOCUS (M).
USE SINGLE-FRAME SHOOTING (S) FILM ADVANCE MODE.
| APPLICABLE NIKON SLR MODELS | |||||
| F5 | ✓ | F-601M/N6000 | ✓ | FE2 | ✓ |
| F90X/N90s | ✓ | F50-Series/N50 | ✓ | FG | ✓ |
| F90-Series/N90 | ✓ | F-401x/N5005 | ✓ | Nikonos V | ✓ |
| F70-Series/N70 | ✓ | F-501/N2020 | ✓ | F3-Series | ✓ |
| F4-Series | ✓ | F-301/N2000 | ✓ | F2-Series | ✓ |
| F-801/N8008 | ✓ | F-401/N4004 | ✓ | FM2 | ✓ |
| F-801s/N8008s | ✓ | F-401s/N4004s | ✓ | FG-20 | ✓ |
| F-601/N6006 | ✓ | FA | ✓ | ||
Set Up and Practice
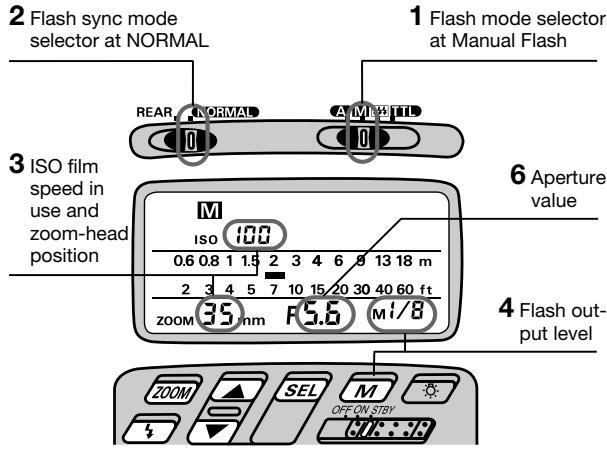
1 Choose M position (flash mode selector). Confirm M appears in the LCD panel.
Choose NORMAL position (flash sync mode selector*).
- REAR position is used for Rear-Curtain Sync Flash, and only with the F5, F90X/N90s, F90-Series/N90, F70-Series/N70, F4-Series, F-801/N8008, and F-801s/N8008s. For details, see page105.
3 Set ISO film speed and the built-in zoom head position.
For instructions, see "Setting ISO Film Speed (Manual Adjustment)," pages 27 to 28, and "Setting Zoom-Head Position (Manual Adjustment)," pages 29 to 30.
Automatic ISO film speed/zoom-head position adjustment: F5, F90X/N90s, F90-Series/N90, F70-Series/N70, F4-Series, F-801/N8008, or F-801s/N8008s used with an AF Nikkor lens (including the latest D-Type) or Nikkor lens having a built-in CPU The film speed and zoom-head position in use are automatically set and indicated in the SB-26's LCD panel.
For other lenses, set manually according to the shooting situation. See "Setting ISO Film Speed (Manual Adjustment)," pages 27 to 28, and "Setting Zoom-Head Position (Manual Adjustment)," pages 29 to 30.
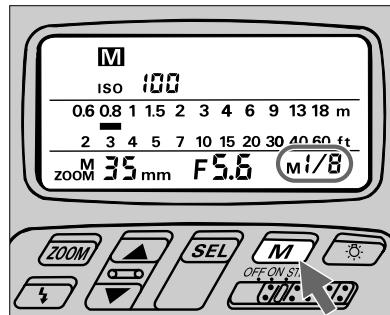
Press button to choose desired light output.
You can choose an amount ranging from full power (1/1) to one sixty-fourth (1/64). LCD indications change as: -Mi/ i -Mi/2 -Mi/4 -Mi/8 -Mi/15 -Mi/32 -Mi/64. With the F5, F90X/N90s, F90-Series/N90 and F70-Series/N70, indication i, and then 2 will appear after M / 5^ 4 . At the same time, EPI appears next to M. This applies exclusively to FP High-Speed Sync Flash and is discussed in the following pages (see pages 98 to 103).
Fine light-output adjustment: F5, F90X/N90s, F90-Series/N90 and F70-Series/N70 with AF Nikkor lens (including the latest D-Type) or Nikkor lens having
a built-in CPU
Additionally, you can manipulate light output in finer increments of ± 1/3 , as long as light output is set between M_i/2 and M_i/64 .
Press SEL button and confirm appears in the SB-26's LCD panel. By pressing button, you can increase the light amount below the mark), by +2 / 3 (blinking 0.0).
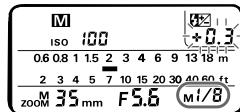
To decrease, use in the same manner; blinking numbers change from -0.3 (by -1/3) to -0.7 (by -2/3) to 0.0 (by -1).
^* At M / 2 , you cannot increase the light amount.

5 For aperture-priority auto, set desired aperture on the camera.
For manual exposure mode, set desired aperture and shutter speed on the camera.
Camera automatically shifts to the fastest synchronization speed if you choose a speed that is not within the synchronization range.
Using guide number
Guide number is helpful to calculate exact flash shooting distance in manual flash operation. For details, see "Guide Number - To Calculate a Proper Aperture," page 118, and "Specification," page 143.
Automatic aperture adjustment: F5, F90X/N90s, F90-Series/N90, F70-Series/N70, F4-Series, F-801/N8008, or F-801s/ N8008s used with an AF Nikkor lens (including latest D-Type) or Nikkor lens having a built-in CPU
The aperture in use and an indicator bar are automatically indicated in the SB-26's LCD panel. With other lenses, you must operate manually and follow steps 6, 7 and 8.
To skip steps 6, 7 and 8, check that subject is standing at the location suggested by the LCD's measurement scale. If not, change aperture by turning the lens' aperture ring to adjust the bar.
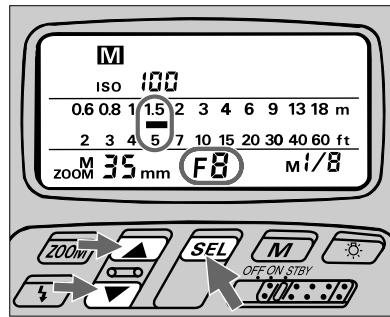
6 Set the same aperture value in the SB-26's LCD panel.
For instruction, see "Setting Aperture Values (Manual Adjustment)," pages 28 to 29.
An indicator bar appears to show appropriate shooting distance for the selected aperture.
7 If necessary, press or button to reset the indicator bar so it points to the measurement scale that matches or nearly equals the actual flash-to-subject distance (can be read from lens barrel).
Manipulating indication bar causes the aperture value in the LCD panel to change.
8 On the camera, reset the aperture value obtained in the previous step (the aperture that corresponds to the actual flash-to-subject distance).
You have now completed all necessary adjustments for locating the subject within an appropriate shooting distance range for the predetermined light output and aperture.
9 Look into camera viewfinder, compose and lightly press the shutter release button to confirm that subject is in focus.
Check that ready-light is on in the camera's viewfinder 4 or on the SB-26 .
10 Fully depress shutter release button to fire flash.
Manual Flash Mode
Synchronization in Continuous Shooting
The SB-26 is able to recycle fast enough to synchronize with a motor-driven camera firing continuously at up to six frames per sec. at 1/64 light output. This means you can take up to 40 flash pictures in rapid succession. Batteries must be fresh to achieve the rates indicated.
Continuous firing in Manual Flash mode
| Batteries | Light output | Number of continuous flash (frames) | |
| Inside SB-26 | Optional external pow-er source | ||
| AA-type alkaline-manganese (four sets) | — | mi/8 | More than 4 |
| mi/15 | More than 8 | ||
| mi/32 | More than 16 | ||
| mi/64 | More than 30 | ||
| SD-7 | mi/8 | More than 6 | |
| mi/15 | More than 10 | ||
| mi/32 | More than 40 | ||
| mi/64 | More than 40 | ||
| SD-8 | mi/8 | More than 5 | |
| mi/15 | More than 10 | ||
| mi/32 | More than 20 | ||
| mi/64 | More than 40 | ||
| AA-type NiCd (four sets) | SD-8 (when used with NiCd batteries) | mi/8 | More than 5 |
| mi/15 | More than 10 | ||
| mi/32 | More than 30 | ||
| mi/64 | More than 40 | ||

Caution
Let the flash unit rest at least 10 minutes after continuous firing at a maximum number (see the chart), to allow it to cool off. Overuse generates heat that could shorten the Speedlight's life.
Safety range in continuous firing
| Flash mode | Max. number |
| TTL Auto TLI | 15 |
| Non-TTL Auto A | 15 |
| Manual Flash M | 15 at full (1/1) or 1/2 light output, 40 at 1/4, 1/8, 1/16, 1/32 or 1/64 light output |
Repeating Flash Mode — For Multiple Exposure
For multiple flash exposures on a single frame, use the SB-26 in the mode. The flash can be fired up to 160 times on one frame, and if used in conjunction with the camera body's multiple exposure control, many more flash can be achieved on the same frame.
When making multiple exposures, there are many factors to consider. You may want to experiment before making the final exposure.
Before proceeding:
ATTACH SPEEDLIGHT TO CAMERA.
TURN ON BOTH SPEEDLIGHT AND CAMERA.
USE MANUAL EXPOSURE MODE.
USE SINGLE-SERVER AUTOFOCUS (S or A) OR MANUAL FOCUS (M).
USE SINGLE-FRAME SHOOTING (S) FILM ADVANCE MODE.
Set Up and Practice
| APPLICABLE NIKON SLR MODELS | |||||
| F5 | ✓ | F-601M/N6000 | ✓ | FE2 | ✓ |
| F90X/N90s | ✓ | F50-Series/N50 | ✓ | FG | ✓ |
| F90-Series/N90 | ✓ | F-401x/N5005 | ✓ | Nikonos V | ✓ |
| F70-Series/N70 | ✓ | F-501/N2020 | ✓ | F3-Series | ✓ |
| F4-Series | ✓ | F-301/N2000 | ✓ | F2-Series | ✓ |
| F-801/N8008 | ✓ | F-401/N4004 | ✓ | FM2 | ✓ |
| F-801s/N8008s | ✓ | F-401s/N4004s | ✓ | FG-20 | ✓ |
| F-601/N6006 | ✓ | FA | ✓ | ||
1 Choose position (flash mode selector). Confirm M and appear in the LCD panel.
Choose NORMAL position (flash sync mode selector*).
- REAR position is only used for Rear-Curtain Sync Flash in TTL Auto, NTTL Auto A and Manual Flash, and only with the F5, F90X/N90s, F90-Series/ N90, F70-Series/N70, F4-Series, F-801/N8008, and F-801s/N8008s. For details, see page 105.
3 Set the built-in zoom head position.
For instructions, see "Setting Zoom-Head Position (Manual Adjustment)," pages 29 to 30.
Press button to choose desired light output.
You can choose an amount ranging from one eighth of full power (1/8) to one sixty-fourth (1/64). LCD indications change as: -Mi/8 -Mi/16 -Mi/32 -Mi/54 -.
Automatic zoom-head position adjustment: F5, F90X/N90s, F90-Series/N90, F70-Series/ N70, F4-Series, F-801/N8008, or F-801s/N8008s used with an AF Nikkor lens (including the latest D-Type) or Nikkor lens having a built-in CPU The zoom-head position in use is automatically set and indicated in the SB-26's LCD panel.
For other lenses, set manually according to the shooting situation. See "Setting Zoom-Head Position (Manual Adjustment)," pages 29 and 30.
Press until a number (flash speed per second) starts blinking beside Hz. Use or to set a desired flash speed. See "Determining shutter speed with number/speed of flashes" on page 93.
6 Press SEL again until a number (flashes per frame) starts blinking beside center hyphen .. Use or to set the desired number. The maximum number of flashes per frame depends on light-output amount and flash speed. If two hyphens - - blink, the available number of flashes is fixed (no other choice). For details, see the chart below.
Number of repeating flashes per frame (shown with blinking hyphens - -): Figures indicate use with External Power Source SD-7 or SD-8
| Flash speed per second | Light output amount | |||
| m/8 | m/15 | m/32 | m/54 | |
| 1 — 7 Hz | 20 | 40 | 80 | 160 |
| 8 — 10 Hz | 10 | 20 | 40 | 80 |
| 20 — 50 Hz | 8 | 16 | 20 | 40 |
F90X/N90s' LCD panel
7 Set desired shutter speed and aperture on the camera.
Choose B (bulb) setting or a shutter speed long enough to accommodate the flash you will fire. For calculations, see at right, "Determining shutter speed with number/speed of flashes."
Use a tripod to minimize camera shake.
Determining shutter speed with number/speed of flash
Frequency (Hz) represents the number of flash fired per second. For example, 10Hz will fire 10 times in one second. Or, because firing the flash five times takes 1/2 sec. at 10Hz, the shutter speed must be adjusted to at least as slow as 1/2 sec.
For another example, firing six times at 8Hz takes 6/8 sec. to occur. However, because your camera does not have a shutter speed of 6/8 (0.75) sec., you should set it to the closest slower shutter speed, which is one second.
The following equation can be applied to calculate an appropriate shutter speed:
[Shutter speed] ≈ [Number of flash per frame][Speed of flash (Hz)]
where the result (shutter speed) must be rounded off to the closest slower shutter speed available with your camera.

8 Set the same aperture value in the SB-26's LCD Panel that you set on the camera (step 7).
For instruction, see "Setting Aperture Values (Manual Adjustment)," pages 28 to 29.
An indicator bar appears to show appropriate shooting distance for the selected aperture.

Automatic aperture adjustment: F5, F90X/N90s, F90-Series/N90, F70-Series/N70, Series, F-801/N8008, or F-801s/ N8008s used an AF Nikkor lens (including latest D-Type) or lens having a built-in CPU
The aperture in use and an indicator bar are automatically indicated in the SB-26's LCD panel. With other lenses, you must operate manually following steps 8, 9 and 10.
To skip steps 8, 9 and 10, check whether subject stands at the location suggested by the LCD's measurement scale. If not, change the aperture by turning the lens' aperture ring to adjust the bar.
Finally, perform "minus" exposure compensation* to prevent overexposure of overlapping images—use the aperture ring to choose another aperture one or two stops smaller than indicated above.
- The aperture indicated by the LCD provides a correct exposure with the very first flash, whereas overlapped images are illuminated from the second flash on. It is advisable to take a few additional shots at different apertures (exposure bracketing).
Chapter 3
Repeating Flash Mode
9 If necessary, press or button to reset the indicator bar so it points at the measurement scale that matches or nearly equals the actual flash-to-subject distance (can be read this from the lens barrel). Manipulating the indication bar causes aperture value in the LCD panel to change.
10 Reset aperture value on the camera.
Use an aperture one or two stops smaller than the LCD panel indicates. This will prevent overexposure for overlapping images ("minus" exposure compensation).*
- Subject will be correctly exposed with the very first flash, but successive overlapping images (form the second flash on) will not be properly exposed, unless you perform minus exposure compensation as indicated in steps 9 and 10. We recommend you take a few additional shots at different apertures (exposure bracketing).
11 Look into camera viewfinder, compose and lightly press the shutter release button to confirm that subject is in focus.
Check that ready-light is on in the camera's viewfinder ±b or on the SB-26
12 Fully depress shutter release button to fire flash.
Background brightness and subject overlap
Use as dark a background material as possible (e.g., black curtain or cloth). If the overlapping exposed images are too weak or too strong, try repositioning subject at the location suggested by the indicator bar
(or adjust indicator bar).
Conditions vary for each situation — try experimenting.
Chapter 4
Flash-Shooting Applications
FP High-Speed Sync Flash — Flash Photography At Higher Shutter
Unlike other Nikon SLR models the F5, F90X/N90s or F90-Series/N90 camera and the SB-26 allow you to use faster shutter speeds up to 1/4000 sec. for flash synchronization.
Ordinarily the flash fires only when the curtains are fully opened in regular flash syncs. With FP High-Speed Sync Flash, the flash consecutively emits light at an extremely rapid cycle, while the shutter curtains travel to expose the entire film surface — but the curtains are never fully opened (i.e. exposure with a "slit").
By using a high-speed shutter and flash simultaneously, you can create light flow from a rapidly moving subject.
In outdoor photography, it also enables you to use both a wider aperture and a faster shutter speed to achieve a shallower depth of field and purposely blur the subject's background.
Note that a guide number for FP High-Speed Sync Flash varies with the selected shutter speed and it is smaller than for regular flash synchronization (i.e. smaller light output). Furthermore, we recommend you use shutter speeds between 1/250 and 1/4000 sec. to avoid uneven exposure. Before proceeding:
ATTACH SPEEDLIGHT TO CAMERA.
TURNOBOTH SPEEDLIGHTANDCAMERA.
USE MANUAL EXPOSURE MODE.
USE SINGLE-SERVER AUTOFOCUS (S or A) OR MANUAL FOCUS (M).
USE SINGLE-FRAME SHOOTING (S) FILM ADVANCE MODE.
| APPLICABLE NIKON SLR MODELS | ||||
| F5 | ✓ | F-601M/N6000 | FE2 | |
| F90X/N90s | ✓ | F50-Series/N50 | FG | |
| F90-Series/N90 | ✓ | F-401x/N5005 | Nikonos V | |
| F70-Series/N70 | F-501/N2020 | F3-Series | ||
| F4-Series | F-301/N2000 | F2-Series | ||
| F-801/N8008 | F-401/N4004 | FM2 | ||
| F-801s/N8008s | F-401s/N4004s | FG-20 | ||
| F-601/N6006 | FA | |||
Speeds
Set Up and Practice
1 Choose M position (flash mode selector). Confirm M appears in the LCD panel.
Choose NORMAL position (flash sync mode selector).
FP High-Speed Sync Flash operation can be performed regardless of the flash sync mode selector setting; for simplicity, always leave the switch at this position.
3 Confirm ISO film speed has been set and appears in the SB-26's LCD panel.
ISO speed of film in use is automatically set; if not shown in the LCD panel, lightly press the camera's shutter release button.
4 Confirm the zoom-head position has been set and appears in the SB-26's LCD panel.
The zoom-head position is automatically set and indicated in the SB-26's LCD panel when the camera is used with an AF Nikkor lens (including the latest D-Type) or a Nikkor lens having a built-in CPU.
Or, set manually according to the shooting situation (see page 29).
DO NOT USE THE WIDE FLASH PANEL (zoom head at the 20mm or 18mm position). When used, m^2g or M^18 , M and FP blink in the LCD panel as an alert.
5 Press M button until FP appears in the LCD panel, and confirm 1 or 2 appears in the light amount indicator while LCD indication changes: - m/1 - m/2 - m/4 - m/8 - m/16 - m/32 - m/64 - 1 - 2. Next, choose either 1 for FP1 flash operation or 2 for FP2.
Detaching the SB-26
When you take off the Speedlight from the F5, F90X/N90s or F90-Series/N90 to use it with another camera, be sure to cancel FP flash operation by pressing the button: confirm disappears from the LCD panel. If it is removed with FP setting, blinks a warning. The SB-26 will not function normally with the FP setting when mounted to any model other than the F5, F90X/N90s or F90-Series/N90.
6 Choose a shutter speed from 1/250 to 1/4000 sec. on the camera
Although any shutter speed can be used, an uneven exposure may result with speeds outside this range.
7 Set your desired aperture on the camera.
8 Focus on the subject.
Look into camera viewfinder and compose shot while lightly pressing the shutter release button.
9 Confirm aperture and shutter speed in the camera's viewfinder.
Check whether subject is focused by using the in-focus indicator
Shifting to other mode
Shutter speed is automatically locked at 1/250 sec., if you have set a shutter speed at 1/250 sec. or faster, then you perform one of the following:
a. Switch exposure mode to programmed auto on the camera, or
b. Change from FP High-Speed Sync to another flash operation on the Speedlight.
10 Set the aperture value (from step 7) in the SB-26's LCD panel.
See "Setting Aperture Value (Manual Adjustment)," pages 28 to 29.
The aperture value is automatically set and indicated in the SB-26's LCD panel when the camera is used with an AF Nikkor lens (including the latest D-Type) or a Nikkor lens having a built-in CPU.
An indicator bar appears to show the appropriate shooting distance.
In a bright scene
After you have adjusted the camera/flash-to-subject distance (with subject standing at the location represented by indication bar), readjust indicator bar (from step 11) to the left by one or two steps so the bar indicates a position closer than the actual subject location.
Experience indicates that a small amount of underexposure may result in a more pleasing photograph.
To readjust the indicator bar, perform one or a combination of the following adjustments:
1) Pressing button to switch from FP1 (FP with i) to FP2.
2) Moving further from the subject.
3) Choose a different number for the zoom-head position (wider angle of coverage).
We recommend that you not manipulate shutter speed and aperture on the camera.
11 Confirm subject is at the distance shown by the indicator bar in the SB-26's LCD panel (from step 10).
To determine the subject-to-camera distance, read the distance scale on the lens barrel.
If the bar location matches the subject-to-camera distance from steps 10 and 11, the subject will be correctly exposed with the selected aperture, shutter speed, and light output amount.
If the subject-to-camera distance does not match the appropriate shooting distance, readjust the indicator bars by:
a. Pressing M button to switch from FP1 (FP with i) to FP2, or vice versa. The bar location then moves to show an alternate shooting distance.
b. Moving closer to or further from the subject.
c. Choose a different number for the zoom-head position (altering guide number).
12 Look into camera's viewfinder again, then compose and lightly press the shutter release button to check that the ready-light is on in the camera's viewfinder 4. Ready-light also appears on the SB-26 5.
13 Fully depress shutter release button to fire flash.
Guide number in FP High-Speed Sync Flash
The "guide number" helps you determine an exact flash-shooting (flash-to-subject) distance for the selected aperture (f/stop number). FP guide numbers vary with the ISO film speed in use, shutter speed and zoom-head position.
Use the equation below for your calculations, and check the following chart for guide numbers. This same equation can be applied to determine an appropriate aperture once the distance is known.
$$ [ \text {f l a s h - s h o o t i n g d i s t a n c e} ] = \frac {[ \text {g u i d e n u m b e r} ]}{[ \mathrm {f} / \text {s t o p} ]} $$
For example, in FP1 operation with an aperture of f/4, a shutter speed of 1/500 sec., a zoom-head position of 35mm and a film speed of ISO 100, the chart recommends a guide number of 12 (or 39 for feet):
If measuring in meters;
$$ [ \text {f l a s h - s h o o t i n g d i s t a n c e} ] = \frac {1 2}{4} = 3 $$
if measuring in feet;
$$ [ \text {f l a s h - s h o o t i n g d i s t a n c e} ] = \frac {3 9}{4} = 9. 7 5 $$
Next, adjust subject and flash/camera location for 3 meters, or 9.75 feet, to obtain correct exposure in FP1 flash operation.
FP1 guide number (at ISO 100; for meters/feet)
| Shutter speed | Zoom-head position | |||||
| 24mm | 28mm | 35mm | 50mm | 70mm | 85mm | |
| 1/250 | 14/46 | 15/50 | 17/56 | 20/65 | 23/74 | 24/77 |
| 1/500 | 10/33 | 11/36 | 12/39 | 14/46 | 16/52 | 17/56 |
| 1/1000 | 7/23 | 7.5/25 | 8.5/28 | 10/33 | 11/36 | 12/39 |
| 1/2000 | 5/16 | 5.3/17 | 6/20 | 7/23 | 8/26 | 8.5/28 |
| 1/4000 | 3.5/11 | 3.7/12 | 4.2/14 | 5/16 | 5.6/18 | 6/20 |
FP2 guide number (at ISO 100; for meters/feet)
| Shutter speed | Zoom-head position | |||||
| 24mm | 28mm | 35mm | 50mm | 70mm | 85mm | |
| 1/250 | 10/33 | 11/36 | 12/39 | 14/46 | 16/52 | 17/56 |
| 1/500 | 7/23 | 7.5/25 | 8.5/28 | 10/33 | 11/36 | 12/39 |
| 1/1000 | 5/16 | 5.3/17 | 6/20 | 7/23 | 8/26 | 8.5/28 |
| 1/2000 | 3.5/11 | 3.7/12 | 4.2/14 | 5/16 | 5.6/18 | 6/20 |
| 1/4000 | 2.5/8.2 | 2.6/8.5 | 3/10 | 3.5/11 | 4/13 | 4.2/14 |
Using a film speed other than ISO 100
For film speeds other than ISO 100, multiply the above figures by the factors shown in the following chart.
If the film speed in the previous example had been ISO 400 rather than ISO 100:
$$ [ \text {f l a s h - s h o o t i n g d i s t a n c e} ] = \frac {1 2}{4} \times 2 = 3 \times 2 = 6 $$
if measuring in feet;
$$ [ \text {f l a s h - s h o o t i n g d i s t a n c e} ] = \frac {3 9}{4} \times 2 = 9. 7 5 \times 2 = 1 9. 5 $$
You should have obtained 6 meters, or 19.5 feet, for correct exposure.
Adjustment factors for other ISO film speeds
| ISO film speed | 25 | 50 | 100 | 200 | 400 | 800 | 1600 |
| Factor | x 0.5 | x 0.7 | x 1 | x 1.4 | x 2 | x 2.8 | x 4 |
Red-Eye Reduction Control — For Better Flash Portraits
Light from the camera's flash reflects off the interior of the eye through the wide-open pupil and back into the camera's lens. The result is a portrait with the subject's eyes bright red, a phenomenon known as "red-eye" effect.
When used with the F90X/N90s, F90-Series/N90 and F70-Series/N70 camera, the SB-26's red-eye reduction lamp lights for a moment before the flash fires and the picture is taken.
Red-eye effect can also be affected by the angle at which light flash on the subject and is reflected back to the lens. For further details on "red eye," see page 138.
Before proceeding:
ATTACH SPEEDLIGHT TO CAMERA.
TURN ON BOTH SPEEDLIGHT AND CAMERA.
USE SINGLE-SERVO AUTOFOCUS (S or A) OR MANUAL FOCUS (M).
USE SINGLE-FRAME SHOOTING (S) FILM ADVANCE MODE.
| APPLICABLE NIKON SLR MODELS | ||||
| F5 | F-601M/N6000 | FE2 | ||
| F90X/N90s | ✓ | F50-Series/N50 | FG | |
| F90-Series/N90 | ✓ | F-401x/N5005 | Nikonos V | |
| F70-Series/N70 | ✓ | F-501/N2020 | F3-Series | |
| F4-Series | F-301/N2000 | F2-Series | ||
| F-801/N8008 | F-401/N4004 | FM2 | ||
| F-801s/N8008s | F-401s/N4004s | FG-20 | ||
| F-601/N6006 | FA | |||
Hints and Notes
| ISO 100 | ||||||||
| 0.6 | 0.8 | 1 | 1.5 | 2 | 3 | 4 | 6 | 9 13 18 m |
| 2 | 3 | 4 | 5 | 7 | 10 | 15 | 20 | 30 40 60 ft |
| ZOOM | 35 mm | F5.6 | ||||||
- Set Red-Eye Reduction Control on the camera. Confirm appears in the SB-26's LCD panel.
- Red-Eye Reduction Control can not be used in Repeating Flash mode.
- Rear-Curtain Sync Flash cannot be performed.
Rear-Curtain Sync Flash — For Natural Light Flows
When used with the F5, F90X/N90s, F90-Series/N90, F70-Series/N70, F4-Series, F-801/ N8008, F-801s/N8008s, F-601/N6006 and F-601M/N6000 camera, the SB-26 lets you synchronize the flash to the instant before the rear (second) curtain begins to close. This turns available light into a stream of light that follows the moving, flash-illuminated subject.
Rear-curtain sync flash photography is most effective with slower shutter speeds. You can slow the shutter down to 30 sec., depending on the background situation.
Before proceeding:
ATTACH SPEEDLIGHT TO CAMERA.
TURN ON BOTH SPEEDLIGHT AND CAMERA.
USE SHUTTER-PRIORITY AUTO OR MANUAL EXPOSURE MODE.
USE SINGLE-SERVER AUTOFOCUS (S or A) OR MANUAL FOCUS (M).
| APPLICABLE NIKON SLR MODELS | |||||
| F5 | ✓ | F-601M/N6000 | ✓ | FE2 | |
| F90X/N90s | ✓ | F50-Series/N50 | FG | ||
| F90-Series/N90 | ✓ | F-401x/N5005 | Nikonos V | ||
| F70-Series/N70 | ✓ | F-501/N2020 | F3-Series | ||
| F4-Series | ✓ | F-301/N2000 | F2-Series | ||
| F-801/N8008 | ✓ | F-401/N4004 | FM2 | ||
| F-801s/N8008s | ✓ | F-401s/N4004s | FG-20 | ||
| F-601/N6006 | ✓ | FA | |||
Hints and Notes
- Select TTL Auto TLI, Non-TTL Auto A or Manual M Flash mode.
- Choose REAR position (flash mode selector). With the F-601/N6006 and F-601M/N6000, you must select REAR-CURTAIN SYNC FLASH on the camera. This sync flash then operates regardless of the SB-26's sync mode setting, either NORMAL or REAR position. With the F5, F90X/N90s, F90-Series/N90 or F70-Series/N70, although it is possible to select REAR-CURTAIN SYNC FLASH on the camera, the SB-26's sync mode setting will override what is set on the camera.
- With the F5, F90X/N90s, F90-Series/N90, F70-Series/N70, F-601/N6006 or F-601M/ N6000 used in programmed auto or aperture-priority auto exposure mode, the camera automatically controls the shutter speed down to as slow as 30 sec.
- In the following cases Rear-Curtain Sync Flash cannot be performed:
1) When using Vari-Program or Red-Eye Reduction Control with an F90X/N90s, F90-Series/N90 or F70-Series/N70 camera.
2) When performing multiple flash photography with an F5, F90X/N90s, F90-Series/N90, F70-Series/N70, F4-Series, F-801/ N8008 or F-801s/ N8008s.
3) When shutter speed dial is set at "T" with an F4-Series camera.
- Use a tripod to minimize camera shake.
Flash Exposure Compensation — To Make Flash-Illuminated Subject
The SB-26 allows you to manually adjust the amount of flash light in a range from -3 to +1 EV. This feature is particularly useful for "balanced" fill-flash where flash illumination is sufficient to brighten the subject to almost the brightness of the background.
Sometimes, you may want to use a little more or less flash to make the subject a little brighter or not quite so bright. Your choice may be based on desired aesthetic qualities, or may be forced by extremes in lighting.
Generally speaking, you don't want to make the subject too bright; you just want to brighten shadows. To achieve a subtle fill-flash effect, you may want to use some manually selected "minus" compensation.
However, when the background is extremely bright, and the subject is in deep shadows, you will probably want to use some "plus" compensation.
Although the SB-26 is quite powerful, when using it for fill-flash, it is competing with the sun's brightness — very strong competition.
| APPLICABLE NIKON SLR MODELS | |||||
| F5 | ✓ | F-601M/N6000 | ✓ | FE2 | |
| F90X/N90s | ✓ | F50-Series/N50 | FG | ||
| F90-Series/N90 | ✓ | F-401x/N5005 | Nikonos V | ||
| F70-Series/N70 | ✓ | F-501/N2020 | F3-Series | ||
| F4-Series | ✓ | F-301/N2000 | F2-Series | ||
| F-801/N8008 | ✓ | F-401/N4004 | FM2 | ||
| F-801s/N8008s | ✓ | F-401s/N4004s | FG-20 | ||
| F-601/N6006 | ✓ | FA | |||
With Standard TTL Flash you can manually compensate exposure by adjusting the flash output level.
You can also adjust flash output level for Matrix Balanced Fill-Flash, Center-Weighted Fill-Flash or Spot Fill-Flash, in combination with the computer's automatic compensation. Before proceeding:
ATTACH SPEEDLIGHT TO CAMERA.
TURNOBOTH SPEEDLIGHTANDCAMERA.
USE SINGLE-SERVER AUTOFOCUS (S or A) OR MANUAL FOCUS (M).
USE SINGLE-FRAME SHOOTING (S) FILM ADVANCE MODE.
For F-601/N6006 and F-601M/N6000 users
Make settings on the camera to control the SB-26's flash exposure compensation; the SB-26 will works as set on the camera. The SB-26's control buttons and LCD panel cannot be used for setting.
Lighter or Darker
Set Up and Practice
1 Choose position (flash mode selector). Confirm in the LCD panel.
This feature is available only in TTL Auto Flash mode.
Press the button.
Confirm the indicator appears and 0.0 (zero exposure compensation value) blinks in the LCD panel.
3 Press l buttons for value adjustment. Adjustment can be made while the value indicator is blinking.
Simultaneously, the shooting indicator bars change.
Press the button again to complete setting.
The the value indicator will automatically stop blinking in eight seconds unless you press the button. In this case, the last figure indicated will be set in the SB-26.
The exposure compensation value remains in the LCD panel.
5 To cancel, readjust compensation value to 0 (steps 1 and 2), then press button or leave it more than eight seconds so the indication disappears.
Exposure compensation on the camera
You can make additional compensation for background by using the camera's exposure compensation dial.
For example, with compensation of -2 on the SB-26 and -1 on the camera body, the total compensated value for flash output level is -3, and the compensated value for the background will be -1.
Note that the SB-26's LCD panel shows only the compensated value of the SB-26.
For further information, see "Exposure Compensation with Camera's Dial — To Make Background Lighter or Darker," pages 108 and 109.
Exposure Compensation on Camera — To Make Background
Some camera models include an EV compensation control. Using this control you can modify the exposure to make your picture lighter or darker.
To make the picture lighter, use “+” compensation. For darker pictures use “-” compensation. How much compensation you choose depends on how much you want to modify the resulting picture.
Since the shooting distance range for TTL Auto Flash varies with the amount of exposure compensation, make sure your subject falls within the range before shooting.
You can use the LCD panel for confirmation by altering the ISO film speed value and observing changes of distance indicator bars.
Hints and Notes
| APPLICABLE NIKON SLR MODELS | |||||
| F5 | ✓ | F-601M/N6000 | ✓ | FE2 | ✓ |
| F90X/N90s | ✓ | F50-Series/N50 | ✓ | FG | ✓ |
| F90-Series/N90 | ✓ | F-401x/N5005 | ✓ | Nikonos V | ✓ |
| F70-Series/N70 | ✓ | F-501/N2020 | ✓ | F3-Series | ✓ |
| F4-Series | ✓ | F-301/N2000 | ✓ | F2-Series | ✓ |
| F-801/N8008 | ✓ | F-401/N4004 | FM2 | ||
| F-801s/N8008s | ✓ | F-401s/N4004s | ✓ | FG-20 | ✓ |
| F-601/N6006 | ✓ | FA | ✓ | ||
- First, make necessary exposure compensation on the camera.
Then, use the chart on the next page, "Assumed ISO film speeds," to set an assumed ISO film speed in the SB-26's LCD panel that corresponds to the actual ISO film speed in use. See "Setting Aperture Values (Manual Adjustment)," pages 28 and 29.
- For TTL Auto Flash, be sure the substituted film speed falls within the range of "usable films" that ensure correct exposure with your camera.
Lighter or Darker
- Confirm whether subject is within the range shown by the shooting distance indicator bars.
If not, make necessary adjustments; move farther or closer.
Assumed ISO film speeds
| Film speed in use | Exposure compensation value | ||||||||
| +3 | +2 | +1 | 0 | -1 | -2 | -3 | -4 | -5 | |
| 25 | — | — | — | 25 | 50 | 100 | 200 | 400 | 800 |
| 50 | — | — | 25 | 50 | 100 | 200 | 400 | 800 | — |
| 100 | — | 25 | 50 | 100 | 200 | 400 | 800 | — | — |
| 200 | 25 | 50 | 100 | 200 | 400 | 800 | — | — | — |
| 400 | 50 | 100 | 200 | 400 | 800 | — | — | — | — |
| 800/1000 | 100 | 200 | 400 | 800 | — | — | — | — | — |
Flash exposure compensation
Additional compensation for the subject can be made by using flash exposure compensation control.
For further information, see "Flash Exposure Compensation — To Make Flash-Illuminated Subject Lighter or Darker," pages 106 and 107.
Open Flash Button 43 For Test Firing
Push the 4 button for a test firing when you are not sure whether the subject is within the flash shooting range.
For test firing, Non-TTL Auto Flash A mode is used because reflected flash light from subject is measured by the light sensor on the front of the SB-26 rather than through the lens (TTL) on the camera. The results, however, can be used for TTL-auto flash.
Hints and Notes
- Set the SB-26 and your camera in the same manner indicated in "Non-TTL Auto Flash A Mode," pages 81 to 84.
- After confirming that the ready-light is on, push the open-flash button and check that the ready-light remains on. If the ready-light blinks, light may be insufficient at the aperture selected. If so, move closer to the subject or select a wider aperture.
| APPLICABLE NIKON SLR MODELS | |||||
| F5 | ✓ | F-601M/N6000 | ✓ | FE2 | ✓ |
| F90X/N90s | ✓ | F50-Series/N50 | ✓ | FG | ✓ |
| F90-Series/N90 | ✓ | F-401x/N5005 | ✓ | Nikonos V | ✓ |
| F70-Series/N70 | ✓ | F-501/N2020 | ✓ | F3-Series | ✓ |
| F4-Series | ✓ | F-301/N2000 | ✓ | F2-Series | ✓ |
| F-801/N8008 | ✓ | F-401/N4004 | ✓ | FM2 | ✓ |
| F-801s/N8008s | ✓ | F-401s/N4004s | ✓ | FG-20 | ✓ |
| F-601/N6006 | ✓ | FA | ✓ | ||
Built-In Wide Flash Adapter — For Shorter Focal-Length Lenses
The SB-26 comes with a wide flash adapter to cover the full range of short focal length lenses.
For focal lengths shorter than 24mm , consider using the wide flash adapter to achieve expanded coverage.
When you use the wide flash adapter, the zoom head is automatically adjusted and the LCD panel shows ZOOM 20mm with M indication. Pressing the ZOOM button switches the zoom position, so the LCD panel shows ZOOM 18mm and M.
While the adapter is used, the automatic zoom-head position adjustment does not function for F5, F90X/N90s, F90-Series/N90, F70-Series/N70, F4-Series, F-801/N8008 or F-801s/N8008s cameras, even when used with an AF Nikkor lens (including the latest D-Type) or Nikkor lens having a built-in CPU.
| APPLICABLE NIKON SLR MODELS | |||||
| F5 | ✓ | F-601M/N6000 | ✓ | FE2 | ✓ |
| F90X/N90s | ✓ | F50-Series/N50 | ✓ | FG | ✓ |
| F90-Series/N90 | ✓ | F-401x/N5005 | ✓ | Nikonos V | ✓ |
| F70-Series/N70 | ✓ | F-501/N2020 | ✓ | F3-Series | ✓ |
| F4-Series | ✓ | F-301/N2000 | ✓ | F2-Series | ✓ |
| F-801/N8008 | ✓ | F-401/N4004 | ✓ | FM2 | ✓ |
| F-801s/N8008s | ✓ | F-401s/N4004s | ✓ | FG-20 | ✓ |
| F-601/N6006 | ✓ | FA | ✓ | ||
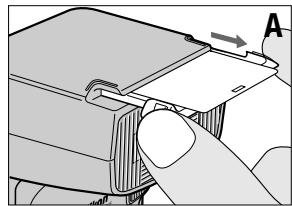
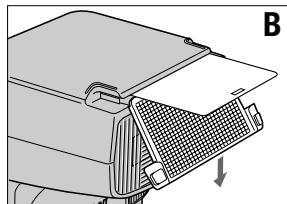
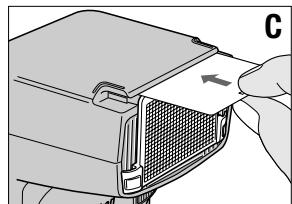
Mounting/Removing wide flash adapter
A. To mount the wide-flash adapter, slide out the adapter (the diffuser card comes out with it).
B.Close only the adapter to cover the head.
C.Slide the diffuser back to its original position.
- To remove, uncover the adapter and slide back to its original position.
Zoom-Lock Capability — To Fix Zoom-Head Position
A predetermined zoom-head position is useful when you wish to use an AF Nikkor lens or a Nikkor lens having a built-in CPU interchangeably with another type. It also provides flexibility when using lenses of different focal lengths in rapid succession.
Set Up and Practice
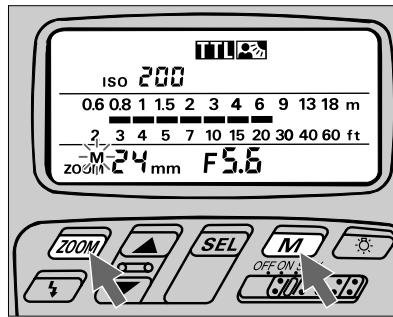
Press ZOOM and M buttons simultaneously for a few seconds until M indication starts blinking.
2 Next, press zoom button only to set desired zoom-head position. This position remains locked as long as the M indication continues blinking.
3 To unlock, press the same buttons simultaneously for a few seconds until the M indication stops blinking or totally disappears.
| APPLICABLE NIKON SLR MODELS | |||||
| F5 | ✓ | F-601M/N6000 | ✓ | FE2 | ✓ |
| F90X/N90s | ✓ | F50-Series/N50 | ✓ | FG | ✓ |
| F90-Series/N90 | ✓ | F-401x/N5005 | ✓ | Nikonos V | ✓ |
| F70-Series/N70 | ✓ | F-501/N2020 | ✓ | F3-Series | ✓ |
| F4-Series | ✓ | F-301/N2000 | ✓ | F2-Series | ✓ |
| F-801/N8008 | ✓ | F-401/N4004 | ✓ | FM2 | ✓ |
| F-801s/N8008s | ✓ | F-401s/N4004s | ✓ | FG-20 | ✓ |
| F-601/N6006 | ✓ | FA | ✓ | ||
Trouble With Wide Flash Adapter
In certain situations, the zoom head may lock at the 20mm or 18mm position (adapter does not return to original position). If this happens, perform following operation.
Although the adjusted zoom-head position and/or M indication will blink if the wide flash adapter is stored in its original place, this does not affect normal flash operation.
Press ZOOM and SEL buttons simultaneously for a few seconds until the previously set number and the M indication start blinking.
2 Press only button to set your desired zoom-head position. To resume automatic adjustment with certain camera/lens combinations (see page 30), press button until the M indication above zoom disappears.
Automatic zoom-head position adjustment: F5, F90X/N90s, F90-Series/N90, F70-Series/N70, F4-Series, F-801/N8008, or F-801s/ N8008s used with an AF Nikkor lens (including the latest D-Type) or Nikkor lens having a built-in CPU
The SB-26 automatically adjusts the zoom-head position to provide an angle of coverage that matches the focal length of the lens in use. For details, see page 30.
AF Assist LED — Autofocus Flash Photography in Dim Light
The SB-26's AF assist LED enables you to perform autofocus flash photography in dim light or even total darkness with some Nikon AF cameras.
When ambient light is insufficient for autofocus operation, the AF illuminator automatically turns on to start operation and give contrast to a dark subject, allowing the camera's autofocus system to function as though it were daytime.
If ambient light is sufficient, the AF illuminator does not light up.
Before proceeding:
ATTACH SPEEDLIGHT TO CAMERA.
TURN ON BOTH SPEEDLIGHT AND CAMERA.
USE SINGLE-SERVO AUTOFOCUS (S or A)
USE SINGLE-FRAME SHOOTING (S) FILM ADVANCE MODE
FOR F5, SELECT CENTER FOCUS AREA
Hints and Notes
- Check that the SB-26's ready-light has come on.
- Lightly press the camera's shutter release button to activates the AF illuminator LED. Do not use autofocus lock function.
- Confirm whether in-focus indicator LED in the camera's viewfinder appears.
If the in-focus indication does not appear inside the viewfinder, the subject is beyond the autofocus distance range (see at right "Notes of AF assist LED"); focus manually on the clear matte field.
- In Rear-Curtain Sync Flash with the F-601/N6006, a light pattern from the AF assist LED sometimes affects the picture. To prevent this, confirm that the LED light pattern has disappeared before shooting.
- Usable autofocus lenses are:
With Nikon F-501/N2020: AF Nikkor lenses from 35mm to 105mm (including the latest D-Type)
With other cameras: AF Nikkor lenses from 24mm to 105mm (including the latest D-Type)
Notes on AF assist LED
Autofocus distance range with AF assist LED depends on the lens in use and subject's reflection ratio.
For example, with an AF Nikkor 50mm f/1.8 lens (including the latest D-Type lens) and a subject having 35% reflection ratio, you can perform autofocus from approx. 1m (3.3 ft.) to approx. 8m (16.4 ft.), at 20^ (68^) .
If the ready-light does not stay on after the AF assist LED activates, replace batteries.
| APPLICABLE NIKON SLR MODELS | |||||
| F5 | ✓ | F-601M/N6000 | FE2 | ||
| F90X/N90s | ✓ | F50-Series/N50 | ✓ | FG | |
| F90-Series/N90 | ✓ | F-401x/N5005 | ✓ | Nikonos V | |
| F70-Series/N70 | ✓ | F-501/N2020 | ✓ | F3-Series | |
| F4-Series | ✓ | F-301/N2000 | F2-Series | ||
| F-801/N8008 | ✓ | F-401/N4004 | ✓ | FM2 | |
| F-801s/N8008s | ✓ | F-401s/N4004s | ✓ | FG-20 | |
| F-601/N6006 | ✓ | FA | |||
Power Switch Standby (STBY) Position — To Conserve Energy and
Setting the power switch to STBY position turns on the SB-26, but the SB-26 will also automatically shut off to conserve flash battery energy.
When you will not use the SB-26 for a long time, however, it is recommended to set the power switch to OFF.
Hints and Notes
- With the SB-26's power switch on standby (STBY) position, the unit turns off to conserve energy approx. 80 sec. after the camera's meter has turned off.
To turn the SB-26 on again, lightly press the shutter release button to turn the camera's meter on, or push the SB-26's open-flash button 35 .
| APPLICABLE NIKON SLR MODELS | |||||
| F5 | ✓ | F-601M/N6000 | ✓ | FE2 | ✓ |
| F90X/N90s | ✓ | F50-Series/N50 | ✓ | FG | ✓ |
| F90-Series/N90 | ✓ | F-401x/N5005 | ✓ | Nikonos V | ✓ |
| F70-Series/N70 | ✓ | F-501/N2020 | ✓ | F3-Series | |
| F4-Series | ✓ | F-301/N2000 | ✓ | F2-Series | |
| F-801/N8008 | ✓ | F-401/N4004 | ✓ | FM2 | ✓ |
| F-801s/N8008s | ✓ | F-401s/N4004s | ✓ | FG-20 | ✓ |
| F-601/N6006 | ✓ | FA | ✓ | ||
Shorten Recycling Time
- When using a remote cord with the FA or FE2 connected to Nikon Motor Drive MD-12, camera remains on as long as the MD-12's power switch is on. In this case, the SB-26 will not turn off in STBY position.
Use OFF position to turn it off manually. - You cannot use the STBY position to turn on the SB-26 when using it with an FA, FE2 or FG set on a mechanical shutter setting (M250 or B setting with the FA or FE2, M90 or B setting with FG or Nikonos V). Use ON position to turn it on manually.
Guide Number — To Calculate a Proper Aperture
The "guide number" helps you determine a correct aperture or f/stop value for using the SB-26's Manual Flash and Repeating-Flash mode. (See "Guide number" chart, page 143.)
Use the following equation for your calculations, and check the following chart for guide numbers at various film speeds.
$$ [ f / s t o p ] = \frac {[ g u i d e n u m b e r ]}{[ f l a s h - t o - s u b j e c t d i s t a n c e ]} $$
For example, when shooting a subject located 9 m (approx. 30 ft.) away at 1/1 (full) light output in MI (Manual Flash) mode, with a zoom-head position of 35mm and a film speed of ISO 100, you will obtain a guide number of 36 (or 118) from the same chart on page 143.
| APPLICABLE NIKON SLR MODELS | |||||
| F5 | ✓ | F-601M/N6000 | ✓ | FE2 | ✓ |
| F90X/N90s | ✓ | F50-Series/N50 | ✓ | FG | ✓ |
| F90-Series/N90 | ✓ | F-401x/N5005 | ✓ | Nikonos V | ✓ |
| F70-Series/N70 | ✓ | F-501/N2020 | ✓ | F3-Series | ✓ |
| F4-Series | ✓ | F-301/N2000 | ✓ | F2-Series | ✓ |
| F-801/N8008 | ✓ | F-401/N4004 | ✓ | FM2 | ✓ |
| F-801s/N8008s | ✓ | F-401s/N4004s | ✓ | FG-20 | ✓ |
| F-601/N6006 | ✓ | FA | ✓ | ||
If measuring in meters;
$$ [ f / s t o p ] = \frac {3 6}{9} = 4 $$
Or, if measuring in feet;
$$ [ f / s t o p ] = \frac {1 1 8}{3 0} = 3. 9 3 \approx 4 $$
You should then choose f / 4 as the proper aperture.
For films other than ISO 100, multiply the above figures by the factors shown in the following chart:
Adjustment factors for other ISO film speeds
| ISO film speed | 25 | 50 | 100 | 200 | 400 | 500 | 1600 |
| Factor | x 0.5 | x 0.71 | x 1 | x 1.4 | x 2 | x 2.8 | x 4 |
If the film speed in the above example was ISO 400 rather than ISO 100:
$$ [ f / s t o p ] = \frac {3 6}{9} \times 2 = 4 \times 2 = 8 $$
Or, if measuring in feet;
$$ [ f / s t o p ] = \frac {1 1 8}{3 0} \times 2 = 3. 9 3 \times 2 = 7. 8 6 \approx 8 $$
You should then choose f / 8 as the proper aperture.
Diffusing Light — To Soften Harsh Shadows
With a subject in front of a wall, a direct flash causes harsh and unattractive shadows. By bouncing the light off the ceiling or walls, or by diffusing the light with card(s) or paper, you can soften harsh shadows and create attractive portraits.
The SB-26 comes with a built-in diffuser. You can use it alone or with a combination of other reflecting surfaces for advanced application.
There are a few ways to diffuse light:
- Bounce light off a broad reflective surface such as the ceiling.
- Use both the ceiling and the built-in diffuser card to create a catchlight for subject's eyes.
- Use a diffuser between the flash and the subject.
| APPLICABLE NIKON SLR MODELS | |||||
| F5 | ✓ | F-601M/N6000 | ✓ | FE2 | ✓ |
| F90X/N90s | ✓ | F50-Series/N50 | ✓ | FG | ✓ |
| F90-Series/N90 | ✓ | F-401x/N5005 | ✓ | Nikonos V | ✓ |
| F70-Series/N70 | ✓ | F-501/N2020 | ✓ | F3-Series | ✓ |
| F4-Series | ✓ | F-301/N2000 | ✓ | F2-Series | ✓ |
| F-801/N8008 | ✓ | F-401/N4004 | ✓ | FM2 | ✓ |
| F-801s/N8008s | ✓ | F-401s/N4004s | ✓ | FG-20 | ✓ |
| F-601/N6006 | ✓ | FA | ✓ | ||
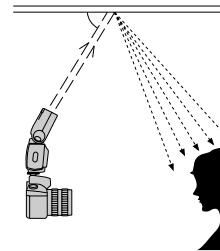
1. Light can be bounced off the ceiling.
2. Natural-appearing light with a pleasing catchlight in the eyes.
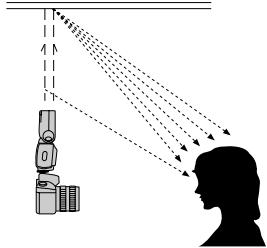
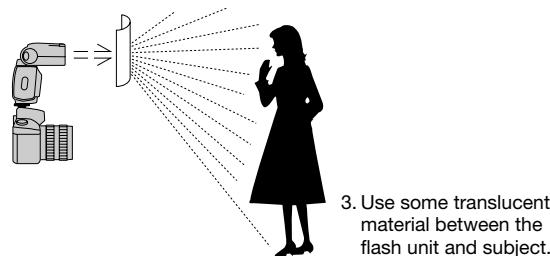
Tilting/Rotating flash head
- The SB-26's flash head tilts and rotates as shown at right.
- The flash head locks at the front/horizontal and vertical (90^ upward) positions. To release, use the tilting or rotating lock release lever.
LCD panel
- The LCD panel cannot be used to compute flash shooting distance when the flash head is tilted upward or rotated away from the horizontal/front position. In these cases, the shooting distance indicator bars do not appear in the LCD panel.
- The shooting distance indicator bars blink when the flash head is tilted downward to the -7^ position. This position is used to shoot a subject within 1.5m (approx. 5 ft.).
For F5, F90X/N90s, F90-Series/N90, F70-Series/N70 users
In bounce photography with the flash head tilted or rotated, the SB-26 does not fire Monitor Preflash(es), even for 3D Multi-Sensor Balanced or Multi-Sensor Balanced Fill-Flash operation.
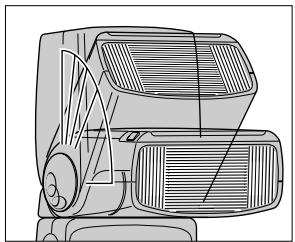
Tilting: up to 90^ — front — down to -7^
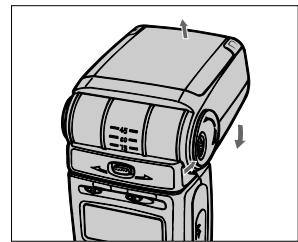

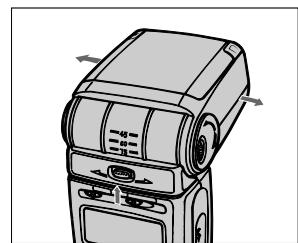
Rotation: to right 90^ — front — to left 180^
Built-in diffuser card for bounce flash photography
- Use the diffuser card to create a catchlight for the subject's eyes, an effect that is not always available in bounce flash photography.
- The diffuser can be used to provide supplemental light to the face or front of the subject, thereby brightening shadows created by top-lighting or bounced flash from the ceiling.
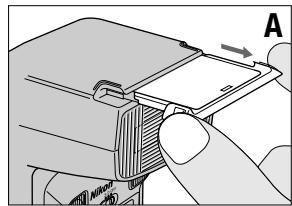
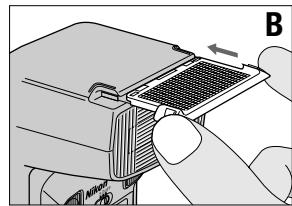
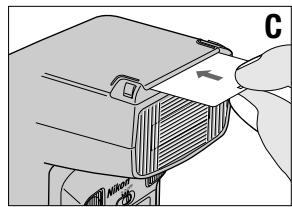
Mounting/Removing diffuser card
A.To mount the diffuser card, slide out the wide flash adapter; the diffuser card comes out with it.
B. Slide the adapter back to its original position.
C.To remove, side the diffuser back to its original position.
Bounce Flash Photography

Bounce flash (above; with ceiling): Soft, natural-looking lighting. Direct flash (below): Harsh, un-flattering lighting

-
Choose TTP position (flash mode selector) for TTL Auto Flash operation.
-
Select a ceiling or wall to bounce the flash from.
- The built-in diffuser card can be effective for creating more natural lighting with a catchlight for the eyes.
- Tilt the flash head 60^ up (first click-stop) or more to avoid uneven illumination.
- In color photography, only use bounce with white surfaces. Otherwise, color photographs will come out with an unnatural color cast similar to that of the reflecting surface.
Use an aperture a few stops wider than you would use for regular TTL Auto Flash operation.
For further instruction, see the TTL Auto Flash Mode section relating to your camera type.
- Although the flash mode A can be used for Non-TTL Auto Flash, perform a test firing. If the ready-light blinks after testing to indicate possible underexposure at the aperture in use, use a wider aperture or reduce the bounce distance. Then, perform test firing again.
Using a Diffuser
- To diffuse light, place a translucent material, such as one or more sheets of tracing paper between the flash and the subject.
Avoid using delicate materials for the diffuser, and ensure a sufficient distance between the flash head and diffuser to avoid burns.
For optimum results, experiment with different flash-to-diffuser distances and with more than one diffuser - In TTL Auto Flash operation, the SB-26 will automatically compensate for the diffuser affect (reduced light amount) in TTL Auto Flash mode.
For further instructions, see the TTL Auto Flash Mode TL section relating to your camera type.
Note that the LCD panel cannot be used to compute flash shooting distance in bounce photography. - To protect the diffuser from burning, be sure it does not come in direct contact with the flash head.
- Avoid reflection from the translucent material into the lens.
Bracketing your exposures
If possible, take additional shots with different apertures and/or exposure compensation techniques for exposure bracketing. Bounce/diffuser techniques reduce the maximum distance available for a given aperture due to the extra distance required for the flash light to travel, or amount of diffusion, or blockage.
Make exposure compensation on your camera (this adjustment is not possible with the F-401x/N5005, F-401/N4004, F-401s/N4004s and FM2) for TTL Auto Flash operation, or with the lens opened up one or two f/stops for Non-TTL Auto Flash operation.
Close-Up Flash Photography in TTL Auto Flash Mode — To Flash On
Optional TTL Remote Cord SC-17 or SC-24 lets you perform TTL Auto Flash shooting on a subject closer than 0.6m (2 ft.).
Hints and Notes
- Connect the SB-26 to the camera, using the SC-17 or SC-24*.
-
Used for F5 with the DW-30/DW-31 attached or for F4-series with the DW-20/ DW-21 attached.
-
Position the SB-26 so light from the head covers the subject.
- Mount the built-in flash adapter. The zoom-head position is automatically adjusted. Confirm the LCD panel shows ZOOM 20mm with M indication.
- Use aperture-priority auto or manual exposure mode.
- Choose TTP position (flash mode selector) for TTL Auto Flash operation.
For further instruction, see the TTL Auto Flash Mode section relating to your camera type.
- Determine the aperture or f/stop value using the following equation and chart, then set on the lens. The SB-26's LCD panel cannot be used to compute shooting distance.
[f/stop] ≥ [coefficient] [flash-to-subject distance]
A Very Close Subject
For example, to shoot a subject located 0.5m away with an ISO 100 film and a wide-flash adapter:
$$ [ f / s t o p ] \geq \frac {4}{0 . 5} = 8 $$
You can then use an aperture of f/8 or smaller (a larger f-number). As far as conditions allow, you should choose the smallest aperture (as large an f-number) possible.
- With a very light- or dark-toned subject, take additional shots with other exposure compensation conditions to ensure a correct exposure.
See "Flash Exposure Compensation" on pages 106 and 107, and "Exposure Compensation on Camera" on pages 108 and 109.
ISO film Speed and coefficient
| ISO film speed | 100 or lower | 125 — 400 | 500 or higher |
| Coefficient* | 4 (14) | 8 (26) | 11 (36) |
- Numbers in parentheses ( ) represents coefficients for foot measurement system.
| APPLICABLE NIKON SLR MODELS | |||||
| F5 | ✓ | F-601M/N6000 | ✓ | FE2 | ✓ |
| F90X/N90s | ✓ | F50-Series/N50 | ✓ | FG | ✓ |
| F90-Series/N90 | ✓ | F-401x/N5005 | ✓ | Nikonos V | |
| F70-Series/N70 | ✓ | F-501/N2020 | ✓ | F3-Series | |
| F4-Series | ✓ | F-301/N2000 | ✓ | F2-Series | |
| F-801/N8008 | ✓ | F-401/N4004 | ✓ | FM2 | |
| F-801s/N8008s | ✓ | F-401s/N4004s | ✓ | FG-20 | |
| F-601/N6006 | ✓ | FA | ✓ | ||
Multiple Flash Photography — Using More Than One Speedlight
If you have another flash unit, you can use it as a secondary light source for multiple flash photography. When you use only one flash unit in front of a subject, harsh shadows may be produced or light may not reach the background. Using more than one flash unit helps you solve these problems.
To perform multiple flash photography with the SB-26, there are two methods, (1) cordless multiple flash photography with the SB-26 used as a slave flash unit (pages 128 to 131), (2) multiple flash photography with flash units connected via cord(s) (pages 131 to 133).
In multiple flash photography, carefully consider the number of flash units to use and their locations. For better results, position each unit so its light can brighten a shadow created by another.
Also remember that the effect produced by using more than one flash unit depends on the lighting ratio or balance of illumination between flash units. In determining the role of each flash unit, first decide which will be the main and which units will be secondary.
For example, to eliminate shadows, control lighting ratio so that the illumination from the main flash unit is a few times brighter than that from the secondary.
| APPLICABLE NIKON SLR MODELS | |||||
| F5 | ✓ | F-601M/N6000 | ✓ | FE2 | ✓ |
| F90X/N90s | ✓ | F50-Series/N50 | ✓ | FG | ✓ |
| F90-Series/N90 | ✓ | F-401x/N5005 | ✓ | Nikonos V | ✓ |
| F70-Series/N70 | ✓ | F-501/N2020 | ✓ | F3-Series | ✓ |
| F4-Series | ✓ | F-301/N2000 | ✓ | F2-Series | ✓ |
| F-801/N8008 | ✓ | F-401/N4004 | ✓ | FM2 | ✓ |
| F-801s/N8008s | ✓ | F-401s/N4004s | ✓ | FG-20 | ✓ |
| F-601/N6006 | ✓ | FA | ✓ | ||

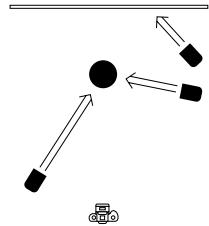


Caution
To avoid damage to flash units or incorrect operation, never mix Nikon Speedlights with flash units of other manufacturers.
Wireless Slave Flash Photography
When used as a slave flash unit, the SB-26 will fire when its Wireless Slave Flash sensor catches light from the master flash unit.
For Wireless Slave Flash photography, the SB-26's Wireless Slave Flash selector provides two positions—"D" ("delay" mode) and "S" ("simultaneous" mode).
In "delay" mode, the SB-26 used as a slave flash unit will fire a moment after the master flash unit fires, without affecting the master flash unit's flash exposure control.
In "simultaneous" mode, the SB-26 as a slave unit will fire at the same time as the main flash unit fires. When performing Wireless Slave Flash to eliminate harsh shadows in TTL auto or non-TTL auto flash mode, the master flash unit's flash exposure control may be affected by the light from the slave flash unit, resulting in underexposed subject. (See photos at right.)
When the Wireless Slave Flash selector set at "D" or "S", _S appears in the LCD panel.
For Speedlights without Wireless Slave Flash function
Use the TTL multiple flash terminal or sync/multiple flash terminal on the SB-26 (used as a slave flash unit) to connect a Speedlight without Wireless Slave Flash function via a sync cord SC-18/SC-19 or SC-11/SC-15. The connected Speedlight(s) will fire at the same time the SB-26 (slave flash unit) fires.


Settings on flash units and camera
- Set the SB-26's wireless slave flash selector to "D" or "S". If two or more SB-26 units are used—one as a master unit, the other as slave unit(s) or all as slave units—set the Wireless Slave Flash selector on all units to the same setting. With the Wireless Slave Flash selector set at "OFF", the SB-26 as a slave flash unit does not fire when the Wireless Slave Flash sensor catches the light.
- Set the flash mode selector of the master flash unit to TTL auto, non-TTL auto or manual, as you like. Do not set FP High-Speed sync when the SB-26 or SB-25 is used as a master flash unit.
- Set the flash mode selector of SB-26 used as a slave flash unit to non-TTL auto or manual. TTL auto flash is not suitable.
- Set the camera's exposure mode to Aperture-Priority Auto or Manual exposure mode and set the desired aperture on the lens.
-
Locate the master flash unit within the flash shooting distance range (for TTL auto or non-TTL auto flash mode) or at the flash shooting distance (for manual flash mode). If camera/Speedlight combination does not offer automatic aperture adjustment on the Speedlight, you must first set the aperture value (same as set on the lens) on the Speedlight.
-
For "delay mode", set the camera's shutter speed one-step slower than the camera's synchronization speed. (When using the F5, F90X/N90s, F70-Series/N70 or F4-Series camera and the SB-26 as a master flash unit, this is not necessary because the shutter speed is automatically switched.)
- When using the F5, F90-Series/N90 or F70-Series/N70 cameras, note the following:
with the SB-26 as a master flash unit set at TTL auto flash mode, Monitor Preflashes will be automatically cancelled when the multiple flash selector set at "D" or "S".
With the SB-25 as a master flash unit set at TTL auto flash mode, avoid Monitor Preflashes by upward tilting or rotating the flash head. If you should not do so, Monitor Preflashes will cause the slave flash unit to fire before shutter release.
- With the Wireless Slave Flash selector set at "D" or "S", the STBY position does not automatically turn off the SB-26.
- For rear-curtain sync, set the Wireless Slave Flash selector on master and slave flash units to "S".
- In "delay" mode, rear-curtain sync is not recommended.
- Make sure that the slave flash unit is disconnected from camera body or connected camera power is off.
Controlling lighting ratio
- When the master flash unit is set at TTL auto or non-TTL auto flash mode, you can vary the light output amount of the master flash unit by changing lens aperture (and aperture value set on the master flash unit).
- To vary the light output amount of the slave flash unit when it is set at non-TTL auto flash mode, change the aperture value set on the slave flash unit. Set one-step smaller value to reduce amount of light output to 1/2; set one-step larger value to double the amount of light output.
- When the flash unit is set at manual flash mode, vary light output amount as desired. (Manual light output adjsumtment is possible with the SB-26, SB-25 and SB-24.)
For 1:1 lighting ratio
For your convenience, the following shows how to set and locate the master and slave flash units for 1:1 lighting ratio.
With a slave flash unit set at non-TTL auto flash mode: For 1:1 lighting ratio, read the aperture value on the master flash unit (same as the aperture set on the lens), set it on the slave flash unit's LCD panel then locate the slave flash unit within the flash shooting distance range indicated on the LCD panel.
With a slave flash unit set at manual flash mode: Set any light output amount on the slave flash unit. For 1:1 lighting ratio, read the aperture value on the master flash unit (same as the aperture set on the lens), set it on the slave flash unit's LCD panel then locate the slave flash unit at the flash shooting distance indicated on the LCD panel.
Test firing
Test firing is recommended. Making sure the Wireless Slave Flash selector of the slave flash unit set at "D" or "S", press the open-flash button on the master flash unit for test firing. If the slave flash unit does not fire, adjust the direction of the slave unit's Wireless Slave Flash sensor. Or use a reflector so that the slave unit's Wireless Slave Flash sensor catches the light from the master unit.
Bracketing your exposure
If possible, take additional shots with different lighting ratios and or flash units' locations.
Multiple Flash Photography Using Cords
Depending on which terminals are used to connect flash units, TTL multiple flash photography or manual multiple flash photography will be performed.
In TTL multiple flash photography, the camera controls flash exposure of all flash units connected (pages 134 to 135); in manual multiple flash photography, each flash unit is set to manual flash mode.
Speedlights for TTL multiple flash photography
| Master | SB-27, SB-26, SB-25, SB-24, SB-23, SB-22, SB-21B, SB-20, SB-18, SB-16B, SB-15, SB-14, SB-11 or SB-140 |
| Slave | SB-27, SB-26, SB-25, SB-24, SB-22, SB-21B, SB-20, SB-18, SB-17, SB-16A, SB-16B, SB-15, SB-14, SB-11 and/or SB-140 |
Precaution for Rear-Curtain Sync Flash
Rear-Curtain Sync Flash can be performed in multiple flash photography only with the F-601/N6006 and F-601M/N6000 cameras.
Rear-Curtain Sync Flash cannot be performed in multiple flash shooting with F5, F90X/N90s, F90-Series/N90, F70-Series/N70, F4-Series, F-801/N8008 and F-801s/N8008s cameras.
TTL Multiple Flash Photography
- Use the TTL multiple flash terminal for connecting other Speedlights via optional sync cords.
- You can use one Speedlight for the master flash unit and up to four other units for slaves. See the chart on pages 134 to 135 to confirm available Speedlights for master and slave use.
Note the following when using an F90-Series/N90 camera for TTL Auto Flash operation with multiple Speedlights: a. Use the SB-26 as a slave flash unit whenever possible, or b. When using the SB-26 as master, avoid Monitor Preflashes* by (1) performing Standard TTL Flash, (2) upward tilting or rotating the flash head (the distance indicator bars disappear), or (3) using a lens other than AF Nikkor (including D-type) or Al-P lenses to perform Center-Weighted or Spot Fill-Flash. - Because 3D Multi-Sensor and Multi-Sensor Balanced Fill-Flash take advantage of the SB-26's Monitor Preflash and the camera's TTL Multi-Sensor, it is difficult to manage such fill-flash operations for TTL Multiple Flash
Photography, especially when using the SB-26 as a master flash unit with other slave flash unit(s). The Sensor system is designed to analyze Monitor Preflash reflection from a single SB-26 (ideally, mounted on the camera) and to control light output from that particular unit, but not from the other slave(s).
- Use optional Multi-Flash Sync Cord SC-18 (1.5m) and/or SC-19 (3m) to connect flash units via the SB-26's TTL multiple flash terminal. Remove the rubber cover to use.
- Use optional TTL Remote Cord SC-17 or SC-24* for use with the SB-27, SB-23, SB-22, SB-21B, SB-20 and/or SB-15 as a master flash unit.
- Used for F5 with the DW-30/DW-31 attached or for F4-series with the DW-20/ DW-21 attached.
- Use optional TTL Multi-Flash Adapter AS-10 for use with the SB-27, SB-22, SB-21B, SB-20 and or SB-15 as a slave flash unit.
- Use optional TTL Remote Cord SC-23 for use with the SB-140, SB-14 and/or SB-11.
- The SB-11/14/140 (even with SC-23) or SB-21B cannot be used for TTL multiple flash photography with the F-401/N4004 and F-401s/N4004s.
- Use the ON position to activate a slave flash unit; the STBY does not function (SB-26, SB-25, SB-24, SB-22 and SB-20). The SB-23 offers only OFF and TTL/STBY positions for power switching. This means it cannot be used as a slave.
- Select Forced TTL mode when using SB-27 as a slave flash unit.
When a second shot cannot be taken (F5, F90X/N90s, F90-Series/N90, F70-Series/N70, F4-Series, F-801/N8008, F-801s/ N8008s, F-601/N6006, F-601M/N6000, F50-Series/N50, F-401x/ N5005, and F-501/ N2020)
For multiple flash photography, if the electronic current in the synchro circuit exceeds a certain level, you may not be able to take a second shot after taking the first shot.
Take care that the combined total of the coefficients (numbers shown in parentheses below) for all Speedlights used at any one time does not exceed 20 at 20^ (68^) , or 13 at 40^ (104^) .
If you are unable to take a second shot, disconnect the master Speedlight from the camera, or turn each of the Speedlights off once. This resets the circuits so you can resume shooting.
Speedlight coefficients
| SB-27 (1) | SB-26 (1) | SB-25 (1) | SB-24 (1) | SB-23 (4) |
| SB-22 (6) | SB-21 (4) | SB-20 (9) | SB-19 (2) | SB-18 (16 |
| SB-17 (4) | SB-16 (4) | SB-15 (4) | SB-14 (1) | SB-12 (1) |
| SB-11 (1) |
Manual Multiple Flash Photography
- Use the sync/multiple flash terminal for connection with other Speedlights via optional sync cords.
- Use optional Sync Cord SC-11 or SC-15.
- Set and use Manual [M] Flash mode on each Speedlight for correct exposure.
System Chart for TTL Multiple Flash
- The SB-11, SB-14, SB-140 and SB-21B cannot be used with the F-401/N4004 or F-401s/N4004s either as a master or slave unit.
- The SB-21A and SB-23 Speedlights cannot be used as slave units.
F5 (with DA-30/DP-30), F90X/N90s, F90-Series/N90, F70-Series/N70
F5 (with DW-31/DW-30)
F4-Series (with DW-21/DW-20)
F4-Series (with DA-20/DP-20), F-801/N8008, F-801s/N8008s
F-601/N6006, F-601M/N6000
F50-Series/N50, F-401x/N5005
F-501/N2020, F-401s/N4004s, F-401/N4004, F-301/N2000
FA, FE2, FG
Nikonos V
F3-Series
134
Slave flash unit
B
Using SC-18 or SC-19, up to five flash units can be used for multiple flash photography, at a total length of 10m (33 ft.).
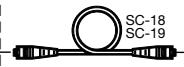
B

B
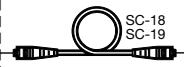
B
Precaution for SC-19/SC-18 connection
Neither of these cords should be used for connecting one camera/ Speedlight combination to another.
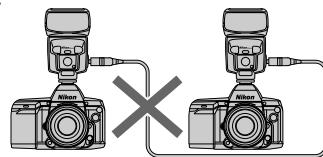
Chapter 4
Multiple Flash Photography
Accessories for TTL Multiple Flash
TTL Remote Cord SC-17
Use coiled cord SC-17 for TTL Auto Flash operation when using the SB-26 off the Nikon F5 (with DP-30 or DA-30), F90X/N90s, F90-Series/ N90, F70-Series/N70, F4-Series (with DP-20 or DA-20), F-801/N8008, F-801s/N8008s, F-601/N6006, F-601M/N6000, F50-Series/N50, F-401x/N5005, F-501/N2020, F-301/N2000, F-401/N4004, F-401s/N4004s, FA, FE2 and FG cameras.
The SC-17 provides automatic sync speed setting and the same ready-light viewfinder indication as if the flash unit were directly mounted on the camera.
The SC-17 comes with two TTL multiple flash terminals and one tripod socket. It is approx. 1.5m (4.9 ft.) long.
TTL Remote Cord SC-24
Use SC-24, for TTL Auto Flash operation when using the SB-26 off a Nikon F5 or F4-Series camera fitted either with a 6x High-Magnification Finder DW-31/DW-21 or Waist-Level Finder DW-30/DW-20.
The SC-24 comes with two TTL multiple flash terminals and one tripod socket. It is approx. 1.5m (4.9 ft.) long.
TTL Multi-Flash Adapter AS-10
Use Multi-Flash Adapter AS-10 when using more than three units for TTL multiple flash operation.
The AS-10 comes with three multiple flash terminals and one tripod socket. (Requires SC-18 or SC-19 for each flash use.)
TTL Multi-Flash Sync Cord SC-18 and SC-19
To connect the flash unit for TTL multiple flash operation, use Sync Cord SC-18 or SC-19.
The SC-18 is approx. 1.5m (4.9 ft.) long; the SC-19, 3m (9.8 ft.) long.
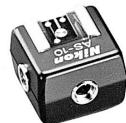
AS-10

Chapter 5
Notes on Speedlight
"Red Eye"
"Red eye" is a common problem in flash photography. Normally, flash pictures are taken when the surroundings light is dim, and under such conditions the subject's eye pupils will be dilated (open very wide). Red-eye effect occurs when light from the camera's flash reflects off the interior of the eye and back into the camera's lens. The wide-open pupil allows much light to enter, and as a result, the center portions of a subject's eyes can appear bright red (white in a black and white picture). It is interesting to note that the intensity of the red-eye effect varies among individuals, and with two people in the same photograph, one may have red-eye and the other may not.
The appearance of red-eye is also based on the angle at which the light flash on the subject and is reflected back to the camera's lens. If the angle is 2 to 2.5 degrees or narrower, red-eye will occur. As you move closer to a subject, the angle becomes wider, and the likelihood of red-eye effect decreases. As you move farther from a subject, the angle narrows and the incidence of red-eye increases. When you get very far from a subject, the size of the eye in the picture may become so small that red-eye is not apparent, but when you switch to a lens with a longer focal length the red-eye will become more apparent.
Angle of reflection vs. distance to subject
A narrow angle of reflection (θ: less than 2.5^ ) increases the likelihood of red eye.
It is sometimes possible to reduce red-eye effect by moving closer to the subject, or the right or left, thereby increasing the angle of reflection.
Flash Sync Mode Selector NORMAL vs. REAR Position
The SB-26 is capable of synchronizing flash output with shutter curtain movement, for either the front (first) curtain or rear (second) curtain.
At NORMAL position, the Speedlight synchronizes flash output at the moment the front curtain has fully opened (at the end of front curtain movement) but before the rear curtain has started to travel. This is called "front-curtain sync flash," and is the most popular sync method in flash photography.
At REAR position, the unit synchronizes the flash to the instant before the rear curtain starts to close (the end of film exposure). Therefore, it is called "rear-curtain sync flash."
The REAR position can be chosen to create special effects, and is most effective for freezing a moving subject at the end of a light flow, especially in flash photography at a slow shutter speed.
For F5, F90X/N90s, F90-Series/N90, F70-Series/N70, F4-Series, F-801/N8008 and F-801s/ N8008s Users:
- Front-curtain sync is performed at NORMAL setting.
- "Rear-Curtain Sync" flash is performed at REAR setting.
For F-601/N6006 and F-601M/N6000 Users:
- The sync mode, whether front- or rear-curtain, or slow or not, must be set on the camera. The selection is executed regardless of the SB-26's selector position.
Therefore, we recommend you leave the selector switch on the NORMAL position in any circumstances.
For F50-Series/N50, F-401x/N5005, F-501/N2020, F-301/N2000, F-401/ N4004, F-401s/ N4004s, FA, FE2, FG, Nikonos V, F3-Series, F2-Series, FM2 and FG-20 Users:
- Front-curtain sync is performed at either NORMAL or REAR setting. These models are not capable of rear-curtain sync.
Therefore, regardless of circumstances, we recommend you leave the selector switch on NORMAL position.
Tips on Speedlight Care
- To remove smudges, wipe with a silicon-treated or other soft, dry cloth. Never use thinner, benzine or alcohol — they might damage plastic parts.

- Never disassemble or repair the Speedlight. If the SB-26 malfunctions, take it immediately to an authorized Nikon dealer or service center.
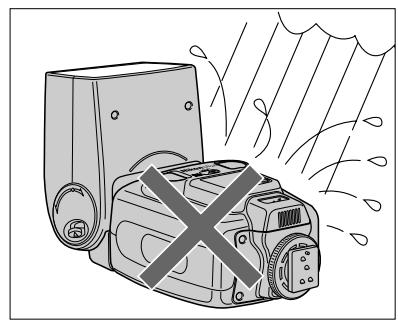
- Keep the SB-26 away from salt water and out of the rain.

- Keep the SB-26 away from high temperatures, and do not store in a damp place.
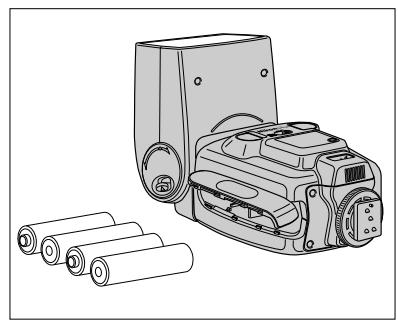
- When not using the SB-26, remove batteries to avoid damage due to battery leakage. If leakage occurs, take the SB-26 to your nearest Nikon dealer.
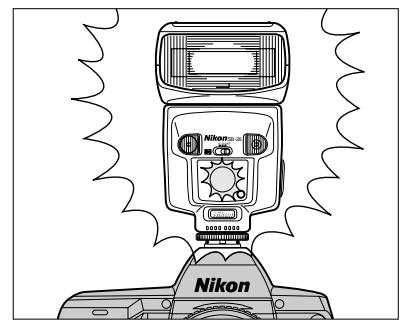
- When not using the SB-26, perform the following once a month:
1. Install batteries, turn on the SB-26.
2. Wait until the ready-light comes on.
3. Fire flash a few times to refresh the main capacitor and lengthen the unit's life.
4. Turn off the SB-26, and remove the batteries.
About Batteries
Warning
- Batteries shall not be exposed to excessive heat such as sunshine, fire or the like.
- Dry batteries shall not be subjected to charging.
New batteries
Purchase the newest (freshest) batteries possible.
Temperature
Battery life ratings are based on operation at 20^ (68^)
Especially at a lower temperature, battery life is shortened. Keep spare batteries and if possible, use NiCd batteries.
Continuous use
Batteries are drained more quickly by continuous use than by intermittent use.
Storage
Store batteries in a cool, dry place, below 20^ (68^) .
Battery brand
Do not mix battery brands or models, or new and old batteries.
Disposal
Do not dispose of batteries by burning, and never disassemble batteries.
NiCd batteries
Compared with regular batteries, NiCd batteries offer a faster recycling time and greater efficiency at low temperatures.
Before charging NiCd batteries, thoroughly read the instructions for the batteries and battery charger.
Batteries with a "+" terminal that exceeds 6mm (0.23") in diameter cannot be used.
DC Units SD-8/SD-7
Nikon DC Unit SD-8 or SD-7 can be used as an optional external power source to enhance flash capacity and provide faster recycling time.
To use the DC Unit, connect its power cord SC-16 to the SB-26's external power terminal. Even when powered with the DC Unit, the SB-26 still requires batteries inside the flash unit. Do not remove the batteries.
In continuous shooting with the DC Unit, to prevent flash head deterioration caused by heat, do not exceed the maximum number of flash listed below. It is recommended to rest for more than 10 minutes after firing near the maximum numbers.
Maximum consecutive firing
| SB-26 Flash mode | Maximum number of flash | |
| SD-8 | SD-7 | |
| TTL Auto Flash III | 15 | 15 |
| Non-TTL Auto Flash A | 15 | 15 |
| Manual Flash W | 15 (at full or 1/2 power)40 (at 1/4 power or less) | 15 (at full or 1/2 power)40 (at 1/4 power or less) |
| Repeating Flash 333 | 15 | 15 |
Power Bracket SK-6
Enables you to use your SB-26 as a grip-type flash. In addition, by installing batteries in the SK-6, you can use it as an external power source for SB-26. If SB-26 is already powered by the SD-7 or SD-8, the SK-6 can be used as a secondary external power source.
Specifications
All performance data are for normal-temperature operation (20^ / 68^) .
Electronic construction:
Automatic Insulated Gate Bipolar Transistor (IGBT) and series circuitry.
Guide number (at ISO 100: for m/ft.):
| Light output | Zoom-head position | |||||||
| 18mm | 20mm | 24mm | 28mm | 35mm | 50mm | 70mm | 85mm | |
| 1/1 (full) | 20/66 | 22/72 | 30/98 | 32/105 | 36/118 | 42/138 | 48/157 | 50/164 |
| 1/2 | 14/46 | 15.5/51 | 21/69 | 22.5/74 | 25.5/84 | 30/98 | 34/112 | 36/118 |
| 1/4 | 10/33 | 11/36 | 15/49 | 16/53 | 18/59 | 21/69 | 24/79 | 25/82 |
| 1/8 | 7/23 | 7.7/25 | 10.5/35 | 11.3/37 | 12.7/42 | 15/49 | 17/56 | 18/59 |
| 1/16 | 5/16 | 5.5/18 | 7.5/25 | 8/26 | 9/30 | 10.5/35 | 12/39 | 12.7/42 |
| 1/32 | 3.5/12 | 3.8/13 | 5.3/17 | 5.7/19 | 6.4/21 | 7.5/25 | 8.5/28 | 9/30 |
| 1/64 | 2.5/8 | 2.7/9 | 3.8/13 | 4/13 | 4.5/15 | 5.3/17 | 6/20 | 6.3/21 |
Angle of coverage:
| Zoom-head position | Horizontal coverage | Vertical coverage |
| 18mm | 102° | 90° |
| 20mm | 98° | 85° |
| 24mm | 78° | 60° |
| 28mm | 70° | 53° |
| 35mm | 60° | 45° |
| 50mm | 46° | 34° |
| 70mm | 36° | 26° |
| 85mm | 31° | 23° |
Zoom capability:
Eight settings — 18mm and 20mm (with the built-in wide flash adapter), 24mm, 28mm, 35mm, 50mm, 70mm, 85mm; auto power zoom with the Nikon F5, F90X/N90s, F90-Series/N90, F70-Series/N70, F4-Series, F-801/N8008 and F-801s/N8008s; manually set with other cameras.
Bounce capability:
Flash head tilts down to -7^ or up to 90^ with click stops; flash head rotates through an arc of 270^ , 90^ clockwise and 180^ counterclockwise with click stops; at front and vertical positions, flash head can be locked
Power source:
Four 1.5 AA-type penlight alkaline-manganese, or 1.2V NiCd batteries; optional Battery Pack SD-8 and SD-7 are available as an external power source.
Power switch:
Three positions are provided — OFF, STBY (standby) and ON; at STBY position with Nikon F5, F90X/N90s, F90-Series/N90, F70-Series/N70, F4-Series, F-801/N8008, F-801s/N8008s, F-601/N6006, F-601M/N6000, F50-Series/N50, F-401x/N5005, F-501/N2020, F-301/N2000, F-401/N4004, F-401s/N4004s, FA, FE2, FG, Nikonos V, FM2 or FG-20, SB-26 turns off automatically when flash unit is not used for approx. 80 seconds, and turns on when camera is turned on.
Flash duration (approx.):
1/1000 sec. @ 1/1 (full) output
1/1100 sec. @ 1/2 output
1/2500 sec. @ 1/4 output
1/5000 sec. @ 1/8 output
1/8700 sec. @ 1/16 output
1/12000 sec. @ 1/32 output
1/23000 sec. @ 1/64 output
Specifications
Number of flash and recycling time at manual full light output:
| Batteries | Number of flash (approx.) | Minimum recycling time** (approx.) | Recycl- ing time (approx.) | |
| AA-type alkaline-manganese | 100 times | 7 sec. | 7—30 sec. | |
| External power source SD-7* | C-type alkaline-manganese | 200 times | 6 sec. | 6 sec. |
| 300 times | 6—10 sec. | |||
| 400 times | 6—30 sec. | |||
| External power source SD-8* | AA-type alkaline-manganese | 100 times | 3 sec. | 3—5 sec. |
| 200 times | 3—9 sec. | |||
| 250 times | 3—30 sec. | |||
| Power Bracket SK-6* | AA-type alkaline-manganese | 200 times | 3.5 sec. | 4.5—30 sec. |
| AA-type NiCd | 40 times | 5 sec. | 5—30 sec. | |
| External power source SD-7* | C-type NiCd | 140 times | 1.6 sec. | 1.6—30 sec. |
| External power source SD-8* | AA-type NiCd | 100 times | 1.6 sec. | 2—30 sec. |
| Power Bracket SK-6* | AA-type NiCd | 80 times | 2 sec. | 3—30 sec. |
- With either alkaline-manganese or NiCd batteries installed in the SB-26.
**Data measured with fresh batteries.
Note: Data for light output at 1/1 (full), no use of AF assist LED and LCD panel illuminator.
Flash exposure control:
Four flash modes are provided — TTL, A, M and Repeating Flash
TTL mode III:
Used with F5, F90X/N90s, F90-Series/N90, F70-Series/N70, F4-Series, F-801/N8008, F-801s/N8008s,
F-601/N6006. F-601M/N6000. F50-Series/N50. F-401x/
N5005, F-501/ N2020, F-301/N2000, F-401/N4004,
F-401s/N4004s, FA, FE2, FG and Nikonos V.
Usable aperture range in TTL mode: f/1.4 to f/22 (at ISO 100)
Shooting distance range in TTL mode: 0.6 - 20m (2 - 66 ft.)
A mode A:
For Non-TTL Auto Flash operation, light is measured via light sensor in front of the flash unit.
Usable apertures in A mode:
f/2, f/2.8, f/4, f/5.6, f/8 and f/11 (at ISO 100)
Shooting distance range in A mode:
0.6—20m (2—66 ft.)
M mode M:
For Manual Flash operation, light output amount can be varied from 1/1 (full) to 1/64 output (total of 18 steps in 1/3 increments).
Flash sync mode selector:
NORMAL position is used for front-curtain sync with all the cameras listed in this manual.
REAR position is used for Rear-Curtain Sync flash with F5, F90X/N90s, F90-Series/N90, F70-Series/N70, F4-Series, F-801/N8008 and F-801s/N8008s.
Red-eye reduction control:
Red-eye reducton lamp lights before the flash fires to reduce the likelihood of red-eye effect when used with F90X/N90s, F90-Series/N90 and F70-Series/N70.
AF assist LED:
In insufficient light, automatically fires LED beam toward subject when performing autofocus with Nikon F5, F90X/N90s, F90-Series/N90, F70-Series/N70, F4-Series, F-801/N8008, F-801s/N8008s, F-601/N6006, F50-Series/N50, F-401x/N5005, F-501/N2020, F-401/ N4004 or F-401s/N4004s.
Ready-light/Open-flash button 4
Indicates recharged battery power (ready-light). In TTL Auto and Non-TTL Auto Flash mode, indicates possible underexposure by blinking. In Non-TTL Auto Flash mode, can be used as a test-firing button for lightamount detection. In Repeating Flash mode, can be used as a test-firing button for preset strobo flashes.
Built-in diffuser card:
In bounce flash photography application, creates natural lighting for catchlight in subject's eyes.
Mount pin:
Fixes F5, F90X/N90s, F90-Series/N90 and F70-Series/ N70 on the hot shoe.
LCD panel illuminator:
Activated with button. Illumination lasts approx. eight seconds; same button turns illumination off.
Flash shooting distance scale:
Measurement systems can be switched between meters and feet using the lever inside the battery chamber.
FP High-Speed Sync flash:
Available with the F5, F90X/N90s and F90-Series/N90. Enables higher shutter speeds (1/250 sec. or faster) for flash synchronization.
Monitor Preflash:
Available with F5, F90X/N90s, F90-Series/N90 and F70-Series/N70 cameras when used with an AF Nikkor lens.
Other features:
External power source terminal, TTL multiple flash terminal and Sync/multiple flash terminal.
Dimensions (W× H× D)
Approx. 79 × 135 × 101 ~mm (3.1 x 5.3 x 4.0 in.)
Weight (without batteries):
Approx. 390g (13.8 oz.)
Accessory provided:
Soft Case SS-24
Specifications and designs are subject to change without notice.
Usable Aperture/Flash Shooting Distance Ranges In TTL Auto and Non-TTL Flash Modes
| ISO film speed | Shooting distance range (in meters) | |||||||||||||||
| 1600 | 800 | 400 | 200 | 100 | 50 | 25 | Zoom set at 18mm | Zoom set at 20mm | Zoom set at 24mm | Zoom set at 28mm | Zoom set at 35mm | Zoom set at 50mm | Zoom set at 70mm | Zoom set at 85mm | ||
| pos | 2.8 | 2 | 1.4 | 2.5-20 | 2.8-20 | 3.8-20 | 4.0-20 | 4.5-20 | 5.3-20 | 6.0-20 | 6.3-20 | |||||
| 4 | 2.8 | 2 | 1.4 | 1.8-20 | 2.0-20 | 2.7-20 | 2.9-20 | 3.2-20 | 3.8-20 | 4.3-20 | 4.5-20 | |||||
| 5.6 | 4 | 2.8 | 2 | 1.4 | 1.3-14 | 1.4-15 | 1.9-20 | 2.0-20 | 2.3-20 | 2.7-20 | 3.0-20 | 3.2-20 | ||||
| 8 | 5.6 | 4 | 2.8 | 2 | 1.4 | 0.9-10 | 0.9-11 | 1.4-15 | 1.5-16 | 1.6-18 | 1.9-20 | 2.2-20 | 2.2-20 | |||
| 11 | 8 | 5.6 | 4 | 2.8 | 2 | 1.4 | 0.6-7.5 | 0.7-7.0 | 1.0-10 | 1.0-11 | 1.2-12 | 1.4-14 | 1.5-16 | 1.6-17 | ||
| 16 | 11 | 8 | 5.6 | 4 | 2.8 | 2 | 0.6-5.0 | 0.6-5.5 | 0.7-7.5 | 0.7-8.0 | 0.8-9.0 | 1.0-10 | 1.1-12 | 1.1-12 | ||
| 22 | 16 | 11 | 8 | 5.6 | 4 | 2.8 | 0.6-3.5 | 0.6-3.8 | 0.6-5.3 | 0.6-5.6 | 0.7-6.3 | 0.7-7.4 | 0.8-8.4 | 0.8-8.8 | ||
| 32 | 22 | 16 | 11 | 8 | 5.6 | 4 | 0.6-2.5 | 0.6-2.7 | 0.6-3.7 | 0.6-4.0 | 0.6-4.5 | 0.6-5.2 | 0.6-6.0 | 0.6-6.2 | ||
| 32 | 22 | 16 | 11 | 8 | 5.6 | 0.6-1.7 | 0.6-1.9 | 0.6-2.6 | 0.6-2.8 | 0.6-3.1 | 0.6-3.7 | 0.6-4.2 | 0.6-4.4 | |||
| 32 | 22 | 16 | 11 | 8 | 0.6-1.2 | 0.6-1.3 | 0.6-1.8 | 0.6-2.0 | 0.6-2.3 | 0.6-2.6 | 0.6-3.0 | 0.6-3.1 | ||||
| ISO film speed | Shooting distance range (in feet) | |||||||||||||||
| 1600 | 800 | 400 | 200 | 100 | 50 | 25 | Zoom set at 18mm | Zoom set at 20mm | Zoom set at 24mm | Zoom set at 28mm | Zoom set at 35mm | Zoom set at 50mm | Zoom set at 70mm | Zoom set at 85mm | ||
| S/ | 2.8 | 2 | 1.4 | 8.2-66 | 9.2-66 | 12-66 | 13-66 | 15-66 | 17-66 | 20-66 | 21-66 | |||||
| 4 | 2.8 | 2 | 1.4 | 5.9-66 | 6.6-66 | 8.7-66 | 9.3-66 | 11-66 | 12-66 | 14-66 | 15-66 | |||||
| 5.6 | 4 | 2.8 | 2 | 1.4 | 4.3-46 | 4.6-49 | 6.2-66 | 6.6-66 | 7.4-66 | 8.6-66 | 9.8-66 | 10-66 | ||||
| 8 | 5.6 | 4 | 2.8 | 2 | 1.4 | 3.0-33 | 3.0-36 | 4.4-49 | 4.7-52 | 5.2-58 | 6.1-66 | 7.0-66 | 7.2-66 | |||
| 11 | 8 | 5.6 | 4 | 2.8 | 2 | 1.4 | 2.0-25 | 2.3-23 | 3.1-34 | 3.3-37 | 3.7-41 | 4.3-48 | 4.9-53 | 5.1-56 | ||
| 16 | 11 | 8 | 5.6 | 4 | 2.8 | 2 | 2.0-16 | 2.0-18 | 2.2-24 | 2.4-26 | 2.6-29 | 3.0-34 | 3.5-39 | 3.6-39 | ||
| 22 | 16 | 11 | 8 | 5.6 | 4 | 2.8 | 2.0-12 | 2.0-13 | 2.0-17 | 2.0-18 | 2.0-20 | 2.2-24 | 2.6-27 | 2.6-29 | ||
| 32 | 22 | 16 | 11 | 8 | 5.6 | 4 | 2.0-8.2 | 2.0-8.9 | 2.0-12 | 2.0-13 | 2.0-14 | 2.0-17 | 2.0-19 | 2.0-20 | ||
| 32 | 22 | 16 | 11 | 8 | 5.6 | 2.0-5.6 | 2.0-6.2 | 2.0-8.6 | 2.0-9.2 | 2.0-10 | 2.0-12 | 2.0-13 | 2.0-14 | |||
| 32 | 22 | 16 | 11 | 8 | 2.0-3.9 | 2.0-4.3 | 2.0-6.1 | 2.0-6.5 | 2.0-7.3 | 2.0-8.6 | 2.0-9.8 | 2.0-10 | ||||
Programmed TTL Auto Flash with Nikon F50-Series/N50, F-401x/N5005, F-501/N2020, F-301/N2000, F-401/N4004 and F-401s/N4004s.
Non-TTL Auto Flash mode.
- Usable film speeds depend on the camera model used.
No reproduction in any form of this manual, in whole or in part (except for brief quotation in critical articles or reviews), may be made without written authorization from NIKON CORPORATION.